MODE D'EMPLOI RC-848 DENON
6REMOTE CONTROL UNIT
The DRA-FIOO comes with a system remote control unit (RC-848).
Inserting the batteries
NOTES:
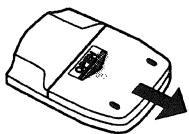
① Open the battery compartment cover on the back of the remote control unit.
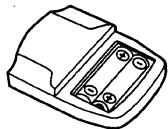
② Insert the two R6P (AA) batteries, following the + and - marks in the battery compartment.
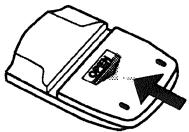
③ Close the cover of the battery compartment
Using the Remote Control Unit
Cautions on Use
- The remote control unit may not operate if the remote sensor is exposed to direct sunlight or the strong light from a lighting fixture, or if there is an obstacle between the remote control unit and the remote sensor.
-
Do not press buttons on the remote control unit and on the set at the same time. Doing so could result in malfunction.
-
If the remote control unit is pointed away from the remote sensor during continuous operations (such as when turning the volume up or down), the operation will stop. If this happens, point the remote control unit at the remote sensor and press the button again.
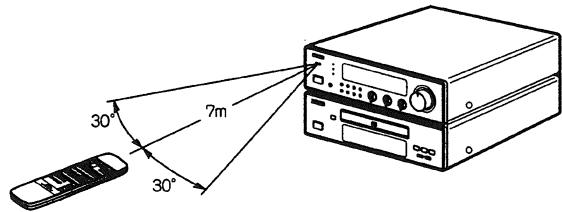
- The remote sensor is located on the receiver. Point the remote control unit at the remote sensor as shown on the diagram when operating it.
The remote control unit will operate from a direct distance of approximately 7 meters, but this distance will be shortened if obstacles are present or if operated at an angle.
(The remote control unit will operate at an angle of up to 30^ in either direction.)
Remote Control Unit Part Names and Functions
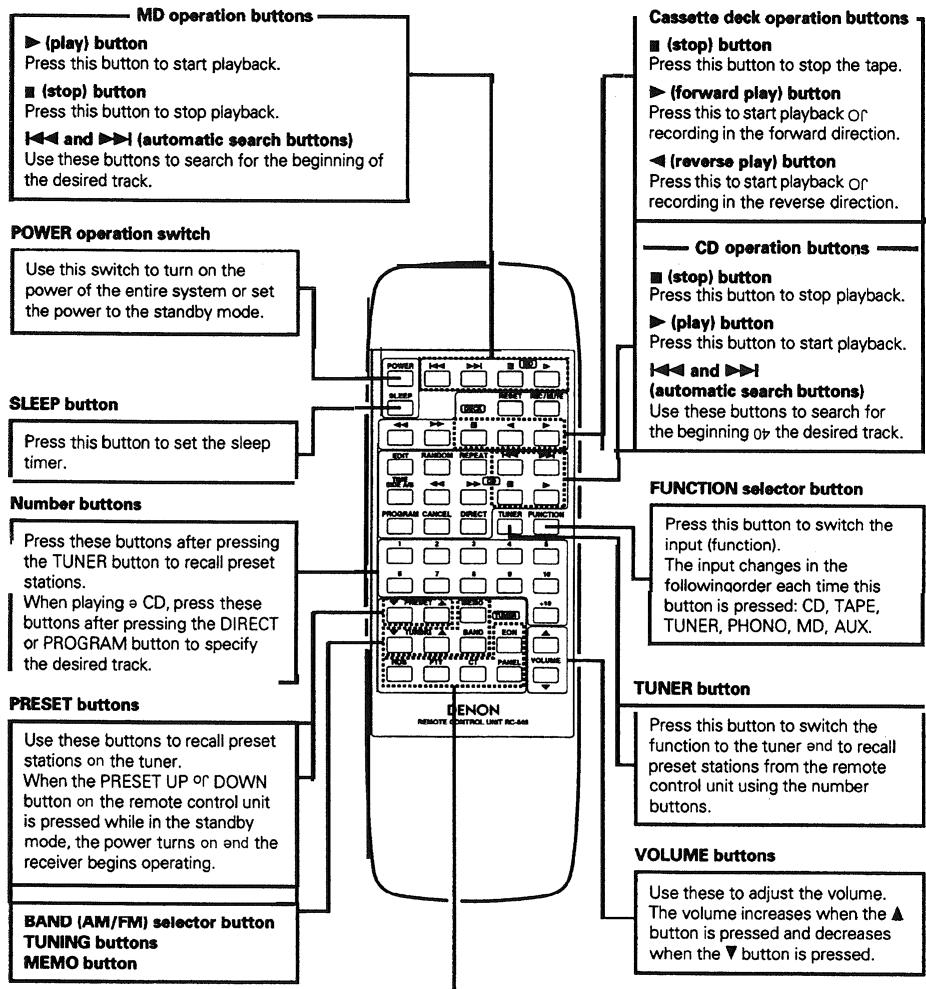
10 start recording from the stop mode, press this button, then press.
When this button is pressed during the recording, a blank section of approximately
5 seconds is created, after which the recording standby mode is set.
Press this button 10 rewind the tape.
Press this button during playback to set the music search mode (to find the beginning of selections).
Press this button to fast-forward the tape.
Press this button during playback to set the music search mode (to find the beginning of selections).
Press this button to reset the tape counter to "吕吕吕"
Press this button for direct search on the CD player.
and
Press these buttons during playback to move quickly forward or backward.
Press this button o repeat playback.
Press this button to play the tracks in random order.
Press this button programmec playback on the CD player.
Press this button to clear the last track from the program.
Press this button o r edited recording on a tape, dividing the tracks onto
sides A end B according to the length 口 the tape.
TIME
Press this button during the play or pause mode to switch the time display.
Normally the elapsed time for one track currently playing is displayed. When this button is pressed, the display switches to the remaining time for that track, the total remaining time on the disc, then back to the elapsed time per track.
During programmed playback, the total remaining time display indicates the total remaining time of the programmed tracks.
SIDE A/B
Press this button during the editing operation to switch the display between sides A and B. 0? the tape.
The TIME/SIDE A/B button functions as the SIDE A/B button when it is pressed after the EDIT button is pressed and the tracks have been divided between sides A and B and before the play or pause button is pressed (before the recording mode is set).
The TIME/SIDE / 巴 button functions as the TIME button when it is pressed during the play, pause, or edited recording modes.
Use this button to automatically tune to stations using the radio.
dataystem.

Press this button after selecting "PTY" with the RDS button to select one of the 15 program types.
Use this to correct the time 0p the clock on the DRA-F 100. Press this button when the time service of an RDS station is being properly received.
"CT" and "TIME" are displayed for 2 seconds and the DRAF100's clock is corrected.
"NO CT" is displayed if the RDS station does not offer a time service and when the broadcast is not being received properly.
This button is used to select the penj mode.
Press this button when receiving RDS stations to select the frequency, PS, PTY or RT display.
The display mode changes as follows each time the button pressed.

Note that this button will not function if the reception is poor.
Press this button L0 turn EON mode ON and
The mode changes as follows each time the button pressed.