
RC 853 - Télécommande DENON - Notice d'utilisation et mode d'emploi gratuit
Retrouvez gratuitement la notice de l'appareil RC 853 DENON au format PDF.

| Type de produit | Télécommande universelle avec fonction d'apprentissage |
| Marque | DENON |
| Modèle | RC 853 |
| Dimensions (approx.) | 17 cm x 5 cm x 2,5 cm |
| Poids (avec piles) | 0,15 kg |
| Alimentation | 2 piles AA (SUM3) 3 V |
| Portée | Environ 7 mètres |
| Angle de fonctionnement | 30 degrés horizontalement |
| Fonctions principales | Contrôle des composants DENON et autres marques, fonction d'apprentissage, mémoire de codes préprogrammés, fonction système (macro), commande des lecteurs CD, MD, platine cassette, tuner, DVD, VDP, magnétoscope, TV |
| Fonction d'apprentissage | Jusqu'à 26 codes, compatibilité avec la plupart des télécommandes infrarouges |
| Fonction système (macro) | Jusqu'à 10 opérations séquentielles (POWER ON/OFF) ou 5 opérations (autres touches) |
| Mémoire permanente | Codes d'usine conservés même sans piles |
| Entretien et nettoyage | Nettoyer avec un chiffon doux et sec. Éviter les produits chimiques. |
| Sécurité | Ne pas exposer à l'humidité ou à la lumière directe du soleil. Utiliser des piles du même type. Retirer les piles en cas d'inutilisation prolongée. Ne pas court-circuiter, démonter, chauffer ou jeter les piles au feu. |
| Pièces détachées | Piles AA (SUM3) disponibles dans le commerce. |
| Réparabilité | Aucune pièce réparable par l'utilisateur. Contacter le service après-vente DENON. |
| Informations générales | Télécommande livrée avec l'amplificateur AVR-5700. Compatible avec les composants DENON et autres marques via apprentissage. Possibilité de préréglage par codes fabricant. |
FOIRE AUX QUESTIONS - RC 853 DENON
Questions des utilisateurs sur RC 853 DENON
0 question sur cet appareil. Repondez a celles que vous connaissez ou posez la votre.
Poser une nouvelle question sur cet appareil
Téléchargez la notice de votre Télécommande au format PDF gratuitement ! Retrouvez votre notice RC 853 - DENON et reprennez votre appareil électronique en main. Sur cette page sont publiés tous les documents nécessaires à l'utilisation de votre appareil RC 853 de la marque DENON.
MODE D'EMPLOI RC 853 DENON
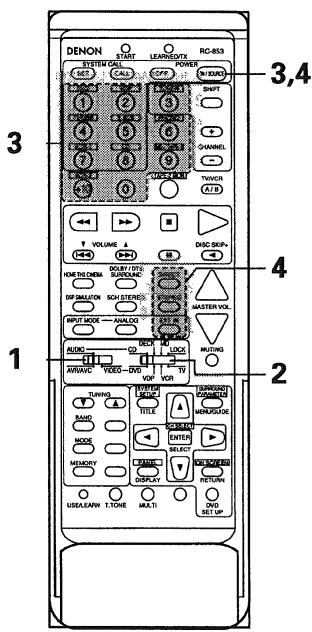
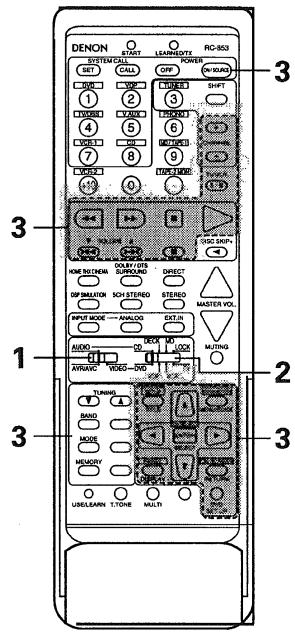
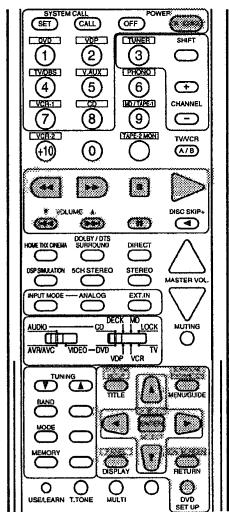
- For details on the functions of these parts, refer to the pages given in parentheses ( ).
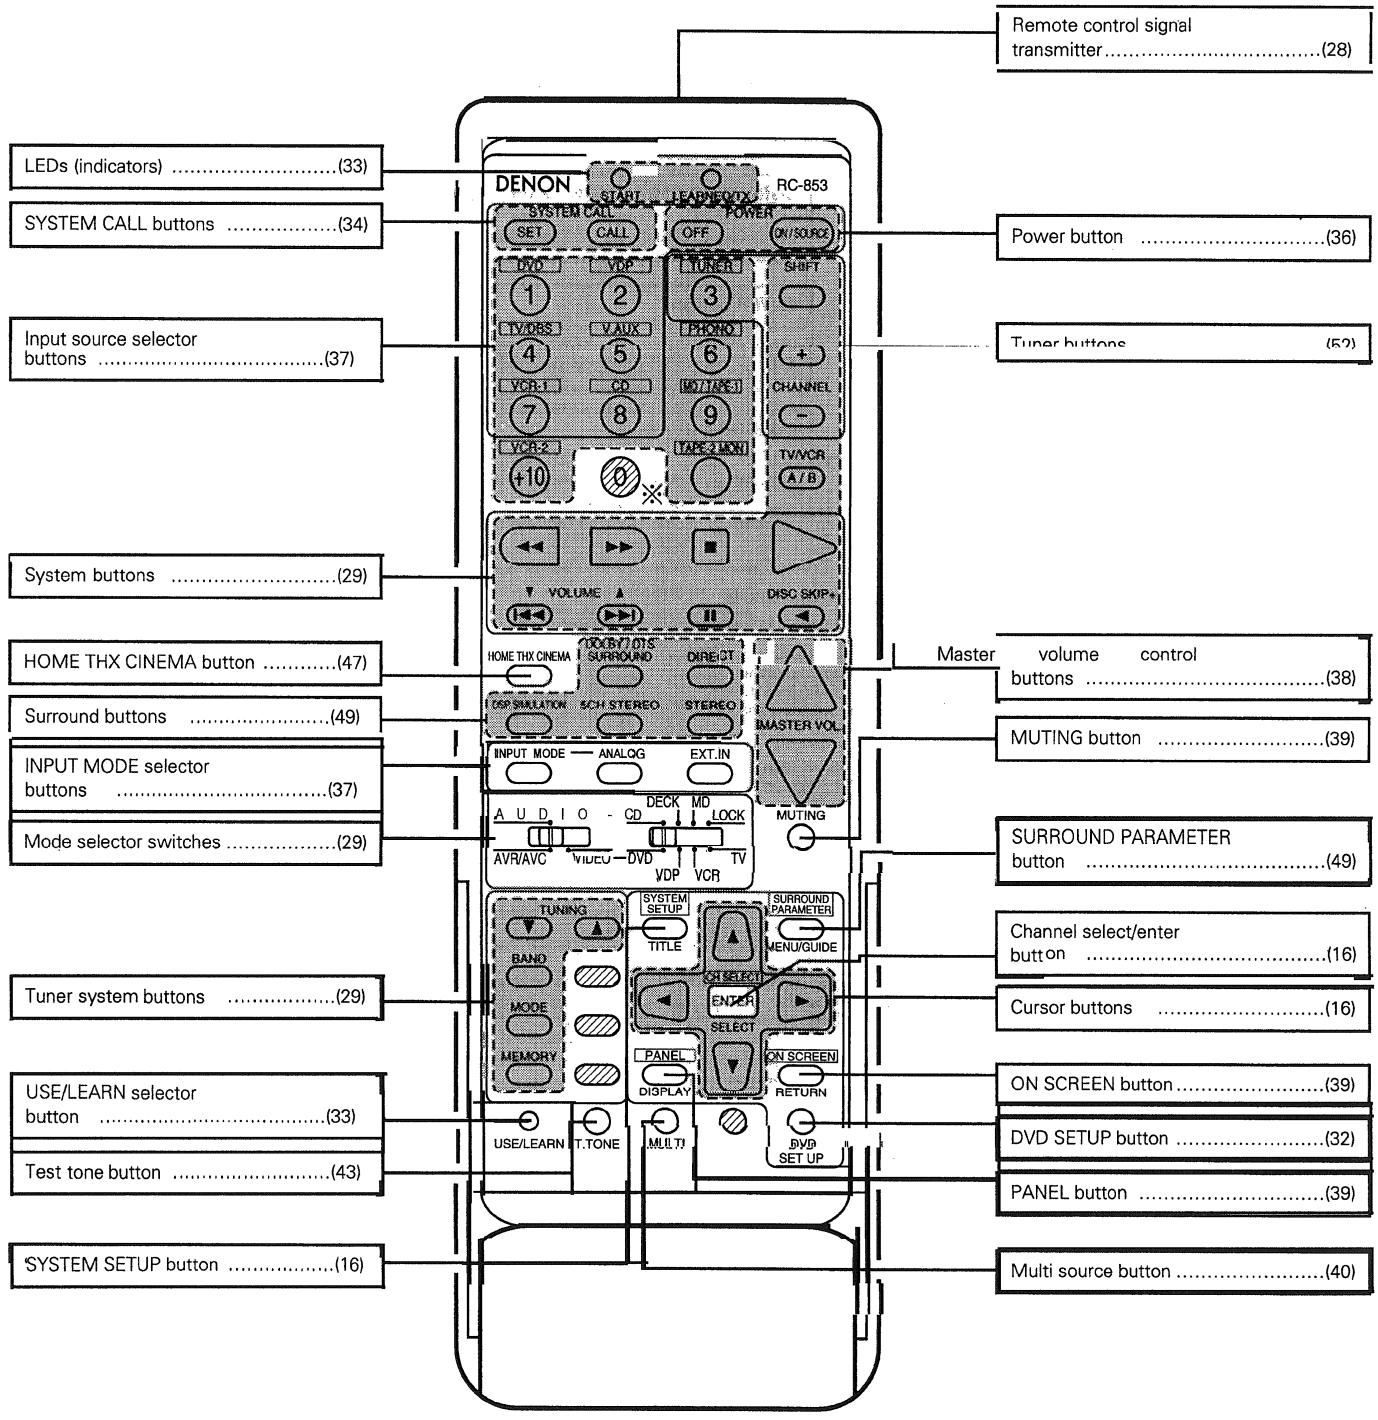
NOTE
The shaded buttons do not function with the AVR-5700. (Nothing happens when they are pressed.)
The button indicated ※ , however, can be used with the learning function.
8REMOTE CONTROL UNIT
The Included remote control unit (RC-853) can be used to operate not only the AVR-5700 but other remote control compatible DENON components as well. Furthermore, it is equipped with a function for learning the control signals of remote control units of other manufacturers, so it can also be used to operate non-DENON remote control compatible video components.
Inserting the batteries
① Remove the remote control unit's rear cover
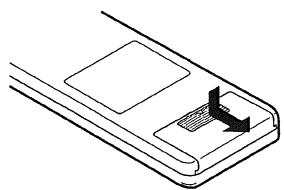
② Set two SUM3 (AA size) batteries in the battery compartment in the indicated direction.
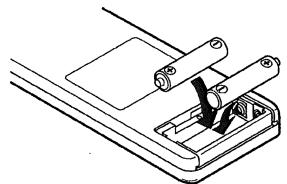
③ Put the rear cover back on

Notes on Batteries
- Use SUM3 (AA size) batteries in the remote control unit.
- The batteries should be replaced with new ones approximately once a year, though this depends on the frequency of usage.
- Even if less than a year has passed, replace the batteries with new ones if the set does not operate even when the remote control unit is operated nearby the set.
- When inserting the batteries, be sure to do so in the proper direction, following the “ ” and “ ” marks in the battery compartment.
-
To prevent damage or leakage of battery fluid:
-
Do not use a new battery together with an old one.
- Do not use two different types of batteries.
-
Do not short-circuit, disassemble, heat or dispose of batteries in flames.
-
Remove the batteries from the remote control unit when you do not plan to use it for an extended period of time.
- If the battery fluid should leak, carefully wipe the fluid off the inside of the battery compartment and insert new batteries.
- When replacing the batteries, have the new batteries ready and insert them as quickly as possible.
- The learned remote control signals may be cleared if no batteries are in the remote control unit for about 5 seconds.
The factory-installed codes are in permanent memory, however.
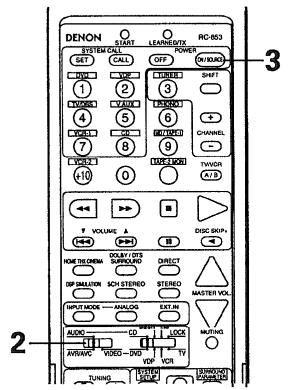
Using the remote control unit
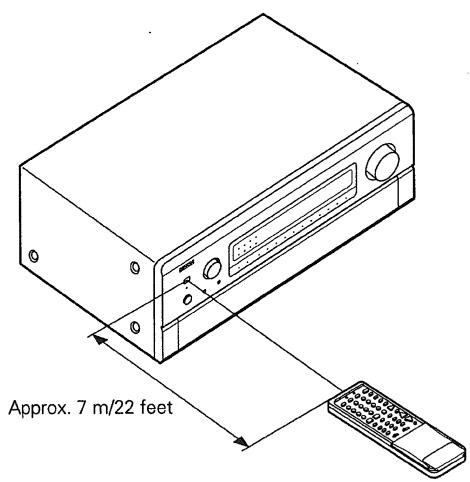
- Point the remote control unit at the remote sensor on the main unit as shown on the diagram.
- The remote control unit can be used from a straight distance of approximately 7 meters/22 feet from the main unit, but this distance will be shorter if there are obstacles in the way or if the remote control unit is not pointed directly at the remote sensor.
- The remote control unit can be operated at a horizontal angle of up to 30 degrees with respect to the remote sensor.
NOTES:
- It may be difficult to operate the remote control unit if the remote sensor is exposed to direct sunlight or strong artificial light.
- Do not press buttons on the main unit and remote control unit simultaneously. Doing so may result in malfunction.
- Neon signs or other devices emitting pulse-type noise nearby may result in malfunction, so keep the set as far away from such devices as possible.
Operating DENON audio components
- Turn on the power of the different components before operating them.
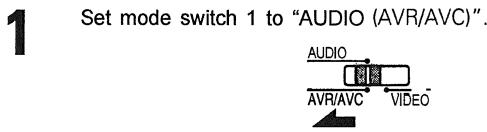
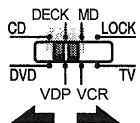
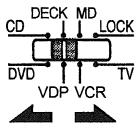
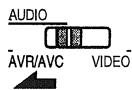
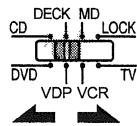
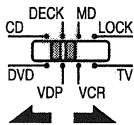
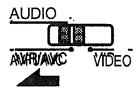
2 Set mode switch 2 to the position for the component to be operated. (The tuner can be operated when the switch is at any position but "LOCK".)
※ When set to LOCK, only the buttons for the basic functions of the AVR-5700 (sections A and B) will function. Use this position for example to prevent children from accidentally operating the system.
Operate the audio component.
-
For details, refer to the component's operating instructions.
※ While this remote control is compatible with a wide range of infrared controlled components, some models of components may not be operated with this remote control. -
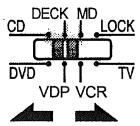
CD player (CD) and MD recorder (MD) system buttons
- Tuner system buttons
- Tape deck (DECK) system buttons
※ For the tuner only, the following buttons can also be operated:
- DENON and other makes of components can be operated by setting the preset memory for your make of video component. Operation is not possible for some models, however. In this case use the learning function (see page 33) to store the remote control signals.
- For instructions on clearing the presettings stored in the preset memory, see page 36.
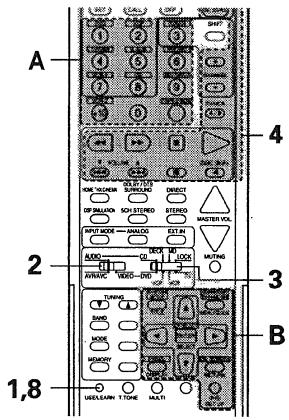
1
Set the slide switch to "VIDEO"
2
Set the slide switch to the component to be registered (VDP, VCR or TV).
(Keep the POWER button pressed in when performing steps 3 and 4
3
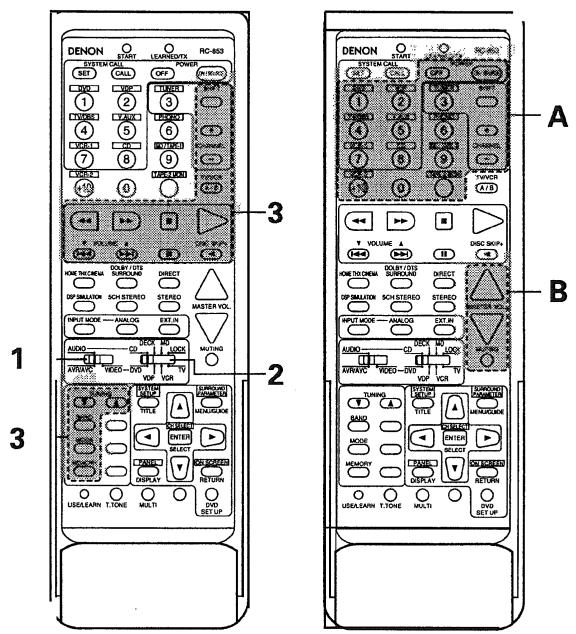
Holding in the POWER button, press the button for the corresponding manufacturer in block A. (Refer to Table 1.)
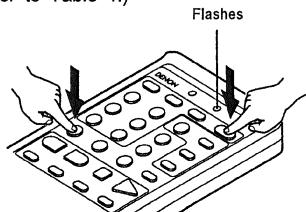
The LEARNED/TX LED flashes
4
Next, while holding the POWER button, press the button for the code in block B. (Refer to Table 1.) The operation is completed when the button is released and the LEARNED/TX LED lights.
5
To continue registering other components, repeat steps 2 to 4.
- This remote control unit can be used to operate components of other manufacturers without using the learning function by registering the manufacturer of the component as shown on Table 1.
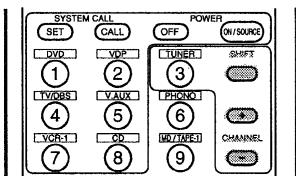
Table 1: Combinations of Personal System Codes for Different Manufacturers
"DVD"
| A\B | DIRECT(DIRECT) | STEREO(STEREO) | EXT.IN(EXT. IN) |
| ① (DVD) | DENON A | DENON B | - |
| ② (VDP) | - | - | - |
| ③ (TUNER) | - | - | - |
| ④ (TV/DBS) | PANASONIC | - | - |
| ⑤ (V. AUX) | - | - | - |
| ⑥ (PHONO) | SONY | - | - |
| ⑦ (VCR-1) | PIONEER | - | - |
| ⑧ (CD) | TOSHIBA | - | - |
| ⑨ (MD/TAPE-1) | - | - | - |
| ⑩ (VCR-2) | - | - | - |
| ⑩ | - | - | - |
"VDP"
| A\B | DIRECT (DIRECT) | STEREO (STEREO) | EXT.IN (EXT. IN) |
| ① (DVD) | DENON A | DENON B | DENON C |
| ② (VDP) | — | — | — |
| ③ (TUNER) | MITSUBISHI | — | — |
| ④ (TV/DBS) | PANASONIC | — | — |
| ⑤ (V. AUX) | — | — | — |
| ⑥ (PHONO) | SONY A | SONY B | SONY C |
| ⑦ (VCR-1) | PIONEER | — | — |
| ⑧ (CD) | — | — | — |
| ⑨ (MD/TAPE-1) | — | — | — |
| ⑩ (VCR-2) | — | — | — |
| ⑪ | — | — | — |

Preset codes set upon shipment from the factory and when reset
"VCR"
| A\B | (DIRECT) | STEREO (STEREO) | EXT.IN (EXT. IN) |
| ① (DVD) | — | — | — |
| ② (VDP) | HITACHI A | HITACHI B | — |
| ③ (TUNER) | MITSUBISHI A | MITSUBISHI B | MITSUBISHI C |
| ④ (TV/DBS) | PANASONIC A | PANASONIC B | PANASONIC C |
| ⑤ (V. AUX) | JVC (VICTOR) A | JVC (VICTOR) B | JVC (VICTOR) C |
| ⑥ (PHONO) | SONY A | SONY B | SONY C |
| ⑦ (VCR-1) | PIONEER | — | — |
| ⑧ (CD) | TOSHIBA A | TOSHIBA B | — |
| ⑨ (MD/TAPE-1) | SANYO A | SANYO B | — |
| ⑩ (VCR-2) | SHARP A | SHARP B | — |
| ⑩ | NEC A | NEC B | NEC C |
"TV"
| A\B | (DIRECT) | STEREOO(STEREO) | EXT.IN(EXT. IN) |
| ① (DVD) | — | — | — |
| ② (VDP) | DENON/HitACHI | — | — |
| ③ (TUNER) | MITSUBISHI A | MITSUBISHI B | — |
| ④ (TV/DBS) | PANASONIC A | PANASONIC B | — |
| ⑤ (V. AUX) | JVC (VICTOR) | — | — |
| ⑥ (PHONO) | SONY | — | — |
| ⑦ (VCR-1) | PIONEER | — | — |
| ⑧ (CD) | TOSHIBA | — | — |
| ⑨ (MD/TAPE-1) | SANYO | — | — |
| ⑩ (VCR-2) | SHARP | — | — |
| ⑩ | NEC | — | — |


Preset codes set upon shipment from the factory and when reset
NOTES:
- The signals for the pressed buttons are emitted while setting the preset memory. To avoid accidental operation, cover the remote control unit's transmitting window while setting the preset memory.
- Some models and years of manufacture of components of the manufacturers listed on Table 1 cannot be used.
The signals stored at "learned" buttons have priority over the preset codes. If you wish to clear the "learned" signals, do so as described on page 36. - Some manufacturers use different types of remote control codes for their products. If the component does not operate when set to remote codeset A, try setting to the B or C codesets.
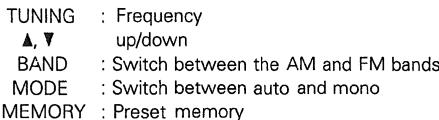
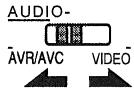
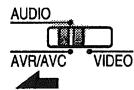
1 Set the slide switch to "VIDEO". AUDIO
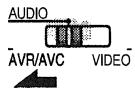
2 Set the slide switch to the component to be registered (VDP, VCR or TV).
Operate the video component.
- For details, refer to the component's operating instructions.
※ Some models cannot be operated with this remote control unit.
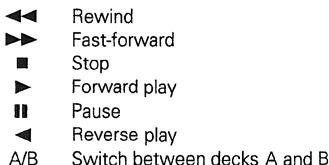
1. Digital video disc player (DVD) system buttons
POWER
Turns power on and off

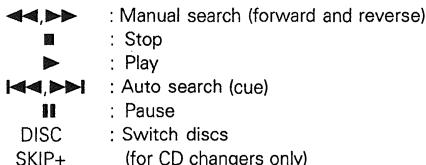
Manual search (forward and reverse)
Stop

Play

Auto search (cue)
Pause
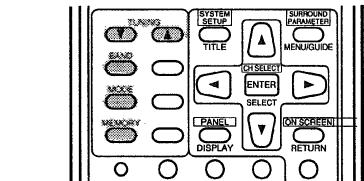
TITLE
Call out title
MENU
Call out menu
DISPLAY
Switch display
DVD SET UP
DVD setup
RETURN
Menu return

Cursor up/down
A
Cursor left/right
SELECT
Enter setting
NOTE:
Some manufacturers use different names for the DVD remote control buttons, so also refer to the instructions on remote control for that component.
2. Video disc player (VDP) system buttons

POWER
Power on/off
Manual search
(forward and reverse)


Stop

Play
Auto search (cue)
Pause
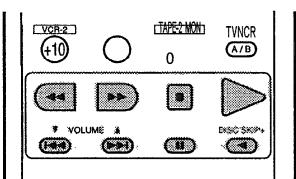
3. Video deck (VCR) system buttons

POWER
: Power on/off
Manual search
(forward and reverse)

Stop
Play
Pause
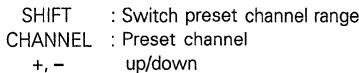
CHANNEL
Switch channel
+,-
4. Monitor TV system buttons
POWER :Power on/off
VOLUME : Volume
up/down
TVVCR : Switch between TV and VCR
CHANNEL : Switch channel
+,一
Learning function
- If your AV component is not a DENON product or it cannot be operated with the preset memory codesets, you can "teach" the AVR-5700's remote control to "learn" the codes from the component's original remote control.
The buttons that can be "learned" are the CD, DECK and MD system buttons (see page 29) and the DVD, VDP, VCR and TV system buttons (see page 32). (For the CD, MD, DVD, VDP and TV, the A block buttons can also be "learned", and for the DVD and TV, the B block buttons can also be "learned".)
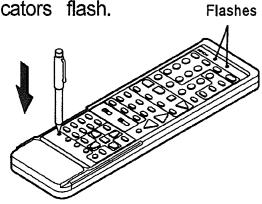
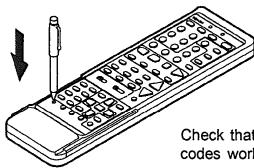
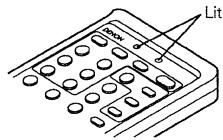
Press the USE/LEARN selector button with the tip of a pen etc., to set the learn mode. Both the START and LEARNED/TX indicators flash.
This unit's remote control unit
2 Set the program switch to the side to be "learned". Set to the AUDIO side for the CD, tape deck or DAT position, to the VIDEO side for the VDP, VCR or TV position.
3 Set the program switch to the position to be "learned" DECK MD
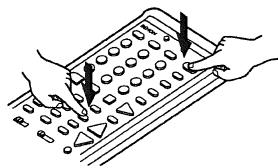
4 Set the remote control units so they are facing each other, then press the button to be "learned" on this unit's remote control unit.
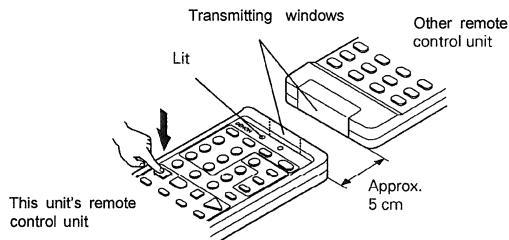
The indicator stops flashing and the START LED lights. The learnable buttons are the buttons which can be operated with the DENON system codes for the CD player, DAT and tape deck, the buttons which can be operated with the preset memory for the VCR, VDP and TV. For the TV only, however, the buttons in the section indicated "A" on the diagram above can also be "learned". Use these to "learn" TV channels.
5 Check that the START LED is lit, then press the button to be "learned" on the other remote control unit.

6 Once the START LED turns off and the LEARNED/TX LED lights, release the button on the other remote control unit.
To "learn" other buttons, repeat steps 2 to 6.
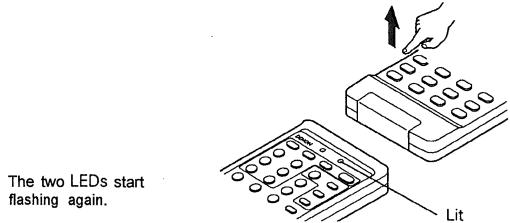
8 Once the learning operation is completed, press the USE/LEARN selector button again. The two LEDs stop flashing and the learning mode is cancelled.
NOTES:
- Up to 26 codes can be "learned", but this number may be lower if the codes are long.
- If a non-learnable button is pressed or two or more buttons are pressed at once, the two LEDs will once again light when the button(s) is released.
- If the codes could not be stored, the LEARNED/TX LED does not light after the START LED turns off. For limited number of models, codes cannot be stored in RC-853.
- If the two LEDs start flashing rapidly after the START LED lights, this means that the memory is already full, and the code you have just attempted to store was not stored. To "learn" that code, first perform the resetting operation. (See page 36.)
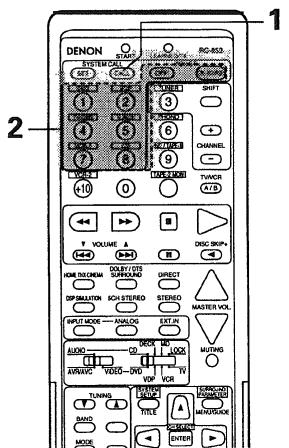
System call function
- The included remote control unit is equipped with a system call function for transmitting multiple remote control signals when a single button is pressed (this is often referred to as a "macro" function).
This function can be used to turn on the amplifier's power, select the input source, turn on the monitor TV's power, turn on a source component's power and start playback, etc., all at the touch of a button.
(1) System call buttons
The buttons that can be used for the system call function are shown on the table below.
A series of up to 10 operations can be performed with the POWER ON and OFF buttons, and a series of up to 5 operations can be performed with other buttons.
System call signals are already preset at the buttons indicated in the shaded section. System call signals can also be stored at any button on the remote control unit, including the buttons in this section. (See page 35.)
| Button | No. transmissions | Stored operation 1 | Stored operation 2 | Stored operation 3 | Stored operation 4 | Stored operation 5 | Stored operation 6 | Stored operation 7 | Stored operation 8 | Stored operation 9 | Stored operation 10 |
| POWER OFF (key 3) | 10 | ||||||||||
| POWER OFF (key 4) | 10 | ||||||||||
| DVD (key 5) | 5 | Receiver power on | DVD player (DVD) power on | Receiver input source switched to DVD | TV power on | DVD player (DVD) playback | |||||
| VDP (key 6) | 5 | Receiver power on | LD player (VDP) power on | Receiver input source switched to VDP | TV power on | LD player (VDP) playback | |||||
| TV/DBS (key 9) | 5 | Receiver power on | TV power on | Receiver input source switched to TV/DBS | |||||||
| V.AUX (key 10) | 5 | Receiver power on | TV power on | Receiver input source switched to V.AUX | |||||||
| VCR-I (key 13) | 5 | Receiver power on | Video (VCR) power on | Receiver input source switched to VCR-1 | TV power on | Video (VCR) playback | |||||
| CD (key 14) | 5 | Receiver power on | Receiver input source switched to CD | ||||||||
(2) Using the system call function
Press the system call button.
- The LEARNED/TX LED flashes for 5 seconds,
Press the button at which the desired system call signals are stored while the LEARNED/TX LED is flashing.
- The preset signals or the signals you have stored at that button are transmitted in succession.
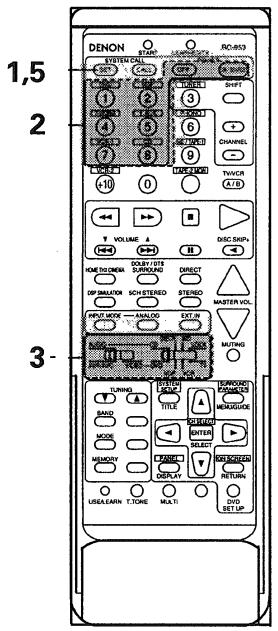
(3) Storing signals
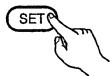
Press the SET button.
- The START LED and LEARNED/TX LED both flash,
Press the button at which you want to store the system call signals.
The START LED flashes.
3 Set the mode switch to the position for the component whose remote control signals you want to store.
Press the buttons whose remote control signals you want to store one by one.
Press the SET button.
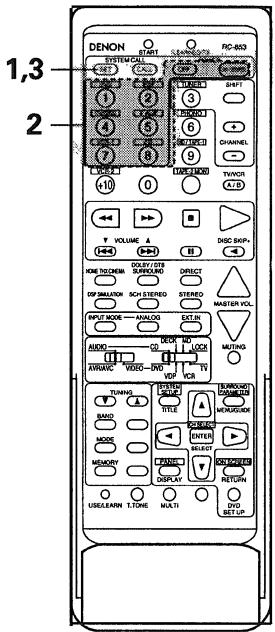
(4) Clearing system call settings
Press the SET button.
Press the button whose settings you want to clear.
Press the SET button.
- The button is reset to the settings shown on the table on page 34.

NOTES:
- The remote control signals for the buttons pressed while storing the system call signals are transmitted when the buttons are pressed, so cover the remote sensor or take other measures so that the components do not operate while the signals are being stored.
- The LEARNED/TX LED does not light if system call signals cannot be stored at the button that you have pressed or if you have already stored the maximum number of signals.
Clearing "learned" remote control signals and resetting the preset memory
Press the USE/LEARN selector button with the tip of a pen, etc., to set the learn mode.

2 To clear "learned" remote control signals, set the slide switch to the position at which the signals were "learned". To clear the preset memory settings, set the slide switch to "VIDEO".
3 Set the slide switch to the position at which the signals were "learned" or at which the preset memory settings were set.
9 OPERATION
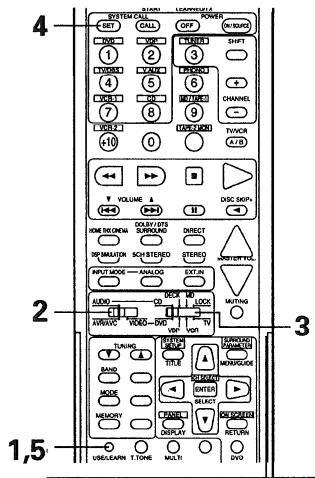
Press the SYSTEM CALL SET button, and hold it in for at least four seconds.
- When both the START and LEARNED/TX LEDs light simultaneously, all the stored codes are cleared.
Press the USE/LEARN selector button
Before operating
Refer to “CONNECTIONS” (pages 6 to 13) and check that all connections are correct.
2 Set the remote control unit's slide switch to the AUDIO position. (only when operating with the remote control unit)
3 Turn on the power. Press the POWER switch (button).
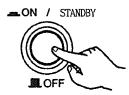
(Main unit)
(Remote control unit)
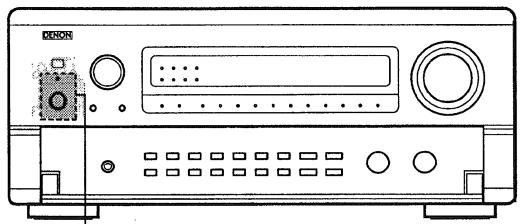
3
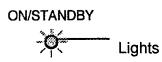
ON/STANDBY
The power turns on and "ON/STANDBY" indicator is lit
Several seconds are required from the time the power switch is set to the "ON" position until sound is output. This is due to the built-in muting circuit that prevents noise when the power switch is turned on and off.
Set the POWER switch to this position to turn the power on and off from the included remote control unit (RC-853).
OFF
The power turns off and "ON/STANDBY" indicator is off.
In this position, the power cannot be turned on and off from the remote control unit.

- NOTE
- 8REMOTE CONTROL UNIT
- Inserting the batteries
- Notes on Batteries
- Using the remote control unit
- NOTES:
- Operating DENON audio components
- Operate the video component.
- Digital video disc player (DVD) system buttons
- NOTE:
- Video disc player (VDP) system buttons
- Video deck (VCR) system buttons
- Monitor TV system buttons
- Learning function
- System call function
- System call buttons
- Using the system call function
- Clearing "learned" remote control signals and resetting the preset memory
- OPERATION
- Before operating
Marque : DENON
Modèle : RC 853
Catégorie : Télécommande