
FO-2970M - Télécopieur SHARP - Notice d'utilisation et mode d'emploi gratuit
Retrouvez gratuitement la notice de l'appareil FO-2970M SHARP au format PDF.


| Type de produit | Télécopieur laser multifonction |
| Marque | SHARP |
| Modèle | FO-2970M |
| Dimensions (L x P x H) | 386 x 398 x 169 mm |
| Poids | Environ 6,3 kg |
| Alimentation | 120 V CA, 60 Hz |
| Consommation électrique | Max. 650 W, Veille 8,7 W |
| Mémoire | 4 Mo (environ 300 pages) |
| Vitesse du modem | 33 600 bps (max.) avec repli automatique |
| Temps de transmission | Environ 3 secondes (selon la charte de test ITU-T n°1) |
| Résolution de numérisation | Fax/copie : 203 x 98 ppp (standard), jusqu'à 391 x 391 ppp (super fin) ; PC : 600 ppp amélioré |
| Résolution d'impression | 406 x 391 ppp ; PC : jusqu'à 1800 ppp amélioré |
| Chargeur automatique de documents | 20 pages max. (80 g/m²) |
| Capacité du bac à papier | 200 feuilles (80 g/m²) |
| Niveaux de gris (halftone) | 64 niveaux (numérisation PC : 256) |
| Modes de réception | Fax, Tél, Répondeur (A.M.) |
| Fonctions principales | Numérotation rapide (20 touches) et abrégée (100 numéros), diffusion, copie multiple/tri (99 exemplaires), appel téléphonique, double accès complet, impression de listes |
| Cartouche toner | Cartouche de démarrage : environ 1875 pages ; Cartouche de remplacement (FO-29ND) : environ 3750 pages (couverture 4%) |
| Cartouche tambour | Environ 20 000 pages (moyenne) ; Remplacement : FO-29DR |
| Entretien et nettoyage | Nettoyer la vitre de numérisation et les rouleaux avec un chiffon doux et sec. Utiliser un aspirateur pour les résidus de toner. |
| Sécurité | Brancher sur une prise mise à la terre 120 V. Ne pas exposer à l'eau. Débrancher en cas d'orage. |
| Pièces détachées et réparabilité | Les cartouches toner et tambour sont remplaçables par l'utilisateur. Pour les autres réparations, contacter un technicien qualifié. |
| Informations générales | Compatibilité G3, ligne téléphonique publique. Mémoire de 4 Mo. Certification ENERGY STAR. |
FOIRE AUX QUESTIONS - FO-2970M SHARP
Questions des utilisateurs sur FO-2970M SHARP
0 question sur cet appareil. Repondez a celles que vous connaissez ou posez la votre.
Poser une nouvelle question sur cet appareil
Téléchargez la notice de votre Télécopieur au format PDF gratuitement ! Retrouvez votre notice FO-2970M - SHARP et reprennez votre appareil électronique en main. Sur cette page sont publiés tous les documents nécessaires à l'utilisation de votre appareil FO-2970M de la marque SHARP.
MODE D'EMPLOI FO-2970M SHARP
FACSIMILE
MANUEL D'UTILISATION
- Installation
- Envoi de documents
- Réception de documents
- Réalisation de copies
- Passer des appels téléphoniques
- Connexion d'un répondeur
- Fonctions spéciales
- Impression de listes
- Entretien
- Dépannage
AVERTISSEMENT - Les règlements de la FCC stipulent que toute modification non autorisée de cet équipement, non expressément approuvée par le fabricant, pourrait annuler le droit de l'utilisateur à utiliser cet équipement.
Remarque : Cet équipement a été testé et déclaré conforme aux limites d'un dispositif numérique de classe B, conformément à la partie 15 des règles de la FCC. Ces limites sont conçues pour fournir une protection raisonnable contre les interférences nuisibles dans une installation résidentielle. Cet équipement génère, utilise et peut émettre de l'énergie radiofréquence et, s'il n'est pas installé et utilisé conformément aux instructions, peut causer des interférences nuisibles aux communications radio. Cependant, il n'y a aucune garantie que des interférences ne se produiront pas dans une installation particulière. Si cet équipement cause des interférences nuisibles à la réception radio ou télévision, ce qui peut être déterminé en éteignant et en allumant l'équipement, l'utilisateur est encouragé à essayer de corriger les interférences par une ou plusieurs des mesures suivantes :
- Réorienter ou déplacer l'antenne de réception.
- Augmentez la distance entre l'équipement et le récepteur.
- Branchez l'équipement sur une prise située sur un circuit différent de celui auquel le récepteur est connecté.
- Consultez le revendeur ou un technicien radio/TV expérimenté pour obtenir de l'aide.
À PROPOS DE LA LOI SUR LA PROTECTION DES CONSOMMATEURS PAR TÉLÉPHONE DE 1991
« La loi sur la protection des consommateurs par téléphone de 1991 rend illégal pour toute personne d'utiliser un ordinateur ou un autre appareil électronique pour envoyer un message via un télécopieur, à moins que ce message ne contienne clairement dans une marge en haut ou en bas de chaque page transmise ou sur la première page de la transmission les informations suivantes :
(1) La date et l'heure de la transmission. (2) L'identification de l'entreprise, de l'entité commerciale ou de la personne qui envoie le message. (3) Le numéro de téléphone de la machine d'envoi, de l'entreprise, de l'entité commerciale ou de la personne.
Pour programmer ces informations dans votre télécopieur, veuillez vous référer aux instructions appropriées dans le manuel d'utilisation."

En tant que partenaire ENERGY STAR®, SHARP a déterminé que ce produit respecte les directives ENERGY STAR® en matière d'efficacité énergétique.
Déclaration de conformité
TÉLÉCOPIEUR LASER SHARP, FO-2970M
Cet appareil est conforme à la partie 15 des règles de la FCC. Son fonctionnement est soumis aux deux conditions suivantes :
(1) Cet appareil ne doit pas causer d'interférences nuisibles, et (2) cet appareil doit accepter toute interférence reçue, y compris les interférences susceptibles de provoquer un fonctionnement indésirable.
Partie responsable :
SHARP ELECTRONICS CORPORATION Sharp Plaza,
Mahwah, New Jersey 07430-2135 TÉL : 800-237-4277
Introduction
| Welcome, and thank you for choosing a Sharp facsimile! The features and specifications of your new Sharp fax are shown below. | |
| Automatic dialing | Rapid Key Dialing: 20 numbers Speed Dialing: 100 numbers |
| Memory size* | 4 MB (approx. 300 pages) |
| Modem speed | 33,600 bps (max.) Automatic fallback to lower speeds. |
| Transmission time* | Approx. 3 seconds |
| Toner cartridge yield (4% page coverage, letter paper) | Initial starter cartridge (included with machine): Approx. 1,875 pages Replacement cartridge (FO-29ND): Approx. 3,750 pages |
| Drum cartridge yield | Initial starter cartridge (included with machine): 20,000 pages (ave.) Replacement cartridge (FO-29DR): 20 pages (ave.) |
| Scanning resolution | Fax/copy: Horizontal: 203 pels/inch (8 pels/mm Vertical: Standard: 98 lines/inch (3.85 lines Fine /Halftone: 196 lines/inch (7.7 lines/mm Super fine: 391 lines/inch (15.4 lines/mm PC: Enhanced 600 dpi |
*Basé sur la carte de test ITU-T n° 1 à la résolution standard en mode spécial Sharp, hors temps des signaux de protocole (c'est-à-dire uniquement le temps de phase C ITU-T).
| Automatic document feeder | 20 pages max. (20-lb. letter paper) |
| Halftone (grayscale) | 64 levels (PC scan: 256 levels) |
| Paper tray capacity | 200 sheets (20-lb. letter paper) |
| Compression scheme | MMR, MR, MH, Sharp (H2) |
| Applicable telephone line | Public switched telephone network |
| Compatibility | ITU-T (CCITT) G3 mode |
| Printing resolution | Horizontal: 406 lines/inch (16 lines/mm)Vertical: 391 lines/inch (15.4 lines/mm)PC Printing: 600 dpi (enhanced 1,800 dpi) |
| Input document size | Automatic feeding:Width: 5.8 to 8.5" (148 to 216 mm)Length: 5.5 to 11" (140 to 279 mm)Manual feeding:Width: 5.8 to 8.5" (148 to 216 mm)Length: 5.5 to 39.4" (140 to 1,000 mm) |
| Effective Scanning width | 8.3" (210 mm) max. |
| Effective Printing width | 8.2" (208 mm) max. |
| Reception modes | Fax/Tel/A.M. |
| Scanning speed | 8 ppm (letter paper) |
| Full Dual Access | Yes |
| Copy function | Single/Multi/Sort (99 copies/page) |
| Power requirements | 120 V AC, 60 Hz |
| Operating temperature | 50 - 86°F (10 - 30°C) |
| Humidity | 20 to 85% RH |
| Power consumption | Standby: 8.7 WMaximum: 650 W |
Dimensions
Largeur : 15,2 pouces (386 mm)
Profondeur : 15,7 pouces (398 mm)
Hauteur : 6,7 pouces (169 mm)
Poids
Environ 13,8 lb (6,3 kg)
Dans le cadre de notre politique d'amélioration continue, SHARP se réserve le droit de modifier les conceptions et les spécifications sans préavis afin d'améliorer ses produits. Les chiffres de performance indiqués sont des valeurs nominales des unités de production. Il peut y avoir des écarts par rapport à ces valeurs sur des unités individuelles.
Informations de sécurité importantes
Conservez ces instructions !
Lors de l'utilisation de votre télécopieur, des précautions de sécurité de base doivent toujours être suivies pour réduire les risques d'incendie, de choc électrique et de blessures, notamment :
- Ne démontez pas cet appareil et n'essayez pas d'effectuer des procédures non décrites dans ce manuel. Confiez toute réparation à un personnel qualifié.
- Cet appareil doit être branché uniquement sur une prise mise à la terre (à 3 broches) de 120 V, 60 Hz. Le brancher sur tout autre type de prise endommagerait l'appareil et annulerait la garantie.
- N'installez pas et n'utilisez pas l'appareil près de l'eau, ou lorsque vous êtes mouillé. Par exemple, n'utilisez pas l'appareil près d'une baignoire, d'un lavabo, d'un évier de cuisine ou d'un bac à lessive, dans un sous-sol humide ou près d'une piscine. Veillez à ne pas renverser de liquide sur l'appareil.
- Débranchez la machine de la prise téléphonique, puis de la prise de courant, et consultez un technicien qualifié si l'une des situations suivantes se produit :
- Du liquide a été renversé sur la machine ou la machine a été exposée à la pluie ou à l'eau.
- La machine dégage des odeurs, de la fumée ou des bruits inhabituels.
- Le cordon d'alimentation est effiloché ou endommagé.
- La machine est tombée ou son boîtier est endommagé.
- Ne laissez rien reposer sur le cordon d'alimentation et n'installez pas la machine à un endroit où les gens pourraient marcher sur le cordon.
- N'insérez jamais d'objets de quelque nature que ce soit dans les fentes ou ouvertures de la machine. Cela pourrait créer un risque d'incendie ou de choc électrique. Si un objet tombe dans la machine et que vous ne pouvez pas le retirer en toute sécurité, débranchez la machine et consultez un technicien qualifié.
- Ne placez pas cette machine sur un chariot, un support ou une table instable. La machine pourrait être sérieusement endommagée si elle tombe.
- Évitez d'utiliser un téléphone (autre qu'un téléphone sans fil) pendant un orage électrique. Il peut y avoir un risque à distance de choc électrique dû à la foudre.
- N'utilisez pas un téléphone pour signaler une fuite de gaz à proximité de la fuite.
- La prise de courant doit être installée près de l'équipement et doit être facilement accessible.
Important :
- Ce télécopieur n'est pas conçu pour être utilisé sur une ligne qui dispose de la mise en attente des appels, du renvoi d'appel ou de certains autres services spéciaux offerts par votre compagnie de téléphone. Si vous tentez d'utiliser le télécopieur avec l'un de ces services, vous pouvez rencontrer des erreurs lors de la transmission et de la réception de messages de télécopie.
- Ce télécopieur n'est pas compatible avec les systèmes téléphoniques numériques.
Table des matières
Introduction 1
Consignes de sécurité importantes. 3
Table des matières 5
Aperçu du panneau de commande 7
1. Installation 10
Liste de déballage. 10
Connexions 11
Installation de la cartouche de toner 17
Chargement du papier d'impression 21
Configuration de l'interface multifonction. 24
Saisie de votre nom et de votre numéro de télécopieur 28
Réglage de la date et de l'heure 32
Réglage du mode de réception 35
Réglage du volume 38
2. Envoi de documents 42
Documents transmissibles 42
Chargement du document 44
Réglage de la résolution et du contraste 47
Envoi d'un fax par numérotation normale 50
Envoi d'un fax par numérotation automatique 52
3. Réception de documents 67
Utilisation du mode FAX 67
Utilisation du mode de réception TEL 69
Réception de substitution en mémoire 75
4. Réalisation de copies 76
5. Passer des appels téléphoniques 79
6. Raccordement d'un répondeur 81
Connexion d'un répondeur 81
Réglages facultatifs du mode A.M. 84
7. Fonctions spéciales 86
Diffusion 86
Sonnerie distinctive (nécessite un abonnement au service) 91
Page de garde 94
Numérotation par lots 97
Blocage de la réception de télécopies indésirables 99
Interrogation (demande d'envoi d'une télécopie) 101
Opérations de minuterie 107
8. Impression de listes 110
9. Entretien 117
Vitre de numérisation et rouleaux 117
Le boîtier 117
Remplacement de la cartouche de toner 118
Remplacement de la cartouche de tambour 119
Nettoyage de la cartouche de tambour 122
10. Dépannage 124
Problèmes et solutions 124
Messages et signaux 130
Débourrage papier 133
Informations réglementaires FCC 137
Guide de référence rapide 140
Guía de referencia
Index 144
Aperçu du panneau de commande

1 Touche NUMÉROTATION RAPIDE
Press this key to dial a fax or voice number using an abbreviated 2-digit Speed Dial number.
2 Touche BIS
Press this key to automatically redial the last number dialed.
3 Voyant VÉRIFICATION PAPIER
This lights when the paper tray is out of paper, the paper has jammed, the printer compartment cover is open, or a paper size error has occurred.
4 Voyant TONER VIDE
This blinks when the toner cartridge nears empty and lights steadily when the toner cartridge needs replacement.
5 Afficheur
This displays messages and prompts during operation and programming.
6 Déverrouillage du panneau
Grasp this release and pull toward you to open the operation panel.
Voyant PC EN SERVICE
This blinks when data is being sent to or from the computer connected to the fax machine.
Voyant LIGNE EN SERVICE
This lights when the fax machine is using the telephone line.
9 Touche MODE RÉCEPTION
Press this key to select the reception mode. An arrow in the display will point to the currently selected reception mode.
10 Touche FONCTION
Press this key to select special functions and settings.
Touche RÉSOLUTION
Press this key to adjust the resolution for faxing or copying.
12 Touches VOLUME (HAUT/BAS)
Press these keys to adjust the volume of the speaker when the SPEAKER key has been pressed, the volume of the handset when the handset is lifted, or the volume of the ringer at all other times. The keys can also be used to scroll through FUNCTION key settings.
13 Touche DIFFUSION
Press this key to send a document to a group of receiving fax machines.
14 touches de numérotation rapide
Press one of these keys to dial a fax number automatically, or send a document as an E-mail attachment to a preset E-mail address.
15 touche E-MAIL
Press this key to send a document as an E-mail attachment. After you press the key, your specified E-mail program will open to let you enter the E-mail address, a subject, and a message if desired.

touche RÉDUCTION/AGRANDISSEMENT
Press this key to select an enlargement or reduction setting when making a copy of a document.

touche STOP
Press this key to cancel an operation before it is completed.

touche START
Press this key to begin transmission when using Speed Dialing, Direct Keypad Dialing, or Normal Dialing.

touche COPIE/AIDE
When a document is in the feeder, press this key to make a copy of a document. At any other time, press this key to print out the Help List, a quick reference guide to the operation of your fax machine.

touche MAINTIEN/RECHERCHE
When dialing, press this key to search for an auto-dial fax number. During a phone conversation, press this key to put the other party on hold.

touche HAUT-PARLEUR
Press this key to listen to the line and fax tones through the speaker when faxing a document.
Note: This is not a speakerphone. You must pick up the handset to talk with the other party.

touches numériques
Use these keys to dial numbers, and enter numbers and letters when storing auto-dial numbers.
1. Installation
Liste de vérification du déballage
Before setting up, make sure you have all of the following items.

If any are missing, contact your dealer or retailer.

Original document support
Handset
Handset cord
Toner cartridge

Drum cartridge (comes pre-installed in machine)

Rapid Key labels

Received document tray

Operation manual

Telephone line cord

Paper tray

Sharp Laser Multifunction CD-ROM
Connexions
Points à garder à l'esprit lors de l'installation

Do not place the machine and the drum cartridge in direct sunlight.

Do not place the machine near heaters or air conditioners.

Keep dust away from the machine.

Keep the area around the machine clear.
À propos de la condensation
If the machine is moved from a cold to a warm place, it is possible that condensation may form on the scanning glass, preventing proper scanning of documents for transmission. To remove the condensation, turn on the power and wait approximately two hours before using the machine.
Connexion du combiné
Connect the handset as shown and place it on the handset rest.
The ends of the handset cord are identical, so they will go into either jack.

Branchement du cordon d'alimentation
Plug the power cord into a 120V , 60Hz , grounded AC (3-prong) outlet.
Attention !
Do not plug the power cord into any other kind of outlet. This will damage the machine and is not covered under the warranty.

The machine does not have a power on/off switch, so the power is turned on and off by simply plugging in or unplugging the power cord.

Note: If your area experiences a high incidence of lightning or power surges, we recommend that you install surge protectors for the power and telephone lines. Surge protectors can be purchased at most telephone specialty stores.
Branchement du cordon de ligne téléphonique
Insert one end of the line cord into the jack on the left of the machine marked TEL. LINE. Insert the other end into a standard (RJ11C) single-line wall telephone jack.

Be sure to insert the line into the
TEL. LINE jack.
Do not insert it into the TEL. SET jack.

Note: Your fax is set for tone dialing. If you are on a pulse dial line, you must set your fax for pulse dialing. Press the keys on the operation panel as follows:
1 Appuyez sur ces touches :
The display will show:
DIAL MODE
1=TONE, 2=PULSE
FONCTION


2 Appuyez sur 1 pour sélectionner la numérotation en tonalité, ou sur 2 pour sélectionner la numérotation en impulsions.
TONALITÉ
IMPULSIONS

or

3 Appuyez sur la touche STOP pour revenir à l'affichage de la date et de l'heure.

STOP

Fixation du bac à papier et des supports de documents
Attach the paper tray.

Attach the received document tray.


Attach the original document support.
Make sure the front side of the support faces you (the support should curve slightly toward you).


Téléphone supplémentaire (en option)
If desired, you can connect an extension phone to the TEL. SET jack on the fax.
To connect an answering machine to your fax, see Chapter 6, Answering Machine Hookup.
1 Remove the seal covering the TEL. SET jack.

2 Connect the extension phone line to the TEL. SET jack.

Installation de la cartouche de toner
The laser printer in your fax machine uses a toner cartridge and a drum cartridge. The drum cartridge comes pre-installed, and the toner cartridge must be installed.
The starter toner cartridge included with your fax can print approximately 1,875 letter-size pages at 4 % page coverage.

When replacing the toner cartridge, use a Sharp FO-29ND toner cartridge. One cartridge can print about 3,750 letter-size pages.

The drum cartridge can print approximately 20,000 letter-size pages. When replacing the drum cartridge, use a Sharp FO-29DR drum cartridge.
Follow the steps below to install the toner cartridge and prepare the drum cartridge.
1 Grasp the print compartment cover at both sides as shown, and pull up to open the cover.
- Caution!
The fusing unit inside the print compartment becomes very hot during operation. Do not touch the inside of the compartment or the paper guide on the underside of the print compartment cover.

2 The drum cartridge has been installed at the factory. Gently pull the paper tab to remove the black sheet of protective paper from the cartridge.
- Be careful not to tear the paper nor leave any pieces of paper in the machine.

3 Remove the new toner cartridge from its packaging. Shake the cartridge side to side four or five times to distribute the toner evenly within the cartridge.
Carefully remove the band and the cardboard packaging material from the toner cartridge.

4 Hold the toner cartridge by the handle with the stamped markings on the cartridge facing upwards, and insert the cartridge into the print compartment.

5 Place your thumb on the center of the handle where it is marked PUSH, and push the handle down and in so that the cartridge fits into place.

6 Close the print compartment cover, pressing down firmly on each side to make sure it is completely closed.

7 Reset the toner counter by pressing the following keys:
FUNCTION


Display shows:
CLR TONER COUNT
PRESS START KEY

START

8 Reset the drum counter by pressing the following keys:
- Note: This setting is only necessary after you have replaced the drum cartridge (not after replacing the toner cartridge).
FUNCTION


Display shows:
CLR DRUM COUNT
PRESS START KEY

START

Chargement du papier d'impression
You can load up to 200 sheets of letter, A4 or legal paper (max. 20 lbs.) in the paper tray.
Attention !
Do not use the blank side of paper that has already been printed on.
1 If you are going to load legal size paper, pull out the paper tray extension.

2 Fan the paper, and then tap the edge against a flat surface to even the stack.

3 Pull the paper release lever toward you.

4 Insérez fermement la pile de papier dans le bac, face imprimable vers le haut.
- Make sure that the stack is not higher than the marked line. Loading too much paper may cause paper jams and misfeeds.
- If paper remains in the tray, take it out and combine it into a single stack with the new paper before adding the new paper.

Important :
Be sure to load the paper so that printing takes place on the print side of the paper. Printing on the reverse side may result in poor print quality.
5 Make sure the stack of paper is aligned against the right paper guide, and then gently move the left paper guide to the 8 1/2 position for letter or legal paper, or the A4 position for A4 paper.

6 Abaissez le levier de libération du papier.
- Note: If the paper does not feed correctly, remove the entire stack from the tray and repeat the loading procedure from the beginning.

7 The fax has been set at the factory to scale the size of received faxes to letter size paper. If you have loaded legal paper, you must change the paper size setting to legal. Press these keys:

The display will show:

Press 1 to select LETTER or 2 to select LEGAL. (You can also press 3 to select A4.)
The display will briefly show your selection and then show:
FINE PRIORITY 1 = YES,2 = NO
Press the STOP key to return to the date and time display.
LETTER LEGAL


Configuration de l'interface multifonction

Connexion du câble parallèle
Connect the fax machine to your computer with a parallel cable.
If you do not already have a parallel cable, you can purchase one from your dealer or any computer store.
Make sure the cable is IEEE 1284-compliant. We recommend a shielded cable no longer than 6 feet.
1 Make sure your computer is turned off and the fax machine is unplugged.


2 Connect one end of the cable to the port on the Sharp Laser Multifunction. Snap the clips on each side of the port onto the cable connector to secure it.

3 Connect the other end of the cable to the parallel port on the back of your computer.

Note: There is normally no need to change the parallel port setting in your computer's setup (BIOS) program. However, if you find that the Sharp Laser Multifunction fax does not operate well when scanning or printing, you may need to change the setting. In this case select ECP, PS2, Bi-directional, or an equivalent parallel port mode.
Installation du logiciel multifonction
Configuration système minimale requise
Processor: Pentium 90 MHz or higher
Operating system: Windows® 95/98, Windows NT® 4.0
(Service Pack 3 or later), English version
Physical RAM: Windows 95/98: 16 MB
Windows NT 4.0:32 MB
Free hard-disk space: Windows 95/98: 30 MB
Windows NT 4.0: 35MB
The Sharp Laser Multifunction software cannot be installed by Plug and Play. If the New Hardware Found box appears when you turn on your computer, click the Cancel button to exit the dialog box.
If you have other multifunction device software installed in your computer, uninstall that software before installing the Sharp Laser Multifunction software. Otherwise, the Sharp Laser Multifunction software may not function correctly.
1. Insert the Sharp Laser Multifunction CD into your computer's CD-ROM drive.
2. If the Sharp Laser Multifunction Setup window appears, click Next in the window and go to step 4. If the window doesn't appear, click the Start button on the Windows taskbar and select the Run... command.
3. Type e:\setup in the Open text box, where e is the letter of your CD-ROM drive, and then click OK.
4. Follow the instructions that appear on the screen.
5. When installation is completed, restart your computer.
Guide d'utilisation en ligne
Detailed instructions for using the Sharp Laser Multifunction software can be found in the Online Guide on the CD. To open the guide, follow these steps:
1. Insert the Sharp Laser Multifunction CD into your CD-ROM drive. (If the Sharp Laser Multifunction Setup window appears, click Cancel and then Exit Setup to close the window.)
2. Click the Start button on the Windows taskbar, point to Programs, and then point to Sharp Laser Multifunction. Click Online Guide.
Saisie de votre nom et de votre numéro de fax
Before you can begin using your fax machine, you must enter your name and fax (telephone) number. You also need to set the date and time.
Once you enter this information, it will automatically appear at the top of each fax page you send.


Important !
The law requires that your name, telephone/fax number, and the date and time appear on each fax message you send. Enter your name and fax number here and set the date and time as explained in the following section to have the fax machine include this information automatically at the top of your fax messages.

1 Appuyez sur ces touches :
FUNCTION
(3)
The display will show:
ENTRY MODE
PRESS OR #
2 Press the # key twice. (Or the UP key twice.)
The display will show:
OWN NUMBER SET
PRESS START KEY

Note: When scrolling through the settings, you can press the UP key in place of the # key, and the DOWN key in place of the × key.
3 Press the START key.
The display will show:

ENTER FAX #
4 Enter your fax number by pressing the number keys (max. of 20 digits).
- To insert a space between digits, press the # key.
- If you make a mistake, press the SPEED DIAL key to backspace and clear the mistake.


(Example)
5 Press the START key to enter the fax number in memory.
The display will show:
ENTER YOUR NAME

6 Enter your name by pressing number keys for each letter as shown in the chart below. Up to 24 characters can be entered.
Example: SHARP = 77777 444 22 7777 SPEAKER 77
SPACE = 1 1 J = 5 5 T = 8 8 A = 2 2 K = 5 5 5 U = 8 8 8 B = 2 2 2 L = 5 5 5 5 V = 8 8 8 8 C = 2 2 2 2 M = 6 6 W = 9 9 D = 3 3 N = 6 6 6 X = 9 9 9 E = 3 3 3 O = 6 6 6 6 Y = 9 9 9 9 F = 3 3 3 3 P = 7 7 Z = 9 9 9 9 9 G = 4 4 Q = 7 7 7 H = 4 4 4 R = 7 7 7 7 I = 4 4 4 4 S = 7 7 7 7 7
To enter two letters in succession that require the same key, press the SPEAKER key after entering the first letter. (The SPEAKER key moves the cursor forward, and the HOLD/ SEARCH key moves the cursor backward.)
To clear a mistake, press the SPEED DIAL key.
To change case, press the REDIAL key.
To select one of the following symbols, press the # key or the key repeatedly:
./!''# ; ( % \ amp; '() +, - :; lt; = gt;? @ [] -\ \
Cursor: A dark square mark in the display that indicates where a number or letter will be entered.
7 Appuyez sur la touche START.
The display will show:
SECURITY SELECT
1=ON, 2=OFF

8 Appuyez sur la touche STOP pour revenir à l'affichage de la date et de l'heure.

STOP

Réglage de la date et de l'heure
The date and time appear in the display and are printed at the top of every page you fax.

Set the date and time by pressing the keys on the operation panel as shown below.

1 Press these keys:


The display will show:
ENTRY MODE
PRESS OR #
2 Press these keys:

The display will show:
DATE & TIME SET
PRESS START KEY
3 Press the START key.
- The currently set date will appear in the display.
4 Enter a two-digit number for the month ("01" for January, "02" for February, "12" for December, etc.).
- To correct a mistake, press the SPEED DIAL key to move the cursor back to the mistake and then enter the correct number.
5 Enter a two-digit number for the day ("01" to "31").
6 Enter the year (four digits).
7 Enter a two-digit number for the hour ("01" to "12") and a two-digit number for the minute ("00" to "59").
8 Press the key to select A.M. or the # key to select P.M.


Example: January

Example: the 5th

Example: 2000

Example: 9:25
A.M. P.M

9 Press the START key to start the clock.
The display will show:
DAY LIGHT SAVING
1=YES, 2=NO

START

10 Press the STOP key to return to the date and time display.

STOP

Heure d'été
If desired, you can set the clock to move forward and backward automatically at the beginning and end of Daylight Saving Time. To turn on this function, press the panel keys as follows:
1 Press these keys:
The display will show:
DAY LIGHT SAVING
1:YES, 2=NO
FUNCTION


2 Press 1 to turn on the Daylight Saving Time function, or 2 to turn it off.
YES
NO
①
or
2
3 Press the STOP key to return to the date and time display.
ST
STOP

Réglage du mode de réception
Your fax machine has three modes for receiving incoming calls and faxes:
Mode TEL :
Select this mode when you want to receive both phone calls and faxes on the line connected to the fax machine. All calls, including faxes, must be answered by picking up the fax machine's handset or an extension phone connected to the same line.
Mode FAX :
Select this mode when you only want to receive faxes on your line. The fax machine will automatically answer all calls on four rings and receive incoming faxes.
Mode A.M. :
Use this mode only if you have connected an answering machine to the fax (see Chapter 6). Select this mode when you go out to receive voice messages in your answering machine and faxes on your fax machine.
Réglage du mode de réception
Press the RECEPTION MODE key until the arrow in the display points to the desired mode.

For more information on receiving faxes in TEL and FAX modes, see Chapter 3, Receiving Documents. For more information on using A.M. mode, see Chapter 6, Answering Machine Hookup.
Sélection de l'unité de réception
If you have connected the fax machine to a computer and installed the Multifunction software, you can choose whether to have incoming faxes received to the fax machine or the computer.
The initial setting is FAX (reception to the fax machine).
1 Appuyez sur ces touches :
The display will show:
RECEIVE UNIT 1=FAX,2=PC
FUNCTION


2 Appuyez sur 1 (FAX) pour sélectionner le télécopieur, ou sur 2 (PC) pour sélectionner l'ordinateur.
- The display briefly shows your selection and then reverts to the date and time display.
FAX

PC
or
2
3 Si vous avez sélectionné la réception sur l'ordinateur et que vous souhaitez que l'ordinateur réponde automatiquement à tous les appels, réglez le mode de réception du télécopieur sur FAX.
- Make sure the Multifunction Desktop software is running and Fax Receive is selected (a checkmark appears next to it) in the Fax menu of the Multifunction Desktop. (If not, the fax machine will receive faxes.)

4 If you selected reception to the computer but also want to receive voice calls, set the reception mode of the fax machine to TEL.
- You must answer all calls using the fax's handset. The Multifunction Desktop will receive a fax only if the sending machine issues a fax tone. (Make sure that Fax Receive is selected in the Fax menu of the Multifunction Desktop.) To receive the fax to your fax machine, press the START key.

5 If you selected reception to the computer but also want to receive voice messages in an answering machine connected to the fax machine as explained in Chapter 6, set the reception mode of the fax machine to A.M.

Réglage du volume
You can adjust the volume of the speaker, handset, and ringer using the UP and DOWN keys.

DOWN key UP key
Haut-parleur
1 Press the SPEAKER key.

SPEAKER
2 Press the UP or DOWN key.
Display:

DOWN
or


UP
JAN-29 01:44
SPEAKER : HIGH

JAN-29 01:44
SPEAKER:MIDDLE

JAN-29 01:44
SPEAKER : LOW
3 When the display shows the desired volume level, press the SPEAKER key to turn off the speaker.

SPEAKER
Combiné
1 Lift the handset.

2 Press the UP or DOWN key.
Display:

JAN-29 01:44
RECEIVER : HIGH

JAN-29 01:44
RECEIVER:MIDDLE

JAN-29 01:44
RECEIVER : LOW
3 When the display shows the desired volume level, replace the handset.
- Note: The handset volume reverts to medium each time you hang up.

Sonnerie
1 Press the UP or DOWN key. (Make sure the SPEAKER key has not been pressed.)
- The ringer will ring once at the selected level, and then the date and time will reappear in the display.
Display:


2 If you selected RINGER : OFF OK?, press the START key.

Durée du bip
Your fax machine normally signals the end of transmission, reception, or copying with a 3-second beep. If desired, you can change the duration of the beep to 1 second or turn the beep off.
1 Appuyez sur ces touches :
FUNCTION


The display will alternately show:
BEEP LENGTH 1=3 SEC,2=1 SEC

BEEP LENGTH 3=NO BEEP


2 Appuyez sur 1 pour 3 secondes, sur 2 pour 1 seconde, ou sur 3 pour aucun bip.

Example: No beep
3. Appuyez sur la touche STOP pour revenir à l'affichage de la date et de l'heure.

STOP

2. Envoi de documents
Documents transmissibles
Taille et poids
The size and weight of documents that you can load in the document feeder depend on whether you load one page at a time or several pages at once.
Chargement d'une page à la fois :
Minimum size

Maximum size

Minimum weight
14 lbs. (52 g/m²)
Maximum weight
42 lbs. (157 g/m²)
Chargement de plusieurs pages à la fois :
Minimum size

Maximum size

Minimum weight
14 lbs. (52 g/m²)
Maximum weight
21.5 lbs. (80 g/m²)
Note: Letters or graphics on the edges of a document will not be scanned.

Autres restrictions
The scanner cannot recognize yellow, greenish yellow, or light blue ink.
Ink, glue, and correcting fluid on documents must be dry before they pass through the document feeder.
All clips, staples, and pins must be removed from documents before loading in the feeder. If these are not removed, they may damage the machine.
Documents which are patched, taped, torn, smaller than the minimum size, carbon backed, easily smudged, or have a slick coated surface should be photocopied, and the copy loaded in the feeder.
Chargement du document
Up to 20 pages can be placed in the feeder at one time. The pages will automatically feed into the machine starting from the bottom page.
If you need to send or copy more than 20 pages, place the additional pages gently and carefully in the feeder just before the last page is scanned. Do not try to force them in, as this may cause double-feeding or jamming.
If your document consists of several large or thick pages which must be loaded one at a time, insert each page into the feeder as the previous page is being scanned. Insert gently to prevent double-feeding.
1 Adjust the document guides to the width of your document.

2 Place the document face down and push it gently into the document feeder. The top edge of the document should enter the machine first.
- The feeder will draw the leading edge of the document into the machine. SEND READY will appear in the display.

3 Adjust the resolution and/or contrast settings (if desired) as explained in the section Resolution and Contrast on the following pages, then dial the receiving machine as explained in Sending a Fax by Normal Dialing which appears later in this section.

RESOLUTION
Retrait d'un document du chargeur
If you need to remove a document from the feeder, open the operation panel.

Important !
Do not try to remove a document without opening the operation panel. This may damage the feeder mechanism.
1 Grasp the panel release and pull up to open the operation panel.

2 Remove the document.

3 Close the operation panel, making sure it clicks into place.

Réglage de la résolution et du contraste
If desired, you can adjust the resolution and contrast before sending a document.

Note: The resolution and contrast settings are only effective for sending and copying a document. They are not effective for receiving a document.
Paramètres de résolution
STANDARD Use STANDARD for ordinary documents. This setting gives you the fastest and most economical transmission.
FINE Use FINE for documents containing small letters or fine drawings.
SUPER FINE Use SUPER FINE for documents containing very small letters or very fine drawings.
HALF TONE Use HALF TONE for photographs and illustrations. The original will be reproduced in 64 shades of gray.
Paramètres de contraste
AUTO Use AUTO for normal documents.
DARK Use DARK for faint documents.
1. Chargez le(s) document(s).
- The document must be loaded before the resolution and contrast can be adjusted.

2. Appuyez sur la touche RÉSOLUTION une ou plusieurs fois jusqu'à ce que les paramètres de résolution et de contraste souhaités apparaissent à l'écran.
- The first time you scroll through the list of resolution settings, the contrast setting AUTO will appear next to each resolution setting. The second time you move through the list, the contrast setting DARK will appear.

RESOLUTION


Note: In order to transmit in SUPER FINE resolution, the receiving fax machine must also have that resolution. If it doesn't, your machine will automatically step down to the next best available setting.
Modification de la résolution par défaut
If desired, you can change the default resolution for faxing documents to FINE. Follow the steps below.
1 Appuyez sur ces touches :
The display will show:
FINE PRIORITY
1=YES, 2=NO
FONCTION


2 Appuyez sur 1 (OUI) pour régler la résolution par défaut sur FINE, ou sur 2 (NON) pour la régler sur STANDARD.
YES
NO

or

3 Appuyez sur la touche STOP pour revenir à l'affichage de la date et de l'heure.

STOP

Envoi d'un fax par numérotation normale
With Normal Dialing, you pick up the handset (or press the SPEAKER key) and dial by pressing the number keys.
If a person answers, you can talk with them through the handset before sending the fax. (If you pressed the SPEAKER key, you must pick up the handset to talk.)
Normal Dialing allows you to listen to the line and make sure the other fax machine is responding.
1 Load the document(s). (Note: If desired, you can load the document after dialing in Step 3, below.)
- SEND READY appears in the display.
- Set the resolution and/or contrast if desired.

2 Pick up the handset or press the SPEAKER key. Listen for the dial tone.

or

SPEAKER
3 Dial the number of the receiving machine by pressing the number keys.

(Example)
4 Wait for the connection. Depending on the setting of the receiving machine, you will either hear a facsimile reception tone or the other person will answer.
- If the other party answers, ask them to press their Start key (if you pressed the SPEAKER key, pick up the handset to speak with them). This causes the receiving machine to issue a reception tone.

5 When you hear the reception tone, press the START key. Replace the handset if you used it.
- When transmission is completed, the fax will beep once.

Utilisation de la touche BIS
You can press the REDIAL key to redial the last number dialed. To send a document, press the START key when you hear the fax tone after the connection is established. Note that the speaker is automatically activated when you press the REDIAL key.
Envoi d'un fax par numérotation automatique
You can dial a fax or telephone number by simply pressing a Rapid Key, or by pressing the SPEED DIAL key and entering a two-digit number.
To use a Rapid Key or Speed Dial number, you must first program the full fax number in the Rapid Key or Speed Dial number. It is usually convenient to program your most frequently dialed numbers in Rapid Keys.
20 Rapid Keys and 100 Speed Dial numbers are available.
You can also store an area code or access code in a Rapid Key or Speed Dial number.
You can use a Rapid Key or Speed Dial number to send a fax as an E-mail attachment to an E-mail address. To program a Rapid Key or Speed Dial number for E-mail, see Programming Rapid Key and Speed Dial Numbers in Chapter 5 of your online operation guide.

Attach the Rapid Key labels above the Rapid Keys as shown here. When you store a number in a Rapid Key, write the name of the party on the label.
Mémorisation des numéros de fax et de téléphone pour la numérotation automatique
1 Appuyez sur ces touches :
The display will show:
FAX/TEL # MODE
1=SET,2=CLEAR
FONCTION


2 Appuyez sur la touche 1 pour sélectionner RÉGLAGE.
The display will show:
FAX/TEL # SET
SPEED # OR RAPID

3 Pour mémoriser un numéro dans une touche rapide, appuyez sur la touche rapide souhaitée.
To store a Speed Dial number, enter the desired 2-digit number (from 00 to 99) by pressing the number keys.
01
Example: Rapid Key 01


Example: Speed Dial 01
4 Saisissez le numéro de fax ou de téléphone en appuyant sur les touches numériques.
(Note: A space cannot be entered.)


- To clear a mistake, press the SPEED DIAL key.
(Example)
If a pause is required between any of the digits to access a special service or an outside line, press the REDIAL key (two seconds per pause). The pause will appear as a hyphen. Several pauses can be entered in a row.
5 Appuyez sur la touche DÉPART.

6 Saisissez le nom du correspondant à l'aide des touches numériques comme indiqué ci-dessous. (Si vous ne souhaitez pas saisir de nom, passez directement à l'étape 7.)
SPACE = ① ① J = ⑤ ⑤ T = ⑧ ⑧ A = ② ② K = ⑤ ⑤ ⑤ U = ⑧ ⑧ ⑧ B = ② ② ② L = ⑤ ⑤ ⑤ ⑤ V = ⑧ ⑧ ⑧ ⑧ C = ② ② ② ② M = ⑥ ⑥ W = ⑨ ⑨ D = ③ ③ N = ⑥ ⑥ ⑥ X = ⑨ ⑨ ⑨ E = ③ ③ ③ O = ⑥ ⑥ ⑥ ⑥ Y = ⑨ ⑨ ⑨ ⑨ F = ③ ③ ③ ③ P = ⑦ ⑦ Z = ⑨ ⑨ ⑨ ⑨ ⑨ G = ④ ④ Q = ⑦ ⑦ ⑦ H = ④ ④ ④ R = ⑦ ⑦ ⑦ ⑦ I = ④ ④ ④ ④ S = ⑦ ⑦ ⑦ ⑦ ⑦
Example: SHARP = 77777 444 22 7777 SPEAKER O 77
To clear a mistake, press the SPEED DIAL key.
To enter two letters in succession that require the same key, press the SPEAKER key after entering the first letter.
To select one of the following symbols, press the # key or the key repeatedly:
. / ! " # % amp; ' () * +, -; lt; = gt; ? @ [] ^ _ - ^ \ \
7 Appuyez sur la touche START.

8 Press 1 if the number programmed is an area code or access code to be used for Chain Dialing (see Chain Dialing for area and access codes below). Press 2 (or START) if the number is a regular fax or voice number.

9 Return to Step 3 to store another number, or press the STOP key to return to the date and time display.
Step 3 or

Numérotation en chaîne pour les indicatifs régionaux et d'accès
You can also program an area code or access code in a Rapid Key or Speed Dial number using the above programming procedure. In Step 8, press 1 to set the number as a Chain Dialing number.
After you dial an area code or access code using a Rapid Key or Speed Dial number set for Chain Dialing, the fax machine will wait for you to dial the remainder of the number (you can dial the remainder of the number by pressing a Rapid Key, by pressing the Speed Dial key and entering a Speed Dial number, or by pressing numeric keys). Note that the remainder of the number should not be set as a Chain Dial number if programmed in a Rapid Key or Speed Dial number.
The maximum number of digits that can be dialed at one time by Chain Dialing is 50.
Effacement des numéros de numérotation automatique
1 Press these keys:
The display will show:
FAX/TEL # MODE
1=SET,2=CLEAR
FUNCTION

(#
2 Press 2 to select CLEAR.

3 Press the Rapid Key or enter the Speed Dial number (press the number keys) that you want to clear.

Example: Speed Dial 01
4 Press the START key.

5 Return to Step 3 to clear another number, or press the STOP key to return to the date and time display.
Step 3 or

Note: You cannot clear a number if it is used in a timer operation or is included in a Group Key. First clear the number from the operation or group, then clear the Rapid Key or Speed Dial number. To check where the number is used, print out the Group List or the Timer List as explained in Chapter 8.
Modifications
To make changes in a number previously stored, repeat the programming procedure. Select the Rapid Key or Speed Dial number for which you want to make changes in Step 3, and then change the number and/or name when they appear in the display in Steps 4 and 6.
Note: The fax machine uses a lithium battery to keep automatic dialing numbers and other programmed data in memory when the power is turned off. Battery power is consumed primarily when the power is off. With the power kept continuously off, the life of the battery is about 5 years. If the battery dies, have your dealer or retailer replace it. Do not try to replace it yourself.
Double accès
The fax machine features full dual access, which means that you can load a document and dial by automatic dialing even when the fax machine is occupied with another operation. After you dial, your document will be immediately scanned into memory and then transmitted once all previously set operations have been completed.
If more than one document has been scanned into memory for transmission, the documents will be transmitted in the order in which they were scanned.
The fax machine can hold approximately 280 pages of average content in memory. Less pages can be held if any pages are scanned using fine or halftone resolution.
The maximum number of transmission jobs that can be held at once is 30.
The amount of memory currently occupied appears as a percentage (M:00%) in the display.
Si la mémoire est pleine...
If the memory becomes full while a document is being scanned, MEMORY FULL will appear in the display. Press the START key or the STOP key as follows:
Press the START key if you want to transmit the pages which have been stored up to that point in memory. The remaining pages will be ejected from the feeder. After transmission, the memory will be cleared and you can transmit the remaining pages. You will also need to transmit the page which was being scanned when the memory filled up.
Press the STOP key if you want to cancel the entire transmission.
If you do not press the START key or the STOP key within one minute, the transmission will be canceled and the pages already scanned cleared from memory. You will need to retransmit all pages of the document.
Numérotation par touche rapide
If the number you want to dial has been programmed in a Rapid Key, you can dial it by pressing the Rapid Key.
1 Chargez le ou les documents.
- SEND READY appears in the display.
- Set the resolution and/or contrast if desired.


RESOLUTION
2 Appuyez sur la touche rapide appropriée.
- The document is automatically transmitted once the connection is established.

(Example)
Numérotation abrégée
If the number you want to dial has been programmed in a Speed Dial number, you can dial it by pressing the SPEED DIAL key and then entering the Speed Dial number.
1 Chargez le ou les documents.
- SEND READY appears in the display.
- Set the resolution and/or contrast if desired.


RESOLUTION
2 Appuyez sur la touche NUMÉROTATION ABRÉGÉE puis saisissez le numéro abrégé à l'aide des touches numériques.
- To enter numbers 1 through 9, first enter 0 and then the number.

3 Vérifiez l'affichage. Si le nom ou le numéro affiché est correct, appuyez sur la touche START. (Sinon, appuyez sur la touche STOP puis répétez l'étape 2.)

Numérotation directe au clavier
You can also enter a full number with the number keys and then press the START key to begin dialing. You can use this method to dial a full number when you don't need to speak to the other party before faxing.
1 Load the document(s). (Note: If desired, you can load the document after dialing in Step 2, below.)
- SEND READY will appear in the display.
- Set the resolution and/or contrast if desired.

2 Enter the number of the receiving machine by pressing the numeric keys.
- If a pause is required between any of the digits to access a special service or an outside line, press the REDIAL key (two seconds per pause). The pause will appear as a hyphen. Several pauses can be entered in a row.

3 Check the display. If the number of the receiving machine shown is correct, press the START key.
- If it is not correct, press the STOP key to backspace and clear one digit at a time, and then re-enter the correct digit(s).

Recherche d'un numéro de numérotation automatique
If you don't remember the Rapid Key or Speed Dial number in which you have programmed a particular fax number or E-mail recipient, you can search for the number by following the steps below. Once you have found the number, you can dial and transmit the loaded document by simply pressing the START key. (Note: To search for an E-mail recipient, your fax must be connected to your computer.)
1 Chargez le ou les documents.
- SEND READY will appear in the display.
- Set the resolution and/or contrast if desired.

2 Appuyez sur la touche MAINTIEN/RECHERCHE.

3 Appuyez sur 1 pour rechercher un numéro de numérotation automatique, ou sur 2 pour rechercher un destinataire e-mail.
NUMÉROTATION AUTOMATIQUE E-MAIL

4 Saisissez la première lettre du nom enregistré en appuyant sur la touche numérique appropriée (la touche située sous la lettre marquée) une ou plusieurs fois jusqu'à ce que la lettre apparaisse à l'écran. Si le nom commence par un caractère spécial ou un chiffre, appuyez sur 1 (uniquement pour les numéros de numérotation automatique).

If you don't remember the first letter, go to Step 5 (you will scroll through the list from the beginning).
If a name wasn't stored (for an auto-dial number), press 0. This will cause numbers, not names, to appear when you scroll.
5 Press the # key or the key to scroll through the names (numbers if you pressed 0). Stop when the desired name appears in the display.
- If no names have been stored that begin with the entered letter, you will scroll from the next name, in alphabetical order, in the list. If no names/numbers have been stored at all, NO DATA will appear.

or

6 Press the START key.
The document is transmitted.

START

Recomposition automatique
If you use automatic dialing (including Direct Keypad Dialing) and the line is busy, the fax machine will automatically redial the number. The fax machine will make up to two redialing attempts at an interval of five minutes.
To stop automatic dialing, cancel the job as explained in Checking and cancelling transmission jobs in Chapter 2.
Intervalle de rappel pour la recomposition automatique
If desired, you can change the interval at which the fax machine makes automatic redialing attempts.
1 Press these keys:


The display will show:
RECALL INTERVAL ENTER (01-15) 05
2 Enter a 2-digit number from 01 to 15 for the number of minutes of the interval.

Example: 3 minutes
3 Press the STOP key to return to the date and time display.

Nombre de rappels pour la numérotation automatique
If desired, you can change the maximum number of automatic redialing attempts made when the line is busy.
Under certain conditions (for example if a person answers the call on a telephone), automatic redialing may stop before the set number of redialing attempts are made.
1 Press these keys:
The display will show:

FUNCTION
RECALL TIMES ENTER (00-10) (02)

2 Enter a 2-digit number from 00 to 10 for the maximum number of radial attempts.

Example: 5 attempts
3 Press the STOP key to return to the date and time display.

Vérification et annulation des travaux de transmission
To display information on currently set transmission (and polling) jobs, follow the steps below. You can also cancel a job with this procedure.
1 Appuyez sur ces touches.
- The display will show ACTION STATUS and the number of transmission jobs, and then information on the first job.
FUNCTION


2 Appuyez sur la touche HAUT ou BAS pour faire défiler la liste des travaux. (Remarque : vous pouvez également faire défiler avec la touche ou #.)
- The display will show the 2-digit memory number assigned to the transmission, the time the transmission was set, and status of the job alternating with the name (or number) of the receiving party.
- To cancel a job, press the START key twice while the job appears in the display.

3 Lorsque vous avez fini de consulter la liste, appuyez sur la touche STOP pour revenir à l'affichage de la date et de l'heure.

Mode de correction d'erreurs
The fax machine is set to automatically correct any distortions in a transmission due to noise on the telephone line before printing at the receiving end. This function is called Error Correction Mode (ECM). ECM is effective for both transmissions and receptions, and is only effective when the other fax machine also has ECM.
1 Appuyez sur ces touches :
The display will show:
ECM MODE
1=YES, 2=NO


2 Appuyez sur 1 pour activer l'ECM ou sur 2 pour le désactiver.
YES
NO

or

3 Appuyez sur la touche STOP pour revenir à l'affichage de la date et de l'heure.

STOP

Quick Online
When you transmit a document, the fax machine normally dials the receiving party and begins transmitting while scanning is still in progress. This function is called Quick Online. If desired, you can turn off Quick Online and have the fax machine wait until all pages have been scanned before dialing.
1 Appuyez sur ces touches :


The display will show:
QUICK ON-LINE
1=YES, 2=NO
2 Appuyez sur 1 pour activer Quick Online ou sur 2 pour le désactiver.
YES
NO

or

3 Appuyez sur la touche STOP pour revenir à l'affichage de la date et de l'heure.
STOP

3. Réception de documents
Utilisation du mode FAX

When the reception mode is set to FAX, the fax machine will automatically answer all calls on four rings and receive incoming faxes.

4 rings

Fax reception
If you pick up the handset before the machine answers, you can talk to the other party and/or receive a document as explained in Using TEL mode.
Note: If you receive a fax while scanning a document into the Multifunction Desktop on your computer, scanning may be canceled.
Modification du nombre de sonneries
If desired, you can change the number of rings on which the fax machine answers incoming calls in FAX mode. Any number from 1 to 5 can be selected.
1 Appuyez sur ces touches :
The display will show:


NUMBER OF RINGS ENTER (1-5) (4)
2 Saisissez le nombre de sonneries souhaité (un nombre de 1 à 5).
The display will briefly show your selection, and then:

Example: 3 rings
RECALL INTERVAL ENTER (01-15) 05
3 Appuyez sur la touche STOP pour revenir à l'affichage de la date et de l'heure.

Note: If you are using Distinctive Ring, the fax machine will answer calls after two rings regardless of the above setting.
Sortie des documents reçus
Note: The received document outlet has a maximum capacity of 100 sheets. To prevent the outlet from becoming obstructed, which will in turn cause paper jams, be sure to frequently remove received documents and copies. Do not allow a large number of documents to accumulate in the outlet.
Utilisation du mode de réception TEL

To select TEL mode, press the RECEPTION MODE key until the arrow in the display points to TEL.


When the reception mode is set to TEL, you must answer all calls by picking up the fax machine's handset or an extension phone connected to the same line.
Répondre avec le combiné du télécopieur
1 When the fax machine rings, pick up the handset.

2 If you hear a fax tone, wait until the display shows RECEIVING and then replace the handset.

Note: If you have set the Fax Signal Receive setting to NO, press the START key to begin reception.
3 If the other party first speaks with you and then wants to send a fax, press the START key after speaking. (Press your START key before the sender presses their Start key.)
- When RECEIVING appears in the display, hang up.

Répondre avec un téléphone supplémentaire
1 Answer the extension phone when it rings.

2 If you hear a soft fax tone, wait until your fax responds (the extension phone will go dead if it is connected to your fax, or you will hear pronounced, high-pitched tones if the phone is connected to a separate wall jack), then hang up.

3 If the fax doesn't respond, or if the other party first talks to you and then wants to send a fax, press 5, , and on the extension phone (only on a tone dial phone). This signals the fax to begin reception. Hang up.

Comments:
Your fax will not accept the signal to begin reception (5** if a document is loaded in its feeder.
If you have set the Fax Signal Receive setting to NO, press 5, , and on the extension phone to begin reception.
Changer le numéro pour l'activation de la télécopie à distance
If desired, you can use a number other than 5 to activate fax reception from an extension telephone. You can select any number from 0 to 9.
1 Press these keys:
The display will show:


TEL/FAX REMOTE # ENTER (0-9) (5)

2 Enter a number from 0 to 9.

(Example)
3 Press the STOP key to return to the date and time display.

Désactiver la détection du numéro de télécopie à distance Tel/Fax
If you don't intend to ever activate fax reception from an extension phone, you can turn off detection of the above TEL/FAX REMOTE NUMBER. This will ensure that the fax never mistakenly attempts to begin reception if it detects a signal similar to the TEL/FAX REMOTE NUMBER while you are talking on an extension phone.
1 Press these keys:

The display will show:

REMOTE RECEPTION
1=YES, 2=NO
2 Press 1 to turn on detection of the TEL/FAX REMOTE NUMBER, or 2 to turn it off.

3 Press the STOP key to return to the date and time display.

Réception de signaux de télécopie
Your fax will automatically begin reception if you hear a soft fax tone after answering a call on your fax or an extension phone. If you use a computer fax modem to send documents on the same line, you must turn this function off in order to prevent your fax from mistakenly attempting to receive documents from the computer fax modem. Follow the steps below to change the setting.
1 Appuyez sur ces touches :
The display will show:
FAX SIGNAL RX
1=YES, 2=NO


2 Appuyez sur 1 pour activer la fonction, ou sur 2 pour la désactiver.
YES
NO

or

3 Appuyez sur la touche STOP pour revenir à l'affichage de la date et de l'heure.
ST
STOP

Taux de réception
The fax has been set at the factory to automatically reduce the size of received documents to fit the size of the printing paper. This ensures that data on the edges of the document are not cut off. If desired, you can turn this function off and have received documents printed at full size.
If a document is too long to fit on the printing paper, the remainder will be printed on a second page. In this case, the cut-off point may occur in the middle of a line.
Automatic reduction may not be possible if the received document is too large, contains too many fine graphics or images, or is sent at high resolution. In this case, the remainder of the document will be printed on a second page.
1 Appuyez sur ces touches :
The display will show:

FUNCTION


RECEPTION RATIO
1=AUTO, 2=100%
2 Appuyez sur 1 pour activer la réduction automatique, ou sur 2 pour la désactiver.
AUTO
100%

or

3 Appuyez sur la touche STOP pour revenir à l'affichage de la date et de l'heure.

STOP

Réception de substitution en mémoire
In situations where printing is not possible, such as when your fax runs out of paper, the toner cartridge needs replacement, or the paper jams, incoming faxes will be received to memory.
When you have received a document in memory, CAN'T PRINT DATA will appear in the display, alternating with a message indicating the problem. When you correct the problem, the stored documents will automatically print out.
If you received documents in memory because the fax ran out of paper, be sure to add paper which is the same size as the paper previously used. If not, the document print-out size may not match the size of the printing paper.
Attention !
When documents are stored in memory, do not turn the power off. This will erase all of the contents.
If documents received in memory are lost due to a power failure or other interruption in the power supply, a CLEAR REPORT will be printed out when the power is restored. This gives information about the receptions lost, including the fax numbers of the transmitting machines if they are available.
4. Faire des copies
Your fax can also be used to make copies. Single and multiple copies (up to 99 per original) can be made, enabling your fax to double as a convenience office copier.
1 Load the document(s) face down. (Maximum of 20 pages.)
- SEND READY appears in the display.

2 If desired, select one or more of the following optional copy settings:
- SORT COPY:
If you are making multiple copies of more than one original and want the copies sorted, press the FUNCTION key and 6, and then enter the number of copies per original. (If the number of copies is less than ten, enter a "0" before the number.)


Example of sorted/not-sorted copies (three each) of three originals
- MULTIPLE COPIES (Not sorted):
If you want to make multiple copies of the original (or each original), enter a 2-digit number for the number of copies per original. (If the number is less than 10, do not enter a 0 before the number.)

Example: Nine copies per original
- RÉDUCTION/AGRANDISSEMENT :
If you want to reduce or enlarge the copy, press the REDUCTION/ ENLARGEMENT key until the desired percentage appears in the display (you can also scroll through the percentages with the UP and DOWN keys). The selections are as follows:
100% (no reduction/enlargement)
AUTO (auto reduction to fit the size of the printing paper.)
94%
88%
73%
50%
200%
150%
125%

REduction/ENLARGEMENT
Note: The enlargement/reduction setting is effective for one time only.
- RÉSOLUTION :
If desired, set the resolution and/or contrast. (The default setting for copying is FINE.)

RESOLUTION
3 Appuyez sur la touche COPIE/AIDE.
- Copying begins.

COPY/HELP
Remarque :
If you place a large number of originals in the feeder, the memory may become full before all of them can be scanned (MEMORY IS FULL will appear in the display). If this happens, press the START key to copy the originals which have been scanned, and then repeat the copy procedure for the remaining originals, including the original which was being scanned when the memory became full.
Coupure de copie
When making a copy of a document that is longer than the printing paper, use the copy cut-off setting to select whether the remaining part of the document will be cut off or printed on a second page. The initial setting is YES (cut off the remainder). To change the setting, follow the steps below.
1 Appuyez sur ces touches :
The display will show:
COPY CUT-OFF
1=YES, 2=NO
FONCTION


2 Appuyez sur 1 pour régler la coupure de copie sur OUI (la partie restante du document ne sera pas imprimée), ou sur 2 pour régler la coupure de copie sur NON (la partie restante sera imprimée sur une deuxième page).
The display briefly shows your selection, and then:
PAPER SIZE
1=LETTER, 2=LEGAL
OUI
NON

or

3 Appuyez sur la touche STOP pour revenir à l'affichage de la date et de l'heure.

STOP

5. Passer des appels téléphoniques
Your fax machine can be used like a regular telephone to make and receive voice calls.
To make or receive a voice call, the power must be on.
1 Pick up the handset or press the SPEAKER key. Listen for the dial tone.

2 Dial the number using one of the following methods:
- Normal Dialing: Enter the full telephone number with the numeric keys.
- Rapid Key Dialing: Press the appropriate Rapid Key.
- Speed Dialing: Press the SPEED DIAL key, and enter the 2-digit Speed Dial number with the numeric keys.

Example: Press Rapid Key 01
3 Speak with the other party when they answer.
- If you pressed the SPEAKER key, pick up the handset to talk.

Commentaires :
While the handset of the fax is lifted (off hook), an extension phone connected directly to the fax cannot be used to speak with the other party.
The fax may interrupt a voice call received on an extension phone if the reception mode is set to A.M. and there is a period of silence during the conversation. If you are on a touch-tone phone, you can prevent this by pressing any three keys on the phone immediately after you answer. (Note: Do not enter the code to activate fax reception: 5, *, *.)
Recherche d'un numéro de numérotation automatique
You can use the HOLD/SEARCH key to search for a Rapid Key or Speed Dial number. First search for the number as described in Searching for an auto-dial number in Sending a Fax by Automatic Dialing in Chapter 2, then pick up the handset or press the SPEAKER key. The number will be dialed automatically (do not press the START key).
Recomposition
The last number dialed can be redialed by pressing the REDIAL key (it is not necessary to pick up the handset or press the SPEAKER key). When the other party answers, pick up the handset to talk.
Maintenir
You can put the other party on hold during a conversation by pressing the HOLD/SEARCH key. When this is done, they cannot hear you. You can put the handset back in the cradle without breaking the connection. When you are ready to speak with them again, pick up the handset. If you did not put the handset back in the cradle, press the HOLD/SEARCH key again to resume conversation.
6. Raccordement d'un répondeur
Connexion d'un répondeur
If desired, you can connect an answering machine to your fax machine's TEL. SET jack. This will allow you to receive both voice messages and faxes when you are out.
1 Remove the seal covering the TEL. SET jack.

2 Connect the answering machine's telephone line jack to the TEL. SET jack.
- If desired, you can connect an extension phone to your answering machine's extension phone jack.
Make sure the TEL LINE jack is connected to the wall jack.

Modification du message d'accueil
The outgoing message (OGM) of your answering machine should be changed to inform callers who want to send a fax to press their Start key. For example, your message might go as follows:
"Hello. You've reached the ABC company. No one is available to take your call right now. Please leave a message after the beep or press your facsimile Start key to send a fax. Thank you for calling."
Try to keep the length of the message under 10 seconds. If it is too long, you may have difficulty receiving faxes sent by automatic dialing.
If your outgoing message must be longer than 10 seconds, leave a pause of about four seconds at the beginning of the message. This will give your fax a chance to detect fax tones sent when automatic dialing is used.
Activation de la connexion du répondeur
Before you go out, activate the answering machine connection as follows:
1 Réglez le mode de réception sur A.M.

2 Réglez votre répondeur sur réponse automatique.
Your answering machine must be set to answer on a maximum of two rings. If not, you may not be able to receive faxes sent by automatic dialing.
If your answering machine has a toll saver function, make sure that it will answer by the fourth ring.
Remarque :
If your answering machine has a remote retrieval function, make sure the code used to activate remote retrieval is different from the code used to activate fax reception with an extension telephone (see Chapter 3, Receiving Documents). If they are the same, entering the code from an outside telephone to retrieve messages will cause the fax machine to be activated.
Fonctionnement de la connexion
While you are out, all of your incoming calls will be answered by your answering machine and its outgoing message will play. Voice callers can leave a message. During this time, your fax will quietly monitor the line. If your fax detects a fax tone or a duration of silence greater than four seconds, it will take over the line and begin reception.
When you return and turn off your answering machine, be sure to change the reception mode back to FAX or TEL!

Réglages optionnels du mode A.M.
If necessary, you can use the following settings to improve the response of the answering machine hookup to incoming calls.
Temps de détection de silence
The fax machine is set to take over the line and begin reception if it detects 4 seconds of silence after the answering machine answers. If needed, you can change this setting to any number of seconds from 1 to 10.
We recommend that you do not set Quiet Detect Time under 3 seconds.
If the fax machine is interrupting callers before they can leave a message, try a longer Quiet Detect Time setting. If your outgoing message includes a period of silence, make sure that the setting is longer than that period of silence, or re-record your outgoing message to shorten the silence.
Remarque :
Quiet Detect Time can be turned off by entering "00" for the time. Note, however, that the fax machine may not be able to receive manually-sent faxes from some older fax machines.
1 Appuyez sur ces touches :
FONCTION


The display will show:


QUIET DETECT TM.
ENTER (00-10) 04
2 Enter a number from 01 to 10, or enter 00 to turn off the function.


(Example)
3 Press the STOP key to return to the date and time display.

Fax lorsque le répondeur ne répond pas
When this function is turned on, your fax will answer the call after 5 rings if the answering machine for some reason fails to answer before that time. This ensures that you will receive fax messages even if the answering machine's tape fills up or the answering machine is not turned on.
This function has been turned off at the factory. If you want to turn it on, follow the steps below:
Remarque :
When this function is turned on, make sure that the answering machine is set to answer on 4 rings or less. If it isn't, the fax will always answer first, preventing callers from leaving voice messages.
1 Appuyez sur ces touches :
FONCTION


The display will show:


TAD FAILS
1=YES, 2=NO
2 Appuyez sur 1 pour activer la fonction, ou sur 2 pour la désactiver.
YES
NO

or

3 Appuyez sur la touche STOP pour revenir à l'affichage de la date et de l'heure.


7. Fonctions spéciales
Diffusion
The Broadcasting function allows you to send the same document to as many as 30 different locations with just one operation. First load the document, then enter the numbers of the receiving machines. The document will be automatically transmitted to each location.
You can only use Rapid Keys or Speed Dial numbers to dial the numbers of the receiving machines.
1 Load the document (s).
- SEND READY will appear in the display.

2 Press the BROADCAST key.
The display will show:
BROADCAST
BROADCAST MODE
SPEED # OR RAPID

3 Dial the receiving machines using one or more of the following methods:
- Press one or more Rapid Keys.
- Enter one or more Speed Dial numbers with the numeric keys.

(Example)
4 Appuyez sur la touche START.
The display will show:
SET RESOLUTION PRESS RESO. KEY
- If desired, adjust the resolution and/or contrast.


RESOLUTION
5 Appuyez sur la touche START. La transmission commence.
- A Transaction Report is automatically printed out after Broadcasting is completed. Check the "Note" column of the report to see if any of the locations are marked "Busy" or have a communication error code. If so, send the document to those locations again.

Diffusion à l'aide d'une touche de groupe
If the fax machines to which you want to broadcast have all been programmed into one Group Key (see Storing numbers in Group Keys which follows), you can perform the broadcasting operation using the following simplified procedure:
1 Chargez le(s) document(s).
- SEND READY will appear in the display.
- If desired, adjust the resolution and/or contrast.


RESOLUTION
2 Appuyez sur la touche de groupe appropriée. La transmission commence.

Mémorisation des numéros dans les touches de groupe
Group Keys allow you to dial a group of fax numbers by simply pressing the appropriate Group Key once. To store a group of numbers in a Group Key, follow the steps below.
Rapid Keys 17/G1 through 20/G4 can be used as Group Keys. Note that one key cannot be simultaneously programmed as both a Group Key and a Rapid Key.
Up to 30 numbers can be stored in one Group Key.
Only Rapid Key and Speed Dial numbers (excluding numbers set for Chain Dialing) can be stored in a Group Key. Full numbers cannot be stored.
1 Appuyez sur ces touches.
The display will show:
GROUP ENTRY MODE 1=SET,2=CLEAR
FUNCTION

7
2 Appuyez sur 1 (SET) pour programmer une touche de groupe, ou sur 2 (CLEAR) pour effacer une touche de groupe.
3 Pour programmer une touche de groupe, appuyez sur la touche que vous souhaitez programmer (l'une des touches rapides 17/G1 à 20/G4).
To clear a Group Key, press the key you want to clear and go to Step 5.
SET
CLEAR

or


4 Enter fax numbers using one or both of the following methods:
- Press one or more Rapid Keys.
- Enter one or more Speed Dial numbers with the numeric keys.


(Example)
5 Press the START key.

6 Return to Step 3 to program another Group Key, or press the STOP key repeatedly until you return to the date and time display.
Step 3 or

Sonnerie distinctive (nécessite un abonnement au service)
Important :
To use distinctive ring, you must subscribe to a distinctive ring service from your local phone company.
Your fax machine may not be compatible with some distinctive ring services.
Distinctive ring is a service offered by some local telephone companies whereby they assign an additional second number to your regular single line. The second number rings differently from your normal number.
If you subscribe to a distinctive ring service, you can set the fax machine to automatically answer when your second number is called. This allows you to use the second number as an exclusive fax number.
To have your fax automatically answer when your second number is called, follow the steps below:
1 Appuyez sur ces touches :
The display will show:
OPTION SETTING
PRESS OR #
FUNCTION


2 Appuyez 11 fois sur la touche .
The display will show:
DISTINCTIVE RING 1:RING PATTERN 1


The ring pattern selections alternately appear here.
3 Press a number from 1 to 3 to select the ring pattern below that matches your second number's ring pattern. Or, press 4 to have your fax automatically answer your normal telephone number. Press 5 to turn off the distinctive ring function.
1 RING PATTERN 1 Two short rings
2 RING PATTERN 2 One short, one long, and one short ring
3 RING PATTERN 3 Two short rings and one long ring
4 STANDARD RING Your standard (normal) ring pattern
OFF SETTING Turn distinctive ring off
The display will briefly show your selection, and then:
FAX SIGNAL RX
1=YES, 2=NO
4 Press the STOP key to return to the date and time display.

5 Set the reception mode to FAX.

When using distinctive ring, you must set the reception mode of your fax machine to FAX. When your designated fax number is dialed, your fax will automatically answer and begin reception after two rings. Note that other devices on the same line will also ring until your fax answers. If one of your other numbers is dialed, the fax will ring; however, it will not answer.
Page de garde
You can have the fax generate a cover sheet and send it as the last page of each of your fax transmissions.

Follow the steps below to turn on the cover sheet function. Once the cover sheet function is turned on, cover sheets will be included with all transmissions until you turn it off.
1 Appuyez sur ces touches :
The display will show:
FONCTION


COVER SHEET
1=YES, 2=NO
2 Press 1 (YES) to turn on the cover sheet function, or 2 (NO) to turn it off.
The display will briefly show your selection, and then:
AUTO PRINT OUT 1=YES,2=NO

3 Press the STOP key to return to the date and time display.

Sélection d'un message d'en-tête (facultatif)
When the cover sheet function is turned on, you can also select a message which will appear as a header at the top of the cover sheet. Note that the message selection is only effective for one transmission.
1 Load the document(s).
- The document must be loaded before a message can be selected.
- The cover sheet function must be turned on.

2 Press these keys:
The display will show:
FUNCTION


3 Select a message by entering a number from 1 to 4:
1: URGENT
2:IMPORTANT
3: CONFIDENTIAL
4:PLS.DISTRIBUTE
①
(Example)
4 Dial the receiving machine and transmit the document.
Remarque :
To cancel a header message selection, press the STOP key or remove the document from the feeder.
Numérotation par lots
You can change the page numbering of the fax from simple numbering ("P.01", "P.02", etc.) to batch numbering, which means that a slash and the total number of pages are added after each page number (for example, "P. 01/05", "P.02/05", etc.). This allows the recipient to check for missing pages.
1 Load the document(s).
- The document must be loaded before batch page numbering can be set.

2 Press these keys:
The display will show:


PAGE COUNTER SET ENTER # (01-99)
3 Enter the total number of pages ("01" to "99") by pressing the number keys. (If the number is less than 10, enter a "0" before the number.)
- If you are sending a cover sheet, do not include it in the total number of pages (the number will be adjusted automatically).

Example: Eight pages
4 Dial the receiving machine and transmit the document.
Commentaires :
If you need to cancel a batch number entry, remove the document from the feeder or press the STOP key.
If the number of pages actually transmitted does not coincide with the batch number entered, the alarm will sound and PAGE COUNT ERROR will appear in the display. PAGE E. will also appear in the NOTE column of the Transaction Report if it has been set to print out.
Blocage de la réception de télécopies indésirables
The Anti Junk Fax function allows you to block reception of faxes from parties which you specify. This saves paper by not printing out unwanted "junk" faxes.
To use this function, follow the steps below to turn it on, and then enter the fax numbers from which you do not want to receive faxes as indicated in the procedure that follows.
1 Appuyez sur ces touches :
The display will show:
JUNK FAX # CHECK
1=YES, 2=NO
FONCTION


2 Appuyez sur 1 pour activer la fonction Anti-Junk, ou sur 2 pour la désactiver.
YES
NO

or

3 Appuyez sur la touche STOP pour revenir à l'affichage de la date et de l'heure.

STOP

Saisie des numéros Anti-Junk
Enter (or clear) a number in the Anti Junk List as shown below. Up to five numbers can be entered.
To clear a number from the Anti Junk Number List, you need to know the 1-digit number which identifies it. If you have forgotten this number, print out the Anti Junk Number List as explained in Chapter 8.
1 Press these keys:
The display will show:
STORE JUNK FAX #
1=SET, 2=CLEAR
FUNCTION


2 Press 1 to enter a number in the Anti Junk Number List, or 2 to clear a number from the list.
SET
CLEAR

or

3 Entering: Enter a 1-digit number from 1 to 5 with the numeric keys. This number identifies the fax number that you will enter in the next step.

(Example)
Clearing: Enter the 1-digit number that identifies the fax number you want to clear, and go to Step 5.
4 Enter the fax number.


(Example)
5 Press the START key.

START

6 Return to Step 3 to enter (or clear) another fax number, or press the STOP key to return to the date and time display.
Step 3 or

STOP

Interrogation (demande d'envoi d'un fax)
Polling allows you to call another fax machine and have it send a document to your machine without operator assistance. In other words, the receiving fax machine, not the transmitting fax machine, initiates the transmission. You can use your fax machine to both poll and be polled by others.
To use the polling function, you must first set Rapid Key 16/POLL for use as a polling key.
1 Appuyez sur ces touches :


The display will show:


POLLING 1=YES,2=NO
2 Appuyez sur 1 pour activer la fonction, ou sur 2 pour la désactiver.

3 Appuyez sur la touche STOP pour revenir à l'affichage de la date et de l'heure.

Note: When Rapid Key 16/POLL is set as a polling key, it cannot be used for Rapid Key dialing.
Demande d'envoi
1 Dial the fax machine you want to poll using one of the following methods:
- Pick up the handset (or press the SPEAKER key) and dial the full number. Wait for the fax answerback tone.
- Pick up the handset (or press the SPEAKER key) and press the Rapid Dial Key. Wait for the fax answerback tone.
- Press the SPEED DIAL key and enter a 2-digit Speed Dial number.
- Enter the full number using the numeric keys.

2 Press Rapid Key 16/POLL.
- If you used the handset, replace it when POLLING appears in the display. Reception will begin.

Interrogation (mémoire d'interrogation)
To let another fax machine poll your fax machine, you must first store the document in memory using the following procedure. Transmission will take place when the other fax machine calls your fax machine and activates polling. You can choose whether to allow polling only once, or an unlimited number of times. In the latter case, your fax machine can be used as an electronic "bulletin board".
Only one document can be stored at a time for memory polling.
If you allow polling only once, the document will be automatically cleared from memory after polling. If you allow polling an unlimited number of times, the document will remain in memory until you clear it as explained in the following section, Clearing a document.
1 Chargez le document.

2 Appuyez sur la touche MODE DE RÉCEPTION pour régler le mode de réception sur FAX.

3 Appuyez sur ces touches :
The display will show:
MEMORY POLL MODE
1=SET, 2=CLEAR
FUNCTION


4 Press 1 to select SET.
5 Press 1 to allow polling only once, or 2 to allow polling an unlimited number of times.
(1)
ONCE
REPEAT

or

6 Press the START key.
- The document is scanned into memory and your fax goes on polling standby.

START

Suppression d'un document
To clear a memory poll document from memory, follow the steps below:
1 Press these keys:
The display will show:
MEMORY POLL MODE
1=SET, 2=CLEAR
FUNCTION

8
2 Press 2 to select CLEAR.
②
3 Press the START key to clear the document, and then the STOP key to return to the date and time display.


Sécurité de l'interrogation
Polling Security allows you to prevent unauthorized polling of your machine. When this function is turned on, polling will only take place when the fax number of the polling fax machine has been entered in your machine's list of permitted fax numbers (called "passwd numbers"). The number of the polling fax must also be correctly programmed into itself for identification.
To use Polling Security, follow the steps below to turn the function on, and then enter permitted numbers as shown on the following page.
1 Appuyez sur ces touches :
The display will show:
SECURITY SELECT 1=ON, 2=OFF
FUNCTION


2 Appuyez sur 1 pour activer la sécurité de la réception, ou sur 2 pour la désactiver.
ON
OFF

or

3 Appuyez sur la touche START puis sur la touche STOP.

START


STOP

Mémorisation et effacement des numéros de fax pour l'autorisation de réception
You can store up to 10 fax numbers in your machine's list of permitted numbers.
1 Appuyez sur ces touches :
The display will show:
FONCTION


PASSCODE # MODE
1=SET, 2=CLEAR
2 Appuyez sur 1 pour mémoriser un numéro, ou sur 2 pour effacer un numéro.
SET
CLEAR

or

3 Mémorisation : Saisissez un numéro à 2 chiffres de 01 à 10. Ce numéro identifie le numéro de fax que vous mémoriserez à l'étape suivante.


(Example)
Clearing: Enter the number which identifies the fax number you want to clear, and go to Step 5.
4 Saisissez le numéro de fax.


(Example)
5 Appuyez sur la touche START.

START

6 Revenez à l'étape 3 pour saisir (ou effacer) un autre numéro, ou appuyez sur STOP pour revenir à l'affichage de la date et de l'heure.
Step 3 or

STOP

Opérations de minuterie
The Timer function allows you to set up a transmission or polling operation to be performed automatically at a time you specify. Up to three operations can be set at any one time, and the times they will be performed can be specified up to one week in advance.
You can use this function to take advantage of lower off-peak telephone rates without having to be there when the operation is performed.
Note: Only a Rapid Key or Speed Dial number can be used to dial the receiving machine. Full numbers cannot be used.
Réglage d'une opération de minuterie
1 If this is a transmission, load the document.

2 Press these keys:
The display will show:
FUNCTION

TIMER MODE 1=SET,2=CLEAR
3 Press 1 to select SET.

4 Press 1 to set a transmission operation (SEND MODE), or 2 to set a polling operation (POLLING MODE).
SEND POLLING

5 Enter the time at which you want the operation to take place (2 digits for the hour and 2 digits for the minute).

Example: 9:25
6 Press the key to select A.M. or the # key to select P.M.
A.M. P.M.

7 Enter a 1-digit number for the day of the operation (skip this step if the operation will be performed within the next 24 hours):

Example: Sunday
0: Sunday
1: Monday
2: Tuesday
3: Wednesday
4: Thursday
5: Friday
6: Saturday
8 Press the START key.
START
9 Press a Rapid Key or enter a Speed Dial number for the receiving fax machine.

- If this is a polling operation, go to Step 12.
Example: Speed Dial #01
10 Press the START key.

START

11 Adjust the resolution and/or contrast if desired (skip to the next step if you don't want to change settings).
RESOLUTION

12 Press the START key.
- If this is a transmission, the document is scanned into memory.

Pour annuler une opération de minuterie
If you need to cancel a timer operation after it has been set, follow the steps below.
1 Press these keys:
The display will show:
FUNCTION


TIMER MODE
1=SET, 2=CLEAR
2 Press 2 to select CLEAR.

3 Enter the 1-digit number assigned to the timer job you want to cancel.
- If you don't remember the number, print out the Timer List as explained in Chapter 8.

(Example)
4 Press the START key and then the STOP key.


8. Impression de listes
You can print lists showing settings and information entered in the fax machine. You can also print out reports on recent activity and individual operations after they are completed. The lists and reports are described on the following pages.
To print a list, follow the steps below.
1 Press the FUNCTION key and 2.
The display will show:
LISTING MODE PRESS 喜 OR #


2 Press the key or the # key until the desired list appears in the display.

or

3 Press the START key to print the list.

Rapport d'activité
This report shows information on your most recently performed send and receive operations (a combined maximum of 30 operations can appear). The report is divided into two parts: the TRANSMISSIONS ACTIVITY REPORT, which shows information on transmissions, and the RECEPTIONS ACTIVITY REPORT, which shows information on receptions.
All information is erased after a report is printed out. If automatic print-out is turned off and the report is not printed manually for 30 operations, the information on the oldest operation will be overwritten each time a new operation is performed.
TRANSMISSIONS ACTIVITY REPORT P.01
APR-01-2000 SAT 04:14 PM
FOR: ABC CORP. 529658742 NO. DATE START RECEIVER TX TIME PAGES TYPE NOTE M# 01 APR-01 04:06 PM KENT CORP. 19" 1 SEND(M) OK 01 02 APR-01 04:08 PM 33" 1 BROADCAST OK 02 03 APR-01 04:14 PM ADRIAN SMITH 19" 1 TIMER SEND OK TOTAL 1'11" 3 GRAND TOTAL TIME: 1M 11S PAGES: 3
Explication des titres
SENDER/ The name or fax number of the other machine involved in the transaction. If that machine does not have an ID function, the communication mode will appear (for example, "G3").
START The time at which transmission/reception started.
TX/RX TIME Total time taken for transmission/reception.
PAGES Number of pages transmitted/received.
NOTE (One of the following notes will appear under NOTE in the report to indicate whether the transaction was successful, and if not, the reason for the failure.)
OK - Transmission/reception was successful.
P.FAIL - A power failure prevented the transaction.
JAM - The printing paper or document jammed, preventing the transaction.
NO PAPER - You ran out of paper during reception.
BUSY - The fax was not sent because the line was busy.
COM.E-0 to COM.E-13 - A telephone line error prevented the transaction. See Line Error in Problems and Solutions in Chapter 10.
CANCEL - The transaction was cancelled because the STOP key was pressed, no document was in the feeder, or the other machine requested transmission using a function which your fax machine does not have. If you were attempting to fax, make sure a document is in the feeder. If you were receiving, contact the faxing party to see how they are trying to send to you.
If desired, you can set the Activity Report to automatically print out whenever information on 30 operations has accumulated. (A report can still be printed on demand at any time.) Follow the steps below:
1 Appuyez sur ces touches :
The display will show:


AUTO PRINT OUT
1=YES, 2=NO
2 Appuyez sur 1 pour activer l'impression automatique, ou sur 2 pour la désactiver.
YES NO

3 Appuyez sur la touche STOP pour revenir à l'affichage de la date et de l'heure.

Liste des minuteries
This list shows the timer operations that are currently set, and whether the Memory Polling function is turned on.
TIMER LIST
APR-01-2000 SAT 04:21 PM
FOR: ABC CORP. 529658742 NO. START TYPE RESOLUTION REMOTE STATION ID # 1 10:30 AM SUN SEND STANDARD :AUTO KENT CORP. 2 01:15 PM WED POLLING JACK SMITH 3 05:51 PM SAT SEND SUPER FINE:AUTO ADRIAN SMITH
Liste des numéros de téléphone
This list shows the fax numbers that have been programmed for automatic dialing.
RAPID
SPEED # NAME TELEPHONE # CHAIN DIAL R01 KENT CORP. 123-456-7890 R02 JACK SMITH 333-555-7777 R03 ADRIAN SMITH 230-347-6385 SET SOO AL E-MAIL STORED SOI ABC SOFT 668-999-0000
Liste des codes d'accès
This list shows settings made for polling security, your name and fax/ telephone number as entered in the machine, and a sample of the header printed at the top of every page you transmit (HEADER PRINT).
PASSCODE LIST
FOR: ABC CORP. 529658742
POLLING MODE
PASSCODE # SECURITY OFF
01
02
03
04
05
06
07
08
09
10
DAY LIGHT SAVING TIME NO
SENDER'S NAME
ABC CORP.
SENDER'S TELEPHONE NUMBER
529658742
HEADER PRINT
APR-01-2000 SAT 03:56 PH ABC CORP. 529658742 P. 01
Liste des réglages des options
This list shows the current status of the option settings.
OPTIONAL SETTING LIST
FOR: ABC CORP. 529658742
APR-01-2000 SAT 03:53 PM NO. ITEM SETTING 01 PAPER SIZE LETTER 02 FINE PRIORITY NO 03 NUMBER OF RINGS 4 RINGS 04 RECALL INTERVAL 05 MINUTES 05 RECALL TIMES 02 TIMES 06 TEL/FAX REMOTE # (5) ** 07 REMOTE RECEPTION YES 08 TRANSACTION PRINT SELECT ERROR ONLY 09 DIAL MODE TONE 10 QUIET DETECT TIME 04 SEC. 11 FAX ANSWER WHEN TAD FAILS NO 12 DISTINCTIVE RINGING OFF SETTING 13 FAX SIGNAL RECEIVE YES 14 JUNK # CHECK NO 15 POLLING NO 16 COVER SHEET NO 17 AUTO PRINT OUT NO 18 ECM MODE YES 19 BEEP LENGTH 3 SECONDS 20 QUICK ON-LINE YES 21 RECEPTION RATIO AUTO 22 COPY CUT OFF YES
Liste des numéros de fax indésirables
This list shows the numbers that are blocked by the Anti Junk function.
ANTI JUNK NUMBER LIST
FOR: ABC CORP. 59658742
ANTI JUNK # CHECK: NO
STORED LOCATION JUNK FAX # 1 8754215632 2 8546324456 3 8965542123
Liste des groupes
This list shows the fax numbers that have been programmed into each Group Key.

Rapport de transactions
This report is printed out automatically after an operation is completed to allow you to check the result. Your fax machine is set at the factory to print out the report only when an error occurs.
The same headings appear in the Transaction Report as in the Activity Report. See Activity Report in this chapter for an explanation of the headings.
The Transaction report cannot be printed on demand.
If desired, you can change the condition under which a report is printed out. Follow the steps below.
1 Appuyez sur ces touches :
The display will show:

2 Appuyez sur un chiffre de 1 à 5 pour sélectionner la condition d'impression.
ALWAYS PRINT A report will be printed after each transmission, reception, or error.
2 ERR/TIMER/MEM A report will be printed after an error, timer operation, or memory transmission.
3 SEND ONLY A report will be printed after each transmission.
NEVER PRINT A report will never be printed.
5 ERROR ONLY A report will be printed only when an error occurs.
3 Appuyez sur la touche STOP pour revenir à l'affichage de la date et de l'heure.

9. Maintenance
Vitre de numérisation et rouleaux
Clean the scanning glass and rollers frequently to ensure that your transmitted images and copies are of the highest quality.
Open the operation panel (grasp the panel release and pull up), and wipe the scanning glass, rollers and white backplate with a soft cloth.
Make sure that all dirt and stains (such as correcting fluid) are removed, as dirt and stains will cause vertical lines on transmitted images and copies.

Le boîtier
Wipe the external parts and surface of the machine with a dry cloth.
Attention !
Do not use benzene or thinner. These solvents may damage or discolor the machine.
Remplacement de la cartouche de toner
When the toner cartridge nears empty (about 100 pages can still be printed), the TONER EMPTY indicator on the operation panel will blink. When the toner cartridge is empty, the toner cartridge indicator will light steadily and REPLACE TONER will appear in the display. Printing will no longer be possible.
Replace the toner cartridge with the following cartridge:
Cartouche de toner Sharp FO-29ND
1 Grasp the print compartment cover at both sides as shown, and pull up to open the cover.
- Caution!
The fusing unit inside the print compartment becomes very hot during operation. Do not touch the inside of the compartment or the paper guide on the underside of the print compartment cover.

2 Grasp the finger hold on the toner cartridge handle where it is marked PUSH, and pull the handle out. Rehold the handle and pull the toner cartridge out of the compartment.
- Dispose of the old toner cartridge according to local regulations. If in doubt, contact your local waste disposal agency.

3 Install the new toner cartridge and reset the toner counter. (Refer to Installing the Toner Cartridge in Chapter 1.)
Remplacement de la cartouche de tambour
To maintain excellent printing quality, we recommend that you replace the drum cartridge about 20,000 pages have been printed. You can view the number of pages printed in the display by pressing the following sequence of keys:

FUNCTION


STA
When finished, press the STOP key to return to the date and time display.
Replace the drum cartridge with the following cartridge:
Cartouche de tambour Sharp FO-29DR
1 Grasp the print compartment cover at both sides as shown, and pull up to open the cover.
- Caution!
The fusing unit inside the print compartment becomes very hot during operation. Do not touch the inside of the compartment or the paper guide on the underside of the print compartment cover.

2 Grasp the finger hold on the toner cartridge handle where it is marked PUSH, and pull the handle out. Rehold the handle and pull the toner cartridge out of the compartment.
- Place the toner cartridge on a sheet of paper on a level surface.

3 Grasp the tabs on the drum cartridge handle and gently pull the cartridge out of the machine.

4 Remove the new drum cartridge from its packaging.

5 Insert the drum cartridge into the print compartment, aligning the guides on the cartridge with the runners on the sides of the compartment.

Gently pull the paper tab to remove the black sheet of protective paper from the drum cartridge.
- Be careful not the tear the paper or leave any pieces of paper in the machine.

7 Replace the toner cartridge and reset the drum counter. (Refer to Installing the Toner Cartridge in Chapter 1.)
Nettoyage de la cartouche de tambour
If you find that characters or parts of an image are missing from your printed pages, the drum in the drum cartridge may need cleaning. Follow the steps below to clean the drum.
1 Grasp the print compartment cover at both sides as shown, and pull up to open the cover.
- Caution!
The fusing unit inside the print compartment becomes very hot during operation. Do not touch the inside of the compartment or the paper guide on the underside of the print compartment cover.

2 Grasp the finger hold on the toner cartridge handle where it is marked PUSH, and pull the handle out. Rehold the handle and pull the toner cartridge out of the compartment.
- Place the toner cartridge on a sheet of paper on a level surface.

3 Grasp the tabs on the drum cartridge handle and gently pull the cartridge out of the machine.

4 Take a sheet of clean paper and roll it into a tube. Roll it tightly so that the diameter of the holes at each end is less than the thickness of your little finger.

5 Gently wipe the surface of the drum with the rolled-up paper to remove any particles of toner caked on the drum.
- Do not let the drum surface come into contact with anything other than the rolled-up paper. Fingerprints, water, alcohol, and other solvents will damage the drum surface.
- Do not touch the drum surface with the edges of the rolled-up paper.


6 Replace the drum cartridge.
- To insert the cartridge, align the guides on the cartridge with the runners on the sides of the compartment.

7 Replace the toner cartridge and close the print compartment cover. (Refer to Installing the Toner Cartridge in Chapter 1.)
10. Dépannage
Problèmes et solutions
Erreur de ligne
Problem Solution LINE ERROR appears in the display. Try the transaction again. If the error persists, check the following:Check the connection. The cord from the TEL LINE jack to the wall jack should be no longer than six feet.Make sure there are no modem devices sharing the same telephone lineCHECK with the other party to make sure their fax machine is functioning properly.Have your telephone line checked for line noise.Try connecting the fax machine to a different telephone line.If the problem still occurs, your fax machine may need service.
Problèmes de numérotation et de transmission
Problem Solution No dial tone when you pick up the handset or press the SPEAKER key. ·Make sure the handset cord is connected to the correct jack. See Connecting the handset in Connections in Chapter 1. Dialing is not possible. ·Make sure the power cord is properly plugged into a power outlet.
·Make sure that the telephone line is properly connected to both the TEL. LINE jack and the wall jack.
·Make sure that the fax machine is set to the correct dialing mode for your telephone line. See Connecting the telephone line cord in Connnecions in Chapter 1. The power is on, but no transmission takes place. ·Make sure that the receiving machine has paper.
·Make sure that the telephone line cord is plugged into the TEL. LINE jack, and not the TEL. SET jack.
·If the receiving machine is in manual mode with no attendant, reception will not be possible.
·Check the display for error messages.
·Pick up the handset and check for a dial tone. Nothing is printed at the receiving end. ·Make sure that the document for transmission is placed face down in the feeder. A distorted image is received at the other end. ·If Error Correction Mode is turned off (see Error Correction Mode in Chapter 2), noise on the telephone line may cause distortion. Try sending the document again.
·Make a copy of the document on your fax machine. If the copy is also distorted, your fax machine may need service.
Reception and copying problems
Problem Solution The fax machine doesn't receive documents automatically. ·Make sure that the reception mode is set to FAX. If you subscribe to a distinctive ring service, make sure that the Distinctive Ring function is set to the correct ring pattern. If you do not subscribe to a distinctive ring service, make sure that Distinctive Ring is set to OFF SETTING. (See Distinctive Ring in Chapter 7.) The power is on, but no reception takes place. ·Make sure that the telephone line cord is plugged into the TEL LINE jack, and not the TEL SET jack. The printing paper comes out blank when you try to receive a document. ·Make sure that the document is loaded properly in the feeder of the transmitting machine. Make a copy or print a report to confirm the printing ability of your machine. The received document is faint. ·Ask the other party to send higher contrast documents. If the contrast is still too low, your fax machine may need service. Make a copy or print a report to check your machine's printing ability.
·The toner cartridge may need replacement. Received images are distorted. ·If the sending machine has Error Correction Mode, make sure this feature is turned on in both fax machines (see Error Correction Mode in Chapter 2).
·If Error Correction Mode is turned off, noise on the telephone line may cause distortion. Have the other party try sending the document again.
·The drum cartridge may be damaged. Try a new drum cartridge.
·Make a copy or print a report on your fax machine. If the copy or report is also distorted, your fax machine may need service. The quality of copies is poor and/or black spots appear. ·Any dirt or material on the scanning glass will cause spots to appear on copies and transmitted faxes. Clean the scanning glass as explained in Chapter 9. Dots appear at regular intervals on received documents and copies. ·The drum cartridge may be damaged. Replace the drum cartridge.
Answering machine connection
Problem Solution The answering machine connection does not operate properly. ·Make sure your fax machine's reception mode is set to A.M.
·Make sure your fax machine's TEL LINE jack is connected to the wall jack. Make sure your fax machine's TEL. SET jack is connected to your answering machine's telephone line jack (not the answering machine's extension phone jack).
·Make sure your answering machine's outgoing message is under 10 seconds.
·Make sure that the Quiet Detect Time setting is set to three or four seconds (see Chapter 6).
·Make sure that the Distinctive Ring function is set to OFF SETTING (see Distinctive Ring in Chapter 7).
·If you have checked all of the above and the hookup still doesn't operate properly, call the Customer Assistance Center.
Problèmes généraux
Problem Solution Nothing appears in the display. ·Make sure the power cord is properly plugged into a power outlet.
·Connect another electrical appliance to the outlet to see if it has power. The machine does not respond when you press any of its keys. ·If a beep sound is not made when you press the keys, open the printer compartment cover and use pencil or pen to press the RESET button. (See the following page.) Automatic document feeding does not work for transmission or copying. ·Check the size and weight of the document (see Transmittable Documents in Chapter 2. Voice calls taken on an extension phone are interrupted by the fax. ·The fax may interrupt during a voice call if the reception mode is set to A.M. To prevent interruption on a tone dial extension phone, press any three keys on the extension phone after answering. (Note: Do not enter the code to activate fax reception.) No reception occurs when polling is attempted. ·Make sure you have not run out of paper.
·Make sure the transmitting machine is in automatic reception mode.
·If the transmitting machine has polling security, make sure that your fax number has been entered both in your machine and in the transmitting machine.
Utilisation de la touche RESET
If the fax machine stops responding when you press any of the operation panel keys, you must reset it. This can be done as follows:
1 Grasp the print compartment cover at both sides as shown, and pull up to open the cover.
- Caution!
The fusing unit inside the print compartment becomes very hot during operation. Do not touch the inside of the compartment or the paper guide on the underside of the print compartment cover.

2 Use a ballpoint pen to press the RESET button.
- Note: Pressing the RESET button clears any documents that are stored in memory.

3 Close the print compartment cover, pressing down firmly on each side to make sure it is completely closed.

Messages et signaux
Display messages
CAN'T PRINT DATA A fax has been received to memory because printing is not possible. This message will alternate with a message that indicates the problem. The fax will print out automatically when the problem is resolved. CHECK PAPER SIZE The paper size setting is incorrect. Change the paper size setting as described in Loading Printing Paper in Chapter 1. CHECK PC This appears if you press the E-MAIL key and your computer is not turned on or is not correctly connected to the fax machine. COVER OPEN The print compartment cover is open. Press down firmly on both sides of the print compartment cover to close it. DOCUMENT JAMMED The original document is jammed. See the following section, Clearing Paper Jams. FUNCTION MODE The FUNCTION key has been pressed. GRP. SPACE FULL This appears if you attempt to program a Group Key when all Group Keys have already been programmed. HOLD The HOLD/SEARCH key has been pressed to put the other party on hold during a phone conversation. Press the HOLD/SEARCH again to take the other party off hold. LINE ERROR Transmission or reception was not successful. Press the STOP key to clear the message and then try again. If the error persists, see Line Error in Problems and Solutions in this chapter. LINE IS IN USE An extension phone connected to the fax is being used. Do not lift the fax's handset or attempt transmission at this time, as this will interrupt the conversation on the extension phone. MEMORY IS FULL The memory is full. This may occur during fax reception if too much data is received before the pages can be printed out. If faxes have been received to memory because printing is not possible (an additional message will indicate the problem), resolve the problem so that printing can continue (see Substitue Reception to Memory in Chapter 3). If you are attempting to transmit by automatic dialing, see If the memory becomes full in Chapter 2. MEMORY PRINTING The fax is preparing to or printing out a document from memory. NO DATA This appears if you attempt to search for an automatic dialing number when none have been stored. NO # STORED You have tried to dial or clear a Rapid Key or Speed Dial number that hasn't been programmed (a full number hasn't been assigned to it). OFF HOOK This appears if you forgot to replace the handset after using it to dial and send a fax. Replace the handset or press the STOP key to clear the message. ON HOOK DIAL The SPEAKER key has been pressed and the fax machine is waiting for you to dial. OUT OF PAPER You are out of printing paper (or the paper release lever is open). Load paper as explained in Loading Printing Paper in Chapter 1. PAPER JAMMED The printing paper is jammed. See the following section, Clearing Paper Jams. SEND READY A document has been loaded and the fax machine is waiting for you to begin faxing or copying. REPLACE TONER The toner cartridge must be replaced. SEARCH DIAL The HOLD/SEARCH key has been pressed. Press # or * to search for an automatic dialing number, or press the STOP key to return to the date and time display. (See Searching for an auto-dial number in Sending a Fax by Automatic Dialing in Chapter 2.) SIZE ERROR The paper size setting is longer than the paper loaded in the tray. Change the paper size setting as explained in Loading Printing Paper in Chapter 1. This message also appears if paper smaller than letter size has been loaded. In this case, change the paper to letter, legal, or A4 size paper. TOTAL PAGE(S) 1 Number of pages transmitted, received, or copied. TX MEMORY FULL This message appears if you insert a document into the document feeder when 30 transmission jobs are already waiting in memory for transmission. You can continue setting up the transmission job after the job currently being sent is completed. This message may also appear if faxes have been received to memory due to a printing problem. In this case, resolve the problem so that printing can take place and free memory.
Signaux sonores
Continuous tone 3 seconds Indicates the end of transmission, reception, or copying. Intermittent tone (3 beeps) 5 seconds (1 second on, 1 second off) Indicates incomplete transmission, reception, or copying. Rapid intermittent tone Continuous (0.7 seconds on, 0.3 seconds off) Indicates that the handset is off hook.
Débourrage papier
Débourrage d'un document coincé
If the original document doesn't feed properly during transmission or copying, or DOCUMENT JAMMED appears in the display, first try pressing the START key. If the document doesn't feed out, open the operation panel and remove it.
Important :
Do not try to remove a document without opening the operation panel. This may damage the feeder mechanism.
1 Open the operation panel by grasping the panel release and pulling up.

2 Remove the document.

3 Close the operation panel, making sure it clicks into place.

Débourrage du papier d'impression coincé
1 If most of the jammed page is protruding from the back of the fax, pull the paper release lever toward you and try pulling the page out.

2 If the jammed page comes out, take out the rest of the paper in the tray, straighten the stack, put it back in the paper tray, and push down the paper release lever.
- If you are unable to clear the jam in this way, continue with the following steps.

3 Grasp the print compartment cover at both sides as shown, and pull up to open the cover.
- Caution! The fusing unit inside the print compartment becomes very hot during operation. Be careful not to touch the inside of the compartment.

4 Grasp the finger hold on the toner cartridge handle where it is marked PUSH, and pull the handle out. Rehold the handle and pull the toner cartridge out of the compartment.
- Place the toner cartridge on a sheet of paper on a level surface.

5 Grasp the tabs on the drum cartridge handle and gently pull the cartridge out of the machine.

6 Wrap the drum cartridge in a large sheet of paper as shown at right so that the green drum section is shielded from light, and place it gently on a level surface.
- Do not touch the green drum in the drum cartridge. This will damage the drum surface.
- Do not expose the drum to direct light. This will damage the drum.

7 Gently pull the jammed paper out of the machine.
- If needed, turn the wheel on the right side of the fusing unit to eject the paper from the machine.
- Caution!
Do not use excessive force to pull the jammed paper out. If the paper tears and a piece remains inside the machine, a service call may be necessary to remove the remaining piece.


Fusing unit
Wheel
8 Replace the drum cartridge.
- To insert the cartridge, align the guides on the cartridge with the runners on the sides of the compartment.

9 Replace the toner cartridge and close the print compartment cover. (Refer to Installing the Toner Cartridge in Chapter 1.)


Informations réglementaires FCC
This equipment complies with FCC rules, Part 68. On this equipment is a label that contains, among other information, the FCC Registration Number and Ringer Equivalence Number (REN) for this equipment. If requested, this information must be provided to your telephone company.
An FCC compliant telephone cord and modular plug is provided with this equipment. This equipment is designed to be connected to the telephone network or premises wiring using a compatible modular jack which is Part 68 compliant. This equipment connects to the telephone network through a standard USOC RJ-11C network interface jack.
The REN is used to determine the quantity of devices which may be connected to your telephone line and still have all of those devices ring when your number is called. Too many devices on one line may result in the devices not ringing in response to an incoming call. In most, but not all, areas as the sum of the RENs of all devices should not exceed five (5.0). To be certain of the number of devices that may be connected to your line, as determined by the total REN, contact your local telephone company.
If this equipment causes harm to the telephone network, your telephone company may disconnect your service temporarily. If possible, they will notify you in advance. If advance notice is not practical, you will be notified as soon as possible. You will also be advised of your right to file a complaint with the FCC.
Your telephone company may make changes in its facilities, equipment, operations, or procedures that could affect the operation of your equipment. If this happens, the telephone company will provide advance notice in order for you to make necessary modifications to maintain uninterrupted service. If the equipment is causing harm to the telephone network, your telephone company may ask you to disconnect the equipment until the problem resolved.
If you have any questions or problems which cannot be solved by reading this manual, please contact Sharp Electronics Corporation at Sharp Plaza, Mahwah, NJ 07430-2135. The customer number is 800-237-4277.
This equipment may not be used on coin service provided by the telephone company. Connection to party lines is subject to state tariffs. Contact your state's public utility commission, public service commission, or corporation commission for more information.
When programming and/or making test calls to emergency numbers:
Remain on the line and briefly explain to the dispatcher the reason for the call.
Perform such activities in the off-peak hours, such as early morning or late evening.
SHARP
Date Revised :
Date Issued July. 16. 1999
FICHE DE DONNÉES DE SÉCURITÉ (1/2)
MSDS No. P-00102
Section 1. Identification du produit
Product: FO-2970/FO29ND,FO-29DC,FO-29DCCN (Black Toner)
Section 2. Nom et adresse du fournisseur
Sharp Corporation
22-22 Nagaike-cho, Abeno-ku, Osaka, Japan
Local suppliers are listed below. Please contact the nearest supplier for additional information.
(Country) (Name and Telephone Number) U.S.A Sharp Document Network System of America
Telephone number for information: 1-800-237-4277
Emergency telephone number: 1-800-255-3924 Canada Sharp Electronics of Canada Ltd.
Telephone number for information: 905-890-2100
Emergency telephone number: 1-800-255-3924 United Kingdom Sharp Electronics (U.K.) Ltd.
Telephone number for information: 01923-474013
Section 3. Ingrédients
Ingredients CAS No. Proportion OSHA PEL ACGIH TLV Other Limits Carbon black 1333-86-4 >5% 3.5mg/m3 3.5mg/m3 None Styrene-Acrylate copolymer 25036-16-2 >90% Not listed Not listed None Iron oxide 1317-61-9 <2% Not listed Not listed None Silica 68909-20-6 <2% 0.8mg/m3 10mg/m3 None
Section 4. Identification des dangers (Aperçu d'urgence)
Toner is a fine, black powder possessing no immediate hazard. There are no anticipated carcinogenic effects from exposure based on animal tests performed using toner. When used as intended according to instructions, studies do not indicate any symptoms of fibrosis will occur.
Section 5. Données sur les risques pour la santé
Route(s) of Entry : Inhalation?
Yes Skin?
No Ingestion?
Possible but very unusual. Health Hazards : Acute oral toxicity—LD50 of this toner is over 2,000mg/kg.
Mutagenicity—The result of Ames test is negative. Carcinogenicity : In 1996 the IARC reevaluated carbon black as a Group 2B carcinogen (possible human carcinogen). This classification is given to chemicals for which there is inadequate human evidence, but sufficient animal evidence on which to base an opinion of carcinogenicity. The classification is based upon the development of lung tumors in rats receiving chronic inhalation exposures to free carbon black at levels that induce particle overload of the lung. Studies performed in animal models other than rats did not show any association between carbon black and lung tumors. Moreover, a two-year cancer bioassay using a typical toner preparation containing carbon black demonstrated no association between toner exposure and tumor development in rats. Chronic Effect : In a study in rats of chronic inhalation exposure to a typical toner, a mild to moderate degree of lung fibrosis was observed in 92% of the rats in the high concentration (16mg/m3) exposure group, and a minimal to mild degree of fibrosis was noted in 22% of the animals in the middle (4mg/m3) exposure group, but no pulmonary change was reported in the lowest (1mg/m3) exposure group, the most relevant level to potential human exposures. Signs and Symptoms of Exposure : Minimal irritation to respiratory tract may occur as with exposure to any non-toxic dust. Medical Conditions Generally Aggravated by Exposure : None
SHARP
Date Revised :
Date Issued July. 16. 1999
FICHE DE DONNÉES DE SÉCURITÉ (2/2)
MSDS No. P-00102
Section 5. Health Hazard Data Emergency and First Aid Procedures : Inhalation Remove to fresh air. If effects occur, consult medical personnel. Eye In case of contact, immediately flush eyes with water for 15 minutes. Section 6. Physical Chemical Characteristics Boiling/Melting Point Not applicable Specific Gravity 1.1 Vapor Pressure Not applicable Solubility in Water Negligible Vapor Density Not applicable PH Not applicable Evaporation Rate Not applicable Viscosity Not applicable Appearance Fine powder Color Black Odor Odorless Section 7. Fire and Explosion Data Flash Point (Method Used) : Not applicable Ignition Temperature : No data available Flammable Limits :(LEL); Not applicable (UEL); Not applicable Extinguishing Media : CO2, dry chemical, foam or water Special Fire Fighting Procedure : None Unusual Fire and Explosion Hazard : This material has no unusual fire or explosion hazards. Sensitivity to Mechanical Impact : None Sensitivity to Static Charge : None Section 8. Reactivity Data Stability : Stable Incompatibility (Material to Avoid) : None Hazardous Decomposition : CO Hazardous Polymerization : Will not occur. Section 9. Precautions for Safe Handling and Use Personal Protection Information (Respiratory, Eye Protection and Protective Glove): Use of a dust mask is recommended when handling a large quantity of toner or during long term exposure, as with any non-toxic dust. Engineering Control/Ventilation : Not required. Work/Hygienic Practice : Inhalation should be minimized as with any non-toxic dust. Steps to be taken in case of Spill or Leak : Sweep up or clean up with vacuum cleaner. Waste Disposal Method : Waste material may be dumped or incinerated under condi- tions which meet all federal, state and local environmental regulations. Section 10. Regulatory Information NFPA Rating (U.S.A) : Health = 1 Flammability = 1 Reactivity = 0 WHMIS Legislation (Canada) : This product is not a controlled product. Transport Information : This product is not a hazardous material. UN No. : None allocated. Section 11. Other Information References :IARC (1996) Monographs on the Evaluation of the Carcinogenic Risk of Chemicals to Humans, Vol. 65, Printing Process and Printing inks, Carbon Black and Some Nitro Com- pounds, Lyon, pp-149-261 H. Muhle, B. Bellmann, O. Creutzenberg, C. Dasenbrock, H. Ernst, R. Kilpper, J. C. Macken-zie, P. Morrow, U. Mohr, S. Takenaka, and R. Mermelstein (1991) Pulmonary Response to Toner upon Chronic Inhalation Exposure in Rats. Fundamental and Applied Toxicology 17, pp. 280-299
Guide de référence rapide
Saisie de votre nom et de votre numéro
1. Press: FUNCTION

Display shows:
OWN NUMBER SET
PRESS START KEY
2. Press: START
3. Enter your fax number (max. of 20 digits) by pressing the number keys.
- To insert a space between digits, press the # key.
- If you make a mistake, press the SPEED DIAL key to backspace and clear the mistake.
4. Press:
5. Enter your name by pressing the appropriate number keys as shown below.
- To enter two letters in succession that require the same key, press the SPEAKER key after entering the first letter.
SPACE = ① ①
J=⑤⑤
T=⑧⑧
A= 2 2
K=⑤ ⑥
U=8 8 8
B ② ②
L=5555
V=8 8 8 8
C=②②②
M=6 6
W=⑨⑨
D=③③
N=6 6 6
X=⑨ ⑨
E ③ ⑧
0=6 6 6 6
Y=⑨ ⑨ ⑨
F=③③⑧
P=⑦⑦
Z=⑨⑨⑨⑨
G= 4 4
Q=⑦⑦
H=④④④
R=⑦⑦⑦
1= 4 4 4
S=⑦⑦⑦⑦
- To change case, press the REDIAL key. Press # or to scroll through symbols and special characters.
6. When finished, press:


Réglage de la date et de l'heure
1. Press: FUNCTION

Display shows:
DATE & TIME SET
PRESS START KEY
2. Press: START
3. Enter two digits for the month (01 to 12).
4. Enter two digits for the day (01 to 31).
5. Enter four digits for the year (Ex: 2000)
6. Enter two digits for the hour (01 to 12) and two digits for the minute (00 to 59).
7. Press for A.M. or # for P.M.
8. When finished, press:


Mémorisation et effacement des numéros de numérotation automatique
1. Press: FUNCTION

Display shows:
FAX/TEL # MODE 1=SET,2=CLEAR
2. Press 1 to store a number or 2 to clear a number.
3. Press a Rapid Key or enter a 2-digit Speed Dial number (from 00 to 99). (If you are clearing a number, go to Step 7.)
4. Enter the full fax/telephone number.
5. Press: START
6. Enter the name of the location by pressing number keys. (Refer to the letter entry table in Entering Your Name and Number.)
7. Press: START STOP
Envoi de télécopies
Place your document (up to 20 pages) face down in the document feeder.

Numérotation normale


1. Lift the handset or press
2. Dial the fax number.
3. Wait for the reception tone (if a person answers, ask them to press their Start key).
4. Press:
Numérotation par touche rapide
Press the appropriate Rapid Key. Transmission will begin automatically.
Numérotation abrégée
1. Press:
SPEED
DIAL

2. Enter the 2-digit Speed Dial number.
3. Press:
START

Réception de télécopies
Press the RECEPTION MODE key until the arrow in the display points to the desired reception mode.

FAX mode: The fax machine automatically answers on four rings and receives the incoming document.
Mode TEL :

A.M. mode: Select this mode when an answering machine is connected to the fax and the answering machine is turned on.
Guide de référence
Saisie de votre nom et de votre numéro
1. Pulse: FUNCTION
3 # #
El visor muestra:
OWN NUMBER SET
PRESS START KEY
2. Pulse:
3. Introduzca su numero de telegram (20 digitos como max.) mediante pulsacion de las teclas numéricas.
- Pulse la tecla # para introducir un espacio libre.
- Si cometiera un error, pulse la tecla SPEED DIAL (marcación rápida) paravoltar un=puesto y corregirlo.
4. Pulse:
5. Introduzca su nombre mediante pulsacion de las teclas numericas adecuadas como se muestra a continuacion.
- Para introducir dos letras sucesivas que requieran el mesmo número, pulse la tecla SPEAKER (altavoz) afterwards introducir la primera letra.
SPACE = ① ①
J=⑤⑤
T=⑧⑧
A=②②
K=⑤⑤⑤
U=8 8 8
B=②②②
L=⑤⑤⑤
V=8 8 8 8
C=②②②
M=⑥⑥
W=⑨⑨
D= ③ ③
N=6 6 6
X=⑨ ⑨ ⑨
E=③ ③
0=6 6 6 6
Y=9 9 9 9
F=③③③③
P=⑦⑦
z=⑨⑨⑨
G= ④ ④
Q=⑦⑦
H=4 4 4
R=7 7 7
1=4 4 4 4
S=⑦⑦⑦⑦
- Paracaebardemayusculaaminusculay viceversa,pulse la tecla REDIAL(repetacion dellamada).Pulse la tecla # o* para hojear por los simbolos y caric-.teres especials.
6. Una vez finalizzato pulse: START STOP
Réglage de la date et de l'heure
1. Pulse: FUNCTION

El visor muestra:
DATE & TIME SET
PRESS START KEY
2. Pulse:


3. Introduzca dos digitos para el mes (01 hasta 12).
4. Introduzca dos digitos para el dia (01 hasta 31).
5. Introduzca cuatro dígitos para el año (Ej.: 2000).
6. Introduzca dos digitos para la hora (01 hasta 12) y dos digitos para los短时间内 (00 hasta 59).
7. Pulse para A.M. o # para P.M.
8. Una vez finalizo pulse:
Mémorisation et effacement des numéros de numérotation automatique
1. Pulse:

FAX/TEL # MODE
1=SET, 2=CLEAR
El visor muestra:
2. Pulse 1 para guardar un número o 2 para borrarlo.
3. Pulse Usted una tecla rápida o entre un número de 2 digitos de descado rápido (entre 00 y 99), (si Usted está bomrando un número, siga con el paso 7.)
4. Introduzca el numero de telegramoplete.
5. Pulse: ① START
6. Introduzca el numero del=peso medi- ante pulsacion de las teclas numéricas. (Consulte la tabla para introduccion de letras en la Introduccion de su nombre y numero).
7. Pulse: STOP
Transmission de télécopies
Cologne el original (hasta 20 páginas)
cara abajo en el alimentador de documents.

SPEAKER
Numérotation normale

1. Levante el auricular o pulse:
2. Marque el número de telegram.
3. Espere hasta escuchar el tono de recepcion (si contestara una persona, pidale pulsar su tecla Start).
4. Pulse:
Numérotation rapide
Pulse la tecla de marcaciónMarcación abreviada
Index 144
Aperçu du panneau de commande
1 Touche NUMÉROTATION RAPIDE
Press this key to dial a fax or voice number using an abbreviated 2-digit Speed Dial number.2 Touche BIS
Press this key to automatically redial the last number dialed.3 Voyant VÉRIFICATION PAPIER
This lights when the paper tray is out of paper, the paper has jammed, the printer compartment cover is open, or a paper size error has occurred.4 Voyant TONER VIDE
This blinks when the toner cartridge nears empty and lights steadily when the toner cartridge needs replacement.5 Afficheur
This displays messages and prompts during operation and programming.6 Déverrouillage du panneau
Grasp this release and pull toward you to open the operation panel.Voyant PC EN SERVICE
This blinks when data is being sent to or from the computer connected to the fax machine.Voyant LIGNE EN SERVICE
This lights when the fax machine is using the telephone line.9 Touche MODE RÉCEPTION
Press this key to select the reception mode. An arrow in the display will point to the currently selected reception mode.10 Touche FONCTION
Press this key to select special functions and settings.Touche RÉSOLUTION
Press this key to adjust the resolution for faxing or copying.12 Touches VOLUME (HAUT/BAS)
Press these keys to adjust the volume of the speaker when the SPEAKER key has been pressed, the volume of the handset when the handset is lifted, or the volume of the ringer at all other times. The keys can also be used to scroll through FUNCTION key settings.13 Touche DIFFUSION
Press this key to send a document to a group of receiving fax machines.14 touches de numérotation rapide
Press one of these keys to dial a fax number automatically, or send a document as an E-mail attachment to a preset E-mail address.15 touche E-MAIL
Press this key to send a document as an E-mail attachment. After you press the key, your specified E-mail program will open to let you enter the E-mail address, a subject, and a message if desired. touche RÉDUCTION/AGRANDISSEMENT
Press this key to select an enlargement or reduction setting when making a copy of a document. touche STOP
Press this key to cancel an operation before it is completed. touche START
Press this key to begin transmission when using Speed Dialing, Direct Keypad Dialing, or Normal Dialing. touche COPIE/AIDE
When a document is in the feeder, press this key to make a copy of a document. At any other time, press this key to print out the Help List, a quick reference guide to the operation of your fax machine. touche MAINTIEN/RECHERCHE
When dialing, press this key to search for an auto-dial fax number. During a phone conversation, press this key to put the other party on hold. touche HAUT-PARLEUR
Press this key to listen to the line and fax tones through the speaker when faxing a document. Note: This is not a speakerphone. You must pick up the handset to talk with the other party. touches numériques
Use these keys to dial numbers, and enter numbers and letters when storing auto-dial numbers.1. Installation
Liste de vérification du déballage
Before setting up, make sure you have all of the following items.  If any are missing, contact your dealer or retailer.  Original document support Handset Handset cord Toner cartridge  Drum cartridge (comes pre-installed in machine)  Rapid Key labels  Received document tray  Operation manual  Telephone line cord  Paper tray  Sharp Laser Multifunction CD-ROMConnexions
Points à garder à l'esprit lors de l'installation
 Do not place the machine and the drum cartridge in direct sunlight.  Do not place the machine near heaters or air conditioners.  Keep dust away from the machine.  Keep the area around the machine clear.À propos de la condensation
If the machine is moved from a cold to a warm place, it is possible that condensation may form on the scanning glass, preventing proper scanning of documents for transmission. To remove the condensation, turn on the power and wait approximately two hours before using the machine.Connexion du combiné
Connect the handset as shown and place it on the handset rest. The ends of the handset cord are identical, so they will go into either jack. Branchement du cordon d'alimentation
Plug the power cord into a 120V , 60Hz , grounded AC (3-prong) outlet.Attention !
Do not plug the power cord into any other kind of outlet. This will damage the machine and is not covered under the warranty.  The machine does not have a power on/off switch, so the power is turned on and off by simply plugging in or unplugging the power cord.  Note: If your area experiences a high incidence of lightning or power surges, we recommend that you install surge protectors for the power and telephone lines. Surge protectors can be purchased at most telephone specialty stores.Branchement du cordon de ligne téléphonique
Insert one end of the line cord into the jack on the left of the machine marked TEL. LINE. Insert the other end into a standard (RJ11C) single-line wall telephone jack.  Be sure to insert the line into the TEL. LINE jack. Do not insert it into the TEL. SET jack.  Note: Your fax is set for tone dialing. If you are on a pulse dial line, you must set your fax for pulse dialing. Press the keys on the operation panel as follows:1 Appuyez sur ces touches :
The display will show: DIAL MODE 1=TONE, 2=PULSEFONCTION
    2 Appuyez sur 1 pour sélectionner la numérotation en tonalité, ou sur 2 pour sélectionner la numérotation en impulsions.
TONALITÉ
IMPULSIONS
 or 3 Appuyez sur la touche STOP pour revenir à l'affichage de la date et de l'heure.
 STOP Fixation du bac à papier et des supports de documents
Attach the paper tray.  Attach the received document tray.   Attach the original document support. Make sure the front side of the support faces you (the support should curve slightly toward you).  Téléphone supplémentaire (en option)
If desired, you can connect an extension phone to the TEL. SET jack on the fax. To connect an answering machine to your fax, see Chapter 6, Answering Machine Hookup. 1 Remove the seal covering the TEL. SET jack.  2 Connect the extension phone line to the TEL. SET jack. Installation de la cartouche de toner
The laser printer in your fax machine uses a toner cartridge and a drum cartridge. The drum cartridge comes pre-installed, and the toner cartridge must be installed. The starter toner cartridge included with your fax can print approximately 1,875 letter-size pages at 4 % page coverage.  When replacing the toner cartridge, use a Sharp FO-29ND toner cartridge. One cartridge can print about 3,750 letter-size pages.  The drum cartridge can print approximately 20,000 letter-size pages. When replacing the drum cartridge, use a Sharp FO-29DR drum cartridge. Follow the steps below to install the toner cartridge and prepare the drum cartridge. 1 Grasp the print compartment cover at both sides as shown, and pull up to open the cover. - Caution! The fusing unit inside the print compartment becomes very hot during operation. Do not touch the inside of the compartment or the paper guide on the underside of the print compartment cover.  2 The drum cartridge has been installed at the factory. Gently pull the paper tab to remove the black sheet of protective paper from the cartridge. - Be careful not to tear the paper nor leave any pieces of paper in the machine.  3 Remove the new toner cartridge from its packaging. Shake the cartridge side to side four or five times to distribute the toner evenly within the cartridge. Carefully remove the band and the cardboard packaging material from the toner cartridge.  4 Hold the toner cartridge by the handle with the stamped markings on the cartridge facing upwards, and insert the cartridge into the print compartment.  5 Place your thumb on the center of the handle where it is marked PUSH, and push the handle down and in so that the cartridge fits into place.  6 Close the print compartment cover, pressing down firmly on each side to make sure it is completely closed.  7 Reset the toner counter by pressing the following keys: FUNCTION     Display shows: CLR TONER COUNT PRESS START KEY  START  8 Reset the drum counter by pressing the following keys: - Note: This setting is only necessary after you have replaced the drum cartridge (not after replacing the toner cartridge). FUNCTION    Display shows: CLR DRUM COUNT PRESS START KEY  START Chargement du papier d'impression
You can load up to 200 sheets of letter, A4 or legal paper (max. 20 lbs.) in the paper tray.Attention !
Do not use the blank side of paper that has already been printed on. 1 If you are going to load legal size paper, pull out the paper tray extension.  2 Fan the paper, and then tap the edge against a flat surface to even the stack.  3 Pull the paper release lever toward you. 4 Insérez fermement la pile de papier dans le bac, face imprimable vers le haut.
- Make sure that the stack is not higher than the marked line. Loading too much paper may cause paper jams and misfeeds. - If paper remains in the tray, take it out and combine it into a single stack with the new paper before adding the new paper. Important :
Be sure to load the paper so that printing takes place on the print side of the paper. Printing on the reverse side may result in poor print quality. 5 Make sure the stack of paper is aligned against the right paper guide, and then gently move the left paper guide to the 8 1/2 position for letter or legal paper, or the A4 position for A4 paper. 6 Abaissez le levier de libération du papier.
- Note: If the paper does not feed correctly, remove the entire stack from the tray and repeat the loading procedure from the beginning.  7 The fax has been set at the factory to scale the size of received faxes to letter size paper. If you have loaded legal paper, you must change the paper size setting to legal. Press these keys:  The display will show:  Press 1 to select LETTER or 2 to select LEGAL. (You can also press 3 to select A4.) The display will briefly show your selection and then show: FINE PRIORITY 1 = YES,2 = NO Press the STOP key to return to the date and time display. LETTER LEGAL  Configuration de l'interface multifonction
Connexion du câble parallèle
Connect the fax machine to your computer with a parallel cable. If you do not already have a parallel cable, you can purchase one from your dealer or any computer store. Make sure the cable is IEEE 1284-compliant. We recommend a shielded cable no longer than 6 feet. 1 Make sure your computer is turned off and the fax machine is unplugged.   2 Connect one end of the cable to the port on the Sharp Laser Multifunction. Snap the clips on each side of the port onto the cable connector to secure it.  3 Connect the other end of the cable to the parallel port on the back of your computer.  Note: There is normally no need to change the parallel port setting in your computer's setup (BIOS) program. However, if you find that the Sharp Laser Multifunction fax does not operate well when scanning or printing, you may need to change the setting. In this case select ECP, PS2, Bi-directional, or an equivalent parallel port mode.Installation du logiciel multifonction
Configuration système minimale requise
Processor: Pentium 90 MHz or higher Operating system: Windows® 95/98, Windows NT® 4.0 (Service Pack 3 or later), English version Physical RAM: Windows 95/98: 16 MB Windows NT 4.0:32 MB Free hard-disk space: Windows 95/98: 30 MB Windows NT 4.0: 35MB The Sharp Laser Multifunction software cannot be installed by Plug and Play. If the New Hardware Found box appears when you turn on your computer, click the Cancel button to exit the dialog box. If you have other multifunction device software installed in your computer, uninstall that software before installing the Sharp Laser Multifunction software. Otherwise, the Sharp Laser Multifunction software may not function correctly. 1. Insert the Sharp Laser Multifunction CD into your computer's CD-ROM drive. 2. If the Sharp Laser Multifunction Setup window appears, click Next in the window and go to step 4. If the window doesn't appear, click the Start button on the Windows taskbar and select the Run... command. 3. Type e:\setup in the Open text box, where e is the letter of your CD-ROM drive, and then click OK. 4. Follow the instructions that appear on the screen. 5. When installation is completed, restart your computer.Guide d'utilisation en ligne
Detailed instructions for using the Sharp Laser Multifunction software can be found in the Online Guide on the CD. To open the guide, follow these steps: 1. Insert the Sharp Laser Multifunction CD into your CD-ROM drive. (If the Sharp Laser Multifunction Setup window appears, click Cancel and then Exit Setup to close the window.) 2. Click the Start button on the Windows taskbar, point to Programs, and then point to Sharp Laser Multifunction. Click Online Guide.Saisie de votre nom et de votre numéro de fax
Before you can begin using your fax machine, you must enter your name and fax (telephone) number. You also need to set the date and time. Once you enter this information, it will automatically appear at the top of each fax page you send.  Important !
The law requires that your name, telephone/fax number, and the date and time appear on each fax message you send. Enter your name and fax number here and set the date and time as explained in the following section to have the fax machine include this information automatically at the top of your fax messages. 1 Appuyez sur ces touches :
FUNCTION (3) The display will show: ENTRY MODE PRESS OR # 2 Press the # key twice. (Or the UP key twice.) The display will show: OWN NUMBER SET PRESS START KEY  Note: When scrolling through the settings, you can press the UP key in place of the # key, and the DOWN key in place of the × key. 3 Press the START key. The display will show:  ENTER FAX # 4 Enter your fax number by pressing the number keys (max. of 20 digits). - To insert a space between digits, press the # key. - If you make a mistake, press the SPEED DIAL key to backspace and clear the mistake.   (Example) 5 Press the START key to enter the fax number in memory. The display will show: ENTER YOUR NAME  6 Enter your name by pressing number keys for each letter as shown in the chart below. Up to 24 characters can be entered. Example: SHARP = 77777 444 22 7777 SPEAKER 77| SPACE = 1 1 | J = 5 5 | T = 8 8 |
| A = 2 2 | K = 5 5 5 | U = 8 8 8 |
| B = 2 2 2 | L = 5 5 5 5 | V = 8 8 8 8 |
| C = 2 2 2 2 | M = 6 6 | W = 9 9 |
| D = 3 3 | N = 6 6 6 | X = 9 9 9 |
| E = 3 3 3 | O = 6 6 6 6 | Y = 9 9 9 9 |
| F = 3 3 3 3 | P = 7 7 | Z = 9 9 9 9 9 |
| G = 4 4 | Q = 7 7 7 | |
| H = 4 4 4 | R = 7 7 7 7 | |
| I = 4 4 4 4 | S = 7 7 7 7 7 |
7 Appuyez sur la touche START.
The display will show: SECURITY SELECT 1=ON, 2=OFF 8 Appuyez sur la touche STOP pour revenir à l'affichage de la date et de l'heure.
 STOP Réglage de la date et de l'heure
The date and time appear in the display and are printed at the top of every page you fax.  Set the date and time by pressing the keys on the operation panel as shown below.  1 Press these keys:   The display will show: ENTRY MODE PRESS OR # 2 Press these keys:  The display will show: DATE & TIME SET PRESS START KEY 3 Press the START key. - The currently set date will appear in the display. 4 Enter a two-digit number for the month ("01" for January, "02" for February, "12" for December, etc.). - To correct a mistake, press the SPEED DIAL key to move the cursor back to the mistake and then enter the correct number. 5 Enter a two-digit number for the day ("01" to "31"). 6 Enter the year (four digits). 7 Enter a two-digit number for the hour ("01" to "12") and a two-digit number for the minute ("00" to "59"). 8 Press the key to select A.M. or the # key to select P.M.   Example: January  Example: the 5th  Example: 2000  Example: 9:25 A.M. P.M  9 Press the START key to start the clock. The display will show: DAY LIGHT SAVING 1=YES, 2=NO  START  10 Press the STOP key to return to the date and time display.  STOP Heure d'été
If desired, you can set the clock to move forward and backward automatically at the beginning and end of Daylight Saving Time. To turn on this function, press the panel keys as follows: 1 Press these keys: The display will show: DAY LIGHT SAVING 1:YES, 2=NO FUNCTION     2 Press 1 to turn on the Daylight Saving Time function, or 2 to turn it off. YES NO ① or 2 3 Press the STOP key to return to the date and time display. ST STOP Réglage du mode de réception
Your fax machine has three modes for receiving incoming calls and faxes:Mode TEL :
Select this mode when you want to receive both phone calls and faxes on the line connected to the fax machine. All calls, including faxes, must be answered by picking up the fax machine's handset or an extension phone connected to the same line.Mode FAX :
Select this mode when you only want to receive faxes on your line. The fax machine will automatically answer all calls on four rings and receive incoming faxes.Mode A.M. :
Use this mode only if you have connected an answering machine to the fax (see Chapter 6). Select this mode when you go out to receive voice messages in your answering machine and faxes on your fax machine.Réglage du mode de réception
Press the RECEPTION MODE key until the arrow in the display points to the desired mode.  For more information on receiving faxes in TEL and FAX modes, see Chapter 3, Receiving Documents. For more information on using A.M. mode, see Chapter 6, Answering Machine Hookup.Sélection de l'unité de réception
If you have connected the fax machine to a computer and installed the Multifunction software, you can choose whether to have incoming faxes received to the fax machine or the computer. The initial setting is FAX (reception to the fax machine).1 Appuyez sur ces touches :
The display will show: RECEIVE UNIT 1=FAX,2=PC FUNCTION  2 Appuyez sur 1 (FAX) pour sélectionner le télécopieur, ou sur 2 (PC) pour sélectionner l'ordinateur.
- The display briefly shows your selection and then reverts to the date and time display. FAX  PC or 23 Si vous avez sélectionné la réception sur l'ordinateur et que vous souhaitez que l'ordinateur réponde automatiquement à tous les appels, réglez le mode de réception du télécopieur sur FAX.
- Make sure the Multifunction Desktop software is running and Fax Receive is selected (a checkmark appears next to it) in the Fax menu of the Multifunction Desktop. (If not, the fax machine will receive faxes.)  4 If you selected reception to the computer but also want to receive voice calls, set the reception mode of the fax machine to TEL. - You must answer all calls using the fax's handset. The Multifunction Desktop will receive a fax only if the sending machine issues a fax tone. (Make sure that Fax Receive is selected in the Fax menu of the Multifunction Desktop.) To receive the fax to your fax machine, press the START key.  5 If you selected reception to the computer but also want to receive voice messages in an answering machine connected to the fax machine as explained in Chapter 6, set the reception mode of the fax machine to A.M. Réglage du volume
You can adjust the volume of the speaker, handset, and ringer using the UP and DOWN keys.  DOWN key UP keyHaut-parleur
1 Press the SPEAKER key.  SPEAKER 2 Press the UP or DOWN key. Display:  DOWN or   UP JAN-29 01:44 SPEAKER : HIGH  JAN-29 01:44 SPEAKER:MIDDLE  JAN-29 01:44 SPEAKER : LOW 3 When the display shows the desired volume level, press the SPEAKER key to turn off the speaker.  SPEAKERCombiné
1 Lift the handset.  2 Press the UP or DOWN key. Display:  JAN-29 01:44 RECEIVER : HIGH  JAN-29 01:44 RECEIVER:MIDDLE  JAN-29 01:44 RECEIVER : LOW 3 When the display shows the desired volume level, replace the handset. - Note: The handset volume reverts to medium each time you hang up. Sonnerie
1 Press the UP or DOWN key. (Make sure the SPEAKER key has not been pressed.) - The ringer will ring once at the selected level, and then the date and time will reappear in the display. Display:   2 If you selected RINGER : OFF OK?, press the START key. Durée du bip
Your fax machine normally signals the end of transmission, reception, or copying with a 3-second beep. If desired, you can change the duration of the beep to 1 second or turn the beep off.1 Appuyez sur ces touches :
FUNCTION      The display will alternately show: BEEP LENGTH 1=3 SEC,2=1 SEC  BEEP LENGTH 3=NO BEEP  2 Appuyez sur 1 pour 3 secondes, sur 2 pour 1 seconde, ou sur 3 pour aucun bip.
 Example: No beep3. Appuyez sur la touche STOP pour revenir à l'affichage de la date et de l'heure.
 STOP 2. Envoi de documents
Documents transmissibles
Taille et poids
The size and weight of documents that you can load in the document feeder depend on whether you load one page at a time or several pages at once.Chargement d'une page à la fois :
Minimum size  Maximum size  Minimum weight 14 lbs. (52 g/m²) Maximum weight 42 lbs. (157 g/m²)Chargement de plusieurs pages à la fois :
Minimum size  Maximum size  Minimum weight 14 lbs. (52 g/m²) Maximum weight 21.5 lbs. (80 g/m²) Note: Letters or graphics on the edges of a document will not be scanned. Autres restrictions
The scanner cannot recognize yellow, greenish yellow, or light blue ink. Ink, glue, and correcting fluid on documents must be dry before they pass through the document feeder. All clips, staples, and pins must be removed from documents before loading in the feeder. If these are not removed, they may damage the machine. Documents which are patched, taped, torn, smaller than the minimum size, carbon backed, easily smudged, or have a slick coated surface should be photocopied, and the copy loaded in the feeder.Chargement du document
Up to 20 pages can be placed in the feeder at one time. The pages will automatically feed into the machine starting from the bottom page. If you need to send or copy more than 20 pages, place the additional pages gently and carefully in the feeder just before the last page is scanned. Do not try to force them in, as this may cause double-feeding or jamming. If your document consists of several large or thick pages which must be loaded one at a time, insert each page into the feeder as the previous page is being scanned. Insert gently to prevent double-feeding. 1 Adjust the document guides to the width of your document.  2 Place the document face down and push it gently into the document feeder. The top edge of the document should enter the machine first. - The feeder will draw the leading edge of the document into the machine. SEND READY will appear in the display.  3 Adjust the resolution and/or contrast settings (if desired) as explained in the section Resolution and Contrast on the following pages, then dial the receiving machine as explained in Sending a Fax by Normal Dialing which appears later in this section.  RESOLUTIONRetrait d'un document du chargeur
If you need to remove a document from the feeder, open the operation panel. Important !
Do not try to remove a document without opening the operation panel. This may damage the feeder mechanism. 1 Grasp the panel release and pull up to open the operation panel.  2 Remove the document.  3 Close the operation panel, making sure it clicks into place. Réglage de la résolution et du contraste
If desired, you can adjust the resolution and contrast before sending a document.  Note: The resolution and contrast settings are only effective for sending and copying a document. They are not effective for receiving a document.Paramètres de résolution
STANDARD Use STANDARD for ordinary documents. This setting gives you the fastest and most economical transmission. FINE Use FINE for documents containing small letters or fine drawings. SUPER FINE Use SUPER FINE for documents containing very small letters or very fine drawings. HALF TONE Use HALF TONE for photographs and illustrations. The original will be reproduced in 64 shades of gray.Paramètres de contraste
AUTO Use AUTO for normal documents. DARK Use DARK for faint documents.1. Chargez le(s) document(s).
- The document must be loaded before the resolution and contrast can be adjusted. 2. Appuyez sur la touche RÉSOLUTION une ou plusieurs fois jusqu'à ce que les paramètres de résolution et de contraste souhaités apparaissent à l'écran.
- The first time you scroll through the list of resolution settings, the contrast setting AUTO will appear next to each resolution setting. The second time you move through the list, the contrast setting DARK will appear.  RESOLUTION   Note: In order to transmit in SUPER FINE resolution, the receiving fax machine must also have that resolution. If it doesn't, your machine will automatically step down to the next best available setting.Modification de la résolution par défaut
If desired, you can change the default resolution for faxing documents to FINE. Follow the steps below.1 Appuyez sur ces touches :
The display will show: FINE PRIORITY 1=YES, 2=NOFONCTION
    2 Appuyez sur 1 (OUI) pour régler la résolution par défaut sur FINE, ou sur 2 (NON) pour la régler sur STANDARD.
YES NO  or 3 Appuyez sur la touche STOP pour revenir à l'affichage de la date et de l'heure.
 STOP Envoi d'un fax par numérotation normale
With Normal Dialing, you pick up the handset (or press the SPEAKER key) and dial by pressing the number keys. If a person answers, you can talk with them through the handset before sending the fax. (If you pressed the SPEAKER key, you must pick up the handset to talk.) Normal Dialing allows you to listen to the line and make sure the other fax machine is responding. 1 Load the document(s). (Note: If desired, you can load the document after dialing in Step 3, below.) - SEND READY appears in the display. - Set the resolution and/or contrast if desired.  2 Pick up the handset or press the SPEAKER key. Listen for the dial tone.  or  SPEAKER 3 Dial the number of the receiving machine by pressing the number keys.  (Example) 4 Wait for the connection. Depending on the setting of the receiving machine, you will either hear a facsimile reception tone or the other person will answer. - If the other party answers, ask them to press their Start key (if you pressed the SPEAKER key, pick up the handset to speak with them). This causes the receiving machine to issue a reception tone.  5 When you hear the reception tone, press the START key. Replace the handset if you used it. - When transmission is completed, the fax will beep once. Utilisation de la touche BIS
You can press the REDIAL key to redial the last number dialed. To send a document, press the START key when you hear the fax tone after the connection is established. Note that the speaker is automatically activated when you press the REDIAL key.Envoi d'un fax par numérotation automatique
You can dial a fax or telephone number by simply pressing a Rapid Key, or by pressing the SPEED DIAL key and entering a two-digit number. To use a Rapid Key or Speed Dial number, you must first program the full fax number in the Rapid Key or Speed Dial number. It is usually convenient to program your most frequently dialed numbers in Rapid Keys. 20 Rapid Keys and 100 Speed Dial numbers are available. You can also store an area code or access code in a Rapid Key or Speed Dial number. You can use a Rapid Key or Speed Dial number to send a fax as an E-mail attachment to an E-mail address. To program a Rapid Key or Speed Dial number for E-mail, see Programming Rapid Key and Speed Dial Numbers in Chapter 5 of your online operation guide.  Attach the Rapid Key labels above the Rapid Keys as shown here. When you store a number in a Rapid Key, write the name of the party on the label.Mémorisation des numéros de fax et de téléphone pour la numérotation automatique
1 Appuyez sur ces touches :
The display will show: FAX/TEL # MODE 1=SET,2=CLEARFONCTION
  2 Appuyez sur la touche 1 pour sélectionner RÉGLAGE.
The display will show: FAX/TEL # SET SPEED # OR RAPID 3 Pour mémoriser un numéro dans une touche rapide, appuyez sur la touche rapide souhaitée.
To store a Speed Dial number, enter the desired 2-digit number (from 00 to 99) by pressing the number keys. 01 Example: Rapid Key 01   Example: Speed Dial 014 Saisissez le numéro de fax ou de téléphone en appuyant sur les touches numériques.
(Note: A space cannot be entered.)         - To clear a mistake, press the SPEED DIAL key. (Example) If a pause is required between any of the digits to access a special service or an outside line, press the REDIAL key (two seconds per pause). The pause will appear as a hyphen. Several pauses can be entered in a row.5 Appuyez sur la touche DÉPART.
6 Saisissez le nom du correspondant à l'aide des touches numériques comme indiqué ci-dessous. (Si vous ne souhaitez pas saisir de nom, passez directement à l'étape 7.)
| SPACE = ① ① | J = ⑤ ⑤ | T = ⑧ ⑧ |
| A = ② ② | K = ⑤ ⑤ ⑤ | U = ⑧ ⑧ ⑧ |
| B = ② ② ② | L = ⑤ ⑤ ⑤ ⑤ | V = ⑧ ⑧ ⑧ ⑧ |
| C = ② ② ② ② | M = ⑥ ⑥ | W = ⑨ ⑨ |
| D = ③ ③ | N = ⑥ ⑥ ⑥ | X = ⑨ ⑨ ⑨ |
| E = ③ ③ ③ | O = ⑥ ⑥ ⑥ ⑥ | Y = ⑨ ⑨ ⑨ ⑨ |
| F = ③ ③ ③ ③ | P = ⑦ ⑦ | Z = ⑨ ⑨ ⑨ ⑨ ⑨ |
| G = ④ ④ | Q = ⑦ ⑦ ⑦ | |
| H = ④ ④ ④ | R = ⑦ ⑦ ⑦ ⑦ | |
| I = ④ ④ ④ ④ | S = ⑦ ⑦ ⑦ ⑦ ⑦ |
7 Appuyez sur la touche START.
 8 Press 1 if the number programmed is an area code or access code to be used for Chain Dialing (see Chain Dialing for area and access codes below). Press 2 (or START) if the number is a regular fax or voice number.  9 Return to Step 3 to store another number, or press the STOP key to return to the date and time display. Step 3 or Numérotation en chaîne pour les indicatifs régionaux et d'accès
You can also program an area code or access code in a Rapid Key or Speed Dial number using the above programming procedure. In Step 8, press 1 to set the number as a Chain Dialing number. After you dial an area code or access code using a Rapid Key or Speed Dial number set for Chain Dialing, the fax machine will wait for you to dial the remainder of the number (you can dial the remainder of the number by pressing a Rapid Key, by pressing the Speed Dial key and entering a Speed Dial number, or by pressing numeric keys). Note that the remainder of the number should not be set as a Chain Dial number if programmed in a Rapid Key or Speed Dial number. The maximum number of digits that can be dialed at one time by Chain Dialing is 50.Effacement des numéros de numérotation automatique
1 Press these keys: The display will show: FAX/TEL # MODE 1=SET,2=CLEAR FUNCTION  (# 2 Press 2 to select CLEAR.  3 Press the Rapid Key or enter the Speed Dial number (press the number keys) that you want to clear.  Example: Speed Dial 01 4 Press the START key.  5 Return to Step 3 to clear another number, or press the STOP key to return to the date and time display. Step 3 or  Note: You cannot clear a number if it is used in a timer operation or is included in a Group Key. First clear the number from the operation or group, then clear the Rapid Key or Speed Dial number. To check where the number is used, print out the Group List or the Timer List as explained in Chapter 8.Modifications
To make changes in a number previously stored, repeat the programming procedure. Select the Rapid Key or Speed Dial number for which you want to make changes in Step 3, and then change the number and/or name when they appear in the display in Steps 4 and 6. Note: The fax machine uses a lithium battery to keep automatic dialing numbers and other programmed data in memory when the power is turned off. Battery power is consumed primarily when the power is off. With the power kept continuously off, the life of the battery is about 5 years. If the battery dies, have your dealer or retailer replace it. Do not try to replace it yourself.Double accès
The fax machine features full dual access, which means that you can load a document and dial by automatic dialing even when the fax machine is occupied with another operation. After you dial, your document will be immediately scanned into memory and then transmitted once all previously set operations have been completed. If more than one document has been scanned into memory for transmission, the documents will be transmitted in the order in which they were scanned. The fax machine can hold approximately 280 pages of average content in memory. Less pages can be held if any pages are scanned using fine or halftone resolution. The maximum number of transmission jobs that can be held at once is 30. The amount of memory currently occupied appears as a percentage (M:00%) in the display.Si la mémoire est pleine...
If the memory becomes full while a document is being scanned, MEMORY FULL will appear in the display. Press the START key or the STOP key as follows: Press the START key if you want to transmit the pages which have been stored up to that point in memory. The remaining pages will be ejected from the feeder. After transmission, the memory will be cleared and you can transmit the remaining pages. You will also need to transmit the page which was being scanned when the memory filled up. Press the STOP key if you want to cancel the entire transmission. If you do not press the START key or the STOP key within one minute, the transmission will be canceled and the pages already scanned cleared from memory. You will need to retransmit all pages of the document.Numérotation par touche rapide
If the number you want to dial has been programmed in a Rapid Key, you can dial it by pressing the Rapid Key.1 Chargez le ou les documents.
- SEND READY appears in the display. - Set the resolution and/or contrast if desired.   RESOLUTION2 Appuyez sur la touche rapide appropriée.
- The document is automatically transmitted once the connection is established.  (Example)Numérotation abrégée
If the number you want to dial has been programmed in a Speed Dial number, you can dial it by pressing the SPEED DIAL key and then entering the Speed Dial number.1 Chargez le ou les documents.
- SEND READY appears in the display. - Set the resolution and/or contrast if desired.   RESOLUTION2 Appuyez sur la touche NUMÉROTATION ABRÉGÉE puis saisissez le numéro abrégé à l'aide des touches numériques.
- To enter numbers 1 through 9, first enter 0 and then the number. 3 Vérifiez l'affichage. Si le nom ou le numéro affiché est correct, appuyez sur la touche START. (Sinon, appuyez sur la touche STOP puis répétez l'étape 2.)
Numérotation directe au clavier
You can also enter a full number with the number keys and then press the START key to begin dialing. You can use this method to dial a full number when you don't need to speak to the other party before faxing. 1 Load the document(s). (Note: If desired, you can load the document after dialing in Step 2, below.) - SEND READY will appear in the display. - Set the resolution and/or contrast if desired.  2 Enter the number of the receiving machine by pressing the numeric keys. - If a pause is required between any of the digits to access a special service or an outside line, press the REDIAL key (two seconds per pause). The pause will appear as a hyphen. Several pauses can be entered in a row.  3 Check the display. If the number of the receiving machine shown is correct, press the START key. - If it is not correct, press the STOP key to backspace and clear one digit at a time, and then re-enter the correct digit(s). Recherche d'un numéro de numérotation automatique
If you don't remember the Rapid Key or Speed Dial number in which you have programmed a particular fax number or E-mail recipient, you can search for the number by following the steps below. Once you have found the number, you can dial and transmit the loaded document by simply pressing the START key. (Note: To search for an E-mail recipient, your fax must be connected to your computer.)1 Chargez le ou les documents.
- SEND READY will appear in the display. - Set the resolution and/or contrast if desired. 2 Appuyez sur la touche MAINTIEN/RECHERCHE.
3 Appuyez sur 1 pour rechercher un numéro de numérotation automatique, ou sur 2 pour rechercher un destinataire e-mail.
NUMÉROTATION AUTOMATIQUE E-MAIL
4 Saisissez la première lettre du nom enregistré en appuyant sur la touche numérique appropriée (la touche située sous la lettre marquée) une ou plusieurs fois jusqu'à ce que la lettre apparaisse à l'écran. Si le nom commence par un caractère spécial ou un chiffre, appuyez sur 1 (uniquement pour les numéros de numérotation automatique).
 If you don't remember the first letter, go to Step 5 (you will scroll through the list from the beginning). If a name wasn't stored (for an auto-dial number), press 0. This will cause numbers, not names, to appear when you scroll. 5 Press the # key or the key to scroll through the names (numbers if you pressed 0). Stop when the desired name appears in the display. - If no names have been stored that begin with the entered letter, you will scroll from the next name, in alphabetical order, in the list. If no names/numbers have been stored at all, NO DATA will appear.  or  6 Press the START key. The document is transmitted.  START Recomposition automatique
If you use automatic dialing (including Direct Keypad Dialing) and the line is busy, the fax machine will automatically redial the number. The fax machine will make up to two redialing attempts at an interval of five minutes. To stop automatic dialing, cancel the job as explained in Checking and cancelling transmission jobs in Chapter 2.Intervalle de rappel pour la recomposition automatique
If desired, you can change the interval at which the fax machine makes automatic redialing attempts. 1 Press these keys:       The display will show: RECALL INTERVAL ENTER (01-15) 05 2 Enter a 2-digit number from 01 to 15 for the number of minutes of the interval.  Example: 3 minutes 3 Press the STOP key to return to the date and time display. Nombre de rappels pour la numérotation automatique
If desired, you can change the maximum number of automatic redialing attempts made when the line is busy. Under certain conditions (for example if a person answers the call on a telephone), automatic redialing may stop before the set number of redialing attempts are made. 1 Press these keys: The display will show:  FUNCTION RECALL TIMES ENTER (00-10) (02)  2 Enter a 2-digit number from 00 to 10 for the maximum number of radial attempts.  Example: 5 attempts 3 Press the STOP key to return to the date and time display. Vérification et annulation des travaux de transmission
To display information on currently set transmission (and polling) jobs, follow the steps below. You can also cancel a job with this procedure.1 Appuyez sur ces touches.
- The display will show ACTION STATUS and the number of transmission jobs, and then information on the first job. FUNCTION  2 Appuyez sur la touche HAUT ou BAS pour faire défiler la liste des travaux. (Remarque : vous pouvez également faire défiler avec la touche ou #.)
- The display will show the 2-digit memory number assigned to the transmission, the time the transmission was set, and status of the job alternating with the name (or number) of the receiving party. - To cancel a job, press the START key twice while the job appears in the display. 3 Lorsque vous avez fini de consulter la liste, appuyez sur la touche STOP pour revenir à l'affichage de la date et de l'heure.
Mode de correction d'erreurs
The fax machine is set to automatically correct any distortions in a transmission due to noise on the telephone line before printing at the receiving end. This function is called Error Correction Mode (ECM). ECM is effective for both transmissions and receptions, and is only effective when the other fax machine also has ECM.1 Appuyez sur ces touches :
The display will show: ECM MODE 1=YES, 2=NO   2 Appuyez sur 1 pour activer l'ECM ou sur 2 pour le désactiver.
YES NO  or 3 Appuyez sur la touche STOP pour revenir à l'affichage de la date et de l'heure.
 STOP Quick Online
When you transmit a document, the fax machine normally dials the receiving party and begins transmitting while scanning is still in progress. This function is called Quick Online. If desired, you can turn off Quick Online and have the fax machine wait until all pages have been scanned before dialing.1 Appuyez sur ces touches :
   The display will show: QUICK ON-LINE 1=YES, 2=NO2 Appuyez sur 1 pour activer Quick Online ou sur 2 pour le désactiver.
YES NO  or 3 Appuyez sur la touche STOP pour revenir à l'affichage de la date et de l'heure.
STOP 3. Réception de documents
Utilisation du mode FAX
 When the reception mode is set to FAX, the fax machine will automatically answer all calls on four rings and receive incoming faxes.  4 rings  Fax reception If you pick up the handset before the machine answers, you can talk to the other party and/or receive a document as explained in Using TEL mode. Note: If you receive a fax while scanning a document into the Multifunction Desktop on your computer, scanning may be canceled.Modification du nombre de sonneries
If desired, you can change the number of rings on which the fax machine answers incoming calls in FAX mode. Any number from 1 to 5 can be selected.1 Appuyez sur ces touches :
The display will show:       NUMBER OF RINGS ENTER (1-5) (4)2 Saisissez le nombre de sonneries souhaité (un nombre de 1 à 5).
The display will briefly show your selection, and then:  Example: 3 rings RECALL INTERVAL ENTER (01-15) 053 Appuyez sur la touche STOP pour revenir à l'affichage de la date et de l'heure.
 Note: If you are using Distinctive Ring, the fax machine will answer calls after two rings regardless of the above setting.Sortie des documents reçus
Note: The received document outlet has a maximum capacity of 100 sheets. To prevent the outlet from becoming obstructed, which will in turn cause paper jams, be sure to frequently remove received documents and copies. Do not allow a large number of documents to accumulate in the outlet.Utilisation du mode de réception TEL
 To select TEL mode, press the RECEPTION MODE key until the arrow in the display points to TEL.    When the reception mode is set to TEL, you must answer all calls by picking up the fax machine's handset or an extension phone connected to the same line.Répondre avec le combiné du télécopieur
1 When the fax machine rings, pick up the handset.  2 If you hear a fax tone, wait until the display shows RECEIVING and then replace the handset.  Note: If you have set the Fax Signal Receive setting to NO, press the START key to begin reception. 3 If the other party first speaks with you and then wants to send a fax, press the START key after speaking. (Press your START key before the sender presses their Start key.) - When RECEIVING appears in the display, hang up. Répondre avec un téléphone supplémentaire
1 Answer the extension phone when it rings.  2 If you hear a soft fax tone, wait until your fax responds (the extension phone will go dead if it is connected to your fax, or you will hear pronounced, high-pitched tones if the phone is connected to a separate wall jack), then hang up.  3 If the fax doesn't respond, or if the other party first talks to you and then wants to send a fax, press 5, , and on the extension phone (only on a tone dial phone). This signals the fax to begin reception. Hang up.  Comments: Your fax will not accept the signal to begin reception (5** if a document is loaded in its feeder. If you have set the Fax Signal Receive setting to NO, press 5, , and on the extension phone to begin reception.Changer le numéro pour l'activation de la télécopie à distance
If desired, you can use a number other than 5 to activate fax reception from an extension telephone. You can select any number from 0 to 9. 1 Press these keys: The display will show:    TEL/FAX REMOTE # ENTER (0-9) (5)  2 Enter a number from 0 to 9.  (Example) 3 Press the STOP key to return to the date and time display. Désactiver la détection du numéro de télécopie à distance Tel/Fax
If you don't intend to ever activate fax reception from an extension phone, you can turn off detection of the above TEL/FAX REMOTE NUMBER. This will ensure that the fax never mistakenly attempts to begin reception if it detects a signal similar to the TEL/FAX REMOTE NUMBER while you are talking on an extension phone. 1 Press these keys:  The display will show:  REMOTE RECEPTION 1=YES, 2=NO 2 Press 1 to turn on detection of the TEL/FAX REMOTE NUMBER, or 2 to turn it off.  3 Press the STOP key to return to the date and time display. Réception de signaux de télécopie
Your fax will automatically begin reception if you hear a soft fax tone after answering a call on your fax or an extension phone. If you use a computer fax modem to send documents on the same line, you must turn this function off in order to prevent your fax from mistakenly attempting to receive documents from the computer fax modem. Follow the steps below to change the setting.1 Appuyez sur ces touches :
The display will show: FAX SIGNAL RX 1=YES, 2=NO    2 Appuyez sur 1 pour activer la fonction, ou sur 2 pour la désactiver.
YES NO  or 3 Appuyez sur la touche STOP pour revenir à l'affichage de la date et de l'heure.
ST STOP Taux de réception
The fax has been set at the factory to automatically reduce the size of received documents to fit the size of the printing paper. This ensures that data on the edges of the document are not cut off. If desired, you can turn this function off and have received documents printed at full size. If a document is too long to fit on the printing paper, the remainder will be printed on a second page. In this case, the cut-off point may occur in the middle of a line. Automatic reduction may not be possible if the received document is too large, contains too many fine graphics or images, or is sent at high resolution. In this case, the remainder of the document will be printed on a second page.1 Appuyez sur ces touches :
The display will show:  FUNCTION     RECEPTION RATIO 1=AUTO, 2=100%2 Appuyez sur 1 pour activer la réduction automatique, ou sur 2 pour la désactiver.
AUTO 100%  or 3 Appuyez sur la touche STOP pour revenir à l'affichage de la date et de l'heure.
 STOP Réception de substitution en mémoire
In situations where printing is not possible, such as when your fax runs out of paper, the toner cartridge needs replacement, or the paper jams, incoming faxes will be received to memory. When you have received a document in memory, CAN'T PRINT DATA will appear in the display, alternating with a message indicating the problem. When you correct the problem, the stored documents will automatically print out. If you received documents in memory because the fax ran out of paper, be sure to add paper which is the same size as the paper previously used. If not, the document print-out size may not match the size of the printing paper.Attention !
When documents are stored in memory, do not turn the power off. This will erase all of the contents. If documents received in memory are lost due to a power failure or other interruption in the power supply, a CLEAR REPORT will be printed out when the power is restored. This gives information about the receptions lost, including the fax numbers of the transmitting machines if they are available.4. Faire des copies
Your fax can also be used to make copies. Single and multiple copies (up to 99 per original) can be made, enabling your fax to double as a convenience office copier. 1 Load the document(s) face down. (Maximum of 20 pages.) - SEND READY appears in the display.  2 If desired, select one or more of the following optional copy settings: - SORT COPY: If you are making multiple copies of more than one original and want the copies sorted, press the FUNCTION key and 6, and then enter the number of copies per original. (If the number of copies is less than ten, enter a "0" before the number.)   Example of sorted/not-sorted copies (three each) of three originals - MULTIPLE COPIES (Not sorted): If you want to make multiple copies of the original (or each original), enter a 2-digit number for the number of copies per original. (If the number is less than 10, do not enter a 0 before the number.)  Example: Nine copies per original- RÉDUCTION/AGRANDISSEMENT :
If you want to reduce or enlarge the copy, press the REDUCTION/ ENLARGEMENT key until the desired percentage appears in the display (you can also scroll through the percentages with the UP and DOWN keys). The selections are as follows: 100% (no reduction/enlargement) AUTO (auto reduction to fit the size of the printing paper.) 94% 88% 73% 50% 200% 150% 125%  REduction/ENLARGEMENT Note: The enlargement/reduction setting is effective for one time only.- RÉSOLUTION :
If desired, set the resolution and/or contrast. (The default setting for copying is FINE.)  RESOLUTION3 Appuyez sur la touche COPIE/AIDE.
- Copying begins.  COPY/HELPRemarque :
If you place a large number of originals in the feeder, the memory may become full before all of them can be scanned (MEMORY IS FULL will appear in the display). If this happens, press the START key to copy the originals which have been scanned, and then repeat the copy procedure for the remaining originals, including the original which was being scanned when the memory became full.Coupure de copie
When making a copy of a document that is longer than the printing paper, use the copy cut-off setting to select whether the remaining part of the document will be cut off or printed on a second page. The initial setting is YES (cut off the remainder). To change the setting, follow the steps below.1 Appuyez sur ces touches :
The display will show: COPY CUT-OFF 1=YES, 2=NOFONCTION
  2 Appuyez sur 1 pour régler la coupure de copie sur OUI (la partie restante du document ne sera pas imprimée), ou sur 2 pour régler la coupure de copie sur NON (la partie restante sera imprimée sur une deuxième page).
The display briefly shows your selection, and then: PAPER SIZE 1=LETTER, 2=LEGALOUI
NON
 or 3 Appuyez sur la touche STOP pour revenir à l'affichage de la date et de l'heure.
STOP
5. Passer des appels téléphoniques
Your fax machine can be used like a regular telephone to make and receive voice calls. To make or receive a voice call, the power must be on. 1 Pick up the handset or press the SPEAKER key. Listen for the dial tone.  2 Dial the number using one of the following methods: - Normal Dialing: Enter the full telephone number with the numeric keys. - Rapid Key Dialing: Press the appropriate Rapid Key. - Speed Dialing: Press the SPEED DIAL key, and enter the 2-digit Speed Dial number with the numeric keys.  Example: Press Rapid Key 01 3 Speak with the other party when they answer. - If you pressed the SPEAKER key, pick up the handset to talk. Commentaires :
While the handset of the fax is lifted (off hook), an extension phone connected directly to the fax cannot be used to speak with the other party. The fax may interrupt a voice call received on an extension phone if the reception mode is set to A.M. and there is a period of silence during the conversation. If you are on a touch-tone phone, you can prevent this by pressing any three keys on the phone immediately after you answer. (Note: Do not enter the code to activate fax reception: 5, *, *.)Recherche d'un numéro de numérotation automatique
You can use the HOLD/SEARCH key to search for a Rapid Key or Speed Dial number. First search for the number as described in Searching for an auto-dial number in Sending a Fax by Automatic Dialing in Chapter 2, then pick up the handset or press the SPEAKER key. The number will be dialed automatically (do not press the START key).Recomposition
The last number dialed can be redialed by pressing the REDIAL key (it is not necessary to pick up the handset or press the SPEAKER key). When the other party answers, pick up the handset to talk.Maintenir
You can put the other party on hold during a conversation by pressing the HOLD/SEARCH key. When this is done, they cannot hear you. You can put the handset back in the cradle without breaking the connection. When you are ready to speak with them again, pick up the handset. If you did not put the handset back in the cradle, press the HOLD/SEARCH key again to resume conversation.6. Raccordement d'un répondeur
Connexion d'un répondeur
If desired, you can connect an answering machine to your fax machine's TEL. SET jack. This will allow you to receive both voice messages and faxes when you are out. 1 Remove the seal covering the TEL. SET jack.  2 Connect the answering machine's telephone line jack to the TEL. SET jack. - If desired, you can connect an extension phone to your answering machine's extension phone jack. Make sure the TEL LINE jack is connected to the wall jack. Modification du message d'accueil
The outgoing message (OGM) of your answering machine should be changed to inform callers who want to send a fax to press their Start key. For example, your message might go as follows: "Hello. You've reached the ABC company. No one is available to take your call right now. Please leave a message after the beep or press your facsimile Start key to send a fax. Thank you for calling." Try to keep the length of the message under 10 seconds. If it is too long, you may have difficulty receiving faxes sent by automatic dialing. If your outgoing message must be longer than 10 seconds, leave a pause of about four seconds at the beginning of the message. This will give your fax a chance to detect fax tones sent when automatic dialing is used.Activation de la connexion du répondeur
Before you go out, activate the answering machine connection as follows:1 Réglez le mode de réception sur A.M.
2 Réglez votre répondeur sur réponse automatique.
Your answering machine must be set to answer on a maximum of two rings. If not, you may not be able to receive faxes sent by automatic dialing. If your answering machine has a toll saver function, make sure that it will answer by the fourth ring.Remarque :
If your answering machine has a remote retrieval function, make sure the code used to activate remote retrieval is different from the code used to activate fax reception with an extension telephone (see Chapter 3, Receiving Documents). If they are the same, entering the code from an outside telephone to retrieve messages will cause the fax machine to be activated.Fonctionnement de la connexion
While you are out, all of your incoming calls will be answered by your answering machine and its outgoing message will play. Voice callers can leave a message. During this time, your fax will quietly monitor the line. If your fax detects a fax tone or a duration of silence greater than four seconds, it will take over the line and begin reception. When you return and turn off your answering machine, be sure to change the reception mode back to FAX or TEL! Réglages optionnels du mode A.M.
If necessary, you can use the following settings to improve the response of the answering machine hookup to incoming calls.Temps de détection de silence
The fax machine is set to take over the line and begin reception if it detects 4 seconds of silence after the answering machine answers. If needed, you can change this setting to any number of seconds from 1 to 10. We recommend that you do not set Quiet Detect Time under 3 seconds. If the fax machine is interrupting callers before they can leave a message, try a longer Quiet Detect Time setting. If your outgoing message includes a period of silence, make sure that the setting is longer than that period of silence, or re-record your outgoing message to shorten the silence.Remarque :
Quiet Detect Time can be turned off by entering "00" for the time. Note, however, that the fax machine may not be able to receive manually-sent faxes from some older fax machines.1 Appuyez sur ces touches :
FONCTION
        The display will show:      QUIET DETECT TM. ENTER (00-10) 04 2 Enter a number from 01 to 10, or enter 00 to turn off the function.   (Example) 3 Press the STOP key to return to the date and time display. Fax lorsque le répondeur ne répond pas
When this function is turned on, your fax will answer the call after 5 rings if the answering machine for some reason fails to answer before that time. This ensures that you will receive fax messages even if the answering machine's tape fills up or the answering machine is not turned on. This function has been turned off at the factory. If you want to turn it on, follow the steps below:Remarque :
When this function is turned on, make sure that the answering machine is set to answer on 4 rings or less. If it isn't, the fax will always answer first, preventing callers from leaving voice messages.1 Appuyez sur ces touches :
FONCTION
      The display will show:     TAD FAILS 1=YES, 2=NO2 Appuyez sur 1 pour activer la fonction, ou sur 2 pour la désactiver.
YES NO  or 3 Appuyez sur la touche STOP pour revenir à l'affichage de la date et de l'heure.
 7. Fonctions spéciales
Diffusion
The Broadcasting function allows you to send the same document to as many as 30 different locations with just one operation. First load the document, then enter the numbers of the receiving machines. The document will be automatically transmitted to each location. You can only use Rapid Keys or Speed Dial numbers to dial the numbers of the receiving machines. 1 Load the document (s). - SEND READY will appear in the display.  2 Press the BROADCAST key. The display will show: BROADCAST BROADCAST MODE SPEED # OR RAPID  3 Dial the receiving machines using one or more of the following methods: - Press one or more Rapid Keys. - Enter one or more Speed Dial numbers with the numeric keys.  (Example)4 Appuyez sur la touche START.
The display will show: SET RESOLUTION PRESS RESO. KEY - If desired, adjust the resolution and/or contrast.   RESOLUTION5 Appuyez sur la touche START. La transmission commence.
- A Transaction Report is automatically printed out after Broadcasting is completed. Check the "Note" column of the report to see if any of the locations are marked "Busy" or have a communication error code. If so, send the document to those locations again. Diffusion à l'aide d'une touche de groupe
If the fax machines to which you want to broadcast have all been programmed into one Group Key (see Storing numbers in Group Keys which follows), you can perform the broadcasting operation using the following simplified procedure:1 Chargez le(s) document(s).
- SEND READY will appear in the display. - If desired, adjust the resolution and/or contrast.   RESOLUTION2 Appuyez sur la touche de groupe appropriée. La transmission commence.
Mémorisation des numéros dans les touches de groupe
Group Keys allow you to dial a group of fax numbers by simply pressing the appropriate Group Key once. To store a group of numbers in a Group Key, follow the steps below. Rapid Keys 17/G1 through 20/G4 can be used as Group Keys. Note that one key cannot be simultaneously programmed as both a Group Key and a Rapid Key. Up to 30 numbers can be stored in one Group Key. Only Rapid Key and Speed Dial numbers (excluding numbers set for Chain Dialing) can be stored in a Group Key. Full numbers cannot be stored.1 Appuyez sur ces touches.
The display will show: GROUP ENTRY MODE 1=SET,2=CLEAR FUNCTION  72 Appuyez sur 1 (SET) pour programmer une touche de groupe, ou sur 2 (CLEAR) pour effacer une touche de groupe.
3 Pour programmer une touche de groupe, appuyez sur la touche que vous souhaitez programmer (l'une des touches rapides 17/G1 à 20/G4).
To clear a Group Key, press the key you want to clear and go to Step 5. SET CLEAR  or   4 Enter fax numbers using one or both of the following methods: - Press one or more Rapid Keys. - Enter one or more Speed Dial numbers with the numeric keys.   (Example) 5 Press the START key.  6 Return to Step 3 to program another Group Key, or press the STOP key repeatedly until you return to the date and time display. Step 3 or Sonnerie distinctive (nécessite un abonnement au service)
Important :
To use distinctive ring, you must subscribe to a distinctive ring service from your local phone company. Your fax machine may not be compatible with some distinctive ring services. Distinctive ring is a service offered by some local telephone companies whereby they assign an additional second number to your regular single line. The second number rings differently from your normal number. If you subscribe to a distinctive ring service, you can set the fax machine to automatically answer when your second number is called. This allows you to use the second number as an exclusive fax number. To have your fax automatically answer when your second number is called, follow the steps below:1 Appuyez sur ces touches :
The display will show: OPTION SETTING PRESS OR # FUNCTION  2 Appuyez 11 fois sur la touche .
The display will show: DISTINCTIVE RING 1:RING PATTERN 1   The ring pattern selections alternately appear here. 3 Press a number from 1 to 3 to select the ring pattern below that matches your second number's ring pattern. Or, press 4 to have your fax automatically answer your normal telephone number. Press 5 to turn off the distinctive ring function. 1 RING PATTERN 1 Two short rings 2 RING PATTERN 2 One short, one long, and one short ring 3 RING PATTERN 3 Two short rings and one long ring 4 STANDARD RING Your standard (normal) ring pattern OFF SETTING Turn distinctive ring off The display will briefly show your selection, and then: FAX SIGNAL RX 1=YES, 2=NO 4 Press the STOP key to return to the date and time display.  5 Set the reception mode to FAX.  When using distinctive ring, you must set the reception mode of your fax machine to FAX. When your designated fax number is dialed, your fax will automatically answer and begin reception after two rings. Note that other devices on the same line will also ring until your fax answers. If one of your other numbers is dialed, the fax will ring; however, it will not answer.Page de garde
You can have the fax generate a cover sheet and send it as the last page of each of your fax transmissions.  Follow the steps below to turn on the cover sheet function. Once the cover sheet function is turned on, cover sheets will be included with all transmissions until you turn it off.1 Appuyez sur ces touches :
The display will show:FONCTION
          COVER SHEET 1=YES, 2=NO 2 Press 1 (YES) to turn on the cover sheet function, or 2 (NO) to turn it off. The display will briefly show your selection, and then: AUTO PRINT OUT 1=YES,2=NO  3 Press the STOP key to return to the date and time display. Sélection d'un message d'en-tête (facultatif)
When the cover sheet function is turned on, you can also select a message which will appear as a header at the top of the cover sheet. Note that the message selection is only effective for one transmission. 1 Load the document(s). - The document must be loaded before a message can be selected. - The cover sheet function must be turned on.  2 Press these keys: The display will show: FUNCTION    3 Select a message by entering a number from 1 to 4: 1: URGENT 2:IMPORTANT 3: CONFIDENTIAL 4:PLS.DISTRIBUTE ① (Example) 4 Dial the receiving machine and transmit the document.Remarque :
To cancel a header message selection, press the STOP key or remove the document from the feeder.Numérotation par lots
You can change the page numbering of the fax from simple numbering ("P.01", "P.02", etc.) to batch numbering, which means that a slash and the total number of pages are added after each page number (for example, "P. 01/05", "P.02/05", etc.). This allows the recipient to check for missing pages. 1 Load the document(s). - The document must be loaded before batch page numbering can be set.  2 Press these keys: The display will show:   PAGE COUNTER SET ENTER # (01-99) 3 Enter the total number of pages ("01" to "99") by pressing the number keys. (If the number is less than 10, enter a "0" before the number.) - If you are sending a cover sheet, do not include it in the total number of pages (the number will be adjusted automatically).  Example: Eight pages 4 Dial the receiving machine and transmit the document.Commentaires :
If you need to cancel a batch number entry, remove the document from the feeder or press the STOP key. If the number of pages actually transmitted does not coincide with the batch number entered, the alarm will sound and PAGE COUNT ERROR will appear in the display. PAGE E. will also appear in the NOTE column of the Transaction Report if it has been set to print out.Blocage de la réception de télécopies indésirables
The Anti Junk Fax function allows you to block reception of faxes from parties which you specify. This saves paper by not printing out unwanted "junk" faxes. To use this function, follow the steps below to turn it on, and then enter the fax numbers from which you do not want to receive faxes as indicated in the procedure that follows.1 Appuyez sur ces touches :
The display will show: JUNK FAX # CHECK 1=YES, 2=NOFONCTION
        2 Appuyez sur 1 pour activer la fonction Anti-Junk, ou sur 2 pour la désactiver.
YES NO  or 3 Appuyez sur la touche STOP pour revenir à l'affichage de la date et de l'heure.
 STOP Saisie des numéros Anti-Junk
Enter (or clear) a number in the Anti Junk List as shown below. Up to five numbers can be entered. To clear a number from the Anti Junk Number List, you need to know the 1-digit number which identifies it. If you have forgotten this number, print out the Anti Junk Number List as explained in Chapter 8. 1 Press these keys: The display will show: STORE JUNK FAX # 1=SET, 2=CLEAR FUNCTION    2 Press 1 to enter a number in the Anti Junk Number List, or 2 to clear a number from the list. SET CLEAR  or  3 Entering: Enter a 1-digit number from 1 to 5 with the numeric keys. This number identifies the fax number that you will enter in the next step.  (Example) Clearing: Enter the 1-digit number that identifies the fax number you want to clear, and go to Step 5. 4 Enter the fax number.        (Example) 5 Press the START key.  START  6 Return to Step 3 to enter (or clear) another fax number, or press the STOP key to return to the date and time display. Step 3 or  STOP Interrogation (demande d'envoi d'un fax)
Polling allows you to call another fax machine and have it send a document to your machine without operator assistance. In other words, the receiving fax machine, not the transmitting fax machine, initiates the transmission. You can use your fax machine to both poll and be polled by others. To use the polling function, you must first set Rapid Key 16/POLL for use as a polling key.1 Appuyez sur ces touches :
    The display will show:   POLLING 1=YES,2=NO2 Appuyez sur 1 pour activer la fonction, ou sur 2 pour la désactiver.
3 Appuyez sur la touche STOP pour revenir à l'affichage de la date et de l'heure.
 Note: When Rapid Key 16/POLL is set as a polling key, it cannot be used for Rapid Key dialing.Demande d'envoi
1 Dial the fax machine you want to poll using one of the following methods: - Pick up the handset (or press the SPEAKER key) and dial the full number. Wait for the fax answerback tone. - Pick up the handset (or press the SPEAKER key) and press the Rapid Dial Key. Wait for the fax answerback tone. - Press the SPEED DIAL key and enter a 2-digit Speed Dial number. - Enter the full number using the numeric keys.  2 Press Rapid Key 16/POLL. - If you used the handset, replace it when POLLING appears in the display. Reception will begin. Interrogation (mémoire d'interrogation)
To let another fax machine poll your fax machine, you must first store the document in memory using the following procedure. Transmission will take place when the other fax machine calls your fax machine and activates polling. You can choose whether to allow polling only once, or an unlimited number of times. In the latter case, your fax machine can be used as an electronic "bulletin board". Only one document can be stored at a time for memory polling. If you allow polling only once, the document will be automatically cleared from memory after polling. If you allow polling an unlimited number of times, the document will remain in memory until you clear it as explained in the following section, Clearing a document.1 Chargez le document.
2 Appuyez sur la touche MODE DE RÉCEPTION pour régler le mode de réception sur FAX.
3 Appuyez sur ces touches :
The display will show: MEMORY POLL MODE 1=SET, 2=CLEAR FUNCTION   4 Press 1 to select SET. 5 Press 1 to allow polling only once, or 2 to allow polling an unlimited number of times. (1) ONCE REPEAT  or  6 Press the START key. - The document is scanned into memory and your fax goes on polling standby.  START Suppression d'un document
To clear a memory poll document from memory, follow the steps below: 1 Press these keys: The display will show: MEMORY POLL MODE 1=SET, 2=CLEAR FUNCTION  8 2 Press 2 to select CLEAR. ② 3 Press the START key to clear the document, and then the STOP key to return to the date and time display.  Sécurité de l'interrogation
Polling Security allows you to prevent unauthorized polling of your machine. When this function is turned on, polling will only take place when the fax number of the polling fax machine has been entered in your machine's list of permitted fax numbers (called "passwd numbers"). The number of the polling fax must also be correctly programmed into itself for identification. To use Polling Security, follow the steps below to turn the function on, and then enter permitted numbers as shown on the following page.1 Appuyez sur ces touches :
The display will show: SECURITY SELECT 1=ON, 2=OFF FUNCTION     2 Appuyez sur 1 pour activer la sécurité de la réception, ou sur 2 pour la désactiver.
ON OFF  or 3 Appuyez sur la touche START puis sur la touche STOP.
 START   STOP Mémorisation et effacement des numéros de fax pour l'autorisation de réception
You can store up to 10 fax numbers in your machine's list of permitted numbers.1 Appuyez sur ces touches :
The display will show:FONCTION
     PASSCODE # MODE 1=SET, 2=CLEAR2 Appuyez sur 1 pour mémoriser un numéro, ou sur 2 pour effacer un numéro.
SET CLEAR  or 3 Mémorisation : Saisissez un numéro à 2 chiffres de 01 à 10. Ce numéro identifie le numéro de fax que vous mémoriserez à l'étape suivante.
  (Example) Clearing: Enter the number which identifies the fax number you want to clear, and go to Step 5.4 Saisissez le numéro de fax.
       (Example)5 Appuyez sur la touche START.
 START 6 Revenez à l'étape 3 pour saisir (ou effacer) un autre numéro, ou appuyez sur STOP pour revenir à l'affichage de la date et de l'heure.
Step 3 or  STOP Opérations de minuterie
The Timer function allows you to set up a transmission or polling operation to be performed automatically at a time you specify. Up to three operations can be set at any one time, and the times they will be performed can be specified up to one week in advance. You can use this function to take advantage of lower off-peak telephone rates without having to be there when the operation is performed. Note: Only a Rapid Key or Speed Dial number can be used to dial the receiving machine. Full numbers cannot be used.Réglage d'une opération de minuterie
1 If this is a transmission, load the document.  2 Press these keys: The display will show: FUNCTION  TIMER MODE 1=SET,2=CLEAR 3 Press 1 to select SET.  4 Press 1 to set a transmission operation (SEND MODE), or 2 to set a polling operation (POLLING MODE). SEND POLLING  5 Enter the time at which you want the operation to take place (2 digits for the hour and 2 digits for the minute).  Example: 9:25 6 Press the key to select A.M. or the # key to select P.M. A.M. P.M.  7 Enter a 1-digit number for the day of the operation (skip this step if the operation will be performed within the next 24 hours):  Example: Sunday 0: Sunday 1: Monday 2: Tuesday 3: Wednesday 4: Thursday 5: Friday 6: Saturday 8 Press the START key. START 9 Press a Rapid Key or enter a Speed Dial number for the receiving fax machine.  - If this is a polling operation, go to Step 12. Example: Speed Dial #01 10 Press the START key.  START  11 Adjust the resolution and/or contrast if desired (skip to the next step if you don't want to change settings). RESOLUTION  12 Press the START key. - If this is a transmission, the document is scanned into memory. Pour annuler une opération de minuterie
If you need to cancel a timer operation after it has been set, follow the steps below. 1 Press these keys: The display will show: FUNCTION   TIMER MODE 1=SET, 2=CLEAR 2 Press 2 to select CLEAR.  3 Enter the 1-digit number assigned to the timer job you want to cancel. - If you don't remember the number, print out the Timer List as explained in Chapter 8.  (Example) 4 Press the START key and then the STOP key.  8. Impression de listes
You can print lists showing settings and information entered in the fax machine. You can also print out reports on recent activity and individual operations after they are completed. The lists and reports are described on the following pages. To print a list, follow the steps below. 1 Press the FUNCTION key and 2. The display will show: LISTING MODE PRESS 喜 OR #   2 Press the key or the # key until the desired list appears in the display.  or  3 Press the START key to print the list. Rapport d'activité
This report shows information on your most recently performed send and receive operations (a combined maximum of 30 operations can appear). The report is divided into two parts: the TRANSMISSIONS ACTIVITY REPORT, which shows information on transmissions, and the RECEPTIONS ACTIVITY REPORT, which shows information on receptions. All information is erased after a report is printed out. If automatic print-out is turned off and the report is not printed manually for 30 operations, the information on the oldest operation will be overwritten each time a new operation is performed.| TRANSMISSIONS ACTIVITY REPORT P.01 APR-01-2000 SAT 04:14 PM FOR: ABC CORP. 529658742 | ||||||||
| NO. | DATE | START | RECEIVER | TX TIME | PAGES TYPE | NOTE | M# | |
| 01 | APR-01 | 04:06 PM | KENT CORP. | 19" | 1 SEND(M) | OK | 01 | |
| 02 | APR-01 | 04:08 PM | 33" | 1 BROADCAST | OK | 02 | ||
| 03 | APR-01 | 04:14 PM | ADRIAN SMITH | 19" | 1 TIMER SEND | OK | ||
| TOTAL | 1'11" | 3 | ||||||
| GRAND TOTAL TIME: | 1M 11S | |||||||
| PAGES: | 3 | |||||||
Explication des titres
SENDER/ The name or fax number of the other machine involved in the transaction. If that machine does not have an ID function, the communication mode will appear (for example, "G3"). START The time at which transmission/reception started. TX/RX TIME Total time taken for transmission/reception. PAGES Number of pages transmitted/received. NOTE (One of the following notes will appear under NOTE in the report to indicate whether the transaction was successful, and if not, the reason for the failure.) OK - Transmission/reception was successful. P.FAIL - A power failure prevented the transaction. JAM - The printing paper or document jammed, preventing the transaction. NO PAPER - You ran out of paper during reception. BUSY - The fax was not sent because the line was busy. COM.E-0 to COM.E-13 - A telephone line error prevented the transaction. See Line Error in Problems and Solutions in Chapter 10. CANCEL - The transaction was cancelled because the STOP key was pressed, no document was in the feeder, or the other machine requested transmission using a function which your fax machine does not have. If you were attempting to fax, make sure a document is in the feeder. If you were receiving, contact the faxing party to see how they are trying to send to you. If desired, you can set the Activity Report to automatically print out whenever information on 30 operations has accumulated. (A report can still be printed on demand at any time.) Follow the steps below:1 Appuyez sur ces touches :
The display will show:    AUTO PRINT OUT 1=YES, 2=NO2 Appuyez sur 1 pour activer l'impression automatique, ou sur 2 pour la désactiver.
YES NO 3 Appuyez sur la touche STOP pour revenir à l'affichage de la date et de l'heure.
Liste des minuteries
This list shows the timer operations that are currently set, and whether the Memory Polling function is turned on.| TIMER LIST APR-01-2000 SAT 04:21 PM FOR: ABC CORP. 529658742 | ||||
| NO. | START | TYPE | RESOLUTION | REMOTE STATION ID # |
| 1 | 10:30 AM | SUN | SEND | STANDARD :AUTO KENT CORP. |
| 2 | 01:15 PM | WED | POLLING | JACK SMITH |
| 3 | 05:51 PM | SAT | SEND | SUPER FINE:AUTO ADRIAN SMITH |
Liste des numéros de téléphone
This list shows the fax numbers that have been programmed for automatic dialing.| RAPID SPEED # | NAME | TELEPHONE # | CHAIN DIAL |
| R01 | KENT CORP. | 123-456-7890 | |
| R02 | JACK SMITH | 333-555-7777 | |
| R03 | ADRIAN SMITH | 230-347-6385 | SET |
| SOO | AL | E-MAIL STORED | |
| SOI | ABC SOFT | 668-999-0000 |
Liste des codes d'accès
This list shows settings made for polling security, your name and fax/ telephone number as entered in the machine, and a sample of the header printed at the top of every page you transmit (HEADER PRINT).| PASSCODE LIST FOR: ABC CORP. 529658742 POLLING MODE PASSCODE # SECURITY OFF 01 02 03 04 05 06 07 08 09 10 DAY LIGHT SAVING TIME NO SENDER'S NAME ABC CORP. SENDER'S TELEPHONE NUMBER 529658742 HEADER PRINT APR-01-2000 SAT 03:56 PH ABC CORP. 529658742 P. 01 |
Liste des réglages des options
This list shows the current status of the option settings.| OPTIONAL SETTING LIST FOR: ABC CORP. 529658742 APR-01-2000 SAT 03:53 PM | ||
| NO. | ITEM | SETTING |
| 01 | PAPER SIZE | LETTER |
| 02 | FINE PRIORITY | NO |
| 03 | NUMBER OF RINGS | 4 RINGS |
| 04 | RECALL INTERVAL | 05 MINUTES |
| 05 | RECALL TIMES | 02 TIMES |
| 06 | TEL/FAX REMOTE # | (5) ** |
| 07 | REMOTE RECEPTION | YES |
| 08 | TRANSACTION PRINT SELECT | ERROR ONLY |
| 09 | DIAL MODE | TONE |
| 10 | QUIET DETECT TIME | 04 SEC. |
| 11 | FAX ANSWER WHEN TAD FAILS | NO |
| 12 | DISTINCTIVE RINGING | OFF SETTING |
| 13 | FAX SIGNAL RECEIVE | YES |
| 14 | JUNK # CHECK | NO |
| 15 | POLLING | NO |
| 16 | COVER SHEET | NO |
| 17 | AUTO PRINT OUT | NO |
| 18 | ECM MODE | YES |
| 19 | BEEP LENGTH | 3 SECONDS |
| 20 | QUICK ON-LINE | YES |
| 21 | RECEPTION RATIO | AUTO |
| 22 | COPY CUT OFF | YES |
Liste des numéros de fax indésirables
This list shows the numbers that are blocked by the Anti Junk function.| ANTI JUNK NUMBER LIST FOR: ABC CORP. 59658742 ANTI JUNK # CHECK: NO STORED LOCATION JUNK FAX # | |
| 1 | 8754215632 |
| 2 | 8546324456 |
| 3 | 8965542123 |
Liste des groupes
This list shows the fax numbers that have been programmed into each Group Key. Rapport de transactions
This report is printed out automatically after an operation is completed to allow you to check the result. Your fax machine is set at the factory to print out the report only when an error occurs. The same headings appear in the Transaction Report as in the Activity Report. See Activity Report in this chapter for an explanation of the headings. The Transaction report cannot be printed on demand. If desired, you can change the condition under which a report is printed out. Follow the steps below.1 Appuyez sur ces touches :
The display will show: 2 Appuyez sur un chiffre de 1 à 5 pour sélectionner la condition d'impression.
ALWAYS PRINT A report will be printed after each transmission, reception, or error. 2 ERR/TIMER/MEM A report will be printed after an error, timer operation, or memory transmission. 3 SEND ONLY A report will be printed after each transmission. NEVER PRINT A report will never be printed. 5 ERROR ONLY A report will be printed only when an error occurs.3 Appuyez sur la touche STOP pour revenir à l'affichage de la date et de l'heure.
9. Maintenance
Vitre de numérisation et rouleaux
Clean the scanning glass and rollers frequently to ensure that your transmitted images and copies are of the highest quality. Open the operation panel (grasp the panel release and pull up), and wipe the scanning glass, rollers and white backplate with a soft cloth. Make sure that all dirt and stains (such as correcting fluid) are removed, as dirt and stains will cause vertical lines on transmitted images and copies. Le boîtier
Wipe the external parts and surface of the machine with a dry cloth.Attention !
Do not use benzene or thinner. These solvents may damage or discolor the machine.Remplacement de la cartouche de toner
When the toner cartridge nears empty (about 100 pages can still be printed), the TONER EMPTY indicator on the operation panel will blink. When the toner cartridge is empty, the toner cartridge indicator will light steadily and REPLACE TONER will appear in the display. Printing will no longer be possible. Replace the toner cartridge with the following cartridge:Cartouche de toner Sharp FO-29ND
1 Grasp the print compartment cover at both sides as shown, and pull up to open the cover. - Caution! The fusing unit inside the print compartment becomes very hot during operation. Do not touch the inside of the compartment or the paper guide on the underside of the print compartment cover.  2 Grasp the finger hold on the toner cartridge handle where it is marked PUSH, and pull the handle out. Rehold the handle and pull the toner cartridge out of the compartment. - Dispose of the old toner cartridge according to local regulations. If in doubt, contact your local waste disposal agency.  3 Install the new toner cartridge and reset the toner counter. (Refer to Installing the Toner Cartridge in Chapter 1.)Remplacement de la cartouche de tambour
To maintain excellent printing quality, we recommend that you replace the drum cartridge about 20,000 pages have been printed. You can view the number of pages printed in the display by pressing the following sequence of keys:  FUNCTION    STA When finished, press the STOP key to return to the date and time display. Replace the drum cartridge with the following cartridge:Cartouche de tambour Sharp FO-29DR
1 Grasp the print compartment cover at both sides as shown, and pull up to open the cover. - Caution! The fusing unit inside the print compartment becomes very hot during operation. Do not touch the inside of the compartment or the paper guide on the underside of the print compartment cover.  2 Grasp the finger hold on the toner cartridge handle where it is marked PUSH, and pull the handle out. Rehold the handle and pull the toner cartridge out of the compartment. - Place the toner cartridge on a sheet of paper on a level surface.  3 Grasp the tabs on the drum cartridge handle and gently pull the cartridge out of the machine.  4 Remove the new drum cartridge from its packaging.  5 Insert the drum cartridge into the print compartment, aligning the guides on the cartridge with the runners on the sides of the compartment.  Gently pull the paper tab to remove the black sheet of protective paper from the drum cartridge. - Be careful not the tear the paper or leave any pieces of paper in the machine.  7 Replace the toner cartridge and reset the drum counter. (Refer to Installing the Toner Cartridge in Chapter 1.)Nettoyage de la cartouche de tambour
If you find that characters or parts of an image are missing from your printed pages, the drum in the drum cartridge may need cleaning. Follow the steps below to clean the drum. 1 Grasp the print compartment cover at both sides as shown, and pull up to open the cover. - Caution! The fusing unit inside the print compartment becomes very hot during operation. Do not touch the inside of the compartment or the paper guide on the underside of the print compartment cover.  2 Grasp the finger hold on the toner cartridge handle where it is marked PUSH, and pull the handle out. Rehold the handle and pull the toner cartridge out of the compartment. - Place the toner cartridge on a sheet of paper on a level surface.  3 Grasp the tabs on the drum cartridge handle and gently pull the cartridge out of the machine.  4 Take a sheet of clean paper and roll it into a tube. Roll it tightly so that the diameter of the holes at each end is less than the thickness of your little finger.  5 Gently wipe the surface of the drum with the rolled-up paper to remove any particles of toner caked on the drum. - Do not let the drum surface come into contact with anything other than the rolled-up paper. Fingerprints, water, alcohol, and other solvents will damage the drum surface. - Do not touch the drum surface with the edges of the rolled-up paper.   6 Replace the drum cartridge. - To insert the cartridge, align the guides on the cartridge with the runners on the sides of the compartment.  7 Replace the toner cartridge and close the print compartment cover. (Refer to Installing the Toner Cartridge in Chapter 1.)10. Dépannage
Problèmes et solutions
Erreur de ligne
| Problem | Solution |
| LINE ERROR appears in the display. | Try the transaction again. If the error persists, check the following:Check the connection. The cord from the TEL LINE jack to the wall jack should be no longer than six feet.Make sure there are no modem devices sharing the same telephone lineCHECK with the other party to make sure their fax machine is functioning properly.Have your telephone line checked for line noise.Try connecting the fax machine to a different telephone line.If the problem still occurs, your fax machine may need service. |
Problèmes de numérotation et de transmission
| Problem | Solution |
| No dial tone when you pick up the handset or press the SPEAKER key. | ·Make sure the handset cord is connected to the correct jack. See Connecting the handset in Connections in Chapter 1. |
| Dialing is not possible. | ·Make sure the power cord is properly plugged into a power outlet. ·Make sure that the telephone line is properly connected to both the TEL. LINE jack and the wall jack. ·Make sure that the fax machine is set to the correct dialing mode for your telephone line. See Connecting the telephone line cord in Connnecions in Chapter 1. |
| The power is on, but no transmission takes place. | ·Make sure that the receiving machine has paper. ·Make sure that the telephone line cord is plugged into the TEL. LINE jack, and not the TEL. SET jack. ·If the receiving machine is in manual mode with no attendant, reception will not be possible. ·Check the display for error messages. ·Pick up the handset and check for a dial tone. |
| Nothing is printed at the receiving end. | ·Make sure that the document for transmission is placed face down in the feeder. |
| A distorted image is received at the other end. | ·If Error Correction Mode is turned off (see Error Correction Mode in Chapter 2), noise on the telephone line may cause distortion. Try sending the document again. ·Make a copy of the document on your fax machine. If the copy is also distorted, your fax machine may need service. |
| Problem | Solution |
| The fax machine doesn't receive documents automatically. | ·Make sure that the reception mode is set to FAX. If you subscribe to a distinctive ring service, make sure that the Distinctive Ring function is set to the correct ring pattern. If you do not subscribe to a distinctive ring service, make sure that Distinctive Ring is set to OFF SETTING. (See Distinctive Ring in Chapter 7.) |
| The power is on, but no reception takes place. | ·Make sure that the telephone line cord is plugged into the TEL LINE jack, and not the TEL SET jack. |
| The printing paper comes out blank when you try to receive a document. | ·Make sure that the document is loaded properly in the feeder of the transmitting machine. Make a copy or print a report to confirm the printing ability of your machine. |
| The received document is faint. | ·Ask the other party to send higher contrast documents. If the contrast is still too low, your fax machine may need service. Make a copy or print a report to check your machine's printing ability. ·The toner cartridge may need replacement. |
| Received images are distorted. | ·If the sending machine has Error Correction Mode, make sure this feature is turned on in both fax machines (see Error Correction Mode in Chapter 2). ·If Error Correction Mode is turned off, noise on the telephone line may cause distortion. Have the other party try sending the document again. ·The drum cartridge may be damaged. Try a new drum cartridge. ·Make a copy or print a report on your fax machine. If the copy or report is also distorted, your fax machine may need service. |
| The quality of copies is poor and/or black spots appear. | ·Any dirt or material on the scanning glass will cause spots to appear on copies and transmitted faxes. Clean the scanning glass as explained in Chapter 9. |
| Dots appear at regular intervals on received documents and copies. | ·The drum cartridge may be damaged. Replace the drum cartridge. |
| Problem | Solution |
| The answering machine connection does not operate properly. | ·Make sure your fax machine's reception mode is set to A.M. ·Make sure your fax machine's TEL LINE jack is connected to the wall jack. Make sure your fax machine's TEL. SET jack is connected to your answering machine's telephone line jack (not the answering machine's extension phone jack). ·Make sure your answering machine's outgoing message is under 10 seconds. ·Make sure that the Quiet Detect Time setting is set to three or four seconds (see Chapter 6). ·Make sure that the Distinctive Ring function is set to OFF SETTING (see Distinctive Ring in Chapter 7). ·If you have checked all of the above and the hookup still doesn't operate properly, call the Customer Assistance Center. |
Problèmes généraux
| Problem | Solution |
| Nothing appears in the display. | ·Make sure the power cord is properly plugged into a power outlet. ·Connect another electrical appliance to the outlet to see if it has power. |
| The machine does not respond when you press any of its keys. | ·If a beep sound is not made when you press the keys, open the printer compartment cover and use pencil or pen to press the RESET button. (See the following page.) |
| Automatic document feeding does not work for transmission or copying. | ·Check the size and weight of the document (see Transmittable Documents in Chapter 2. |
| Voice calls taken on an extension phone are interrupted by the fax. | ·The fax may interrupt during a voice call if the reception mode is set to A.M. To prevent interruption on a tone dial extension phone, press any three keys on the extension phone after answering. (Note: Do not enter the code to activate fax reception.) |
| No reception occurs when polling is attempted. | ·Make sure you have not run out of paper. ·Make sure the transmitting machine is in automatic reception mode. ·If the transmitting machine has polling security, make sure that your fax number has been entered both in your machine and in the transmitting machine. |
Utilisation de la touche RESET
If the fax machine stops responding when you press any of the operation panel keys, you must reset it. This can be done as follows: 1 Grasp the print compartment cover at both sides as shown, and pull up to open the cover. - Caution! The fusing unit inside the print compartment becomes very hot during operation. Do not touch the inside of the compartment or the paper guide on the underside of the print compartment cover.  2 Use a ballpoint pen to press the RESET button. - Note: Pressing the RESET button clears any documents that are stored in memory.  3 Close the print compartment cover, pressing down firmly on each side to make sure it is completely closed. Messages et signaux
Display messages| CAN'T PRINT DATA | A fax has been received to memory because printing is not possible. This message will alternate with a message that indicates the problem. The fax will print out automatically when the problem is resolved. |
| CHECK PAPER SIZE | The paper size setting is incorrect. Change the paper size setting as described in Loading Printing Paper in Chapter 1. |
| CHECK PC | This appears if you press the E-MAIL key and your computer is not turned on or is not correctly connected to the fax machine. |
| COVER OPEN | The print compartment cover is open. Press down firmly on both sides of the print compartment cover to close it. |
| DOCUMENT JAMMED | The original document is jammed. See the following section, Clearing Paper Jams. |
| FUNCTION MODE | The FUNCTION key has been pressed. |
| GRP. SPACE FULL | This appears if you attempt to program a Group Key when all Group Keys have already been programmed. |
| HOLD | The HOLD/SEARCH key has been pressed to put the other party on hold during a phone conversation. Press the HOLD/SEARCH again to take the other party off hold. |
| LINE ERROR | Transmission or reception was not successful. Press the STOP key to clear the message and then try again. If the error persists, see Line Error in Problems and Solutions in this chapter. |
| LINE IS IN USE | An extension phone connected to the fax is being used. Do not lift the fax's handset or attempt transmission at this time, as this will interrupt the conversation on the extension phone. |
| MEMORY IS FULL | The memory is full. This may occur during fax reception if too much data is received before the pages can be printed out. If faxes have been received to memory because printing is not possible (an additional message will indicate the problem), resolve the problem so that printing can continue (see Substitue Reception to Memory in Chapter 3). If you are attempting to transmit by automatic dialing, see If the memory becomes full in Chapter 2. |
| MEMORY PRINTING | The fax is preparing to or printing out a document from memory. |
| NO DATA | This appears if you attempt to search for an automatic dialing number when none have been stored. |
| NO # STORED | You have tried to dial or clear a Rapid Key or Speed Dial number that hasn't been programmed (a full number hasn't been assigned to it). |
| OFF HOOK | This appears if you forgot to replace the handset after using it to dial and send a fax. Replace the handset or press the STOP key to clear the message. |
| ON HOOK DIAL | The SPEAKER key has been pressed and the fax machine is waiting for you to dial. |
| OUT OF PAPER | You are out of printing paper (or the paper release lever is open). Load paper as explained in Loading Printing Paper in Chapter 1. |
| PAPER JAMMED | The printing paper is jammed. See the following section, Clearing Paper Jams. |
| SEND READY | A document has been loaded and the fax machine is waiting for you to begin faxing or copying. |
| REPLACE TONER | The toner cartridge must be replaced. |
| SEARCH DIAL | The HOLD/SEARCH key has been pressed. Press # or * to search for an automatic dialing number, or press the STOP key to return to the date and time display. (See Searching for an auto-dial number in Sending a Fax by Automatic Dialing in Chapter 2.) |
| SIZE ERROR | The paper size setting is longer than the paper loaded in the tray. Change the paper size setting as explained in Loading Printing Paper in Chapter 1. This message also appears if paper smaller than letter size has been loaded. In this case, change the paper to letter, legal, or A4 size paper. |
| TOTAL PAGE(S) 1 | Number of pages transmitted, received, or copied. |
| TX MEMORY FULL | This message appears if you insert a document into the document feeder when 30 transmission jobs are already waiting in memory for transmission. You can continue setting up the transmission job after the job currently being sent is completed. This message may also appear if faxes have been received to memory due to a printing problem. In this case, resolve the problem so that printing can take place and free memory. |
Signaux sonores
| Continuous tone | 3 seconds | Indicates the end of transmission, reception, or copying. |
| Intermittent tone (3 beeps) | 5 seconds (1 second on, 1 second off) | Indicates incomplete transmission, reception, or copying. |
| Rapid intermittent tone | Continuous (0.7 seconds on, 0.3 seconds off) | Indicates that the handset is off hook. |
Débourrage papier
Débourrage d'un document coincé
If the original document doesn't feed properly during transmission or copying, or DOCUMENT JAMMED appears in the display, first try pressing the START key. If the document doesn't feed out, open the operation panel and remove it.Important :
Do not try to remove a document without opening the operation panel. This may damage the feeder mechanism. 1 Open the operation panel by grasping the panel release and pulling up.  2 Remove the document.  3 Close the operation panel, making sure it clicks into place. Débourrage du papier d'impression coincé
1 If most of the jammed page is protruding from the back of the fax, pull the paper release lever toward you and try pulling the page out.  2 If the jammed page comes out, take out the rest of the paper in the tray, straighten the stack, put it back in the paper tray, and push down the paper release lever. - If you are unable to clear the jam in this way, continue with the following steps.  3 Grasp the print compartment cover at both sides as shown, and pull up to open the cover. - Caution! The fusing unit inside the print compartment becomes very hot during operation. Be careful not to touch the inside of the compartment.  4 Grasp the finger hold on the toner cartridge handle where it is marked PUSH, and pull the handle out. Rehold the handle and pull the toner cartridge out of the compartment. - Place the toner cartridge on a sheet of paper on a level surface.  5 Grasp the tabs on the drum cartridge handle and gently pull the cartridge out of the machine.  6 Wrap the drum cartridge in a large sheet of paper as shown at right so that the green drum section is shielded from light, and place it gently on a level surface. - Do not touch the green drum in the drum cartridge. This will damage the drum surface. - Do not expose the drum to direct light. This will damage the drum.  7 Gently pull the jammed paper out of the machine. - If needed, turn the wheel on the right side of the fusing unit to eject the paper from the machine. - Caution! Do not use excessive force to pull the jammed paper out. If the paper tears and a piece remains inside the machine, a service call may be necessary to remove the remaining piece.   Fusing unit Wheel 8 Replace the drum cartridge. - To insert the cartridge, align the guides on the cartridge with the runners on the sides of the compartment.  9 Replace the toner cartridge and close the print compartment cover. (Refer to Installing the Toner Cartridge in Chapter 1.)  Informations réglementaires FCC
This equipment complies with FCC rules, Part 68. On this equipment is a label that contains, among other information, the FCC Registration Number and Ringer Equivalence Number (REN) for this equipment. If requested, this information must be provided to your telephone company. An FCC compliant telephone cord and modular plug is provided with this equipment. This equipment is designed to be connected to the telephone network or premises wiring using a compatible modular jack which is Part 68 compliant. This equipment connects to the telephone network through a standard USOC RJ-11C network interface jack. The REN is used to determine the quantity of devices which may be connected to your telephone line and still have all of those devices ring when your number is called. Too many devices on one line may result in the devices not ringing in response to an incoming call. In most, but not all, areas as the sum of the RENs of all devices should not exceed five (5.0). To be certain of the number of devices that may be connected to your line, as determined by the total REN, contact your local telephone company. If this equipment causes harm to the telephone network, your telephone company may disconnect your service temporarily. If possible, they will notify you in advance. If advance notice is not practical, you will be notified as soon as possible. You will also be advised of your right to file a complaint with the FCC. Your telephone company may make changes in its facilities, equipment, operations, or procedures that could affect the operation of your equipment. If this happens, the telephone company will provide advance notice in order for you to make necessary modifications to maintain uninterrupted service. If the equipment is causing harm to the telephone network, your telephone company may ask you to disconnect the equipment until the problem resolved. If you have any questions or problems which cannot be solved by reading this manual, please contact Sharp Electronics Corporation at Sharp Plaza, Mahwah, NJ 07430-2135. The customer number is 800-237-4277. This equipment may not be used on coin service provided by the telephone company. Connection to party lines is subject to state tariffs. Contact your state's public utility commission, public service commission, or corporation commission for more information. When programming and/or making test calls to emergency numbers: Remain on the line and briefly explain to the dispatcher the reason for the call. Perform such activities in the off-peak hours, such as early morning or late evening.SHARP
Date Revised : Date Issued July. 16. 1999FICHE DE DONNÉES DE SÉCURITÉ (1/2)
MSDS No. P-00102Section 1. Identification du produit
Product: FO-2970/FO29ND,FO-29DC,FO-29DCCN (Black Toner)Section 2. Nom et adresse du fournisseur
Sharp Corporation 22-22 Nagaike-cho, Abeno-ku, Osaka, Japan Local suppliers are listed below. Please contact the nearest supplier for additional information.| (Country) | (Name and Telephone Number) |
| U.S.A | Sharp Document Network System of America Telephone number for information: 1-800-237-4277 Emergency telephone number: 1-800-255-3924 |
| Canada | Sharp Electronics of Canada Ltd. Telephone number for information: 905-890-2100 Emergency telephone number: 1-800-255-3924 |
| United Kingdom | Sharp Electronics (U.K.) Ltd. Telephone number for information: 01923-474013 |
Section 3. Ingrédients
| Ingredients | CAS No. | Proportion | OSHA PEL | ACGIH TLV | Other Limits |
| Carbon black | 1333-86-4 | >5% | 3.5mg/m3 | 3.5mg/m3 | None |
| Styrene-Acrylate copolymer | 25036-16-2 | >90% | Not listed | Not listed | None |
| Iron oxide | 1317-61-9 | <2% | Not listed | Not listed | None |
| Silica | 68909-20-6 | <2% | 0.8mg/m3 | 10mg/m3 | None |
Section 4. Identification des dangers (Aperçu d'urgence)
Toner is a fine, black powder possessing no immediate hazard. There are no anticipated carcinogenic effects from exposure based on animal tests performed using toner. When used as intended according to instructions, studies do not indicate any symptoms of fibrosis will occur.Section 5. Données sur les risques pour la santé
| Route(s) of Entry | : Inhalation? Yes | Skin? No | Ingestion? Possible but very unusual. |
| Health Hazards | : Acute oral toxicity—LD50 of this toner is over 2,000mg/kg. Mutagenicity—The result of Ames test is negative. | ||
| Carcinogenicity | : In 1996 the IARC reevaluated carbon black as a Group 2B carcinogen (possible human carcinogen). This classification is given to chemicals for which there is inadequate human evidence, but sufficient animal evidence on which to base an opinion of carcinogenicity. The classification is based upon the development of lung tumors in rats receiving chronic inhalation exposures to free carbon black at levels that induce particle overload of the lung. Studies performed in animal models other than rats did not show any association between carbon black and lung tumors. Moreover, a two-year cancer bioassay using a typical toner preparation containing carbon black demonstrated no association between toner exposure and tumor development in rats. | ||
| Chronic Effect | : In a study in rats of chronic inhalation exposure to a typical toner, a mild to moderate degree of lung fibrosis was observed in 92% of the rats in the high concentration (16mg/m3) exposure group, and a minimal to mild degree of fibrosis was noted in 22% of the animals in the middle (4mg/m3) exposure group, but no pulmonary change was reported in the lowest (1mg/m3) exposure group, the most relevant level to potential human exposures. | ||
| Signs and Symptoms of Exposure | : Minimal irritation to respiratory tract may occur as with exposure to any non-toxic dust. | ||
| Medical Conditions Generally Aggravated by Exposure : None | |||
SHARP
Date Revised : Date Issued July. 16. 1999FICHE DE DONNÉES DE SÉCURITÉ (2/2)
MSDS No. P-00102| Section 5. | Health Hazard Data | ||
| Emergency and First Aid Procedures : | |||
| Inhalation | Remove to fresh air. If effects occur, consult medical personnel. | ||
| Eye | In case of contact, immediately flush eyes with water for 15 minutes. | ||
| Section 6. | Physical Chemical Characteristics | ||
| Boiling/Melting Point | Not applicable | Specific Gravity | 1.1 |
| Vapor Pressure | Not applicable | Solubility in Water | Negligible |
| Vapor Density | Not applicable | PH | Not applicable |
| Evaporation Rate | Not applicable | Viscosity | Not applicable |
| Appearance | Fine powder | Color | Black |
| Odor | Odorless | ||
| Section 7. | Fire and Explosion Data | ||
| Flash Point (Method Used) | : Not applicable | ||
| Ignition Temperature | : No data available | ||
| Flammable Limits | :(LEL); Not applicable (UEL); Not applicable | ||
| Extinguishing Media | : CO2, dry chemical, foam or water | ||
| Special Fire Fighting Procedure | : None | ||
| Unusual Fire and Explosion Hazard | : This material has no unusual fire or explosion hazards. | ||
| Sensitivity to Mechanical Impact | : None | ||
| Sensitivity to Static Charge | : None | ||
| Section 8. | Reactivity Data | ||
| Stability | : Stable | ||
| Incompatibility (Material to Avoid) | : None | ||
| Hazardous Decomposition | : CO | ||
| Hazardous Polymerization | : Will not occur. | ||
| Section 9. | Precautions for Safe Handling and Use | ||
| Personal Protection Information (Respiratory, Eye Protection and Protective Glove): | |||
| Use of a dust mask is recommended when handling a large quantity of toner or during long term exposure, as with any non-toxic dust. | |||
| Engineering Control/Ventilation | : Not required. | ||
| Work/Hygienic Practice | : Inhalation should be minimized as with any non-toxic dust. | ||
| Steps to be taken in case of Spill or Leak | : Sweep up or clean up with vacuum cleaner. | ||
| Waste Disposal Method | : Waste material may be dumped or incinerated under condi- tions which meet all federal, state and local environmental regulations. | ||
| Section 10. | Regulatory Information | ||
| NFPA Rating (U.S.A) | : Health = 1 Flammability = 1 Reactivity = 0 | ||
| WHMIS Legislation (Canada) | : This product is not a controlled product. | ||
| Transport Information | : This product is not a hazardous material. | ||
| UN No. | : None allocated. | ||
| Section 11. | Other Information | ||
| References | :IARC (1996) Monographs on the Evaluation of the Carcinogenic Risk of Chemicals to Humans, Vol. 65, Printing Process and Printing inks, Carbon Black and Some Nitro Com- pounds, Lyon, pp-149-261 H. Muhle, B. Bellmann, O. Creutzenberg, C. Dasenbrock, H. Ernst, R. Kilpper, J. C. Macken-zie, P. Morrow, U. Mohr, S. Takenaka, and R. Mermelstein (1991) Pulmonary Response to Toner upon Chronic Inhalation Exposure in Rats. Fundamental and Applied Toxicology 17, pp. 280-299 | ||
Guide de référence rapide
Saisie de votre nom et de votre numéro
1. Press: FUNCTION  Display shows: OWN NUMBER SET PRESS START KEY 2. Press: START 3. Enter your fax number (max. of 20 digits) by pressing the number keys. - To insert a space between digits, press the # key. - If you make a mistake, press the SPEED DIAL key to backspace and clear the mistake. 4. Press: 5. Enter your name by pressing the appropriate number keys as shown below. - To enter two letters in succession that require the same key, press the SPEAKER key after entering the first letter. SPACE = ① ① J=⑤⑤ T=⑧⑧ A= 2 2 K=⑤ ⑥ U=8 8 8 B ② ② L=5555 V=8 8 8 8 C=②②② M=6 6 W=⑨⑨ D=③③ N=6 6 6 X=⑨ ⑨ E ③ ⑧ 0=6 6 6 6 Y=⑨ ⑨ ⑨ F=③③⑧ P=⑦⑦ Z=⑨⑨⑨⑨ G= 4 4 Q=⑦⑦ H=④④④ R=⑦⑦⑦ 1= 4 4 4 S=⑦⑦⑦⑦ - To change case, press the REDIAL key. Press # or to scroll through symbols and special characters. 6. When finished, press:  Réglage de la date et de l'heure
1. Press: FUNCTION  Display shows: DATE & TIME SET PRESS START KEY 2. Press: START 3. Enter two digits for the month (01 to 12). 4. Enter two digits for the day (01 to 31). 5. Enter four digits for the year (Ex: 2000) 6. Enter two digits for the hour (01 to 12) and two digits for the minute (00 to 59). 7. Press for A.M. or # for P.M. 8. When finished, press:  Mémorisation et effacement des numéros de numérotation automatique
1. Press: FUNCTION  Display shows: FAX/TEL # MODE 1=SET,2=CLEAR 2. Press 1 to store a number or 2 to clear a number. 3. Press a Rapid Key or enter a 2-digit Speed Dial number (from 00 to 99). (If you are clearing a number, go to Step 7.) 4. Enter the full fax/telephone number. 5. Press: START 6. Enter the name of the location by pressing number keys. (Refer to the letter entry table in Entering Your Name and Number.) 7. Press: START STOPEnvoi de télécopies
Place your document (up to 20 pages) face down in the document feeder. Numérotation normale
  1. Lift the handset or press 2. Dial the fax number. 3. Wait for the reception tone (if a person answers, ask them to press their Start key). 4. Press:Numérotation par touche rapide
Press the appropriate Rapid Key. Transmission will begin automatically.Numérotation abrégée
1. Press: SPEED DIAL  2. Enter the 2-digit Speed Dial number. 3. Press: START Réception de télécopies
Press the RECEPTION MODE key until the arrow in the display points to the desired reception mode.  FAX mode: The fax machine automatically answers on four rings and receives the incoming document.Mode TEL :
 A.M. mode: Select this mode when an answering machine is connected to the fax and the answering machine is turned on.Guide de référence
Saisie de votre nom et de votre numéro
1. Pulse: FUNCTION 3 # # El visor muestra: OWN NUMBER SET PRESS START KEY 2. Pulse: 3. Introduzca su numero de telegram (20 digitos como max.) mediante pulsacion de las teclas numéricas. - Pulse la tecla # para introducir un espacio libre. - Si cometiera un error, pulse la tecla SPEED DIAL (marcación rápida) paravoltar un=puesto y corregirlo. 4. Pulse: 5. Introduzca su nombre mediante pulsacion de las teclas numericas adecuadas como se muestra a continuacion. - Para introducir dos letras sucesivas que requieran el mesmo número, pulse la tecla SPEAKER (altavoz) afterwards introducir la primera letra. SPACE = ① ① J=⑤⑤ T=⑧⑧ A=②② K=⑤⑤⑤ U=8 8 8 B=②②② L=⑤⑤⑤ V=8 8 8 8 C=②②② M=⑥⑥ W=⑨⑨ D= ③ ③ N=6 6 6 X=⑨ ⑨ ⑨ E=③ ③ 0=6 6 6 6 Y=9 9 9 9 F=③③③③ P=⑦⑦ z=⑨⑨⑨ G= ④ ④ Q=⑦⑦ H=4 4 4 R=7 7 7 1=4 4 4 4 S=⑦⑦⑦⑦ - Paracaebardemayusculaaminusculay viceversa,pulse la tecla REDIAL(repetacion dellamada).Pulse la tecla # o* para hojear por los simbolos y caric-.teres especials. 6. Una vez finalizzato pulse: START STOPRéglage de la date et de l'heure
1. Pulse: FUNCTION  El visor muestra: DATE & TIME SET PRESS START KEY 2. Pulse:   3. Introduzca dos digitos para el mes (01 hasta 12). 4. Introduzca dos digitos para el dia (01 hasta 31). 5. Introduzca cuatro dígitos para el año (Ej.: 2000). 6. Introduzca dos digitos para la hora (01 hasta 12) y dos digitos para los短时间内 (00 hasta 59). 7. Pulse para A.M. o # para P.M. 8. Una vez finalizo pulse:Mémorisation et effacement des numéros de numérotation automatique
1. Pulse:  FAX/TEL # MODE 1=SET, 2=CLEAR El visor muestra: 2. Pulse 1 para guardar un número o 2 para borrarlo. 3. Pulse Usted una tecla rápida o entre un número de 2 digitos de descado rápido (entre 00 y 99), (si Usted está bomrando un número, siga con el paso 7.) 4. Introduzca el numero de telegramoplete. 5. Pulse: ① START 6. Introduzca el numero del=peso medi- ante pulsacion de las teclas numéricas. (Consulte la tabla para introduccion de letras en la Introduccion de su nombre y numero). 7. Pulse: STOPTransmission de télécopies
Cologne el original (hasta 20 páginas) cara abajo en el alimentador de documents.  SPEAKERNumérotation normale
 1. Levante el auricular o pulse: 2. Marque el número de telegram. 3. Espere hasta escuchar el tono de recepcion (si contestara una persona, pidale pulsar su tecla Start). 4. Pulse:Numérotation rapide
Pulse la tecla de marcación- Appuyez sur :
NUMÉRO ABRÉGÉ
- Composez le numéro à deux chiffres de numérotation abrégée.
- Appuyez sur :

Réception de messages télécopie
Appuyez sur la touche MODE DE RÉCEPTION jusqu'à ce que la flèche à l'écran indique le mode de réception souhaité.
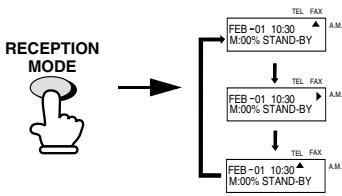
Mode FAX : Le télécopieur répond automatiquement aux appels et reçoit le document entrant.
Mode TEL :
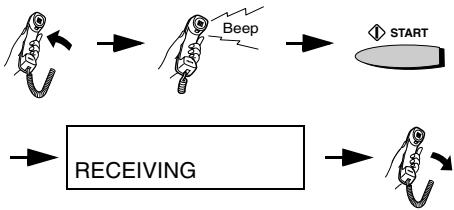
Mode A.M. Sélectionnez ce mode si un répondeur automatique est connecté au télécopieur et que le répondeur est allumé.
Index
A
Mode de réception A.M., 35, 82
Rapport d'activité, 110
Impression automatique, 112
Branchement du répondeur
Activation, 82
Connexion, 81
Réception de fax en cas de panne du répondeur, 85
Temps de détection silencieuse, 84
Dépannage, 127
Anti-junk fax, 99 - 100
Liste des numéros anti-junk, 114
Signaux sonores, 132
Numéros de numérotation automatique, mémorisation, 53
B
Numérotation par lots, 97
Longueur du bip, 41
Diffusion, 86 - 88
C
Numérotation en chaîne, 55
Contraste, 47
Copies, 76 - 78
Décalage de coupe des copies, 78
Page de garde, 94 - 96
D
Date, réglage, 32
Heure d'été, 34
Mode de numérotation, 14
Numérotation
En chaîne, 55
Clavier direct, 60
Normal, 50, 79
Rapid Key, 58, 79
Speed, 59, 79
Composition directe par clavier numérique, 60
Messages affichés, 130 - 132
Sonnerie distinctive, 91
Chargeur de documents, 44
Guides de documents, 44
Restrictions relatives aux documents, 43
Formats de documents, 42
Taille maximale de numérisation des documents, 43
Cartouche de tambour
Nettoyage, 122 - 123
Préparation, 17 - 18
Remplacement, 119 - 121
E
ECM (Error Correction Mode), 65
E-MAIL, 8
Extension telephone
Connecting, 16
Using, 70
F
FAX reception mode, 35, 67
Fax Signal Receive, 73
Fine resolution priority, 49
G
Group Keys, 89 - 90
Group List, 115
H
Halftone setting, 47
Combiné, 12
Volume du combiné, 39
Maintien, 80
Boîtier, nettoyage, 117
J
Bourrages, débourrage, 133-136
L
Lettres, saisie, 30
Erreur de ligne, 124
Voyant LIGNE OCCUPÉE, 8
Chargement du papier d'impression, 21 - 23
Chargement du document, 44
M
Mémoire
Vérification des documents en mémoire, 64
Envoi de télécopies, 57
Réception en remplacement, 75
N
Numérotation normale, 50, 79
Nombre de sonneries en mode réception fax, 68
0
Liste des réglages d'options, 114
Support de document original, 15
P
Bourrages papier, dégagement, 133-136
Réglage du format papier, 23
Papier, chargement, 21-23
Câble parallèle, connexion, 24
Liste des codes d'accès, 113
Pauses dans la numérotation automatique, 53
Polling, 101 - 106
Cordon d'alimentation, 13
Q
Quick Online, 66
R
Numérotation rapide, 58, 79
Intervalle de rappel, 62
Temps de rappel, 63
Réglage de l'unité de réception, 36
Mode de réception
Mode A.M., 35, 82
Mode FAX, 35, 67
Réglage, 35
Mode TEL, 35, 69
Réglage du rapport de réception, 74
Numérotation abrégée, 51, 62, 80
Réglage de la réception à distance, 72
Retrait du document original, 45
Résolution, 47
Volume de la sonnerie, 40
Vitre de numérisation, nettoyage, 117
Numérotation par recherche, 61, 80
Nom et numéro de l'expéditeur, saisie, 28
Logiciel multifonction Sharp Laser, installation, 26
Volume du haut-parleur, 38
Numérotation rapide, 59, 79
Mode de réception TEL, 35, 69
Prise de ligne téléphonique, 14
Prise de combiné téléphonique, 16, 81
Numéro de télécopie/téléphone à distance, 71, 72
Cordon de ligne téléphonique, 14
Liste des numéros de téléphone, 113
Heure, réglage, 32
Liste des minuteries, 113
Opérations de minuterie, 107 - 109
Cartouche de toner
Installation, 17 - 20
Remplacement, 118
Index
Rapport de transaction, 115
Réglage des conditions d'impression, 115
Index
Index
NOTICE
VEUILLEZ DEMANDER À VOTRE REVENDEUR AGRÉÉ SHARP AU SUJET DE LA GARANTIE QUE VOTRE REVENDEUR VOUS ACCORDE. Afin de vous assurer, en tant qu'utilisateur final, une protection de garantie, Sharp accorde une garantie limitée à chacun de ses revendeurs agréés et, à son tour, exige que chacun de ses revendeurs agréés vous accorde sa propre garantie à des conditions non moins favorables que celles accordées au revendeur par Sharp. Vous devez toutefois être conscient que Sharp n'accorde lui-même aucune garantie, expresse ou implicite, directement à vous, utilisateur final, et que personne n'est autorisé à faire des déclarations ou des garanties au nom de Sharp. Plus précisément, SHARP N'ACCORDE PAS À VOUS, UTILISATEUR FINAL, DE GARANTIE EXPRESSE OU DE GARANTIE IMPLICITE DE QUALITÉ MARCHANDE, D'ADAPTATION À UN USAGE OU D'ADAPTATION À UN USAGE PARTICULIER EN CE QUI CONCERNE LE MATÉRIEL, LE LOGICIEL OU LE FIRMWARE INCORPORÉS DANS CE PRODUIT OU UTILISÉS AVEC CE PRODUIT. Sharp n'est pas responsable des dommages ou pertes, directs, accessoires ou consécutifs, que vous, utilisateur final, pourriez subir à la suite de l'achat ou de l'utilisation du matériel, du logiciel ou du firmware incorporés dans ce produit ou utilisés avec ce produit. Votre seul recours, en cas de difficulté avec le produit, est contre le revendeur agréé auprès duquel vous avez acheté le produit. Si ce revendeur agréé ne respecte pas ses engagements de garantie, veuillez contacter le Vice-président, Sharp Document Network System of America, Business Product Group, Sharp Plaza, Mahwah, NJ 07430-2135, afin que Sharp puisse tenter d'aider à assurer la pleine satisfaction de tous les droits de garantie auxquels vous avez droit de la part du revendeur agréé.
SHARP®
SHARP DOCUMENT NETWORK SYSTEM OF AMERICA
Sharp Plaza, Mahwah, New Jersey 07430-2135
SHARP CORPORATION
POUR VOS DOSSIERS
Veuillez noter le numéro de modèle et le numéro de série ci-dessous pour référence facile, en cas de perte ou de vol. Ces numéros se trouvent à l'arrière de l'appareil. Un espace est également prévu pour d'autres informations pertinentes.
Numéro de modèle
Numéro de série
Date d'achat
Lieu d'achat
IMPRIMÉ EN CHINE
(TINSE4147SCZZ)
- FACSIMILE
- MANUEL D'UTILISATION
- À PROPOS DE LA LOI SUR LA PROTECTION DES CONSOMMATEURS PAR TÉLÉPHONE DE
- DÉCLARATION DE CONFORMITÉ
- TÉLÉCOPIEUR LASER SHARP, FO-2970M
- INTRODUCTION
- DIMENSIONS
- POIDS
- INFORMATIONS DE SÉCURITÉ IMPORTANTES
- IMPORTANT
- TABLE DES MATIÈRES
- APERÇU DU PANNEAU DE COMMANDE
- INSTALLATION
- ENVOI DE DOCUMENTS
- RÉCEPTION DE DOCUMENTS
- RÉALISATION DE COPIES
- PASSER DES APPELS TÉLÉPHONIQUES
- RACCORDEMENT D'UN RÉPONDEUR
- FONCTIONS SPÉCIALES
- IMPRESSION DE LISTES
- ENTRETIEN
- DÉPANNAGE
- GUIDE DE RÉFÉRENCE RAPIDE
- GUÍA DE REFERENCIA
- TOUCHE NUMÉROTATION RAPIDE
- TOUCHE BIS
- VOYANT VÉRIFICATION PAPIER
- VOYANT TONER VIDE
- AFFICHEUR
- DÉVERROUILLAGE DU PANNEAU
- VOYANT PC EN SERVICE
- VOYANT LIGNE EN SERVICE
- TOUCHE MODE RÉCEPTION
- TOUCHE FONCTION
- TOUCHE RÉSOLUTION
- TOUCHES VOLUME (HAUT/BAS)
- TOUCHE DIFFUSION
- TOUCHES DE NUMÉROTATION RAPIDE
- TOUCHE E-MAIL
- TOUCHE RÉDUCTION/AGRANDISSEMENT
- TOUCHE STOP
- TOUCHE START
- TOUCHE COPIE/AIDE
- TOUCHE MAINTIEN/RECHERCHE
- TOUCHE HAUT-PARLEUR
- TOUCHES NUMÉRIQUES
- LISTE DE VÉRIFICATION DU DÉBALLAGE
- CONNEXIONS
- POINTS À GARDER À L'ESPRIT LORS DE L'INSTALLATION
- À PROPOS DE LA CONDENSATION
- CONNEXION DU COMBINÉ
- BRANCHEMENT DU CORDON D'ALIMENTATION
- ATTENTION
- BRANCHEMENT DU CORDON DE LIGNE TÉLÉPHONIQUE
- APPUYEZ SUR CES TOUCHES
- FONCTION
- APPUYEZ SUR 1 POUR SÉLECTIONNER LA NUMÉROTATION EN TONALITÉ, OU SUR 2 POUR SÉLECTIONNER LA NUMÉROTATION EN IMPULSIONS
- TONALITÉ
- IMPULSIONS
- APPUYEZ SUR LA TOUCHE STOP POUR REVENIR À L'AFFICHAGE DE LA DATE ET DE L'HEURE
- FIXATION DU BAC À PAPIER ET DES SUPPORTS DE DOCUMENTS
- TÉLÉPHONE SUPPLÉMENTAIRE (EN OPTION)
- INSTALLATION DE LA CARTOUCHE DE TONER
- CHARGEMENT DU PAPIER D'IMPRESSION
- INSÉREZ FERMEMENT LA PILE DE PAPIER DANS LE BAC, FACE IMPRIMABLE VERS LE HAUT
- ABAISSEZ LE LEVIER DE LIBÉRATION DU PAPIER
- CONFIGURATION DE L'INTERFACE MULTIFONCTION
- CONNEXION DU CÂBLE PARALLÈLE
- INSTALLATION DU LOGICIEL MULTIFONCTION
- CONFIGURATION SYSTÈME MINIMALE REQUISE
- GUIDE D'UTILISATION EN LIGNE
- SAISIE DE VOTRE NOM ET DE VOTRE NUMÉRO DE FAX
- APPUYEZ SUR LA TOUCHE START
- RÉGLAGE DE LA DATE ET DE L'HEURE
- HEURE D'ÉTÉ
- RÉGLAGE DU MODE DE RÉCEPTION
- MODE TEL
- MODE FAX
- MODE A.M
- SÉLECTION DE L'UNITÉ DE RÉCEPTION
- APPUYEZ SUR 1 (FAX) POUR SÉLECTIONNER LE TÉLÉCOPIEUR, OU SUR 2 (PC) POUR SÉLECTIONNER L'ORDINATEUR
- SI VOUS AVEZ SÉLECTIONNÉ LA RÉCEPTION SUR L'ORDINATEUR ET QUE VOUS SOUHAITEZ QUE L'ORDINATEUR RÉPONDE AUTOMATIQUEMENT À TOUS LES APPELS, RÉGLEZ LE MODE DE RÉCEPTION DU TÉLÉCOPIEUR SUR FAX
- RÉGLAGE DU VOLUME
- HAUT-PARLEUR
- COMBINÉ
- SONNERIE
- DURÉE DU BIP
- APPUYEZ SUR 1 POUR 3 SECONDES, SUR 2 POUR 1 SECONDE, OU SUR 3 POUR AUCUN BIP
- DOCUMENTS TRANSMISSIBLES
- TAILLE ET POIDS
- CHARGEMENT D'UNE PAGE À LA FOIS
- CHARGEMENT DE PLUSIEURS PAGES À LA FOIS
- AUTRES RESTRICTIONS
- CHARGEMENT DU DOCUMENT
- RETRAIT D'UN DOCUMENT DU CHARGEUR
- RÉGLAGE DE LA RÉSOLUTION ET DU CONTRASTE
- PARAMÈTRES DE RÉSOLUTION
- PARAMÈTRES DE CONTRASTE
- CHARGEZ LE(S) DOCUMENT(S)
- APPUYEZ SUR LA TOUCHE RÉSOLUTION UNE OU PLUSIEURS FOIS JUSQU'À CE QUE LES PARAMÈTRES DE RÉSOLUTION ET DE CONTRASTE SOUHAITÉS APPARAISSENT À L'ÉCRAN
- MODIFICATION DE LA RÉSOLUTION PAR DÉFAUT
- APPUYEZ SUR 1 (OUI) POUR RÉGLER LA RÉSOLUTION PAR DÉFAUT SUR FINE, OU SUR 2 (NON) POUR LA RÉGLER SUR STANDARD
- ENVOI D'UN FAX PAR NUMÉROTATION NORMALE
- UTILISATION DE LA TOUCHE BIS
- ENVOI D'UN FAX PAR NUMÉROTATION AUTOMATIQUE
- MÉMORISATION DES NUMÉROS DE FAX ET DE TÉLÉPHONE POUR LA NUMÉROTATION AUTOMATIQUE
- APPUYEZ SUR LA TOUCHE 1 POUR SÉLECTIONNER RÉGLAGE
- POUR MÉMORISER UN NUMÉRO DANS UNE TOUCHE RAPIDE, APPUYEZ SUR LA TOUCHE RAPIDE SOUHAITÉE
- SAISISSEZ LE NUMÉRO DE FAX OU DE TÉLÉPHONE EN APPUYANT SUR LES TOUCHES NUMÉRIQUES
- APPUYEZ SUR LA TOUCHE DÉPART
- SAISISSEZ LE NOM DU CORRESPONDANT À L'AIDE DES TOUCHES NUMÉRIQUES COMME INDIQUÉ CI-DESSOUS. (SI VOUS NE SOUHAITEZ PAS SAISIR DE NOM, PASSEZ DIRECTEMENT À L'ÉTAPE 7.)
- NUMÉROTATION EN CHAÎNE POUR LES INDICATIFS RÉGIONAUX ET D'ACCÈS
- EFFACEMENT DES NUMÉROS DE NUMÉROTATION AUTOMATIQUE
- MODIFICATIONS
- DOUBLE ACCÈS
- SI LA MÉMOIRE EST PLEINE
- NUMÉROTATION PAR TOUCHE RAPIDE
- CHARGEZ LE OU LES DOCUMENTS
- APPUYEZ SUR LA TOUCHE RAPIDE APPROPRIÉE
- NUMÉROTATION ABRÉGÉE
- APPUYEZ SUR LA TOUCHE NUMÉROTATION ABRÉGÉE PUIS SAISISSEZ LE NUMÉRO ABRÉGÉ À L'AIDE DES TOUCHES NUMÉRIQUES
- VÉRIFIEZ L'AFFICHAGE. SI LE NOM OU LE NUMÉRO AFFICHÉ EST CORRECT, APPUYEZ SUR LA TOUCHE START. (SINON, APPUYEZ SUR LA TOUCHE STOP PUIS RÉPÉTEZ L'ÉTAPE 2.)
- NUMÉROTATION DIRECTE AU CLAVIER
- RECHERCHE D'UN NUMÉRO DE NUMÉROTATION AUTOMATIQUE
- APPUYEZ SUR LA TOUCHE MAINTIEN/RECHERCHE
- APPUYEZ SUR 1 POUR RECHERCHER UN NUMÉRO DE NUMÉROTATION AUTOMATIQUE, OU SUR 2 POUR RECHERCHER UN DESTINATAIRE E-MAIL
- NUMÉROTATION AUTOMATIQUE E-MAIL
- SAISISSEZ LA PREMIÈRE LETTRE DU NOM ENREGISTRÉ EN APPUYANT SUR LA TOUCHE NUMÉRIQUE APPROPRIÉE (LA TOUCHE SITUÉE SOUS LA LETTRE MARQUÉE) UNE OU PLUSIEURS FOIS JUSQU'À CE QUE LA LETTRE APPARAISSE À L'ÉCRAN. SI LE NOM COMMENCE PAR UN CARACTÈRE SPÉCIAL OU UN CHIFFRE, APPUYEZ SUR 1 (UNIQUEMENT POUR LES NUMÉROS DE NUMÉROTATION AUTOMATIQUE)
- RECOMPOSITION AUTOMATIQUE
- INTERVALLE DE RAPPEL POUR LA RECOMPOSITION AUTOMATIQUE
- NOMBRE DE RAPPELS POUR LA NUMÉROTATION AUTOMATIQUE
- VÉRIFICATION ET ANNULATION DES TRAVAUX DE TRANSMISSION
- APPUYEZ SUR LA TOUCHE HAUT OU BAS POUR FAIRE DÉFILER LA LISTE DES TRAVAUX. (REMARQUE : VOUS POUVEZ ÉGALEMENT FAIRE DÉFILER AVEC LA TOUCHE OU #.)
- LORSQUE VOUS AVEZ FINI DE CONSULTER LA LISTE, APPUYEZ SUR LA TOUCHE STOP POUR REVENIR À L'AFFICHAGE DE LA DATE ET DE L'HEURE
- MODE DE CORRECTION D'ERREURS
- APPUYEZ SUR 1 POUR ACTIVER L'ECM OU SUR 2 POUR LE DÉSACTIVER
- QUICK ONLINE
- APPUYEZ SUR 1 POUR ACTIVER QUICK ONLINE OU SUR 2 POUR LE DÉSACTIVER
- UTILISATION DU MODE FAX
- MODIFICATION DU NOMBRE DE SONNERIES
- SAISISSEZ LE NOMBRE DE SONNERIES SOUHAITÉ (UN NOMBRE DE 1 À 5)
- SORTIE DES DOCUMENTS REÇUS
- UTILISATION DU MODE DE RÉCEPTION TEL
- RÉPONDRE AVEC LE COMBINÉ DU TÉLÉCOPIEUR
- RÉPONDRE AVEC UN TÉLÉPHONE SUPPLÉMENTAIRE
- CHANGER LE NUMÉRO POUR L'ACTIVATION DE LA TÉLÉCOPIE À DISTANCE
- DÉSACTIVER LA DÉTECTION DU NUMÉRO DE TÉLÉCOPIE À DISTANCE TEL/FAX
- RÉCEPTION DE SIGNAUX DE TÉLÉCOPIE
- APPUYEZ SUR 1 POUR ACTIVER LA FONCTION, OU SUR 2 POUR LA DÉSACTIVER
- TAUX DE RÉCEPTION
- APPUYEZ SUR 1 POUR ACTIVER LA RÉDUCTION AUTOMATIQUE, OU SUR 2 POUR LA DÉSACTIVER
- RÉCEPTION DE SUBSTITUTION EN MÉMOIRE
- FAIRE DES COPIES
- RÉDUCTION/AGRANDISSEMENT
- RÉSOLUTION
- APPUYEZ SUR LA TOUCHE COPIE/AIDE
- REMARQUE
- COUPURE DE COPIE
- APPUYEZ SUR 1 POUR RÉGLER LA COUPURE DE COPIE SUR OUI (LA PARTIE RESTANTE DU DOCUMENT NE SERA PAS IMPRIMÉE), OU SUR 2 POUR RÉGLER LA COUPURE DE COPIE SUR NON (LA PARTIE RESTANTE SERA IMPRIMÉE SUR UNE DEUXIÈME PAGE)
- OUI
- NON
- STOP
- COMMENTAIRES
- RECOMPOSITION
- MAINTENIR
- CONNEXION D'UN RÉPONDEUR
- MODIFICATION DU MESSAGE D'ACCUEIL
- ACTIVATION DE LA CONNEXION DU RÉPONDEUR
- RÉGLEZ LE MODE DE RÉCEPTION SUR A.M
- RÉGLEZ VOTRE RÉPONDEUR SUR RÉPONSE AUTOMATIQUE
- FONCTIONNEMENT DE LA CONNEXION
- RÉGLAGES OPTIONNELS DU MODE A.M
- TEMPS DE DÉTECTION DE SILENCE
- FAX LORSQUE LE RÉPONDEUR NE RÉPOND PAS
- DIFFUSION
- APPUYEZ SUR LA TOUCHE START. LA TRANSMISSION COMMENCE
- DIFFUSION À L'AIDE D'UNE TOUCHE DE GROUPE
- APPUYEZ SUR LA TOUCHE DE GROUPE APPROPRIÉE. LA TRANSMISSION COMMENCE
- MÉMORISATION DES NUMÉROS DANS LES TOUCHES DE GROUPE
- APPUYEZ SUR 1 (SET) POUR PROGRAMMER UNE TOUCHE DE GROUPE, OU SUR 2 (CLEAR) POUR EFFACER UNE TOUCHE DE GROUPE
- POUR PROGRAMMER UNE TOUCHE DE GROUPE, APPUYEZ SUR LA TOUCHE QUE VOUS SOUHAITEZ PROGRAMMER (L'UNE DES TOUCHES RAPIDES 17/G1 À 20/G4)
- SONNERIE DISTINCTIVE (NÉCESSITE UN ABONNEMENT AU SERVICE)
- APPUYEZ 11 FOIS SUR LA TOUCHE
- PAGE DE GARDE
- SÉLECTION D'UN MESSAGE D'EN-TÊTE (FACULTATIF)
- NUMÉROTATION PAR LOTS
- BLOCAGE DE LA RÉCEPTION DE TÉLÉCOPIES INDÉSIRABLES
- APPUYEZ SUR 1 POUR ACTIVER LA FONCTION ANTI-JUNK, OU SUR 2 POUR LA DÉSACTIVER
- SAISIE DES NUMÉROS ANTI-JUNK
- INTERROGATION (DEMANDE D'ENVOI D'UN FAX)
- DEMANDE D'ENVOI
- INTERROGATION (MÉMOIRE D'INTERROGATION)
- CHARGEZ LE DOCUMENT
- APPUYEZ SUR LA TOUCHE MODE DE RÉCEPTION POUR RÉGLER LE MODE DE RÉCEPTION SUR FAX
- SUPPRESSION D'UN DOCUMENT
- SÉCURITÉ DE L'INTERROGATION
- APPUYEZ SUR 1 POUR ACTIVER LA SÉCURITÉ DE LA RÉCEPTION, OU SUR 2 POUR LA DÉSACTIVER
- APPUYEZ SUR LA TOUCHE START PUIS SUR LA TOUCHE STOP
- MÉMORISATION ET EFFACEMENT DES NUMÉROS DE FAX POUR L'AUTORISATION DE RÉCEPTION
- APPUYEZ SUR 1 POUR MÉMORISER UN NUMÉRO, OU SUR 2 POUR EFFACER UN NUMÉRO
- MÉMORISATION : SAISISSEZ UN NUMÉRO À 2 CHIFFRES DE 01 À 10. CE NUMÉRO IDENTIFIE LE NUMÉRO DE FAX QUE VOUS MÉMORISEREZ À L'ÉTAPE SUIVANTE
- SAISISSEZ LE NUMÉRO DE FAX
- REVENEZ À L'ÉTAPE 3 POUR SAISIR (OU EFFACER) UN AUTRE NUMÉRO, OU APPUYEZ SUR STOP POUR REVENIR À L'AFFICHAGE DE LA DATE ET DE L'HEURE
- OPÉRATIONS DE MINUTERIE
- RÉGLAGE D'UNE OPÉRATION DE MINUTERIE
- POUR ANNULER UNE OPÉRATION DE MINUTERIE
- RAPPORT D'ACTIVITÉ
- EXPLICATION DES TITRES
- APPUYEZ SUR 1 POUR ACTIVER L'IMPRESSION AUTOMATIQUE, OU SUR 2 POUR LA DÉSACTIVER
- LISTE DES MINUTERIES
- LISTE DES NUMÉROS DE TÉLÉPHONE
- LISTE DES CODES D'ACCÈS
- LISTE DES RÉGLAGES DES OPTIONS
- LISTE DES NUMÉROS DE FAX INDÉSIRABLES
- LISTE DES GROUPES
- RAPPORT DE TRANSACTIONS
- APPUYEZ SUR UN CHIFFRE DE 1 À 5 POUR SÉLECTIONNER LA CONDITION D'IMPRESSION
- MAINTENANCE
- VITRE DE NUMÉRISATION ET ROULEAUX
- LE BOÎTIER
- REMPLACEMENT DE LA CARTOUCHE DE TONER
- CARTOUCHE DE TONER SHARP FO-29ND
- REMPLACEMENT DE LA CARTOUCHE DE TAMBOUR
- CARTOUCHE DE TAMBOUR SHARP FO-29DR
- NETTOYAGE DE LA CARTOUCHE DE TAMBOUR
- PROBLÈMES ET SOLUTIONS
- ERREUR DE LIGNE
- PROBLÈMES DE NUMÉROTATION ET DE TRANSMISSION
- PROBLÈMES GÉNÉRAUX
- UTILISATION DE LA TOUCHE RESET
- MESSAGES ET SIGNAUX
- SIGNAUX SONORES
- DÉBOURRAGE PAPIER
- DÉBOURRAGE D'UN DOCUMENT COINCÉ
- DÉBOURRAGE DU PAPIER D'IMPRESSION COINCÉ
- INFORMATIONS RÉGLEMENTAIRES FCC
- SHARP
- FICHE DE DONNÉES DE SÉCURITÉ (1/2)
- SECTION 1. IDENTIFICATION DU PRODUIT
- SECTION 2. NOM ET ADRESSE DU FOURNISSEUR
- SECTION 3. INGRÉDIENTS
- SECTION 4. IDENTIFICATION DES DANGERS (APERÇU D'URGENCE)
- SECTION 5. DONNÉES SUR LES RISQUES POUR LA SANTÉ
- FICHE DE DONNÉES DE SÉCURITÉ (2/2)
- SAISIE DE VOTRE NOM ET DE VOTRE NUMÉRO
- MÉMORISATION ET EFFACEMENT DES NUMÉROS DE NUMÉROTATION AUTOMATIQUE
- ENVOI DE TÉLÉCOPIES
- NUMÉROTATION NORMALE
- RÉCEPTION DE TÉLÉCOPIES
- GUIDE DE RÉFÉRENCE
- TRANSMISSION DE TÉLÉCOPIES
- NUMÉROTATION RAPIDE
- MARCACIÓN ABREVIADA
- RÉCEPTION DE MESSAGES TÉLÉCOPIE
- INDEX
- A
- B
- C
- D
- E
- F
- G
- H
- J
- L
- M
- N
- P
- Q
- R
- NOTICE
- SHARP®
- SHARP DOCUMENT NETWORK SYSTEM OF AMERICA
- SHARP CORPORATION
- POUR VOS DOSSIERS
Marque : SHARP
Modèle : FO-2970M
Catégorie : Télécopieur