TEMPORIS 25 - Téléphone fixe ALCATEL - Notice d'utilisation et mode d'emploi gratuit
Retrouvez gratuitement la notice de l'appareil TEMPORIS 25 ALCATEL au format PDF.

| Type de produit | Téléphone fixe |
| Marque | ALCATEL |
| Modèle | TEMPORIS 25 |
| Dimensions (L x l x h) | 220 x 200 x 100 mm (estimation) |
| Poids | 500 g (estimation) |
| Alimentation | Via la ligne téléphonique (pas d'alimentation secteur nécessaire) |
| Nombre de mémoires | 10, jusqu'à 24 chiffres chacune |
| Fonctions principales | Combiné, mains-libres, rappel, muet, écouteur, réglage volume sonnerie et combiné, sonnerie 4 tonalités, verrouillage par code, montage mural, prise casque RJ9, indicateur de message en attente |
| Type de numérotation | Décimale (pulsée) ou fréquentielle (tonalité) - programmable |
| Connectivité | Prise téléphonique RJ11, prise casque RJ9, prise modem supplémentaire |
| Entretien et nettoyage | Nettoyer avec un chiffon humide ; ne pas laisser entrer en contact avec l'eau |
| Sécurité | Ne pas utiliser pendant un orage ; ne pas exposer à l'eau ou à l'humidité excessive |
| Pièces détachées et réparabilité | Contacter le revendeur agréé ; garantie 12 mois pièces et main-d'œuvre |
| Informations générales | Conforme CE (directive 1999/5/CE) ; approuvé pour réseau analogique TIVO classe EN60950 |
FOIRE AUX QUESTIONS - TEMPORIS 25 ALCATEL
Questions des utilisateurs sur TEMPORIS 25 ALCATEL
0 question sur cet appareil. Repondez a celles que vous connaissez ou posez la votre.
Poser une nouvelle question sur cet appareil
Téléchargez la notice de votre Téléphone fixe au format PDF gratuitement ! Retrouvez votre notice TEMPORIS 25 - ALCATEL et reprennez votre appareil électronique en main. Sur cette page sont publiés tous les documents nécessaires à l'utilisation de votre appareil TEMPORIS 25 de la marque ALCATEL.
MODE D'EMPLOI TEMPORIS 25 ALCATEL

2. WALL MOUNTING
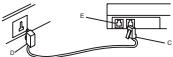
To mount your telephone set on the wall, remove the wall mounting peg and put it back the other way round as shown below. Drill two 6 mm holes, spaced 70 mm apart. Fit two wall plugs, then insert two screws (3.5 mm ∅ and 25 mm long), but without tightening them.
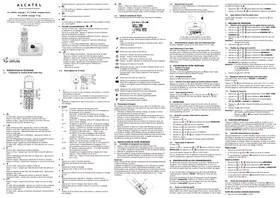
Place the cord in the slot situated underneath the set
Wall mounted position Horizontal position
FUNCTION KEYS
text_image
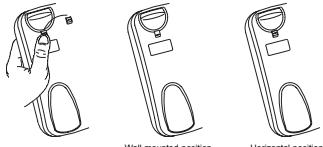
Peg for wall mounting Affix emergency number label here 10 memory keys Message waiting lamp Memory and set programming keys Redall/Pause Mute key Additional services access key Loudspeaker Hands-free key Ringer and hands-free volume control3. GENERAL USE
3.1 LINE LAMP / MESSAGE WAITING LAMP
This light flashes in time with the ringer when you receive a call. It goes out as soon as you take the line.
If you are connected to an ALCATEL PABX with a voicemail service, the mes-
→ sage waiting lamp tells you there is a message in your mailbox
There are two different ways of dialling by lifting the handset, then dialling
• by dialling in on-hook mode.
3.2 DIALING IN ON HOOK MODE
Press the hands-free key then dial your correspondent's number. Pick up the
handset to talk.
3.3 HANDS-FREE MODE
If you are talking to somebody on the handset, and you want to hear and talk to them over the loudspeaker instead:
Press and replace the handset
The people around you can join in the conversation
- + • Adjust the volume using the - and • keys
- Lift the handset to return to private conversation mode
3.4 HANDSET VOLUME CONTROL
When the hands-free function is off, you can increase the handset volume.
⊕ • Press the ⊙ key.
(-) • To return to the initial volume, press the (-) key.
3.5 MUTE
- The Mute key puts your correspondent on hold so that you can talk to someone
He else without the first person hearing.
To resume the conversation, press the Mute key again
3.6 LAST NUMBER DERIAL
3.0 EAST NUMBER 1 - Pick up the handset
• Press the Redial key
To erase the last dialled number
Disk up the bandest
- Pick up the handset. - Press the Programm
P Press the Redial key
3.7 ADDITIONAL SERVICE KEY0
(1) (2) 6.7 ADDITIONAL SERVICES KEY These function key provide quick access to additional services (ask your not
R Work operator or installer for details).
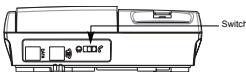
- CONNECTING AND USING THE HEADSET**
Connection
J9 headset cord into the socket on the base of the telephone

Utilisation
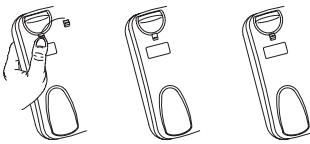
To use the headset, once you have plugged it in:
- Pick up the handset.
- Slide the switch on the back of the base towards the headset symbol - Dial the number
▶ You can now use the telephone in the normal way.
To continue your conversation with the handset instead, slide the switch towards
the handset symbol.
5. USING THE MEMORIES
NOTE: In programming mode, your TEMPORIS communicates with you by emit
ting a number of beeps.
1 beep . every key press is acknowledged by a beep 2 bears programming arrest
2 beeps: programming correct. 3 beeps: programming error. Start again from the beginning
Your telephone set can store 10 numbers of up to 24 digits
5.1 PROGRAMMING THE MEMORIES
Programming without calling
• Pick up the handset
- Press the Programming key.
- Enter the number.
- Press one of the ten memory keys
Programming while calling
- Pick up the hands
•
- Press the Programming key, whether you are already in conversation or not
- Press one of the ten memory keys.
5.2 MEMORY DIALLING
- Pick up the handset.
- Press one of the ten memory keys. The stored number is dialled automatically.
5.3 ERASING A MEMORY
- Pick up the handset.
Press the Programming key twice.
- Press the key corresponding to the memory to be erased.
6. SELECTING AND ADJUSTING THE RINGTONE
(14) You have a choice of four ringtones. You can adjust the volume when the phone
3.1 WITH A CALL CONTENTS
0.1 WHEN A CALL COMES IN You can change the airport as the phone is ringing
- Press 1, 2, 3 or 4 to select a ringtone.
(+)(-) • To turn the volume down or up, press (-) or (+).
Your modifications are memorized, and you can answer the call.
6.2 IN PROGRAMMING MODE
To go into programming mode:
1) 2) • Press and hold keys 1 and 3 simultaneously.
- Pick up the handse
- Release the keys.
- Access to programming mode is confirmed by 1 beep
To adjust the ringtone:
• Press the Programm
- To reduce or increase the ringer volume, press - or +.
• To change the ringtone press a key from 1 to 4
(1) 2017年1月1日
To turn the ringer ON or OFF:
Press the Programming key followed by 0.
4 beeps.
- Press ⭐ to turn th
- Replace the handset
•
7. LOCKING THE TELEPHONE
Using a 4-digit password, you can
- block access to the ringtone volume control.
- block access to the configuration for professional use.
- block calls to phone nu
The initial password is 0000
7.1 ACCESSING THE PROGRAMMING MODE
For each of the 3 operations, you need to go into programming mode first.
- Press and hold keys 4 and 6 simultaneously. Risk up the hardest
- Pick up the handset - Release the keys
TO LOCK/UNLOCK
1.2 Look/UNLOOK
- Press the Programming key followed by 1.
LOCK
- Press the Ⓞ key.
- Replace the handse
Unloc
- Press the Ⓞ key.
- Enter the password.
- Replace the handset.
7.3 MODIFYING THE PASSWORD
Go into programming mode again and then:
- Press the Programming key followed by 2.
- Enter the current password. 2 beeps are emitted.
- Enter the new 4-digit password. 2 beeps are emitted. - Enter it a second time, 2 beeps are emitted.
- Enter it a second time. 2 beeps are emitted - Replace the handset
7.4 IF YOU FORGET
7.4 IF YOU FORGET THE PASSWORD
Go into programming mode again and then. Press the Programming key followed by 0
- Press the key
- 2 hoops are emitted
- Replace the handse
-
This operation clears ALL the settings, including the memories. The password is reset to 0000.
The Ground Truth image displays a single, solid horizontal line. According to Rule 2 (UNDERSCORE & LINE RULES), this is a stylistic or background line, not a placeholder underscore. Therefore, the OCR result must ignore it and output nothing or only meaningful text. The provided OCR content is "\_\_\_\_", which consists of four underscores. This is an incorrect interpretation of the line as a placeholder, violating the rule that stylistic lines must be ignored. The OCR has hallucinated underscores where none should exist based on the GT's visual context. Hence, the OCR result is inconsistent with the Ground Truth.
8. CONFIGURATION FOR PROFESSIONAL USE
Skip this chapter if your TEMPORIS is connected directly to the public network.
8.1 ACCESSING THE PROGRAMMING MODE
For each of the 3 operations, you need to go into programming mode first
For each of the 3 operational, you need to go into programming mode first. ① ③ • Press and hold keys 1 and 3 simultaneously.
- Pick up the handset
- Release the keys.
8.2 TYPE OF DIALLING
- Press the Programming key followed by 2.
For pulse dialling
- Drop the Ⓞ key (or ⚙ key)
- Reduce the hedges
- Replaced the rent
For tone dialling
- Press the Ⓞ key (or Ⓗ key).
- Replace the handse
8.3 FLASH DURATION (R
Go into programming mode again
- Press the Programming key follow
- Press: 1 for a 100 ms flash
2 for a 300 ms flash
3 for a 600 ms flash.
- Replace the handset.
9. GUARANTEE
- 2017-2018年1月1日,公司与上海浦东发展银行股份有限公司签订了《关于使用部分闲置募集资金进行现金管理的协议》。
Your TEMPORIS 25 telephones are approved in conformity with European regulations, as attested by the CE mark.
You are covered by a legal guarantee on this product. For all information concerning this guarantee, please contact your reseller.
Regardless of the legal warranty covering the product, the reseller guarantees conformi
ty of the products with their technical specifications for a period of twelve (12) months, parts and labour, starting from the date appearing on the proof of purchase of the product.
You should therefore retain your invoice or till receipt specifying the date of purchase of the product and the name of the reseller. However, if the legal warranty applicable in your
exceeds twel
ing part or product will be repaire
possible to repair or replace the item,
The spare product or part, which may be either new or reconditioned, is guaranteed either for three months from the date of repair or until the end of the initial warranty period, whi
For three months from the date of repair of both and the end of the initial maturity period, whichever is the longer. All parts or products returned and replaced become the property of the manufacturer.
r, this warranty does not apply in the following cases:
- installation or use in a way that fails to comply with the instructions contained in this guide:
- incorrect connection or non-standard use of the product, notably with accessories not
designed for the purpose; normal wear and tear;
to comply with the technical
- failure to comply with the technical and safety standards prevailing in the state of country of use;
es subjected to shocks or falls;
- devices damaged by lightning, voltage surge, heat sources or radiation therefrom, water, exposure to excessive humidity, or any other cause external to the product itself:
- negligence or poor maintenance;
- maintenance, modification or repair of the product by persons not authorised by the manufacturer or reseller.
SUBJECT TO LEGAL PROVISIONS, ALL WARRANTIES OTHER THAN THOSE DES-
HEREIN ARE EXPRE
(
10. CUSTOMERS SERVICE
The store where you bought the telephone is in a position to give you information and pro-
vide alter-sales service.
11. DECLARATION OF CONFORMITY
Thomson Telecom hereby declares that the TEMPORIS 25 conforms to the essential requi-
rements and other relevant provisions of directive 1999/5/CE.
[Non-Text]
[Non-Text]
[Non-Text]
- De esta forma, puede utilizar normalmente el telefono.
Of desea reanudar la conversación con el microteléfono, despacia en interruptor situado en la parte posterior de la base al lado de la toma del microteléfono.

,
s auriculares, una vez que estos se han conectado
el microteléfono
interruptor situado en la parte posterior de la base, al lado de la
auriculares.
umero. ormo, puede utilizas normalmente el teléfono
udar la conversación con el microteléfono, desplace el interruptor
parte posterior de la base al lado de la toma del microteléfono
[NO TEXT]
1
B
V | □ | 2 □ | □ □ □ □ □ □ □ □ □ □ □ □ □ □ □ □ □ □ □ □ □ □ □ □ □ □ □ □ □ □ □ □ □ □ □ □ □ □ □ □ □ □ □ □ □ □ □ □ □ □ ▢
[Figure]
|
DE LAS MEM
DE LAG MEMORIAS
nte la programación, el TEMPORIS comunica con una serie de
slo sulcado 20 w
cela paisada es validada por 1 bip. ramación es correcta
gramación es incorrecta. Vuelva a empezar.
uede almacen hasta 10 números de 24 días
12. PRECAUTIONS OF USE / TECHNICAL SPECIFICATIONS
- Caution: never let your telephone set come into contact with water. You may, however,
use a damp cloth to clean your telephone.
- During storms, you are advised not to use the telephone.
- The TEMPORIS 25 telephone is designed for making and receiving telephone calls
and for connection to a private or public service telephone network.
- Appliance designed for connection to a TIVO class analogue telephone line as defined in European safety standard EN60950.
(1) 2017年1月1日至2018年1月1日(含)的公司股票交易均价为4.56元/股,与前一交易日收盘价相比,涨幅为-0.97%。
(二) 2017年1月1日
Espanol
-
INSTALACIÓN
-
INSTALACION
- Conecte el cable en espiral al microtelefon (A) y al conector situado en el lado izquierdo del teléfono (B).
(1) AD = BD = 1
[Non-Text]
(1) 12 (2) 12 (3) 12 (4) 12 (5) 12 (6) 12 (7) 12 (8) 12 (9) 12 (10)
A B
- Conecte el cable telefónico a la toma situada en la parte posterior izquierda del teléfono
no (C) y a la toma mural (D).
E
图 2-1
D C
NOTA: La toma adicional (E) permite conectar un módem.
- Pasque lo etiqueto de números de emergencia en el lugar adecuado
- P esque la etiqueta de números de emergencia en el lugar acudado.
2. COLOCACION MURAL
Para montar su teléfono en la pared, retire la lengüeta de montaje mural e insértela en la
posición inversa como se muestra a continuación. Peróre dos orificios de 6 mm de diametro a una distancia de 70 mm. Coloque dos tacos y dos tornillos (3.5 mm de ∅ y 25 mm
de largo) sin apretarlos.
Coloque el cable en la ranura situada bajo el teléfono.
Posición mural Posición de sobre mesa
TECLAS DE FUNCIÓN

text_image
Lengüeta de colocación mural Pegue aquí la etiqueta con el número del teléfono 10 memorias Indicador de mensaje en espera Tecla de programación y ajuste de memorias Relitamada/Pausa Tecla Silencio Tecla de acceso a servicios adicionale Tecla manos libres Ajuste del volumen del altavoz y del timbre3. USO GENERAL
3.1 INDICADOR DE LINEA / MENSAJE EN ESPERA
Cuando recibe una llamada, el indicador parpadea al mismo ritmo que el timbre.
Tambien se ilumina cuando se toma la línea. Si está reportado o una controllo telefóricas privada ALGATEL, cujaredo en
es la esta constituido a una centralia telefónica privada A204722 equipada con mensajería, el indicador luminoso de mensaje en espera se encenderá para
indicarle la presencia de un mensaje en su buzón de voz.
La marcación se puede realizar de dos forma
- descolgando el microteléfono y marcando,
- marcandó sin descolgar
3.2 MARCACIÓN SIN DESCOLGAR
Pulse el botón del altavoz y marque el numero de su interlocutor. Descuelgue para establecer la conversación.
3.3. UTILIZACIÓN MANGO LIBRES
Si está en comunicación, con el microteléfono descolgado y desea escuchar y
conversar con su interlocutor por el altavoz:
● Pulse la tecla ◀ y cuelgue el microteléfono.
Las personas que están a su alrededor pueden participar en la conversación.
- + • Ajuste el volumen del altavoz con las teclas - y + .
- Descuelgue el microtelefono para volver a una conversación confidencial.
3.4 AJUSTE DEL VOLUMEN DEL MICROTELÉFONO
Cuando se desactiva el modo manos libres, puede aumentar el volumen sono-
ro del microtelefonso.
- Puise la tecla - Para motave el volumen inicial, pulse la tecla
- Para restadural el volumen inicial, pulse la tecla
3.5 TECLA SECRETO
La tecla Secreto pone en espera a su interlocutor para que este no pueda oirle dumpte su convorción con una tenero persone.
• Cada 10 segundos se escucha 1 bin en la línea
- Para reanudar la conversación, vuelva a pulsar la tecla Secreto.
3.6. LLAMAR AL ÚLTIMO NÚMERO MARCADO
• Descuelque el microteléfono
• Pulse la tecla de Repetición.
Para horrar el último número marcado
- Descuelque el microteléfono
- Pulse dos veces la tecla Programación
• Pulse la tecla de Repetición.
3.7 TESLA 20 DE ACO590 A SERVICIOS SUPLEMENTARIOS*
(*) (#) 0.1 TECEAS DE ACESSO A SERVICIO SOF ELEMENTARIOS Extra talar permites acendo a servizio adizionale (contents e os
R Estas todas permiten poderer a servicios adicionales (contada con su Operador local para obtener más información).
-
CONEXIÓN Y UTILIZACIÓN DE LOS AURICUL ARES**
-
CONEXIÓN Y UTILIZACIÓN DE LOS AGRICUEARES
Conexion
- Conecte el cable de los auriculares (RJ9) a la toma situada en la base del teléfono.
Utilización
Para utilizar los auriculares, una vez que estos se han conectado:
- Descuelgue el microteléfono. Desclupe el interruptar situado en la parte posterior de la hora, el lado de la