
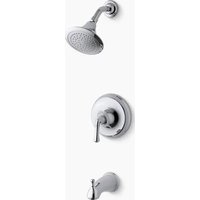
Revival K-T16113 - Pomme de douche KOHLER - Notice d'utilisation et mode d'emploi gratuit
Retrouvez gratuitement la notice de l'appareil Revival K-T16113 KOHLER au format PDF.

| Type de produit | Pomme de douche |
| Marque | Kohler |
| Modèle | Revival K-T16113 |
| Matériau | Laiton chromé |
| Poids | 0,5 kg |
| Dimensions (L x l x h) | 200 x 100 x 80 mm (estimation) |
| Raccordement | 1/2" NPT |
| Pression d'eau recommandée | 0,5 – 5 bar |
| Débit maximal | 9 L/min |
| Température maximale d'eau | 49 °C (120 °F) |
| Fonctions | Douchette réglable, buses en silicone anti-tartre |
| Entretien | Nettoyer les buses en frottant avec le doigt sous l'eau courante ; nettoyer la rondelle de filtre |
| Sécurité | Risque d'ébouillantage en cas d'eau trop chaude |
| Garantie | Garantie limitée à vie Kohler |
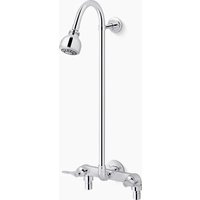
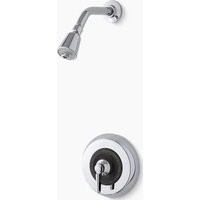
| Contenu du colis | Pomme de douche, bras de douche, plaque murale, adaptateurs, joint |
| Instructions d'installation | Utiliser du ruban d'étanchéité, clé à sangle, respecter les codes de plomberie locaux |
| Réparabilité | Pièces de rechange disponibles sur le site Kohler ; kit de service selon fiche technique |
FOIRE AUX QUESTIONS - Revival K-T16113 KOHLER
Questions des utilisateurs sur Revival K-T16113 KOHLER
0 question sur cet appareil. Repondez a celles que vous connaissez ou posez la votre.
Poser une nouvelle question sur cet appareil
Téléchargez la notice de votre Pomme de douche au format PDF gratuitement ! Retrouvez votre notice Revival K-T16113 - KOHLER et reprennez votre appareil électronique en main. Sur cette page sont publiés tous les documents nécessaires à l'utilisation de votre appareil Revival K-T16113 de la marque KOHLER.
MODE D'EMPLOI Revival K-T16113 KOHLER
| 3/32" | 1/16" | Rags Chifons Trapos | Strap Wrench Crlé à sangle Llave de correa | Assorted Screwdrivers Touchevis assortis Destorniladora surtodos | Plus/Plus/Mas: • 12" NPT Pipe Nipple or Copper Tube Tube en culve ou mamelon de tuyautrefe 1/2" NPT Tubo de cobre o niple NPT de 1/2" • Emery Paper/Papier dmort/Papel lja | ||
| WARNING: Risk of scalding. High water temperature can cause severe burns. Set the water temperature at or below 120°F (49°C) following the adjustment procedure in the valve installation and Care Guide. ADVERTISSEMENT: Risque de brûlures. Une température élevée peut cause des brûlres graves. Régir le température de l'ou au 120°F (49°C) ou moins sur laufant la procedure de rigglage tourne dans le guide d'installation et d'entrelon du robinat. ADVERTENCIJA: Riesgo de quemaduras. El agua a alta temperature能把 ocasionner quenaduras graves. Pongo la température del agua a un maximo de 120°F (49°C), de accurate al procedimento de ajusie en la Guía de instalación y cuicido de valvulas. | Observe all local plumbing and building codes. Record your model number below for future reference: Respecter tous les codes de plombère et de bâtimont locaux. Consigner le numéro de modulo ci-dessous pour toute reférieance: Cumpla todos les)códigos locales de plomeria y construction. Anote abajo el número de modelo como referencia futura: | For service parts information, visit www.kohler.com/serviceparts. For service kit information, refer to the Specification Sheet on your product page at www.kohler.com. Pour tout renseignement sur les pièces de recharge, visitor www.kohler.com/serviceparts. Pour tout renseignement sur les kits, consulter la fiche technique sur la page du produit à www.kohler.com. Para consulir information sobre plezes de repuesto, visiter www.kohler.com/serviceparts. Para consulir information sobre el kit de service consulte la Höhe de especification en la頁a de su produco en www.kohler.com. | 1 Apply sealant tape to a 1/2" spout nipple. Apblacker du ruban d'échéchité sur un mamelon de bec de 1/2". Aplique cinta selladora al niple de 1/2" del servitor. | 2 Install the spout nipple 7/16" (11 mm) for non-divertier, 11/16" (17 mm) for diverter spout, from the wall. Apply sealant tape to the end. Installer le mamelon de bec de 7/16" (11 mm) pour non inverseur, de 11/16" (17 mm) Pour Inverseur, a partir du mur. Apblacker du ruban d'échéchité sur l'extrémite. Instale el niple del servitor a 7/16" (11 mm) en el caso de surtidor sin desviador, y a 11/16" (17 mm) en el caso de surtidor con desvidor, de la pared. Aplique cinta selladora al extremo. | |||
| 3 Use a clean spray wrench to install the spout. Utiliser une clé à sangle propre pourposer le bac. Instalo el suridor con una llave de correa limpia. | 4 Apply sealant, leaving a gap at the bottom. Wipe away excess. Apblacker du mastic en laissant un espace à la base. Essuyer l'excedent. Apblacker sellador, y doit une separation en la parte inferior. Limpie el excesso. | 5 Shower Arm With Wall Plate: Slide the escutcheon onto the shower arm. Apply sealant tape. Bras de douche avec rosace: Glisserr l'applique sur le bras de douce. Apblacker du ruban d'échéchée. Brazo de ducha con plac mural: Desiclé et chapéton en el brazo de ducha. Aplique cinta selladora. | Install the shower arm. Slide the plate against the wall. Poser le bras de douche. Glisser la rosace contre le mur. Instalo el brazo de ducha. Doslco la placa contra la pared. | Secure the wall plate with the setscrew. Securier la plaque murale avec la vis d'agrêt. Fijo la placar mural con el tornillo de fijación. | |||
| 6 Shower Arm Less Wall Plate: Apply sealant tape to a 1/2" nipple. Install 7/16" (11 mm) from the wall. Bras de douche sans rosace: Apblacker du ruban d'échéchité sur un mamelon de 1/2". Le poser à 7/16" (11 mm) du mur. Brazo de ducha sin plac mural: Aplique cinta selladora al niple de 1/2". Instale a 7/16" (11 mm) de la pared. | Install the shower arm. Poser le bras de douche. Instale el brazo de ducha. | Apply sealant, leaving a gap at the bottom. Wipe away excess. Apblacker du mastic en laissant un espace à la base. Essuyer l'excedent. Apblacker sellador, y doit une separation en la parte inferior. Limpie el excesso. | 7 Remove the plaster guard. Turn on the water. Retrir le protège-platre. Ouvrir l'arrivée d'eau. Retrir el protector de yesso. Abra el agua. | 8 To adjust maximum water temperature, refer to the User Guide at www.kohler.com. Pour régier la température maximale de l'eau, se reporter au guide de l'utilitaire à www.kohler.com. Para ajustar la temperatura maxima del agua, conseulte la Guía del usuario en www.kohler.com. | |||
| 9 Turn off the water. Couper l'arrêtée d'eau. Cierre el agua. | 10 For Diverter Valves Only: Install the button and secure with the setscrew. Install the guide. Pour les inverseurs seulement: Poser le bouton et le fixer en place avec la vis d'arrêt. Poser le guide. Solo en valvulas desviadoras: Instale el boton y filie con el tornillo de fujación. Instale la guía. | IMPORTANT: For K-2971 Valve: If the finished wall is fiberglass or acrylic, do not use the screws provided. Use the shallow wall kit listed in the Specification Sheet. IMPORTANT: Vanne K-2971: Si la finition murale est en fibre de verre ou en acrylé, ne pas utiliser les vis foumies. Utilier le kit pour mur peu profond indiqué dans la fiche des specifications. IMPORTANT: Con la valvula K-2971: Si la pared acabada es de fibre de vidrio o de acrilico, no use los tornillos que se incluyen. Use el kit para pared poco profunda que se indica en la hoja de specifications. | 11 Measure dimension "Y" to determine the appropriate adapter. Mesurer la dimension "Y" pour determine l'adaptateur propriériel. Mida la dimension "Y" par determine cuál es el adaptor apropiado. Finished Wall Mur fin Pared academia | 12 Install the short adapter when "Y" is within the dimension shown below. Installer l'adaptateur court torsque la dimension "Y" se trouve dans la dimension indiquée ci-dessous. Instale el adaptador corto cuando el valor "Y" est entre de las dimensiones que aparence abajo. Y=2-1/2" (64 mm)-2-11/16" (68 mm) |
| 13] "Y" is within the dimensions below, or within the return of the return of the return of the return of the return of the return of the return of the return of the return of the return of the return of the return of the return of the return of the return of the return of the return of the return of the return of the return of the return of the return of the return of the return of the return of the return of the return of the return of the return of the return of the return of the return of the return of the return of 2-14" (57 mm)2-14" (64 mm) | 14] Install the retainer. Poser lo disposito do retuer. Instalel retener. | 15] Fit the faceplate over the retainer with the piece de retenue avec l'encotee vor la bas. Cologue la placal frontal sobre el retener con la mucera bajo. | 16] With the handle in the OFF position, handighten the bonnet onto the retainer. Avec la poignie en position off, socrer le chapeau a la main sur le dispositif de retener. Con la manja en la posicin cerrada, aprietate a un majo en bonte en el retener. | 17] Run water to remove debris. Apply teatant tape. Install the showerhead. Faire couler e泉水 pour eliminer les detbris. Appliquee du ruban d'enchete. Poser la pommé de douche. Deje r accouper aquile para eliminer les residues. Applique cinq seladdora. Instale la cabeza de ducta. | ||
| 18] "Y" is within the dimensions below, or within the return of the return of the return of the return of the return of the return of the return of the return of the return of the return of the return of the return of the return of the return of the return of the return of the return of the return of the return of the return of the return of the return of the return of the return of the return of the return of the return of the return of the return of 2-14" (57 mm)2 - 14" (64 mm) | 19] Install the retainer. Poser lo disposito do retuer. Instalel retener. | 19] Fit the faceplate over the retainer with the piece de retenue avec l'encotee vor la bas. Cologue la placal frontal sobre el retener con la mucera bajo. | 19] With the handle in the OFF position, handighten the bonnet onto the retainer. Avec la poignie en position off, socrer le chapeau a la main sur le dispositif de retener. Con la manja en la posicin cerrada, aprietate a un majo en bonte en el retener. | 19] Run water to remove debris. Apply teatant tape. Install the showerhead. Faire couler e泉水 pour eliminer les detbris. Applique cinq seladdora. Instale la cabeza de ducta. | ||
| Maintenance: Clean the Screen: Remove the showerhead and screen washer. Entretten: Nettoyer la rondelle: Retier la pomme de douche et la rondelle à giclre. Mantenitement: Limpie la revjilla: Retier la cabeze de ducha y la ranela de revjilla. KOHLER Fauce Lufite Limited Warranty KOHLER Co. warrants that KOHLER Customer Care Center at 1-800-KOHOL (1-800-800-4537). For service partie information, visit your product page at www.kohler.com/service/ | Clean the screen washer, then reistall. Nettoyer la rondelle a grille pus remonter. Limpie la randèle de revjilla, y lago uvea la inestatia. | Clean the Spray Nozzles: Tum the water on. Ruby your finger back and forth across the nozzle. Nettoyer les buses du vaporisateur: Ouvrir le'eau. Frotter voive dont dans un mouvement de v-et-vient dans les busses. Limpie les bouquillas del rociador: Atra el agua, Frote con el dedo hac aladolement y hac ao sbote las botas. | ||||
| 19] "Y" is within the dimensions below, or within the return of the return of the return of the return of the return of the return of the return of the return of the return of the return of the return of the return of the return of the return of the return of the return of the return of the return of the return of the return of the return of the return of the return of the return of the return of the return of the return of the return of the return of thc return of the return of the return of the return of the return of the return of the return of the return of the return of the return of the return of the return of the return of the return of the return of the return of the return of the return of the return of the return of the return of the return of the return of the return of the return of the return of the return of the return of the return of the return of the return of the return of the return of the 1-1-1-1-1-1-1-1-1-1-1-1-1-1-1-1-1-1-1-1-1-1-1-1-1-1-1-1-1-1-1-1-1-1-1-1-1-1-1-1-1-1-1-1-1-1-1-1-1-1-1- 19] "Y" is within the dimensions below, or within the return of the return of the return of the return of the return of the return of the return of the return of the return of the return of the return of the return of the return of the return of the return of the return of the return of the return of the return of the return of the return of the return of the return of the return of the return of the return of the return of the return of the 1-1-1-1-1-1-1- 19] "Y" is within the dimensions below, or within the return of the return of the return of the return of the return of the return of the return of the return of the return of the return of the return of the return of the return of the return of the return of the return of the return of the 1-1-1-1-1-1-1-1-1-1-1-1-1-1-1-1-1-1-1-1-1-1-1-2-1-1-1-1-1-1-1-1-1-1-1-1-1-1-1-1-1-1-1-1-1-1-1-1-1-1-1-1-1-1-1-1-1-1-1-1-1-1-1-1-1-1-1-1-1-1-1-1-1-2-1-1-1-1-1-1-1-1-1-1-1-1-1-1-1-1-1-1-1-1-1-1-1-1-1-1- 19] "Y" is within the dimensions below, or within the return of the return of the return of the return of the return of the return of the return of the return of the return of the return of the return 2-14" (57 mm)2 - 14" (64 mm) | ||||||
| 19] "Y" is within the dimensions below, or within the return of the return of the return of the return of the return of the return of the return of the return of the return of the return of the return of the return of the return of the return of the return of the return of the return of the return of the return of the return of the return of the return of the return of the return of the return of the return of the return 2-14" (57 mm)2 - 14" (64 mm) | 19] Install the retainer. Poser lo disposito do retuer. Instalel retener. | 19] Fit the faceplate over the retainer with the piece de retenue avec l'encotee vor la bas. Cologue la placal frontal sobre el retener con la mucera bajo. | 19) With the handle in the OFF position, handighten the bonnet onto the retainer. Avec la poignie en position off, socrer le chapeau a la main sur le dispositif de retener. Con la manja en la posicin cerrada, aprietate a un majo en bonte en le retener. | 19] Run water to remove debris. Apply teatant tape. Install the showerhead. Faire couler e泉水 pour eliminer les detbris. Applique cinq seladdora. Deje r accouper aquile para eliminer les residues. Applique cinq seladdora. Con la manja en la posicin cerrada, aprietate a un majo en bonte en le retener. Con la manja en la posicin cerrada, aprietate a un majo en bonte en le retener. Con la manja en la posicin cerrada, aprietate a un majo en bonte en le retener. Con la manja en la posicin cerrada, aprietate a un majo en bonte en le retener. Con la manja en la posicin cerradi, aprietate a un majo en bonte en le retener. Con la manja en la posicin cerradi, aprietate a un majo en bonte en le retener. Con la manja en la posicin cerradi, aprietate a un majo en bonte en le retener. Con la manja en la posicin cerradi, aprietate a un majo en bonte in deration de cuo; encoiption de cuo; encoiption de cuo; encoiption de cuo; encoiption de cuo; encoiption de cuo; encoiption de cuo; encoiption de cuo; encoiption de cuo; encoiption de cuo; encoiption de cuo; encoiption de cuo; encoiption de cuo; encoiption de cuo; 19] "Y" is within the dimensions below, or within the return of the return of the return of the return of the return of the return of the return of the return of the return of the return of the return of the return of the return of the return of the return of the return of the 1-1-1-1-1-1-1-1-1-1-1-1-1-1-1-1-1-1-1-1-1-1-1-1-1- 19] "Y" is within the dimensions below, or within the return of the return of the return of the return of the 1-1-1-1-1-1-1-1-1-1-1-1-1-1-1-1-1-1-1-1-1-1-1-1-1-1-1-1-1-1-1-1-1-1-1-1-1-1-1-1-1-1-1- 19] "Y" is within the dimensions below, orwithin the return of the return of the return of the 1-1-1-1-1-1-1-1-1-1-1-1-1-1-1-1-1-1-1-1-1-1-1-1-1-1-1-1-1-1-1-1-1-1-1-1-1-1-1-1-1-1-1-1-2-1-1-1-1-1- 19] "Y" is within the dimensions below, or within the return of the return of the 1-1-1-1-1-1-1-1-1-1-1-1-1-1-1-1-1-1-1-1-1-1-1-1-1-1-1-1-1-1-1-1-1-1-1-1-1-1-1-1-1-1-1-1-1-1- 19] "Y" is Within the dimensions below, or within the return of the return of the 1-1-1-1-1-1-1-1-1-1-1-1-1-1-1-1-1-1-1-1-1-1-1-1-1-1-1-1-1-1-1-1-1-1-1-1-1-1-1-1-1-1-1- 19] "Y" 19] "Y" 19] "Y" 19] "Y" 19] "Y" 19] "Y" 19] "Y" 19] "Y" 19] "Y" 19] "Y" 19] "Y" 19] "Y" 19] "Y" 19] "Y" 19] "Y" 19] "Y" 19] "Y" 19] “Y” 19] "Y" 19] "Y" 19] "Y" 19] "Y" 19] "Y" 19] "Y" 19] "Y" 19] "Y" 19] "Y" 19] "Y" 19] "Y" 19] "Y" 19] "Y" 19] "Y" 19] "Y" 19] "Y" 19] 'Y" 19] "Y" 19] "Y" 19] "Y" 19] "Y" 19] "Y" 19] "Y" 19] "Y" 19] "Y" 19] "Y" 19] "Y" 19] "Y" 19] "Y" 19] "Y" 19] "Y" 19] "Y" 19] "Y" 18] "Y" 18] "Y" 18] "Y" 18] "Y" 18] "Y" 18] "Y" 18] "Y" 18] "Y" 18] "Y" 18] "Y" 18] "Y" 18] "Y" 18] "Y" 18] "Y" 18] "Y" 18] "Y" 18] "Y Y" Y Y Y Y Y Y Y Y Y Y Y Y Y Y Y Y Y Y Y Y Y Y Y Y Y Y Y Y Y Y Y Y Y Y Y Y Y Y Y Y Y Y Y Y Y Y Y Y Y Y Y |
Marque : KOHLER
Modèle : Revival K-T16113
Catégorie : Pomme de douche