
NPL27 - Éclairage Nitecore - Notice d'utilisation et mode d'emploi gratuit
Retrouvez gratuitement la notice de l'appareil NPL27 Nitecore au format PDF.

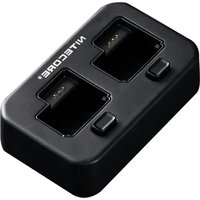
| Type de produit | Lampe tactique pour arme |
| Marque | Nitecore |
| Modèle | NPL27 |
| Dimensions | 70 x 32 x 26 mm |
| Poids | 80 g (avec batterie) |
| Alimentation | Batterie Li-ion intégrée 3,7 V 650 mAh |
| Charge | Magnétique, 5 V / 0,5 A, 1 h 10 min |
| Autonomie | Variable selon le niveau d'éclairage |
| Éclairage maximal | 400 lumens |
| Portée maximale | 110 m |
| Intensité maximale | 3000 cd |
| Résistance aux chocs | 1,5 m |
| Étanchéité | IPX7 (immergeable 1 m) |
| Matériau du boîtier | Alliage d'aluminium, anodisation HAIII |
| Fonctions | Deux boutons, mémoire, ATR, indicateur de batterie |
| Montage | Rail Glock ou Picatinny (adaptateur inclus) |
| Entretien | Nettoyer avec un chiffon doux et sec |
| Sécurité | Ne pas regarder directement le faisceau, ne pas couvrir la tête, température max 60 °C |
| Pièces détachées | Adaptateur Picatinny, câble de charge magnétique |
| Garantie | Voir conditions du fabricant |
FOIRE AUX QUESTIONS - NPL27 Nitecore
Questions des utilisateurs sur NPL27 Nitecore
0 question sur cet appareil. Repondez a celles que vous connaissez ou posez la votre.
Poser une nouvelle question sur cet appareil
Téléchargez la notice de votre Éclairage au format PDF gratuitement ! Retrouvez votre notice NPL27 - Nitecore et reprennez votre appareil électronique en main. Sur cette page sont publiés tous les documents nécessaires à l'utilisation de votre appareil NPL27 de la marque Nitecore.
MODE D'EMPLOI NPL27 Nitecore
NITECORE®
User Manual NPL27

IMPORTANT
- Thanks for purchasing NITE/CORRU
Please read this manual carefully
before using the product and follow the instructions.
- This manual contains important safety
Information and operating instructions. Please keep it for future reference.
• In case of updates, please refer to the
latest version available on the official website.
Warning
- However, the company is
L. Always make sure your firearm's clear and unloaded before mounting
dismounting the product or changing the
- Always obey the safety regulations when
operating the firearms to avoid accidental
damage to personal health or property.
(3) Always and make the probable when maintaining and servicing the firearms.
- This product is intended for use by
adults aged 15 and over. Please keep this product out of the reach of children.
- CAUTION: Possible dangerous radiation
DO NOT lean directly into the light beam or shine the light directly into the eyes of
of urine and light orally into the eyes of anyone!
- The product will generate massive heat during prolonged operation. Please
during prolonged operation: Please exercise caution during use. It is
recommended not to use high brightness level for extended switch to prevent
levels for extended periods to prevent burns and product damage.
- DO NOT cover or place objects near the head of the product, as this may serve
head of the product, as this may cause damage to the product or accidents due
to high temperatures.
- DO NOT use the product to illuminate flammable or explosive materials, as the
high heat may lead to combustion or
explosion.
- Please use the product in a standard manner to avoid accidents in the event of
product failure. 10. When the product is placed in an
- When the product is placed in an enclosed or flammable environment such
as a pocket or backpack, or when it is left
unused for an extended period, please remove the battery to avoid accidental
activation and damage from battery
- DO NOT expose the product In
temperatures above 60°C (140°F) for a
prolonged time, as this poses a risk of battery explosion or combustion.
- Please recharge the product with
the original charging cable to avoid
showering the lifespan of the battery. 13. Please recharge the product every 6
months when left unused for a prolonged
- DO NOT disassemble or modify this
product as doing so will cause damage
to it and render the product warranty invalid. Please refer to the warranty
section in the manual for complete
warranty information.
Battery Safety
Impression use of the battery may result in
anproper use of the battery may result in severe battery damage or safety hazards
such as combustion or explosion. DO NOT
use damaged battery. DO NOT disassemble, puncture, put, crush, incinerate or short-
circuit the battery. If any leakage, abnormal
odor, or deformation is noticed, stop using the battery immediately and dispose of it.
Feat
• Max
• An op
coati
■ Max
inter
• Polio of 1
• LJ-lor
change and
• Comp
carry • locry
Exigu
ZL20
• Tail-
- High
• Coms
alloy
anod • Wate
accio
• Impa
[Non-Text]
Spe
Dress
DARIELS
Weight:
[Non-Text]
(No text)
Acc
UHan B
Picatine
[Non-Text]
Tech
F
STAR
2
|
1
|
|
1
Notes
accompedale
testing using the
ambient
NETSAC use duo
[Non-Text]
2014
Char
[EMPTY]
|
|
|
|
1
1
| |
|
V
-
[Non-Text]
B.11
Batt
广力云智慧零售收银系统
[Non-Text]
m = 311
C
[NO TEXT]
C
A
(e)
[Unreadable]
1
[Non-Text]
[Non-Text]
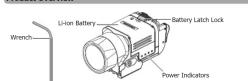
Battery Removal

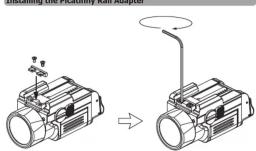
Installing the Picatinny Rail Adapter
Removing the Picatinny Rail Adapter
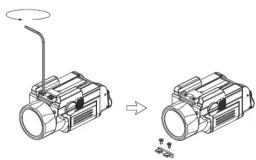
natural_image
Diagram showing a mechanical device before and after assembly, with no visible text or symbols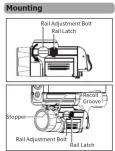
(English)
Charning Function
The included Li-ion battery comes with
magnetic charging contacts. Please charge
the battery before the first use.
Power Connection: Attach the magnetic
Power Connection: Action the magnetic end of the charging cable to the battery and
connect the other end to an external power supply in a net investor or investor sharing.
supply (e.g. an adoption of other charging devices) to begin charging. The charging time
is approx. 1 hour 10 minutes. (Input: 5k)/0.5A)
Charging Indication: During the charging
process, the power indicators will transition gradually from flashing to a steady light, one
by one, displaying the battery level. When
the battery is fully charged, the 4 power indicators will become steadily turned on.
Figure 10: A series summary of
Operation Instructions
Battery Installation / Removal
Battery Installation: Please insert the
battery removal: In illustrated slide the
Battery Removal. At illuminated, hide the Battery Latch Lock outward and then remove
the Li-ion battery.
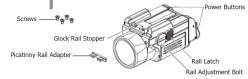
Installing or Removing the Picatinny
Rail Adapter The rail stopper of the NFI 27 is factory set
The rail stopper of the NFL27 rail history list to fit Glock rail, and it can be adapted to
Picatiny rail by installing the Picatiny rail
adapter. Please use a wrench, a screwdriver, or other appropriate tools to install or remove
the rail adapter.
- Converting from a clock rail stopper to a Pictatovy rail steeper: Align the Pictatovy.
mall adapter with the groove on the Glock
rail stopper and insert the mounting arms. Tighten the screw clockwise with
the wrench until the Picatinny rail adapter
is firmly secured. The MPL27 is now
- Converted for Picatinny rail. - Converting from a Picatinny rail stopper
to a Glock rail stopper: Use the wrench to
I stolen the two screws counterclockwise on the Pkatnny rail stopper and remove the
Picatinny rail adapter. The NPL27 is now
compatible with block rail.
Mounting 1. As illustrated, loosen the Rail Adjustment
Bolt counterclockwise,
-
Align the stopper with the recoil groove of the rail
-
Press and hold the Rail Latch and slide the
NPL27 forward or backward to the desired
position. Then tighten the Rail Adjustment bolt clockwise to secure it.
2018年1月1日
Tactical Momentary Illumination
Press and hold either Power Button to turn on
the light momentarily. Release to turn it off.
On / Off
On: When the light is off, short press other
Power Button to turn it on.
Off: When the light is on, short press ether
Power button to turn it off. The MRI 27 is designed with a memory function.
When reactivated, it will automatically access
the previous memorized brightness level.
Brightness Levels Adjustment
Brightness Levels Adjustment When the light is on, quickly short mass
either Power Button twice to switch between
ATR (Advanced Temperature
Regulation)
The Integrated ATR technology regulates the output of the MP127 according to the
working condition and ambient environment
to maintain the optimal performance.
Power Indication
Short press the Battery Power Button and
Power Indicators will light up to indicate the remaining battery power. When the better
low, the power indicator will flash to inform
the user and then the MPL27 will turn off automatically.
Automodicsy. Status of
Status of Indicators Power Level
4 Constant-on 75% - 100%
3 Constant-on 50% - 75%
2 Constant-on 25% – 50%
1 Constant-on 5% - 25%
- Flashing 0% – 5% (Please charge product as soon as nearly
• Product is used as possible
[Non-Text]
[Non-Text]
(Deutsch)
(Deutsch)
⚠️ Warnungen
- Vergewestern Sie sich immer, dass ihre Schusswaffe entladen und gesichert
ist, bevor Sie das Produkt montieren/
- Betoflorn Sie beim Betrieb der Schuss
stets die Sicherheitsvorschriften,
um Erbelabschlagte Personen- oder Sachschäden zu vermeiden.
- Bauern Sie das Produkt immer aus, wenn 5
die Schusswaffen pflegen und inspizieren 4. Dieser Produkt ist für den Gebrauch du
Erwachsene ab 18 Jahren bestimmt. B
bewahren Sie dimes Produkt außerhalb der Reichtwerte von Kindern auf.
- VORSICHT! Mögliche gefährliche
Strahlung! Blicken Sie MÖRT direkt in den Lichtstrahl und lechten Sie
niemanden direkt in die Augeni!
- Das Produkt erzeugt bei längerem Bet- große Hitze. Bitte lassen Sie bei der
Verwendung Vorsicht halten. Es wird
empfohlen, hohe Helligkeitsstufen nicht über Umsatz Zeitleihres zu verwandeten
über längere Zentralische zu Anwendeten um Verbrennungen und Produktschädte
zu vormelden. 7. Deriven Sie das Produkt NICHT ab und
7) Bauschen Sie des Fristelle, Rechnen als die stellen Sie keine Gegenstände in der Na
des Lampenkogtes ab, da dies zu Schäke am Produkt oder zu Unfällen aufgrund.
bihen Temperaturen führen kann.
- Verwenden Sie das Produkt NICHT zur Beleuchtung von hrennbanen oder
zu Bezeichnung vom durchbereich des explosiven Materialien, da die hohe HR
zu Verbrennungen oder Explosionen Süberg kaza
- Bitte verwenden Sie das Produkt auf
normale Weise, um Unfälle im Fälle et Unfälle des Grund sites zu vermeiden.
- Wenn das Produkt in einer geschlossen
oder feuergefährlichen Umgebung - wie einer Tasche oder einem Buckrack
- aufbewahrt wird, oder auch wenn es
längere Zeit nicht benutzt wird, nehmen. Ein bitte der Betriebs dem Akrujungen
Sie erste die Bauterlögen Aktiva fällbare um eine versehentliche Aktivierung so
Schilden durch auslaufende Batterien?
- Setzen Sie das Produkt NOHT über eine
längeren Zeitraum Temperaturen über 6 aus, die wird die Gefahr eines Erkstärme
für, da sonst die Gehann einer Emission oder Verbrennung der Batterie besteht.
- Bitte laden Sie das Produkt mit dem Original Lefektur auf um eine Verhöme
Original Caleksäfer auf, um eine verkurz der Lebensdauer des Akkuz zu vermeide
- Bitte laden Sie das Produkt alle 6 Mon
auf, wenn es über einer langoren Zeitraum nicht benutzt wird.
- Nehmen Sie dieses Produkt NICHT
dusständer und immobilizieren sie es nicht, da es somt beschädigt wird und
die Produktgarantie erlicht, Vollständige
Informatoren zur Garfarbe finden Sie im Abschnitt „Garantiebedingungen“ in
dieser Bedienungsanleitung.
[Non-Text]
⚠ Sicherheit des Akkus
Die unsachgemäße Verwendung des Akkuz kann zu schweeren Aktien schäden oder
Sicherheitsrisiken wie Verbrennung oder
Explosion führen. Verwenden Sie KEINE berzördista Batterie. Die Batterie auf NICV
durchsloge, beloche. Die beloche, den Recht zerlegt, durchstochen, zerschnitten, gequets
verbrannt oder kurzgeschlossen werden. We Sie ein Auslaufen, einen ungewöhnlichen
Geruch oder eine Verformung feststellen, str
Sie die Verwendung des Akkus sofort ein un entsorgen Sie ihn ordnungsgemäß. Entsorge
Sie das Gerät/die Batterien gemäß dem
gettenden ortlichen gesetzen und Vorschrifte
Ladefunktion
Der mitgelieferte Li-Ionen-Akkw verfügt über magnetisch Ledakopbide. Bitte jeden Sie den
Akku vor dem ersten Gebrauch auf.
Stromanschluss: Schließen Sie das
Insgrebsche Ende des Labelzabels an den AUM an und verbinden Sie das andere Ende mit
einer externen Stroniversorgung (2. 8. einem Adapter oder insbesondere Linderation), um ein
Adappter über anderen Laubegensamt, um dem Ladevorgang zu starten. Die Ladzeit beträgt e
1 Stunde und 10 Minuten. (Eingang: 5V/0,5A)
Anzeige des Läsevorgängt. Mannen und Ledzorpangs blinkten die Energie-Anzysien
Wenn der Akku vollständig aufgeladen ist, bevitteten die 4. Bierante Anzinsien sind verfüllt
Kocherschik
Bedienungsanleitung
Einsetzen des Akkus
Setzen Sie den Akku ein w
Entnehmen des Akku
Schieden Sie - wie in der Abbildung gezeigt den Betzeriefach-Venschluss nach außen um
entnehmen Sie dann den Li-Jonen-Aidku.
Montage oder Demontage des
Picatinny-Schienenadapters Der Schienenatpper des NFL27 ist
werkseitig für die Glock-Schiene
eingestellt und kann durch die Installation des Pictatarge-Schiegeradapters zu die
Picafinny-Schiene angepasst werden. Bitte
verwenden sie geeignete werkzeuge, um den Schenkredigter zu installieren oder zu
entferen.
- Umführung von einem Glock-Schienenstopper auf einen Picatinny-
Schienenstopper: Richten Sie den
Huzohny-Schienstkopter an den Nat. der Glock-Schienenstoppers aus und setzen
Sie die Befestigungsschrauben ein. Ziehe Sie die Erzrauben mit dem Jahreschlüge
Sie die Schuldor mit den Stadsschutz im Uhrzeigeminn an, bis der Picatinny-
Schienenadapter festsitzt. Die NPL27 ist run für die Ricatiny-Schirgs angenaut
- Umrüstung von einem Picatinny-
Schierwinstopper auf einen Glock- Schienenstopper: Lösen Sie mit dem
Schraubenschlüssel die beiden Schraube


Marque : Nitecore
Modèle : NPL27
Catégorie : Éclairage