H6 ID25B3LPTX - Four HAIER - Notice d'utilisation et mode d'emploi gratuit
Retrouvez gratuitement la notice de l'appareil H6 ID25B3LPTX HAIER au format PDF.

| Type de produit | Four encastrable |
| Marque | Haier |
| Modèle | H6 ID25B3LPTX |
| Dimensions (L x H x P) | 595 x 595 x 575 mm |
| Poids | Environ 35 kg |
| Alimentation électrique | 220-240 V ~ 50/60 Hz, 16 A (réglable 13 A) |
| Puissance maximale | 3500 W |
| Capacité | 77 L (estimation) |
| Fonctions principales | Convection, Multiniveau, Supergrill, Pizza, ÉCO, Fonction vapeur (Viande+Vapeur, Poisson+Vapeur, Légumes+Vapeur), Fonction Jolly |
| Nettoyage | Pyrolytique (jusqu'à 410 °C), Nettoyage vapeur, Détartrage automatique |
| Éclairage | Lampe intérieure (classe énergétique G) |
| Connectivité | Wi-Fi 802.11 b/g/n, Bluetooth 4.2, Application hOn |
| Fonctions de sécurité | Verrouillage enfant, Verrouillage porte en pyrolyse, Arrêt automatique |
| Accessoires fournis | Grille métallique, Lèchefrite, Plateau profond, Grilles latérales (selon modèle), Entonnoir vapeur |
| Type d'installation | Encastrable sous plan ou en colonne |
| Classe énergétique | A+ (estimation) |
| Consommation en veille | 2,0 W (réseau connecté) |
| Entretien | Nettoyage régulier avec chiffon doux, Démonter la porte pour nettoyage vitres |
| Pièces détachées disponibles | Ampoules, Joints de porte, Grilles, Plaques signalétiques |
| Réparabilité | S'adresser au service client pour pièces d'origine |
| Garantie | 2 ans (standard) |
FOIRE AUX QUESTIONS - H6 ID25B3LPTX HAIER
Questions des utilisateurs sur H6 ID25B3LPTX HAIER
0 question sur cet appareil. Repondez a celles que vous connaissez ou posez la votre.
Poser une nouvelle question sur cet appareil
Téléchargez la notice de votre Four au format PDF gratuitement ! Retrouvez votre notice H6 ID25B3LPTX - HAIER et reprennez votre appareil électronique en main. Sur cette page sont publiés tous les documents nécessaires à l'utilisation de votre appareil H6 ID25B3LPTX de la marque HAIER.
MODE D'EMPLOI H6 ID25B3LPTX HAIER

text_image
Haier Full User ManualHaier.com
English
Español
Hrvatski
Čeština
Română
Magyar
Slovenčina
Português
Polski
Lietuvių
Latviešu
Eesti
Français
Italiano
Deutsch
Ελληνικά
Nederlands
Slovenščina
Српски
Български
Dansk
Suomi
Norsk
Svenska
Українська
Türkçe
Қазақ
Русский
قيبرعلا
中文
قيبرعلا
WELCOME
Thank you for choosing our product. To ensure your safety and get the best results, please read this manual carefully, including the safety instructions, and keep it for future reference.
Before installing the oven note the serial number, which you might need for repairs. Check for any damage during transportation and consult a technician if you're unsure before using it. Keep packaging materials away from children.
NOTE: Please note that the oven's features and accessories may vary depending on the model you purchased.
SUMMARY
1. SAFETY INFORMATION
2. PRODUCT INTRODUCTION
2.1. Overview of the product
2.2. Accessories
2.3. Control panel
2.4. Connectivity
3. BEFORE STARTING
3.1. Information to start
3.2. First usage
3.3. Preliminary cleaning
4. OPERATION OF PRODUCT
4.1. How the product works
4.2. Cooking functions
4.2.1. Standard functions
4.2.2. Special functions
4.2.3. Multi Step Feature
5. COOKING GUIDELINES
5.1. General Cooking tables
5.2. Everyday Cooking tables
6. CARE & CLEANING
6.1. General recommendations
6.2. Cleaning the oven
6.2.1. Inside the oven: cleaning functions
6.2.2. Outside the oven: removal and cleaning the glass door
6.3. Cleaning of accessories
6.4. Maintenance
7. TROUBLESHOOTING
8. ENVIRONMENTAL PROTECTION & DISPOSAL
8.1. Appliance disposal
8.2. Saving and respecting the environment
9. INSTALLATION
GENERAL WARNINGS
- Do not use a steam cleaner for cleaning operations.
- CAUTION: in order to avoid a hazard due to inadvertent resetting of the thermal cut-out, this appliance must not be supplied through an external switching device, such as a timer, or connected to a circuit that is regularly switched on and off by the utility
- During use the appliance become hot. Care should be taken to avoid touching heating elements inside the oven.
Use in accordance with attendend use
- Only use the oven for its intended purpose, that is only for the cooking of foods: any other use, for example as a heat source, is considered improper and therefore dangerous. The manufacturer cannot be held responsible for any damage resulting from improper, incorrect or unreasonable usage.
Use limitations
- The appliance can be used by children aged from 8 years and above and persons with reduced physical, sensory or mental capabilities or lack of experience and knowledge if they have been given supervision or instruction concerning use of the appliance in a safe way and understand the hazards involved. Children shall not play with the appliance. Cleaning and maintenance shall not be made by children without supervision.
- This appliance is not intended to be used by persons (including children) with reduced physical, sensory or mental capabilities, or lack of experience and knowledge, unless they have been given supervision or instruction concerning use of the appliance by a person responsible for their safety.
- Children should be supervised to ensure that they do not play with the appliance.
- WARNING: the appliance and its accessible parts become hot during use. Care should be taken to avoid touching heating elements. Children less than 8 years of age shall be kept at away unless continuously supervised.
- WARNING: Accessible parts may become hot during use. Young children should be kept away.
INSTALLATION WARNINGS
- The oven can be located high in a column or under a worktop.
- Before fixing, you must ensure good ventilation in the oven space to allow proper circulation of the fresh air required for cooling and protecting the internal parts. Make the openings specified on the illustrations according to the type of fitting. Always fix the oven to the furniture with screws provided with the appliance.
- No additional operation/setting is required in order to operate the appliance at the rated frequencies.
- The appliance must not be installed behind a decorative door in order to avoid overheating.
- During installation the oven should be disconnected from the mains to avoid overheating.
- If the assistance of the manufacturer is required to rectify faults arising from incorrect installation, this assistance is not covered by the guarantee. The installation instructions for professionally qualified personnel must be followed.
- Incorrect installation may cause harm or injury to people, animals or belongings. The manufacturer cannot be held responsible for such harm or injury.
- Installation must be carried on by a qualified technician who must know and respect the laws in force in the country of installation and the manufacturer's instruction.
- After unboxing the appliance, always check it is not damaged, in case of issue contact the customer service before installing and do not connect to the power supply.
- Remove the packaging material before operating the appliance.
- During installation do not use the oven door's handle to lift and move the oven.
- The installation furniture and the adjacent ones must with stand temperatures of 95°C.
- It is recommended to wear protective gloves during installation to avoid cut injuries.
- Do not install the product in open environments exposed to
atmospheric agents.
- This appliance is designed to be used at altitude lower than 2000m.
- To remove protective films and advertisement stickers on front surface of the oven before first usage.
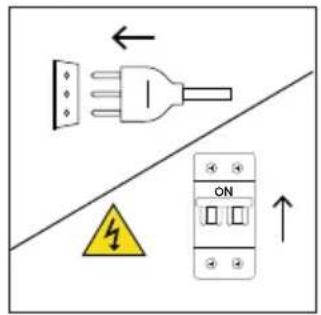
ELECTRICAL WARNINGS
- The socket must be suitable for the load indicated on the tag and must have ground contact connected and in operation. The earth conductor is yellow-green in colour. This operation should be carried out by a suitably qualified professional.
- Connection to the power source can be made by plug or by fixed wiring placing an omnipolar breaker, with contact separation compliant to the requirements for overvoltage category III, between the appliance and the power source that can bear the maximum connected load and that is in line with current legislation.
- In case of incompatibility between the socket and the appliance plug, ask a qualified electrician to substitute the socket with another suitable type. The plug and the socket must be conformed to the current norms of the installation country.
- The yellow-green earth cable should not be interrupted by the breaker. The socket or omnipolar breaker used for the connection should be easily accessible when the appliance is installed.
- If the supply cord is damaged, it must be replaced by the manufacturer, its service agent or similarly qualified persons in order to avoid a hazard.
- For any repairs, refer only to the Customer Care Department and request the use of original spare parts.
- Disconnect the appliance from the mains electricity supply before carrying out any work or maintenance on it.
- WARNING: ensure that the appliance is switched off before replacing the bulb, to avoid the possibility of electric shocks.
- The oven must be switched off before removing the removable parts. After cleaning, reassemble them according the instructions.
- The use of any electrical appliance implies the observance of some fundamental rules:
- do not pull on the power cable to disconnect the appliance from the power source;
- do not touch the appliance with wet or damp hands or feet;
– in general the use of adaptors, multiple sockets and extension cables is not recommended;
- in case of malfunction and/or poor operation, switch off the appliance and do not tamper with it.
- NOTE: as the oven could require maintenance work, it is advisable to keep another wall socket available so that the oven can be connected to this if it is removed from the space in which it is installed.
- Any repair, installation and maintenance not carried out correctly can seriously endanger the user.
- The manufacturing company hereby states that it does not assume any responsibility for direct or indirect damages caused by incorrect installation, maintenance, or repair work. Furthermore, it is not liable for damages caused by the absence or interruption of the grounding system (e.g., electric shock).
- CAUTION: in order to avoid a hazard due to inadvertent resetting of the thermal cut-out, this appliance must not be supplier through an external switching device, such as a timer, or connected to a circuit that is regularly switched on and off by the utility.
- The appliance is not designed to be activated by an external timer or separate remote control system.
USE & MANTEINANCE
- The dripping pan collects the residues that drip during cooking.
- When you place the Airfry tray or the grid on the side racks, make sure that the shorter section of the side (between the stop and the extremity) is directed towards the interior of the oven. If the grid has a decorative metal bar, pay attention to position it on the exterior of the oven so that the brand logo can be visible and readable. For the correct positioning refer also to the image in the Accessories section of this user manual.
- Do not use harsh abrasive cleaners or sharp metal scrapers to clean the oven door glasses, since they can scratch the surface, which may result in shattering of the glass.
- Only use the temperature probe recommended for this oven.
- During cooking, moisture may condense inside the oven cavity or on the glass of the door. This is a normal condition. To reduce this effect,
wait 10-15 minutes after turning on the power before putting food inside the oven. In any case, the condensation disappears when the oven reaches the cooking temperature.
- Cook the vegetables in a container with a lid instead of an open tray.
- Avoid leaving food inside the oven after cooking for more than 15/20 minutes.
- A long power supply failure during an occurring cooking phase may cause a malfunction of the monitor. In this case contact customer service.
- WARNING: Do not line the oven walls with aluminium foil or single-use protection available from stores. Aluminium foil or any other protection, in direct contact with the hot enamel, risk melting and deteriorating the enamel of the insides.
- WARNING: Never remove the oven door seal.
- CAUTION: Do not refill the cavity bottom with water during cooking or when the oven is hot.
- Oven trays and grids are not suitable for direct contact with food. Please use suitable cookware or baking paper.
- Wash all accessories before first use with a solution of hot water and washing up liquid.
WARNINGS (\*FOR PYRO OVENS)
- Excess spillage must be removed before cleaning.
- WARNING: before initiating the automatic cleaning cycle:
- Clean the oven door;
- Remove large or coarse food residues from the inside of the oven using a damp sponge. Do not use detergents;
- Remove all accessories and the sliding rack kit (where present);
-
Do not place tea towels.
-
During the pyrolytic cleaning process (if available), the surfaces may get hotter than usual and children should be kept away.
- If a hob has been fitted above the oven, never use the hob while the Pyrolizer is working, this will prevent the hob from overheating.
WARNINGS (\*FOR STEAM LITE)
WARNING: Risk of burn and damage to the appliance: using the steam function the released steam can cause burns: Open the door carefully to avoid injury after using a cooking function with steam
- Use only drinking water to fill in the tank.
- When filling in the oven with water use maximum 250ml of water.
2. PRODUCT INTRODUCTION
2.1. OVERVIEW OF THE PRODUCT
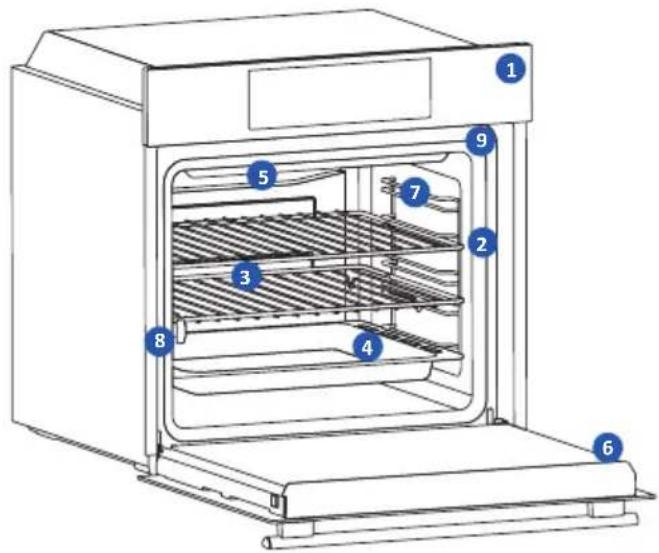
text_image
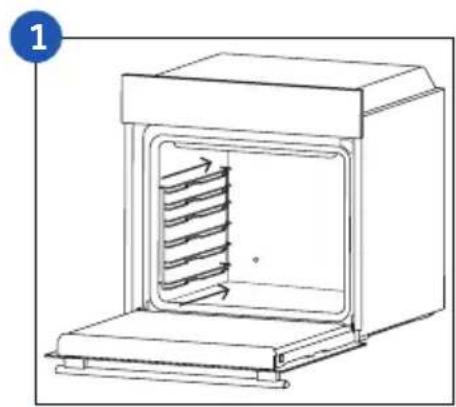
Technical diagram of an oven with numbered components for identification2.2 ACCESSORIES
- Control panel
- Shelf positions numbers
- Metal grid
- Trays
- Fan cover
- Oven door
- Lateral wire grids (if present: only for flat cavity)
- Serial number & QRcode
- Steam Funnel Insertion

natural_image
Empty white rectangle with a thin gray border (no text or symbols)Write here your serial number for future reference.
1 Metal grid

natural_image
Line drawing of a rectangular kitchen appliance with horizontal slats and labeled 'STOP' (no text or symbols beyond labels)A metal grid in an oven is a removable, adjustable shelf that supports cookware, ensuring even cooking, and makes cleaning easy. It can be used to hold plates and pans at different heights for various cooking needs.
2 Baking tray (only if present\*)
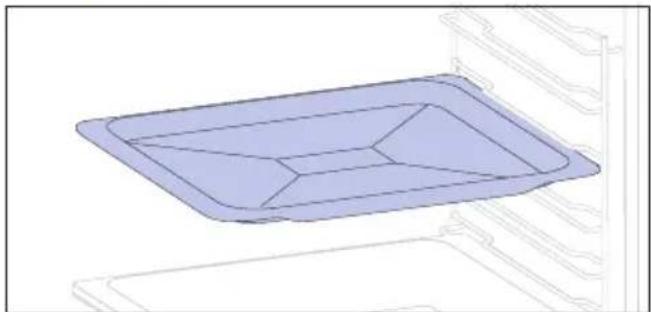
natural_image
3D diagram of a rectangular tray with internal compartments, placed inside an oven (no text or symbols)A baking tray is ideal for achieving even bottom browning, making it perfect for cookies and pastries due to its shallow, flat design. Additionally, placing it under a cooking grid can help collect drips and prevent messes in the oven.
3 Deeper Tray
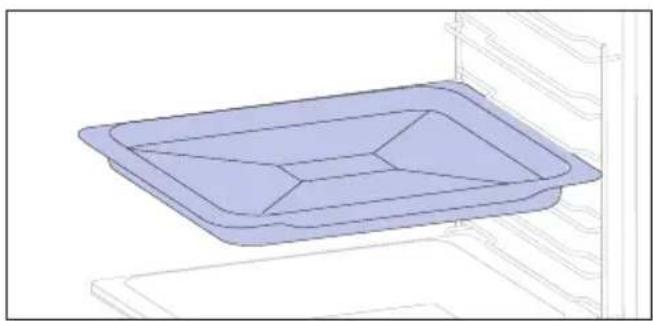
natural_image
3D wireframe diagram of a rectangular tray or basin with internal partitioning, placed inside an oven (no text or symbols)The deeper tray is ideal for recipes with added liquids or layers, such as casseroles or roasts. Its depth is specifically designed to ensure the desired consistency of the food prepared in it.
4 Lateral wire grids (only if present\*)
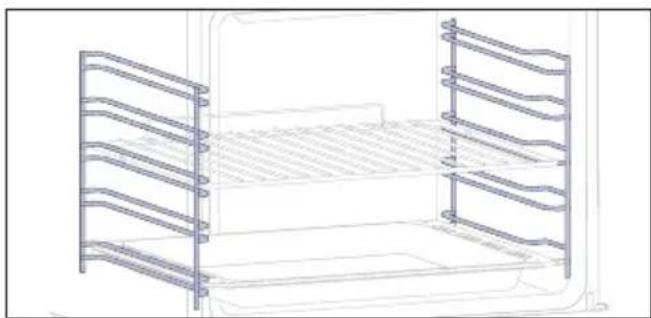
natural_image
Line drawing of a multi-tiered storage unit with horizontal and vertical metal racks (no text or symbols)Located on both sides of the oven cavity, the side racks are designed for placing baking tray and grids during the cooking.
5 Telescopic Guides (only if present*)
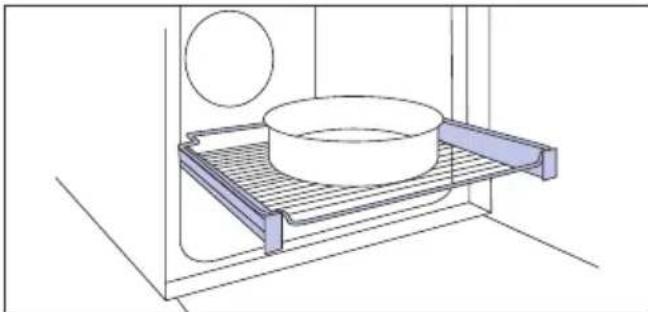
natural_image
Technical line drawing of a kitchen sink with a bowl, plate, and wall-mounted dish (no text or symbols)Telescopic oven rails are shelves that can be extended, making it easier to place or remove items, without the need to reach deep inside a hot oven. They improve safety, stability, and can be adjusted at different level positions.
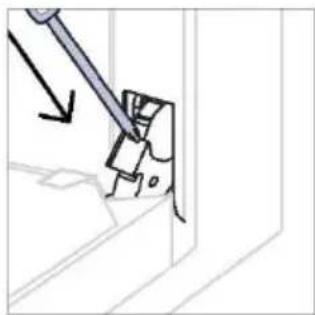
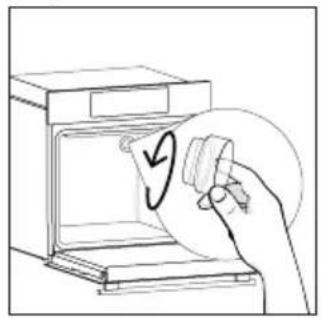
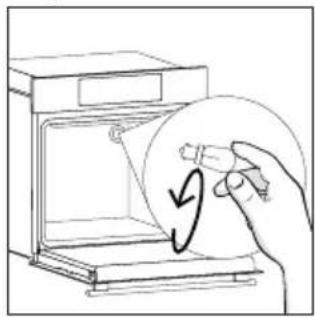
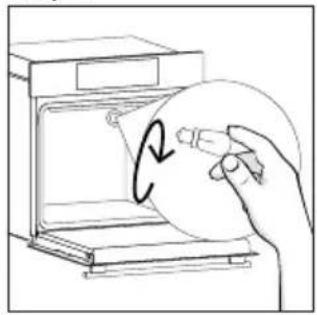
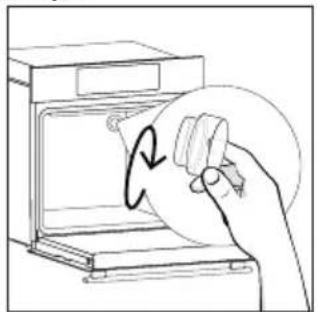
7 Softclose/Soft open hinges (only if present*)
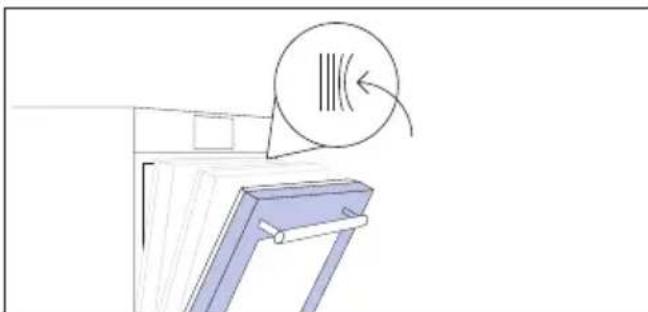
natural_image
Simple line drawing of a window with a circular icon and arrow, no text or symbols presentSoft close and open hinges control the door's motion, ensuring smooth movement and preventing slamming.
6 Steam Funnel
natural_image
Three-step diagram showing a door handle mechanism with a blue bucket and directional arrows (no text or symbols)The Steam Funnel is a useful accessory to add the necessary water, through the dedicated hole, for steam cooking programs.
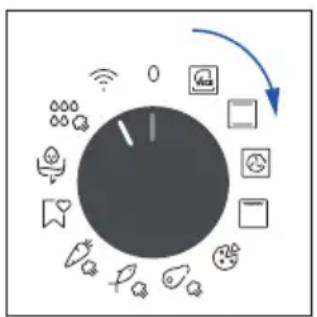
2.3 CONTROL PANEL

text_image
1 2 3 4 5 6 7 220°CFunctions and function ranking can be changed depending on the model.
- Function selector knob
- Time
- Temperature
- LED display
- Remote control
- Lamp
- Dial control
MAIN FUNCTIONS
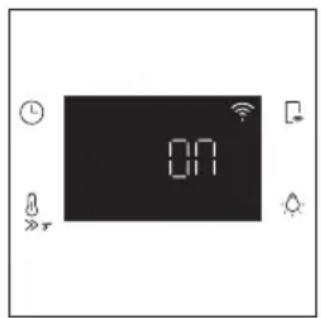
The display has 4 main functions:
| Symbol Function Description | ||
 | Time | Press once for cooking duration, twice for the minute minder (available in standby mode), three times for the time of day, and four times for delay start. In standby mode, only the kitchen timer is accessible. |
 | Temperature | Press once to check the cavity temperature, press and hold for 3 seconds to activate the fast-pre-heating option (only available during the oven's preheat phase). When the preheat is active, the released icon will be shown on the display. |
 | Remote Control on/off | Press the button to activate remote control, after pairing the oven with the hOn app (through the application). |
 | Light Press to turn on/off the oven cavity light. | |
DISPLAY FUNCTIONS (visible only when active)
| Symbol Function Description | ||
 | Dry Mode | The icon appears when the amount of water added through the Steam Funnel isn’t enough to carry out the steam cooking program. The cooking program will proceed in Dry Mode. |
2.4 CONNECTIVITY
Wireless parameters
| Technology Wi-Fi Bluetooth | ||
| Standard IEEE 802.11 | b/g/n Bluetooth v4.2, BR/EDR, BLE | |
| Frequency Band(s) [MHz] | 2401 ÷2483 2402÷2480 | |
| Maximum Power [mW] | 100 10 | |
Product information for networked equipment
Power consumption of the product in networked standby if all wired network ports are connected and all wireless network ports are activated: 2,0 W.
How to activate wireless network port:
WIFI module switches on as soon as the function knob is set to a position different to zero.
How to deactivate wireless network port:
WIFI module is always off when the function knob is set to zero position. If the knob is set to different position, go to WIFI menu and select off to deactivate the WIFI.
Hereby, Candy Hoover Group Srl declares that the radio equipment is in compliance with Directive 2014/53/EU and with the relevant statutory requirements for the UK market. The full text of the declaration of conformity is available at the following internet address: www.candy-group.com
HOW TO INTERACT WITH THE APP
Your appliance may be connected to your home wireless network and operated remotely using the app. Connect your appliance to ensure it stays up to date with the latest software and features.

NOTE
- Once the oven is turned on, the WIFI icons blinks for 30 minutes. During this period it's possible to enroll the product.
- Ensure your home Wi-Fi network is turned on.
- You will be given step by step guidance on both your appliance and mobile device.
- It may take up to 10 minutes to connect your oven.
- For further guidance and troubleshooting, please refer to the app.
Download on your smartphone.


text_image
Available on the App Store GET IT ON Google PlayNEW USER REGISTRATION
- Click on "Register"
- You can register through social accounts or sign up with your personal email

text_image
Welcome! Sign in to enter in your home page ENTER REGISTER Are you new to hOn? Click below to learn about our products TRY DEMO hOn Do you already have a thousand passwords? Register with your social accounts and log in in the easiest and fastest way. SIGN UP WITH GOOGLE SIGN UP WITH APPLE SIGN UP WITH FACEBOOK No information relating to you will be stored and we will not post anything from you OF SIGN UP WITH EMAIL Already registered? LOGINQUICK PAIR ENROLLMENT
Step 1
- Select "Add appliance".

text_image
Hello USERNAME YOUR APPLIANCES ADD Add appliance NOs Virtual Wine Bank second row 2 bottles there is a second row YOUR WIDGETS Lawn / your door sit out. Scant to Care NEW Your NEWS What functions do smart appliances have! How to live sustain: home and reduce wStep 2
- Allow your location permission.

Allow your location permission
To enhance your experience, please allow location permission to hOn app in the next step.


CONTINUE
Step 3
- Select oven from the appliance category.

Select your appliance category

Search your appliance

Washing machine

Washer dryer

Tumble dryer

Dishwasher

Air conditionair

Air purifier

Air scanner
Step 4
- Turn on your appliance; if it is already on, turn it off and on again.

Appliance connection

Turn OFF and then ON your appliance
In case you can't switch OFF your appliance, unplug (for at least 10 seconds) and then plug its power supply.

natural_image
Circular icon with a blue 'Power' button surrounded by abstract geometric shapes (no text or symbols)OK, I DID IT
Step 5
• After turning on, the hOn app will start searching for your home appliance.

text_image
Appliance connection Searching your appliance Don't turn off your Bluetooth. iOn app is looking for your appliance... 00:00:40 Stay close to your appliance in order to correctly capture the signal.Step 6.1-6.2
- Select your home appliance, tap on "connect" and wait a few seconds.
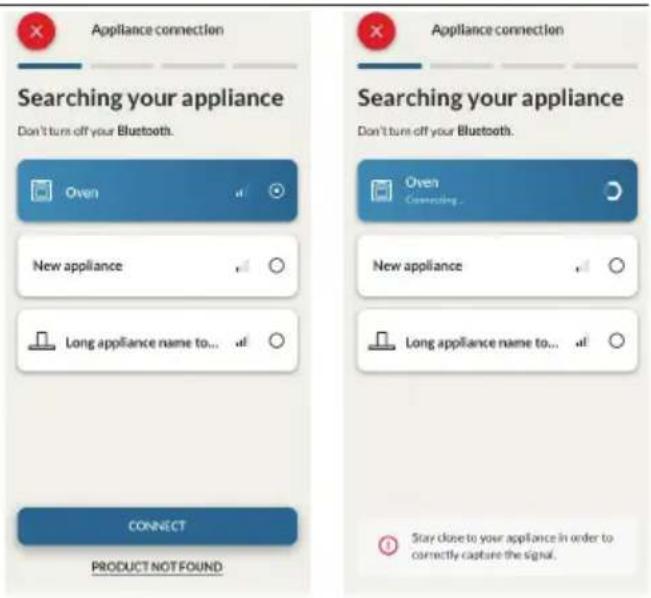
text_image
Appliance connection Searching your appliance Don't turn off your Bluetooth. Oven New appliance Long appliance name to... CONNECT PRODUCT NOT FOUND Appliance connection Searching your appliance Don't turn off your Bluetooth. Oven Connecting New appliance Long appliance name to... Stay close to your appliance in order to correctly capture the signal.Step 7
- Your Oven will be found and you can control it through hOn.
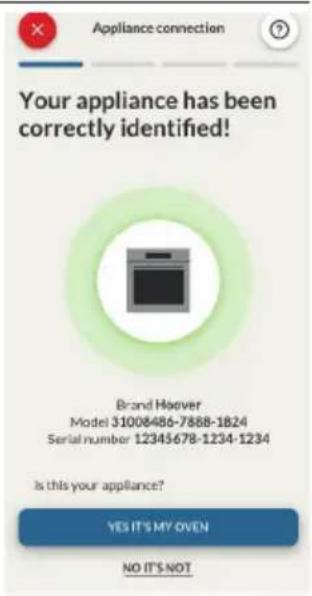
text_image
Appliance connection Your appliance has been correctly identified! Brand Hoover Model 31008486-7888-1824 Serial number 12345678-1234-1234 Is this your appliance? YES IT'S MY OVEN NO IT'S NOT
HOW TO CHANGE WIFI SETTINGS
Once the appliance is enrolled, the user can change the WIFI settings between:
- WIFI ON: It is only possible to monitor the oven status by App.
• WIFI OFF: The oven is not connected but still enrolled with network credentials saved. -
WIFI RESET: The connection is reset and a new enrollment is possible.
-
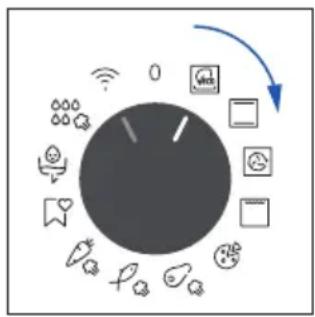
Turn the function knob on WIFI menu.
- On display appears "On".
- Rotate the dial control until "Off" or the reset setting "rSt" will be showed.
flowchart
graph TD
    A["Central Unit"] --> B["Device 1"]
    A --> C["Server 1"]
    A --> D["Desktop 1"]
    A --> E["Mobile 2"]
    A --> F["Cloud Services 3"]
    A --> G["Data Storage 4"]
    A --> H["Information System 5"]
text_image
ON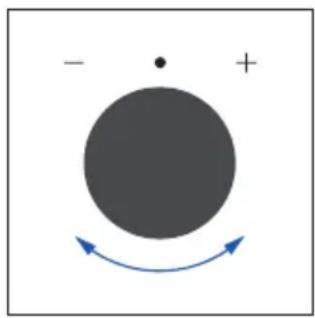
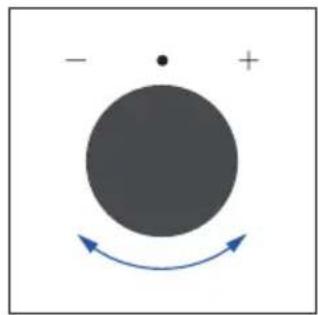
natural_image
Simple diagram with a large circle, a dot, and a curved arrow indicating rotation or direction (no text or symbols)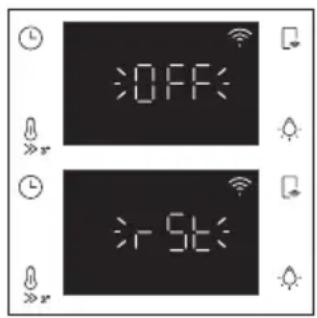
text_image
OFF 5K
REMOTE CONTROL
The Remote Control offers numerous advantages for users, enhancing convenience, efficiency, and the overall cooking experience, by giving the capability to control the product directly from both the appliance and hOn App
This function allows, through your device, to enjoy various features, such as: instant or scheduled start of recipes or cooking programs already available in the app; real-time monitoring of the progress of your recipes; adjustment of the cooking parameters in use; monitoring of the cooking process using the probe; managing saved recipes using the "Jolly function" on the product (see related section). Furthermore, it is possible to receive notifications once programs or recipes are completed. The Remote Control can be activated exclusively when the product is enrolled.
NOTE: It is available for all cooking functions on the product, except for Gratin and Supergrill programs.
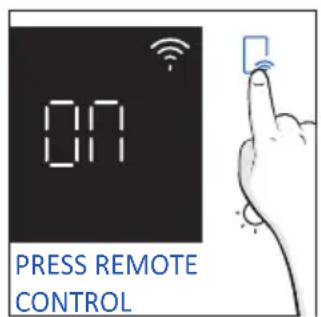
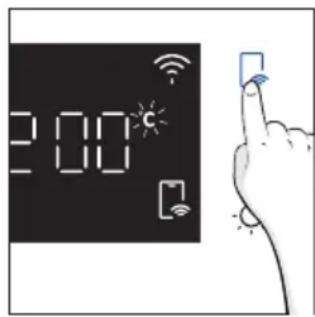
How to activate Remote Control:
- Turn the function knob on WIFI menu.
- Press
- On display appears "hOn". Both WIFI and Remote Control icons will be shown.
- Access to the App, select a program and let the cooking starts. During the process is possible to control and change the program parameters from both product and App.
flowchart
graph TD
    A["Central Dial"] --> B["Mobile App"]
    A --> C["Data Transfer Icon"]
    A --> D["User Interface Icon"]
    A --> E["Information Icon"]
    A --> F["Smart Phone Icon"]
    A --> G["Global Display Icon"]
    A --> H["Global Display Icon"]
text_image
ON PRESS REMOTE CONTROL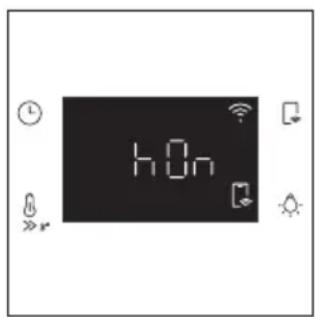
text_image
hOnIt's also possible to activate Remote Control during cooking process by pressing related button
text_image
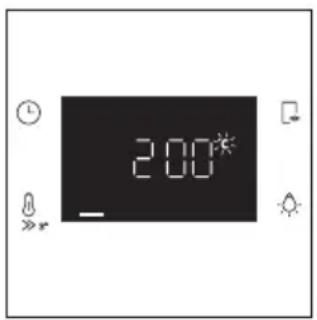
2:00*
text_image
PRESS REMOTE CONTROL 2:00
text_image
2:00*How to stop Remote Control:
While the cooking program is in progress, it can be stopped directly from the product itself by rotating the function knob to a different position. These actions interrupt the cooking process.
Another way is by pressing the corresponding button of Remote Control that came with your appliance. These actions interrupt the cooking process.
flowchart
graph TD
    A["Central Control Unit"] --> B["Module 1"]
    A --> C["Module 2"]
    A --> D["Module 3"]
    A --> E["Module 4"]
    A --> F["Module 5"]
    A --> G["Module 6"]
    A --> H["Module 7"]
    A --> I["Module 8"]
    A --> J["Module 9"]
    A --> K["Module 10"]
    A --> L["Module 11"]
    A --> M["Module 12"]
    A --> N["Module 13"]
    A --> O["Module 14"]
    A --> P["Module 15"]
    A --> Q["Module 16"]
    A --> R["Module 17"]
    A --> S["Module 18"]
    A --> T["Module 19"]
    A --> U["Module 20"]
text_image
2:00 c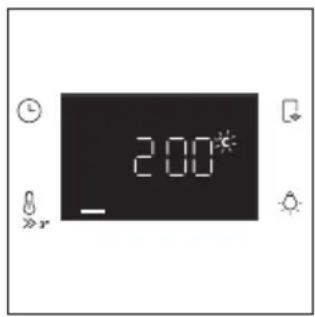
text_image
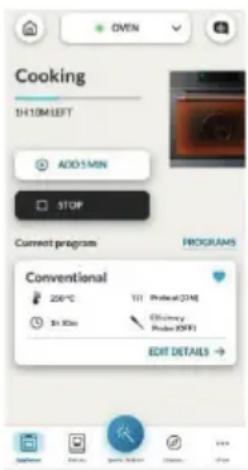
2:00You can also stop the cooking program remotely using the app by clicking the 'STOP' Button on display device. The oven will automatically stop the cooking.
NOTE: If the user stops the cooking in progress from the oven, simultaneously the stopped cooking will be seen in the App.
text_image
Cooking 1H:10M LEFT ADD:1 MIN STOP Current programs PROGRAMS Conventional 206°C Ttl Protect (214) Efficiency Prote 20FF3 EDIT DETAILS →3. BEFORE STARTING
3.1. INFORMATION TO START
When you first turn on the oven, you might notice some smoke. Don't worry, just wait for the smoke to clear before using the oven.
How door works
During the pyrolytic cleaning process, the oven door remains locked at all times. If it's not locked, the oven will display error code 24 and pause the cleaning function.
How illumination works
The oven cavity is illuminated by one or more light bulbs, typically activated each time a cooking function begins.
For ovens equipped with a door switch (see below), the light automatically turns on when the door is opened.
For ovens equipped with lamp button, it can also be used to activate the lighting.
If the oven door remains open for more than 10 minutes, the lights will automatically turn off.
During pyrolytic cleaning process light remains off. *
How cooling fan works
The cooling fan is responsible for dissipating the heat, keeping the oven and its surroundings from getting too hot, as well as protecting kitchen appliances from the effects of high temperatures. For this reason, the cooling fan remains audible for a period of time even after the oven is turned off. It operates during and after cooking cycle in relation to the internal temperature of the oven.
When the cooling fan is operational, it usually generates a gentle humming or whirring noise. You may also notice a warm airflow emanating from the gap between the oven door and the control panel.
During pyrolytic cleaning and when door is locked, cooling fan is switched on. *
During ECO function the light will remain off.
(*only for pyro ovens)
How status bar works
The status bar, based on the set programs, simplifies monitoring of temperature and time. Specifically, for functions involving preheating, it displays the temperature increase during this phase. In cooking programs and the pyrolytic cleaning function, it shows the countdown of cooking time and the cleaning cycle, respectively.
3.2. FIRST USAGE
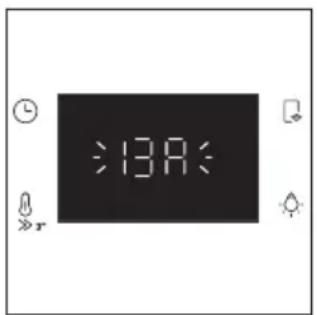
When the appliance is switched On for the first time, the initial step is to set time of day, choose between 13 ampere or 16 ampere, select brightness and sound level.
- SET THE TIME: The display will show the blinking preset time '12:00'. To modify it, press ⏚ and use the right knob to adjust the current hour. Press again ⏚ and follow the same procedure to set the minutes. To confirm, press ⏚ once more.

- AMPERAGE: By default, the oven is set to work with higher power suitable for households with more than 3 kW (16 A). If your home has lower power, you can change this setting to 13 A. This setting affects how quickly the oven heats up. Choosing the higher option (16A) means it heats up faster (because the power absorption is increased). On the display, you'll see two choices: 13A and 16A. Just turn the right knob to pick the one you want, then press ⏻ to confirm.
text_image
:13A: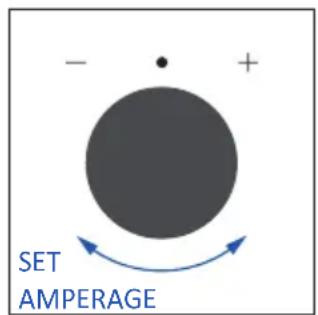
text_image
- + SET AMPERAGE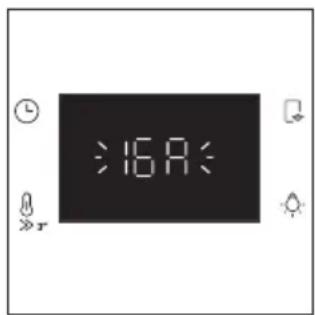
text_image
:16A: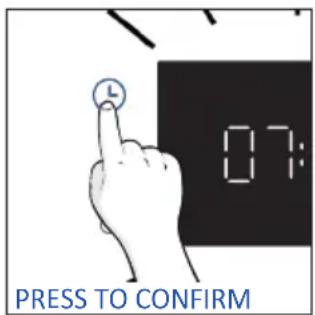
text_image
L 07: PRESS TO CONFIRMNOTE: The option to set the amperage is only available during the initial installation. To modify the set amperage, please refer to the post-installation instructions.
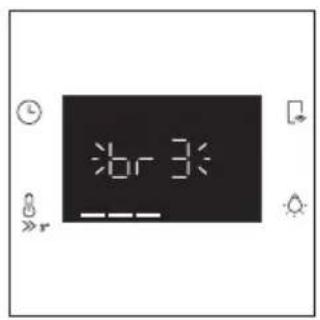
- BRIGHTNESS: The display shows the symbol "br". The numbers represent the level of brightness intensity, editable turning the right knob. To confirm press Ⓛ
text_image
6r3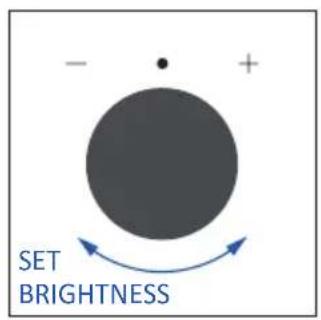
text_image
- + SET BRIGHTNESS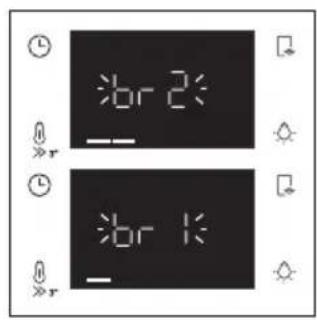
text_image
7br 2 7br 1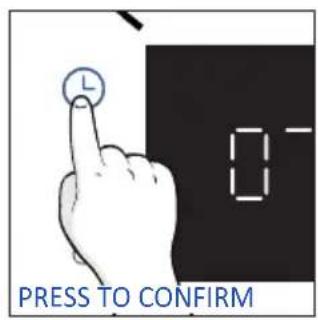
text_image
0 PRESS TO CONFIRM- SOUND: The display shows the symbol "Sn". The numbers represent the level of sound intensity, editable turning the right knob. To confirm press ⏻
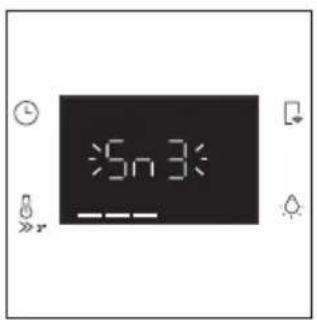
text_image
5n3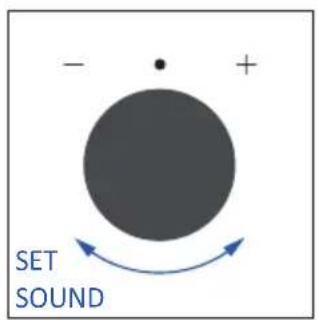
text_image
- + SET SOUND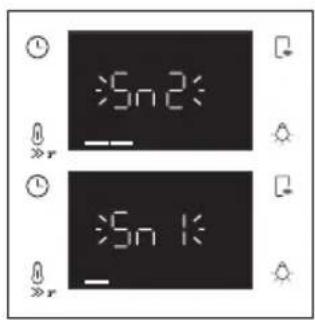
text_image
5n 2 5n 1
text_image
PRESS TO CONFIRM• POST INSTALLATION INSTRUCTIONS
When oven is in stand-by mode, it is possible to go back to initial settings by pressing simultaneously Temperature and Lamp buttons for 5 sec.
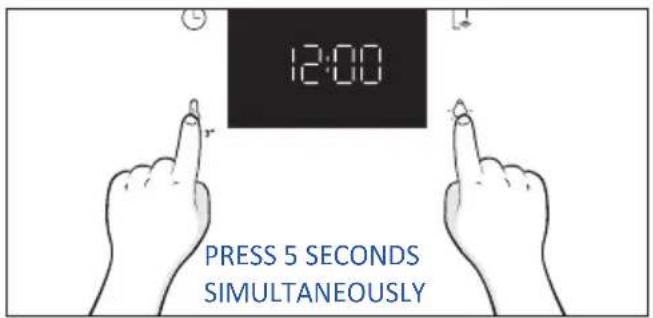
text_image
12:00 PRESS 5 SECONDS SIMULTANEOUSLY3.2. PRELIMINARY CLEANING
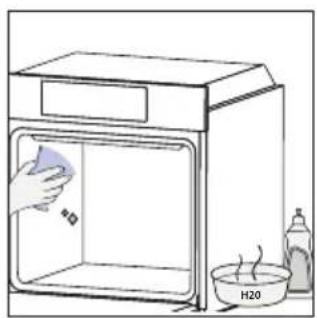
Clean the oven before using for the first time. Wipe over external surfaces with a damp soft cloth. Wash all accessories and wipe inside the oven with a solution of hot water and washing up liquid. Set the empty oven to the maximum temperature and leave on for about 1 hour, this will remove any lingering smells of newness.
natural_image
Simple line drawing of a kitchen sink with a hand cleaning the interior, water bath, and a bottle (no text or symbols)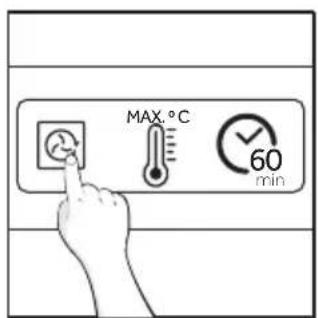
text_image
MAX.°C 60 min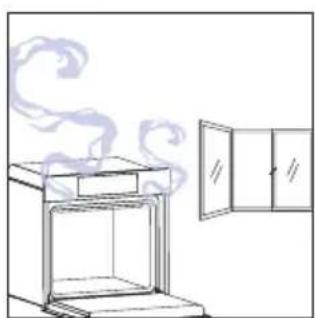
natural_image
Line drawing of a steam rising from an oven next to a cabinet (no text or symbols)4. OPERATION OF PRODUCT
4.1. HOW THE PRODUCT WORKS
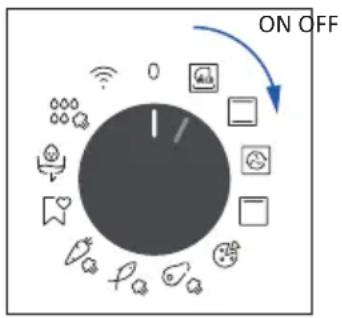
SWITCHING ON/OFF THE OVEN
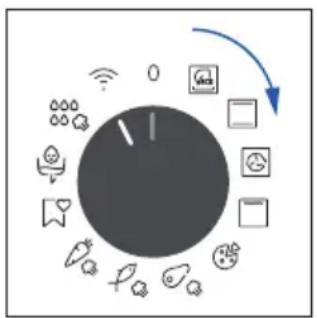
To turn ON the oven rotate the function knob (clockwise/counterclockwise) and select a cooking program. To turn it OFF, set the function knob to the '0' position.
text_image
ON OFF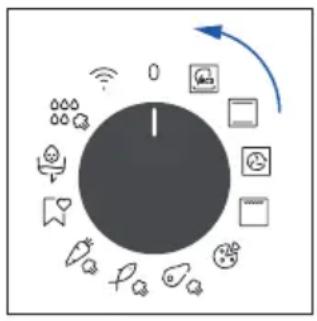
flowchart
graph TD
    A["Central Node"] --> B["Smart Lock Icon"]
    A --> C["Camera Icon"]
    A --> D["Battery Icon"]
    A --> E["Light Bulb Icon"]
    A --> F["Radio Station Icon"]
    A --> G["Water Heater Icon"]
    A --> H["Electric Light Battery Icon"]
    A --> I["Global Wireless System Icon"]
    A --> J["Global Smart Lock Icon"]
    A --> K["Global Cable System Icon"]
    A --> L["Global Wireless System Icon"]
SET COOKING PROGRAM
Turn the function knob and select the desired program. On display will appear a default temperature that can be edit in every moment turning the right knob (clockwise to increase and counterclockwise to decrease the temperature).
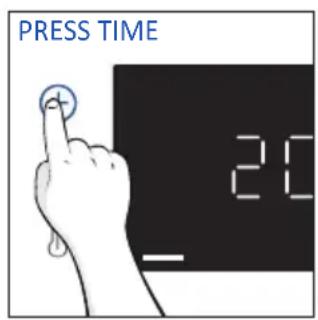
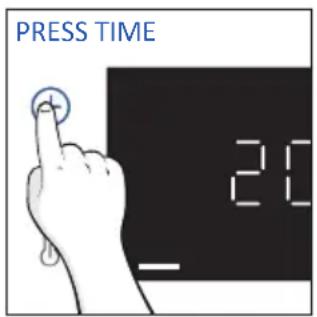
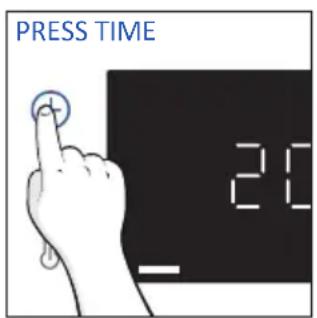
TIME MENU
Access the Time menu by pressing Ⓛ. To navigate into tap ☐ as many times as is needed to enter in the following settings:
text_image
PRESS TIME 20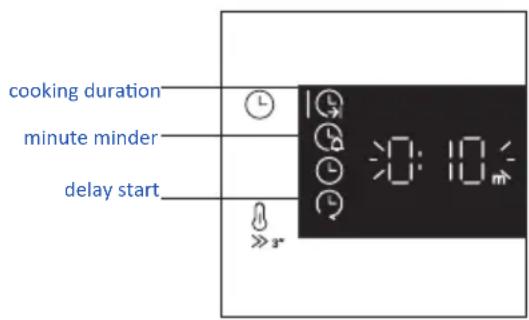
text_image
cooking duration minute minder delay startNOTE: several parameters cannot be set at the same time, therefore only the last set remains in the memory while the previous one is deleted.
COOKING DURATION
Allows to preset the cooking time required for the recipe chosen.
ACTIVATION: press ⏻ to enter in the Time menu. Tap ⓐ as many times as you need to select "Cooking duration" function. Then use the dial control to regulate the value.

The countdown starts at the end of preheating (if present). During cooking phase is possible to change the duration value by turning the right knob. When duration is elapsed the cooking stops.
MINUTE MINDER
Allows to use the oven as alarm clock.
ACTIVATION: press ⏻ to enter in the Time menu. Tap ⓐ as many times as you need to select "Minute minder" function. Then use the dial control to regulate the value.
text_image
PRESS TIME 20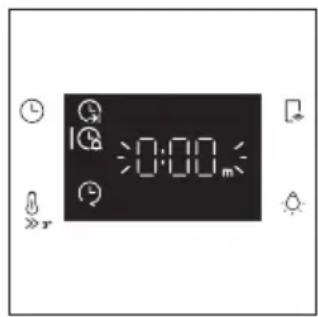
text_image
0:00m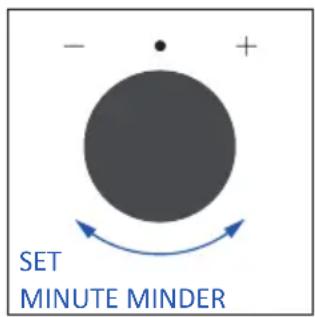
text_image
- + SET MINUTE MINDER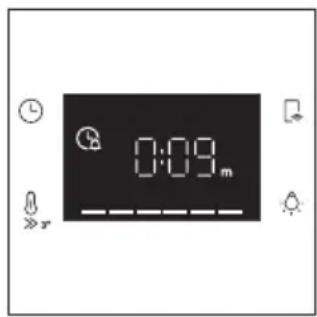
text_image
0:09.mWhen the function is set, the primary information showed on display is always the time. To edit the temperature, press ⏻ to enter dedicated edit mode. When duration is elapsed, the cooking continues until the left knob is turned in 0 position.
This function can be set also when the oven is in stand by mode by pressing ⏻. When activated, the minute minder operates independently of the oven's cooking functions.
DELAY START
Allows to choose the cooking start time.
ACTIVATION: press Ⓛ to enter in the Time menu. Tap as many times as you need to select "Delay start" function. Then use the dial control to set the start time of cooking.
text_image
PRESS TIME 20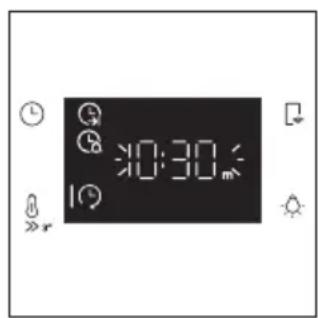
text_image
0:30
text_image
- + SET DELAY START
text_image
20:00NOTE: Delay start is activable only after setting Cooking Duration and it is not available with grill's functions.
ADDITIONAL FUNCTIONS
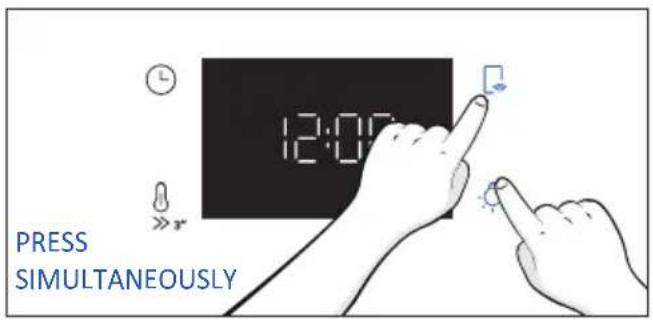
CHILD LOCK
This function allows you to lock the screen to prevent any unwanted use by minors. To activate it, simultaneously press the Lamp and Remote Control buttons for 3 seconds.
An icon with a padlock will appear on the user interface. In this condition, the oven user interface is locked, and no changes in settings can be made.
To deactivate the child lock, press the Lamp and Remote Control buttons again for 3 seconds (the icon with the key will disappear)
text_image
12:00 PRESS SIMULTANEOUSLY4.2. COOKING FUNCTIONS
FAST PREHEATING OPTION
In order to accelerate preheating phase, the fast-preheating option can be selected by pressing the temperature icon for 3s after having selected cooking program and temperature. This option will activate a combination of fan and heating elements regardless of the chosen cooking function. To save energy, when fast preheating is activated the lamp will be turned OFF until the oven reaches the desired temperature.
4.2.1. STANDARD FUNCTIONS
NOTE: for functions that require preheating, ensure all accessories are removed during this phase. Follow instructions in the table below for what regards preheating.
"YES/FAST PREHEAT" means that preheating is required and fast preheat option is available; "NO" means that preheat is not available and foods must be inserted with cold oven.
| Symbol Function | T°C default T°C range | Suggested shelf position | Preheat | Suggestions | |
 | *ECO | 190 °C 150-220 °C | L3/L4 NO | IDEAL FOR: cooking meat, fish or vegetablesThis function allows to save energy during cooking keeping the food moist and tender. Cavity lamp is switched off | |
 | *Conventional | 200°C 30-250°C | L2/L3 | YES/FAST PREHEAT | IDEAL FOR: cakes, breads, biscuits, quiches on one level using both upper and lower heating.Can be used with Preci Probe. |
 | Multi-Level | 160°C 50-250°C | L4 (one tray)L2+L5 (two trays)L2+L4+L6 (three trays) | YES/FAST PREHEAT | IDEAL FOR: cakes, biscuits and pizzas on one or more levels. Ideal to cook different foods. Can be used with Preci Probe. |
 | **Supergrill | 05 01-05 | L6 NO | IDEAL FOR: big quantities of sausages, steaks and toast bread.The entire area below the grill element becomes hot. Use with the door closed. Turn food two thirds of the way through cooking (If necessary). | |
4.2.2. SPECIAL FUNCTIONS
| Symbol Function | T°C default T°C range | Suggested shelf position | Preheat | Suggestions | |
 | Pizza | 300°C 200-300°C | L2/L3 NO | IDEAL FOR: all kind of pizzas without preheating the oven. Use lower temperatures for frozen items and 300°C for home-made recipes | |
 | Jolly --- | Add to the preset list of functions your favorite one that's not already present in your oven. You canconfigure it through the hOn app. | |||
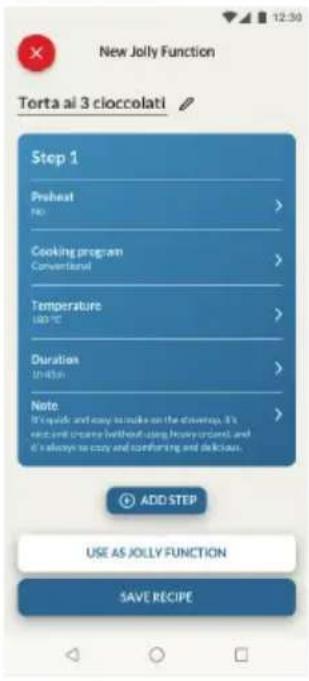
Jolly function
Thanks to the Jolly function, this product offers a fully customizable experience, allowing you to store your personalized recipes directly on the oven. You can execute these recipes as often as you like, even without the need to log into the app.
text_image
New Jolly Function Torta ai 3 cioccolati Step 1 Preheat PKI > Cooking program Conventional > Temperature 100 °C > Duration 1 min Note It's quicks and easy to make on the stewart. It's crying and creating without using heavy ordant, and it's always so easy and confusing and delicious. ADD STEP USE AS JOLLY FUNCTION SAVE RECIPEHow to Set the Jolly Function:
To set the Jolly function on your oven, open the app's recipe section, select the recipe you want to use, and click 'Use As Jolly Function'.
From this point onward, you can launch it from the product even without interaction with the app. Simply turn the function knob to the Jolly function to start the cooking process.
The display will show the preset temperature.
How to edit the Jolly function:
To edit a Jolly function, go to the app's recipe section and select the card of the recipe designated as a Jolly function. Tap the "edit" button to customize the recipe and modify the previously set settings.
A pop-up message will inform you that to save the newly modified Jolly function, you must remove the previous one. If you confirm, the previous Jolly function will be deleted, and the new parameters will be saved on the product and will be visible in the app.
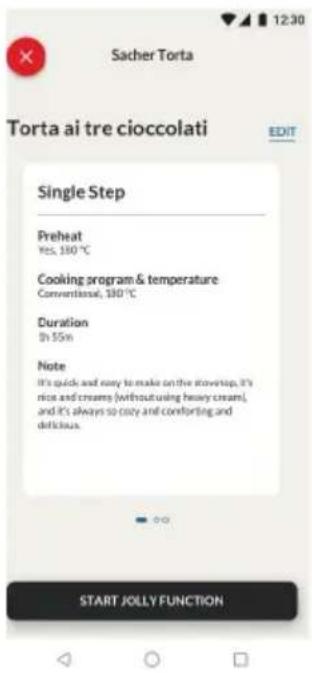
text_image
Sacher Torta Torta ai tre cioccolati EDIT Single Step Preheat Yes, 100 °C Cooking program & temperature Conventional, 100 °C Duration On 55 min Note It's quick and easy to make on the stoveup, it's nice and creamy (without using heavy cream), and it's always so noisy and comforting and delicious. START JOLLY FUNCTION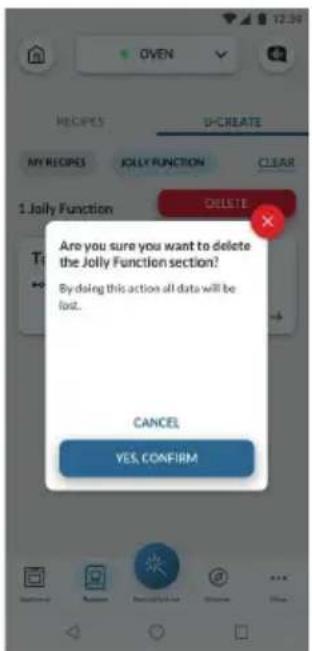
text_image
OVEN U-CREATE MY RECIPES JOLLY FUNCTION CLEAR 1.Jolly Function DELETE Are you sure you want to delete the Jolly Function section? By doing this action all data will be lost. CANCEL YES, CONFIRMHow to Delete the Jolly Function:
To remove the Jolly function from the oven's user interface, access the app's recipe section.
By tapping on the card of the recipe designated as a Jolly function, it's possible to delete it by clicking the red button 'delete button'.
A pop-up will confirm the operation, asking for your confirmation. If you proceed, the Jolly function saved on the oven will be removed, and it will no longer be available in the app.
4.2.3. MULTI STEP FEATURE
The multi step feature allows to maintain previously set cooking parameters (temperature and time) while changing function during cooking.
Multi-step recipes can be created on hOn App through the U-Create function and saved on the oven.
The user can save the Multi-step recipe as a Jolly Function to store it on the oven, or save it on hOn to start it remotely from the App.
Step 1. From the U-Create section of the App, press "Create Recipe".

text_image
OVEN RECIPIES U-CREATE MY RECIPES JOLLY FUNCTION There are no recipes! Start creating your first recipe! CREATE RECIPEStep 2. Edit the recipe's name and choose the parameters for the first step of the recipe.
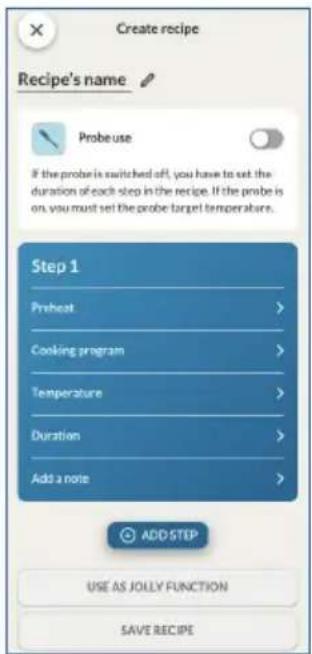
text_image
Create recipe Recipe's name Probe use If the probe is switched off, you have to set the duration of each step in the recipe. If the probe is on, you must set the probe target temperatures. Step 1 Preheat > Cooking program > Temperature > Duration > Add a note > ADD STEP USE AS JOLLY FUNCTION SAVE RECIPE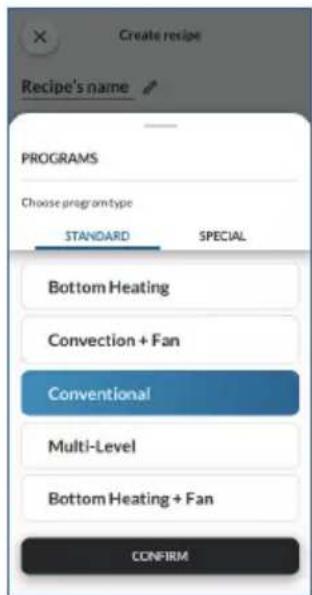
text_image
Create recipe Recipe's name PROGRAMS Choose programtype STANDARD SPECIAL Bottom Heating Convection + Fan Conventional Multi-Level Bottom Heating + Fan CONFIRM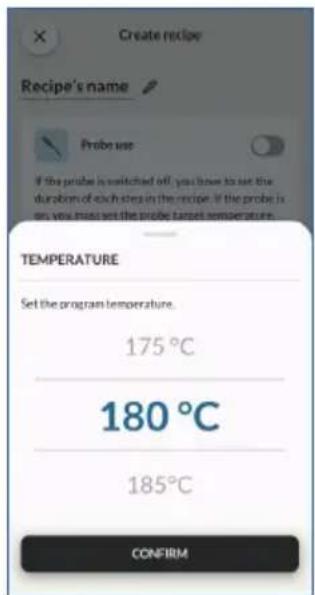
text_image
Create recipe Recipe's name Probe use If the probe is switched off, you have to set the duration of each step in the recipe. If the probe is on, you must set the probe target temperature. TEMPERATURE Set the program temperature. 175°C 180°C 185°C CONFIRM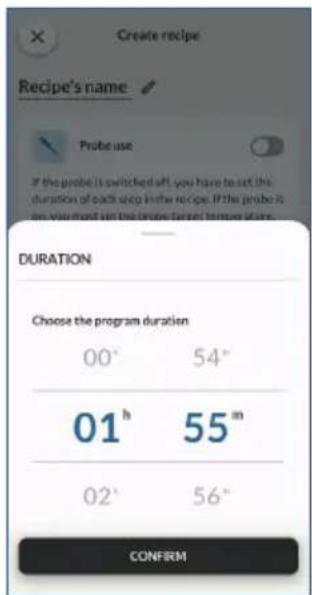
text_image
Create recipe Recipe's name Probe use If the probe is switched aft, you have to set the duration of each step in the recipe. If the probe is on you would set the probe's first time of up. DURATION Choose the program duration 00° 54° 01 h 55 m 02° 56° CONFIRMStep 3. After customizing the first step, press "Add step" to add another cooking function to the recipe and customize its parameters.
text_image
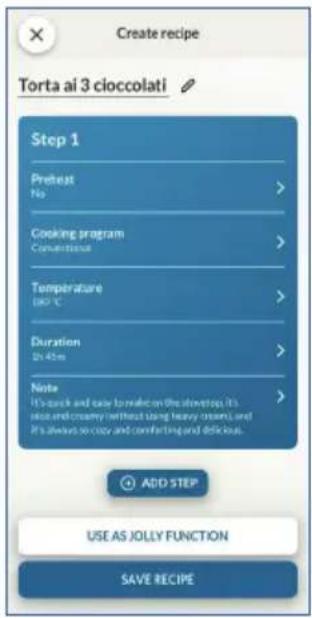
Create recipe Torta ai 3 cioccolati Step 1 Pretest No > Cooking program Convectional > Temperature (90°C) Duration 21:45m > Note It's quick and easy to make on the showstop. It's rice and creamy (without using heavy creams) and It's always so crazy and comforting and delicious. ADD STEP USE AS JOLLY FUNCTION SAVE RECIPEStep 4. Save the recipe on the app to start it from hOn remotely, or save it as a "Jolly Function" to find it directly on the oven.

text_image
Create recipe Torta ai 3 cioccolati Step 1 Cooking program Conventional > Duration 230 °C > Duration In $mn > Note It's quick and easy to make on the stovetop, it's nice and creamy (without using heavy cream), and it's always in July and December and delicious. Step 2 Cooking program USE AS JOLLY FUNCTION SAVE RECIPE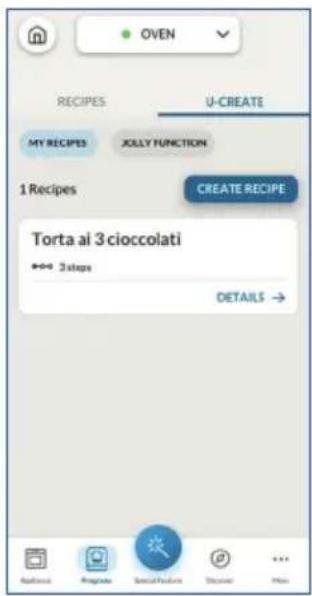
text_image
OVEN RECIPIES U-CREATE MY RECIPES XOLLY FUNCTION 1 Recipes CREATE RECIPE Torta al 3 cioccolati +→ 3 steps DETAILS → Applications Regulate Social Features Discover Help5. COOKING GUIDELINES
5.1. GENERAL COOKING TABLE
| Category Recipe | N° of levels | Cooking program | T°C | Preheat | Cooking accessory | Shelf position | Cooking time after preheating* (min) | |
| Sweet bakery | Small cakes /Muffins | 1 | Conventional Multilevel | 175°C 160°C | Y | Baking tray Baking tray | L3 L4 | 20-30 30-40 |
| 2 Multilevel 150°C | Baking + Deeper trays | L2+L5 30- | 40 | |||||
| 3 Multilevel 140°C Baking | trays L2+L4+L6 40-50 | |||||||
| Sponge cakes (26 cm ∅) | 1 | Conventional 170°C | Y | Metal grid + Cake tin | L2 30-40 | |||
| Multilevel 150°C | Metal grid + Cake tin | L4 40-50 | ||||||
| 2 Multilevel 150°C | Metal grids + Cake tin | L1+L4 50- | 60 | |||||
| Biscuits/Shortbreads | 1 | Conventional Multilevel | 150°C 150°C | Y | Baking tray Baking tray | L3 L4 | 25-30 30-40 | |
| 2 Multilevel 140°C | Baking + Deeper trays | L2+L5 30- | 40 | |||||
| 3 Multilevel 140°C Baking | trays L2+L4+L6 35-40 | |||||||
| Choquettes | 1 Multilevel 190°C | Y L5 25-35 | Baking tray L3 | 25-35 | ||||
| 2 Multilevel 180°C Baking | tray L2+ | |||||||
| Yorkshire pudding | 1 Conventional 200°C | Y Baking tray L3 20-30 | ||||||
| Meringues | 1 Multilevel | 90°C | Y | Baking tray | 90-160 | |||
| Macaron | 1 Conventional | 150°C | Y | Baking tray | L3 | 15-20 | ||
| Apple pie | 1 Conventional 185°C | Y | Metal grid + Cake tin | L2 60-70 | ||||
| 1 Multilevel 170°C | Y | Metal grid + Cake tin | L4 65-75 | |||||
| Tarte tatin 1 Conventional 170°C Y | Metal grid + Cake tin | L2 40-60 | ||||||
| Chocolate souffle | 1 Conventional 200°C | Y | Baking tray + molds | L3 10-15 | ||||
| Cheesecake 1 Conventional 150°C Y | Metal grid + Cake tin | L2 50-65 | ||||||
| Frozen croissants | 1 Conventional 180°C | L2YL5 25-35 | Baking tray L3 | 20-25 | ||||
| 2 Multilevel 180°C Baking | trays | |||||||
| 3 Multilevel 160°C Baking | trays L2+L4+L6 30-40 | |||||||
| Strudel, frozen | 1 Conventional 210°C | Y Baking tray L3 30-45 | ||||||
| Breads and Flatbread | Toast bread | 1 Supergrill | 5°C | N | Metal grid | L6 | 4-6 | |
| Focaccia | 1 Conventional | 200°C | Y | Baking tray | L2 or L3 | 25-35 | ||
| Bread, whole | 1 Conventional | 200°C | Y | Baking tray | L3 | 35-50 | ||
| Category Recipe | N° of levels | Cooking program | T°C Preheat | Cooking accessory | Shelf position | Cooking time after preheating* (min) | ||
| Savory pies and casseroles | Salty cakes / Quiches (26 cm ∅) | 1 Conventional 200°C Y | Metal grid + Quiche tin | L1 or L2 30-50 | ||||
| 2 Multilevel 180°C Y | Metal grid + Quiche tin | L1+L4 50-70 | ||||||
| Cheese souffle | 1 Conventional 200°C Y | Baking tray + molds | L3 20-35 | |||||
| Lasagna, fresh | 1 Conventional 200°C Y | Metal grid + ovenproof dish | L3 40-60 | |||||
| Lasagna, frozen | 1 Conventional 180°C Y | Metal grid + ovenproof dish | L3 50-60 | |||||
| Cannelloni, frozen | 1 Conventional 180°C Y | Metal grid + ovenproof dish | L3 45-55 | |||||
| Baked pasta 1 | Multilevel 200°C Y | Metal grid + ovenproof dish | L4 20-30 | |||||
| Pizza | Pizza, fresh (Tray) | 1 Conventional 250°C Y Baking tray L2 or L3 15-20 | ||||||
| Pizza, fresh (Tray) | 1 Pizza 250°C N Baking tray L2 or L3 18-25 | |||||||
| 2 Multilevel 180°C Y | Baking + Deeper trays | L2+L5 25-35 | ||||||
| Pizza, fresh (Round) | 1 Conventional | 250°C | Y | Baking tray | L2 or L3 | 8-10 | ||
| Pizza, fresh (Round) | 1 Pizza 300°C N Baking tray L2 or L3 15-20 | |||||||
| 2 Multilevel 180°C Y | Baking + Deeper trays | L2+L5 30-40 | ||||||
| Pizza, frozen (thin crust) | 1 Conventional 220°C | Metal grid Metal grid | Metal grid | L3 10-15 | ||||
| 2 Multilevel 200°C | L2+L5 15-25 | |||||||
| 3 Multilevel 180°C | L2+L4+L6 20-30 | |||||||
| Pizza, frozen (thin crust) | 1 Pizza | 200°C | N | Metal grid | L2 | 10-15 | ||
| Meat & Poultry | Roasted whole chicken (1-1.2kg) | 1 Multilevel 220°C Y | Metal grid/L4 Place Backing tray at L1 with 150ml of water | L4 40-60 | ||||
| Chicken thighs | 1 Multilevel | 220°C | N | Airfry tray** | L4 | 30-50 | ||
| Roasted duck | 1 Multilevel 200°C Y | Metal grid + Ovenproof dish | L3 50-60 | |||||
| Category Recipe | N°of levels | Cooking program | T°C | Preheat | Cooking accessory | Shelf position | Cooking time after preheating* (min) | |
| Meat & Poultry | Rooster 1 Multilevel 220°C Y | Metal grid Place baking tray at L1 | L4 20-40 | |||||
| Roasted Turkey | 1 Multilevel 200°C Y | Metal grid + Ovenproof dish | L3 50-60 | |||||
| Pork ribs (1000-1200g) | 1 Conventional 200°C Y | Metal grid + Ovenproof dish | L3 80-100 | |||||
| Sausages 1 Supergrill 4 Y Metal grid L5 40-50 | ||||||||
| Roast beef (500g) | 1 Multilevel 220°C Y Baking tray | L3 20-40 | ||||||
| Meatloaf (1000-1500g) | 1 Conventional 180°C Y Baking tray | L3 40-50 | ||||||
| Roasted chicken with potatoes | 1 Multilevel 200°C Y | Deeper tray L4 45-60 | ||||||
| Fish and Seafood | Grilled seafood | 1 Supergrill 4 N | Metal grid L5 15-30 | |||||
| Frozen fish sticks | 1 Multilevel | 200°C | N | Air fry tray** | L4 | 20-25 | ||
| Baked fish | 1 ECO | 200°C | N | Metal grid Place baking tray at L1 | L3 40-60 | |||
| Vegetables | Vegetable gratin | 1 ECO | 200°C | N | Metal grid + Ovenproof dish | L3 80-90 | ||
| Frozen french fries (300-500g) | 1 Multilevel | 220°C | N | Air fry tray** | L4 | 18-25 | ||
| Potato gratin | 1 Multilevel 200°C Y | Metal grid + Ovenproof dish | L4 15-25 | |||||
| Roasted potatoes | 1 Conventional 200°C Y Baking tray | L4 30-50 | ||||||
Cooking times may vary according to consumer's recipe and ingredients.
*if preheating required
** Depending on the oven model.
NOTE: For cooking cakes, quiches and other recipes that require a mold or a container on 2 levels, place them staggered: the upper tray on the left side and the lower tray on the right side.
5.2. EVERYDAY COOKING TABLE
Food category menu allows to cook a variety of recipes without preheating the oven, thanks to dedicated cooking programs tailored to each category needs.
| Symbol | Description Preheat | Shelf position | Temperature range (°C) | Time Range (min) | Preci Probe temperature (if available) | Description | |
 | Meat+Steam | NO | L3-L4 | 200-230 | 20-120 | For beef, veal and pork roasts, poultry and cuts of meat. | For beef, veal and pork roasts, poultry and cuts of meat. |
 | Fish+Steam | NO | L3-L4 | 150-180 | 15-60 | For whole fish and fillets. | For whole fish and fillets. |
 | Vegetables +Steam | NO L3 | L4 180-220 | 30-90 | For roasted vegetables and potatoes | For roasted vegetables and potatoes |
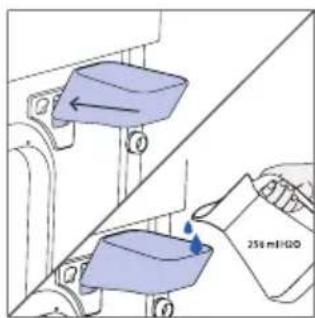
How to use the Steam Funnel for steam cooking programs
After selecting the steam cooking program, the UI will ask to add water through the dedicated accessory (Steam Funnel), proceed as following.
- Insert the Steam Funnel into the proper hole in the top right corner of the cavity
natural_image
Pure technical line drawing of a mechanical component with no text or symbols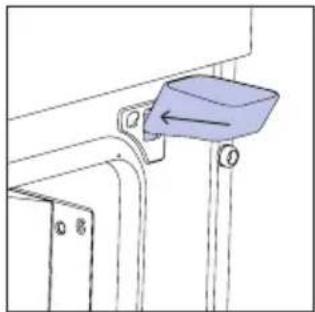
natural_image
Technical line drawing of a mechanical bracket with a blue component and an arrow indicating direction (no text or symbols)- Add 250 ml of water to the Steam Funnel
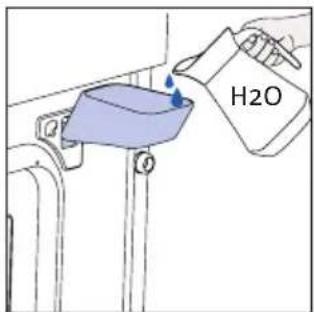
text_image
H2O- Remove the Steam Funnel from the cavity hole and close the oven door.
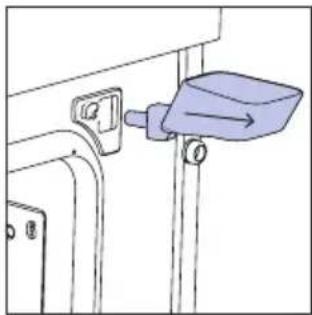
natural_image
Simple line drawing of a mechanical component with a blue lever and attached bracket (no text or symbols)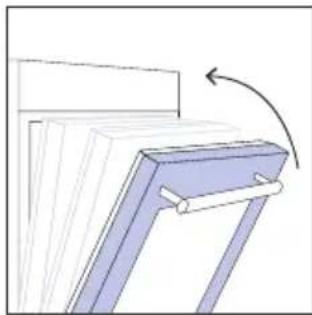
natural_image
Diagram of a mechanical component with a blue bracket and arrow indicating rotation (no text or symbols)The default time will be then shown and the cooking program will start automatically after one second. The time can be edited by turning the right knob; cooking temperature can be changed by pressing the dedicated icon. Both parameters can be set within a limited range as shown in the table above.
If the water amount added isn't enough or if no water is added at all, the cooking program will proceed regardless in "Dry Mode", a sound will be heard and will be shown on display.
natural_image
Simple black rectangle with small icons and symbols, no readable text or labelsNOTE: If too much water is loaded, the excess will come out from the draining nozzle.
NOTE: when cooking with steam, some residual water or condensation may be observable on the cavity bottom at the end of cooking.
NOTE: if, after turning off the oven, there is a need to continue cooking, it's recommended avoiding the use of everyday cooking programs and instead opting for standard functions.
| Recipe Serving size | Cooking program | T°C | Cooking accessory | Shelf position | Cooking time (min) | |
| Beef roast | 500-800g | Meat+Steam | 220°C | Metal grid | L3 | 30-40 |
| Beef fillet 200g | Meat+Steam 200°C | Metal grid L3 20-25 | ||||
| Meatloaf | 1000-1500g | Meat+Steam | 200°C | Metal grid | L3 | 40-50 |
| Beef wellington | 500g Meat+ | Steam 200°C Metal grid L3 50-80 | ||||
| Pot roast | 800-1000g | Meat+Steam | 200°C | Metal grid | L3 | 40-70 |
| Pork ribs | 1000-1200g | Meat+Steam | 200°C | Metal grid | L3 | 80 |
| Lamb rack | 800-1000g | Meat+Steam | 210°C | Metal grid | L3 | 60-80 |
| Lamb leg | 1500-2000g | Meat+Steam | 200°C | Metal grid | L3 | 80 |
| Salmon fillets | 200-600g | Fish+Steam | 170°C | Baking tray | L3 | 20-35 |
| Tuna steaks | 600g (app. 4 pcs) | Fish+Steam | 180°C Meta | grid L3 15-20 | ||
| Swordfish steaks | 700g (app. 4 pcs) | Fish+Steam | 180°C | Baking tray | L3 | 15-20 |
| Cod fillet | 600g (app. 4 pcs) | Fish+Steam | 160°C | Baking tray | L3 | 15-20 |
| Seabream, whole | 1 | Fish+Steam | 170°C | Baking tray | L3 | 35-45 |
| Seabream, fillet | 600g (app. 4 pcs) | Fish+Steam | 160°C | Baking tray | L3 | 15-20 |
| Seabass fillet | 600g (app. 4 pcs) | Fish+Steam | 160°C | Baking tray | L3 | 15-20 |
| Salt baked fish | 1 | Fish+Steam | 180°C | Baking tray | L3 | 30-40 |
| Fish skewers | 8 pieces | Fish+Steam | 160°C | Metal grid | L3 | 20-30 |
| Stuffed squid | 4 pieces | Fish+Steam | 180°C | Baking tray | L3 | 25-40 |
| Fennels 1 tray | Vegetables+-Steam | 200°C Metal | grid L3 30-40 | |||
| Mixed vegetables | 1 tray | Vegetables+-Steam | 190°C Metal | grid L3 40-45 | ||
| Cauliflowers 1 tray | Vegetables+-Steam | 190°C Metal | grid L3 40-50 | |||
| Pumpkins, cubed | 1 tray | Vegetables+-Steam | 200°C Metal | grid L3 30-40 | ||
| Stuffed peppers | 1 tray | Vegetables+-Steam | 180°C Metal | grid L3 70-80 | ||
| Stuffed zucchini | 1 tray | Vegetables+-Steam | 190°C Metal | grid L3 35-45 | ||
| Carrot sticks | 1 tray | Vegetables+-Steam | 180°C Baking | tray L3 35-40 | ||
| Broccoli 1 tray | Vegetables+-Steam | 190°C Baking | tray L3 30-40 | |||
| Ratatouille 1 tray | Vegetables+-Steam | 190°C Metal | grid L3 40-45 | |||
| Vegetable flan | 6 ramekins | Vegetables+-Steam | 180°C | Baking tray + molds | L3 25-35 | |
6. CARE & CLEANING
6.1. GENERAL RECOMMENDATIONS
Regular cleaning can extend the lifecycle of your appliance. Wait for the oven to cool before carrying out manual cleaning.
• After each use of the oven, a minimum of cleaning will help keep the oven perfectly clean.
- Do not line the oven walls with aluminum foil or single-use protection available from stores.
Aluminum foil or any other protection, in direct contact with the hot enamel, risks melting and deteriorating the enamel of the insides.
- In order to prevent excessive dirt of your oven and the resulting strong smokey smells, we recommend not using the oven at very high temperature. It is better to extend the cooking time and lower the temperature a little.
- In addition to the accessories supplied with the oven, we advise you only use dishes and baking molds resistant to very high temperatures.
6.2. CLEANING THE OVEN
6.2.1. INSIDE THE OVEN: cleaning functions
Pyrolytic cleaning (*depending on the oven model)
This process relies on the chemical process bearing the same name, which involves the decomposition of complex substances through the application of heat treatment.
Once initiated, it automatically locks the oven door and swiftly elevates the temperature to a searing 410^ C.
At the end of the cleaning cycle, food residues will leave a white coating on the enamel surfaces. To remove these particles, wipe with a cloth soaked in hot soapy water and use a brush or steel wool. Suitable cleaning agents are hot soapy water or oven cleaner.
How does it work:
- Remove any accessories from the oven, such as grids, side racks and side racks screw;
- Turn function knob on 🎨. Turn the dial control to set the Pyrolytic program; Allow the function to operate for the preset time. During this process and the following cooling phase, the oven door will remain locked.
- When the appliance is cool, clean the inner surfaces of the oven with a cloth.
▲ WARNING: Make sure that the appliance is cool before you touch it. Care must be taken with all hot surfaces as there is a risk of burns. Use distilled or drinkable water.
natural_image
Line drawing of an oven with a rack inside, showing internal structure and airflow direction (no text or symbols)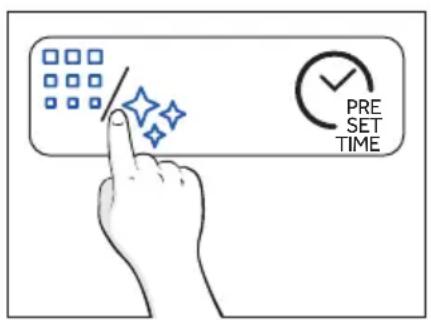
text_image
PRE SET TIME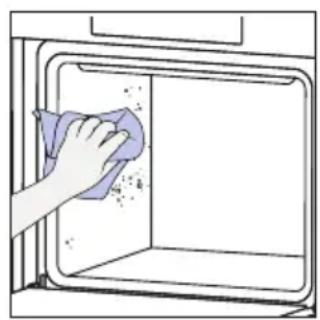
natural_image
Hand cleaning a kitchen appliance with a cloth (no text or symbols visible)
H2O Steam
The Steam cleaning function is designed to effortlessly tackle light dirt and provide a quick and eco-friendly solution for cleaning your oven cavity using the power of steam.
How does it work:
- Pour 250 ml of water through the dedicated steam funnel.
- Turn the knob on ☐. If necessary, turn the dial control to set the Steam clean program. Allow the function to operate for the preset time.
- At the end of the cleaning process, allow the oven to cool down.
- When the appliance is cool, clean the inner surfaces of the oven with a cloth.
- ⚠ WARNING: Make sure that the appliance is cool before you touch it. Care must be taken with all hot surfaces as there is a risk of burns. Use distilled or drinkable water. Wipe the cooking compartment and allow it to dry completely to avoid possible corrosions.

flowchart
graph TD
    A["Central Circle"] --> B["Smart Devices Icon"]
    A --> C["Data Server Icon"]
    A --> D["User Interface Icon"]
    A --> E["Mobile Device Icon"]
    A --> F["Balance Box Icon"]
    A --> G["User Interface Box Icon"]
    A --> H["User Interface Box Icon"]
    A --> I["User Interface Box Icon"]
    A --> J["User Interface Box Icon"]
    A --> K["User Interface Box Icon"]
    A --> L["User Interface Box Icon"]
    A --> M["User Interface Box Icon"]
    A --> N["User Interface Box Icon"]
    A --> O["User Interface Box Icon"]
    A --> P["User Interface Box Icon"]
    A --> Q["User Interface Box Icon"]
    A --> R["User Interface Box Icon"]
    A --> S["User Interface Box Icon"]
    A --> T["User Interface Box Icon"]
    A --> U["User Interface Box Icon"]
    A --> V["User Interface Box Icon"]
    A --> W["User Interface Box Icon"]
    A --> X["User Interface Box Icon"]
    A --> Y["User Interface Box Icon"]
    A --> Z["User Interface Box Icon"]
text_image
250 mL/100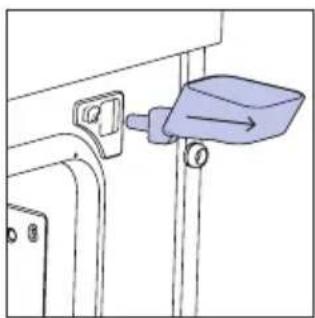
natural_image
Simple line drawing of a mechanical component with a blue tool inserted into a housing (no text or symbols)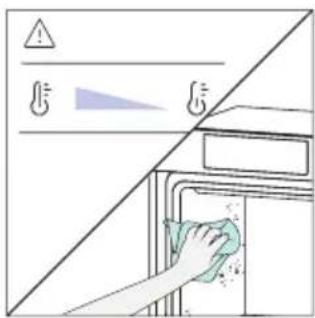
text_image
Diagram showing a hand cleaning a kitchen appliance with warning symbols and a clean water droplet, likely illustrating a hygiene or disinfection scenario.STEAM SYSTEM CLEANING
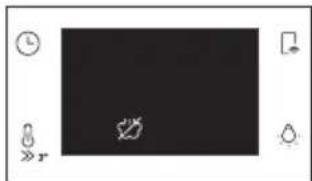
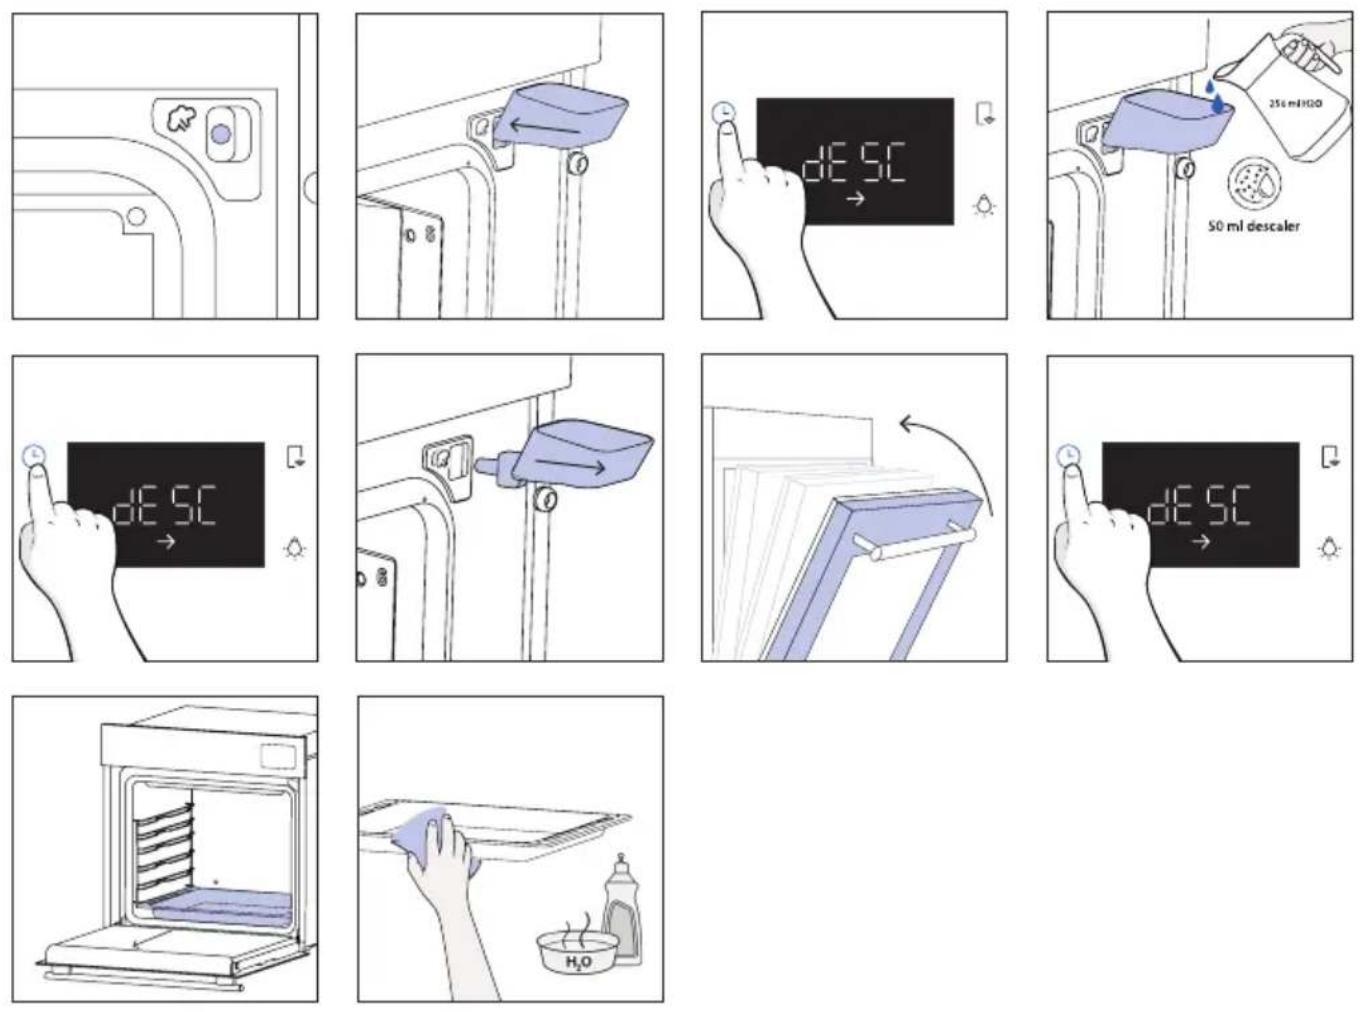
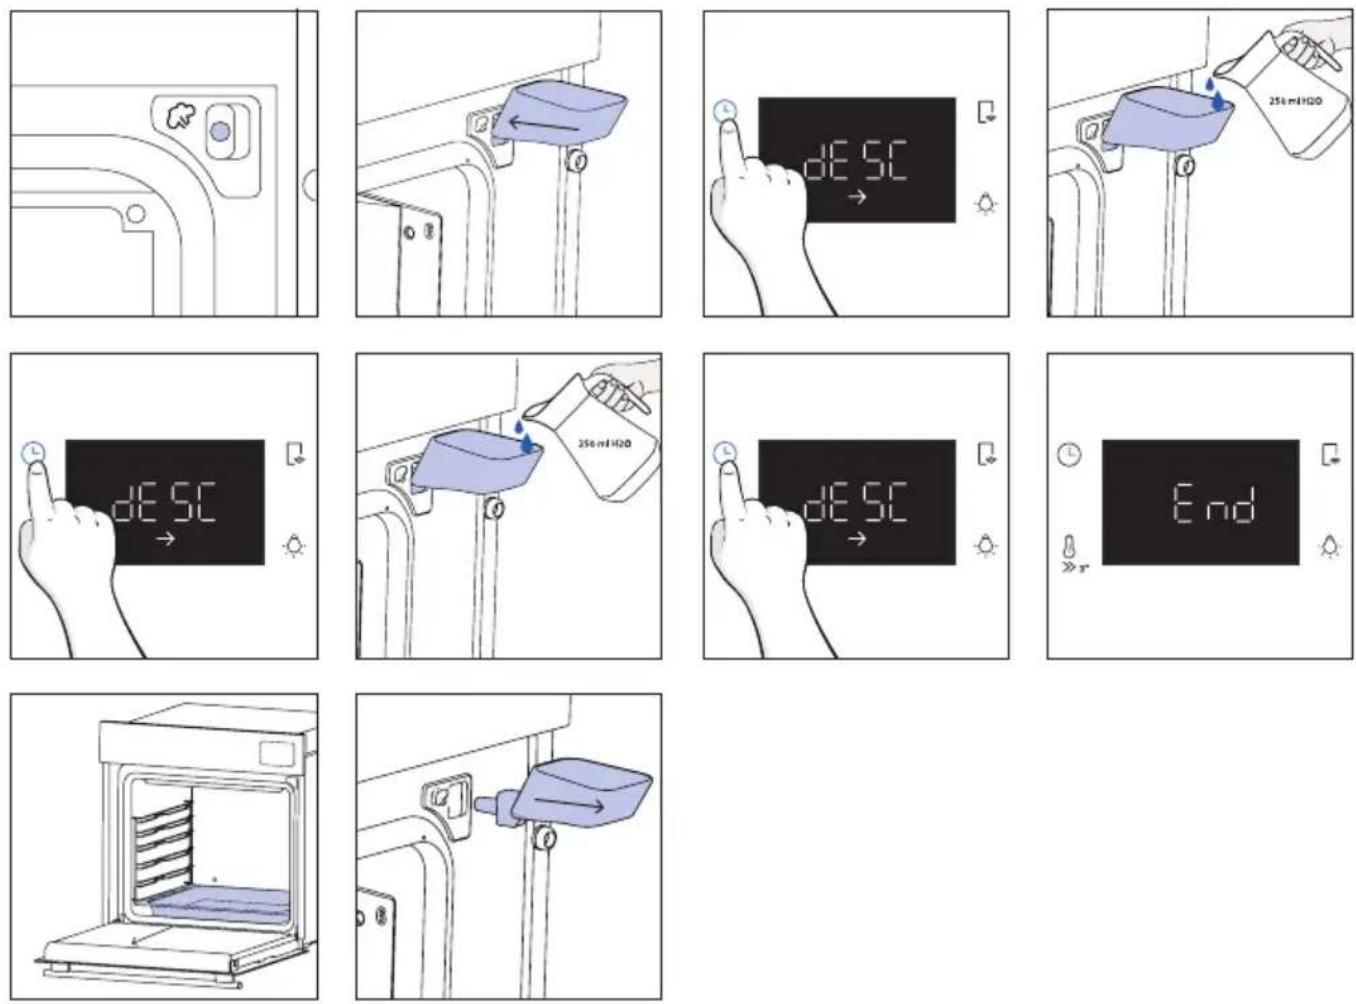
This function is suggested after 25 steam cycles, and it will be mandatory after 40 steam cycles. The oven will show the “descaling icon” at the end of every steam cycle starting from the 25th if users have not performed descale yet. After 40 steam cycles, none of the steam cooking programs will start before users execute the descaling program. It is divided into three steps:
6.2.1.1.

ESCALE
Step 1 (Removing residual water from steamer):
i. Select drain-descale mode from left knob and then select the descale function with the right knob and press time button to confirm.
ii. Place tray on cavity bottom and press the time button to start.
iii. After the buzzer beeps to proceed to the second stage, remove the tray and clean it.
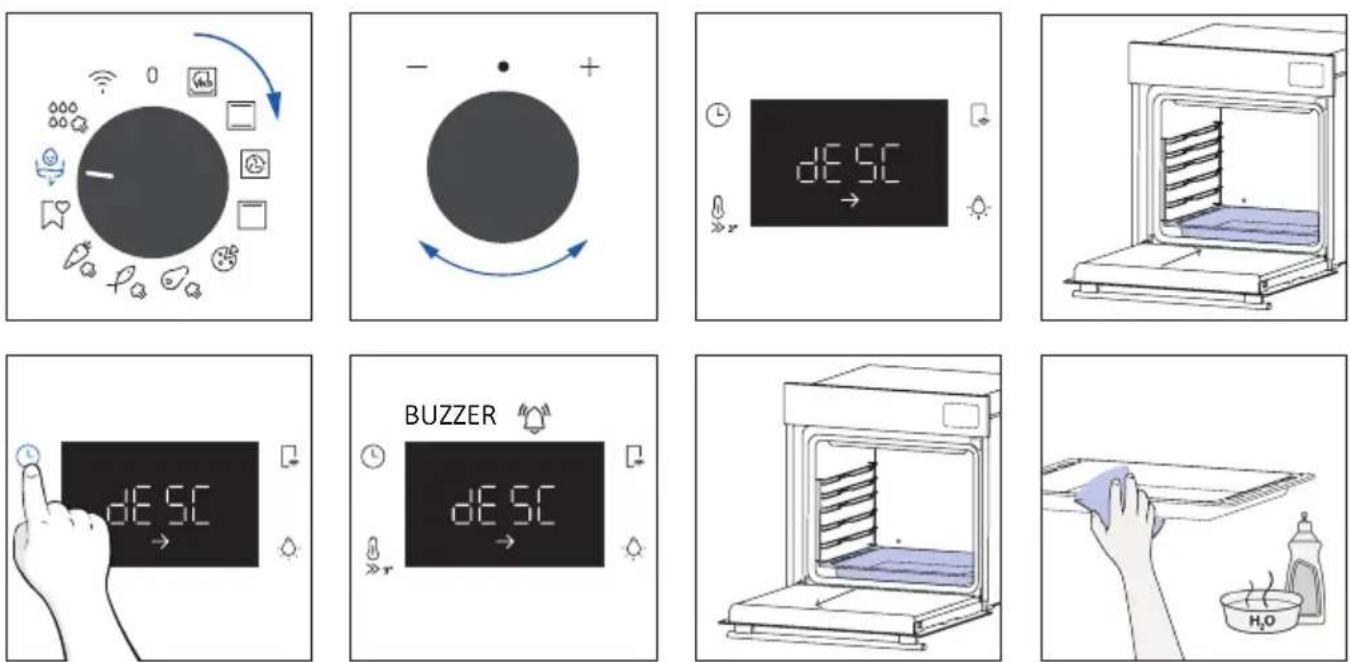
Step 2 (Descaling):
i. Place the water funnel and tray and press the time button to confirm.
ii. Fill 200 ml water and 50 ml descaler into the funnel. Then press the time button to confirm.
iii. Pull out the funnel, close the door and press the time button to confirm.
iv. Descaling process will take for a while, after that to proceed to the third stage, remove the tray and clean it again.
Step 3 (Rinsing):
i. Place the water funnel and tray and press the time button to confirm.
ii. Fill 250 ml water into the funnel. Then press the time button to confirm.
iii. After first draining completed, fill 250 ml water into the funnel. Then press the time button to continue rinsing.
iv. After second draining completed, fill 250 ml water into the funnel. Then press the time button to continue rinsing.
v. When the descaling function ends, remove the tray and funnel.
6.2.1.2. DRAINING
Step 1 (Removing residual water from steamer):
i. Select drain-descale mode and then select the draining function with the right knob.
ii. Place tray on cavity bottom and press the time button to start.
iii. When the draining function ends, remove the tray and clean it.
flowchart
graph TD
    A["Central Node"] --> B["WeChat"]
    A --> C["QQ"]
    A --> D["Social Media Icon"]
    A --> E["QQ Box Icon"]
    A --> F["QQ Box Icon"]
    A --> G["QQ Box Icon"]
    A --> H["QQ Box Icon"]
    A --> I["QQ Box Icon"]
    A --> J["QQ Box Icon"]
    A --> K["QQ Box Icon"]
    A --> L["QQ Box Icon"]
    A --> M["QQ Box Icon"]
    A --> N["QQ Box Icon"]
    A --> O["QQ Box Icon"]
    A --> P["QQ Box Icon"]
    A --> Q["QQ Box Icon"]
    A --> R["QQ Box Icon"]
    A --> S["QQ Box Icon"]
    A --> T["QQ Box Icon"]
    A --> U["QQ Box Icon"]
    A --> V["QQ Box Icon"]
    A --> W["QQ Box Icon"]
    A --> X["QQ Box Icon"]
    A --> Y["QQ Box Icon"]
    A --> Z["QQ Box Icon"]
natural_image
Simple diagram with a large circle, a dot, and a curved arrow indicating rotation or direction (no text or symbols)
natural_image
Line drawing of a laboratory oven with a rack inside and a blue cushion on the side (no text or symbols)
text_image
dr R1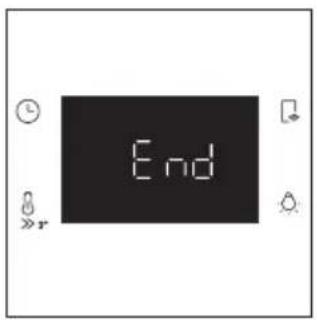
text_image
End
natural_image
Line drawing of a laboratory oven with a rack inside (no text or symbols)
natural_image
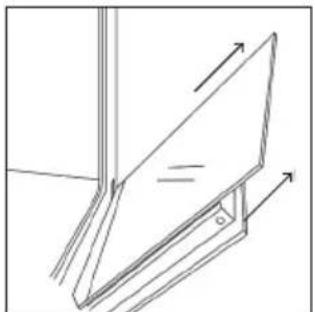
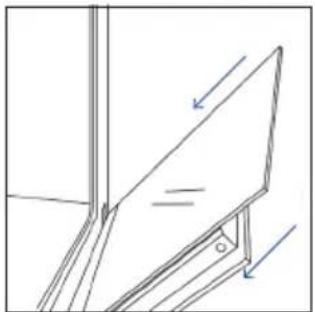
Illustration of a hand cleaning a cloth over a plate with a water bottle and a small bowl labeled H₂O (no text or symbols on the main subject)6.2.2. OUTSIDE THE OVEN: removal and cleaning the glass door
- Position the door at 90^ . Rotate the hinge locking tabs outward from the oven.

natural_image
Line drawing of a double-bowel oven with hands inserting a plug into the opening (no text or symbols)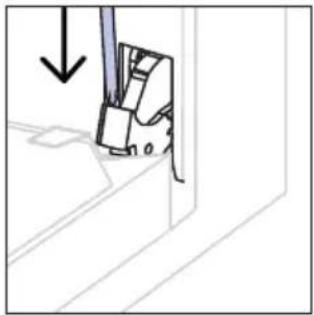
natural_image
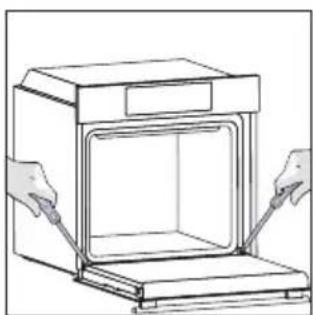
Diagram of a mechanical component with an arrow indicating direction (no text or symbols present)- Position the door at 45°. Simultaneously press the two buttons on both the sides of the door's lateral shoulders and pull towards yourself to remove the upper glasses' door cover.
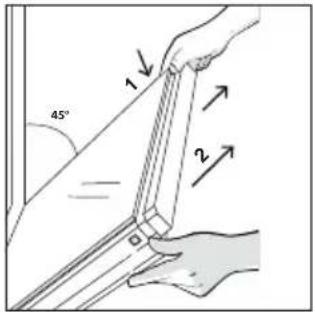
text_image
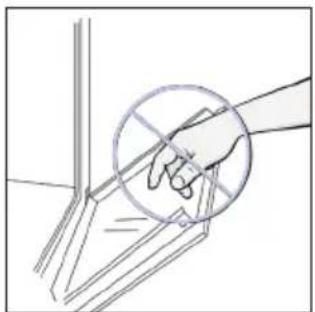
45° 1 2- Very carefully remove the oven glass, starting with the inner one. During the procedure, firmly hold the glass with both hands and place them on a cushioned flat surface (e.g., on a fabric).
natural_image
Simple line drawing of a folding chair or stand with arrows indicating direction (no text or symbols)- ⚠ WARNING: The outer glass is not removable.
natural_image
Hand holding a tool with a circular annotation overlay (no text or symbols)- Clean the glass using a soft cloth and suitable cleaning products.
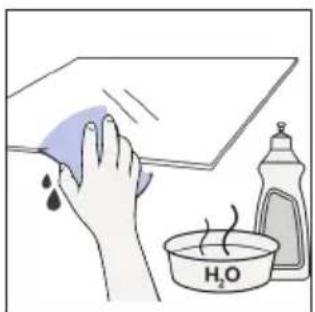
natural_image
Illustration of a hand cleaning a tiled surface with a water droplet and a small bottle labeled H₂O (no text or symbols on the main image)- Insert the glass panels, making sure that the "Low-E" label is correctly readable and positioned on the lower left side of the door, near the left-side hinge. This way, the printed label on the first glass will remain on the inside of the door.
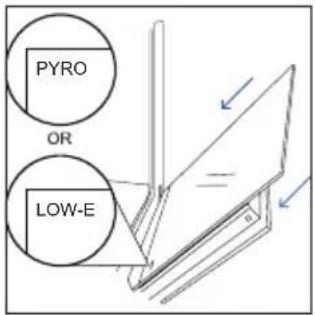
text_image
PYRO OR LOW-E- Reattach the upper glasses' door cover by pushing it inwards until you hear a click from the two side buttons.
natural_image
Line drawing of a mechanical assembly with arrows indicating direction (no text or symbols)- Then, bring the door back to 90^ and rotate the hinge locking tabs inward towards the inside of the oven.
natural_image
Line drawing of a kitchen oven with two hands inserting a tool (no text or symbols)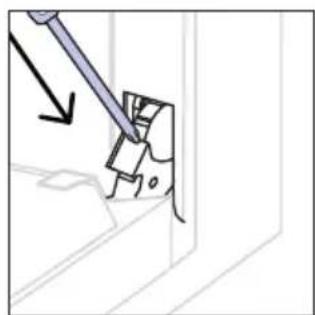
natural_image
Diagram showing a tool interacting with a mechanical component, no text or symbols present6.3 CLEANING OF ACCESSORIES
Ensure that you clean the accessories thoroughly after every use and dry them using a towel. For persistent residues, consider soaking the accessories in a mixture of water and soap for approximately 30 minutes before giving them a second wash.
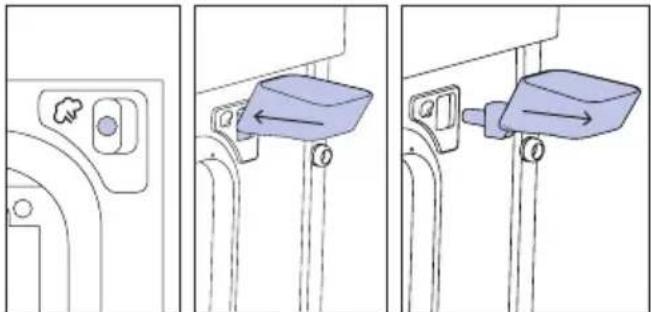
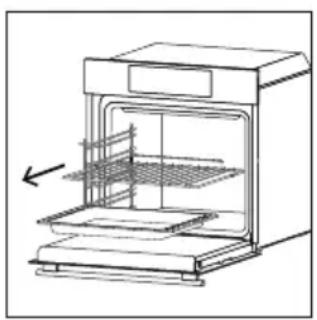
CLEANING OF SIDE RACKS:
- Remove the side racks by pulling them in the direction of the arrows.
- To clean the side racks either put them in the dishwasher or use a wet sponge, ensuring that they are dried afterwards.
- After the cleaning process install the side racks in reverse order.
natural_image
Line drawing of a laboratory oven with internal cooling unit and heat exchanger (no text or symbols)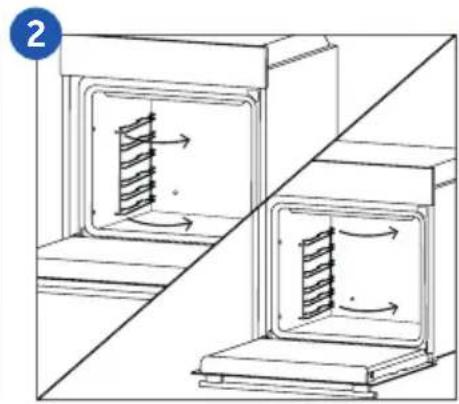
natural_image
Diagram showing two open industrial machines with internal blades and directional arrows, separated by a diagonal line (no text or symbols)
text_image
3 H₂O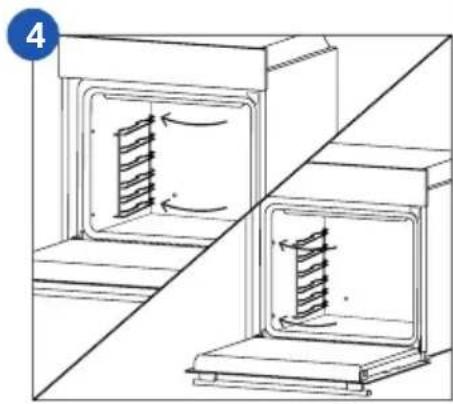
natural_image
Diagram of two industrial furnace or oven structures with internal flow arrows, no text or symbols present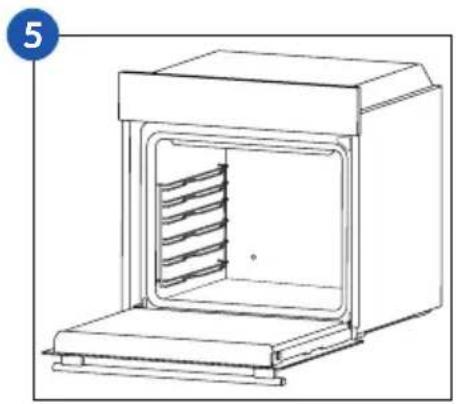
natural_image
Line drawing of a laboratory oven with internal cooling ducts (no text or symbols)6.4 MAINTENANCE
COMPONENTS REPLACEMENT
Changing the bulb on top:
- Disconnect the oven from mains supply.
- Remove the lamp's glass cover.
- Disassemble the bulb.
- Replace the bulb with a new one of the same type.
- Relocate the lamp's glass cover.
- Reconnect the oven from mains supply.
Step 1
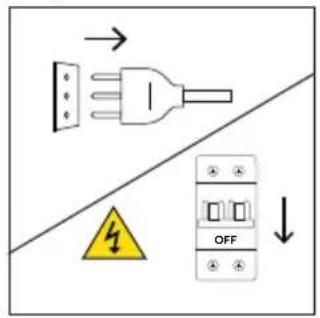
text_image
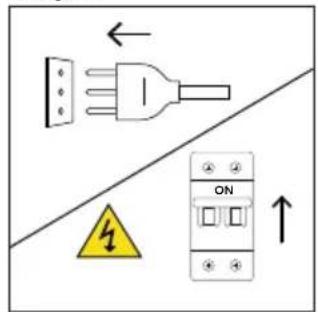
Electrical diagram showing a plug, warning symbol with lightning, and OFF button labeled 'OFF'Step 2
natural_image
Line drawing of a hand holding a circular object with an arrow, next to an open oven (no text or symbols)Step 3
natural_image
Line drawing of a hand holding a circular object inside an oven, with a curved arrow indicating rotation (no text or symbols)Step 4
natural_image
Hand holding a circular object inside an oven, with a hand holding a pen (no text or symbols visible)Step 5
natural_image
Line drawing of a hand holding a circular object with an arrow, inside an oven (no text or symbols)Step 6
text_image
Electrical diagram showing a plug, warning symbol, and ON/OFF switch with directional arrowsThis product contains one or more light sources of energy efficiency class G (Lamp)
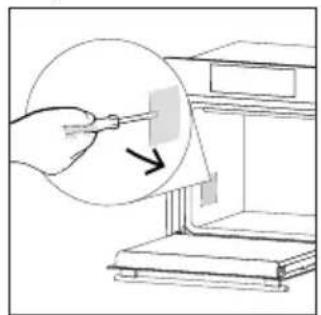
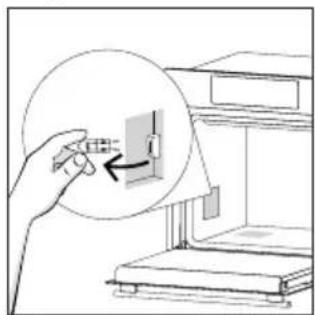
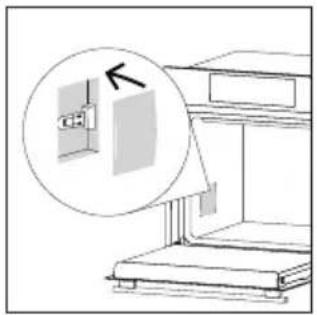
Changing the lateral bulb:
- Disconnect the oven from mains supply.
- Use a flat-head screwdriver by positioning it to the side of the protective glass and gently apply pressure to remove it.
- Carefully grasp the bulb from its base.
- Insert the new one.
- Reinstall the protective glass by pressing it gently until it's locked into position.
- Reconnect the oven from mains supply.
Step 1

text_image
Electrical diagram showing a plug connected to an ON/OFF switch, with warning symbol and directional arrowsStep 2
natural_image
Illustration of a hand using a tool to clean or store items, with a magnified inset showing the process (no text or symbols present)Step 3
natural_image
Illustration of a hand inserting a small component into a device, with no visible text or symbols.Step 4

natural_image
Illustration of a hand inserting a component into a device, with no visible text or symbolsStep 5
natural_image
Diagram showing a cabinet with an open door and a magnified inset highlighting the exterior wall (no text or symbols present)Step 6
text_image
Safety warning diagram showing a plug, ON/OFF switch, and warning symbol with arrowsThis product contains one or more light sources of energy efficiency class G (Lamp)
7. TROUBLESHOOTING
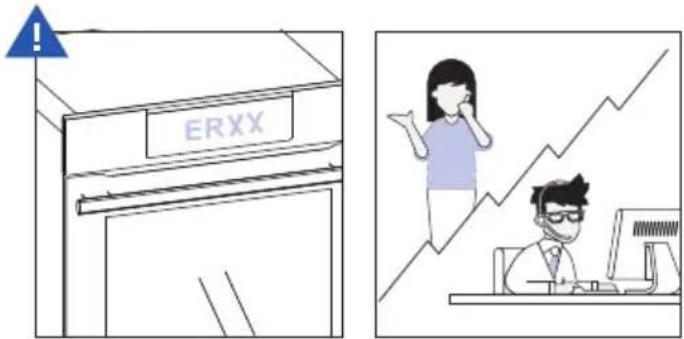
If, during oven use, an error occurs, the display will show the code "ER" followed by two digits, which will identify the error.
Proceed by turn off the oven and un-plug it, wait for a few minutes, and then reconnect it.
If the error disappears, you can resume using the oven. If it doesn't, call customer service and communicate the code (ERXX) you see on the display.
Error
text_image
ERXXSmoke
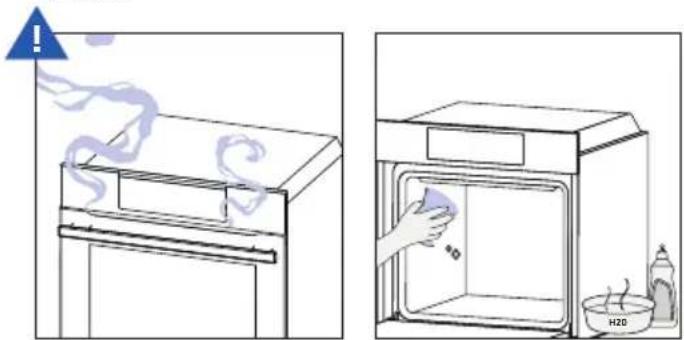
text_image
Diagram showing two steps of a chemical process: heating a lid with smoke and drying liquid, and cleaning a gas washing bottle labeled H2O.8. ENVIRONMENTAL PROTECTION & DISPOSAL
8.1. APPLIANCE DISPOSAL
This appliance is labelled in accordance with European Directive 2012/19/EU regarding electric and electronic appliances (WEEE). The WEEE contain both polluting substances (that can have a negative effect on the environment) and base elements (that can be re-used). It is important that the WEEE undergo specific treatments to correctly remove and dispose of the pollutants and recover all the materials.
Individuals can play an important role in ensuring that the WEEE do not become an envi -
ronmental problem; it is essential to follow a few basic rules:
– the WEEE should not be treated as domestic waste;
– the WEEE should be taken to dedicated collection areas managed by the town council or a registered company.
In many countries, domestic collections may be available for large WEEEs. When you buy a new appliance, the old one can be returned to the vendor who must accept it free of charge as a one-off, as long as the appliance is of an equivalent type and has the same functions as the purchased appliance.
8.2. SAVING AND RESPECTING THE ENVIRONMENT
Where possible, avoid pre-heating the oven and always try to fill it.
Open the oven door as infrequently as possible, because heat from the cavity disperses every time it is opened. For a significant energy saving, switch off the oven between 5 and 10 minutes before the planned end of the cooking time, and use the residual heat that the oven continues to generate. Keep the seals clean and in order, to avoid any heat dispersal outside of the cavity. If you have an electric contract with an hourly tariff, the “delayed cooking” programme makes energy saving simpler, moving the cooking process to start at the reduced tariff time slot.
Back view Side view
EN 51

text_image
min. 560 600 min. 560x45 560-8
text_image
550 568 548 20 9 478,5 575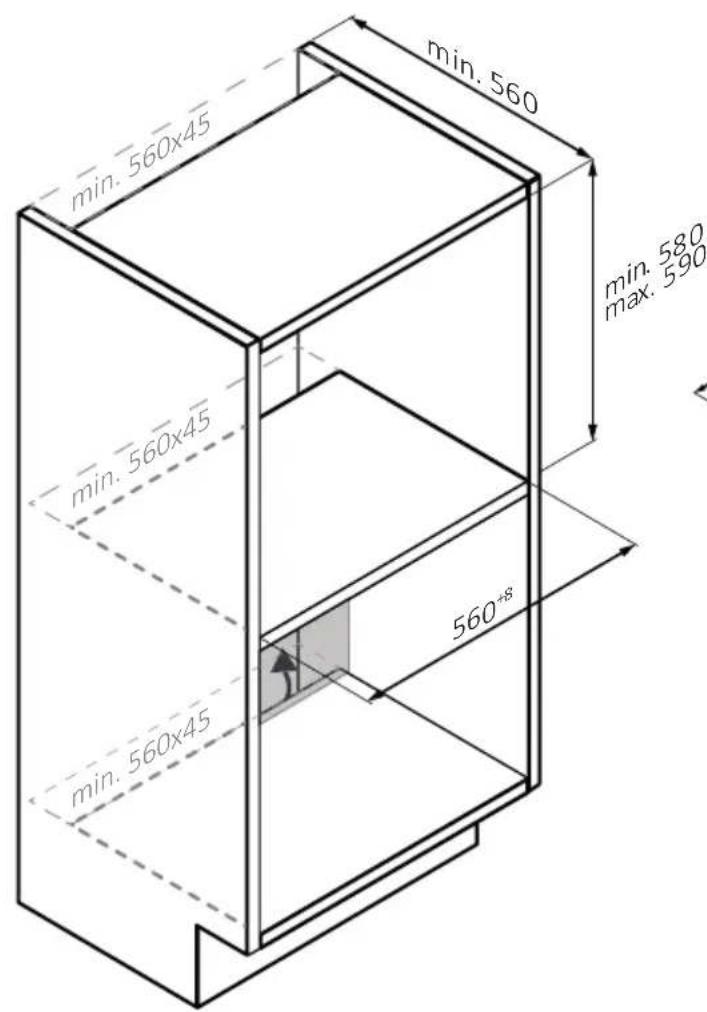
text_image
min. 560 min. 560x45 min. 560x45 min. 560x45 min. 560 min. 560 max. 590 560*8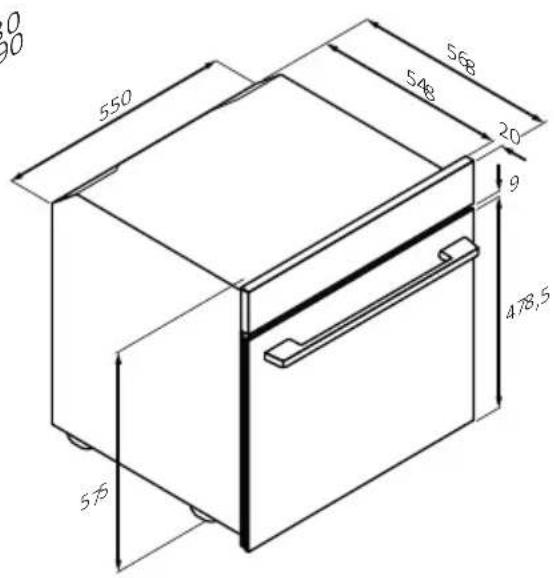
text_image
550 568 548 20 9 478,5 576
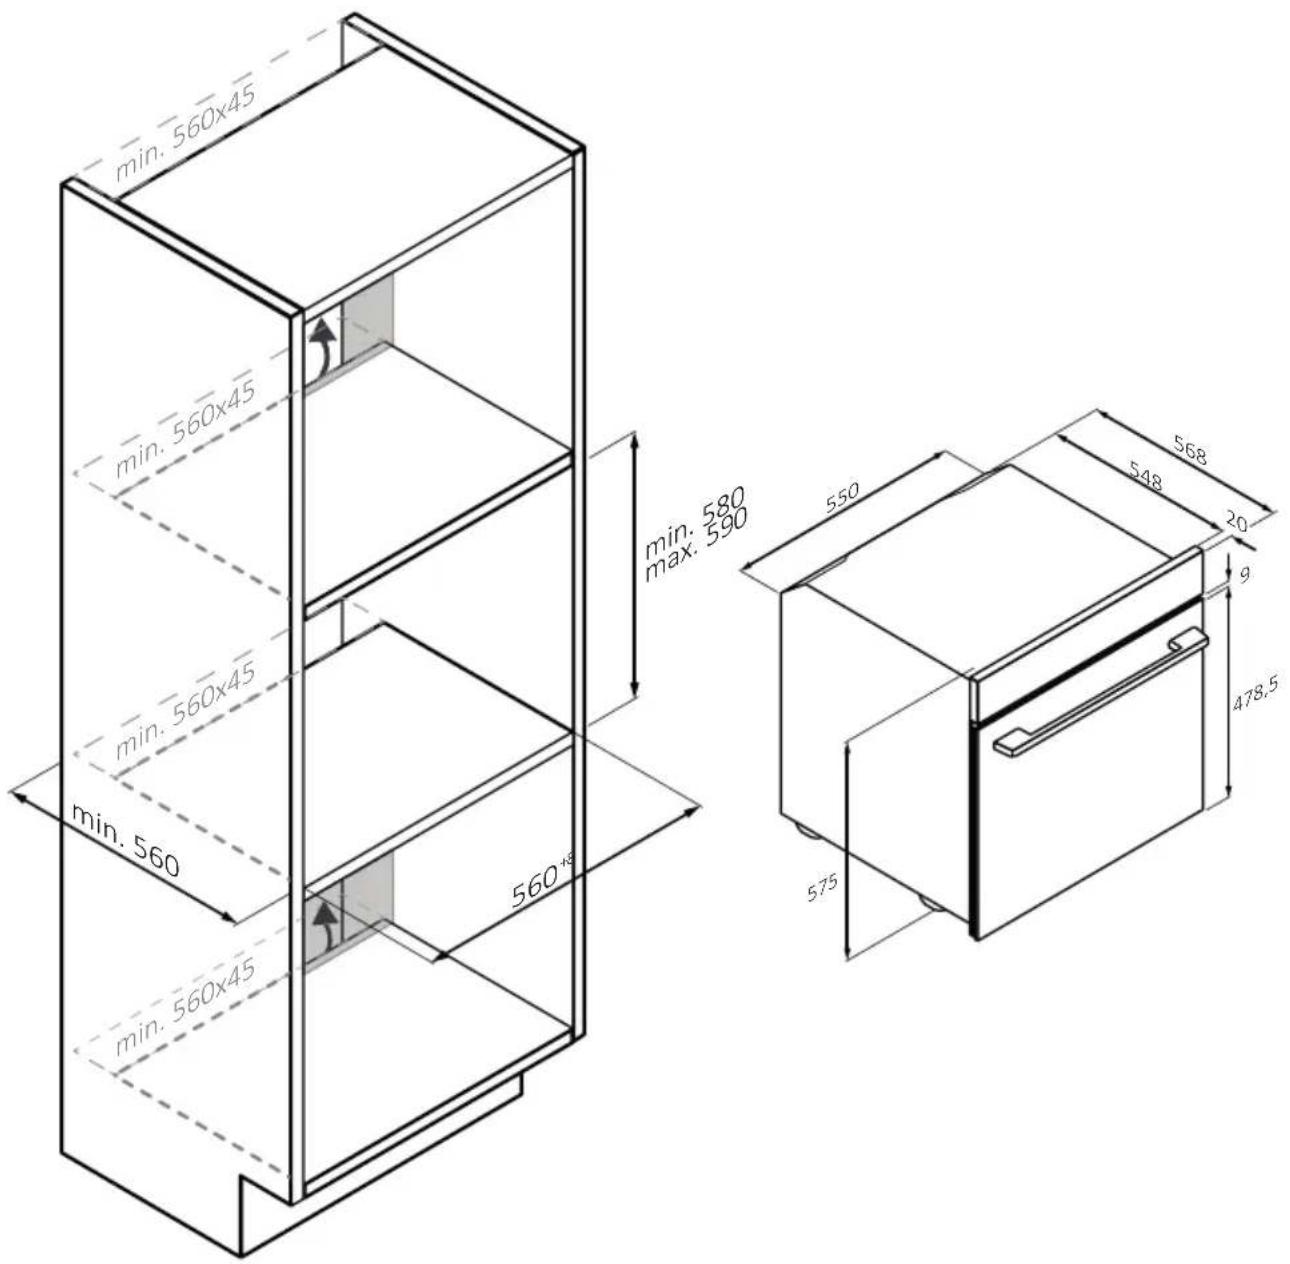
text_image
min. 560x45 min. 560x45 min. 560x45 min. 560 min. 560x45 560+3 min. 560 min. 580 max. 590 550 548 20 9 478,5 575 568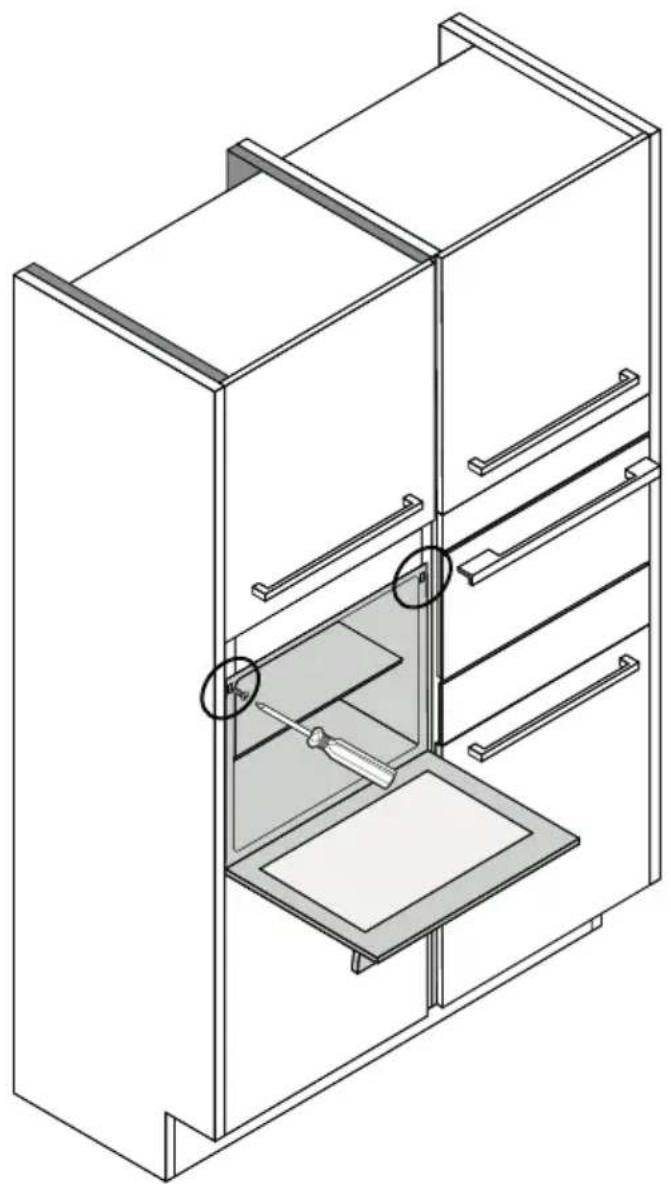
natural_image
Isometric line drawing of a multi-level cabinet or refrigerator with internal compartments and drawers (no text or symbols)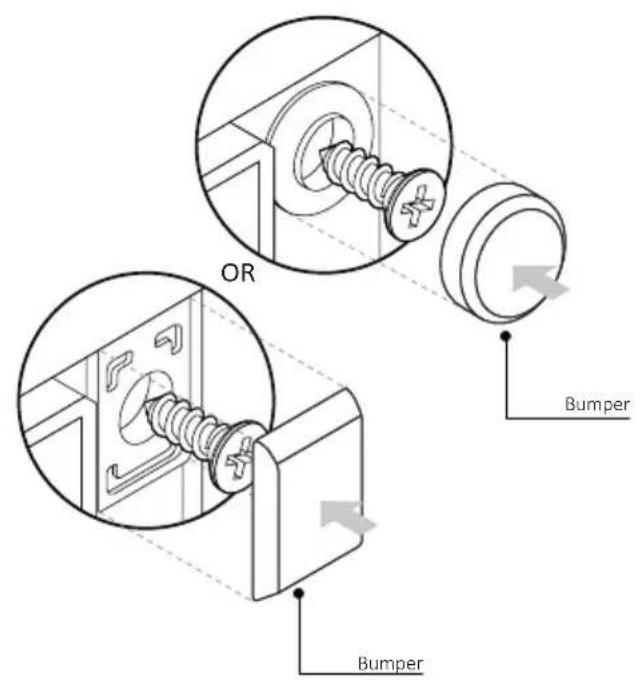
text_image
OR Bumper Bumper
BIENVENIDO/A
Gracias por elegir nuestro producto. Para garantizar su seguridad y obtener los mejores resultados, lea atentamente este manual, incluidas las instrucciones de seguridad, y consérvelo para futuras consultas.
Antes de instalar el horno, anote el número de serie, ya que podría necesitarlo para realizar reparaciones. Compruebe si ha sufrido algún daño durante el transporte y consulte a un técnico si no está seguro antes de utilizarlo. Mantenga los materiales de embalaje fuera del alcance de los niños.
NOTA: Tenga en cuenta que las características y accesorios del horno pueden variar en función del modelo adquirido.
ÍNDICE
1. INFORMACIÓN DE SEGURIDAD
2. PRESENTACIÓN DEL PRODUCTO
2.1. Descripción general del producto
2.2. Accesorios
2.3. Panel de control
2.4. Conectividad
3. ANTES DE EMPEZAR
3.1. Información para empezar
3.2. Primer uso
4. FUNCIONAMIENTO DEL PRODUCTO
4.1. Cómo funciona este producto
4.2. Funciones de cocción
4.2.1. Funciones estándar
4.2.2. Funciones especiales
4.2.3. Función multi step
5. DIRECTRICES DE COCCIÓN
5.1. Tabla de cocción general
5.2. Tabla everyday cooking
6. CUIDADO Y LIMPIEZA
6.1. Recomendaciones generales
6.2. Limpieza del horno
6.2.1. Interior del horno: funciones de limpieza
6.2.2. Exterior del horno: retirada y limpieza de la puerta de cristal
6.3. Limpieza de accesorios
6.4. Mantenimiento
7. SOLUCIÓN DE PROBLEMAS
8. ELIMINACIÓN Y PROTECCIÓN DEL MEDIO AMBIENTE
8.1. Eliminación de electrodomésticos
8.2. Ahorrar y respetar el medio ambiente
9. INSTALACIÓN
1. INFORMACIÓN DE SEGURIDAD
ADVERTENCIAS GENERALES
- No utilice un limpiador a vapor para realizar las operaciones de limpieza.
- PRECAUCIÓN: Para evitar peligros debido al restablecimiento inadvertido después de una interrupción de corriente, este electro-doméstico no debe alimentarse a través de un dispositivo de conmutación externo, como un temporizador, ni conectarse a un circuito de encendido y apagado regular mediante la red.
- Durante el uso, el aparato se calienta. Procure no tocar la resistencia interna del horno.
Utilización conforme al uso previsto
- Utilice el horno únicamente para el fin para el que fue diseñado, es decir, solo para cocinar alimentos. Cualquier otro uso (por ejemplo, como fuente de calor) se considera inadecuado y, por lo tanto, peligroso. El fabricante no se hace responsable de ningún daño resultante de un uso incorrecto, inadecuado o irracional del horno.
Limitaciones de uso
- Este electrodoméstico puede ser utilizado por niños a partir de 8 años y por personas con capacidades físicas, sensoriales o mentales reducidas, o sin experiencia o conocimientos previos, siempre y cuando hayan recibido la supervisión y las instrucciones necesarias para utilizar el electrodoméstico de forma segura y comprendan los riesgos que implica. Los niños no deben jugar con este electrodoméstico. Las operaciones de limpieza y mantenimiento no deben ser realizadas por niños sin supervisión.
- Este electrodoméstico no está pensado para ser usado por personas (incluidos niños) con capacidades físicas, sensoriales o mentales reducidas o con falta de experiencia y conocimientos, a no ser que sea bajo supervisión o tras haber recibido instrucciones precisas respecto a su uso por parte de una persona responsable de su seguridad.
- En presencia de niños, vigile el aparato para evitar que los niños jueguen con él.
- ADVERTENCIA: Este electrodoméstico y sus partes accesibles se calientan durante el uso. Se debe tener cuidado para evitar tocar los
elementos calefactores. Los niños menores de 8 años deben mantenerse alejados a menos que estén continuamente supervisados.
- ADVERTENCIA: Las partes accesibles pueden calentarse durante el uso. Los niños pequeños deben mantenerse alejados de este electrodoméstico.
ADVERTENCIAS DE INSTALACIÓN
- El horno se puede ubicar en la parte alta de una columna o debajo de una encimera.
- Antes de instalarlo, debe garantizar una buena ventilación en el espacio del horno para permitir la circulación adecuada del aire fresco requerido para enfriar y proteger las partes internas. Realice las aberturas especificadas en las ilustraciones según el tipo de accesorio. Fije siempre el horno a los muebles con los tornillos suministrados con el aparato.
- No se requiere ninguna operación/ajuste adicional para hacer funcionar este electrodoméstico a las frecuencias nominales.
- Para evitar sobrecalentamientos, este electrodoméstico no debe instalarse detrás de una puerta decorativa.
- Durante la instalación, el horno debe desconectarse de la red eléctrica para evitar sobrecalentamientos.
- Si se requiere la asistencia del fabricante para corregir fallos derivados de una instalación incorrecta, esta asistencia no estará cubierta por la garantía. Se deben seguir las instrucciones de instalación para personal profesionalmente cualificado.
- Una instalación incorrecta puede causar daños o lesiones a personas, animales o pertenencias. El fabricante no se hace responsable de tales daños o lesiones.
- La instalación debe ser realizada por un técnico cualificado que debe conocer y respetar la legislación vigente en el país de instalación y las instrucciones del fabricante.
- Después de desembalar el aparato, compruebe siempre que no esté dañado; en caso de problemas, póngase en contacto con el servicio de atención al cliente antes de instalarlo y no lo conecte a la red eléctrica.
- Retire el material de embalaje antes de poner en funcionamiento el aparato.
-
Durante la instalación, no utilice el asa de la puerta del horno para levantar y mover el horno.
-
El mobiliario de la instalación y los adyacentes deben soportar temperaturas de 95 °C.
- Se recomienda utilizar guantes de protección durante la instalación para evitar lesiones por corte.
- No instale el producto en ambientes abiertos expuestos a agentes atmosféricos.
- Este aparato está diseñado para utilizarse a una altitud inferior a 2000 m.
- Retirar las películas protectoras y los adhesivos publicitarios de la superficie frontal del horno antes de utilizarlo por primera vez.
ADVERTENCIAS ELÉCTRICAS
- La toma de corriente debe ser adecuada para la carga indicada en la etiqueta y debe tener la conexión a tierra conectada y en funcionamiento. El conductor de tierra es de color amarillo-verde. Esta operación debe realizarla un profesional debidamente cualificado.
- La conexión a la fuente de alimentación se puede realizar mediante enchufe o mediante cableado fijo colocando un disyuntor omnipolar, con una separación de contacto que cumpla con los requisitos de la categoría de sobretensión III, que pueda soportar la carga máxima conectada y que cumpla la legislación vigente.
- En caso de incompatibilidad entre la toma de corriente y la clavija del electrodoméstico, solicite a un electricista cualificado que sustituya la toma de corriente por otra del tipo adecuado. La clavija y la toma de corriente deben cumplir con la normativa actual del país de instalación.
- El cable de tierra amarillo-verde no debe ser interrumpido por el interruptor. Cuando se instala el electrodoméstico, la toma de corriente o el interruptor omnipolar utilizado para la conexión deben ser fácilmente accesibles.
- Si el cable de alimentación está dañado, debe ser sustituido por el fabricante, por su servicio técnico o por cualquier profesional cualificado similar para evitar riesgos.
- Para cualquier reparación, diríjase exclusivamente al departamento de atención al cliente y solicite el uso de repuestos originales.
-
Desconecte el dispositivo de la red eléctrica antes de realizar cualquier operación o mantenimiento sobre este.
-
ADVERTENCIA: Para evitar la posibilidad de descargas eléctricas, asegúrese de que el electrodoméstico esté apagado antes de cambiar la bombilla.
- Antes de retirar las piezas extraíbles, hay que apagar el horno. Después de realizar la limpieza, vuelva a montarlas siguiendo las instrucciones.
-
El uso de cualquier aparato eléctrico implica el cumplimiento de algunas reglas fundamentales:
-
No tire del cable de alimentación para desconectar este electrodoméstico de la fuente de alimentación.
- No toque el aparato con las manos o los pies mojados o húmedos.
- En general no se recomienda el uso de adaptadores, múltiples tomas de corriente y cables alargadores.
- En caso de avería y/o mal funcionamiento, apague el aparato y no lo manipule.
- i NOTA: Dado que el horno podría requerir mantenimiento, es aconsejable tener disponible otra toma de corriente de pared para que el horno pueda conectarse a esta si se retira del espacio donde está instalado.
- Cualquier reparación, instalación y mantenimiento no realizados correctamente pueden poner en grave peligro al usuario.
- La empresa fabricante declara que no asume ninguna responsabilidad por daños directos o indirectos causados por una instalación, mantenimiento o reparación incorrectos. Además, no se hace responsable de los daños causados por la ausencia o interrupción del sistema de puesta a tierra (por ejemplo, descargas eléctricas).
- PRECAUCIÓN: Para evitar peligros debido al restablecimiento inadvertido después de una interrupción de corriente, este electro-doméstico no debe alimentarse a través de un dispositivo de conmutación externo, como un temporizador, ni conectarse a un circuito de encendido y apagado regular mediante la red.
- El aparato no está diseñado para ser activado por un temporizador externo o un sistema de control remoto independiente.
USO Y MANTENIMIENTO
- La bandeja de goteo recoge los residuos que gotean durante la cocción.
- Cuando coloque la bandeja Freidora de aire o la rejilla en los estantes laterales, asegúrese de que la sección más corta del lateral (entre el tope
y la extremidad) esté orientada hacia el interior del horno. Si la rejilla tiene una barra metálica decorativa, preste atención a colocarla en el exterior del horno para que el logotipo de la marca sea visible y legible. Para colocarla correctamente, consulte también la imagen de la sección Accesorios de este manual de usuario.
- No utilice limpiadores abrasivos o raspadores metálicos afilados para limpiar los cristales de la puerta del horno, ya que pueden rayar la superficie, lo que podría provocar la rotura del cristal.
- Utilice exclusivamente la sonda de temperatura recomendada para este horno.
- Durante la cocción, la humedad puede condensarse dentro de la cavidad del horno o en el cristal de la puerta. Esto es normal. Para reducir este efecto, espere de 10 a 15 minutos después de encender el horno antes de colocar alimentos en su interior. En cualquier caso, la condensación desaparece cuando el horno alcanza la temperatura de cocción.
- Cocine las verduras en un recipiente con tapa en lugar de en una bandeja abierta.
- No deje alimentos dentro del horno pasados 15/20 minutos desde el final de la cocción.
- Una falla prolongada en la fuente de alimentación durante una fase de cocción puede causar un mal funcionamiento del monitor. En este caso, póngase en contacto con el servicio de atención al cliente.
- ADVERTENCIA: No cubra las paredes del horno con papel de aluminio o protectores de un solo uso disponibles en las tiendas. En contacto directo con el esmalte caliente, el papel de aluminio o cualquier otro protector corre el riesgo de derretirse y deteriorar el esmalte del interior.
- ADVERTENCIA: Nunca retire la junta de la puerta del horno.
- PRECAUCIÓN: No llene el fondo de la cavidad con agua durante la cocción o cuando el horno esté caliente.
- Las bandejas y rejillas del horno no son adecuadas para el contacto directo con los alimentos. Utilice utensilios de cocina adecuados o papel de horno.
- Lave todos los accesorios antes de usarlos por primera vez con una solución de agua caliente y detergente líquido.
ADVERTENCIAS (\*PARA HORNOS PIROLÍTICOS)
- Los derrames excesivos deben eliminarse antes de realizar la limpieza.
-
ADVERTENCIA: Antes de iniciar el ciclo de limpieza automática:
-
Limpie la puerta del horno.
- Retire los residuos de comida grandes del interior del horno con una esponja húmeda. No use detergentes.
- Retire todos los accesorios y el kit de estante deslizante (si está presente).
-
No ponga paños de cocina.
-
Durante el proceso de limpieza pirolítica (si está disponible), las superficies pueden calentarse más de lo normal y debe mantenerse alejados a los niños.
- Si encima del horno se ha instalado una placa de cocción, nunca use la placa mientras el pirolizador está en funcionamiento; esto evitará que la placa se sobrecaliente.
ADVERTENCIAS (\*PARA STEAM LITE)
ADVERTENCIA: Riesgo de quemaduras y daños al electrodoméstico: el vapor liberado al usar la función vapor puede causar quemaduras: abra la puerta con cuidado para evitar lesiones después de utilizar una función de cocción con vapor.
- Utilice solo agua potable para llenar el depósito.
- Cuando rellene el horno con agua, utilice un máximo de 250 ml de agua.
2. PRESENTACIÓN DEL PRODUCTO
2.1. DESCRIPCIÓN GENERAL DEL PRODUCTO

text_image
Technical diagram of an oven with numbered components for identification- Panel de control
- Números de posición de las estanterías
- Rejilla metálica
- Bandejas
- Cubierta del ventilador
- Puerta del horno
- Rejillas laterales (si están presentes: sólo para cavidad plana)
- Número de serie y código QR
- Inserción del embudo de vapor
natural_image
Empty white rectangle with black border (no text or symbols)Escriba aquí su número de serie para futuras consultas.
2.2. ACCESORIOS
1 Rejilla metálica
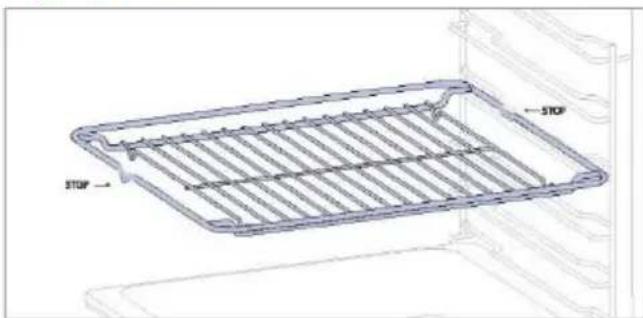
natural_image
Technical line drawing of a rectangular metal grate or tray with 'STOP' annotations indicating stop conditions (no text or symbols on the plate itself)La rejilla metálica de un horno es un estante extraíble y ajustable que sirve de apoyo a los utensilios de cocina, garantiza una cocción uniforme y facilita la limpieza. Puede utilizarse para sostener platos y utensilios de cocción a diferentes alturas para diversas necesidades culinarias.
2 Bandeja de horno (sólo si está presente\*)
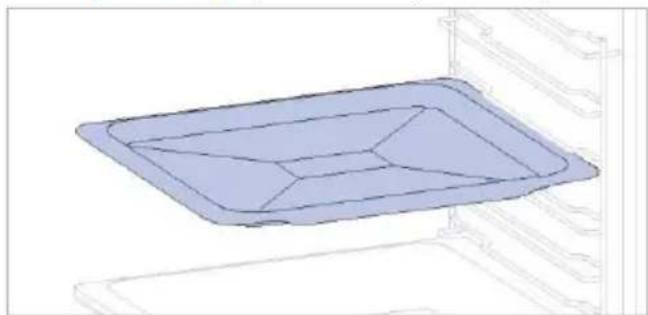
natural_image
3D diagram of a rectangular tray with internal compartments, placed inside a storage unit (no text or symbols)Una bandeja de horneado es ideal para conseguir un dorado uniforme del fondo, por lo que es perfecta para galletas y pasteles gracias a su diseño plano y poco profundo. Además, colocarla debajo de una rejilla de cocción puede ayudar a recoger los goteos y evitar que se ensucie el horno.
3 Bandeja profunda
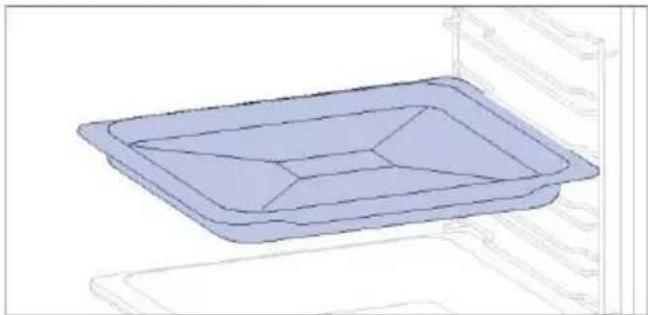
natural_image
3D diagram of a rectangular tray with internal compartments, placed on an open shelf (no text or symbols)La bandeja profunda es ideal para recetas con líquidos añadidos o capas, como guisos o asados. Su profundidad está diseñada específicamente para garantizar la consistencia deseada de los alimentos preparados en ella.
5 Guías telescópicas (sólo si están presentes\*)
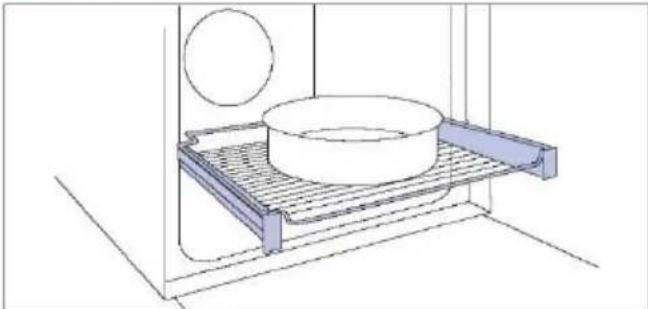
natural_image
Technical line drawing of a kitchen sink with a bowl, a sphere, and a mesh rack (no text or symbols)Los raíles telescópicos de horno son estantes extensibles que facilitan la colocación o extracción de objetos, sin necesidad de introducir la mano en el interior de un horno caliente. Mejoran la seguridad, la estabilidad y pueden ajustarse en diferentes posiciones de nivel.
7 Bisagras de cierre suave/apertura suave
(solo si están presentes*)
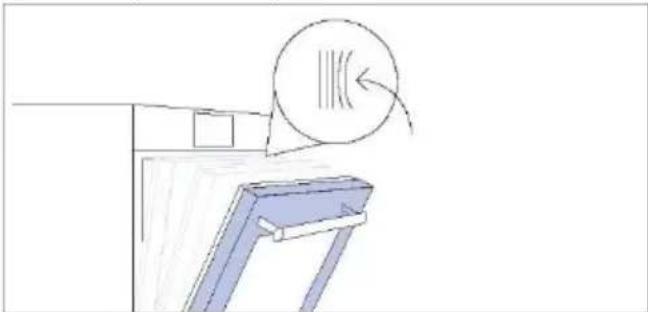
natural_image
Simple line drawing of a door with a circular component above it, no text or symbols presentLas bisagras de cierre y apertura suave controlan el movimiento de la puerta, garantizando un movimiento suave y evitando portazos.
4 Rejillas metálicas laterales (sólo si están presentes\*)
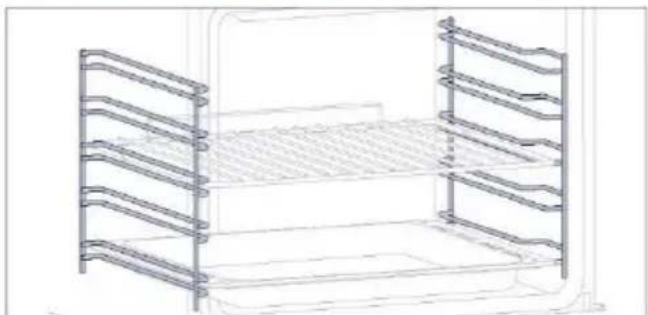
natural_image
Line drawing of a multi-tiered storage unit with horizontal metal racks (no text or symbols)Situadas a ambos lados de la cavidad del hornc las rejillas laterales están diseñadas para colocar la bandeja de horno y las rejillas durante la cocción.
6 Embudo de vapor
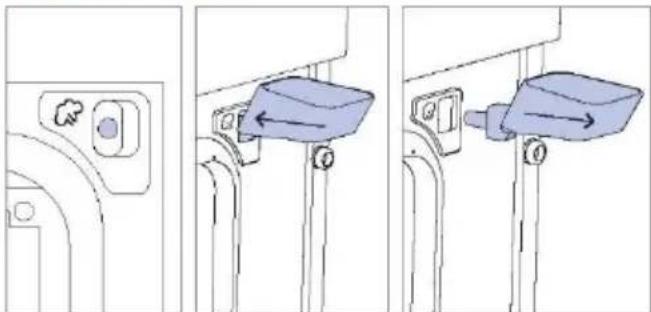
natural_image
Three-step diagram showing a door lock mechanism with a blue container and directional arrows (no text or symbols)El embudo de vapor es un accesorio útil para añadi el agua necesaria a través del orificio dedicado para los programas de cocción al vapor.
2.3. PANEL DE CONTROL
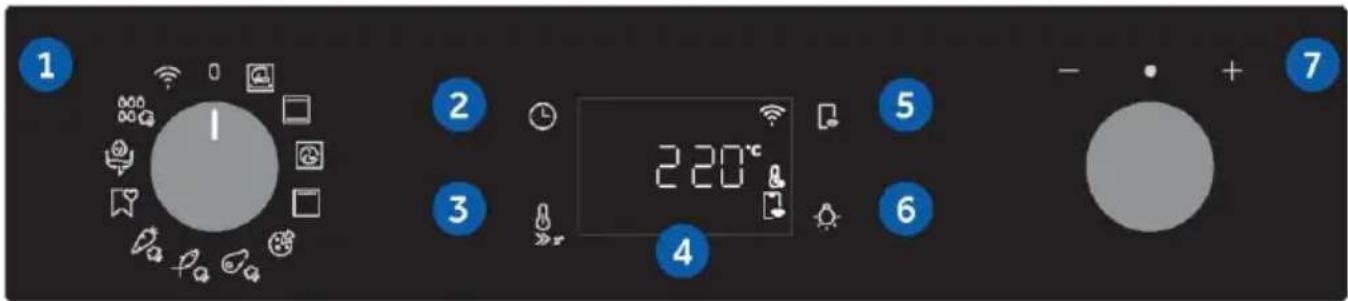
text_image
1 2 3 4 5 6 7 220°CLas funciones y la clasificación de las funciones pueden modificarse según el modelo.
- Selector de funciones
- Hora
- Temperatura
- Pantalla LED
- Control remoto
- Luz
- Dial de control
FUNCIONES PRINCIPALES
La pantalla tiene 4 funciones principales:
| Símbolo | Función | Descripción |
 | Hora | Pulse una vez para la duración de la cocción, dos veces para el minutero (disponible en modo de espera), tres veces para la hora del día y cuatro veces para el inicio diferido. En modo de espera, sólo se puede acceder al temporizador de cocina. |
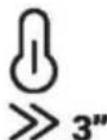 | Temperatura | Pulse una vez para comprobar la temperatura de la cavidad; pulse y mantenga pulsado durante 3 segundos para activar la opción de precalentamiento rápido (sólo disponible durante la fase de precalentamiento del horno). Cuando el precalentamiento está activo, el icono correspondiente aparece en la pantalla. |
 | Control remoto encendido/apagado | Pulse el botón para activar el control remoto después de emparejar el horno con la app hOn (a través de la aplicación). |
 | Luz | Pulse para encender/apagar la luz de la cavidad del horno. |
FUNCIONES DE VISUALIZACIÓN (visibles sólo cuando están activas)
| Símbolo | Función | Descripción |
 | Modo seco | El icono aparece cuando la cantidad de agua añadida a través del embudo de vapor no es suficiente para llevar a cabo el programa de cocción al vapor. El programa de cocción continuará en Modo seco. |
2.4. CONECTIVIDAD
Parámetros de conexión inalámbrica
| Tecnología | Wi-Fi | Bluetooth |
| Estándar | IEEE 802.11 b/g/n | Bluetooth v4.2, BR/EDR, BLE |
| Bandas de frecuencia [MHz] | 2401÷2483 | 2402÷2480 |
| Potencia máxima [mW] | 100 | 10 |
Información del producto para equipos en red
Consumo de energía del producto en modo de espera en red si todos los puertos de red cableados están conectados y todos los puertos de red inalámbrica están activados:
2,0 W.
Cómo activar el puerto de red inalámbrica:
El módulo WIFI se enciende en cuanto el mando de función se coloca en una posición distinta de cero.
Cómo desactivar el puerto de red inalámbrica:
El módulo WIFI está siempre apagado cuando el mando de función está en la posición cero.
Si el selector está en otra posición, vaya al menú WIFI y seleccione apagar para desactivar el WIFI.
Por la presente, Candy Hoover Group Srl declara que este equipo radioeléctrico cumple con lo dispuesto por la Directiva 2014/53/UE y con los requisitos legales pertinentes para el mercado UKCA. El texto completo de la declaración de conformidad está disponible en la siguiente dirección web: www.candy-group.com
CÓMO INTERACTUAR CON LA APLICACIÓN
El aparato puede conectarse a la red inalámbrica doméstica y manejarse a distancia mediante la aplicación. Conecte su aparato para asegurarse de que se mantiene actualizado con el software y las funciones más recientes.
i NOTA
- Una vez encendido el horno, los iconos de WIFI parpadean durante 30 minutos. Durante este periodo es posible registrar el producto.
- Asegúrese de que la red Wi-Fi de su casa está encendida.
Se le guiará paso a paso tanto en su aparato como en su dispositivo móvil.
• La conexión del horno puede tardar hasta 10 minutos. - Para más información y resolución de problemas, consulte la aplicación.
Descárguela en su smartphone.


text_image
Available on the App Store GET IT ON Google PlayREGISTRO DE NUEVOS USUARIOS
- Haga clic en "Registrarse".
- Puede registrarse a través de cuentas sociales o inscribirse con su correo electrónico personal.

text_image
hOn Welcome! Sign in to enter in your home page ENTER REGISTER Are you new to hOn? Click below to learn about our products TRY DEMO
text_image
Do you already have a thousand passwords? Register with your social accounts and log in the closest and fastest way. SIGN UP WITH GOOGLE SIGN UP WITH APPLE SIGN UP WITH FACEBOOK No information relating to you will be shared and we will not part anything from you or SIGN UP WITH EMAIL Already registered? LOGINREGISTRO RÁPIDO PARA EMPAREJAMIENTO
Paso 1
- Seleccione "Añadir electrodoméstico".
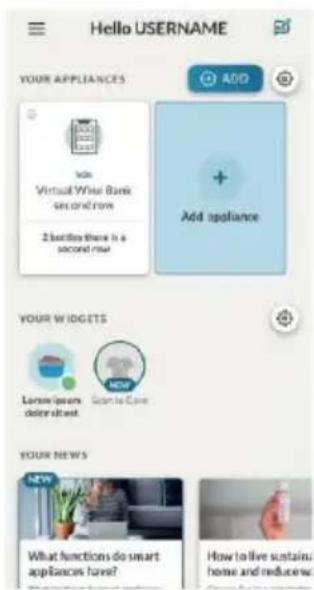
text_image
Hello USERNAME YOUR APPLIANCES Add Add appliance Vox Virtual White Bank second row 2 better than is a second row YOUR W I G D E T S Lamore/lesser down sheet Go to Care NEW YOUR NEWS NEW What functions do smart appliances have? How to live sustain: home and reduce workPaso 2
- Permita su localización.

text_image
Allow your location permission To enhance your experience, please allow location permission to HOn app in the next step. CONTINUEPaso 3
- Seleccione el horno en la categoría de electrodomésticos.
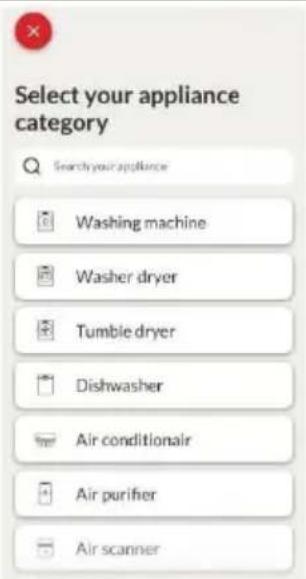
text_image
Select your appliance category Search your appliance Washing machine Washer dryer Tumble dryer Dishwasher Air conditionair Air purifier Air scannerPaso 4
- Encienda su electrodoméstico; si ya está encendido, apáguelo y vuelva a encenderlo.

text_image
Turn OFF and then ON your appliance In case you can't switch OFF your appliance, unplug (for at least 10 seconds) and then plug its power supply. OK, I DID ITPaso 5
- Tras encenderse, la aplicación hOn empezará a buscar su electrodoméstico.
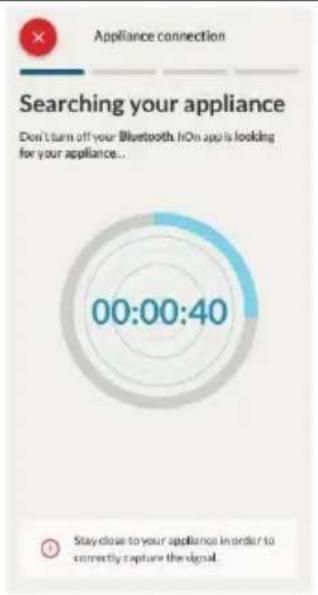
text_image
Appliance connection Searching your appliance Don't turn off your Bluetooth. No app is looking for your appliance.. 00:00:40 Stay close to your appliance in order to correctly capture the signal.Paso 6.1-6.2
- Seleccione su electrodoméstico, pulse "conexión" y espere unos segundos.
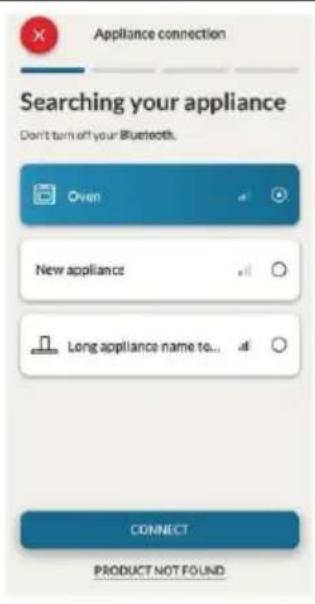
text_image
Appliance connection Searching your appliance Don't turn off your Bluetooth. Oven New appliance Long appliance name to... CONNECT PRODUCT NOT FOUND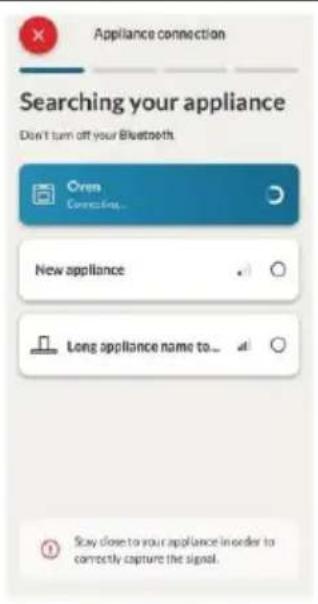
text_image
Appliance connection Searching your appliance Don't turn off your Bluetooth Oren Connecting... New appliance Long appliance name to... Stay close to your appliance in order to correctly capture the signal.Paso 7
- Se detectará su horno y podrá controlarlo a través de hOn.
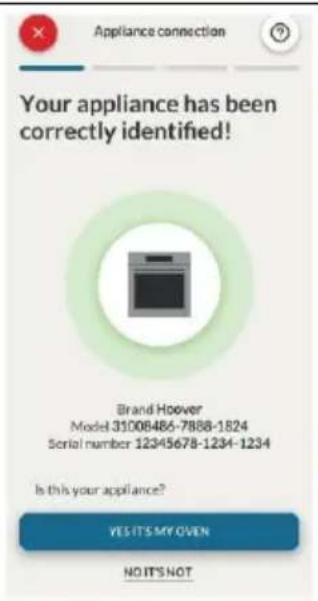
text_image
Appliance connection Your appliance has been correctly identified! Brand Hoover Model 31008486-7888-1824 Serial number 12345678-1234-1234 Is this your appliance? YES IT'S MY OVEN NO IT'S NOT
CÓMO CAMBIAR LA CONFIGURACIÓN WIFI
Una vez registrado el aparato, el usuario puede cambiar la configuración WIFI entre:
• WIFI ACTIVA: Solo es posible supervisar el estado del horno mediante la app.
- WIFI APAGADA: El horno no está conectado, pero todavía está registrado con las credenciales de red guardadas.
• REINICIO WIFI: La conexión se reinicia y es posible un nuevo registro.
- Gire el selector de funciones en el menú WIFI.
- En la pantalla aparece "Encendido".
- Gire el dial de control hasta que aparezca "Apagado" o el ajuste de reinicio "rSt".
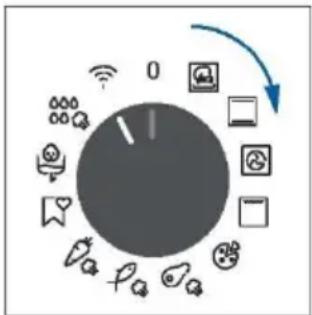
flowchart
graph TD
    A["Central Dial Indicator"] --> B["0"]
    B --> C["Data Icon"]
    B --> D["App Icon"]
    B --> E["Cloud Icon"]
    B --> F["Smart Icon"]
    B --> G["Desktop Icon"]
    B --> H["Mobile Phone Icon"]
    B --> I["Information Icon"]
    B --> J["Video Icon"]
    B --> K["Audio Icon"]
    B --> L["Lightbulb Icon"]
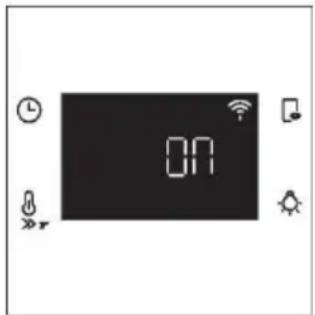
text_image
ON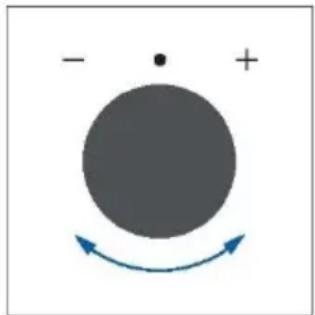
natural_image
Simple diagram with a large circle, plus sign, and curved arrows indicating rotation or direction (no text or symbols)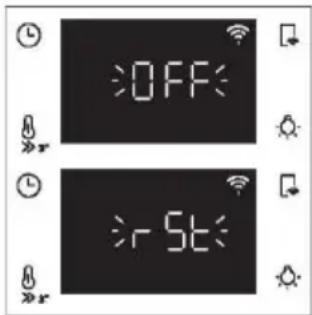
text_image
OFF -5t
CONTROL REMOTO
El control remoto ofrece numerosas ventajas a los usuarios, mejorando la comodidad, la eficiencia y la experiencia culinaria en general, ya que permite controlar el producto directamente desde el aparato y la aplicación hOn.
Esta función permite, a través de su dispositivo, disfrutar de diversas características, tales como: inicio instantáneo o programado de recetas o programas de cocción ya disponibles en la app; seguimiento en tiempo real del progreso de sus recetas; ajuste de los parámetros de cocción en uso; seguimiento del proceso de cocción mediante la sonda; gestión de recetas guardadas mediante la "función Jolly" en el producto (ver sección relacionada). Además, es posible recibir notificaciones una vez finalizados los programas o las recetas. El control remoto solo puede activarse cuando el producto está registrado.

NOTA: Está disponible para todas las funciones de cocción del producto, excepto para los programas atinado y Supergrill.
Cómo activar el control remoto:
- Gire el selector de funciones en el menú WIFI.
- Pulse .
- En la pantalla aparece "hOn". Se mostrarán los iconos de WIFI y Control remoto.
- Acceda a la app, seleccione un programa y deje que empiece la cocción. Durante el proceso es posible controlar y cambiar los parámetros del programa tanto desde el producto como desde la app.
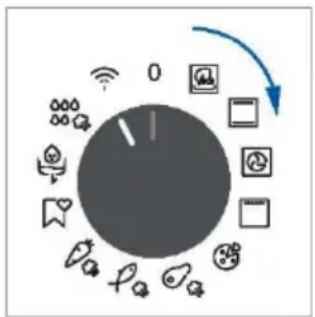
flowchart
graph TD
    A["Central Dial"] --> B["Mobile Phone Icon"]
    A --> C["Desktop Icon"]
    A --> D["Smart Phone Icon"]
    A --> E["Information Icon"]
    A --> F["Video Icon"]
    A --> G["User Interface Icon"]
    A --> H["Balance Button Icon"]
    A --> I["Remote Call Icon"]
    A --> J["Wireless Signal Icon"]
    A --> K["Global Display Icon"]

text_image
ON PULSE EL CONTROL REMOTO
text_image
hOnTambién es posible activar el control remoto durante el proceso de cocción pulsando el botón correspondiente.
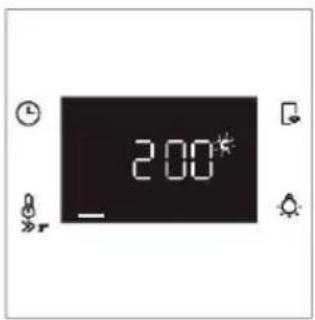
text_image
2:00
text_image
PULSE EL CONTROL REMOTO 2:00°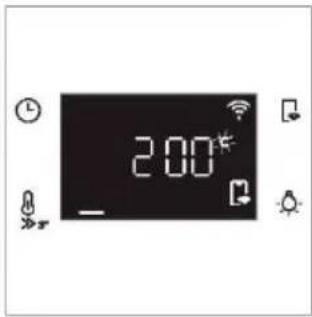
text_image
2:00*Cómo detener el control remoto:
Mientras el programa de cocción está en curso, puede detenerse directamente desde el propio producto girando el selector de funciones a una posición diferente. Estas acciones interrumpen el proceso de cocción. Otra forma es pulsando el botón correspondiente de Control remoto que viene con su aparato. Estas acciones interrumpen el proceso de cocción.
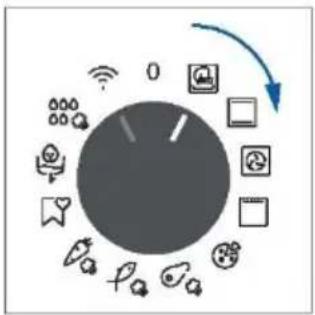
flowchart
graph TD
    A["Central Dial"] --> B["Smart Lock"]
    A --> C["App Icon"]
    A --> D["Mobile Phone Icon"]
    A --> E["Smart Bag Icon"]
    A --> F["Phone Icon"]
    A --> G["Audio Icon"]
    A --> H["Radio Icon"]
    A --> I["Wireless Phone Icon"]
    A --> J["Global Display Icon"]
    A --> K["Global Audio Icon"]
    A --> L["Global Display Icon"]
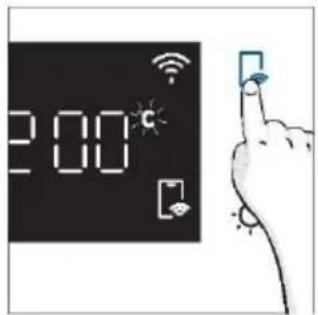
text_image
2:00°C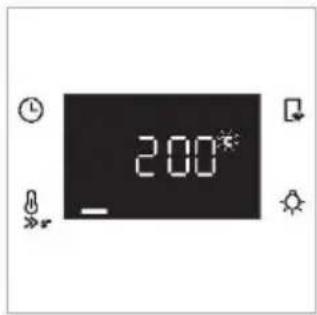
text_image
200°Usted también puede detener el programa de cocción de forma remota utilizando la aplicación haciendo clic en el botón "DETENER" en el dispositivo de visualización. El horno detendrá automáticamente la cocción.
NOTA: Si el usuario detiene la cocción en curso desde el horno, simultáneamente se verá en la app la cocción detenida.
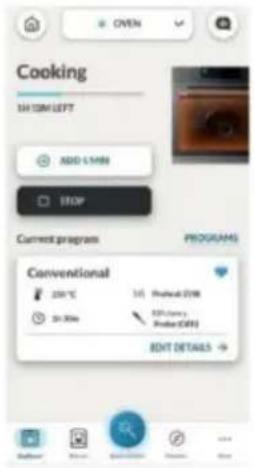
text_image
Cooking 1H 30M LEFT ADD 5/19M STOP Current program PROGRAMS Conventional 200°C 300 Sr.30m 1st Printout (STM) 8th Clearance Printout (OFF) BENT DETAILS →3. ANTES DE EMPEZAR
3.1. INFORMACIÓN PARA EMPEZAR
Cuando encienda el horno por primera vez, es posible que note algo de humo. No se preocupe, espere a que salga el humo antes de utilizar el horno.
Cómo funciona la puerta
Durante el proceso de limpieza pirolítica, la puerta del horno permanece cerrada en todo momento. Si no está bloqueado, el horno mostrará el código de error 24 y pausará la función de limpieza.
Cómo funciona la iluminación
La cavidad del horno está iluminada por una o varias bombillas, que suelen activarse cada vez que se inicia una función de cocción.
En los hornos equipados con interruptor de puerta (ver más abajo), la luz se enciende automáticamente al abrir la puerta.
En los hornos equipados con botón de lámpara, también se puede utilizar para activar la iluminación. Si la puerta del horno permanece abierta durante más de 10 minutos, las luces se apagarán automáticamente.
Durante el proceso de limpieza pirolítica la luz permanece apagada. *
Funcionamiento del ventilador de enfriamiento
El ventilador de enfriamiento se encarga de disipar el calor, evitando que el horno y su entorno se calienten demasiado, así como de proteger los aparatos de cocina de los efectos de las altas temperaturas. Por esta razón, el ventilador de enfriamiento permanece audible durante un periodo de tiempo incluso después de apagar el horno.
Funciona durante y después del ciclo de cocción en función de la temperatura interna del horno.
Cuando el ventilador de refrigeración está en funcionamiento, suele emitir un suave zumbido.
Usted también puede notar una corriente de aire caliente que emana del hueco entre la puerta del horno y el panel de control. Durante la limpieza pirolítica y cuando la puerta está bloqueada, se enciende el ventilador de enfriamiento. *
Durante la función ECO, la luz permanecerá apagada.
(*sólo para hornos pirolíticos)
Cómo funciona la barra de estado
La barra de estado, basada en los programas establecidos, simplifica el control de la temperatura y el tiempo. En concreto, para las funciones que implican precalentamiento, muestra el aumento de temperatura durante esta fase. En los programas de cocción y en la función de limpieza pirolítica, muestra la cuenta atrás del tiempo de cocción y del ciclo de limpieza, respectivamente.
3.2. PRIMER USO
Cuando el aparato se enciende por primera vez, el paso inicial es ajustar la hora del día, elegir entre 13 amperios o 16 amperios, seleccionar el brillo y el nivel de sonido.
- AJUSTE DE LA HORA: La pantalla mostrará la hora preestablecida '12:00' parpadeando. Para modificarla, pulse yutilice el selector derecho para ajustar la hora actual. Pulse de nuevo y siga el mismo procedimiento para ajustar los minutos. Para confirmar, pulse una vez más.
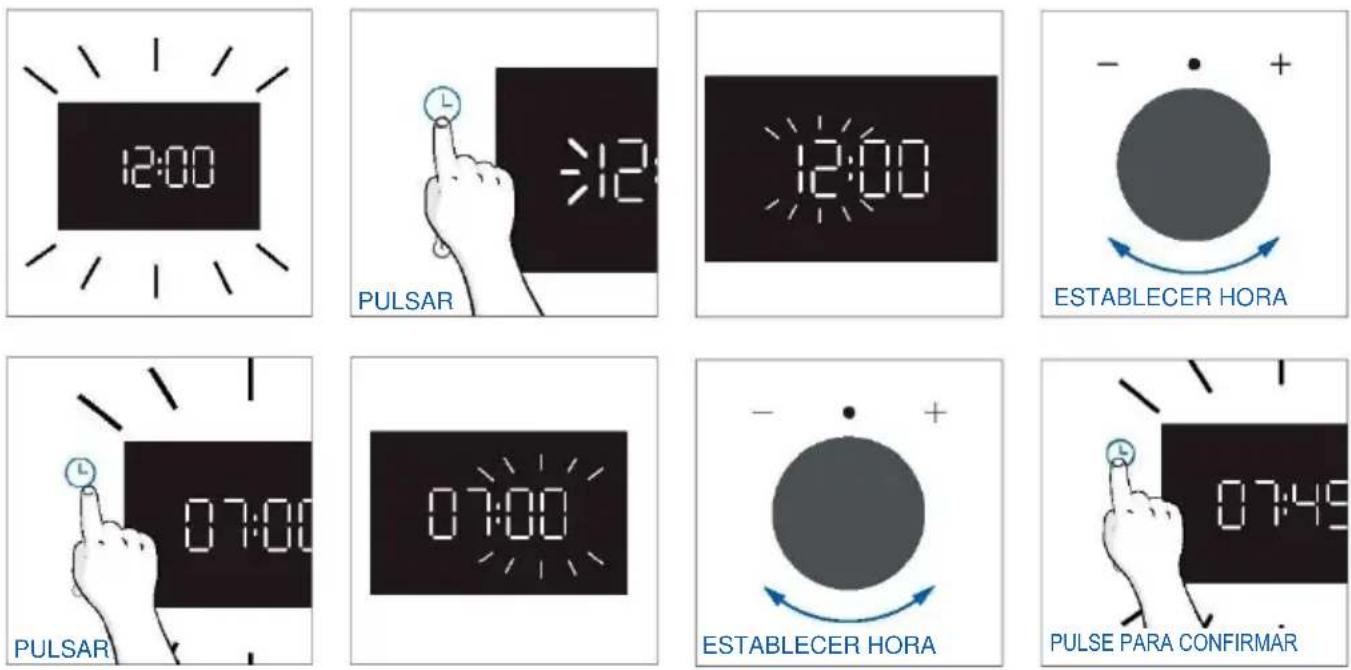
- AMPERAJE: Por defecto, el horno está configurado para funcionar con una potencia superior adecuada para hogares con más de 3 kW (16 A). Si su casa tiene una potencia inferior, puede cambiar este ajuste a 13 A. Este ajuste afecta a la rapidez con la que se calienta el horno. Elegir la opción más alta (16A) significa que se calienta más rápido (porque aumenta la absorción de energía). En la pantalla verá dos opciones: 13A y 16A. Sólo tiene que girar el selector derecho para elegir la que quiera y pulsar para confirmar.
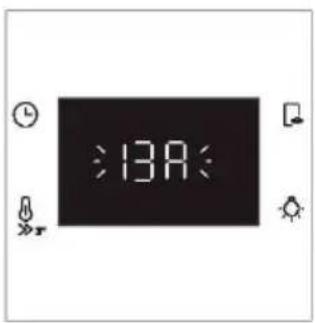
text_image
:13A: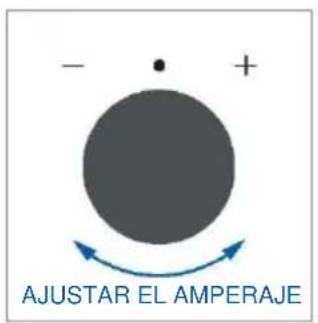
text_image
- • + AJUSTAR EL AMPERAJE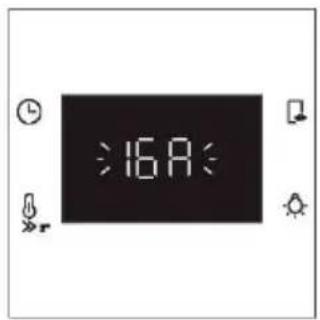
text_image
:16A: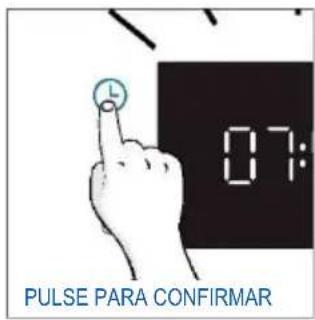
text_image
07: PULSE PARA CONFIRMARNOTA: La opción de ajustar el amperaje sólo está disponible durante la instalación inicial. Para modificar el amperaje ajustado, consulte las instrucciones posteriores a la instalación.
- BRILLO: En la pantalla aparece el símbolo "br". Los números representan el nivel de intensidad del brillo, editable girando el selector derecho. Para confirmar, pulse
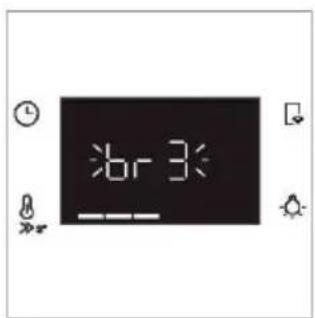
text_image
6r3: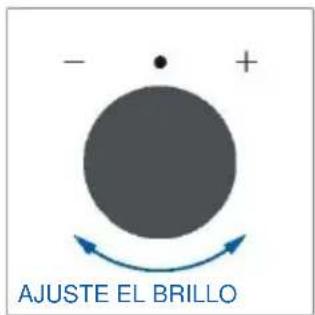
text_image
- + AJUSTE EL BRILLO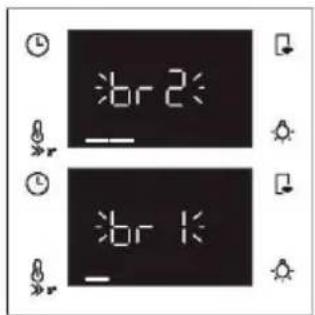
text_image
br 2 br 1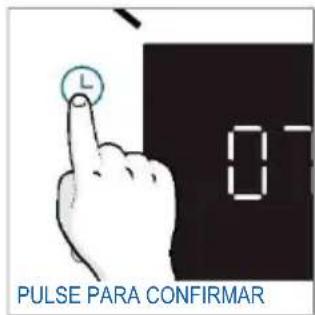
text_image
PULSE PARA CONFIRMAR- SONIDO: En la pantalla aparece el símbolo "Sn". Los números representan el nivel de intensidad del sonido, editable girando el selector derecho. Para confirmar, pulse 📊

text_image
5n3:
text_image
- + AJUSTE EL SONIDO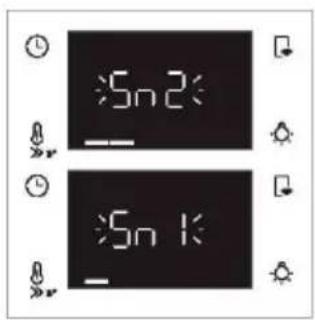
text_image
Sn 2 Sn 1
text_image
PULSE PARA CONFIRMAR• INSTRUCCIONES DE POSTINSTALACIÓN
Cuando el horno está en modo de espera, es posible volver a los ajustes iniciales pulsando simultáneamente los botones Temperatura y Lámpara durante 5 segundos.
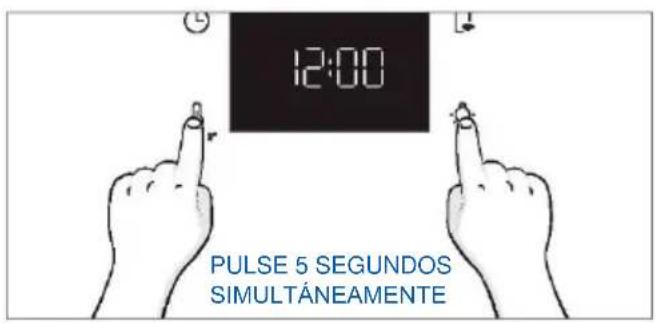
text_image
12:00 PULSE 5 SEGUNDOS SIMULTÁNEAMENTE3.2. LIMPIEZA PRELIMINAR
Limpie el horno antes de usarlo por primera vez. Limpie las superficies externas con un paño suave humedecido. Lave todos los accesorios y limpie el interior del horno con una solución de agua caliente y detergente lavavajillas. Compruebe que el horno esté vacío, seleccione la temperatura máxima y déjelo encendido aproximadamente durante una hora para eliminar todos los olores que puede haber presentes en los hornos nuevos.
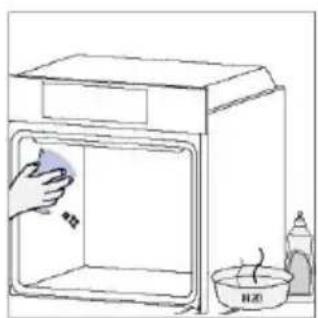
natural_image
Simple line drawing of a kitchen sink with a hand cleaning the interior and a water bottle nearby (no text or symbols)
text_image
MAX.℃ 60 min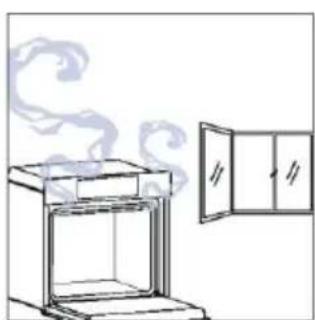
natural_image
Line drawing of a kitchen oven with steam rising, next to an open door (no text or symbols)4. FUNCIONAMIENTO DEL PRODUCTO
4.1. CÓMO FUNCIONA ESTE PRODUCTO
ENCENDIDO Y APAGADO DEL HORNO
Para encender el horno, gire el selector de funciones (sentido horario/antihorario) y seleccione un programa de cocción. Para apagarlo, coloque el selector de funciones en la posición "0".
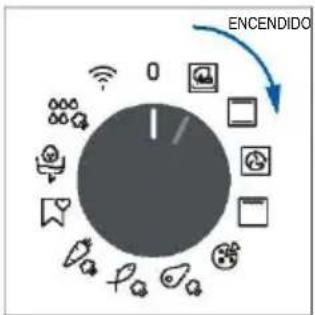
flowchart
graph TD
    A["Central Node"] --> B["Node 1"]
    A --> C["Node 2"]
    A --> D["Node 3"]
    A --> E["Node 4"]
    A --> F["Node 5"]
    A --> G["Node 6"]
    A --> H["Node 7"]
    A --> I["Node 8"]
    A --> J["Node 9"]
    A --> K["Node 10"]
    A --> L["Node 11"]
    A --> M["Node 12"]
    A --> N["Node 13"]
    A --> O["Node 14"]
    A --> P["Node 15"]
    A --> Q["Node 16"]
    A --> R["Node 17"]
    A --> S["Node 18"]
    A --> T["Node 19"]
    A --> U["Node 20"]
    A --> V["Node 21"]
    A --> W["Node 22"]
    A --> X["Node 23"]
    A --> Y["Node 24"]
    A --> Z["Node 25"]
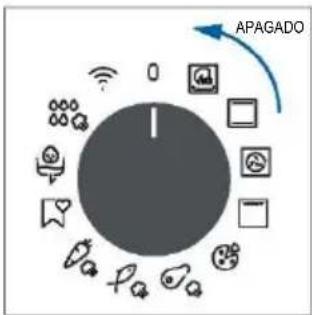
flowchart
graph TD
    A["Control knob"] --> B["APAGADO"]
    B --> C["Security icon"]
    B --> D["Data icon"]
    B --> E["Communication icon"]
    B --> F["Mobile phone icon"]
    B --> G["Smartphone icon"]
    B --> H["Phone icon"]
    B --> I["Information icon"]
    B --> J["User interface icon"]
ESTABLECER EL PROGRAMA DE COCCIÓN
Gire el selector de funciones y seleccione el programa deseado. En pantalla aparecerá una temperatura por defecto que puede ser editada en cada momento girando la perilla derecha (en sentido horario para aumentar y en sentido antihorario para disminuir la temperatura).
MENÚ DE TIEMPO
Acceda al menú Tiempo pulsando 📁. Para navegar por él, pulse 🔒 tantas veces como sea necesario para entrar en los ajustes siguientes:
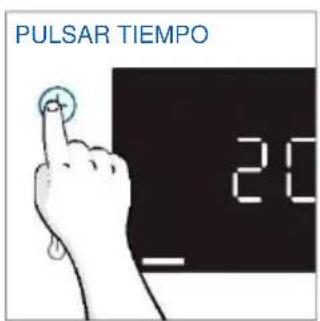
text_image
PULSAR TIEMPO 20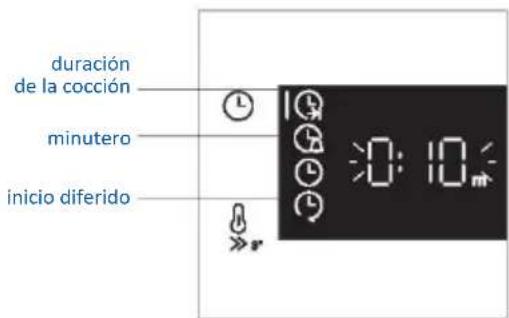
text_image
duración de la cocción minutero inicio diferidoNOTA: no se pueden ajustar varios parámetros al mismo tiempo, por lo que sólo el último ajustado permanece en la memoria mientras que el anterior se borra.

DURACIÓN DE LA COCCIÓN
Permite preseleccionar el tiempo de cocción necesario para la receta escogida.
ACTIVACIÓN: pulse 📁 para entrar en el menú Tiempo. Pulse 🔒 tantas veces como sea necesario para seleccionar la función "Duración de la cocción". A continuación, utilice el dial de control para regular el valor.
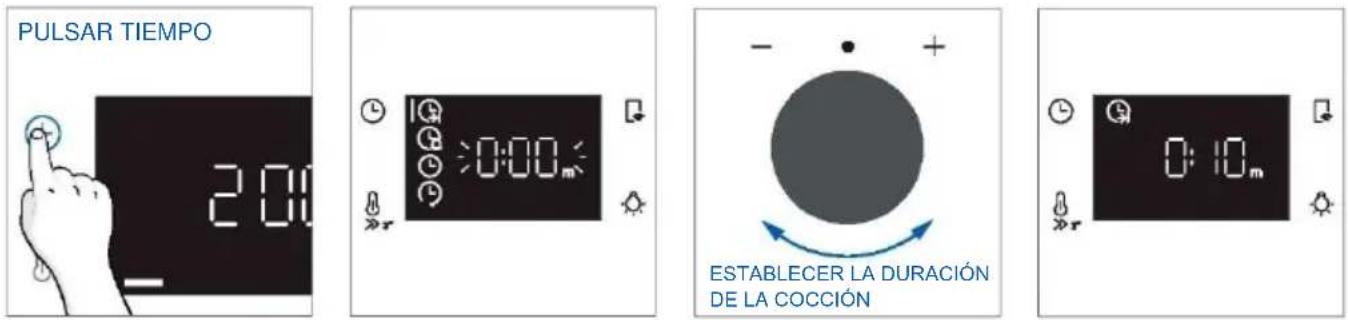
La cuenta atrás comienza al final del precalentamiento (si lo hay). Durante la fase de cocción, es posible modificar el valor de duración girando el selector derecho. Una vez transcurrido el tiempo, la cocción se detiene.

MINUTERO
Permite utilizar el horno como alarma.
ACTIVACIÓN: pulse 📁 para entrar en el menú Tiempo. Pulse 🔒 tantas veces como sea necesario para seleccionar la función "Minutero". A continuación, utilice el dial de control para regular el valor.
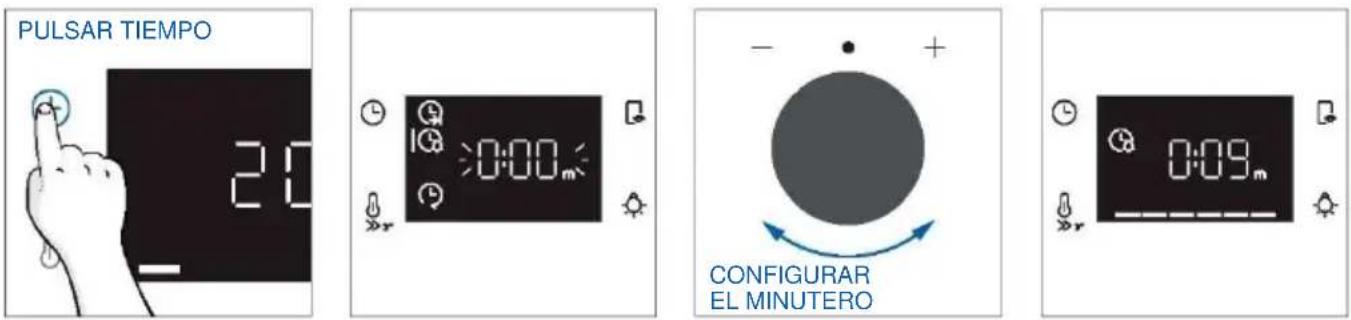
Cuando la función está activada, la información principal que aparece en pantalla es siempre la hora. Para editar la temperatura, pulse para entrar en el modo de edición dedicado. Una vez transcurrido el tiempo, la cocción continúa hasta que la perilla izquierda se gira a la posición 0.
Esta función también se puede ajustar cuando el horno está en modo de espera pulsando ¿Cuando está activado, el minutero funciona independientemente de las funciones de cocción del horno.

INICIO DIFERIDO
Permite elegir la hora de inicio de la cocción.
ACTIVACIÓN: pulse 📁 para entrar en el menú Tiempo. Pulse tantas veces como sea necesario para seleccionar la función "Inicio diferido". A continuación, utilice el dial de control para ajustar la hora de inicio de la cocción.
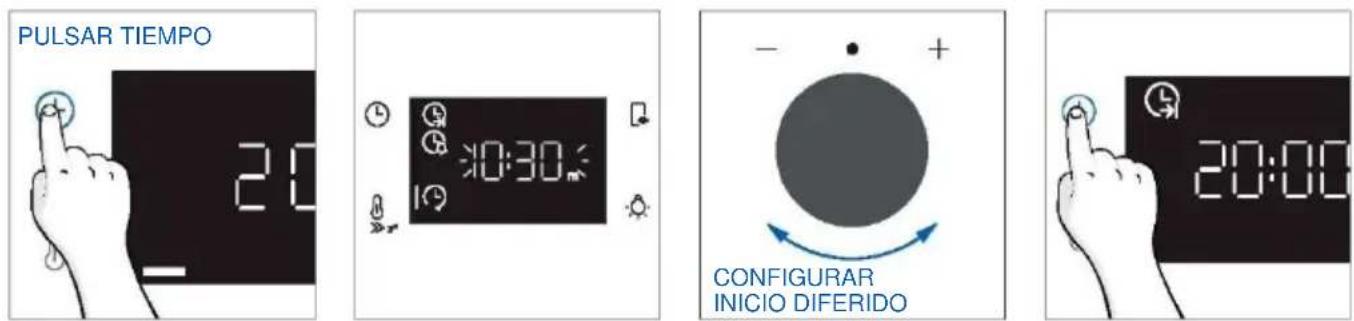
NOTA: El inicio diferido sólo se activa después de ajustar la duración de la cocción y no está disponible con las funciones del grill.
FUNCIONES ADICIONALES

BLOQUEO PARA NIÑOS
Esta función permite bloquear la pantalla para evitar cualquier uso no deseado por parte de menores. Para activarlo, pulse simultáneamente los botones Lámpara y Control remoto durante 3 segundos.
Aparecerá un icono con un candado en la interfaz de usuario. En este estado, la interfaz de usuario del horno está bloqueada y no se pueden realizar cambios en los ajustes.
Para desactivar el bloqueo para niños, pulse de nuevo los botones Lámpara y Control remoto durante 3 segundos (el icono con la llave desaparecerá).
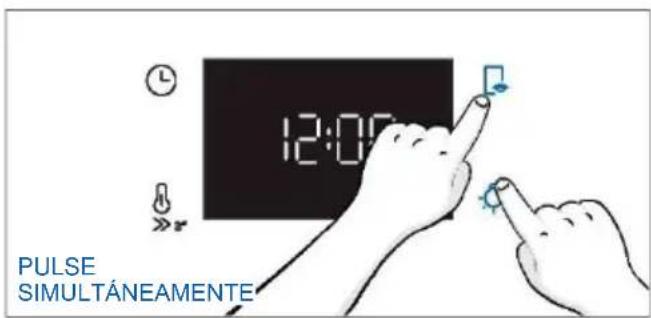
text_image
12:00 PULSE SIMULTÁNEAMENTE4.2. FUNCIONES DE COCCIÓN
OPCIÓN DE PRECALENTAMIENTO RÁPIDO
Para acelerar la fase de precalentamiento, se puede seleccionar la opción de precalentamiento rápido pulsando el icono de temperatura durante 3s después de haber seleccionado el programa de cocción y la temperatura. Esta opción activará una combinación de ventilador y resistencias independientemente de la función de cocción elegida.
Para ahorrar energía, cuando se activa el precalentamiento rápido, la lámpara se apaga hasta que el horno alcanza la temperatura deseada.
4.2.1. FUNCIONES ESTÁNDAR
NOTA: para las funciones que requieren precalentamiento, asegúrese de retirar todos los accesorios durante esta fase. Siga las instrucciones de la tabla siguiente en lo que se refiere al precalentamiento. "SÍ/PRECALENTAMIENTO RÁPIDO" significa que se requiere precalentamiento y que la opción de precalentamiento rápido está disponible; "NO" significa que el precalentamiento no está disponible y que los alimentos deben introducirse con el horno frío.
| Símbolo | Función | T°C por defecto Rango T°C | Posición sugerida en el estante | Preca-lentar | Sugerencias |
 | *ECO | 190 °C 150-220 °C | L3/L4 | NO | IDEAL PARA: cocinar carne, pescado o verduras.Esta función permite ahorrar energía durante la cocción manteniendo los alimentos húmedos y tiernos. La lámpara de la cavidad está apagada. |
 | *Convección | 200 °C 30-250 °C | L2/L3 | SÍ/PRECA-LENTA-MIENTO RÁPIDO | IDEAL PARA: tartas, panes, galletas, quiches en un nivel con calentamiento superior inferior.Se puede utilizar con Preci Probe. |
 | Multinivel | 160 °C 50-250 °C | L4 (una bandeja) L2+L5 (dos bandejas) L2+L4+L6 (tres bandejas) | SÍ/ PRECA-LENTA-MIENTO RÁPIDO | IDEAL PARA: tartas, galletas y pizzas en uno o más niveles. Ideal para cocinar diferentes alimentos. Se puede utilizar con Preci Probe. |
 | **Supergrill | 05 01-05 | L6 | NO | IDEAL PARA: grandes cantidades de salchichas, filetes y pan tostado.Toda la zona debajo del grill se calienta. Usar con la puerta cerrada. Voltee los alimentos pasados dos tercios del tiempo de cocción (si es necesario). |
4.2.2. FUNCIONES ESPECIALES
| Símbolo | Función | T°C por defecto Rango T°C | Posición sugerida en el estante | Preca-lentar | Sugerencias |
 | Pizza | 300 °C200-300 °C | L2/L3 | NO | IDEAL PARA: todo tipo de pizzas sin precalentar el horno. Utilice temperaturas más bajas para los productos congelados y 300 °C para las recetas caseras. |
 | Jolly | - | - | - | Añada a la lista de funciones predefinidas su favorita que no esté ya presente en tu horno. Puede configurarloa través de la aplicación hOn. |

Función Jolly
Gracias a la función Jolly, este producto ofrece una experiencia totalmente personalizable, permitiéndole almacenar sus recetas personalizadas directamente en el horno. Usted puede ejecutar estas recetas tantas veces como quiera, incluso sin necesidad de conectarse a la aplicación.

text_image
New Jolly Function Torta ai 3 cioccolati Step 1 Preheat of Mio > Cooking program Conventional > Temperature 100 °C > Duration 10 - 40 min > Note It's quick and easy to make up the strettop. It's nice and creative individual using heavy gallons, and it's always so empty and comforting and delicious. ADO STEP USE AS JOLLY FUNCTION SAVE RECIPECómo configurar la función Jolly:
Para configurar la función Jolly en su horno, abra la sección de recetas de la aplicación, seleccione la receta que desea utilizar y haga clic en "Usar como función Jolly".
A partir de este momento, puede lanzarla desde el producto incluso sin interactuar con la app. Basta con girar el selector de funciones hasta la función Jolly para iniciar el proceso de cocción.
La pantalla mostrará la temperatura preestablecida.
Cómo editar la función Jolly:
Para editar una función Jolly, vaya a la sección de recetas de la aplicación y seleccione la tarjeta de la receta designada como función Jolly. Pulse el botón "editar" para personalizar la receta y modificar los ajustes establecidos previamente.
Un mensaje emergente le informará de que, para guardar la función Jolly recién modificada, debe eliminar la anterior. Si confirma, la función Jolly anterior se eliminará y los nuevos parámetros se guardarán en el producto y serán visibles en la aplicación.
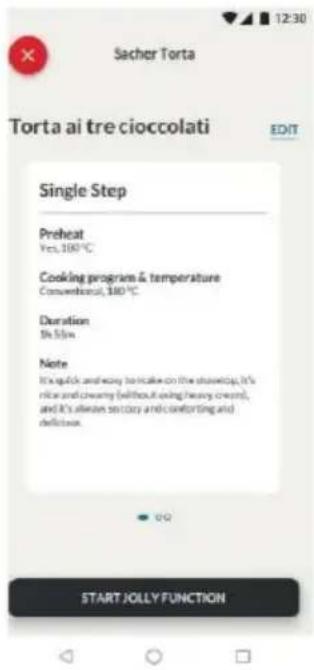
text_image
Sacher Torta Torta ai tre cioccolati EDIT Single Step Preheat Yes, 100°C Cooking program & temperature Conventional, 300°C Duration Be Slow Note It's quick and easy to make on the kitchen, it's nice and creamy (without using heavy cream), and it's allure so busy and comforting and deficient. START JOLLY FUNCTION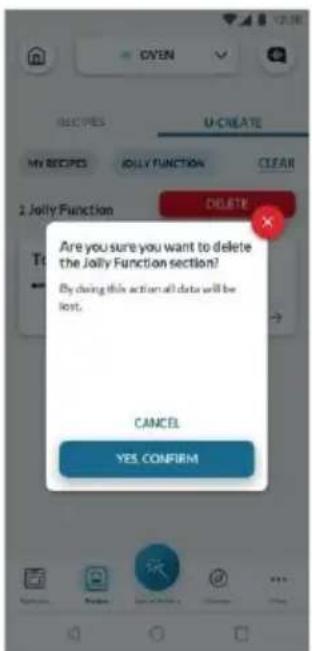
text_image
OXYEN U-CREATE MY RECIPES JOLLY FUNCTION CLEAR 2 Jolly Function DELETE Are you sure you want to delete the Jolly Function section? By doing this action all data will be lost. CANCEL YES, CONFIRMCómo eliminar la función Jolly:
Para eliminar la función Jolly de la interfaz de usuario del horno, acceda a la sec de recetas de la aplicación.
Pulsando sobre la tarjeta de la receta designada como función Jolly, es posible suprimirla pulsando el botón rojo "botón suprimir".
Una ventana emergente confirmará la operación, solicitando su confirmación. Si sigue adelante, la función Jolly guardada en el horno se eliminará y dejará de estar disponible en la app.
4.2.3. FUNCIÓN MULTI STEP
La función Multi Step permite mantener los parámetros de cocción previamente ajustados (temperatura y tiempo mientras se cambia de función durante la cocción.
Se pueden crear recetas Multi Step en la app hOn a través de la función U-Create y guardarlas en el horno.
El usuario puede guardar la receta como una Función Jolly para almacenarla en el horno, o guardarla en hOn para iniciarla remotamente desde la app.
Paso 1. En la sección U-Create de la aplicación, pulse "Crear receta".

text_image
OVEN RECIPIES U-CREATE MY RECIPES JOLY FUNCTION There are no recipes! Start creating your first recipe! CREATE RECIPEPaso 2. Edite el nombre de la receta y elija los parámetros para el primer paso de la receta.
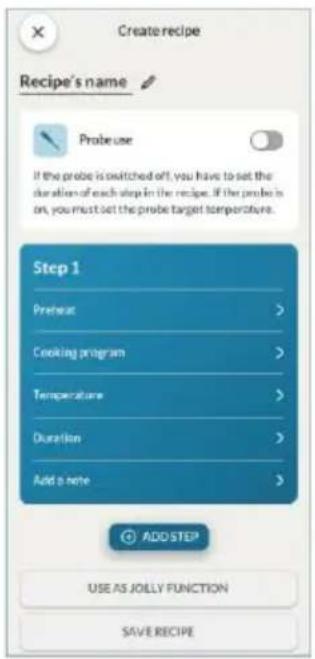
text_image
Create recipe Recipe's name Probe use If the probe is switched off, you have to set the duration of each step in the recipe. If the probe is on, you must set the probe target temperature. Step 1 Preheat > Cooking program > Temperature > Duration > Add a note > ADD STEP USE AS JOLLY FUNCTION SAVE RECIPE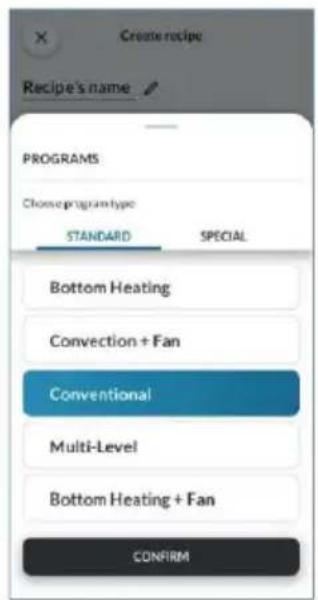
text_image
Create recipe Recipe's name PROGRAMS Choose program type STANDARD SPECIAL Bottom Heating Convection + Fan Conventional Multi-Level Bottom Heating + Fan CONFIRM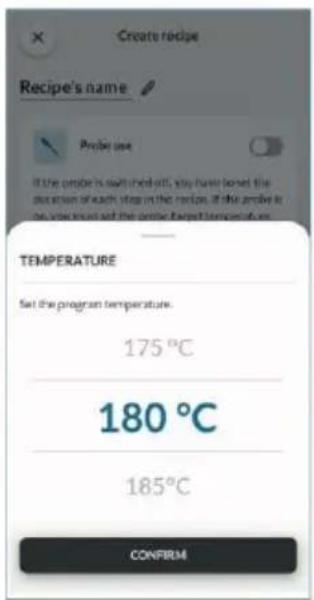
text_image
Create recipe Recipe's name Probe use If the probe is soft check off, you have locked the duration of each step in the next. If the probe is on your hand set the probe target temperature. TEMPERATURE Set the program temperature. 175 °C 180 °C 185 °C CONFIRM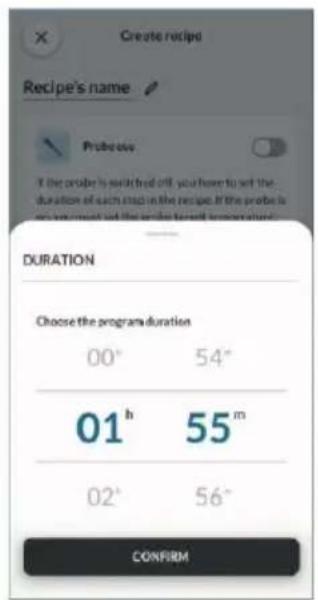
text_image
Create recipe Recipe's name Probe(s) If the order is will find off, you have to set the duration of each step in the recipe. If the probe is you want to set the order to get a new item. DURATION Choose the program duration 00° 54° 01 h 55 m 02° 56° CONFIRMPaso 3. Después de personalizar el primer paso, pulse "Añadir paso" para añadir otra función de cocción a la receta y personalizar sus parámetros.
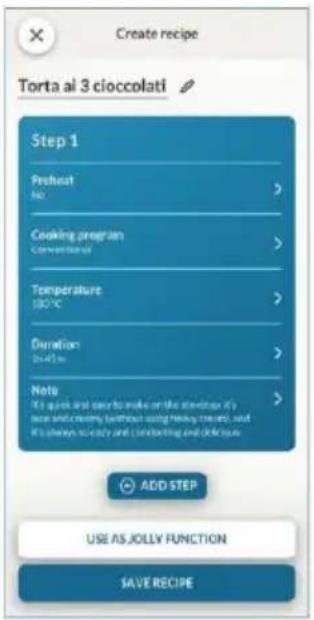
text_image
Create recipe Torta al 3 cioccolati Step 1 Preheat No > Cooking program Conventional > Temperature 180°C > Duration 24.5 min > Neto It's quick and easy to make on the kitchen it's rice and destroy without using healthy rice, and it's always so easy and comforting and digestive ADD STEP USE AS JOLLY FUNCTION SAVE RECIPEPaso 4. Guarde la receta en la app para iniciarla desde hOn a distancia, o guárdela como "Función Jolly" para encontrarla directamente en el horno.
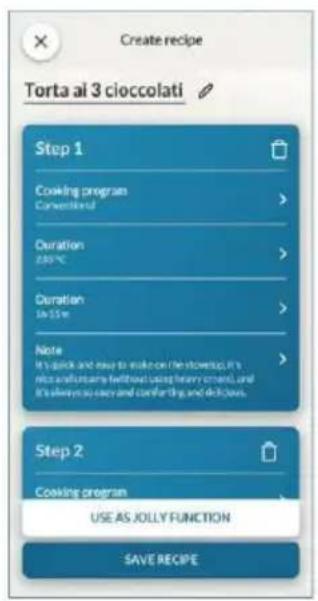
text_image
Create recipe Torta al 3 cioccolati Step 1 Cooking program Converted Duration 200°C Duration In Size Note It's quick and easy to make on the stopwatch, it's nice and funny perfectly using heavy skew, and it's always so easy and comfortable, and delicious. Step 2 Cooking program USE AS JOLLY FUNCTION SAVE RECIPE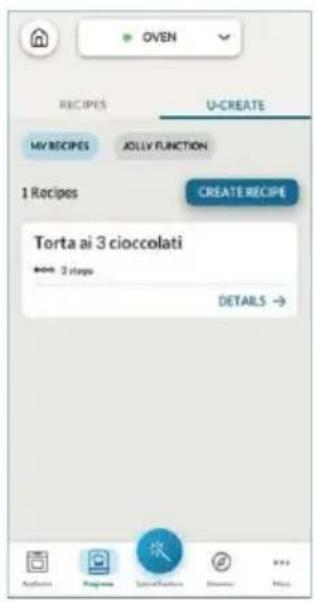
text_image
OVEN RECIPES U-CREATE MY RECIPES JOLLY FUNCTION 1 Recipes CREATE RECIPE Torta ai 3 cioccolati *** 3 steps DETAILS → Applications Programs Special Features Disks Help5. DIRECTRICES DE COCCIÓN
5.1. TABLA DE COCCIÓN GENERAL
| Categoría | Receta | N.° de niveles | Programa de cocción | T°C | Preca-lentar | Accesorio de cocina | Posición en el estante | Tiempo de cocción después del precalenta-miento* (min) |
| Pastelería dulce | Pequeños pasteles/ Muffins | 1 | Convección Multinivel | 175 °C 160 °C | S | Bandeja de horneado Bandejas de horneado | L3 L4 | 20-30 30-40 |
| 2 | Multinivel | 150 °C | Bandeja de horneado + profunda | L2+L5 | 30-40 | |||
| 3 | Multinivel | 140 °C | Bandejas de horneado | L2+L4+L6 | 40-50 | |||
| Bizcochos (26 cm ∅) | 1 | Convección | 170 °C | S | Rejilla metálica - Molde | L2 | 30-40 | |
| Multinivel | 150 °C | Rejilla metálica - Molde | L4 | 40-50 | ||||
| 2 | Multinivel | 150 °C | Rejillas metálicas + Molde | L1+L4 | 50-60 | |||
| Galletas/ Galletas de mantequilla | 1 | Convección Multinivel | 150 °C 150 °C | S | Bandeja de horneado Bandejas de horneado | L3 L4 | 25-30 30-40 | |
| 2 | Multinivel | 140 °C | Bandeja de horneado + profunda | L2+L5 | 30-40 | |||
| 3 | Multinivel | 140 °C | Bandejas de horneado | L2+L4+L6 | 35-40 | |||
| Chouquettes | 1 | Multinivel | 190 °C | S | Bandeja de horneado | L3 | 25-35 | |
| 2 | Multinivel | 180 °C | Bandeja de horneado | L2+L5 | 25-35 | |||
| Budín de Yorkshire | 1 | Convección | 200 °C | S | Bandeja de horneado | L3 | 20-30 | |
| Merengues | 1 | Multinivel | 90 °C | S | Bandeja de horneado | 90-160 | ||
| Macarons | 1 | Convección | 150 °C | S | Bandeja de horneado | L3 | 15-20 | |
| Tarta de manzana | 1 | Convección | 185 °C | S | Rejilla metálica - Molde | L2 | 60-70 | |
| 1 | Multinivel | 170 °C | S | Rejilla metálica - Molde | L4 | 65-75 | ||
| Tarta tatin | 1 | Convección | 170 °C | S | Rejilla metálica - Molde | L2 | 40-60 | |
| Suflé de chocolate | 1 | Convección | 200 °C | S | Bandeja de horno + moldes | L3 | 10-15 | |
| Tarta de queso | 1 | Convección | 150 °C | S | Rejilla metálica - Molde | L2 | 50-65 | |
| Cruasanes congelados | 1 | Convección | 180 °C | S | Bandeja de horneado | L3 | 20-25 | |
| 2 | Multinivel | 180 °C | Bandejas de horneado | L2+L5 | 25-35 | |||
| 3 | Multinivel | 160 °C | Bandejas de horneado | L2+L4+L6 | 30-40 | |||
| Strudel congelado | 1 | Convección | 210 °C | S | Bandeja de horneado | L3 | 30-45 | |
| Pan y pan sin levadura | Pan tostado | 1 | Supergrill | 5 °C | N | Rejilla metálica | L6 | 4-6 |
| Focaccia | 1 | Convección | 200 °C | S | Bandeja de horneado | L2 o L3 | 25-35 | |
| Pan integral | 1 | Convección | 200 °C | S | Bandeja de horneado | L3 | 35-50 | |
| Pasteles salados y guisos | Tartas saladas / Quiches (26 cm ∅) | 1 | Convección | 200 °C | S | Rejilla metálica molde para quiche | L1 o L2 | 30-50 |
| 2 | Multinivel | 180 °C | S | Rejilla metálica molde para quiche | L1+L4 | 50-70 | ||
| Suflé de queso | 1 | Convección | 200 °C | S | Bandeja de horno + moldes | L3 | 20-35 | |
| Lasaña fresca | 1 | Convección | 200 °C | S | Rejilla metálica fuente de horno | L3 | 40-60 | |
| Lasaña congelada | 1 | Convección | 180 °C | S | Rejilla metálica fuente de horno | L3 | 50-60 | |
| Canelones congelados | 1 | Convección | 180 °C | S | Rejilla metálica fuente de horno | L3 | 45-55 | |
| Pasta al horno | 1 | Multinivel | 200 °C | S | Rejilla metálica fuente de horno | L4 | 20-30 | |
| Pizza | Pizza fresca (Bandeja) | 1 | Convección | 250 °C | S | Bandeja de horneado | L2 o L3 | 15-20 |
| Pizza fresca (Bandeja) | 1 | Pizza | 250 °C | N | Bandeja de horneado | L2 o L3 | 18-25 | |
| 2 | Multinivel | 180 °C | S | Bandeja de horneado + profunda | L2+L5 | 25-35 | ||
| Pizza fresca (Redonda) | 1 | Convección | 250 °C | S | Bandeja de horneado | L2 o L3 | 8-10 | |
| Pizza fresca (Redonda) | 1 | Pizza | 300 °C | N | Bandeja de horneado | L2 o L3 | 15-20 | |
| 2 | Multinivel | 180 °C | S | Bandeja de horneado + profunda | L2+L5 | 30-40 | ||
| Pizza congelada (masa fina) | 1 | Convección | 220 °C | Rejilla metálica | L3 | 10-15 | ||
| 2 | Multinivel | 200 °C | S | Rejilla metálica | L2+L5 | 15-25 | ||
| 3 | Multinivel | 180 °C | Rejilla metálica | L2+L4+L6 | 20-30 | |||
| Pizza congelada (masa fina) | 1 | Pizza | 200 °C | N | Rejilla metálica | L2 | 10-15 | |
| Carne y aves de corral | Pollo entero asado (1-1,2 kg) | 1 | Multinivel | 220 °C | S | Rejilla metálica/L4Coloque la bandeja de horneado en L1 con 150 ml de agua | L4 | 40-60 |
| Muslos de pollo | 1 | Multinivel | 220 °C | N | Bandeja Airfry** | L4 | 30-50 | |
| Pato asado | 1 | Multinivel | 200 °C | S | Rejilla metálica + Fuente para horno | L3 | 50-60 | |
| Carne y aves de corral | Gallo | 1 | Multinivel | 220 °C | S | Rejilla metálica.Coloque la bandeja de horneado en L1 | L4 | 20-40 |
| Pavo asado | 1 | Multinivel | 200 °C | S | Rejilla metálica + Fuente para horno | L3 | 50-60 | |
| Costillas de cerdo (1000-1200 g) | 1 | Convección | 200 °C | S | Rejilla metálica + Fuente para horno | L3 | 80-100 | |
| Salchichas | 1 | Supergrill | 4 | S | Rejilla metálica | L5 | 40-50 | |
| Rosbif (500 g) | 1 | Multinivel | 220 °C | S | Bandeja de horneado | L3 | 20-40 | |
| Pastel de carne (1000-1500 g) | 1 | Convección | 180 °C | S | Bandeja de horneado | L3 | 40-50 | |
| Pollo asado con patatas | 1 | Multinivel | 200 °C | S | Bandeja profunda | L4 | 45-60 | |
| Pescado y marisco | Marisco a la plancha | 1 | Supergrill | 4 | N | Rejilla metálica | L5 | 15-30 |
| Palitos de pescado congelados | 1 | Multinivel | 200 °C | N | Bandeja Freidora de aire ** | L4 | 20-25 | |
| Pescado al horno | 1 | ECO | 200 °C | N | Rejilla metálica.Coloque la bandeja de horneado en L1 | L3 | 40-60 | |
| Tablas vegetales | Verduras gratinadas | 1 | ECO | 200 °C | N | Rejilla metálica + Fuente para horno | L3 | 80-90 |
| Patatas fritas congeladas (300-500 g) | 1 | Multinivel | 220 °C | N | Bandeja Freidora de aire ** | L4 | 18-25 | |
| Patatas gratinadas | 1 | Multinivel | 200 °C | S | Rejilla metálica + Fuente para horno | L4 | 15-25 | |
| Patatas asadas | 1 | Convección | 200 °C | S | Bandeja de horneado | L4 | 30-50 |
Los tiempos de cocción pueden variar según la receta y los ingredientes del consumidor.
*si se requiere precalentamiento
** Según el modelo de horno.
NOTA: Para cocinar tartas, quiches y otras recetas que requieran un molde o un recipiente en 2 niveles, colóquelos escalonados: la bandeja superior en el lado izquierdo y la bandeja inferior en el lado derecho.
5.2. TABLA EVERYDAY COOKING
El menú de categorías de alimentos permite cocinar una gran variedad de recetas sin precalentar el horno, gracias a los programas de cocción específicos adaptados a las necesidades de cada categoría.
| Símbolo | Descripción | Preca-lentar | Posición en el estante | Rango de temperatura (°C) | Intervalo de tiempo (min) | Temperatura de Preci Probe (si está disponible) | Descripción |
 | Carne + Vapor | NO | L3-L4 | 200-230 | 20-120 | Para asados de vacuno, ternera y cerdo, aves y cortes de carne. | Para asados de vacuno, ternera y cerdo, aves y cortes de carne. |
 | Pescado + Vapor | NO | L3-L4 | 150-180 | 15-60 | Para pescado entero y fileteado. | Para pescado entero y fileteado. |
 | Verduras + Vapor | NO | L3-L4 | 180-220 | 30-90 | Para verduras y patatas asadas | Para verduras y patatas asadas |
Cómo utilizar el embudo de vapor para los programas de cocción al vapor
Después de seleccionar el programa de cocción al vapor, la interfaz de usuario le pedirá que añada agua a través del accesorio específico (embudo de vapor); proceda como se indica a continuación.
- Inserte el embudo de vapor en el orificio correspondiente de la esquina superior derecha de la cavidad.
natural_image
Pure architectural line drawing of a curved corridor with a small circular feature and a cloud symbol (no text or labels)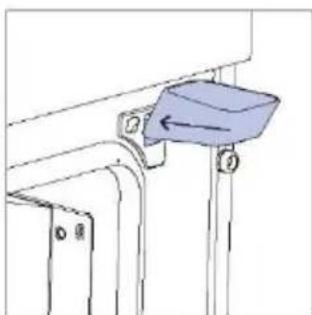
natural_image
Technical line drawing of a mechanical component with a blue component and directional arrow (no text or symbols)- Añada 250 ml de agua al embudo de vapor.
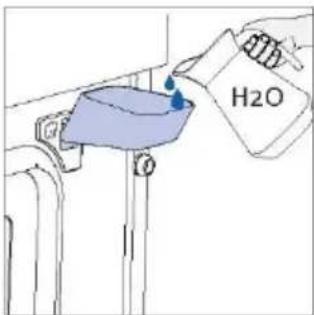
text_image
H2O- Retire el embudo de vapor del orificio de la cavidad y cierre la puerta del horno.
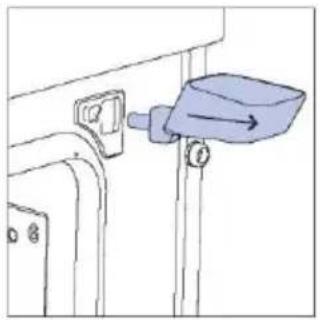
natural_image
Simple line drawing of a mechanical component with a blue lever and arrow indicator (no text or symbols)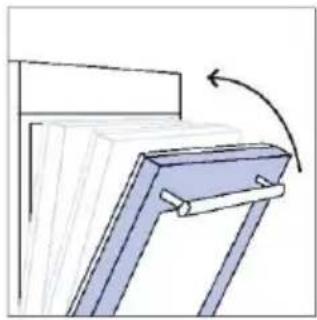
natural_image
Diagram of a structural frame with an arrow indicating rotation (no text or symbols present)A continuación, se mostrará el tiempo predeterminado y el programa de cocción se iniciará automáticamente al cabo de un segundo. El tiempo puede editarse girando el selector derecho; la temperatura de cocción puede modificarse pulsando el icono correspondiente. Ambos parámetros pueden ajustarse dentro de un rango limitado, como se muestra en la tabla anterior.
Si la cantidad de agua añadida no es suficiente o si no se añade agua en absoluto, el programa de cocción continuará a pesar de todo en "Modo Seco", se oirá un sonido y se mostrará en la pantalla.
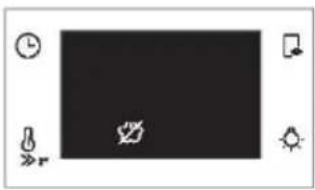
natural_image
Pure graphical interface element with icons and no text or symbolsNOTA: Si se carga demasiada agua, el exceso saldrá por la boquilla de vaciado.
NOTA: cuando se cocina con vapor, puede observarse algo de agua residual o condensación en el fondo de la cavidad al final de la cocción.
NOTA: si después de apagar el horno es necesario seguir cocinando, se recomienda evitar el uso de los programas Everyday Cooking y optar en su lugar por las funciones estándar.
| Receta | Tamaño de la ración | Programa de cocción | T°C | Accesorio de cocina | Posición en el estante | Tiempo de cocción (min) |
| Asado de ternera | 500-800 g | Carne + Vapor | 220 °C | Rejilla metálica | L3 | 30-40 |
| Filete de ternera | 200 g | Carne + Vapor | 200 °C | Rejilla metálica | L3 | 20-25 |
| Pastel de carne | 1000-1500 g | Carne + Vapor | 200 °C | Rejilla metálica | L3 | 40-50 |
| Ternera Wellington | 500 g | Carne + Vapor | 200 °C | Rejilla metálica | L3 | 50-80 |
| Estofado | 800-1000 g | Carne + Vapor | 200 °C | Rejilla metálica | L3 | 40-70 |
| Costillas de cerdo | 1000-1200 g | Carne + Vapor | 200 °C | Rejilla metálica | L3 | 80 |
| Costillar de cordero | 800-1000 g | Carne + Vapor | 210 °C | Rejilla metálica | L3 | 60-80 |
| Pierna de cordero | 1500-2000 g | Carne + Vapor | 200 °C | Rejilla metálica | L3 | 80 |
| Filetes de salmón | 200-600 g | Pescado + Vapor | 170 °C | Bandeja de horneado | L3 | 20-35 |
| Filetes de atún | 600 g (aprox. 4 pzas.) | Pescado + Vapor | 180 °C | Rejilla metálica | L3 | 15-20 |
| Filetes de pez espada | 700 g (aprox. 4 pzas.) | Pescado + Vapor | 180 °C | Bandeja de horneado | L3 | 15-20 |
| Filete de bacalao | 600 g (aprox. 4 pzas.) | Pescado + Vapor | 160 °C | Bandeja de horneado | L3 | 15-20 |
| Besugo entero | 1 | Pescado + Vapor | 170 °C | Bandeja de horneado | L3 | 35-45 |
| Filete de dorada | 600 g (aprox. 4 pzas.) | Pescado + Vapor | 160 °C | Bandeja de horneado | L3 | 15-20 |
| Filete de lubina | 600 g (aprox. 4 pzas.) | Pescado + Vapor | 160 °C | Bandeja de horneado | L3 | 15-20 |
| Pescado a la sal | 1 | Pescado + Vapor | 180 °C | Bandeja de horneado | L3 | 30-40 |
| Brochetas de pescado | 8 pzas. | Pescado + Vapor | 160 °C | Rejilla metálica | L3 | 20-30 |
| Calamares rellenos | 4 pzas. | Pescado + Vapor | 180 °C | Bandeja de horneado | L3 | 25-40 |
| Hinojo (bulbo) | 1 bandeja | Verduras + Vapor | 200 °C | Rejilla metálica | L3 | 30-40 |
| Verduras mixtas | 1 bandeja | Verduras + Vapor | 190 °C | Rejilla metálica | L3 | 40-45 |
| Coliflor | 1 bandeja | Verduras + Vapor | 190 °C | Rejilla metálica | L3 | 40-50 |
| Calabaza en dados | 1 bandeja | Verduras + Vapor | 200 °C | Rejilla metálica | L3 | 30-40 |
| Pimientos rellenos | 1 bandeja | Verduras + Vapor | 180 °C | Rejilla metálica | L3 | 70-80 |
| Calabacines rellenos | 1 bandeja | Verduras + Vapor | 190 °C | Rejilla metálica | L3 | 35-45 |
| Palitos de zanahoria | 1 bandeja | Verduras + Vapor | 180 °C | Bandeja de horneado | L3 | 35-40 |
| Brócoli | 1 bandeja | Verduras + Vapor | 190 °C | Bandeja de horneado | L3 | 30-40 |
| Ratatouille | 1 bandeja | Verduras + Vapor | 190 °C | Rejilla metálica | L3 | 40-45 |
| Flan de verduras | 6 ramequines | Verduras + Vapor | 180 °C | Bandeja de horno + moldes | L3 | 25-35 |
6.1. RECOMENDACIONES GENERALES
La limpieza regular puede ampliar la vida útil del electrodoméstico. Espere a que el horno se enfríe antes de llevar a cabo la limpieza manual.
- Un mínimo de limpieza después de cada uso ayudará a mantener el horno perfectamente limpio.
- No cubra las paredes del horno con papel de aluminio o protectores de un solo uso disponibles en las tiendas. En contacto directo con el esmalte caliente, el papel de aluminio o cualquier otro protector corre el riesgo de derretirse y deteriorar el esmalte del interior.
- Para evitar fuertes olores de humo y una suciedad excesiva, recomendamos no usar el horno a temperaturas muy altas. Es mejor prolongar el tiempo de cocción y bajar un poco la temperatura.
- Además de los accesorios suministrados con el horno, le recomendamos que utilice únicamente platos y moldes resistentes a temperaturas muy altas.
6.2. LIMPIEZA DEL HORNO
6.2.1. INTERIOR DEL HORNO: funciones de limpieza
Limpieza pirolítica (*según el modelo de horno)
Este proceso se basa en el proceso químico homónimo, que implica la descomposición de sustancias complejas mediante la aplicación de un tratamiento térmico.
Una vez activado, bloquea automáticamente la puerta del horno y eleva rápidamente la temperatura a 410°C.
Al final del ciclo de limpieza, los restos de comida dejarán una capa blanca en las superficies esmaltadas. Para eliminar estas partículas, limpie con un paño empapado en agua jabonosa caliente y utilice un cepillo o lana de acero. Los productos de limpieza adecuados son agua caliente jabonosa o limpiador de hornos.
Cómo funciona:
- Retire todos los accesorios del horno, como parrillas, rejillas laterales y tornillo de las rejillas laterales.
- Gire el selector de funciones hasta ❖. Gire el dial de control para ajustar el programa Pirolítico. Deje que la función trabaje durante el tiempo preestablecido. Durante este proceso y la siguiente fase de enfriamiento, la puerta del horno permanecerá bloqueada.
- Cuando el electrodoméstico está frío, limpie las superficies interiores del horno con un paño.
ADVERTENCIA: Compruebe que el electrodoméstico esté frío antes de tocarlo. Se debe prestar atención a las superficies calientes: existe el riesgo de quemaduras. Use agua destilada o potable.
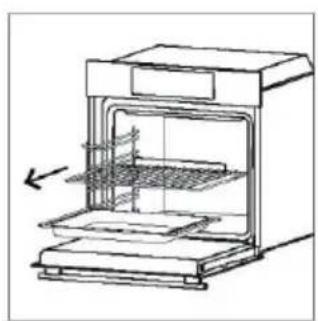
natural_image
Line drawing of an oven with internal grating and a side panel, showing no text or symbols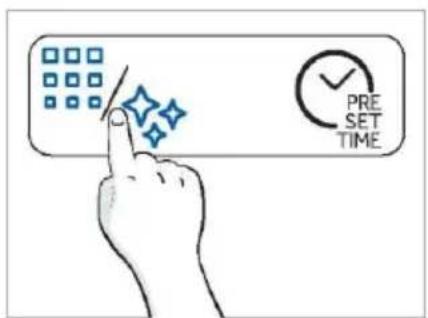
text_image
PRE SET TIME
natural_image
Hand cleaning a kitchen appliance with a cloth (no text or symbols visible)
Vapor H2O
La función de limpieza al vapor está diseñada para eliminar sin esfuerzo la suciedad ligera y proporcionar una solución rápida y ecológica para limpiar la cavidad de su horno utilizando el poder del vapor.
Cómo funciona:
- Vierta 250 ml de agua a través del embudo de vapor específico.
- Gire el selector hasta 🐘. Si es necesario, gire el dial de control para ajustar el programa de limpieza al vapor. Deje que la función trabaje durante el tiempo preestablecido.
- Al final del proceso de limpieza, deje que el horno se enfríe.
- Cuando el electrodoméstico está frío, limpie las superficies interiores del horno con un paño.
- ADVERTENCIA: Compruebe que el electrodoméstico esté frío antes de tocarlo. Se debe prestar atención a las superficies calientes: existe el riesgo de quemaduras. Use agua destilada o potable. Limpie el compartimento de cocción y déjelo secar completamente para evitar posibles corrosiones.

flowchart
graph TD
    A["Central Node"] --> B["Mobile Device Icon"]
    A --> C["Social Media Icon"]
    A --> D["Medical Devices Icon"]
    A --> E["Health Care Icon"]
    A --> F["Smart Speaker Icon"]
    A --> G["Radio Station Icon"]
    A --> H["Wireless Headset Icon"]
    A --> I["Global Wireless Icon"]
    A --> J["Global Health Sensor Icon"]
    A --> K["Global Medical System Icon"]
    A --> L["Global Security System Icon"]
    A --> M["Global Network System Icon"]
    A --> N["Global Communication System Icon"]
    A --> O["Global Security Communication System Icon"]
    A --> P["Global Network Communication System Icon"]
    A --> Q["Global Security Communication System Icon"]
    A --> R["Global Network Communication System Icon"]
    A --> S["Global Security Communication System Icon"]
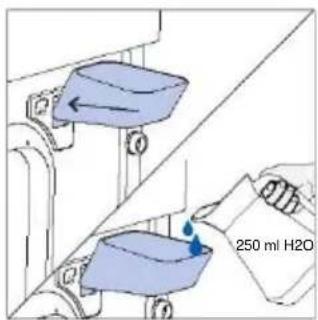
text_image
250 ml H2O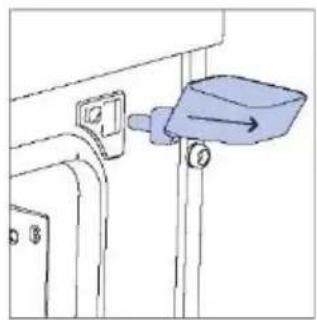
natural_image
Simple line drawing of a mechanical component with a blue lever and mounting bracket (no text or symbols)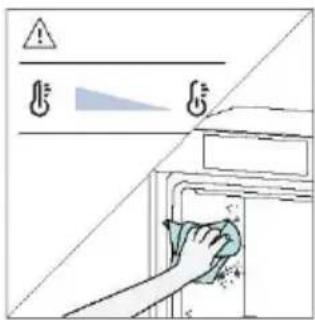
text_image
Diagram showing a hand cleaning a washing machine with warning symbols and a diagonal line, likely illustrating a cleaning or disinfection procedure.STEAM SYSTEM CLEANING
Esta función se sugiere después de 25 ciclos de vapor, y será obligatoria después de 40 ciclos de vapor. El horno mostrará el "icono de descalcificación" al final de cada ciclo de vapor a partir del día 25 si los usuarios aún no han realizado la descalcificación. Después de 40 ciclos de vapor, ninguno de los programas de cocción a vapor se iniciará antes de que los usuarios ejecuten el programa de descalcificación. Se divide en tres pasos:
6.2.1.1 DESCALCIFICACIÓN
Paso 1 (eliminar el agua residual del vaporizador):
i. Seleccione el modo de drenaje-descalcificación con el selector izquierdo y luego seleccione la función de descalcificación con el selector derecho y pulse el botón de tiempo para confirmar.
ii.Coloque la bandeja en el fondo de la cavidad y pulse el botón de tiempo para empezar.
iii.Después de que suene el zumbador para pasar a la segunda fase, retire la bandeja y límpiela.

Paso 2 (descalcificación):
i.Coloque el embudo de agua y la bandeja y pulse el botón de tiempo para confirmar.
ii.Introduzca 200 ml de agua y 50 ml de descalcificador en el embudo. A continuación, pulse el botón de tiempo para confirmar.
iii.Saque el embudo, cierre la puerta y pulse el botón de tiempo para confirmar.
iv.El proceso de descalcificación durará un rato; después de eso, para proceder a la tercera etapa, retire la bandeja y límpiela de nuevo.
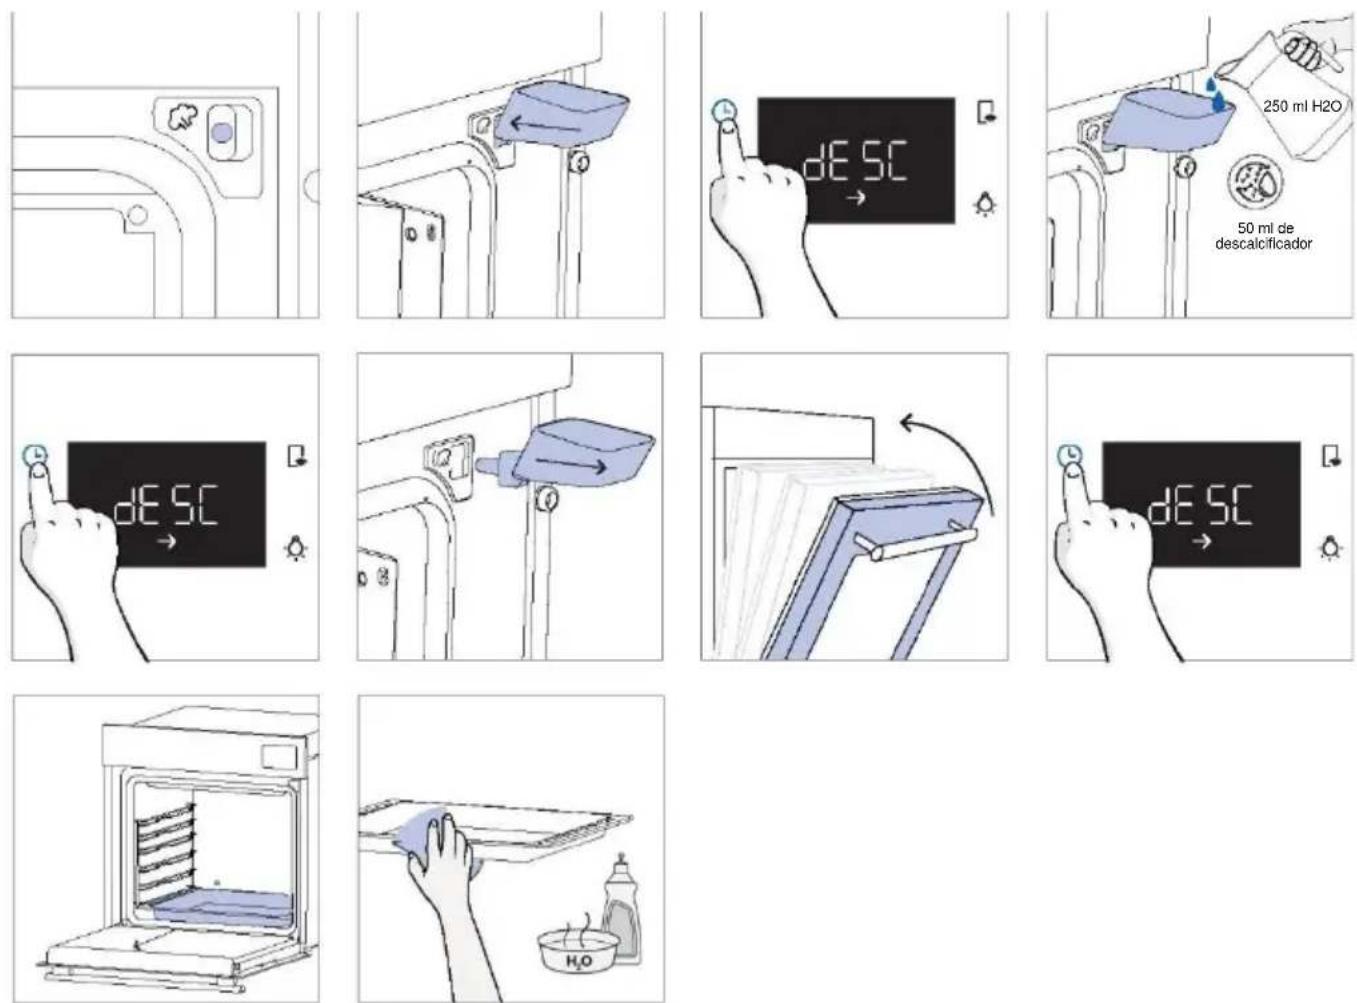
Paso 3 (enjuague):
i.Coloque el embudo de agua y la bandeja y pulse el botón de tiempo para confirmar.
ii. Introduzca 250 ml de agua en el embudo. A continuación, pulse el botón de tiempo para confirmar.
iii. Una vez completado el primer vaciado, llene 250 ml de agua en el embudo. A continuación, pulse el botón de tiempo para continuar con el enjuague.
iv. Una vez completado el segundo vaciado, llene 250 ml de agua en el embudo. A continuación, pulse el botón de tiempo para continuar con el enjuague.
v. Cuando finalice la función de descalcificación, retire la bandeja y el embudo.
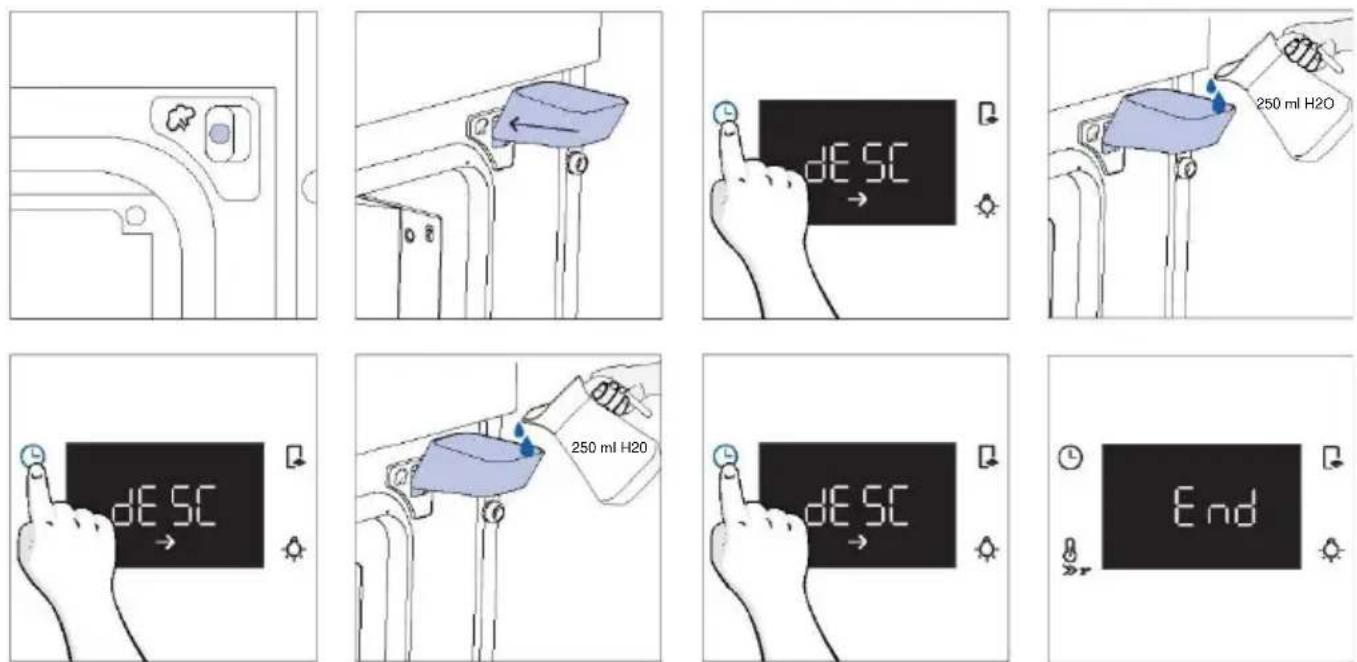
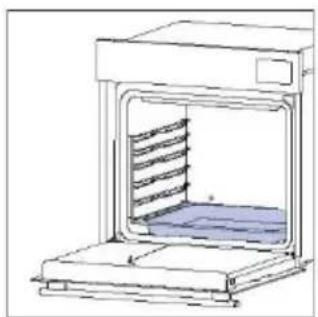
natural_image
Line drawing of a laboratory oven with a rack inside (no text or symbols)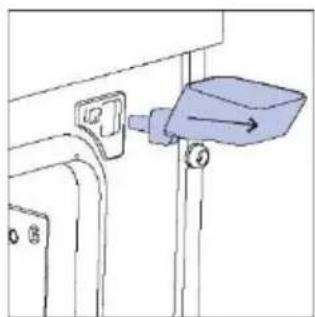
natural_image
Simple line drawing of a mechanical component with a blue arrow pointing to a component (no text or symbols)6.2.1.2 DRENAJE
Paso 1 (eliminar el agua residual del vaporizador):
i. Seleccione el modo de drenaje-descalcificación y, a continuación, seleccione la función de drenaje con el selector derecho.
ii.Coloque la bandeja en el fondo de la cavidad y pulse el botón de tiempo para empezar.
iii. Cuando finalice la función de drenaje, retire la bandeja y límpiela.
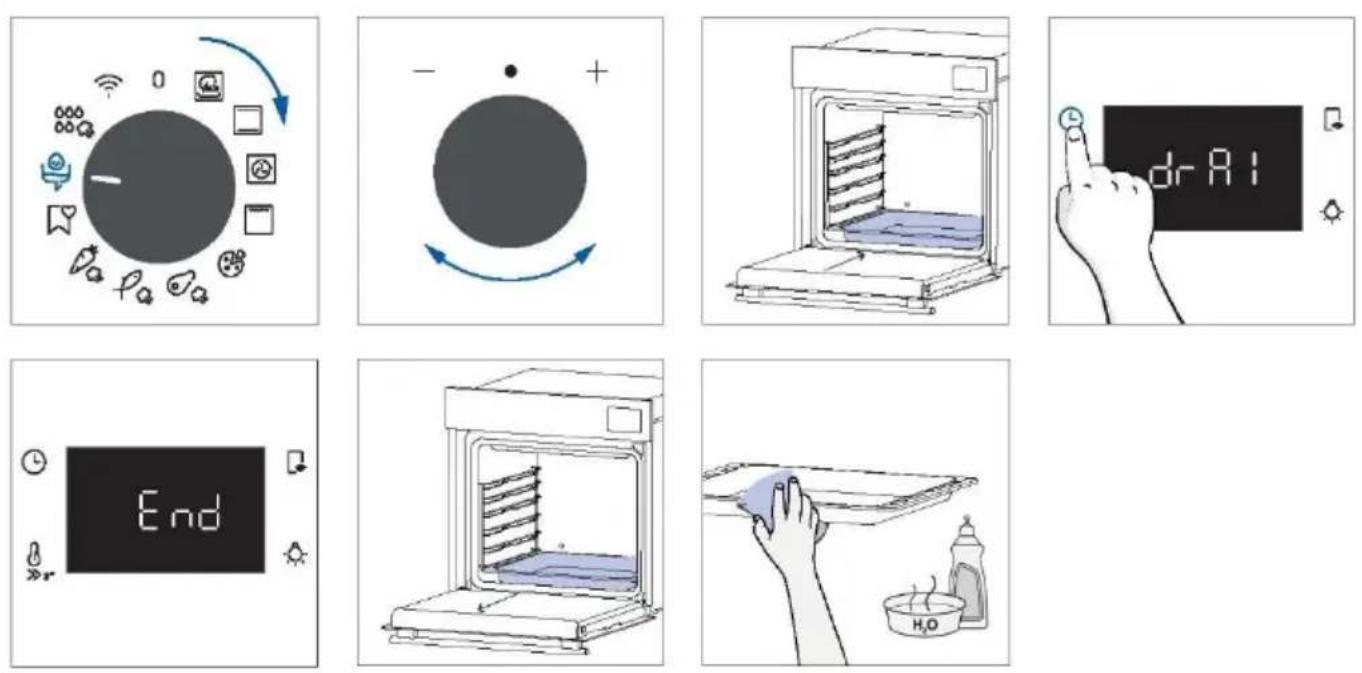
6.2.2. EXTERIOR DEL HORNO: retirada y limpieza de la puerta de cristal
- Coloque la puerta a 90°. Gire las lengüetas de bloqueo de la bisagra hacia fuera del horno.
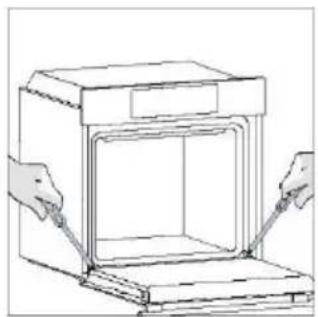
natural_image
Line drawing of a box with hands inserting or adjusting its interior (no text or symbols)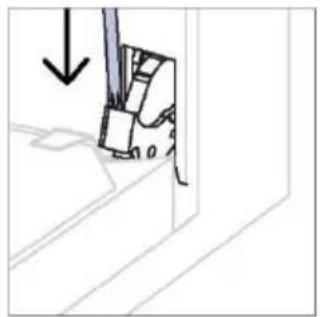
natural_image
Diagram showing a mechanical component with an arrow indicating downward motion (no text or symbols present)- Coloque la puerta a 45°. Pulse simultánea-mente los dos botones situados a ambos lados de los hombros laterales de la puerta y tire hacia usted para retirar la tapa superior de la puerta de los cristales.
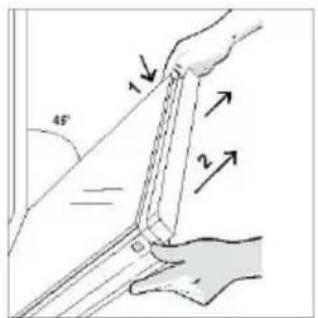
text_image
45° 1 2- Retire con mucho cuidado el cristal del horno, empezando por el interior. Durante el procedimiento, sujete firmemente el cristal con ambas manos y colóquelo sobre una superficie plana acolchada (por ejemplo, sobre una tela).
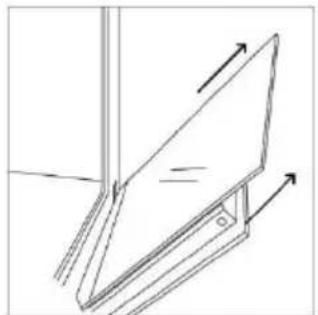
natural_image
Simple line drawing of a tilted rectangular object with directional arrows indicating motion or force (no text or symbols)- ADVERTENCIA: El cristal exterior no es desmontable.
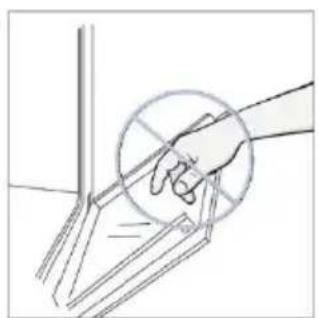
natural_image
Hand holding a circular object with intersecting lines, no text or symbols visible- Limpie el cristal con un paño suave y productos de limpieza adecuados.
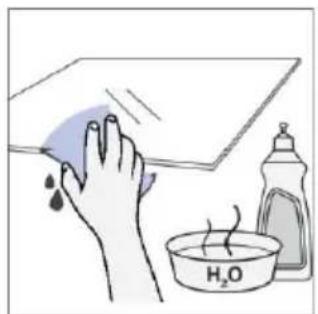
natural_image
Illustration of a hand cleaning a surface with a water bath and a bottle (no text or symbols)- Inserte los paneles de cristal, asegurándose de que la etiqueta "Low-E" sea correctamente legible y esté colocada en la parte inferior izquierda de la puerta, cerca de la bisagra del lado izquierdo. De este modo, la etiqueta impresa en el primer cristal permanecerá en el interior de la puerta.
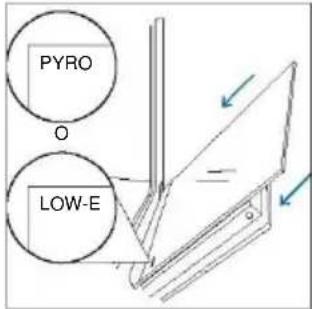
text_image
PYRO O LOW-E- Vuelva a colocar la tapa superior de la puerta de cristal empujándola hacia dentro hasta que oiga un clic de los dos botones laterales.
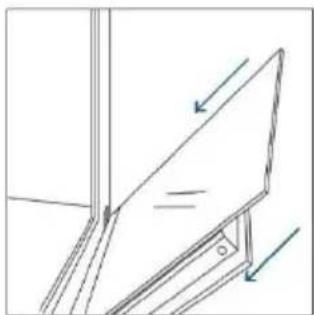
natural_image
Pure technical line drawing of a mechanical assembly with no text or symbols- A continuación, vuelva a colocar la puerta a 90° y gire las lengüetas de bloqueo de las bisagras hacia el interior del horno.
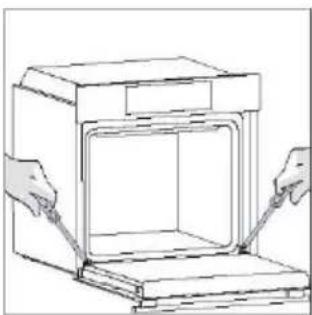
natural_image
Line drawing of a door opening with hands inserting or adjusting the interior (no text or symbols)