ALPINE DDC-R13H - Haut-parleur audio

DDC-R13H - Haut-parleur audio ALPINE - Notice d'utilisation et mode d'emploi gratuit

Retrouvez gratuitement la notice de l'appareil DDC-R13H ALPINE au format PDF.

📄 2 pages Français FR Télécharger 💬 Question IA 8 questions ⚙️ Specs
Notice ALPINE DDC-R13H - page 1
Choisissez votre langue et indiquez votre email : nous vous enverrons une version traduite specifiquement.
Caractéristiques Techniques Détails
Type de produit Non catégorisé
Dimensions Non spécifiées
Poids Non spécifié
Alimentation Non spécifiée
Connectivité Non spécifiée
Utilisation Non spécifiée
Maintenance Non spécifiée
Sécurité Non spécifiée
Informations Générales Non spécifiées

FOIRE AUX QUESTIONS - DDC-R13H ALPINE

Comment installer l'ALPINE DDC-R13H ?
Pour installer l'ALPINE DDC-R13H, suivez le manuel d'instructions fourni avec le produit. Assurez-vous de déconnecter l'alimentation avant de commencer l'installation.
Quels sont les problèmes courants avec l'ALPINE DDC-R13H ?
Les problèmes courants incluent des connexions défectueuses, des difficultés de compatibilité avec d'autres appareils et des problèmes d'alimentation. Vérifiez les connexions et assurez-vous que tous les appareils sont compatibles.
Comment résoudre un problème de son défaillant ?
Vérifiez d'abord les câbles et les connexions. Assurez-vous que le volume est réglé correctement et que le mode audio est bien sélectionné. Si le problème persiste, essayez de réinitialiser l'appareil.
L'ALPINE DDC-R13H est-il compatible avec mon véhicule ?
Pour vérifier la compatibilité, consultez la liste des véhicules compatibles dans le manuel d'instructions ou sur le site web du fabricant.
Comment mettre à jour le firmware de l'ALPINE DDC-R13H ?
Pour mettre à jour le firmware, visitez le site web d'ALPINE pour télécharger la dernière version. Suivez ensuite les instructions fournies pour l'installation de la mise à jour.
Que faire si l'appareil ne s'allume pas ?
Vérifiez d'abord l'alimentation et assurez-vous que tous les câbles sont correctement connectés. Testez avec une autre source d'alimentation si nécessaire. Si l'appareil ne s'allume toujours pas, contactez le service client.
Comment réinitialiser l'ALPINE DDC-R13H ?
Pour réinitialiser l'appareil, maintenez enfoncé le bouton de réinitialisation pendant 10 secondes. Consultez le manuel pour plus de détails sur la réinitialisation.
Y a-t-il une garantie pour l'ALPINE DDC-R13H ?
Oui, l'ALPINE DDC-R13H est généralement couvert par une garantie limitée. Vérifiez les détails de la garantie dans le manuel ou sur le site d'ALPINE.

Questions des utilisateurs sur DDC-R13H ALPINE

0 question sur cet appareil. Repondez a celles que vous connaissez ou posez la votre.

Poser une nouvelle question sur cet appareil

L'email reste privé : il sert seulement à vous prévenir si quelqu'un répond à votre question.

Aucune question pour l'instant. Soyez le premier à en poser une.

Téléchargez la notice de votre Haut-parleur audio au format PDF gratuitement ! Retrouvez votre notice DDC-R13H - ALPINE et reprennez votre appareil électronique en main. Sur cette page sont publiés tous les documents nécessaires à l'utilisation de votre appareil DDC-R13H de la marque ALPINE.

MODE D'EMPLOI DDC-R13H ALPINE

Note : En raison des ampelarons qui peuvent été appropriés au produit, la rhine technique et la conception son

MODELDEC-R17HDEC-R13H
Chrome Monarche (Phiile)150 Wails-
Amplication Reconnaissance60 Walls RMS-
Chrome Monarche (Continuous)40 Walls RMS-
Transiting40 to 500 Hz-
F}). Indexes4 inches-
Independence4 inches-
RMS per Rail precursorRMS per rail precursor-
Transiting89 dBW/mH-
F.). Index of manufactureTipo de production-
Tipo de productionTipo de production-
Conductors20 nm (1-3×16)-
Conductors30 nm (1-3×16)-
Conductors67 nm (2-14×7)-
Speed Water57 nm (1-14×7)-
Water-Margazine57 nm (1-14×7)-
Water-Megazine57 nm (1-14×7)-
Freezing a Bit far free du cooler (Fz)62 nm (2-14×7)-
Ours du cooler0.65-
Ours du cooler0.6-
Ours du cooler2.6-
Ours du cooler2.6-
Ours du cooler11.8 inches (0.4 cm, ll.)-
Ours du cooler0.74-
Total de Measure Moulinemonite7.8 ng (0.5 ns/dec)-
Total de Measure Moulinemonite12.8 ng (0.5 ns/dec)-
Total de Measure Moulinemonite14.4 ng (0.5 ns/dec)-
Total de measure Moulinemonite1.2 ng (0.5 ns/dec)-

FICHE TECHNIQUE

• La pointe du haut-parteur d'agus indiquée dans le circuit diverser de fréquence n'est pas toujours

Un circuit diverser de fréquence extime permet un réglage aïse et améliore la qualité du son.

Le modèle de référence des senses DBive représente un aliment direction révoluntary pour une reproduction supérieure du son. Ceine nouvelle structure du circuit magnétique permet la reproduction du son avec une distorsion extrêmement basse.

Méral pour avoir acheter un produit APLINE. Event de faire toute convoy connexions, l'èvement ce guide et vous laméniser avec toutes les procedures et illustrations afin d'obturi des résultats.

results.

Système de haut-parleur à 2 voies

ALPINE®

ALPINE ELECTRONICS, INC.

Tokyo Office: 1-1-8 Nishi Goranda,

вграждам-ш, телус

Tel: (00) 3484-1101

ALPINE ELECTRONICS OF AMERICA, INC.

19145 Gramercy Place, Torrance,

California 90501 U.S.A

Tel : (310) 325-8000

ALPINE ELECTRONICS OF CANADA, INC.

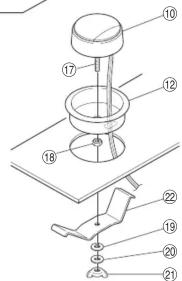
⑬ Slant spacer/L'écarteur d'inclinaison....x2

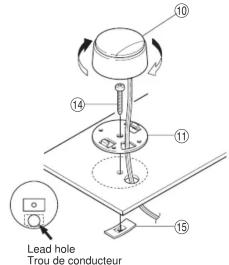
⑭ Self-tapping screw (ø4X20mm) / Vis auto-taraudeuse (ø4X20mm)....x4

⑮ Speed nut/Écrou de vitesse....x4

⑮ Self-tapping screw (ø4X8mm) / Vis auto-taraudeuse(ø4X8mm) x2

⑬ Spring washer (M4): Rondelle élastique bombée (M4)....x2

⑩ Flat washer(M4)/Rondelle plate(M4)....x2

② Wing nut(M4)/Écrou à ailettes (M4)....x2

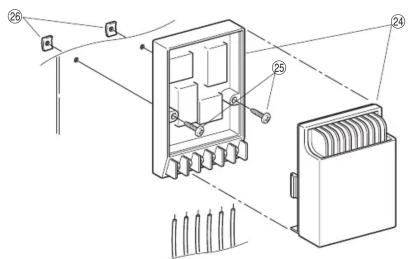
② Spring bracket/Support de rondelle....x2

② Sponge cushion (Double side adhesive tape included)/Coussin en éponge (Bande adhésive à deux faces fournie)....x2

For Network mount/Pour montage de réseau

② Network unit/Réseau....x2

② Screw (ø4X20mm): Vis (ø4X20mm)....x4

② Speed nut flat type/ Écrou de vitesse type plat....x4

② Network wire/Câble de réseau....x2

■ Installation procedures/Instructions d'installation

Nota: Mettre le côté large du coussin en caoutchouc ④ au côté extérieur autour du mailles métallique ③.

ALPINE DDC-R13H - ■ Installation procedures/Instructions d'installation - 1

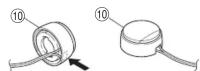
other | Category | Item | Value | | :--- | :--- | :--- | | DDC-R17H | Without spacer/Sans écarteur | 4 | | DDC-R17H | Without spacer/Sans écarteur | 4 | | DDC-R17H | Without spacer/Sans écarteur | 9 | | DDC-R17H | Without spacer/Sans écarteur | 3 | | DDC-R17H | Without spacer/Sans écarteur | 1 | | DDC-R17H | Without spacer/Sans écarteur | 2 | | DDC-R17H | Without spacer/Sans écarteur | 6 | | DDC-R17H | Without spacer/Sans écarteur | 8 | | DDC-R17H | Without spacer/Sans écarteur | 3 | | DDC-R13H | Surface mounting (Template®) /Montage en surface (Gabarit®) | 15 | | Surface mounting (Template®) /Montage en surface (Gabarit®) | Flush mounting (Template®)/Montage en encastré(Gabarit®) | 16 | | Surface mounting (Template®) /Montage en surface (Gabarit®) | Load hole Trou de conducteur | 14 | | Surface mounting (Template®) /Montage en surface (Gabarit®) | Angle mounting(Template®)/Montage en angle(Gabarit®) | 11 | | Surface mounting (Template®) /Montage en surface (Gabarit®) | Load hole Trou de conducteur | 15 | | Surface mounting (Template®) /Montage en surface (Gabarit®) | Angle mounting(Template®)/Montage en angle(Gabarit®) | 10 | | Surface mounting (Template®) /Montage en surface (Gabarit®) | Load hole Trou de conducteur | 16 | | Surface mounting (Template®) /Montage en surface (Gabarit®) | Angle mounting(Template®)/Montage en angle(Gabarit®) | 10 | | Surface mounting (Template®) /Montage en surface (Gabarit®) | Load hole Trou de conducteur | 18 | | Surface mounting (Template®) /Montage en surface (Gabarit®) | Angle mounting(Template®)/Montage en angle(Gabarit®) | 13 | | Surface mounting (Template®) /Montage en surface (Gabarit®) | Load hole Trou de conducteur | 19 | | Surface mounting (Template®) /Montage en surface (Gabarit®) | Angle mounting(Template®)/Montage en angle(Gabarit®) | 16 | | Surface mounting (Template®) /Montage en surface (Gabarit®) | Load hole Trou de conducteur | 11 | | Surface mounting (Template®) /Montage en surface (Gabarit®) | Angle mounting(Template®)/Montage en angle(Gabarit®) | 12 | | Surface mounting (Template®) /Montage en surface (Gabarit®) | Load hole Trou de conducteur | 22 | | Surface mounting (Template®) /Montage en surface (Gabarit®) | Angle mounting(Template®)/Montage en angle(Gabarit®) | 19 | | Surface mounting (Template®) /Montage en surface (Gabarit®) | Load hole Trou de conducteur | 20 | | Surface mounting (Template®) /Montage en surface (Gabarit®) | Angle mounting(Template®)/Montage en angle(Gabarit®) | 21 | | Surface mounting (Template®) /Montage en surface (Gabarit®) | Load hole Trou de conducteur | 13 | | Surface mounting (Template®) /Montage en surface (Gabarit®) | Angle mounting(Template®)/Montage en angle(Gabarit®) | 23 | | Surface mounting (Template®) /Montage en surface (Gabarit®) | Load hole Trou de conducteur | 25 | There is an hexagonal hole at the back of speaker unit 35, enter the head of hexagonal screw machine 05 and install bracket 0 to speaker unit. To lock in place, adjust holes by projecting it to the back of the flush mounting bracket 0 then links dockwise. (see §3 to loose it). It is a un-trou hexagonal à l'unité de l'unité d'encointe il 0, entrer la leve de ris de macrime hexagonalis et installer le support il 0 à l'unité d'encointe. Pour varrouitor on plaas, ajuster les trous en projessant 0 vers l'arrière du support de montage encastré §2 plus tainer en sans horraire, utiliser §2 pour devrouiller! ) Load hole Trou de conducteur Adjust the direction of the speed nut so that it doesn't hinder the hole to use when routing speaker leads. Auster la direction de l'acrou de vitesse de manière à ne cas gérer le trou prévu pour guiter les conducteurs de haute parcours. DDC-R17H | With spacer/Avec écarteur | 3 | | DDC-R17H | With spacer/Avec écarteur | 6 | | DDC-R17H | With spacer/Avec écarteur | 1 | | DDC-R17H | With spacer/Avec écarteur | 2 | | DDC-R17H | With spacer/Avec écarteur | 3 | | DDC-R17H | With spacer/Avec écarteur | 4 | | DDC-R17H | With spacer/Avec écarteur | 9 | | DDC-R17H | With spacer/Avec écarteur | 3 | | DDC-R17H | With spacer/Avec écarteur | 5 | | DDC-R17H | With spacer/Avec écarteur | 1 | | DDC-R17H | With spacer/Avec écarteur | 2 | | DDC-R17H | With spacer/Avec écarteur | 7 | | DDC-R17H | With spacer/Avec écarteur | 2 | | DDC-R17H | With spacer/Avec écarteur | 5 | | DDC-R17H | With spacer/Avec écarteur | 1 | | DDC-R17H | With spacer/Avec écarteur | 2 | | DDC-R17H | With spacer/Avec écarteur | 7 | | DDC-R17H | With spacer/Avec écarteur | 2 | | DDC-SR17H | Without spacer/Sans écarteur | 4 | | Without spacer/Sans écarteur | Without spacer/Sans écarteur | 4 | | Without spacer/Sans écarteur | Without spacer/Sans écarteur | 2 | | Without spacer/Sans écarteur | Without spacer/Sans écarteur | 6 | | Without spacer/Sans écarteur | Without spacer/Sans écarteur | 8 | The head of the head of the head of the head of the head of the head of the head of the head of the head of the head of the head of the head of the head of the head of the head of the head of the head of the head of the head of the head of the head of the head of the head of the head of the head of the head of the head of the head of the head of the head of the head of the head of the head of the head of the hand. The head of the head of the head of the head of the head of the head of the head of the head of the head of the head of the head of the head of the head of the head of the head of the head of the head of the head of the head of the head of the head of the head of the head of the head of the head of the head of the head of the head of the head of the head of the head of the head of the head of the body. The head of the body is not closed. If you are just a trout hexagonal à l'unité de l'unité d'encointe il 0, entrer la leve de ris de macrime hexagonalis et installer le support il 0 à l'unité d'encointe. Pour varrouitor on plaas, ajuster les trous en projessant 0 vers l'arrière du support de montage encastré §2 plus tainer en sans horraire, utiliser §2 pour devrouiller? ) Load hole Trou de conducteur Adjust the direction of the speed nut so that it doesn't hinder the hole to use when routing speaker leads. Auster la direction de l'acrou de vitesse de manière à ne cas gérer le trou prévu pour guiter les conducteurs de haute parcours. DNC-SR17H | On dashboard mounting/Montage sur le tableau de bord Load hole Trou de conducteur Join Janora Alpine logo positir Position du logo Alpine Left front door mounting/Montage sur la portière avant gauche Join Janora Lead hole Trou de conducteur Join Janora Upine logo positir Position du logo Alpine Right front door mounting/Montage sur la portière avant droite Upine logo positir Position du logo Alpine Upine logo positir Position du logo Alpine Upine logo positir Position du logo Alpine Upine logo positir Position du logo Alpine Upine logo positir Position du logo Alpine Upine logo positir Position du logo Alpine Upine logo positir Position du logo Alpine Upine logo positir Position du logo Alpine Upine logo positir Position du logo Alpine
ALPINE DDC-R13H - ■ Installation procedures/Instructions d'installation - 2

text_image • Surface mounting (Template®) /Montage en surface (Gabarit®) 16 17 18 19 20 21 22 23 24 25 26 27 28 29 30 31 32 33 34 35 36 37 38 39 40 41 42 43 44 45 46 47 48 49 50 51 52 53 54 55 56 57 58 59 60 61 62 63 64 65 66 67 68 69 70 71 72 73 74 75 76 77 78 79 80 81 82 83 84 85 86 87 88 89 90 91 92 93 94 95 96 97 98 99 100 101 102 103 104 105 106 107 108 109 110 111 112 113 114 115 116 117 118 119 120 121 122 123 124 125 126 127 128 129 130 131 132 133 134 135 136 137 138 139 140 141 142 143 144 145 146 147 148 149 150 151 152 153 154 155 156 157 158 159 160 161 162 163 164 165 166 167 168 169 170 171 172 173 174 175 176 177 178 179 180 181 182 183 184 185 186 187 188 189 190 191 192 193 194 195 196 197 198 199 200 201 202 203 204 205 206 207 208 209 210

ALPINE DDC-R13H - ■ Installation procedures/Instructions d'installation - 3

text_image Surface mounting/ Montage en surface 36 30 Angle mounting/Montage en angle 13 35 36 ※ Cut the portion pointed by the arrow using a nipper. Découper la portion pointée par la fièche à l'aide d'une pince. ※ Route out the wire from the portion pointed by the arrow. Conduire déhors le câble par la portion pointée avec la fièche.
Assistant notice
Powered by Anthropic
En attente de votre message
Informations produit

Marque : ALPINE

Modèle : DDC-R13H

Catégorie : Haut-parleur audio