
DF 650 - Friteuse KENWOOD - Notice d'utilisation et mode d'emploi gratuit
Retrouvez gratuitement la notice de l'appareil DF 650 KENWOOD au format PDF.

| Type d'appareil | Friteuse électrique |
| Marque | KENWOOD |
| Modèle | DF 650 |
| Capacité huile | 2,5 L |
| Capacité aliments | 1 kg |
| Thermostat réglable | Oui, rotatif |
| Voyant de chauffe | Oui |
| Fenêtre de visualisation | Oui |
| Panier monte-et-baisse sans ouverture | Oui |
| Paroi refroidissante Coolwall | Oui |
| Filtre d'humidité anti-odeurs | Oui |
| Unité electrique amovible | Oui (nettoyage facilite) |
| Reference filtre a huile | 290-29219 |
FOIRE AUX QUESTIONS - DF 650 KENWOOD
Questions des utilisateurs sur DF 650 KENWOOD
0 question sur cet appareil. Repondez a celles que vous connaissez ou posez la votre.
Poser une nouvelle question sur cet appareil
Téléchargez la notice de votre Friteuse au format PDF gratuitement ! Retrouvez votre notice DF 650 - KENWOOD et reprennez votre appareil électronique en main. Sur cette page sont publiés tous les documents nécessaires à l'utilisation de votre appareil DF 650 de la marque KENWOOD.
MODE D'EMPLOI DF 650 KENWOOD
instructions
Kenwood DF650
Our unique design means cleaning your fryer could not be simpler - just pull out the electrics unit and wash the rest. The easy-to-use temperature dial lets you choose the right temperature for whatever you are cooking, and the window lets you view what is going on inside. For extra safety you can even raise and lower the basket without opening the lid. So it is easy to see why your DF650 Fryer stands out from the crowd.
know your Kenwood deep fryer
safety
- Never plug in the fryer before filling the bowl with oil.
- Keep children away during use and after - fat stays hot for a long time.
- Never let the cord touch hot surfaces or hang down over the worktop edge - a child could grab it and pull the fryer down. Place excess cord in cord storage area at the back of the fryer.
- Never touch the bowl, pour away oil or move your fryer while the oil's hot.
- Never put the electrics unit in water. Remove it before washing the rest of your fryer.
- After cleaning, ensure the bowl and its electric pins are dry before use.
- Never leave your fryer on unattended.
- This fryer is not intended for use by young children or infirm persons without supervision.
- Young children should be supervised to ensure that they do not play with this appliance.
- Take care when removing the electrics unit - the temperature probes may be hot.
- Do not use if there is any damage to the fryer, cord or plug. Get it checked or repaired: see 'service', page 4.
- Only use the electrics unit supplied.
- Watch out for steam during cooking and when you open the lid.
- Never put your fryer near or on cooker hot plates.
- This fryer is for domestic use only.
Always unplug the fryer after use.
before plugging in
- Make sure your electricity supply is the same as the one shown on the underside of the electrics unit.
- The wires in the cord are coloured as follows: Green & Yellow = Earth, Blue = Neutral, Brown = Live.
- This machine complies with European Economic Community Directive 89/336/EEC.
before using for the first time
1 Remove all packaging
2 Dismantle: see 'to dismantle, assemble and use your fryer', page 3.
3 Wash the parts: see 'cleaning', page 4.
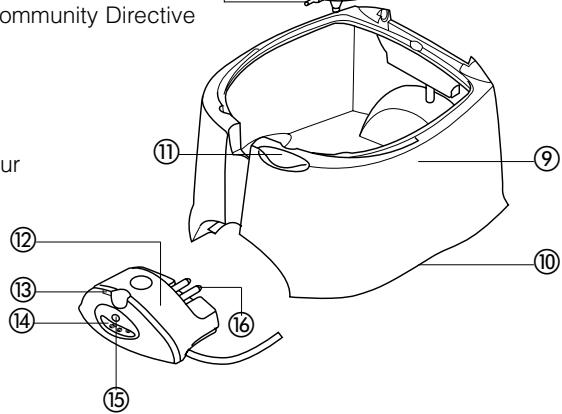
know your Kenwood fryer
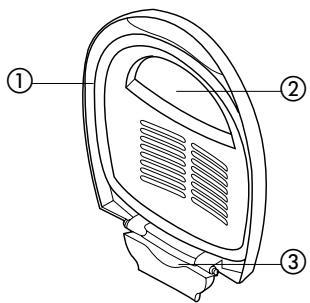
① removable lid with permanent mesh filter
② viewing window
(3) condensation trap
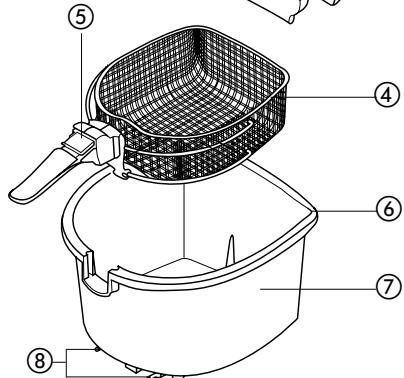
④basket
(5) rise and fall control
⑥ pouring spouts
(7) bowl
⑧ bowl electric pins
⑨ body
⑩ carrying handles
1 lid release
⑫ electrics unit
⑬ temperature light
⑭ temperature control
⑤temperature window
16 temperature probes
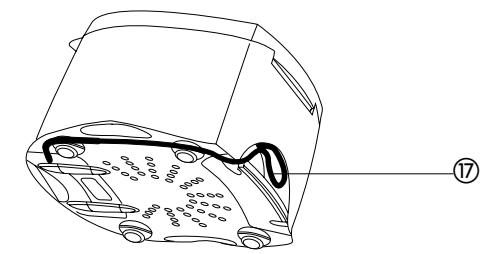
⑦ cord storage
to dismantle, assemble and use your fryer
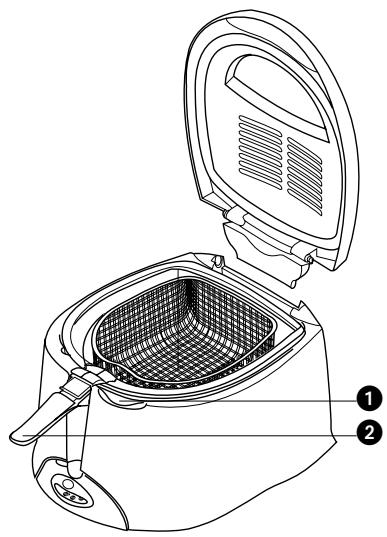
to dismantle
1 Push the lid release down to open the lid ①. Then lift the lid off.
2 Lift up the handle until it locks 2 and remove the basket.
3 Pull out the electrics unit and then lift out the bowl.
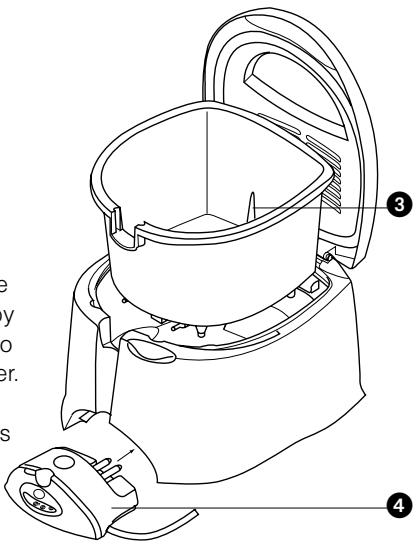
to assemble and use
1 Insert the bowl - 'MAX' and 'MIN' marks towards the back ③. And then insert the electrics unit ④
2 Pour in the oil. The level must be between the 'MAX' and 'MIN' marks.
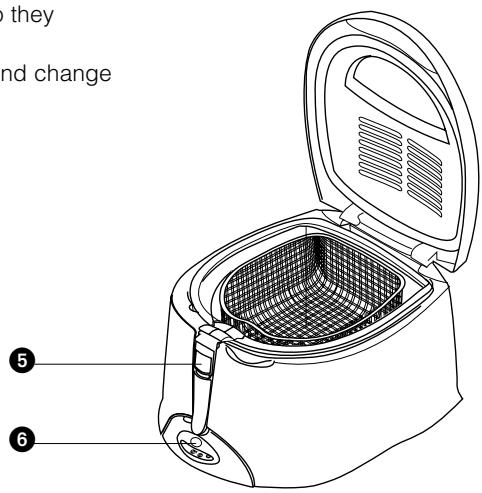
3 Insert the basket, then lower the handle by sliding back the rise and fall control 5. Close the lid.
4 Use the cord storage at the back of the fryer to store any excess cord.
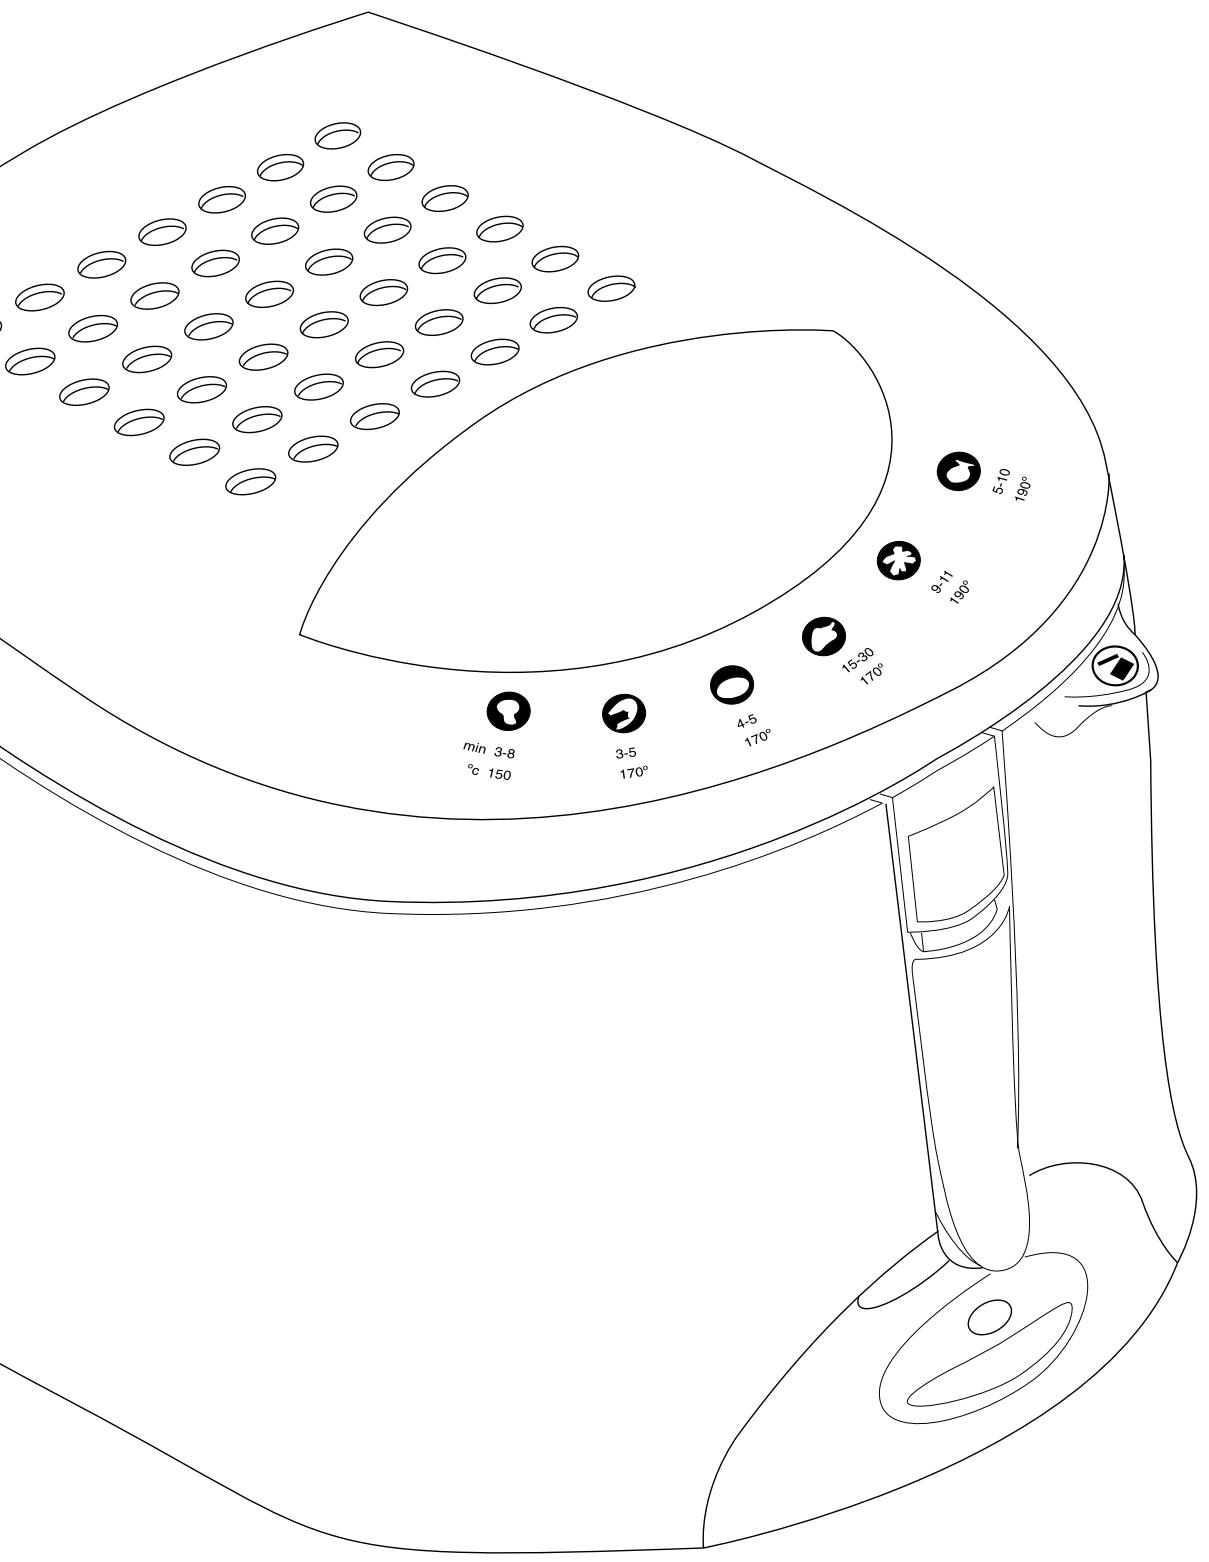
5 Plug in and select the required temperature: which will appear in the temperature window 6
6 The light goes out when the oil reaches the right temperature - start frying. The light will come on and off as the fryer maintains the temperature.
7 When ready, raise the basket and allow the food to drain before opening the lid.
- To re-use oil, allow to cool then remove the bowl and pour the oil through fine muslin or absorbent paper.
Always unplug the fryer after use.
hints
We would recommend the use of a good quality oil for deep frying, such as corn oil or groundnut oil. A good quality solid fat may also be used. Other oils may be used if they are specifically recommended by the manufacturer for deep frying. Never mix different oils or fat and do not use olive oil, butter or margarine as they will smoke or bubble over.
- Pre-cooked food needs a higher temperature than raw food.
- Cook food thoroughly. The outside may look ready before the inside is cooked.
- Keep your fryer with oil (cooled and strained) inside it, ready for use. The lid keeps the dust out.
- Before frying battered food, drain off excess batter.
- To make chips, use old potatoes and cut them up evenly so they cook evenly. Rinse and dry before frying.
- To prolong the life of your fryer, filter the oil after each use and change it after 8 - 10 uses.
maximum food capacities
- fresh chips 1.2Kg / 2 lb 10 oz
- frozen chips 1 Kg/2 lb 3 oz
oil and fat capacities
maximum oil 2% litres/4½ pints
- minimum oil 2 litres/3½ pints
maximum solid fat 2.25kg/5lb
- minimum solid fat 1.8kg/4lb 3oz
cleaning and service
cleaning
-
Never start cleaning until the oil has cooled down.
-
Always unplug and remove the electrics unit before cleaning.
- Ensure everything's completely dry before reassembling.
electrics unit Pull out, wipe with a damp cloth and dry thoroughly.
- Never put it in water.
Iid - After each use, remove and soak in hot soapy water for 20 minutes.
basket - After each use, remove and soak in hot soapy water for 20 minutes. Then use a stiff brush.
bowl - After each use, remove and soak in hot soapy water for 20 minutes. Then use a non-abrasive cleaner.
fryer body Wash in hot soapy water.
- If you have a dishwasher everything - except the electrics unit - is dishwasher-safe. Your dishwasher may darken the inside of the lid and the outside of the bowl but they'll still work perfectly. For baked on oil, we recommend soaking the bowl prior to dishwashing.
service and customer care
- If the cord is damaged it must, for safety reasons, be replaced by KENWOOD or an authorised KENWOOD repairer.
UK If you need help with:
- using your fryer or
- servicing or repairs (in or out of guarantee)
Call KENWOOD on 023 92392333 and ask for Customer Care. Have your model number ready - it's on the underside of the electrics unit. Alternatively, contact your authorised KENWOOD repairer: look in Yellow Pages under 'Electrical appliance repairs'.
Eire See our advertisement in Golden Pages.
other countries Contact the shop where you bought your fryer.
UK only guarantee
If your fryer goes wrong within one year from the date you bought it, we will repair or where necessary replace it free of charge provided:
- you have not misused, neglected or damaged it;
- it has not been modified (unless by KENWOOD);
- it is not second-hand;
- it has not been used commercially;
- you have not fitted a plug incorrectly; and
- you supply your receipt to show when you bought it.
This guarantee does not affect your statutory rights.
recipes
swedish meat balls
oil temperature required 150^
ingredients
- 200g (8oz) minced beef
- 200g (8oz) minced pork
- 25g (1oz) butter
- 25g (1oz) onion - finely chopped
- 50g (2oz) white breadcrumbs
- 1 egg
- 125ml (1/4 pt) milk
- 5ml (1 tsp) salt
- pinch of pepper
method
1 Melt the butter in a pan and fry the onions until soft.
2 Add the remaining ingredients and mix until smooth.
3 Shape the mix into 2.5cm (1 in) balls using floured hands.
4 Heat the oil and fry for 5 - 6 minutes.
Serves 6
chicken kiev
oil temperature required 170^
ingredients
- 50g (2oz) butter
2.5ml (1/2 tsp) garlic powder - 5ml (1tsp) chopped parsley
- 2 chicken breasts
- wooden cocktail sticks
- 1 egg
- 25g (1oz) flour seasoned with salt and pepper
- 25g (1oz) white breadcrumbs
method
1 Mix together the butter, garlic powder and parsley and roll into 2 log shapes.
2 Skin and bone the chicken breasts and flatten out.
3 Place a roll of the butter mix into each breast and roll up the breast, fold in the ends so that the butter is enclosed. Secure with a cocktail stick.
4 Beat the egg and dip the chicken pieces into the egg. Make sure that the chicken is fully coated with the egg.
5 Coat the chicken with flour and then roll in the breadcrumbs. Chill for at least 1 hour before frying.
6 Heat the oil and fry the chicken for 15 - 20 minutes.
Ensure that you remove the cocktail sticks before serving.
basic batter for coating
oil temperature required 190^
ingredients
- suitable for coating fish, meat, vegetables and fruit.
- 125g (5oz) plain flour
- pinch of salt
- 10ml (2tsp) baking powder
- 170ml (7fl oz) liquid (water, milk, beer or cider)
method
1 Place the flour, salt and baking powder in a bowl.
2 Make a well in the centre and add half the liquid and mix well. Then add the remaining liquid.
3 If the batter is left to stand, mix again before use.
4 Dip the food in flour seasoned with salt and pepper before coating with batter.
5 Lower the basket before adding the food to prevent the batter sticking to the basket.

