
C500 - Appareil photo numérique HP - Notice d'utilisation et mode d'emploi gratuit
Retrouvez gratuitement la notice de l'appareil C500 HP au format PDF.

| Type de produit | Appareil photo numérique |
| Marque | HP |
| Modèle | C500 |
| Résolution | 5,0 mégapixels (estimation) |
| Zoom optique | 3x (estimation) |
| Écran LCD | 2,4 pouces (estimation) |
| Modes de prise de vue | Photo, Vidéo (720p), Enregistrement audio |
| Modes scène | Auto, Programme, et autres modes disponibles via le menu |
| Stabilisateur d'image | Oui, stabilisateur intégré |
| Flash intégré | Oui |
| Microphone intégré | Oui |
| Haut-parleur intégré | Oui |
| Support mémoire | Carte SD/SDHC, classe 6 recommandée pour vidéo HD |
| Alimentation | 2 piles AA |
| Dimensions (approx.) | 94 x 62 x 30 mm (estimation) |
| Poids (approx.) | 130 g (sans piles, estimation) |
| Compatibilité PC | Windows et Mac (via logiciel fourni sur CD-ROM) |
| Connectivité | Port USB |
| Sortie vidéo | Non spécifiée (probablement composite) |
| Trépied | Support pour trépied (vis au dos) |
| Entretien et nettoyage | Nettoyer l'objectif avec un chiffon doux et sec. Éviter l'humidité. |
| Sécurité | Éteindre l'appareil avant d'insérer ou retirer la carte mémoire ou les piles. |
| Pièces détachées et réparabilité | Contacter un centre de service agréé HP ou le point de vente d'origine. |
FOIRE AUX QUESTIONS - C500 HP
Questions des utilisateurs sur C500 HP
0 question sur cet appareil. Repondez a celles que vous connaissez ou posez la votre.
Poser une nouvelle question sur cet appareil
Téléchargez la notice de votre Appareil photo numérique au format PDF gratuitement ! Retrouvez votre notice C500 - HP et reprennez votre appareil électronique en main. Sur cette page sont publiés tous les documents nécessaires à l'utilisation de votre appareil C500 de la marque HP.
MODE D'EMPLOI C500 HP

natural_image
HP logo in white on black circular background, no additional text or symbolsc500
Digital Camera
Quick Start Guide
For more details about the camera operation and troubleshooting, please read the User Manual located on the CDROM disc included with your camera or visit http://www.hp.com/support and download it for the camera support page.
Tour of Your HP Camera
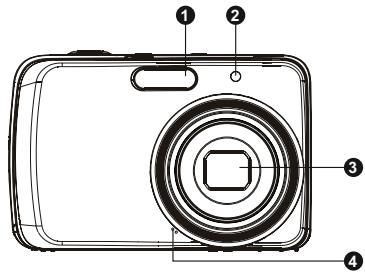
Front View
text_image
Diagram of a digital camera with numbered parts labeled 1 to 4 for identification.- Flash
- Self-timer LED / AF Assist Lamp
- Lens
- Microphone
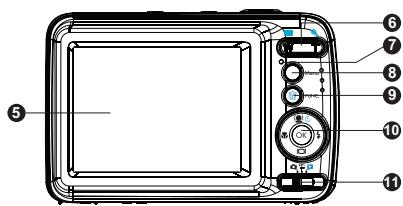
Back View
text_image
Diagram of a digital camera with numbered parts labeled for identification- LCD Screen
- Zoom Toggle
- LED Indicator
- Menu Button
- Function / Delete Button
- OK Button / 4-way Navigation Control
- Mode Selector Switch

Photo Mode

Video Mode

Playback Mode
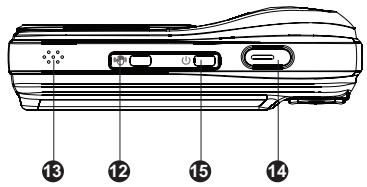
Top View
text_image
13 12 15 14- Stabilizer Button
- Speaker
- Shutter Button
- Power Button
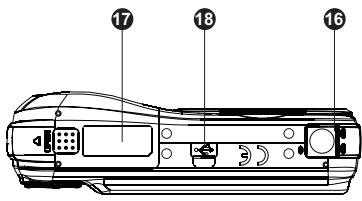
Bottom View
text_image
Technical diagram of a device rear panel with numbered labels pointing to key components- Tripod Screw Hole
- Battery/Memory Card Compartment Door
- USB Port
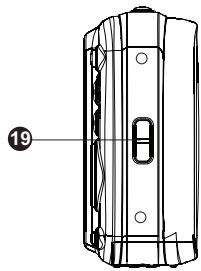
Left/Right View
natural_image
Technical line drawing of a mechanical component with no visible text or symbols
natural_image
Technical line drawing of a cylindrical mechanical component with mounting holes (no text or symbols)- Strap Ring
1. Getting Started Attach the Camera Strap
To reduce the risk of dropping the camera, it is strongly recommended to attach and use the provided camera strap
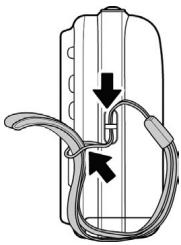
natural_image
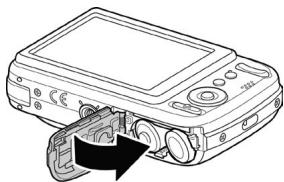
Diagram of a device with two curved connectors and directional arrows indicating movement or force (no text or symbols)Inserting the Batteries
Follow these instructions to insert the batteries into the battery/memory card compartment.
-
If the batteries are already installed, make sure to power off the camera before removing and inserting recharged or new batteries.
-
Open the battery/memory cardcompartment at the bottom of the camera as illustrated.
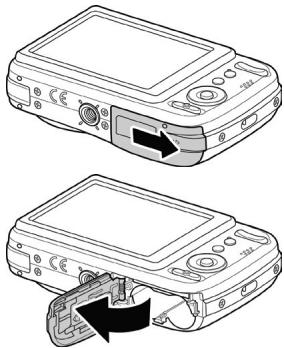
natural_image
Two line drawings of a digital camera module with an arrow indicating the open lid (no text or symbols present)- Insert the batteries into the compartment with correct orientation as illustrated.
natural_image
Line drawing of a computer monitor with two ports and directional arrows indicating movement (no text or symbols)- Close and secure the battery/memory card compartment.
natural_image
Line drawing of a digital camera module with an open lens and internal components (no text or symbols)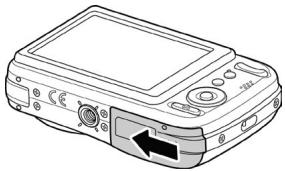
natural_image
Line drawing of a digital camera with an open lid and control panel (no text or symbols)Inserting an SD/SDHC Memory Card
It is highly recommended that the camera storage is expanded by inserting a SD or SDHC memory card. These memory cards are available at most consumer store and online locations.
-
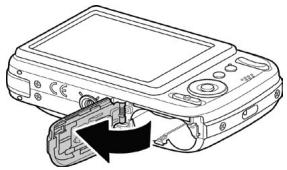
Make sure to power off the camera before proceeding. Inserting the memory card while powered on may damage the card and camera.
-
Open the battery/memory card compartment at the bottom of the camera.
-
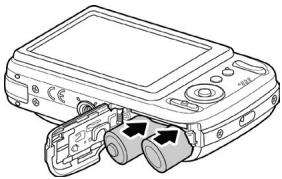
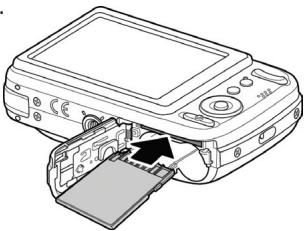
Insert the SD/SDHC card into the memory card slot with the metallic connectors facing the front side of the camera as illustrated below.
-
Push the SD/SDHC card into the memory slot until it clicks into place. If the card does not click into place, repeat the previous step to ensure proper orientation.
-
Close the battery/memory card compartment.
natural_image
Line drawing of a handheld electronic device with a black arrow indicating a component or insertion (no text or symbols present)
The 720p video recording capability of this camera requires a class 6 (High Speed) SD/SDHC memory card.
- To remove the SD/SDHC card
- Make sure to power off the camera before proceeding. Removing the memory card while powered on may damage the card and camera.
- Open the battery/memory cardcompartment.
- Gently push the card until it clicks and pushes our of position.
- Carefully pull out the card.
natural_image
Line drawing of a digital camera module with an open lid and internal components (no text or symbols)2. Initial Settings
When the camera is powered up for the first time, please set the display language and date & time.
Setting the Language
- Use the 4-way navigation control to move through the selections.
- Highlight the desired language and press the OK button OK to select.
Setting the Date & Time
- Use the 4-way navigation control to move through the selections and to change the setting values.
- Press OK button OK when finished. This will save your date and time settings.
- If necessary, press Menu button ☐ Menu to close the menu.
At this point, the camera settings are set to the default automatic mode and is ready to take photos and videos.
Modes
This camera has a three mode selector switch. The different modes are:
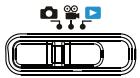
natural_image
Pure diagram of a stylized vehicle with camera, video, and play icons above it (no text or symbols)Photo Mode
- Slide the mode switch to [ ] take photos and record audio clips by selecting Voice REC from scene modes.
Video Mode
- Slide the mode switch to [ 😊] record videos.
Playback Mode
- Slide the mode switch to [▶] view and edit captured images or playback videos and audio clips.
The recording of voice memo attached to images is also available in this mode.
3. Taking Photos
This camera is designed to make the experience of taking photos simple and quick. It's Auto mode feature will optimise the internal settings so that in most situations, it can take photos with ease. This camera also has additional modes and features that extend the capabilities for the more experienced user.
- Power on the camera by pressing the Power button ⏻☐.
- Slide the Mode switch to Photo mode [ ]
- Frame the shot using the focus bracket on the LCD monitor.
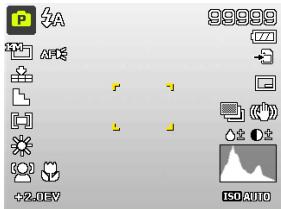
text_image
99999 ISO AUTO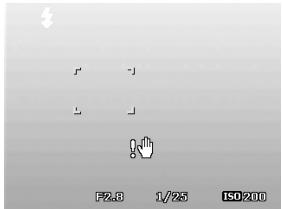
text_image
F2.8 1/25 ISO200-
Lightly pressing the Shutter button down to the halfway position will start the automatic focus and adjustments to the exposure level. When the camera has successfully completed this automatic routine, the focus bracket will turn green. If the automatic focus and exposure routine is not successful, the bracket will turn red. If this occurs, simply release the shutter and repeat this step until the bracket turns green. In some situations, lighting and contrast may be insufficient for the camera to successfully complete the auto focus and exposure level routine. If this occurs, try better lighting.
-
Pressing the Shutter button ⏻ down fully will take the photo. If you take the photo when the bracket is red, the focus and exposure may not be correct.
If the shake warning icon 🎨 appears, hold the camera steadily, with your arms at your side or use a tripod to stabilize the camera to reduce the risk of blurred photos.
4. Using the Function Menu
The Function Menu is used to quickly adjust basic capture settings while in Photo and Video mode. In Photo mode, the Function menu displays the last 6 scene modes used as well as allow changes to be made in resolution and file compression quality settings, (EV compensation, Auto White Balance (AWB), ISO settings, Metering, and Color mode may be available for different scene modes). In Video mode, the function menu displays and allows changes to be made to Video resolution setting, AWB, Metering, and Color mode.

FUNC.
- Press the FUNC button of your camera to launch the Function Menu.
-
Press the FUNC button again to close the menu.
-
The Menu bar displays the current status of the camera settings. Only the available functions for the settings are shown as icon on the menu bar.
- The available options for each item on the menu bar are shown in the Menu options.
- Use the 🎨 or ↓ key to move through the menu selections then press the OK button

to save and apply the changes.
Menu Options
Menu Bar
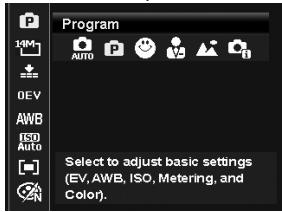
text_image
Program Select to adjust basic settings (EV, AWB, ISO, Metering, and Color).5. Playback
Playback the photos, video and audio clips on the LCD screen.
Viewing in Single Navigation
The Single navigation mode displays the image one by one on the LCD monitor. To view images/videos/audio clips, follow the steps below.
- Slide the Mode switch to Playback mode ▶.
- The camera's LCD screen with display an image. To understand the icons and other information on the screen, please see "Photo Mode Screen Layout" in the electronic User Manual on the software CD-ROM.
Still Image
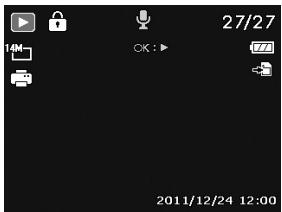
text_image
27/27 OK : ▶ 2011/12/24 12:00-
Use the 🎨 or ↓ keys to view next/previous image/video/audio.
-
To play a movie or audio clip, press the OK button OK.
6. Using the Setup Menu
You can access the Setup menu whether you are in Record or Playback mode.
The Setup menu allows to configure general camera settings.
- To enter the Setup Menu:
- Press Menu button ☐ Menu to launch the Record/Playback Menu.
- Use the 🎨 or ↓ keys to switch the menu tab to Setup menu.
- Use the |0| or [●] Ⓧ keys to move through the menu selections.
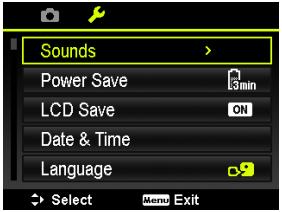
text_image
Sounds Power Save LCD Save ON Date & Time Language Select Menu Exit-
To select an item, press the OK button Ⓞ or ↓ key.
-
Change the submenu settings using the 4-way navigation control.
-
Press the OK button Ⓞ to save and apply settings.
Getting Help
Should you have a technical support question or your HP Digital Camera require service within the warranty period, please contact the original point of purchase or an authorized HP reseller in your country. If service is not available at those locations, please contact an HP Branded Product warranty agent from the support contact list provided below. A service agent will work with you to troubleshoot your issue and if necessary, issue a Return Material Authorization (RMA) number in order to replace your HP Branded Product. For warranty claims, you will be required to provide a copy of your original dated sales receipt as proof of purchase and the issued RMA number. You will be responsible for shipping charges when shipping the product to the service center. The service agent will provide you with an address and you will also be responsible for any shipping charges to the warranty service center. Once your product is received by this service center, a replacement unit will be shipped back to you typically within 5 business days.
| Contact/phone Support: | |
| Language | Contact/phone Support: |
| 中文 | simp.chinese@hpodd.com |
| trad.chinese@hpodd.com | |
| Deutsch | deutsch@hpodd.com |
| Nederlands | hollands@hpodd.com |
| English | english@hpodd.com |
| Español | espanol@hpodd.com |
| Français | francais@hpodd.com |
| Italiano | italiano@hpodd.com |
| 日本語 | nippon@hpodd.com |
| 한국어 | korean@hpodd.com |
| Português | portugues@hpodd.com |
| Svenska | svensk@hpodd.com |
| Contact/phone Support: | |||
| Country | Language | Number | |
| Europe Region (EMEA) | |||
| België | Nederlandsk/ Deutsch | + 32 2700 1724 | |
| Deutschland | Deutsch | + 49 6950073896 | |
| España | Español | + 34 914533458 | |
| France | Français | + 33 171230454 | |
| Ireland | English | + 353 1850882016 | |
| Italia | Italiano | + 39 269682189 | |
| Nederland | Nederlandsk | + 31 202015093 | |
| Schweiz | Deutsch/ Français/ Italiano | + 41 18009686 | |
| UK | English | + 44 2073652400 | |
| North America | |||
| United States | English | 1.866.694.7633 | |
| Canada | English and Français | 1.866.694.7633 | |
| Country | Language | City | Number |
| México | Español | Mexico City | 52.55.1204.8185 |
| Guadalajara | 52.33.1031.3872 | ||
| Monterrey | 52.81.1107.2639 | ||
| Venezuela | Español | Caracas | 58.212.335.4574 |
| Colombia | Español | Bogota | 57.1.508.2325 |
| Perú | Español | Lima | 51.1.705.6232 |
| Chile | Español | Santiago | 55.11.5504.6633 |
| Brasil | Português | Sao Paolo | 55.11.5504.6633 |
| Argentina | Español | Buenos Aires | 54.11.6091.2399 |