XR-3503MK2 - Autoradio SONY - Notice d'utilisation et mode d'emploi gratuit
Retrouvez gratuitement la notice de l'appareil XR-3503MK2 SONY au format PDF.

| Type d'appareil | Autoradio cassette |
| Bandes radio | FM / MW / LW |
| Lecture cassette | Oui |
| Alimentation | 12 V DC (courant continu) |
| Compatibilité cassette | Standard |
| Contrôle du volume | Manuel |
| Réglage des stations | Manuel |
| Sortie audio | Mono |
| Connectique | Entrée antenne, sortie haut-parleur |
| Dimensions | Standard DIN simple |
| Poids | Non précisé |
| Fonction mémoire | Non précisé |
| Affichage | Analogique |
| Année de fabrication | 1996 |
| Marque | Non précisé |
| Modèle | Non précisé |
FOIRE AUX QUESTIONS - XR-3503MK2 SONY
Questions des utilisateurs sur XR-3503MK2 SONY
0 question sur cet appareil. Repondez a celles que vous connaissez ou posez la votre.
Poser une nouvelle question sur cet appareil
Téléchargez la notice de votre Autoradio au format PDF gratuitement ! Retrouvez votre notice XR-3503MK2 - SONY et reprennez votre appareil électronique en main. Sur cette page sont publiés tous les documents nécessaires à l'utilisation de votre appareil XR-3503MK2 de la marque SONY.
MODE D'EMPLOI XR-3503MK2 SONY
FM/MW/LW Cassette Car Stereo
Operating Instructions EN
Instrukcja ob sugi PL
Instrukcja za eksploataciBG
Haszn-lati AmutatU H
Instrukcja po qkspluataci RF
For installation and connections, see the supplied installation/connections manual.
Informaci o instalacji i pod ± czeniu naleoy szukaE w za ± czonej instrukcji instalacji/pod ± czania.
Za instalirane i svßrzvane na aparata, izpolzuuvajte priloøeniña narßhnik.
A kÉsz, lÉk, zembehelyezÉsÉril és csatlakoztat-s-rÜl rÉszletes t-jÉkoztat-st tal-l az (zembehelyezEsi/catlakoztat-si 'tmutatÜban.
Pered ustanovkoj i podkloheniami obratites' k preragaemoj instrukcii po ustanovke i podklohenice.
XR-3503MK2
© 1996 by Sony Corporation
Features
General
- Detachable-front panel enables you to take the front panel away with you when you leave your car (page 4).
- Caution alarm will be activated if you turn off the ignition key without removing the front panel from the unit.
- Built-in power amplifier (max. output: 20W × 4ch ) enables you to enjoy a 4-speaker system.
- Digital 24-hour clock provided (page 5).
Cassette player section
- ATA (Automatic Tuner Activation) for automatically turning on the tuner while fast-forwarding or rewinding a tape (page 6).
Tuner section
- Up to 30 stations can be preset: 18 stations on FM, 6 stations each of MW and LW.
Automatic Memory function stores a total of 30 stations in memory quickly and easily (page 7).
Precautions
- If your car is parked in direct sunlight resulting in a considerable rise in temperature inside the car, allow the unit to cool off before operating it.
- If no power is being supplied to the unit, check the connections first. If everything is in order, check the fuse.
- If no sound comes from the speakers of a 2-speaker system, set the fader control to the centre position.
- If your car is equipped with a power antenna, note that it will be automatically extended while the unit is operating.
If you have any questions or problems concerning your unit that are not covered in this manual, please consult your nearest Sony dealer.
Notes on Cassettes
Cassette care
- Do not touch the tape surface of a cassette, as any dirt or dust will contaminate the heads.
- Keep cassettes away from equipment with built-in magnets such as speakers and amplifiers, as erasure or distortion of the recorded tape could occur.
- Do not expose cassettes to direct sunlight, extremely cold temperatures, or moisture.
- When the tape is played back for a long period, the cassette shell may become warm because of the built-in power amplifier. This is not a sign of a malfunction.
Notes on Cassette Deck Tape Heads
- Long use of cassette tapes contaminates the tape head causing poor sound quality or complete sound dropout. Therefore, we recommend cleaning the tape head once a month or so with the separately available Sony Cassette Cleaning Set. If the sound does not improve after using a cleaning cassette, please consult your nearest Sony dealer.
- In case of old or inferior cassette tapes, the tape head gets contaminated much more quickly. Depending on the tape, one or two playbacks may cause poor sound.
Cassettes longer than 90 minutes
The use of cassettes longer than 90 minutes is not recommended except for long continuous play. The tapes used for these cassettes are very thin and tend to be stretched easily. Frequent playing and stopping of these tapes may cause them to be pulled into the cassette deck mechanism.
Table of Contents
Detaching and Attaching the Front Panel. 4
Setting the Clock 5
Cassette Player Operation
Listening to Tape Playback 5
Ejecting the Cassette 5
Fast-winding the Tape 6
Radio Reception during Fast-forwarding or Rewinding of a Tape
— ATA (Automatic Tuner Activation) Function 6
Radio Reception
Searching for Stations Automatically Automatic Tuning 6
If FM Stereo Reception is Poor
— Monaural Mode 6
Tuning in by Adjusting the Frequency
— Manual Tuning 7
Memorizing Stations Automatically
— Automatic Memory Function 7
Memorizing Only the Desired Stations 7
Receiving the Memorized Stations 7
Other Functions
Adjusting the Sound Characteristics 8
Enjoying Bass and Treble at Low Volume - Loudness Function 8
Muting the Beep Tone 8
Maintenance 8
Dismounting the Unit 9
Button Locations 10
Specifications 11
Troubleshooting Guide 12
EN
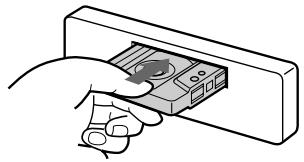
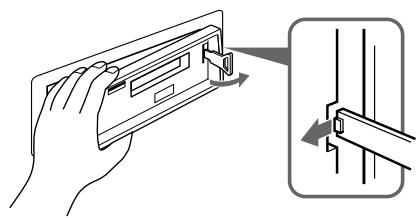
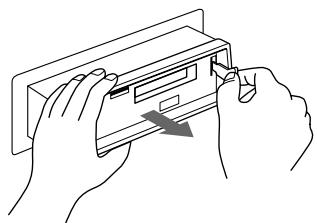
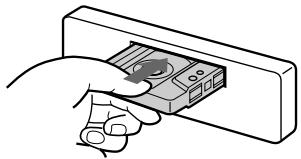
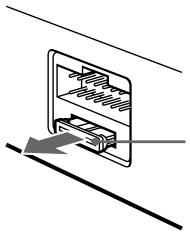
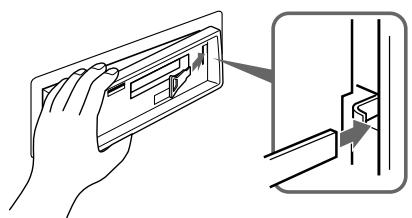
Detaching and Attaching the Front Panel
The front panel of this unit can be detached in order to prevent the unit from being stolen.
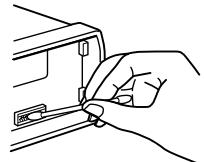
Detaching the Front Panel
Before detaching the front panel, be sure to press the button first. Then press the RELEASE button to open up the front panel and detach the panel by pulling it towards you as illustrated.
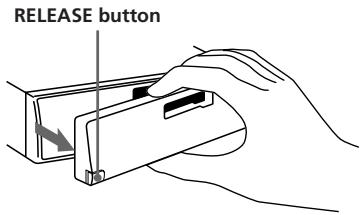
Be sure not to drop the panel after detaching it from the unit.
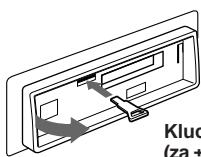
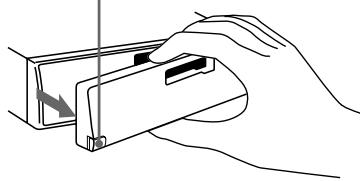
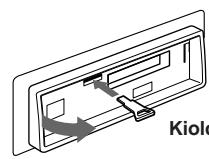
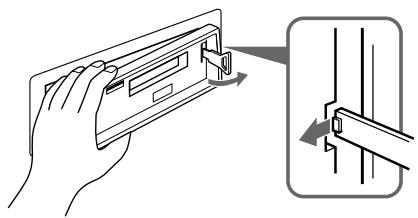
Attaching the Front Panel
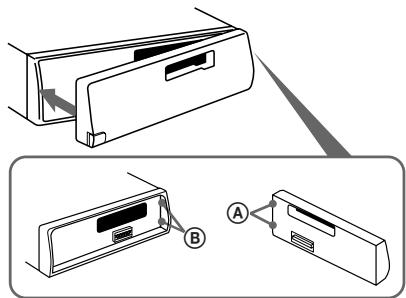
Apply the right side of the front panel to the unit by attaching part A of the front panel to part B of the unit as illustrated, then swing the left side into the unit until it clicks.
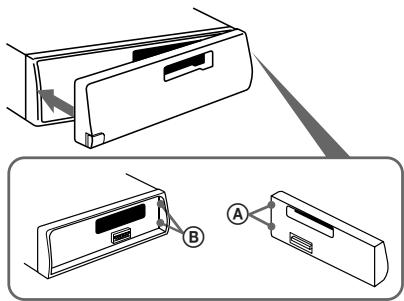
Notes
- Make sure that the front panel is the right way up when attaching it to the unit as it cannot be attached upside down.
- Do not press the front panel hard against the unit when attaching it to the unit. It can easily be attached by pressing it lightly against the unit.
- When you carry the front panel with you, put it in the supplied front panel case.
- Do not press hard or give excessive pressure to the display windows of the front panel.
-
Before removing the front panel, be sure to turn the power off. However, if you press the RELEASE button to detach the panel while the unit is still turned on, the power will be automatically turned off in order to protect the speakers from being damaged.
-
Do not expose the front panel to direct sunlight, heat sources such as hot air ducts or leave it in a humid place. Never leave it on the dashboard etc. of a car parked in direct sunlight where there may be a considerable rise in temperature inside the car.
Caution alarm
If you turn the ignition key to the OFF position without removing the front panel, the caution alarm will be activated and a beep tone will be heard for a few seconds.
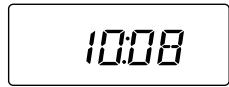
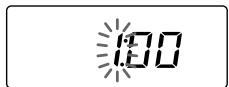
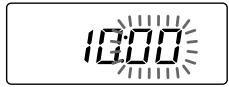
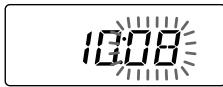
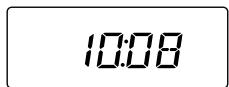
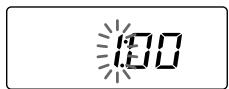
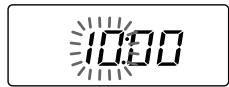
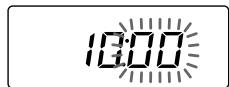
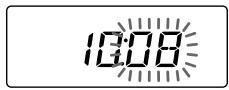
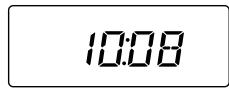
Setting the Clock
The clock has a 24-hour digital indication.
For example, setting it to 10:08
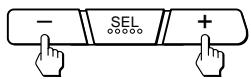
1 Display the time. (Press the button during unit operation.)
2 Press the O button for more than two seconds.
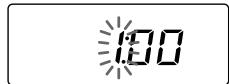
The hour digit(s) blinks.
Set the hour digits.
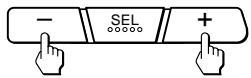
(to go back) (to go forward)

3 Press the button momentarily.
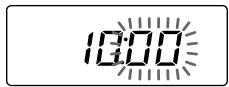
The minute digits blink.
Set the minute digits.
(to go back) (to go forward)

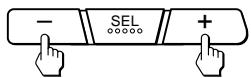
4 Press the DSPL button momentarily.
The clock activates.
Note
The clock cannot be set unless the power is turned on. Set the clock after you turn on the radio, or during tape playback.
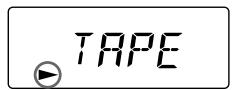
Cassette Player Operation
Listening to Tape Playback
After inserting the cassette, playback will start automatically.
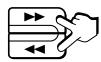
To change the tape direction, press both the and the buttons at the same time.

Indication of Tape Transport Direction
The side facing up is being played.

The side facing down is being played.
Tape playback automatically changes direction at the end of the tape.
Note
Before turning off the unit, eject the tape to avoid tape damage.
Ejecting the Cassette
Press the 串 button to stop playback and eject the cassette.
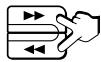
Fast-winding the Tape
| Direction indicator* | To advance | To rewind |
| ▲ | ← | ← |
| ▲ | ← | → |
To resume playback, press the other fast-winding button partially until the locked button is released.
- The or indicator will flash while fast-winding the tape.
EN
Radio Reception during Fast-forwarding or Rewinding of a Tape
- ATA (Automatic Tuner Activation) Function
Press the ATA button during playback. "ATA" appears on the display.
When fast-forwarding or rewinding with the or button, the tuner will turn on automatically.
Radio Reception
Searching for Stations Automatically
Automatic Tuning
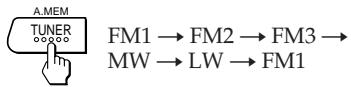
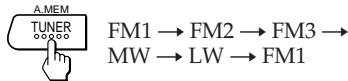
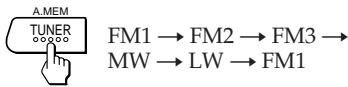
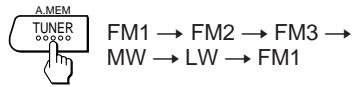
1 Select the desired band.

FM1 FM2 FM3
MW LW FM1
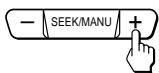
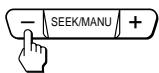
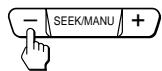
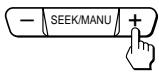
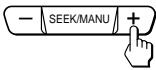
2 Press either side of the SEEK/MANU button momentarily to search for the next station (automatic tuning).
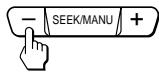
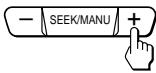
For lower frequencies
For higher frequencies
The scanning stops when a station is received. Press either side of the button repeatedly until the desired station is received.
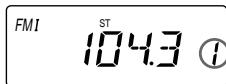
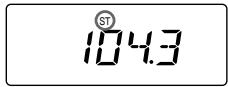
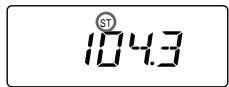
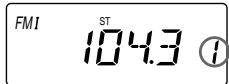
When an FM stereo program with a sufficient signal strength is tuned in,
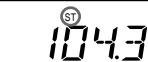
the "ST" indication will appear.
To avoid the automatic tuning from stopping on stations too frequently (local seek mode), press the SENS button momentarily to get the "LCL" indication.
Only the stations with relatively strong signals will be tuned in. The local seek mode functions only when the automatic tuning is in operation.
If FM Stereo Reception is
Poor — Monaural Mode
Press the SENS button momentarily. "MONO" appears on the display.
The sound will improve, but it will become monaural.
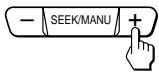
Tuning in by Adjusting the Frequency — Manual Tuning
1 Select the desired band.
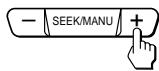
2 Press and hold either side of the SEEK/ MANU button.
Release the button when the desired station is received.
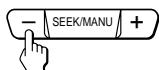
For lower frequencies
For higher frequencies
PREVENT ACCIDENTS!
When tuning in during driving, use the automatic tuning and the memory preset tuning instead of the manual tuning.
Memorizing Stations Automatically
Automatic Memory Function
Stations with the clearest reception are automatically searched and memorized on each band (FM1, FM2, FM3, MW and LW). Up to 6 stations on each band can be stored on the preset number buttons 1 to 6 in the order of band frequency.
1 Select the desired band.
2 Press the TUNER/A.MEM button for more than two seconds.

The unit will be start scanning the selected band and memorize the tuned stations on the preset number button 1 through 6 automatically.
Memorizing Only the Desired Stations
1 Select the desired band.
2 Tune in the station which you wish to store on the preset number button.
3 Press and hold the desired preset number button (ATA 1 to 6) for about two seconds until you hear a beep tone.
The number of the pressed preset number button appears in the display window.
Up to 6 stations on each band (FM1, FM2, FM3, MW and LW) can be stored on the preset number buttons in the order of your choice. Therefore, 18 stations can be memorized on FM.
If you try to store another station on the same preset number button, the previously stored station will be erased.
Receiving the Memorized Stations
1 Select the desired band.
2 Press momentarily the preset number button (ATA to 6) on which the desired station is stored.
Note
If you press the preset number button for more than two seconds, the currently received station will be memorized. To receive the previously memorized station, make sure that the preset number button is pressed only momentarily.
Other Functions
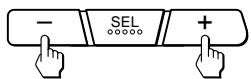
Adjusting the Sound Characteristics
1 Select the item you want to adjust by pressing the button repeatedly.
VOL (volume) BAS (bass) TRE (treble) BAL (balance) FAD (fader) VOL (volume)
2 Adjust the selected item by pressing either the - or + button.
Adjust within three seconds after selecting. (After three seconds the button will again serve as volume control button.)
Enjoying Bass and Treble at Low Volume
— Loudness Function
Press the LOUD button. "LOUD" will appear on the display.
Bass and treble will be boosted. To cancel, press again.
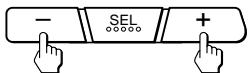
Muting the Beep Tone
Press the 5 button while pressing the SEL button.
To reactivate the beep tone, press these buttons once more.
Maintenance
Fuse Replacement
When replacing the fuse, be sure to use one matching the amperage rating stated on the fuse. If the fuse blows, check the power connection and replace the fuse. If the fuse blows again after replacement, there may be an internal malfunction. In such a case, consult your nearest Sony dealer.
Warning
Never use a fuse with an amperage rating exceeding the one supplied with the unit as this could damage the unit.
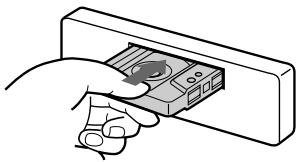
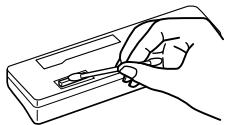
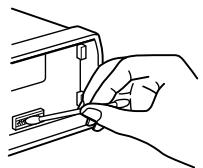
Cleaning the Connectors
The unit may not function properly if the connectors between the unit and the front panel are not clean. In order to prevent this, open the front panel by pressing the RELEASE button, then detach it and clean with a cotton swab dipped in alcohol. Do not apply too much force. Otherwise, the connector may get damaged.
Main unit

Back of the front panel
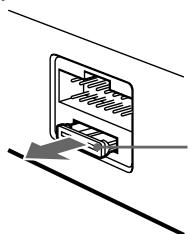
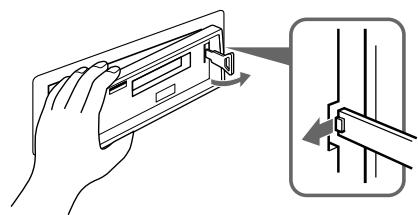
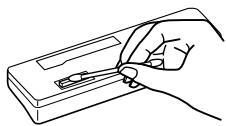
Dismounting the Unit
1
Release key (supplied)
2

3
4

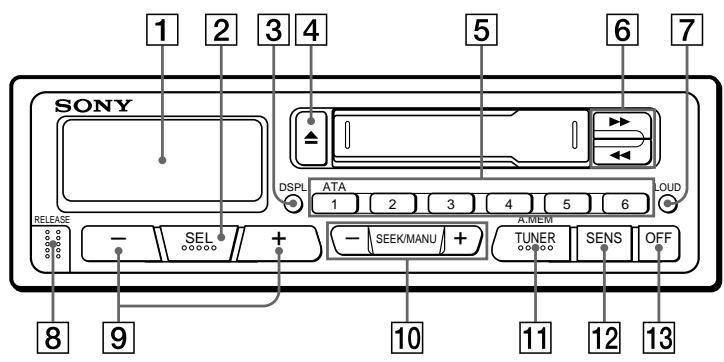
Button Locations
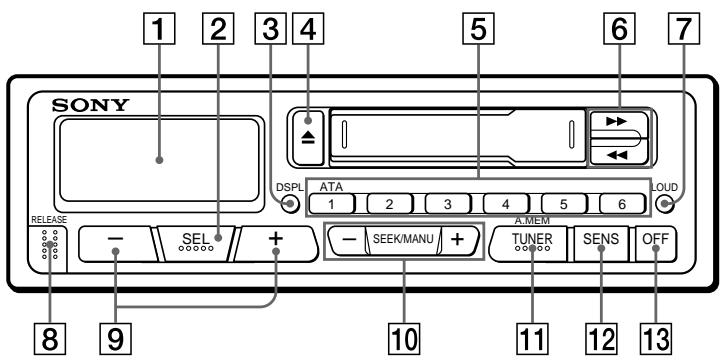
EN
Refer to the pages in for details.
1 Display window
SEL (control mode select) button ⑤
DSPL (display mode change/time set) button ⑤
4 (eject) button 5
During radio reception: Preset number buttons
During tape playback: ATA 1 ATA (Automatic Tuner Activation) button 6
(fast winding)/DIR (tape transport direction change) buttons
7 LOUD (loudness) button 8
8 RELEASE(front panel release) button 46
9 - + (volume/bass/treble/ balance/fader control) buttons ⑤⑧
10 SEEK/MANU buttons 67
11 TUNER/A.MEM (radio on • band select/ automatic memory) button 67
12 SENS (sensitivity adjust) button 3
13 OFF button 4
Specifications
Cassette player section
Tape track 4-track 2-channel stereo
Wow and flutter 0.13% (WRMS)
Frequency response 30 - 15,000Hz
Signal-to-noise ratio 55 dB
General
Output lead Power antenna relay
control lead
Tone controls Bass ± 8 dB at 100Hz
Treble ± 8 dB at 10kHz
Power requirements 12 V DC car battery
Approx. 186× 57× 170mm (w/h/d)
Mounting dimension Approx. 182× 53× 155mm
(w/h/d)
Mass Approx. 1.2kg
Supplied accessories Parts for installation and
connections (1 set)
Front panel case (1)
Tuner section
FM
Tuning range 65.0-74.0 MHz
87.5-108.0MHz
Antenna terminal
External antenna connector
Intermediate frequency
10.7 MHz
Usable sensitivity
12 dBf
Selectivity
70 dB at 400 kHz
Signal-to-noise ratio
65 dB (stereo),
68 dB (mono)
Harmonic distortion at 1kHz
0.5% (stereo),
0.3% (mono)
Separation
35 dB at 1 kHz
Frequency response
30 - 15,000Hz
Capture ratio
2 dB
MW/LW
Tuning range
MW:531-1,602kHz
LW:153 - 281kHz
Antenna terminal
External antenna connector
Intermediate frequency
450 kHz
Sensitivity
MW:30 V
LW:50~ V
Power amplifier section
Outputs
Speaker outputs
(sure seal connectors)
Speaker impedance
4-8 ohms
Maximum power output 20W× 4 (at 4 ohms)
Design and specifications are subject to change without notice.
EN
Troubleshooting Guide
The following checklist will assist in the correction of most problems which you may encounter with your unit.
Before going through the checklist below, refer to the connection and operating procedures.
General
| Problem | Cause/Solution |
| No sound | ·Adjust the volume with the + button. ·Set the fader control to the centre position for 2-speaker systems. |
| Indications do not appear in the display window. | Remove the front panel and clean the connectors. See “Cleaning the Connectors” of “Maintenance” for details. |
Tape playback
| Problem | Cause/Solution |
| Playback sound is distorted. | Contamination of the tape head. → Clean the head. |
Radio reception
| Problem | Cause/Solution |
| Preset tuning is not possible. | Memorize the correct frequency. The broadcast is too weak. |
| Automatic tuning is not possible. | The broadcast is too weak.→Use the manual tuning. |
| The "ST" indication flashes. | Tune in precisely. The broadcast is too weak.→Press the SENS button to enter the MONO mode. |
Cechy indywidualne
OgUlne
Zdejmowana przy wsiadaniu z samochodu (strona 4).
- Alarm ostrzegawczy w ±cza sil, joeliy wy ±czy o sil kluczyk zap onu bez wyjcia przykBci zianki urz±dzenia.
Wbudowany wzmacniacz mocy (maksymalnie na wyj ciu 20W× 4 kana y) pozwala na s uchanie poprzej cztery g o niki.
- Radio wyposaone w cyfrowy zegar 24 godzinny (strona 5).
Odtwaracz kaset magnetofonowych
- Funkcja ATA (AUTOMATIC TUNER ACTIVATION) w ±czaj±ca automatycznie radio podczas przywijania ta my w przyUd lub wty (strona 6).
Odbiornik radiowy
Uoytkownik ma moolio E zaprogramwomania 30 radiowych staci nadawczyh: 18 staci w zakresie FM i po 6 w zakresie MW i LW.
- Funkcja automatycznej pamilci sprzítu pozwala na zapisanie w prosty i szybki sposUb w pamilci sprzítu maksymalnie 30 pozycji staci radiowych (strona 7).
Zasady bezpieczOstwa
- Jeøeli samochUd by zaparkowany w mistrsbu bezpo rendio nas onecznionym, co spowodowa o znaczny wzrost temperatury w loro wnitrzu, naleoy poczekaE, aorz±dzenie ostygnie, zanim Rozpocznie sil loro uoytkowanie.
- Jeøeli odbiornik nie jest zasilany, naleøy napj Pierw sprawdziE wszystkie pod ±czenia. Gdy wszystko jest w porz±dku, proszi sprawdziE bezpiecznik.
- Jeøeli wuk adzie dwug o nikowym brak d'wilku zg o nikUw, naleoy przystawiE regulacj sygna Uw na po øenie rodkowe.
- Jeøeli posiadany przy PaÖstwa samoch Üd posiada system elektrycznie wysuwanej anteny, jest ona automatycznie wysuwana podczas uøytkowania odbiornika.
Jeøeli wyst±pi± pytania lub problemy在内的 rodzaju zwi±zane z uoytkowaniem niniejszego urz±dzenia, ktUrych nie opisano w niniejszej instrukcji obs ugi, naley zwrUciE si o poradí do najbloszego punktu sprzedaoy sprzítu Sony.
Uwagi odno nie kaset
Obchodzenie sil z kasetami
- Nie dotyka powierzchni ta my, gdyo brud lub kurz mog± zanieczy ci g owice.
Kasety trzymaE z daleka od urz±dzeO zwbudowanymi magnesami, jak g o niki lub wzmaciacze, gdyø nagranie na ta mie moe ulec skasowaniu lub zniekszta ceniu. - Nie naraøaE kaset na bezpo redni wp yw promiens i onecznych, niezmiernie niskich temperatur lub wilgotno ci.
- Jeøeli odtwarza sil ta mi przyez d uɒszy okres, obudowa kasety moe ulec nagrzaniu ze wzglídu na wbudowy wzmacniacz mocy. Nie jest to jegnak symptomem nieprawid owego funkcjonowania urz±dzenia.
Uwagi na temat g owic magnetofunukasetowego
- D ugie uwytkowanie kaset magnetofonowych powoduje zanieszczenie g owic magnetofonowych, co powoduje nisk±, niewyrañ± jako Š odbieranego dωwilku lub tez ca kowity zanik dωwilku. Dlatego tezialecamy czyszczenie g owic magnetofun kasetowego mniej wilcej raz na miesi±c wykorzystuj±c do tego celu dostípy w handlu komplet firmy Sony do czyszczenia g owic magnetofun kasetowego Sony Cassette Cleaning Set. Jeøeli"Justnake poprawi sil po wykonaniu czyszczenia przy uovciu kasety czyszcz±cej, jako Š odbieranego dωwilku, proszí zwrUciE sil do nabliószego punktu spredaoy prowadz±cego produkty firmy Sony.
- W przypadku starych ta m lub ta m o niskiej jako ci, g owice magnetofonu kasetowego ulegaj± o wiele szybciej zanieczyszczeniu. Wazole no ci od rodzaju ta my, jestnokrotne lub dwukrotne obtworzenia danej ta my moe spowodowaE nisk±, niewyra0n± niewyra0n± jako E odbieranego dwoilku.
Kasety o czasie odtwarzania powyoej 90 minut
Nie polecamy uzytkowania kaset o czasie odtwarzania powyoej 90 minut za wyj±tkiem sta ego odtwarzania. Ta my uwywane do tego rodzaju kaset s± bardzo cienkie i maj± tendencj do atewe wcy±gania sil. Czlste odtwarzanie i zatrzymywanie takich ta m moe spowodowaE wci±gnicie ich przyez mechanizm odtwarzacza.
Spistre ci
Zdejmowanie i zak adanie przydnaiej cianki ....4
Ustawianie zegara. 5
Obs uga odtwarzacza kaset magnetofonowych
S uchanie ta my 5
Wyjmowanie kasety 5
Szybkie przewijanie ta my 6
OdbiUr programu radiowego podczas
przewijania w przUd lub w ty
ä Funkcja ATA (Automatic Tuner
Activation = automatyczne w ±czanie
programu radiowego) 6
Odbi Radiowy
Automatyczne szukanie staci
Ä Automatyczne dostrajanie 6
Jeéeli odbiUr radiowy na pa maie FM jest s aby
Tryb odbioru monofonicznego 7
Strojenie przy regulacja czistotliwo ci
ä Ricnz dostrajanie 7
Automatyczne zapisywanie wAMIci sprzǐtu poźycji staci radiowych
Funkcja automatycznégo zapisywania w pamilci sprzǐtu. 7
Zapamilywanie wy ±cznie wybranych staci .... 8
Odbieranie zapisanych w pamilci staci 8
Inne funkcje
Regulacion Charakterystyki d6wiiku 8
Odbieranie niskich i wysokich tonUw nawet przy ma ejsileg osu
Funkcja LOUDNESS 8
Wy ±czanie sygnu u dwiikowego 8
Konserwacja 8
Demontao urz±dzenia 9
Lokalizacja kontrolek 10
Dane techniczne 11
Usuwanie usterek 12
PL
Zdejmownik i zak adanie przyzniej cianki
Aby zapobiec kradziey urz ± dzenia, moyna zdj ± E loro przyedni ± cianki.
Zdejmowanie przychodnej cianki
Przed zdjiciem przyedniej cianki naleoypamiita o naci ni ciu przycisk OFF. Nastipnie naleoynacisn ± przycisk RELEASEaby odklokowae przydni cianki i wyj ± j ± ci ± gn ± cdo siebie jak to zilustrowano ponieej.

Przycisk RELEASE
PL
UwaαaE,abyprzyzdejmowaniuprzednej cianki nie upu ciE jej.
Zak adanie przydnej cianki
Przymocowa praw ± stroní przychodnej cianki do radia przyez po ± czenie czi cis ④ przychodnej cianki z czi cis ⑧ radia, jak to zilustrowano poniej i przycisn ± E, a do zaskoczenia.

Uwagi
- UpewniE sil zawsze,czy przedni cianki przyk ada sil do radia odpowiedni ± stron ± gdyo odwrUcona Udo gUry nogami nie daje sil za ooyE
- Podczas zak adania przemnejci cianki nie naley jej mocno przyciskaE do直达. Mocona ± atwo za ooyE przyez tylko lekke przyci nilie do直达.
- Jeøeli przedni± ciankl zabiera sil ze sob±, naleoy w oeyE j± do przyznaczonego na ni± etui.
-
Nie wolno mocno naciskaE okienka konsoli przydnej cianki lub poddawaE go zbytniemu nasciskowy.
-
Przed wyjfciem przydnej cianki naleoy zawsze wy ± czyEzasilanie. Chociaq, gdy naci nie sil przyczisk RELEASE, aby odlblokowaE przydnizcianik, podczas gdy radio nadal jest w± zone,zasilanie wy ± czai simulatycznie, aby zapobiec uszkodzeniu g o nikUw.
- Przednej cianki urz±dzenia nie poddawaE bezpo redniemu dzia aniu promeni s onecznych lub rUde ciep a, takich jak gor±ce kana y wentylacyjne oraz nie pozostawiaE w miejscach o duoej wilgotno ci. Nigdy nie pozostawiaE jej na tabicyr odzdrzieczej itp. samochodu zaparkowanego bezpo rednio na s oOcu, kiedy to moe doe J do znacznego wroztu temperatry wewn±trz pojadzu.
Alarm ostrzegawczy
Jeøeli kluczyk zap onu przekrǐci sił do
po oøenia OFF bez zdjićia przyednej cianki,
w ±cza sil alarm ostrzegawczy i sygn
d'wilkowy bīdzie trwa przyez parl sekund.
Ustawianie zegara
Zegar pos uguje sil 24 godzinnym wy wietlaniem cyfrowym.
Przyk ad: ustawienie godziny 10:08 na zegarze
1 Wy wietlanie czasu. (Nacisin przycisk podczas uoytkowania urz ± dzenia.)
2 NaciskaE przyez ponad dwie sekundy przycisk DsPL.
Cyfra wskazuj ± ca godziny miga.
Ustawiège godzini.

(do przodu)

(doty u)
3 Nacisn±E przye chwiliy przycisk SEL
Cyfra wskazuj±ca minuty miga.
UstawiE minuty.
(do przodu)
(doty u)
4 Nacisin±E przye chwil przycisk DSPL.
Zegarulega w ± czeniu.
Uwaga
Nie moona ustawiaE zegara dopUki nie w ± czy sifzasilandia. Proszl ustawiaE zegar po upzrednim w ± czeniu radia lub po Rozpoczciu odtwarzania kasety magnetofonowej.
Obs uga odtwarzacza kaset magnetofonowych
S uchanie ta my
Po w oeniu kasety w ± cza sil automatyczne odtwarzanie.
AbyzmieniE kierunek odtwarzania ta my
proszl nacin±E jegnocze nie przycisk i przycisk

Wska*nik kierunku przesuwu ta my
Odtwarzana jest przydnia strona ta my.

Odtwarzana jest tylna strona ta my.
Kierunek odtwarzania jest automatycznie zmieiany, gdy zakoOczy sil odtwarzanie jedernej strony ta my.
Uwaga
Proszl wyj±E ta ml przed wy ±czeniem odbiornika, aby zapobiec jej uszkodzeniu.
Wyjmownikie kasety
Nacisin ± E przycisk w celu zatrzymania odtwarzania i wyjcia kasety.
Szybkie przywijanieta my
| Wska®nik kierunku odtwarzania* | W celu przejcia do przodu | W celu przejcia do tyu |
| ▲ | ||
| ▲ |
W celu wznowienia trybu odtwarzania proszí nacin±E drugi przycisk szybkiego przywijania do momentu zwolnienia wci niltego przycisku.
- Wska ^ nik lub wska ^ nik miga podczas szybkiego przyzewijania ta my.
PL
OdbiUr programu radiowego podczas przywijania w przyUd lub wty
Ä Funkcja ATA (Automatic Tuner Activation = automatyczne w ±czanie programu radiowego)
Podczas odtwarzania nacin±E przycisk ATA 1. → Na wy wietlaczu pojawia sil napis UATAa.
Podczas przywijania w przUd lub w ty przy pomocy przycisku lub odiUr programu radiowego w ± cza sil automatycznie.
Odbi Radiowy
Automatyczne szukianie stacji Å Automatyczne dostrajanie
1 WybraE po±dane pasmo.
2 Nacisin±E jegn± ze stron przycisku SEEK/MANU,aby w ±czyE szukanie staci (automatyczne dostrajanie).
Dla mniejszych czistotliwo ci
Dla wilkszych czistotliwo ci
Przeszukiwanie wy ± cza sil po uzyskaniu odbioru staci.
Aby nastawiE odbiornik na odbiUr konkretnej staci, naley wielokrotnie naciskaE jegn± ze stron przyczisku.
Jegoeli odiornik radiowy dostroi sil do programu stereofonicznego w zakresie FM o wystarczaj ± co monocnym sygnale,
w okienku konsoli povawia si napis USTá.
Aby automatyczne dostrajanie nie zatrzymywa o sil na poszczegUlnych stacjach zbyt czlsto (tryb LOCAL SEEK), naleoy przyez chwill nacin±E przycisk SENS, oeby na wy wietlaczu pojawi sil napis ÜLCLá.
Odiornik dostraja sil tylko do staci ze stosunkowo mucnymi sygna ami nadawczymi. Tryb LOCAL SEEK Funktionje tylko wtedy, gdy w ± czy o sil automatyczne dostrajanie.
Jeøeli odbiUr radiowy na pa mie FM jest s aby
ä Tryb odbioru monofoniczneo
Nacisin±E przyez chwil przycisk SENS. → Na wy wietlaczu pojawia si napis ÜMONOá.
Jako E dwiiku polepsza si, ale staje si on monofoniczny.
Strojenie przyż regulacja cz Istotliwo ci
ä Ríczne dostrajanie
1 WybraE po±dane pasmo.

FM1 FM2 FM3
MW LW FM1
2 Nacisn±E i trzymaE przyci ni'tym jegn± stroní przycisku SEEK/MANU.
Pu ciE przycisk w momencie uzyskania odbioru po±danej staci.
Dla mniejszych czlstotliwo ci
Dla wilkszych czistotliwo ci
ZAPOBIEGANIE WYPADKOM!
Podczas jazdy samochodem naley uywaE wy ± cznie strojenia automatycznego i przyciskUw do przy ± czania staci zapisanych w pamilci. Nie naley dostrajaE radia rlcznie!
Automatyczne zapisywanie w familci sprzltu pozycji stacji radiowych
ä Funkcja automatycznego zapisywania w pamilci sprzǐtu
Staje radiowe o wyra'nym odbiorze s ± automatycznie szukane i zapisywane w pamilci sprzltu dla ka dego psama (FM1, FM2, FM3, MW i LW). Maksymalnie moyna zapisaE dla ka dego psama 6 staci radiowych, ktUre bld ± obs ugiwane przycz przymiski 1 do 6, w kolejno ci odpowiadaj ± cej danyl cztstotliwo ciom radiwym.
1 WybraE po±dane pasmo.

FM1 FM2 FM3
MW LW FM1
2 NaciskaÊ przycisk TUNER/A.MEM przyezd uøej niö dwie sekundy.

Rozpoczyna sil automatycznie
przeszukiwanie pasma i w pamilci sprzǐtu
zapisywana jest poźycja danego
odbieranego dostrojonego programu
radiowego, pod jederm z przyciskǔw
oznaczonych cyframi 1 do 6.
Zapamietywanie wy ± cznie wybranych staci
1 WybraE poø±dane pasmo.

FM1 FM2 FM3 MW LW FM1
2 DostroiE do staci, ktUr± pragnie sil zapisaE w pamilci pod danym przyciskiem numerycznym.
3 NaciskaE wybrany przycisk numeryczny (od ATA 1 do 6) przyez oko o dwie sekundy, aø us ysz si fi sygna d'wiikowy.
Numer wybranego przycisku pojawia sil teraz w okienku konsoli.
FMI

W pamilo moana wed ug w asné goyboru zapisaE pod przyciskami numerycznymi po sze E staci dla kaðdego pasma (FM1, FM2, FM3, MW i LW). W zakresie FM moana zatem zprogramowa E 18 staci. Jeøeli pod przyciskiem, pod ktUrym by a juø zprogramOWANA stacja,usi uje sil zapisaE inn±, poprzedni zapis ulega skasowaniu.
Odbieranie zapisanych w pamíci staci
1 WybraE po±dane pasmo.

FM1 FM2 FM3 MW LW FM1
2 Nacisin±E krUtko dany przycisk numeryczny (od ATA 1 do 6) pod ktUrym zapisana zosta a szukana stacja nadawczka.
Uwaga
Jeøeli naciska sil przycisk numeryczny d uøejnio dwie sekund, dochodzi do zapisania w pamírciactualnie odbieranej staci. Aby w ±czyE odbiUr staci uprzednio zaprogramawanéj pod danym przyciskiem numerycznym, naleøy go przycisin±E tylko krUtko.
Inne funkcje
Regulacja charakterystyki d0wiłku
1 WybraE parametr, ktUry chce si uregulowaE, przyez wielokrotne naciskanie przycisku.
VOL (si a g osu) BAS (basy) TRE (tony wysokie) BAL (rUwnowaga) FAD (wzmacnianie sygna u) VOL (si a g osu)
2 Dokonaé regulazioni danego parametruprzej naciskanie przycisku - lub +
Regulacci parametrudokonaE w ci±gu trzech sekund po loro wybraniu. (Po trzech sekundach przycisk bldzie znowu s uoy jakeregulatorsi yg osu.)
Odbieranie niskich i wysokich tonUw nawet przy ma ej sileg osu ä Funkcja LOUDNESS
Nacisin±E przycisk LOUD .→ Wokienku konsoli pojawia sif napis ULOUDa (g o no). Basy i tony wysokie ulegaj+ wzmocnieniu. Dla wy ±czenia tej FUNCj naleoy ponownie nacisin±E przycisk.
Wy ±czaniesygnu u d'wiłk战略布局
Nacisn±E przycisk 5 jederocne naciskajc przycisk
PrzywrUcenie sygna u d ^0 wilkowergo uzyskuje sil przyzemponowne naci niwie powyoszych przyciskUw.
Konserwacja
Wymiana bezpiecznika
Podczas wymiany bezpiecznika naleo y
uwaøaÉ na w ciw± jegobci±øalno E, ktUra
podana jest na opakowaniu bezpiecznika.
Jeøeli bezpiecznik sil spali, proszí
skontrolowaE pod ±czenie dozasilandia i
wymieniE bezpiecznik. Jeøeli po wymianie
bezpiecznik sil ponownie przypali, w
urz±dzeniu wyst±pi ± usterka. W takim
wypadku proszí skontaktowaE sil z
najbliəszym punktem prowadz±cym produkty
firmy Sony.
Bepezicznik (15 A)
Uwaga
Nigdy nie stosowa bezpiecznik w, kt rych stopie obci ± alno ci pr ± dowej przyekracza obci ± alno bezpiecznika umieszczonego fabrycznie w odbiorniku, gdy moe to prowadzi do uszkodzenia sprzftu.
Czyszczeneni ± cznikUw
Urz±dzenie moe nie dzia aE poprawnie, jeoeli ±czniki pomildzy korpsem a przedni± ciank± nie s± czyste. Aby temu zapobiec, naleoy odkowaeE przedni± ciankl przy zaci naci nicié przycisku RELEASE, nestlpnie zdj±E j± i oczy ciE ±czniki przy pomocy wacika, ktury by uprozdnio lekko zwilonyw alkoholu. Nie naleoy zbyt silnie dociskaE.W prereciwnym wypadku moe doj E do uszkodzeniaz ±czeO.
Korpus radia
Ty przydnej cianki
Demontaø urz±dzenia
1
Klucz zwalnaj±cy (za ±czony)
2

3
4
Lokalizational kontrolek

SzczegU Uw szukaE na stronach w
PL
1 Okienko konsoli
2 Przycisk SEL (wybUr trybu kontrolnego) 58
3 Przycisk DSPL (zmiana trybu wy wietmania/ustawianie czasu) 5
4 Przycisk (wysuwanie kasety) 5
5 Podczas odbioru programUw radiowych: Przyciski numeryczne 7
Podczas odtwarzania ta m:
ATAPrzycisk ATA (automatyczne w ± czanie programu radiowego) 6
6 Przyciski (szybkie przyzewijanie)/ DIR (zmiana kierunku transportu ta my) 5
7 Przycisk LOUD (g o no 8
8 Przycisk RELEASE (odblokowanie przychodnej cianki) 48
9 Przyciski - + (Regulacja si y g osu/basUw/tonUw wysokich/ rUwnowagi/wzmacniania sygna Uw) 58
10 Przycisk SEEK/MANU 67
11 Przycisk TUNER/A.MEM (radio w ±czona • wybÜRasma/funkcja automatycznégo zapisywania w pamíci sprzítu) 67
12 Przycisk SENS (czu o Eodbiornika) 6
13 Przycisk OFF 4
Dane techniczne
Odtwaracz kaset magnetofonowych
fcieka ta my odtwarzacz
4-ciekowy,
2-g o nikowy,
sterofoniczny
Zniekszta cenia d ^d wilku (wskutek nier wnomiernego przesuwu ta my)
0,13% (WRMS)
Odpowied° czistotliwo ciowa
30 à 15.000 Hz
Odstip psofometryczny 55 dB
Odiornik radiowy
FM
Zakres strojenia 65,0 a 74,0 MHz
87,5 à 108,0 MHz
Antena Zewnltrzne z ± cze
antenowe
Czlstotliwo Epo rednia 10,7 MHz
12 dBf
Wybiorczo E
65 dB (stereo).
Odstlp psofometryczny
68 dB (mono)
Harmoniczne zniekszta cenie przy 1 kHz
0,5% (stereo)
0,5% (stereo)
0,3% (mono)
Rozdzielanie 35 dB przy 1 kHz
OWA
Odpowied° czlstotiwo ciowa
30 à 15.000 Hz
WspU czynnik przechwytu
2 dB
MW/LW
Zakres strojenia
MW:531a1.602kHz
LW:153a281kHz
Antena
Zewnitrzne z ±cze
Czlstotliwo Epo rednia
antenowe
Czuo E
MW: 30~ V
LW:50~ V
Wzmacniacz mocy
Wyjcia
Wyjcia dag o nikUw
(z ±czniki szczelne)
Impedancja g o nikUw
4 à 8 omUw
Maksymalne wyj cie mocy
20W× 4 (przy 4 omach)
OgUlne
PrzewUd wyj ciowy
PrzewUdzasilaj±cy
sterowanie anteny automatycznej
Regulacja barwy d'wilku
Basy ± 8 dB przy 100Hz
Tony niskie ±8 dB przy
Zapotrzebowanie mocy
10kHz
Zapotrzebowanie mocy
12 V DC z akumulatora
samochodowego (c
uziemieniu ujemnym)
Wymiary ok.
186× 57× 170mm
m - 1 0 ;
(d./wys./szer.)
Wymiary montaowe ok.
182× 53× 155mm
m - 1 0 ;
(d./wys./szer.)
Cilvarok.
1,2 kg
Za ±czone akcesoria
Za ± czone elementy
montaowe (1 komplet)
Etui na przydni± ciankl
(1)
Wygl±d i dane techniczneg mog± ulec zmianie bez uprzedzenia.
PL
Usuwanie usterek
Nastípuj±ca lista kontrolna moège okazaÉ sil przydatna do rozwī±zania wīkszo ci problemUw, ktÜre mog± wyst±piÉ podczas uøytkowania urz±dzenia.
Przed przyczytaniem ponioszej listy kontrolnej naleoyny przyczyaß instrukcj l montaʊ i obsugi.
OgUIne
| Usterka | Przyczyna/Usuwanie usterki |
| Brak d0wiiku | • WyregulowaÉ si òg osu przyciskiem +. • Proszl ustawiÉ regulator wzmocnienia syrna Üw w pozycji rodkowej dwug o nikowego systemu. |
| W okienku konsoli nie pojawiaz± sil wska0niki. | Zdj±É przydni± ciankí oczy ciÉ ±czniki. SzczegÜ Üw szukaÉ w czl ci ÜCzyszczeneni ±cznikÜw a w rozdziele ÜKonserwacjaám. |
Odtwarzanie ta m
| Usterka | Przyczyna/Usuwanie usterki |
| D®wilk odtwarzany z kasety jest znieksztá cony. | G owica jest zanieczyszczona. → Naleź y j± oczy ciÊ. |
PL
OdbiUr programUw radiowych
| Usterka | Przyczyna/Usuwanie usterki |
| Brak odbioru zapamiltanych staci. | • ZapisaÊ wAMIci w a ciw± czístotliwoÊ. • Sygna nadawczy jest za s aby. |
| Automatyczne dostrajanie nie jest moßliwe. | Sygna nadawczy jest za s aby. →Pos uøyÊ sil strojeniem rícznym. |
| Wska®nik ÜSTá miga. | • DostroiÊ dok adnie. • Sygna nadawczy jest za s aby. →Nacisin±Ê przycisk SENS, aby przyejÊ na tryb odbioru monofonicznero. |
Fibb jellemzik
jltal-nos tudnivalUk
Leveheti kezelilap, melyet mag-val vihet, ha kisz-II autUj-bUI (4. oldal).
Ha kikapcsolja a gy'jt-st, m nem t-volltja el a kEsz,Ik kezelilapj-t, 'gy aktiviz-IUdik a figyelmezteti funkciU.
A beEpttert erisiti (max. teljesItmEny: 20 W × 4 csatorna) lehetivE teszi 4-hangszUrUs rendszer alkalmaz-s.t.
A kEsz,IEk Ur-ja 24-Ur-s digit-lis kijelzivel rendelkezik (5. oldal).
MagnU
- Az ATA (Automatic Tuner Activation = Automatikus Rádio Aktivizálás) funkciú automatikusan bekapcsolja a r-diUt, ha ðn elire- vagy h-tracsEvEi egy kazett-t (6. oldal).
HangolU
- KÉsz, IÉkEn 30 adUt programozhat be: 18 ultrar
vidhull·m' (FM), 6 kzÉphull·m' (MW) És 6 hossz`hull·m' (LW) adUt. - Az Automatikus MemUria funkciU segltsEgEvel 30 r-diUadUt programozhat be egyszer'en Es gyorsan (7. oldal).
Biztons·gi elilr-sok
Ha autUj-t zi napfEnynek kitett helyen hagyta, s az autU belsi terEben felforrUsodott a levegi, hagyja leh'Ini a kEsz, I'Eket, sCsak ezut-n kapcsolja be.
Ha a kEsz,IEk nem kap -ramot, kErj,k ellenirizze elsz'r a csatlakoz-sokat, s ha ezeknEl nem tal- rendellenessEget, ellenirizze aBiztosltEkot.
- Ha nem j'n hang egy 2 hangsz'UrUs rendszerbil, -lltsa a hangszab-Iyoz'Ut a k'zEpsi -II-sba.
Ha kEsz, lEke motors antenn-val rendelkezik, gy az antenna automatikusan kiemelkedik Es kiegyenesedik a kEsz, lEk bekapcsol-sakor.
Amennyiben olyan kEdEsek vagy probEm-k mer,InEnek fel kEszJEkEt illetien, melyekre nem ny'jt eligazIt-st haszn-lati tmutatU, ggykErj, k forduljon a legk'zelebbi Sony m-rkakereskedih'z.
Tudnival k a kazett-kr
A kazett-k kezelEse
- Ne Erintse meg a kazett-ban a szalagot, mert az esetleg r-ker,1 szennyezidEsek Es a por hat-s-ra elpiszkolUdnak a fejek.
<gyeljen arra, hogy kazett-i ne ker.ljenek beEpllett m-gnest tartalmazU egysEgek (pl. hangszUrk vagy erisiti) k'zelEbe, ellenkezi esetben ugyanis elifordulhat, hogy a felvEtlet let'rlidik, ill. eltorzul. - Netegye ki kazett-it k'zvetlen napfEnynek, k's'n'sen alacsony himErsEkletnek, ill. p-r-nak.
Ha hossz' idin kereszt, I hallgat egy kazett-t, elfordulhat, hogy az felmelegszik. Ez azonban a beEpltt erislti hat-s-ra t'rtEnik, s nim jalent rendellenessEget.
Tudnival a szalagtov-bbit fejek tisztl-t-s-rUl
A szalagtov-bbitU fejek a kazett-k haszn-lata sor-n idivel elpiszkolUdnak, s ez gyenge hangminisEghez, ill. hangkiesEshez gezethet. EzErt javasoluk, hogy tiszlttsa meg a szalagtov-bbitU fejeket kb. havonta egyszer a szak,zletekben kaphatU Sony tisztlUkazetta segltsEgEvel. Ha a hangminisEg a tisztlUkazetta haszn-lata ut-n sem javulna, 'gy kErlk forduljon a legk'zelebbi Sony m-rkakereskedih^z.
- RÉgi, ill. rossz minisEg° kazett-k haszn-latakor hamarabb elpiszkolUdnak a szalagtov-bbltU fejek. llyen esetben m-r ak-r égy vagy kEt lej-tsz-s ut-n is romolhat a hangminisEg.
90 percesnEl hosszabb kazett-k
90 percesnEl hosszabb kazett-k haszn-lat-t kiz-rUlag hossz', folyamatos lej-tsy-skor javasoljuk. Ezek a kazett-k ugyanis k,I'n'sen vEkony szalaggal kEsInk, mely k'nnyen megnyIthat. Ha az ilyen szalagokat gyakran elinditj-k Es meg-Ilitj-k, elifordulhat, hogy a kEs,IEk becsipi a szalagot.
TartalomjegyzEk
A kezelilap levEtele Es vissahelyezEse ......... 4
Az Ura be-llit-sa 5
A magnú kezelÉse
Kazetta lej.tsz-sa 5
Kazetta kivEtele 5
GyorscsEvEIs 6
R-diUhallgat-s elire-, ill. h-tracsEvEIEs k'zben
ä ATA (Automatic Tuner Activation = Automatikus R-diU Aktiviz-I-s) funkciU .... 6
R-diUhallgat-s
Automatikus adUkeresEs
a Automatikus hangol-s 6
Gyenge FM-vEtel esetEn
aamOnU vEtel 6
Az adUk be-llt-sa finomhangol-ssal Manu-lis hangol-s 6
Az adUk automatikus beprogramoz-sa
ä Automatikus memUria funkciU 7
Kiv-lasztott adUk beprogramoz-sa 7
Beprogramozott adUk hallgat-sa. 7
EgyEbfunkciUk
Hangszin-szab-Iyoz-s 8
Magas- Es mEly hangok kiemelEse ak-r halk hangeri esetEn is
a Hangeri funkciU
A figyelmezteti jel lekapcsol-sa 8
A kEsz, lEk karbantart-sa 8
A kEsz.Ik kivEtele 9
A kEsz,IEk kezeligombjai 10
M'szaki adatok 11
HibakeresEs 12
A kezelilap levEtele Es visszahelyezEse
Az autUr-diU kezelilapj-t leveheti a kEs,IEkril Es mag-val viheti, megelizve ezzel a kEs,IEk esetleges ellop-s-t.
A kezelilap levEtele
A kÉsz, lÉk kezelilapj-nak levÉtele elitt ne felejtse el megnyomni az gombot. Ezut-n oldja ki a kezelilapot a RELEASE gomb megnyom-s-val, majd vegye le a kÉsz, lÉkril maga feIé h'zva, az -br-nak megfelelien.
RELEASE gomb
Figyeljen arra, hogy ne ejtse le a kioldott kezelilapot.
A kezelilap viss ZahelyezEse
Igazltsa oda a kezelilap jobb oldal-t a kEsz,IEkhez, 'gy, hogy a kezelilap A-val jel'lt pontja a kEsz,IEk B-vel jel'lt pontj-hoz illeszkedjen, (I-sd -bra), majd nyomja a kezelilapot a kEsz,IEkhez,amlg be nem pattan.
TudnivalUk
Figyeljen array, hoga a kezellapot a megafelei helyzbete -lltva helyezze vissza, fejel lefeIe ugyanis nem lehet beilieszteni a KEsz, IKbe.
- A kezelilap bepattint-sakor ne fejtsen ki eris nyom-st - a kezelilap ugyanis akkor is bepattan a helyEre, ha egEszen finoman nyomja hozz-a kEsz,Ikhez.
Ha a kezelilapot kiveszi a kEsz, IEkbl, helyezea a kEsz, IEk tartozEkakEnt sz-lltott tartUdobozba.
A kezelilap kijelzi ablak-ra eris nyom-st gyakorolni nem szabad.
Figyeljen arra, hogy a kezelilapotCsak az OFF gomb megnyom-sa ut-n vegye le a kEsz,IkriHa azonban erril elfelejtkezne,gy a kEsz,Ik a RELEASE gomb megnyom-sakor automatikusan kikapcsolUdk, megakad-Iyozva a hangszUrUk k-rosod-s.t.
- Ne tegy ki a kezelilapot K'zvetlen napfEnynek, hiforr-snak, - pl. forrU levegi kivezetics^vEnek - Es ne hagyja nyirkos helyen. Soha ne hagyja a kezelilapot a m'szerfalon, ha autUj-val napfEnyes helyen parkol, s annak belsi terEben felforUsodhat a levegi.
Figyelmezteti jelzEsek
Ha kikapcsolja a gyjt-st anElk,I, hogy elt-volltan-a kEsz,IEk kezelilapj,t,gy bekapcsol a figyelmezteti funkciU Es nEh-ny m-sodpercen kereszt,I figyelmezteti jeleket hallat.
Az Üra be-llIt-sa
Az Ura 24-Ur-s digit-lis kijelzivel rendelkezik.
Az Ura be-llit-sa pl. 10:08-ra
1 Az Úra kijelzÉse. (Kapcsolja be a kÉsz, lÉket, majd nyomaj meg a DSPL gombat.)
2 Nyomja le a DSPL gombot f'bb mint kEt m-sodpercen kereszt.1.
Ekkor villogni kezdenek az Ura karakterhelyei.
Jiltsa be a helyes Ur-t.
(h-tra)
(elire)
3 Nyomja meg r'viden a grombot.
Ekkor villogni kezdenek a perc karakterhelyei.
jlltsa be a helyes percet.
(elire)
(h-tra)
4 Nyomja meg r'viden a ^DSPL gombat.
Ekkor bekapcsol az Ura.
TudnivalU
Az · t Csak a kEsz, lEk bekapcsol-sa ut-n lehet be-llItani, be-llt-sa eltt teh-t mindig kapcsolja be ar-diUt, vagy kezdjen en lej-tszani egy kazett-t.
A magnû kezelèse
Kazetta lej·tsz·sa
A kazetta behelyezEse ut-n a kEsz, lEk automatikusan megkezdi a lej-tsz-st.
A lej-tsz-s ir-ny-nak megv-ltoztat-s-hoz nyomja meg egyszerre a Es a gombat.
A szalag lej.tsz-si ir-ny-nak kijelzEse

A kEsz, lEk a szalag felsi oldal-t j- tsza le.

A kEsz, lEk a szalag alsU oldaI-t j- tsza le.
Ha a szalag lej-rt, a kEsz,Ik automatikusan megv-Itoztatja a lej-tsz-si ir-nyt.
TudnivalU A szalag k-rosod-s-nak elker, IEsEre javasoljuk, hogy ne hagyja benne a kazett-t a kikapcsolt kEsz,Ikben.
Kazetta kivEtele
Nyomja meg a gombot. A kEsz,IeE ekkor befejezi a lej-tsz-st Es kiadja a kazett-t.
GyorscsEvEiEs
Ir-nyjelzi*
ElirecsEvEIs
H-tracsEveIes


A norm-I lej-tsz-s folytat-s-hoz nyomja meg az ellenkezi ir-ny' gyorscsEvEi gombot, amig ki nem oldUdkiz ak elizileg lenyomott gyorscsEvEi gomb.
* GyorscsEvElEs k'zben villog az ,ill. az ir-nyjelzi.
R-diUhallgat-s elre-, ill. h-tracsEvEIEs k^zben
ä ATA (Automatic Tuner Activation = Automatikus R·diÜ Aktiviz-I·s) funkciÜ
ATA
Nyomja meg lej-tsz-s k'zben az 1 gombot. A kijelzin ekkor megjelenik az UATAfélirat.
Ha gyorscsEvEiEse be kezd a ill. a gomb segItsEgEvel, a r-diU automatikusan bekapcsol.
R-diUhallgat-s
Automatikus adUkeresEs
Ä Automatikus hangol-s
1 jlltsa be a kiv-nt s-vot.

FM1 FM2 FM3 MW LW FM1
2 Az egyes adUk bekeresEsEhez nyomja meg a SEEK/MANU (keresEs/manu-lis) gomb valamelyik szEiEt (automatus hangol-s).

Alacsonyabb frekvenci-k ir-ny-ban
Magasabb frekvenci-k ir-ny-ban
A keresEs azonnal meg-II, mihelyt be-llltUdik egy adU. Nyomja le a gomb valamelyik szEIt t'bbsz'r egym-s ut-n addig, amg meg nem tal-lja a klv-nt adUt.
Ha a kEsz, IEk megfelei szint° FM sztereU programot hangolt be,
megjelenik az ÜSTá kijelzÉs.
Ha el akarja ker,Ini, hogy az automatikus hangol-s az 'sszes adUn-1 - beleErtve a t'I gyengEn foghatU adUkat - meg-IIjon, nyomja meg r'viden az LCL gombot, amg a kijelzin megjelenik az ULCLá felirat. A kEsz,IEk ekkor Ühelyi keresi ,zemmUdbaá (local seek mode) v-It.
A kEsz,IEk ekkorCsak azokat az adUkat hangolja be,melyektil viszonylag eris jelek Erkeznek.A helyi keresi, zemmUdcsak automatikus hangol-skor m'k'dik.
Gyenge FM-vÉtel esetEn
a MonU vEtel
Nyomja meg r'viden a gombot. A kijelzin ekkor megjelenik a UMONOa felirat. Az ad-st Iggy ugyanCsak monUban hallgathatja, m javul a hangminisEg.
Az adUk be-llit-sa finomhangol-ssal
Manu-lis hangol-s
1 illtsa be a kiv-nt s-vot.

FM1 FM2 FM3 MW LW FM1
2 Nyomja meg Es tartsa lenyomva a SEEK/ MANU gomb valamelyik szEiEt.
Engedje el a gombot a keresett adU vTelekor.

Alacsonyabb frekvenci-k ir-ny-ban
Magasabb frekvenci-k ir-ny-ban
ABALESETVESZ...LYELKER.L...S...RE!
Ha gezetEs k'zben kiv-n r-diUzni, az automatikus hangol-st, ill. a programgombokat haszn-ija Es ne vEgezzen manu-lis hangol-st.
Az adÜk automatikus beprogramoz-sa
ä Automatikus mem Üria funkci Ü
Ez a funkci automatikusan beprogramozza valamennyi s-von (FM1, FM2, FM3, MW s LW) a legjobban foghat ad kat. A k sz, ek\ minden egyes s-von 6 -llom-st t-rol a\ programogombok alatt, az ad k\ frekvenci-j-nak megfeleli sorrendben.
1 illtsa be a kiv-nt s-vot.

FM1 FM2 FM3 MW LW FM1
2 Nyomja meg Es tartsa lenyomva a TUNER/A.MEM gombat t'bb mint kEt m-sodpercen kereszt,I.

A kEsz.IEk ekkor vEgigkeresi a be-lllott s-vot Es automatikusan bet-rolja a behangolt adUkat az 1-6-os programgombok alatt.
Kiv-lasztott adUk beprogramoz-sa
1 illitsa be a kiv-nt s-vot.

FM1 FM2 FM3 MW LW FM1
2 Hangolja be azt az adUt, melyet t-rolni kiv-n egy programgomb alatt.
3 Tartsa lenyomva a kiv-nt programgombat (ATA 1 - 6) kb. kEt m-sodpercen kereszt, I, amlg sipjelet nem hall.
A lenyomott programgomb sz·ma ekkor megjelenik a kijelziablakban.
A kÉsz, lÉk minded egyes s-von (FM1, FM2, FM3, MW És LW) max. 6 -lom-st kÉpes t-rolni a programgombok alatt, az -n -lal meghat-rozott sorrendben. FM s-von teh-t 18 adÜt lehet beprogramozni.
Ha 'adUt prUb-l beprogramozni egy m-r Üfoglaltá programgombon, gy azzal kit'rla kör-bban beprogramoztott adUt.
Beprogramozott adUk hallgat-sa
1 jllitsa be a kiv-nt s-vot.

FM1 FM2 FM3 MW LW FM1
2 Nyomja le r`viden azt a programgombat (ATA 1 - 6), amely alatt beprogramozta a kiv-nt adUt.
TudnivalU
Ha t'bb mint kEt m-sodpercn kereszt I tartja lenyomva a programgombot, 'gy a kEsz, lEk bet-rolja az Epp vett adUt. Ha beprogramozott adUt kl\n\nkv\~n hallgatni, 'gy ,gyeljen arra, hogyCsak egEszen r'vid idre nyomja meg a programgombot.\n\n
EgyÈb funkciÎk
Hangszin-szab-Iyoz-s
1 V-lassza ki a gombismEtelt megnyom-s-val a mUdositani kiv-nt jellemzit.
VOL (hangeri) BAS (mÉly hangok) TRE (magas hangok) BAL (balansz) FAD (hangszin) VOL (hangeri)
2 A kiv-lasztott jellemzit a - , ill. a gomb segitsEgEvel mUdosilthatja.
A mUdosl-t-3 m-sodpercen bel,I vEgezze el, ennek lej-rt-val ugyanis a fenti gombok ismEt norm-I hangeriszab-lyozU gombkEnt m ^mk^~~ dnek.
Magas-És mÉly hangok kiemelÉse ak-r halk hangeri esetEn is
ä Hangeri funkciU
LOUD Nyomja meg a gombot. A kijelzin ekkor megjelenik a ULOUDa felirat.
A kÉsz, lÉk kiemeli a mÉly És a magas hangokat. Ha norm-l hangszlnnel klv-nja
folytatni a lej.tsz-st, nyomja le 'jra a LOUP gombot.
A figyelmezteti jel lekapcsol-sa
Tartsa lenyomva a gbot Es nyomja le k'zben a gbot.
Ha 'jra aktiv-lni kiv-nja a figyelmezteti jeleket, nyomja le 'jra a fenti gombokat.
A kEsz,IEk karbantart-sa
BiztoslitEkcsere
Ha kicserEli aBiztosItEkot,gyeljen arra, hogy azjbiztosItEkon felt,ntetett amper-ERTk megfeleIjen a REdi biztosItEk nEvleges
-ramerissEgEnk. Ha kiEgett aBiztosltEk, ellenirizze a t-pvezetEk csatlakoz-s-t, majd cserElje ki abiztosltEkot. Ha az jbiztoslitEk is kiEgne, gy annak valUszin'leg a kEsz,Ik belsi meghib-sod-sa az oka. Ebben az esetben kErlj, k forduljon a legk'zelebbi Sony m-rkakereskedih z.
BiztositEk (15 A)
FigyelmeztetEs
Soha ne haszn-jon olyanBiztosltEket, melynek nEvleges -ramerissEge meghaladja az eredetileg a kEsz, Ikhez adott biztosltEk nEvleges -ramerissEgEt, ezzel ugyanis k-roslthatja kEsz'IEkEt.
A csatlakozUk tisztlt-sa
A kEsz,Ik Es a kezelap k'z'tti csatlakozUk elpiszkolUd-sa akad-Iyozhatja a kEsz,Ik rendeltetEsszer° m'k'dEsEt. Ennek
elker, IEsEre oldja ki a kezelilapot a RELEASE gomb megnyom-s-val, emelje le a
kEsz,IEkril, majd tisztltsa meg a
csatlakozUkat egy alkoholba m-rtott fItisztltU
p-lcika segItsEgEvel. A tisztl-st finom
mozdulatokkal vEgezze, Ellenkezi esetben
ugyanis k-rovodhat a csatlakozU.
Kesz,IeK
A kezelilap h-toldala
A kÉsz, IÈk kivÉtele
1
Kioldu kulcs (tartozEk)
2
3
4

H
A kEsz,Ik kezeligombjai
A fekete k'rben ● megadott oldalakon rEszletes t-jEkoztat-st tal-l.
1 Kijelziablak
2 SEL (vezErlEsi mUd v-lasztU) gomb 58
DSPL (kijelzEs-mUd v-ItoztatU/Ura be-llitU) gomb ⑤
4 (kazettakiad-s) gomb 5
5 R-diUhallgat-s k'zben: Programgombok 7
Kazettalej-tsz-s k'zben:
ATA 1 ATA (automatikus r-diU aktiv-IU) 6
6 / / (gyorscsEvEl)/DIR (lej-tsz-si ir-ny v-ItU) gombok ⑤ ⑥
7 LOUD (hangeri) gomb 8
8 RELEASE (kezelilap kioldUgomb) 43
9 - + (hangeri/mEly hang/ magas hang/balansz/hangszin) gomb 56
10 SEEK/MANU (kesi /manu-lis) gomb 67
11 TUNER/A.MEM (r-diUbekapsolU s-vbe-IItU/automatikus memUria) gomb 67
12 SENS (ErzEkenysEg be-llitU) gomb 6
13 OFF (KI) gomb 4
M'szaki adatok
MagnU
Szalagrendszer 4 s-vos,2 csatorn-s
sztereU
Ny-vog-s Es torzl-t s 0,13% (WRMS)
Frekvencia-tvitel 30 à 15.000 Hz
Jel-zaj viszony 55 dB
HangolU
FM
Hangol-sitartom·ny 65,0a74,0MHz
87,5 à 108,0 MHz
Antenna bemenet
K. Isi antennacsatlakozU
K'zEpfrekvencia
10,7 MHz
...rZEkenysEg
12 dBf
Szelektivit-s
400 kHz-en 70 dB
Jel-zaj viszony
65 dB (sztereU)
68 dB (monU)
HarmUnikus torzlt-s 1 kHz-en
z-en
0,5% (sztereU),
0.3% (monU)
1 kHz-en 35 dB
S- vsz°rEs
30 à 15.000 Hz
Frekvencia-tvitel
2 dB
VÉteli ar·ny
MW/LW
Hangol-si tartom-ny
MW: 531 Å 1.602 kHz
LW:153a281kHz
K. Isi antennacsatlakoz
450 kHz
MW:30 V
LW: 50~ V
Erisiti
Kimenetek
Hangsz r kimenetek
(kis -ramn-1 is biztos
kontaktus)
4 à 8 ohm
20W× 4 (4 ohm
impedancia)
jltal-nos m'szaki jellemzik
VezErl pontok Motoros antenna vezErl
pontjap
HangszInvezEriEs MEly hangok 100 Hz-en
± 8 dB
Magas hangok 10 kHz-en
± 8 dB
jramell-t-s 12 V egyen-ram
autUakkumul·tor
negativ f'dl
MRetek kb. 186× 57× 170mm
(szE×ma×mE)
BeszerelEsi mEretek kb. 182× 53× 155mm
(szE×ma×mE)
T^meg kb. 1,2 kg
MellEkelt tartozEkok SzerelikEszlet az
,zembehelyezEshez/
csatlakoztat-shoz
(1kEszlet)
Kezelilap tartU doboz (1)
A formatery Es a m szaki adatok v-Itoztat-s-nak
jog-t fenntartjuk.
H
HibakeresEs
Az al-bbi lista segltsEget ny'jt a kEsz, lEke haszn-lata k'zben esetleg fellEpi hib-k legt'bbjEnek kik, sz^b^lEsEhez.
A hibakeresÉsi tmutatÜ elolvas-sa elitt kErj,k nEzze -t a csatlakoztat-si Es a haszn-lati tmutatÜt.
jltal-nos hib-k
| HibajelensÉg | Ok/Hibaelh·rìt·s |
| Nincs hang | ·jìltsa be a hangerit a + gomb segltsÉgEvel. ·jìltsa a 2-hangszǔrUs rendszer hangszab-lyozǔj·t a k^zÉpsi pozičiUba. |
| Nem jelennek meg a kijelzÉsek a kijelzɪablakban. | T·volltsa el a kezelɪlapot ðs tiszītsa meg a csatlakoz Ükat. Erril rÉszletesebb 'tmutat·st tal-l UA kÉsz,IEk karbantart-saá clm' fejezet ëA csatlakoz Ük tiszīt-saà clmszava alatt. |
Kazetta lej-tsz-s
| HibajelensÉg | Ok/Hibaelh-rìt·s |
| Torz a hang. | Elpiszkol Üdott a lej・tsz Üfej. → Tisztltsa meg. |
R-diUhallgat-s
| HibajelensÉg | Ok/Hibaelh·rìt·s |
| Nem m°k^dnek a programgombok. | • Programozza be a helyes frekvenci·t. • T'l gyenge az ad·s. |
| Nem m°k^dik az automatikus hangol·s. | T'l gyenge az ad·s. → A kǐv·nt adŶt manu-lisan kell be-llitani. |
| A kijelziablakban villog az ÜSTá jel. | • Hangolja be pontosan. • T'l gyenge az ad·s. → V-Itson·t MONO-ra a SENS gomb megnyom·s·val. |