
Paris HO1513228 - Montre BOSS - Notice d'utilisation et mode d'emploi gratuit
Retrouvez gratuitement la notice de l'appareil Paris HO1513228 BOSS au format PDF.

| Type de produit | Montre analogique à quartz pour homme |
| Mouvement | Quartz (pile) |
| Affichage | Analogue avec aiguilles pour les heures, minutes et secondes |
| Fonctions principales | Affichage de l'heure, de la date et du jour de la semaine (selon le modèle) |
| Réglages | Couronne à 3 positions : position normale, réglage de la date, réglage de l'heure |
| Étanchéité | 5 ATM (50 mètres) - résiste aux éclaboussures et à la pluie, mais pas à la nage |
| Matériau du boîtier | Acier inoxydable |
| Matériau du verre | Verre minéral |
| Matériau du bracelet | Acier inoxydable maillé ou cuir (selon version) |
| Dimensions du boîtier | Environ 42 mm de diamètre, 11 mm d'épaisseur |
| Poids | Environ 85 g (bracelet acier) |
| Alimentation | Pile bouton SR626SW (ou équivalente) |
| Durée de vie de la pile | Environ 2 ans |
| Entretien et nettoyage | Nettoyer avec un chiffon doux et sec. Éviter les solvants et l'immersion prolongée. |
| Sécurité | Ne pas utiliser la montre pour la plongée ou les sports nautiques. Éviter les chocs. |
| Pièces détachées et réparabilité | Bracelets et piles disponibles auprès de revendeurs agréés. Service après-vente BOSS. |
FOIRE AUX QUESTIONS - Paris HO1513228 BOSS
Questions des utilisateurs sur Paris HO1513228 BOSS
0 question sur cet appareil. Repondez a celles que vous connaissez ou posez la votre.
Poser une nouvelle question sur cet appareil
Téléchargez la notice de votre Montre au format PDF gratuitement ! Retrouvez votre notice Paris HO1513228 - BOSS et reprennez votre appareil électronique en main. Sur cette page sont publiés tous les documents nécessaires à l'utilisation de votre appareil Paris HO1513228 de la marque BOSS.
MODE D'EMPLOI Paris HO1513228 BOSS
WATCHES WITH SIMPLE FUNCTIONS 2-Hand or 3-Hand Models

natural_image
Close-up of a Boer wristwatch with silver strap and white dial (no visible text or symbols)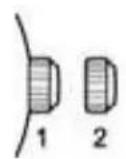
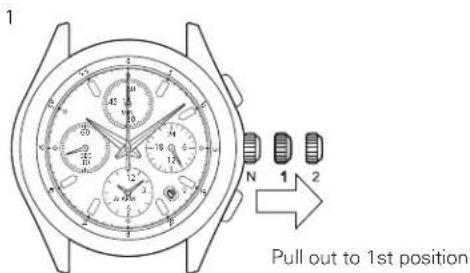
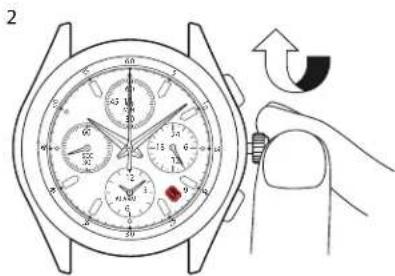
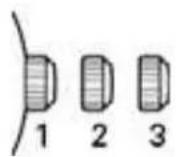
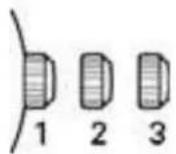
Positions of the crown:
Position 1 - Normal position.
Crown pushed against the case.
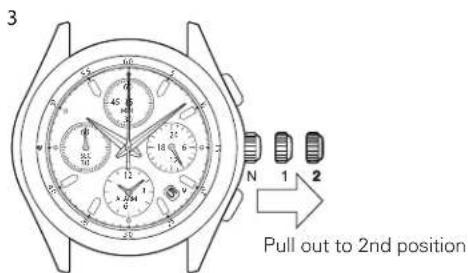
Position 2 - Setting the TIME:
Rotate the crown in either direction.
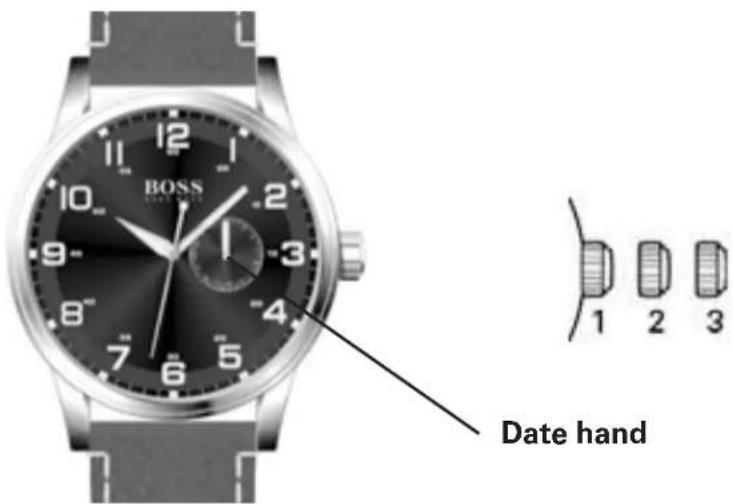
WATCHES WITH SIMPLE FUNCTIONS 2-Hand or 3-Hand Models with Date Display
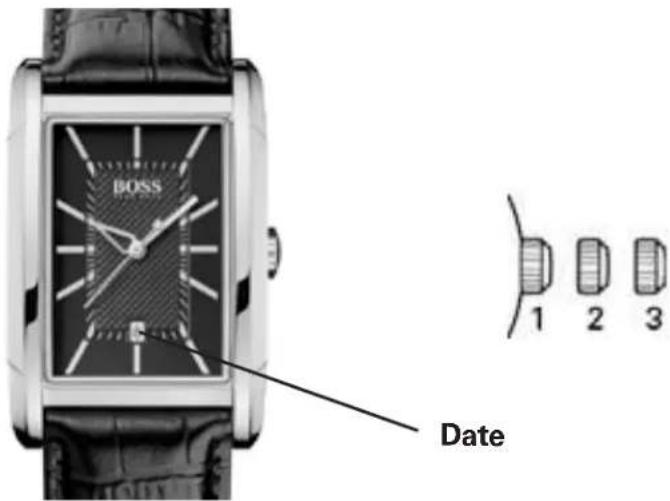
Positions of the crown:
Position 1 - Normal position.
Crown pushed against the case.
Position 2 - Setting the DATE:
Rotate the crown clockwise.
Position 3 - Setting the TIME:
Rotate the crown in either direction.
NOTE: Setting the date does not affect the working of the watch. When the watch is working, the date changes gradually during the period between 9:00 pm and 3:00 am.
WATCHES WITH SIMPLE FUNCTIONS 3-Hand Models with Day / Date Display
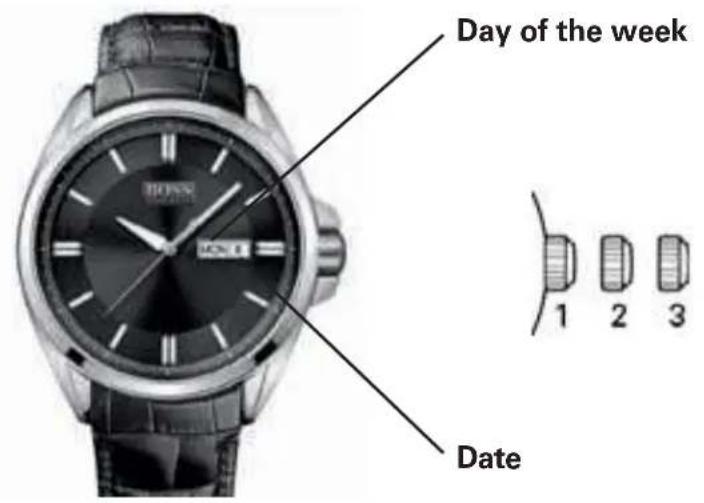
Positions of the crown:
Position 1 - Normal position.
Crown pushed against the case.
Position 2 - Setting the DATE and DAY of week*:
Rotate the crown clockwise to set the DATE and counterclockwise to set the DAY of week.
NOTE: The DAY of week can be set up in
English or Spanish. When rotating the crown counterclockwise, the English version first appears and if you move the crown forward to the next step the word will be Spanish. To choose a language, just select it when rotating the crown and push the crown back to position 1. It will remain in the selected language.
Position 3 - Setting the TIME:
Rotate the crown in either direction.
*WARNING: Never set the DAY of week when the hands are between 9:00 pm and 4:00 am to avoid damage to the calendar mechanism.
NOTE: It will be necessary to adjust the DATE on the first day of any month following one with fewer than 31 days.
WATCHES WITH MULTIPLE FUNCTIONS
3-Hand Models with Small Seconds
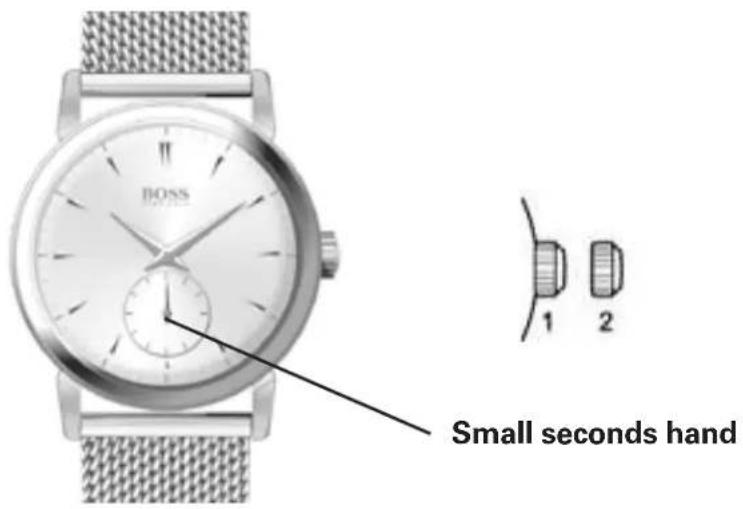
Positions of the crown:
Position 1 - Normal position.
Crown pushed against the case.
Position 2 - Setting the TIME:
Rotate the crown in either direction.
WATCHES WITH MULTIPLE FUNCTIONS
3-Hand Models with Date Indicator
Positions of the crown:
Position 1 - Normal position.
Crown pushed against the case.
Position 2 - Setting the DATE counter:
Rotate the crown in either direction.
Position 3 - Setting the TIME:
Rotate the crown in either direction.
WATCHES WITH MULTIPLE FUNCTIONS
Multi-eye Models with Day, Date and 24-Hour Indicators
Positions of the crown:
Position 1 - Normal position.
Crown pushed against the case.
Position 2 - Setting the DATE*:
Rotate the crown clockwise to advance DATE indicator hand. Once hand points to desired date, push the crown back to position 1.
Position 3 - Setting the TIME and DAY of week:
Rotate the crown clockwise until DAY hand indicates desired day of week, then continue to rotate the crown clockwise until hour, minute and 24-hour hands indicate desired TIME.
*WARNING: Never set the DATE when the hands are between 9:00 pm and 1:00 am to avoid damage to the calendar mechanism.
NOTE: It will be necessary to adjust the DATE on the first day of any month following one with fewer than 31 days.
WATCHES WITH MULTIPLE FUNCTIONS
Multi-eye Models with Day, Date and Moon phase Indicators
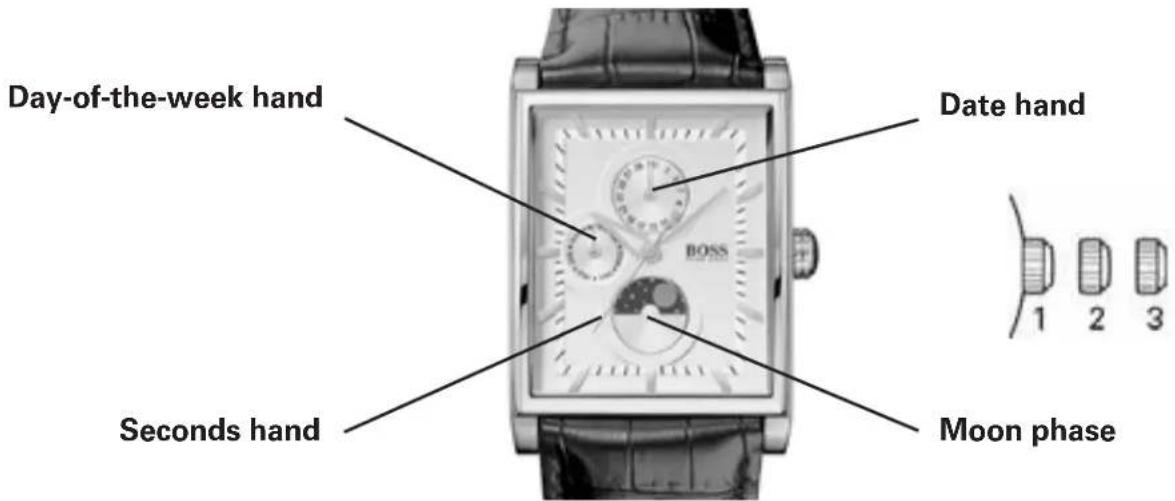
Setting the DAY:
Pull crown out to position 3 when Seconds hand reaches 12 o'clock position.
Turn crown clockwise to set the DAY: each time the Hour and Minute hands complete a 24-hour rotation, the DAY indicator hand will advance by one day.
NOTES:
Do not set the DAY by turning the crown counterclockwise; if you do so, the DATE may not advance automatically at midnight.
The DAY will change automatically during the period between midnight (0:00) and about 5:30 am
Setting the TIME:
NOTE: You must first set the DAY before you set the Hour and Minute hands.
With crown in position 3, rotate it clockwise until the Hour and Minute hands indicate the desired TIME.
To set the TIME to the exact Second:
With crown in position 3, rotate Minute hand 5 minutes ahead of the desired TIME, then slowly turn the crown counterclockwise to align Minute hand with correct minute marker.
Take an accurate time signal, from a radio news station, for example: as soon as the audible tone signals the exact time, push crown back in to position 1; the watch and Seconds hand will restart, now set to the exact time.
NOTES:
Make sure you have correctly set the AM/PM status before setting the TIME: When the DAY changes, the watch moves to AM (ante meridiem) status.
The DAY will change automatically during the period between midnight (0:00) and about 5:30 am.
Setting the MOON PHASE:
Pull crown out to position 2.
Turn crown clockwise to advance the moon phase disk display.
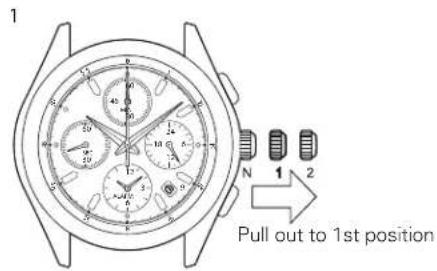
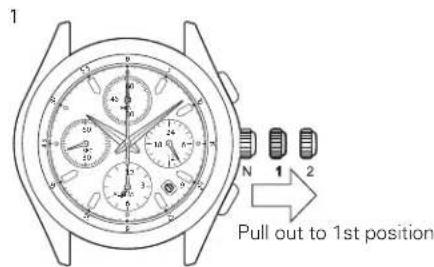
CHRONOGRAPH MODELS
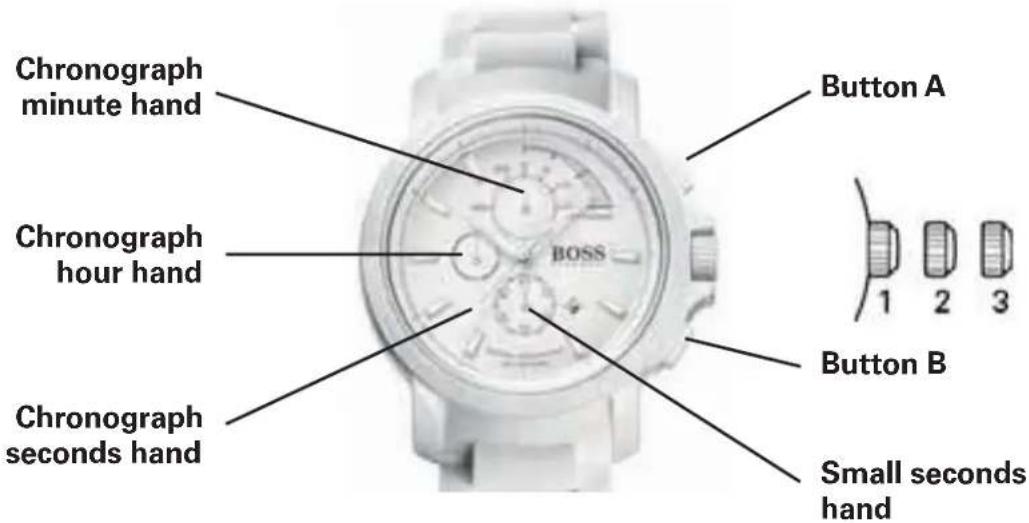
Simple Chronograph Models with Small Chronograph Seconds Hand at 6
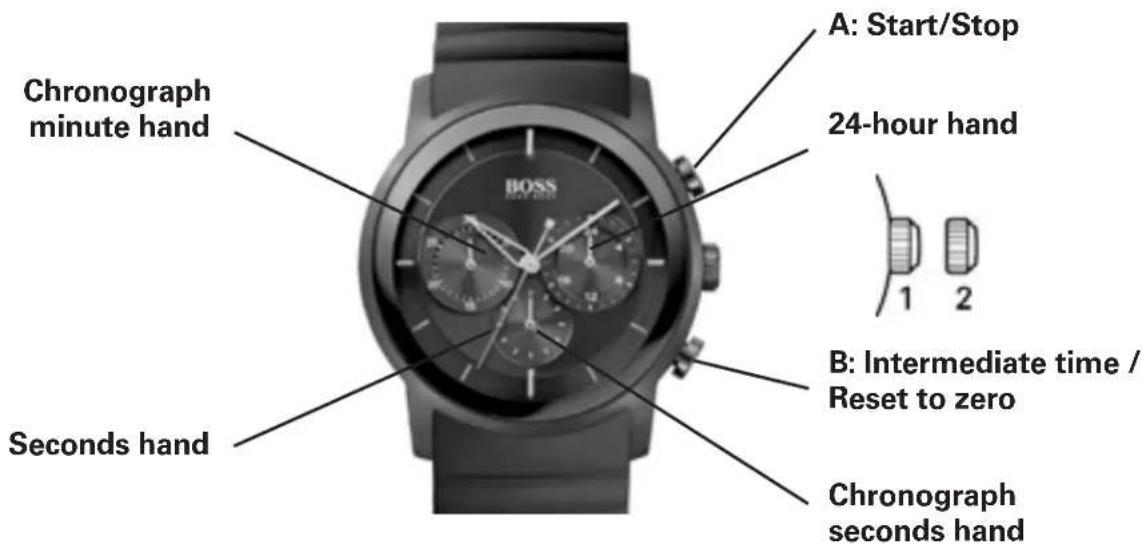
Positions of the crown:
Position 1 - Normal position.
Crown pushed against the case.
Position 2 - Setting the TIME:
Rotate the crown in either direction.
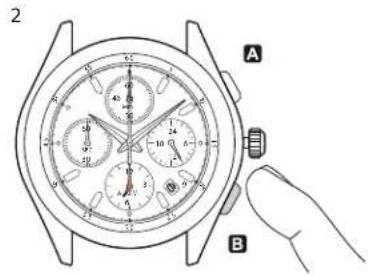
Operating the chronograph:
The chronograph function of this model lets you time an event lasting up to 59 minutes / 59 seconds in one second increments. Use the buttons A and B to operate the chronograph.
IMPORTANT: The crown must be in position 1, and the hands of the chronograph must be at 60 (zero) before starting chronograph. Do not use the chronograph if the crown is in position 2 or 3. If necessary press button B to set the hands of the chronograph to zero before using it.
Simple chronograph functions:
Measuring a single event without interruptions:
- Press button A to start the chronograph.
- Press button A a second time to stop the chronograph.
- Press button B to reset the chronograph to zero.
Clocking total time of a series of events of short duration (for example, the exact playing time of a soccer game which is frequently interrupted):
- Push button A to start the chronograph at the beginning of the match.
- Push button A to stop the timing when the match is interrupted.
- Press button A again when play resumes.
- Repeat steps 2 and 3 until the end of the match.
- Press button B to reset the chronograph to zero.
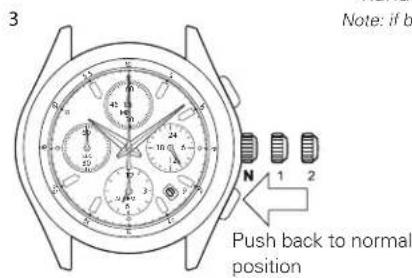
Synchronizing the chronograph hands:
After a battery change or in case of error, it may be necessary to adjust the chronograph seconds hand of the chronograph to align it correctly at the zero position:
- Pull the crown out to position 2.
- Press button A to adjust the chronograph seconds hand: Each press of button A will move the chronograph hand forward one second. Press and hold button A to advance the hand rapidly.
- Once the hand is properly aligned, push the crown back to position 1.
CHRONOGRAPH MODELS
Simple Chronograph Models with
Center-mounted Chronograph Seconds Hand and Date
Positions of the crown:
Position 1 - Normal position.
Crown pushed against the case.
Position 2 - Setting the DATE*:
Rotate the crown counterclockwise to set the DATE.
Position 3 - Setting the TIME:
Rotate the crown in either direction.
*WARNING: Never set the date when the hands are between 9:00 pm and 1:00 am to avoid damage to the calendar mechanism.
NOTE: It will be necessary to adjust the DATE on the first day of any month following one with fewer than 31 days.
Operating the chronograph:
The chronograph function of this model lets you time an event lasting up to 59 minutes / 59 seconds in one second increments. Use the buttons A and B to operate the chronograph.
IMPORTANT: The crown must be in position 1, and the hands of the chronograph must be at 60 (zero) before starting chronograph. Do not use the chronograph if the crown is in position 2 or 3. If necessary press button B to set the hands of the chronograph to zero before using it.
Simple chronograph functions:
Measuring a single event without interruptions:
- Press button A to start the chronograph.
- Press button A a second time to stop the chronograph.
- Press button B to reset the chronograph to zero.
Clocking total time of a series of events of short duration (for example, the exact playing time of a soccer game which is frequently interrupted):
- Push button A to start the chronograph at the beginning of the match.
- Push button A to stop the timing when the match is interrupted.
- Press button A again when play resumes.
- Repeat steps 2 and 3 until the end of the match.
- Press button B to reset the chronograph to zero.
Synchronizing the chronograph hands:
After a battery change or in case of error, it may be necessary to adjust the chronograph seconds hand of the chronograph to align it correctly at the zero position:
- Pull the crown out to position 2.
- Press button A to adjust the chronograph seconds hand: Each press of button A will move the chronograph hand forward one second. Press and hold button A to advance the hand rapidly.
- Once the hand is properly aligned, push the crown back to position 1.
CHRONOGRAPH MODELS
1/10 seconds Aviator Chronograph Models
Positions of the crown:
Position 1 - Normal position.
Crown pushed against the case.
Position 2 - Setting the DATE*:
Rotate the crown counterclockwise to set the DATE.
Position 3 - Setting the TIME:
Rotate the crown in either direction.
*WARNING: Never set the date when the hands are between 9:00 pm and 1:00 am to avoid damage to the calendar mechanism.
NOTE: It will be necessary to adjust the DATE on the first day of any month following one with fewer than 31 days.
Setting the time:
- Pull crown to position 3 as soon as the small seconds hand reaches the 60 seconds position. The watch stops.
- Rotate crown in either direction to move the hands and set the time, making sure that the date changes at midnight and not at noon.
- Place the hands slightly ahead of the exact time, then rotate the crown slowly counterclockwise to align the minute hand with the correct minute marker.
- Take an accurate time signal, from a radio station, for example: as soon as the audible tone signals the exact time, push crown back in to position 1; the watch will restart, now set to the exact time.
Setting the date:
- Pull crown to position 2.
- Rotate crown in either direction to move the hands and set the time making sure that the date changes at midnight and not at noon.
Operating the chronograph:
Simple chronograph functions:
Measuring a single event without interruptions:
- Press button A to start the chronograph.
- Press button A a second time to stop the chronograph.
- Press button B to reset the chronograph to zero.
Clocking total time of a series of events of short duration (for example, the exact playing time of a soccer game which is frequently interrupted):
- Push button A to start the chronograph at the beginning of the match.
- Push button A to stop the timing when the match is interrupted.
- Press button A again when play resumes.
- Repeat steps 2 and 3 until the end of the match.
- Press button B to reset the chronograph to zero.
Synchronizing the chronograph hands:
After a battery change or in case of error, it may be necessary to adjust the chronograph hands of the chronograph to align it correctly to the zero position:
- Pull crown out to position 2.
- Press button A to adjust the stopwatch 1/10 seconds hand. Press button B to adjust stopwatch seconds and minute hands.
- Once the hands are properly aligned, push the crown back to position 1.
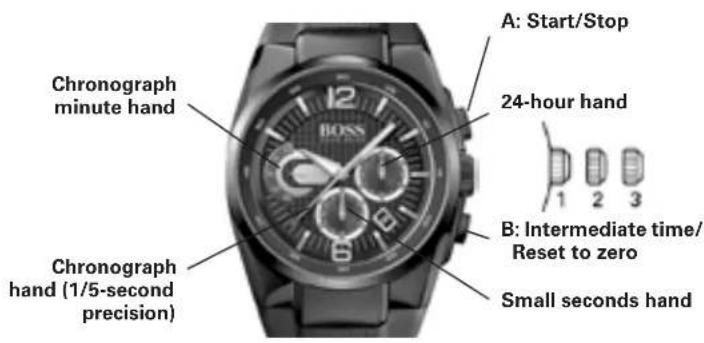
CHRONOGRAPH MODELS
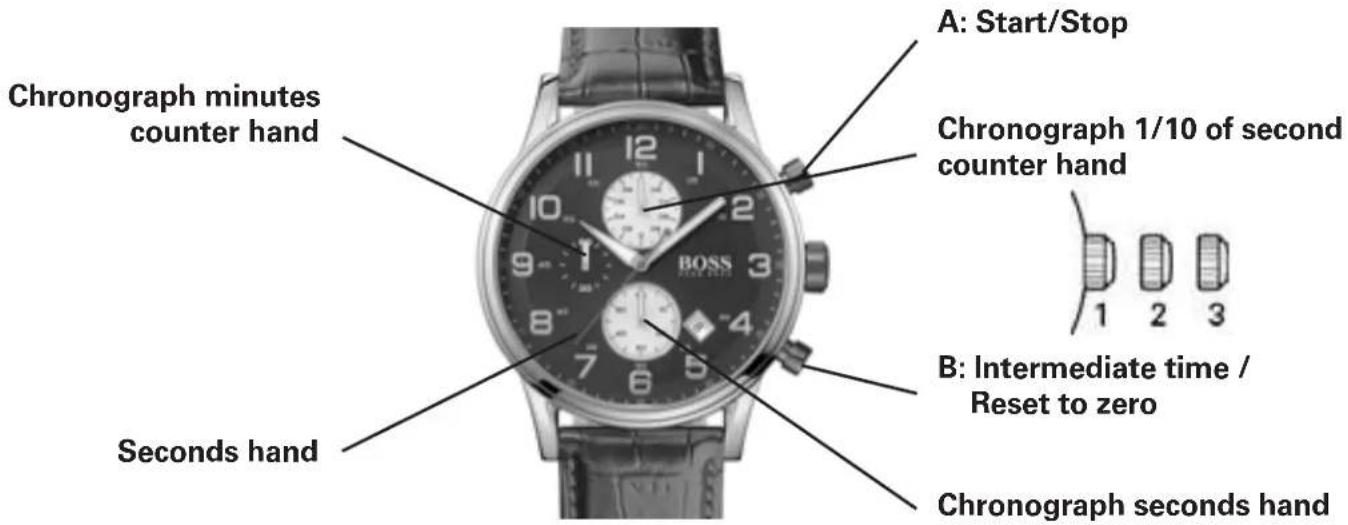
1/5-seconds Chronograph Models
with Retrograde Minutes Counter and 24-Hour Hand
Setting the day and time:
Positions of the crown:
Position 1 - Normal position.
Crown pushed against the case.
Position 2 - Setting the DATE*:
Rotate crown clockwise.
Position 3 - Setting the TIME:
Rotate crown in either direction.
*NOTE: If the DATE setting is performed between 9:00 pm and 3:00 am when automatic calendar changes are in progress, the date may not change automatically the following day.
Operating the chronograph:
The chronograph function on this watch allows you to time on event lasting up to 20 minutes to the nearest fifth of a second. Use buttons A and B to operate the chronograph.
IMPORTANT: The crown must be in position 1 and the hands of the chronograph must be at 60 (zero) before starting the chronograph. Do not use the chronograph if the crown is in position 2 or 3. If necessary, Press button B to reset the hands of the chronograph to zero before using it.
Simple chronograph functions:
Measuring a single event without interruptions:
- Press button A to start the chronograph.
- Press button A a second time to stop the chronograph.
- Press button B to reset the chronograph to zero.
Intermediate time functions:
Clocking split times during a race:
- Press button A to start the chronograph.
- Press button B to temporarily stop the chronograph.
- Read the intermediate time.
-
Press button B to restart the chronograph: the hands catch up with the ongoing event.
-
To read a second intermediate time, press button B again.
Repeat steps 2 to 4 to measure further intermediate times.
-
Press button A to stop the chronograph.
-
Read final time display.
-
Press button B to reset the chronograph to zero.
NOTE: The chronograph's 1/5-seconds hand will stop after 10 minutes while the internal mechanism continues the calculation.
Synchronization of the chronograph hands:
After a battery change or in case of error, it may be necessary to adjust the 1/5-second, seconds, minute and hour hands to correctly align their respective positions to zero.
NOTE: It is important to follow the steps in the prescribed order:
- Pull the crown out to position 3.
- Press button B and keep it down for 2 seconds, then release.
- Rotate the crown to move the chronograph minute hand to zero position.
- Press button B again and keep it down for 2 seconds, then release.
- Rotate the crown to bring the seconds hand to zero.
- Press button B a third time and keep it down for 2 seconds, then release.
- Rotate the crown to bring the minute and hour hands to zero.
- If necessary, Press button B and keep it down for 2 seconds, then release to prepare the mechanism to adjust the seconds hand of the chronograph.
- When the chronograph hand setting is finished, push the crown back to position 1.
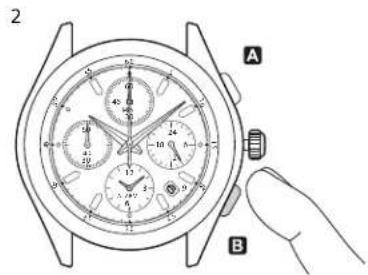
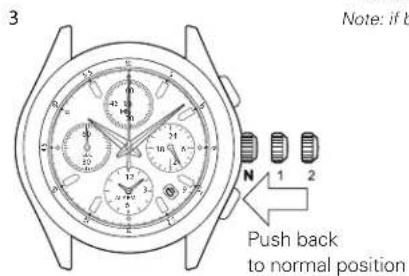
CHRONOGRAPHS WITH COMPLEX FUNCTIONS Regatta Chronograph
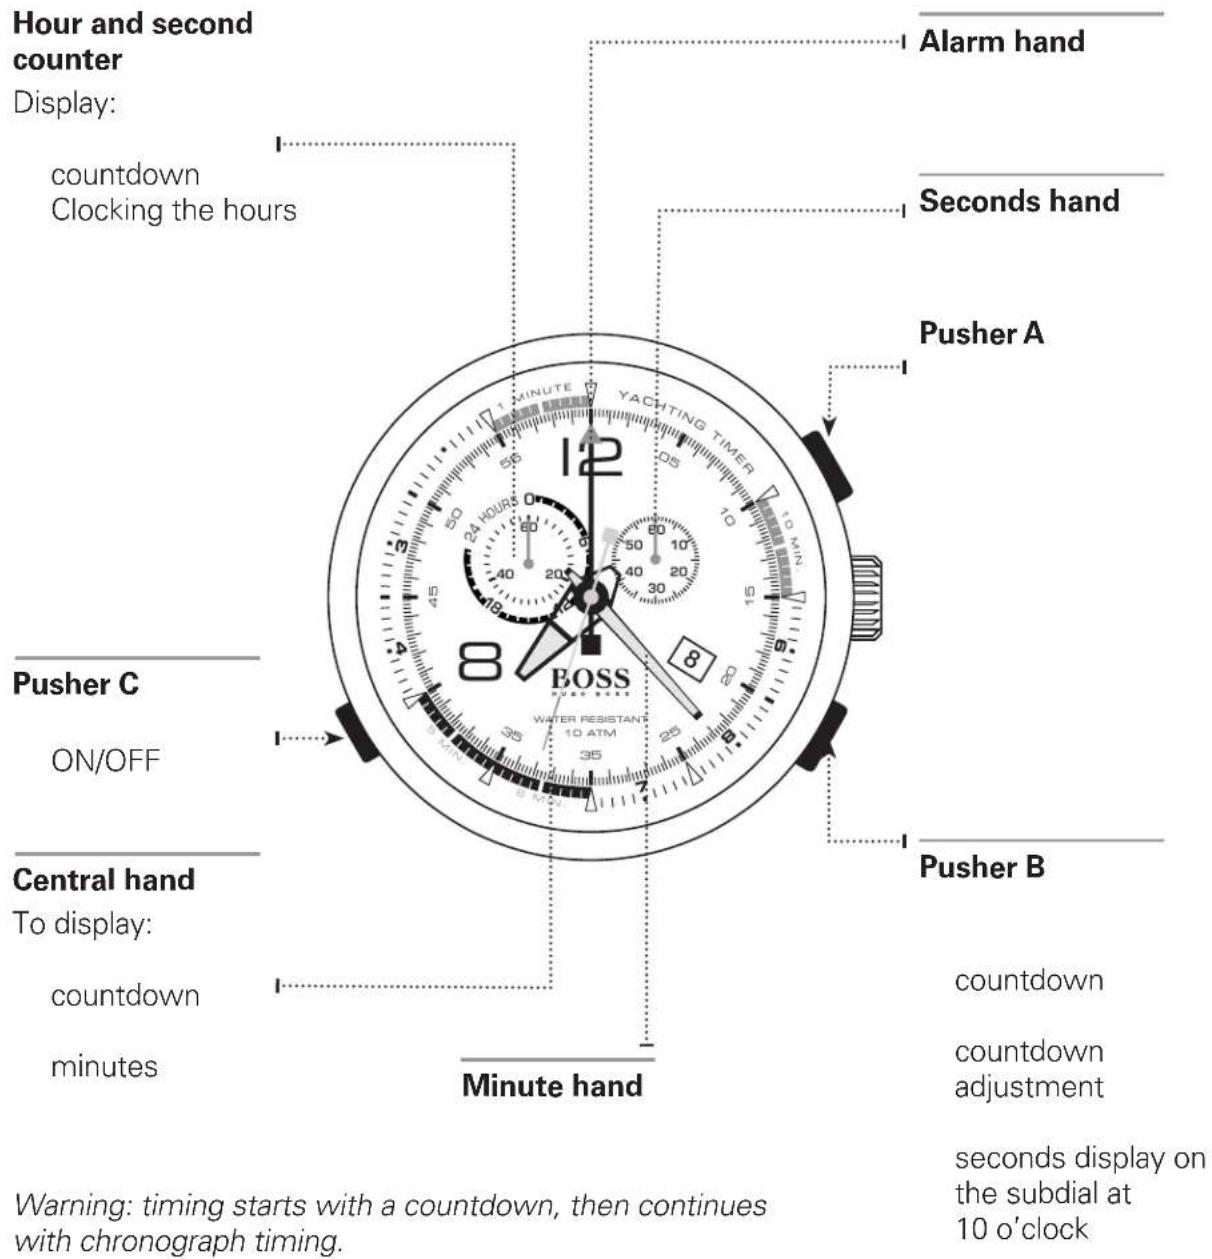
CHRONOGRAPHS WITH COMPLEX FUNCTIONS
Racing Chronograph
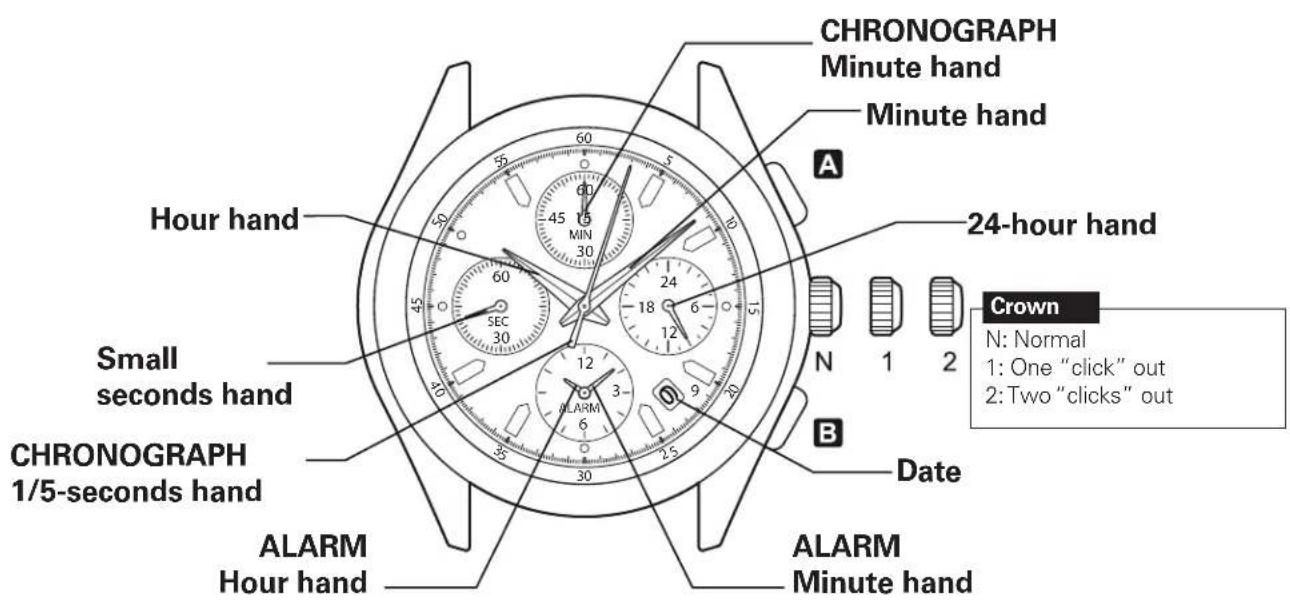
How to set the time and date:
day's date is displayed. Note: do not set the date between 9 pm and 1 am to avoid upsetting the change.
seconds hand is at 12 o'clock. Note: when the chronograph is running or has stopped, the hands will be automatically reset to zero if the crown is two clicks out.
CHRONOGRAPHS WITH COMPLEX FUNCTIONS
Racing Chronograph
How to set the alarm function:
hands to the desired time.
Note: if button B is held down, the Alarm function hands advance rapidly.
Note: the alarm function is automatically activated.
How to deactivate the alarm function :
function hands stop on the current time.
Note: if button B is held down, the alarm function hands advance rapidly.
Note: the alarm function is automatically deactivated.
WATCHES WITH COMPLEX CHRONOGRAPH FUNCTIONS
Racing Chronograph
How to use the Chronograph functions:
This Chronograph can measure up to 59' 59" in 1/5 second increments.
After 60 minutes, it resumes counting from zero to 12 hours.
After 12 hours the Chronograph stops automatically.
CHRONOGRAPH
Minute sub-dial
CHRONOGRAPH
Minute hand
START STOP RESTART
SPLIT-TIME COUNTER RELEASING THE SPLIT-TIME COUNTER HAND REINITIALIZING
CHRONOGRAPH 1/5-seconds hand
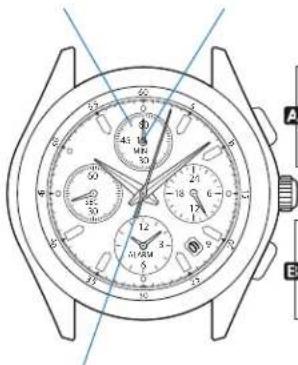
CHRONOGRAPHS WITH COMPLEX FUNCTIONS Worldtimer chronograph

Positions of the crown:
Position 1 - Normal position.
Crown pushed against the case.
Position 2 - Setting the DATE and HOUR*:
To set the DATE, turn the crown clockwise, passing midnight, to advance the DATE.
To set ONLY the HOUR, turn the crown in either direction.
Position 3 - To set the hour for both the local time and in a second time zone, turn the crown in either direction. The hour hand for the local time and the hour hand for the second time zone are connected to set the time for both.
*NOTE: If the date setting is performed between 9:00 pm and 3:00 am when automatic calendar changes are in progress, the date may not change automatically in time zones.
Simple chronograph functions:
Measuring a single event without interruptions:
- Press button A to start the chronograph.
- Press button A a second time to stop the chronograph.
- Press button B to reset the chronograph to zero.
Clocking total time of a series of events of short duration (for example, the exact playing time of a soccer game which is frequently interrupted):
- Push button A to start the chronograph at the beginning of the game.
- Push button A to stop the chronograph when the game is interrupted.
- Press button A when play resumes.
- Repeat steps 2 and 3 until the end of the game.
- Press button B to reset the chronograph to zero.
Synchronizing the chronograph hands:
After a battery change or in case of error, it may be necessary to adjust the Chronograph seconds hand of the chronograph to align it correctly at the zero position:
- Pull the crown out to position 2.
- Press button A to adjust the chronograph seconds hand: Each press of button A will move the chronograph hand forward one second.
Press and hold button A to advance the hand rapidly.
- Once the hand is properly aligned, push the crown back to position 1.
GMT functions:
The center-mounted red hand indicates the hour in a second time zone.
To set the second time-zone, pull the crown to position 2 and rotate counterclockwise until red hand points at major city in desired second time zone on cities of the time ring.
Then push the crown back in to position 1.
Worldtimer functions:
The crown at 10 o'clock rotates a graduated ring set in the watch dial. It is not necessary to pull the crown to rotate this ring.
The user can instantly calculate the time in the 24 cities printed on the flange.
Simply align the numeral "0" with your current city. Then add the number corresponding to each city to the local time to calculate the time instantly.
So in the diagram below, it is 10:10 am in London.
It is therefore 10:10 + 2 hours = 12:10 pm in Cairo 10:10 + 4 hours = 14:10 (2:10 pm) in Dubai
10:10 - 6 hours = 4:10 am in Chicago
AUTOMATIC WATCHES Standard 2-Hand and 3-Hand Models
natural_image
Black and white photo of a BoSS watch with visible branding and mechanical components (no readable text or symbols)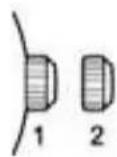
Positions of the crown:
Position 1 - Normal position.
Crown pushed against the case.
Position 2 - Setting the TIME:
Rotate the crown in either direction.
To manually wind an automatic movement:
The motion of your arm during normal daily activities should be sufficient to keep the movement of your automatic timepiece wand. However, if you have not worn your watch for a few days, and the watch has stopped, you will need to wind it by hand before setting the time:
- With the crown in position 1, turn the crown clockwise approximately 20 revolutions.
- Reset time following instructions above.
AUTOMATIC WATCHES Models with Moon Phase Indicator, Small Seconds and Big Date
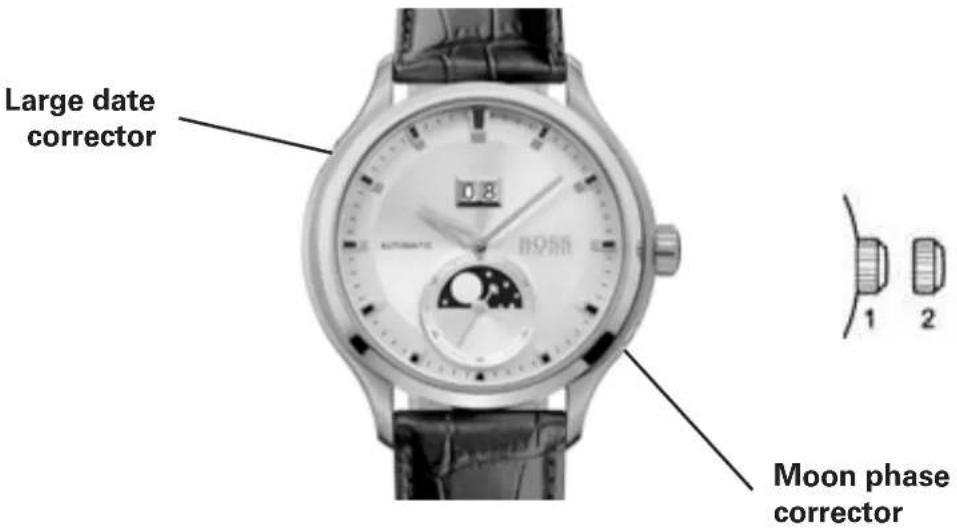
Positions of the crown:
Position 1 - Normal position.
Crown pushed against the case.
To wind the movement by hard, turn the crown
clockwise approximately 20 revolutions.
Position 2 - To set TIME:
Rotate the crown in either direction.
To correct the MOON PHASE:
Use a pointed object like the tip of a pen to depress the recessed corrector button at
4 o'clock. Each press and release will advance the moon phase disk by one day in the lunar cycle.
To correct the BIG DATE:
Use a pointed object like the tip of a pen to depress the recessed corrector button at
10 o'clock. Each press and release will advance the big date display by one.
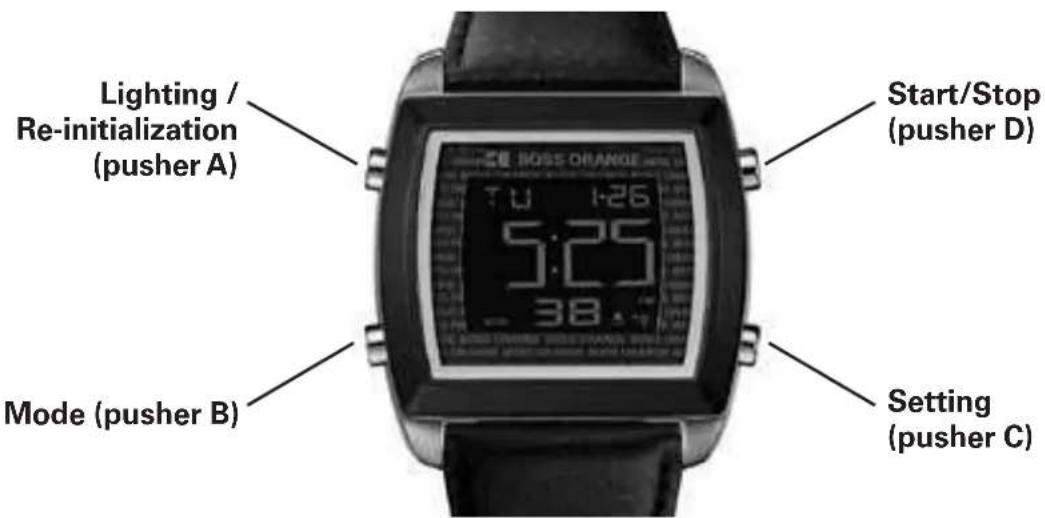
DIGITAL WATCHES Models with simple digital display
B - MODE
A - SET
Time setting
Press button A twice to enter time setting mode which follows this sequence: Month -> Day -> Hours -> Minutes. The active display field will flash.
Press button B to adjust the digits displayed in the active field.
Press button A to confirm the display setting; then press B to advance to the next setting field. When done, press button A to exit setting mode.
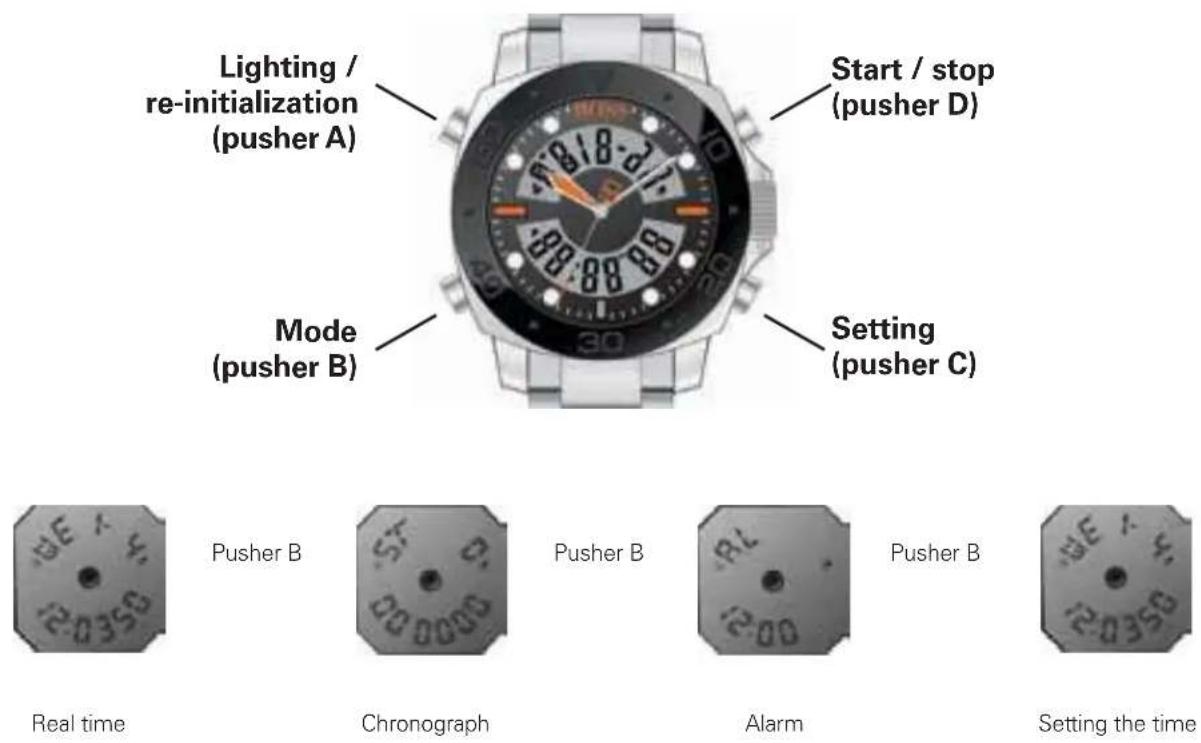
DIGITAL WATCHES
Digital Chronograph Models
Overview
Press button A to activate the backlight for 3 seconds in any mode.
Press button B to move between modes.
Button C and D are used to adjust setting and operate the chronograph.
NOTE: Press and release a button repeatedly to advance displayed information in single increments; press and hold button down to advance information in a display rapidly.
1. Real time
Press A to turn on lighting whatever the mode selected.
Setting the time:
- Press C to set the time.
- Press B to select the hour, minutes, year, month and day.
- Press D to set the flashing unit and C to return to Real Time mode.
- Setting the second time-zone: with the time setting function selected, press A to choose the 12 or 24 hour format.
2. Setting the Alarm function
- Press C to select alarm setting. This causes the hour display to flash and sets the alarm to auto start.
- Press B to select the hour, minutes, year, month and day.
- Press D to set the flashing and C to return to Alarm mode.
- With the Alarm function selected, press A to stop or start the alarm ( ) or the chime ( )
- When the alarm time is displayed, an alert sounds and an indicator (◀) flashes for around 20 seconds.
3. Timer
Setting the timer:
- Press C to select the timer:
- Press A to start/stop the timer.
- Press B to set the hour, minutes and seconds.
-
Press D to set the flashing and C to return to Timer mode.
-
Functioning of the timer: Press D to start/stop the timer: press C to reset to zero when the timer stops.
-
A 10 second alert is triggered at this precise moment.
4. Chronograph
- Press D to start/stop the Chronograph:
- Once the Chronograph stops, press A to reset it to zero.
- When the Chronograph is running, it is possible to press B to return to Real Time mode.
DIGITAL WATCHES
Models with analog and digital Chronograph
1. Overview
Press button A to activate the backlight for 3 seconds in any mode.
Press button B to move between modes.
Button C and D are used to adjust settings and operate the chronograph.
2. Setting the time
The seconds flash during loading. Press D to return to zero. Press C to select the elements, in the following order: Hour -> Minute -> Month -> Day -> Day of the week -> Second.
When setting the time, "H" is displayed for 24 hour format, and "A" or "P" for 12 hour format. If you press D while the number of seconds displayed is between 30 and 59, seconds are reset to zero and the time is set to the next minute. If the number of seconds is between 00 and 29, the minutes stay the same.
3. Chronograph
Press D to start/stop the Chronograph.Once the Chronograph stops, press C to reset it to zero. When it is running, press C to display an intermediate time. The indicator "SP" appears.Then, press D to leave Intermediate Time mode and stop the timing. Press C again to reset to zero.
When the Chronograph is running, it is possible to press B to return to Real Time mode.
4. Daily alarm
Start and stop of the alarm and the chime: press D to stop or start the alarm ( ) or the chime ( )
Setting the alarm function: press C to select the hour and minutes and D to set the flashing unit.
Press C to confirm and B to return to Real Time mode.
Starting and stopping the Repeater function: When the alarm chime sounds, press a pusher or on D to stop the chime and press B to start or stop the Repeater function. When it is activated, the chime will sound after five minutes, and will stop automatically after 20 seconds.
ANALOG WATCHES 2-Hand or 3-Hand Models with Date
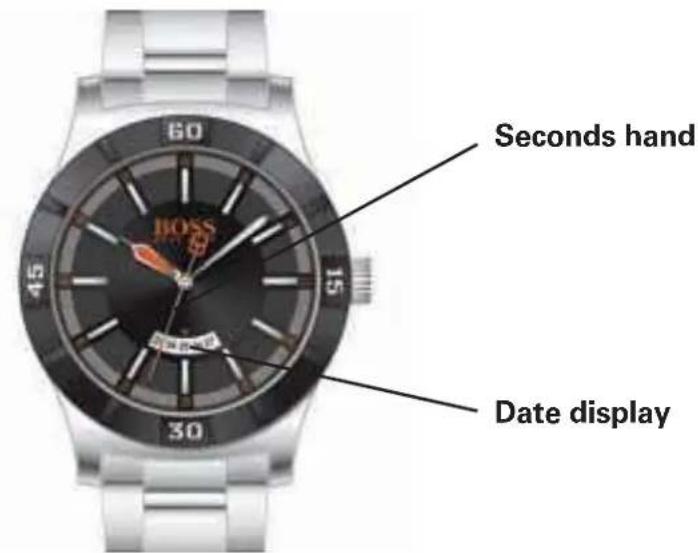
Positions of the crown:
Position 1 - Normal position.
Crown pushed against the case.
Position 2 - Setting the DATE:
Rotate the crown clockwise.
Position 3 - Setting the TIME:
Rotate the crown in either direction.
NOTE: Setting the date does not affect the working of the watch. When the watch is working, the date changes gradually during the period between 9:00 pm and 3:00 am.
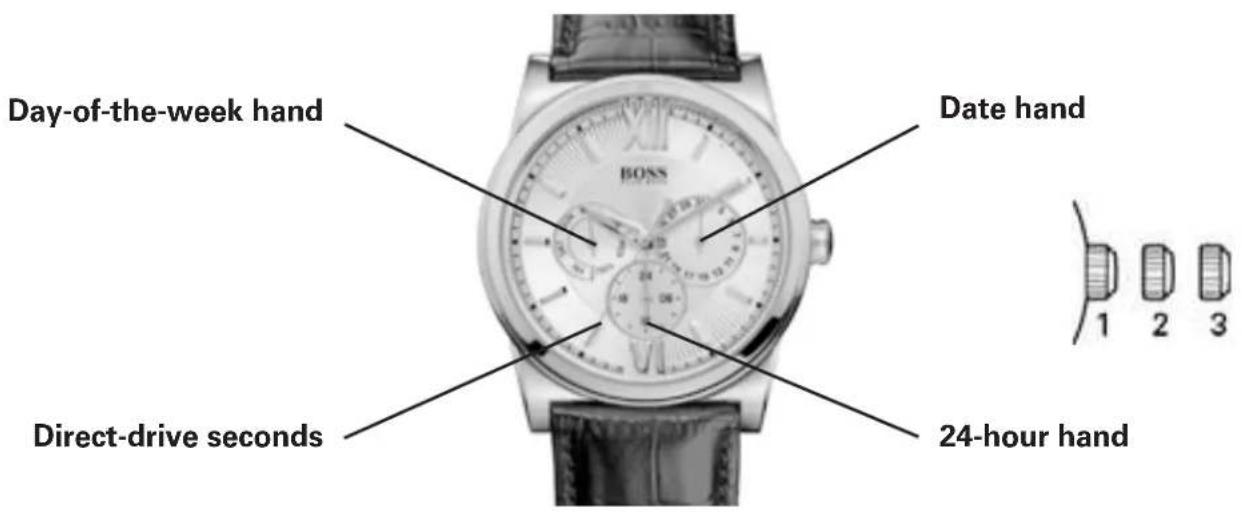
ANALOG WATCHES
Multi-eye models with Day, Date and 24-Hour Indicators
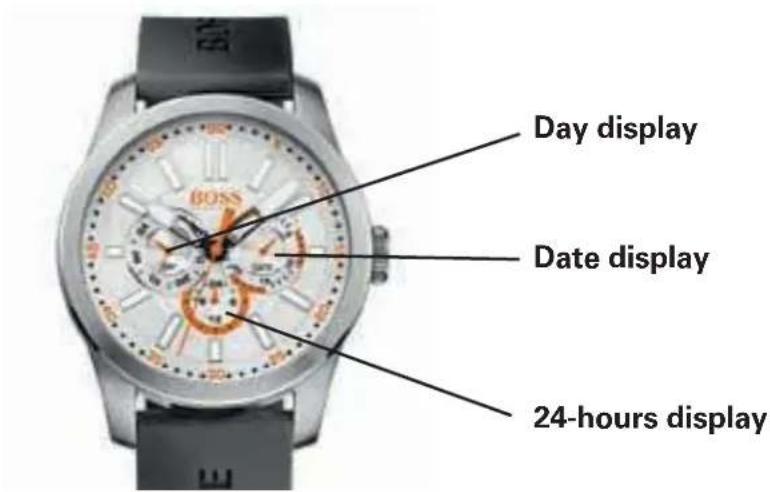
Powered by multi-function quartz analog movements, these models feature three subdials or "eyes" that indicate the Day, Date and 24-Hour Time.
Crown positions:
Position 1 – Normal position. Crown pushed against case.
Position 2 – Setting the DATE: Rotate crown in either direction.
Position 3 – Setting the TIME: Rotate crown in either direction.
Setting the DAY:
To move the DAY indicator hand to the following or previous day, turn crown in either direction until the Hour hand has completed two full rotations

- WATCHES WITH SIMPLE FUNCTIONS 2-Hand or 3-Hand Models
- Positions of the crown:
- WATCHES WITH SIMPLE FUNCTIONS 2-Hand or 3-Hand Models with Date Display
- WATCHES WITH SIMPLE FUNCTIONS 3-Hand Models with Day / Date Display
- WATCHES WITH MULTIPLE FUNCTIONS
- 3-Hand Models with Small Seconds
- 3-Hand Models with Date Indicator
- Multi-eye Models with Day, Date and Moon phase Indicators
- Setting the DAY:
- NOTES:
- Setting the TIME:
- To set the TIME to the exact Second:
- Setting the MOON PHASE:
- CHRONOGRAPH MODELS
- Simple Chronograph Models with Small Chronograph Seconds Hand at 6
- Operating the chronograph:
- Simple chronograph functions:
- Synchronizing the chronograph hands:
- 1/10 seconds Aviator Chronograph Models
- Setting the date:
- 1/5-seconds Chronograph Models
- with Retrograde Minutes Counter and 24-Hour Hand
- Setting the day and time:
- Intermediate time functions:
- Synchronization of the chronograph hands:
- CHRONOGRAPHS WITH COMPLEX FUNCTIONS Regatta Chronograph
- CHRONOGRAPHS WITH COMPLEX FUNCTIONS
- Racing Chronograph
- WATCHES WITH COMPLEX CHRONOGRAPH FUNCTIONS
- How to use the Chronograph functions:
- CHRONOGRAPHS WITH COMPLEX FUNCTIONS Worldtimer chronograph
- GMT functions:
- Worldtimer functions:
- AUTOMATIC WATCHES Standard 2-Hand and 3-Hand Models
- To manually wind an automatic movement:
- AUTOMATIC WATCHES Models with Moon Phase Indicator, Small Seconds and Big Date
- DIGITAL WATCHES Models with simple digital display
- Time setting
- Overview
- Real time
- Setting the Alarm function
- Timer
- Chronograph
- Overview
- Setting the time
- Chronograph
- Daily alarm
- ANALOG WATCHES 2-Hand or 3-Hand Models with Date
- ANALOG WATCHES
- Multi-eye models with Day, Date and 24-Hour Indicators
- Crown positions:
Marque : BOSS
Modèle : Paris HO1513228
Catégorie : Montre