PMX240 - Haut-parleur LENCO - Notice d'utilisation et mode d'emploi gratuit
Retrouvez gratuitement la notice de l'appareil PMX240 LENCO au format PDF.

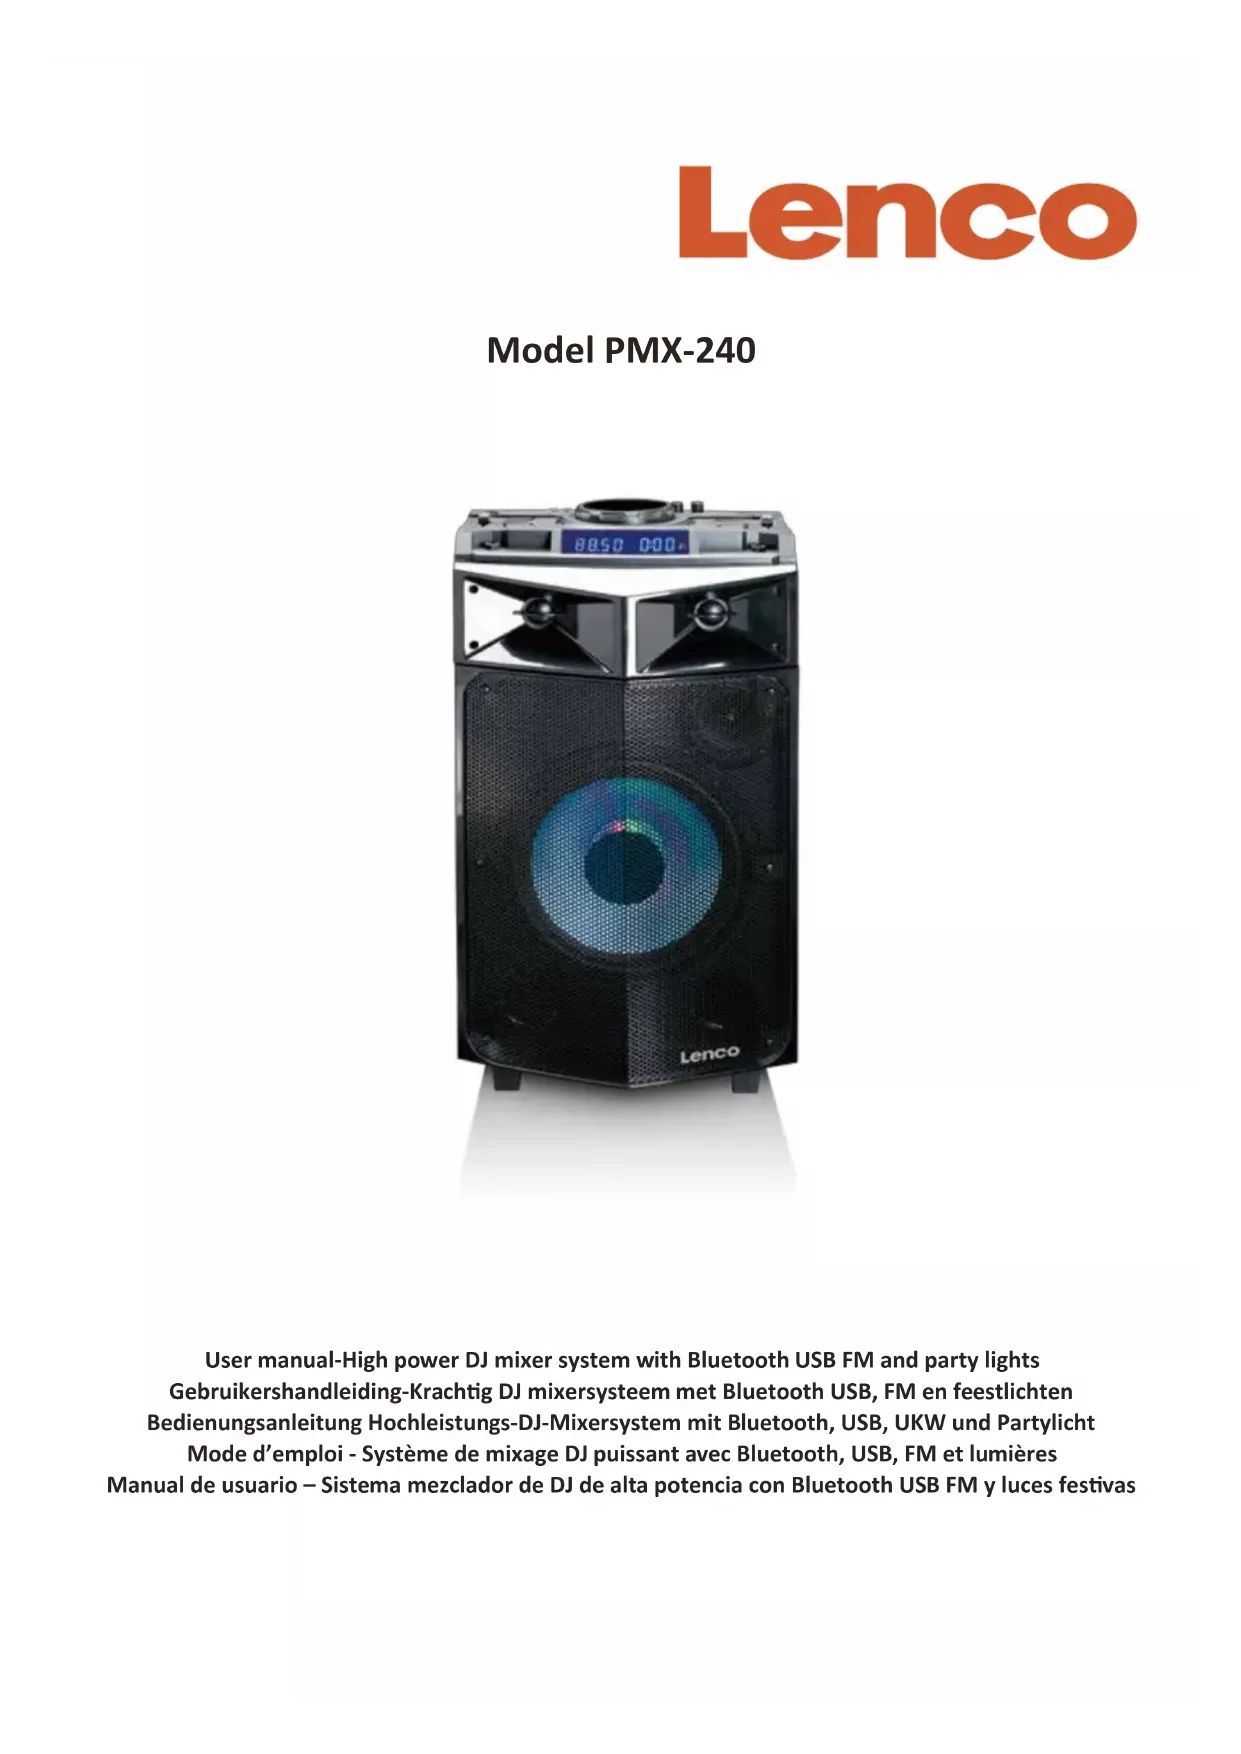


| Type de produit | Système de mixage DJ puissant avec enceinte |
| Marque | Lenco |
| Modèle | PMX240 |
| Dimensions (L x P x H) | 32 x 33,7 x 59 cm |
| Poids | 14,5 kg |
| Alimentation | 230 V~ 50 Hz ou 12 V DC (batterie plomb-acide 12 V, 3,5 Ah) |
| Puissance de sortie | 150 W RMS |
| Bluetooth | V4.2, portée environ 10 m |
| Radio FM | 87,5 - 108 MHz, avec antenne intégrée |
| Entrées audio | AUX, LINE, USB A/B, Bluetooth, micro (jack 6,35 mm), guitare (jack 6,35 mm) |
| Sortie casque | Jack 3,5 mm avec sélection de source (A, B ou AB) |
| Fonctions DJ | Effets Scratch, Reverb, Beat Box, Yeah, Bring It, Geya, Come On, Drums |
| Égaliseur | Basses et aigus réglables, X-Drive (X-Bass) |
| Effets lumineux | LED intégrées : R, G, B, RG, RB, GB, RGB, Auto, Demo |
| Microphone | Micro sans fil 864 MHz inclus, réglages volume et écho |
| Télécommande | Infrarouge, avec fonctions de base (volume, lumière, etc.) |
| Batterie | Plomb-acide 12 V, 3,5 Ah, autonomie environ 10 h à 50 % du volume |
| Entretien et nettoyage | Chiffon doux et sec ; ne pas utiliser de solvants |
| Sécurité | Ne pas exposer à l'eau, ne pas ouvrir le boîtier, débrancher en cas d'orage |
| Pièces détachées incluses | Télécommande, micro sans fil, câble d'alimentation secteur |
| Réparabilité | Confier à un service agréé ; l'ouverture par un non-professionnel annule la garantie |
FOIRE AUX QUESTIONS - PMX240 LENCO
Questions des utilisateurs sur PMX240 LENCO
0 question sur cet appareil. Repondez a celles que vous connaissez ou posez la votre.
Poser une nouvelle question sur cet appareil
Téléchargez la notice de votre Haut-parleur au format PDF gratuitement ! Retrouvez votre notice PMX240 - LENCO et reprennez votre appareil électronique en main. Sur cette page sont publiés tous les documents nécessaires à l'utilisation de votre appareil PMX240 de la marque LENCO.
MODE D'EMPLOI PMX240 LENCO
Lenco
Model PMX-240
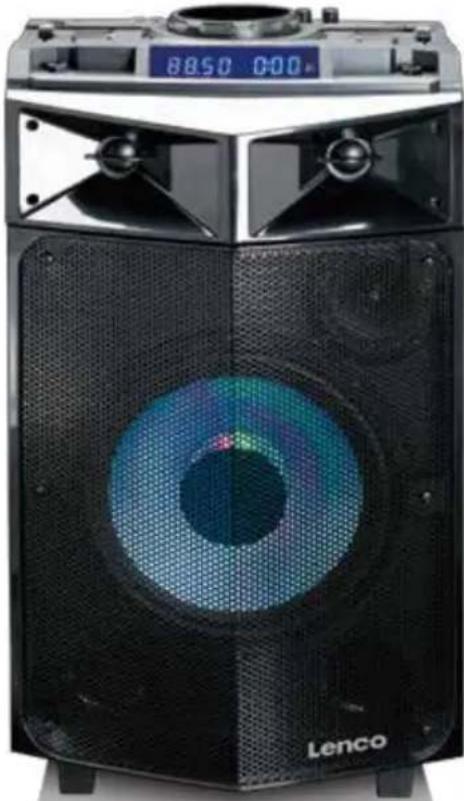
User manual-High power DJ mixer system with Bluetooth USB FM and party lights
Gebruikershandleiding-Krachtig DJ mixersystem met Bluetooth USB, FM en feestlichen
Bedienungsanleitung Hochleistungs-DJ-Mixersystem mit Bluetooth, USB, UKW und Partylicht
Mode d'emploi - Système de mixage DJ puissant avec Bluetooth, USB, FM et lumières
Manual de usuario - Sistema mezcluder de DJ de alta potentia con Bluetooth USB FM y luces festivas
Index
English 3
Nederlands 15
Deutsch 26
Francais 37
Espanol 48
CAUTION:
Usage of controls or adjustments or performance of procedures other than those specified herein may result in hazardous radiation exposure.
This unit should not be adjusted or repaired by anyone except qualified service personnel.
PRECAUTIONS BEFORE USE
KEEP THESE INSTRUCTIONS IN MIND:
- Do not use this device near water.
- Clean only with a slightly damp cloth.
- Do not cover or block any ventilation openings. When placing the device on a shelf, leave 5cm (2") free space around the whole device.
- Install in accordance with the supplied user manual.
- Don't step on or pinch the power adaptor. Be very careful, particularly near the plugs and the cable's exit point. Do not place heavy items on the power adaptor, which may damage it. Keep the entire device out of children's reach! When playing with the power cable, they can seriously injure themselves.
- Unplug this device during lightning storms or when unused for a long period.
- Keep the device away from heat sources such as radiators, heaters, stoves, candles and other heat-generating products.
- Avoid using the device near strong magnetic fields.
- Electrostatic discharge can disturb normal usage of this device. If so, simply reset and restart the device following the instruction manual. During file transmission, please handle with care and operate in a static-free environment.
- Warning! Never insert an object into the product through the vents or openings. High voltage flows through the product and inserting an object can cause electric shock and/or short circuit internal parts. For the same reason, do not spill water or liquid on the product.
- Do not use in wet or moist areas such as bathrooms, steamy kitchens or near swimming pools.
- Do not use this device when condensation may occur.
- Although this device is manufactured with the utmost care and checked several times before leaving the factory, it is still possible that problems may occur, as with all electrical appliances. If you notice smoke, an excessive build-up of heat or any other unexpected phenomena, you should disconnect the plug from the main power socket immediately.
- This device must be well ventilated at all time!
- This device must operate on a power source as specified on the specification label. If you are not sure of the type of power supply used in your home, consult your dealer or local power company.
- The socket outlet must be installed near the equipment and must be easily accessible.
- Do not overload ac outlets or extension cords. Overloading can cause fire or electric shock.
- Devices with class 1 construction should be connected to a main socket outlet with a protective earthed connection.
- Devices with class 2 construction do not require an earthed connection.
- Keep away from rodents. Rodents enjoy biting on power cords.
- Always hold the plug when pulling it out of the main supply socket. Do not pull the power cord. This can cause a short circuit.
- Avoid placing the device on any surfaces that may be subject to vibrations or shocks.
- To protect the device during a thunderstorm, unplug the ac power adaptor.
- When the device is not in use for long periods, unplug the ac power adaptor for safety reasons.
- To clean the device, use a soft dry cloth. Do not use solvents or petrol based fluids. To remove severe stains, you may use a damp cloth with dilute detergent.
- The supplier is not responsible for damage or lost data caused by malfunction, misuse, modification of the device or battery replacement.
-
Do not interrupt the connection when the device is formatting or transferring files. Otherwise, data may be corrupted or lost.
-
The usb memory stick should be plugged into the unit directly. Don't use an usb extension cable because it can cause interference resulting in failing of data.
- The apparatus shall not be exposed to dripping or splashing and make sure that no objects filled with liquids, such as vases, are placed on or near the apparatus.
- To completely disconnect the power input, the mains plug of the apparatus shall be disconnected from the mains, as the disconnect device is the mains plug of apparatus.
- The mains plug of the apparatus should not be obstructed or should be easily accessed during intended use.
- Battery shall not be exposed to excessive heat such as sunshine, fire or the like.
- Minimum distance of 10cm around the apparatus is needed for sufficient ventilations.
- The ventilation should not be impeded by covering the ventilation openings with items such as newspapers, table-cloths, curtains etc.
- No naked flame sources such as lighted candles should be placed on the apparatus.
- Attention should be drawn to the environmental aspects of battery disposal.
- The apparatus can only be used in moderate extremely cold or climates warm environments should be avoided.
- The rating label has been marked on the bottom panel of the apparatus.
- This device is not intended for use by people (including children) with physical, sensory or mental disabilities, or a lack of experience and knowledge, unless they're under supervision or have received instructions about the correct use of the device by the person who is responsible for their safety.
- This product is intended for household use only and not for commercial or industrial use.
- Make sure the unit is adjusted to a stable position. Damage caused by using this product in an unstable position or by failure to follow any other warning or precaution contained within this user manual will not be covered by warranty.
- Never remove the casing of this apparatus.
- Never place this apparatus on other electrical equipment.
- Do not use or store this product in a place where it is subject to direct sunlight, heat, excessive dust or vibration.
- Do not clean this product with water or other liquids.
- Do not block or cover the slots and holes in the product.
- Do not push foreign objects into the slots or holes in the product.
- Do not allow children access to plastic bags.
- Please check that the voltage on the type plate of your appliance corresponds with your house electricity supply (type plate is located on the back of the unit).
- Protect the power cord from being walked on or pinched, particularly at plugs, convenience receptacles, and the point where they exit from the apparatus.
- Only use attachments/accessories specified by the manufacturer.
- Refer all servicing to qualified service personnel. Servicing is required when the apparatus has been damaged in any way, such as the power supply cord or the plug, when liquid has been spilled or objects have fallen into the apparatus, when the apparatus has been exposed to rain or moisture, does not operate normally, or has been dropped.
- Do not use a damaged power cord or plug or a loose outlet. Doing so may result in fire or electric shock. Warning: prolonged exposure to loud sounds from personal music players may lead to temporary or permanent hearing loss.
INSTALLATION
- Unpack all parts and remove protective material.
- Do not connect the unit to the mains before checking the mains voltage and before all other connections have been made.
- Do not cover any vents and make sure that there is a space of several centimeters around the unit for ventilation.
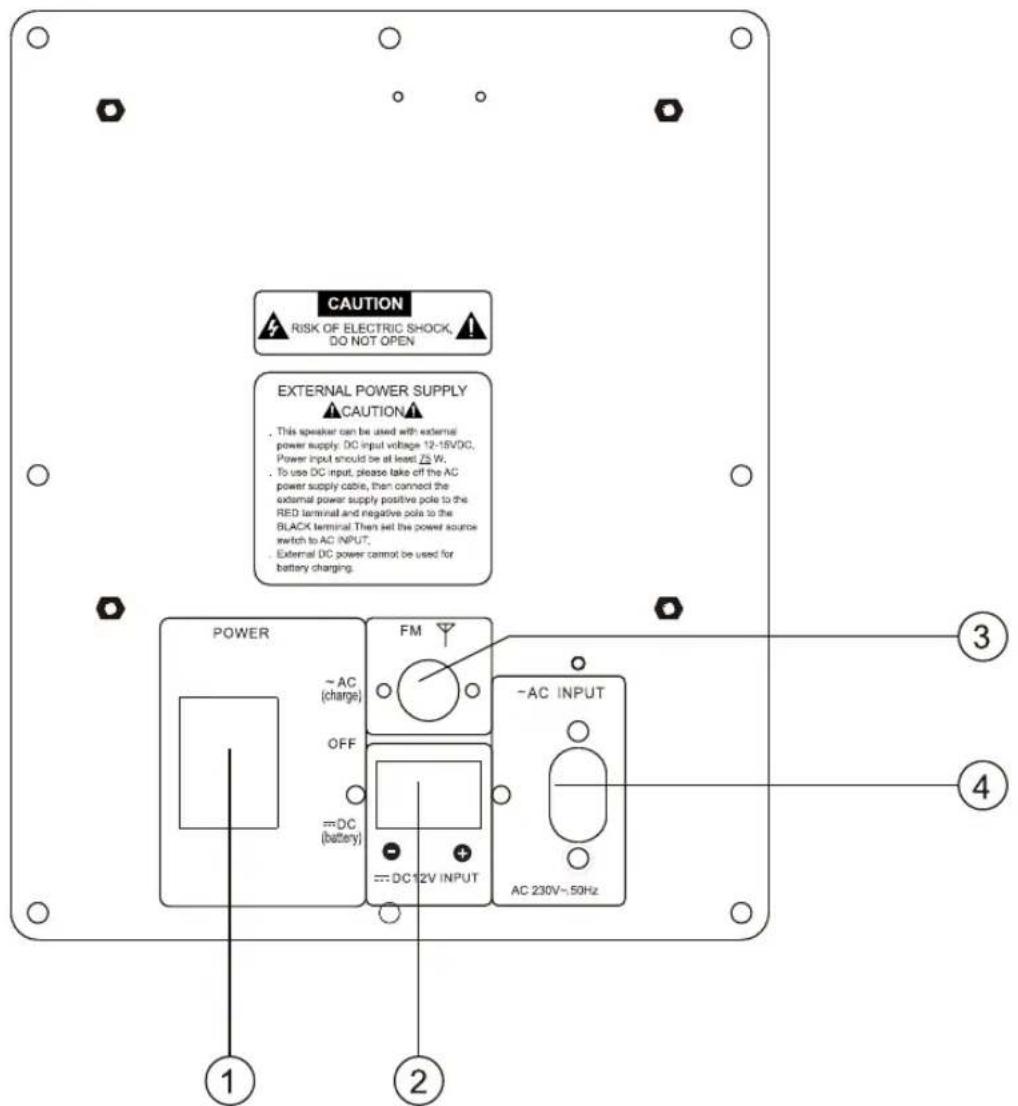
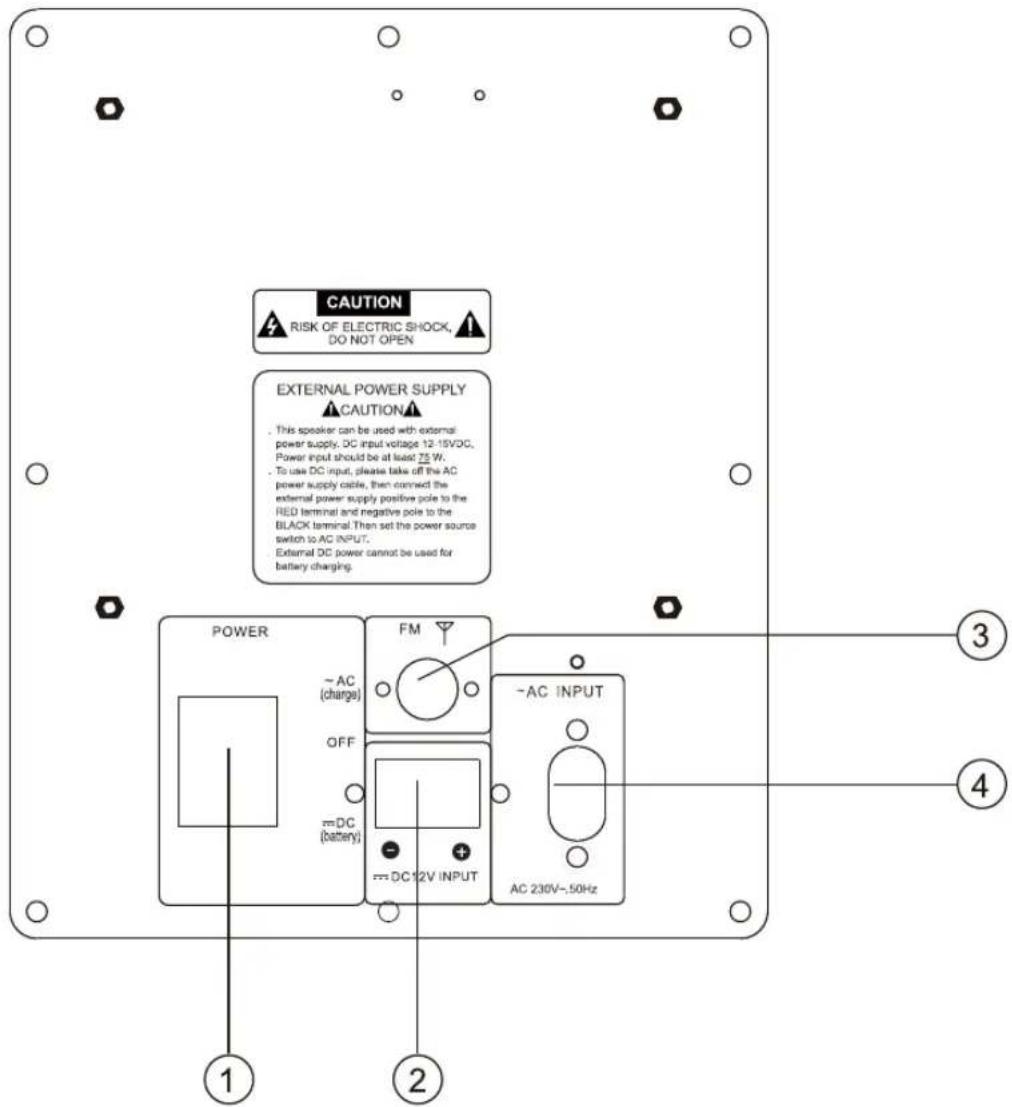
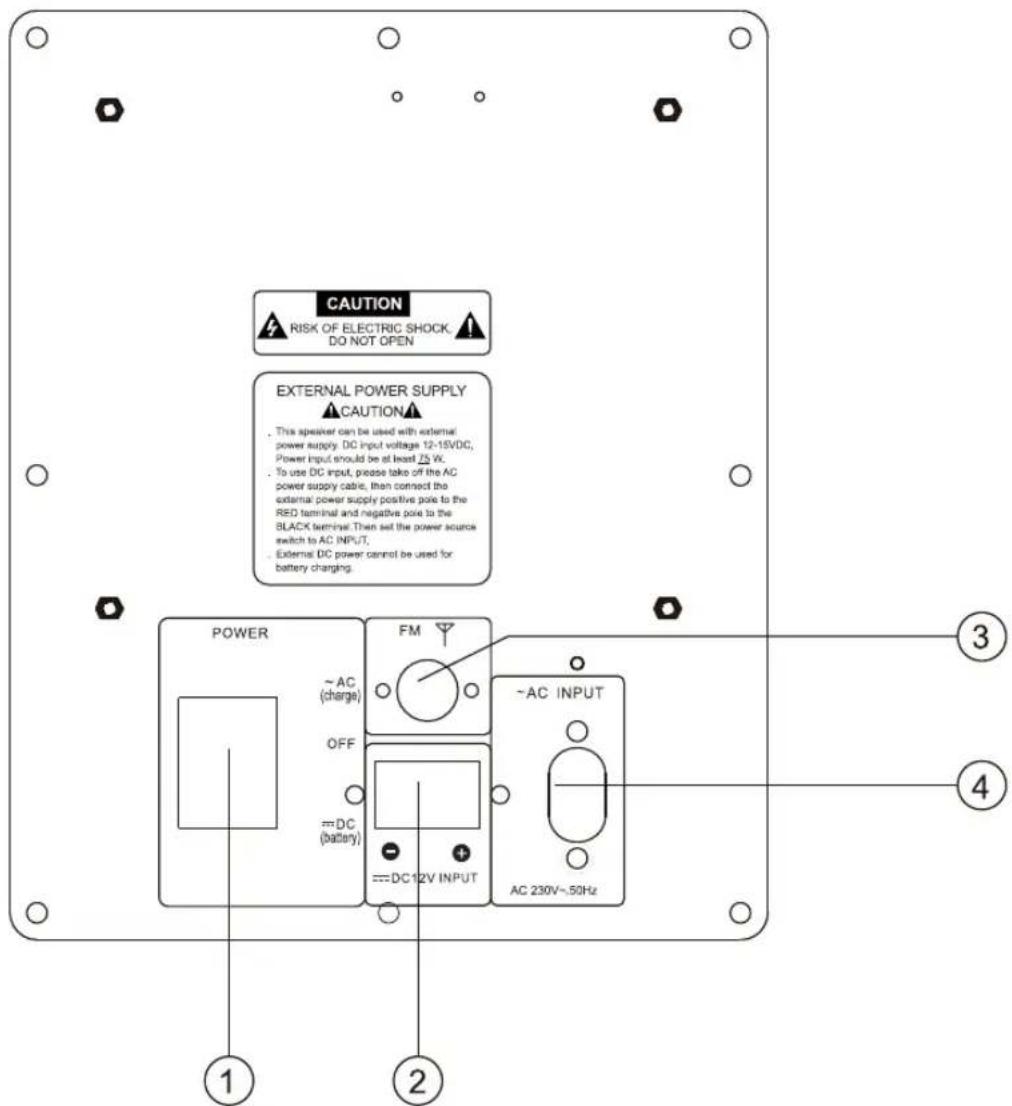
- Power Switch
Switch modes DC INPUT, AC INPUT or off.
When switched to AC status, the speaker is working on 230V and Battery will be charged.
When switched to OFF, power is off with no battery charging.
When switched to DC, speaker is battery powered.
- DC 12V INPUT
The speaker can be connected to the 12V DC battery of a car. - FM ANTENNA
- AC INPUT AC 230V\~, 50Hz
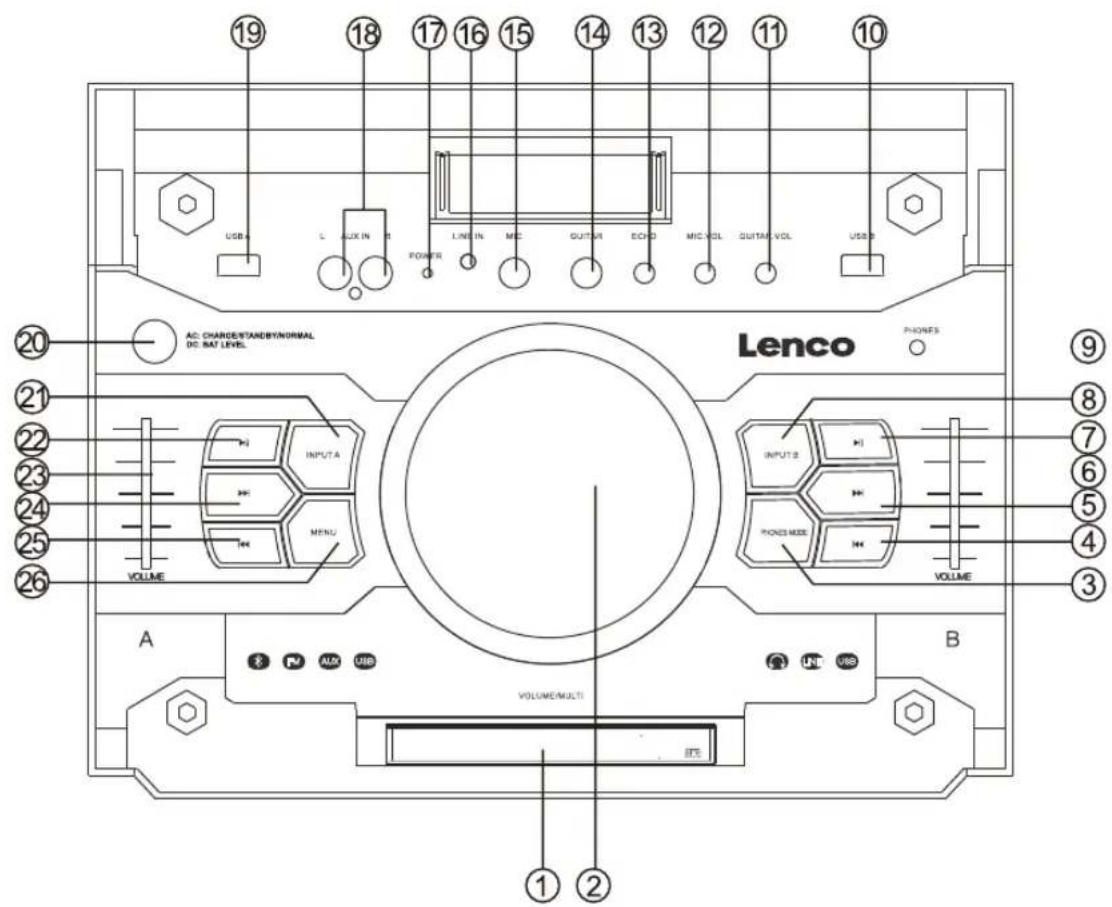
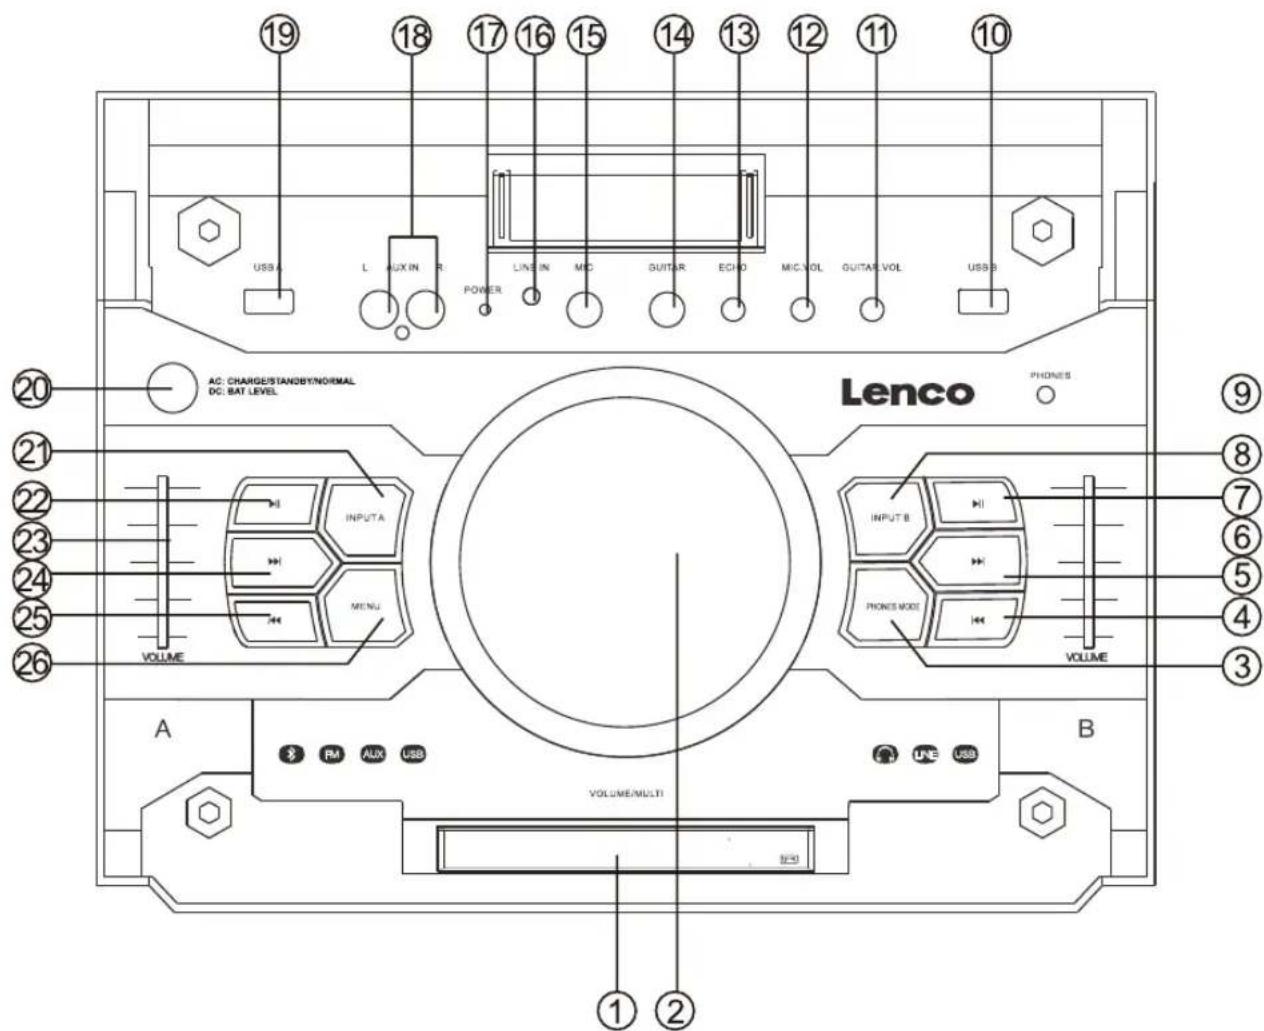
- LED DISPLAY
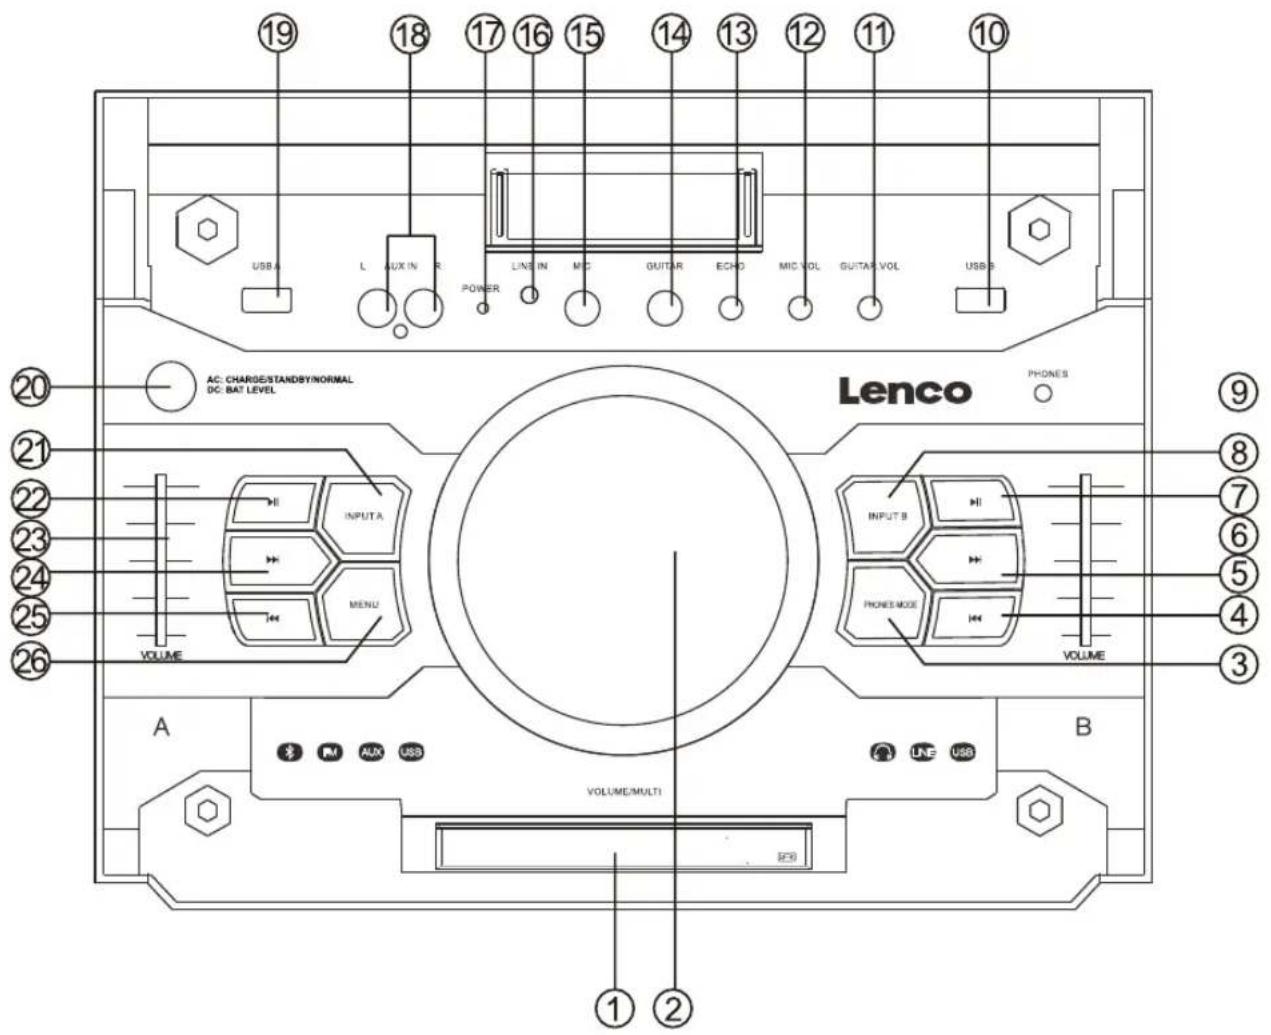
Display System parameter information, the left side of the display shows the INPUT A status, the right side of the display shows the INPUT B status
- VOLUME/MULTI/DJ EFFECT
Rotate the knob to adjust the main volume, phones volume, treble, bass. Short press this key to choose different music effect SCRATCH, REVERB, BEAT BOX, YEAH, BRING IT, GEYA, COME ON Long press plays DRUMS effect.
- PHONES MODE
Press this key to choose different EARPHONES mode, INPUT A, INPUT B, INPUT AB
- INPUT B PREV
Press this key to choose previous music with USB B
- INPUT B NEXT
Press this key to choose next music with USB B
- INPUT B VOLUME
This is used to adjust the volume with INPUT B
- INPUT B PLAY/PAUSE
Press this key to choose play/pause music with INPUT B
When playing usb, long press this key to change playtime count down or count up.
- INPUT B MODE
Press this key to choose different INPUT B mode, LINE, USB B
-
EARPHONES INPUT JACK
-
USB B input jack
-
GUITAR VOLUME
Adjust the volume of the GUITAR
- MIC VOLUME
Adjust the volume of the MICROPHONE
- ECHO
Adjust the ECHO of the MIC input
-
GUITAR jack
-
MIC jack
-
LINE IN AUDIO INPUT JACK
Connect to LINE IN signal input jack.
-
DC POWER light
-
AUX AUDIO INPUT JACK
Connect to AUX signal input jack.
-
USB A input jack
-
On AC: CHARGE/STANDBY/NORMAL
A long Press on this key turns on or standby the unit. A short Press on this key turns on the unit to CHARGE, STANDBY or NORMAL mode
On DC: BAT LEVEL
A Press on this key shows the current battery level.
- INPUT A MODE
Press this key to choose different INPUT A mode, AUX A, BT A, FM, USB A
- INPUT A PLAY/PAUSE
Press this key to choose play/pause music with INPUT A
When playing usb, long press this key change play time count down or count up.
- INPUT A VOLUME
This is used to adjust the volume of INPUT A
- INPUT A NEXT
Press this key to choose next music with USB A
- INPUT A PREV
Press this key to choose previous music with INPUT USB A
26.MENU
This switch selects the main volume, bass, treble, x driver, light mode
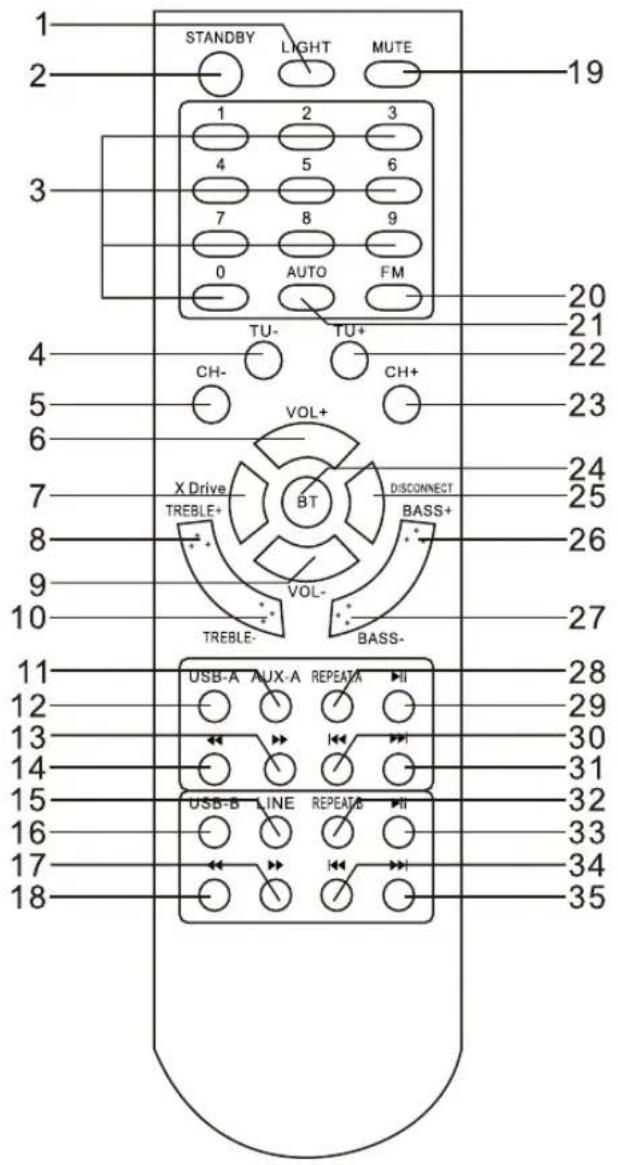
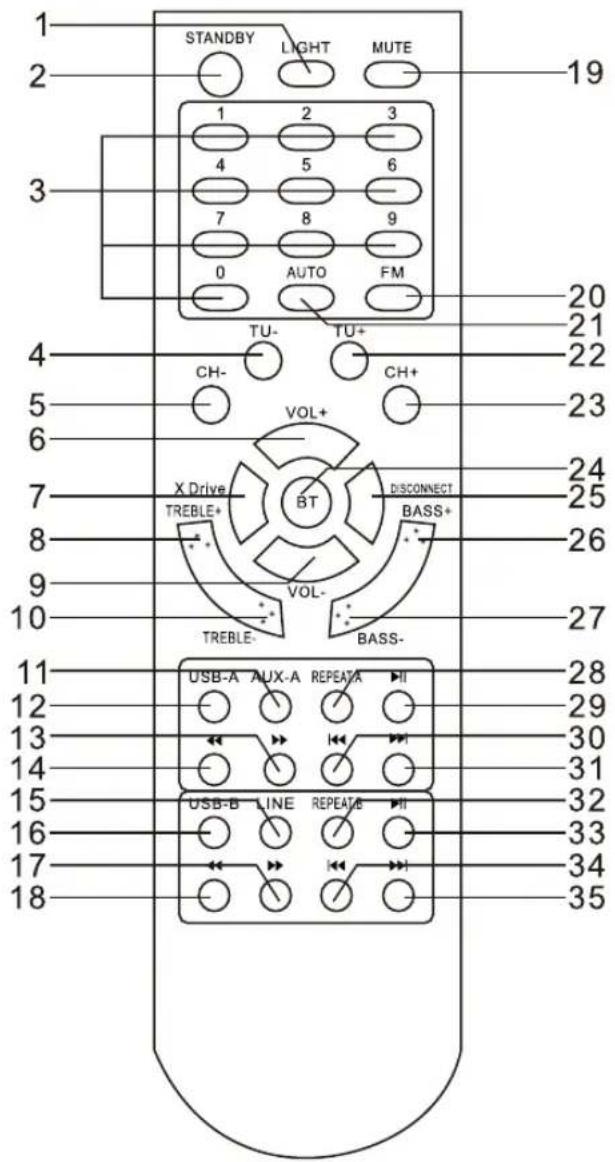
- LIGHT
2.STANDBY - NUMBER BUTTON
- TUNING
5.CHANNEL - VOLUME+
7.XDRIVE - TREBLE+
- VOLUME
- TREBLE-
11.AUX-A - USB-A
- USB-A F.WARD
- USB-A B.WARD
- LINE
- USB-B
- USB-B F.WARD
- USB-B B.WARD
- MUTE
- FM
21.AUTO - TUNING+
23.CHANNEL+
24.BT
25.DISCONNECT
26.BASS+ - BASS
- INPUT-A REPEAT
- INPUT-A PAUSE
- INPUT-A PREVIOUS
- INPUT-A NEXT
- INPUT-B REPEAT
- INPUT-B PAUSE
- INPUT-B PREVIOUS
- INPUT-B NEXT
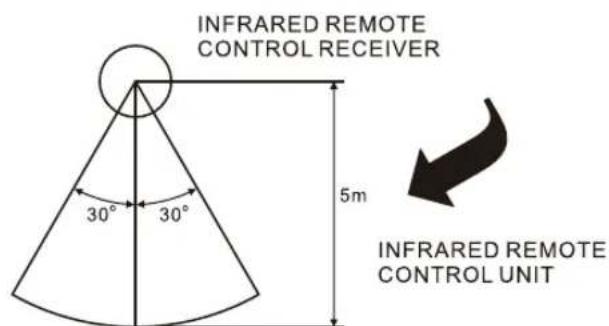
| EN EN | |
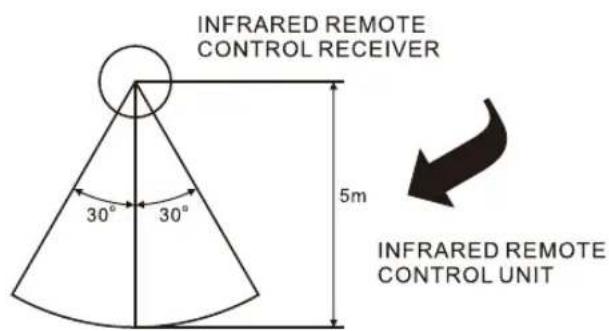
| INFRARED REMOTE CONTROL RECEIVER | INFRARED REMOTE CONTROL RECEIVER |
| 5m 5m | |
| INFRARED REMOTE CONTROL UNIT | INFRARED REMOTE CONTROL UNIT |
REMOTE CONTROL OPERATION:
If the remote control conflicts with other devices, the operation will be affected.
Do not simultaneously press buttons on the unit and the remote control.
□ Avoid using two remote controls at the same me as this will cause a malfunction.
Use only UM-4 'AAA' size batteries. Do not mix old batteries with new ones.
If the batteries leak, clean the remote control thoroughly before replacing batteries
Do not short two terminals of the batteries. Dispose old batteries in a suitable place.
NORMAL FUNCTION
- Select power switch on the backside of the speaker to AC or DC mode.
- Select an audio source by pressing the INPUT A key on the front panel to display AUX A, BT A, FM, USB A. Press the INPUT B key on the front panel to display LINE, USB B.
When unit is AC mode:
- Pressing standby button once will activate charging mode, showing the battery charging status on the blue led-display.
- Pressing standby button second time will activate the speaker and showing green charging light.
- You can also select the standby mode, without charging the battery
When unit is DC mode:
- Pressing standby button shows the battery level on the blue led display
- Rotate the VOLUME/MULTI/DJ EFFECT wheel on the control panel or the VOL+/- key on the remote control to adjust the main volume. Then adjust the volume slider of INPUT A and use the right volume slider to change the volume of INPUT B.
- To adjust the bass, treble, X-drive, speaker lights and main volume, press the menu key to select bass, treble, X-drive, speaker lights, then rotate the big VOLUME/MULTI/DJ EFFECT wheel.
- PHONES OUTPUT selection. Press the PHONES MODE button on the control panel to display INPUT A, INPUT B, or INPUT AB and adjust the volume of A,B or AB by rotating the multi DJ effect wheel.
- Press the LIGHT button on the remote control or press the MENU button on the front panel until speaker light mode is displayed, then rotate the VOLUME/MULTI/DJ EFFECT wheel to select to OFF, R, G, B, RG, RB, GB, RGB, AUTO, DEMO light mode.
- Press the MUTE key on the remote to mute, press it again to reset.
- Press X DRIVE on the remote to turn on/off X-Bass effect.
SPEAKER LIGHT COLOR CONTROL OPTIONS
- R = red lights flash
- G = green lights flash
- B = blue lights flash
- RG = red and green lights flash RB = red and blue lights flash GB = green and blue lights flash
- RGB = red, green, and blue lights flash
- Auto = the various color combinations cycle through and flash.
- Demo = lights flash and change color as if they were responding to the beat of the music.
TUNER APPLICATIONS
- Before using the radio functions, you must adjust the antenna to obtain optimum reception.
Press the INPUT A key on the front panel or the FM key on the remote control, to select "FM" function.
- Press the AUTO key on the remote control or the play button of the INPUT A control panel.
The machine will scan radio channels from low- frequency to high-frequency by itself and stores the channels found one by one. - Press the CH + / CH- key on the remote control to change radio presets that have been stored previously.
- Press or hold the TU + / TU - key on the remote control to adjust the radio frequency manually.
- To select radio stations from the control panel, press and hold the next/prev buttons.
KARAOKE & GUITAR FUNCTION
- The machine can auto detect whether a MICROPHONE or GUITAR is connected.
- Please turn off the microphone volume with the MIC.VOL knob on the front panel and adjust the volume gradually after inserting the microphone. Remark: The PMX-240 is delivered with a wireless microphone using 2AA batteries (not included). When you switch the button to "ON", you can speak in it and adjust volume and echo on the control panel.
- Adjust the ECHO knob on the front panel to change the microphone ECHO.
- Adjust the GUITAR VOL knob on the front panel to change the guitar VOLUME.
Note: Do not touch the top of the microphone when singing in order to avoid howling effect.
Adjust the microphone volume gradually to avoid howling effect.
BLUETOOTH PAIRING AND CONNECT
- Turn off any Bluetooth devices previously paired (linked) with this unit.
- Turn on the Bluetooth feature on your phone or music player.
- Turn on and set this unit to Bluetooth mode. The flashing blue light "BT" on LED display indicates it is in pairing mode.
- Set your phone or music player to search for Bluetooth devices.
- Select 'PMX-240' from search results on your phone or music player.
- Select OK or YES to pair this unit with your phone or music player.
- If protected, enter 0000 for passkey steady blue light indicates successful connection.
- Press the DISCONNECT key on the remote control to disconnect the Bluetooth.
FUNCTION OF USB READER
USB interface
This unit has two USB jacks. Press the INPUT A key to select USB A, then you can insert a USB stick to play music. Press the INPUT B key to select USB B, then you can insert another USB stick to play music.
Important: The USB port is intended for data transfer only, other devices cannot be used with this USB connection. The use of USB extension cords is not recommended.
TIME DISPLAY
In USB mode, the display can show either the elapsed or the remaining time.
With long press of the play/pause key, you can select negative or positive display of the time.
CHARGING THE BATTERY
- When in battery powered mode, the standby operation cannot be used.
- The control panel has a charging light. When the battery is charged enough, the light is green. When the battery is low, the system display prompts 'LOW POWER' and the light turns red.
TO PROTECT THE LIFETIME OF THE INTERNAL BATTERY:
When the battery is empty, switch immediately the POWER knob on the backside to OFF position to protect the lifetime of the internal battery or to AC to charge it again.
Important: The supplier is not responsible for damage caused by misuse of the device and the battery will not be covered by the guarantee.
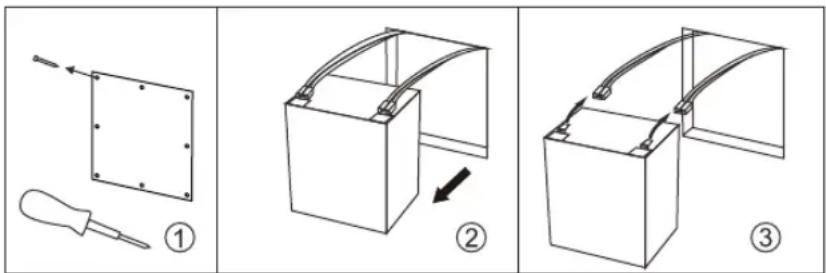
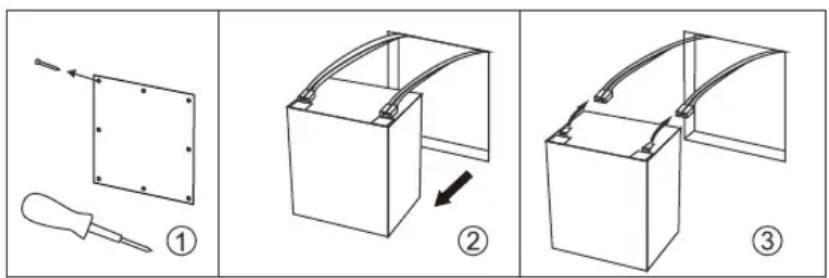
BATTERY DISASSEMBLY
- Remove the screws on the rear panel.
- Take out the battery.
- Disconnect the battery
ACCESSIONS
Remote control 1 pc
Instruction Manual 1 pc
Wireless Microphone 1 pc
AC power cable 1 pc
| SPECIFICATION | |
| Frequency Response 20Hz-20KHz | |
| Power Source | 230V ~ 50Hz/12VDC |
| Max.Power | 120W |
| Consumption | |
| Battery Lead/Acid 12VDC, 3.5 Ah | |
| DC Playback time ~10hrs on 50% volume | |
| Output power 150W (RMS) | |
| Microphone Wireless 864 MHz | |
| Bluetooth V4.2 | |
| FM radio 87.5-108 MHz | |
| Unit Size (W x D x H) | 32 x 33.7 x 59 cm |
| Tweeter size 2 x 1 inch | |
| Woofer size 1 x 3 inch | |
| Subwoofer size 1 x 10 inch | |
| Unit weight 14.5 kg | |
| Working Temperature 10-40 °C |
The specification presents only as a reference. The value of weight and size are approximation.
Our product is improved ceaselessly and the specification and function may be changed without prior notice.
This product operates at 2400 - 2483.5 MHz and is designated only to be used inside a normal household environment. This product is suited for this purpose within all EU counties.
Please note (For use of wireless microphone)
This product operates at a frequency of 864 MHz and is designated only to be used inside a normal household environment. This product is suited for this purpose within most EU countries.
The user should check the allowed frequencies of the country where the unit will be used in.
(More information can be found at: https://www.apwpt.org)
The user is responsible for the use of this unit. Lenco cannot be held responsible if this unit is used for other purposes than which are described in this manual.
Guarantee
Lenco offers service and warranty in accordance to European law, which means that in case of repairs (both during and after the warranty period) you should contact your local dealer.
Important note: It is not possible to send products that need repairs to Lenco directly.
Important note: If this unit is opened or accessed by a none official service center in any way, the warranty expires.
This device is not suitable for professional use. In case of professional use, all warranty obligations of the manufacturer will be void.
Disclaimer
Updates to Firmware and/or hardware components are made regularly. Therefore some of the instruction, specifications and pictures in this documentation may differ slightly from your particular situation. All items described in this guide for illustration purposes only and may not apply to a particular situation. No legal right or entitlements may be obtained from the description made in this manual.
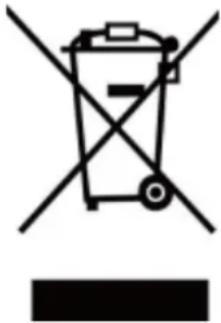
Disposal of the Old Device
This symbol indicates that the relevant electrical product or battery should not be disposed of as general household waste in Europe. To ensure the correct waste treatment of the product and battery, please dispose them in accordance to any applicable local laws of requirement for disposal of electrical equipment or batteries. In so doing, you will help to conserve natural resources and improve standards of environmental protection in treatment and disposal of electrical waste (Waste Electrical and Electronic Equipment Directive).
Service
For more information and helpdesk support, please visit www.lenco.com
Lenco Benelux BV, Thermiekstraat 1a, 6361 HB Nuth, The Netherlan
LET OP:
Gebruik van bediereningen of afstellenen of uitvoer van procedures anders dan gespecifieerd in deze documentatie kan leiden tot blootstelling aan schadelijke straling.
Dit apparaat dient uitsluitend te worden aangepast of gerepareerd door gekwalificeerd onderhoudspersoneel.
VOORZORGSMAATREGELEN VOOR GEBRUIK
ONTHOUD DE VOLGENDE INSTRUCTIES:
- Gebruik dit apparaat Niet in de buurt van water.
- Reinig het uitsluitend met een Licht vochtige doeck.
- Bedek of blokkeer de ventilatie-openingen Niet. Wanneer u het apparaat op een schap plaatst, dient u 5 cm (2") vrij ruimte rondon het gehele apparaat te behouden.
- Installee het product volgens de meegeleverde gekruikershandleiding.
- Nooit op de stroomadapter stappen of deze indrukken. Wees voornamelijk voorzichtig in de buurt van de stekkers en het punt waar de kabel uit het apparaat komt. Plaats geen zware voorwerpen op de stroomadapter, om beschadiging ervan te voorkomen. Houd het gehele apparaat buiten bereik van kinderen! Wanner kinderen met de voedingskabel spelen, können zich ernstig letsel oplopen.
- Haal de stekker uit het stopcontact tijdens onweer of wanner u deze langereijd Niet gebruikt.
- Houd het apparaat uit de buurt van hittebronnen, zoals radiateurs, verwarmingen, kachels, kaarsen en anderehittegenererende producten.
- Gebruik dit apparaat Niet in de buurt van krachtige magnetische velden.
- Elektrostatice ontlading kan normala gebruik van dit apparaat verstoren. U hoeft het apparaat in dit geval slechts te resetten en opnieuw op te starten volgens de gebruikershandleiding. Wees voorzichtig tijdens bestandsoverdracht en doe dat in een omgeving zonder statische verstoringen.
- Waarschuwing! Steek nooit een voorwerp via de ventilatie- of andere openings in het product. Er is hoogspanning in het product aanwezig en als u er een object insteekt, kan dat een elektrische schok veroorzaken en/of kortsluiting in de interne onderdelen. Mors omdezelfde reden geen water of vloeistof op het product.
- Gebruik het toestel Niet in vochtige ruimtes, zoals badkamers, stomende keukens of in de buurt van zwembaden.
- Gebruik dit apparaat nicht wanner condensatie kan optreden.
- Alhoewel dit apparaat met große zorg gefabricieerd en verschillende keren geinspecteerd is voordat het de fabriek verlaat, is het nog steeds möglichk dat er problemen optreden, zoals met alle elektrische apparaten. Als u rook, een overmatige hitteontwikkeling of enig ander onverwacht verschijnsel opmerkt,要去 u onmiddelijk de stekker van het netsnoeruit het stopcontact halen.
- Dit apparaat要去 allen tijde goed worden geventileerd!
- Dit apparaat要去 aangedreven worden door een voedingsbron, zoals aangegeven op het specificatieplaatje. Als u twijfelt over het type voeding dat gebruikt worden in uwuis, raadpleeg dan a.u.b. uw dealer of plaatselijk energiebedrijf.
- Het stopcontact moet in de buurt van de apparatuur zijn geinstalleerd en eenvoudig te bereiken zijn.
- Overbelast stopcontacten of verlengsnoeren nicht. Overbelasting kan brand of een elektrische schokveroorzaken.
- Apparaten met een Klasse 1 structuur dienen te worden aangesloten op een stopcontact met een beschermende aardverbinding.
- Apparaten met een Klasse 2 structuur vereisen geen aardverbinding.
- Houd ze uit de buurt van knaagdieren. Knaagdieren knauwen graag aan voedingskabels.
- Houd.altijd de stekker vast wanner u deze uit het stopcontact trekt.Trek nooit aan de voedingskabel.Dit kan tot een kortsluiting leiden.
- Vermijd om het toestel teplaatsen op een ondergrond die blootgesteld kan worden aan trillingen of schokken.
- Om het apparaatijdens onweer te beschermen, haalt u de netvoedingadapter uit het stopcontact.
- Wanner het apparaat voor een langeperiode Niet in gebruik is, haalt u de netvoedingadapter om veiligheidsredenenuit het stopcontact.
-
Gebruik een zacht, droog doeke om het apparaat te reinigen. Gebruik geen oplosmiddelen of op benzine gebaseerde vloeistoffen. U kunt een vochtig doeke met verdund schoonmaakmiddel gebruiken om hardnekkige vlekken te verwijderen.
-
De leverancier is nicht verantwoordelijk voor schade of verloren gegevens veroorzaakt door storing, misbruik, modificatie van het apparaat of batterijvervanging.
- Onderbreek nooit de verbinding wanner het apparaat formatteert of bestanden overdraagt. De gegevens+knen anders corrupt of verloren raken.
- De USB-geheugenstick dient direct in het apparaat te worden gestoken. Gebruik geen USB-verlengkabel, waar dat die kan leiden tot storingen met foutieve geeverns als gevolg.
- Het apparaat mag Niet worden blootgesteld aan druppels of spatten en zorg ervoor dat er geen met vloeistof bevulde voorwerpen, zoals vazen, op of nabij het apparaat zich geplaatst.
- Om de verbinding met de stroomaansluiting volledig te verbeken, moet de stekker van het apparaat uit het stopcontact worden gehaald, waar dat de stekker van het apparaat de hoofdschakelaar is.
- De stekker van het apparaat mag Niet worden belemmerd en moetijdens gebruik eenvoudig toegankelijk worden gezchoolen.
- Batterijen mogen Niet aan overmatige但它, zoals zonlicht, open vuur e.d. worden blootgesteld.
- Een afstand van minimaal 10 cm rondon het apparaat is nodig voor voldoende ventilatie.
- De ventilatie mag Niet worden gehinderd door het bedekken van de ventilatieopeningen met voorwerpen zoals kranten, tafelkleden, gordijnen etc.
- Plaats geen bronnen met een open vlam, zoals brandende kaarsen, op het apparatusaat.
- Aandacht voor het milieu is nodig bij het verwijderen van de batterijen.
- Het apparaat kan alleen worden gebruikt in gematigde klimaten. Extreem foude of warme omgevingen要去en worden vermeden.
- Het nominale specificatielabel is te vinden op het paneel aan de onderkant van het apparatusaat.
- Dit apparaat is Niet bestemd voor gebruik door mensen (inclusief kinderen) met fysieke, zintuiglijke of geestelijkke gebreken of gebrek aan kennis en ervaring, tenzij zij onder toezicht staan of instructies hebben over het juiste gebruik van het apparaat hebben gekregen van de persoon die verantwoordelijk is voor hun veriligheid.
- Dit product is alleen voor huishoudelijk gebruik bedoeld en Niet voor commercieel of industrieel gebruik.
- Verzeker uervaan dat het apparaat in een stabiele positie staat opgesteld. Schade,veroorzaakt door het gebruik van dit product in een onstabile positie, of door het Niet naleven van waarschuwingen of voorzorgsmaatregelen genoemd in deze handleiding, valt nicht onder de garantie.
- Verwijder nooit de behuizing van dit apparatus.
- Plaats dit apparaat nooit op andere elektrische apparatuur.
- Dit product Niet gebruiken of opslaan opplaatsen waar het wordt blootgesteld aan direct zonlicht,但它, buitensporig veel stof of trillingen.
- Reinig dit product nicht met water of andere vloeistoffen.
- Bedek of blokkeer de gleuven en de gaten in het product Niet.
- Stop geen vreemde voorwerpen in de gleuven of gaten van het product.
- Geef kinderen geen gelegenheid in aanraking met plastic zakken te komen.
- Controller of de spanning op het specificatieplaatje van uw apparaat overeenkomt met het lichtnet in uw huis (specificatieplaatje is te vinden op dechterzijde van het apparaat).
- Zorg ervoor dat niemand op de voedingskabel kan gaan staan of dat de kabel kan worden ingedrukt, voornamelijk bij stekkers, stopcontacten en het punt waar kabels uit het apparatusatkommen.
- Gebruik uitsluitend uitbreidingen/accessoires gespecifieerd door de fabrikant.
- Laat alle reparations over aan gekwalificeerd onderhoudspersoneel. Onderhoud is vereist als het toestel hoe dan ook is beschadigd, zoals bijvoorbeeld het netsnoer of de stekker, wanner er vloeistof een voorwerp in het apparaat isterechtgekomen, wanner het apparaat is blootgesteld aan regen of vocht, als het Niet normal werkt of is gevallen.
- Gebruik nooit een beschadigde voedingskabel of stekker of een los stopcontact. Dit vormt namelijk een risico op brand of elektrische schokken.
Waarschuwing: Langdurige bloatstelling aan luid geluid van persoonlijke muziekspeler kan leiden tot tijdelijke of permanente gehoorbeschadiging.
INSTALLATIE
Pak alle onderdelenuit en verwijder de beschemende materialen.
- Sluit het apparaat Niet aan op het stopcontact, voordat u de netspanning hebt gecontroleerd en voordat alle andere aansluitingen zijn gemaaakt.
Bedek geen van de ventilatieopengen en zorg voor enkele centimeters vrij ruimte rond het apparaat voor ventilatie.
- Aan/uit-schakelaar
Schakelmodi DC INGANG, AC INGANG ofuit.
Wanner u de schakelaar op AC zet, werkt de speaker op 230V en za de accu opgeladen worden.
Wanner u de schakelaar op OFF zet, is er geen stroom en za de accu Niet opgeladen worden.
Wanner u de schakelaar op DC zet, worden de speaker aangedreten door de accu.
2.DC12VINGANG
De speaker kan verbonden worden met de 12V DC accu van een auto.
3. FM-ANTENNE
4. ACINGANG AC 230V\~,50H z
1. LED-SCHERM
Geeft system parameter informatione weer, de linkerkant laat de INVOER A status zien en de rechterkant van het scherm laat de INVOER B status zien
2. VOLUME/MULTI/DJ EFFECT
Draai aan de knop om het primaire volume, hoofdtelefoon volume, de treble en bas aan te passen. Druk deze knop kort in om een ander muziek effectuit te kiezen, zoals SCRATCH, REVERB, BEAT BOX, YEAH, BRING IT, GEYA of COME ON. Lang indrukken speelt een DRUMS effect af.
3. HOOFDTELEFOON MODUS
Druk op deze knop om verschillende HOOFDTELEFOON modiuit te kiezen, zoals INVOER A, INVOER B, INVOER AB
4. INVOER B VORIGE
Druk op deze knop om het vorige nummer met USB B te kiezen
5. INVOER B VOLGENDE
Druk op deze knop om het volgende nummer met USB B te kiezen
6. INVOER B VOLUME
Dit worden gezruikt om het volume van INVOER B aan te passen
7. INVOER B AFSPELEN/PAUZEREN
Druk op deze knop om muziek met INVOER B af te spelen/pauzeren
Wanner een USB afspeelt, kunt u door deze knop lang ingedrukt te houden de speeltijd af of op latenten tellen.
8. INVOER B MODUS
Druk op deze knop om een andere INVOER B modus te selecteren, zoals LINE of USB B
- HOOFDTELEFOON AANSLUITING
- USB B invoer aansluiting
- VOLUME GITAAR
Pas het volume van de GITAAR aan
- VOLUME MICROFOON
Pas het volume van de MICROFOON aan
- ECHO
Pas de ECHO van de MIC invoer aan
- GITAAR aansluiting
- MICROFOON aansluiting
- LINE IN AUDIO INVOER AANSLUITING
Verbind met de LINE IN-signal invoer aansluiting.
- Voedingslampje
- AUX AUDIO INVOER AANSLUITING
Verbind met de AUX-signaal invoer aansluiting.
- USB A invoer aansluitin g
- Op AC: OPLADEN/STAND-BY/NORMAAL
Door deze knop lang in te drukken zet u het apparaat aan of in stand-by. Door deze knop kort in te
drukken zet u het apparatusat in de OPLAAD, STAND-BY of NORMAAL modus
Op DC:ACCUNIVEAU
Als u deze knop indrukt worden het huidige accuniveau weergegeven.
- INVOER A MODUS
Druk deutsche knop in om een andere INVOER A modus te kiezen, zoals AUX A, BT A, FM, USB A
- INVOER A AFSPELEN/PAUZEREN
Druk op deze knop om muziekmet INVOER A af te spelen/pauzeren
Wanner een USB aftspeelt, kunt u door deze knop lang ingedrukt te houden de speeltijd af of op
latentellen.
- INVOER A VOLUME
Dit worden gezruikt om het volume van INVOER A aan te passen
- INVOER A VOLGENDE
Druk op deze knop om het volgende nummer met USB A te kiezen
- INVOER A VORIGE
Druk op deze knop om het vorige nummer met USB A te kiezen
- MENU
Deze schakelaar selecteert het primaire volume, de bas, treble, x driver en Licht modus
- LICHT
2.STAND-BY - NUMERIEKE TOETSEN
4.AFSTEMMEN - KANAAL
- VOLUME+
7.X DRIVE - TREBLE+
- VOLUME
- TREBLE
11.AUX-A - USB-A
- USB-A DOORSPOELEN
- USB-A TERUGSPOELEN
- LINE
- USB-B
- USB-B DOORSPOELEN
- USB-B TERUGSPOELEN
19.DEMP - FM
21.AUTO
22.AFSTEMMEN+ - KANAAL+
24.BT - VERBINDING VERBREKEN
- BASS+
- BASS
- INVOER-A HERHALEN
- INVOER-A PAUZEREN
- INVOER-A VORIGE
- INVOER-A VOLGENDE
- INVOER-B HERHALEN
- INVOER-B PAUZEREN
- INVOER-B VORIGE
- INVOER-B VOLGENDE
| EN |
| INFRARED REMOTE CONTROL RECEIVER |
| 5m |
| INFRARED REMOTE CONTROL UNIT |
| NL |
| INFRARODE AFSTANDSBEDIENING ONTVANGER |
| 5m |
| INFRARODE AFSTANDSBEDIENING |
AFSTANDSBEDIERING:
Als de afstandsbediening verstoord wordt door andere apparaten, za het gebruik hierdoor beinvloedt worden.
Druk Niet gelijkijdig knappen op het apparaat en de afstandsbediening in.
Vermijd het gelijktijdig gebruiken van twee afstandsbedieningen, aangezien dit een storing za veroorzaken.
Gebruik alleen UM-4 AAA' batterijen. Gebruik geen oude en neue batterijen naast elkaar.
Als de batterijen lekken, maak de afstandsbediening dan grondig schoon voordat u de batterijen verrangt
Verbind twee kanten van de batterijen Niet met elkaar. Gooi oude batterijen weg op de waarvoortbestemde plek.
NORMALE FUNCTIE
- Zet de aan/uit-schakelaar op de blijktant van de speaker op de AC of DC modus.
- Selecteer een geluidsbron door op de INVOER A knop te drukken op het voorpaneel om AUX A, BT A, FM en USB A waar te gehen. Druk op de INVOER B knop op het voorpaneel om LINE en USB B waar te gehen.
Wanner het apparaat in de AC modus staat:
- Wanner u een keer op de stand-by knop drukt, za u de oplaadmodus activeren en de oplaadstatus van de accu worden weergegeven op het blauwe led-schem.
- Een tweede keer op de stand-by knop drukken za de speaker activeren en een groen oplaadlichtje latent zien.
- U kunt ook de stand-by modus selecteren zonder de accu op de laden
Wanner het apparaat in de DC modus staat:
-
Als u op de stand-by knop drukt, ziet u het accuniveau op het blauwe led-schem
-
Draai aan de VOLUME/MULTI/DJ EFFECT knop op het besturingspaneel of druk op de VOL+/- knappen op de afstandsbediening om het primaire volume aan te passen. Pas cervolgens de volumeschuifregelaar van INVOER A aan en gebruik de rechtter volumeschuifregelaar om het volume van INVOER B aan te passen.
- Om de bas, treble, X-drive, speakerlichen en het primaire volume aan te passen, drukt u op de menuknop om bas, treble, X-drive of speakerlichen te selecteren en verrolgens draait u aan de grote VOLUME/MULTI/DJ EFFECT knop.
- HOOFDTELEFOON UI TVOER selectie. Druk op de PHONES MODE knop op het besturingspaneel om INPUT A (INVOER A), INPUT B (INVOER B) of INPUT AB (INVOER AB) waar te geben en pas het volume van A, B of AB aan door aan de multi DJ effect knop te draaien.
- Druk op de LIGHT knop op de afstandsbediening of druk op de MENU knop op het Voorpaneel totdat de speaker Licht modus weergegeven is. Draai verrolgens aan de VOLUME/MULTI/DJ EFFECT knop om de OFF (UIT), R,G,B, RG, RB, GB, RGB, AUTO, DEMOicht modus te selecteren.
- Druk op de MUTE knop op de afstandsbediening om het geluid te dampen en nog een keer om dit ongedaan te make.
- Druk op de X DRIVE knop op de afstandsbediening om het X-Bas effect in/uit te schakelen.
SPEAKER LICHTKLEUR BESTURINGSOPTIES
- R = rode lichten knipperen
- G = groene lichten knipperen
B = blauwe lichten knipperen - RG = rode en groene lichten knipperen RB = rode en blauwe lichten knipperen GB = groene en blauwe lichten knipperen
- RGB = rode, groene en blauwe lichten knipperen
- Auto = de verschillende kleurcombinaties worden willekeurig geselecteerd en knipperen.
- Demo = lichten knipperen en veranderen van kleur, net alsof ze reageren op de beat van de muziek.
AFSTEM APPLICATIONS
- Voordat u de radiofuncties gebruikt, moet u eerst de antennne aanpassen om een optimaal ontvangst te krijgen.
Druk op de INVOER A knop op het voorpaneel of de FM knop op de afstandsbediening om de "FM" functie te selecteren.
- Druk op de AUTO knop op de afstandsbediening of de aftspeelknop van het INVOER A besturingspaneel. Het apparaat za automatisch lage tot hoge radiofrequenties scannen en de gezonden kanalen een voor een opslaan.
- Druk op de CH+/CH- knop op de afstandsbediening om te schakelen:tussen de radiokanalen die opgeslagen zich.
- Druk op of houdt de TU+/TU- knop op de afstandsbediening ingedrukt om de radiofrequentie handmatig aan te passen.
- Om radiostations vanaf het besturingspaneel te selecteren, houdt u de volgende/vorige knuppen ingedrukt.
KARAOKE EN GITAAR FUNCTIE
- Het apparatus kan automatisch detecteren of een MICROFOON of GITAAR verbonden is.
- Zet het geluid van het microloon volume uit met de MIC.VOL knop op het voorpaneel en pas het volume geleidelijk aan nadat u de microloon verbonden heeft. Opmerking: De PMX-240 worden geleverd met een draadloze microloon op 2 AA-batterijen (niet meegeleverd). Wanner u de knop op "ON" zet, kutu spreken en het volume en echo aanpassen op het bedieningspaneel.
- Draai aan de ECHO knop op het Voorpaneel om de ECHO van de microfoon aan te passen.
- Draai aan de GUITAR VOL knop op het Voorpaneel om het VOLUME van de gitaar aan te passen.
Opmerking: Raak de bovenkant van de microfoon Niet aanijdens het zingen om het jankende effect te voorkomen.
Pas het volume van de microfoon geleidelijk aan om het jankende effect te voorkommen.
BLUETOOTH KOPPELEN EN VERBINDEN
Schakel alle Bluetooth apparaten uit die u voorheen gekoppeld (verbonden) heeft met dit apparaat.
Activeerde Bluetooth functie op uw telefoon of muziekspeler.
- Zet dit apparaat aan en stel deze in op de Bluetooth modus. Het knipperende blauwe "BT" Licht op het LED-schem geeft aan dat de koppelmodus geactiveerd is.
- Zoek met uw telefoon of muziekspeleraar Bluetooth apparaten.
- Selecteer 'PMX-240' in de Zoekresultaten van uw telefoon of muziekspeler.
- Selecteer OK (OKÉ) of YES (JA) om dit apparaat met uw telefoon of muziekspeler te verbinden.
- Voer 0000 in als er om een wachtwoord gezraagd worden en een vast blauwlicht geeft aan dat de verbinding gelukt is.
- Druk op de DISCONNECT knop op de afstandsbediening om de Bluetooth verbinding te verbreken.
FUNCTIE VAN DE USB-LEZER
USB-interface
Dit apparaat heeft twee USB aansluitingen. Druk op de INVOER A knop om USB A te selecteren en cervolgenskest u een USB-stick verbinden om muziek af te spelen. Druk op de INVOER B knop om USB B te selecteren en cervolgenskest u nog een USB-stick verbinden om muziek af te spelen.
Belangrijk: De USB-poort is alleen bedoeld voor het versturen van data, andere apparaten können nicht gezruikt worden met de USB-verbinding. Het gebruik van USB-verlengkabels raden we af.
TIJDWEERGAVE
In de USB modus kan het scherm zowel de verstreten als resterendeijd weergeven.
Door de afspelen/pauzeren knop lang ingedrukt te houden, kurz u schakelen:tussen een negatieve of positieveijdweergave.
DE ACCU OPLADEN
-
De stand-by kan nicht gebruikt worden wanner het apparaat aangedreten worden door de accu.
-
Het besturingspaneel heeft een oplaadlichtje. Wanneer de accu voldoende opgeladen is, is het Lichtje groen.
Wanneer de accu bijna leeg is, zal er 'LOW POWER' (ACCU BIJNA LEEG) op het scherm verschijnen en hetlichtje worden rood.
OM DE LEVENSDUUR VAN DE INTERNE BATTERIJ TE BESCHERMEN:
Zet wanneser de batterij leeg is onmiddelijk de aan/uit-schakelaar aan dechterzijde op de OFF-positie om de levensduur van de interne batterij te beschermen of op AC om ze opnieuw op te laden.
Belangrijk: De leverancier is nicht aansprakelijk voor schade veroorzaakt door verkeerd gebruik van het apparaat en de batterij is gedekt door de garantie.
ACCU VERWIJDEREN
- Verwijder de schroeven op het hinterpaneel.
- Haal de accu eruit.
- Ontkoppel de accu
| ACCESSIONS | |
| Afstandsbediening 1 st | |
| Handleiding 1 st | |
| Draadloze microfoon 1 st | |
| AC stroomkabel 1 st | |
| SPECIFICATIE | |
| Frequentiebereik 20Hz-20KHz | |
| Voedingsbron 230V~50Hz/12VDC | |
| Max. Stroomverbruik 120 W | |
| Accu Lood/zuur 12VDC, 3,5 Ah | |
| DC Gebruikestijd ~10u bij 50% volume | |
| Totaal vermogen 150W (RMS) | |
| Microfoon Draadloos 864 MHz | |
| Bluetooth V4.2 | |
| FM-radio 87,5-108 MHz | |
| Afmetingen (B x D x H) | 32 x 33,7 x 59 cm |
| Tweeter afmeting 5,08 x 2,54 cm | |
| Woofer afmeting | 2,54 x 7,62 cm |
| Subwoofer afmeting | 2,54 x 25,4 cm |
| Gewicht van het apparaat | 14,5 kg |
| Gebruikstemperatuur | 10-40 °C |
- De specificatie fungeert alleen als een referentie. Het gewicht en de afmetingen zijn gemiddeldennen.
- Ons product worden continu verbeterd en de specificaties en functies können zonder voorafgaande kennisgeving aangepast worden.
Dit product werkt op 2400 - 2483,5 MHz en is ontworpen om alleen te worden gebruikt in een normale huishoudelijk omgeving. Dit product is geschikt voor dit doel binnen alle EU-landen.
Opgelet (bij gebruik van draadloze microfoon)
Dit product werkt met een freiestie van 864 MHz en is alleen bedoeld voor gebruik binnen een normale huishoudelijk omgeving. Dit product is geschikt voor dit doel in de meeste EU-landen.
De gebruiker zou de toegestane frequencies van het land waar het apparaat gebruikt za worden要去en controleren.
(Meer informatie kan gezonden worden op: https://www.apwpt.org)
De gebruiker is verantwoordelijk voor het gebruik van dit apparaat. Lenco kan nicht aansprakelijk gesteld worden als dit apparaat gebruikt worden voor andere doeleinden dan degene die in deze handleiding zijn beschreiben.
Garantie
Lenco biedt service en garantie aan overeenkomstig met de Europese wetgeving. Dit houdt in dat u, in het geval van reparaties (zowel tijdens als na de garantiperiode), uw lokale handelaar moet contacteren.
Belangrijke opmerking: Het is Niet möglich om producten die要去en worden gerepareerdrechtstreeks maar Lenco te sturen.
Belangrijke opmerking: De garantie verloopt als een onofficieel servicecenter het apparaat op wat voor manier dan ook heeft geopend, of er toegang toe heeft gekregen.
Het apparaat is nicht geschikt voor professioneel gebruik. In het geval van professioneel gebruik worden alle garantieverplichtingen van de fabrikant Nietig verklaard.
Disclaimer
Er worden regelmatig updates in de firmware en/of hardwarecomponenten gemaakt. Daardoor{kunnen gedeelten van de instructie, de specificaties en afbeeldingen in deze documentatie enigszins verschillen van uw eigena situatie. Alle onderwerpen die staan beschreiben in deze handleiding zich boedeld als illustratie en zich Niet van toepassing op specifieke situatuies. Aan de beschrijving in dit document{kunnen geen rechten worden ontleend.
Afvoer van het oude apparatus
Dit symbol geeft aan dat het betreffende elektrische product of de accu/batterij Niet mag worden verwijderd als algemeen huishoudelijk afval in Europa. Zorg voor een juiste afvalverwerking door het product en de accu/batterij in overeenstemming met alle van toepassing+zijnde lokale wetten voor het verwijderen van elektrische apparatuur of accu's/batterijen te verwijderen. Als u dit doet, helpt u de naturuike hulpbronnen te behonden en de standard van milieubescherming te verbeteren bij de behandeling en verwijdering van elektrisch afval (Afgedankte Elektrische en Elektronische Apparatuur).
Service
Bezoek voor meer informatie en helpdeskondersteuning www.lenco.com
Lenco Benelux BV, Thermiekstraat 1a, 6361 HB, Nuth, Nederland.
Deutsch PMX-240
ACHTUNG:
Die zweckentfremdete Bedienung, Benutzung oder Einstellung der Prozeduren kann zu gefährlichen Unfallen durch Strahlen führen.
Dieses Gerat darf außer von qualifizierten Fachleuten von niemand anderem repariert oder eingestellt werden.
VORSICHTSMASSNAHMIEN VOR DER BENUTZUNG
BEFOLGEN SIE IMMER FOLGENDE ANWEISUNGEN:
- Benutzen Sie das Gerät nicht in der Nähe von Wasser.
- Benutzen Sie zur Reinigung ein nur leicht befeuchtetes Tuch.
- Blockieren Sie keine Luftungsöffnungen. Wenn Sie das Gerät auf ein Regal stellen, halten Sie um das gesamte Gerät 5 cm (2") freien Platz.
- Stellen Sie das Gerät entsprechend den Anweisungen der mitgelieferten Bedienungsanleitung auf.
- Treten Sie nicht auf das Netzteil und klemmen Sie es auch nicht ein. Seien Sie im früheren Bereich des Steckers und der Herausfuhrungen des Kabels entsprechigt. Stellen Sie keine schweren Gegenstände auf das Netzteil, weil es dadurch beschädigt werden können. Halten Sie das gesamte Gerät außerhalb der Reichweite von Kindern! Durch Spieler mit dem Netzkabel können sie sich ernsthafte Verletzungen zuziehen.
- Trennen Sie das Gerät während eines Gewitters oder bei längerer Nichtbenutzung vom Netz.
- Halten Sie das Gerät von Hitzequellen wie Radiatoren, Heizern, Öfen, Kerzen oder anderen hitzeerzeugenden Gegenständen fern.
- Meiden Sie bei der Nutzung des Produkts die Nähe starker Magnetfelder.
- Elektrostatice Entladungen können die normale Verwendung von thisem Gerät stären. Sollte dies geschehen, führen Sie einfach einen Reset aus und starten Sie dann das Gerät entsprechend den Anweisungen dieser Bedienungsanleitung neu. Gehen Sie besonderss bei Datenübertragungen mit dem Gerät vorsichtig um und führen Sie diese nur in einer antielektrostatischen Umgebung aus.
- Warning! Niemals Gegenstände durch die Luftungsschlitze oder Öffnungen in das Gerät stecken. Im Gerät sind hohe Spannungen vorhanden und das Einführren von Gegenständen kann zu Stromschlag bzw. zu Kurzschlüssen der internen Teile führen. Aus dem gleichen Grund kein Wasser oder Flüssigkeiten in das Gerät geben.
- Benutzen Sie das Gerät nicht in nasser oder feuchter Umgebung wie Bad, Dampfküche oder in der Nähe von Schwimmbecken.
- Benutzen Sie das Gerät nicht bei Kondensationsgefahr.
- Obwohl these Gerät unter großter Sorgfalt und vor Auslieferung mehrmals überprüft wurde, konnen trotzdem wie bei jedem anderen elektrischen Gerät auch Probleme auftauchen. Trennen Sie das Gerät im Falle einer Rauchentwicklung, starker Hitzeentwicklung oder jeder anderen unnatürlichen Erscheinungsofar vom Netz.
- Das Gerät muss immer gut beluftet sein!
- Dieses Gerät ist durch eine Stromquelle wie auf dem Typenschild angegeben zu betreiben. Halten Sie bei Unsicherheiten über die Art Ihrer Stromversorgung in Ihrer Wohnung Rücksprache mit Ihrem Handler oder ihrer Stromzuliefererirma.
- Die Wandsteckdose muss sich in der Nähe des Geräts befinden und einfach zu erreichen sein.
- Steckdosen und Verlangerungsleitungen nicht überlasten. Eine Überlastung kann zu Brandgefahr bzw. Stromschlagen führen.
- Geräte der Schutzklasse 1 sind an eine Netzsteckdose mit Schutzleiter anzuschlieben.
- Geräte der Schutzklasse 2 benötigen keinen Schutzleiteranschluss.
- Halten Sie Nagetiere vom Gerät fern. Nagetiere lieben es, am Netzkabel zu nagen.
- Halten Sie den Netzstecker in der Hand, wenn Sie ein aus der Netzsteckdoseziehen. Ziehen Sie ihren nicht durch Zerren am Kabel hereaus. Das kann zu einem Kurzschluss führen.
- Vermeiden Sie es, das Gerät auf Oberflächen aufzustellen, die zu Schwingungen oder Stöß neigen.
- Trennen Sie bei Gewitter den Netzadapter vom Stromnetz, um das Gerät zu schützen.
- Wenn das Gerät für längerere Zeit nicht verwendet wird, sollte die Stromversorgung aus Sicherheitsgründen unterbrochen werden.
- Benutzen Sie zur Reinigung ein nur leicht befeuchtetes Tuch. Benutzen Sie niemals Lösungsmittel oder Flüssigkeiten auf Ölbasis. Benutzen Sie zum Entfernen hartnäckiger Flecken ein feuchtes Tuch mit mildem Reinigungsmittel.
- Der Hersteller haftet nicht für Schäden oder Verluste durch Fehlfunktion, Zweckentfremdung oder
Modification des Gerats oder durch Wechseln der Batterien.
-
Unterbrechen Sie die Verbindung nicht während einer Formatierung oder einer Datenübertragung. Bei Unterbrechung drohen Datenverlust und Datenbeschädigung.
-
USB-Sticks sind direkt mit dem Gerät zu verbinden. Verwenden Sie kein USB-Veränderungskabel, weil die erhöhte Störungsanfälligkeit zu Datenverlust führen können.
-
Das Gerätarfweder Tropf-noch Spritzwasser ausgesetzt werden und es dürfen keine mit Flüssigkeit gefüllten Behälter wie z.B. Vasen auf das Gerät oder in der Naze des Gerätes gestellt werden.
-
Um das Gerät vollständig vom Netz zu trennen, muss der Netzstecker des Gerätes vom Stromnetz getrennt werden, wobei die zu trennende Einheit den Netzstecker des Gerätes bezeichnet.
-
Der Netzsteckerarf nicht blockiert werden und muss wahrend des bestimmungsgemaien Gebrauchs immer leicht erreichbar sein.
-
Die Batterie darf keiner extremen Hitze wie z.B. Sonnenschein, Feuer o.a. ausgesetzt werden.
-
Für eine ausreichende Kuhlung des Geräts ist um diese herum mindestens ein Freiraum von 10 cm zu halten.
-
Die Ventilationarf nicht durch Abdecken der Ventilationsöffnungen durch Gegenstände wie Zeitungen, Tischdecken, Gardinen o.a. behindert werden.
-
Stellen Sie kein offenes Feuer wie z.B. angezündete Kerzen auf das Gerät.
-
Be der Batterieentsorgung sind die Entsorgungsvorschriften einzhalten.
-
Das Gerät kann nur bei moderaten Temperaturen verwendet werden. Eine Nutzung in extrem kalten oder bereits Umgebungen sollte vermieden werden.
-
Das Typenschild befindet sich an der Unterseite des Geräts.
-
Dieses Gerät ist nicht zur Benutzung durch Personen (auch Kinder) mit physischen, sensorischen oder mentalen Beeinträchtigungen oder ohne ausreichender Erfahrung vorgesehen, es sei dess, sie werden durch eine verantwortliche Person beaufsichtigt oder wurden in die ordnungsgemäß Bedienung des Gerätes durch eine für ihre Sicherheit verantwortlichen Person eingewiesen.
-
Dieses Produkt ist nur für den Hausgebrauch und nicht für gewerbliche oder industrielle Zwecke bestimmt.
-
Stellen Sie sichere, dass das Gerät in einer stabilen Position aufgestellt ist. Schäden, die durch Verwendung dieser Produkte in einer instabilen Position oder durch Nichtbeachtung der anderen in this Handbuch enthaltener Warnungen und Vorwahrung entstehen, werden nicht durch die Garantie abgedeckt.
-
Entfernen Sie niemals das Gehäuse dieseres Geräts.
-
Stellen Sie diese Gerät niemals auf andere elektrische Geräte.
-
Verwenden oder bewahren Sie diese Produkt nicht an Orten auf, in denen es direkter Sonneneinstrahlung, Hitze, übermögem Staub oder Vibration ausgesetzt ist.
-
Reinigen Sie diesen Produkt nicht mit Wasser oder anderen Flüssigkeiten.
-
Blockieren Sie nicht die Schlatze und Öffnungen in these Products.
-
Schieber Sie keine Fremdkörper in die Schlitze und Öffnungen in these Products.
-
Ermöglichen Sie Kindern nicht den Zugriff auf Plastiktüten.
-
Vergewissern Sie sich, dass die Spannungssangaben auf dem Typenschild des Geräts mit der Spannungsvorsorgung in Ihr Haushalt übereinstimmen (Das Typenschild befindet sich an der Rückseite des Geräts).
-
Verhindern Sie, dass das Netzkabel eingequetscht oder darauf getreten wird, insbesondere an den Steckern, Steckdosen und der Stelle, an der das Kabel aus dem Gerät austritt.
-
Benutzen Sie nur vom Hersteller empfohlene Erweiterungen/Zubehörteile.
-
Sprechen Sie alle Eingriffe mit qualifizierten Fachpersonal ab. Eingriffe werden notwendig, wenn das Gerät in irgendeiner Weise beschädigt wurde, beispelsweise am Netzkabel oder am Netzstecker oder wenn Flüssigkeit in das Gerät gelangt ist bzw. Gegenstände in das Gerät gefallen sind, das Gerät Regen oder Feuchtigkeit ausgesetzt war, es heruntergefallen ist oder nicht ordnungsgemäß Funktioniert.
-
Verwenden Sie weder ein beschädigtes Netzkabel noch einen beschädigten Stecker oder eine lockere Steckdose. Es besteht Brand- und Stromschlaggefahr.
Warning: Längeres Hören lauter TONE aus einem Musicgeber kann zum zeitweiligen oder permanenten Horverlust führen.
AUFBAU
- Packen Sie alle Teile aus und entfern den Sie danach die Schutzmaterialien.
- Schlieben Sie das Gerät nicht mehr an das Netz an, bevor Sie die Netzspannung überprüft haben und alle anderen notwendigen Verbindungen hergestellt sind
- Bedecken Sie die Luftungsschlitze nicht und vergewissern Sie sich, dass um das Gerät herum einige cm Platz für die Kuhlung gelassen wurden.
- Ein/Aus-Schalter
Schaltermodi: BATTERIEBETRIEB, NETZBETRIEB oder aus.
Wenn Sie den Schalter auf AC stellen, dann wird der Laufsprecher mit 230 V Netzspannung betrieben und die Batterie aufgeladen.
Wenn Sie den Schalter auf OFF stellen, Denn ist der Laufsprecher ausgeschelt und die Batterie wird nicht aufgeladen.
Wenn Sie den Schalter auf DC stellen, dann wird der Lautspecher über Batterie betrieben.
- GLEICHSPANNUNGSEINGANG 12 V
Der Laufsprecher kann an das 12-V-Bordnetz von Autos angeschlossen werden.
-
FM-ANTENNE
-
WECHSELSPANNUNGSEINGANG 230 V/50 Hz
1. LED-Display
Das Display zeigt Ihnen Informationen über Systemparameter an – auf der linken Seite des Displays wird der Status von EINGANG A, auf der rechten der von EINGANG B angezeigt.
2. LAUTSTARKE/MULTI/DJ-EFFEKT
Drehen Sie den Drehregler, um Gesamtlautstärke, Kopfhörerlaufstärke, Hohen und Basse einzustellen. Drücken Sie diese Taste kurz, um die verschiedene Musikeffekte SCRATCH, REVERB, BEAT BOX, YEAH, BRING IT, GEYA, COME ON auszwahlen. Drücken Sie diese zur Auswahl der SCHLAGZEUGEFFEKTE lang.
3. KOPFHÖRERMODUS
Drucken Sie diese Taste, um zwischen den Kopfhörermodi EINGANG A, EINGANG B und EINGANG AB auszuwahlen.
4. EINGANG B VORHERIGER
Drucken Sie diese Taste, um den vorherigen Titel für USB B zu wahlen.
5. EINGANG B NACHTER
Drucken Sie diese Taste, um den{nachsten Titel fur USB B zu wahlen.
6. LAUTSTARKE EINGANG B
Stellen Sie hiermit die Lautstärke für EINGANG B ein.
7. WIEDERGABE/PAUSE EINGANG B
Drücken Sie diese Taste, um die Musikwiedergabe von EINGANG B zu starten oder zu pausieren. Drücken Sie während der USB-Wiedergabe diese Taste lang, um die Anzeige der Wiedergabezeit aufwärts oder abwärts zahlend einzustellen.
- MODUS EINGANG B
Drucken Sie diese Taste, um entweder LINE oder USB B als Eingangsmodi für EINGANG B auszuwahlen.
-
BUCHSE KOPFHÖREREINGANG
-
USB-PORT für EINGANG USB B
-
GITARRENLAUTSTARKE
Stellen Sie hier die Lautstärke Ihrer GITARRE ein.
- MIKROFONLAUTSTARKE
Stellen Sie hier die Lautstärke des MIKROFONS ein.
- ECHO
Stellen Sie hier das ECHO für den MIKROFONEINGANG ein.
-
GITARRENBUCHSE
-
MIKROFONBUCHSE
-
AUDIOEINGANGSBUCHSE LINE-IN
Schlieben Sie hier das LINE-IN-Signal einer Audioquelle an.
-
Betriebsanzeige-LED
-
AUDIOEINGANGSBUCHSE AUX
Schlieben Sie hier das AUX-OUT-Signal einer Audioquelle an.
-
USB-PORT für EINGANG USB A
-
Bei Wechselspannung: AUFLADEN/STANDBY/NORMAL
Drücken Sie diese Taste lang, um in den Standby-Modus zu wechseln oder das Gerät einzuschalten.
Durch kurzes Drücken der Taste können Sie in den AUFLADE-, STANDBY- oder NORMALBETRIEB wechseln.
Bei BATTERIEBETRIEB: BATTERIELADUNG
Wenn Sie diese Taste kurz drücken, wird die aktuelle Batterieladung angezeigt.
- MODUS EINGANG A
Drücken Sie diese Taste, um zwischen den Modi für EINGANG A auszuwahlen - AUX A, BLUETOOTH A, UKW, USB A.
- WIEDERGABE/PAUSE EINGANG A
Drucken Sie diese Taste, um die Musikwiedergabe von EINGANG A zu starten oder zu pausieren.
Drücken Sie während der USB-Wiedergabe diese Taste lang, um die Anzeige der Wiedergabezeit aufwärts oder abwärts zahlend einzustellen.
- LAUTSTARKE EINGANG A
Stellen Sie hiermit die Lautstärke für EINGANG A ein.
- EINGANG A NACHTER
Drucken Sie diese Taste, um den nachsten Titel für USB A zu wahlen.
- EINGANG A VORHERIGER
Drucken Sie diese Taste, um den vorherigen Titel für EINGANG USB A zu wahlen.
26.MENU
Mit dieser Taste wahlen Sie die Gesamtlautstärke, Basse, Höhen, X-Drive und Lichtmodus aus.

- Lenco
- CAUTION:
- PRECAUTIONS BEFORE USE
- KEEP THESE INSTRUCTIONS IN MIND:
- INSTALLATION
- REMOTE CONTROL OPERATION:
- NORMAL FUNCTION
- When unit is AC mode:
- When unit is DC mode:
- SPEAKER LIGHT COLOR CONTROL OPTIONS
- TUNER APPLICATIONS
- KARAOKE & GUITAR FUNCTION
- BLUETOOTH PAIRING AND CONNECT
- FUNCTION OF USB READER
- USB interface
- TIME DISPLAY
- CHARGING THE BATTERY
- BATTERY DISASSEMBLY
- Please note (For use of wireless microphone)
- Guarantee
- Disclaimer
- Service
- LET OP:
- VOORZORGSMAATREGELEN VOOR GEBRUIK
- ONTHOUD DE VOLGENDE INSTRUCTIES:
- INSTALLATIE
- LED-SCHERM
- VOLUME/MULTI/DJ EFFECT
- HOOFDTELEFOON MODUS
- INVOER B VORIGE
- INVOER B VOLGENDE
- INVOER B VOLUME
- INVOER B AFSPELEN/PAUZEREN
- INVOER B MODUS
- AFSTANDSBEDIERING:
- NORMALE FUNCTIE
- Wanner het apparaat in de AC modus staat:
- Wanner het apparaat in de DC modus staat:
- SPEAKER LICHTKLEUR BESTURINGSOPTIES
- AFSTEM APPLICATIONS
- KARAOKE EN GITAAR FUNCTIE
- BLUETOOTH KOPPELEN EN VERBINDEN
- FUNCTIE VAN DE USB-LEZER
- USB-interface
- TIJDWEERGAVE
- DE ACCU OPLADEN
- ACCU VERWIJDEREN
- Opgelet (bij gebruik van draadloze microfoon)
- Garantie
- Deutsch PMX-240
- ACHTUNG:
- VORSICHTSMASSNAHMIEN VOR DER BENUTZUNG
- BEFOLGEN SIE IMMER FOLGENDE ANWEISUNGEN:
- AUFBAU
- LED-Display
- LAUTSTARKE/MULTI/DJ-EFFEKT
- KOPFHÖRERMODUS
- EINGANG B VORHERIGER
- EINGANG B NACHTER
- LAUTSTARKE EINGANG B
- WIEDERGABE/PAUSE EINGANG B
Marque : LENCO
Modèle : PMX240
Catégorie : Haut-parleur