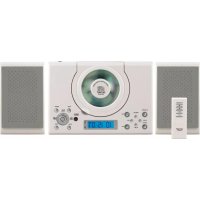
MC5000 - Système hifi DENVER - Notice d'utilisation et mode d'emploi gratuit
Retrouvez gratuitement la notice de l'appareil MC5000 DENVER au format PDF.

| Type de produit | Système hi-fi avec lecteur CD, radio FM et réveil |
| Marque | Denver |
| Modèle | MC5000 (MC-5000) |
| Alimentation | 230 V ~ 50 Hz (secteur) ; batterie de secours pour l'horloge : 2 piles AA (1,5 V) non incluses |
| Lecteur CD | Programmable jusqu'à 20 plages, lecture aléatoire, répétition d'une plage ou de toutes |
| Radio | FM stéréo avec sélecteur de bande (FM ST / FM MO), réglage manuel |
| Fonctions réveil | Réveil par radio, CD ou buzzer ; arrêt automatique après 1 heure |
| Affichage | LCD avec horloge, indicateur de stéréo et de mise sous tension |
| Entrée auxiliaire | Prise AUX (jack 3,5 mm) pour sources externes |
| Sortie casque | Prise jack stéréo 3,5 mm |
| Haut-parleurs | 2 enceintes (droite et gauche) avec prises dédiées |
| Télécommande | Oui, avec piles AAA (2 x 1,5 V) incluses |
| Antenne FM | Antenne filaire intégrée |
| Entretien et nettoyage | Nettoyer avec un chiffon doux et humide ; ne pas utiliser de solvants ; nettoyer la lentille du CD avec un disque nettoyant |
| Sécurité | Ne pas exposer à la pluie ou à l'humidité ; débrancher en cas de non-utilisation prolongée ; respecter la polarité des piles |
| Reparabilité | Pièces détachées non spécifiées ; confier à un technicien qualifié pour toute réparation |
| Informations générales | Poids et dimensions non communiqués ; respecter l'environnement : ne pas jeter avec les ordures ménagères |
FOIRE AUX QUESTIONS - MC5000 DENVER
Questions des utilisateurs sur MC5000 DENVER
0 question sur cet appareil. Repondez a celles que vous connaissez ou posez la votre.
Poser une nouvelle question sur cet appareil
Téléchargez la notice de votre Système hifi au format PDF gratuitement ! Retrouvez votre notice MC5000 - DENVER et reprennez votre appareil électronique en main. Sur cette page sont publiés tous les documents nécessaires à l'utilisation de votre appareil MC5000 de la marque DENVER.
MODE D'EMPLOI MC5000 DENVER
ENGLISH
DENVER ELECTRONICS
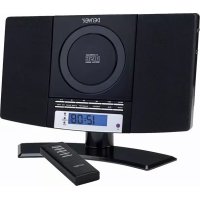
CD PLAYER WITH FM STEREO ALARM CLOCK RADIO
MODEL MC-5000

20-TRACK PROGRAMMABLE CD PLAYER
LCD CLOCK
FM STEREO RADIO
ALARM FUNCTION-WAKE TO RADIO,
CD PLAYER OR BUZZER
AC POWER SUPPLY WITH CLOCK BATTERY BACKUP
STEREO HEADPHONE JACK
WARNING: TO REDUCE THE RISK OF FIRE OR ELECTRIC SHOCK,DO NOT EXPOSE THE APPLIANCE TO RAIN OR MOISTURE.
Under the influence of electrostatic phenomenon, the product may malfunction and require user to power reset.

BEFORE OPERATING THIS PRODUCT,
READ, UNDERSTAND, AND FOLLOW
THESE INSTRUCTIONS.
Be sure to save this booklet for future reference.
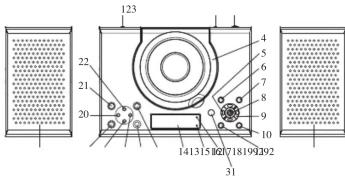
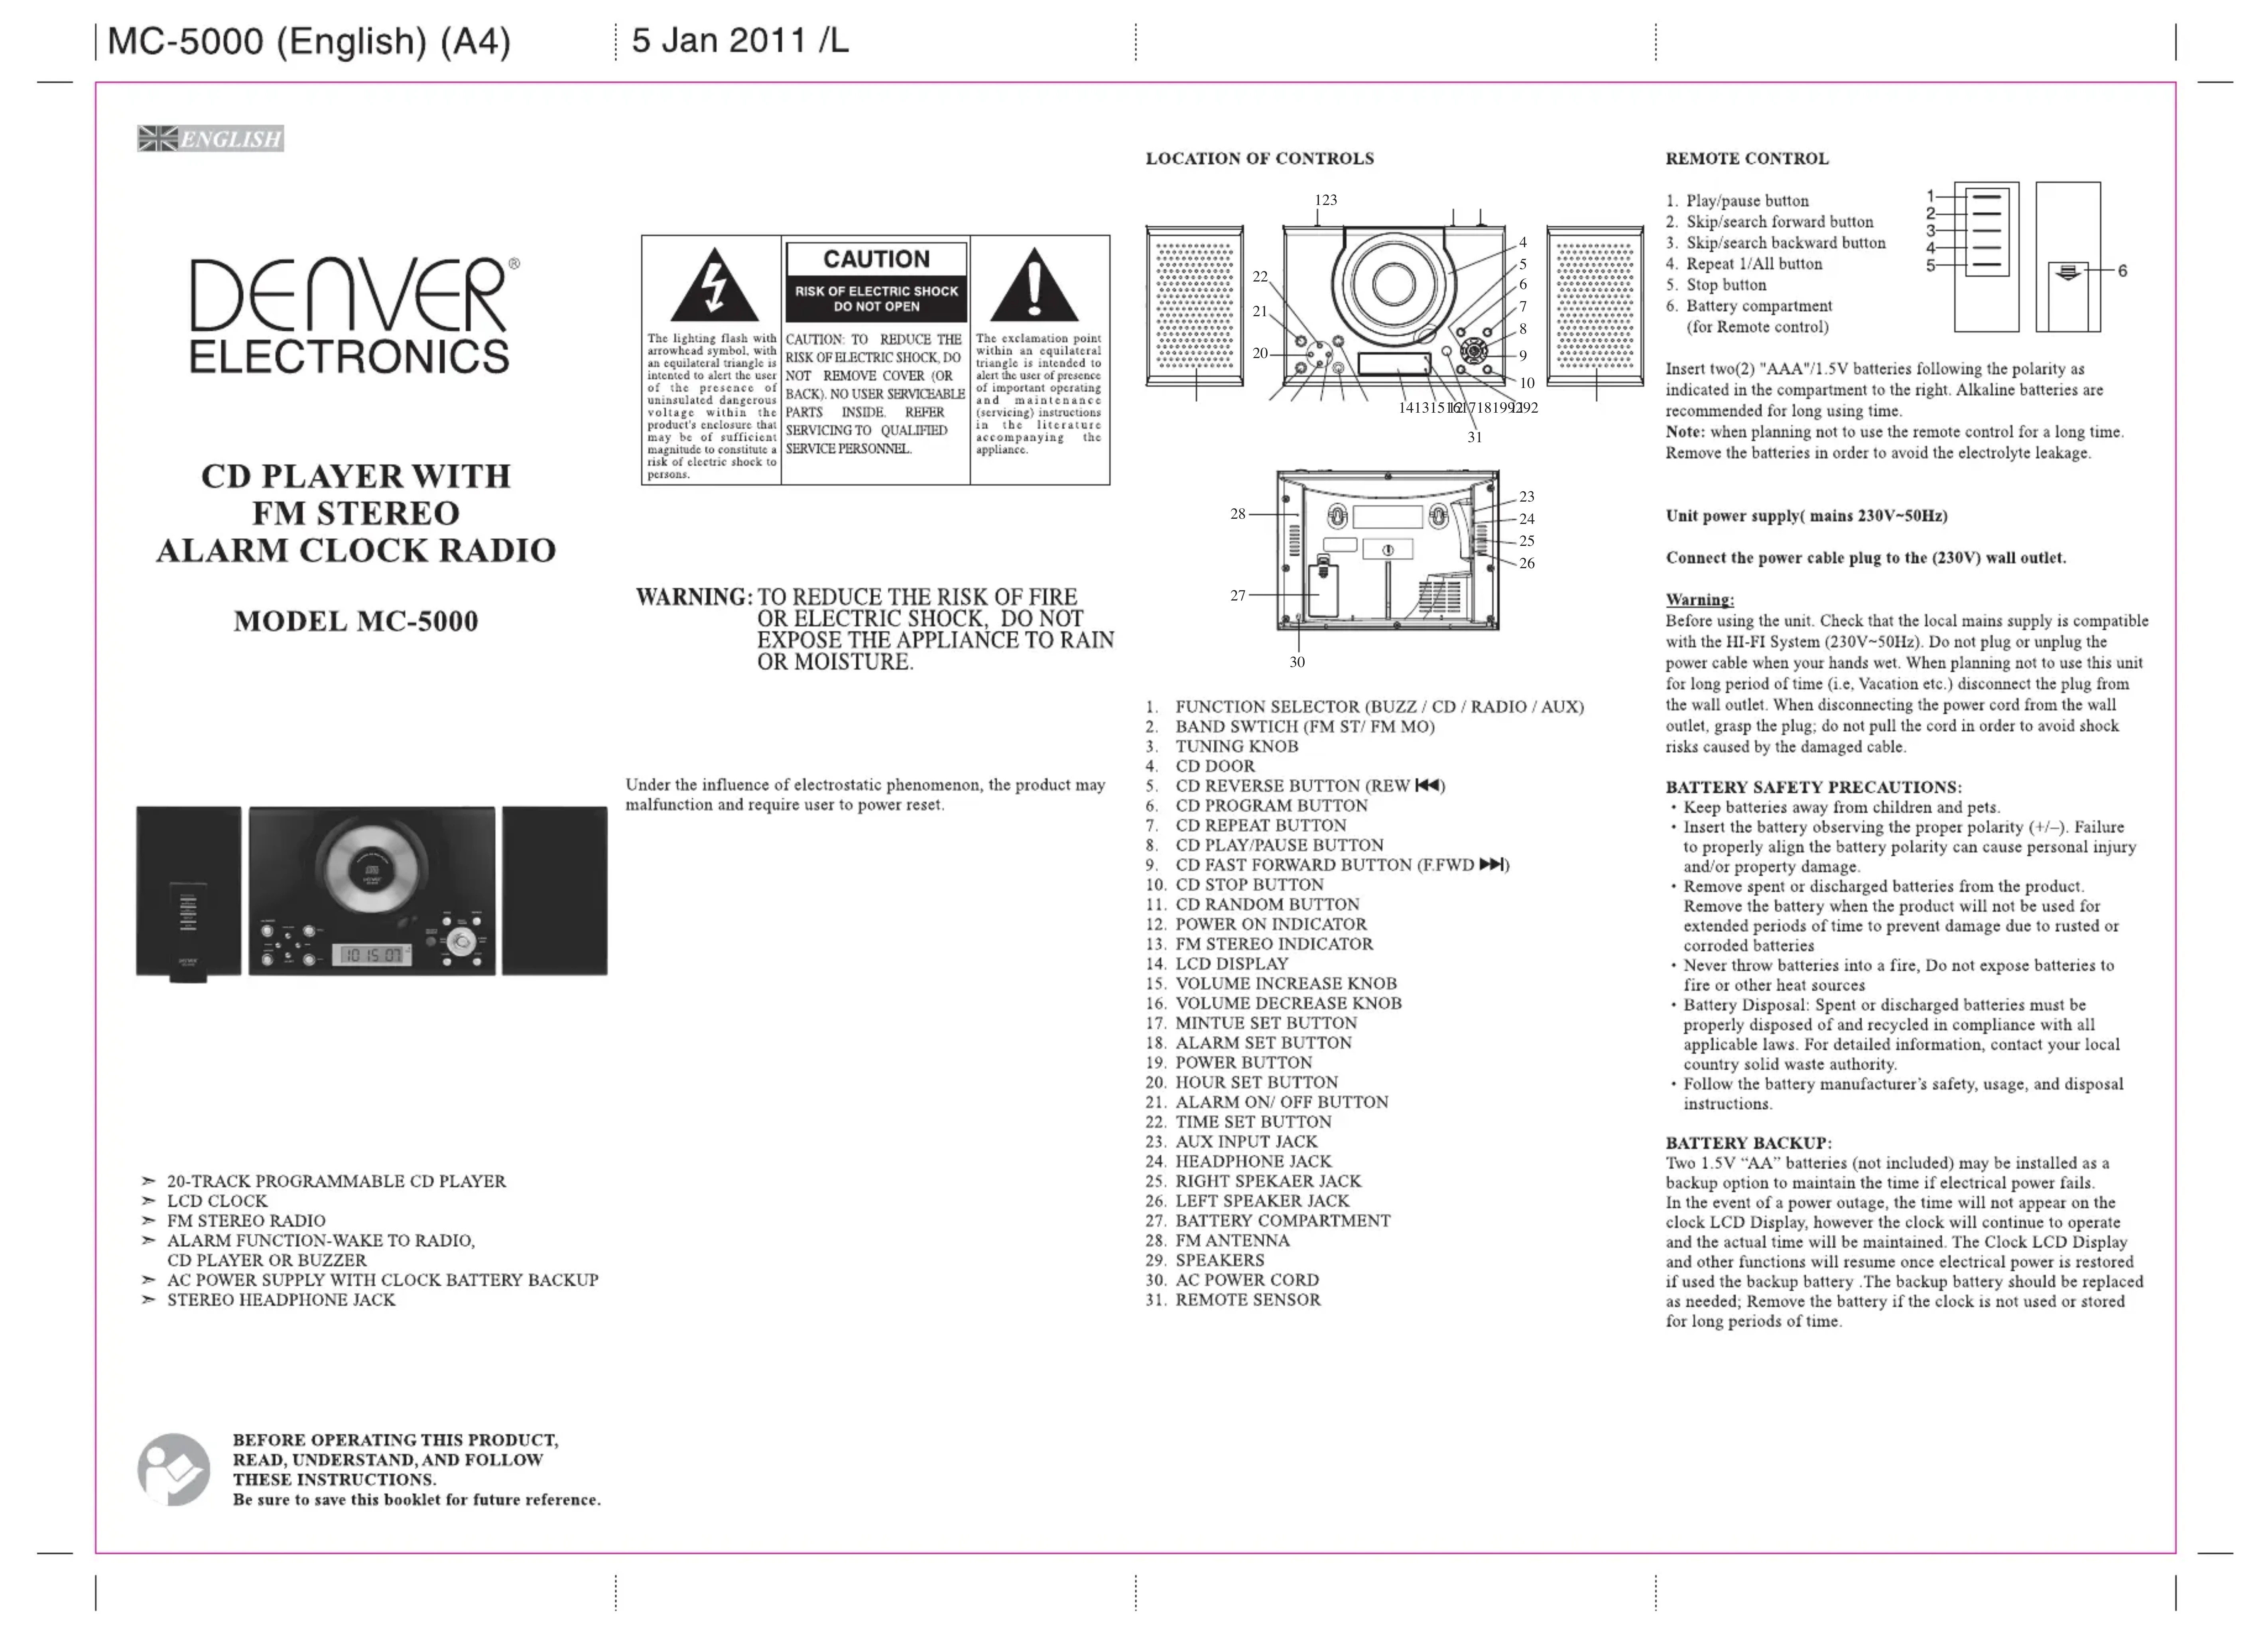
LOCATION OF CONTROLS
- FUNCTION SELECTOR (BUZZ / CD / RADIO / AUX)
- BAND SWTICH (FM ST/ FM MO)
- TUNING KNOB
- CD DOOR
- CD REVERSE BUTTON (REW)
- CD PROGRAM BUTTON
7.CD REPEAT BUTTON
8.CD PLAY/PAUSEBUTTQ
9.CDFASTFORWARDBUTTON(FFWD)
10.CD STOP BUTTON
11.CD RANDOM BUTTON - POWER ON INDICATOR
13.EMSTEREOINDICATOR
14LCDDISPLAY - VOLUME INCREASE KNOB
- VOLUME INCREASE KNOB 16. VOLUME DECREASE KNOB
- MINTLE 6FT BUTTON
- MINUCE SET BUTTON 18. AVERAGE BUTTON
- ALARM SET BUTTON 19. POWER BUTTON
- POWER BUTTON
20.HOUR SET BUTTON - ALARM ON/ OFF BUTTON
- TIME SET BUTTON
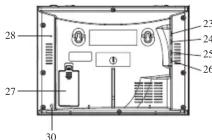
23.AUX INPUT JACK - HEADPHONE JACK
- RIGHT SPEKAER JACK
- RIGHT SPEAKER JACK
- LEFT SPEAKER JACK
- LEFT SPEAKER JACK 27. BATTERY COMPARTI
- BATTERY COMPARIN 28. EAMINTENSIAT
- FM ANTENNA
- SPEAKERS
- AC POWER CORD
- REMOTE SENSOR
REMOTE CONTROL
- Play/pause button
- Skin/search forward button
- Skin/search backward button
- Repeat 1/All button
- Repeat 1/All
- Stop button
- Battery compartment
(for Remote control)
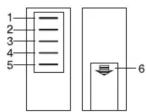
Insert two(2) "AAA'/1.5V batteries following the polarity as indicated in the compartment to the right. Alkaline batteries are recommended for long using time.
Note: when planning not to use the remote control for a long time Remove the batteries in order to avoid the electrolyte leakage.
Unit power supply(mains 230V - 50Hz )
Connect the power cable plug to the (230V) wall outlet.
Warning
Before using the unit. Check that the local mains supply is compatible with the HI-FI System (230V~50Hz). Do not plug or unplug the power cable when your hands wet. When planning not to use this unit for long period of time (i.e. Vacation etc.) disconnect the plug from the wall outlet. When disconnecting the power cord from the wall outlet, grasp the plug; do not pull the cord in order to avoid shock risks caused by the damaged cable.
BATTERY SAFETY PRECAUTIONS:
- Keep batteries away from children and pets
- Insert the battery observing the proper polarity (+/ - ) . Failure to observe the battery polarity can cause personal injury and property damage.
- Remove spent or discharged batteries from the product
Remove the battery when the product will not be used for extended periods of time to prevent damage due to rusted or corroded batteries - Never throw batteries into a fire, Do not expose batteries to fire or other heat sources
- Battery Disposal: Spent or discharged batteries must be properly disposed of and recycled in compliance with all applicable laws. For detailed information, contact your local country solid waste authority.
- Follow the battery manufacturer's safety, usage, and disposal instructions.
BATTERY BACKUP:
Two 1.5V "A" batteries (not included) may be installed as a backup option to maintain the time if electrical power fails. In the event of a power outage, the time will not appear on the clock LCD Display, however the clock will continue to operate until the time will be maintained. The clock LCD display and other functions will resume once electrical power is restored if used the backup battery. The backup battery should be replaced as needed; Remove the battery if the clock is not used or stored for long periods of time.
CLOCK SETTING
Press and hold "TIME" button to set the clock, press HOUR button or MIN button respectively to adjust the display time.
TO SET ALARM FUNCTION
- Power off the unit and enter into "POWER OFF" mode. While
pressing and holding the AL_SET BUTTON, press the HO BUTTON to set desired alarm hour.
-
While pressing and holding the AL_SET BUTTON, press MIN BUTTON to set desired alarm minute.
-
After setting the alarm time as your desired, remember to press ALON/OEE button to turn on the alarm function.
press ALON/OFF button to turn on the alarm sign will show on LCD display)
TO WAKE UP TO ALARM BUZZER:
a. Slide the Function switch (BUZZ/CD/RADIO/AUX) to BUZZ.
BUZZ position h. The alarm buzz
- The alarm buzzer will sound for 5 minutes at the set time.
Note: Press ALARM ON/OFF button to turn off the alarm when it sounds.
TO WAKE UP TO CD:
a. Slide the Function Switch (BUZZ/CD/RADIO/AUX) to CD
position b. Open the CD Door and insert a CD (with the label side f)
up) into the CD compartment.
c. Close the CD Door.
d. The CD will sound at the set alarm time playing the first on the CD.
Note: The unit will automatically be turned off after 1 hour. To deactivate the alarm (CD playing) manually, press the S50 button.
TO WAKE UP TO RADIO:
a. Slide the Function Switch (BUZZ/CD/RADIO/AUX) to RADIO position.
b. Slide the Band Switch (FM ST. / FM MO) to FM or FM position.
c. Press POWER ON/OFF BUTTON to turn on the unit first.
d. Tune the radio to a broadcasting station and adjust the voice as desired.
e. Then press the POWER ON/OFF BUTTON again to turn off the unit.
f. The radio will sound at the set alarm time.
Note: The unit will automatically be turned off after 1 hour of operation. (Audio sound) manually, press the POWER ON/OFF BUTTON.
HOW TO TURN OFF THE ALARM
In "POWER OFF" mode, press ALARM ON/OFF button to turn off the alarm function. (alarm sign ^串 will disappear on the LCD Display).
ADJUST VOLUME
Press VOL.+ button to increase the volume. Press VOL.- button to decrease the volume.
- Press VOL. - button to decrease the volume.
RADIO OPERATION
- Select the Function Switch (BUZZ/ CD/ ALARM/ AUX) to RADIO position.
- Select the Band Switch (FM ST - FM MO) to desired band 3. Press the POWER ON/OFF BUTTON to switch POWER on :
- Rotate the Tuning Control Knob to the desired radio station Note: The STEREO Indicator will light when a program is received in FM Stereo. If the FM reception is noisy, switch band selector to the FM MO position and the program will be turned off.
- Press the Volume Control Knob to a comfortable listening level
- To switch off the radio, Press the Power ON/OFF Button once.
HANDING A COMPACT DISC
- Always protect a disc against scratches, soil, dust and etc. If the CD REPEAT Button may be used to repeat a single track or You experience a problem with this unit check the chart disc is treated with reasonable care, wiping off the disc with a nepad all tracks on a compact disc. below before calling of service
cloth should be the only maintenance needed to retain its excellent Press the REPEAT BUTTON once during playback, the "REP"
| sound reproduction. Discs should be retained in their original case sign will show on LCD Display and flash. The same track will be repeated over and over. UR Handle a disc only by its edges, Do not touch the surface or 2. Press the REPEAT BUTTON a second time to repeat all tracks. The "REP" sign will show on the LCD display, but will not flash rainbow-colored side of the disc 42 Handle a disc as shown in the illustrations in this section this time. • Use a soft cloth to wipe a disc clean. Do not use benzene, thiolate, or other chemical cleaners to clean the disc as damage may result until the "REP" sign disappeared. A disc should always be wired in a straight line from its center to | SYNTHOM | CAUSE | SOLUTION |
| CD Player with Not turn on | AC Cord not connected properly. | Connect the AC cord properly. | |
| eddy Disc will not | Disc inserted incorrectly. Defective compact disc CD compartment not | Reinsert disc with lab side facing up. Try another compact disc. |
its edge. Never wipe a disc in a circular motion.
Do not expose a disc to direct sunlight, high humidity, or high The Program feature can be used to program up to 20 tracks to temperatures for extended periods of time. Do not place the Display in a selected order.
on other equipment or near any heat source. 1. While in the stop mode only (CD is not playing), press the "n" dust on the pickup lens can lead to erratic operation and CD PROGRAM "PROG" Button, LCD Display will show the interruption of the sound during play. To clean the pickup lens, open the disc compartment and blow the dust off. Using a canterpress the CD Reverse (RE) / Forward Buttons (F.W) CD PROG "PROG" button, then press the "PROG" button.
Note: Do not touch the surface of the lens. Do not allow any 3. Press the CD PROGRAM BUTTON to select and store the track
liquids on the inside of the product. into memory. To clean the C1 player cabinet, use a soft and damp cloth to dip each step 2 to 3 to select up to 20 tracks. 5: To play the selected tracks (in the program mode), press the CD whenever use benzol, benzene, or other strong chemical cleaners, as PLAY/PAUSE BUTTON. The track number and the "PROG" appear on LCD Display.
DO: DO NOT: 6. Press the CD Reverse (REW) to hear the previous or press the CD Forward (F.WF) buttons to hear next program track. Note: After all of the programmed tracks have played, the CD player will return to the stop mode.
7. To clear the programmed tracks from memory, press STOP two times.
PLAYING A COMPACT DISC (CD) NOTE: No text on the disk.
NOTE: Never touch the laser lens inside of the CD compartment. HEADPHONEJACK Clean the laser lens with a CD cleaner disc if it becomes dirty. This unit will accept stereo headphones with a 0.3.5mm plug. 1. Slide the Function Switch (BUZZ/CD/ALARM/RADIO) to CD Before connecting the headphones set the volume to minimum level step position.
2. Open the CD DOOR and insert a CD into the tray with printefheadphones to the headphones jack. The speakers will be
Table 1. Label side racing up. 3. Close the CD DOOR and Press the Power ON/OFF Button to Warning: Prolonged exposure to high sound levels may permanently damage your hearing. You may not hear some warning sound while your health and the environment, if the waste material (discarded) is on the ground, will rotate for a few seconds and then stop damaging your hearing. You may not hear some warning sound while your health and the environment, if the waste material (discarded) is on the ground, will rotate for a few seconds and then stop damaging your hearing. You may not hear some warning sound while your health and the environment, if the waste material (discarded) is on the ground, will rotate for a few seconds and then stop damaging your hearing.
5. Press the PLAY/PAUSE BUTTON to start play
6. Press the PLAY/PAUSE BUTTON again to PAUSE play 7. Touch the OK button on PAUSE button
7. To stop the album temporarily, press PAUSE button, to resume. Adjust the POWER OFF/ AUX/ RADIO/ CD selector to A press again. 2. Connect the AUX connect wire from the out jack of your
8. Press the STOP BUTTON to STOP play.
www.denver-electronics.com
Electric and electronic equipment and included batteries contains "Materials, components and substances that can be hazardous to Your health and the environment, if the waste material (discarded or used as electronic equipment and batteries) is not handled correctly.
RANDOM PLAY
- In CD stop mode, Press the RANDOM BUTTON once, "RAND"
will appear on LCD Display. - Press PLAY/PAUSE BUTTON, this will enable random tracks play.
REVERSE/FORWARD
- The CD Reverse (RE) and CD Forward (F.FW) Buttons can be used to jump to a different track number or to scan disc tracks at high speed.
- Press the CD Reverse Skip Button (S) once to hear the beginning of the current track. Press it two or more times to hear 4 times.
- Press the CD Forward Skip Button (F.F) to hear the next track on the disc.
- Press and hold the CD Reverse Search (H) Button, the current track will be scanned and move backwards to the previous track(s). When the desired track section is found, release the track and press the track wall.
- Press and hold the CD Forward Search (F) Button, the current track will be scanned and move forward to the next track(s). When the desired track section is found, release the selected button and normal play will resume.
COPYRIGHT DENVER ELECTRONICS A/S
DENVER
Electric and electronic equipment and batteries is marked with W crossed out trash can symbol, seen below. This symbol signifies that electric and electronic equipment and batteries should not be disposed with other household waste, but should be disposed of separately.
As the end user it is important that you submit your used batteries to the appropriate and designated facility. In this manner you make sure that the batteries are recycled in accordance with legislature and will not harm the environment.
All cities have established collection points, where electric and electronic equipment and batteries can either be submitted free of charge at recycling stations and other collection sites, or be collected by the city's recycling center. The information is available at the technical department of your city.

- DENVER ELECTRONICS
- CD PLAYER WITH FM STEREO ALARM CLOCK RADIO
- MODEL MC-5000
- WARNING: TO REDUCE THE RISK OF FIRE OR ELECTRIC SHOCK,DO NOT EXPOSE THE APPLIANCE TO RAIN OR MOISTURE.
- REMOTE CONTROL
- Unit power supply(mains 230V - 50Hz )
- Warning
- BATTERY SAFETY PRECAUTIONS:
- BATTERY BACKUP:
- CLOCK SETTING
- TO SET ALARM FUNCTION
- TO WAKE UP TO ALARM BUZZER:
- TO WAKE UP TO CD:
- TO WAKE UP TO RADIO:
- HOW TO TURN OFF THE ALARM
- ADJUST VOLUME
- RADIO OPERATION
- HANDING A COMPACT DISC
- its edge. Never wipe a disc in a circular motion.
- PLAYING A COMPACT DISC (CD) NOTE: No text on the disk.
- RANDOM PLAY
- REVERSE/FORWARD
- COPYRIGHT DENVER ELECTRONICS A/S
- DENVER
Marque : DENVER
Modèle : MC5000
Catégorie : Système hifi