KF 2981 VI - Réfrigérateur combiné MIELE - Notice d'utilisation et mode d'emploi gratuit
Retrouvez gratuitement la notice de l'appareil KF 2981 VI MIELE au format PDF.
| Type de produit | Réfrigérateur combiné avec congélateur en bas |
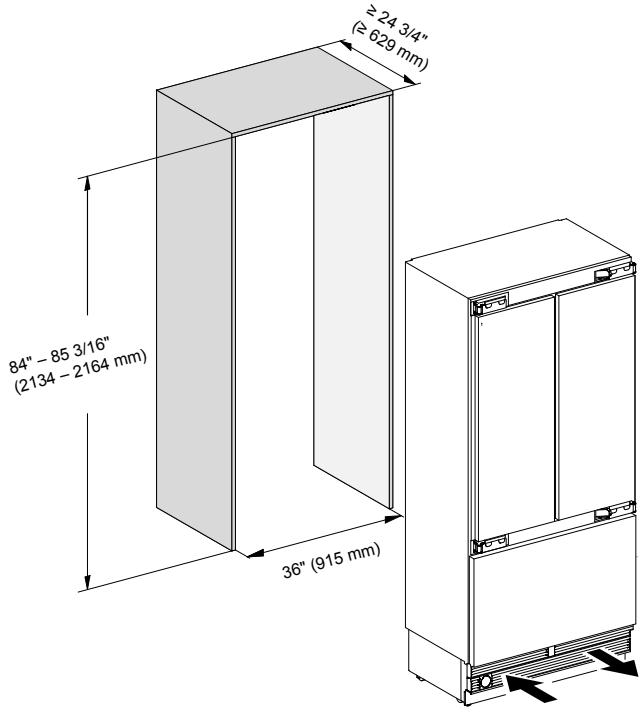
| Dimensions (niche) | Hauteur : 84 po (2134 mm), Largeur selon niche, Profondeur selon niche |
| Poids (à pleine charge) | Environ 518 kg (1142 lb) |
| Alimentation électrique | 110-120 V, 60 Hz, 10-16 A |
| Classe climatique | SN, N, ST, T (10°C à 43°C) |
| Réfrigérant | R134a (congélateur 90 g, réfrigérateur 175 g) |
| Fonctions principales | SuperCool, SuperFrost, Eco Mode, Vacation Mode, Sabbath Mode, Door Assistant (Push2Open/Pull2Open), Miele@home, machine à glaçons, zone SmartFresh, filtres Active AirClean |
| Température recommandée | Réfrigérateur : 4°C, Congélateur : -18°C, Zone SmartFresh : 0°C |
| Capacité de congélation maximale | Non spécifié, mais grande capacité |
| Entretien et nettoyage | Nettoyer avec eau tiède et détergent doux. Ne pas utiliser de nettoyeur vapeur. Dégivrage automatique. |
| Sécurité | Verrouillage clavier, alarmes de température et de porte, arrêt automatique des fonctions |
| Pièces détachées et réparabilité | Filtres à eau (charbon actif/bypass), filtres Active AirClean, autres accessoires disponibles via Miele. Réparations par service technique Miele. |
| Informations générales | Marque Miele, modèle KF 2981 VI, fabriqué en Turquie |
FOIRE AUX QUESTIONS - KF 2981 VI MIELE
Questions des utilisateurs sur KF 2981 VI MIELE
0 question sur cet appareil. Repondez a celles que vous connaissez ou posez la votre.
Poser une nouvelle question sur cet appareil
Téléchargez la notice de votre Réfrigérateur combiné au format PDF gratuitement ! Retrouvez votre notice KF 2981 VI - MIELE et reprennez votre appareil électronique en main. Sur cette page sont publiés tous les documents nécessaires à l'utilisation de votre appareil KF 2981 VI de la marque MIELE.
MODE D'EMPLOI KF 2981 VI MIELE
Operating and Installation Instructions Fridge-freezer Combination

To prevent accidents and machine damage, read these instructions before installation or use.
IMPORTANT SAFETY INSTRUCTIONS 6
Caring for the environment 15
Installation information 16
Installation location 16
Climate class 17
Installation notes 17
Load-bearing capacity of the niche floor 17
Adjoining cabinetry/units 17
Ventilation 17
Specifications for the plumbed water connection. 18
Side-by-side 19
Installation dimensions 20
Dimensions when the appliance door is open (opening angle 90^ / 115^ 22
Dimensions of the cabinet front 23
Building in the appliance 24
Before starting. 24
Tools required 24
Weight of cabinet fronts 25
Aligning the installation niche 25
Checking the installation space 26
Before installation 26
Preparing the installation niche 27
Pushing the appliance into the niche 30
Aligning the appliance 31
Securing the appliance in the niche 34
Preparing the cabinet fronts 35
Securing and aligning the cabinet fronts 38
Mounting the retaining brackets 40
Securing the covers 42
Securing the toe-kick board and cover 45
Limiting the opening angle of the appliance doors 45
Electrical connection 46
Water connection 48
Information on the fresh water connection 48
Installing the water hose to the appliance 49
How to save energy 50
Guide to the appliance 52
Main screen 54
Settings mode 55
Symbols in settings mode 56
Accessories 57
Accessories supplied 57
Optional accessories 58
Before first use 59
Before first use 59
Opening and closing the Fridge Zone door 59
Sticking on the SmartFresh zone labels 59
Inserting the Active AirClean filters 60
Using the appliance 61
Starting up for the first time 61
Switching on and off 63
Turning off for longer periods of time 64
Selecting additional settings 65
Switching Keypad Lock on or off 65
Switching Eco Mode ^ on or off. 65
Performing a Self Test 66
Switching Condensation Protection on and off 67
Switching on Door Assistant 68
Switching off Door Assistant 69
Setting up Miele@home @ 70
Switching off Demo Mode 74
Resetting the settings to their default settings 74
Switching Vacation mode on or off. 76
Switching Sabbath Mode On/Off 77
Switching on, switching off or resetting Water Filter Display 78
Switching on, switching off, or resetting the Display Active AirClean Filter 80
The correct temperature 82
... in the Fridge Zone and in the SmartFresh zone 82
Automatic cold air circulation (DynaCool) 82
in the Freezer Zone 82
Setting the temperature 83
Temperature range 83
Using Automatic SuperCool and SuperFreeze 84
Temperature and door alarm 86
Contents
Adjusting the interior fittings 88
Moving the shelves in the appliance door 88
Moving the adjustable shelves 88
Removing the hanging drawer 89
Removing compartments from the Fridge Zone 89
Removing the freezer baskets 90
Removing the dividing panel (depending on the model) 90
Removing the ice cube tray. 91
Storing food in the refrigerator section 92
Different storage zones 92
Food which is not suitable for storage in the refrigerator section 93
Notes on buying food 94
Storing food correctly 94
Storing food in the SmartFresh zone 95
SmartFresh zone 95
Humidity-controlled compartment with moisture regulator 95
Dry compartment with low temperature 97
Freezing and storing food 99
Maximum freezing capacity 99
What happens when you freeze fresh food? 99
Storing frozen food 100
Home freezing 100
Placing food in the Freezer Zone 101
Making ice cubes 103
Automatic defrosting 105
Cleaning and care 106
Cleaning agents. 106
Before cleaning the appliance. 107
Interior and accessories 107
Cleaning the door seal 108
Cleaning the ventilation grilles. 108
After cleaning 108
Frequently Asked Questions 109
Causes of noises 119
Water filter 120
Changing the water filter 121
Using an external water filter 122
Lead-free certificate 124
Technical Service 125
Contact in case of fault 125
Warranty 125
Declaration of conformity 126
Copyright and licenses 127
IMPORTANT SAFETY INSTRUCTIONS
This appliance complies with all statutory safety requirements. Please note that inappropriate use can lead to personal injury and damage to property.
To avoid the risk of accidents and damage to the appliance, please read these instructions carefully before using it for the first time. They contain important notes on installation, safety, use and maintenance.
Miele cannot be held liable for non-compliance with these instructions.
Keep these instructions in a safe place and ensure that new users are familiar with the contents. Pass them on to any future owner.
Danger of injury!
This appliance is very heavy and can tip forwards when the door is open.
Keep the appliance door shut until the appliance has been built in and secured in its housing in accordance with the operating and installation instructions.
Appropriate use
This appliance is intended for use in domestic households and similar residential environments such as
- staff kitchen areas in shops, offices and other working environments
- farm houses and by clients in hotels, motels and other residential type environments
- bed and breakfast type environments
- catering and similar non-retail applications.
This appliance is not intended for use outdoors, in damp environments or in places exposed to rain.
This appliance is intended for domestic use only for cooling and storing food and drink as well as for storing deep frozen food, freezing fresh food and for making ice.
Any other usage is not supported by the manufacturer and could be dangerous.
This appliance is not suitable for storing and keeping cool medicines, blood plasma, laboratory preparations or other such materials or products. Incorrect use of the appliance for such purposes can cause deterioration of the items stored. The appliance is not suitable for use in areas where there is a risk of explosion.
Miele cannot be held liable for damage resulting from improper or incorrect use of the appliance.
- Persons (including children) which lack physical, sensory or mental abilities or experience with the machine should not use it without supervision or instruction by a responsible person.
Safety with children
To reduce the risk of injury, do not allow children to play in, on or near the appliance.
The door hinges can cause injury. Keep children well away at all times.
Ensure that any packing material is disposed of safely and kept out of the reach of children. DANGER of suffocation!
Technical safety
The refrigerant system is tested for leaks. This appliance complies with statutory safety requirements.
To avoid the risk of damage to the appliance, make sure that the connection data (fuse rating, frequency and voltage) on the data plate corresponds to the household supply.
Check that this is the case before connecting the appliance. Consult a qualified electrician if in any doubt.
IMPORTANT SAFETY INSTRUCTIONS
The electrical safety of the appliance can only be guaranteed when correctly grounded. It is essential that this standard safety requirement is met. If in any doubt please have the electrical installation tested by a qualified electrician.
Reliable and safe operation of this appliance can only be assured if it has been connected to the electricity supply.
The outlet must not be concealed behind the appliance and must be easily accessible so that the appliance can be quickly disconnected from the electrical supply in case of an emergency.
If the power cord is damaged, it must be replaced by a Miele authorized technician in order to protect the user from harm.
The electrical outlet must be properly grounded.
- Do not connect the appliance to the electrical supply with a power bar or extension cord. These are a fire hazard and do not guarantee the required safety of the appliance.
If moisture gets into electrical components or into the power cord, it could cause a short circuit. Therefore, do not operate the machine in areas where there may be moisture or splashing water (e.g., garages, laundry rooms).
This appliance must not be installed and operated in mobile installations (e.g. on a ship).
Do not use a damaged appliance. It could be dangerous. Check the appliance for visible signs of damage.
For safety reasons, this appliance may only be used after it has been built in.
The machine must be disconnected from the power supply during installation, maintenance, and repair work, and installation work on the fresh water connection. The machine is only completely isolated from the power supply when:
- the fuses have been switched off, or
IMPORTANT SAFETY INSTRUCTIONS
- the circuit breaker has been removed completely, or
- the power cord has been unplugged. Pull on the plug and not on the power cord when disconnecting it from the power supply.
Unauthorized installation, maintenance, and repairs, or a faulty fresh water connection can cause considerable danger for the user. Installation, maintenance, and repairs, installation work on the fresh water connection, and all repairs on the ice/water outlet must only ever be carried out by a Miele authorized technician.
Any manufacturer's warranty will be void if the appliance is not repaired by a Miele approved service technician.
Defective components should only be replaced by Miele original parts. Only with these parts can the manufacturer guarantee the safety of the appliance.
Miele cannot be held liable for damage caused by a faulty connection to the fresh water supply.
The ice cube maker must only be connected to a cold water line.
DANGER of injury! Never tamper with the movable components on the ice cube maker or the element on the ice cube maker.
Correct use
The appliance is designed for use within a certain climate range (ambient temperatures), and should not be used outside this range. The climate range for your appliance is stated on the data plate inside the appliance. Installing it in a room with too low an ambient temperature, e.g. a garage, will lead to the appliance switching off for longer periods so that it cannot maintain the required temperature.
WARNING! DANGER of overheating! Do not cover or block the air vents. This can impair the efficiency of the appliance, increase the power consumption and cause damage to the appliance.
IMPORTANT SAFETY INSTRUCTIONS
If storing food which contains a lot of fat or oil in the appliance, make sure that it does not come into contact with plastic components as this could cause stress cracks or break the plastic.
- Do not store explosive materials in the appliance or any products containing propellants (e.g. spray cans). Electrical components could cause flammable vapors to ignite.
- DANGER of fire and explosion.
- Do not operate any electrical equipment (e.g. an electric ice cream maker) inside the appliance.
- DANGER of sparking and explosion.
- Do not store cans or bottles containing carbonated drinks or liquids which could freeze in the freezer. The cans or bottles could explode.
DANGER of injury and damage to the appliance.
- When cooling drinks quickly in the freezer, make sure bottles are not left in for more than one hour; otherwise they could burst, causing injury or damage.
- Never handle frozen food or the metal parts of the appliance with wet hands. Your hands may freeze to the frozen food or to the metal. DANGER of frost burn!
Do not take ice cubes out with your bare hands and never place ice cubes or popsicles in your mouth straight from the freezer section. The very low temperature of the frozen ice or popsicles can cause frost burn to the lips and tongue. DANGER of injury.
Do not refreeze partially or fully defrosted food. Consume defrosted food as soon as possible, as it will lose its nutritional value and spoil if left for too long. Defrosted food may only be refrozen after it has been cooked.
IMPORTANT SAFETY INSTRUCTIONS
- When eating stored food, there is a danger of food poisoning. Storage times will depend on several factors, including the freshness and quality of the food, as well as the temperature at which it is stored. Observe the manufacturer's "use-by" dates and storage instructions.
Use only genuine original Miele parts. If parts or accessories from other manufacturers are used, the warranty may become invalid.
IMPORTANT SAFETY INSTRUCTIONS
Cleaning and maintenance
Do not use any oil or grease on the door seals. They can cause the seals to deteriorate over time.
- Never use a steam cleaner to clean the appliance.
The steam can reach the electrical components and cause a short circuit.
Sharp edged or pointed objects will damage the evaporator, causing irreversible damage to the appliance. Do not use sharp edged or pointed objects to
- remove frost or ice,
- separate frozen foods or remove ice trays.
- Never place electric heaters or candles in the appliance to defrost it. These can damage the plastic parts.
- Do not use defrosting sprays or de-icers, as they could contain substances which could damage the plastic parts or which might cause the build-up of gases and pose a danger to health.
IMPORTANT SAFETY INSTRUCTIONS
Transport
To avoid damage to the appliance, always transport it upright and in its packaging.
DANGER of injury and damage. The appliance is very heavy and must be transported by two people.
IMPORTANT SAFETY INSTRUCTIONS
Disposal of your old appliance
Children could become trapped in the machine and could suffocate.
- Remove the machine doors.
- Remove the drawers.
- Leave the adjustable shelves in the machine so children cannot climb inside.
DANGER of electric shock!
- Cut the plug off the power cord.
- Cut the power cord off the old appliance.
Dispose of them separately from the appliance.
Ensure that the appliance is not stored in the vicinity of gasoline or inflammable gases and liquids during and after disposal.
Make sure that the coolant pipework is not damaged during disposal to avoid uncontrolled leakage of oil and coolant (see data plate for coolant type).
▶ Splashes of coolant can cause damage to the eyes. Be careful not to damage any part of the pipework while awaiting disposal, e.g. by
- puncturing the coolant channels in the evaporator,
- kinking any pipework,
- scratching the surface coating.
Disposal of packaging material
The packaging is designed to protect the appliance from damage during transportation. The packaging materials used are selected from materials which are environmentally friendly for disposal and should be recycled.
Ensure that any plastic wrappings, bags, etc. are disposed of safely and kept out of the reach of children. Return the packaging to your dealer.
Disposal of your old appliance
Electrical and electronic appliances contain valuable materials. They also contain certain substances, compounds and components which were essential for the proper functioning and safe use of the equipment. Handling these materials improperly by disposing of them in your household waste can be harmful to your health and the environment. Therefore, please do not dispose of your old appliance with regular household waste and follow local regulations on proper disposal.

Consult with local authorities, dealers or Miele in order to dispose of and recycle electrical and electronic appliances. Miele assumes no responsibility for deleting any personal data left on the appliance being disposed.
Take care not to damage the pipework at the back of your appliance before or during transportation to an authorized, environmentally friendly collection depot.
This way, coolant in the pipework and oil in the compressor will be contained, and will not leak into the environment.
Please ensure that your old appliance does not pose a danger to children while being stored prior to disposal. See "IMPORTANT SAFETY INSTRUCTIONS" for more information.
Risk of injury and damage.
This appliance must be built in, otherwise it could tip over.
Keep the appliance door(s) shut until the appliance has been built in and secured in its housing in accordance with the operating and installation instructions.
! Fire hazard and risk of damage.
The appliance must not be installed underneath a cooktop.
If installation near a heat source is unavoidable, observe the following minimum distances between the appliance and the heat source:
- At least 1 14 (3 cm) to electric or gas stoves
- At least 11 3/4'' (30 cm) to oil or coal-based stoves
If it is not possible to observe these minimum distances, an insulation plate must be installed between the appliance and the heat source.
Installation location
This appliance should be installed in a dry, well-ventilated room.
When deciding where to install your appliance, please bear in mind that the energy consumption will increase if installed near to a heater, a cooker, or other appliance that gives off heat. Direct sunlight should also be avoided. The higher the room temperature, the longer the compressor has to run and the higher the energy consumption is.
When installing the appliance, please note:
- The electrical outlet must be easily accessible in an emergency and not concealed behind the appliance.
- The plug and power cord must not touch the back of the appliance as they could be damaged by vibrations from the appliance.
- Do not plug other appliances into electrical outlets behind this appliance.
Climate class
The appliance is designed for use within a certain climate range (ambient temperatures) and should not be used outside this range. The climate range of the appliance is stated on the data plate inside the appliance.
| Climate class | Room temperature |
| SN | 50°F to 90°F / 10°C to 32°C |
| N | 60°F to 90°F / 16°C to 32°C |
| ST | 60°F to 100°F / 16°C to 38°C |
| T | 60°F to 109°F / 16°C to 43°C |
Operating in a room which is too cold will cause the compressor to turn off for too long, causing the internal temperature in the appliance to rise, resulting in damage.
Risk of damage. In environments with high humidity, condensation may appear on the external surfaces of the appliance.
This condensate can cause corrosion on external appliance panels.
To prevent this, it is advisable to install the appliance with sufficient ventilation in a dry and/or air-conditioned room.
After installation, make sure that the appliance door closes properly, the air vents are not covered and that the appliance has been installed in accordance with these installation instructions.
Installation notes
Load-bearing capacity of the niche floor
The floor of the space where the appliance is to be installed must be flat and level.
It must be made from strong, rigid material.
The appliance is extremely heavy when fully loaded, and the floor it stands on must be able to bear its weight. If necessary, seek the advice of an architect or structural engineer.
When fully loaded, the weight of the appliance is about:
KF 2981 Vi
1142 lbs
(518 kg)
Adjoining cabinetry/units
The appliance is screwed to the adjoining cabinetry/units to the side and above. For this reason, it is essential that all cabinets/units are fixed to the ground and/or wall.
Ventilation
WARNING! Risk of fire! Operation of the appliance is limited. Keep the required ventilation gaps free from obstruction.
Noncompliance with the specified dimensions for the ventilation grille will cause the compressor to turn on more often and run for longer periods.
This causes increased energy consumption and an increased compressor operating temperature, which can result in damage to the compressor.
Do not block the ventilation gaps. They must also be cleaned on a regular basis to remove dust.
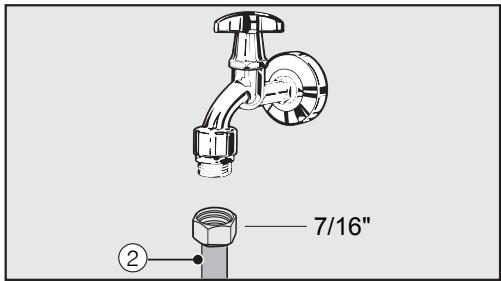
Specifications for the plumbed water connection
- The machine may only be connected to the plumbed water connection by qualified technicians.
- Connection to the household water supply must comply with the applicable regulations in the country in which the machine is being installed. All units and systems used to supply water to the machine must also comply with the applicable regulations in the respective country.
- The water quality must comply with the requirements for drinking water in the country in which the machine is being operated.
- The water pressure must be between 29 and 116 psi (2 and 8 bar).
- The appliance is only suitable for connection to a cold water line.
- The appliance may only be connected directly to a fresh water supply to ensure that water is circulated in the cold water line.
- A shut-off valve must be provided between the water line and the water supply of the building to ensure that the water supply can be cut off if necessary.
- Make sure that the shut-off valve is still accessible after the appliance has been installed.
Side-by-side
This appliance can be installed side-by-side with another refrigeration appliance. The following overview will show you which side-by-side options you have with your appliance:
A side-by-side merging kit is required for this. This is available from your Miele dealer or Miele Technical Service.
Instructions for installing appliances side-by-side can be found in the side-by-side merging kit instruction manual.
... with partition wall
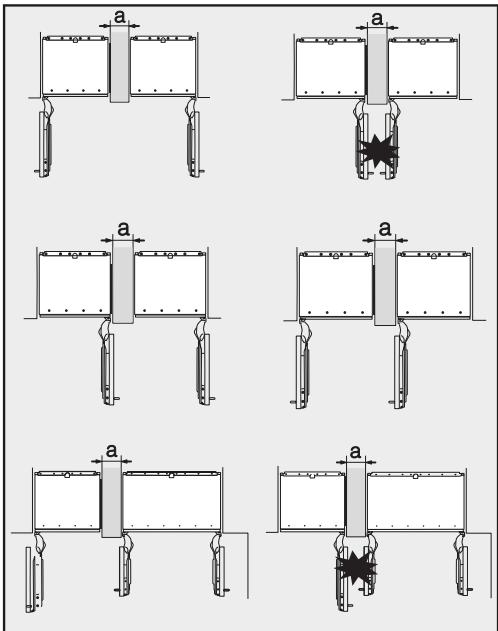
The wall a between the side-by-side appliances must be at least 5 / 8'' (16 mm) thick.
The appliances are secured individually in their niche using the supplied installation material.
If the partition wall a is narrower than 6 5/16" (160 mm), you will need the side panel heater from the side-by-side installation kit to prevent condensation from forming and any resulting damage.
If the partition wall a is thicker than 6 5/16" (160 mm), you do not need the side-by-side installation kit, nor the side panel heater.
... without partition wall
If the appliances are to be installed next to each other without a partition wall between them, they will need to be joined together with the side-by-side installation kit. In addition, you must install the side panel heater to prevent condensation from forming and any resulting damage.
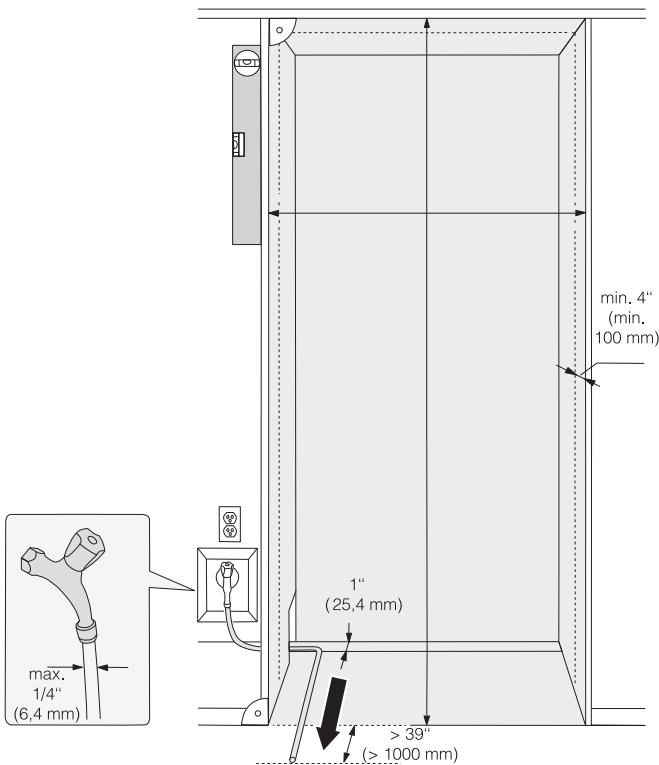
- The electrical connection must not be positioned higher than 9'' above the floor.
- The 1/4" plumbed water connection (not supplied) should not be positioned higher than 2" above the floor.
The electrical outlet must not be concealed behind the appliance and must be easily accessible in an emergency!
KF 2981 Vi

Side view
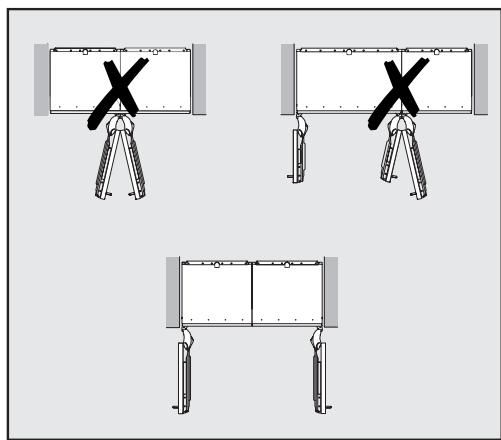
Dimensions when the appliance door is open (opening angle 90^ / 115^ )
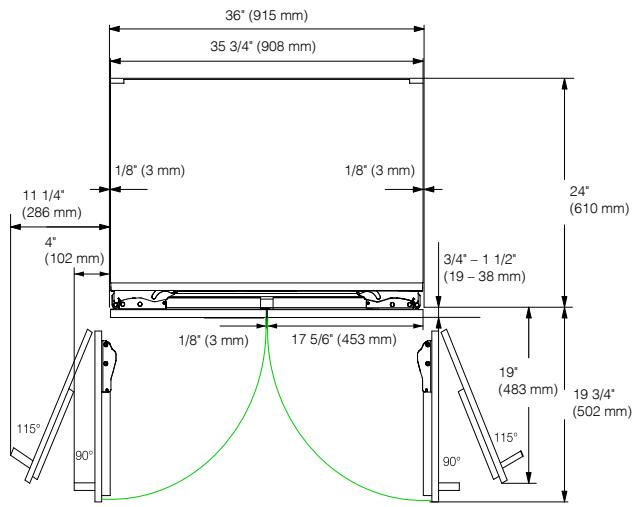
- The dimensions of the cabinet front and the door handle vary depending on the design of the kitchen.
KF 2981 Vi

Before starting...
It is essential to read these installation instructions carefully before starting to install the appliance.
The appliance should be installed by a suitably qualified tradesman in accordance with these installation instructions. Safe operation of the appliance is only assured if it has been installed and connected in accordance with the installation instructions.
Risk of damage and injury!
This appliance is very heavy and can tip forwards when the door is open. Keep the appliance door shut until the appliance has been built in and secured in its housing in accordance with the operating and installation instructions.
The appliance is both large and heavy. Installation must be carried out by two people.
The appliance must be installed in accordance with local regulations. If local regulations are not available, the following regulations must be observed:
- in the USA: the National Electric Code, ANSI/NFPA 70 - latest edition/ State and Municipal codes and/or local codes.
- in Canada: the Canadian Electric code C22.1 - latest edition/Provincial and Municipal codes and/or local codes.
Tools required
- Cordless drill
- TX 20 screwdriver
- Hammer drill
- Drill bits in various sizes, depending on materials
- Hammer
- Open-ended wrench
- Ratchet wrench, attachment: socket, 5/16" (8 mm)
- Adhesive tape
- Utility knife
- Pipe wrench
- Level
- Tape measure
- Pencil
Other
- Step ladder
- Hand truck
Weight of cabinet fronts
Before installing the cabinet fronts, make sure that they do not exceed the maximum permitted weight:
| Appliance | Max. weight of upper cabinet fronts | Max. weight of lower cabinet front |
| KF 2981 Vi | Left 150 lb (68 kg); right 154 lb (70 kg) | 19 lb (9 kg) |
Risk of damage due to weight of cabinet front.
Cabinet fronts that exceed the permitted weight can damage the hinges, and this can affect various factors, such as operation of the appliance.
Always observe the permissible weight of the cabinet fronts.
Aligning the installation niche
The installation niche must be carefully aligned using a level before installing the appliance. The niche corners must be at 90^ angles to each other, otherwise the cabinet door will not sit straight on all four corners.
- The side panels of the installation niche must be even.
- The surrounding walls of the installation niche must be at least 5/8 ” (16 mm) thick.
- The surrounding walls must be securely fixed to the floor or wall.
- The shortened side walls must be at least 4'' (100 mm) thick.
- The baseboard must be at least 1 / 2 (13 mm) thick (preferably 3 / 4 (19 mm)).
Checking the installation space
Check the installation dimensions.
Check the position of the electrical and plumbing connections.
- Check that all adjacent cabinets / units are securely fixed to the wall.
- Check the adjacent cabinets / units for possible collisions when opening doors (door opening angle).
Before installation
! Heavy weight!
This appliance is very heavy and can tip forwards when the door is open.
Prepare the plumbed water connection for the appliance (see "Plumbed water connection").
Before installation, remove any accessories from the back of the appliance.
Check the appliance for damage during transportation.
Do not install a damaged appliance.
- Check that all parts at the back of the appliance are unhindered.
- To protect the floor when installing the appliance, secure an off-cut of flooring or similar material to the floor in front of the installation area.
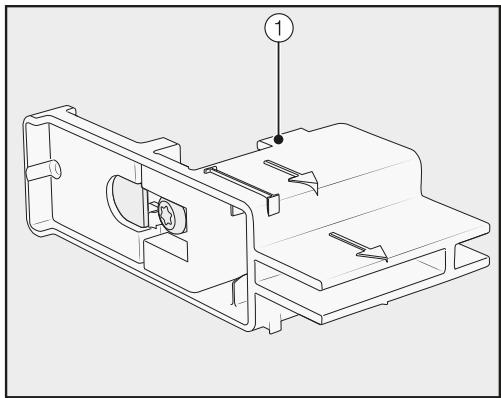
- Do not remove the installation aids ① from the appliance door. These will be required later when the appliance is installed in the niche.
Risk of tipping over!
Make sure the appliance is no longer secured to the pallet as soon as you unscrew the brackets that fix the appliance to the pallet.
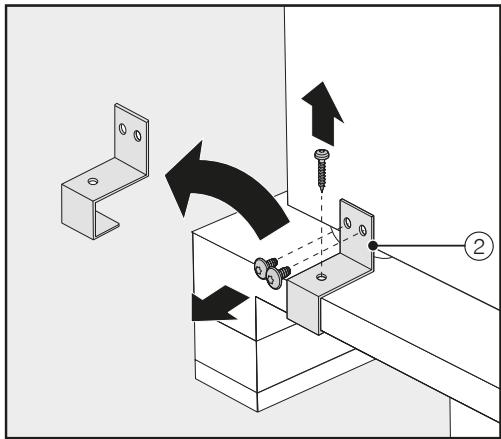
Unscrew the brackets ②.
- With the help of several people as required, carefully lift the appliance from the pallet, starting with the back of the appliance.
As soon as you have set the appliance upright, you can move it using the rollers on the bottom.
Preparing the installation niche
Keep the appliance door closed until the appliance is secured inside the niche!
Risk of tipping over!
The installation niche must be secured to the wall behind it with several screws. Only this can ensure that the appliance will not tip over after being installed!
Always use the provided anti-tip brackets to secure the niche.
Due to the sheer size and weight of the appliance, it needs to be ensured that it cannot tip forwards once it is built into the niche.
Using the installation equipment
Parts required for installation of the appliance are supplied with the appliance. The plastic bags supplied are marked with letters for easy identification.
- When performing the individual assembly steps, observe the letters specified and use the matching plastic bag with the required installation equipment.
Securing the installation niche
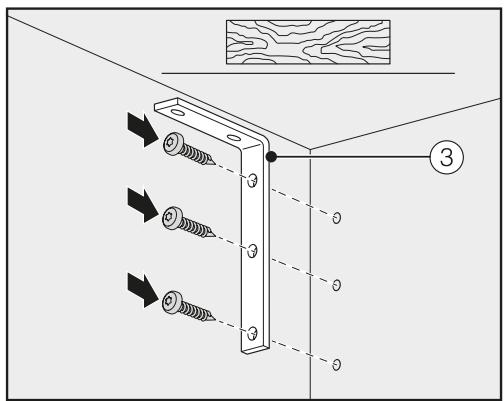
The provided anti-tip brackets ③ ensure the installation niche is securely fixed to the wall.

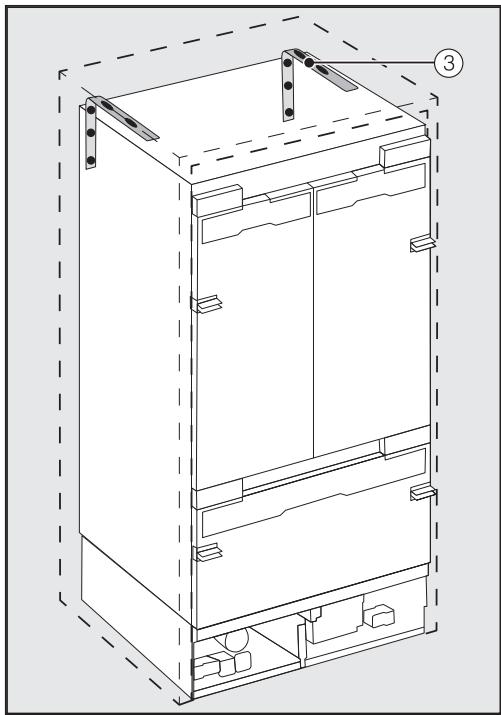
Use 2 anti-tip brackets ③ for each individual appliance or 4 anti-tip brackets for each (side-by-side) combination of 2 appliances.
Position the anti-tip brackets ③ on the left and right of the niche.
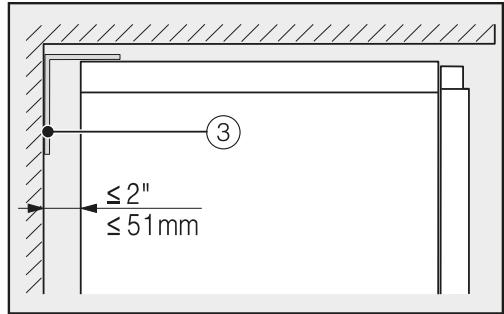
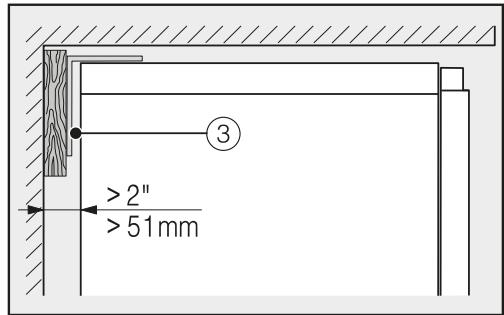
Make sure that the gap between the appliance's rear wall and the installation niche does not exceed 2'' (51 mm).
- Place a wooden wedge behind the anti-tip brackets ③ if necessary.
While holding the anti-tip brackets in place, mark the necessary drill holes on the rear wall of the installation niche.

Retaining screws for different uses and types of material are supplied in the accompanying pack:

Securing to a concrete wall
Securing to a wooden wall
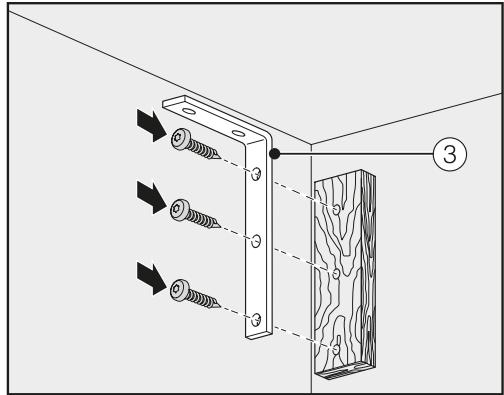
Securing with a wooden wedge
- Secure the installation niche to the wall using the anti-tip brackets ③.
Now prepare the plumbed water connection for the appliance (see "Plumbed water connection").
Pushing the appliance into the niche
Push the appliance into the niche, taking care not to damage the power cord and plumbed water connections.
If you are installing several appliances side by side, now secure the appliances to one another (see the instructions for the side-by-side installation kit).
Remove the toe-kick board ④ from the appliance toe-kick as follows:
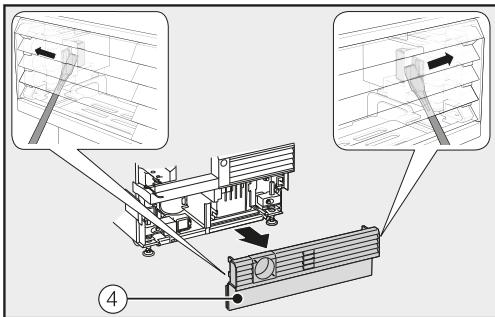
Carefully guide a flat-head screwdriver through the grate in the toe-kick board ④ on both sides and use it to push the internal plastic latches outwards to release the toe-kick board.
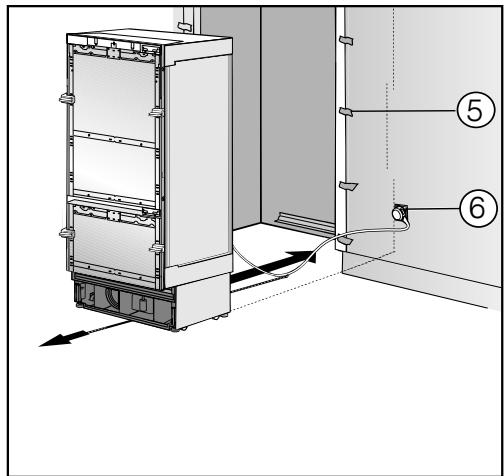
- Affix edge protection ⑤ to the adjacent cabinet fronts.
Insert the plug connector at the back of the appliance (see "Electrical connection").
Insert the plug ⑥ into the electrical outlet.
The electrical outlet should be close to the appliance and easily accessible!
Otherwise, it must be possible to switch the appliance on and off using an external all-pole switch with a sufficient contact gap!
Risk of short circuit and overloading!
When installing appliances side by side, each appliance must have its own dedicated electrical outlet.
Tip: Secure the power cord to prevent it becoming caught: Tie a piece of string to the middle of the power cord and as the appliance is being pushed into the niche, pull the cord forward underneath the appliance.
Carefully push the appliance into the niche.
If the appliance cannot be pushed into the niche (because the floor is uneven, for example), unscrew the rear feet slightly (see "Aligning the appliance") and slide the appliance into the niche.
Remove the edge protection ⑤ from the adjacent cabinet fronts.
Aligning the appliance
Align the appliance with neighboring cabinet fronts as described below.
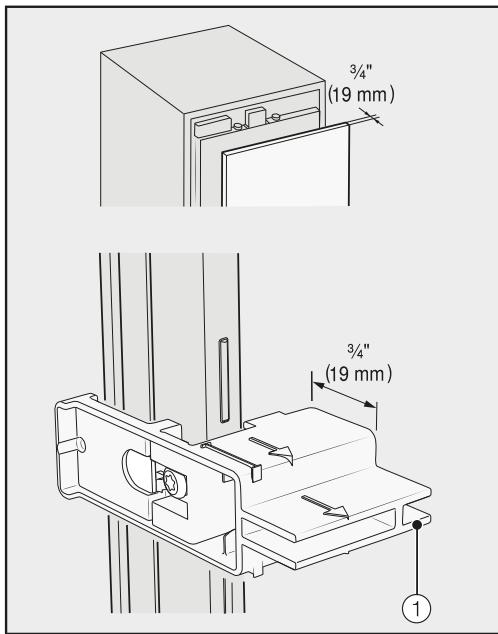
Cabinet-front thickness of 3/4'' (19 mm)
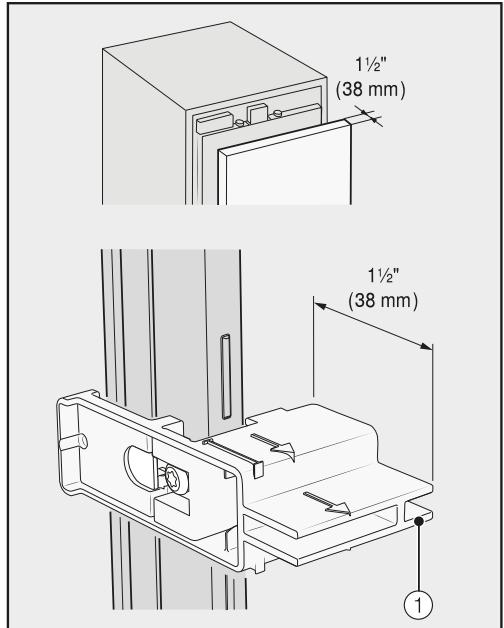
Cabinet-front thickness of 1 1/2'' (38 mm)
The installation aids ① on the appliance door are suitable for a cabinet-front thickness of 3 / 4'' (19 mm) or 1 1/2" (38 mm).
Building in the appliance
The adjustable feet at the front and back of the appliance can all be adjusted from the front:
Risk of damage!
Do not under any circumstances use a cordless screwdriver to adjust the front and rear feet.

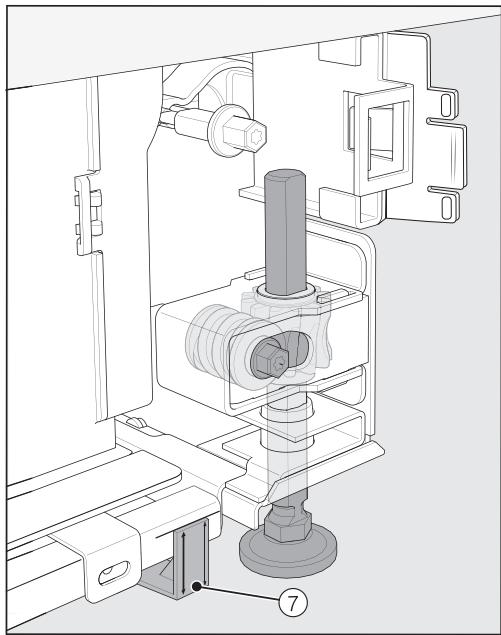
Position the supplied spacers ⑦ on both sides on the markings next to the adjustable feet at the front of the appliance.
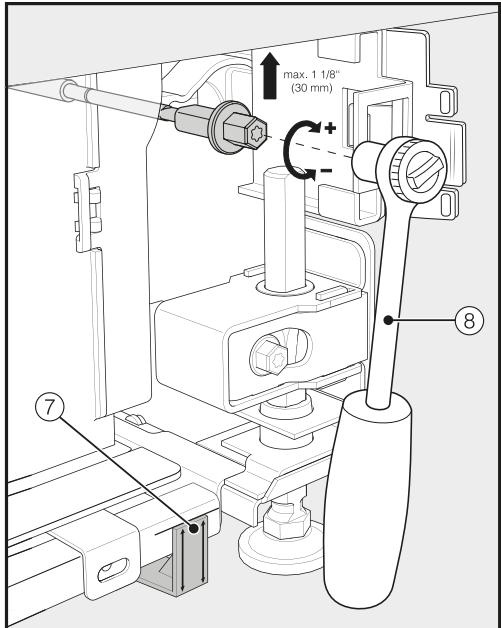
Adjust the front feet ⑧ with a ratchet (attachment: 5/16" (8 mm) socket) or a TX 20 screwdriver.
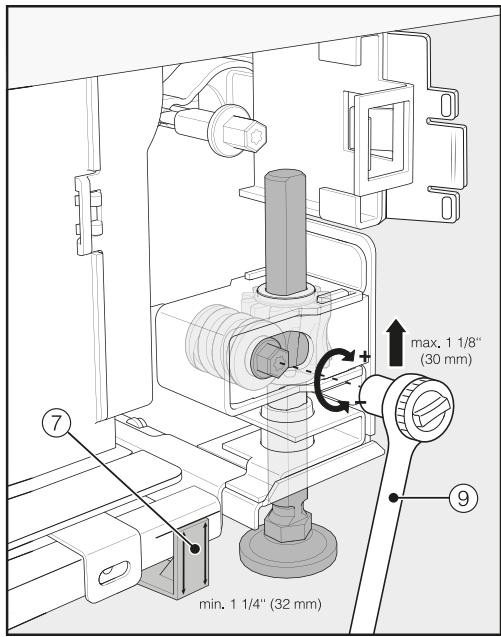
Adjust the rear feet ⑨ with a ratchet (attachment: 5/16" (8 mm) socket) or a TX 20 screwdriver.
Tip: Proceed carefully when adjusting the feet, alternating between the left and right feet.
- Place a spirit level across the installation aids ① on the appliance door to check the appliance's alignment.
- Unscrew the feet ⑧ and ⑨ on both sides at least until the marking on the toe-kick is aligned with the required 1 1 / 4" (32 ~mm) on the spacer ⑦ . The standard dimension of 1 1 / 4" (32 ~mm) relates to a niche height of 84" (2,134 ~mm) .
It is important to align the feet to a height of at least 114 (32 mm) so that the appliance's ventilation works properly via the toe-kick.
Risk of damage!
Unscrew the feet only until the marking on the toe-kick is aligned to a maximum of 2 7/16" (62 mm) (max. niche height of 84" (2,164 mm)). Otherwise the rear foot adjustment will be damaged.
- Check the alignment of the appliance again using installation aids ① and the spirit level.
Securing the appliance in the niche

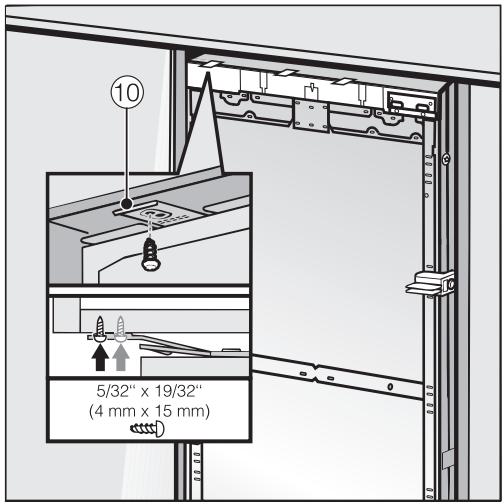
Screw the lugs for the fixing plate 10 into the cabinets/units above the appliance.
If it is not possible to secure the appliance at the top, it can be attached to the niche with the side fixing plates:
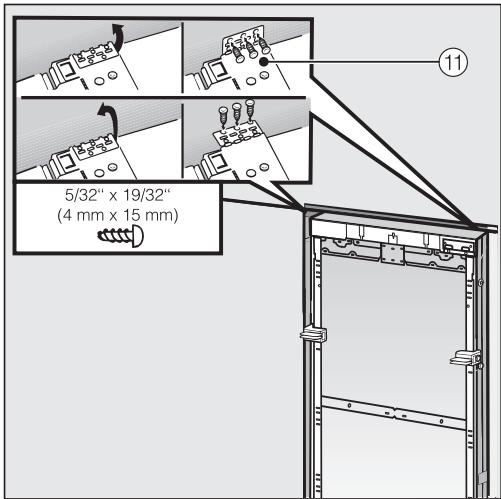
Open out the side fixing lugs 1
- Secure the side fixing lugs ① with the screws provided.
Open both appliance doors.
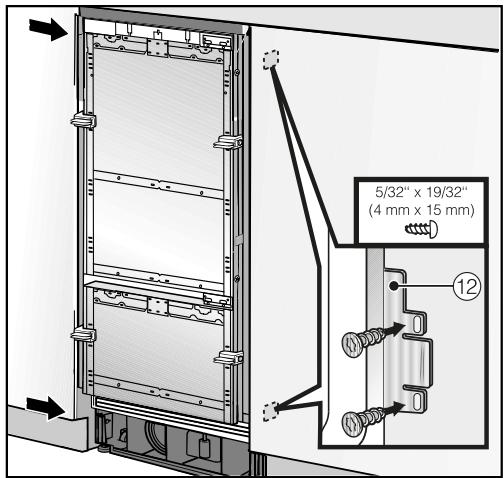
Screw the mounting plate lugs ⑫ at the top and bottom to the cabinets/ units adjacent to the appliance.
In a side-by-side combination, only the external panels of the two appliances can be secured to the cabinet wall.
- Connect the appliance to the household water supply (see "Plumbed water connection").
Preparing the cabinet fronts
- Open all appliance doors as far as they will go.
- Unscrew the installation aids ① from the appliance doors.
For optimum alignment of the cabinet fronts, it is important to install the upper cabinet fronts first, followed by the lower cabinet front.
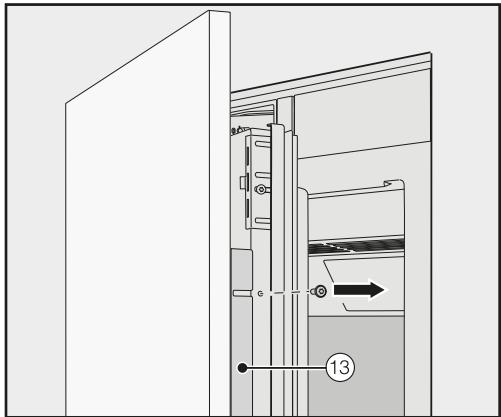
Building in the appliance
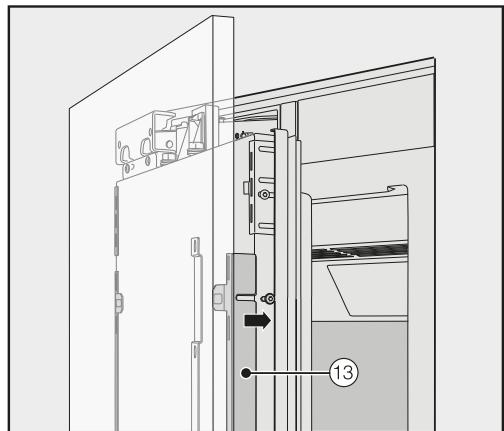
- On both sides, unscrew the angle trims ⑬ from the upper appliance doors and place the trims and screws to one side – they will be required later.
- Close the upper appliance doors.
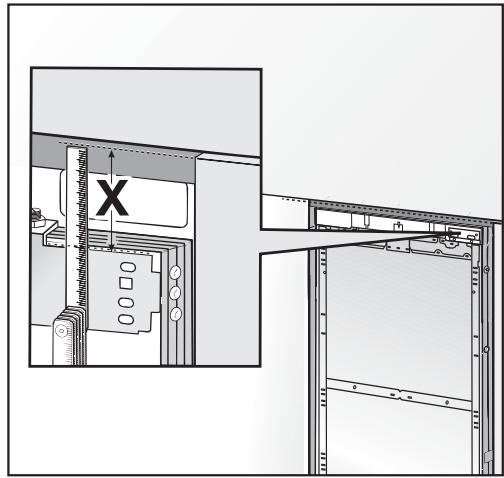
Measure the gap X between the adjusting bars and the upper edge of the adjacent cabinet front.
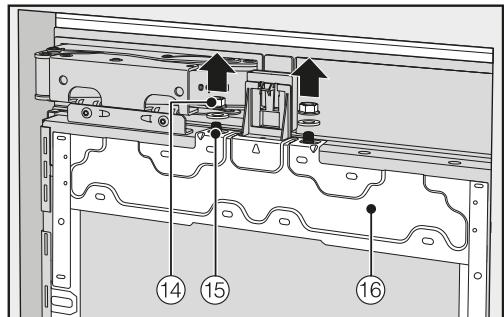
- On both appliance doors, remove the nuts and washers ⑭ from the threaded bolts ⑮ and store them in a safe place – they will be required later.
The mounting frames ⑥ can now be removed from the appliance doors.
- Place each cabinet front on a firm surface, with the external side facing downwards (place on a blanket or similar to avoid it becoming scratched).
■ Mark the distance X -1/8" (3 mm) on the inner side of the cabinet front.
Similarly, locate and mark the midpoint Y on each cabinet front.
Position each mounting frame 16 according to the markings on the cabinet front.
Pre-drill the holes.

Screw each mounting frame 16 to the cabinet front:
Use at least one screw for each retaining point on the mounting frame 16.
- Secure the mounting frame ⑥ to the top of the cabinet front, using at least 10 screws depending on the size.
The mounting frames have several different types of holes to take account of a variety of cabinet fronts.
When securing the frame, always screw into the strongest part of the cabinet door. To do this, select screws which are slightly shorter than the thickness of the cabinet front.
Screw the appliance handles to the cabinet fronts from the inside if necessary (not for handle-free kitchens).
Securing and aligning the cabinet fronts
Now insert the angle trims 13 as far as they will go into the provided spaces in the mounting frame 16.
- Open both appliance doors and hang each cabinet front with its mounting frame ⑥ from the top onto the threaded bolts ⑤

From the outside, press the angle trims 13 into the white plastic frame on both sides and screw them se
curely into place. Spare screws are provided in the plastic bag marked with the letter E.
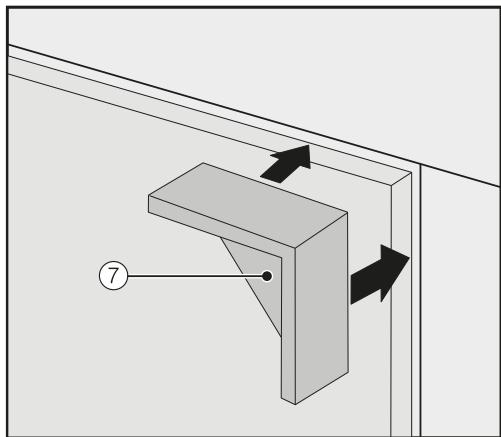
- Place the spacers ⑦ from the outside on top of the cabinet front on both sides.
- Close both appliance doors and check the distance between each door and adjacent cabinet doors.
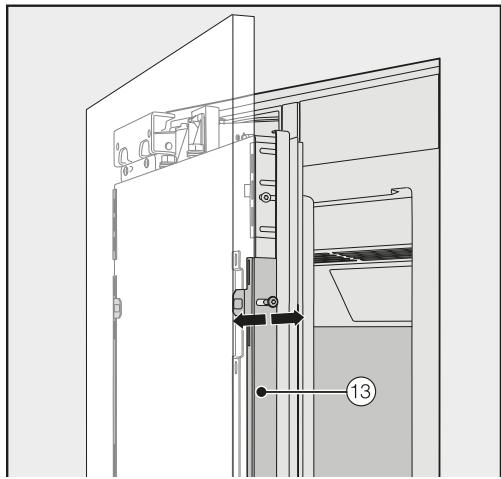
Align the depth of the appliance doors via the gaps in the angle trims 13. Then screw the angle trims 13 into position.
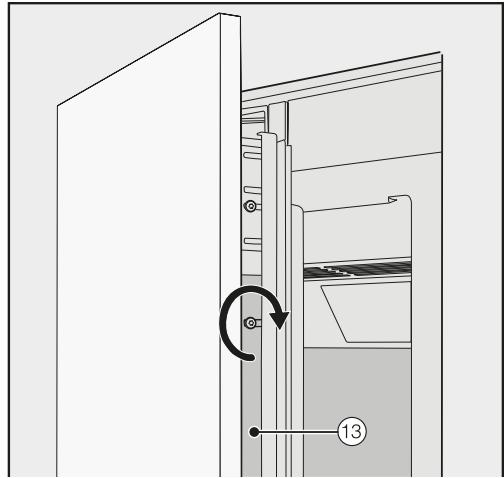
Now tighten the screws in the angle trims 13.
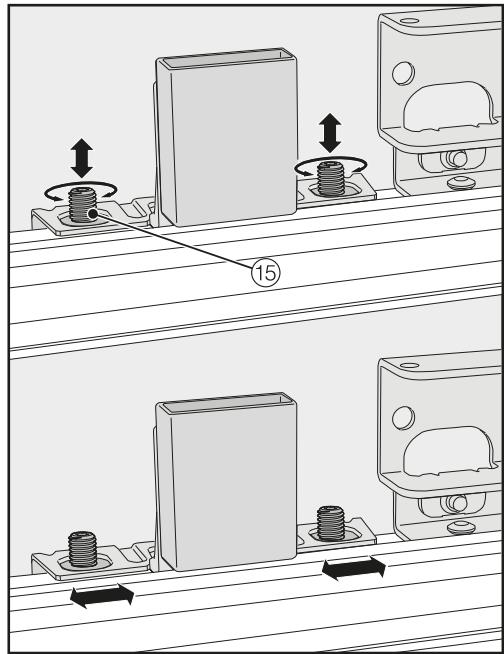
Align the height and sides of the appliance doors using the threaded bolts 15.
Building in the appliance
- Close the appliance doors and check the distance between each door and adjacent cabinet doors.
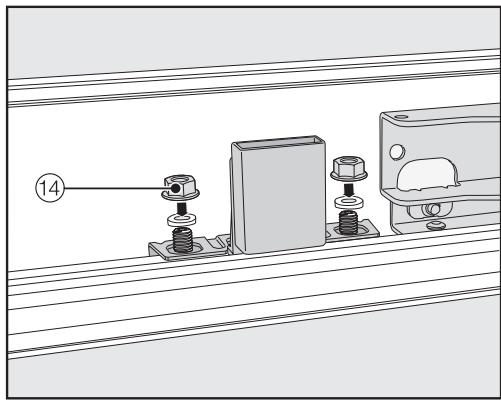
- Place the washers and nuts ⑭ back in position and tighten the nuts ⑭ . The appliance doors are now secured.
Remove the spacers ⑦ from the cabinet fronts.
The position of the lower cabinet front aligns with the position of the upper cabinet fronts.
When installing cabinet fronts, consider the dimensions of the upper cabinet fronts.
To install the cabinet front to the lower appliance door, repeat the steps starting from "Preparing to install the cabinet fronts".
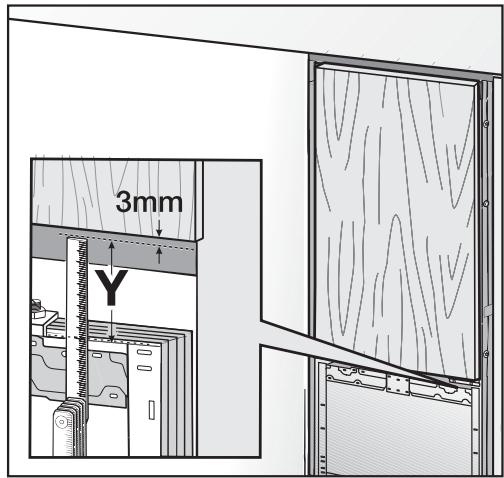
Measure the gap Y between the adjusting bar for the lower appliance door and the upper appliance doors.
- Maintain a gap of 1 / 8'' (3 mm) to the upper cabinet fronts.
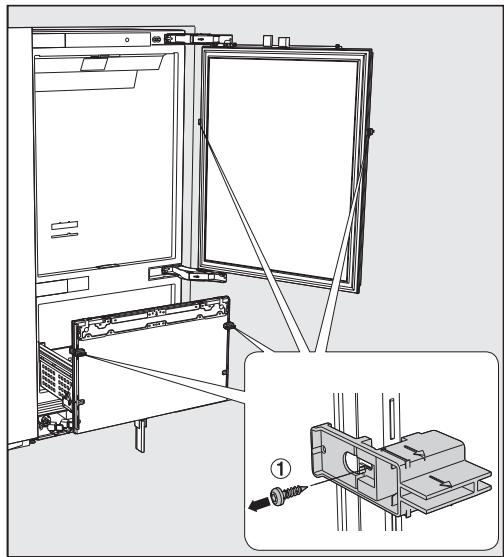
Mounting the retaining brackets

The retaining brackets are used to additionally secure the cabinet fronts to the bottom of the appliance door.
Do not mount the retaining brackets until the appliance (or side-by-side combination, if applicable) has been installed and the cabinet fronts have been aligned.
- Open all appliance doors as far as they will go.
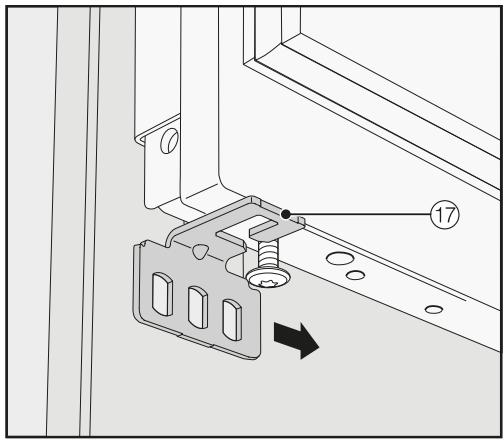
- Slide the top and bottom retaining brackets ⑦ from both sides onto the screw at the bottom of the appliance door.
Screw the retaining brackets ⑦ securely to the cabinet fronts.

- Tighten the screws at the bottom of the appliance door.

- Place the covers ⑧ on the retaining brackets ⑦ .
- Click the covers ⑱ onto the retaining brackets.
Securing the covers
The top cover 19 must be assembled as follows before it can be installed:
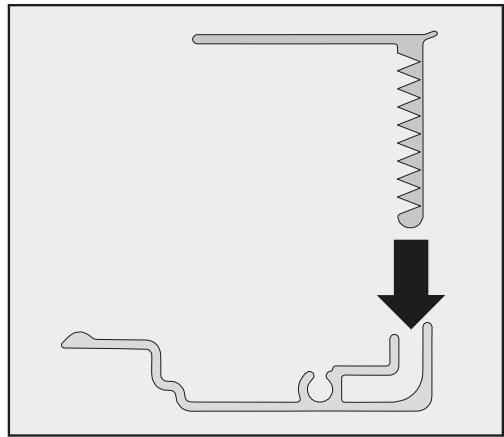
Insert the two parts of the cover into one another.

Cover viewed from the side
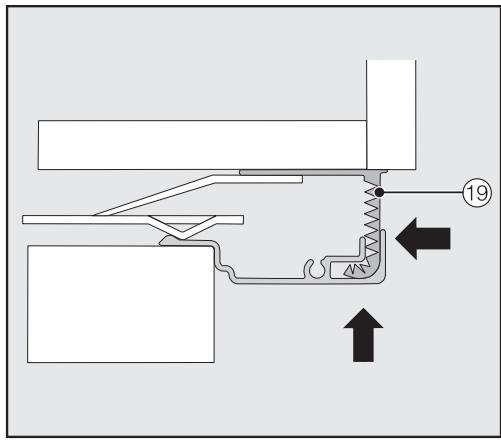
- Place the assembled cover ⑲ into the gap above the appliance so it clicks into place. While doing so, slide both parts of the cover together as required.
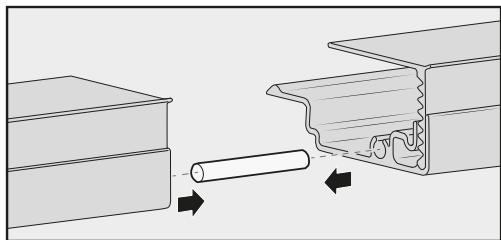
Mounting the cover in a side-by-side combination
Insert the joining peg (from the side-by-side kit) halfway into the channel in the cover for the left-hand appliance.
- Place the second cover onto the pin and press the two covers together.
- Click the two covers together into the niche above the appliance.
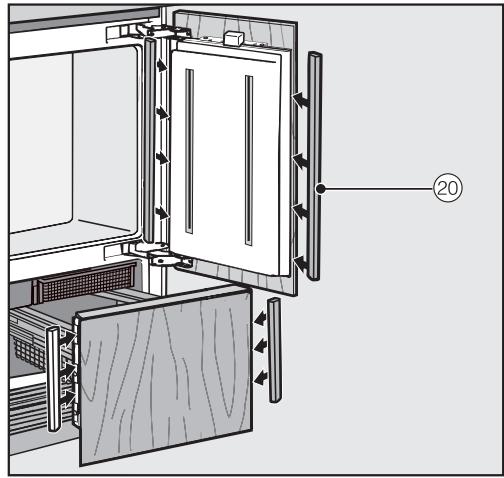
- On both the upper and lower appliance doors, mount the plastic covers ② to the sides of the appliance door by clicking them into the gap between the appliance door and the cabinet door, starting at the bottom and working up to the top.

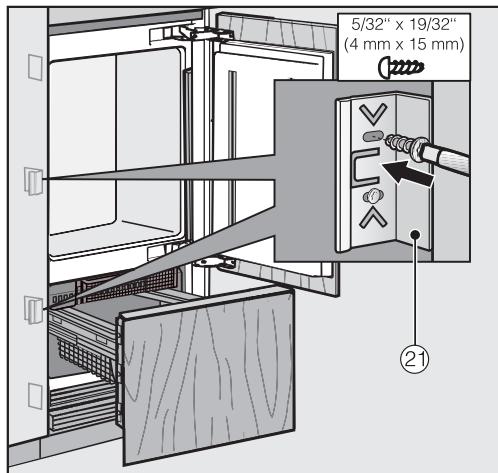
- Secure both sides of the appliance using at least 3 clips ② for the covers.
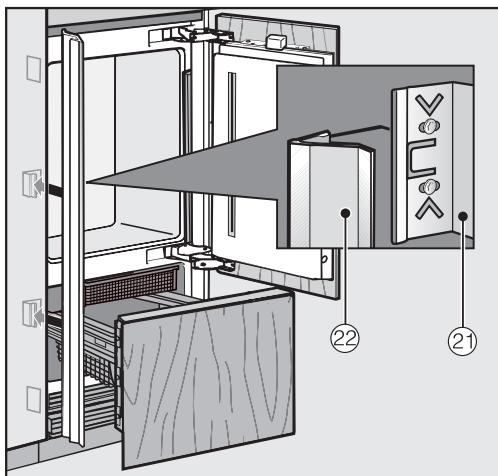
Now attach the covers 22 onto the retaining clips 21 on both sides. In the case of side-by-side installation, the covers are only required on the outer side.
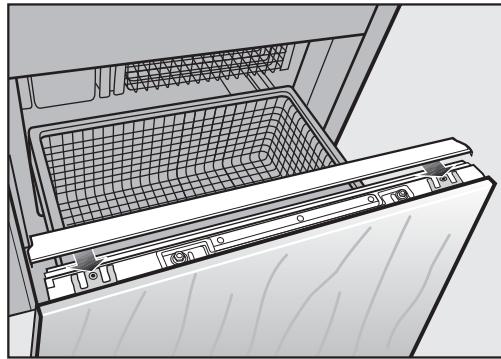
- Slide the cover onto the lower appliance door from the inside.

Install the cover ② onto the light contact switch.
Securing the toe-kick board and cover
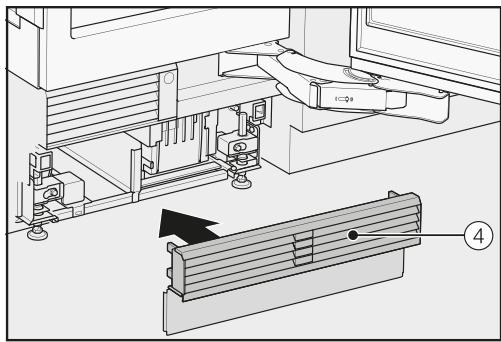
- Click the toe-kick board ④ onto the bottom of the appliance toe-kick.
Do not cover the vents in the appliance toe-kick. This will damage the appliance!
If necessary, cut the toe-kick cover to the required length and height (cut along the lower edge of the toe-kick facing where it touches the floor).
- Attach the toe-kick cover to the bottom of the appliance.
Limiting the opening angle of the appliance doors

The door hinges are set ex works to enable the upper appliance doors to be opened wide.
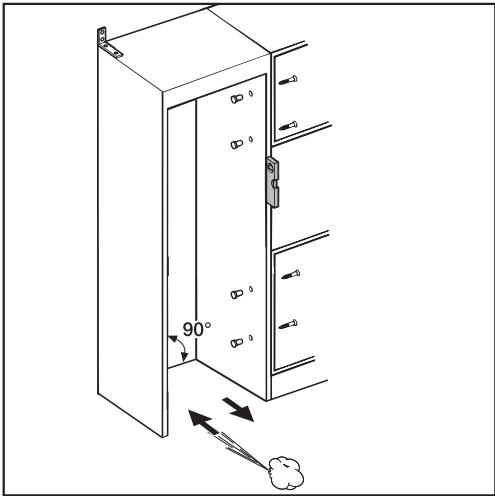
If, for example, the appliance doors hit an adjacent wall when they are opened, you should limit the opening angle of the appliance doors to 90^ :
Open each appliance door.
Insert each pin into the hinge from above.
This will limit the opening angles of the appliance doors to 90^ .
Risk of electric shock!
The appliance must only be switched on when it has been installed in accordance with the installation instructions.
Ground the appliance.
The appliance must not be grounded via a gas pipe.
If in doubt, have a suitably qualified and experienced electrician check that the installation complies with relevant regulations.
Do not install a fuse into neutral current or grounding electrical circuit.
Do not use extension cords or underground (two prong) adapters.
Do not use a frayed or damaged power cord.
Risk of electric shock!
For protection against electric shock, this appliance is equipped with a pole-free plug which is protected against reverse polarity. The electrical outlet must be properly grounded.
Do not remove the round grounding connector pin from the plug.
Use only a grounded plug adapter.
Wait for 1 hour after installation before plugging the appliance into the power supply. This allows coolant and refrigerator oil to settle in accordance with regulations.
Ensure that the voltage of the power supply corresponds with the connection voltage of the appliance. A power supply of 110-120 V, 60 Hz and 10-16 Amp, which is protected by a power switch or a fuse, is required to operate the appliance.
The manufacturer recommends operating the appliance on a dedicated circuit to avoid overloading the electrical circuit.
All relevant legal electrical, fire, and building regulations must be observed when installing the electrical outlet and/or the appliance.
In certain countries, appliances are required to be connected to the electrical supply via a wall-mounted ON/OFF switch.
To avoid the risk of fire, electric shock, or other injuries, the appliance must be installed and connected by a suitably qualified electrician in accordance with all relevant local and national regulations and standards, including fire prevention.
The socket must not be concealed behind the appliance and must be easily accessible so that the appliance can be quickly disconnected from the electrical supply in case of an emergency.
If the outlet is no longer accessible after installation, an additional means of disconnection must be provided for all poles. Suitable means of disconnection include switches with an all-pole disconnect device with a contact opening of at least 1/8'' (3 mm). These can be circuit breakers, fuses, and relays.
The plug and power cord must not come into contact with the back of the appliance as vibrations can cause damage to these components. This could result in a short circuit.
Do not plug other appliances into electrical outlet behind this appliance.
Do not connect the appliance to a stand-alone inverter such as those used with an autonomous energy source e.g., solar power.
When the appliance is turned on, power surges could result in a safety switch-off. This can damage the electronics. The appliance must not be used with so-called energy saving devices either. These reduce the amount of energy supplied to the appliance, causing it to overheat.
If the power cord needs to be replaced, this must be performed by a qualified technician.
Connecting the appliance
Insert the plug into the back of the appliance.
Make sure that the plug has clicked into position correctly.
Insert the plug into the electrical outlet and switch on.
The appliance is now connected to the electricity supply:
Follow the steps described in "Switching the appliance on and off", section "Switching on the appliance".
Information on the fresh water connection
The machine may only be connected to the fresh water supply by qualified technicians.
Disconnect the machine from the power supply before connecting it to the fresh water supply.
Turn off the water supply before connecting the water supply line for the ice cube maker.
The water quality must comply with the requirements for drinking water in the country in which the machine is being operated.
WARNING! Connect to potable water supply only.
Connection to the household water supply must comply with the applicable regulations in the country in which the machine is being installed. All units and systems used to supply water to the machine must also comply with the applicable regulations in the respective country.
The appliance is only suitable for connection to a cold water line, which
- is directly connected to the water supply in order to ensure that water is circulated in the cold water line.
Avoid connection to a water supply in which the water might stagnate. This can affect the taste of water and ice cubes.
- withstands the operating pressure.
- fulfills the hygiene regulations.
The water pressure must be between 29 and 116 psi (2 and 8 bar).
A shut-off valve must be provided between the water line and the water supply of the building to ensure that the water supply can be cut off if necessary.
Make sure that the shut-off valve is still accessible after the appliance has been installed.
Risk of damage!
If the water intake is blocked while the Ice Maker is still in use, the water intake pipe can freeze up.
Turn the Ice Maker off if the water intake is interrupted (e.g., while on vacation).
Unduly high water pressure in the system can result in damage to the appliance.
Install a pressure reducing valve if the water pressure in the system exceeds 116 psi (8 bar).
Do not install the system if the water pressure exceeds 120 psi (8.3 bar). Contact your plumbing specialist if you are unsure of your water pressure.
Installing the water hose to the appliance
Before establishing the plumbed-water connection, ensure that the appliance is disconnected from the power supply.
When installing the water hose, make sure that it is neither kinked nor damaged.
By this time, the installation niche should already have been prepared so that the appliance needs only to be pushed into it.
Position the appliance slightly in front of the installation niche so that the shut-off valve can still be accessed.
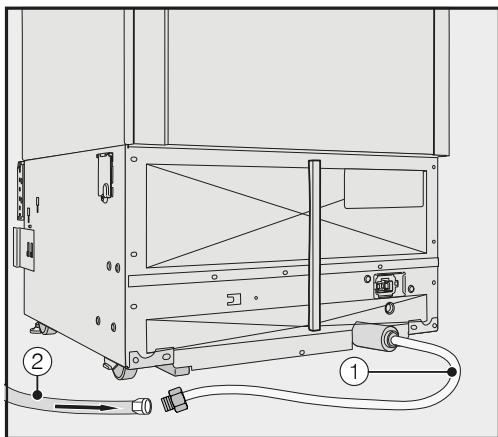
The water connection of the appliance ① is ready for connection at the rear of the appliance.
Install the water hose ② onto the water connection ① at the rear of the appliance. Ensure that the connections are tight and leak-proof.
Connect the water hose ② to the shut-off valve.
Ensure that it is properly screwed into position.
- Slowly open the shut-off valve in the water supply line and check the whole water system for leaks.
The appliance can now be installed in the niche (see "Installation").
The appliance can now be connected to the power supply (see "Electrical connection").
How to save energy
| Normal energy consumption | Increased energy consumption | |
| Installation / Maintenance | In a well-ventilated room. | In an enclosed, poorly ventilated room. |
| Protected from direct sunlight. | In direct sunlight. | |
| Away from heat sources (radiator, range/oven). | Near a heat source (radiator, oven). | |
| Where the ideal room temperature is approx. 68°F (20°C). | Where the ambient room temperature is above 77°F (25°C). | |
| Air vents uncovered and dusted regularly. | Where the ventilation openings are blocked and full of dust. | |
| Temperature setting | 39°F to 41°F (4°C to 5°C) in the refrigerator section | The lower the temperature in the appliance, the higher the energy consumption. |
| SmartFresh drawer close to 32°F (0°C) | ||
| 0°F (-18°C) in the freezer section | ||
| Use | The drawers, and shelves are arranged as they were when the appliance was de-livered. | |
| Only open the door when necessary and for as short a time as possible. Store food in an organized way. | Frequent opening of the door for long periods will cause a loss of coldness. The appliance will try to cool down and the compressor will run for longer periods. | |
| When shopping, use a cooler bag and place the food in the appliance as soon as possible. Replace any food removed as quickly as possible, before it warms up too much. Allow hot food and drinks to cool down before placing them in the appliance. | Hot food or food at room temperature raises the temperature inside the refrigeration appliance. The appliance will try to cool down and the compressor will run for longer periods. | |
| Store food well packaged or covered. | The evaporation or condensation of liquids in the refrigerator section will cause a loss of coldness. | |
| Place frozen food in the re-frigerator section to defrost. | ||
| Do not overfill the appliance in order to allow the air to circulate. | Poor air circulation will cause a loss of coldness. |
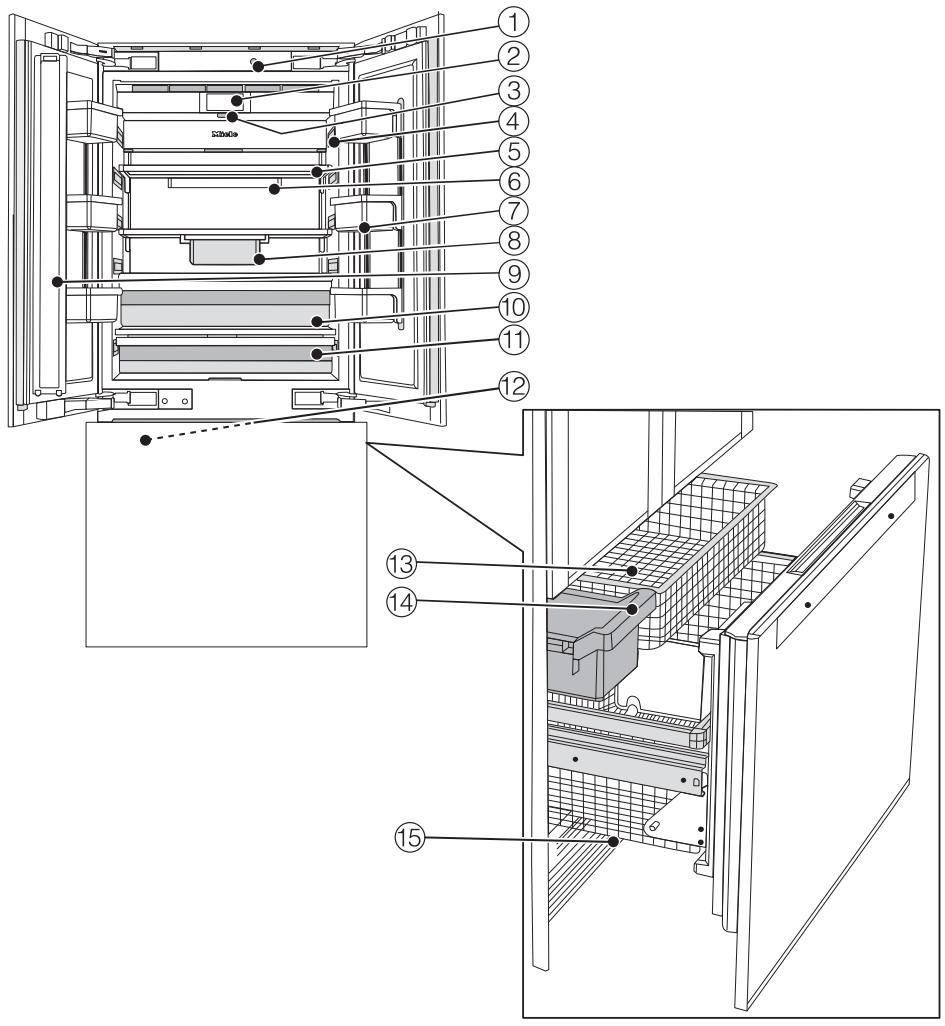
① Automatic door opening
② Display
③ On/Off switch
④ Interior lighting
⑤ Shelves
⑥ Holder for the Active AirClean filter
⑦ Door shelves in the appliance door
⑧ Hanging drawer
⑨ Door pillar with integrated heating (Condensation Protection)
Humidity-controlled compartment with moisture regulator for fruit and vegetables
⑪ Dry compartment with low temperature for food which goes off quickly
⑫ Ice maker
⑬ Freezer baskets
14 Ice-cube container
15 Water filter
The dry compartment in the SmartFresh zone fulfills the requirements of a cold storage compartment according to EN ISO 15502.
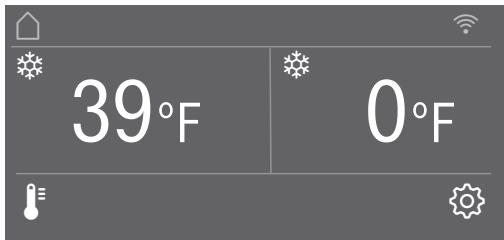
Main screen
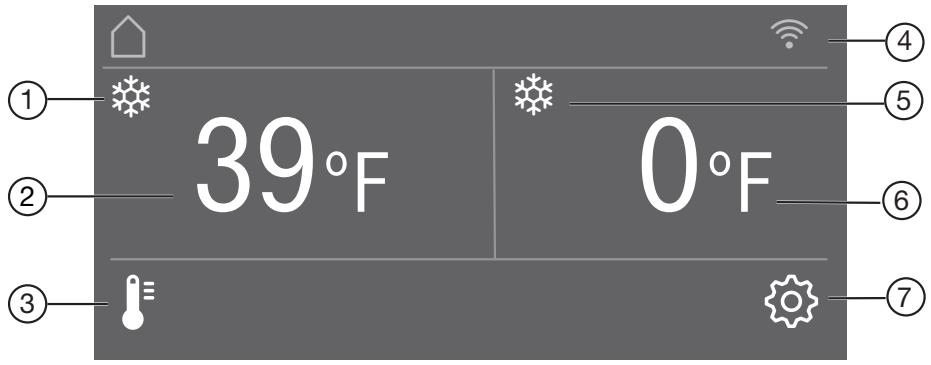
① Automatic SuperCool display
(only visible when the Automatic SuperCool function has been switched on)
② Temperature display (target temperature) for the refrigerator section.
③ Sensor control
for setting the temperature
④ Display for Miele@home connection status
(only visible when Miele@home has been set up)
⑤ SuperFrost display
(only visible when the SuperFrost function has been switched on)
⑥ Temperature display (target temperature) for the freezer section.
⑦ Sensor control
for adjusting various settings in settings mode
Settings mode
The following icons can be selected in settings mode:
| Symbol | Function | |
| ■ | Language | Set |
| ▲ | Display Brightness | Adjust (darker to brighter) |
| □ | Color Scheme | Set (dark or bright) |
| ▲▲/▲▲ | Buzzer Tones | Adjust the volume or switch off the Buzzer Tones completely (e.g., for the door alarm) |
| ▲▲▲/▲▲▲ | Keypad Tone | Adjust the volume or switch off the Keypad Tone completely |
| °C/F/C | Temperature Unit | Set (°Fahrenheit or ° Celsius) |
| ○/○ | Keypad Lock | Switch on or off (see “Selecting additional settings”) |
| ○ | Eco Mode | Switch on or off (see “Selecting additional settings”) |
| √ | Self Test | The system restarts and is checked for faults or malfunctions (see “Selecting additional settings”) |
| △△ | Condensation Protection | Switch on or off (see “Selecting additional settings”) |
| □ | Door Assistant | Switch on (Push2Open or Pull2Open) or switch off (see “Selecting additional settings”) |
| @ | Miele@home | Set up, deactivate, or query WLAN connection status (see “Selecting additional settings”) |
| ■* | Demo Mode | Switch off * (only visible when Demo Mode, is switched on see “Selecting additional settings”) |
| ■ | Factory Default | Reset to default settings (see “Selecting additional settings”) |
| ▲ | Vacation | Switch on or off (see “Selecting additional settings”) |
| ▲▲ | Ice Maker | Switch on or off (see “Making ice cubes”) |
Guide to the appliance
Sabbath Mode Switch on or off (see "Selecting additional settings")
Water Filter Display Switch on or off or reset (see "Selecting additional settings")
Display Active Air- Switch on or off or reset Clean Filter (see "Selecting additional settings")
Symbols in settings mode
</> Scroll in settings mode or select a setting
-/+ Change a setting (e.g., display brightness)
OK Confirm a setting
Exit the menu level
Accessories supplied
Appliance plug
Labels for the SmartFresh zone
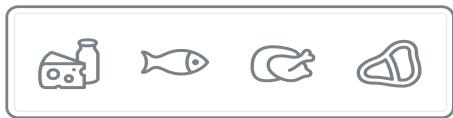
Each type of food has its own characteristics which determine the specific storage conditions it requires.
Dry compartment label
Humidity-controlled compartment label
The labels for the two compartments in the SmartFresh zone help you to choose the right type of food to ensure ideal storage conditions.
Stick the labels onto the compartments in the SmartFresh zone as described under "Before first use" in "Initial commissioning".
Water filter (Bypass/Active charcoal filter)
The water filter filters supply water for making ice cubes.
The appliance is supplied with a water filter (Active charcoal filter) that filters supply water for making ice cubes.
Active AirClean filters
This Active AirClean filters neutralize unpleasant odors in the refrigerator section for optimal air quality.
The holder for the Active AirClean filters is in the refrigerator section. Insert the Active AirClean filters supplied as described under "Inserting the Active AirClean filters" in "Initial commissioning".
We recommend replacing the Active AirClean filters every 6 months.
Optional accessories
A range of useful Miele accessories and care products are available for your appliance.
Active AirClean filters
See "Accessories supplied" for a description.
Water filter (Bypass/Active charcoal filter)
The water filter filters supply water for making ice cubes.
The appliance is supplied with a water filter (Active charcoal filter) that filters supply water for making ice cubes.
Stainless steel front panel
Stainless steel front panels give your appliance a high-quality appearance.
In addition, you can order toe-kick covers in a stainless steel look.
Side-by-side installation kit
For installing two or more appliances next to each other.
Accessories are available to order via the Miele Webstore, from Miele directly (see back cover for contact details) or from your Miele dealer.
Before first use
Allow the appliance to stand for approx. 1 hour prior to connecting it to the power supply.
This will help prevent any malfunctions.
Packaging material
- Remove all packaging material from the inside of the appliance.
Leftover tape residue.
Always remove all packaging material, including adhesive tape, before switching on the appliance.
Opening and closing the Fridge Zone door
Risk of damage due to incorrect handling.
If the left Fridge Zone door is closed while the door pillar is open (see "Product description"), the pillar could get trapped and sustain damage. There is also a risk of damage to the cabinet front of the right Fridge Zone door.
Ensure that the door pillar is always closed when closing the left Fridge Zone door.
Cleaning
Please refer to the relevant instructions in "Cleaning and care".
Clean the inside of the appliance and the accessories.
Sticking on the SmartFresh zone labels
The labels supplied for the two compartments in the SmartFresh zone help you to choose the right type of food to ensure ideal storage conditions.
Please note that the refrigeration appliance must be switched off when sticking on the labels, as the labels will not adhere to a cold surface. Furthermore, there should not be any dust or grease on the surface.
- Stick the labels on as described below:
- Humidity-controlled compartment for fruit and vegetables


- Remove the label from the foil and stick it onto the frame of the humidity-controlled compartment (see "Product description").
- Dry compartment for food which goes off quickly


Remove the label from the foil and stick it onto the frame of the dry compartment (see "Product description").
Tip: If you are not satisfied with the positioning of the labels, you can easily pull them off and stick them on again. In addition, they can be removed without leaving any residue.
Inserting the Active AirClean filters
Your refrigeration appliance is equipped with 2 Active AirClean filters which neutralize unpleasant odors in the Fridge Zone.
The holder for the Active AirClean filters is located under each of the shelves in the Fridge Zone.
To remove the holder for the Active AirClean filters, press against the retainers on both sides of the holder from the rear and pull the holder downwards diagonally from the shelf.
Insert the two Active AirClean filters supplied with the surrounding edge pointing downwards into the holder.
To replace the holder, press against the retainers on both sides from the rear and, using the retainers, clamp it into the gap on the shelf from below.
Using the appliance
The touch display can be scratched by pointed or sharp objects, e.g., pens.
Only touch the display with your fingers.
If your fingers are cold, the touch display may not react.
The symbols underneath the temperature display can be selected directly by touch; the symbols and text in or above the temperature display can only be displayed.
... in settings mode
- Touch the symbol to open settings mode.
Use the arrow buttons < and > to select the function whose settings you wish to adjust.
Confirm your selection with OK. - Adjust the settings using either the arrow buttons < and > or sensors + and - .
Confirm your selection with OK.
The setting with the colored background is always the selected setting; it can be confirmed directly with OK.
- Select if you wish to switch to the previous menu level or terminate the process.
Every touch of the display is confirmed with an audible keypad tone. You can switch off this keypad tone in settings mode .
Starting up for the first time
Open the appliance door.
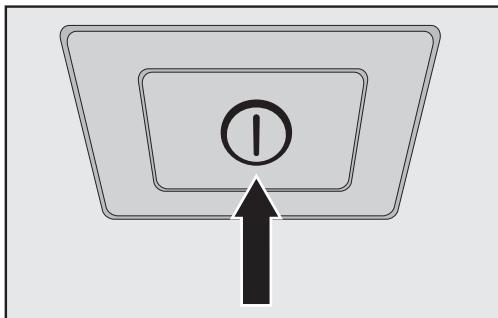
Turn the appliance on by pressing the On/Off switch.
The appliance will start to cool and the interior lighting will come on when the appliance door is opened.
Miele will then appear in the appliance display.
-
When you turn the appliance on for the first time, you will be asked to make following settings:
-
Set the Language
(if you accidentally select the wrong Language, return to settings mode and use the symbol to change the language),
- Set Temperature Unit: ^ C (degrees Celsius) or ^ F (degrees Fahrenheit),
-
Set up Miele@home:
-
Select Continue if you wish to set up Miele@home now (to do this, following the instructions under "Selecting additional settings", section "Set up Miele@home").
- Select Skip if you would prefer to set up Miele@home later.
- Use the < and > arrow buttons to select the correct setting and touch OK to confirm your selection.
- Select if you want to return to the previous menu level.
Set-up Successfully Completed appears in the display.
Confirm the first use with OK.
Your appliance has been successfully set up and is ready for use.
The main screen appears on the display.
You cannot terminate the initial startup process. The only way to terminate the process is to switch off the appliance, though the process will continue when the appliance is switched back on.
Switching on the appliance
Open the appliance door.
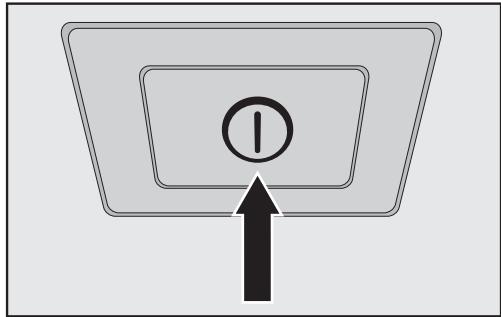
Turn the appliance on by pressing the On/Off switch.
The appliance will start to cool and the interior lighting will come on when the appliance door is opened.
Miele will then appear on the main screen in the appliance display.
The message Freezer temperature too high. Max. temperature ^ F will appear in the display when the appliance is switched on for the first time and the selected freezer temperature has been reached.
An alarm tone sounds.
Confirm the message with OK.
The message disappears from the display and the alarm tone stops.
However, the message may reappear on the display after a brief delay.
As soon as the selected freezer temperature has been reached, the message will disappear completely from the display and the alarm tone will stop.
To enable the temperature to get sufficiently cold inside the appliance, allow the appliance to run for a few hours before placing food in it. Do not place food in the Freezer Zone until it has reached the required coldness (at least 0^ / -18^ ).
Switching off the appliance
Turn the appliance off by pressing the On/Off switch.
The cooling and interior lighting are switched off.
Please note: The appliance is not disconnected from the power supply when the on/off switch is in the "off" position.
Turning off for longer periods of time
If the appliance is not going to be used for a longer period of time:
turn the appliance off,
unplug the appliance or disconnect the fuse,
close the shut-off valve in the water supply line (approx. 3 hours before switching off the appliance to avoid the build-up of bacteria caused by stagnant water),
empty the ice cube tray,
clean the appliance,
■ replace the water filter and
leave the door ajar to air the appliance and avoid odors building up inside the appliance.
If, during a long absence, the appliance is switched off but not cleaned and the door is left shut, there is a danger of bacteria building up inside the appliance.
In settings mode, certain settings can be adjusted and functions selected, allowing you to adjust the machine to suit your requirements.
The following section only describe the functions in settings mode that require further explanation.
The door alarm and other warnings are automatically disabled when the appliance is in settings mode.
Switching Keypad Lock on or off
Switch on Keypad Lock if you wish to protect your appliance from unwanted temperature changes or other unintentional adjustments in settings mode.
In settings mode, use the < and arrow buttons to select Keypad Lock and touch OK to confirm your selection.
Use the arrow buttons < and > to switch the keypad lock On or Off and confirm your selection with OK.
The keypad lock will not be activated until you close the appliance door.
Nothing will appear in the display to indicate that the keypad lock is switched on.
The message Press OK for 6 seconds to unlock will appear in the display if you select a sensor control while the keypad lock is switched on.
Follow the instructions on the display.
The display is unlocked briefly so you can adjust the settings as required.
Closing the appliance door will reactivate the keypad lock.
Switching Eco Mode on or off
Eco Mode is useful when going on vacation, for example, if you do not wish to switch off the appliance completely or do not need a high degree of cooling. Energy consumption in Eco Mode is lower than in normal operation.
The Fridge Zone is thereby regulated to a temperature of 43^ (6^) , the dry compartment in the SmartFresh zone to approx. 37^ (3^) .
The Freezer Zone is regulated to a temperature of 3^ (-16^)
Ice cube production is deactivated for as long as Eco Mode is switched on.
If the Automatic SuperCool or SuperFrost function is switched on, these will be automatically switched off when Eco Mode is selected.
In settings mode, use the < and > arrow buttons to select Eco Mode and touch OK to confirm your selection.
Use the < and > arrow keys to switch Eco Mode On or Off and confirm your selection with OK.
Only the changed temperatures in the display indicate that Eco Mode is switched on.
Health risk caused by decomposing food.
The usability and quality of food in the Freezer Zone may deteriorate if the temperature remains above 0^ (-18^) for an extended period.
Only ever switch on the Eco Mode function for a limited period.
When switching to Eco Mode, check that the food in the Freezer Zone is already properly frozen.
Do not freeze any new food while the Eco Mode function is switched on.
Performing a Self Test
Perform a Self Test if you are concerned that your appliance is not working properly and want to check if it is suffering from any problems.
In settings mode, use the < and > arrow buttons to select Self Test and select OK to confirm your selection.
- Touch the sensor control if you wish to terminate the process.
The Self Test starts and the appliance is checked for any faults or malfunctions.
- The message System Restarting appears in the display if the Self Test does not discover any faults or malfunctions.
- If the Self Test does discover any faults or malfunctions, they are indicated as error messages in the display.
An alarm also sounds.
If you find the alarm disruptive, you can switch it off in advance by touching the sensor control.
Make a note of the error message(s) displayed.
- Contact Technical Service and inform them of the error message(s) on the display.
Confirm the message with OK.
System Restarting appears in the display.
The appliance briefly switches off and then back on automatically.
Self test completed appears in the display.
Confirm the message with OK.
The main screen appears on the display again.
Switching Condensation Protection on and off
The door pillar of the upper left appliance door (see "Product description") features integrated heating.
Switch the heating on if you notice condensation on the door pillar between the Fridge Zone doors or on the door seals.
Please note that energy consumption does increase slightly when the Condensation Protection is switched on.
In settings mode, use the < and > arrow buttons to select Condensation Protection and select OK to confirm your selection.
- Touch the sensor control if you wish to terminate the process.
Use the < and > arrow buttons to select On or Off and touch OK to confirm your selection.
Switching on Door Assistant
You can choose between the two Door Assistants Push2Open and Pull2Open. The default Door Assistant is Push2Open.
The Push2Open Door Assistant is suitable for cabinet fronts without handles. The door will then open automatically when you gently press against it.
The Pull2Open Door Assistant is suitable for cabinet fronts with handles. The appliance door can be opened easily with little force.
When the Door Assistant is switched on, repeatedly closing the appliance door early can lead to damage or malfunctions.
Refrain from holding onto or closing the appliance door while automatic door opening is still extended. If you have indeed closed the appliance door, leave it closed for 5 minutes. Automatic door opening resets itself.
Please note that the Door Assistant can only be used to control the right Fridge Zone door.
If the Push2Open function is activated in the case of a handle-free cabinet front, the right Fridge Zone door must be opened first before the left Fridge Zone door can be opened.
Switching on Push2Open
In settings mode, use the < and > arrow buttons to select Door Assistant and select OK to confirm your selection.
Use the < and > arrow buttons to select Mode and touch OK to confirm your selection.
Use the < and arrow buttons to select Push2Open and touch OK to confirm your selection.
- Touch the sensor control to return to the previous menu level.
- Adjusting the intensity
You can also adjust the intensity of the Push2Open function. The higher the intensity, the less force required when pushing against the door.
In settings mode, use the < and arrow buttons to select Door Assistant and select OK to confirm your selection.
In settings mode, use the < and arrow buttons to select Intensity and select OK to confirm your selection.
Use the < and > arrow buttons to select the desired intensity (Low, Medium, High) and touch OK to confirm your selection.
- Adjusting the duration of the AutoClose function
You can also adjust the duration for how long the appliance door will remain open until it closes automatically.
In settings mode, use the < and arrow buttons to select Door Assistant and select OK to confirm your selection.
In settings mode, use the < and arrow buttons to select AutoClose and select OK to confirm your selection.
Use the + and - sensor controls to select the duration (5 to 30 seconds) and touch OK to confirm your selection.
To protect against inadvertent opening: if you do not pull the appliance open, it will close again by itself after a duration defined by you (see "Set AutoClose duration").
Pull2Open
In settings mode, use the < and arrow buttons to select Door Assistant and select OK to confirm your selection.
Use the < and arrow buttons to select Mode and touch OK to confirm your selection.
Use the < and > arrow buttons to select Pull2Open and touch OK to confirm your selection.
- Touch the sensor control to return to the previous menu level.
- Adjusting the intensity
You can also adjust the intensity of the Pull2Open function. The higher the intensity, the less force is required when pulling the door.
In settings mode, use the < and > arrow buttons to select Door Assistant and select OK to confirm your selection.
In settings mode, use the < and arrow buttons to select Intensity and select OK to confirm your selection.
Use the < and > arrow buttons to select the desired intensity (Low, Medium, High) and touch OK to confirm your selection.
Switching off Door Assistant
In settings mode, use the < and > arrow buttons to select Door Assistant and select OK to confirm your selection.
Use the < and > arrow buttons to select Mode and touch OK to confirm your selection.
Use the < and arrow buttons to select Off and touch OK to confirm your selection.
- Touch the sensor control to return to the previous menu level.
Setting up Miele@home @
Your appliance is equipped with an integrated WiFi module.
Connectivity is deactivated at the factory.
To use this feature, you will need:
- a WiFi network
- the Miele@mobile app
- a Miele user account. The user account can be created via the Miele@mobile app.
The Miele@mobile app will guide you as you connect your appliance to your home WiFi network.
Once your appliance is connected to your WiFi network you can use the app to carry the following activities, for example:
- Make certain settings on your appliance
- Display information on the operating state of your appliance
- Set up a Miele@home network with additional WiFi-capable Miele appliances
Connecting your appliance to your WiFi network will increase energy consumption, even when the appliance is switched off.
Make sure that the signal of your WiFi network is sufficiently strong in the place where you want to set up your appliance.
Miele@mobile app
The Miele@mobile app is available to download free of charge from the Apple App Store® or from the Google Play™ Store.

Download on the
App Store


ANDROID APP ON
Google Play


Please observe and follow the safety information and warnings in these operating instructions including when you are operating your appliance with the Miele@mobile app.
Connecting your appliance via the Miele@mobile app
You will also require the following to log in:
- the password to your WLAN network
- the password to your appliance
Your appliance's password is its serial number, which can be found on the data plate.
You will find the data plate inside your appliance.
| E-Nr: MB30L10305/01 PD: 9803 05780000012-Nr: 100001 | ||
| Type KI KBM30USM KF 2811 Vi 228030200298000013 | ||
| BOTTOM FREEZER / CONGELATEUR EN BAS /REFRIGERADOR-CONGELADOR Refrigeration load/Refrigération charge/Carga de refrigeracion 4,00 A Defrost heater load / Dégivir chauflage charge / Deshielko 3,50 A / 350 W | ||
| Ice maker load / Distributeur de glacons charge / Carga fabrica de hiejo 0,40 A Max inel water pressure / la pression maxima de l'air et / entree / P resin maxima de estrada de agua 0,8 Mpa / 8 bar / 115 psi Min inel water pressure / la pression minima de l'air et / entree / P resin minima de estrada de agua 0,2 Mpa / 2 bar / 29 psi | ||
| Refrigerant / Refrigerant /Refrigerante 134A Freezer / Conglador 3,17 oz (90 g) Fridge / Refrigerator 6,17 oz (175 g) Mat.Nr.: 10745780 10,0 A | ||
| Made in Turkey FABRIOE EN TURQUE Hecho en Turquia | ||
| Para uso domestico unicolemente PROTOTYPE TESTING APPLIANCE PC |
If your serial number is "78000001" for example, your password will be "78000001".
In settings mode, use the < and arrow buttons to select Miele@home and select OK to confirm your selection.
Set up will appear in the display.
Confirm your selection with OK.
Use the < and arrow buttons to select via the App and touch OK to confirm your selection.
- Open the Miele@mobile app and follow the instructions in the app.
As soon as your appliance has been integrated into your WLAN network, the message Connection successful appears in your appliance's display.
- Confirm the process with OK again. If the WLAN connection is active, will appear in the display.
Connecting your appliance via WPS
Your router must be equipped with the WPS function for this connection option.
In settings mode, use the < and arrow buttons to select Miele@home and select OK to confirm your selection.
Set up will appear in the display.
Confirm your selection with OK.
Use the < and > arrow buttons to select via WPS and touch OK to confirm your selection.
Now follow the instructions in the display.
Confirm the process with OK.
To be able to use the Miele@home functions, you also have to register your appliance in the app.
As soon as your appliance has been integrated into your home network via WPS, the message Connection successful appears in the display.
Confirm the process with OK again.
If the WLAN connection is active, will appear in the display.
Deactivating Miele@home
In settings mode, use the < and arrow buttons to select Miele@home and touch OK to confirm your selection.
Use the < and arrow buttons to select Deactivate and touch OK to confirm your selection.
Deactivation successful appears in the display.
Confirm the message with OK.
Your appliance is now disconnected from your WLAN network.
The symbol will go out in the display.
Activating Miele@home
If you have already activated Miele@home and then disconnected the connection, you can still reactivate the connection.
In settings mode, use the < and arrow buttons to select Miele@home and touch OK to confirm your selection.
Use the < and > arrow buttons to select Activate and touch OK to confirm your selection.
Activation successful appears in the display.
Confirm the message with OK.
If the WLAN connection is active, will appear in the display.
Checking the WLAN connection status
In settings mode, use the < and arrow buttons to select Miele@home and select OK to confirm your selection.
Use the < and > arrow buttons to select Connection status and touch OK to confirm your selection.
Information about the WLAN connection status will then appear in the display:
- connected: there is a strong connection,
- connected: there is an average connection,
- connected: there is a weak connection,
- : disconnected.
Setting up Miele@home again
If you have changed your WiFi network, you can set up Miele@home again for your appliance.
In settings mode, use the < and arrow buttons to select Miele@home and select OK to confirm your selection.
Use the < and arrow buttons to select Set up again and touch OK to confirm your selection.
Reset configuration? appears on the display.
Use the < and > arrow buttons to select Yes or No and touch OK to confirm your selection.
Switching off Demo Mode
Demo mode allows the appliance to be presented in the showroom without the cooling system being switched on. Do not activate this setting for domestic use.
If Demo mode has been switched on as a default setting, will show in the display.
In settings mode, use the < and > arrow buttons to select Demo Mode and select OK to confirm your selection.
Press OK for 4 seconds to deactivate appears in the display.
Follow the instructions on the display and touch and hold the sensor control OK for 4 seconds.
The countdown Demo Mode will deactivate in seconds. will appear in the display.
Demo Mode deactivated. The appliance will cool down. appears in the display.
Confirm the message with OK.
The main screen appears in the display again.
Resetting the settings to their default settings
You can reset the appliance's settings to their default settings.
In settings mode, use the < and arrow buttons to select Factory Default and select OK to confirm your selection.
Use the < and > arrow buttons to select Reset and touch OK to confirm your selection.
After a brief delay, Settings Reset appears in the display.
Confirm the message with OK.
The initial start-up process restarts (see "Starting up for the first time").
The appliance's settings will be reset to the following values:
Function
Default settings

Language
English

Display
Average value
Brightness
(4 of 7 segments)

Color
Scheme

Buzzer
Dark

Tones
Average value
(4 of 7 segments)

Keypad
Tone
Average value
(4 of 7 segments)

Tempera-
Fahrenheit

ture Unit

Keypad
Lock

Eco Mode
Switched off

Condensa-
tion Pro-
tection

Door As-
sistent

Miele@ho
me

Vacation
Ice Maker
Push2open

Sabbath
Mode

Water Filter
Display

Display Ac
tive Air-
Clean Filter
Switched off
Switched on
Switched on

Tempera-
ture in the
Fridge
Zone
Tempera-
ture in the
dry com-
partment

Tempera-
ture in the
Freezer
Zone
37^ (4^)
32^ (0^)
0^ (-18^)
Switching Vacation mode on or off
Tip: Vacation is useful when going on vacation, for example, if you do not wish to switch off the Fridge Zone completely or do not need a high degree of cooling.
Food which does not go off quickly can be stored in the appliance for some time at this moderate Fridge Zone temperature and energy consumption is lower than in normal operation. This also prevents the build-up of odors and mold which can occur if the Fridge Zone is switched off and the door is closed.
The Fridge Zone is thereby regulated to a temperature of 57^ (14^) , remaining in operation whilst also saving energy.
The Freezer Zone remains switched on at the previously set temperature, and the SuperFrost function can still be selected.
Ice production is deactivated for as long as Vacation mode is switched on.
Health risk caused by decomposing food.
The usability and quality of food in the Fridge Zone may deteriorate if the temperature remains above 37^ (4^) for an extended period.
Only ever switch on the Vacation function for a limited period.
Do not store any temperature-sensitive food which goes off easily such as fruit, vegetables, fish, meat, and dairy products during this time.
Turning on Vacation mode
In Settings mode use the < and arrow buttons to select "Vacation" and touch OK to confirm your selection.
Use the < and > arrow buttons to select "on" and touch OK to confirm your selection.
57^ F(14^ C) is now displayed in the temperature display for the Fridge Zone.
The temperature in the Fridge Zone can only be adjusted again once Vacation mode has been turned off.
Turning off Vacation mode
In Settings mode use the < and arrow buttons to select "Vacation" and touch OK to confirm your selection.
Use the < and > arrow buttons to select "off" and touch OK to confirm your selection.
The temperature you had set previously is now displayed in the temperature display for the Fridge Zone.
Switching Sabbath Mode Off
The appliance offers a Sabbath Mode for the purposes of religious observance.
If Sabbath Mode is switched on, appears in the display.
When Sabbath Mode is switched on, you cannot make any settings on your appliance.
Ensure that the appliance door is properly closed, as visual and audible alarms are switched off in Sabbath mode.
In settings mode, use the < and arrow buttons to select Sabbath Mode and select OK to confirm your selection.
Use the < and arrow buttons to select On or Off and touch OK to confirm your selection.
When Sabbath Mode is switched on, it appears in the display and the display brightness is reduced (the display does not change when the appliance door is closed).
When Sabbath Mode is switched on, the following functions are switched off:
- Door Assistant (for cabinet fronts without handles, the appliance door will have to be pulled from the bottom or side)
- Lighting
- All audible and visual signals,
-
Temperature display
-
The Automatic SuperCool function (if previously switched on)
SuperFrost function (if previously switched on) - Ice Maker (if previously switched on)
You can still select:
- The sensor control for Settings Mode so that Sabbath mode can be switched off.
The Sabbath Mode function will switch off automatically after approx. 125 hours.
Switching on, switching off or resetting Water Filter Display
Depending on the quantity of ice cubes produced, the Water Filter Display will remind you approximately every 6 months that the water filter has to be replaced (see "Water filter", section "Changing the water filter").
New water filters (Bypass and Active charcoal filters) are available from Miele, from your dealer, or via the internet.
Danger of food poisoning!
Any power failure during Sabbath Mode will not be shown on the display. After a power failure, the appliance will restart in Sabbath Mode.
When power is restored, no notification of the power failure will appear on the display.
If there is a power failure during Sabbath mode, check the quality of the food.
Switching on Water Filter Display
In settings mode, use the < and > arrow buttons to select Water Filter Display and select OK to confirm your selection.
Use the < and > arrow buttons to select On and touch OK to confirm your selection.
The Water Filter Display has been switched on.
Switching off Water Filter Display
If you have replaced the OdorFree charcoal filter with a Bypass filter, you can switch off the Water Filter Display. The Bypass filter does not have to be changed.
Danger to health!
Do not switch off the Water Filter Display if you have installed an Odor-Free charcoal filter in the appliance.
This is installed in the appliance prior to delivery.
Only switch off the Water Filter Display if an external water filter has been fitted to your household water supply in place of the OdorFree charcoal filter. In this case, you should also use a mesh filter in place of the OdorFree charcoal filter (see "Optional accessories").
In settings mode, use the < and > arrow buttons to select Water Filter Display and select OK to confirm your selection.
Use the < and > arrow buttons to select Off and touch OK to confirm your selection.
The Water Filter Display has been switched off.
Resetting Water Filter Display
After replacing the water filter (see "Water filter", section "Changing the water filter"), you will have to reset the Water Filter Display.
In settings mode, use the < and > arrow buttons to select Water Filter Display and select OK to confirm your selection.
Use the < and > arrow buttons to select Reset and touch OK to confirm your selection.
The message Replace the water filter disappears from the display.
The reminder function for the next water filter change is activated.
Switching on, switching off, or resetting the Display Active AirClean Filter
Approximately every 6 months, the Active AirClean filter display will remind you to change the Active AirClean filters (see "Inserting the Active AirClean filters" in "Before first use"). Change Active AirClean Filter will appear in the display.
The first time the Active AirClean filters need to be changed, the display will remind you automatically; the reminder does not need to be switched on separately.
After the Active AirClean filters have been changed, the Active AirClean filter reminder display must be reset (see "Resetting the Active AirClean filter display").
If the Active AirClean filter reminder display is not reset, it will appear again after 7 days.
If you do not require the Active AirClean filter reminder display, it can be switched off (see "Switching off the Display Active AirClean Filter").
New Active AirClean filters are available from Miele Technical Service, your Miele dealer, or online.
Switching on the Display Active AirClean Filter
If the Display Active AirClean Filter has been switched off once, it must be switched on again if required.
In settings mode, use the < and arrow buttons to select Display Active AirClean Filter and select OK to confirm your selection.
Use the < and > arrow buttons to select On and touch OK to confirm your selection.
The Display Active AirClean Filter has been switched on.
Switching off the Display Active Air-Clean Filter
If you do not require the Display Active AirClean Filter, you can switch it off.
In settings mode, use the < and > arrow buttons to select Display Active AirClean Filter and select OK to confirm your selection.
Use the < and > arrow buttons to select Off and touch OK to confirm your selection.
The Display Active AirClean Filter has been switched off.
Resetting the Display Active AirClean Filter
The Display Active AirClean Filter must be reset each time the filter is replaced, so that it is displayed again after 6 months.
In settings mode, use the < and arrow buttons to select Display Active AirClean Filter and select OK to confirm your selection.
Use the < and > arrow buttons to select Reset and touch OK to confirm your selection.
The Change Active AirClean Filter message disappears from the display.
The Display Active AirClean Filter has been reset.
It is very important to set the correct temperature for storing food in the appliance. Bacteria will cause food which is not stored at the correct temperature to deteriorate rapidly. Temperature influences the growth rate of these bacteria. Reducing the temperature reduces their growth rate.
The temperature in the appliance will rise:
- The more often the door is opened and the longer it is kept open
- The more food that is stored in it
- The warmer the food is which is being put into it
- The higher the ambient temperature surrounding it. The appliance is designed for use within specific ambient temperatures (climate range). Do not use in ambient temperatures for which it is not designed.
… in the Fridge Zone and in the SmartFresh zone
We recommend a refrigerator temperature of 37^ (4^) in the Fridge Zone.
The temperature in the dry compartment of the SmartFresh zone is regulated automatically and maintained just above 32^ (0^) .
Automatic cold air circulation (DynaCool)
The fan automatically turns on when the cooling system for the refrigerator section turns on. It distributes the temperature in the refrigerator section to all areas evenly so that all the food inside will be chilled to about the same degree.
... in the Freezer Zone
To freeze fresh food and to store frozen food for a long time, a temperature of 0^(-18^) is required. At this temperature the growth of bacteria is generally halted. As soon as the temperature rises above 14^(-10^) , the bacteria become active in the food again so it cannot be kept as long. For this reason, partially defrosted or defrosted food must not be re-frozen. Food may be refrozen once it has been cooked (boiled or roasted), as the high temperatures achieved when cooking destroy most bacteria.
Setting the temperature
- Touch the symbol for setting the temperature.
The previously set temperatures of the Fridge and Freezer Zones are displayed.
- Use the < and > arrow buttons to select the temperature zone for which you want to adjust the temperature and touch OK to confirm your selection.
Set the temperature you want with the + and - sensor controls. Keeping your finger on the sensor control changes the temperature continuously. - Confirm the temperature setting with OK or wait approx. 8 seconds after the last touch of the sensor. This temperature will be automatically adopted.
Tip: The newly set temperature can also be confirmed and adopted by closing the appliance door.
The temperature display always shows the required temperature.
If you have adjusted the temperature, wait for approximately 6 hours if the appliance is not very full and for approximately 24 hours if the appliance is full before checking the temperature display. It will take this long for an accurate reading to be given.
If, after this time, the temperature is still too high or too low, adjust it again.
Temperature range
The temperature can be adjusted:
From 36^ (2^) to 46^ (8^) in the Fridge Zone
- From 7^ F (-14^ C) to -11^ F (-24^ C) in the Freezer Zone
The temperature in the dry compartment of the SmartFresh zone is regulated automatically and is maintained just above 0^ (32^) at a Fridge Zone temperature of 4^ (37^) .
Please note that if the temperature in the Fridge Zone is any warmer, the temperature in the dry compartment of the SmartFresh zone will rise as well.
The ambient temperature in the room and the installation location can affect the time it takes for the appliance to reach the lowest temperature. If the ambient temperature is too high, the appliance may not reach the lowest temperature.
SuperCool function
The SuperCool function can be used to rapidly reduce the temperature in the Fridge Zone to its lowest setting (depending on the room temperature).
SuperCool is particularly recommended for the rapid chilling of large amounts of fresh food or drink.
Switching on SuperCool
- Touch the ^± symbol in the display for setting the temperature.
- Then touch the 喜 symbol for turning on the SuperCool function.
The symbol is highlighted in color and the new temperature setting of 36^ F ( 2^ C ) appears in the display.
- Confirm the setting with OK or wait approx. 8 seconds after the last press of the button. The setting will be automatically adopted.
The appliance will now run at maximum power.
Switching off SuperCool
- Touch the ^± symbol in the display for setting the temperature.
The symbol is highlighted in color and a temperature value of 36^ (2^) is shown in the display.
- Touch the 念 symbol to turn off the SuperCool function.
The symbol is no longer highlighted in color and the previous temperature setting appears again in the display.
- Confirm the setting with OK or wait approx. 8 seconds after the last press of the button. The setting will be automatically adopted.
The appliance will then continue running at normal power.
If you do not turn off the SuperCool function, it will turn itself off automatically after approx. 6 hours. The appliance will then run at normal power again.
Tip: To save energy, the SuperCool function can be turned off once food and drinks are sufficiently chilled.
SuperFrost function
For best results, turn on the SuperFrost function before putting fresh food into the freezer.
Fresh food will be frozen quickly, so that the nutritional value, vitamin content, appearance, and taste are maintained.
Exceptions:
- Placing food in the freezer that is already frozen.
- When freezing up to 4.4lb ( 2kg ) kg fresh food daily.
Turning on SuperFrost
SuperFrost should be turned on 4-6 hours before placing food in the freezer. When freezing the maximum amount of food, the SuperFrost function should be switched on 24 hours beforehand.
- Touch the ^是 symbol for setting the temperature.
- Then touch the symbol for turning on the SuperFrost function.
The 品 symbol is highlighted in color and the newly set temperature value of -22^ (-30^) appears in the display.
- Confirm the setting with OK or wait approx. 8 seconds after the last press of the button. The setting will be automatically adopted.
The symbol is now illuminated in the display.
The appliance will now run at maximum power.
Turning off SuperFrost
- Touch the symbol for setting the temperature.
The symbol is highlighted in color and the temperature value of -22^ (-30^) is shown in the display. - Touch the 品 symbol for turning off the SuperFrost function.
The symbol is no longer highlighted in color and the previous temperature setting appears again in the display.
- Confirm the setting with OK or wait approx. 8 seconds after the last press of the button. The setting will be automatically adopted.
The symbol disappears from the temperature display.
The appliance will then continue running at normal power.
If you do not turn off the SuperFrost function, it will turn itself off automatically after approx. 54 hours. The quantity of fresh food placed in the freezer will determine the duration before the SuperFrost function turns off.
The appliance will then run at normal power again.
Tip: To save energy, you can manually switch off the SuperFrost function once the freezer reaches a constant temperature of 0^ (-18^) or colder. Monitor the temperature in the freezer.
The appliance has been fitted with a warning system which ensures that the temperature in the freezer cannot rise unnoticed and to avoid energy being wasted if the door is left open.
Temperature alarm
The Freezer temperature too high. Max. temperature ^ C message appears in the display if the temperature in the Freezer Zone becomes too warm. An alarm will also sound.
The temperature display will show the highest temperature that was reached during the time the temperature rose.
The audio and visual signals are triggered, for example:
- When the appliance is switched on and the temperature in the appliance differs greatly from the set temperature
- If a lot of warm room air enters the freezer when food is being loaded, rearranged, or taken out
- When freezing large amounts of food at once
- When freezing fresh food which is still warm
- After an extended power failure
The alarm will be silenced and the fault message in the display will go out as soon as the reason for the alarm has been resolved.
If the temperature remains above 0^ (-18^) for a long time, check that the frozen food has not started to defrost. If it has, use the food as soon as possible or cook it before freezing it again.
Turning the temperature alarm off early
If the alarm disturbs you, it can be turned off early.
- Touch the OK sensor button in the display.
The alarm stops and the message disappears from the display.
Door alarm
An alarm will sound if the appliance doors have been left open for longer than 2 minutes.
The Close the door message also appears in the display.
As soon as the doors are closed, the alarm will stop and the message in the display will go out.
Turning the door alarm off early
If the alarm disturbs you, it can be turned off early.
- Touch the OK sensor control in the display.
The alarm stops and the message disappears from the display.
After a certain time, the alarm will sound again and the message will reappear in the display until the appliance doors have been closed.
Moving the shelves in the appliance door
Danger of injury!
Only move the shelves in the door when they are empty.
The shelves can be moved when loading and unloading and for cleaning or they can be removed completely:
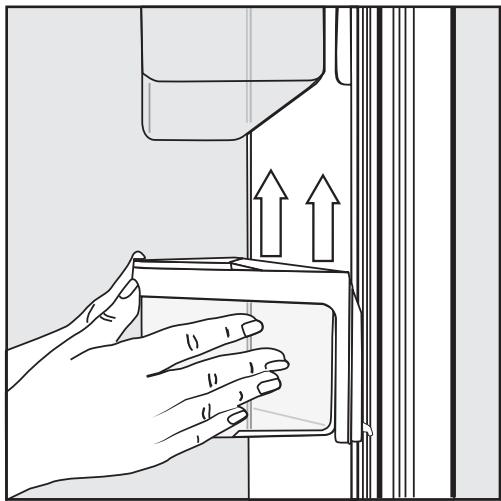
Hold the shelf on the frame with both hands and lift it slightly so that it can be lifted with the catches on both sides over the guide.
- Remove the shelf or place it in the required position at the back with the catches in the guides at the same height.
Make sure that the shelf is straight.
Tip: For the purposes of loading and unloading or cleaning, the clip-in containers in the shelves can be removed from their holders completely.
Moving the adjustable shelves
If necessary, the adjustable shelves can be removed or their height can be adjusted:
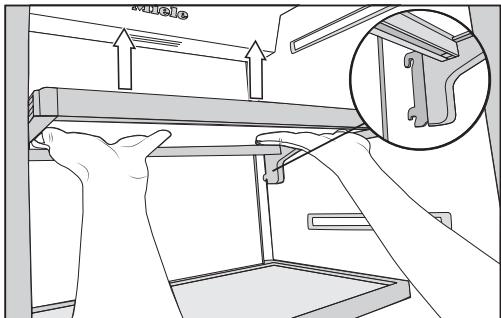
Hold the shelf on both sides and raise it slightly so that it can be lifted with the catches over the guide at the back.
Pull the shelf forwards.
- Remove the shelf or place it in the required position, with the catches engaged at the back.
Make sure that the shelf is straight.
Removing the hanging drawer
The hanging drawer can be moved to the left or right if required.
To clean the hanging drawer, remove it as follows:
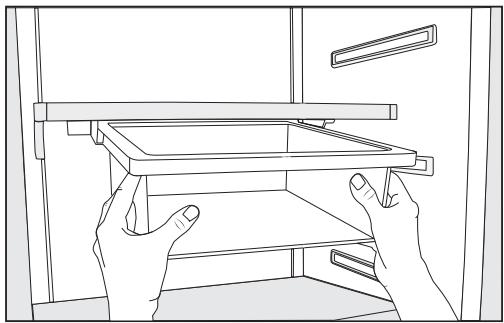
Pull the hanging drawer straight out to lift it over the pull-out stops.
To reinsert the hanging drawer, push it straight into the guide.
Removing compartments from the Fridge Zone
The compartments in the Fridge Zone are on telescopic runners, and can be removed for filling, emptying, or cleaning purposes:
Pull the compartment out a little bit.
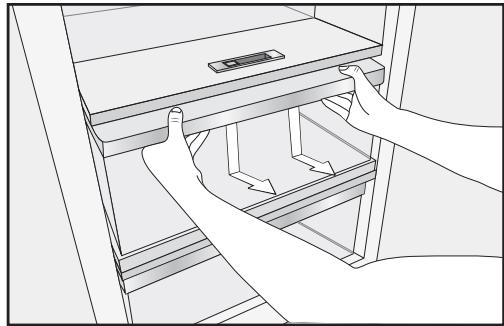
Using both hands, grasp the compartment frame from below and push the compartment downwards so that the rear end disengages and lifts upwards.
Pull the compartment forwards to remove it.
Push the runners back in again to avoid damaging them!
Be careful not to wash away the special lubricant in the telescopic runners during cleaning.
Wipe the telescopic runners with a damp cloth to clean them.
To reinsert the compartment, position it on the telescopic runners so that it clicks into place.
Removing the freezer baskets
The freezer baskets can also be removed if necessary (e.g., for cleaning).
- Open the lower appliance door as wide as possible.
Pull the freezer basket out as far as it will go.
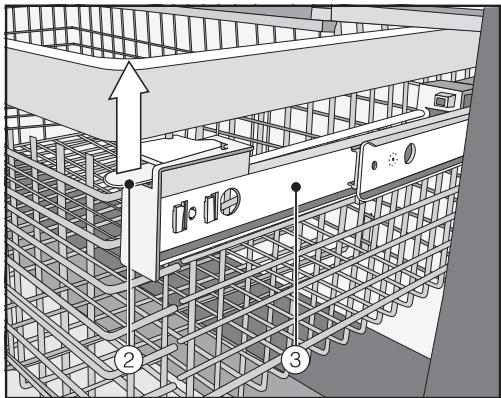
- Raise the snap fastening ② on both sides, unclip, and carefully lift the basket out.
To replace it, pull the telescopic runners ③ out as far as they will go.
Place the freezer basket back in again. - Slide the basket all the way back in again until it engages in the snap fastening.
Removing the dividing panel (depending on the model)
The dividing panel in the freezer basket can be removed for cleaning:
The dividing panel is secured to the freezer basket with brackets.

Pull the freezer basket out as far as it will go.
To release the brackets, use a suitable object to turn the slots in the pegs to a horizontal position (1.).
Remove the pegs from the brackets (2.).
Pull the dividing panel upwards to remove it.
To reinsert the partition wall, place the brackets in an upright position, and position the dividing panel into the brackets so that you hear it click into place.
Insert the pegs into the brackets, and use a suitable object to turn the slots in the pegs into a vertical position.
Push the freezer basket all the way back in.
Removing the ice cube tray
The ice cube tray can be removed for cleaning:
- Open the lower appliance door as wide as possible.
Tilt the ice cube tray forwards and pull it up and out to remove it.
Ice cube production does not stop when the ice cube tray has been removed. Ice cubes can fall into the freezer basket underneath.
Only remove the ice cube tray for the shortest time possible or switch off the Ice Maker beforehand (see "Switching off the Ice Maker" in "Making ice cubes").
Always observe USDA food safety guidelines.
Risk of fire from electrical appliances.
Operating electrical devices in the appliance can cause sparks to form.
Do not operate any electrical devices inside the appliance.
Risk of explosion due to flammable mixes of gases.
Electrical components can cause flammable mixes of gases to ignite.
Do not store any explosive materials or products containing flammable propellants (e.g., spray cans) in the appliance. The spray cans in question can be identified by the contents printed on the can or by a flame symbol. Electrical components can cause escaping gases to ignite.
Risk of damage due to greasy or oily foods.
If storing food which contains a lot of fat or oil in the appliance or the door, make sure that it does not come into contact with plastic components as this could cause stress cracks or break the plastic.
Make sure that no fat or oil leaks onto the plastic parts of the appliance.
Different storage zones
Due to natural air circulation, there are different temperature zones in the refrigerator section.
Cold, heavy air sinks to the lowest section of the refrigeration section. Make use of the different zones when placing food in the appliance.
Tip: To allow air to circulate efficiently, do not pack food too closely together in the refrigerator.
If there is insufficient air circulation, the cooling performance will decrease and energy consumption will increase.
Do not cover the fan in the rear wall of the appliance.
Tip: Do not store food in such a way that it touches the rear wall of the refrigerator section as it may freeze to the rear wall.
This appliance has DynamicCooling, which helps to keep an even temperature when the fan is running. When DynamicCooling is turned on, the difference between the various zones is less pronounced.
Warmest area
The warmest area in the refrigerator section is in the top section of the door. Use this for storing butter so that it remains spreadable and cheese so that it retains its flavor.
Coldest area
The coldest area in the refrigerator section is inside the appliance at the back. The temperature in the dry compartment of the SmartFresh zone is even colder.
Use this area in the refrigerator section and in the dry compartment of the SmartFresh zone for all delicate and highly perishable food, e.g.:
- Fish, meat, poultry
- Cold cuts, ready-made meals
Dishes or baked goods containing eggs or cream - Fresh dough, cake mixtures, pizza dough, or pie dough
- Raw milk cheese and other raw milk products
- Pre-packed vegetables and other fresh food whose best-before date requires storage at a temperature of at least 39^ ( 4^ ).
Food which is not suitable for storage in the refrigerator section
Not all food is suitable for refrigeration at temperatures below 41^ (5^) because it is sensitive to cold. Depending on the type of food, the appearance, consistency, flavor, and/or vitamin content may be altered if stored at too cold a temperature.
Foods which are sensitive to cold include:
- Pineapples, avocados, bananas, pomegranates, mangoes, melons, papayas, passion fruit, citrus fruits such as lemons, oranges, mandarins, grapefruits
- Fruit (which is not yet ripe)
- Eggplants, cucumbers, potatoes, peppers, tomatoes, zucchini
- Hard cheeses (e.g., Parmesan)
Notes on buying food
The freshness of food when first placed in the appliance is an important factor in determining how long it stays fresh, and how long it can be kept in the appliance.
Take into account the use-by date and the correct storage temperature.
Time out of the refrigerator, e.g., transporting food in a warm car, should be kept to a minimum.
Tip: Take a cool bag when shopping, and load food in the appliance as soon as possible.
Storing food correctly
Food should generally be stored covered or packaged in the refrigerator section (there are some exceptions to this rule in the PerfectFresh zone - see below). This will prevent food smells from affecting other foods, food from drying out, and also any cross-contamination of bacteria. This is especially important for storing animal products. The shelf life of food can be significantly increased by setting the correct temperature and maintaining good standards of hygiene.
SmartFresh zone
The SmartFresh zone provides ideal storage conditions for fruit, vegetables, fish, meat, and dairy products. Food stays fresh considerably longer while retaining both flavor, and vitamins.
The SmartFresh zone comprises a humidity-controlled and a dry compartment.
- Depending on the moisture-regulator setting, the humidity-controlled compartment is particularly suitable for storing fruit and vegetables.
- The dry compartment is suitable for storing perishable foods such as fish, meat, and dairy products.
Humidity-controlled compartment with moisture regulator
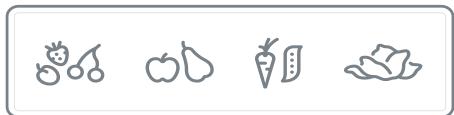
The humidity level in the humidity-controlled compartment can be regulated to approximately suit the food being stored. Food retains its own moisture if stored at a higher humidity and so does not dry out as quickly. This allows it to stay crisp and fresh for longer.
The moisture released by food in storage is kept within the humidity-controlled compartment drawer. The closer the air humidity in the humidity-controlled compartment is to the humidity content of the food, the crisper and fresher the food remains over a longer period, as the water content of the food is largely retained.
The moisture level greatly depends on the type and quantity of food being stored, if stored unwrapped.
The temperature in the humidity-controlled compartment is approximately equivalent to the temperature in the conventional refrigerator section.
Remember that the fresher the food when it is placed in the appliance, the longer it will stay fresh!
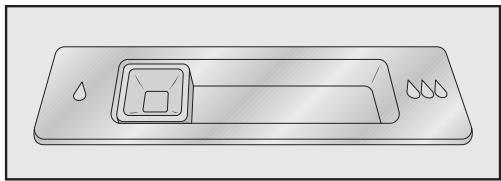
Slide control at = moisture increased slightly
We recommend this setting if you store very large quantities of fruits and vegetables in the humidity-controlled compartment. The slide control partially closes the vents in the compartment so that some of the moisture present is retained.
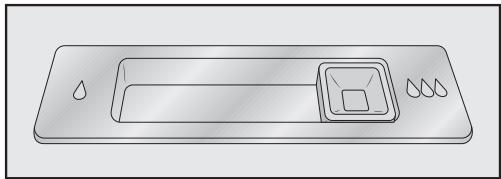
Slide control at = moisture increased
We recommend this setting if you store small to large quantities of fruits and vegetables in the humidity-controlled compartment. The slide control closes the vents in the compartment completely so that all of the moisture present is retained.
Tip: If the humidity level is too high and a lot of moisture has collected in the compartment, select the setting.
If the quantity of food being stored in this compartment is small, the moisture level may be too low. If you are only storing a small amount of food, wrap it in airtight packaging.
The humidity level in the humidity controlled compartment is determined by the type and quantity of food being stored when it is not packaged.
Increased moisture in the humidity-controlled compartment can, in some circumstances, cause a buildup of condensate.
This should be removed with a cloth.
Regulating the humidity level in the humidity-controlled compartment
The slide control is used to regulate the amount of moisture in the humidity controlled compartment with settings to .
- Slide the control to the left or right depending on the setting required.
Dry compartment with low temperature
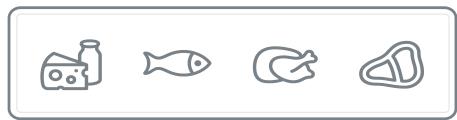
The temperature in the dry compartment is maintained at 30 to 37^ (-1 to 3^ ). While lower than the temperature in a standard refrigerator, this is the optimum temperature range for storing fresh food which is not sensitive to cold. The deterioration process is decelerated at this temperature range so food can be stored without loss of freshness for considerably longer than in a standard refrigerator.
The humidity level is similar to that in the conventional Fridge Zone.
The dry compartment is suitable for storing perishable foods such as:
- Fresh fish and shellfish
- Meat and poultry
- Deli salads
- Dairy products such as yogurt, cheese, cream, etc.
- Any type of food can in fact be stored in this compartment, as long as it is packaged.
Please note that foods rich in protein deteriorate faster than others.
Shellfish, for example, deteriorates faster than fish, and fish deteriorates faster than meat.
For hygiene reasons, always keep these foods covered or wrapped in this compartment.
Take food out of the dry compartment approximately 30 to 60 minutes before using it. The aroma and taste do not fully develop until the food has reached room temperature.
| Max. load of the humidity-controlled compartment | Max. load of the dry compartment | |
| KF 28x1 Vi /SF | 23 lb (10.5 kg) | 31 lb (14 kg) |
| KF 29x1 Vi /SF | 30 lb (13.5 kg) | 40 lb (18 kg) |
The following tips may help if you find that food you have stored does not keep well (for example, the food wilts or becomes withered after only a short storage time):
- Only place fresh food in the appliance as the initial condition of the food is crucial to maintaining freshness.
Clean the SmartFresh zone before storing food in it. - Very wet food should be dried off before storing it in the humidity-controlled compartment.
- Do not store food which is sensitive to cold in the dry compartment (see "Food which is not suitable for storing in the Fridge Zone").
- Allocate the appropriate settings to food you wish to store (e.g., humid or dry storage).
Store food loose in the humidity-controlled compartment.
A high humidity level in the humidity-controlled compartment is achieved by the moisture present in the food being stored.
If the humidity level is not high enough (e.g., too little food is being stored), it can be increased by placing a damp sponge in the drawer.
If you think that the temperature in the dry compartment is too high or too low, adjust the temperature in the Fridge Zone (see "Setting the temperature" in "The correct temperature"). If ice crystals start to form on the floor of the dry compartment, increase the temperature as otherwise the cold temperature will damage the food.
If too much water collects at the bottom of the humidity-controlled compartment, dry it with a cloth. If necessary, dry food before placing it in the appliance or place a rack at the bottom of the humidity-controlled compartment to allow water to drain off.
Always observe USDA food safety guidelines.
Risk of fire from electrical appliances.
Operating electrical devices in the appliance can cause sparks to form.
Do not operate any electrical devices inside the appliance.
Maximum freezing capacity
To ensure that fresh food placed in the freezer freezes through to the core as quickly as possible, the maximum freezing capacity must not be exceeded. The maximum freezing capacity for freezing within a 24-hour period is given on the data plate: "Freezing capacity ....Ibs/24 hrs."
What happens when you freeze fresh food?
Fresh food should be frozen as quickly as possible so that the nutritional value of the food, its vitamin content, appearance and flavor are maintained.
Food which takes a long time to freeze will lose more water from its cells, which then shrink. During the defrosting process, only some of this water is reabsorbed by the cells. What this means in practice is that the food loses more moisture. You can see this in the large amount of water that collects around the food when it defrosts.
If food is frozen quickly, the cells have less time to lose moisture, so they shrink less. As there is not so much moisture loss, it is easier for the food to reabsorb it during the defrosting process, and very little water collects around the defrosted food.
Storing frozen food
Never re-freeze partially or fully defrosted food. Defrosted food may only be re-frozen after it has been cooked.
When buying frozen food to store in your freezer, make sure to check:
- that the packaging is not damaged,
- the expiration date and
- the temperature at which the frozen food is being stored in the store.
The length of time food can be kept is reduced if it has been stored at a temperature warmer than 0^ (-18^) .
Buy frozen food at the very end of your shopping trip.
Store it in the freezer compartment as soon as possible.
Home freezing
Only freeze food that is fresh and in good condition.
Tips for home freezing
- The following types of food are suitable for home freezing: fresh meat, poultry, game, fish, vegetables, herbs, fresh fruit, dairy products, baked goods, leftovers, egg yolks, egg whites, and a range of pre-cooked meals.
- The following types of food are not suitable for freezing: lettuce, radishes, sour cream, mayonnaise, whole eggs in their shells, onions, whole raw apples and pears.
- To retain color, taste, aroma, and vitamin C, vegetables should be blanched before they are frozen. To do so, place them portion by portion into boiling water for 2-3 minutes. Then, remove and plunge the vegetables into ice-cold water to cool quickly. Leave the vegetables to drain.
- Lean meat freezes better than fatty meat and can be stored for considerably longer.
- Separate chops, steaks, cutlets, etc. with a sheet of plastic freezer film. to prevent them from freezing together in a block.
-
Do not season raw food or blanched vegetables with herbs or salt before freezing. Cooked food should only be lightly seasoned. The flavor of some herbs intensifies when frozen.
-
Placing hot food or drink in the freezer causes food that is already frozen to partially thaw and increases energy consumption. Allow hot food and drink to cool down before placing it in the freezer.
Packaging food for freezing
Freeze food in portions.
- Suitable packaging
- Unsuitable packaging
- Plastic films
- Freezer bags
Aluminum foil - Freezer containers
- Packing paper
- Parchment paper
- Cellophane
- Garbage bags
- Plastic shopping bags
- Remove as much air as possible from the packaging before sealing.
Close the packaging tightly with - rubber bands,
- bag clips,
string or bag ties, or - freezer tape.
Tip: Freezer bags and poly tubing may also be sealed using home heat sealing kits.
Label the packaging with the contents and the date of freezing.
Before placing food in the freezer
- When freezing more than 4.4lb ( 2kg ) of fresh food, switch on the SuperFrost function some time before placing the food in the freezer (see "SuperFrost").
This helps food which is already stored in the freezer to stay frozen.
Placing food in the Freezer Zone
Food to be frozen can be placed anywhere in the Freezer Zone.
Place large quantities of food in the large freezer basket.
- Place the food flat in the bottom of the basket so that it freezes through to the core as quickly as possible.
- When placing items in the Freezer Zone, ensure that the packaging and containers are dry to prevent them from freezing together or to the walls.
Please follow the guidelines in the table below regarding recommended weights for the baskets:
| Upper freezer basket | Lower freezer basket | |
| KF 28x1 Vi/SF | 26 lb (12 kg) | 61 lb (28 kg) |
| KF 29x1 Vi/SF | 40 lb (18 kg) | 79 lb (36 kg) |
Unfrozen food should not touch frozen food, as this will cause the frozen food to begin to thaw.
Storage time for frozen food
The storage life of food is very variable, even at a constant temperature of 0^ (-18^) . Decomposition processes also take place in frozen food, albeit at a very reduced speed. Fat can become rancid from contact with oxygen in the air, for example. This is why lean meat can be stored approx. twice as long as fatty meat.
The storage times quoted are guide values for the storage life of different food groups in the Freezer Zone.
| Food group | Storage time (Months) |
| Ice cream | 2 to 6 |
| Bread, baked goods | 2 to 6 |
| Cheese | 2 to 4 |
| Fish, oily | 1 to 2 |
| Fish, lean | 1 to 5 |
| Sausage, ham | 1 to 3 |
| Game, pork | 1 to 12 |
| Poultry, beef | 2 to 10 |
| Vegetables, fruit | 6 to 18 |
| Herbs | 6 to 10 |
Where the storage time given on the packaging differs, follow the advice on the packaging.
Defrosting frozen goods
Never re-freeze partially or fully defrosted food. Defrosted food may only be re-frozen after it has been cooked.
Frozen food can be defrosted in different ways:
- In a microwave
- In an oven using "Convection" or the "Defrost" setting
- At room temperature
- In the Fridge Zone (the cold given off by the frozen food helps to keep the other food cold)
- In a steam oven
Flat pieces of partially thawed meat or fish can be placed directly into a hot skillet.
Meat and poultry (e.g., hamburgers, chicken, fish) should not come into contact with other foods while defrosting. Catch the defrosting liquid and dispose of it carefully.
Fruit can be thawed at room temperature, either in the packaging or in a covered bowl.
Most vegetables can be cooked while still frozen. Just put straight into boiling water or hot grease. The cooking time is slightly less than that of fresh vegetables due to changes in the cell structure.
Cooling drinks quickly
When chilling drinks in the freezer, make sure that bottles are not left in for more than one hour. Otherwise they could burst.
For the automatic ice maker to operate, it must be connected to a water supply (see "Water connection").

CAUTION
The first three batches of ice cubes made after the ice maker is started up must not be consumed, as the water will have been used for the initial rinse through the water supply line.
This applies to the initial commissioning as well as when using the appliance again after it has been turned off for a long while.
Switching on Ice Maker
Make sure that the ice cube tray is correctly located underneath the Ice Maker.
In settings mode, use the < and > arrow buttons to select Ice Maker and select OK to confirm your selection.
Use the < and arrow buttons to select On and touch OK to confirm your selection.
Once the Freezer Zone has cooled down to its set temperature, the Ice Maker will fill with water.
As soon as the water is frozen, the ice cubes drop out of the Ice Maker into the ice cube tray.
Ice cube production is halted automatically as soon as the ice cube tray is full.
The Ice Maker can make up to 2.9 lb (1.3 kg) of ice cubes in 24 hours.
The amount of ice cubes made by the appliance depends on the temperature in the freezer. The lower the temperature, the more ice cubes are produced.
After the setting up the appliance for the first time, it can take up to 10 hours for the first ice cubes to drop out of the Ice Maker and collect in the tray.
Do not place any bottles or food into the Ice Maker to chill them quickly. The Ice Maker could become blocked and, as a result, be damaged.
Empty the ice cube tray at regular intervals, or at least if you have not produced any ice for more than a week. This will ensure that you always have fresh ice and the ice cubes will not form a clump.
Ice cube production does not stop when the ice cube tray has been removed. Ice cubes can fall into the freezer basket underneath.
Only remove the ice cube tray for the shortest possible time or switch off the Ice Maker before removing it.
Switching off Ice Maker
The Ice Maker can be turned off independently of the Freezer Zone if you do not want to make any ice cubes.
- Close the shut-off valve in the water supply line (approx. 3 hours before switching off the appliance to avoid the build-up of bacteria caused by stagnant water).
In settings mode, use the < and > arrow buttons to select Ice Maker and select OK to confirm your selection.
Use the < and > arrow buttons to select Off and touch OK to confirm your selection.
WARNING! DANGER of injury and damage!
Do not use any mechanical or other types of aids which are not recommended by the manufacturer to accelerate the defrosting process.
Refrigerator section and SmartFresh drawer
The refrigerator section and the Smart-Fresh drawer defrost automatically.
Condensate and frost can build up on the back wall of the refrigerator section and the SmartFresh drawer while in use. You do not need to remove this, as it will defrost and evaporate automatically with the warmth generated by the appliance.
Freezer Zone
The appliance is equipped with a "NoFrost" system. The freezer defrosts automatically.
The moisture generated in the appliance collects on the condenser and is automatically defrosted and evaporates periodically.
This automatic defrosting system enables the freezer to remain permanently ice-free. However, the food stored in the freezer will not defrost.
WARNING! DANGER of electric shock!
Unplug the appliance or trip the circuit breaker.
WARNING! Fire hazard! Do not damage the coolant pipework.
Do not let water get into the electronic unit or the lighting.
Do not use a steam cleaner. Steam from a steam cleaning appliance could reach the electrical components and cause a short circuit.
The data plate located inside the appliance must not be removed. It contains information which is required in the event of a service call.
Cleaning agents
To avoid damaging the surfaces of your appliance, do not use
- cleaning products containing soda, ammonia, acid, or chloride,
-lime scaleremovers, - abrasive cleaning products, such as scouring powder, scouring liquid, or pumice stones,
- cleaners containing solvents,
- stainless steel cleaners,
-dishwasher detergent, - oven sprays,
glass cleaning agents, - hard, abrasive sponges and brushes, such as pot scrubbers,
- eraser sponges,
sharp metal scrapers.
Cleaning and conditioning agents used inside the appliance must be food safe.
Use warm water and liquid dish soap.
The following pages contain important information on cleaning.
Before cleaning the appliance
Turn the appliance off completely by pressing the On/Off switch.
Unplug the appliance or switch off the fuse.
Take any food out of the appliance and store it in a cool place.
Take out all other removable parts for cleaning (see "Adjusting the interior fittings").
Interior and accessories
Clean the appliance regularly, or at least once a month.
Clean up any spills, stains, or food immediately. Do not allow them to dry and stick to the appliance.
Clean the appliance with a solution of lukewarm water and liquid dish soap. Rinse all parts by hand. Do not wash in a dishwasher.
After cleaning, wipe with clean water and dry with a soft cloth.
- Leave the door open to air the appliance sufficiently for a short while and to prevent odor buildup.
Aluminum frames
The frames to the shelves inside the appliance and the door shelves are partially made from aluminum.
Aluminum is a dynamic material. The reflection and appearance of aluminum changes in different lights and environments and depending on the angle you observe it from. It is also susceptible to scratching.
The aluminum frames may become discolored or damaged if soiling is left on for too long. Remove any soiling immediately.
Cleaning the door seal
Do not use any grease or oil on the door seal as these will cause the seal to deteriorate and become porous over time.
The door seal should be cleaned regularly with clean water and then wiped thoroughly dry with a soft cloth.
Cleaning the ventilation grilles
A build-up of dust will increase the energy consumption of the appliance.
The air vents should be cleaned on a regular basis with a brush or vacuum cleaner (you could use a Miele vacuum cleaner dusting brush, for example).
After cleaning
- Replace all shelves and accessories in the Fridge Zone.
- Reconnect to the power supply and switch the appliance back on.
Place food in the Fridge Zone and close the door. - Switch on the SuperFrost function for a while so that the Freezer Zone can cool down quickly.
Once the Freezer Zone has reached the required temperature, place the freezer baskets containing the food to be frozen back in the Freezer Zone. - Switch off the SuperFrost function as soon as the temperature in the Freezer Zone is a constant 0^ (-18^) or colder.
With the help of the following guide minor faults in the performance of the machine, some of which may result from incorrect operation, can be remedied without contacting the Service Department.
This guide may help you to find the reason for the fault, and how to correct it.
To prevent cold from escaping, open the appliance doors as little as possible until the fault has been corrected.
| Problem | Possible cause and solution |
| If you are concerned that your appliance is not working properly, you can perform a Self Test. Your appliance will be checked for any faults or malfunctions. | Any errors identified during the Self Test are shown on the display. ■ Perform a Self Test (see “Additional settings”, section “Performing a Self Test☑”). ■ Contact Technical Service and inform them of the error message(s) on the display. |
| The appliance is not getting cold and the interior lighting does not come on when the appliance door is opened. | The appliance has not been turned on. ■ Turn the appliance on. The temperature appears in the display. The plug is not properly plugged into the electrical outlet. ■ Insert the plug into the outlet. The fuse has tripped. There could be a fault with the appliance, the household electrical wiring, or another appliance. ■ Contact a technician or the Technical Service department. |
| The compressor is switching on more frequently and for longer periods of time, so the temperature in the appliance is dropping. | The ventilation slits in the cabinetry have been covered or become too dusty. ■ Do not block the ventilation slits. ■ Clean the ventilation slits on a regular basis. |
| The doors have been opened too frequently, or a large amount of fresh food has been put in at once for storage or freezing. ■ Only open the doors when necessary and for as short a time as possible. After a while the temperature will return to normal by itself. | |
| The doors are not properly closed. A thick layer of ice may have formed in the freezer. ■ Close the appliance doors. After a while the temperature will return to normal by itself. If a thick layer of ice has formed, it will decrease the cooling capacity and increase the energy consumption. ■ Defrost the appliance and clean it. | |
| The room is too warm. The higher the room temperature, the longer the compressor has to run. ■ See “Installation location”. | |
| The appliance was not properly installed in the niche. ■ See “Installation - Building in the appliance”. | |
| The compressor is switching on more frequently and for longer periods of time, so the temperature in the appliance is dropping. | The temperature setting is too low. ■ Correct the temperature setting. |
| A large amount of food is being frozen at once. ■ See “Freezing and storing food”. | |
| The SuperCool function is still switched on. ■ To save energy, you can turn SuperCool off yourself. | |
| The SuperFreeze function is still switched on. ■ You can turn off the Automatic SuperCool function earlier to save energy. | |
| The compressor comes on less and less often and for shorter periods of time. The temperature in the appliance rises. | This is not a fault. The temperature setting is too high. ■ Correct the temperature setting. ■ Check the temperature again after 24 hours. |
| The food begins to thaw. The room temperature is too low for this appliance. If the room temperature is too low, the compressor will run less frequently. This may cause the freezer to become too warm. ■ See the “Installation location” section in the “Installation information”. ■ Increase the room temperature. | |
| The compressor runs continuously. | Not a fault. To save energy, the compressor runs at a lower speed when less cooling is required. This increases the compressor run time. |
| Food has frozen to-gether or to the wall. | The food packaging was not dry when loaded in the freezer. ■ Use a blunt instrument (such as a spoon handle) to carefully pry them apart. |
| An alarm sounds. | The appliance doors have been open for longer than approx. 2 minutes. ■ Close the appliance doors. |
| No alarm sounds despite the appliance door being open. | You have switched off the audible signal. ■ Switch the audible signal back on using Settings mode Ⓒ. |
| The appliance door cannot be opened. | The Pull2Open Door Assistant is switched on but the appliance has a handle-free cabinet front. ■ For handle-free cabinet fronts, switch on the Push2Open Door Assistant (see “Switching on the Door Assistant” in “Selecting additional settings”). |
| The appliance door cannot be opened. | The Pull2Open Door Assistant is switched on but the appliance has a handle-free cabinet front. ■ For handle-free cabinet fronts, switch on the Push2Open Door Assistant (see “Switching on the Door Assistant” in “Selecting additional settings”). |
Frequently Asked Questions
| Problem | Possible cause and solution |
| The appliance door cannot be opened when Sabbath Mode is switched on. | The Push2Open Door Assistant is switched on at the same time as Sabbath Mode. ■ When Sabbath Mode is switched on, the Door Assistant is deactivated. ■ Pull the appliance door open from below or from the side. |
| The left Fridge Zone door will not open. | The Push2Open Door Assistant is switched on but only the right Fridge Zone door can be controlled with the Door Assistant. ■ Not a fault. If the Push2Open function is activated in the case of a handle-free cabinet front, the right Fridge Zone door must be opened first before the left Fridge Zone door can be opened. |
| The storage life of the food stored in the dry compartment of the SmartFresh zone is reduced. | The temperature in the dry compartment of the SmartFresh zone is possibly too high. The temperature in the dry compartment is controlled by the set temperature in the Fridge Zone. ■ Lower the temperature in the Fridge Zone (see “Setting the temperature” in “The correct temperature”). |
| There is condensation on the door pillar between the Fridge Zone doors or on the door seals. | The combination of high air humidity and low ambient temperature can result in condensation forming on the door pillar between the Fridge Zone doors or on the door seals. ■ Ensure lower humidity or a higher temperature in the room. ■ Switch the Condensation Protection on (see “Switching Condensation Protection on or off” in “Selecting additional settings”). |
| The left Fridge Zone door and the door pill feel warm. | Not a fault. The left-hand appliance door features integrated heating. Switching the heating on prevents condensation on the door pillar and on the door seals. ■ If required, you can switch off the heating (see “Switching Condensation Protection on and off” in “Selecting additional settings”). |
Messages in the display
| Message | Possible cause and solution |
| The warning sounds and the message Freezer temperature too high. Max. temperature °F appears in the display. | The temperature in the appliance has risen significantly. This could be due to, for example: - the appliance door being opened too often, or being left open, - a large amount of food being frozen at once, - an extended power failure ■ If you find the alarm disruptive, you can switch it off in advance by touching the sensor control OK. The alarm will stop. ■ Rectify the cause of the alarm. The alarm stops and the error message disappears from the display. The temperature display will show the highest temperature that was reached during the time the temperature in the Freezer Zone rose. ■ Depending on the temperature displayed, you should check whether food in the freezer has started to thaw or has defrosted. If it has, cook it before freezing it again. ■ In the event of a power failure, check whether there are any ice cubes in the ice cube tray and dispose of these. Otherwise, the ice cubes will freeze together and can damage the ice cube container when they expand. |
| The warning sounds and the message Close the door appears in the display. | The appliance door is open. ■ Close the appliance door. ■ If you wish to turn the alarm off early, touch the sensor control OK in the display. The alarm will stop. |
| The temperature display is dark and is shown in the display. | Sabbath Mode is turned on: The interior lighting is turned off and the appliance is cooling down. ■ You can switch off Sabbath Mode at any time (see “Selecting additional settings”, section “Switching Sabbath Mode on and off”). |
Frequently Asked Questions
| Message | Possible cause and solution |
| “F Please contact Miele Technical Service.” appears in the display and an alarm sounds. | There is a fault. ■ Make a note of the fault message if necessary. ■ Contact Technical Service. ■ To turn the alarm off, touch the ⋅ symbol. The error message does not disappear from the display until the error has been rectified. |
| The voltage level is too high/low. ■ Observe the connection data under “Electrical connections”. ■ Contact Technical Service if necessary. ■ To turn the alarm off, touch the ⋅ symbol. The error message does not disappear from the display until the error has been rectified. | |
| ■ is shown in the display. The machine does not get cold, but the machine controls are working. | Demo Mode■ is switched on. Demo mode allows the appliance to be presented in the showroom without the cooling system being turned on. Do not activate this setting for domestic use. ■ Switch off Demo mode■ (see “Selecting additional settings”, section “Switching off Demo Mode■”). |
Problems with the ice cube maker
| Problem | Possible cause and solution |
| The Ice Maker is not producing any ice cubes. | The appliance and/or the Ice Maker is not turned on. ■ Turn on the appliance and/or the Ice Maker. ■ Check whether the water filter has been inserted correctly (see “Water filter”, section “Changing the water filter”). |
| The plumbed water connection was not installed. ■ Make sure that the plumbed water connection was installed correctly. | |
| The water intake is not open or has not been vented. ■ Open the water intake. ■ Check that the water supply has been vented. | |
| There is a kink in the water hose. ■ Check the water hose and replace it, if necessary. | |
| The temperature in the Freezer Zone is too high. ■ Select a lower temperature. | |
| The appliance door has been opened too frequently, causing the compressor to turn on more often and the Ice Maker has iced up. ■ Only open the door when necessary and for as short a time as possible. | |
| The water pressure is too low. ■ Check that the water pressure is between 29 and 116 psi (2 and 8 bar). ■ Check if an incorrect valve has been installed, making the pressure too low. Remember that it can take up to 10 hours for the production of ice cubes to commence. |
Frequently Asked Questions
| Problem | Possible cause and solution |
| The Ice Maker is pro-ducing only small ice cubes. | Several household appliances connected to the plumbed water connection are in operation, which has reduced the amount of water being taken in. ■ Avoid using the dishwasher, washing machine, etc. at the same time. |
| The water filter is clogged. ■ Check whether the water filter needs to be changed (see “Water filter”). | |
| The water pressure is too low. ■ Check that the water pressure is between 29 and 116 psi (2 and 8 bar). ■ Check if an incorrect valve has been installed. | |
| The ice maker is pro-ducing only a few or de-formed ice cubes. | The water filter is clogged. ■ Check whether the water filter needs to be changed (see “Water filter”). |
| The water pressure is too low. ■ The water pressure must be between 29 and 116 psi (2 and 8 bar). | |
| The temperature in the freezer is too high. ■ Select a lower temperature. | |
| The ice cubes have an unpleasant odor or flavor. | The ice cube container is in constant use and needs to be cleaned regularly. ■ Check if the ice cube container is dirty and clean it if necessary. |
| The ice maker is seldom used. If you do not use it very often, ice cubes that are stored for a long period can absorb the taste and smell of other items. ■ Empty the ice cube container if you are not going to use it for a long time. | |
| There are unsealed packages in the freezer. Ice can absorb the taste and smell of unsealed food. ■ Store only sealed food in the freezer. | |
| The water filter is dirty. ■ Check whether the water filter needs to be changed (see “Water filter”). | |
| Water is flowing out of the appliance. | The water intake is faulty. ■ Close the water shut-off valve immediately! ■ Check the water line for damage. ■ Contact Miele Technical Service. ■ Check whether the water pressure is too high |
| Too high water pressure can cause leakages. ■ Check that the water pressure is between 29 and 116 psi (2 and 8 bar). ■ Check if an incorrect valve has been installed. |
The interior lighting is not working.
| Problem | Possible cause and solution |
| The interior lighting is not working. | The appliance has not been turned on. ■ Turn the appliance on. |
| Sabbath Mode is switched on: The temperature display is dark and ↑↑ is shown in the display. ■ You can switch off Sabbath Mode at any time via Settings mode Ⓞ. | |
| There is a fault. | |
| Risk of electric shock! There are live electrical components under the lighting cover. The LED lighting may only be repaired or replaced by Technical Service. | |
| Risk of injury from LED lighting! The light intensity corresponds to laser beam class 1/1M. The lighting covers must not be removed or damaged, or be removed due to damage. This could cause injury to your eyes. Do not look into the LED lighting (laser beam class 1/1M) with optical instruments (e.g., a magnifying glass). | |
| ■ Contact Technical Service. | |
| Normal noises | Cause |
| Brrrrr... | A humming noise is made by the motor (compressor). This noise can get louder for brief periods when the motor switches on. |
| Blub, blub... | A gurgling noise can be heard when the coolant circulates through the pipes. |
| Click... | Clicking sounds occur whenever the thermostat switches the motor on or off. |
| Sssrrrrr... | You can sometimes just hear the sound of the fan inside the appliance. |
| Crack... | A cracking sound can be heard when materials expand inside the appliance. |
| Please bear in mind that a certain amount of noise is unavoidable (from the compressor and the coolant circulating through the system). | |
| Noises | Cause and solution |
| Rattling, clinking | The appliance is uneven. Realign the appliance using a level, by raising or lowering the adjustable feet underneath the appliance or placing something underneath it. |
| The appliance is touching another machine or piece of furniture. Move it away. | |
| Drawers, baskets or shelves are jiggling or are stuck. Check all removable parts and refit them correctly if required. | |
| Bottles or containers are touching each other. Separate them a little. |
The appliance is supplied with a water filter (OdorFree charcoal filter) that filters supply water for making ice cubes.
The OdorFree charcoal filter improves the taste and smell of the ice cubes by removing chlorine and other substances from supply water.
To ensure the quality of the ice cubes remains high, it is essential to change the water filter regularly.
Please note:
- After inserting a new water filter, dispose of all ice cubes produced in the next 24 hours following the change.
- If you have not used the appliance or the ice maker much in the last few weeks, or if the ice cubes smell unpleasant, install a new water filter.
- If an external water filter is fitted to your household water supply, use a Bypassfilter in place of an OdorFree charcoal filter.
In this case, you can switch off the Water Filter Display (see "Selecting additional settings", section "Switching off the Water Filter Display").
New water filters (Bypass filters and OdorFree charcoal filters) are available from Miele Technical Service, from your dealer, or via the internet.
The reminder to change the water filter is issued approx. every 6 months, depending on the quantity of ice cubes produced.
A reminder to change the water filter appears in the display: Replace the water filter.
An audible signal also sounds.
Confirm the message with OK.
Change the water filter.
The first time the water filter needs to be changed, the display will remind you automatically; the reminder does not need to be switched on separately.
The reminder to change the water filter keeps appearing until you change the water filter and reset the Water Filter Display (see "Switching on, switching off", or resetting the Water Filter Display" in "Selecting additional settings").
Changing the water filter
Air in the system can cause water to gush out and the filter to spring out when it is removed. Take great care when changing the water filter.
Turn the cap of the water filter counter-clockwise as far as the marker 1.).
Pull the used water filter out of the filter opening 2.).
Remove the safety cap from the new water filter.

Remove the cap from the old water filter 3.) and place it onto the new water filter 4.).
Drain the water from the old water filter.
Tip: The old water filter can be disposed of with household trash.
- Slide the new water filter as far as it will go into the filter opening 5.), making sure the cap is horizontal.
Turn the cap of the water filter clockwise as far as the marker 6.).
Risk of damage caused by water gushing out.
If the water filter is not fitted correctly, there is a risk of water leaking out of the appliance.
When fitting the water filter, be sure to turn it as far as the marker.
Once you have changed the water filter, the Water Filter Display remains lit up.
Now reset the Water Filter Display using Settings mode in the display (see "Selecting additional settings", section "Resetting Water Filter Display").
When it is time to change the water filter again, the reminder for the Water Filter Display 電 will appear in the display.
After inserting a new water filter, dispose of all ice cubes produced in the next 24 hours following the change.
Using an external water filter
If an external water filter is fitted to your household water supply, use a Bypass water filter in place of an Active charcoal filter.
In this case, you can switch off the Water Filter Display (see "Selecting additional settings", section "Switching off the Water Filter Display").
Performance Data Sheet
Model: Miele 07134220
Use Replacement Cartridge 07134220
The concentration of the indicated substances in water entering the system was reduced to a concentration less than or equal to the permissible limit for water leaving the system as specified in NSF/ANSI Standard 42 and Standard 53.

System tested and certified by NSF International against NSF/ANSI Standard 42 and Standard 53 for the reduction of the claims specified on the Performance Data Sheet.
Capacity 739.68 Gallons (2800 Liters)
Contaminant Reduction Determined by NSF testing.
| Substance Reduction | Average Influent | NSF specified Challenge Concentration | Avg % Reduction | Average Product Water Concentration | Max Permissible Product Water Concentration | NSF Reduction Requirements | NSF Test Report |
| Chlorine Taste and Odor | 2.1 mg/L | 2.0 mg/L ± 10% | 97.6% | 0.05 mg/L | N/A | ≥ 50% | J-00121313 |
| Nominal Particulate Class I, ≥0.5 to < 1.0 μm | 9,100,000 pts/mL | At least 10,000 particles/mL | 98.8% | 111,817 pts/ml | N/A | ≥85% | J-00099871 |
| Cyst* | 170,000 cysts/L | Minimum 50,000 cysts/L | 99.99% | 0.001 cyst/L | N/A | ≥99.95% | J-00109715 |
- Based on the use of Cryptosporidium parvum oocysts
FOR RESIDENTIAL USE ONLY
Application Guidelines/Water Supply Parameters
| Service Flow | 0.75 gpm (2.83 lpm) |
| Water Supply | Potable Water |
| Water Pressure | 30 -120 psi (207 – 827 kPa) |
| Water Temperature | 33°F - 100°F (0.6°C - 38°C) |
It is essential that the manufacturer's recommended installation, maintenance and filter replacement requirements be carried out for the product to perform as advertised. See Installation Manual for Warranty information.
Note: While the testing was performed under standard laboratory conditions, actual performance may vary.
Replacement Cartridge: 07622430
For estimated costs of replacement elements please contact your local dealer, go to www.miele-shop.com or call Tel. 0180 31 31 340 (€ 0.09/Min.).

WARNING
Read entire manual. Failure to follow all guides and rules could cause personal injury or property damage.
- Check with your local public works department for plumbing codes. You must follow their guidelines as you install the water filtration system.
- Your water filtration system will withstand up to 120 pounds per square inch (psi) water pressure. If your water supply pressure is higher than 80 psi, install a pressure reducing valve before installing the water filtration system.
To reduce the risk associated with the ingestion of contaminants:
- DO NOT use with water that is microbiologically unsafe or of unknown quality without adequate disinfection before or after the system. Systems certified for cyst reduction may be used on disinfected water that may contain filterable cysts.
NOTICE
To reduce the risk associated with water leakage or flooding:
- Read and follow Use Instructions before installation and use of this system.
- Change the disposable filter cartridge every six months or sooner if you observe a noticeable reduction in water flow rate.
- Failure to replace the disposable filter cartridge at recommended intervals may lead to reduced filter performance and failure of the filter, causing property damage from water leakage or flooding.
For questions or concerns, please contact Customer Service at Tel. 0180 31 340 (€0.09/Min.).
3M is a trademark of 3M Company used under license.
NSF is a trademark of NSF International.
© 2017 3M Company. All rights reserved.
34-8721-1445-8
Manufactured by:
3M Purification Inc.
3130 Lexington Avenue South,
Eagan, MN 55121
Lead-free certificate

This product is tested and certified by WQA against NSF/ANSI 372 for "lead free" compliance.
Miele & Cie. KG
Carl-Miele-Strasse 29
D-33332 Gütersloh
Contact in case of fault
In the event of a fault which you cannot remedy yourself, please contact your Miele dealer or Miele Technical Service.
Contact information for Miele Technical Service can be found at the end of this document.
Please quote the model and serial number of your appliance when contacting Miele. Both pieces of information can be found on the data plate.
You will find the data plate inside your appliance.
Warranty
For more information about warranty conditions, please contact Miele Technical Service.
Frequency band 2,412 GHz - 2,462 GHz
Maximum trans- < 100 mW mitting power
Miele uses software to operate and control the appliance.
The copyright authorization from Miele and other relevant software suppliers must be respected.
Miele and its suppliers reserve the rights to the software components.
In particular the following are prohibited:
- Copying and distribution
- Modifications and derivations
- Decompression, reverse engineering, disassembling, and other such reductions of software
Components which fall under GNU General Public Licence and further Open Source licenses are integrated into the software.
An overview of the integrated Open Source components and a copy of the current license can be obtained at http://www.miele.com/device-software-licenses. You will need to enter the specific product name.
Miele will provide the source code for all components of software licensed under the GNU General Public Licence and comparable Open Source licenses.
For source code requests, please e-mail info@miele.com.
Please have the model and serial number of your appliance available when contacting Technical Service.
U.S.A.
Miele, Inc.
National Headquarters
9 Independence Way
Princeton, NJ 08540
Phone: 800-843-7231
Fax: 609-419-4298
www.mieleusa.com
Technical Service & Support
Phone: 800-999-1360
Fax: 888-586-8056
TechnicalService@mieleusa.com
International Headquarters
Miele & Cie. KG
Carl-Miele-StraBe 29
33332 Gütersloh
Germany

Canada
Importer
Miele Limited
Headquarters and Miele Centre
161 Four Valley Drive
Vaughan, ON L4K 4V8
www.miele.ca
Customer Care Centre
Phone: 800-565-6435
905-532-2272
customercare@miele.ca