
DRC96AQ50 - Ventilateur d'extraction BOSCH - Notice d'utilisation et mode d'emploi gratuit
Retrouvez gratuitement la notice de l'appareil DRC96AQ50 BOSCH au format PDF.

| Type de produit | Ventilateur d'extraction de plafond (hotte aspirante) |
| Marque | Bosch |
| Modèle | DRC96AQ50 |
| Modes de fonctionnement | Extraction (évacuation vers l'extérieur) et recyclage (avec filtre à odeurs optionnel) |
| Niveaux de ventilation | 3 vitesses + 2 niveaux intensifs |
| Éclairage | LED intégrée, réglable en intensité et température de couleur (via application Home Connect) |
| Télécommande | Oui, avec piles (CR2032, 3 V) |
| Connectivité | Home Connect (Wi-Fi 2,4/5 GHz) pour contrôle via smartphone |
| Filtres à graisse | Lavables au lave-vaisselle (max 70 °C) ou à la main |
| Filtre à odeurs | Module CleanAir en option (non régénérable ou régénérable) |
| Indicateur de saturation | Oui, pour filtres à graisse et à odeurs |
| Fonctions automatiques | Mode automatique avec capteur, ventilation intermittente, marche/arrêt différé (10 min) |
| Alimentation électrique | 220-240 V, 50 Hz, protection classe 1 |
| Poids | Environ 40 kg (max) |
| Installation | Montage au plafond, distance minimale 700 mm de la table de cuisson |
| Entretien | Nettoyage régulier des filtres à graisse, remplacement des piles de la télécommande |
| Sécurité | Arrêt automatique, détection de saturation des filtres, sécurité enfants (Home Connect) |
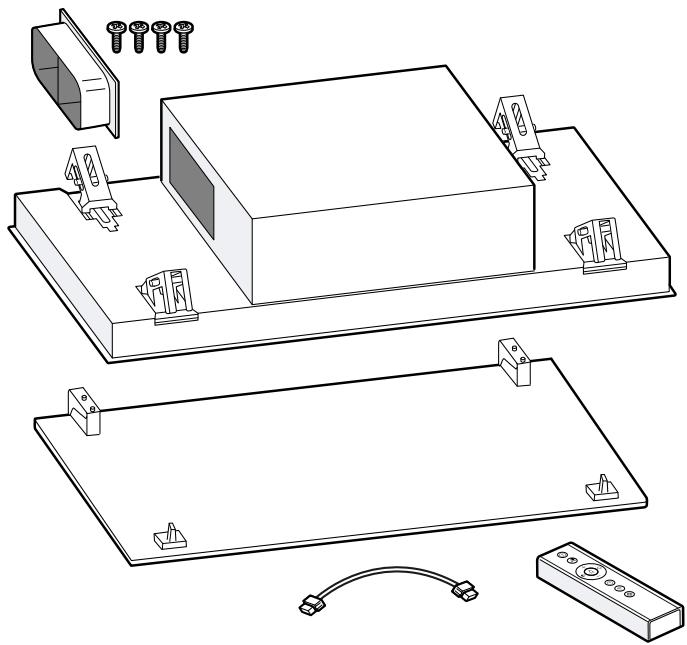
| Accessoires inclus | Télécommande, kit de montage |
| Accessoires optionnels | Modules CleanAir (réf. DIZ1JX5C1, DIZ1JX2C1), filtre de rechange (DSZ1JC1B1) |
| Réparabilité | Pièces détachées disponibles pendant au moins 10 ans (conformité Écoconception) |
FOIRE AUX QUESTIONS - DRC96AQ50 BOSCH
Questions des utilisateurs sur DRC96AQ50 BOSCH
0 question sur cet appareil. Repondez a celles que vous connaissez ou posez la votre.
Poser une nouvelle question sur cet appareil
Téléchargez la notice de votre Ventilateur d'extraction au format PDF gratuitement ! Retrouvez votre notice DRC96AQ50 - BOSCH et reprennez votre appareil électronique en main. Sur cette page sont publiés tous les documents nécessaires à l'utilisation de votre appareil DRC96AQ50 de la marque BOSCH.
MODE D'EMPLOI DRC96AQ50 BOSCH
Register your new device on MyBosch now and get free benefits: bosch-home.com/ welcome
Ceiling-mounted ventilation system
DRC96AQ50
[en] User manual and assembly instructions
Table of contents
Safety 2
Preventing material damage 4
Environmental protection and saving energy. 5
Operating modes 5
Familiarising yourself with your appliance 5
Before using for the first time 6
Basic operation 6
Hob-based hood control 8
Home Connect 8
Cleaning and servicing 10
Troubleshooting 13
Customer Service. 14
Accessories 14
Disposal 14
Installation instructions 15

Safety
Please read the safety information to ensure that you use the appliance safely.
General information
You can find general information about this instruction manual here.
- Read this instruction manual carefully. Only this will ensure you use the appliance safely and efficiently.
This manual is intended for the installer and the user of the appliance. - Follow the safety instructions and warnings.
- Keep the instruction manual and the product information safe for future reference or for the next owner.
- Check the appliance after unpacking it. Do not connect the appliance if it has been damaged in transit.
Intended use
Read the information on intended use to ensure that you use the appliance correctly and safely.
This appliance is designed only to be built into kitchen units. Read the special installation instructions.
The appliance can only be used safely if it is correctly installed according to the safety instructions. The installer is responsible for ensuring that the appliance works perfectly at its installation location.
Only use this appliance:
In accordance with these instructions for installation and use.
For extracting cooking vapour.
- In private households and in enclosed spaces in a domestic environment.
- Up to an altitude of max. 2000 ~m above sea level.
Do not use the appliance:
- With an external timer.
Restriction on user group
Avoid risks to children and vulnerable persons.
This appliance may be used by children aged 8 or over and by people who have reduced physical, sensory or mental abilities or inadequate experience and/or knowledge, provided that they are supervised or have been instructed on how to use the appliance safely and have understood the resulting dangers.
Children must not play with the appliance. Children must not perform cleaning or user maintenance unless they are at least 15 years old and are being supervised.
Keep children under the age of 8 years away from the appliance and power cable.
Safe use
Follow these safety instructions when using the appliance.
WARNING - Risk of suffocation!
Children may put packaging material over their heads or wrap themselves up in it and suffocate.
- Keep packaging material away from children.
- Do not let children play with packaging material.
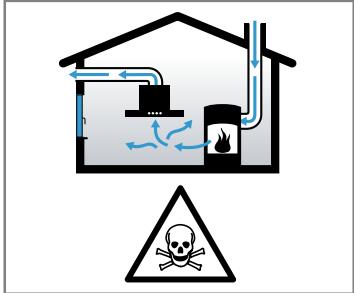
WARNING - Risk of poisoning!
Risk of poisoning from flue gases being drawn back in. Room-air-dependent heatproducing appliances (e.g. gas, oil, wood or coal-operated heaters, continuous flow
heaters or water heaters) obtain combustion air from the room in which they are installed and discharge the exhaust gases into the open through an exhaust gas system (e.g. a chimney). With the extractor hood switched on, air is extracted from the kitchen and the adjacent rooms. Without an adequate supply of air, the air pressure falls below atmospheric pressure. Toxic gases from the flue or the extraction shaft are sucked back into the living space.
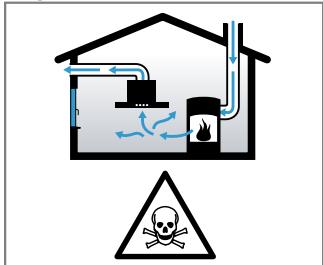

Always ensure adequate fresh air in the room if the appliance is being operated in exhaust air mode at the same time as a room air-dependent heat-producing appliance is being operated.
- It is only possible to safely operate the appliance if the pressure in the room in which the heating appliance is installed does not drop more than 4 Pa (0.04 mbar) below atmospheric pressure. This can be achieved whenever the air needed for combustion is able to enter through openings that cannot be sealed, for example in doors, windows, in conjunction with incoming/exhaust air wall boxes or by other technical means. An incoming/ exhaust air wall box alone does not ensure compliance with the limit.
In any case, consult your responsible chimney sweep. They are able to assess the house's entire ventilation setup and will suggest the suitable ventilation measures to you.
Unrestricted operation is possible if the appliance is operated exclusively in air recirculation mode.
WARNING - Risk of fire!
- Fatty deposits in the grease filters may catch fire.
- Never operate the appliance without a grease filter.
Clean the grease filters regularly.
- Never work with naked flames close to the appliance (e.g. flambéing).
- Do not install the appliance near a solid fuel heating appliance (e.g. wood- or coal-burning) unless the heating appliance has a sealed, non-removable cover. There must be no flying sparks.
Hot oil or grease ignites very quickly.
Always supervise hot oil and fat.
- Never extinguish burning oil or fat with water. Switch off the cooking zone. Extinguish flames carefully using a lid, fire blanket or something similar.
-
When gas burners are in operation without any cookware placed on them, they can build up a lot of heat. A ventilation appliance installed above the cooker may become damaged or catch fire.
-
Only operate the gas burners with cookware on them.
Gas burners can build up a lot of heat while operating. A ventilation appliance installed above the cooker may become damaged or catch fire.
- Only operate the gas burners with cookware on them.
Set at least fan setting 3.
Never operate large burners of more than 5 kW with the highest flame for longer than 15 minutes, e.g. a wok.
WARNING - Risk of burns!
The accessible parts of the appliance become hot during operation.
- Never touch these hot parts.
- Keep children at a safe distance.
WARNING - Risk of injury!
- Components inside the appliance may have sharp edges.
-
Carefully clean the appliance interior.
-
Items placed on the appliance may fall off.
- Do not place any objects on the appliance.
Changes to the electrical or mechanical assembly are dangerous and may lead to malfunctions. - Do not make any changes to the electrical or mechanical assembly.
The filter cover may swing out. - Open the filter cover slowly.
Take hold of the filter cover after opening until it no longer swings out.
- Close the filter cover slowly.
- Risk of injury when opening and closing the hinges.
- Keep your hands away from the hinges.
- The light emitted by LED lights is very dazzling, and can damage the eyes (risk group 1).
- Do not look directly into the switched-on LED lights for longer than 100 seconds.
Children may swallow batteries.
- Keep batteries out of the reach of children.
- Keep an eye on any children when you are replacing batteries.
Batteries may explode.
- Do not charge the batteries.
Do not short-circuit the batteries. -
Do not throw batteries into a fire.
-
Risk of falling when working on the appliance
Use a stable stepladder.
Do not lean over the hob.
- Do not step on the hob or the work surface.
- It may create an increased risk of injury if the appliance is operated by another person via the Home Connect app during cleaning.
Before cleaning, disconnect the appliance from the Home Connect app.
WARNING - Risk of electric shock!
If the appliance or the power cord is damaged, this is dangerous.
- Never operate a damaged appliance.
- Never pull on the power cord to unplug the appliance. Always unplug the appliance at the mains.
- If the appliance or the power cord is damaged, immediately unplug the power cord or switch off the fuse in the fuse box.
Call Customer Service. Page 14
Repairs to the appliance should only be carried out by trained specialist staff.
-
Improper repairs are dangerous.
-
Repairs to the appliance should only be carried out by trained specialist staff.
- Only use genuine spare parts when repairing the appliance.
-
If the power cord of this appliance is damaged, it must be replaced by trained specialist staff.
-
An ingress of moisture can cause an electric shock.
Before cleaning, pull out the mains plug or switch off the fuse in the fuse box.
- Do not use steam- or high-pressure cleaners to clean the appliance.
WARNING - Risk of explosion!
Highly caustic alkaline or highly acidic cleaning agents in conjunction with aluminium parts in the interior of the appliance may cause explosions.
- Never use highly caustic alkaline or highly acidic cleaning agents. In particular, do not use commercial or industrial cleaning agents in conjunction with aluminium parts, e.g. grease filter on extractor hoods.

Preventing material damage
Follow these instructions to prevent material damage to your appliance, accessories or other objects in your kitchen.
General
Follow these instructions when using the appliance.
ATTENTION!
- Condensate may cause corrosion damage.
- To prevent condensation from building up, switch on the appliance during cooking.
If moisture gets into the controls, this may result in damage. - Never clean controls with a wet cloth.
Incorrect cleaning damages the surfaces.
Follow the cleaning instructions.
Do not use harsh or abrasive detergents. - Clean stainless steel surfaces in the direction of the finish only.
-
Never clean controls with stainless steel cleaners.
-
Condensation that flows back in may damage the appliance.
The air extraction duct must be installed with a gradient of at least 1^ from the appliance.
If you put incorrect stress on the design elements, they may break off.
Do not pull design elements.
- Do not place objects on the design elements or hang objects from them.
Leaking batteries may damage the remote control.
- Remove the batteries if you are not using the remote control.
-
Safely dispose of the empty or defective batteries in an environmentally friendly manner.
-
There is a risk of surface damage if you do not peel off the protective film.
- Remove the protective film from all parts of the appliance before using for the first time.
Environmental protection and saving energy
Help protect the environment by using your appliance in a way that conserves resources and by disposing of reusable materials properly.
Disposing of packaging
The packaging materials are environmentally compatible and can be recycled.
- Sort the individual components by type and dispose of them separately. Information about current disposal methods are available from your specialist dealer or local authority.
Saving energy
If you follow these instructions, your appliance will use less power.
Ensure that there is sufficient ventilation when cooking.
+ The appliance works more efficiently and with fewer operating noises.
Adjust the fan speed to the amount of steam produced during cooking.
- The lower the fan speed, the less energy is consumed.
Only use intensive mode when required.
If cooking produces large amounts of steam, select a higher fan speed in good time.
+ The odours are distributed around the room less.
Switch the appliance off when you are not using it.
- The appliance does not consume any energy.
Switch off the lighting if you no longer require it. - The lighting does not consume any energy.
Clean or replace the filters at regular intervals.
+ The effectiveness of the appliance is increased.
Put the cooking lid on.
+ The cooking vapours and condensation are reduced.
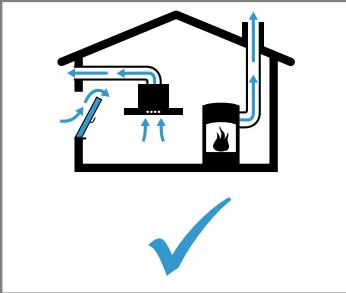
Operating modes
Air extraction mode
The air which is drawn in is cleaned by the grease filters and conveyed to the exterior by a pipe system.

The air must not be discharged into a flue that is used for exhausting fumes from appliances burning gas or other fuels (not applicable to appliances that only discharge the air back into the room).
If the exhaust air is to be conveyed into a non-functioning smoke or exhaust gas flue, you must obtain the consent of the heating engineer responsible.
If the exhaust air is conveyed through the external wall, a telescopic duct should be used.
Air recirculation mode
The air which is drawn in is cleaned by the grease filters and an odour filter, and conveyed back into the room.
To bind odours in circulating-air mode, you must install an odour filter. The different options for operating the appliance in circulating-air mode can be found in our catalogue. Alternatively, ask your dealer. The required accessories are available from specialist retailers, from customer service or from the Online Shop.
Familiarising yourself with your appliance
Familiarise yourself with the parts of your appliance.
Controls
Use the remote control to set all of the functions of your appliance.
Tip: Align the remote control as precisely as possible to the infrared receiver for the LED display.
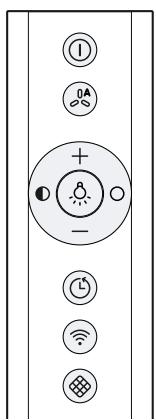
| ① | Switch the appliance on or off |
| ②A | Switch on automatic mode1 |
| + | Increase the fan setting |
| - | Decrease the fan setting |
| . | Switch the lighting on or off |
| ○ | Reduce the brightness |
| ○ | Increase the brightness |
| L | Switch the fan run-on on or off |
| √ | Switch Home Connect on or off |
| ⊗ | Reset the filter saturation indicator |
| 1 | Depending on the appliance specifications |
LED display
Die LED-Anzeige zeigt eingestellte Werte und Funktionen.
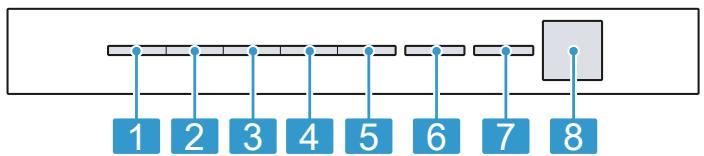
| 1 | Fan setting 1/grease filter saturation display |
| 2 | Fan setting 2/odour filter saturation indicator |
| 3 | Fan setting 3 |
| 4 | Intensive mode 1 |
| 5 | Intensive mode 2 |
| 6 | Automatic mode1/fan run-on time/interval vent- ilation |
| 7 | Home Connect |
| 8 | Infrared receiver |
1 Depending on the appliance specifications
Before using for the first time
Configure the settings for initial start-up. Clean the appliance and accessories.
Setting an operating mode
Your appliance is set to air extraction mode by default. To use it in circulating-air mode, you must set the operating mode.
Note: For use in circulating-air mode, you require additional Accessories Page 14.
Requirement: The appliance is switched off.
-
Press and hold ① and 念 for approx. three seconds.
-
To set circulating-air mode (non-regenerable filter), press +/- until LED 2 lights up in the LED display.
- To set circulating-air mode (non-regenerable filter), press +/- until LED 3 lights up in the LED display.
-
To convert the electronic control back to operation without the air recirculation filter, press +/- until LED 1 lights up on the LED display.
-
To save the setting, press and hold ① and ⑧ for approx. three seconds.
Or wait approx. 10 seconds until the setting is saved automatically.
To cancel the setting, press ①.
A signal tone sounds as soon as the selected setting is saved.
Basic operation
You can find out everything you need to know about operating your appliance here.
Switching on the appliance
Requirement: Align the remote control as precisely as possible to the infrared receiver for the LED display.
Press ① to switch on the appliance.
- The appliance starts at fan setting 2.
- The LED for the set fan setting lights up in the LED display.
Switching off the appliance
Switch the appliance off when you are not using it.
Press ① to switch the appliance off.
- The appliance switches off. Any functions currently in progress are cancelled.
Selecting a fan setting
Press + or -.
- The LED for the set fan setting lights up in the LED display.
Switching on intensive mode
If particularly strong odours or vapours develop, you can use intensive mode.
-
Press + repeatedly until LED 4 lights up in the LED display for intensive mode 1.
-
Press + repeatedly until LED 5 lights up in the LED display for intensive mode 2.
After approx. 6 minutes, the appliance automatically switches to fan setting 3.
Switching off intensive mode
To select a fan setting of your choice, press -
- After approx. 6 minutes, the appliance automatically switches to fan setting 3.
Switching on the fan run-on
Press
LED 1 for the fan setting lights up in the LED display. LED 6 flashes for the fan run-on.
- The appliance switches off automatically after approx. 10 minutes.
Switching off the fan run-on
Press
This immediately stops the fan run-on.
- The appliance switches to the fan setting that was previously selected.
Switch on automatic mode
The optimum fan setting is set automatically using a sensor.
Press
In the LED display, LED 6 lights up for automatic mode.
Switch off automatic mode
Press
- The appliance switches to the fan setting that was previously set.
- The ventilation is automatically ended when the sensor detects no further change in the room air quality.
Automatic mode runs for a maximum of four hours.
Intermittent ventilation
With interval ventilation, the ventilation system switches on and off in the selected setting for the selected time.
Note: This function is only available via a mobile device with the Home Connect app.
If the interval ventilation is switched on, LED 6 continuously flashes in the LED display for the interval ventilation and the LED for the selected fan setting lights up. As soon as the ventilation time ends, the LED for the fan setting you have selected goes out. LED 6 continues to flash.
Sensor control
In automatic mode, a sensor in the appliance detects the intensity of the cooking and roasting fumes. Depending on the setting of the sensor sensitivity, the optimum fan setting automatically switched on.
If the sensor control system reacts too weakly or too strongly, the setting for the sensor sensitivity may change.
Default setting: Fan setting 3
Lowest setting: Fan setting 1
Highest setting: Fan setting 5
Setting the sensor control
Requirement: The appliance is switched off.
- Press and hold ① and for approx. three seconds.
- Press + or - to change the setting. To cancel the setting, press ①.
- To save the setting, press and hold ① and for approx. three seconds. Or wait approx. 10 seconds until the setting is saved automatically.
A signal tone sounds as soon as the selected setting is saved.
Setting the saturation indicator
The saturation indicator must be adjusted depending on the filter used.
Requirement: The appliance is switched off.
-
Press and hold ① and for approx. three seconds. - To set circulating-air mode (non-regenerable filter), press +/- until LED 2 lights up in the LED display.
-
To set circulating-air mode (non-regenerable filter), press +/- until LED 3 lights up in the LED display.
-
To convert the electronic control back to operation without the air recirculation filter, press +/- until LED 1 lights up on the LED display.
-
To convert the electronic control back to operation without the air recirculation filter, press +/- until LED 1 lights up on the LED display.
-
To save the setting, press and hold ① and ⑧ for approx. three seconds.
Or wait approx. 10 seconds until the setting is saved automatically.
To cancel the setting, press ① .
A signal tone sounds as soon as the selected setting is saved.
Resetting the saturation indicator
After cleaning the grease filter or after changing the odour filter, the saturation indicator can be reset.
Requirements
- After the appliance has been switched off, LED 1 flashes in the LED display for the grease filter saturation display and/or LED 2 flashes for the saturation indicator for the odour filter.
A repeated signal tone sounds.
Press - The saturation indicator is reset.
Switching on the lighting
Press to switch on the lighting.
Note: Colour temperature settings are available in the Home Connect app provided the appliance has this function.
Setting the brightness
Press and hold or O.
Note: Colour temperature settings are available in the Home Connect app provided the appliance has this function.
Switching on the button tone
The button tones can be switched on.
Requirement: The appliance is switched off.
- Press and hold ① and - for approx. three seconds.
In the LED display, the LED for the setting that is currently selected lights up. - Press + or - until LED 1 lights up in the LED display. To cancel the setting, press ①
- To save the setting, press and hold ① and - for approx. three seconds. Or wait approx. 10 seconds until the setting is saved automatically.
A signal tone sounds as soon as the selected setting is saved.
Switching the button tone off
The button tones can be switched off.
Note: Signal tones for the appliance are always switched on and cannot be switched off.
Requirement: The appliance is switched off.
- Press and hold ① and - for approx. three seconds.
In the LED display, the LED for the setting that is currently selected lights up. - Press + or - until LED 2 lights up in the LED display. To cancel the setting, press ①
- To save the setting, press and hold ① and — for approx. three seconds.
Or wait approx. 10 seconds until the setting is saved automatically.
A signal tone sounds as soon as the selected setting is saved.
Hob-based hood control
You can connect your appliance to a suitable hob and, in this way, control the functions of your appliance via the hob.
You have the following options for connecting the appliances with each other:
- Connecting the appliance via the Home Connect app. If both appliances are Home Connect-compatible, they can be connected using the Home Connect app. Follow the instructions in the app.
- Connecting appliances directly with each other.
- Connecting appliances via the Wi-Fi home network.
Note: Please note the safety precautions in the instruction manual for your appliance and ensure that they are also observed when operating the appliance via the hob-based hood control.
Tip: Operating your appliance always takes priority. It is not possible to use the hood controls on the hob during this time.
Connecting directly
Requirements
-
Your appliance is now switched off.
Before connecting the appliances, reset all connections to your home network or other appliances. If your appliance is connected directly to the hob, it cannot be connected to your home network as well and you will not be able to use Home Connect. -
Note: Refer to the section entitled "Hob-based hood control" in the instruction manual for your hob. Switch on the hob and select the search mode.
- Press and hold the button until the LED for Home Connect flashes in the LED display.
- The appliance is connected to the hob if the LED for Home Connect no longer flashes and lights up permanently.
Connecting via your home network
- Follow the instructions in
"Automatically connecting the appliance to the WLAN home network (Wi-Fi)", Page 9 or
"Manually connecting the appliance to the WLAN home network (Wi-Fi)", Page 9.
- As soon as the appliance is connected to the home network, establish the connection to the hob via the Home Connect app.
- Follow the instructions on your mobile device.
Home Connect
This appliance is network-capable. Connecting your appliance to a mobile device lets you control its functions via the Home Connect app, adjust its basic settings and monitor its operating status.
The Home Connect services are not available in every country. The availability of the Home Connect function depends on the availability of Home Connect services in your country. You can find information about this at: www.home-connect.com.
To be able to use Home Connect, you must first set up the connection to the WLAN home network (Wi-Fi1) and to the Home Connect app.
- Automatically connecting appliance to WLAN home network (Wi-Fi) Page 9
- Connecting appliance to WLAN home network (WiFi) manually Page 9
The Home Connect app guides you through the entire login process. Follow the instructions in the Home Connect app to configure the settings.
If the appliance is not connected to your home network, it functions as an appliance with no network connection and can still be operated via the display.
Tips
Please consult the documents supplied by Home Connect.
- Please also follow the instructions in the Home Connect app.
Notes
- Please note the safety precautions in this instruction manual and make sure that they are also observed when operating the appliance via the Home Connect app.
"Safety", Page 2 - Operating the appliance on the appliance itself always takes priority. During this time it is not possible to operate the appliance using the Home Connect app.
In networked standby mode, the appliance requires a maximum of 2W .
If you need your device's MAC address to connect to your home network, you can find this next to the rating plate Page 14 inside the appliance. To do this, Remove the filter Page 11.
Automatically connecting the appliance to the WLAN home network (Wi-Fi)
If your router has a WPS function, you can connect the appliance to your WLAN home network (Wi-Fi) automatically.
Note: The appliance cannot be switched on during the connection process. Press ① to cancel the process.
Requirements
Wi-Fi on the router is activated.
- The appliance receives signals from the WLAN home network (Wi-Fi) at its installation location.
- The Home Connect app is installed on your mobile device.
The appliance and the light are switched off.
- Press and hold the button until LED 7 flashes in the LED display.
- Press+.
LED 1 and LED 7 flash in the LED display. - Press the WPS button on the router within the next 2 minutes.
- If the connection has been established, the appliance automatically connects to the Home Connect app. LED 3 and LED 7 flash in the LED display.
- If no connection can be established, the appliance automatically switches to the manual connection to the home network, LED 2 and LED 7 flash in the
LED display. Log the appliance manually into the home network or press - in order to restart the login.
- On your mobile device, follow the instructions for automatic network login.
- The login process is complete when LED 7 stops flashing and remains continuously lit.
Manually connecting the appliance to the WLAN home network (Wi-Fi)
Note: The appliance cannot be switched on during the connection process. Press ① to cancel the process.
Requirement: The appliance and the light are switched off.
- Press and hold the button until LED 7 flashes in the LED display.
- Press + twice to start logging into your home network manually.
LED 2 and LED 7 flash in the LED display.
- Follow the instructions in the app.
If the connection has been established, the appliance automatically connects to the Home Connect app. LED 3 and LED 7 light up in the LED display. - On your mobile device, follow the instructions for manually logging into your network.
- The login process is complete when LED 7 stops flashing and remains continuously lit.
Connecting the appliance to the Home Connect app
Requirements
-
The Home Connect app is installed on your mobile device.
The Home Connect app is opened. -
Press and hold the button until LED 3 and LED 7 flash in the LED display.
- Follow the instructions for the Home Connect app on the mobile device.
- The login process is complete when LED 7 stops flashing and remains continuously lit.
Software update
Your appliance's software can be updated using the software update function, e.g. for the purposes of optimisation, troubleshooting or security updates.
To do this, you must be a registered Home Connect user, have installed the app on your mobile device and be connected to the Home Connect server.
As soon as a software update is available, you will be informed via the Home Connect app and will be able to start the software update via the app. Once the update has been successfully downloaded, you can start installing it via the Home Connect app if you are in your local area network. The Home Connect app will inform you once installation is successful.
Notes
- You can continue to use your appliance as normal while updates are downloading. Depending on your personal settings in the app, software updates can also be set to download automatically.
We recommend that you install security updates as soon as possible.
Resetting the connection
Saved connections to the home network and to Home Connect can be reset.
Press and hold and + until LED 7 goes out in the LED display.
An audible signal sounds.
Remote diagnostics
Customer Service can use Remote Diagnostics to access your appliance if you contact them, have your appliance connected to the Home Connect server and if Remote Diagnostics is available in the country in which you are using the appliance.
Tip: For further information and details about the availability of Remote Diagnostics in your country, please visit the service/support section of your local website: www.home-connect.com
Data protection
Please see the information on data protection.
The first time your appliance is registered on a home network connected to the Internet, your appliance will transmit the following types of data to the
Home Connect server (initial registration):
- Unique appliance identification (consisting of appliance codes as well as the MAC address of the Wi-Fi communication module installed).
- Security certificate of the Wi-Fi communication module (to ensure a secure data connection).
- The current software and hardware version of your appliance.
Status of any previous reset to factory settings.
This initial registration prepares the Home Connect functions for use and is only required when you want to use the Home Connect functions for the first time.
Note: Please note that the Home Connect functions can only be utilised with the Home Connect app. Information on data protection can be retrieved in the Home Connect app.
Declaration of Conformity
Robert Bosch Hausgeräte GmbH hereby declares that the appliance with Home Connect functionality meets the essential requirements and other relevant provisions of the Directive 2014/53/EU.
A detailed RED Declaration of Conformity can be found online at www.bosch-home.com among the additional documents on the product page for your appliance.

2.4 GHz band: 100 mW max.
5 GHz band: 100 mW max.
| BE | BG | CZ | DK | DE | EE | IE | EL |
| ES | FR | HR | IT | CY | LV | LT | LU |
| HU | MT | NL | AT | PL | PT | RO | SI |
| SK | FI | SE | UK | NO | CH | TR |
5 GHz WLAN (Wi-Fi): For indoor use only.
Cleaning and servicing
To keep your appliance working efficiently for a long time, it is important to clean and maintain it carefully.
Cleaning products
You can obtain suitable cleaning products from after-sales service or the online shop.
WARNING - Risk of electric shock!
An ingress of moisture can cause an electric shock.
Before cleaning, pull out the mains plug or switch off the fuse in the fuse box.
- Do not use steam- or high-pressure cleaners to clean the appliance.
ATTENTION!
Unsuitable cleaning products may damage the surfaces of the appliance.
Do not use harsh or abrasive detergents.
- Do not use cleaning products with a high alcohol content.
- Do not use hard scouring pads or cleaning sponges.
- Do not use any special cleaners for cleaning the appliance while it is hot.
- Do not use limescale remover on the door handle or control panel, as it may leave permanent staining.
- Only use glass cleaners, glass scrapers or stainless steel care products if recommended in the cleaning instructions for the relevant part.
- Wash sponge cloths thoroughly before use.
Cleaning the stainless steel surfaces
- Observe the information regarding the cleaning agents.
"Cleaning products", Page 10 - Clean using a sponge cloth and hot soapy water in the direction of the finish.
- Dry with a soft cloth.
- Apply a thin layer of the stainless steel cleaning product with a soft cloth.
Tip: You can obtain stainless steel cleaning products from after-sales service or the online shop.
Cleaning painted surfaces
- Observe the information regarding the cleaning agents.
"Cleaning products", Page 10 - Clean using a sponge cloth and hot soapy water in the direction of the finish.
- Dry with a soft cloth.
Cleaning plastic
- Observe the information regarding the cleaning agents.
"Cleaning products", Page 10 - Clean with a soft cloth and glass cleaner.
Cleaning glass
- Observe the information regarding the cleaning agents.
"Cleaning products", Page 10 - Clean with a soft cloth and glass cleaner.
Cleaning controls

WARNING - Risk of electric shock!
Penetrating moisture may cause an electric shock.
Do not use wet sponge cloths.
- Observe the information regarding the cleaning agents.
"Cleaning products", Page 10 - Clean using a damp sponge cloth and hot soapy water.
- Dry with a soft cloth.
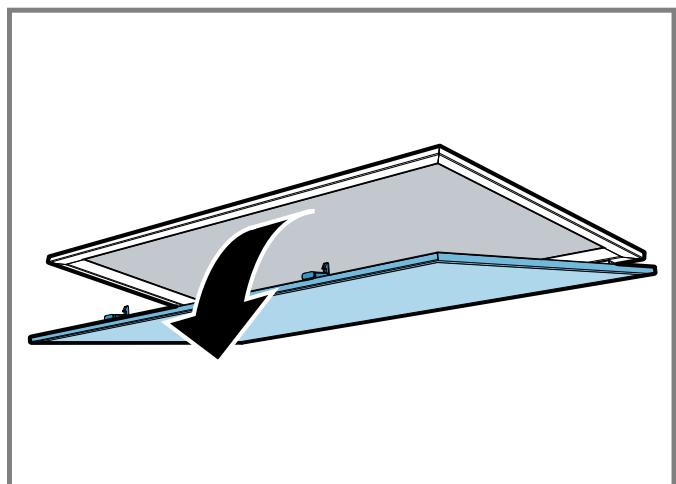
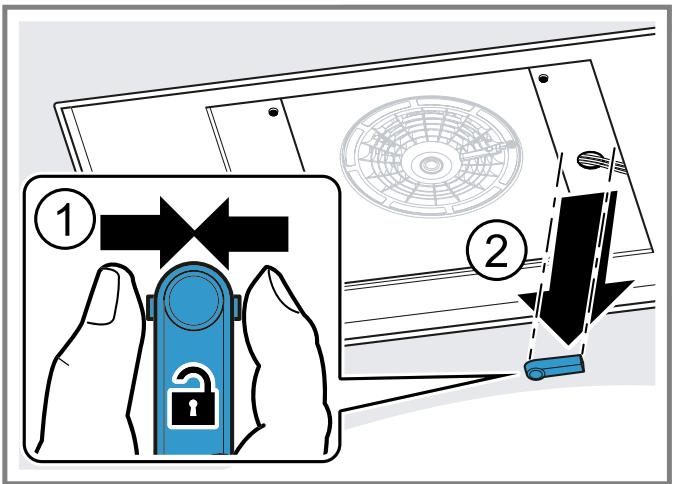
Removing the grease filter

WARNING - Risk of injury!
The filter cover may swing out.
- Open the filter cover slowly.
Take hold of the filter cover after opening until it no longer swings out. - Close the filter cover slowly.
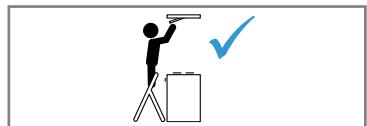
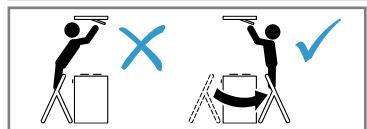
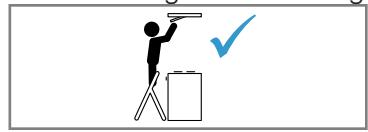
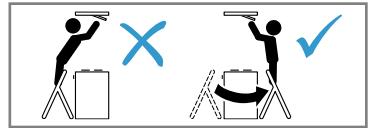
Risk of falling when working on the appliance

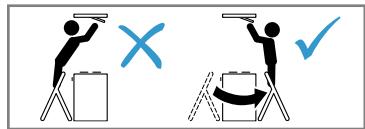
Use a stable stepladder.
Do not lean over the hob.
Do not step on the hob or the work surface.
- Press the lock on the filter cover.
To prevent the filter cover from swinging down suddenly, hold onto the filter cover firmly with two hands.
- Open the filter cover by pulling it downwards.
-
ATTENTION! Falling grease filters may damage the hob below.
-
Grip below the grease filter with one hand. Open the locks on the grease filters.
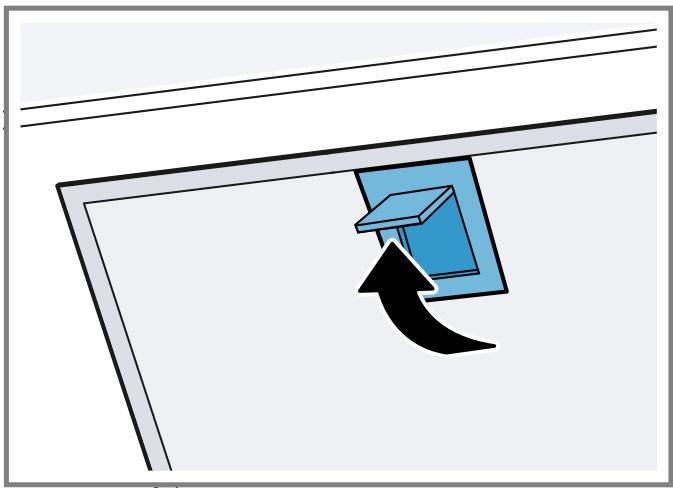
- Remove the grease filters from the holders. To prevent grease from dripping, hold the grease filter horizontally.
Cleaning grease filters in the dishwasher
The grease filters filter the grease from the cooking vapour. Regularly cleaned grease filters guarantee a high level of grease removal.

WARNING - Risk of fire!
Fatty deposits in the grease filters may catch fire.
Clean the grease filters regularly.
ATTENTION!
The grease filters may become damaged if they are squeezed.
Do not squeeze the grease filters.
Note: When cleaning the grease filter in the dishwasher, light discolouration may occur. This discolouration has no effect on the performance of the metal grease filters.
Requirement: The grease filters have been removed.
- Observe the information regarding the cleaning agents. "Cleaning products", Page 10
- Place the grease filters loosely into the dishwasher. Do not clean heavily soiled grease filters with utensils. Use special grease solvent for stubborn dirt. You can obtain grease solvents from after-sales service or the online shop.
- Start the dishwasher. Select a temperature of no more than 70^ .
- Allow the grease filters to drain.
Cleaning grease filters manually
The grease filters filter the grease from the cooking vapour. Regularly cleaned grease filters guarantee a high level of grease removal.

WARNING - Risk of fire!
Fatty deposits in the grease filters may catch fire.
Clean the grease filters regularly.
Requirement: The grease filters have been removed.
- Observe the information regarding the cleaning agents.
"Cleaning products", Page 10 - Soak the grease filter in hot soapy water. Use special grease solvent for stubborn dirt. You can obtain grease solvents from after-sales service or the online shop.
- Use a brush to clean the grease filters.
- Rinse the grease filters thoroughly.
- Allow the grease filters to drain.
Fitting grease filters
ATTENTION!
Falling grease filters may damage the hob below.
Grip below the grease filter with one hand.
- Fit the grease filters.
- Fold the grease filters upwards and engage the locks.
- Make sure that the locks engage.
- Fold the filter cover upwards to close it.
- Make sure that the filter cover locks engage correctly.
Replacing the batteries in the remote control

WARNING - Risk of injury!
Children may swallow batteries.
- Keep batteries out of the reach of children.
-
Keep an eye on any children when you are replacing batteries.
-
Batteries may explode.
Do not charge the batteries.
Do not short-circuit the batteries.
Do not throw batteries into a fire.
ATTENTION!
- Improper handling of batteries.
Do not short-circuit the terminals.
Use the specified type of batteries only.
Do not use different battery types together.
Do not use new and used batteries together.
Do not use rechargeable batteries.
Leaking batteries may damage the remote control.
- Remove the batteries if you are not using the remote control.
-
Safely dispose of the empty or defective batteries in an environmentally friendly manner.
-
Remove the cover.
-
Remove the empty batteries.
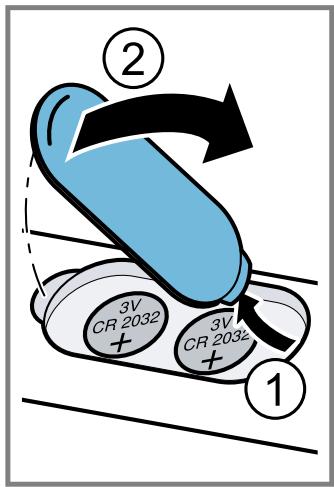
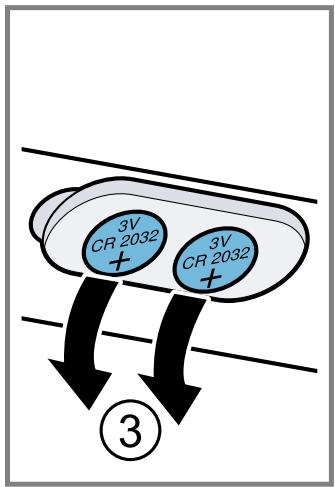
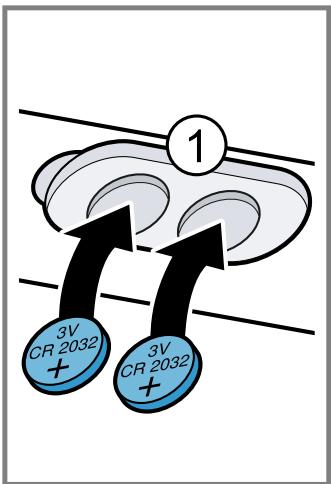
- Insert the new batteries (3 V CR 2032).
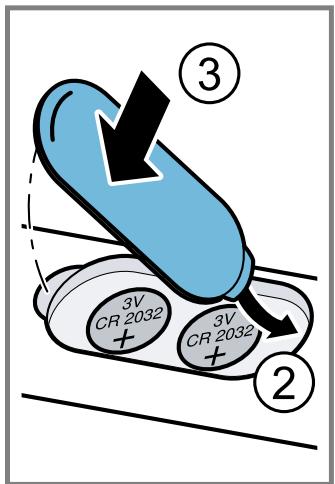
- Close the cover.
- Dispose of the empty batteries in an environmentally friendly manner.
Troubleshooting
You can rectify minor faults on your appliance yourself. Read the troubleshooting information before contacting after-sales service. This will avoid unnecessary costs.
WARNING - Risk of injury!
Improper repairs are dangerous.
- Repairs to the appliance should only be carried out by trained specialist staff.
If the appliance is defective, call Customer Service.
WARNING - Risk of electric shock!
Improper repairs are dangerous.
- Repairs to the appliance should only be carried out by trained specialist staff.
- Only use genuine spare parts when repairing the appliance.
If the power cord of this appliance is damaged, it must be replaced by trained specialist staff.
Malfunctions
| Fault | Cause | troubleshooting |
| The appliance is not working. | The mains plug of the power cord is not plugged in. | Connect the appliance to the power supply. |
| The circuit breaker is faulty. | Check the circuit breaker in the fuse box. | |
| There has been a power cut. | Check whether the lighting in your kitchen or other appliances are working. | |
| The lighting does not work. | Different causes are possible. | Call the after-sales service. → "Customer Service", Page 14 |
| Remote control not working. | The batteries are flat. | → "Replacing the batteries in the remote control", Page 12 |
| In the LED display, the LEDs flash one to five times after the appliance is switched off. | The batteries are almost empty. | → "Replacing the batteries in the remote control", Page 12 |
| LED 1 flashes in the LED display. | The grease filters are saturated. | → "Cleaning grease filters in the dishwasher", Page 12 → "Cleaning grease filters manually", Page 12 |
| LED 2 flashes in the LED display. | The odour filters are saturated. | Change the odour filter. |
| HomeConnect is not working correctly. | Different causes are possible. | Go to www.home-connect.com. |
Customer Service
If you have any queries on use, are unable to rectify faults on the appliance yourself or if your appliance needs to be repaired, contact Customer Service.
You can solve many problems yourself by consulting the information on eliminating faults in this instruction manual or on our website. If this is not the case, contact our Customer Service.
We will always find an appropriate solution and try to avoid unnecessary visits being made by a Customer Service technician.
With any warranty claims we will make sure that your appliance is repaired by trained Customer Service technicians using original spare parts, including after the manufacturer's warranty has expired.
Function-relevant genuine spare parts according to the corresponding Ecodesign Order can be obtained from Customer Service for a period of at least 10 years from the date on which your appliance was placed on the market within the European Economic Area.
Note: Under the terms of the manufacturer's warranty the use of Customer Service is free of charge.
Detailed information on the warranty period and terms of warranty in your country is available from our Customer Service, your retailer or on our website.
If you contact Customer Service, you will require the product number (E-Nr.) and the production number (FD) of your appliance.
The contact details for Customer Service can be found in the enclosed Customer Service directory or on our website.
Product number (E-Nr.) and production number (FD)
You can find the product number (E-Nr.) and the production number (FD) on the appliance's rating plate. Depending on the model, the rating plate can be found:
- Inside the appliance (remove grease filters for access).
- On top of the appliance.
Make a note of your appliance's details and the Customer Service telephone number to find them again quickly.
Accessories
Only use original accessories. These have been made especially for your appliance. Here you can find an overview of your appliance's accessories and how to use them.
| accessories | Order number |
| CleanAir recirculation module, flat with easy- change filter (cannot be regenerated), stainless steel | DIZ1JX5C1 |
| accessories | Order number |
| CleanAir recirculation module, flat with easy-change filter (can be re-generated), white | DIZ1JX2C1 |
| Filter for air recirculation module, flat (cannot be re-generated) | DSZ1JC1B1 |
Disposal
Find out here how to dispose of old appliances correctly.
Disposing of old appliance
Valuable raw materials can be reclaimed by recycling.
- Unplug the appliance from the mains.
- Cut through the power cord.
- Dispose of the appliance in an environmentally friendly manner.
This appliance is labelled in accordance with European Directive
2012/19/EU concerning used electrical and electronic appliances (waste electrical and electronic equipment - WEEE).
The guideline determines the framework for the return and recycling of used appliances as applicable throughout the EU.
Disposing of batteries
Batteries should be recycled in an environmentally friendly manner. Do not dispose of the batteries in the household rubbish.
- Dispose of batteries in an environmentally friendly manner.
Only for EU countries:
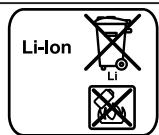
According to the European Guideline 2006/66/EC, defective or used battery packs/batteries, must be collected separately and disposed of in an environmentally correct manner.
Installation instructions
Included with the appliance
After unpacking all parts, check for any damage in transit and completeness of the delivery.
Safety clearances
Comply with the safety clearances for the appliance.

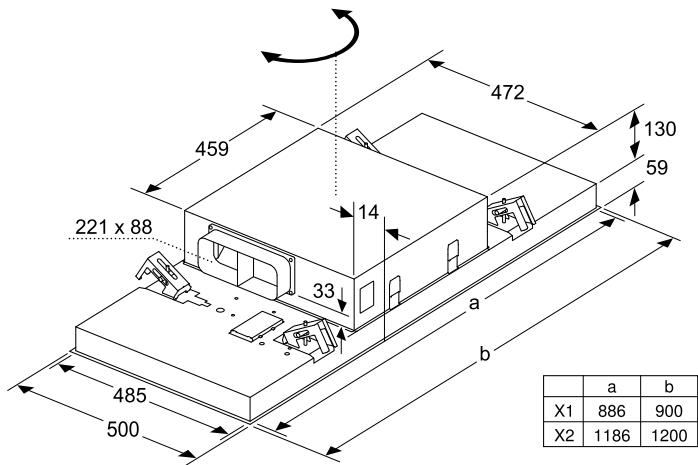
Dimensions
You will find the dimensions of the appliance here

Secure installation
Follow these safety instructions when installing the appliance.

WARNING - Risk of poisoning!
Risk of poisoning from flue gases being drawn back in. Room-air-dependent heat-producing appliances (e.g. gas, oil, wood or coal-operated heaters, continuous flow heaters or water heaters) obtain combustion air from the room in which they are installed and discharge the exhaust gases into the open through an exhaust gas system (e.g. a chimney). With the extractor hood switched on, air is extracted from the kitchen and the adjacent rooms. Without an adequate supply of air, the air pressure falls below atmospheric pressure.
Toxic gases from the flue or the extraction shaft are sucked back into the living space.
Always ensure adequate fresh air in the room if the appliance is being operated in exhaust air mode at the same time as a room air-dependent heat-producing appliance is being operated.
It is only possible to safely operate the appliance if the pressure in the room in which the heating appliance is installed does not drop more than 4 Pa (0.04 mbar) below atmospheric pressure. This can be achieved whenever the air needed for combustion is able to enter through openings that cannot be sealed, for example in doors, windows, in conjunction with incoming/exhaust air wall boxes or by other technical means. An incoming/exhaust air wall box alone does not ensure compliance with the limit.
In any case, consult your responsible chimney sweep. They are able to assess the house's entire ventilation setup and will suggest the suitable ventilation measures to you.
Unrestricted operation is possible if the appliance is operated exclusively in air recirculation mode.
WARNING - Risk of suffocation!
Children may put packaging material over their heads or wrap themselves up in it and suffocate.
- Keep packaging material away from children.
Do not let children play with packaging material.
WARNING - Risk of fire!
Grease deposits in the grease filter may catch fire.
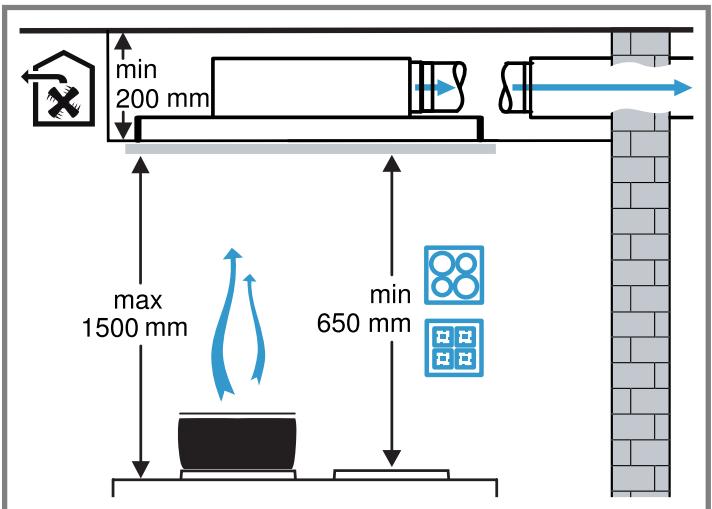
The specified safety clearances must be complied with in order to prevent a build-up of heat.
- Observe the specifications for your cooking appliance. If gas and electric hobs are being operated together, the largest specified clearance applies.
Grease deposits in the grease filter may catch fire.
- Never work with naked flames close to the appliance (e.g. flambéing).
- Do not install the appliance near a heat-producing appliance for solid fuel (e.g. wood or coal) unless a closed, non-removable cover is available. There must be no flying sparks.
WARNING - Risk of injury!
- Components inside the appliance may have sharp edges.
Wear protective gloves. - The appliance may fall down if it has not been properly fastened in place.
All fastening components must be fixed firmly and securely in place.
The appliance is heavy.
To move the appliance, two people are required.
Use only suitable tools and equipment.
The appliance is heavy.
The appliance must not be fitted directly onto plasterboard or similar lightweight materials.
To ensure correct installation, you must use a material which is sufficiently stable and suitable for both the structural conditions and the weight of the appliance.
Changes to the electrical or mechanical assembly are dangerous and may lead to malfunctions.
- Do not make any changes to the electrical or mechanical assembly.
Risk of falling when working on the appliance
Use a stable stepladder.
Do not lean over the hob.
Do not step on the hob or the work surface.
The filter cover may swing out.
- Open the filter cover slowly.
Take hold of the filter cover after opening until it no longer swings out. -
Close the filter cover slowly.
-
Risk of injury when opening and closing the hinges.
-
Keep your hands away from the hinges.
WARNING - Risk of electric shock!
- Sharp-edged components inside the appliance may damage the connecting cable.
Do not kink or trap the connecting cable.
If the appliance or the power cord is damaged, this is dangerous.
- Never operate a damaged appliance.
- Never pull on the power cord to unplug the appliance. Always unplug the appliance at the mains.
If the appliance or the power cord is damaged, immediately unplug the power cord or switch off the fuse in the fuse box.
▶ Call Customer Service. → Page 14 -
Repairs to the appliance should only be carried out by trained specialist staff.
-
Improper repairs are dangerous.
Repairs to the appliance should only be carried out by trained specialist staff.
- Only use genuine spare parts when repairing the appliance.
If the power cord of this appliance is damaged, it must be replaced by trained specialist staff.
-
Improper installation is dangerous.
-
Connect and operate the appliance only in accordance with the specifications on the rating plate.
- Connect the appliance to a power supply with alternating current only via a properly installed socket with earthing.
The protective conductor system of the domestic electrical installation must be properly installed.
- Never equip the appliance with an external switching device, e.g. a timer or remote control.
- When the appliance is installed, the mains plug of the power cord must be freely accessible. If free access is not possible, an all-pole isolating switch must be installed in the permanent electrical installation according to the conditions of Overvoltage Category III and according to the installation regulations.
- When installing the appliance, check that the power cable is not trapped or damaged.
Information on the installation situation
Install this appliance on the kitchen ceiling or a stable suspended ceiling.
- The surfaces of the appliance are sensitive. Avoid damaging them during installation.
Instructions for the exhaust air pipe
The appliance manufacturer does not provide any warranty for faults attributable to the pipeline.
- Use a short, straight exhaust air pipe with as large a pipe diameter as possible.
- Long, rough exhaust air pipes, many pipe bends or small pipe diameters reduce the suction power and increase the fan noise.
- An exhaust air pipe that is made of non-combustible material.
- To prevent condensate from returning, fit the exhaust air pipe from the appliance with a 1^ gradient.
Round pipes
Round pipes with an inner diameter of 150~mm
Flat ducts
Use flat ducts whose inner cross-section corresponds to the diameter of the round pipes:
- Diameter of 150 ~mm corresponds to approx. 177 ~cm^2 .
Use sealing strips for different pipe diameters. - Do not use any flat ducts with sharp bends.
Instructions for the electrical connection
In order to be able to safely connect the appliance electrically, follow these instructions.

WARNING - Risk of electric shock!
-
It must always be possible to disconnect the appliance from the electricity supply. The appliance must only be connected to a protective contact socket that has been correctly installed.
-
The mains plug for the mains power cable must be easily accessible after the appliance is installed.
-
If this is not possible, an all-pole isolating switch must be integrated into the permanent electrical installation according to the conditions of over-voltage category III and according to the installation regulations.
The permanent electrical installation must only be wired by a professional electrician. We recommend installing a residual-current circuit breaker (RCCB) in the appliance's power supply circuit. -
Sharp-edged components inside the appliance may damage the connecting cable.
Do not kink or trap the connecting cable.
- The connection data can be found in the rating plate inside the appliance.
To see the rating plate, remove the odour filter.
The connecting cable is approx. 1.30m long. - This appliance complies with the EC interference suppression regulations.
- The appliance corresponds to protection class 1. Therefore, only use the appliance with a protective earth connection.
- Do not connect the appliance to the power supply during installation.
- Only a licensed professional may connect appliances without plugs. They are subject to the requirements of the local electricity provider.
General information
- The appliance finds it more difficult to draw in the cooking vapours the further away they are from the hob. Therefore maintain a distance of at least 700 ~mm and a maximum of 1500 ~mm .
- To optimally detect the cooking vapours, install the appliance in the middle of the cooktop.
In order to freely access the appliance for servicing, select an easy-to-reach installation site. - The surfaces of the appliance are sensitive. Avoid damaging them during installation.
Installation
Checking the ceiling
- Check whether the ceiling is horizontal and adequately load-bearing.
The max. weight of the appliance is 40kg .
Do not fit the appliance directly onto plasterboard (or similar lightweight materials) in a suspended ceiling. - Drill the borehole depth in accordance with the length of the screws.
- Install the appliance with a material which is sufficiently stable and has been adjusted accordingly for both the structural conditions and the weight of the appliance.
- Check the cut-out area for existing cables of other appliances.
Preparing the ceiling
- Ensure that the stability of the ceiling is guaranteed after the cut-outs have been made.
-
Cover the hob to prevent damage.
-
Saw a cut-out into the ceiling.
- Remove any shavings.
Preparing the appliance
- Remove the grease filters.
To avoid causing damage, do not bend the grease filters. - Screw the flat duct connection onto the fan group.
Installing the appliance
WARNING - Risk of injury!
-
Components inside the appliance may have sharp edges.
Wear protective gloves.
The appliance is heavy.
To move the appliance, two people are required.
Use only suitable tools and equipment. -
Insert the appliance into the cut-out until you hear the mounting brackets engage.
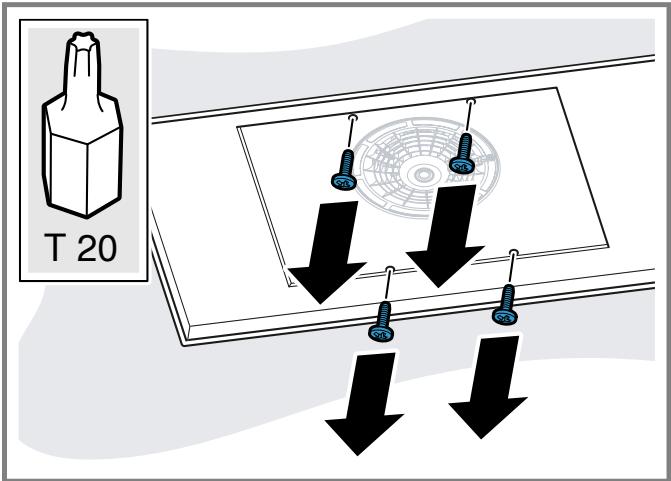
- Carefully screw in diagonally opposite screws.

Tighten the screws one at a time so that the appliance is not wedged in the cut-out.
- Note: To ensure that the appliance is not damaged, do not overtighten the screws.
Carefully tighten screws in succession until the appliance is flush-mounted on the ceiling.
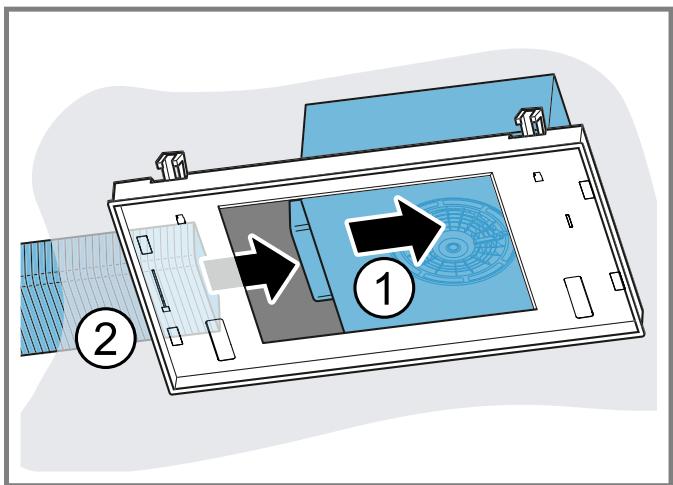
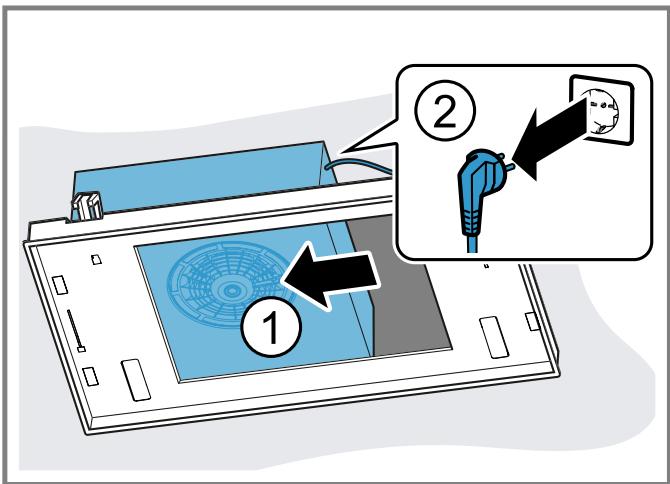
Connecting the appliance
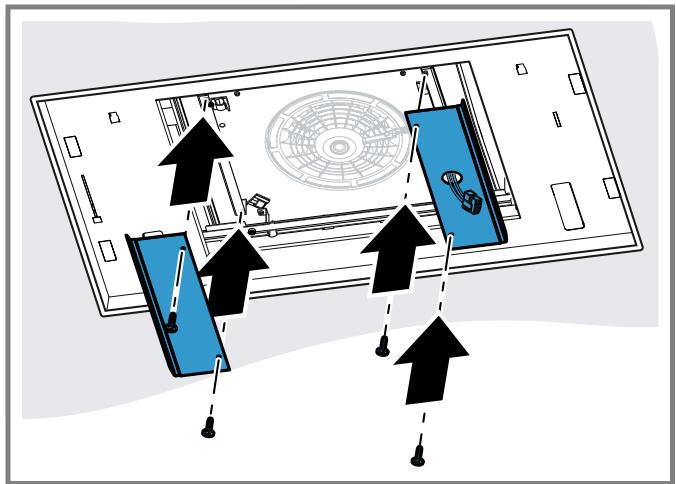
- Undo the screws on the top frame assembly using a screwdriver and remove the top frame assembly.
- Press together the cable duct at the sides and remove it.
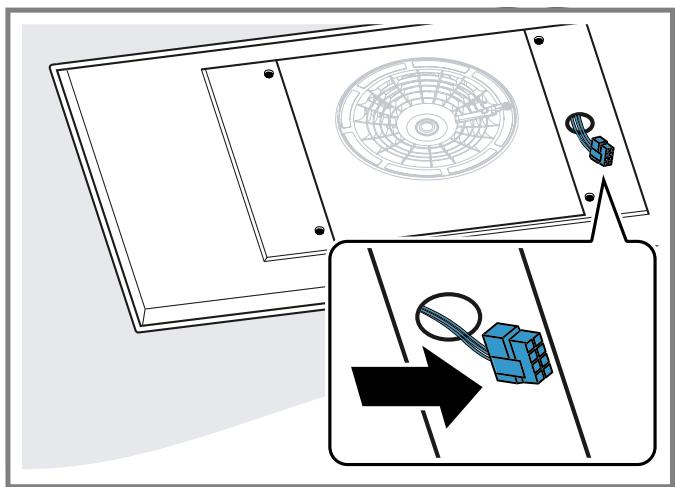
- Disconnect the cable at the appropriate point.

- Loosen the screws on the side covers and remove the covers.
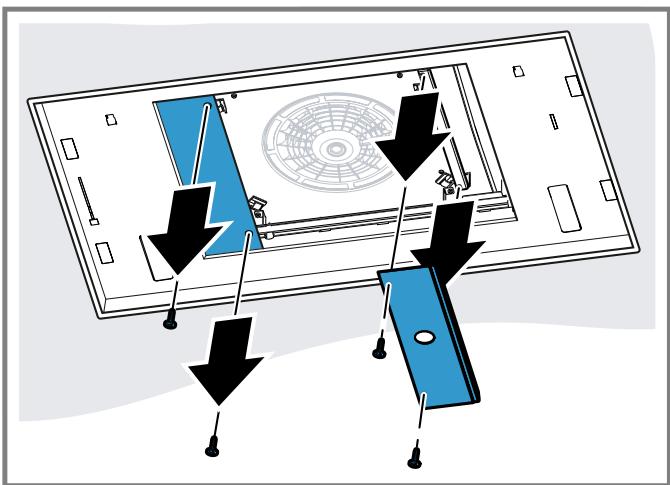
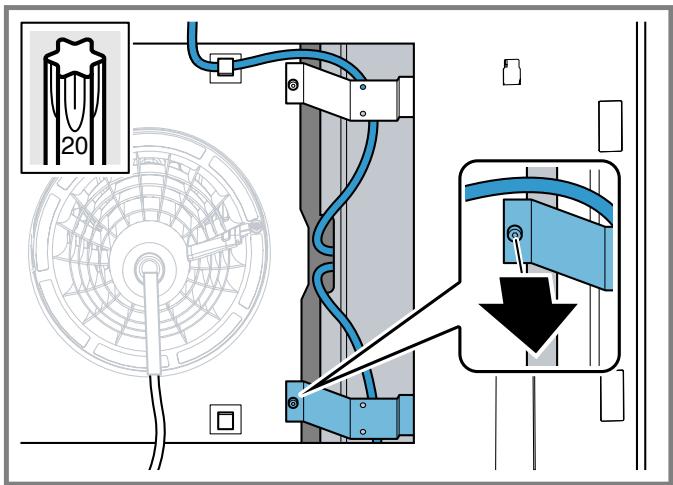
- Undo the opposite screws to loosen the fan box.
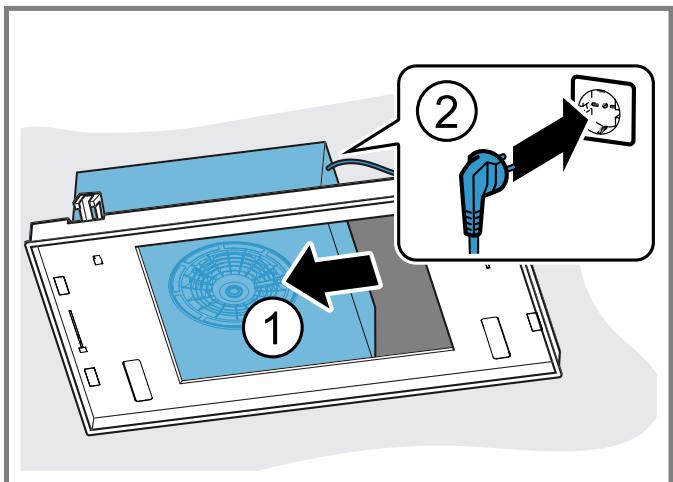
- Push the fan box to the side and connect the appliance to the power supply.
- Push the fan box to the other side and connect the pipework.
- Position the fan box in the centre and screw it firmly in place.
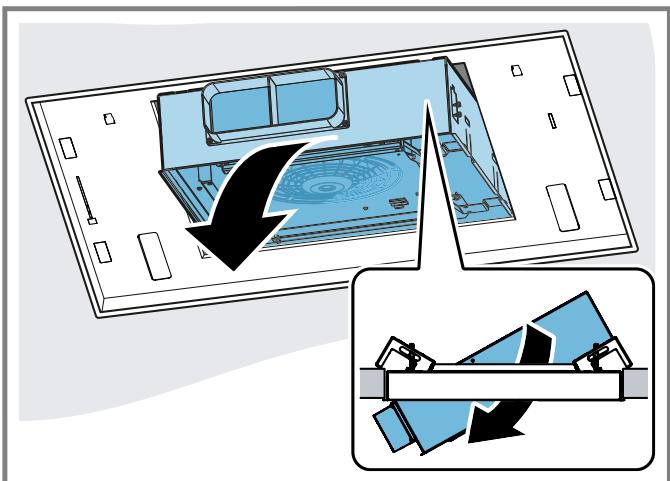
Installation variants of the fan box
The fan box can be rotated according to the installation situation.
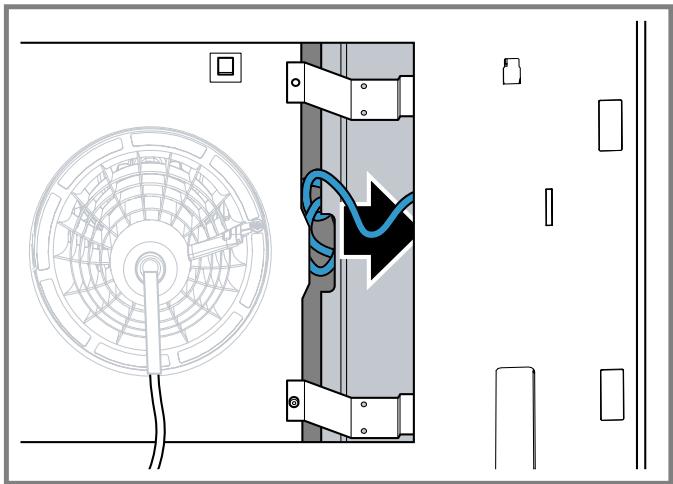
Turning the air outlet to the back
- Starting with the delivery condition, turn the fan box clockwise so that the air outlet is pointing to the back.
- Insert the extension cable.
- Hook the cable into the cable guides 1 and 2.
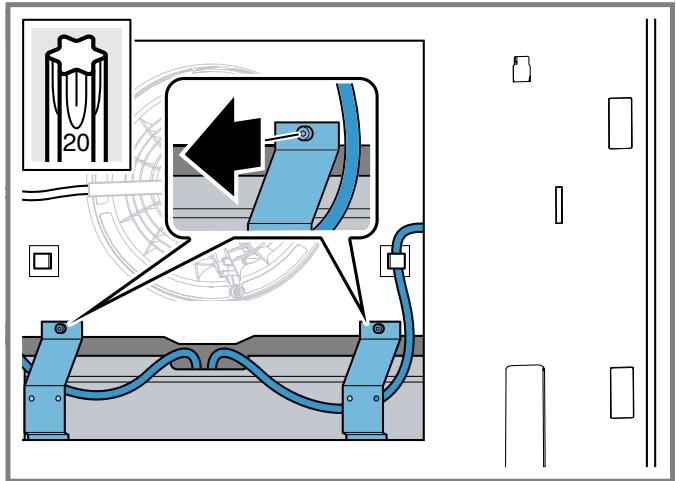
Turning the air outlet to the front
- Starting with the delivery condition, turn the fan box anti-clockwise so that the air outlet is pointing to the front.
- Undo the screw on the metal hook.
- Pull the cable through behind the metal hook and hook it in the cable guides.
- Store the remaining cable in the gap.
- Tighten the screw on the metal hook so that it is firmly in place.
Turning the air outlet clockwise
-
Ausgehend vom Auslieferungszustand, den Lüfterkasten im Uhrzeigersinn drehen, sodass der Luftauslass nach rechts zeigt.
-
Undo the screw on the metal hook.
- Das Kabel durch den Metallhakenziehen.
- Das Kabel in die Kabelführung 4 einhängen.
- Tighten the screw on the metal hook so that it is firmly in place.
Finishing connecting the appliance
- Guide the cable through the opening in the side cover.
- Insert the side covers and screw them firmly in place.
- Connect the cable.
- Press together the cable duct at the sides and attach.
- Fit the cover frame and screw it firmly in place.
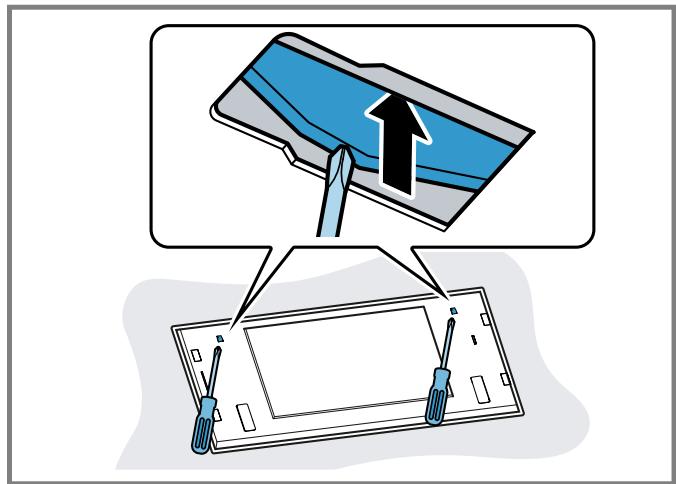
Fitting the filter cover

WARNING - Risk of injury!
- Components inside the appliance may have sharp edges.
Wear protective gloves. - Risk of injury when opening and closing the hinges.
-
Keep your hands away from the hinges.
-
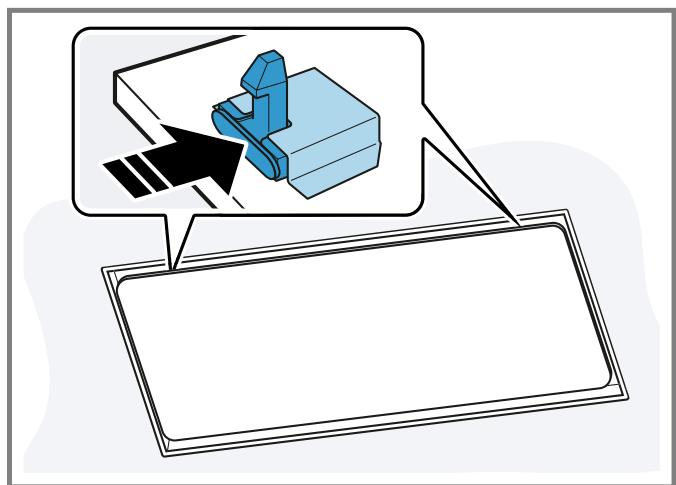
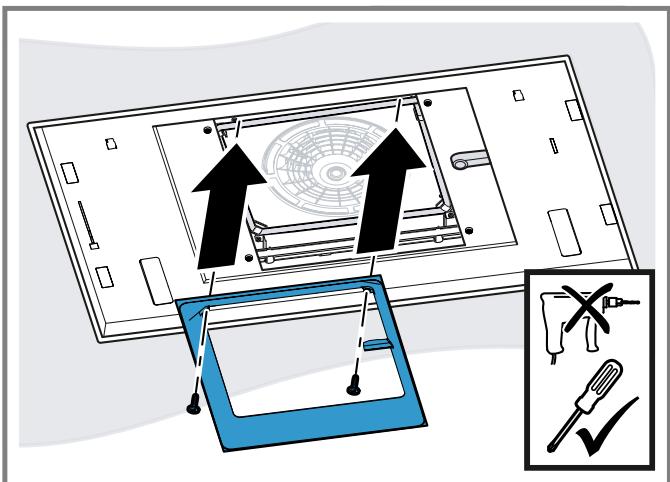
Open the hinges on the filter cover.
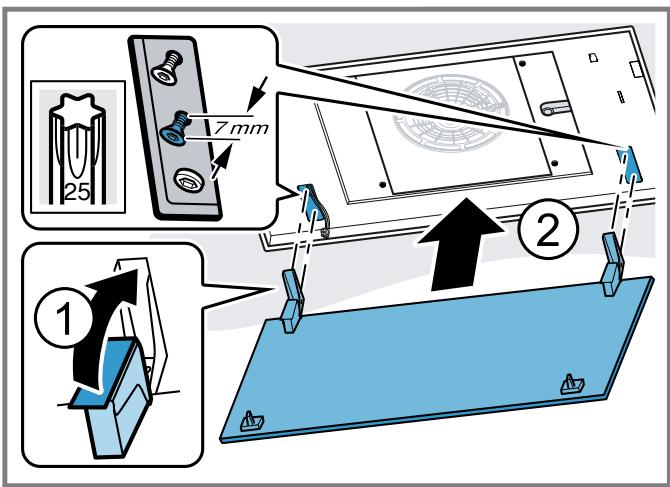
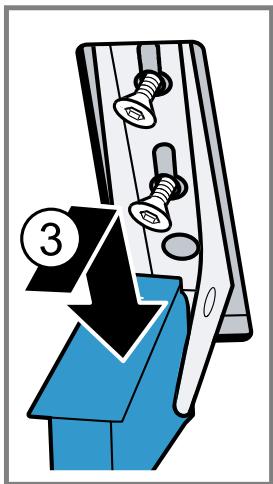
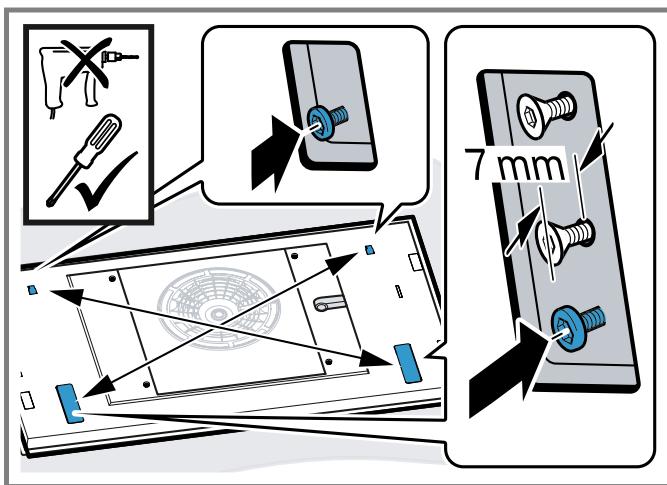
- Mount the filter cover on the designated screws and push it backwards/forwards depending on the key hole opening into the narrow section.
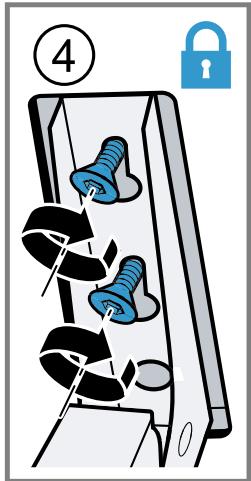
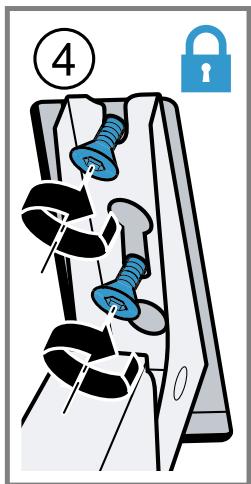
- Tighten the fastening screws on the hinges.
- Check whether the appliance frame is lying flush.
Tighten the screws once again if necessary.
- Insert the grease filters.
To avoid causing damage, do not bend the grease filters.
- Swing the filter cover up and ensure that it engages.
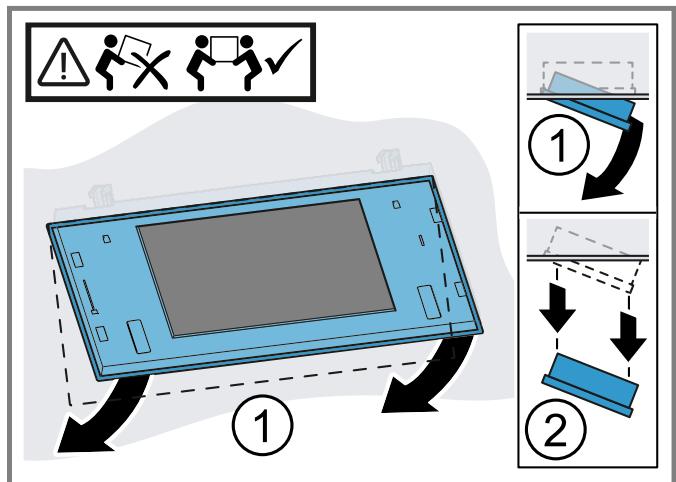
Removing the appliance
WARNING - Risk of injury!
The appliance is heavy.
To move the appliance, two people are required.
Use only suitable tools and equipment.
- Components inside the appliance may have sharp edges.
Wear protective gloves. - Risk of injury when opening and closing the hinges.
-
Keep your hands away from the hinges.
-
Disconnect the appliance from the power supply.
- Remove the grease filters.
To avoid causing damage, do not bend the grease filters.
- Open the cable duct on the filter cover and loosen the cable.
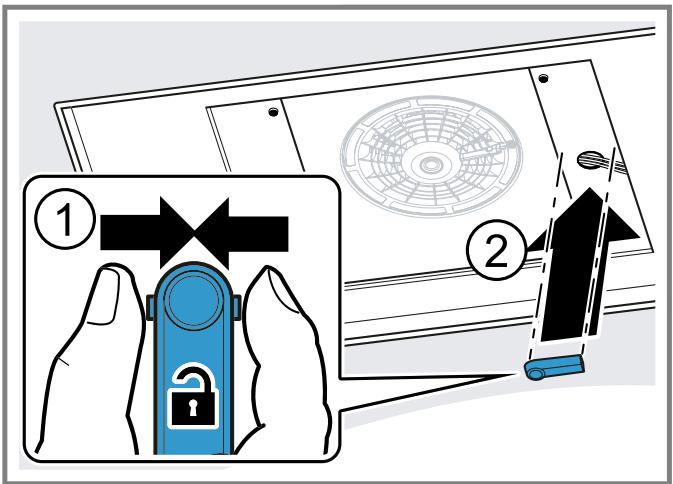
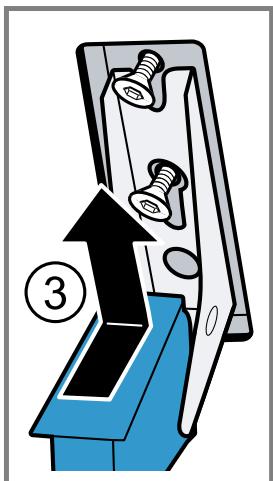
- Undo the screws on the hinges up to approx. 7 mm. Do not loosen the screws fully.
- Unhook and remove the filter cover.
- Undo the screws on the top frame assembly using a screwdriver and remove the top frame assembly.
- Loosen the screws on the side covers and remove the covers.
- Press together the cable duct at the sides and remove it.
- Disconnect the cable at the appropriate point.
- Undo the opposite screws to loosen the fan box.

- Push the fan box to the side and release the pipework.

- Push the fan box to the other side and pull out the mains plug.
- Rotate the fan box in such a way that the air outlet faces forwards.
-
Remove the fan box.
-
Loosen the mounting brackets on the appliance using a screwdriver.
- Slowly take the appliance out of the cutout.

Thank you for buying a Bosch Home Appliance!
Register your new device on MyBosch now and profit directly from:
- Expert tips & tricks for your appliance
- Warranty extension options
- Discounts for accessories & spare-parts
- Digital manual and all appliance data at hand
- Easy access to Bosch Home Appliances Service
Free and easy registration – also on mobile phones:
www.bosch-home.com/welcome
BOSCH HOME APPLIANCES SERVICE
Looking for help? You'll find it here.
Expert advice for your Bosch home appliances, help with problems or a repair from Bosch experts.
Find out everything about the many ways Bosch can support you:
www.bosch-home.com/service
Contact data of all countries are listed in the attached service directory.
Robert Bosch Hausgeräte GmbH
Carl-Wery-Straße 34
81739 München
GERMANY
www.bosch-home.com
9001482616 (991115)
- Ceiling-mounted ventilation system
- Table of contents
- Safety
- General information
- Intended use
- Restriction on user group
- Safe use
- WARNING - Risk of suffocation!
- WARNING - Risk of poisoning!
- WARNING - Risk of fire!
- WARNING - Risk of burns!
- WARNING - Risk of injury!
- WARNING - Risk of electric shock!
- WARNING - Risk of explosion!
- Preventing material damage
- General
- ATTENTION!
- Environmental protection and saving energy
- Disposing of packaging
- Saving energy
- Operating modes
- Air extraction mode
- Air recirculation mode
- Familiarising yourself with your appliance
- Controls
- LED display
- Before using for the first time
- Setting an operating mode
- Basic operation
- Switching on the appliance
- Switching off the appliance
- Selecting a fan setting
- Switching on intensive mode
- Switching off intensive mode
- Switching on the fan run-on
- Switching off the fan run-on
- Switch on automatic mode
- Switch off automatic mode
- Intermittent ventilation
- Sensor control
- Setting the sensor control
- Setting the saturation indicator
- Resetting the saturation indicator
- Requirements
- Switching on the lighting
- Setting the brightness
- Switching on the button tone
- Switching the button tone off
- Hob-based hood control
- Connecting directly
- Connecting via your home network
- Home Connect
- Tips
- Notes
- Automatically connecting the appliance to the WLAN home network (Wi-Fi)
- Manually connecting the appliance to the WLAN home network (Wi-Fi)
- Connecting the appliance to the Home Connect app
- Software update
- Resetting the connection
- Remote diagnostics
- Data protection
- Declaration of Conformity
- Cleaning and servicing
- Cleaning products
- Cleaning the stainless steel surfaces
- Cleaning painted surfaces
- Cleaning plastic
- Cleaning glass
- Cleaning controls
- Removing the grease filter
- Cleaning grease filters in the dishwasher
- Cleaning grease filters manually
- Fitting grease filters
- Replacing the batteries in the remote control
- Troubleshooting
- Customer Service
- Product number (E-Nr.) and production number (FD)
- Accessories
- Disposal
- Disposing of old appliance
- Disposing of batteries
- Installation instructions
- Included with the appliance
- Safety clearances
- Dimensions
- Secure installation
- Information on the installation situation
- Instructions for the exhaust air pipe
- Round pipes
- Flat ducts
- Instructions for the electrical connection
- Installation
- Checking the ceiling
- Preparing the ceiling
- Preparing the appliance
- Installing the appliance
- Connecting the appliance
- Installation variants of the fan box
- Turning the air outlet to the back
- Turning the air outlet to the front
- Turning the air outlet clockwise
- Finishing connecting the appliance
- Fitting the filter cover
- Removing the appliance
- Thank you for buying a Bosch Home Appliance!
- Looking for help? You'll find it here.
Marque : BOSCH
Modèle : DRC96AQ50
Catégorie : Ventilateur d'extraction