F1200N - Scanner MUSTEK - Notice d'utilisation et mode d'emploi gratuit
Retrouvez gratuitement la notice de l'appareil F1200N MUSTEK au format PDF.
| Type de produit | Scanner à plat A3 |
| Marque | Mustek |
| Modèle | F1200N |
| Élément de numérisation | Capteur d'image CIS (Contact Image Sensor) |
| Source lumineuse | LED trois couleurs (RVB) |
| Résolution optique | 1200 x 1200 dpi |
| Résolution améliorée | 9600 x 9600 dpi |
| Zone de numérisation maximale | 299 x 427 mm (11,8 x 16,8 pouces) |
| Modes de numérisation | Couleur 48/24 bits, Niveaux de gris 16/8 bits, Trait 1 bit |
| Interface | USB 2.0 haute vitesse |
| Alimentation | 12 V CC, 2 A, 24 W |
| Dimensions (L x P x H) | 576 x 406 x 72 mm |
| Poids | 4,6 kg |
| Température de fonctionnement | 10 °C à 35 °C |
| Humidité de fonctionnement | 10 % à 85 % |
| Mise en veille | Arrêt automatique après 15 minutes d'inactivité |
| Systèmes d'exploitation supportés | Windows XP SP3/Vista/7/8/10, Mac OS X 10.7 à 10.11 et supérieur |
| Contenu du carton | Scanner, câble USB, CD d'installation |
| Entretien | Nettoyer régulièrement la vitre de numérisation avec un chiffon doux et sec |
| Sécurité | Ne pas exposer à l'humidité, ne pas ouvrir le boîtier, utiliser uniquement les accessoires spécifiés |
| Réparabilité | Contactez le support technique Mustek pour toute réparation |
FOIRE AUX QUESTIONS - F1200N MUSTEK
Questions des utilisateurs sur F1200N MUSTEK
0 question sur cet appareil. Repondez a celles que vous connaissez ou posez la votre.
Poser une nouvelle question sur cet appareil
Téléchargez la notice de votre Scanner au format PDF gratuitement ! Retrouvez votre notice F1200N - MUSTEK et reprennez votre appareil électronique en main. Sur cette page sont publiés tous les documents nécessaires à l'utilisation de votre appareil F1200N de la marque MUSTEK.
MODE D'EMPLOI F1200N MUSTEK
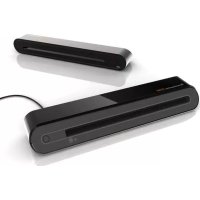
High Speed A3 Flatbed Scanner

SAFETY PRECAUTION
- Keep away from water or moisture and dusty areas.
- Never store in hot and very cold areas.
Only use attachments/accessories specified by the manufacturer. - No objects filled with liquids, such as vases, shall be placed on the Scanner.
- Avoid dust contamination when the Scanner is not in use.
- When left unused for a long period of time, the unit should be
connected from the power cable. - Avoid environments where the Scanner would be exposed to direct sunlight.
Sunlight (or any other source of excessive heat) for long periods of time .Protect the sensors from potential liquid spills such as soda , so - Protect the Scanner from potential liquid spills such as soda, coffee, tea, and etc.
- Be carefully to keep it without dropping it or strong impact.
- Operate the Scanner on a level, well-grounded work surface, free of
excessive vibration - Don't open the Scanner case alone without technical support because there is danger of electrical shock
- Position the equipment near a power outlet where it can be easily
accessed when plugged in.

SYSTEM REQUIREMENTS
| Processor | PC: Intel Pentium IV or faster Mac: Intel Core Duo or faster |
| Support OS | PC: Windows XP (Service Pack 3) / Vista / 7 / 8 /10 Mac: Mac OS X 10.7 to 10.11 and above |
| Color Display | 1024 x 768 resolution or above |
| RAM | 1GB RAM (2GB recommended) |
| Free Hard Drive Space | PC: 600MB Mac: 100MB |
| Drive | CD or DVD-ROM Drive for software installation |
| Interface | Available USB port |

SPECIFICATIONS
| Model | A3F1200NC |
| Scanning Element | Contact Image Sensor (CIS) |
| Light Source | Three-color (RGB) LEDs |
| Scan Mode | Color: 48-bit, 24-bit Gray: 16-bit, 8-bit Line art: 1-bit |
| Scan Area (Max.) | 299mm x 427mm (11.8" x 16.8") |
| Optical Resolution | 1200 dpi x1200 dpi |
| Enhanced Resolution | 9600 dpi x 9600 dpi |
| Interface | Hi-Speed USB 2.0 |
| Power Consumption | 12VDC, 2A, 24W (Input: 100~120VAC or 200~240VAC, 50~60Hz) |
| Operation Temperature and Humidity | 10 °C - 35 °C (50 °F - 95 °F); 10% to 85% |
| Power Saving | Auto power off after no operation for 15min |
| Dimension (LxWxH) | 576mm x 406mm x 72mm (22.6" x 15.9" x 2.8") |
| Weight | 4.6 kgs (10.1 lbs) |

BUNDLED DRIVERS AND SOFTWARE
YOU MUST FIRST INSTALL SCANNER DRIVER IN ORDER TO USE THE SCANNER ON YOUR COMPUTER.
[Windows]
- Scanner Driver - Scanner Driver includes following:
a. TWAIN and WIA driver: it comes with TWAIN interface to use the Scanner from within any WIA or TWAIN-compliant graphics software applications such as Medialpression, Photoshop.
b. iDocScan Touch: it is consisted of 5 Scan-to functions, including Scan to Folder, Scan to PDF, Scan to Application (Default: E-Mail), Scan to Cloud, and Scan to Print destinations, and Advanced Scan with a preview window for displaying the prescanned image.
c. Help files: this includes detailed instructions of idocscan touch and of the tWAln interface.
d. Clean Calibration: Run this tool to clear the calibration data left from the previous scanner, when you use another same model scanner on the same computer with a previous driver. - Presto! Pagemanager - this TWAIN-compliant application enables scanning via the TWAIN interface. For detailed information of this application, see the "Help" file integrated within this application.
- ABBYY FineReader Sprint - this application converts scanned text into searchable text when using the PDF function. For detailed information of this application, see the "Help" file integrated within this application
- Adobe Acrobat Reader - this application opens the scanned image that is converted into a PDF format using the PDF function.
[Mac]
- ImageAcquire - this application is used to scan from the Scanner within the TWAIN interface. For detailed instructions of ImageAcquire, see the PDF file inside the ImageAcquire folder.
- Scanner Driver - it comes with TWAIN interface to use the Scanner from within any TWAIN-compliant graphics application such as ImageAcquire, Photoshop. Refer to the PDF file inside the ImageAcquire folder for detailed instructions of TWAIN interface.
- ScanMust - this application allows you to easily scan from the Scanner buttons or within this software. For the detailed instructions of ScanMust, see the "Help" file integrated within this software.
![MUSTEK F1200N - [Mac] - 1](/content/2024/11/222894/images/966e0e66a23730393865850902f7e8b2a2de78eb2ce4edc098b6727d14020b61.jpg)
PACKAGE CONTENTS
This package includes the following items

Scanner
Installation CD


USB Cable

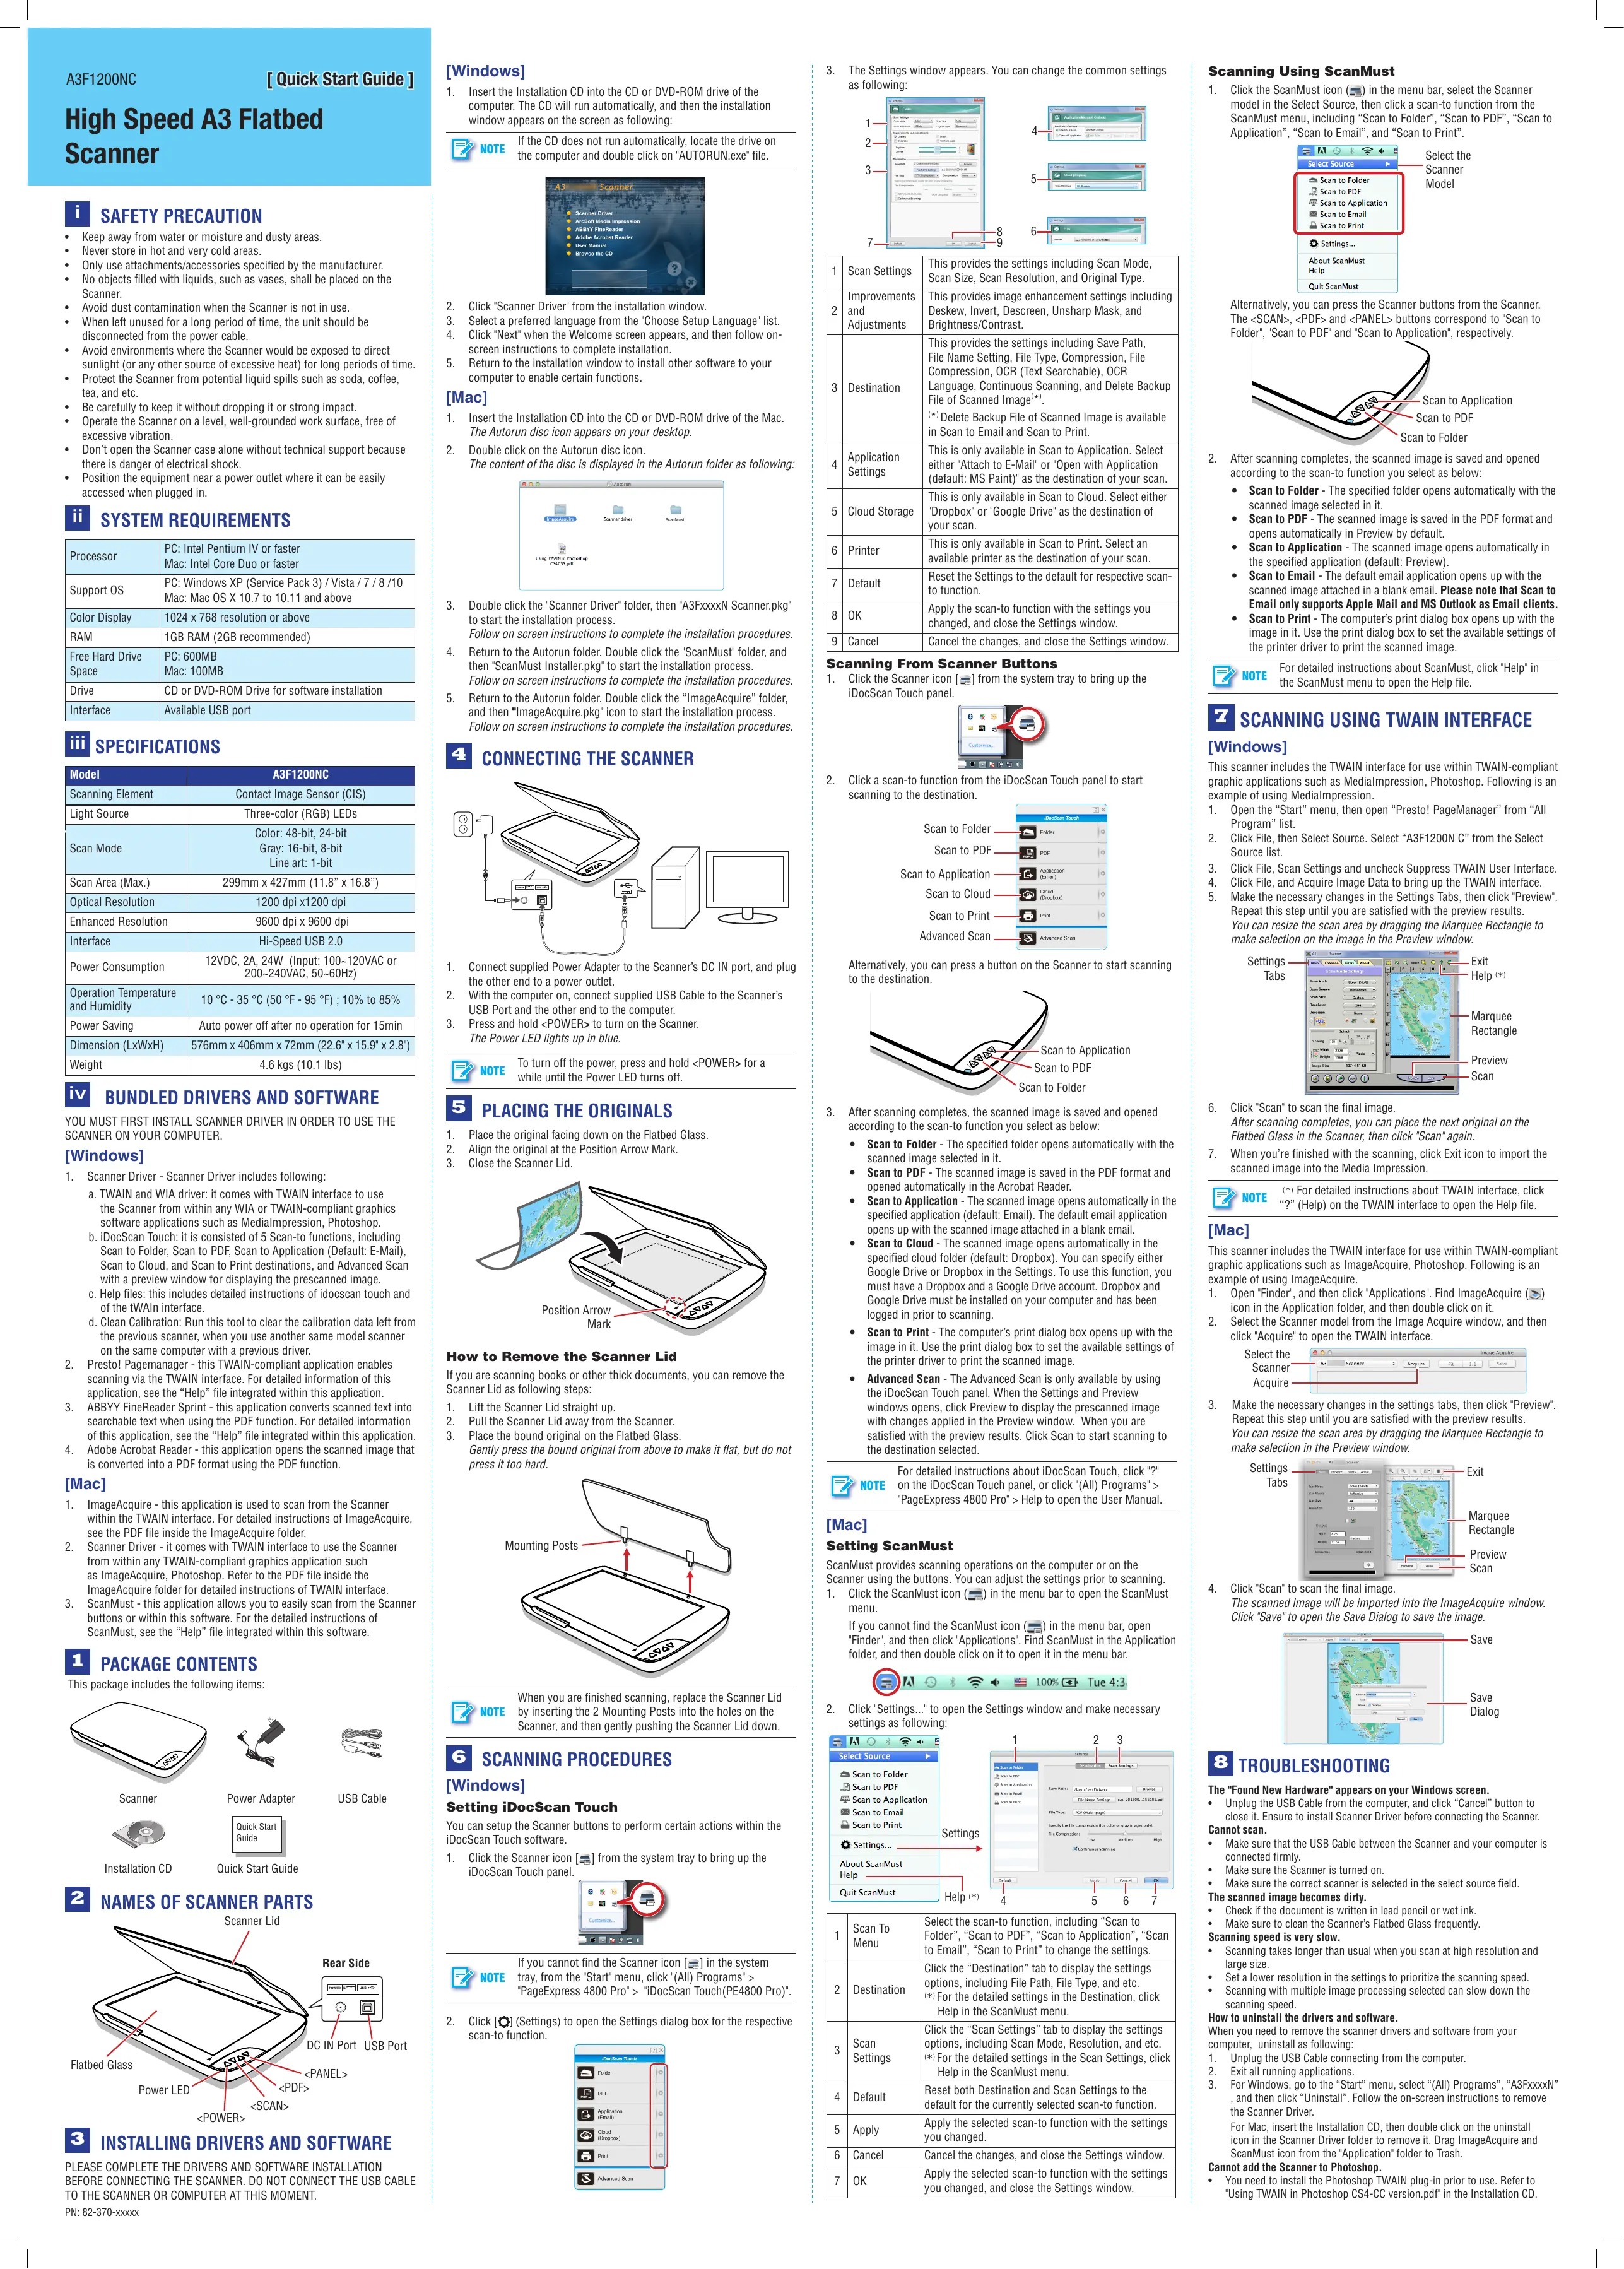
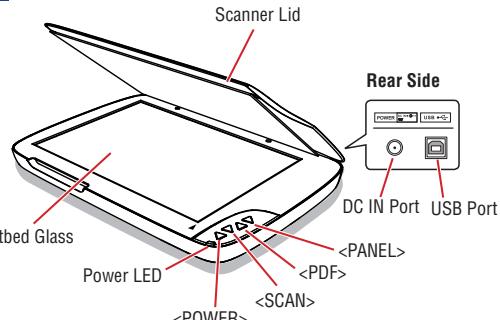
NAMES OF SCANNER PARTS

INSTALLING DRIVERS AND SOFTWARE
PLEASE COMPLETE THE DRIVERS AND SOFTWARE INSTALLATION BEFORE CONNECTING THE SCANNER. DO NOT CONNECT THE USB CABLE TO THE SCANNER OR COMPUTER AT THIS MOMENT.
PN:82-370-xxxxxx
[Windows]
- Insert the Installation CD into the CD or DVD-ROM drive of the computer. The CD will run automatically, and then the installation window appears on the screen as following:
![MUSTEK F1200N - [Windows] - 1](/content/2024/11/222894/images/84b38d1fb4c45df094cf2708bdba6ca2bbf32261859e827834c8b6faf8df374e.jpg)
If the CD does not run automatically, locate the drive on the computer and double click on "AUTORUN.exe" file.
![MUSTEK F1200N - [Windows] - 2](/content/2024/11/222894/images/ded8fa7f3db435d4ed281b965026668e84bc816ecb45caf7ee7dcf6906b50e03.jpg)
- Click "Scanner Driver" from the installation window.
- Select a preferred language from the "Choose Setup Language" list.
- Click "Next" when the Welcome screen appears, and then follow on screen instructions to complete installation.
- Return to the installation window to install other software to your computer to enable certain functions.
[Mac]
- Insert the Installation CD into the CD or DVD-ROM drive of the Mac. The Autorun disc icon appears on your desktop.
- Double click on the Autorun disc icon.
![MUSTEK F1200N - [Mac] - 1](/content/2024/11/222894/images/190211afb98bb64e23e526f61acd1c0d60b6068c8ad6a2efcdbb1659171f1c4b.jpg)
- Double click the "Scanner Driver" folder, then "A3FxxxxN Scanner.png" to start the installation process.
Follow on screen instructions to complete the installation procedures -
Return to the Autorun folder. Double click the "ScanMust" folder, and then "ScanMust Installer.pkg" to start the installation process. Follow on some instructions to complete the installation procedure
Follow on screen instructions to complete the installation procedures 5. Return to the Autoave folder Double click the "moveAssets" folder -
Return to the Autorun folder. Double click the "ImageAcquire" folder, and then "ImageAcquire.png" icon to start the installation process. Follow on screen instructions to complete the installation procedures.
![MUSTEK F1200N - [Mac] - 2](/content/2024/11/222894/images/5ef98df707c9fb86f36fe048c918cf0c98d001fcebe75a907251f0df58598bf3.jpg)
CONNECTING THE SCANNER
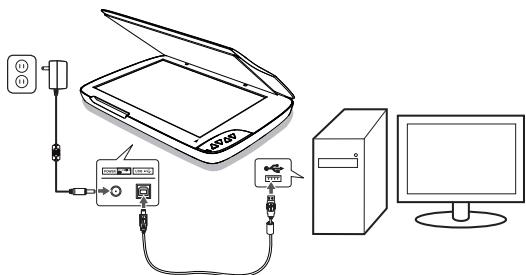
- Connect supplied Power Adapter to the Scanner's DC IN port, and plug the other end to a power outlet.
- With the computer on, connect supplied USB Cable to the Scanner's USB port and the device is connected to the
USB Port and the other end to the computer. 3. Press and holdto turn on the Scanner.
The Power LED lights up in blue.

NOTE To turn off the power, press and hold <POWER> for a while until the Power LED turns off.

PLACING THE ORIGINALS
- Place the original facing down on the Flatbed Glass.
-
Align the original at the Position Arrow Mark.
-
Close the Scanner Lid.

How to Remove the Scanner Lid
If you are scanning books or other thick documents, you can remove the Scanner Lid as following steps:
- Lift the Scanner Lid straight up
-
Pull the Scanner Lid away from the Scanner.
-
Place the bound original on the flatbed glass.
Gently press the bound original from above to make it flat, but do not press it too hard.
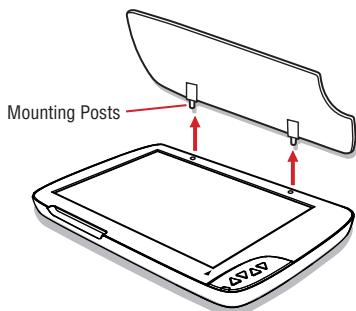

When you are finished scanning, replace the Scanner Lid by inserting the 2 Mounting Posts into the holes on the Scanner, and then gently pushing the Scanner Lid down.

SCANNING PROCEDURES
[Windows]
Setting iDocScan Touch
You can setup the Scanner buttons to perform certain actions within the iDocScan Touch software.
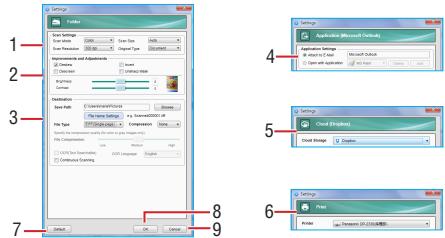
1. Click the Scanner icon [ ] from the system tray to bring up the iDocScan Touch panel.
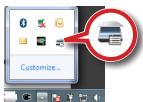

If you cannot find the Scanner icon [ ] in the system tray, from the Start menu, click (All) Programs > "Start From 1000 Pairs" "End From 5000 Pairs"
PageExpress 4800 Pro > "DocScan Touch(PE4800 Pro)
- Click [O] (Settings) to open the Settings dialog box for the respective scan-to function.
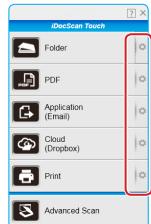
- The Settings window appears. You can change the common settings as following:
| 1 | Scan Settings | This provides the settings including Scan Mode, Scan Size, Scan Resolution, and Original Type. |
| 2 | Improvements and Adjustments | This provides image enhancement settings including Deskew, Invert, Descscreen, Unsharp Mask, and Brightness/Contrast. |
| 3 | Destination | This provides the settings including Save Path, File Name Setting, File Type, Compression, File Compression, OCR (Text Searchable), OCR Language, Continuous Scanning, and Delete Backup File of Scanned Image(*). (*) Delete Backup File of Scanned Image is available in Scan to Email and Scan to Print. |
| 4 | Application Settings | This is only available in Scan to Application. Select either "Attach to E-Mail" or "Open with Application (default: MS Paint)" as the destination of your scan. |
| 5 | Cloud Storage | This is only available in Scan to Cloud. Select either "Dropbox" or "Google Drive" as the destination of your scan. |
| 6 | Printer | This is only available in Scan to Print. Select an available printer as the destination of your scan. |
| 7 | Default | Reset the Settings to the default for respective scan-to function. |
| 8 | OK | Apply the scan-to function with the settings you changed, and close the Settings window. |
| 9 | Cancel | Cancel the changes, and close the Settings window. |
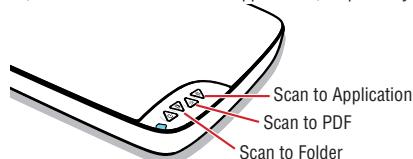
Scanning From Scanner Buttons
- Click the Scanner icon [ ] from the system tray to bring up the iDocScan Touch panel.
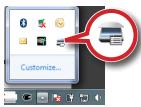
- Click a scan-to function from the iDocScan Touch panel to start scanning to the destination.
Alternatively, you can press a button on the Scanner to start scanning to the destination.
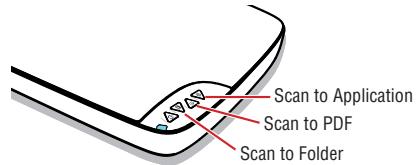
-
After scanning completes, the scanned image is saved and opened according to the scan-to function you select as below:
-
Scan to Folder - The specified folder opens automatically with the scanned image selected in it.
- Scan to PDF - The scanned image is saved in the PDF format and opened automatically in the Acrobat Reader.
- Scan to Application - The scanned image opens automatically in the specified application (default: Email). The default email application opens up with the scanned image attached in a blank email.
- Scan to Cloud - The scanned image opens automatically in the specified cloud folder (default: Dropbox). You can specify either Google Drive or Dropbox in the Settings. To use this function, you must have a Dropbox and a Google Drive account. Dropbox and Google Drive must be installed on your computer and has been logged in prior to scanning.
- Scan to Print - The computer's print dialog box opens up with the image in it. Use the print dialog box to set the available settings of the printer driver to print the scanned image.
- Advanced Scan - The Advanced Scan is only available by using the iDocScan Touch panel. When the Settings and Preview are changed, the Preview will show the new settings.
windows opens, click Preview to display the prescanned image with changes applied in the Preview window. When you are satisfied with the preview results. Click Scan to start scanning to the destination selected.

NOTE For detailed instructions about iDocScan Touch, click on the iDocScan Touch panel, or click "(All) Programs" > "PageExpress 4800 Pro" > Help to open the User Manual.
[Mac]
Setting ScanMust
ScanMust provides scanning operations on the computer or on the Scanner using the buttons. You can adjust the settings prior to scan
1. Click the ScanMust icon ( ) in the menu bar to open the ScanMust menu.
If you cannot find the ScanMust icon ( ) in the menu bar, open "Finder", and then click "Applications". Find ScanMust in the Application folder, and then double click on it to open it in the menu bar.

100% Tue 4:3
- Click "Settings..." to open the Settings window and make necessary settings as following:
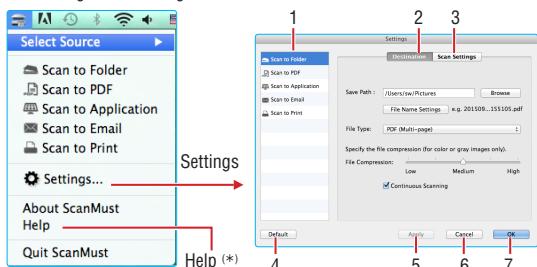
| 1 | Scan To Menu | Select the scan-to function, including “Scan to Folder”, “Scan to PDF”, “Scan to Application”, “Scan to Email”, “Scan to Print” to change the settings. |
| 2 | Destination | Click the “Destination” tab to display the settings options, including File Path, File Type, and etc. (*) For the detailed settings in the Destination, click Help in the ScanMust menu. |
| 3 | Scan Settings | Click the “Scan Settings” tab to display the settings options, including Scan Mode, Resolution, and etc. (*) For the detailed settings in the Scan Settings, click Help in the ScanMust menu. |
| 4 | Default | Reset both Destination and Scan Settings to the default for the currently selected scan-to function. |
| 5 | Apply | Apply the selected scan-to function with the settings you changed. |
| 6 | Cancel | Cancel the changes, and close the Settings window. |
| 7 | OK | Apply the selected scan-to function with the settings you changed, and close the Settings window. |
Scanning Using ScanMust
Click the ScanMust icon ( ) in the menu bar, select the Scanner model in the Select Source, then click a scan-to function from the ScanMust menu, including "Scan to Folder", "Scan to PDF", "Scan to Application", "Scan to Email", and "Scan to Print".

Alternatively, you can press the Scanner buttons from the Scanner. The
-
After scanning completes, the scanned image is saved and opened according to the scan-to function you select as below:
-
Scan to Folder - The specified folder opens automatically with the scanned image selected in it.
- Scan to PDF - The scanned image is saved in the PDF format and opens automatically in Preview by default.
- Scan to Application - The scanned image opens automatically in the specified application (default: Preview).
- Scan to Email - The default email application opens up with the scanned image attached in a blank email. Please note that Scan to
Email only supports Apple Mail and MS Outlook as Email clients - Scan to Print - The computer's print dialog box opens up with the image in it. Use the print dialog box to set the available settings of the printer driver to print the scanned image.

NOTE For detailed instructions about ScanMust, click "Help" in the ScanMust menu to open the Help file.

SCANNING USING TWAIN INTERFACE
[Windows]
This scanner includes the TWAIN interface for use within TWAIN-compliant graphic applications such as MedialImpression, Photoshop. Following is an example of using MedialImpression.
- Open the "Start" menu, then open "Presto! PageManager" from "All Program" list.
- Click File, then Select Source. Select "A3F1200N C" from the Select Source list
- Click File, Scan Settings and uncheck Suppress TWAIN User Interface.
- Click File, and Acquire Image Data to bring up the TWAIN interface.
- Make the necessary changes in the Settings Tabs, then click "Preview Repeat this step until you are satisfied with the preview results. You can resize the scan area by dragging the Marquee Rectangle to make selection on the image in the Preview window.
![MUSTEK F1200N - [Windows] - 1](/content/2024/11/222894/images/fe83dacc7c6b90cdd5fae169817edb45b7b815dbc4cedd780ba8f8b6e4102174.jpg)
- Click "Scan" to scan the final image.
After scanning completes, you can place the next original on the Flatbed Glass in the Scanner, then click "Scan" again. - When you're finished with the scanning, click Exit icon to import the scanned image into the Media Impression.
![MUSTEK F1200N - [Windows] - 2](/content/2024/11/222894/images/8d8afba4d0e7b8c48c3989a52b5241fe3235fcb5f4bfbe0df5dc76cb90a38621.jpg)
(*) For detailed instructions about TWAIN interface, click "?" (Help) on the TWAIN interface to open the Help file.
[Mac]
This scanner includes the TWAIN interface for use within TWAIN-compliant graphic applications such as ImageAcquire, Photoshop. Following is an example of using ImageAcquire.
- Open "Finder", and then click "Applications". Find ImageAcquire ( ) icon in the Application folder, and then double click on it.
- Select the Scanner model from the Image Acquire window, and then click "Acquire" to open the TWAIN interface.
![MUSTEK F1200N - [Mac] - 1](/content/2024/11/222894/images/7d7578e2d3cc11e0878269d56b68b285bac1c3b9d45b4800494300397e67bfb9.jpg)
- Make the necessary changes in the settings tabs, then click "Preview" Repeat this step until you are satisfied with the preview results. You can resize the scan area by dragging the Marquee Rectangle to make selection in the Preview window.
![MUSTEK F1200N - [Mac] - 2](/content/2024/11/222894/images/20329a8be5847b06f4932549e270be2e715f07e783737cebe732ecbcc9a1d896.jpg)
- Click "Scan" to scan the final image.
The scanned image will be imported into the ImageAcquire window. Click "Save" to open the Save Dialog to save the image.
![MUSTEK F1200N - [Mac] - 3](/content/2024/11/222894/images/f43e7c24a3e48b294f86716f936ec84e154d2dd65709843ebd861ef011a0714b.jpg)
![MUSTEK F1200N - [Mac] - 4](/content/2024/11/222894/images/fbb6a50bfd0081f0c076ca42ae4b8c909063cbecb03bfcd124fab4053eb5ad32.jpg)
TROUBLESHOOTING
The "Found New Hardware" appears on your Windows screen.
-
Unplug the USB Cable from the computer, and click "Cancel" button to close it. Ensure to install Scanner Driver before connecting the Scanner Cannot scan.
-
Make sure that the USB Cable between the Scanner and your computer is connected firmly.
Make sure the Scanner is turned on.
- Make sure the correct scanner is selected in the select source field. The scanned image becomes dirty.
The summed image becomes dirty. Check if the document is written in
- Check if the document is written in lead pen or wet ink.
-
Make sure to clean the Scanner's Flatbed Glass frequently. Scanning speed is very slow.
-
Scanning takes longer than usual when you scan at high resolution and large size.
-
Set a lower resolution in the settings to prioritize the scanning speed.
- Scanning with multiple image processing selected can slow down the scanning speed.
How to uninstall the drivers and software.
When you need to remove the scanner drivers and software from your computer, uninstall as following:
1. Unplug the USB Cable connecting from the computer.
2. Exit all running applications.
3. For Windows, go to the "Start" menu, select "All Programs", "A3FxxxxN", and then click "Uninstall". Follow the on-screen instructions to remove the Scanner Driver.
For Mac, insert the Installation CD, then double click on the uninstall icon in the Scanner Driver folder to remove it. Drag ImageAcquire as a user.
ScamWestIcon from the ApplicatiCant not add the Scanner to Photoshop.
You need to install the Photoshop TWAIN plug-in prior to use. Refer to Using TWAIN in Photoshop 64-CC version.pdf in the Installation CD.