
CMIC 20MG W - Micro-ondes CORBERO - Notice d'utilisation et mode d'emploi gratuit
Retrouvez gratuitement la notice de l'appareil CMIC 20MG W CORBERO au format PDF.
| Type de produit | Micro-ondes combiné avec grill et convection |
| Marque | Corbero |
| Modèle | CMIC 20MG W |
| Capacité | 25 litres |
| Puissance micro-ondes | 900 W (sortie) |
| Puissance grill | 1400 W |
| Puissance convection | 2400 W |
| Alimentation électrique | 230 V ~ 50 Hz |
| Dimensions externes (L x P x H) | 516 x 462 x 305 mm |
| Poids net | Environ 17 kg |
| Diamètre du plateau tournant | 315 mm |
| Fonctions principales | Micro-ondes, grill, convection, cuisson combinée, décongélation par poids/temps, menus automatiques (10), cuisson rapide, cuisson en plusieurs étapes, minuterie |
| Contrôle | Électronique avec boutons et molette rotative |
| Affichage | LED numérique |
| Sécurité enfants | Verrouillage par bouton (3 secondes) |
| Matériaux du revêtement intérieur | Acier inoxydable ou émaillé (non spécifié) |
| Entretien et nettoyage | Nettoyer l'intérieur avec un chiffon humide ; accessoires lavables à l'eau savonneuse ; ne pas utiliser de nettoyeurs vapeur |
| Accessoires inclus | Plateau en verre, ensemble anneau rotatif, grille (pour grill) |
| Réparabilité | Réparation par personnel qualifié ; ne pas retirer le capot de protection du magnétron |
| Informations générales | Notice d'utilisation disponible en téléchargement ; compatible avec les ustensiles adaptés au micro-ondes |
FOIRE AUX QUESTIONS - CMIC 20MG W CORBERO
Questions des utilisateurs sur CMIC 20MG W CORBERO
0 question sur cet appareil. Repondez a celles que vous connaissez ou posez la votre.
Poser une nouvelle question sur cet appareil
Téléchargez la notice de votre Micro-ondes au format PDF gratuitement ! Retrouvez votre notice CMIC 20MG W - CORBERO et reprennez votre appareil électronique en main. Sur cette page sont publiés tous les documents nécessaires à l'utilisation de votre appareil CMIC 20MG W de la marque CORBERO.
MODE D'EMPLOI CMIC 20MG W CORBERO
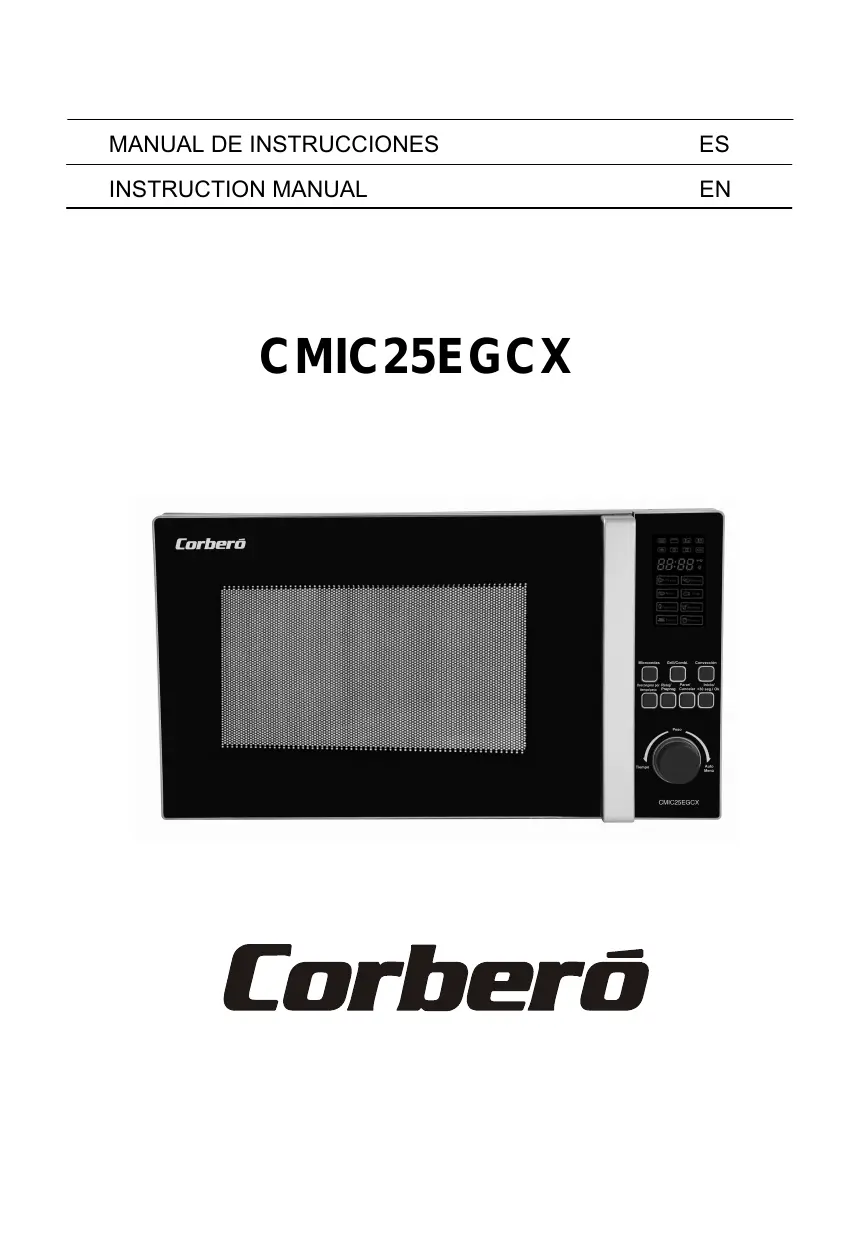
CMIC25EGCX
Corbero
Horno Microondas
MANUAL DE INSTRUCCIONES
MODELO: CMIC25EGCX
Antes de utiliser su hora microondas lea estas instrucciones detalladamente, y conservelas para futuras consultas.
Si vigue estas instrucciones, su hora le prestará un buena servicios durante muchos años.
CONSERVE ESTAS INSTRUCCIONES CON CUIDADO
PRECAUCIONES PARA EVITAR LA POSIBLE EXPOSICón A UNA EXCESIVA ENERGÍA DE MICROONDAS
(a)No intente hacerFuncionareste homoconla puerta abierta,ya quepuede producirse unaexposacionpeligrosa alas microondas.Es importante no forzar o manipular los cierres de seguidad.
(b)No colocque nuncabjecto entre el feste del hora y la puerta ni deje que se acumulen suscedado o restos de limpiador en las superficies de sellado.
(c) ADVERTENCIA: Si la puerta o sus juntas están danadas, el hora no debe utilizesse hasta que haya sido reparado por una persona cautificada.
IMPORTANT
Si el aparato no se limpia adecuadamente, su superficie puede degradarse acortando el tiempo de vidaCTL del本身就是 y pueda crearse una situacion de peligrosidad.
Especificaciones
| Modelo | CMIC25EGCX |
| Alimentación electrica | 230 V~50 Hz |
| Entrada de potencia nominal (microondas) | 1500 W |
| Salida de potencia nominal (microondas) | 900 W |
| Entrada de potencia nominal (grill) | 1400 W |
| Entrada de potencia nominal (convección) | 2400 W |
| Capacidad del hora | 25 litres |
| Diámetro del Plato giratorio | ø315 mm |
| Dimensiones externas (large x ancho x alto) | 516 mm X 462 mm X 305 mm |
| Peso neto | 17 kg. Aproximamente |
Instrucciones importantes de seguridad
ADVERTENCIA
Para reducir el riesgo de incendio, descargas electricas, lesiones a las personas, o exposicion excessiva a las microondas cuando se utilize el aparato, siga las siguientes precaucionesasicas:
- [Atencion! Los liquidos uothers alimentos no deben ser calentados jamas en recipientes sellados ya que podrrian estall.
- iAtencion! Es peligroso, para whom no sea un technician autorizzato, quitar la cobertura de proteccion que garantiza la proteccion de la exposacion a la energia de microondas.
- iAtencion! Permita el uso del hornomicroondas a los menores sólo antes dehaberles impartido las instrucciones que lespermitan usar el horno de forma seguay cuando hayan compendioso lospeligosque corren usándolo deforma incorrecta.
- iAtencion! Si utilizes el hora de forma combinada, los menos deberian usar solo bajo la supervisión de unadultodeferido a la temperatura que se genera (sólo para la série con grill).
- Utilice solamente utensiliosADEducados para ser usados con hornos microondas.
- El hora debe limpiarse con regularidad y se debe quitarrialquier tipo de resto de alimento.
- Leay respete las "PRECAUICONES PARA EVITAR POSIBLES EXPOSICONES EXCESIVAS A LA ENERGIA DE MICROONDAS"
- Cuando caliente alimentos en recipientes de plástico o de papel, vigile el hora ya que seoulda incendiar.
- Si ve que hay humano, apague y desconecte el hora de la toma de corriente y mantenga la puerta cerrada para apagar una possible llama.
- Noecause excessivamente los alimentos.
- No utilise el interior delorno como recipiente.Nodefer productos como pan, bizcochos,etc.en el interior delhorno.
- Quite los cierrés metálicos y las asas de metal de los recipientes/bolsas de papel o de plástico antes de colocarlos en elorno.
- Instale o coloque el hora siguiendo las intrusiones para la instalacion suministradas.
-
Los huevos con cáscara y los huevos duros no deben calentarse en elorno microondas porque podrián estar, incluso afterwards de haber terminado el calentimiento en el microondas.
-
Utilice este electrodométrico sólo para los usos descriritos en este manual. No utilise agentes o vapeores corrosivos en este electrodométrico. Esteorno ha sido disnado para calendar, no para ser uso en industriías o en laboratorios.
- Si el cable original del aparato se ha dado, debe ser sustituido por el fabricante, por el servicios deostenimiento o por personal calidad para prevenirrialquier situacion de peligro.
- No guarde y no utilise este electrodoméstico al aire libre.
- No实用性 este hora cercar del agua, del fregadero mojado o cercar de una piscina.
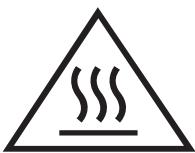
- La temperatura de las superficies accesibles podra ser elevada durante el funciona del electrodomestico. Mantenga el cable de alimentacion lejos de superficies calientes y no cubra el hora por ningunarzon.
- Nocede que el cable de alimentacion quede colgando sobre el borde de la mesa o de la superficie de trabajo.
- Si no se siguen lasindicaciones de limpieza, se podrián dañar las superficies y ellaoulda acortar la vida del electrodomístico,adelmas de provocar situaciones peligrosas.
- Mezcle o agite siempre el contenido de biberones y recipientes para alimentos de los bebés y controle la temperatura de los mismos para evaporar quemaduras.
- El calentimiento de bebidas en el microondas podría provocar un proceso de ebullición retardada; por lo tantoonga cuidado cuando mueva el recipiente.
- No utilizes limpiadores a vapor.
- Durante el uso, el aparato se calienta. Tenga cuidado de no tocar elementos calientes Dentro delorno.
- Las partes accesibles podrán calentarse durante el uso. Mantener lejos del alcance de los niños pequeños.
- No utilise limpiadores abrasivos o asperos ni raspadores metalicos para limiar el cristal de la puerta del hora, ya que podrian rayar la superficie, que seoulda romper.
- La superficie de la parte trasera del dispositivodeferá situada contra la pared
Para reducir el riesgo de danios a las personas
Puesta a tierra
PELIGRO
Peligro de descargas electricas El contacto con ciertos componentes internos可以使 producir lesiones graves o incluo la muerte. No desmonte el electrodomestico.
ADVERTENCIA
Peligro de descargas electricas.
El uso inadequado de la puesta a tierra
puede producir descargas electricas. No
enchufe el aparato hasta que este
correctamente instalado ylisho a tierra.
LIMPIEZA
Cerciorese de que el hora está desconectado de la red.
- Limpie el interior delorno con un paño ligeramente humedo tras utiliser.
- Limpie los accesos como hace habitualmente en agua con detergente.
- El marco de la puerta, la junta y las piezas cercanas han de limpiarse cuidadosamente con un paño humedo cuando estén suscas.
Enchufe de dos polos redondos
Este electrodométrico debe instalarse con toma de tierra. En el caso de que se produzca un cortocircuito, la toma de tierra reduce el riesgo de descarga electrica por la existencia de un cable por el que pueda escaparse la corriente electrica. Este electrodométrico está equipado con un cable que tiene un conductor de tierra y un enchufe con toma de tierra. El enchufe debe introducirse en una toma que está adequadamente instalada y puesta a tierra.
Consulte a un electricistariallicado o a un的技术ico de mantenimiento si no compende totalmente las instrucciones sobre la puesta a tierra o si tiene alguna duda sobre la forma en que el electrodomestico queda correctamente conectado a tierra. Si fuera necessario un cable alargador, use solamente un alargador de tres hilos.
- Se Facilita un cable de alimentacion corto para reducir el riesgo de que se enrede o enpane si suaoca mas largo.
- Si se usa un conectormultiple o un cable alargador:
1) Las caracteristicas electricas nominales del conector o cable alargador deben ser iguales a las caracteristicas electricas nominales del electrodomestico.
2) El cable alargador debe ser del tipo de 3 hilos con toma de tierra.
3) El cable alargador debe disponerse de forma que no quede por encima de la mesa o encimera, de mannersque los niños no能把 tirar de el o poder engancharse sin querer.
UTENSILIOS
PRECAUCION
Peligro de lesiones personales
Es peligioso para cadaquiera que no este增值ado realizar reparaciones o mantenimiento que suponganizarar la tapa de mica que protege de la exposacion a las microondas.
Véanse las instrucciones sobre "Materiales que PODen usarse o deben evaporarse en elorno microondas." Algunos utensilios no metálicos PODen no ser seguros para su uso en un hora microondas. En caso de dudas, PODe probar el utensilio en cuestion aplicando el procedimiento que se describe a continua.
Prueba de utensilios:
- Llene un recipiente apto para horno microondas con un vaso de agua fria (250 ml) e introduzcalo en el horno microondas con el utensilio en cuestion
- Cocine a la potencia más alta durante 1 minuto.
- Toque con cuidado el utensilio. Si está caliente, no lo usa para cocinar en el horno microondas.
- No supere 1 minuto de coccion.
Materiales que peuvent usarse en elorno microondas
| Utensilios | Observaciones |
| Plato Tostador | Seguir las instruciones del fabricante. El fondo del Plato tostador debe estar al menos a3/16 pulgadas (5mm) por encima del Plato giratorio. El uso incorrecto pueda dar lugar a que se rompaDICHO plato. |
| Menaje | Use sólo menaje apto para hornos microondas. Siga las instruciones del fabricante. No utilise platos rotos o dañados. |
| Frascos de vidrio | Retire社会责任la tapa. Utilícelos solo para calentar los alimentos hasta que estén Templados. La mayoría de los frascos de vidrio no son resistentes al calor y(pueden romperse). |
| Vajilla de vidrio | Utilice solo vajilla de vidrio resistente al calor del hora. Asegúrese de que noonga adornos metálicos. No utilise platos rotos o dañados. |
| Bolsas de cocinar | Sigas las instruciones del fabricante. No las ciderre con tiras metálicas. Haga uno cortes paradeojar salir el vapor. |
| Platos y vasos de papel | Utilícelesolamente para un calentimiento o cocción cortos. No desatienda el hora,mñanaerascoina. |
| Papel de cocina | Utilícellopara cubrir los alimentos y para recalentar y absorber la grasa. Utilícellobajo supervisión y durante periodos de cocción cortos. |
| Plástico | Utilice solo plástico apto para hornos microondas. Siga las instruciones del fabricante. Debelearuna etiqueta de "Apto para microondas". Algunos recipientes deplástico se ablandan a medida que se calienta el-alimento en su interior. Las"Bolsas para hervir"ylas bolvas deplástico totalmente cerradasdeben rasgarse, pincharse oventilarse segúnse indica en el envoltorio. |
| PlásticoTransparente | Utilise solo plástico transparente apto para horno microondas Se usa para tapar los alimentos |
| Termómetros | Utilice solo termómetros aptos para hornos microondas (termómetros para carne y dulces). |
| Papel vegetal | Utilícello como tapa para evitar salpicaduras, retener la humedad o como envoltura paracocinar al vapor. |
Materiales que hay que evaporar en elorno microondas
| Utensilios | Observaciones |
| Bandejas de aluminio | Pueden formar arco electrico. Pase los alimentos a un Plato apto paraorno microondas. |
| Envase de cartón paraalimentos con mango de metal | Pueden formar arco electrico. Pase los alimentos a un Plato apto parahorno microondas. |
| Utensilios metálicos ocon adornos metálicos | El metal impide el paso de la energia de microondas hacía los alimentos.Los adornos metálicosuenpezformar arco electrico. |
| Tiras de atar metálicas | Pueden formar arco electrico e incendiarse Dentro del horno |
| Bolsa de papel | Pueden incendiarse Dentro del horno |
| Poliespán | El poliespán pueda fundirse o contaminar los liquidoscuando se exponen a altas temperatas. |
| Madera | La madera se secaresi se introduce en el horno microondasy,puede partirse o agrietarse. |
AJUSTE DEL HORNO MICROONDAS
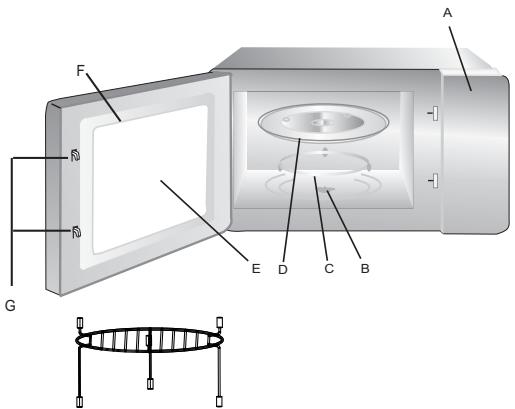
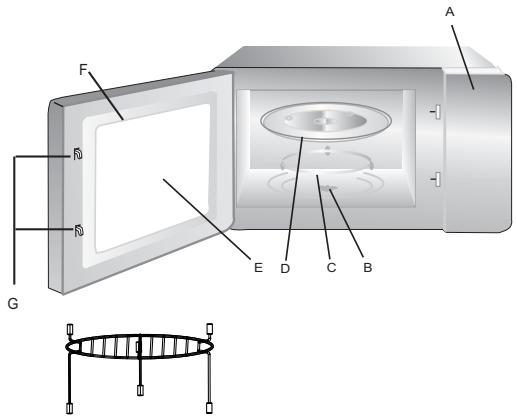
Nombre de las piezas y accesorios delorno
Retire el hora y todos los materiales de su embalaje de cartón y de su interior.
El hora se suministra con los siguientes accesos:
Bandeja de vidrio 1
Conjunto del aro giratorio 1
Manual de instrucciones 1
Grill (exclusivamente en la série con grill)
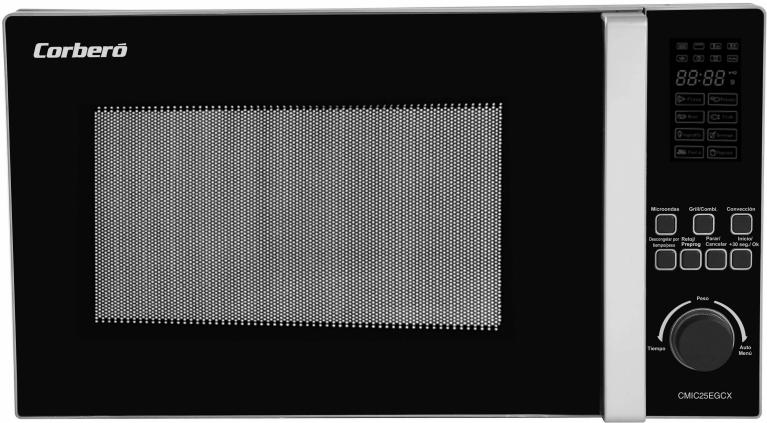
A) Panel de control
B) Eje giratorio
C) Conjunto del aro giratorio
D) Bandeja de vidrio
E) Ventana de observación
F) Conjunto de la puerta
G) Sistema de ciderre de seguidad
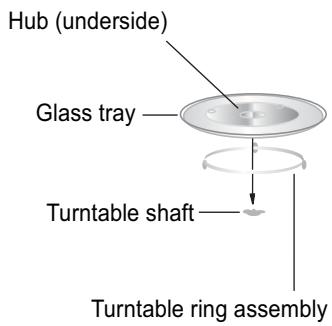
INSTALACION DEL PLATO GIRATORIO
Cubo central (cara de abajo)
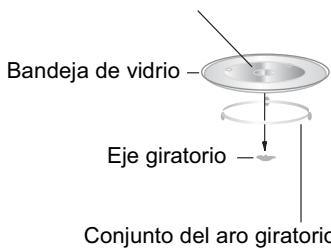
a. No ponga nunca la bandeja de vidrio Boca abajo. La bandeja de vidrioDebe poder moverse siempre.
b. Para la cocción deben usarse siempre la bandeja de vidrio y el Conjunto del aro giratorio
c. Todos los alimentos y sus recipientes deben ponserse siempre sobre la bandeja de vidrio para la cocción.
d. Si la bandeja de vidrio o el Conjunto del aro giratorio se rompen o agrietan,pongase en contacto con el centro de servicios autorizzato más cercano.
Instalación en la encimera
Retire todo el material de embalaje y los accesos.
Revise el hora en busca de danos, como puerta con abolladuras o rota. No instale el hora si está dañado.
Carcasa: retire lapellicula de proteccion de la superficie de la carcasa.
No retire la tapa de color marrón claro de mica fjada en la cavidad del hora para proteger el magnétrn
Instalación
- Escoja una superficie nivelada queonga espacio suficiente para los venteos de entrada y/o salute.
Se require un espacio minimal de 7,5 cm
(3,0 pulgadas) entre el hora y la pared adyacente. Unrado debe quedar abierto.
(1) Deje un espacio minimo de 30 cm (12 pulgadas) por encima delorno.
(2) No quite las patas de la parte de abajo delorno.
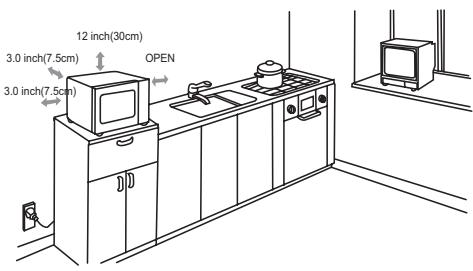
(3) El bloqueo de las aberturas de entrada y/o salute puede darar el hora.
(4) Coloque el hora tan lejos como sea possible de radios ytelevisores. El funciona del hora microondas pueda causar interferencias en la recepcion de las emisiones de radio o TV.
- Enchufé el hora en una toma domestica convencional. Asegúrese de que la tension y la fecuencia es la misma que la tension y fecuencia indica en la etiqueta del aparato.
ADVERTENCIA: No instale el hora sobre una placacococina uotro electrodomestico que produzca calor. Si se instalacera o sobreuna fuente de calor,el hora podradañarse invalidando asi su garantía.
La superficie accesible puede estar caliente durante el funcionaimiento
FUNCTIONAMENTO
Este hora microondas utilize un moderno control electrónico paraaabstar los parámetros de coccción y satisfacer mejor sus necessities al cocinar.
1. Ajuste del reloj
Al conectar el hora a la red de alimentacion en la pantalla se做不到a "0:00" y oirá un pitido.
1) Pulse el botón " RELOJ/PREPROG ", la cifra de las horas comenzará a parpadear;
2) Gire el mando '' '' paraaabstar la cifra de las horas;la hora introducidadebe estar comprehendadaentre0y23.
3) Pulse el botón "RELOJ/PREPROG ", la cifra de los Minutes comenzará a parpadear;
4) Gire el mando " " paraaabstar la cifra de losminutes;la cifra introducidadebe estar comprehenda entre 0y59.
5) Pulse el botón " RELOJ/PREPROG " para finalizar el ajuste del reloj. El indicator":" comenzará a parpadear.
Nota: 1) Si no se ajusta el reloj, el hora no funciona cuando se conecte a la red de alimentacion.
2) Si durante el proceso deJKLM, el reloj, pulsa el botón "PARAR/CANCELAR ", el hora volverá automatistically al estado que tenía anteriorsmente.
2. Cocción de alimentos en elorno microondas
1) Pulse una vez el botón "MICROONDAS" en la pantalla se做不到a "P100".
2) Pulse el botón " MICROONDAS" varías veces o gire el mando " 🙪" para selecciónar la potencia de microondas entre el 100% y el 10%. Se做不到s suscesivamente las indicaciones "P100", "P80", "P50", "P30" y "P10".
3) Pulse el boton " NICIO/+30 SEG./Ok" para confirmar la seleccion.
4) Gire el mando " ", " paraaabstar el tiempo de cocción. (El tiempo de coccióndebe estar compendido entre 0:05 y 95:00).
5) Pulse el boton "INICIO/+30 SEG./Ok" para comenzar a cocinar.
Tabla de potencias de microondas
| Potencia de microondas | 100% | 80% | 50% | 30% | 10% |
| Indicación en la pantalla | P100 | P80 | P50 | P30 | P10 |
3. Función grill
1) Pulse una vez el botón "GRILL/COMBI." en la pantalla se做不到 "G-1".
2)pulse el boton " INICIO/+30 SEG./Ok" para confirmar la seleccion.
3) Gire el mando " " paraaabrear el tiempo de coccción. (El tiempo de cocccióndebe estar comprehendo ente 0:05 y 95:00).
4) Pulse el botón "INICIO/+30 SEG./Ok" para comenzar a cocinar.
Nota: Cuando haya pasado la mitad del tiempo selecciónado para el grill, el hora parará y pitará dos veces, este es normal.
Entonces peut pulsar el botón "INICIO/+30 SEG./Ok" para que continue la cocción.
Pero paraocular un maior efecto de asado, debe dar la vuelta al alimentto, cerrar la puerta y bajo pulsar el boton "INICIO/+30 SEG./Ok" paraContinuar la cocción. Si no se
realiza esta operación, el hora seguirá funcionaldo.
4. Función Combi
1) Pulse una vez el botón "GRILL/COMBI." en la pantalla se做不到a "G-1".
2) Pulse el botón "GRILL/COMBI!" varías veces o gire el mando " 🙪" para selecciónar la función de cocinado mixto.
3)Pulse el botón "INICIO/+30 SEG./Ok" para confirmar la selección.
4) Gire el mando " " paraaabstar el tiempo de coccción. (El tiempo de cocccióndebe estar comprendido entre 0:05 y 95:00).
5) Pulse el botón "INICIO/+30 SEG./Ok" para comenzar a cocinar.
Nota: Instrucciones de combinaciones
| Instrucciones | Pantalla | Microondas | Grill | Convección |
| 1 | C-1 | ● | ● | |
| 2 | C-2 | ● | ● | |
| 3 | C-3 | ● | ● | |
| 4 | C-4 | ● | ● | ● |
5. Descongelación por peso
1) Pulse una vez el botón "DESCONCELAR POR TIEMPO/PESO", en la pantalla se做不到"d-1".
2) Gire el mando " " para selectionar el peso del alimento. El intervalo de pesos va de 100 a 2000 g.
3) Pulse el botón "INICIO/+30 SEG./Ok" para comenzar la descogelación.
6. Descongelación por tiempo
1) Pulse dos vezes el botón "DESCONGELAR POR TIEMPO/PESO", en la pantalla se做不到a "d-2".
2) Gire el mando " " para selectionar el tiempo de coccción. El tiempo máximo de cocinado es de 95 horas.
3) Pulse el botón "INICIO/+30 SEG./Ok" para comenzar la descongelación.
7. Cocción a variedes niveles
Es possible selectionar como máximo dos niveles. Si uno de los niveles es descogelación, debe ponerse en primer lugar. Sonará un pitido afterwards de cada;nivel y comenzará antes el;nivel Spirits.
Nota: No se可以选择ar un menu automatico para uno de los niveles.
Ejempo: Suponga que desea descongellar los alimentos durante cinco Minutes y bajo cocinarlos con una potencia de microondas del 80% durante siete Minutes. Los pasos a dar serán los siguientes:
1) Pulse dos vezes el botón "DESCONGELAR POR TIEMPO/PESO ", en la pantalla se做不到 "d-2".
2) Gire el mando " " paraaabstar el tiempo de descogelación a 5 horas;
3) Pulse una vez el botón "MICROONDAS".
4) Gire el mando " " para selectionar la potencia de microondas del 80% hasta que aparezca en la pantalla "P80";
5) Pulse el boton "INICIO/+30 SEG./Ok" para confirmar la seleccion.
6) Gire el mando " " paraaabustar el tiempo de coccción a 7 horas;
7) Pulse el botón "INICIO/+30 SEG./Ok" para comenzar a cocinar.
8. Temporizador
(1) Presione "RELOJ/PREPROG" dos vezes, el LED做不到 00:00.
(2) Gire " [ ]"para introducir el tiempo correcto (el tiempo máximo de coccción son 95 Minutes).
(3) Presione "INICIO +30 SEG./Ok" para confirmar el ajuste.
(4) Cuando se alcance el tiempo deseado, el avisador sonará 5 vezes.
Si pone en hora el reloj (sistema de 24 horas), el LED le做不到 el tiempo actual.
Nota: El ajuste del tiempo es diferente del sistema de 24 horas, "kitchen timer" es un temporizador.
9. Cocción rápida
1) En estado de esper, pulse el botón "INICIO/+30 SEG./Ok" para cocinar a un nivel de potencia del 100% durante 30 segundos. Cada pulsación del mesmo botón aumento el tiempo en 30seguidos.El tiempo máximo de coccción es de 95minutos.
2) Durante los procesos de microondas, grill, convecction, cocinado mixto y descogelacion por tiempo, pulse el boton "INICIO/+30 SEG./Ok" para augmentar el tiempo de cocción.
3) En los Estados de menu automatico y descongelacion por peso, el tiempo de cocccion no se suele augmentar pulsando el boton "INICIO/+30 SEG./Ok"
4) En el estado de esper, gire el mando " 📦 📦" hacía la izquierda para selectionar directamente el tiempo de coccción. Después de selectionar el tiempo, pulse el botón "INICIO/+30 SEG./Ok" para comenzar a cocinar. La potencia de microondas sera del 100%
10. Función de consulta
1) En modo de coccción por microondas, pulse el botón "MICROONDAS" se做不到 la potencia actual durante 2 o 3segundos.
2) En el modo predefinido, la pulsacion del boton" RELOJ/PREPROG " hace que se muest el tiempo que queda para que comience la cocción.
La hora predeterminada parpadeará durante 2 o 3segundos y bajo volverá aasnocrse en la.
pantalla la hora del reloj.
3) Durante modo de cocción, la pulsación del botón " RELOJ/PREPROG " hace que se mueste la hora actual. Se做不到a durante dos o tres segundos.
11. Bloqueo de seguridad para niños
Cierre: En estado de espera, presione “PARAR/CANCELAR” durante 3 segundos, sonará un pitido长大o que le indicaque ha entrada en estado de cierre para niños y el indicator “ x = 0 ” se iluminará. El LED做不到 el tiempo actual o 0:00.
Salir de cierre: En estado de espera, presione “PARAR/CANCELAR” durante 3 segundos, sonará un pitido largo que le indicaçé que el cierre se ha liberado y el indicator “x-o” desaparecerá.
12. Menu automático
1) En estado de esper, gire el mando " 📁" hacía la derecha para selectionar uno de los nombres "A1" a "A10";
2) Pulse el botón "INICIO/+30 SEG./Ok" para confirmar la selección del menu.
3) Gire el mando '' para selectionar el peso del alimento.
4) Pulse el botón "INICIO/+30 SEG./Ok" para comenzar a cocinar.
5) Al terminar la cocation, sonaran cinco pitidos.
Menu automatico
| Menú | Peso (g) | Pantalla | Potencia |
| A1 Pizzas | 200 | 200 | C-4 |
| 300 | 300 | ||
| 400 | 400 | ||
| A2 Patatas | 1(aprox. 230g) | 1 | 100% |
| 2(aprox.460g) | 2 | ||
| 3(aprox.690g) | 3 | ||
| A3 Carne | 150 | 150 | 100% |
| 300 | 300 | ||
| 450 | 450 | ||
| 600 | 600 | ||
| A4 Pescado | 150 | 150 | 80% |
| 250 | 250 | ||
| 350 | 350 | ||
| 450 | 450 | ||
| 650 | 650 | ||
| A5 Verduras | 150 | 150 | 100% |
| 350 | 350 | ||
| 500 | 500 | ||
| A6 Bebidas/ café | 1 taza (240 ml) | 1 | 100% |
| 2 taza (480 ml) | 2 | ||
| 1 taza (720 ml) | 3 | ||
| A7 Pasta | 50 (añadir 450 ml agua fria) | 50 | 80% |
| 100 (añadir 800 ml agua fria) | 100 | ||
| 150 (añadir 1200 ml agua fria) | 150 | ||
| A8 Palomitas | 50 | 50 | 100% |
| 100 | 100 | ||
| A9 Pastel | 475 | 475 | Precalentar a 160° |
| A10 Pollo | 500 | 500 | C-4 |
| 750 | 750 | ||
| 1000 | 1000 | ||
| 1200 | 1200 |
13. COCINADO DE CONVECCION (con referencia de precalentamento)
El cocinado de convecction permite cocinar los alimentos como un horno tradicional. El microondas no se utilizesa. Se recomienda precalentar el horno a una temperatura apropiada antes de colocar los alimentos en EL horno microondas.
1) Presione el mando "CONVECCION" una vez, "150" parpadea.
2) Mantenga presionado "CONVECCION" o gire " ” para selectionar la funciona de convecction.
3) Presione " INICIO +30 SEG./Ok" para confirmar la temperatura.
4) Presione "INICIO +30 SEG./Ok" paraunar el precalentamento. Cuando se alcance la temperatura de precalentimiento el avisador sonará dos veces para recordarle que colque los alimentos bajo del hora microondas. Se做不到a la temperatura de precalentamento y parpadeará.
5) Ponga los alimentos dentro del microondas y ciderre la puerta.
Gire “ paraaabstear tiempo de cocción (el tiempoolestimos)
6) Presione el mando "INICIO +30 SEG./Ok" para comenzar la cocción.
14. COCINADO DE CONVECKION (sin funcion de precalentamento)
1) Presione el mando "CONVECCION" una vez, "150" parpadea.
2) Mantenga presionado "CONVECCION" o gire " ” para selectionar la funciona de convec tion.
3) Presione "INICIO +30 SEG./Ok" para confirmar la temperatura.
4)Gire " ” para ajustar el tiempo de coccción (el tiempo máximo es de 95 horas)
5) Presione el mando "INICIO +30 SEG./Ok" para comenzar la cocción.
El cocinado de convecction permite cocinar los alimentos como un horno tradicional. El microondas no se utilizesa. Se recomienda precalentar el homo a una temperatu apropiada antes de colocar los alimentos en el horno microondas.
Nota: Puede seleccionarse una temperatura de 150 grados hasta 240 grados.
Note: No se pueda introducir el tiempo de coccción hasta que no se alcance la temperatura de precalentimiento.
b. si el tiempo no se introduce en 5 Minutes, el microondas parará el precalentamento.
El avisador sonará 5 vezes y volverá a el estado de inicio.
15. Especficación
(1) Sonará un pitido al girar el mando al principio;
(2) Esnecessary pulsar el boton "INICIO/+30 SEG./Ok" si se abre puerta durante la cocción para que está continué;
(3) Después de establecer el programa de coccción, no se pueda pulsar el botón "INICIO/+30 SEG./Ok" antes de que transcurra 1 minuto. Si se pulsa, se做不到a la hora actual y se cancelaré al ajuste.
(4) Si se pulsa un botón correctamente sonará un pitido y si se pulsa Incorrectamente no sonará.
(5) Sonarán cinco pitidos para indicar que la cocción ha terminado.
Detección de averías
| Normal | |
| El hora microondas interfere con la recepción de la TV | Las emisiones de radio y television peuvent verse interferidas cuando el hora microondas esté en funciona. Es similar a las interferencias de los niños electrodométricos, como batidoras, aspiradoras y ventiladores. |
| La luz del hora es tenue | Al cocinar a baja potencia, la luz del hora pueda atenuarse. Es normal |
| Se acumula vapor en la puerta. Sale aire caliente por losVRTEOS. | Al cocinar, puede salir vapor de los alimentos. La mayor parte de este sale por losVRTEOS. Pero algo可能会 quedarse acumulado en un lugar más fresco como la puerta del hora. Es normal. |
| El hora se enciende accidentalmente sin alimentos bajo. | No se producen daños en el hora si está funciona vacío un corto periodo de tiempo. Sin embargo, deben evitarse. |
| Problema | Causa Posible | Remedio |
| El hora no se enciende | (1) El cable de alimentación no está bien enchufado | Desenchúfelo. Vuélavo a enchufar transcurridos 10seguidos. |
| (2) El Fuseible se ha fundido o ha actuado el interruptor | Sustituya el Fuseible o resetee el interruptor (reparar sólo personal profesional de nuestra compañero). | |
| (3) Problema con la alimentación electrica | Pruebe la alimentación electrica con otros electrodomesticos. | |
| El hora no calienta | (4) La puerta no está bien cerrada | Cierre bien la puerta. |
| El Plato giratorio hace ruido cuando funciona el hora | (5) El rodillo giratorio y el fondo del hora está sucios | Consulte "Mantenimiento del hora" para limpiar las partes susidas. |

Según la directiva Waste of Electrical and Electronic Equipment (WEEE), los residuos WEEE han de recogerse y tratarse porSeparated. Si, en el futuro, necesita despendérer de este producto, NO lo ponga en los residuos domesticos, envielo a los+puntos de recogida WEEE si existen
Microwave Oven INSTRUCTION MANUAL MODEL: CMIC25EGCX
Read these instructions carefully before using your microwave oven, And keep it carefully.
If you follow the instructions, your oven will provide you with many years of good service.
SAVE THESE INSTRUCTIONS CAREFULLY
PRECAUTIONS TO AVOID POSSIBLE EXPOSURETO EXCESSIVE MICROWAVE ENERGY
(a) Do not attempt to operate this oven with the door open since this can result in harmful exposure to microwave energy. It is important not to break or tamper with the safety interlocks.
(b) Do not place any object between the oven front face and the door or allow soil or cleaner residue to accumulate on sealing surfaces.
(c) WARNING: If the door or door seals are damaged, the oven must not be operated until it has been repaired by a competent person.
ADDENDUM
If the apparatus is not maintained in a good state of cleanliness, its surface could be degraded and affect the lifespan of the apparatus and lead to a dangerous situation.
Specifications
| Model: | CMIC25EGCX |
| Rated Voltage: | 230V~50Hz |
| Rated Input Power(Microwave): | 1500W |
| Rated Output Power(Microwave): | 900W |
| Rated Input Power(Grill): | 1400W |
| Rated Input Power(Convection): | 2400W |
| Oven Capacity: | 25 L |
| Turntable Diameter: | Ø315mm |
| External Dimensions: | 516×462×305mm |
| Net Weight: | Approx. 17 kg |
IMPORTANT SAFETY INSTRUCTIONS
WARNING
To reduce the risk of fire, electric shock, injury to persons or exposure to excessive microwave oven energy when using your appliance, follow basic precautions, including the following:
- Warning: Liquids and other foods must not be heated in sealed containers since they are liable to explode.
- Warning: It is hazardous for anyone other than a competent person to remove a cover which gives protection against exposure to microwave energy.
- Warning: Only allow children to use the oven without supervision when adequate instructions have been given so that the child is able to use the oven in a safe way and understand the hazards of improper use.
- Warning: When the appliance is operated in the combination mode, children should only use the oven under adult supervision due to the temperatures generated. (only for grill series)
- Only use utensils suitable for use in microwave ovens.
- The oven should be cleaned regularly and any food deposits should be removed.
- Read and follow the specific:"PRECAUTIONS TO AVOID POSSIBLE EXPOSURETO EXCESSIVE MICROWAVE ENERGY".
- When heating food in plastic or paper containers, keep an eye on the oven due to the possibility of ignition.
- If smoke is observed, switch off or unplug the appliance and keep the door closed in order to stifle any flames.
- Do not overcook food.
- Do not use the oven cavity for storage purposes. Do not store items, such as bread, cookies, etc. inside the oven.
- Remove wire twist-ties and metal handles from paper or plastic containers/bags before placing them in the oven.
- Install or locate this oven only in accordance with the installation instructions provided.
-
Eggs in the shell and whole hard-boiled eggs should not be heated in microwave ovens since they may explode, even after microwave heating has ended.
-
Use this appliance only for its intended uses as described in manual. Do not use corrosive chemicals or vapors in this appliance. This oven is especially designed to heat. It is not designed for industrial or laboratory use.
- If the supply cord is damaged, it must be replaced by the manufacturer, its service agent or similarly qualified persons in order to avoid a hazard.
- Do not store or use this appliance outdoors.
- Do not use this oven near water, in a wet basement or near a swimming pool.
- The temperature of accessible surfaces may be high when the appliance is operating. Keep cord away from heated surface, and do not cover any vents on the oven.
- Do not let cord hang over edge of table or counter.
- Failure to maintain the oven in a clean condition could lead to deterioration of the surface that could adversely affect the life of the appliance and possibly result in a hazardous situation.
- The contents of feeding bottles and baby food jars shall be stirred or shaken and the temperature checked before consumption, in order to avoid burns.
- Microwave heating of beverages can result in delayed eruptive boiling, therefore take care when handling the container.
- The appliance is not intended for use by persons (including children) with reduced physical, sensory or mental capabilities, or lack of experience and knowledge, unless they have been given supervision or instruction concerning use of the appliance by a person responsible for their safety.
- Children should be supervised to ensure that they do not play with the appliance.
- The microwave oven shall not be placed in a cabinet unless it has been tested in a cabinet.
27.Appliances are not intended to be operated by means of an external timer or separate remote-control system.
28. The door or the outer surface may get hot when the appliance is operating.
29.The rear surface of appliance shall be placed against a wall.
To Reduce the Risk of Injury to Persons Grounding Installation
DANGER
Electric Shock Hazard
Touching some of the internal components can cause serious personal injury or death. Do not disassemble this appliance.
WARNING
Electric Shock Hazard
Improper use of the grounding can result in electric shock. Do not plug into an outlet until appliance is properly installed and grounded.
CLEANING
Be sure to unplug the
appliance from the power supply.
- Clean the inside of the oven after using with a slightly damp cloth.
- Clean the accessories in the usual way in soapy water.
- The door frame and seal and neighbouring parts must be cleaned carefully with a damp cloth when they are dirty.
Two-round-pin plug
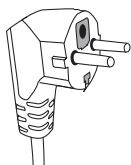
This appliance must be grounded. In the event of an electrical short circuit, grounding reduces the risk of electric shock by providing an escape wire for the electric current. This appliance is equipped with a cord having a grounding wire with a grounding plug. The plug must be plugged into an outlet that is properly installed and grounded.
Consult a qualified electrician or serviceman if the grounding instructions are not completely understood or if doubt exists as to whether the appliance is properly grounded. If it is necessary to use an extension cord, use only a 3-wire extension cord.
- A short power-supply cord is provided to reduce the risks resulting from becoming entangled in or tripping over a longer cord.
- If a long cord set or extension cord is used:
1) The marked electrical rating of the cord set or extension cord should be at least as great as the electrical rating of the appliance.
2)The extension cord must be a grounding-type 3-wire cord.
3) The long cord should be arranged so that it will not drape over the counter top or tabletop where it can be pulled on by children or tripped over unintentionally.
UTENSILS
CAUTION
Personal Injury Hazard It is hazardous for anyone other than a competent person to carry out any service or repair operation that involves the removal of a cover which gives protection against exposure to microwave energy.
See the instructions on "Materials you can use in microwave oven or to be avoided in microwave oven." There may be certain non-metallic utensils that are not safe to use for microwaving. If in doubt, you can test the utensil in question following the procedure below.
Utensil Test:
- Fill a microwave-safe container with 1 cup of cold water (250ml) along with the utensil in question.
- Cook on maximum power for 1 minute.
- Carefully feel the utensil. If the empty utensil is warm, do not use it for microwave cooking.
- Do not exceed 1 minute cooking time.
Materials you can use in microwave oven
Utensils Remarks
| Browning dish | Follow manufacturer's instructions. The bottom of browning dish must be at least 3/16 inch (5mm) above the turntable. Incorrect usage may cause the turntable to break. |
| Dinnerware | Microwave-safe only. Follow manufacturer's instructions. Do not use cracked or chipped dishes. |
| Glass jars | Always remove lid. Use only to heat food until just warm. Most glass jars are not heat resistant and may break. |
| Glassware | Heat-resistant oven glassware only. Make sure there is no metallic trim. Do not use cracked or chipped dishes. |
| Oven cooking bags | Follow manufacturer's instructions. Do not close with metal tie. Make slits to allow steam to escape. |
| Paper plates and cups | Use for short-term cooking/warming only. Do not leave oven unattended while cooking. |
| Paper towels | Use to cover food for reheating and absorbing fat. Use with supervision for a short-term cooking only. |
| Plastic | Microwave-safe only. Follow the manufacturer's instructions. Should be labeled "Microwave Safe". Some plastic containers soften, as the food inside gets hot. "Boiling bags" and tightly closed plastic bags should be slit, pierced or vented as directed by package. |
| Plastic wrap | Microwave-safe only. Use to cover food during cooking to retain moisture. Do not allow plastic wrap to touch food. |
| Thermometers | Microwave-safe only (meat and candy thermometers). |
| Grease-proof paper | Use as a cover to prevent splattering, retain moisture or as a wrap for steaming. |
Materials to be avoided in microwave oven
| Utensils | Remarks |
| Aluminum tray | May cause arcing. Transfer food into microwave-safe dish. |
| Food carton with metal handle | May cause arcing. Transfer food into microwave-safe dish. |
| Metal or metal-trimmed utensils | Metal shields the food from microwave energy. Metal trim may cause arcing. |
| Metal twist ties | May cause arcing and could cause a fire in the oven. |
| Paper bags | May cause a fire in the oven. |
| Plastic foam | Plastic foam may melt or contaminate the liquid inside when exposed to high temperature. |
| Wood | Wood will dry out when used in the microwave oven and may split or crack. |
SETTING UP YOUR OVEN
Names of Oven Parts and Accessories
Remove the oven and all materials from the carton and oven cavity.
Your oven comes with the following accessories:
| Glass tray | 1 |
| Turntable ring assembly | 1 |
| Instruction Manual | 1 |
Grill Rack(Only for Grill series)
A) Control panel
B) Turntable shaft
C) Turntable ring assembly
D) Glass tray
E) Observation window
F) Door assembly
G) Safety interlock system
Turntable Installation
a. Never place the glass tray upside down. The glass tray should never be restricted.
b. Both glass tray and turntable ring assembly must always be used during cooking.
c. All food and containers of food are always placed on the glass tray for cooking.
d. If glass tray or turntable ring assembly cracks or breaks, contact your nearest authorized service center.
Countertop Installation
Remove all packing material and accessories. Examine the oven for any damage such as dents or broken door. Do not install if oven is damaged.
Cabinet: Remove any protective film found on the microwave oven cabinet surface. Do not remove the light brown Mica cover that is attached to the oven cavity to protect the magnetron.
Installation
- Select a level surface that provide enough open space for the intake and/or outlet vents.
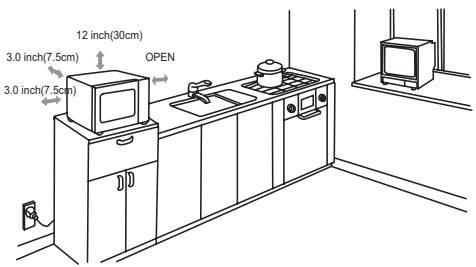
A minimum clearance of 3.0 inches (7.5cm) is required between the oven and any adjacent walls. One side must be open.
(1) Leave a minimum clearance of 12 inches (30cm) above the oven.
(2) Do not remove the legs from the bottom of the oven.
(3) Blocking the intake and/or outlet openings can damage the oven.
(4) Place the oven as far away from radios and TV as possible. Operation of microwave oven may cause interference to your radio or TV reception.
- Plug your oven into a standard household outlet. Be sure the voltage and the frequency is the same as the voltage and the frequency on the rating label.
WARNING: Do not install oven over a range cooktop or other heat-producing appliance. If installed near or over a heat source, the oven could be damaged and the warranty would be void.

OPERATION INSTRUCTION
This microwave oven uses modern electronic control to adjust cooking parameters to meet your needs better for cooking.
1.Clock Setting
When the microwave oven is electrified, the oven will display "0:00", buzzer will ring once.
1) Press "RELOJ/PREPROG ", the hour figure flash;
2) Turn " " to adjust the hour figures, the input time should be within 0--23.
3) Press "RELOJ/PREPROG ", the minute figures will flash.
4) Turn " " to adjust the minute figures, the input time should be within 0--59.
5) Press "RELOJ/PREPROG" to finish clock setting.":will flash.
Note: 1) If the clock is not set, it would not function when powered.
2) During the process of clock setting, if no appreation in 1 minute, the oven will go back to the previous status automatically.
2. Microwave Cooking
1) Press the "MICROONDAS" key once, and "P100" display.
2) Press "MICROONDAS" for times or turn " " to select the microwave power "P100", "P80", "P50", "P30", "P10" will display in order.
3) Press "INICIO/+30 SEG./Ok" to confirm.
4)Turn " " to adjust the cooking time. (The time setting should be 0:05- 95:00.)
5) Press "INICIO/+30 SEG./Ok" to start cooking.
Microwave Power Chart
| Microwave Power | 100% | 80% | 50% | 30% | 10% |
| Display | P100 | P80 | P50 | P30 | P10 |
3.Grill Cooking
1) Press the "GRILL/COMBI." key once, and "G-1" display.
2) Press "NICIO/+30 SEG./Ok" to confirm.
3)Turn " " to adjust the grill time. (The time setting should be 0:05- 95:00.)
4) Press "INICIO/+30 SEG./Ok" to start cooking.
Note:If half the grill time passes, the oven sounds twice, and this is normal. In order to have a better effect of grilling food, you should turn the food over, close the door, and then press"INICIO/+30 SEG./Ok " to continue cooking. If no operation,it will continue working.
4. Combination Cooking
1) Press the "GRILL/COMBI." key once, and "G-1" display.
2) Press "GRILL/COMBI." for times or turn " " to select the combination power, and "G-1", "C-1", "C-2", "C-3" or "C-4" will display for each added press.
3) Press "INICIO/+30 SEG./Ok" to confirm.
4)Turn " to adjust the cooking time. (The time setting should be 0:05-95:00.)
5) Press "INICIO/+30 SEG./Ok" to start cooking.
Note: Combination instructions
| Instructions | Display | Microwave | Grill | Convection |
| 1 | C-1 | ● | ● | |
| 2 | C-2 | ● | ● | |
| 3 | C-3 | ● | ● | |
| 4 | C-4 | ● | ● | ● |
5. Speedy Cooking
1) In waiting state, press "INICIO/+30 SEG./Ok" key to cook with 100% power level for 30 seconds. Each press on the same key can increase 30 seconds. The maximum cooking time is 95 minutes.
2) During the microwave, grill and combination cooking and time defrost process, press "INICIO/+30 SEG./Ok" to increase the cooking time.
3) In waiting states, turn " " left to choose the cooking time directly. After choosing the time, press "INICIO/+30 SEG./Ok" to start cooking. The microwave power is 100% .
Note: Under the states of auto menu and weight defrost, cooking time cannot be increased by pressing " INICIO/+30 SEG./Ok"
6. Defrost By Weight
1) Press "DESCONGELAR POR TIEMPO/PESO" once, the screen will display "d-1".
2) Turn " " to select the food weight. The range of weight is 100-2000g.
3) Press "NICIO/+30 SEG./Ok" key to start defrosting.
7. Defrost By Time
1) Press "DESCONGELAR POR TIEMPO/PESO" twice, the screen will display "d-2".
2) Turn " " to select the cooking time.
3) Press "INICIO/+30 SEG./Ok" key to start defrosting.
8. Multi-Stage Cooking
Two stages can be maximumly set. If one stages is defrosting, it should be put in the first stage. The buzzer will ring once after each stage and the next stage will begin.
Note: Auto menu cannot be set as one of the multi-stage.
Example: if you want to defrost the food for 5 minutes, then to cook with 80% microwave power for 7 minutes. The steps are as following:
1) Press "DESCONGELAR POR TIEMPO/PESO" twice, the screen will display "d-2";
2) Turn " " to adjust the defrost time of 5 minutes;
3) Press" MICROONDAS" once;
4) Turn " " to choose 80% microwave power till "P80" display;
5) Press "NICIO/+30 SEG./Ok" to confirm;
6) Turn " to adjust the cooking time of 7 minutes;
7) Press "NICIO/+30 SEG./Ok" to start cooking.
9. Kitchen Timer
(1) Press "RELOJ/PREPROG" twice, LED will display 00:00.
(2) Turn " " to enter the correct timer.(The maximum cooking time is 95 minutes.)
(3) Press "INICIO +30 SEG./Ok" to confirm setting.
(4) When the kitchen time is reached, the buzzer will ring 5 times.
If the clock be set(24-hour system), LED will display the current time.
Note: The kitchen Time is differ from 24-hour system,Kitchen Timer is a timer.
10. Auto Menu
1) In waiting states, turn " right to choose the menu from "A1" to "A10";
2) Press "INICIO/+30 SEG./Ok" to confirm the menu you choose;
3) Turn " " to choose th food weight;
4) Press "NICIO/+30 SEG./Ok" to start cooking;
5) After cooking finish, the buzzer sounds five times.
Auto Menu
| Menu | Weight(g) | Display | Power |
| A1 Pizza | 200 | 200 | C-4 |
| 300 | 300 | ||
| 400 | 400 | ||
| A2 Potato | 1(about 230g) | 1 | 100% |
| 2(about 460g) | 2 | ||
| 3(about 690g) | 3 | ||
| A3 Meat | 150 | 150 | 100% |
| 300 | 300 | ||
| 450 | 450 | ||
| 600 | 600 | ||
| A4 Fish | 150 | 150 | 80% |
| 250 | 250 | ||
| 350 | 350 | ||
| 450 | 450 | ||
| 650 | 650 | ||
| A5 Vegetable | 150 | 150 | 100% |
| 350 | 350 | ||
| 500 | 500 | ||
| A6 Beverage/ Coffee | 1 cup(240ml) | 1 | 100% |
| 2cups(480ml) | 2 | ||
| 3cups(720ml) | 3 | ||
| A7 Pasta | 50(add 450ml cold water) | 50 | 80% |
| 100(add 800ml cold water) | 100 | ||
| 150(add 1200ml cold water) | 150 | ||
| A8 Popcorn | 50 | 50 | 100% |
| 100 | 100 | ||
| A9 Cake | 475 | 475 | Preheat at 160 degrees |
| A10 Chicken | 500 | 500 | C-4 |
| 750 | 750 | ||
| 1000 | 1000 | ||
| 1200 | 1200 |
- Convection Cooking(With preheating funtion)
The convection cooking can let you to cook the food as a traditional oven. Microwave is not used. It is recommended that you should preheat the oven to the appropriate temperature before placing the food in the oven.
1) Press the "CONVECCION" key once, "150" flash.
2) Keep pressing "CONVECCION" or turn " " to select the convection function. Note:the temperature can be chosen from 150 degrees to 240 degrees.
3) Press the "INICIO/+30 SEG./Ok" to confirm the temperature.
4) Press the "INICIO/+30 SEG./Ok" to start preheating. When the preheating temperature arrives, the buzzer will sound twice to remind you to put the food into the oven. And the preheated temperature is displayed and flash.
5) Put the food into the oven and close the door. Turn " " to adjust the cooking time. (The maximum setting time is 95 minutes.)
6) Press the "INICIO/+30 SEG./Ok" key to start cooking.
Note: a. Cooking time cannot be input until the preheating temperature arrives. If the temperature arrives, door must be opened to input the cooking time.
b. If the time not input in 5 minutes, the oven will stop preheating. The buzzer sound five times and turn back to waiting states.
- Convection Cooking (Without pre-heating function)
1) Press the "CONVECCION" key once, "150" flash.
2) Keep pressing "CONVECCION" or turn " " to select the convection function. Note:the temperature can be chosen from 150 degrees to 240 degrees.
3) Press the "INICIO/+30 SEG./Ok" to confirm the temperature
4) Turn " to adjust the cooking time. (The maximum setting time is 95 minutes.)
5) Press the "NICIO/+30 SEG./Ok" key to start cooking.
13. Lock-out Function for Children
Lock: In waiting state, press "PARAR/CANCELAR" for 3 seconds, there will be a long "beep" denoting entering into the children-lock state and "☑O" indicator will light. LED will display current time or 0:00.
Lock quitting: In locked state, press "PARAR/CANCELAR" for 3 seconds, there will be a long "beep" denoting that the lock is released, and " +0 " indicator will disappear.
14. Inquiring Function
1) In cooking states of microwave, grill and combination, press "MICROONDAS", the current power will be displayed for 2-3 seconds.
2) In pre-set state, press " RELOJ/PREPROG " to inquire the time for delay start cooking. The pre-set time will flash for 2-3 seconds, then the oven will turn back to the clock display.
3) During cooking state, press "RELOJ/PREPROG" to check the current time. It will be displayed for 2-3 seconds.
15. Specification
(1) The buzzer will sound once when turning the knob at the beginning;
(2) "INICIO/+30 SEG./Ok" must be pressed to continue cooking if the door is opened during cooking;
(3) Once the cooking programme has been set, "INICIO/+30 SEG./Ok" is not pressed in 1 minute. The current time will be displayed. The setting will be cancelled.
(4) The buzzer sounds once by efficient press, inefficient press will be no response.
(5) The buzzer will sound five times to remind you when cooking is finished.
Trouble shooting
| Normal | |
| Microwave oven interfering TV reception | Radio and TV reception may be interfered when microwave oven operating. It is similar to the interference of small electrical appliances, like mixer, vacuum cleaner, and electric fan. It is normal. |
| Dim oven light | In low power microwave cooking, oven light may become dim. It is normal. |
| Steam accumulating on door, hot air out of vents | In cooking, steam may come out of food. Most will get out from vents. But some may accumulate on cool place like oven door. It is normal. |
| Oven started accidentally with no food in. | It is forbidden to run the unit without any food inside. It is very dangerous. |
| Trouble | Possible Cause | Remedy |
| Oven can not be started. | (1) Power cord not plugged in tightly. | Unplug. Then plug again after 10 seconds. |
| (2) Fuse blowing or circuit breaker works. | Replace fuse or reset circuit breaker (repaired by professional personnel of our company) | |
| (3) Trouble with outlet. | Test outlet with other electrical appliances. | |
| Oven does not heat. | (4) Door not closed well. | Close door well. |
| Glass turntable makes noise when microwave oven operates | (5) Dirty roller rest and oven bottom. | Refer to "Maintenance of Microwave" to clean dirty parts. |
13/14
According to Waste of Electrical and Electronic Equipment (WEEE) directive, WEEE should be separately collected and treated. If at any time in future you need to dispose of this product please do NOT dispose of this product with household waste. Please send this product to WEEE collecting points where available.