KX-TS500EXB - Téléphone fixe PANASONIC - Notice d'utilisation et mode d'emploi gratuit
Retrouvez gratuitement la notice de l'appareil KX-TS500EXB PANASONIC au format PDF.
| Intitulé | Détails |
|---|---|
| Type de produit | Téléphone fixe analogique |
| Caractéristiques techniques principales | Affichage LCD, clavier à touches, son clair |
| Alimentation électrique | Alimentation par ligne téléphonique |
| Dimensions approximatives | 200 mm x 180 mm x 80 mm |
| Poids | Environ 1 kg |
| Compatibilités | Compatible avec les lignes téléphoniques analogiques |
| Fonctions principales | Appels, fonction haut-parleur, réglage du volume |
| Entretien et nettoyage | Essuyer avec un chiffon doux, éviter les produits abrasifs |
| Pièces détachées et réparabilité | Réparabilité limitée, pièces disponibles sur demande |
| Sécurité | Conforme aux normes de sécurité électrique |
| Informations générales | Garantie de 2 ans, service client disponible |
FOIRE AUX QUESTIONS - KX-TS500EXB PANASONIC
Questions des utilisateurs sur KX-TS500EXB PANASONIC
0 question sur cet appareil. Repondez a celles que vous connaissez ou posez la votre.
Poser une nouvelle question sur cet appareil
Téléchargez la notice de votre Téléphone fixe au format PDF gratuitement ! Retrouvez votre notice KX-TS500EXB - PANASONIC et reprennez votre appareil électronique en main. Sur cette page sont publiés tous les documents nécessaires à l'utilisation de votre appareil KX-TS500EXB de la marque PANASONIC.
MODE D'EMPLOI KX-TS500EXB PANASONIC
Panasonic
Integrated Telephone System
Operating Instructions
Model No. KX-TS500EX
natural_image
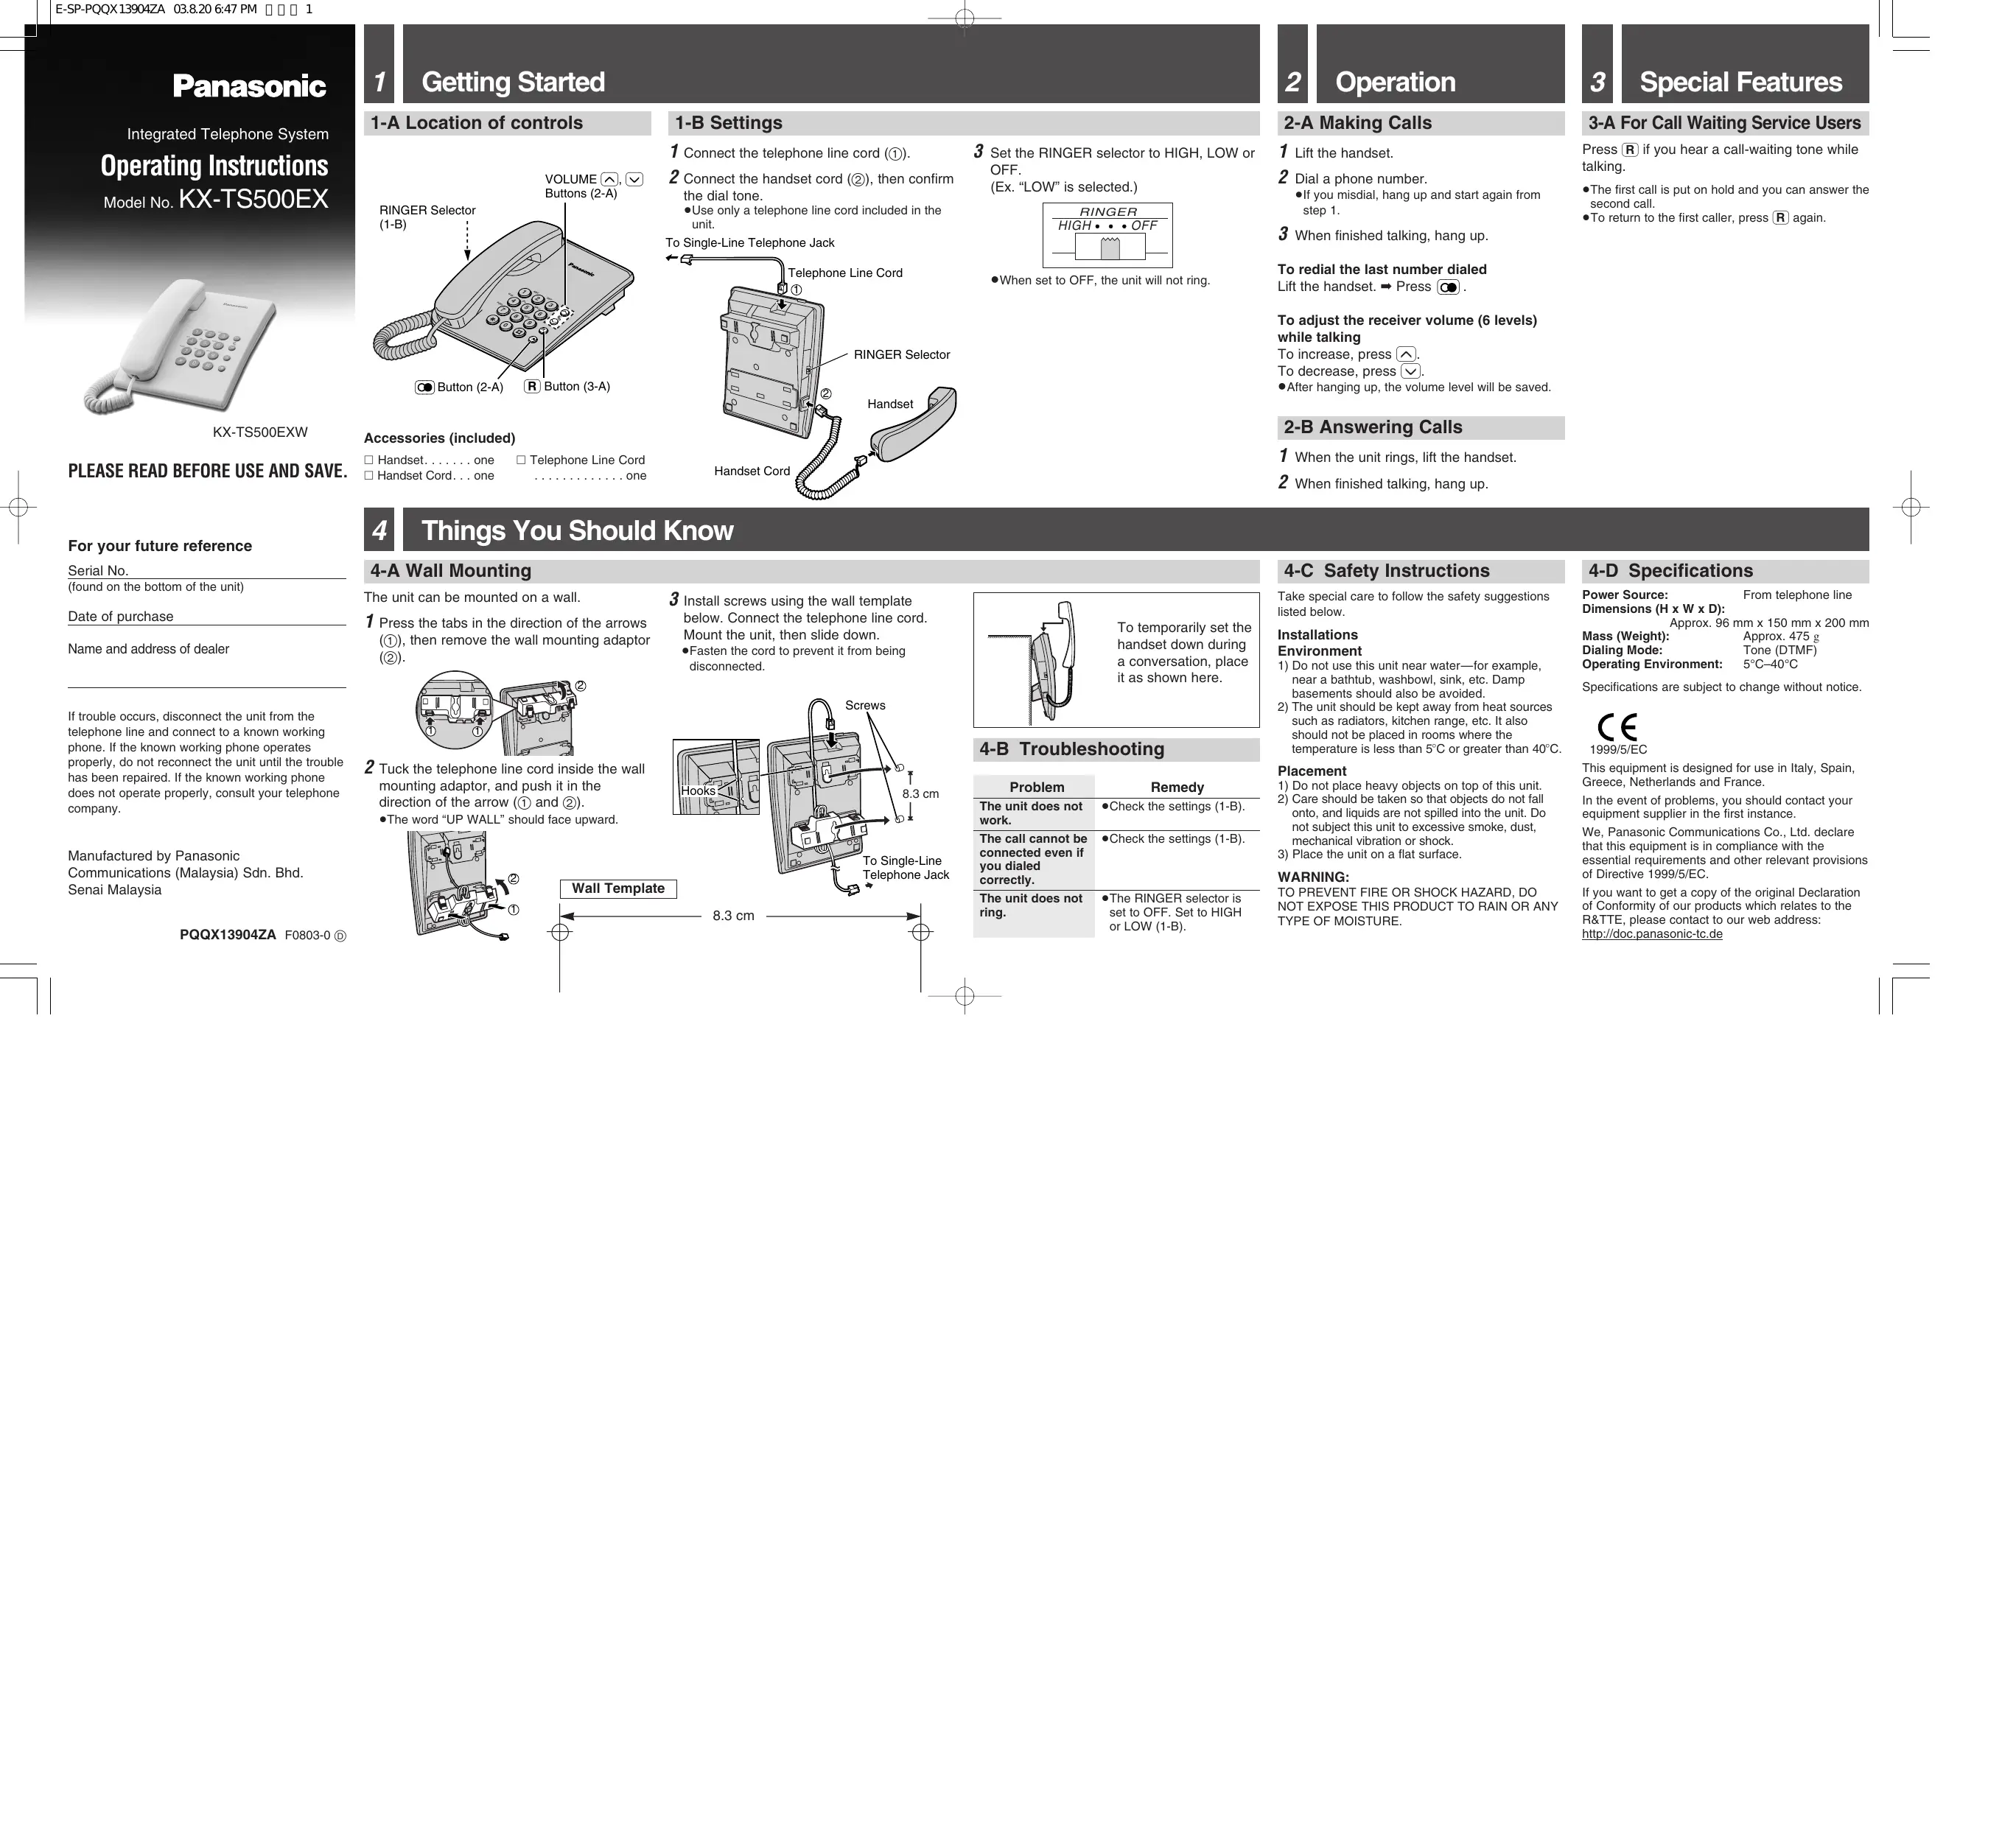
White Panasonic tele handset with keypad and cord (no visible text or symbols)KX-TS500EXW
PLEASE READ BEFORE USE AND SAVE.
1 Getting Started
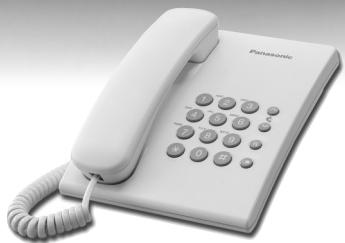
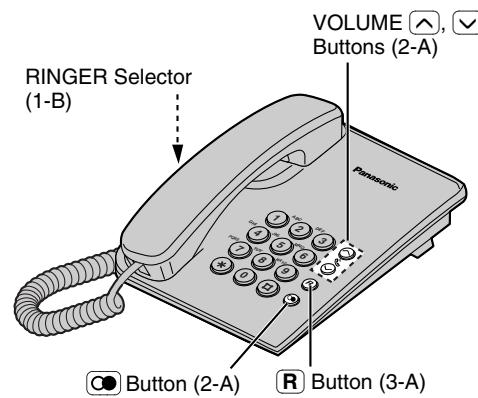
1-A Location of controls
text_image
RINGER Selector (1-B) VOLUME ↑, ✓ Buttons (2-A) Panasonic Button (2-A) R Button (3-A)Accessories (included)
□ Handset.....one □ Telephone Line Cord
□ Handset Cord...one ..... one
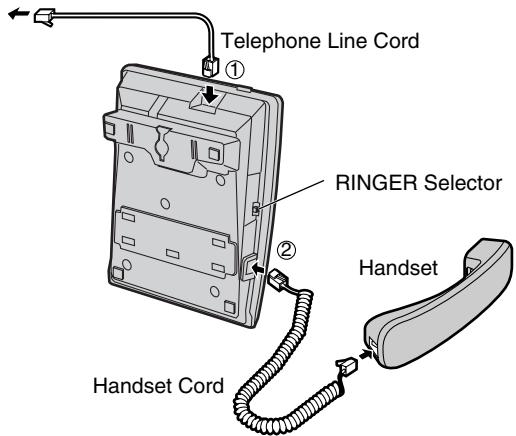
1-B Settings
1 Connect the telephone line cord (①).
2 Connect the handset cord (②), then confirm the dial tone.
- Use only a telephone line cord included in the unit.
To Single-Line Telephone Jack
text_image
Telephone Line Cord RINGER Selector Handset Handset Cord3 Set the RINGER selector to HIGH, LOW or OFF.
(Ex. "LOW" is selected.)
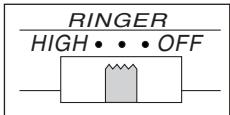
- When set to OFF, the unit will not ring.
2 Operation
2-A Making Calls
1 Lift the handset.
2 Dial a phone number.
- If you misdial, hang up and start again from step 1.
3 When finished talking, hang up.
To redial the last number dialed
Lift the handset. → Press
To adjust the receiver volume (6 levels) while talking
To increase, press ⬌.
To decrease, press √.
●After hanging up, the volume level will be saved.
2-B Answering Calls
3 Special Features
3-A For Call Waiting Service Users
Press Ⓡ if you hear a call-waiting tone while talking.
●The first call is put on hold and you can answer the second call.
- To return to the first caller, press again.
2-B Answering Calls
1 When the unit rings, lift the handset.
2 When finished talking, hang up.
1 When the unit rings, lift the handset.
2 When finished talking, hang up.
For your future reference
Serial No.
(found on the bottom of the unit)
Date of purchase
Name and address of dealer
If trouble occurs, disconnect the unit from the telephone line and connect to a known working phone. If the known working phone operates properly, do not reconnect the unit until the trouble has been repaired. If the known working phone does not operate properly, consult your telephone company.
Manufactured by Panasonic Communications (Malaysia) Sdn. Bhd Senai Malaysia
PQQX13904ZA F0803-0 D
4 Things You Should Know
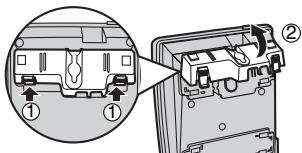
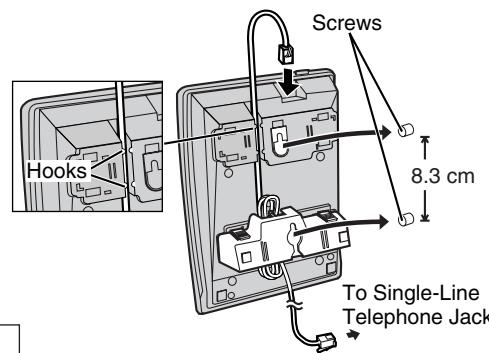
4-A Wall Mounting
The unit can be mounted on a wall.
1 Press the tabs in the direction of the arrows (①), then remove the wall mounting adaptor (②).
2 Tuck the telephone line cord inside the wall mounting adaptor, and push it in the direction of the arrow (① and ②).
- The word "UP WALL" should face upward.
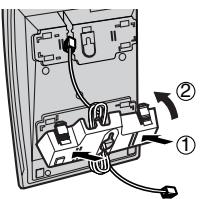
3 Install screws using the wall template below. Connect the telephone line cord. Mount the unit, then slide down.
- Fasten the cord to prevent it from being disconnected.
text_image
Hooks Screws 8.3 cm To Single-Line Telephone Jack8.3 cm
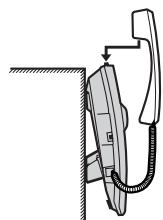
To temporarily set the handset down during a conversation, place it as shown here.
4-B Troubleshooting
| Problem | Remedy |
| The unit does not work. | ●Check the settings (1-B). |
| The call cannot be connected even if you dialed correctly. | ●Check the settings (1-B). |
| The unit does not ring. | ●The RINGER selector is set to OFF. Set to HIGH or LOW (1-B). |
4-C Safety Instructions
Take special care to follow the safety suggestions listed below.
Installations
Environment
1) Do not use this unit near water—for example, near a bathtub, washbowl, sink, etc. Damp basements should also be avoided.
2) The unit should be kept away from heat sources such as radiators, kitchen range, etc. It also should not be placed in rooms where the temperature is less than 5^ C or greater than 40^ C.
Placement
1) Do not place heavy objects on top of this unit.
2) Care should be taken so that objects do not fall onto, and liquids are not spilled into the unit. Do not subject this unit to excessive smoke, dust, mechanical vibration or shock.
3) Place the unit on a flat surface.
WARNING:
TO PREVENT FIRE OR SHOCK HAZARD, DO NOT EXPOSE THIS PRODUCT TO RAIN OR ANY TYPE OF MOISTURE.
4-D Specifications
Power Source: From telephone line Dimensions (H x W x D): Approx. 96 mm x 150 mm x 200 mm
Mass (Weight): Approx. 475 g Dialing Mode: Tone (DTMF)
Operating Environment: 5°C–40°C
Specifications are subject to change without notice.

1999/5/EC
This equipment is designed for use in Italy, Spain, Greece, Netherlands and France.
In the event of problems, you should contact your equipment supplier in the first instance.
We, Panasonic Communications Co., Ltd. declare that this equipment is in compliance with the essential requirements and other relevant provisions of Directive 1999/5/EC.
If you want to get a copy of the original Declaration of Conformity of our products which relates to the R&TTE, please contact to our web address: http://doc.panasonic-tc.de
Panasonic
Sistema telefónico integrado
Instrucciones de
funcionamiento
Modelo N.°
KX-1 S500EX

natural_image
White Panasonic 3rd-century telephone with keypad and cord (no visible text or symbols on body)KX-TS500EXW
Lea estas instrucciones antes de utilizar el sistema y guárdelas.
Para su futura referencia
N.° de serie
(se encuentra en la parte inferior de la unidad)
Fecha de compra
Nombre y dirección del distribuidor
Si ocurriese cualquier problema, desconecte el teléfono de la línea telefónica y conecte un teléfono que funcione. Si ese teléfono funcionara correctamente no vuelva a conectar el teléfono hasta que haya sido reparado. Si este teléfono tampoco funcionara consulte con su operador de telefonía.
Fabricado por Panasonic
Communications (Malaysia) Sdn. Bhd.
Senai Malaysia
1 Antes de empezar
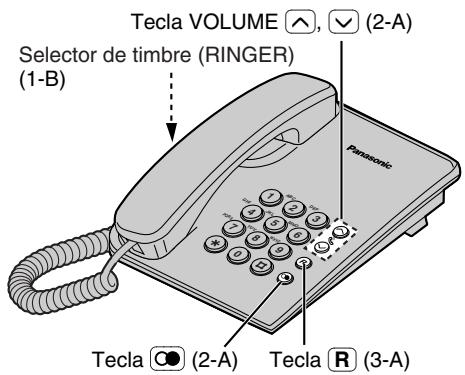
1-A Ubicación de los controles
text_image
Tecla VOLUME ⬆, ⬆ (2-A) Selector de timbre (RINGER) (1-B) Panasonic Tecla ⭕ (2-A) Tecla Ⓚ (3-A)Accesorios (incluidos)
□ Microteléfono .. Uno □ Cable para línea telefónica
□ Cable del microteléfono .. Uno .......Uno
1-B Ajustes
1 Conecte el cable de la línea telefónica (①).
2 Conecte el cable del microauricular (②), y después confirme el tono de marcación.
- Utilice únicamente el cable de línea que se incluye junto con el teléfono.
Al conector de teléfono
de línea única

text_image
Cable para línea telefónica ① Selector de timbre (RINGER) ② Microteléfono Cable del microteléfono3 Colocar el selector de RINGER en la posición deseada HIGH, LOW o OFF. (por ejemplo ahora "LOW" esta seleccionado.)
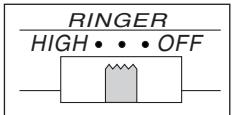
- Cuando lo ponga en OFF, la unidad no sonará.
2 Operación
2-A Para hacer llamadas
1 Levante el auricular.
2 Marque un número de teléfono.
- Si se equivoca al marcar, cuelgue y empiece de nuevo desde el paso 1.
3 Cuando termine de conversar, cuelgue.
Para repetir la marcación del último número marcado
Levante el auricular. → Presione ∞.
Para ajustar el volumen del auricular (6 niveles) mientras está conversando
Para incrementar el volumen, presione ⚗. Para disminuirlo, presione √.
- Después de colgar, el nivel de volumen será almacenado.
2-B Para contestar llamadas
1 Levante el auricular cuando suene la unidad.
2 Cuando termine de conversar, cuelgue.
3 Características especiales
3-A Para utilizar el Servicio Llamada en Espera
Presione R si escucha el tono de llamada en espera mientras está conversando.
- La primera llamada se pondrá en espera y podrá contestar la segunda llamada.
- Para volver con la primera llamada, presione R de nuevo.
[Non-Text]
[Non-Text]
[Non-Text]
[Non-Text]
[Non-Text]
[Non-Text]
[Non-Text]
[Non-Text]
[Non-Text]
[Non-Text]
[Non-Text]
[Non-Text]
[Non-Text]
[Non-Text]
[Non-Text]
[Non-Text]
[Non-Text]
[Non-Text]
[Non-Text]
[Non-Text]