
ZFFS302NX - Four ZEROWATT - Notice d'utilisation et mode d'emploi gratuit
Retrouvez gratuitement la notice de l'appareil ZFFS302NX ZEROWATT au format PDF.
| Type de produit | Four encastrable |
| Marque | ZEROWATT |
| Modèle | ZFFS302NX |
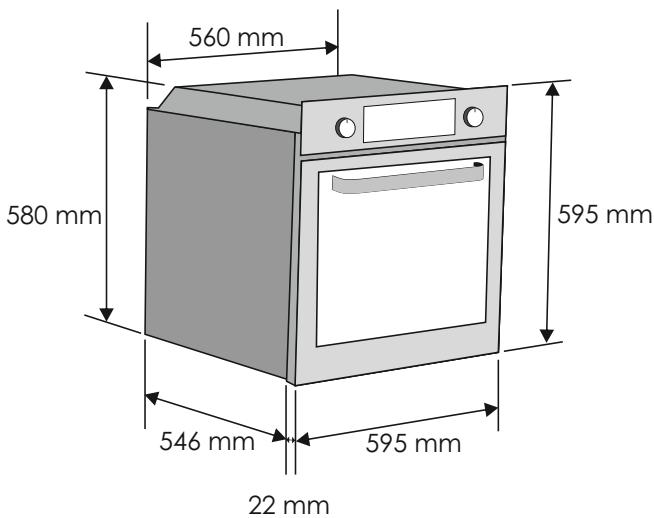
| Dimensions (L x H x P) | 595 x 595 x 550 mm (estimation) |
| Poids net | Environ 35 kg |
| Alimentation électrique | 230 V / 50 Hz, 3000 W (estimation) |
| Type de câble d'alimentation | H05V2V2-F |
| Fonctions de cuisson | Convection naturelle, gril, turbo-gril, chaleur tournante, sole, éclairage |
| Thermostat | 50°C à Max (selon fonction) |
| Minuterie | Minuteur mécanique (jusqu'à 120 min) |
| Nombre de grilles | 2 grilles incluses (selon modèle) |
| Lèchefrite | Incluse |
| Éclairage intérieur | Ampoule résistante aux hautes températures (remplaçable) |
| Nettoyage | Catalytique (panneaux optionnels) et pyrolytique |
| Matériau de la porte | Verre trempé |
| Arrêt de sécurité des grilles | Oui, système d'arrêt pour extraction partielle |
| Installation | Encastré sous plan ou en colonne |
| Classe énergétique | Non spécifiée (selon norme CENELEC EN 60350-1) |
| Accessoires fournis | Grille simple, grille porte-plat, lèchefrite, éventuellement sonde thermique (selon modèle) |
| Sécurité enfants | Verrouillage non mentionné ; tenir les enfants à distance |
FOIRE AUX QUESTIONS - ZFFS302NX ZEROWATT
Questions des utilisateurs sur ZFFS302NX ZEROWATT
0 question sur cet appareil. Repondez a celles que vous connaissez ou posez la votre.
Poser une nouvelle question sur cet appareil
Téléchargez la notice de votre Four au format PDF gratuitement ! Retrouvez votre notice ZFFS302NX - ZEROWATT et reprennez votre appareil électronique en main. Sur cette page sont publiés tous les documents nécessaires à l'utilisation de votre appareil ZFFS302NX de la marque ZEROWATT.
MODE D'EMPLOI ZFFS302NX ZEROWATT
ZEROWATT
FORNI
ISTRUZIONI PER L'USO
IT
OVENS
USER INSTRUCTIONS
GB

CONTENO TO
IT
Indicazioni Di Sicurezza 03
- Avvertenze Generali 04
1.1 Dichiarazione Di Conformità 04
1.2 Informazioni Sulla Sicurezza 04
1.3 Installazione 04
1.4 Inserimento Del Mobile 04
1.5 Importante 04
1.6 Allacciamento Elettrico 04
1.7 Dotazione Del Forno (Secondo Modelo) 05 - Consigli Utili 05
2.1 Griglie Forno - Sistema Di Arresto 05
2.2 Tempi Di Cottura 05
2.3 Forno Autopulente Catalitico .05
2.4 La Cottura Al Grill 05
2.5 Pulizia E Manutenzione 05
2.6 Garanzie 06 - Istruzioni Per L'uso 06
- Tabella Tempi Di Cottura .07-08
CONTENTS
GB
Safety Instructions 09
1. GeneralWarnings 10
1.1 Declaration Of Compliance 10
1.2 Safety Hints 10
1.3 Installation 10
1.4 Fitting The Oven Into The Kitchen Unit 10
1.5 Important 10
1.6 Connecting To The Power Supply 10
1.7 Oven Equipment (According To The Model). 10
2.Useful Tips 11
2.1 Shelf Safety System 11
2.2Grilling 11
2.3 Cooking Time 11
2.4 Self Cleaning Oven With Catalytic 11
2.5 Cleaning And Maintenance 11
2.6 Service Centre 11
3. Operating Instructions 11
4. Tables Of Cooking Times 12-13
-
Durante la cottura l'umidità può condensarsi all'interno della cavity o sul vetro della porta. Énormale. Per ridurre quello effetto, attendere 10-15 minuti dopo l'accensione prima di mettere il cibo all'interno del forno. In agli giorni, la condensa scompare quando il forno raggiunge la temperature di cottura.
-
Cuocere le verdure in un contentitore con un coperchio"Ince di un vassoio aperto.
-
Evitare di lasciare il cibo all'interno delorno后再o la cottura per un periodo superiore a 15/20 minuti.
-
ATTENZIONE: l'apparecchio e le parti accessibili divertano calde durante l'uso. Prestare attenzione a non toccare le parti calde.
-
ATTENZIONE: le parti accessibili sono divertare molto calde quando si utilizes ilorno. I bambini devono essere tenuti a distance di sicurezza.
-
L'apparecchio può essere usato da bambini dagli 8 anni in su e persone con ridotte capacità fisiche, sensoriali o mentali oswana esperienza e conoscenza del prodotto se supervisionate o dando loro istruzioni riguardo al funzionamento dell'apparecchio in maniera sicura e coscente del rischio possibile.
-
I bambini non dovrebbero giocare con l'apparecchio.
-
La pulizia e la manutenzione non dovrebbero essere fatto da bambinienza supervisione
-
Durante l'uso l'apparecchio diventa molto caldo. Si dovrebbe fare attenzione a non toccare gli elementi riscaldanti all'interno delorno.
-
ATTENZIONE: Le parti accessibili possono divertare molto calde durante l'uso. I bambini dovrebbero essere tenuti a distanza.
-
Non usare per la pulizia materiali ruvidi abrasivi o raschietti metallici affiliati per pulire le porte di vetro del fornodo che possono graffiare la superficie e causare la frantumazione del vetro.
-
Spagnere ilorno prima di rimuovere lo schermo di protezione e, dopo la pulizia, rimontarlo secondo le istruzioni.
-
Usare solo la sondaTERMICA racomandata per questo forno.
-
Nonutilizzare un pulitore a vapore.
-
Collegare al cavo di alimentazione una spina dimensionata per la tensione, la corrente e la potenza indicate nella targhetta e dotata del contatto di terra. La presa deve essere dimensionata per la potenza indicata sulla targhetta e deve ave il contatto di terra collegato e funzionante. Il conduttore di terra è giallo-verde. Questa operazione deve essere eseguita solo da un technician adeguatamente addestrato. In caso di incompatibilità tra presa e spina dell'elettrodomestico, richiedere ad un technician specializzato di sostuire la presa con un'altra di tipo compatibile. La spina e la presa devono essere conformi alle normative attuali del paese di installmente. Il collegamento alla rete di alimentazione può essere effettuatoanche collocando un interrottore automatico onnipolare tra l'elettrodomestico e la rete di alimentazione, in grado di supportare il carico massimo collegato, in linea con la legislazione currente. Il cavo di terra giallo-verde non deve essere interrotto dall'interruttore automatico. La presa o l'interruttore automatico onnipolare utilizzati per il collegamento devono essere facilemente accessibili al momento del montaggio dell'elettrodomestico.
-
La disconnessione può essere eseguita con la spina accessibile o aggiungendo un interrottore sul cablaggio fisso, nel rispetto delle normative relative ai cablaggi.
-
Se il cavo di alimentazione si danneggia, deve essere sostituito con un cavo o uno speciale fascio di cavi disponibile presso il produttore o contattando il reparto assistenza al cliente.
-
Il cavo di alimentazione deve essere di tipo H05V2V2-F.
-
Il mancato rispetto di quanto indicate sopra cui compensettere la sicurezza dell'elettrodomestico e renderere nulla la garanzia.
-
Qualsiasi materiale fuoriuscito in effcco deve essere molto prima della pulizia.
-
Durante il processo di pulizia pirolitico, le superfici sono surriscaldarsi più del normale: mantenere sempre i bambini a distance di sicurezza;
L'electrodomestico non deve essere installato dietro a una porta a scopo ornamentale per evitarne il surriscaldamento.
- Quando si posizione uno scaffale all'interno, accertarsi che il blocco sia rivolto versus l'alto e nella parte posteriore della guida.
Lo scaffale delve essere insertito completamente nella guida
-
AVVERTENZA: Non copire le pareti del forno con fogli di alluminio o protezioni monouso disponibili in commercio. I fogli di alluminio o le altre protezioni, se a diretto contatto con lo smalto caldo, rischiano di fondersi e di danneggiare lo smalto interno stesso.
-
AVVERTENZA: Non togliere mai la guarnizione della porta del forno.
-
Il funzionamento dell'elettrodomestico alle frequenze nominali non richiede alcuna operazione o impostazione.
1-AVVERTENZE GENERALI
Vi ringraziamo per aver scelto uno dei nostri prodotti, per ottenere da questo elettrodomestico le migliorari prestazioni consigliamo di:
-
Leggere attentamente le avventenze contente nel presente libretto.
-
Conservare con cura quello libretto per agli ulteriori consultazione.
Durante I'uso il fornodiventa caldo,fare attenzione a non toccare gli elementi riscaldanti all'interno del forn.
Alla prima accensione del forno puo svilupparsi fumo di odore acre, causato dal primo riscaldamento del collante dei pannelli d'isolamento avolgenti il forno. Si tratta di un fenomeno assolutamente normale e, in caso si verificasse, occorre attendere la cessione del fumo prima di introdurre le vivande.
Il forno è per sua natura un appearecchio che diventa caldo, in modo particolare in corrispondenza del cristallo porta.
1.1. DICIHIARAZIONE DI CONFORMITA
Apponendo la marcatura CE su quello prodotto, dichiariamo, sotto la nostra responsabilità, di ottemperare a tutti i requisiti relativi alla tutela di sicurezza, salute e ambiente previsti dalla legislazione europea in essere per quello prodotto.
1.2 INFORMAZIONI SULLA SICUREZZA
- Questo apparecchio dovrè essere destinato solo all'uso per il quale è stato espessamenteconcepto, ecisione per la cottura di alimenti.
Ogni altri uso (ad esempio riscaldamento ambiente) è da considerarsi improprio e quindi pericoloso. Il costruttore non può essere considerato responsable per eventuali danni derivanti da usi improperi, erronei ed irragionevoli.
L'uso di un qualsiasi apparecchio elettrico comporta
I'osservanza di alcune regole fondamentali.
In particolare:
-non tirare il cavo di alimentazione per staccare la spina alla presa di corrente
-non toccare l'apparecchio con mani o piedi bagnati o umidi
-non usare l'apparecchio a piedi nudi
-in generale è sconsigliabile l'uso di adattatori, prese multiple e prolonghe.
-
In caso di guasto e/o di cattivo funzionamento dell'apparecchio, spegnerlo e non manometterlo.
-
In caso di danneggiamento del cavo, provvedere tempestivamente alla sua sostituzione seconde le seguendi indicatori:
aprimi l coperchio morsettiera, togliere il cavo di alimentazione e sostituirlo con uno corrispondente, (tipio H05RR-F, H05VVF, H05V2V2-F) e adeguato alla portata dell'apparecchio.
Tale operazione dovrà essere eseguita da personale professionalmente qualificato. Il conduittre di terra (giallo-verde), delve obbligatoriamente essere più lungo di circa 10 mm rispetto ai conduttori di linea.
Per l'eventuale riparazione rivolgersi solamente ad un centro di assistenza tecnia autorizzato e richiedere l'utilizzo di ricambi originali.
Il mancato rispetto di甚么 sopra cui compromettere la sicurezza dell'apparecchio.
- Non rivestire le pareti delorno con fogli d'alluminio da cucina o fogli monouso commerciali, perché potrebbero fondersi aicontatto con le superfici in smalto caldo e danneggiare le superfici in smalto all'interno delorno.
1.3 INSTALLAZIONE
L'installazione è a carico dell'acquirente e la Casa Costruttrice è esonerata da questo servizio; gli eventuali interventi richiesti alla Casa Costruttrice che dipendono da una errata installazione non sono compresi nella garanzia.
L'installazione deve essere effettuata secondo le istruzioni da personale professionalmente qualificato. Una errata installmentazione può causare danni a persona, animali o cose, nei confronti dei quali il costruttore non può essere considerato responsable.
1.4 INSERIMENTO DEL MOBILE
Inserire l'apparecchio nel vano del mobile (sottopiano o in colonna). Il fissaggio si esegue con 4 vitiattraverso i fori della cornice, visibili aprendo la porta.(vedere ultima pagina). Per consentire la migliorie aerazione del mobile, i fornì devono essere incassati rispetto le misure e le distance indicate nella figura in ultima pagina.
Nota: per i forn di abbinamento con piano cottura è indispensable rispetto le istruzioni contenate nel libretto allegato all'apparecchiatura da abbinare.
1.5 IMPORTANTE
Per garantire un buon funzionamento dell'apparecchio da incasso è necessario che il mobile sia di caratteristiche adatte. I pannelli dei mobili adiacenti il forno dovranno essere in materiale resistente al calore. In particolare nel caso di mobili in legno impiallicciato le colle dovranno essere resistenti alla temperatura di 120^ : materiali plastici o collanti non resistenti a但这a temperatura sono causa di deformazioni o scollature. In conformità alle norme di sicurezza, una volta incassato l'apparecchio, non debbono essere possibili eventuali contatti con le parti elettriche. Tutte le parti che assicurano la protezione debbono essere fissate in modo tale da non poter essereolta sulla aiuto di quale utensile.
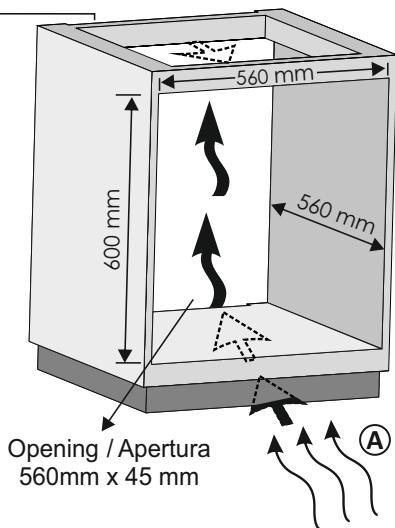
Per garantire una Buona areazione è necessario eliminare la parete posteriori del vano; inoltre il pianale di appoggio deve ave una luce posteriori di almeno 45mm .
1.6 ALLACCIAMENTO ELETTRICO
Inserire la spina in una presa di corrente munita di un terzo contatto corrispondente alla presa di terra, che deve essere collegata in modo efficiente.
Per i modelli sprovvisti di spina, montare sul cavo una spina normalizzata che sia in grado di sostortare il carico indicate in targa. Il conduttore di messa a terra e contraddistinto dai colori giallo-verde. Tale operazione dovrè essere eseguita da personale professionalmente qualificato.
In caso di incompatibilità tra la presa e la spina dell'apparecchio fare sostituire la presa con另一a di tipo adatto, da personale professionlmente qualificato. Si può effettuireanche l'allacciamento alla rete interponendo tra l'apparecchio e la rete un interrottore omnipolare dimensionato al carico e rispondente alle norme in vigore. Il cavo di terra giallo-verde non devesse essere interrotto dall'interruttore. La presa o l'interruttore omnipolare usati per l'allacciamento devono essere facilemente accessibili ad elettrodomestico installato.
Importante: in fase di installatione, posizionare il cavo di alimentazione in modo che in nessun punto si raggiungano temperature superiori di 50^ alla temperatura ambiente.
L'apparecchio è conforme ai requisiti di sicurezza previsti dagli istituti normativi. La sicurezza elettrica di questo apparecchio è assicurata soltanto quando lo stesso è correttamente collegato ad un efficace impianto di messa a terra come previsto delle vigenti norme di sicurezza elettrica, (in caso di dubbio, richiedere un controllo accurato dell'impianto da parte di personale professionalmente qualificato).
Importante: la ditta costruttrice resta sollevata da agli responsabilità per eventuali danni a persono o cose, derivanti dal mancato allacciamento della linea di terra.
ATTENZIONE: la tensione e la frequenza di alimentazione sono indicate in targa matricola (figura in ultima pagina). Verificare che la portata elettrica dell'impianto e delle prese di corrente siano adeguate alla potenza massima dell'apparecchio indicate in targa. In caso di dubbio rivolgersi ad una persona professionalmente qualificata.
1.7 DOTAZIONE DEL FORNO (secondo modello)
Prima di utilizzato gli accessori del forno per la prima volta è necessario pulirli. Per esta operazione si consiglia di utilizzato una spugna. Successivement risciacquare ed asciugare gli accessori.
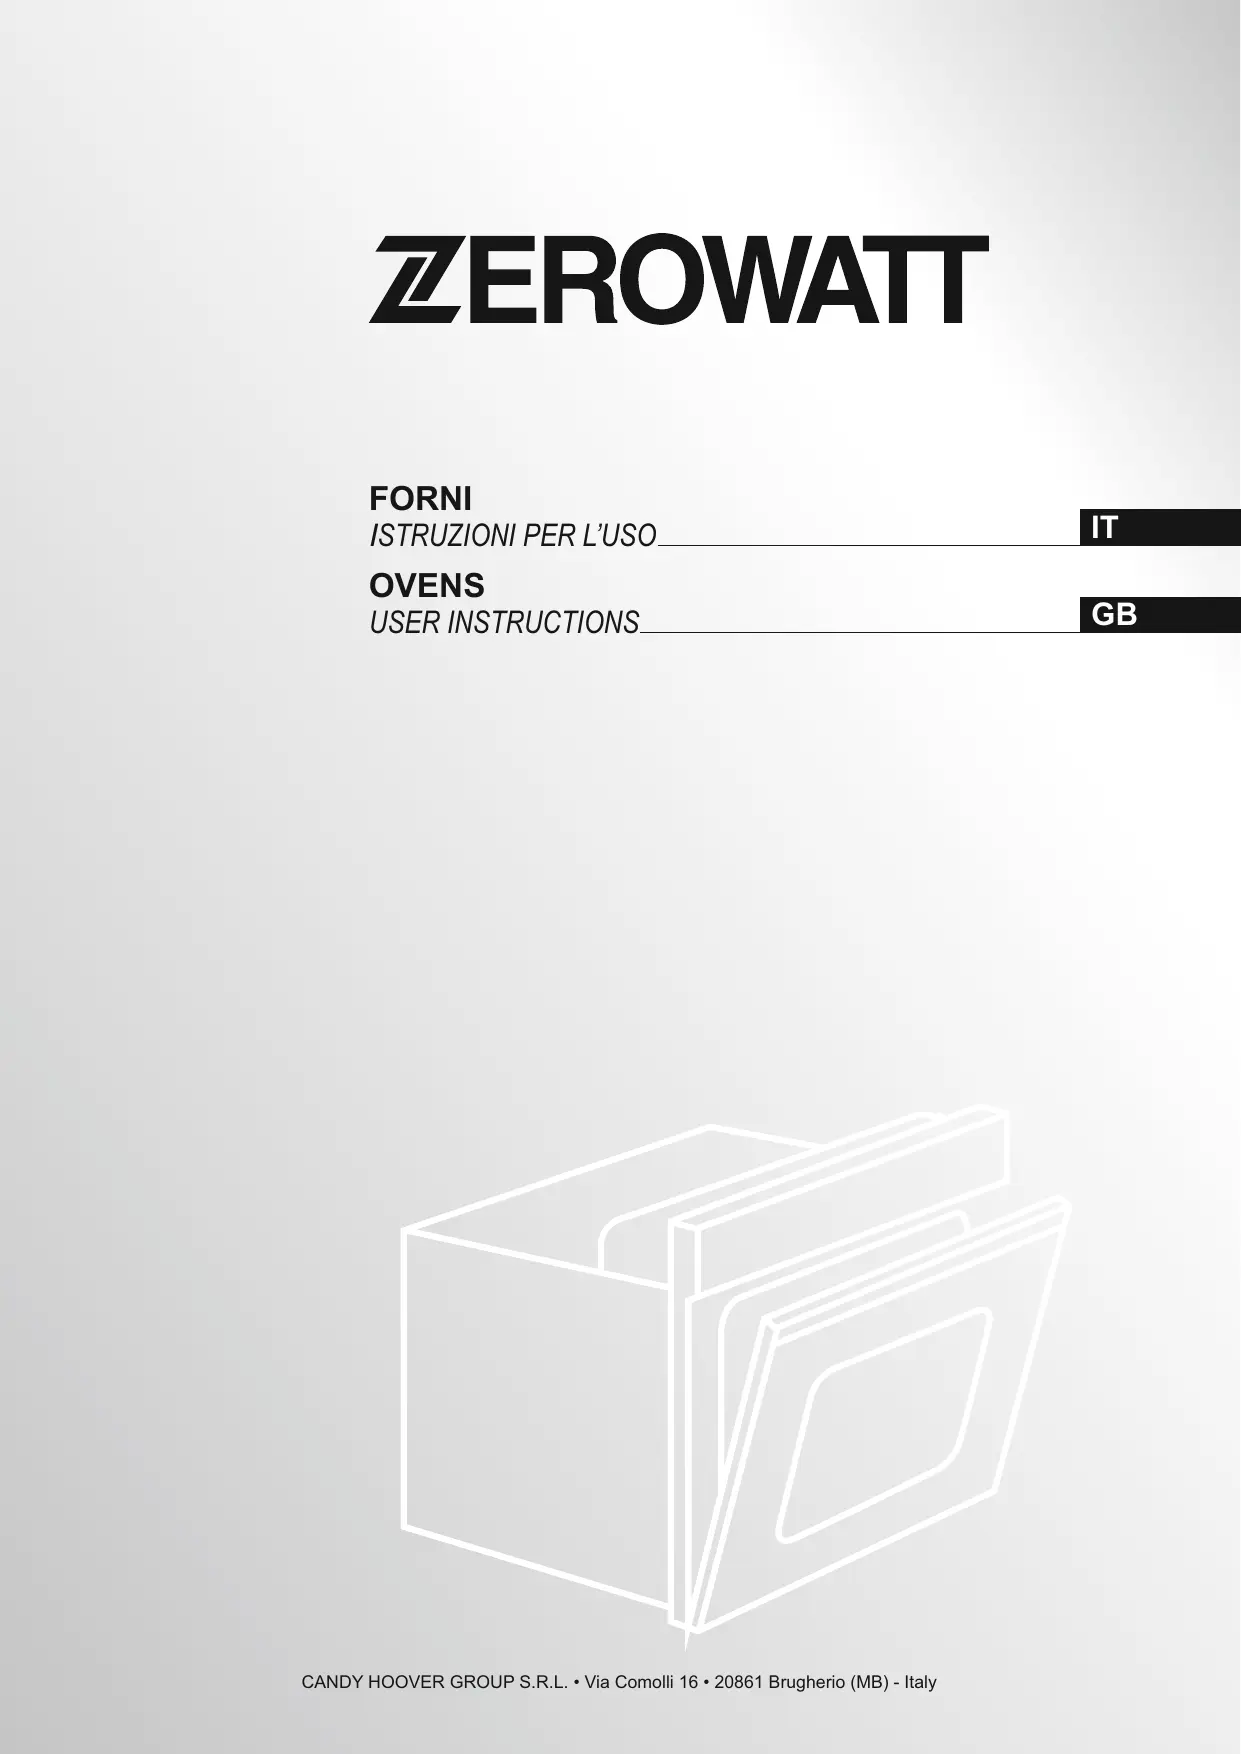
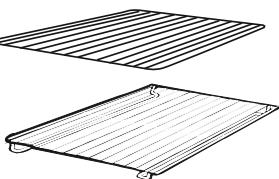
La griglia semplice serve da supporto per teglie, pirofile, stampi per i dolci.
La griglia porta-piatto serve in particolare per le grigliate di carne poiché sostiene ancche la leccarda che raccoglie i grassi che colano.
Grazie ai loro profili speciali, le griglie restano sempre in orizzontale,anche quando vengono estratte verso l'esterno. Non c'ennsun rischio quindi che i tegami scivolino o si ribaltino.
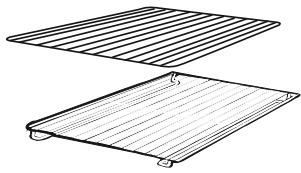
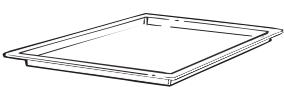
Raccoglie i residui di cibo che gocciolano durante la cottura. Deve essere utilizzata solamente con il grill, il girarrosto o il turbo girarrosto, secondo il modello.
Attenzione: in tutti gli altri modi di cottura, la leccarda deve essereolta dalorno.
Non usare mai la leccarda per cuocere gli arrosti perché ne risulterebbe un eccessivo sviluppo di fumo e evapori e ilorno si sporcherebbe inultamente.
Gli accessori devono essere totti dal forno se non vengono utilizzati.
e/o appositi contentori.
2. CONSIGLI UTILI
2.1 GRIGLIE FORNO - SISTEMA DI ARRESTO
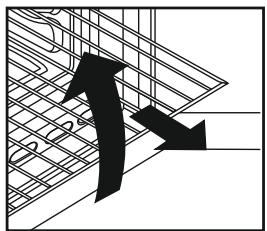
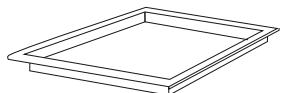
Il forno è dotato di un nuovosystema di arresto griglie. Questoistema consente di estrarre le griglie quasi completenessenza che queste fuoriscano dal forno mantenendole perfettamente in piano, consentendo di verificare e mescolare il cibo con la massima tranquilità e sicurezza.
Per estrarre le griglie è sufficiente, come indicato sul disegno, alzarle, prendendole alla parte anteriore e tirarle.
2.2 TEMPI DI COTTURA
Alle pagine 8-9 riportiamo una tabella indicativa dove sono indicati tempi e temperature consigliati per le prime cotture. Ad esperienza acquisita potrete variare a mystro piacimento i valori riportati nella tabella stessa.
2.3 FORNO AUTOPULENTE CATALITICO
Speciali pannelli autopulenti ricoperti da uno smalto a struttura microporosa, offerto come accessori opzionali per tutti i modelli, eliminano la pulizia manuale del forno.
I grassi proiettati sulle pareti durante la cottura, vengono decomposti dallo smalto, mediante un processo catalitico di ossidazione e trasformati in prodotti gassosi.
Schizzi eccessivi di grasso possono ostruire i pori e quando impedire l'autopolizia. Tale caratteristica può essere ripristinata mediante un riscaldamento per circa 10-20 minuti del forno vuoto impostando la manopola forno in corrispondenza della massima temperatura.
Non usare prodotti abrasivi, pagliette metalliche, oggetti appuntiti, panni ruvidi, prodotti chimici o detersivi che possono danneggiare irrimediabilmente lo smalto.
Si consiglia inoltre di utilizzare pentole a bordi alto nel caso di cotture di vivande particolarmente grasse (arrosti, ecc.) e di usare la leccarda quando si esegue la cottura al grill.
Qualora, per particolari condizioni di sporco, non fosse sufficiente l'azione precedente, si consiglia di intervenire asportando i grassi con un panno morbido od una spugna inumiditi con acqua calda.
La porosità dello smalto è fondamentale per garantire l'azione autopulente.
N.B.: Tutti i pannelli autopulenti in commercio hanno un'efficacia di rendimento di circa 300 ore di funzionamentoorno. Dopo tale limite i pannelli dovrebbero essere sostituiti.
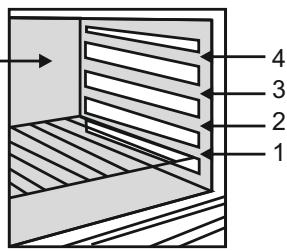
2.4 LA COTTURA AL GRILL
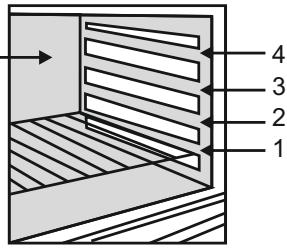
Questo tipo di cottura consente la doratura rapida dei cibi. A questo scopo consigliamo di insereire la griglia generalmente nel 3^ o 4^ ripiano, seconde le dimensioni dei cibi (Fig. pag. 8). Quasi tutte le carni possono essere cotte al grill, fanno eccezione alcune carni magre di selvaggina ed i polpettoni. La carne ed il pesce da cucinare al grill vanno leggermente unti con olio.
2.5 PULIZIA E MANUTENZIONE
Pulire le superfici in acciaio inox e smaltate con acqua tiepida e sapone, oppure con apposti prodotti in commercio, evitando assolutamente l'uso di polveri abrasive che danneggerebbero le superfici e le parti estetiche.
La pulizia del forno è molto importante e deve essere effettuata agli volta che questo viene usato. Infatti, sulle pareti si depositano grassi sciolti durante la cottura che potrebbero, alla successiva accensione, produrre odori sgradevoli che nuocerebbbero al buon esito della cottura. Per la pulizia usare acqua calda e detersivo, sciacquando accuratamente.
Per eliminare quello fastidioso intervento, su tutti i modelli possono essere inserti pannelli autopulenti, offerti come accessori opzionali: vedere apposto paragrafo«FORNO AUTOPULENTE CATALITICO »
Usare detersivi e pagliette d'acciaio per le griglie inox. La pulizia delle superfici in cristallo temperato deve essere eseguita quando le superfici sono fredde. Eventuali rotture dovute alla non osservanza di但这a regola elementare non rientano nei termini di garanzia.
La lampada forno può essere sostituita disinserendo elettricamente l'apparecchio e svitando l'ampolla che la racchiude, sostuendo la lampada non funzionante con una analoga resistente alle alto temperature.
2.6 GARANZIE
Il prodotto è garantito,或者其他 che ai sensi di legge, alle condizioni e nei termini riportati sul certificato di garanzia convenzionale inserto nel prodotto. Il certificate dovrà essere conservato e migliorato al nostro Centro di Assistenza Tecnica Autorizzato, in caso di necessità, insieme allo scontrino comprovante l'acquisto dell'elettrodomestico. Puoì consultare le condizioni di garanziaanche sul nostro site internet.
Per ottenere assistenza compiling a's apposto form on-line oppure contattaci al numero che trovi indicate nella pagina di assistenza del nostro site internet.
Questo apparecchio è contrassegnato in conformità alla Direttiva europea 2012/19/EU sulle apparecchiature elettriche ed elettroniche (WEEE). I WEEE contengono via le sostanze inquinanti (che sono provocare consequences negative sull'ambiente) che componenti di base (che sono essere riutilizzati). è importante che i WEEE siano soggetti a trattamenti specifici, per
rimuovere e smaltire correttamente tutti gli inquinanti e recuperare e riciclare tutti i materiali.
I singoli possono giocare un ruolo importante nell'assicurare che i WEEE non diventino un problema ambientale; è essenziale seguire alcune regole di base:
I WEEE non devono essere trattati come rifui di domestici. I WEEE devono essere portati ai punti di raccolta apposti gestiti dal comune o da società registrate. In molti Paesi, per i WEEE grandi, potrebbe essere presente la raccolta domestica. Quando si acquista un nuovo appearecchio, quello vecchio potrebbe essere restituito al rivenditore che deve acquisirlo Gratisamente su base singola, sempre che l'apparecchio sa ia del tipo equivalente e abbia le stati funzioni di quello acquistato.
3. CONTAMINUTI
3.1 USO DEL CONTAMINUTI
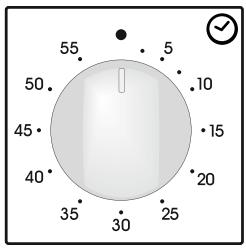
Per selezionare il tempo prescelto, ruotare la manopola di un giro completo, quando ritornare con l'indice nella posizione correspondente al tempo desiderato. Allo scadere del tempo, entrere in azione la suoneria per alcuni secondi.
4. ISTRUZIONI PER L'USO
| Manopola commutatore | Manopola termostato | FUNZIONE |
| Accende la luce interna. | ||
| 50 ÷ MAX | Convezione naturale Sono in funizione le resistenze superiore e inferiore. È la cottura tradizionale, ottima per arrostire cosciotti, selvaggina, ideale per biscotti, mele al forno e per rendere i cibi molto croccanti | |
| 50 ÷ MAX | Suola Adatta per cotture delicate (torte-soufflè). | |
| 50 ÷ MAX | Grigliatura tradizionale a porta chiusa InQLsta posizione viene insertita la resistenza del grill. Ottima nella cottura di carni di medie e piccolo spessore (salsicce, costine, bacon). | |
| 50 ÷ MAX | Forno ventilato L'aria calda, viene ripartita sui diversi ripiani; è l'ideale per cuocere contemporaneamente e diversi tipi di cibo (carne, pesce), alla miscelare sapori e odori. Cottura delicata - indica per pan di Spagna, torte Margherita, pasta sfoglia, ecc... | |
| 50 ÷ 200 | TURBO-GRILL (a): l'utilizzo del turbo-grill richiede la porta chiusa. Utilizzato la ventilazione e la resistenza cielo contemporaneamente. Si cui的缘故mplicato grandi pezzi di cibo, come arrosti, pollame, ecc., Mettete la griglia a metà del forno e posizione la leccarda sulla due della passagia, all'ora, o non è il cibo non sua troppo vicino al grill. Girate la carne a metà cotta. |
- Programma di prova secondo CENELEC EN 60350-1 utilizzato per la definizione della classe energetica.
5. TABELLA TEMPI DI COTTURA
I tempi suggeriti nelle seguente tabelle sono indicativi, infatti possono varire secondo la qualità, la freschezza, la dimensione e lo spessore degli alimenti e secondo il vostro gusto. Lasciare sempre riposare per alcuni minuti prima di servire, perché tutti gli alimenti continuano a cuocere dopo averli totti dalorno.
CONSIGLIO UTILE: Per non rendere le superfici troppo secche è consigliato abbassare la temperatura e allungare i tempi di cottura.
Posizione ripiani
| Forno elettrico statico | Forno elettrico ventilato | |||||||
| Pietanza | Quantità | Ripiano | Tempo di cottura in minuti | Tempe- ratura forno | Ripiano | Tempo di cottura in minuti | Tempe- ratura forno | Osservazioni |
| • Pasta | ||||||||
| Lasagne | Kg 3,5 | 2 | 70 ÷ 75 | 220 | 2 | 60 ÷ 65 | 200 | Inserire le lasagne nel forno freddo |
| Cannelloni | Kg 1,8 | 2 | 50 ÷ 60 | 220 | 2 | 40 ÷ 50 | 200 | Inserire i cannelloni nel forno freddo |
| Pasta al forno | Kg 2,5 | 2 | 55 ÷ 60 | 220 | 2 | 45 ÷ 50 | 200 | Inserire la pasta al forno nel forno freddo |
| • Paste salute | ||||||||
| Pane | Kg 1 di pasta | 2 | 35 prerisc.10 | 200 | 2 | 30 ÷ 35 prerisc.10 | 180 | Preparare la pasta a forma di pagnotta e incidere con un coltello una croce sulla parte superiore della forma. Lasciare lievitate a temperatura ambiente almeno 2 ore, ungere la leccarda e posizionate la forma bene al centro della stessa. |
| Pizza | Kg 1 | 1 | 25 ÷ 35 | 190 | 1 | 20 ÷ 25 | 190 | Preriscaldate per 15min. il forno e preparare le pizzo nella leccarda smaltata con pomodori, mozzarella e prosciutto, olio, sale, origano |
| Pasta sfoglia Vol au vent (Surgelati) | n° 24 | 1 | 30 ÷ 35 | 220 | 2 | 25 ÷ 30 | 200 | Disponete 24 vol au vent nella leccarda e cuocete. |
| Focaccia (n° 4) | gr. 200 di pasta cad | 2 | 25 ÷ 30 | 200 | 2 | 20 ÷ 25 | 180 | Preriscaldate per 15 min., ungere la teiglia del forno, disporre le 4 focacce oliate e salute prima di informare, lasciare lievitate a temperatura ambiente per almeno 2 ore |
| • Carne | ||||||||
| Tutte le carni possono essere cotte in recipienthe con bordo basso o bordo alto. è consigliabile coprire il recipienthe a bordo basso con un coperchio per evitare di sporcare il forno con schizzi del condimento. Le carni coperte risultano più morbide e succose, nelle quale scoperte risultano più croccanti. I tempi indicate valgono per cotture con recipienthe coperto o scoperto. | ||||||||
| Roastbeef intero | Kg 1 | 3 | 70 ÷ 80 | 220 | 3 | 50 ÷ 60 | 200 | Disporre la carne in una teiglia Pirex a bordo alto con sale pepe. Voltare a meta cottura |
| Arrosto di maiale arrotolato | Kg 1 | 2 | 100 ÷ 110 | 220 | 2 | 80 ÷ 90 | 200 | Cuocere come sopra |
| Arrosto di vitello arrotolato | Kg 1,3 | 1 | 90 ÷ 110 | 220 | 2 | 90 ÷ 100 | 200 | Cuocere come sopra |
| Arrosto di manzo filetto | Kg 1 | 2 | 80 ÷ 90 | 220 | 2 | 80 ÷ 90 | 200 | Cuocere come sopra |
| • Pesci | ||||||||
| Trota | 3 intere/Kg 1 | 2 | 40 ÷ 45 | 220 | 2 | 35 ÷ 40 | 200 | Cuocere le trote coperte con olio, sale e cipolle in teiglia Pirex. |
| Salmone | 700 g a fette 2,5 cm s.p. | 2 | 30 ÷ 35 | 220 | 2 | 30 ÷ 25 | 200 | Cuocere il salmone non coperto in teiglia Pirex con sale, pepe e olio. |
| Sogliola | Filetti / Kg 1 | 2 | 40 ÷ 45 | 220 | 2 | 35 ÷ 40 | 200 | Cuocete la sogliola con sale e un cucchioio d'olio. |
| Orata | 2 intere | 2 | 40 ÷ 45 | 220 | 2 | 35 ÷ 40 | 200 | Cuocere in recipienthe coperto le orate con olio e sale |
5. TABELLA TEMPI DI COTTURA
| Forno elettrico statico | Forno elettrico ventilato | |||||||
| Pietanza | Quantità | Ripiano | Tempo di cottura in minuti | Tempe- ratura forno | Ripiano | Tempo di cottura in minuti | Tempe- ratura forno | Osservazioni |
| Pollame, Coniglio | ||||||||
| Faraona | Kg 1-1,3 | 2 | 60 ÷ 80 | 220 | 2 | 60 ÷ 70 | 200 | Sistemare la faraona in teglia Pirex o ceramicà bordo alto condita con aromi naturali e pochissimo olio. |
| Pollo | Kg 1,5-1,7 | 2 | 110 ÷ 120 | 220 | 2 | 100 ÷ 110 | 200 | Come per la faraona |
| Coniglio a peszi | Kg 1-1,2 | 2 | 55 ÷ 65 | 220 | 2 | 50 ÷ 60 | 200 | Mettete i peszi di uguali dimensioni nella leccarda smaltata, condite con aromi naturali. Se necessario voltate i peszi. |
| Dolci, Torte | ||||||||
| Torta cacao | Scatola | 1 | 55 | 180 | 1 | 50 | 160 | In teglia per torte Ø 22. Prerisc. per 10 min. |
| Torta margherita | Scatola | 1 | 55 | 175 | 1 | 40 ÷ 45 | 160 | In teglia per torte Ø 22. Prerisc. per 10 min. |
| Torta di carote | Scatola | 1 | 65 | 180 | 1 | 50 ÷ 60 | 160 | In teglia per torte Ø 22. Prerisc. per 10 min. |
| Torta crostata albicocca | 700 gr | 1 | 40 | 200 | 2 | 30 ÷ 35 | 180 | In teglia per torte Ø 22. Prerisc. per 10 min. |
| Verdura | ||||||||
| Finocchi | 800 gr | 1 | 70 ÷ 80 | 220 | 1 | 60 ÷ 70 | 200 | Disponete i finocchi tagliati in 4 parti e coperti in teglia di Pirex con burro e sale e possibilmente con la parte interna verso l'alto |
| Zucchini | 800 gr | 1 | 70 | 220 | 1 | 60 ÷ 70 | 200 | Affettate le zucchini e cuocete in teglia Pirex coperte con burro e sale |
| Patate | 800 gr | 2 | 60 ÷ 65 | 220 | 2 | 60 ÷ 65 | 200 | Tagliate le patate in parti uguali e cuocetele coperte con olio, sale e origano o rosmarino in teglia Pirex. |
| Carote | 800 gr | 1 | 80 ÷ 85 | 220 | 1 | 70 ÷ 80 | 200 | Tagliate le carote a fettine, copritele e cuocetele in teglia Pirex. |
| Frutta | ||||||||
| Mele intere | Kg 1 | 1 | 45 ÷ 55 | 220 | 2 | 45 ÷ 55 | 200 | Cuocere la frutta in teglia di Pirex o ceramicà non coperta. Lasciare raffreddare in forso. |
| Pere | Kg 1 | 1 | 45 ÷ 55 | 220 | 2 | 45 ÷ 55 | 200 | Come sopra |
| Pesche | Kg 1 | 1 | 45 ÷ 55 | 220 | 2 | 45 ÷ 55 | 200 | Come SOPRA |
| Cottura a grill | ||||||||
| La cotta con il grill delve essere seeguita ponendo il cibo sotto il grill elettrico. Attenzione: durante il funzionamento il grill diventa di colore rosso vivo. La leccarda delve essere insertita sulla griglia per raccogliere i sughi. | ||||||||
| Pane carrè tostato | 4 fette | 4 | 5 (5 prerisc.) | Grill | 4 | 5 (10 prerisc.) | Grill | Inserire il pane carrè sulla griglia supporto. Dopo la 1° cottura capovolgere forn a cottura ultimata. |
| Toasts farkiti | 4 | 3 | 10 (5 prerisc.) | Grill | 3 | 5/8 (10 prerisc.) | Grill | Inserire i toasts sulla griglia supporto leccarda; dopa la prima brunitura capovolgere i toasts forn a brunitura ultimata. |
| Salsiccie | n°6 / Kg 0,9 | 4 | 25/30 (5 prerisc.) | Grill | 4 | 15/20 (10 prerisc.) | Grill | Tagliare le salsiccie a metà e disporte sulla griglia, con la parte interna verso l'alto. Ametà cottura capovolgere le salsiccie forn a cottura ultimata. Avvertenza: agli tanto controllate visibiliene l'uniformità di cottura. Nel caso di disuniformità intercambiare quella cotte con quello meno cotte. |
| Costate di manzo | n°4 / Kg 1,5 | 4 | 25 (5 prerisc.) | Grill | 4 | 15/20 (10 prerisc.) | Grill | Disporre le fette bene sono l'azione del grill e voltarle due volte. |
| Coscie di pollo | n°4 / Kg 1,5 | 3 | 50/60 (5 prerisc.) | Grill | 3 | 50/60 (10 prerisc.) | Grill | Condite con aromi naturali e voltatele agli tanto. |
- During cooking, moisture may condense inside the oven cavity or on the glass of the door. This is a normal condition. To reduce this effect, wait 10-15 minutes after turning on the power before putting food inside the oven. In any case, the condensation disappears when the oven reaches the cooking temperature.
- Cook the vegetables in a container with a lid instead of an open tray.
- Avoid leaving food inside the oven after cooking for more than 15/20 minutes.
- WARNING: the appliance and accessible parts become hot during use. Be careful not to touch any hot parts.
- WARNING: the accessible parts can become hot when the oven is in use. Children must be kept at a safe distance.
- WARNING: ensure that the appliance is switched off before replacing the bulb, to avoid the possibility of electric shocks.
- WARNING: before initiating the automatic cleaning cycle:
- Clean the oven door;
- Remove large or coarse food residues from the inside of the oven using a damp sponge. Do not use detergents;
- Remove all accessories and the sliding rack kit (where present);
- Do not place tea towels
- In ovens with meat probe it is necessary, before making the cleaning cycle, close the hole with the nut provided. Always close the hole with the nut when the meat probe is not used.
Children under 8 must be kept at a safe distance from the appliance if not continuously supervised. - Children must not play with the appliance. The appliance can be used by those aged 8 or over and by those with limited physical, sensorial or mental capacities, without experience or knowledge of the product, only if supervised or provided with instruction as to the operation of the appliance, in a safe way with awareness of the possible risks.
- Cleaning and maintenance should not be carried out by unsupervised children.
- Do not use rough or abrasive materials or sharp metal scrapers to clean the oven door glasses, as they can scratch the surface and cause the glass to shatter.
- The oven must be switched off before removing the removable parts and, after cleaning, reassemble them according the instructions.
- Only use the meat probe recommended for this oven.
- Do not use a steam cleaner for cleaning operations.
- Connect a plug to the supply cable that is able to bear the voltage, current and load indicated on the tag and having the earth contact. The socket must be suitable for the load indicated on the tag and must be having the earth contact connected and in operation. The earth conductor is yellow-green in colour. This operation should be carried out by a suitably qualified professional. In case of incompatibility between the socket and the appliance plug, ask a qualified electrician to substitute the socket with another suitable type. The plug and the socket must be conformed to the current norms of the installation country. Connection to the power source can also be made by placing an omnipolar breaker between the appliance and the power source that can bear the maximum connected load and that is in line with current legislation. The yellow-green earth cable should not be interrupted by the breaker. The socket or omnipolar breaker used for the connection should be easily accessible when the appliance is installed.
- The disconnection may be achieved by having the plug accessible or by incorporating a switch in the fixed wiring in accordance with the wiring rules.
- If the power cable is damaged, it must be substituted with a cable or special bundle available from the manufacturer or by contacting the customer service department.
- The type of power cable must be H05V2V2-F.
- Failure to comply with the above can compromise the safety of the appliance and invalidate the guarantee.
- Any excess of spilled material should be removed before cleaning.
- During the pyrolytic cleaning process, surfaces can heat up more than usual, children must therefore be kept at a safe distance.
- The appliance must not be installed behind a decorative door in order to avoid overheating.
- When you place the shelf inside, make sure that the stop is directed upwards and in the back of the cavity.
The shelf must be inserted completely into the cavity - WARNING: Do not line the oven walls with aluminum foil or single-use protection available from stores. Aluminum foil or any other protection, in direct contact with the hot enamel, risk melting and deteriorating the enamel of the insides.
- WARNING: Never remove the oven door seal.
- No additional operation/setting is required in order to operate the appliance at the rated frequencies.
1. GENERAL WARNINGS
Thank you for choosing one of our products. To get the most out of your oven we recommend that you:
-
Read the notes in this manual carefully: they contain important instructions on how to install, use and service this oven safely.
-
Keep this booklet in a safe place for easy, future reference.
When the oven is first switched on it may give out acrid smelling fumes. This is because the bonding agent for insulating panels around the oven has been heated up for the first time.
This is a completely normal, if it does occur you merely have to wait for the fumes to clear before putting the food into the oven.
An oven by its very nature becomes very hot. Especially the glass of the oven door.
1.1 DECLARATION OF COMPLIANCE
By placing the C mark on this product, we are confirming compliance to all relevant European safety, health and environmental requirements which are applicable in legislation for this product.
When you have unpacked the oven, make sure that it has not been damaged in any way. If you have any doubts at all, do not use it: contact a professionally qualified person. Keep packing materials such as plastic bags, polystyrene, or nails out of the reach of children as they are dangerous.
1.2 SAFETY HINTS
- The oven must be used only for the purpose for which it was designed: it must only be used for cooking food. Any other use, e.g. as a form of heating, is an improper use of the oven and is therefore dangerous.
- The manufacturers cannot be held responsible for any damage caused by improper, incorrect or unreasonable use. When using any electrical appliance you must follow a few basic rules.
- Do not pull on the power cable to remove the plug from the socket.
- Do not touch the oven with wet or damp hands or feet.
- Do not use the oven unless you are wearing something on your feet.
- It is not generally a good idea to use adapters, multiple sockets for several plugs and cable extensions.
-
If the oven breaks down or develops a fault switch it off at the mains and do not touch it.
-
If the cable is damaged it must be replaced promptly.
When replacing the cable, follow these instructions. Remove the power cable and replace it with one of the H05RRF, H05VV-F, H05V2V2-F type. The cable must be able to bear the electrical current required by the oven. Cable replacement must be carried out by properly qualified technicians. The earthing cable (yellow-green) must be 10 mm longer than the power cable.
Use only an approved service centre for repairs and ensure that only original parts are used. If the above instructions are not adhered to the manufacturers cannot guarantee the safety of the oven.
- Do not line the oven walls with aluminium foil or single-use protection available from stores. Aluminium foil or any other protection, in direct contact with the hot enamel, risks melting and deteriorating the enamel of the insides.
1.3 INSTALLATION
Installation is the customer's responsibility. The manufacturers have no obligation to carry this out. If the assistance of the manufacturer is required to rectify faults arising from incorrect installation, this assistance is not covered by the guarantee.
The installation instructions for professionally qualified personal must be followed. Incorrect installation may cause harm or injury to people, animals or belongings. The manufacturer cannot be held responsible for such harm or injury.
1.4 FITTING THE OVEN INTO THE KITCHEN UNIT
Fit the oven into the space provided in the kitchen unit; it may be fitted underneath a work top or into an upright cupboard. Fix the oven in position by screwing into place, using the four fixing holes in the frame. (Fig.on last page).
To locate the fixing holes, open the oven door and look inside. To allow adequate ventilation, the measurements and distances indicated in the diagram on last page must be adhered to when fixing the oven.
Note: For ovens that are combined with a hob unit the instructions contained in the manual for the hob unit must be followed.
1.5 IMPORTANT
If the oven is to work properly, the kitchen housing must be suitable. The panels of the kitchen unit that are next to the oven must be made of a heat resistant material. Ensure that the glues of units made of veneered wood can withstand temperatures of at least 120^ . Plastics or glues that cannot withstand such temperatures will melt and deform the unit. Once the oven has been lodged inside the unit, the electrical parts must be completely insulated. This is a legal safety requirement. All guards must be firmly fixed into place so that it is impossible to remove them without using special tools.
Remove the back of the kitchen unit to ensure an adequate current of air circulates around the oven. The hob must have a rear gap of at least 45mm .
1.6 CONNECTING TO THE POWER SUPPLY
Plug into the power supply. Ensure first that there is a third contact that acts as earthing for the oven. The oven must be properly earthed.
If the model of oven is not fitted with a plug, fit a standard plug to the power cable. It must be able to bear the power supply indicated on the specifications plate. The earthing cable is yellowgreen. The plug must be fitted by a properly qualified person. If the socket and the plug are incompatible the socket must be changed by a properly qualified person. A properly qualified person must also ensure that the power cables can carry the current required to operate the oven.
An ON/OFF switch may also be connected to the power supply. The connections must take account of the current supplied and must comply with current legal requirements. The yellow-green earthing cable must not be governed by the ON/OFF switch. The socket or the ON/OFF switch used for connecting to the power supply must be easily accessible when the oven has been installed.
Important: During installation, position the power cable in such a way that it will not be subjected to temperatures of above 50^ at any point. The oven complies with safety standards set by the regulatory bodies. The oven is safe to use only if it has been adequately earthed in compliance with current legal requirements on wiring safety. You must ensure that the oven has been adequately earthed.
The manufacturers cannot be held responsible for any harm or injury to persons, animals or belongingss caused by failure to properly earth the oven.
WARNING: the voltage and the supply frequency are showed on the rating plate (fig. on last page).
The cabling and wiring system must be able to bear the maximum electric power required by the oven. This is indicated on the specifications plate. If you are in any doubt at all, use the services of a professionally qualified person.
1.7 OVEN EQUIPMENT (according to the model)
It is necessary to do an initial cleaning of the equipment before the first use of each of them. Wash them with a sponge. Rinse and dry off.
The simple shelf can take baking trays and dishes.
The tray holder shelf is especially good for grilling things. Use it with the drip tray.
The special profile of the shelves means they stay horizontal even when pulled right out. There is no risk of a dish sliding or spilling.
The drip tray catches the juices from grilled foods. It is only used with the Grill, Rotisserie, or Fan Assisted Grill; remove it from the oven for other cooking methods.
Never use the drip tray as a roasting tray as this creates smoke and fat will spatter your oven making it dirty.
Accessories must be removed from the oven when not in use.
2.1 SHELF SAFETY SYSTEM
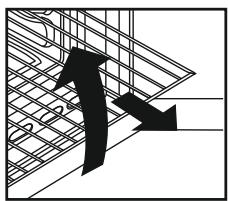
The oven features a new shelf safety system.
This allows you to pull out the oven shelves when inspecting the food without danger of food spillages or shelves falling accidentally out of the oven.
To remove the shelves pull out and lift.
2.2 GRILLING
Grilling makes it possible to give food a rich brown colour quickly. For browning we recommend that you insert the grill onto the fourth level, depending on the proportions of the food (see fig. page 7).
Almost all food can be cooked under the grill except for very lean game and meat rolls.
Meat and fish that are going to be grilled should first be lightly doused with oil.
2.3 COOKING TIME
For recommended cooking times and temperatures the first time you use the oven, refer to the tables on pages 7, 8. You may then wish to vary these times and settings in the light of your own experience.
2.4 SELF-CLEANING OVEN WITH CATALYTIC
Special self-cleaning panels covered in a micro-porous coating are available as optional extras for all models. If they are fitted, the oven no longer needs to be cleaned by hand.
The fat that is splattered onto the sides of the oven during roasting is eliminated by the microporous coating which breaks the fat down by catalysis and transforms it into gas.
Excessive splattering may nevertheless block the pores and therefore hinder self-cleaning. The self-cleaning capacity may be restored by switching on the empty oven to maximum for about 10-20 minutes.
Do not use abrasive products, metal cleaning wads, sharp objects, rough cloths, or chemical products and detergents that may permanently damage the catalytic lining.
It is a good idea to use deep roasting trays to roast fatty foods such as joints of meat etc. and to put a tray underneath the grill to catch surplus fat. If the walls of the oven are so thickly coated in grease that the catalytic lining is no longer effective remove surplus grease with a soft cloth or sponge soaked in hot water.
The lining must be porous for self-cleaning to be effective.
N.B.: All catalytic linings currently on the market have a working life of about 300 hours. They should therefore be replaced after about 300 hours.
2.5 CLEANING AND MAINTENANCE
Clean the stainless steel and enamelled surfaces with warm, soapy water or with suitable brand products. On no account use abrasive powders that may damage surfaces and ruin the oven's appearance. It is very important to clean the oven each time that it is used. Melted fat is deposited on the sides of the oven during cooking. The next time the oven is used this fat could cause unpleasant odours and might even jeopardise the success of the cooking. Use hot water and detergent to clean; rinse out thoroughly.
To make this chore unnecessary all models can be lined with catalytic self-cleaning panels: these are supplied as an optional extra (see the section SELF-CLEANING OVEN WITH CATALYTIC LINING).
Use detergents and abrasive metal pads like «brillo pads» for the stainless steel grills.
The glass surfaces facia panel, oven door and warming compartment door must be cleaned when they are cold. Damage that occurs to them because this rule was not adhered to are not covered by the guarantee.
To replace the interior light:
- switch off the mains power supply and unscrew bulb. Replace with an identical bulb that can withstand very high temperatures.
2.6 SERVICE CENTRE
Before calling the Service Centre
If the oven is not working, we recommend that:
you check that the oven is properly plugged into the power supply.
If the cause of the fault cannot be detected:
disconnect the oven from the mains, do not touch the oven and call the after sales service.
Before calling the Service Centre remember to make a note of the serial number on the specifications plate (see fig. On last page).
The oven is supplied with a guarantee certificate that ensures that it will be repaired free of charge by the Service Centre.
3. TIMER
3.1 USING THE MINUTE TIMER
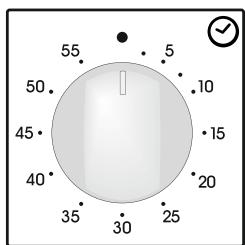
To set the cooking time, turn dial one complete revolution and then position the index to the required time. When the time has lapsed, the signal will ring for a few seconds.
4. OPERATING ISTRUCTIONS
| Function dial | Thermostat dial | Function |
| Turns on the oven light This will automatically activate the cooling fan (on fan cooled models only) | ||
| 50÷MAX | Natural convection Bottom and top oven elements are used. This is the traditional form of baking and roasting. It is ideal for roasting joints of meat and game, baking biscuits and apples and making the food nice and crispy. | |
| 50÷MAX | Lower Resistance Lower element. This function is ideal for delicate dishes (pies-souffle). | |
| 50÷MAX | GRILL: use the grill with the door closed. The top heating element is used alone and you can adjust the temperature. Five minutes preheating time is required to get the elements red-hot. Success is guaranteed for grills, kebabs and gratin dishes. White meats should be put at a distance from the grill; the cooking time is longer, but the meat will be tastier. You can put red meats and fish fillets on the shelf with the drip tray underneath. | |
| 50÷MAX | Fan cooking Both top and bottom heating elements are used with the fan circulating the air inside the oven. We recommend you use this method for poultry, pastries, fish and vegetables. Heat penetrates into the food better and both the cooking and preheating times are reduced. You can cook different foods at the same time with or without the same preparation in one or more positions. This cooking method gives even heat distribution and the smells are not mixed. Allow about ten minutes extra when cooking foods at the same time. | |
| 50÷200 | FAN ASSISTED GRILL (a): use the turbo-grill with the door closed. The top heating element is used with the fan circulating the air inside the oven. Preheating is necessary for red meats but not for white meats. Ideal for cooking thick food items, whole pieces such as roast pork, poultry, etc. Place the food to be grilled directly on the shelf centrally, at the middle level. Slide the drip tray under the shelf to collect the juices. Make sure that the food is not too close to the grill. Turn the food over halfway through cooking. |
5. TABLES OF COOKING TIMES
The overall suggested cooking times set out below are intended as a rough guide only. They may in fact vary according to the quality, the freshness, the size and the thickness of the food cooked and of course cooking time is also partly a matter of taste. Let the food stand for a few minutes before serving because the ingredients continue cooking after they have been removed from the oven.
HANDY TIP: Lower the temperature so as to avoid the surface of the food becoming hard and dry.
Shelf position
| Static electric oven | Electric fan oven | |||||||
| Food | Quantity | Shelf | Time of cooking in minutes | Oven temperature | Shelf | Time of cooking in minutes | Oven temperature | Remarks |
| · Pasta | ||||||||
| Lasagne | Kg 3,5 | 2 | 70 ÷ 75 | 220 | 2 | 60 ÷ 65 | 200 | Put the lasagne into an unheated oven |
| Cannelloni | Kg 1,8 | 2 | 50 ÷ 60 | 220 | 2 | 40 ÷ 50 | 200 | Put the cannelloni into an unheated oven |
| Oven baked pasta | Kg 2,5 | 2 | 55 ÷ 60 | 220 | 2 | 45 ÷ 50 | 200 | Put the oven baked pasta into an unheated oven |
| · Baking (not cakes) | ||||||||
| Bread | Kg 1 di pasta | 2 | 35 10 (pre-heating) | 200 | 2 | 30 ÷ 35 10 (pre-heating) | 180 | Form the dough into a loaf and make a cross with a knife on top of the dough leave the dough to rise for at least 2 hours. Grease the baking tin and put the dough in the middle of it. |
| Pizza | Kg 1 | 1 | 25 ÷ 35 | 190 | 1 | 20 ÷ 25 | 190 | Warm the oven for 15 minutes and place the pizzas on the greased baking tray. Garnish them with tomatoes, mozzarella, ham, oil, salt and origano. |
| Pastry (frozen) vol au vents | n° 24 | 1 | 30 ÷ 35 | 220 | 2 | 25 ÷ 30 | 200 | Place 24 vol au vents in the oven and bake. |
| Focaccia (n° 4) | gr. 200 of dough each | 2 | 25 ÷ 30 | 200 | 2 | 20 ÷ 25 | 180 | Warm the oven for 15 minutes, grease the baking tray, season the 4 focaccia with oil and salt and leave them to rise at room temperature for at least 2 hours before putting them in the oven. |
| · Meat | ||||||||
| All meats can be roasted in shallow or deep roasting trays. It is advisable to cover the shallow trays to avoid splattering the sides of the oven with grease. The roasting times are the same whether the meat has been covered up or not. | ||||||||
| Whole joint of beef | Kg 1 | 3 | 70 ÷ 80 | 220 | 3 | 50 ÷ 60 | 200 | Put the meat into a deep Pyrex dish and season with salt and pepper; turn the meat half way through cooking. |
| Joint of deboned | Kg 1 | 2 | 100 ÷ 110 | 220 | 2 | 80 ÷ 90 | 200 | Cook the meat in a covered Pyrex dish with herbs, spice, oil and butter. |
| Joint of deboned veal | Kg 1,3 | 1 | 90 ÷ 110 | 220 | 2 | 90 ÷ 100 | 200 | Cook as indicated above |
| Joint of fillet of beef | Kg 1 | 2 | 80 ÷ 90 | 220 | 2 | 80 ÷ 90 | 200 | Cook as indicated above. |
| · Fish | ||||||||
| Trout | 3 whole trout or / Kg 1 | 2 | 40 ÷ 45 | 220 | 2 | 35 ÷ 40 | 200 | Cover the trout with salt, oil and onions and cook in a Pyrex dish. |
| Salmon | 700 g 2,5 cm slice | 2 | 30 ÷ 35 | 220 | 2 | 30 ÷ 25 | 200 | Cook the salmon in an open Pyrex dish with salt, pepper and oil. |
| Sole | Kg 1 | 2 | 40 ÷ 45 | 220 | 2 | 35 ÷ 40 | 200 | Cook the sole with salt and a spoonful of oil. |
| Bream | 2 whole ones | 2 | 40 ÷ 45 | 220 | 2 | 35 ÷ 40 | 200 | Cook the bream in oil and salt in a covered dish. |
5. TABLES OF COOKING TIMES
| Static electric oven | Electric fan oven | |||||||
| Food | Quantity | Shelf | Time of cooking in minutes | Oven temperature | Shelf | Time of cooking in minutes | Oven temperature | Remarks |
| Rabbits and Poultry | ||||||||
| Guinea fowl | Kg 1-1,3 | 2 | 60 ÷ 80 | 220 | 2 | 60 ÷ 70 | 200 | Place the guinea fowl in a deep Pyrex or pottery dish with very little oil and season with herbs and spices. |
| Chicken | Kg 1,5-1,7 | 2 | 110 ÷ 120 | 220 | 2 | 100 ÷ 110 | 200 | Follow the procedure for cooking the guinea fowl. |
| Rabbit pieces | Kg 1-1,2 | 2 | 55 ÷ 65 | 220 | 2 | 50 ÷ 60 | 200 | Put all the pieces of the same size in the glazed tray. Season with herbs and spices. Turn the pieces as and when required. |
| Cakes | ||||||||
| Coconut cake baked in a tin | 1 | 55 | 180 | 1 | 50 | 160 | Use a tin that is 22 cm deep. Pre-heat for 10 mins. | |
| Sponge cake | 1 | 55 | 175 | 1 | 40 ÷ 45 | 160 | Use a tin that is 22 cm deep. Pre-heat for 10 mins. | |
| Carrot cake baked in a tin | 1 | 65 | 180 | 1 | 50 ÷ 60 | 160 | Use a tin that is 22 cm deep. Pre-heat for 10 mins. | |
| Apricot pie | 700 gr | 1 | 40 | 200 | 2 | 30 ÷ 35 | 180 | Use a tin that is 22 cm deep. Pre-heat for 10 mins. |
| Vegetable | ||||||||
| Fennel | 800 gr | 1 | 70 ÷ 80 | 220 | 1 | 60 ÷ 70 | 200 | Cut the fennel into four pieces, add butter, salt and potatoes if required and place in a Pyrex face up. Cover the dish. |
| Courgettes | 800 gr | 1 | 70 | 220 | 1 | 60 ÷ 70 | 200 | Slice the courgettes, place in a Pyrex dish and add butter and salt. |
| Potatoes | 800 gr | 2 | 60 ÷ 65 | 220 | 2 | 60 ÷ 65 | 200 | Cut the potatoes into equal parts and place in a Pyrex dish. Season with salt, origano and rosemary. Cook in oil. |
| Carrots | 800 gr | 1 | 80 ÷ 85 | 220 | 1 | 70 ÷ 80 | 200 | Slice the carrots, place in a Pyrex dish and cook. |
| Fruit | ||||||||
| Whole apples | Kg 1 | 1 | 45 ÷ 55 | 220 | 2 | 45 ÷ 55 | 200 | Bake the fruit in an open Pyrex or earthen-ware dish. Leave it to cool inside the oven. |
| Pears | Kg 1 | 1 | 45 ÷ 55 | 220 | 2 | 45 ÷ 55 | 200 | Follow procedure above. |
| Peaches | Kg 1 | 1 | 45 ÷ 55 | 220 | 2 | 45 ÷ 55 | 200 | Follow procedure above. |
| Grilling | ||||||||
| Place the food to be grilled underneath the infra-red grill. Warning: When the grill is on it takes on a bright red colour. Place the tray underneath the grill to collect juices and fat from the food being grilled. | ||||||||
| Squares of bread for toasting | 4 pieces | 4 | 5 (5 to heat up grill) | Grill | 4 | 5 (10 to heat up grill) | Grill | Lay the bread on the grill tray. When one side of the bread has been toasted, turn over and toast the other side. Remember: keep the toast warm at the bottom of the oven until you are ready to serve it. |
| Toasted sandwiches | 4 | 3 | 10 (10 to heat up grill) | Grill | 3 | 5/8 (10 to heat up grill) | Grill | Lay the bread on the grill tray. When one side of the sandwich has been toasted, turn over and toast the other side. |
| Sausages | n°6 / Kg 0,9 | 4 | 25/30 (5 to heat up grill) | Grill | 4 | 15/20 (10 to heat up grill) | Grill | Cut the sausages in half and lay them face down on the grill. Half way through grilling turn them over. Every so often, check that they are being cooked equally all over. (If this is not happening, turn and reposition the ones being cooked either less or more than the others. |
| Ribs of beef | n°4 / Kg 1,5 | 4 | 25 (5 to heat up grill) | Grill | 4 | 15/20 (10 to heat up grill) | Grill | Make sure that the ribs of beef are exposed to the full effect on the main grill. |
| Chicken legs | n°4 / Kg 1,5 | 3 | 50/60 (5 to heat up grill) | Grill | 3 | 50/60 (10 to heat up grill) | Grill | Turn them over twice during grilling |
13/14
This appliance is marked according to the European directive 2012/19/EU on Waste Electrical and Electronic Equipment (WEEE). WEEE contains both polluting substances (which can cause negative consequences for the environment) and basic components (which can be re-used). It is important to have WEEE subjected to specific treatments, in order to remove and dispose properly all pollutants, and recover and recycle all materials. Individuals can play an important role in ensuring that WEEE does not become an environmental issue; it is essential to follow some basic rules: WEEE shall not be treated as household waste. WEEE shall be handed over to the relevant collection points managed by the municipality or by registered companies. In many countries, for large WEEE, home collection could be present. When you buy a new appliance, the old one may be returned to the retailer who has to collect it free of charge on a one-to-one basis, as long as the equipment is of equivalent type and has the same functions as the supplied equipment.
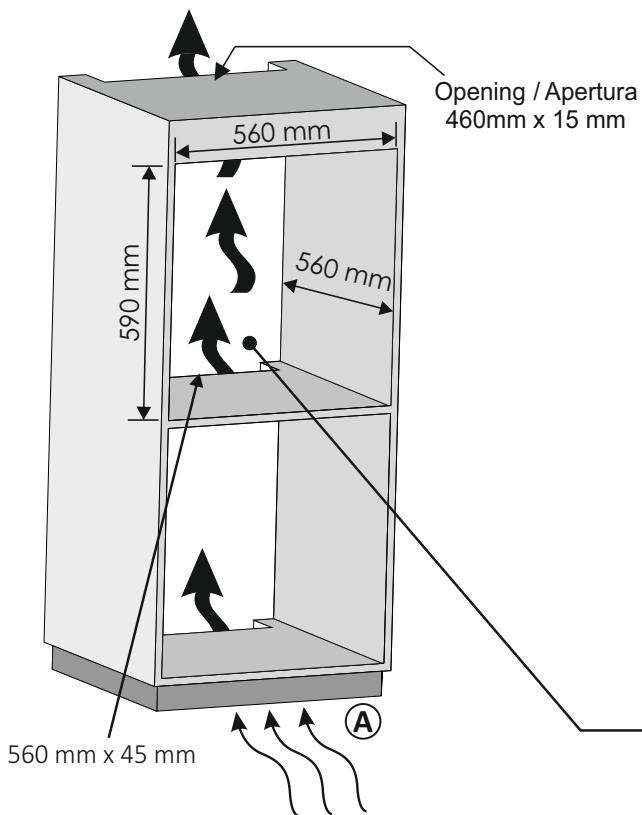
- GB If the furniture is equipped with a bottom at the back part, provide an opening for the power supply cable.
IT Se il mobile ha un fondo posteriore, praticare un foro per il passaggio del cavo di alimentazione.
A GB If the mounting of the plinth does not allow air circulation, to obtain the maximum performance of the oven it is necessary to create an opening of 500 × 10 ~mm or the same surface in 5.000 ~mm^2
A It Se il montaggio del plinto non consente la circolazione dell'aria, per ottenere le massime prestazioni del forno è necessario create un'apertura di 500x10mm o la stessa superficie in 5.000mm^2
GB If the oven does not have a cooling fan, create an opening 460~mm× 15~mm
IT Se il forn o non dispone di una ventola di raffreddamento, lasciare uno spazio 460~mm× 15~mm

IT
La Ditta costrutrice declina agli responsabilità per eventuali errori di stampa conteni nel presente libretto. Si riserva inoltre il diritto di apportare le modifiche che si renderanno utili ai propri prodotti sulla compensatore le caratteristiche essenziali.
GB
The manufacturer will not be responsible for any inaccuracy resulting from printing or transcript errors contained in this brochure. We reserve the right to carry out modifications to products as required, including the interests of consumption, without prejudice to the characteristics relating to safety or function.

- ZEROWATT
- CONTENO TO
- IT
- CONTENTS
- GB
- 1-AVVERTENZE GENERALI
- DICIHIARAZIONE DI CONFORMITA
- INFORMAZIONI SULLA SICUREZZA
- In particolare:
- INSTALLAZIONE
- INSERIMENTO DEL MOBILE
- IMPORTANTE
- ALLACCIAMENTO ELETTRICO
- DOTAZIONE DEL FORNO (secondo modello)
- CONSIGLI UTILI
- GRIGLIE FORNO - SISTEMA DI ARRESTO
- TEMPI DI COTTURA
- FORNO AUTOPULENTE CATALITICO
- LA COTTURA AL GRILL
- PULIZIA E MANUTENZIONE
- GARANZIE
- CONTAMINUTI
- USO DEL CONTAMINUTI
- ISTRUZIONI PER L'USO
- TABELLA TEMPI DI COTTURA
- GENERAL WARNINGS
- DECLARATION OF COMPLIANCE
- SAFETY HINTS
- INSTALLATION
- FITTING THE OVEN INTO THE KITCHEN UNIT
- IMPORTANT
- CONNECTING TO THE POWER SUPPLY
- OVEN EQUIPMENT (according to the model)
- SHELF SAFETY SYSTEM
- GRILLING
- COOKING TIME
- SELF-CLEANING OVEN WITH CATALYTIC
- CLEANING AND MAINTENANCE
- SERVICE CENTRE
- TIMER
- USING THE MINUTE TIMER
- OPERATING ISTRUCTIONS
- TABLES OF COOKING TIMES
Marque : ZEROWATT
Modèle : ZFFS302NX
Catégorie : Four