
EDB-4590-I - Lave-vaisselle EDESA - Notice d'utilisation et mode d'emploi gratuit
Retrouvez gratuitement la notice de l'appareil EDB-4590-I EDESA au format PDF.

| Type de produit | Lave-vaisselle |
| Marque | EDESA |
| Modèle | EDB-4590-I |
| Capacité standard | 9 couverts |
| Classe d'efficacité énergétique | A+ |
| Consommation énergétique annuelle | 215 kWh |
| Consommation d'eau annuelle | 2660 litres |
| Niveau sonore | 49 dB(A) |
| Hauteur | 815 mm (sans plan de travail) / 845 mm (avec plan de travail) |
| Largeur | 448 mm |
| Profondeur (porte fermée) | 550 mm |
| Profondeur (porte ouverte à 90°) | 1150 mm |
| Alimentation électrique | 220-240 V / 50 Hz |
| Puissance absorbée | 1760-2100 W |
| Pression d'eau requise | 0,04 - 1,0 MPa (0,4 - 10 bar) |
| Programmes de lavage | Intensif, Normal, ECO, 90 min, Rapide |
| Fonctions spéciales | Séchage extra, demi-charge, départ différé (3/6/9 h) |
| Type d'installation | Indépendant ou intégrable |
| Sécurité | Sécurité enfant (utilisation à partir de 8 ans sous surveillance), protection contre les fuites (manguera de sécurité) |
| Entretien | Nettoyage régulier des filtres et des bras de lavage, adoucisseur d'eau avec sel régénérant |
| Accessoires inclus | Panier à couverts, panier supérieur réglable, entonnoir pour sel |
FOIRE AUX QUESTIONS - EDB-4590-I EDESA
Questions des utilisateurs sur EDB-4590-I EDESA
0 question sur cet appareil. Repondez a celles que vous connaissez ou posez la votre.
Poser une nouvelle question sur cet appareil
Téléchargez la notice de votre Lave-vaisselle au format PDF gratuitement ! Retrouvez votre notice EDB-4590-I - EDESA et reprennez votre appareil électronique en main. Sur cette page sont publiés tous les documents nécessaires à l'utilisation de votre appareil EDB-4590-I de la marque EDESA.
MODE D'EMPLOI EDB-4590-I EDESA
edesa


www.edesa.es

EDB-4590-I
ES Manual de instructaciones
EN Instruction manual
CONTENIDO
NOTA:
- Si revisa la sección sobre Resolución de problemas encontrará algunos consejos para resolver problemas comunes.
- Si no pueda SOLUTIONAR某个 problema, pida可以帮助 a un的技术ico profesional.
- El fabricante, siguiendo su的政治a deularrollo yactualizacion constantes del producto, podria hacer modifications sin previo aviso.
- Si lo pierde o se queda obsoleto, pueda solicitar un manual de usuario nuevo al fabricante o al vendedor.
INFORMACION SOBRE SEGURIDAD
ADVERTENCIA
Al usar el lavavajillas, tome las precauciones indicadas a continuación:
- La instalación y reparación solo puede ser lllavidas a cabo por un的专业 equivalido.
- Este electrodométrico ha sido Diseño para un uso dométrico y other aplicaciones como:
- zonas de comida para personal en tiendas, ofecinas y otros entornos de trabajo;
-casasrurales; - para el uso de los clientes en hoteles, hostales, moteles y otros entornos de tipo Residence
- entornos tipo pensión.
- Este electrodométrico lo pueda usar niños a partir de 8 años y personas con capacities sensoriales o mentales reducidas o con falta de experiencia y conocimiento siCNTAN con la superviación o las instrucciones necessities relativas al uso seguro del aparato y comprenden lospeligros que esteenta.
- Los niños no deben usar con el aparato. Los niños no deben realizar las tareas de limpieza y mantenimiento sin supervisión. (Norma EN60335-1)
Este electrodométrico no está Diseñado para que lo usen personas (incluidos niños) con capacities físicas, sensoriales o mentalaes reduidas, o con falta de experiencia y conocimiento sin la supervisión o las instrucciones你需要as relacionas al uso seguro del aparato por parte de una persona responsable de su seguridad. (Norma IEC60335-1)
- El material del embalaje pueda ser peligioso para los niños.
- Este aparato solo se deben utilizar en interiores.
Para evaporar riesgos de descarga electrica, no sumerja la unidad, el cable ni el enchufe en agua ni en除外 liquido.
- Desenchufe el aparato antes de limpiarlo y realizar suostenimiento.
- Use un paño suave humedecido con jabón neutro, y después un paño seco para frotarlo.

Instrucciones de puesta a tierra
- Este aparato debeponerseaterra.En caso del fallo orotura,la puesta atierra reducirale riesgo deuna descargaelectricaofreciendouna vía de menor resistencia de corrienteelectrica. Este aparato estáequipado conuna clavija para un conductor atierra.
- La clavija debe conectarse a una calidad adecuada, instalada y puesta a tierra conforme a loscottos y lasordenanzas locales.
- Una connexion inadequada del conductor de puesta a tierra del equipo pueda dar como的结果ado un riesgo de descarga electrica.
-
Consulte a un electricista o unrepresentante de servicecrialico si tiene una duda sobre si el aparato está puesto a tierra conveniente.
-
No modifie el enchufe que se suministra con el aparato si no se adapta a la salute.
- Haga que un electricistariallicado le instale una salute adecuada.
- No abuse, se siente ni se suba en la puerta o la bandeja del lavavajillas.
- No utilise el lavavajillas salvo que todos los paneles suministrados estén colocados correctamente.
- Abra la puerta con是多么 cuidado si el lavavajillas está funcionando, ya que existe el riesgo de que salpique agua.
- No Coloque objetos pesados ni se apoye en la puerta@m间隙 está abierta. El aparato podría volcar.
- Al cigar los elementos aregar:
1) Coloque los objetivos afilados de tal forma que no pueda darar el sellado de la puerta;
2) Advertencia: Los cuchillos y otros utensilios con puntas aflidas deben colocarse en la cesta con las puntas hacía abajo o en posicion horizontal. - Algunos detergentes para lavavajillas son sumamente alcalinos. Pueden resultar muy peligrosos si se ingieren. Evite el contacto con la piel y los ojos y mantenga a los niños alejados del lavavajillas cuando está la puerta abierta.
-
Compruebe que no queda nada de detergente en polvo una vez completado el ciclo de lavado.
-
No lave objetos de plástico salvo que lleven lamarca "apto para lavavajillas" o equivalente.
- Si los objetivos de plástico no incluyen ningunaónica, consulte las recomendaciones del fabricante.
- Use solo detergente yibrillantador recomendados para su uso con lavavajillas automaticos.
- Nunca use jabón, detergente para la ropa ni detergente para lavar a mano en el lavavajillas.
- La puerta no debe dejarse abierta, ya que podra augmentar el riesgo de tropezar Si el cable de alimentacion electrica está dañado, debe solicitar al fabricante, al serviceo deostenimiento u othera persona qualificada que lo sustituyan para evitar posiblespeligos.
- Durante la instalación, el suministro de alimentación no debe estar muy doblado ni aplastado
- No lo manipule con controles.
- El aparato debe connectarse a la valvula de agua principal usingo mangueras新品。Los elementos antiguos no deben volver a utiliser.
- Para ahorrar energia, en modo reposo, el aparato se apagará automatistically si no minutes.
, Eliminación
- Para eliminar el embalaje y el aparato, dirijase a un centro de reciclaje. Corte el cable de alimentacion e inutilice el cierre de la puerta del aparato.
- El embalaje de cartón está hecho de papel reciclado y deben desecharse en el lugar adecuado para su reciclaje.
- Al garantizar que este producto se desea correctamente, poderá a prevenir potecillas consecuencias negativas para el medio ambiente y la salute humana, que de othero modo se generarjan por una eliminacion inadecuada de este producto.
- Para Obtener información más detallada sobre el reciclaje de este producto,pongase en contacto con su ayuntimiento y con el servicios de eliminación de residuos.
- ELIMINACION: No deseche este producto como un residuo domés clasificacion para que reciba un tratimiento especial.
RESUMEN DEL PRODUCTO
1 IMPORTANTE:
Para Obtener el máximo provecho de su lavavajillas, lea todas las instrucciones de funciona bajo el nombre.

NOTA:
Las imagenes se muestran únicamente como referencia, pudiendo variar entre losDistinctos modelos. Meramente ilustrativas.
USO DEL LAVAVAJILLAS
Antes de usar el lavavajillas:

- Ajuste el suavizante para el agua
- Echar sal en el suavizante
- Cargar la cesta
- Llenar el dispensador

Consulte la Sección 1 "Suavizante para el agua" en el APARTADO II: Version especial, si necesita ajustar el suavizante para el agua.
Echar sal en el suavizante
NOTA:
Si su modelo noriba suavizante para el agua, pueda saltarse esta seccion. Use siempre sal para lavavajillas.
El depóstito está situado bajo de la cesta interior y deben llenarse como se indica a continuación:
ADVERTENCIA
- Use solo sal especialmente Diseñada para lavavajillas.
Los demás típos de sal, no especificamente diseñados para lavavajillas, especially si es sal de mesa, daßñan el suavizante para el agua. En caso de daños causados por el uso de sal de tipo inadequado, el fabricante no asumirá ninguna garantía ni sera responsable de los daños occasionados. - Eche sal unicamente antes de pone r en marcha un ciclo.
Así se evita que los granos de sal o el agua salada, que pueda salpicarse, se quede en el fondo de laquina durante un tiempo, pudiendo Causear corrosión.
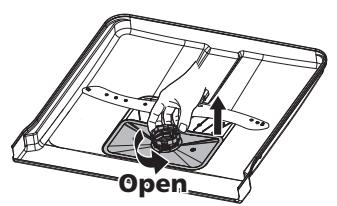
Siga"These pasos para echar sal al lavavajillas:

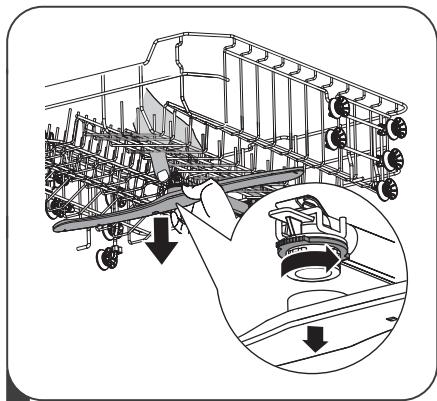
- Saque la cesta inferior y desenrosque la tapa del deposito.
- Coloque el extremo del embudo (suministrado) en el orificio y vierta, en torno a 1,5 kg de sal para lavavajillas.
- Llene de agua el deposito de sal hasta el limite máximo. Es normal que pueda salir unaLEEa cantidad de agua del deposito de sal.
- Una vez Ileno, vuela a enroscar la tapa antesdola.
- La luz de advertencia de que no hay sal se apagará una vez rellenado el deposito.
- Inmediamente après de llenar el deposito, deben ponerse en marcha un programa (se recomienda usar un programa certo). Si no, el sistemas de filtrado, la bomba u otros componentes importantes de laquina podrjan dañarse con el agua salada. Este no lo incluye la garantía.
NOTA:
- El depuesto de sal solamente se debe rellenar cuando se enciende la la luz de advertencia ( ) en el panel de control. Dependiendo de como bien se disuelva la sal, la luz de advertencia pourrait quedar encendada una vez renlenado el depuesto.
Si no hay una luz de advertencia en el panel de control (en algunos modelos), pueda estar cuando esnecessary rellenar el deposito de sal según los ciclos de lavado realizados por el lavavajillas.
- Si se ha derramado sal, ponga en marcha un programa de remojo o un programa rápido.
Consejos sobre la cesta
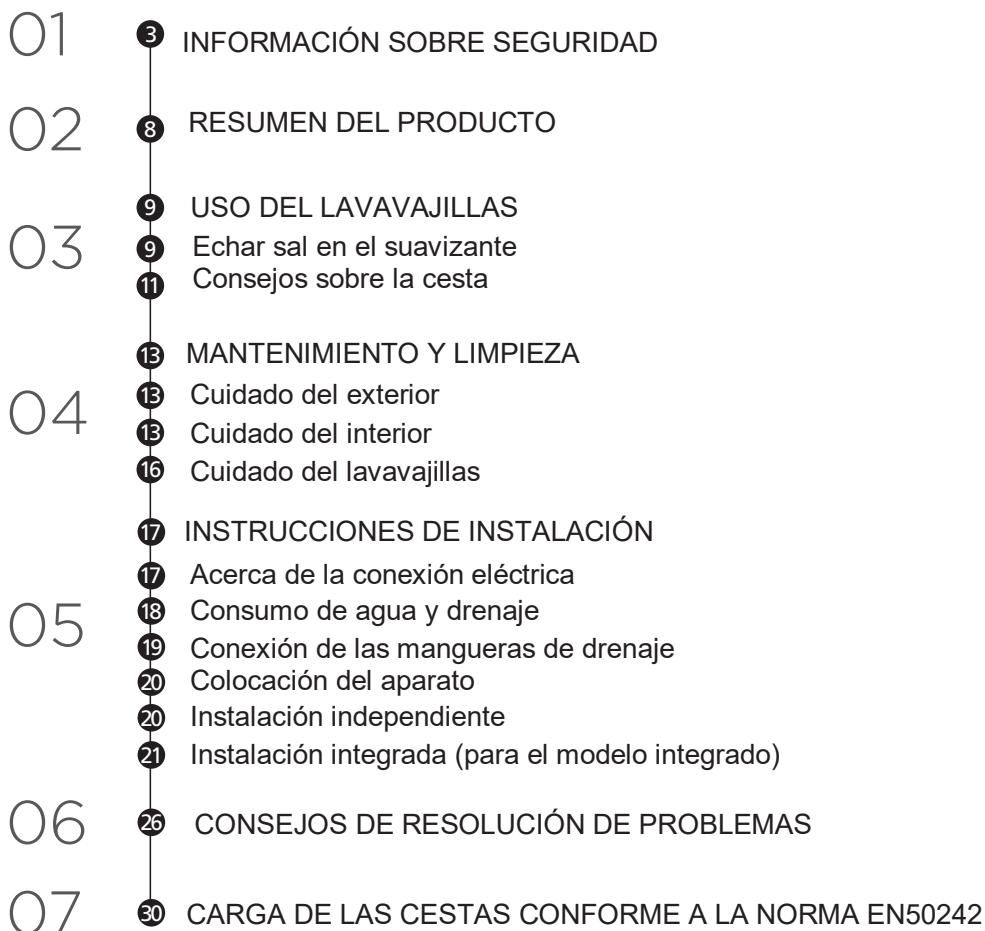
Ajuste de la cesta superior.
Type 1:
Laaltitude de la cesta superior se peut ajustar fácilmente para meter platos masy Grandes en la cesta superior o en la inferior.
Paraajustarlaaltaresla cesta superior,sigaestos pasos:
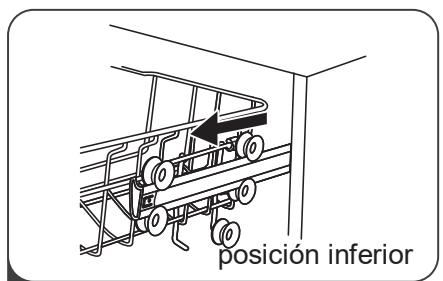
1 Tire hacía fuera de la cesta superior.
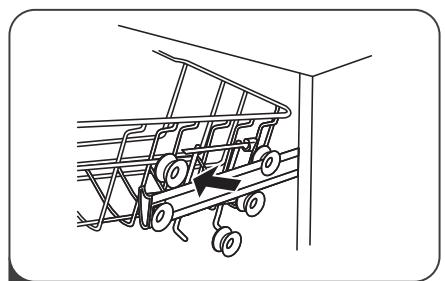
2 Extraiga la cesta superior.

3 Vuelva a colocar la cesta superior en los rodillos superiores o inferiores.
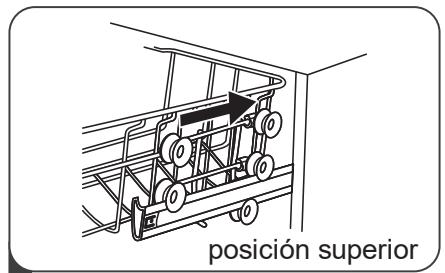
4 Empuje la cesta superior para introducirla.
Type 2:

1 Para departing la cesta más arriba,asta con elevar la cesta por el centro de cada lado hasta que la cesta se bloquee en su posicion más alta.No esnecessarylevelearelasa de ajuste.

2 Para bajo la cesta superior, levante las asas de ajuste por cada lado para soltar la cesta y bajela hasta la posicion inferior.
Plegar los estantes para copas
Para departing espacio para los objetivos altos en la cesta superior, pliegue hacer arriba los estantes para copas. Puede apoyar los vasos altos contra ellos.
Tambienpuediquitarlossi no necesitausarlos.
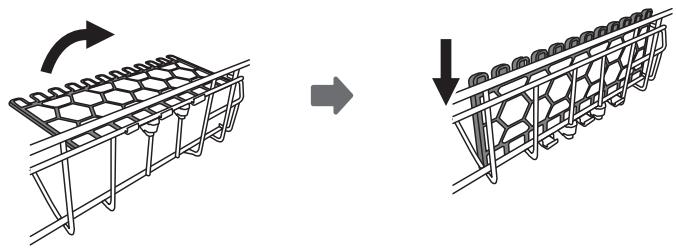
Plegar los estantes de la bandeja
Las+puntas de la cesta inferior sirven para sostener los platos y las fuentes. Se pueda bajo para partir más espacio para articulos de mayormanso.
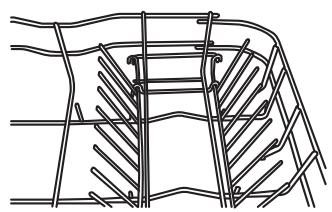
elevator hacia arriba

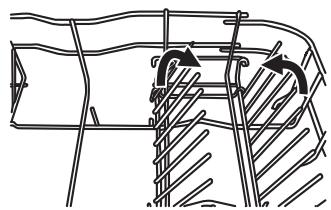
plegar hacia abajo
MANTENIMIENTO Y LIMPIEZA
Cuidado del exterior
La puerta y la junta de la puerta
Al meter los platos en el lavavajillas, poder caer restos de comida o bebida en los laterales de la puerta. Estas superficies esta fuera de la estructura del lavavajillas y el agua de los brazos pulverizadores no llega a ellas.
Los alimentos depositados deben retirarse antes de cerrar la puerta.
El panel de control
Si esnecessarylimpiarelpaneldecontrol,debefrotarlocon unpaño suave humedecido.
ADVERTENCIA
- Paraantarqueentreaguaen el cierrede la puerta ylos componenteseléctricos,no useun limpiador en espray de ningún tipo.
- No use limpiadores abrasivos ni estropajos en las superficies externas, ya que podra rayar el acabado. Alunas toallas de papel también puede rayar odeer MARCAS en la superficie.
Cuidado del interior
Sistema de filtrado
El sistemas de filtrado en la base de laestructura almacena la suciedad gruesa que se genera en el ciclo de lavado.Esta suciedad puede hacer que el filtros se obstruya. Compruebe el estado de los filtros regularmente y limpielos si esnecessary con agua del grifo. Siga these pasos para limiar los filtros en laestructura de lavado.
NOTA:
Las imagenes se muestran únicamente a modo de referencia, ya que los distinctos modelos de sistemas de filtrado y brazos pulverizadores peuvent variar.
1 Sujete el filtro para suciedad gruesa y gírelo hacer la izquierda para desbloquearlo. Eleve el filtro hacer arriba y hacía fuera para sacarlo del lavavajillas.
2 El bajo se quede extraer tirando de la parte inferior del conjunto del bajo. El bajo para sucidad gruesa se possible desacoplar del bajo principal girando suavamente las pestas en la parte superior y tirando hasta性强.
3 Los restos de comida de mayor taman o se pueda limpar aclarando el filtro con agua del grifo. Para una limpieza mas exhaustiva use un cepillo suave.
4 Vuelva a montar los filtros enorden inverso, sustituya el encaje del filtro y gírelo hacer la derecha, hacer la flecha de cierre.
ADVERTENCIA
- No apriete los filtros en excesso. Coloque los filtros de nuevo siguiendo una secuencia segura, o la仇恨idad gruesa pourrait introducirse en el sistema y causar una obstruccion.
- Nunca use el lavavajillas sin los filtres en su lugar. Una colocacion Incorrecta del filtro可以使 reducir el nivel de rendimiento del aparato y做不到 los platos y demas utensilios.
Brazos pulverizadores
Es necessario limpiar los brazos pulverizadores regularmente para retirar los productos químico agua que pueda obstruir los orificios para los chorros de agua y los rodimientos.
Para limpar los brazos pulverizadores, siga las instrucciones a continuación:
Para quitar el brazo pulverizador superior, sujele la tuerca del centro para que no se mueva, y gire el brazo pulverizador hacía la izquierda para extraerlo.
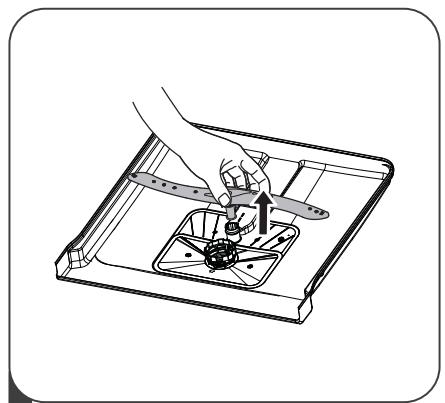
Para quitar el brazo pulverizador inferior, tire hacía fuera del brazo y hacía arriba.
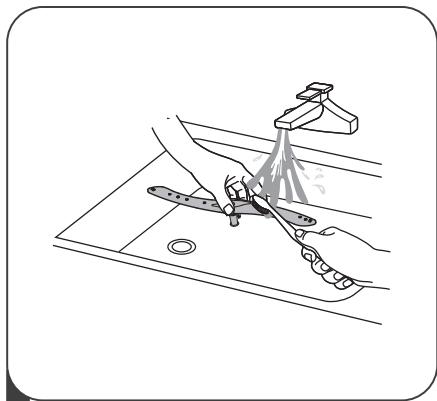
3 Lave los brazos con agua Templada jabonosa y use un use un cepillo suave para limpiar los orificios para los chorros. Vuela a colocarlos afterwards de aclararlos concienzudamente.
Cuidado del lavavajillas
Precaución anti congelación
Tome medidas para que el lavavajillas no se congele durante el invierno.
Cada vez que use un ciclo de lavado, haga lo siguientes:
- Corte el suministro electrico al lavavajillas en la fuente de alimentacion.
- Apague el suministro de agua y desconecte el tubo de entrada de agua de la valvula de agua.
- Drene el agua del tubo de entrada y la valvula de agua. (Use un recipientte para recoger el agua).
- Vuelva a conectar el tubo de entrada a la valvula de agua.
- Quite el filtro de la parte inferior de la cuba y use una esponja para recoger el agua del sumidero.
Después de cada lavado
Después de cada lavado, corte el suministro de agua al aparato ycede la puerta ligeramente abierta para que la humedad y los olores no queden atrapados en su interior.
Retire el enchufe
Antes de realizar labores de limpieza o mantenimiento, retire sempre el enchufe de la toma.
No usar limpiadores abrasivos ni disolventes
Para limpar el exterior y las partes de caucho, no use productos de limpieza abrasivos ni disolventes.Use solamente un paño con agua jabonosa Templada. Para qitar las manchas de la superficie del interior, use un paño humedecido con vinagre, o un producto de limpieza Diseño especificamente para lavavajillas.
Si no se va a usar durante un tiempo
Se recomienda realizar un ciclo de lavado con el lavavajillas vacio yuponesutar el enchufe de la toma, cerrar el suministro de agua ydeojar la puerta del aparato ligeramente abierta. Asi las juntas de la puerta duraran más y se evitará que se formen olores dentro del aparato.
Traslado del aparato
Si necesita mover el aparato, trate de Maintenerlo en posicion vertical. Si es absolutamente necessario, se pueda apoyar sobre su parte posterior.
Juntas
Uno de los factores que generan olores en el lavavajillas son los alimentos que queden atrapados en las juntas. Limpiarlas regularmente con una esponja humeda evitará que ese ocurre.
INSTRUCCIONES DE INSTALLACION
ADVERTENCIA

Riesgo de descarga electrica
Desconecte la alimentación electrica antes de instalar el lavavajillas. Si no lo hace podería producirse una descarga electrica, e inclujo la muerte.

Atencion
La instalación de las tuberías y los equipos electricos debe corre a cargo de profesionales.
- Acerca de la connexion electrica
ADVERTENCIA
Por la seguridad personal:
- No use un alargador ni un adaptor con este aparato.
- Bajo ninguna circunstancia corte ni retire la connexion a tierra del cable de alimentacion.
Requisitos electricos
Observe la etiqueta de clasificacion para saber la tension nominal y conectar el lavavajillas a la fuente de alimentacion adecauda. Use el fusible necessario, de 10 A, 13 A o 16 A, un fusible de retardo temporal o un cortocircuito recommendado e incluya un circuito independiente que sirva solamente para este aparato. Conexion electrolytica
Asegúrese de que la tensión y la fecuencia de la alimentación se corresponden con las que aparecen en la placía identificativa. Inserte el enchufe únicamente en una toma electrónica puesta a tierra conveniently. Si la toma electrónica a la que ha de connectarse el aparato no es adecuada para el enchufe, sustituya la toma, en lugar de usar adaptadores o similares, ya que podráan sobrecalentarse y Causear quemaduras.

Asegürese de que existe una puesta a tierra adequada antes de usar el aparato
- Consumo de agua y drenaje
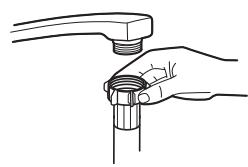
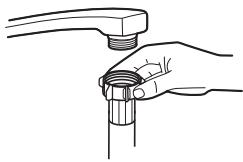
Conexión de agua fria Conecte la manguera del suministro de agua fria a un conector roscado de 3/4 (pulgadas) y asegúrese de que está apretado firmamente en su posición.
Si las tuberías de agua son新品as no se han utilisé durante mucho tiempo, deben el agua correr para asegurarde que sale limpia. Es necesarioayarostea precaución para evitar el riesgo de que la entrada de agua se bloquee y dfaje el aparato.
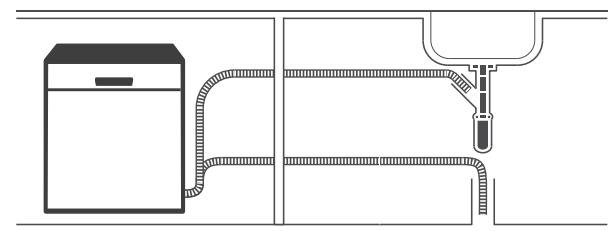
manguera de suministro ordinaria
manguera de suministro de segundad
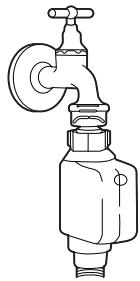
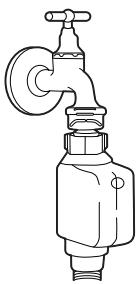
Acerca de la manguera de suministro de seguridad
La manguera de suministro de seguidad se compone de paredes dobles. El sistemas de la manguera garantiza su intervencion bloqueando el flujo de agua en caso de rotura de la manguera de suministro y cuando el espio de aire entre la manguera de suministro propiamente dicha y la manguera corrugada exterior se llena de agua.
ADVERTENCIA
Una manguera que se acoplal al rociador del fregadero, pueda revertar si se instala en la misma linea de agua que el lavavajillas. Si su fregadero tiene uno, se recomienda desconectar la manguera y tapar el orificio.
Cómo conectar la manguera de suministro de seguridad
- Tire de las mangueras de suministro de seguridad completeness para extraerlas del compartmento situado en la parte posterior del lavavajillas.
- Apriete los tornillos de la manguera de suministro de seguridad a la llave de agua, con rosa de 3/4
pulgadas.
- Abra el agua Completely antes deponer en marcha el lavavajillas.
Cóme desconectar la manguera de suministro de seguridad
- Cierre el suministro de agua.
- Desatornille la manguera de suministro de seguridad de la llave de agua.
Conexión de las mangueras de drenaje
Inserte la manguera de drenaje en una tuberia de drenaje con un diametro minimo de 4 cm, o除去 que corra por el sumidero, asegurándose de que no se doble ni se enrolle. La alta de la tuberia de drenaje debe ser inferior a 1000~mm . El extremo libre de la manguera no debe sumergirse en agua para evaporar el returno del flujo.
Fije con seguridad la manguera de trenaje en la posicion A o en la posicion B.
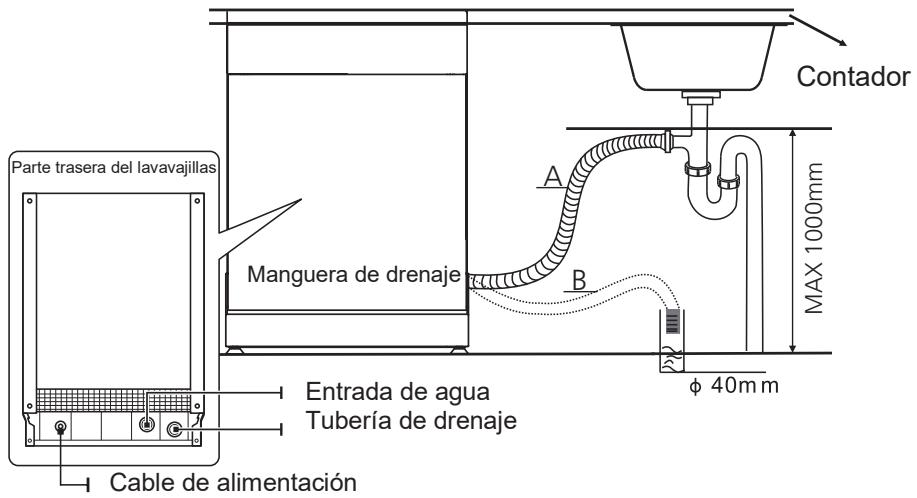
Cómo drenar el excesso de agua de las mangueras
Si el sumidero está 1000mm por encima del sueño, el excesso de agua de las mangueras no podrá drenarse directamente al sumidero. Seránecessarydrenar el excesso de agua de las mangueras en un recipiente o un deposito adecuado, fauna del sumidero y más bajo.
Salida de agua
Conecte la manguera de drenaje del agua. La manguera de drenaje debe acoplarse correctamente para evaporar fugas de agua. Asegürese de que la manguera de drenaje de agua no está presionada ni aplastada.
Manguera de extension
Si necesita una extension para la manguera de drenaje, asegúrese de utiliser una manguera de drenaje similar.
No debe medir mas de 4 metros, o el efecto de limpieza del lavavajillas podra verse reducido.
Conexión del sifón
La connexion para residuos debe estar a una alta inferior a 100 cm (máximo) desde la parte inferior del lavavajillas. La manguera de drenaje de agua debe estar fjada.
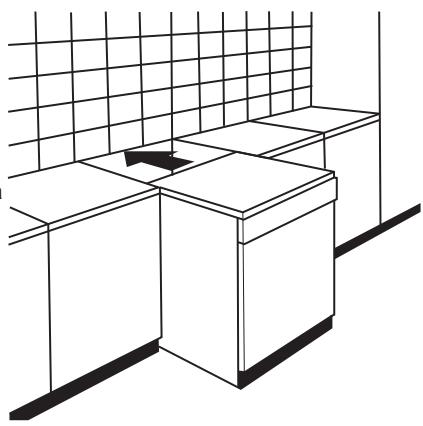
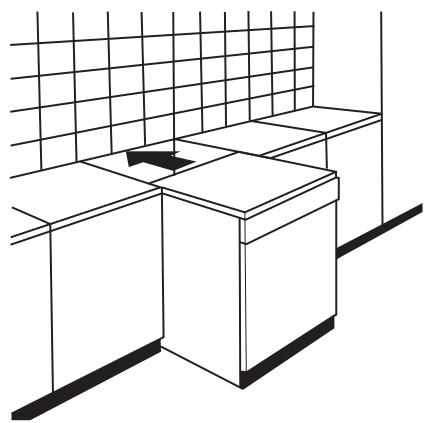
Colocacion del aparato
Coloque el aparato en la posicion deseada. La parte posterior debe reposar sobre la pared tras él, y los laterales, a lo largeo de los muebles o paredes adyacentes. El lavavajillas está equipado con mangueras de suministro de agua y de drenaje que se pueda colocar a la derecha o a la izquierda, para poder una instalacion adecauda.
Nivelado del aparato
Una vez colocado el aparato para ser nivelado,
la alta del lavavajillas se pueda alterar ajustando
el nivel de rosca de las patas.
Enequalquier caso,el aparato no debe inclinarse masde 20^


NOTA:
Esto solo es有条件 para los lavavajillas independentes.
Instalación independiente
Encaje entre los armarios existentes. La alta del lavavajillas, 845 mm, se ha disnéado de forma que permita encasar laquina entre los armarios existentes de la mesma alta en cocinas modernas.
Las patas se PUden ajustar para lograr la alta deseada. La parte superior laminada de laquina no requiere ningún cuidado en particular ya que es a prueba de calor, de arañzos y de manchas.
Debajo de la encimera existente
(Cuando se encaja bajo una encimera) En la mayoría de las cocinas modernas solo hay una encimera bajo la que se acoplan los armarios y los electrodomesticos. En este caso, retire la parte superior del lavavajillas desatornillando los tor bajo el borde posterior de la parte superior (a).
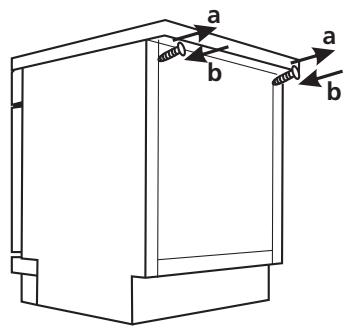

Atencion
Una vez retrada la parte superior, los tornillos deben volver a colocarse bajo el borde posterior de la parte superior (b).
La alta se reduciráentries a 815 mm, que es lo establecido por las normativas internociales (ISO) y el lavavajillas encasaráperfectamente bajo la encimera de la cucina.
- Instalación integrada (para el modelo integralado)
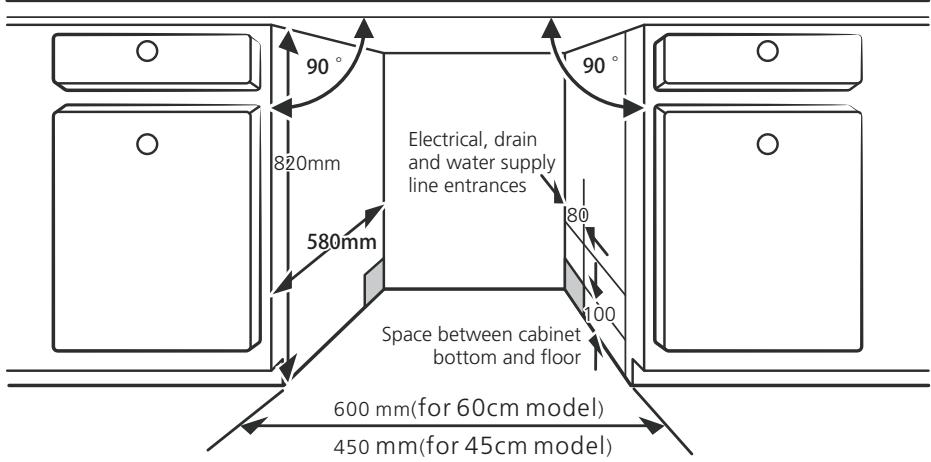
Paso 1. Señ Conceón del mejor lugar para el lavavajillas
El lugar de instalacion del lavavajillas debe ser circa de una entada de agua, mangueras de drenaje y un cable de alimentacion. Ilustraciones de las dimensiones de la estructura y posicion de instalacion del lavavajillas. 1.Menos de 5mm entre la parte superior del lavavajillas y el armario y la puerta exterior, alineada a la
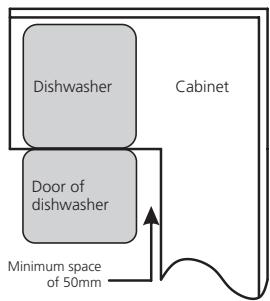
estructura.
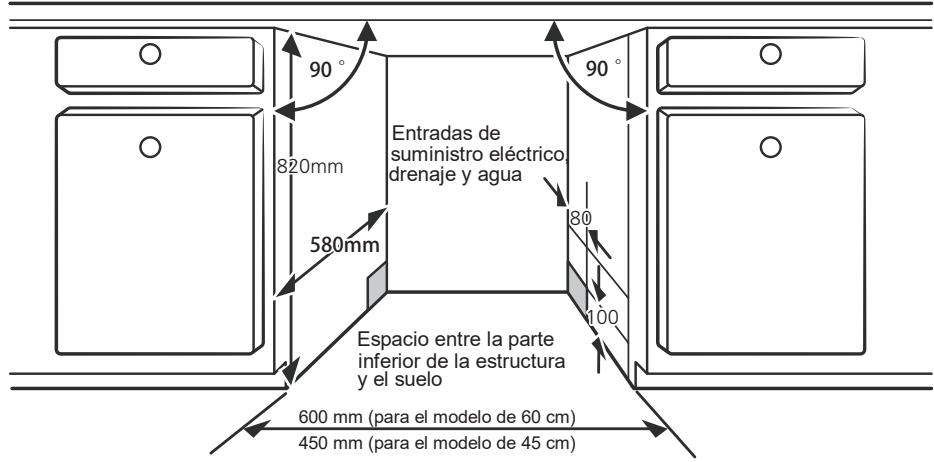
- Si el lavavajillas se instala en la esquina del armario, debenemarksalgun espacio paraAbrir la puerta.

NOTA:
Dependiendo de donde está la toma electrica,oulda necessities hercer un orificio en la parte opuesta del armario.
Paso 2. Dimensiones del panel estético e instalación

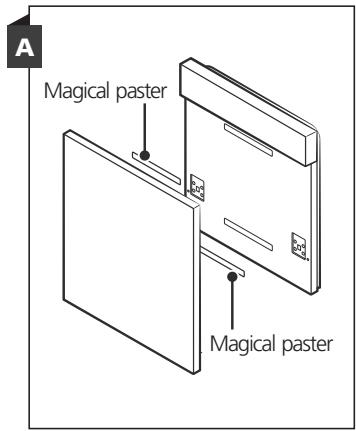
El panel estético de madera puede colocarse según los planos de instalación.
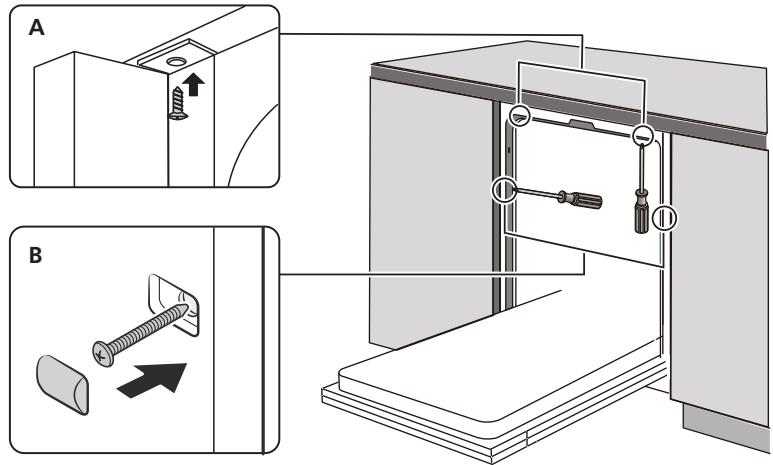
Modelo semi integrado
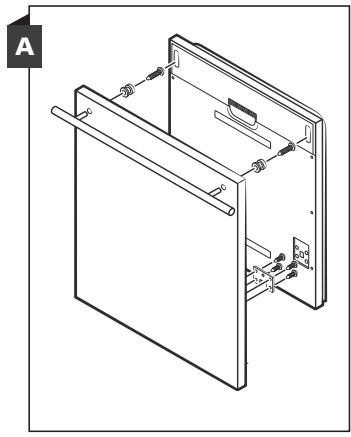
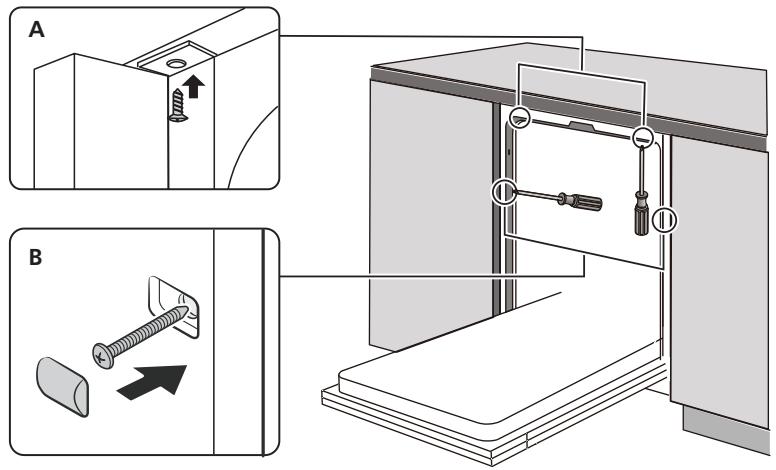
Adhesivo magico A y adhesivo magico B por分开, el adhesivo A en el panel de madera y el adhesivo B en el exterior de la puerta del lavavajillas (vea la figura A). Una vez colocado el panel, fjelo al exterior de la puerta con tornillos y pernos (vea la figura B).

Adhesivo magico
Adhesivo magico
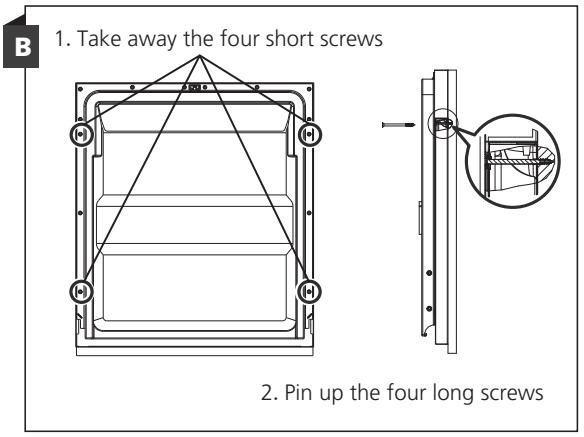
1. Quite los cuales tornillos cortos

2. Coloque los cinco tornillos largos
Modelo totalmente integrado
Instale el gancho del panel estético de madera y colóquelo en la ranura de la puerta del lavavajillas (vea la figura A). Una vez colocado el panel, fjelto al exterior de la puerta con tornillos y pernos (vea la figura B).


Paso 3. Ajuste de la tensión del muelle de la puerta
- Los muelles de la puerta se suministran de fabrica con la tension adecuada para la puerta. Si se instalala un panel estético, deben ajustar la tension de los muelles. Gire el tornillo de ajuste para tensar o relajar el cable de acero.
- La tension del muelle de la puerta sera correcta cuando la puerta permanece en posicion horizontal cuando este totalmente abierta, pero se eleve para cerrarse con un ligero empueje con un dedo.
Paso 4. Pasos para la instalación del lavavajillas
nsulte los pasospecificos en las ilustraciones sobre la instalacion.
- Fije la tira de condensacion bajo la encimera del armario. Asegurese de que la tira de condensation está a ras de la encimera. (Paso 2)
- Conecte la manguera de entrada al suministro de agua fría.
- Conecte la manguera de drenaje.
- Conecte el cable de alimentación.
- Coloque el lavavajillas en su posición. (Paso 4)
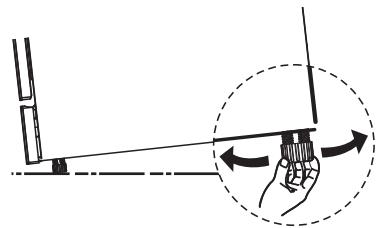
- Nivelar el lavavajillas. La pata posterior se puedaJKLM de la parte delantera del lavavajillas girando el tornillo Philips en el centro de la base, using an tornillo
Philips. Paraaabstar las patas frontales,use un destornillador de cabeza plana y gire las patas frontales hasta que el lavavajillas este nivelado. (Paso 5 a Paso 6)
- Instale la puerta del mueble en el exterior de la puerta del lavavajillas. (Paso 7 a Paso 10)
- Ajuste la tension de los muelles de la puerta con una llave Allen, girando hacía la derechos para estarlos muelles izquierdo y derecho de la puerta. Si no lo hace, podra dañarse el lavavajillas. (Paso 11)
- El lavavajillas deben fjarse en su posicion. Hay dos formas de hacerlo:
A. Encimera normal: Coloque el gancho de instalacion en la ranura del plano lateral y fijelo en la encimera con tornillos para madera.
B. Encimera de marmol o granito: Fije el lateral con el tornillo.
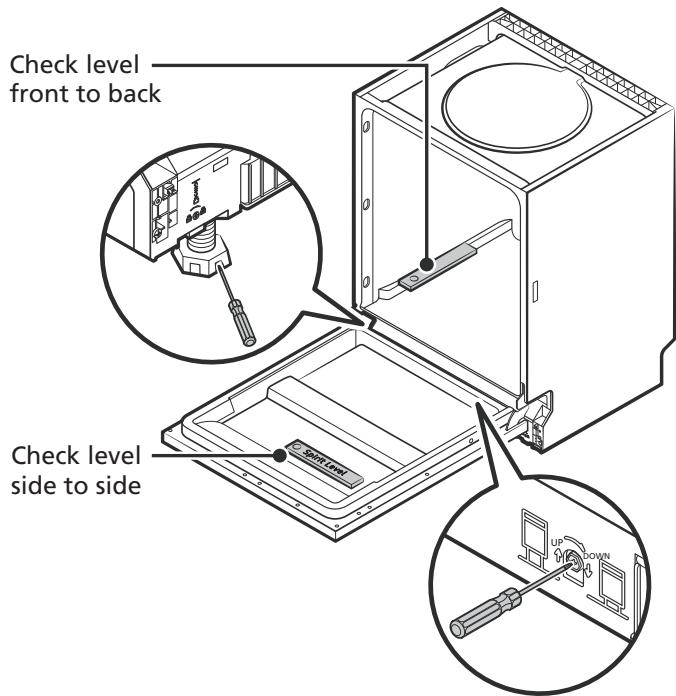
Paso 5. Nivelar el lavavajillas
El lavavajillas deben estar nivelado paraFuncionarcorrectamente y lavar bien.
1. Coloque un nivel de burbuja en la puerta y la bandeja interior bajo de la cuba, como se muestra, para comprar que el lavavajillas está nivelado.
2. Nivele el lavavajillas ajustando las tres patas niveladoras por分开.
3. Al nivelar el lavavajillas, preste atencion para evaporar que vuelque.
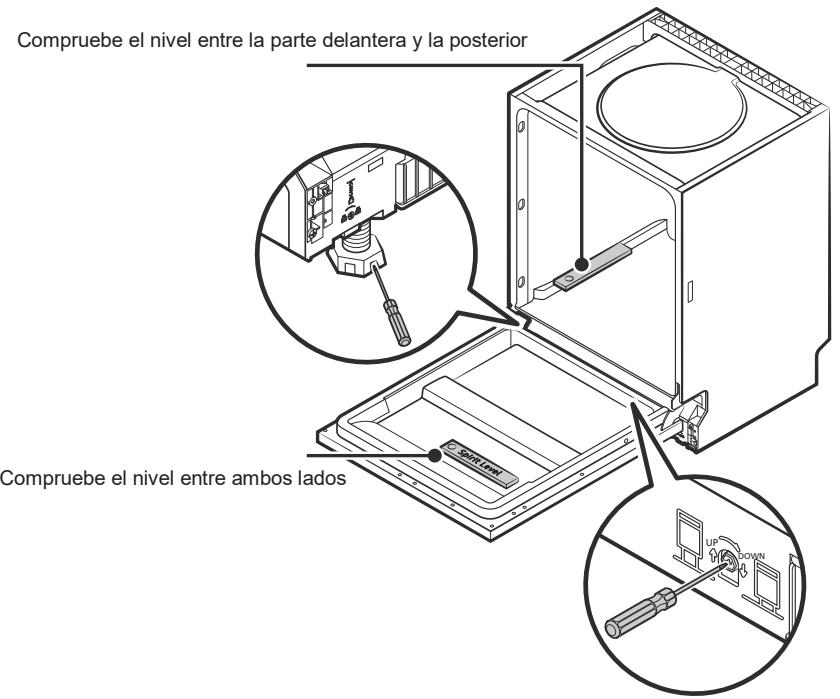
NOTA:
La alta de ajuste maxima de las patas es de 50 mm.
CONSEJOS DE RESOLUCION DE PROBLEMAS
Antes de llamar al servicios专业技术
Revisar las páginases sugíentes pueda ahorrarle llamar al servicios técnico.
| Problema | Posibles causas | Qué hacer |
| El lavavajillas no se pone en marcha. | Fusible fundido, o fallo de corrente en el cortocircuito. | Sustituya el fusible o resetee el cortocircuito. Quiterialquier除外 aparato que está compartiendo el本身就是circuito con el lavavajillas. |
| La alimentación no se enciende. | Asegúrese de que el lavavajillas está encendido y que la puerta está bien cerrada.Asegúrese de que el cable de alimentación está bien connectado a la toma de pared. | |
| La presión de agua es baja. | Compruebe que el suministro de agua está connectado adecuadamente y la llave de agua está abierta. | |
| La puerta del lavavajillas no está bien cerrada. | Asegúrese de cerrar la puerta correctamente. | |
| No se bombea agua desde el lavavajillas. | La manguera de drenaje está torcida o aplastada. | Compruebe la manguera de drenaje. |
| Filtro obstruido. | Compruebe la suciedad del filtro. | |
| El sumidero de la comida está obstruido. | Compruebe el sumidero de la comida para asegurarde que está drenando bien. Si el problema es que el sumidero de la comida no drena bien,oulda necessitar un fontanero más que a un reparador de lavavajillas. | |
| Espuma en la cuba | Detergente inadequado. | Use solo detergente especial para lavavajillas,para evaporar la formación de espuma. Si this occurre,abra el lavavajillas y dejoque la espuma se evapore. Vierta 4 litros de agua fria en la parte inferior del lavavajillas. Cierre la puerta del lavavajillas y selección un ciclo de lavado.Inicialmente,el lavavajillas drenará toda el agua. Abra la puerta tras la fase de drenaje y compruebe que la espuma ha desaparecido. Repita el procesosis es NEEDario. |
| El ablivantador se ha(derramado. | Limpie siempre con un pañodel ablivantador que se hayadderramado inmediamente. | |
| Manchas en elinterior de la cuba | Puede haberseutilizando detergentecon colorante. | Asegúrese de que el detergente no vale colorante. |
| Pelliculablanquecina en lasuperficie interior. | Minerales duros en elagua. | Para limpiar el interior, use unaexponja humedecida condetergente para lavavajillas y useguantes de goma. Nunca useotro limpiador que no sea detergente para lavavajillas, opodrágenerarse espuma. |
| Manchas de oxido en los cubiertos. | Los objetosafectados no sonresistantes a lacorrosión. | Evite lavar articículos que no seanresistentes a la corrosión en ellavavajillas. |
| No se ha puesto en marcha un programadespues deañadirsal para lavavajillas.Se han metido restosde sal en el ciclo dellavado. | Ponga siempre un programadelavado sin vajilla después deañadir sal. No selección lafunción Turbo (si la hubiera),después deañadir sal paralavavajillas. | |
| La tapa delsuavizante está floja. | Compruebe que la tapa delsuavizante está bien fjada. | |
| Ruido de golpeteo en el lavavajillas. | Un brazopulverizador estáchocando conalgúnobjecto de la cesta. | Detenga el programay coloquentlos objetos que esténobstruyendo el brazo. |
| Ruido de traqueteo en el lavavajillas. | Objetos de vajilla sueltos en ellavavajillas. | Detenga el programay coloquentlos objetos de vajilla. |
| Ruido de golpeteo en las tuberías deagua. | Puede estar causadopor la instalación insitu o la seccióntransversal de lastuberías. | No influye en el functionamento del lavavajillas. En caso de duda,póngase en contacto con unfontaneroequalificado. |
| Los platos no salenlimpios. | Los platos no secolocaroncorrectamente. | Consulte el APARTADO II"Preparación y cargo de losplatos". |
| El programa no era lo suficiententepotenté. | Selección un programa másintensivo. | |
| Los platos no salen limpios. | No se ha:puesto suficiente detergente. | Ponga más detergente o de detergente. |
| Hay objetivos Bloqueando el movimiento de los brazos pulverizadores. | Coloque los objetivos para que el brazo pulverizador pueda girar libremente. | |
| La combinación de filtrado no está limpia o no se acopladocorrectamente a la base de la estructuredel lavado. Estopeuede hacer que losorificios del brazo pulverizador sebloqueen. | Limpie o colque el filtrot Correctamente.Limpie los orificios del brazopulverizador. | |
| Los objetivos de cristal quedar opacos. | Combinación de agua blanda ydemasiado detergente. | Use menos detergente si el agua de su zona es blanda y selección(other ciclo más cortopara lavar los objetivos de vidrio yque queden limpios. |
| Los platos y vasospresentan manchas blancas. | El agua dura de su zona puede hacerque se depositela cal. | Añada más detergente. |
| Marcas negrasogrises en los platos. | Los utensilios del aluminio se hanrozado con losplatos. | Use un limpiador abrasivo suave para eliminar estas marcas. |
| Queda detergente en el dispensador. | Los platos bloqueanei disposandedor detergente. | Coloque los platoscorrectamente. |
| Los platos no está secos. | Los platos se hancolocadoincorrectamente. | Cargue el lavavajillas como sugiere en las instrucciones. |
| Ha sacado los platosdemasiado antes. | No vacie el lavavajillas imeditamente después dellavado. Abra la puerta ligeramente para que salga elvapor. Saque los platos cuando la temperatura inferior sea segura.Saque primero la cesta inferiorpara evaporar que caiga agua de la cesta superior. | |
| Los platos no están secs. | Se ha selectionado un programa inadeuido. | Con un programa corte, la temperature de lavado es más baja, reduciendo el rendimiento de la limpieza. Elija un programa con una mayor duración de lavado. |
| Uso de cubiertos c un recubrimiento de baja calidad. | El drenaje de agua es más fácil con这些东西 objetivos. Los cubiertos o los platos de este tipo no son adecuados para lavarlos en el lavavajillas. |
CARGAR LAS CESTAS
CONFORME A LA NORMA EN 50242:
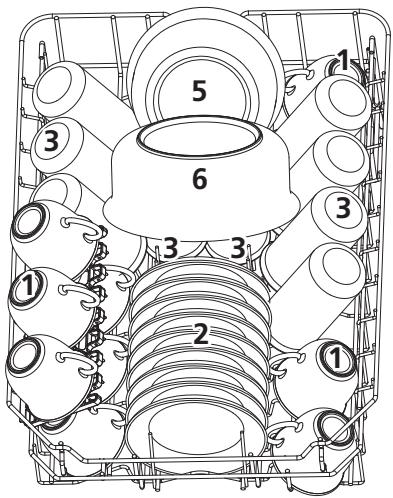
1. Cesta superior:
| Número | Articulo |
| 1 | Tazas |
| 2 | Cazos |
| 3 | Vasos |
| 4 | Cuencos de servirtlechos |
| 5 | Cuencos de servirmedianos |
| 6 | Cuencos de servirgrandes |
2. Cesta inferior:

| Número | ARTICULO |
| 7 | Platos de postre |
| 8 | Platos llanos |
| 9 | Platos hondos |
| 10 | Fuentes ovaladas |
| 11 | Cesto para cubiertos |
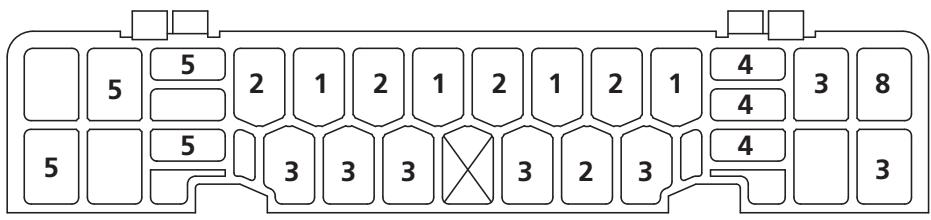
3. Cesto para cubiertos:
La informacion para la prueba de compatibilidad cumple con la norma EN 50242
Capacidad: 9 juegos de cubiertos
Posión de la cesta superior: posición inferior
Programa: ECO
Ajustes del abrillantador: 6
Ajustes del suavizante: H3
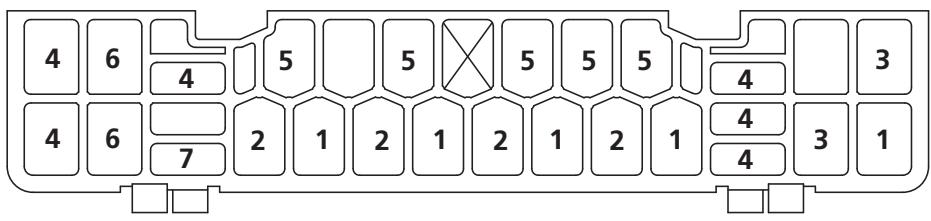
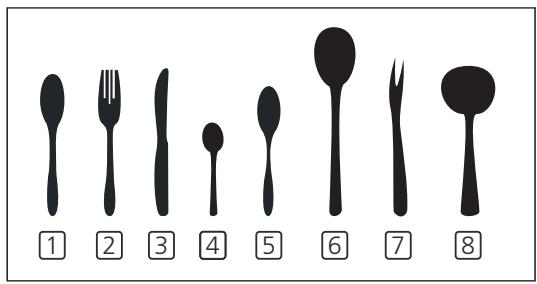
| Número | Artístico |
| 1 | Cucharas de sopa |
| 2 | Tenedores |
| 3 | Cuchillos |
| 4 | Cucharillas de café |
| 5 | Cucharillas de postre |
| 6 | Cucharas de servir |
| 7 | Tenedores de servir |
| 8 | Cacillos para salsas |
CONTENIDO
USO DEL LAVAVAJILLAS
Panel de control
6 Suavizante para el agua
7 Preparación e introducción de la vajilla
10 Funcioncimiento del abrillantador y el detergente
Llenado del deposito de abrillantador
12 Llenado del dispensador de detergente
PROGRAMAR EL LAVAVAJILLAS
13 Tabla de ciclos de lavado
Puesta en marcha del ciclo de lavado
14 Cambiar el programa a mitad del ciclo
Ha olvidado meter algo?
02
16
CÓDIGOS DE ERROR
04
INFORMACION TECNICA

NOTA:
- Si no pueda SOLUTIONARylvania problema, pida ayud a un的技术ico profesional.
- El fabricante, siguiendo su的政治a de descarrollo yactualizacion constantes del producto, podria hacer modifications sin previo aviso.
- Si lo pierde o se queda obsoleto, pueda solicitar un manual de usuario nuevo al fabricante o al vendedor.
GUIA RÁPIDA
Lea el contenido correspondiente del manual de instrucciones para poder el funciona en mayor detaille.
1 Instalación del lavavajillas
(Consulte la Sección 5 "INSTRUCCIONES DE INSTALACION" en el APARTADO I: Version générica).
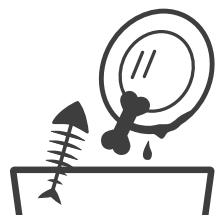
2 Retirar la suciedad más visible de los cubiertos

Dentro Fuera

4 Llenar el dispensador

5 SeLECTIONAR un programa yponer en marcha el lavavajillas
USO DEL LAVAVAJILLAS
Panel de control
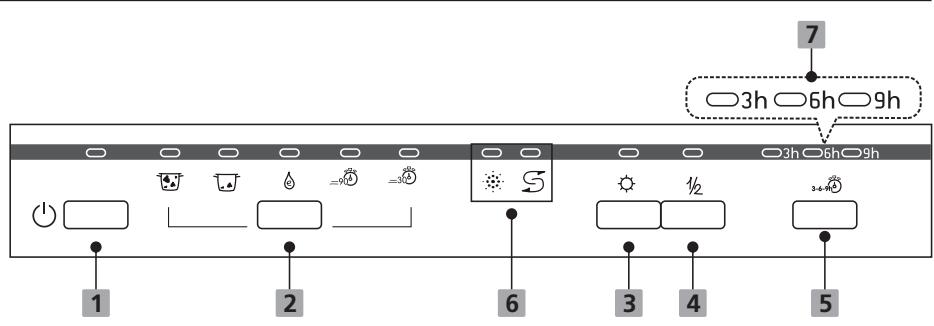
Funcioncimiento (Botón)
| 1 Potencia | Pulse este botón para encender el lavavajillas, la pantalla se encenderá. |
| 2 Programa | Intensivo Artículos muy sucios, incluidas ollas y sartenes. Con comida seca pegada. Normal Para elementos con una sueidad normal, como ollas, platos, vasos y sartenes ligeramente susias. ECO Es el programa estándar adecuado para cargas con una sueidad normal, como ollas, platos, vasos y sartenes ligeramente susias. 90 min Para cargas con una sueidad normal que deben lavarse rápidamente. Rápido Un programa de lavado más corto para cargas ligeramente susias que no necesitan secarse. |
| 3 Secado extra | Paraocular la vajilla en mayor profundidad. (Solamente se pueda usar con los programas Intensivo, Normal, ECO, Vidrio, 90 min) |
Funcionamento (Botón)
| 4 Media cargo | Esta funciona de Media cargo soloEARáutilizarla cuando tengá, comoolestimo, 6 juegos de cubiertos,y tendrá un menorconsumo de agua yenergia.(Solamente se puede usar con losprogramas Intensivo, Normal, ECO, Vidrio, 90 min) |
| 5 Retardo | Pulse el botón paraestablisher el tiempo de retardo. |
Pantalla
| 6 Indicador de advertencia | Abrillantador Si se enciende el indicator “”, significa que queda poco abrillantador y debe renlenarse el depósito. Sal Si se enciende el indicator “”, significa que queda poca sal y debe renlenarse el depósito. |
| 7 Tiempo de retardo | Pulse el botón para establecer el tiempo de retardo. (3 h, 6 h, 9 h) |
, Suavizante para el agua
El suavizante para el agua se debe seleccionar manualmente, con el selector de la dureza del agua.
El suavizante para el agua se ha diseñado para eliminar las sales y los minerales del agua, que pudieran tener un efecto negativo en el funcionaimiento del aparato.
Cuantos más minerales contiene, más dura es el agua.
El suavizante debe ajustarse conforme a la dureza del agua de su zona. SuEmpresa de aguas local podra asesorarle sobre la dureza del agua de su zona.
Ajuste del consumo de sal
El lavavajillas ha sido diseñado para permitir el ajuste en la calidad de sal consumida basándose en la dureza del agua realizada. La intencion es optimizar y adaptar el nivel de consumo de sal.
Siga"These pasos paraaabustar elconsumo de sal:
- Encendido del aparato;
- Pulse el botón de Inicio/Pausa durante más de 5seguidos para起初ar el modelo de ajuste del suavizante del agua en los 60seguidos siguientes al encendido del aparato;
- Pulse el botón Inicio/Pausa para selectionar el ajuste adecuado dependiendo de su entorno local, los ajustes cambiarán en la secuencia",[siguiente]:
H1->H2->H3->H4->H5->H6;
- Pulse el botón de encendido/apagado (on/off) para finalizar el modelo de configuración.
| DUREZA DEL AGUA | Nivel de suavizante del agua | Consumo de sal (gramo/ciclo) | |||
| Grados alemanes °dH | Grados francheses °fH | Grados ingleses °eH | Mmol/l | ||
| 0 - 5 | 0 - 9 | 0 - 6 | 0 - 0.94 | H1 > Luz de Rápido | 0 |
| 6 - 11 | 10 - 20 | 7 - 14 | 1.0 - 2.0 | H2 > Luz de 90 min | 9 |
| 12 - 17 | 21 - 30 | 15 - 21 | 2.1 - 3.0 | H3 > Luz de 90 min, Rápido | 12 |
| 18 - 22 | 31 - 40 | 22 - 28 | 3.1 - 4.0 | H4 > Luz de ECO | 20 |
| 23 - 34 | 41 - 60 | 29 - 42 | 4.1 - 6.0 | H5 > Luz de ECO, Rápido | 30 |
| 35 - 55 | 61 - 98 | 43 - 69 | 6.1 - 9.8 | H6 > Luz de ECO, 90 min | 60 |
1°dH=1,25°eH=1,78°fH=0,178 mmol/l
Ajuste de fabrica: H3
Póngase en contacto con laEmpresa de agua de su localidad para Obtener información sobre la dureza de su suministro de agua.

Consulte la Sección 3 "Carga de sal en el suavizante" en el APARTADO I: Version su genérica. Si su lavavajillas noiene sal.

NOTA:
si su modelo noriba suavizante para el agua, pueda saltarse esta seccion. Suavizante para el agua La dureza del agua varia de un lugar aarlo. Si se utilizes agua dura con el lavavajillas, se formaran depuestos en los platos y demas utensilios.
El aparato está equipado con un suavizante especial, que utilizes un recipiente de sal asignamente dejenado para eliminar la cal y los minerales del agua.
- Preparación e introducción de la vajilla
- Cuando compre utensilios, preste atencion a que se pueda meter en el lavavajillas.
- En algunos casos particulares, selección un programa con la temperatura más baja possible.
- Para registrar daños, no saque los objetivos de vidrio ni los cubiertos del lavavajillas inmediamente afterwards de que finalice el programa.
Para lavar los cubiertos/platos
No sonADECUADOS
- Cubiertos con madera, porcelana abocinada o asas de nácar
- Artículos de plástico que no sean resistentes al calor
- Cubiertos antiguos con piezas pegadas que no sean resistentes a la temperatura
- Cubiertos o platos con piezas unidas
- Artículos de pultro o cobre
- Artículos de cristal
- Artículos de acero que se pueda oxidar
- Platos de madera
- Artículos hechos de fibras sintéticas
Presentan ciertas limitaciones
- Algunos típos de cristal que se pueda volver opacios tras una série de lavados
- Los componentes de plata y aluminio tienden a decolorarse durante el lavado
- Los patrones de vidrio peuvent desvanecerse si se lavan con Frequencia
Recomendaciones para llenar el lavavajillas
Retire los restos de alimentos de tamaño considerable. • Reblandezca los restos de comida quemada de sartenes y ollas. No esnecessary aclarar losplatos bajo el grifo.
Para lograr un mejor rendimiento del lavavajillas, siga estas instrucciones de carga.
(Las caracteristicas y aparancia de las cestas y el cesto para cubiertos能把variegando del modelo).
Coloque los objetivos en el lavavajillas de lasuma forma:
- Los elementos como copas, vasos, ollas/sartenes, etc., deben mirar hacer abajo.
- Los elementos curvados o con huecos deben colocarse en posicion obliqua para que el agua pueda resbalar por ellos.
- Todos los utensilios han de apilarse deforma segura para que no pueda volcar.
- Todos los utensilios se colocarán de tal forma que los brazos pulverizadores能把 Girar libremente durante el lavado.
- Cargue los elementos con cavidades como copas, vasos, ollas, etc., con la aperture hacía abajo para que el agua no pueda acumularse en el recipiente ni en la base.
- Losplatos y cubiertos no deben irunoindentro de other,ni cubirse entre sI.
- Para evacitar daños, los vasos no deben tocarse entre sí.
- La cesta superior ha sido disenada para colocar los elementos más delicados y ligeros, como vasos, tazas de café y de te.
- Los cuchillos de hoja larga colocados mirando hacía arriba suponen un riesgo potencial.
- Los elementos largos o afilados como los cuchillos deben colocarse horizontalmente en la cesta superior.
- No sobrecargue el lavavajillas. Es importante para lograr buenos resultados y un consumo energeticoreasonable.

NOTA:
Los elementos muy pequeños no deben lavarse en el lavavajillas, ya que podría caerse de la cesta con fácil.
Extracción de la vajilla
Para evaporar que el agua gotee desde la cesta superior en la cesta inferior,se recomienda vaciar la cesta inferior en primer lugar,seguida de la cesta superior.
ADVERTENCIA

Lo que saque está caliente! Para registrar días, no saque los objetivos de vidrio ni los cubiertos del lavavajillas hasta uno 15 horas après que finalice el programa.
Carga en la cesta superior
La cesta superior ha sido disnada para los elementos más delicados y ligeros, como los vasos, las tazas de café y los cazos, asi como platos, cuencosPEGUEY OLLAS POCKO profundas (siempre que no estén demasiado susicas).
Cologne los platos y cacerolas de modo que no se muevan al aplicarles elchorro de agua.
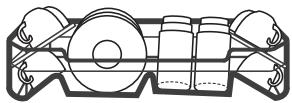
Carga en la cesta inferior
Se recomienda colocar los articculos de mayor tamaño y más dificiles de limpiar en la cesta inferior: ollas, sartenes, tapas, fuentes y cuencos, como se muestra en la figura a continuación. Es preferible colocar las fuentes y las tapas en el lateral de las cestas, para evaporar bloquear el giro del brazo pulverizador superior.
El diámetro máximo recomendado para los platos delante del dispenser de detergente es de 19 cm, para no obstaculizar su aperture.
Carga del cesto para cubiertos
Los cubiertos deben colocarse en el cesto para cubiertos independiente,分开ar oentre s y las posiciones adequadas, y asegurandose de que los utensilios no se rozan, ya que podrjan no quedar bien limpios.
ADVERTENCIA
No deje que ningún utensilio sobresalga por la parte inferior. Deje siempre los utensilios aflilados con la punta hacía bajo.

Para lograr un mejor efecto de lavado, cargue las cestas según las options de此案 estándar queaparen en laULTima sección del APARTADO I: Version generica
- Funcionamento del abrillantador y el detergente
El ablillantador se libera durante el aclarado final para evitar que el agua forme gotas sobre los platos, dejo manchas y rastos. Internacionalmente, como el agua resbale por los platos. El lavavajillas ha sido disnado para usar ablillantador liquido.
ADVERTENCIA
Use solamente un abrillantador demarca para el lavavajillas. Nunca llene el dispenser del abrillantador con ninguna other sustancia (como limpia-lavavajillas o detergente liquido). Se podra darar el aparato.
Cuando rellenar el dispensador del abrillantador
A menos que la luz de advertencia de abrillantador (2) del panel de control esté encendida, siempre Possible
estimar lacantidad segun el color del indicator de nivel optico situado junto a la tapa. Si el deposito del abrillantador está lleno, el indicator estara totalmente oscuro. El tamen del punto oscuro se iraduciendo a medida que disminuya la cantidad de abrillantador. No debe dejar que el nivel del abrillantador caiga por debajo de 1/4.
Al disminuir el nivel, el時間 del punto oscuro en el indicator de nivel del abrillantador combustar, como se ilustra a continuación.
Lleno
3/4 leno
Medio Ileno 1/4 Ileno
Vacio
Función del detergente
Los ingredientes químicos que componen el detergente son necessarios para arrancar, deshacer y eliminar toda la suciedad del lavavajillas. La mayoría de los detergentes commerciales son adecuados para este fin.
ADVERTENCIA
- Uso adecuado del detergente
Use solamente detergente fabricado expresamente para su uso en lavavajillas. Conservelo en un lugar fresco y seco.
No ponga el detergente en polvo en el dispensador hasta el momento justo en que vaya a lavar los platos.
El detergente para lavavajillas es corrosivo. Mantengalo alejado del alcance de los niños.

- Llenado del deposito de Abrillantador

Indicador del abrillantador
1 Para abrir el dispenser, gire la tapa hacia la izquierda (flecha de "abrir") y retírela.
Vierta el abrillantador con cuidado en el dispensador, evitando que se desborde.
NOTA:
Limpie el ablillantador que se haya podido detrarar con un paño absorbente para evaporar el excesso de espuma durante el proximo lavado.
Vuelva a colocar la tapa introduciendola en linea con la flecha de "Abrir" y girandola hacer la derecha (flecha de cerrar).
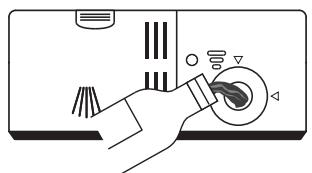
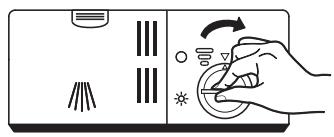
Ajuste del deposito deibrillantador
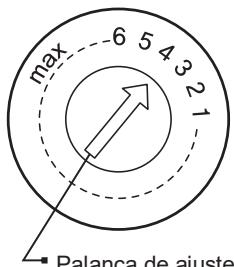
El depóstito del abrillantador dispone de seis configuraciones. Tanto la configuración recommendada como la configuración de fabrica es la “4”. Si los platos no se están secando correctamente o presentan manchas, ajuste el dial al número inmediamente superior hasta que deje de occurrir. Reduzca el número si los platos presentan manchas blanquecas pegajosas o unapellicula azulada en los vasos o cuchillos.
Palanca de ajuste (abrillantador)
- Llenado del dispenser de detergente
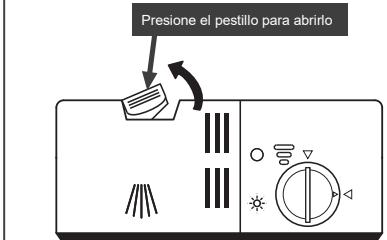
1 Pulse el gancho de liberacion del dispensador de detergente paraAbrir la tapa.
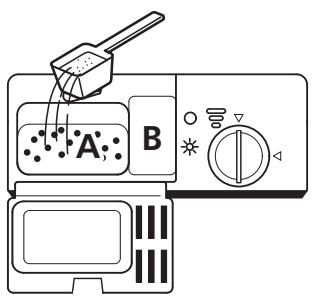
2 Añada detergente en la cavidad más grande (A) paraponer en marcha el ciclo de lavado principal. Para carrgas más sucias,añada también algo de detergente en la cavidad más(PCQUENA B) para el ciclo de prelimvado.

3 Cierre la tapa y presione hasta que quede bloqueada en su posicion.
NOTA:
- Tenga en cuenta que,dependiendo de la polución del agua, el ajuste pueda serdifferente.
- Cumpla con las recomendaciones del fabricante en el envase del detergente.
PROGRAMAR EL LAVAVAJILLAS
Tabla de ciclo de lavado
En lasuma tabla se muestra que programas son miglioras para los niveles de residuos de alimentos y cuando detergente esnecessary. Internacional meuda informacion variada sobre los programas.
(●) significa que esnecessary rellenar el dispensador del abrillantador.
| Programa | Descripción del ciclo | Detergente avado/principal | Tiempo de funcionaamie nto (min) | Energía (kW/h) | Agua (I) | Abrilla ntador |
| Intensive | Prelavado (50 °C) | |||||
| Lavado (60 °C) | 5/22g | 165 | 1.4 | 16.5 | ● | |
| Aclarado Aclarado Aclarado (70 °C) | (1 piece) | |||||
| Secado | ||||||
| Normal | Prelavado (45 °C) | |||||
| Lavado (55 °C) | 5/22g | 175 | 1.1 | 13 | ● | |
| Aclarado Aclarado (65 °C) | (1 piece) | |||||
| Secado | ||||||
| (*EN 50242) | Prelavado (45 °C) | |||||
| Lavado | 5/22g | 190 | 0.69 | 9 | ● | |
| Aclarado (65 °C) | (1 piece) | |||||
| Secado | ||||||
| 90 min | Lavado (65 °C) | |||||
| Aclarado Aclarado (65 °C) | 27g | 90 | 1.15 | 11.5 | ● | |
| Secado | (1 piece) | |||||
| Rapid | Lavado (45 °C) | |||||
| Aclarado (50 °C) | 20g | 30 | 0.7 | 10 | ○ | |
| Aclarado (55 °C) |

NOTA:
EN 50242:
Este programa es el ciclo de prueba. La informacion para la prueba de compatibilidad cumple con la norma EN 50242.
- Puesta en marcha del ciclo de lavado
- Saque las cestas superior e inferior, coloque los platos y vuelva a introducirlas. Se recomienda cargar primero la cesta inferior y después la superior.
- Vierta el detergente.
- Inserte la clavija en la toma. Para Obtener informacion sobre la alimentacion, vaya a la ultima pagea "Ficha del producto". Asegürese de que el suministro de agua está abierto y a maxima presion.
- Abra la puerta. Pulse el botón de encendido.
- Elija un programa, la luz de respecta se encenderá. A continuación, ciderre la puerta y el lavavajillas comenzará su ciclo.
- Cambiar el programa a mitad del ciclo
Un ciclo de lavado solo se puedaoniano poco tiempo, de othero modo el detergente podría haberse liberado y el lavavajillas podría haber comenzado a drenar agua. Si fuera este el caso, el lavavajillas deben reiniciarse y el dispensador de detergente volver a rellenarse. Para reinicair el lavavajillas, siga las instrucciones a continuación:
- Abra un poco la puerta para que el lavavajillas se detenga. Una vez que el brazo pulverizador se haya parado, pueda averir Completely la puerta.
- Pulse el botón Programa durante más de tres segundos y el aparato pasará a modo reposo.
- Puede embarir el programa a la configuracion de ciclo que desee.

¿Ha olvidado meter algo?
Si olvida algo nplato, puea aadirlo en qualquier momento ante de que se abra el dispensador de detergente. Si este fuera el caso, siga las instrucciones a continuacion:
- Abra un poco la puerta para que el lavavajillas se detenga.
- Una vez que el brazo pulverizador se haya parado, pueda abrir Completely la puerta.
- Meta los platos que haya olvidado.
- Cierre la puerta.
- El lavavajillas volverá a ponerse en funciona.

ADVERTENCIA
Es peligrosoAbrir la puerta en mitad de un ciclo, ya que el vapor caliente pueda provocarle escaldadas.
CÓDIGOS DE ERROR
Si el lavavajillas no funciona bien, el lavavajillasDSL como para identificarlos:
| Códigos | Significad | Posibles causas |
| La luz de Rápido parpadea muy=rápido | Tiempo de entrada más largo. | La llave de agua no está abierta, o el suministro de agua se ha restrangido, o la presión de agua esblemado bajo. |
| La luz de Rápido y la luz de 90 min parpadean muy rápido | No alcanza la temperatura deseada. | El elemento calefactor no funciona correctamente. |
| La luz de ECO parpadea muy rápido | Rebose. | Algún elemento del lavavajillas presente fugas. |
ADVERTENCIA
- Si se produce algo n rebose, apaque la llave de agua principal antes de llamar al servicios专业技术.
- Si hay agua en la bandeja de la base por un rebose o unalittle fuga,deferaretrirarse el agua.
antes de volver aponer en marcha el lavavajillas.
INFORMACION TECNICA

| Altura (Al) | 815mm |
| Anchura (An) | 448mm |
| Profundidad (P1) | 550 mm (con la puerta cerrada) |
| Profundidad (P2) | 1150 mm (con la puerta abierta 90°) |
Ficha del producto
Hoja informativa del lavavajillas domestico conforme a la Direcva de la UE 1016/2010 y 1059/2010:
| Fabricante | EDESA |
| Tipo / Descripción | EDB-4590-I |
| Juegos de cubiertos estándar | 9 |
| Clase de eficiencia enerética | A+ |
| Consumo enerético anual | 215 kWh |
| Consumo enerético del ciclo de lavado estándar | 0.75 kWh |
| Consumo enerético apagado | 0.45 W |
| Consumo enerético encendido | 0.49W |
| Consumo de agua anual | 2660 litres |
| Clase de eficiencia de secado | A |
| Ciclo de lavado estándar | ECO 45°C |
| Duración del programa del ciclo de lavado estándar | 190 min |
| Nivel de ruido | 49 dB(A) re 1 pW |
| Montaje | Independiente |
| Puede ir integrado | sí |
| Consumo enerético | 1760-2100W |
| Tensión nominal / Frequencia | 220-240V/50Hz |
| Presión de agua (presión del flujo) | 0.04-1.0MPa=0.4-10 bar |
NOTA:
A + ++ (la eficiencia más alta) a D (la eficiencia más baja)
2 Consumo energetico bajo en 280 ciclos de lavado estandar usinga agua fría y el consumo de los发展模式 de potencia bajos. El consumo energetico real dependerá de como se utilizes el aparato.
3 Consumo de agua bajo en 280 ciclo de lavado estándar. El consumo de agua real dependerá de como se usa el aparato.
A (la eficiencia más alta) a G (la eficiencia más baja)
Este programa es adecuado para lavar una vajilla con una suciedad normal y es el programa mas eficiente en关键时刻 de su combinacion de consumo energetico y de agua para este tipo de articulos.
CONTENTS
01
SAFETY INFORMATION
02
PRODUCT OVERVIEW
03
USING YOUR DISHWASHER
Loading The Salt Into The Softener
Basket Used Tips
04
MAINTENANCE AND CLEANING
External Care
Internal Care
Caring For The Dishwasher
05
INSTALLATION INSTRUCTION
About Power Connection
Water Supply And Drain
Connection Of Drain Hoses
Position The Appliance
Free Standing Installation
Built-In Installation(for the integrated model)
06
TROUBLESHOOTING TIPS
07
LOADING THE BASKETS ACCORDING TO EN50242
NOTE:
- Reviewing the section on troubleshooting Tips will help you solve some common problems by yourself.
- If you cannot solve the problems by yourself, please ask for help from a professional technician.
- The manufacturer, following a policy of constant development and updating of the product, may make modifications without giving prior notice.
- If lost or out-of-date, you can receive a new user manual from the manufacturer or responsible vendor.
SAFETY INFORMATION
WARNING
When using your dishwasher, follow the precautions listed below:
- Installation and repair can only be carried out by a qualified technician
-
This appliance is intended to be used in household and similar applications such as:
-
staff kitchen areas in shops, offices and other working environments;
-farm houses;
-by clients in hotels, motels and other residential type environments;
-bed and breakfast type environments.
- This appliance can be used by children aged from 8 years and above and persons with reduced physical, sensory or mental capabilities or lack of experience and knowledge if they have been given supervision or instruction concerning use of the appliance in a safe way and understand the hazards involved.
- Children shall not play with the appliance. Cleaning and user maintenance shall not be done by children without supervision. (For EN60335-1)
This appliance is not intended for use by persons (including children) with reduced physical, sensory or
mental capabilities, or lack of experience and knowledge, unless they have been given supervision or instruction concerning use of the appliance by a person responsible for their safety. (For IEC60335- 1 )
- Packaging material could be dangerous for children!
- This appliance is for indoor household use only. To protect against the risk of electrical shock, do not immerse the unit, cord or plug in water or other liquid.
- Please unplug before cleaning and performing maintenance on the appliance.
- Use a soft cloth moistened with mild soap, and then use a dry cloth to wipe it again.

Earthing Instructions
- This appliance must be earthed. In the event of a malfunction or breakdown, earthing will reduce the risk of an electric shock by providing a path of least resistance of electric current. This appliance is equipped with an earthing conductor plug.
- The plug must be plugged into an appropriate outlet that is installed and earthed in accordance with all local codes and ordinances.
- Improper connection of the equipment-earthing conductor can result in the risk of an electric shock.
-
Check with a qualified electrician or service representative if you are in doubt whether the appliance is properly grounded.
-
Do not modify the plug provided with the appliance; If it does not fit the outlet.
- Have a proper outlet installed by a qualified electrician.
- Do not abuse, sit on, or stand on the door or dish rack of the dishwasher.
- Do not operate your dishwasher unless all enclosure panels are properly in place.
- Open the door very carefully if the dishwasher is operating, there is a risk of water squirting out.
- Do not place any heavy objects on or stand on the door when it is open. The appliance could tip forward.
- When loading items to be washed:
1) Locate sharp items so that they are not likely to damage the door seal;
2) Warning: Knives and other utensils with sharp points must be loaded in the basket with their points facing down or placed in a horizontal position.
-
Some dishwasher detergents are strongly alkaline. They can be extremely dangerous if swallowed. Avoid contact with the skin and eyes and keep children away from the dishwasher when the door is open.
-
Check that the detergent powder is empty after completion of the wash cycle.
-
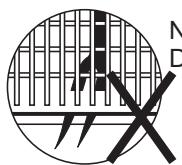
Do not wash plastic items unless they are marked "dishwasher safe" or the equivalent.
- For unmarked plastic items not so marked, check the manufacturer's recommendations.
- Use only detergent and rinse agents recommended for use in an automatic dishwasher.
- Never use soap, laundry detergent, or hand washing detergent in your dishwasher.
- The door should not be left open, since this could increase the risk of tripping. If the supply cord is damaged, it must be replaced by the manufacturer or its service agent or a similarly qualified person in order to avoid a hazard.
- During installation, the power supply must not be excessively or dangerously bent or flattened.
- Do not tamper with controls.
- The appliance needs to be connected to the main water valve using new hose sets. Old sets should not be reused.
- To save energy, in stand by mode, the appliance will switch off automatically while there is no any operation in 30 minutes.
Disposal
- For disposing of package and the appliance please go to a recycling center. Therefore cut off the power supply cable and make the door closing device unusable.
- Cardboard packaging is manufactured from recycled paper and should be disposed in the waste paper collection for recycling.
- By ensuring this product is disposed of correctly, you will help prevent potential negative consequences for the environment and human health, which could otherwise be caused by inappropriate waste handling of this product.
- For more detailed information about recycling of this product, please contact your local city office and your household waste disposal service.
- DISPOSAL: Do not dispose this product as unsorted municipal waste. Collection of such waste separately for special treatment is necessary.
PRODUCT OVERVIEW
1IMPORTANT:
To get the best performance from your dishwasher, read all operating instructions before using it for the first time.

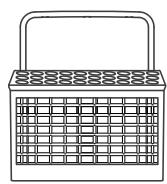
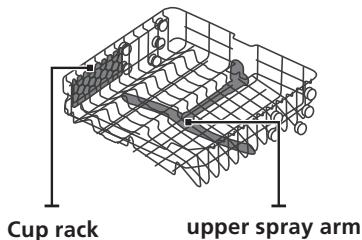
Cutlery basket
Upper basket
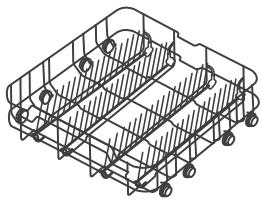
Lower basket
NOTE:
Pictures are only for reference, different models may be different. Please prevail in kind.
USING YOUR DISHWASHER
Before using your dishwasher :

- Set the water softener
- Loading the salt Into the softener
- Loading the basket
- Fill the dispenser

Please check the section 1 "Water Softener" of PART II: Special Version, If you need to set the water softener.
Loading The Salt Into The Softener
NOTE:
If your model does not have any water softener, you may skip this section. Always use salt intended for dishwasher use.
The salt container is located beneath the lower basket and should be filled as explained in the following:
WARNING
- Only use salt specifically designed for dishwashers use!
Every other type of salt not specifically designed for dishwasher use, especially table salt, will damage the water softener. In case of damages caused by the use of unsuitable salt the manufacturer does not give any warranty nor is liable for any damages caused.
- Only fill with salt before running a cycle.
This will prevent any grains of salt or salty water, which may have been spilled, remaining on the bottom of the machine for any period of time, which may cause corrosion.
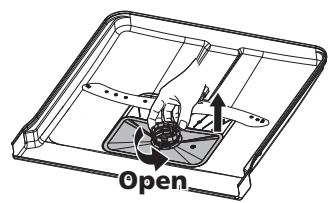
Please follow the steps below for adding dishwasher salt:
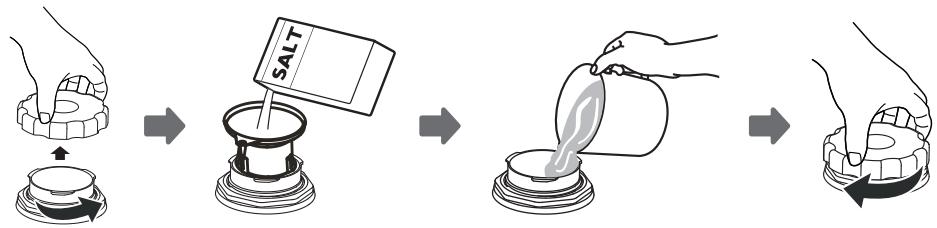
- Remove the lower basket and unscrew the reservoir cap.
- Place the end of the funnel (supplied) into the hole and pour in about 1.5kg of dishwasher salt.
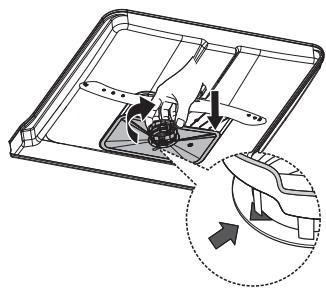
- Fill the salt container to its maximum limit with water, It is normal for a small amount of water to come out of the salt container.
- After filling the container, screw back the cap tightly.
- The salt warning light will stop being after the salt container has been filled with salt.
- Immediately after filling the salt into the salt container, a washing program should be started (We suggest to use a short program). Otherwise the filter system, pump or other important parts of the machine may be damaged by salty water. This is out of warranty.
NOTE:
- The salt container must only be refilled when the salt warning light ( ) in the control panel comes on. Depending on how well the salt dissolves, the salt warning light may still be on even though the salt container is filled. If there is no salt warning light in the control panel (for some Models), you can estimate when to fill the salt into the softener by the cycles that the dishwasher has run.
- If salt has spilled, run a soak or quick program to remove it.
Basket Used Tips
Adjusting the upper basket
Type 1:
The height of the upper basket can be easily adjusted to accommodate taller dishes in either the upper or lower basket.
To adjust the height of the upper rack, follow these steps:
1 Pull out the upper basket.
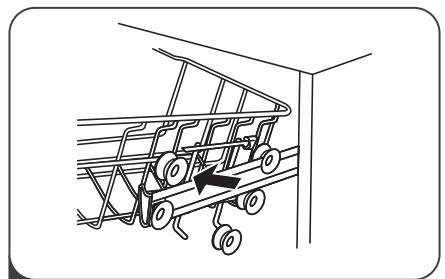
2 Remove the upper basket.
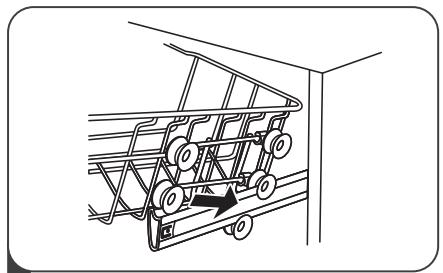
3 Re-attach the upper basket to upper or lower rollers.
4 Push in the upper basket.
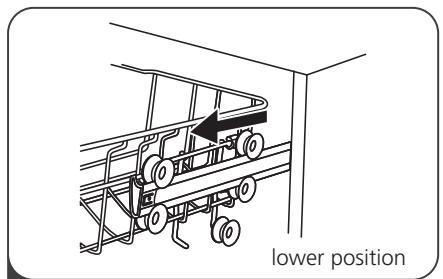
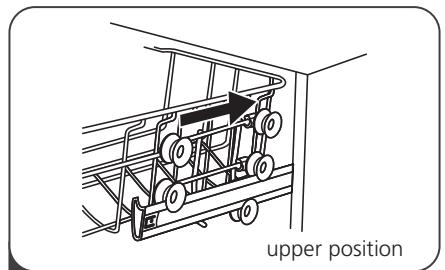
Type 2:
To raise the upper basket, just lift the upper basket at the center of each side until the basket locks into place in the upper position. It is not necessary to lift the adjuster handle.
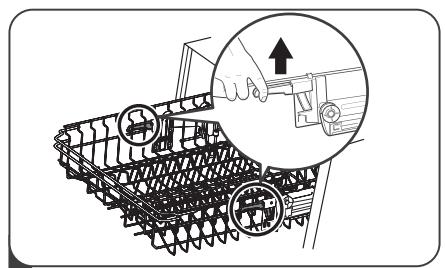
2 To lower the upper basket, lift the adjust handles on each side to release the basket and lower it to the lower position.
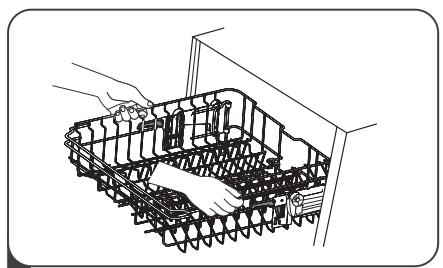
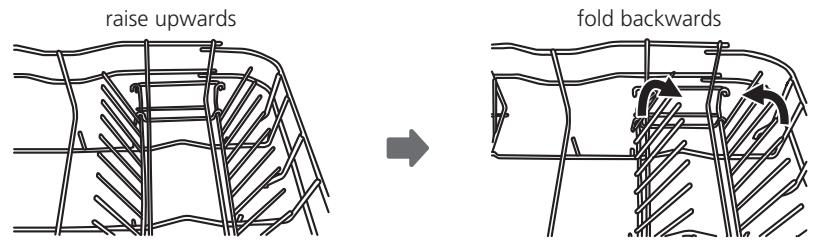
Folding back the cup shelves
To make room for taller items in the upper basket, raise the cup rack upwards. You can then lean the tall glasses against it. You can also remove it when it is not required for use.

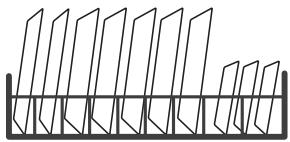
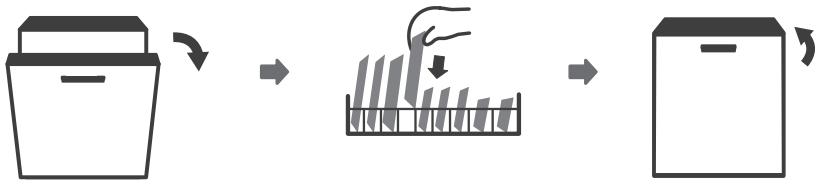
Folding back the rack shelves
The spikes of the lower basket are used for holding plates and a platter. They can be lowered to make more room for large items.
MAINTENANCE AND CLEANING
External Care
The door and the door seal
Clean the door seals regularly with a soft damp cloth to remove food deposits. When the dishwasher is being loaded, food and drink residues may drip onto the sides of the dishwasher door. These surfaces are outside the wash cabinet and are accessed by water from the spray arms. Any deposits should be wiped off before t door is closed.
The control panel
If cleaning is required, the control panel should be wiped with a soft damp cloth only.
WARNING
- To avoid penetration of water into the door lock and electrical components, do not use a spray cleaner of any kind.
- Never use abrasive cleaners or scouring pads on the outer surfaces because they may scratch the finish. Some paper towels may also scratch or leave marks on the surface.
Internal Care
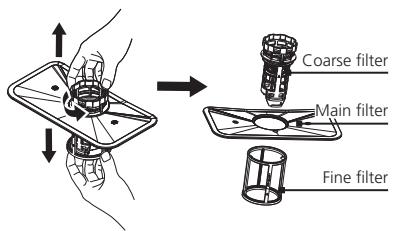
Filtering system
The filtering system in the base of the wash cabinet retains coarse debris from the washing cycle. The collected coarse debris may cause the filters to clog. Check the condition of the filters regularly and clean them if necessary under running water. Follow the steps below to clean the filters in the wash cabinet.

NOTE:
Pictures are only for reference, different models of the filtering system and spray arms may be different.
Hold the coarse filter and rotate it anticlockwise to unlock the filter. Lift the filter upwards and out of the dishwasher.

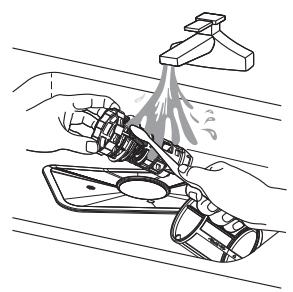
3 Larger food remnants can be cleaned by rinsing the filter under running water. For a more thorough clean, use a soft cleaning brush.

2 The fine filter can be pulled off the bottom of the filter assembly. The coarse filter can be detached from the main filter by gently squeezing the tabs at the top and pulling it away.
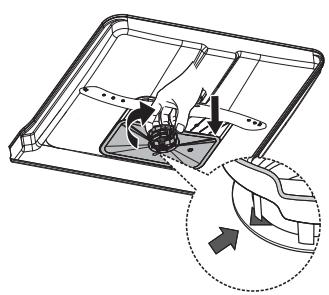
4 Reassemble the filters in the reverse order of the disassembly, replace the filter insert, and rotate clockwise to the close arrow.
WARNING
- Do not over tighten the filters. Put the filters back in sequence securely, otherwise coarse debris could get into the system and cause a blockage.
- Never use the dishwasher without filters in place. Improper replacement of the filter may reduce the performance level of the appliance and damage dishes and utensils.
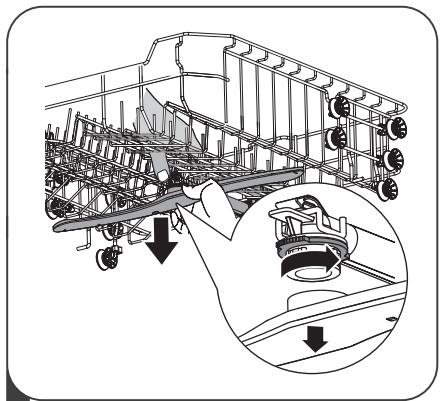
Spray arms
It is necessary to clean the spray arms regularly for hard water chemicals will clog the spray arm jets and bearings.
To clean the spray arms, follow the instructions below:
1 To remove the upper spray arm, hold the nut in the center still and rotate the spray arm counterclockwise to remove it.

2 To remove the lower spray arm, pull out the spray arm upward.
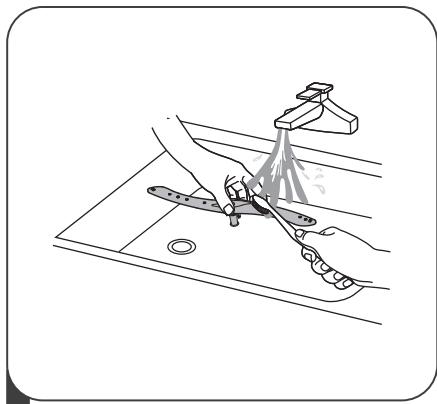
3 Wash the arms in soapy and warm water and use a soft brush to clean the jets. Replace them after rinsing them thoroughly.
Caring For The Dishwasher
Frost precaution
Please take frost protection measures on the dishwasher in winter. Every time after washing cycles, please operate as follows:
- Cut off the electrical power to the dishwasher at the supply source.
- Turn off the water supply and disconnect the water inlet pipe from the water valve.
- Drain the water from the inlet pipe and water valve. (Use a pan to gather the water)
- Reconnect the water inlet pipe to the water valve.
- Remove the filter at the bottom of the tub and use a sponge to soak up water in the sump.
After every wash
After every wash, turn off the water supply to the appliance and leave the door slightly open so that moisture and odors are not trapped inside.
Remove the plug
Before cleaning or performing maintenance, always remove the plug from the socket.
No solvents or abrasive cleaning
To clean the exterior and rubber parts of the dishwasher, do not use solvents or abrasive cleaning products. Only use a cloth with warm soapy water.
To remove spots or stains from the surface of the interior, use a cloth dampened with water an a little vinegar, or a cleaning product made specifically for dishwashers.
When not in use for a longtime
It is recommend that you run a wash cycle with the dishwasher empty and then remove the plug from the socket, turn off the water supply and leave the door of the appliance slightly open. This will help the door seals to last longer and prevent odors from forming within the appliance.
Moving the appliance
If the appliance must be moved, try to keep it in the vertical position. If absolutely necessary, it can be positioned on its back.
Seals
One of the factors that cause odours to form in the dishwasher is food that remains trapped in the seals. Periodic cleaning with a damp sponge will prevent this from occurring.
INSTALLATION INSTRUCTION
WARNING

Electrical Shock Hazard
Disconnect electrical power before installing dishwasher.
Failure to do so could result in death or electrical shock.

Attention
The installation of the pipes and electrical equipments should be done by professionals.
About Power Connection
WARNING
For personal safety:
- Do not use an extension cord or an adapter plug with this appliance.
- Do not, under any circumstances, cut or remove the earthing connection from the power cord.
Electrical requirements
Please look at the rating label to know the rating voltage and connect the dishwasher to the appropriate power supply. Use the required fuse 10A/13A/16A, time delay fuse or circuit breaker recommended and provide separate circuit serving only this appliance.
Electrical connection
Ensure the voltage and frequency of the power being corresponds to those on the rating plate. Only insert the plug into an electrical socket which is earthed properly. If the electrical socket to which the appliance must be connected is not appropriate for the plug, replace the socket, rather than using a adaptors or the like as they could cause overheating and burns.
Ensure that proper earthing exists before use
Water Supply And Drain
Cold water connection
Connect the cold water supply hose to a threaded 3/4(inch) connector and make sure that it is fastened tightly in place.
If the water pipes are new or have not been used for an extended period of time, let the water run to make sure that the water is clear. This precaution is needed to avoid the risk of the water inlet to be blocked and damage the appliance.
ordinary supply hose
safety supply hose
About the safety supply hose
The safety supply hose consists of the double walls. The hose's system guarantees its intervention by blocking the flow of water in case of the supply hose breaking and when the air space between the supply hose itself and the outer corrugated hose is full of water.
WARNING
A hose that attaches to a sink spray can burst if it is installed on the same water line as the dishwasher. If your sink has one, it is recommended that the hose be disconnected and the hole plugged.
How to connect the safety supply hose
- Pull The safety supply hoses completely out from storage compartment located at rear of dishwasher.
- Tighter the screws of the safety supply hose to the faucet with thread 3/4inch.
- Turn water fully on before starting the dishwasher.
How to disconnect the safety supply hose
- Turn off the water.
- Unscrew the safety supply hose from the faucet.
Connection Of Drain Hoses
Insert the drain hose into a drain pipe with a minimum diameter of 4cm , or let it run into the sink, making sure to avoid bending or crimping it. The height of drain pipe must be less than 1000mm . The free end of the hose must not be immersed in water to avoid the back flow of it.
4 Please securely fix the drain hose in either position A or position B
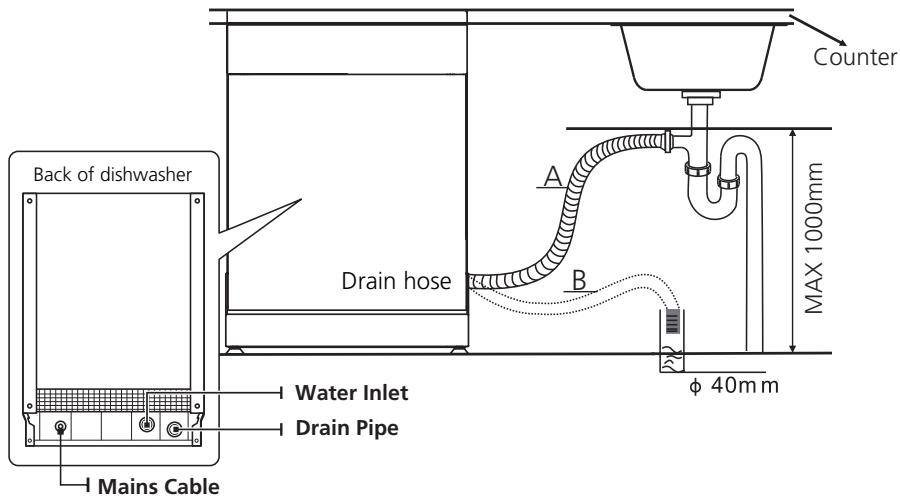
How to drain excess water from hoses
If the sink is 1000 higher from the floor, the excess water in hoses cannot be drained directly into the sink. It will be necessary to drain excess water from hoses into a bowl or suitable container that is held outside and lower than the sink.
Water outlet
Connect the water drain hose. The drain hose must be correctly fitted to avoid water leaks. Ensure that the water drain hose is not kinked or squashed.
Extension hose
If you need a drain hose extension, make sure to use a similar drain hose. It must be no longer than 4 meters; otherwise the cleaning effect of the dishwasher could be reduced.
Syphon connection
The waste connection must be at a height less than 100cm (maximum) from the bottom of the dish. The water drain hose should be fixed.
Position The Appliance
Position the appliance in the desired location. The back should rest against the wall behind it, and the sides, along the adjacent cabinets or walls. The dishwasher is equipped with water supply and drain hoses that can be positioned either to the right or the left sides to facilitate proper installation.
Levelling the appliance
Once the appliance is positioned for levelling, the height of the dishwasher may be altered via adjustment of the screwing level of the feet. In any case, the appliance should not be inclined more than 2^ .

NOTE:
Only apply to the free standing dishwasher.
Free Standing Installation
Fitting between existing carbinets
The height of the dishwasher, 845 mm, has been designed in order to allow the machine to be fitted between existing cabinets of the same height in modern fitted kitchens. The feet can be adjusted so that correct height is reached.
The laminated top of the machine does not require any particular care since it is heatproof, scratchproof and stainproof.
Underneath existing work top
(When fitting beneath a work top)
In most modern fitted kitchens there is only one single work top under which cabinets and electrical appliances are fitted. In this case remove the work top of the dishwasher by unscrewing the screws under the rear edge of the top (a).
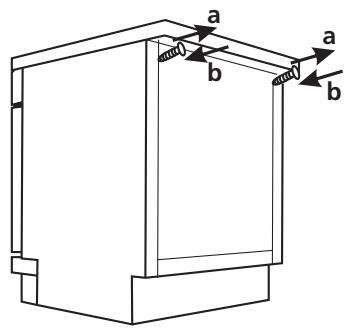

Attention
After removing the work top, the screws must be screwed again under the rear edge of the top (b).
The height will then be reduced to 815~mm , as scheduled by the International Regulations (ISO) and the dishwasher will fit perfectly under the kitchen working top
Built-In Installation(for the integrated model)
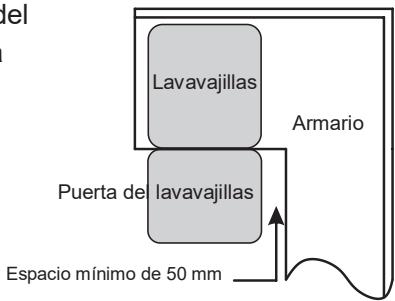
Step 1. Selecting the best location for the dishwasher
The installation position of dishwasher should be near the existing inlet and drain hoses and power cord.
Illustrations of cabinet dimensions and installation position of the dishwasher.
- Less than 5 mm between the top of dishwasher and cabinet and the outer door aligned to cabinet.
- If dishwasher is in stalled at the corner of the cabinet, there should be some space when the door is opened.

NOTE:
Depending on where your electrical outlet is, you may need to cut a hole in the opposite cabinet side.
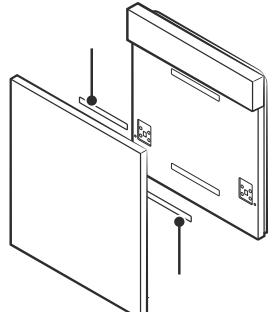
Step 2. Aesthetic panel's dimensions and installation

The aesthetic wooden panel could be processed according to the installation drawings.
Semi-integrated model
Magical raster A and magical raster B be disjoinedon ,magical raster A on the aesthetic wooden panel and felted magical raster B of the outer door of dishwasher (see figure A). After positioning of the panel, fix the panel onto the outer door by screws and bolts (See figure B).

Full-integrated model
Install the hook on the aesthetic wooden panel and put the hook into the slot of the outer door of dishwasher (see figure A). After positioning of the panel, fix the panel onto the outer door by screws and bolts (See figure B).
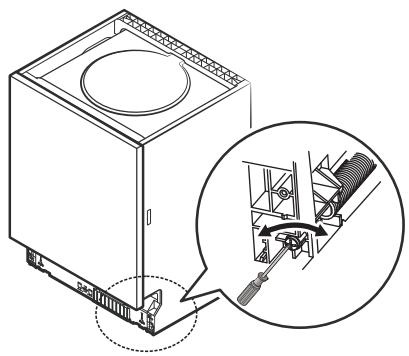
Step 3. Tension adjustment of the door spring
- The door springs are set at the factory to the proper tension for the outer door. If aesthetic wooden panel are installed, you will have to adjust the door spring tension. Rotate the adjusting screw to drive the adjustor to strain or relax the steel cable.
- Door spring tension is correct when the door remains horizontal in the fully opened position, yet rises to a close with the slight lift of a finger.

Step 4. Dishwasher installation steps
Please refer to the specified installation steps in the installation drawings.
- Affix the condensation strip under the work surface of cabinet. Please ensure the condensation strip is flush with edge of work surface. (Step 2)
- Connect the inlet hose to the cold water supply.
- Connect the drain hose.
- Connect the power cord.
- Place the dishwasher into position. (Step 4)
- Level the dishwasher. The rear food can be adjusted from the front of the dishwasher by turning the Philips screw in the middle of the base of dishwasher use an Philips screw. To adjust the front feet, use a flat screw driver and turn the front feet until the dishwasher is level. (Step 5 to Step 6)
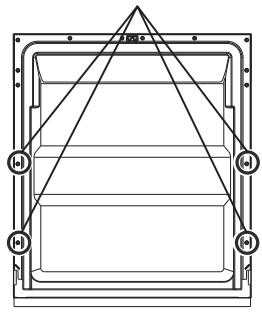
- Install the furniture door to the outer door of the dishwasher. (Step 7 to Step 10)
- Adjust the tension of the door springs by using an Allen key turning in a clockwise motion to tighten the left and right door springs. Failure to do this could cause damage to your dishwasher. (Step 11)
- The dishwasher must be secured in place. There are two ways to do this:
A. Normal work surface: Put the installation hook into the slot of the side plane and secure it to the work surface with the wood screws.
B. Marble or granite work top: Fix the side with Screw.
Step 5. Levelling the dishwasher
Dishwasher must be level for proper dish rack operation and wash performance.
- Place a spirit level on door and rack track inside the tub as shown to check that the dishwasher is level.
- Level the dishwasher by adjusting the three levelling legs individually.
- When level the dishwasher, please pay attention not to let the dishwasher tip over.

NOTE:
The maximum adjustment height of the feet is 50~mm
TROUBLESHOOTING TIPS
Before Calling For Service
Reviewing the charts on the following pages may save you from calling for service.
| Problem | Possible Causes | What To Do |
| Dishwasher doesn't start | Fuse blown, or the circuit break tripped. | Replace fuse or reset circuit breaker. Remove any other appliances sharing the same circuit with the dishwasher. |
| Power supply is not turned on. | Make sure the dishwasher is turned on and the door is closed securely. Make sure the power cord is properly plugged into the wall socket. | |
| Water pressure is low | Check that the water supply is connected properly and the water is turned on. | |
| Door of dishwasher not properly closed. | Make sure to close the door properly and latch it. | |
| Water not pumped form dishwasher | Twisted or trapped drain hose. | Check the drain hose. |
| Filter clogged. | Check coarse the filter. | |
| Kitchen sink clogged. | Check the kitchen sink to make sure it is draining well. If the problem is the kitchen sink that is not draining, you may need a plumber rather than a serviceman for dishwashers. | |
| Suds in the tub | Wrong detergent. | Use only the special dishwasher detergent to avoid suds. If this occurs, open the dishwasher and let suds evaporate. Add 1 gallon of cold water to the bottom of the dishwasher. Close the dishwasher door, then select any cycle. Initially, the dishwasher will drain out the water. Open the door after draining stage is complete and check if the suds have disappeared. Repeat if necessary. |
| Spilled rinse-aid. | Always wipe up rinse-aid spills immediately. | |
| Stained tub interior | Detergent with colourant may have been used. | Make sure that the detergent has no colourant. |
| White film on inside surface | Hard water minerals. | To clean the interior, use a damp sponge with dishwasher detergent and wear rubber gloves. Never use any other cleaner than dishwasher detergent otherwise, it may cause foaming or suds. |
| There are rust stains on cutlery | The affected items are not corrosion resistant. | Avoid washing items that are not corrosion resistant in the dishwasher. |
| A program was not run after dishwasher salt was added. Traces of salt have gotten into the wash cycle. | Always run a wash program without any crockery after adding salt. Do not select the Turbo function (if present), after adding dishwasher salt. | |
| The lid of the softer is loose. | Check the softener lid is secure. | |
| Knocking noise in the dishwasher | A spray arm is knocking against an item in a basket | Interrupt the program and rearrange the items which are obstructing the spray arm. |
| Rattling noise in the dishwasher | Items of crockery are loose in the dishwasher. | Interrupt the program and rearrange the items of crockery. |
| Knocking noise in the water pipes | This may be caused by on-site installation or the cross-section of the piping. | This has no influence on the dishwasher function. If in doubt, contact a qualified plumber. |
| The dishes are not clean | The dishes were not loaded correctly. | See PART II “Preparing And Loading Dishes”. |
| The program was not powerful enough. | Select a more intensive program. | |
| The dishes are not clean. | Not enough detergent was dispensed. | Use more detergent, or change your detergent. |
| Items are blocking the movement of the spray arms. | Rearrange the items so that the spray can rotate freely. | |
| The filter combination is not clean or is not correctly fitted in the base of wash cabinet. This may cause the spray arm jets to get blocked. | Clean and/or fit the filter correctly. Clean the spray arm jets. | |
| Cloudiness on glassware. | Combination of soft water and too much detergent. | Use less detergent if you have soft water and select a shorter cycle to wash the glassware and to get them clean. |
| White spots appear on dishes and glasses. | Hard water area can cause limescale deposits. | Add more detergent. |
| Black or grey marks on dishes | Aluminium utensils have rubbed against dishes | Use a mild abrasive cleaner to eliminate those marks. |
| Detergent left in dispenser | Dishes block detergent dispenser | Re-loading the dishes properly. |
| The dishes aren't drying | Improper loading | Load the dishwasher as suggested in the directions. |
| Dishes are removed too soon | Do not empty your dishwasher immediately after washing. Open the door slightly so that the steam can come out. Take out the dishes until the inside temperature is safe to touch. Unload the lower basket first to prevent the dropping water from the upper basket. | |
| The dishes aren't drying | Wrong program has been selected. | With a short program, the washing temperature is lower, decreasing cleaning performance. Choose a program with a long washing time. |
| Use of cutlery with a low-quality coating. | Water drainage is more difficult with these items. Cutlery or dishes of this type are not suitable for washing in the dishwasher. |
LOADING THE BASKETS ACCORDING TO EN50242:
1. Upper basket:

| Number | Item |
| 1 | Cups |
| 2 | Saucers |
| 3 | Glasses |
| 4 | Small serving bowl |
| 5 | Medium serving bowl |
| 6 | Large serving bowl |
2. Lower basket:
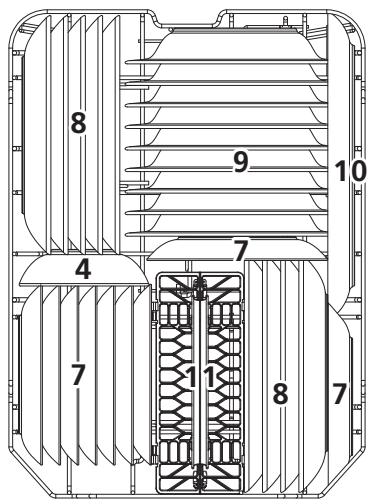
| Number | Item |
| 7 | Dessert dishes |
| 8 | Dinner plates |
| 9 | Soup plates |
| 10 | Oval platter |
| 11 | Cutlery basker |
3.Cutlery basket:


Information for comparability
tests in accordance with EN 50242
Capacity: 9 place settings
Position of the upper basket: lower position
Program: ECO
Rinse aid setting: 6
Softener setting: H3
| Number | Item |
| 1 | Soup spoons |
| 2 | Forks |
| 3 | Knives |
| 4 | Teaspoons |
| 5 | Dessert spoons |
| 6 | Serving spoons |
| 7 | Serving forks |
| 8 | Gravy ladles |
CONTENTS
01
4 USING YOUR DISHWASHER
4 Control Panel
6 Water Softener
7 Preparing And Loading Dishes
10 Function Of The Rinse Aid And Detergent
1 Filling The Rinse Aid Reservoir
Filling The Detergent Dispenser
13 PROGRAMMING THE DISHWASHER
13 Wash Cycle Table
14 Starting A Cycle Wash
Changing The Program Mid-cycle
15 Forget To Add A Dish?
U3
16 ERROR CODES
04
TECHNICAL INFORMATION
NOTE:
- If you cannot solve the problems by yourself, please ask for help from a professional technician.
- The manufacturer, following a policy of constant development and updating of the product, may make modifications without giving prior notice.
- If lost or out-of-date, you can receive a new user manual from the manufacturer or responsible vendor.
QUICK USER GUIDE
Please read the corresponding content on the instruction manual for detailed operating method.
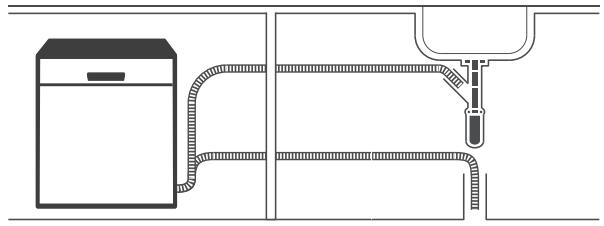
1 Install the dishwasher
(Pleases check the section 5 INSTALLATION INSTRUCTION
of PART I: Generic Version.)

2 Removing the larger residue on the cutlery
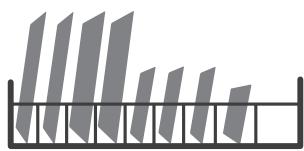
Inside Outside
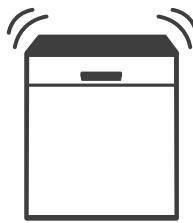
3 Loading the baskets
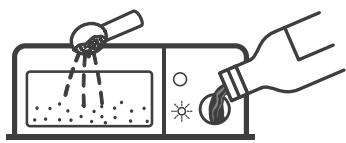
4 Filling the dispenser
5 Selecting a program and running the dishwasher
USING YOUR DISHWASHER

, Control Panel
Operation (Button)
| 1 Power | Press this button to turn on your dishwasher, the screen lights up. |
| 2 Program | Intensive Heavily soiled items include pots and pans. With dried on food. Normal For normally soiled loads, such as pots, plates, glasses and lightly soiled pans. ECO This is the standard program suitable for normally soiled loads, such as pots, plates, glasses and lightly soiled pans. 90 Min For normally soiled loads that need quick wash. Rapid A shorter wash for lightly soiled loads that do not need drying. |
| 3 Extra Drying | To dry dishes more completely. (It can only be used with Intensive, Normal, ECO, Glass, 90min) |
Operation (Button)
| 4 Half load | With this Half-load function you can only use it when you have about or less than 6 place setting dishware, and you will see less water and energy consumption. (It can only be used with Intensive, Normal, ECO, Glass, 90min) |
| 5 Delay | Press the button to set the delay time. |
Display
| 6 Warning indicator | Rinse Aid If the “ ” indicator is lit, it means the dishwasher is low on dishwasher rinse aid and requires a refill. Salt If the “ S ” indicator is lit, it means the dishwasher is low on dishwasher salt and needs to be refilled. |
| 7 Delay time | Press the button to set the delay time. (3h,6h,9h) |
Water Softener
The water softener must be set manually, using the water hardness dial.
The water softener is designed to remove minerals and salts from the water, which would have a detrimental or adverse effect on the operation of the appliance.
The more minerals there are, the harder your water is.
The softener should be adjusted according to the hardness of the water in your area.
Your local Water Authority can advise you on the hardness of the water in your area.
Adjusting salt consumption
The dishwasher is designed to allow for adjustment in the amount of salt consumed based on the hardness of the water used. This is intended to optimise and customise the level of salt consumption.
Please follow the steps below for adjustment in salt consumption.
- Switch on the appliance;
- Press the Start/Pause button for more than 5 seconds to start the water softener set model within 60seconds after the appliance was switched on;
- Press the Start/Pause button to select the proper set according to your local environment, the sets will change in the following sequence: H1->H2->H3->H4->H5->H6;
- Press the On/Off button to end the set up model.
| WATER HARDNESS | Water softener level | Salt consumption (gram/cycle) | |||
| German dH | French fH | British Clarke | Mmol/l | ||
| 0 - 5 | 0 - 9 | 0 - 6 | 0 - 0.94 | H1-> Rapid Light bright | 0 |
| 6 - 11 | 10 - 20 | 7 - 14 | 1.0 - 2.0 | H2-> 90 Min Light bright | 9 |
| 12 - 17 | 21 - 30 | 15 - 21 | 2.1 - 3.0 | H3-> 90 Min、Rapid Light bright | 12 |
| 18 - 22 | 31 - 40 | 22 - 28 | 3.1 - 4.0 | H4-> ECO Light bright | 20 |
| 23 - 34 | 41 - 60 | 29 - 42 | 4.1 - 6.0 | H5-> ECO、Rapid Light bright | 30 |
| 35 - 55 | 61 - 98 | 43 - 69 | 6.1 - 9.8 | H6-> ECO、90 Min Light bright | 60 |
1°dH=1.25 °Clarke=1.78 °fH=0.178mmol/l
The manufactory setting: H3
Contact your local water board for information on the hardness of your water supply.

Please check the section 3 "Loading The Salt Into The Softener" of PART I: Generic Version, If your dishwasher lacks salt.

NOTE:
If your model does not have any water softener, you may skip this section. Water Softener
The hardness of the water varies from place to place. If hard water is used in the dishwasher, deposits will form on the dishes and utensils.
The appliance is equipped with a special softener that uses a salt container specifically designed to eliminate lime and minerals from the water.
Preparing And Loading Dishes
- Consider buying utensils which are identified as dishwasher-proof.
- For particular items, select a program with the lowest possible temperature.
- To prevent damage, do not take glass and cutlery out of the dishwasher immediately after the program has ended.
For washing the following cutlery/dishes
Are not suitable
- Cutlery with wooden, horn china or mother-of-pearl handles
- Plastic items that are not heat resistant
- Older cutlery with glued parts that are not temperature resistant
Bonded cutlery items or dishes - Pewter or cooper items
Crystal glass - Steel items subject to rusting
Wooden platters - Items made from synthetic fibres
Are of limited suitability
- Some types of glasses can become dull after a large number of washes
Silver and aluminum parts have a tendency to discolour during washing - Glazed patterns may fade if machine washed frequently
Recommendations for loading the dishwasher
Scrape off any large amounts of leftover food. Soften remnants of burnt food in pans. It is not necessary to rinse the dishes under running water.
For best performance of the dishwasher, follow these loading guidelines.
(Features and appearance of baskets and cutlery baskets may vary from your model.)
Place objects in the dishwasher in following way:
- Items such as cups, glasses, pots/pans, etc. are faced downwards.
- Curved items, or ones with recesses, should be loaded aslant so that water can run off.
- All utensils are stacked securely and can not tip over.
- All utensils are placed in the way that the spray arms can rotate freely during washing.
- Load hollow items such as cups, glasses, pans etc. With the opening facing downwards so that water cannot collect in the container or a deep base.
- Dishes and items of cutlery must not lie inside one another, or cover each other.
- To avoid damage, glasses should not touch one another.
- The upper basket is designed to hold more delicate and lighter dishware such as glasses, coffee and tea cups.
- Long bladed knives stored in an upright position are a potential hazard!
- Long and / or sharp items of cutlery such as carving knives must be positioned horizontally in the upper basket.
- Please do not overload your dishwasher. This is important for good results and for reasonable consumption of energy.

NOTE:
Very small items should not be washed in the dishwasher as they could easily fall out of the basket.
Removing the dishes
To prevent water dripping from the upper basket into the lower basket, we recommend that you empty the lower basket first, followed by the upper basket.
WARNING

Items will be hot! To prevent damage, do not take glass and cutlery out of the dishwasher for around 15 minutes after the program has ended.
Loading the upper basket
The upper basket is designed to hold more delicate and lighter dishware such as glasses, coffee and tea cups and saucers, as well as plates, small bowls and shallow pans (as long as they are not too dirty). Position the dishes and cookware so that they will not get moved by the spray of water.

Loading the lower basket
We suggest that you place large items and the most difficult to clean items are to be placed into the lower basket: such as pots, pans, lids, serving dishes and bowls, as shown in the figure below. It is preferable to place serving dishes and lids on the side of the racks in order to avoid blocking the rotation of the top spray arm.
The maximum diameter advised for plates in front of the detergent dispenser is of 19~cm , this not to hamper the opening of it.
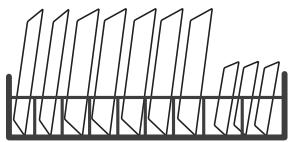
Loading the cutlery basket
Cutlery should be placed in the cutlery rack separately from each other in the appropriate positions, and do make sure the utensils do not nest together, this may cause bad performance.
WARNING
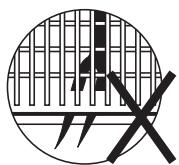
Do not let any item extend through the bottom.
Always load sharp utensils with the sharp point down!

For the best washing effect, please load the baskets refer to standard loading options on last section of PART I: Generic Version
Function Of The Rinse Aid And Detergent
The rinse aid is released during the final rinse to prevent water from forming droplets on your dishes, which can leave spots and streaks. It also improves drying by allowing water to roll off the dishes. Your dishwasher is designed to use liquid rinse aids.
WARNING
Only use branded rinse aid for dishwasher. Never fill the rinse aid dispenser with any other substances (e.g. Dishwasher cleaning agent, liquid detergent). This would damage the appliance.
When to refill the rinse aid dispenser
Unless the rinse-aid warning light ( ) on the control panel is on, you can always estimate the amount from the color of the optical level indicator located next to the cap. When the rinse-aid container is full, the indicator will be fully dark. The size of the dark dot decreases as the rinse-aid diminishes. You should never let the rinse aid level be less than 1/4 full.
As the rinse aid diminishes, the size of the black dot on the rinse aid level indicator changes, as illustrated below.

Full

3/4 full

1/2 full

1/4 full

Empty
Function of detergent
The chemical ingredients that compose the detergent are necessary to remove, crush and dispense all dirt out of the dishwasher. Most of the commercial quality detergents are suitable for this purpose.
WARNING
- Proper Use of Detergent
Use only detergent specifically made for dishwashers use. Keep your detergent fresh and dry. Don't put powdered detergent into the dispenser until you are ready to wash dishes.

Dishwasher detergent is corrosive! Keep dishwasher detergent out of the reach of children.
Filling The Rinse Aid Reservoir

1 To open the dispenser, turn the cap to the "open" (left) arrow and lift it out.
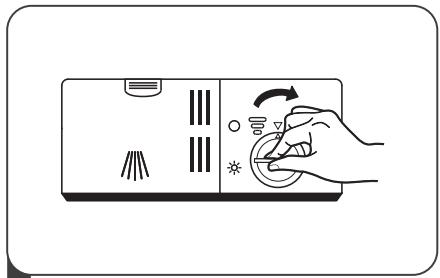
3 Replace the cap by inserting it aligned with "open" arrow and turning it to the closed (right) arrow.
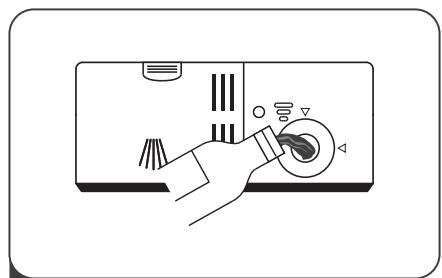
2 Carefully pour in the rinse-aid into its dispenser, whilst avoiding it to overflow.

NOTE:
Clean up any spilled rinse aid with an absorbent cloth to avoid excessive foaming during the next wash.
Adjusting the rinse aid reservoir
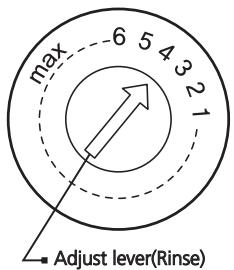
The rinse aid reservoir has six settings. Both the recommended setting and the factory setting is "4". If the dishes are not drying properly or are spotted, adjust the dial to the next higher number until your dishes are spot-free. Reduce it if there are sticky whitish stains on your dishes or a bluish film on glassware or knife blades.
Filling The Detergent Dispenser
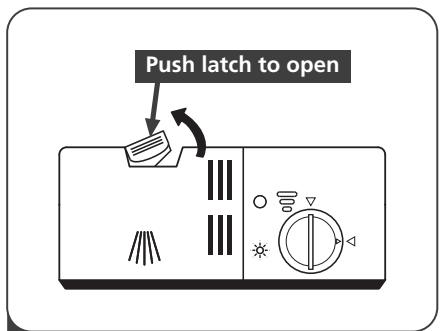
Press the release catch on the detergent dispenser to open the cover.

3 Close the cover and press on it until it locks into place.
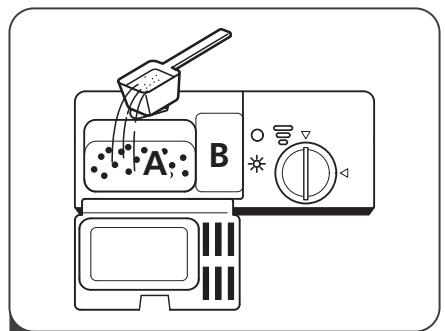
2 Add detergent into the larger cavity (A) for the main wash cycle. For more heavily soiled wash loads, also add some detergent into the smaller cavity (B) for the pre-wash cycle.
NOTE:
- Be aware that depending on the soiling of water, setting may be different.
- Please observe the manufacturer's recommendations on the detergent packaging.
PROGRAMMING THE DISHWASHER
Wash Cycle Table
The table below shows which programs are best for the levels of food residue on them and how much detergent is needed. It also show various information about the programs.
( )Means: need to fill rinse into the Rinse-Aid Dispenser.
| Program | Description Of Cycle | Detergent Pre/Main | Running Time(min) | Energy (Kwh) | Water (L) | Rinse Aid |
| Intensive | Prewash(50℃) Wash(60℃) Rinse Rinse Rinse(70℃) Drying | 5/22g (1 piece) | 165 | 1.4 | 16.5 | ● |
| Normal | Prewash(45℃) Wash(55℃) Rinse Rinse(65℃) Drying | 5/22g (1 piece) | 175 | 1.1 | 13 | ● |
| (*EN 50242) | Prewash Wash(45℃) Rinse(65℃) Drying | 5/22g (1 piece) | 190 | 0.69 | 9 | ● |
| 90 min | Wash(65℃) Rinse Rinse (65℃) Drying | 27g (1 piece) | 90 | 1.15 | 11.5 | ● |
| Rapid | Wash (45 ℃) Rinse (50 ℃) Rinse (55 ℃) | 20g | 30 | 0.7 | 10 | ○ |
NOTE:
EN 50242: This program is the test cycle. The information for comparability test in accordance with EN 50242.
Starting A Cycle Wash
- Draw out the lower and upper basket, load the dishes and push them back. It is commended to load the lower basket first, then the upper one.
- Pour in the detergent.
- Insert the plug into the socket. The power supply refers to last page "Product fiche". Make sure that the water supply is turned on to full pressure.
- Open the door, Press the power button.
- Choose a program, the response light will turn on. Then close the door, the dishwasher will start its cycle.
Changing The Program Mid-cycle
A wash cycle can only be changed if it has been running for a short time otherwise, the detergent may have already been released and the dishwasher may have already drained the wash water. If this is the case, the dishwasher needs to be reset and the detergent dispenser must be refilled. To reset the dishwasher, follow the instructions below:
- Open the door a little to stop the dishwasher, after the spray arm stop working, you can open the door completely.
- Press Program button more than three seconds the machine will be in stand by state.
- You can change the program to the desired cycle setting.

Forget To Add A Dish?
A forgotten dish can be added any time before the detergent dispenser opens. If this is the case, follow the instructions below:
- Open the door a little to stop the washing.
- After the spray arms stop working, you can open the door completely.
- Add the forgotten dishes.
- Close the door.
- The dishwasher will start running again.
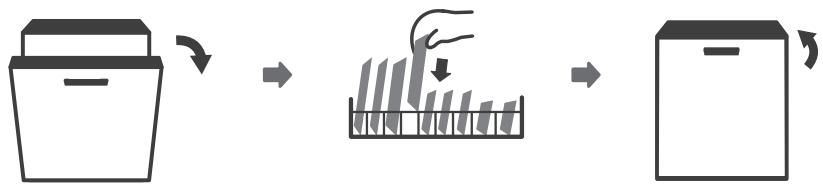
WARNING
It is dangerous to open the door mid-cycle, as hot steam may scald you.
ERROR CODES
If there is a malfunction, the dishwasher will display error codes to identify these:
| Codes | Meanings | Possible Causes |
| The Rapid light flicker fleetly | Longer inlet time. | Faucets is not opened, or water intake is restricted, or water pressure is too low. |
| The Rapid light and the 90Min light flicker fleetly | Not reaching required temperature. | Malfunction of heating element. |
| The ECO light flicker fleetly | Overflow. | Some element of dishwasher leaks. |
WARNING
- If overflow occurs, turn off the main water supply before calling a service.
- If there is water in the base pan because of an overfill or small leak, the water should be removed before restarting the dishwasher.
TECHNICAL INFORMATION
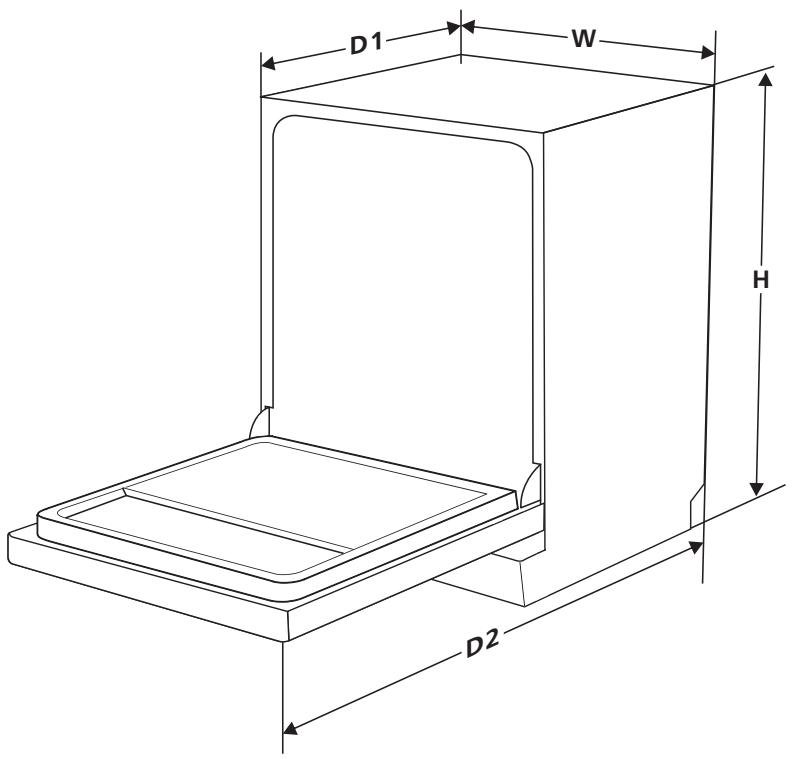
| Height (H) | 815mm |
| Width (W) | 448mm |
| Depth (D1) | 550mm (with the door closed) |
| Depth (D2) | 1150mm (with the door opened 90°) |
Product fiche
Sheet of household dishwasher according to EU Directive 1016/2010 & 1059/2010:
| Manufacturer | EDESA |
| Type / Description | EDB-4590-I |
| Standard place settings | 9 |
| Energy efficiency class ① | A+ |
| Annual energy consumption ② | 215 kWh |
| Energy consumption of the standard cleaning cycle | 0.75 kWh |
| Power consumption of off-mode | 0.45 W |
| Power consumption of left-on mode | 0.49W |
| Annual water consumption ③ | 2660 liter |
| Drying efficiency class ④ | A |
| Standard cleaning cycle ⑤ | ECO 45℃ |
| Program duration of the standard cleaning cycle | 190 min |
| Noise level | 49 dB(A) re 1 pW |
| Mounting | Free standing |
| Could be built-in | YES |
| Power consumption | 1760-2100W |
| Rated voltage / frequency | 220-240V/50Hz |
| Water pressure (flow pressure) | 0.04-1.0MPa=0.4-10 bar |
NOTE:
1 A++ (highest efficiency) to D (lowest efficiency)
Energy consumption based on 280 standard cleaning cycles using cold water fill and the consumption of the low power modes. Actual energy consumption will depend on how the appliance is used.
Water consumption based on 280 standard cleaning cycles. Actual water consumption will depend on how the appliance is used.
A (highest efficiency) to G (lowest efficiency)
This program is suitable for cleaning soiled normally soiled tableware and that it is the most efficient program in terms of its combined energy and water consumption for that type of tableware.
CNA group
Oficinas: c/ Anabel Segura 11, 3^ 28108. Alcobendas. Madrid. España
Fábrica: c/ del Ter 2, Apdo. 9.08570. Torello. Barcelona. España
www.edesa.es


- edesa
- CONTENIDO
- NOTA:
- INFORMACION SOBRE SEGURIDAD
- ADVERTENCIA
- Instrucciones de puesta a tierra
- , Eliminación
- RESUMEN DEL PRODUCTO
- IMPORTANTE:
- USO DEL LAVAVAJILLAS
- Echar sal en el suavizante
- Siga"These pasos para echar sal al lavavajillas:
- Consejos sobre la cesta
- Type 1:
- Plegar los estantes para copas
- Plegar los estantes de la bandeja
- MANTENIMIENTO Y LIMPIEZA
- Cuidado del exterior
- El panel de control
- Cuidado del interior
- Sistema de filtrado
- Brazos pulverizadores
- Cuidado del lavavajillas
- Precaución anti congelación
- Después de cada lavado
- Retire el enchufe
- No usar limpiadores abrasivos ni disolventes
- Si no se va a usar durante un tiempo
- Traslado del aparato
- Juntas
- INSTRUCCIONES DE INSTALLACION
- Riesgo de descarga electrica
- Atencion
- - Acerca de la connexion electrica
- Requisitos electricos
- - Consumo de agua y drenaje
- Acerca de la manguera de suministro de seguridad
- Cómo conectar la manguera de suministro de seguridad
- Conexión de las mangueras de drenaje
- Cómo drenar el excesso de agua de las mangueras
- Salida de agua
- Manguera de extension
- Conexión del sifón
- Colocacion del aparato
- Nivelado del aparato
- Instalación independiente
- Debajo de la encimera existente
- - Instalación integrada (para el modelo integralado)
- Paso 1. Señ Conceón del mejor lugar para el lavavajillas
- Paso 2. Dimensiones del panel estético e instalación
- Modelo semi integrado
- Modelo totalmente integrado
- Paso 3. Ajuste de la tensión del muelle de la puerta
- Paso 4. Pasos para la instalación del lavavajillas
- Paso 5. Nivelar el lavavajillas
- CONSEJOS DE RESOLUCION DE PROBLEMAS
- CARGAR LAS CESTAS
- CONFORME A LA NORMA EN 50242:
- Cesta superior:
- Cesta inferior:
- Cesto para cubiertos:
- GUIA RÁPIDA
- Panel de control
- Funcionamento (Botón)
- Pantalla
- , Suavizante para el agua
- Ajuste del consumo de sal
- Siga"These pasos paraaabustar elconsumo de sal:
- - Preparación e introducción de la vajilla
- Para lavar los cubiertos/platos
- No sonADECUADOS
- Presentan ciertas limitaciones
- Recomendaciones para llenar el lavavajillas
- Coloque los objetivos en el lavavajillas de lasuma forma:
- Extracción de la vajilla
- Carga en la cesta superior
- Carga en la cesta inferior
- Carga del cesto para cubiertos
- - Funcionamento del abrillantador y el detergente
- Cuando rellenar el dispensador del abrillantador
- Función del detergente
- - Llenado del deposito de Abrillantador
- Ajuste del deposito deibrillantador
- - Llenado del dispenser de detergente
- PROGRAMAR EL LAVAVAJILLAS
- Tabla de ciclo de lavado
- - Puesta en marcha del ciclo de lavado
- - Cambiar el programa a mitad del ciclo
- ¿Ha olvidado meter algo?
- CÓDIGOS DE ERROR
- INFORMACION TECNICA
- Ficha del producto
- CONTENTS
- SAFETY INFORMATION
- PRODUCT OVERVIEW
- USING YOUR DISHWASHER
- MAINTENANCE AND CLEANING
- INSTALLATION INSTRUCTION
- TROUBLESHOOTING TIPS
- LOADING THE BASKETS ACCORDING TO EN50242
- NOTE:
- WARNING
- When using your dishwasher, follow the precautions listed below:
- Earthing Instructions
- Disposal
- 1IMPORTANT:
- Loading The Salt Into The Softener
- WARNING
- Basket Used Tips
- Adjusting the upper basket
- Folding back the cup shelves
- Folding back the rack shelves
- External Care
- The door and the door seal
- The control panel
- Internal Care
- Filtering system
- Spray arms
- Caring For The Dishwasher
- Frost precaution
- After every wash
- Remove the plug
- No solvents or abrasive cleaning
- When not in use for a longtime
- Moving the appliance
- Seals
- Electrical Shock Hazard
- Attention
- About Power Connection
- Electrical requirements
- Electrical connection
- Water Supply And Drain
- Cold water connection
- About the safety supply hose
- How to connect the safety supply hose
- How to disconnect the safety supply hose
- Connection Of Drain Hoses
- How to drain excess water from hoses
- Water outlet
- Extension hose
- Syphon connection
- Position The Appliance
- Levelling the appliance
- Free Standing Installation
- Fitting between existing carbinets
- Underneath existing work top
- Built-In Installation(for the integrated model)
- Step 1. Selecting the best location for the dishwasher
- Step 2. Aesthetic panel's dimensions and installation
- Semi-integrated model
- Full-integrated model
- Step 3. Tension adjustment of the door spring
- Step 4. Dishwasher installation steps
- Step 5. Levelling the dishwasher
- Before Calling For Service
- LOADING THE BASKETS ACCORDING TO EN50242:
- Upper basket:
- Lower basket:
- 3.Cutlery basket:
- QUICK USER GUIDE
- Operation (Button)
- Display
- Water Softener
- Adjusting salt consumption
- Preparing And Loading Dishes
- For washing the following cutlery/dishes
- Are not suitable
- Are of limited suitability
- Recommendations for loading the dishwasher
- (Features and appearance of baskets and cutlery baskets may vary from your model.)
- Removing the dishes
- Loading the upper basket
- Loading the lower basket
- Loading the cutlery basket
- Function Of The Rinse Aid And Detergent
- When to refill the rinse aid dispenser
- Function of detergent
- Filling The Rinse Aid Reservoir
- Adjusting the rinse aid reservoir
- Filling The Detergent Dispenser
- PROGRAMMING THE DISHWASHER
- Wash Cycle Table
- Starting A Cycle Wash
- Changing The Program Mid-cycle
- Forget To Add A Dish?
- ERROR CODES
- TECHNICAL INFORMATION
- Product fiche
- CNA group
Marque : EDESA
Modèle : EDB-4590-I
Catégorie : Lave-vaisselle