
GCS942UW6 - KVM Switch IOGEAR - Notice d'utilisation et mode d'emploi gratuit
Retrouvez gratuitement la notice de l'appareil GCS942UW6 IOGEAR au format PDF.
| Type d'appareil | Scanner |
| Interface | USB 2.0 |
| Compatibilité système | Windows, Mac OS |
| Résolution optique | Non précisé |
| Profondeur de couleur | Non précisé |
| Format de numérisation | Non précisé |
| Alimentation | Alimentation par bus USB |
| Contenu du paquet | Scanner, câble USB, CD d'installation, guide rapide |
| Dimensions | Non précisé |
| Poids | Non précisé |
| Fonctions supplémentaires | Numérisation couleur et noir & blanc |
| Logiciel inclus | Logiciel de numérisation compatible |
| Garantie | Non précisé |
| Support technique | Contact par email et téléphone |
| Installation | Plug and Play |
| Port sélectionnable | USB |
FOIRE AUX QUESTIONS - GCS942UW6 IOGEAR
Questions des utilisateurs sur GCS942UW6 IOGEAR
0 question sur cet appareil. Repondez a celles que vous connaissez ou posez la votre.
Poser une nouvelle question sur cet appareil
Téléchargez la notice de votre KVM Switch au format PDF gratuitement ! Retrouvez votre notice GCS942UW6 - IOGEAR et reprennez votre appareil électronique en main. Sur cette page sont publiés tous les documents nécessaires à l'utilisation de votre appareil GCS942UW6 de la marque IOGEAR.
MODE D'EMPLOI GCS942UW6 IOGEAR
Troubleshooting
New Keyboard Functions Not Working?
You plugged in a new keyboard while the computers were running, so the operating system failed to initialize the new keyboard functions. Restart the computers so that the operating system can recognize the new functions.
Warranty
IN NO EVENT SHALL THE DIRECT VENDOR'S LIABILITY FOR DIRECT, INDIRECT, SPECIAL, INCIDENTAL OR CONSEQUENTIAL DAMAGES RESULTING FROM THE USE OF THE PRODUCT, DISK, OR ITS DOCUMENTATION EXCEED THE PRICE PAID FOR THE PRODUCT.
The direct vendor makes no warranty or representation, expressed, implied, or statutory with respect to the contents or use of this documentation, and especially disclaims its quality, performance, merchantability, or fitness for any particular purpose.
The direct vendor also reserves the right to revise or update the device or documentation without obligation to notify any individual or entity of such revisions, or updates. For further inquiries please contact your direct vendor.
Contact
Toll Free 866-9-IOGEAR (USA)
Phone: 949-453-8782
23 Hubble
Irvine, CA 92618 USA
www.igea.com support@igea.com
support@logear.com
About Us
IOGEAR offers connectivity solutions that are innovative, fun, and
- stylish, helping people enjoy daily life using our high technology
products
GREEN
IOGEAR is an environmentally conscious company that emphasizes
the importance of conserving natural resources. The use of our
technology solutions helps reduce electronic waste
HEALTH
IOGEAR supports healthy and fit lifestyles. By integrating products with
the latest scientific developments, IOGEAR's solutions enhance the life of
© 2007 IOGEAR, INC.
IOGEAR
QuickStart Guide
2-Port Hybrid DVI-D KVM Switch with Audio
GQS942LW6
PART NO.00580
Package Contents
1 x 2-Port Hybrid DVI-D KVM Switch with Cables
1 xOne Touch Port Selection Switch
1 xQuick Start Guide
1 xWarranty / Registration Card
System Requirements
Console
- A DVI monitor capable of the highest resolution that you will be using on
any computer in the installation
A PS/2 keyboard
A USB mouse - Speakers and microphone (optional)
Computers
The following equipment must be installed on each computer that is to be
connected to the system:
A DV-FD video port 1.40mm x 2.5mm
A 6-pin mini-DIN (PS/2) keyboard port and a USB Type A port
Features
Hybrid connections for USB mouse and PS/2 keyboard
Hot key or one touch remote port switching
Support powered two speakers
- Micronbone support
Independent Audio switching (hot key only)
- Independent Audio Switching (Not Key only)
- Asymmetry cable lengths to cut down cable clutter
- Video resolution support up to 1000 X 1000 DPC8R @ 60Lm
Video Resolution Support Britis Ateo Gao Mok
Built-In Auto Scan Mode
LED indicates selected port
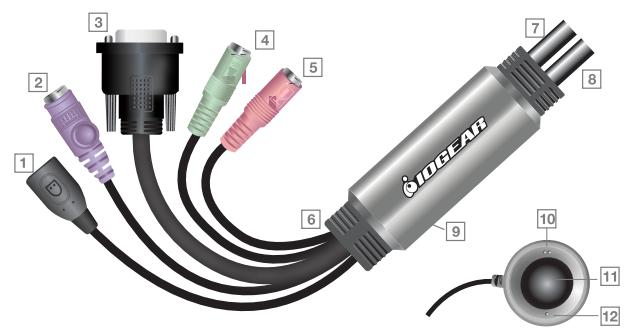
Overview
Start Here!
- USB mouse connector
- PS/2 keyboard connector
- DVI-D monitor connector
- Speaker connector
- Microphone connector 6. Cable holder
-
Console cable
-
KVM cable for computer 1
- KVM cable for computer 2
- Port selection switch jack
10.Port 2 LED - Manual selection switch
12.Port 1 LED
Installation
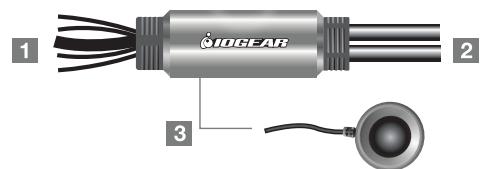
Note: Make sure power to all computers being installed has been turned off!
1 Connecting Console Devices
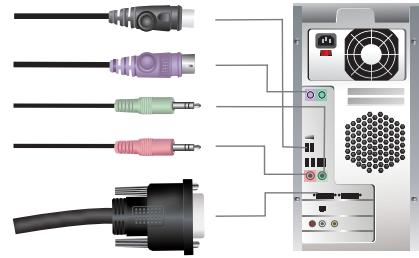
Plug your keyboard, monitor, mouse, microphone, and speakers into the appropriate connectors at the end of the console cable. The ports are color coded and labeled with an identifying icon.
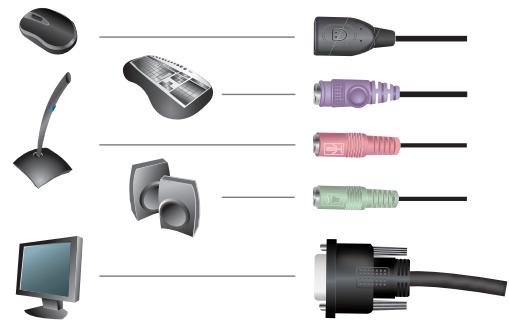
Note: Plug the keyboard in before plugging in the mouse.
2 Connecting Computers
Plug the keyboard, monitor, mouse, microphone, and speaker connectors of the KVM cables into their respective ports on the computers that you are installing.
3 Connecting Port Selection Switch (Optional)
If you choose to use the Port Selection Switch, plug its cable into the port selection switch jack, located on the right side of the unit.
Note: The switch can be operated with hotkeys alone, so connecting the port selection switch is optional.
FINAL STEP
Turn on the power to the computers
Port Selection
Manual Port Selection
Press the port selection button to toggle the KVM and Audio focus between the two computers. The port's Port LED lights to indicate that its correspond port has the focus.
Hotkey Port Selection
All hotkey port switches begin with tapping the Scroll Lock key twice. The following tables describe the actions that each hotkey operation performs.
Note: The default hotkey invocation key is the Scroll Lock key, but you can choose the Ctrl key instead.
Hotkey Summary Table
Ho
[Scroll]Lock][Scroll]Lock]
[Enter]
different ports, only the KVM focus switches.
two ports
Note: If the KVM and Audio focus are on
different ports, only the KVM focus switches.
[Scroll]Lock] [Scroll]Lock]
[k] [Enter]
Action
Toggles the KVM and Audio focus between the
[Scroll Lock] [Scroll Lock]
[k] [Enter]
Only toggles the KVM focus
[Scroll Lock] [Scroll Lock]
[s] [Enter]
Only toggles the audio focus
[Scroll Lock] [Scroll Lock]
[a] [Enter] [n]
Starts Auto Scan. The KVM focus cycles from
port to port at n second intervals.
Note: The n stands for the number of seconds that the focus dwells on a port before switching
to the other one. Replace the n with a number n by 1, 2, 3, . Then we obtain this result.
between 1 and 4 when entering this hotkey combination. (See the scan interval table below.)
[Scroll Lock] [Scroll Lock]
[x] [Enter]
Toggles the hotkey invocation key between
the [Scroll Lock] key and the [Ctrl] key
Scan Interval Table
N
Seconds
1
2 5 seconds (default)
3
4