
PF701 - Cadre photo numérique GENUIS - Notice d'utilisation et mode d'emploi gratuit
Retrouvez gratuitement la notice de l'appareil PF701 GENUIS au format PDF.

| Type d'écran | Écran TFT LCD |
| Taille de l'écran | 7 pouces |
| Résolution | 480 x 234 pixels |
| Format d'affichage | 4:3 et 16:9 |
| Formats de fichiers supportés | JPEG & Motion-JPEG |
| Vitesse de lecture vidéo | 15 fps (320x240), 6 fps (640x480) |
| Fonction diaporama | Oui, avec différentes vitesses |
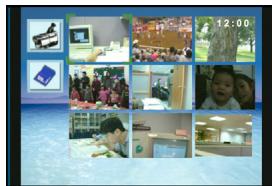
| Aperçu des miniatures | 3x3 |
| Rotation photo | 90°/180°/270° avec zoom |
| Fonctions supplémentaires | Calendrier, alarme, affichage de l'heure |
| Mode veille | Oui, pour prolonger la durée du rétroéclairage |
| Types de cartes mémoire supportées | SD, MMC, MS |
| Sortie vidéo | Composite Video (CVBS) |
| Accessoires inclus | Câble USB, télécommande, adaptateur secteur, support |
| Compatibilité système | Windows 2K/XP/Vista, Linux 2.4.2 |
| Port USB requis | USB 1.1 ou supérieur |
FOIRE AUX QUESTIONS - PF701 GENUIS
Questions des utilisateurs sur PF701 GENUIS
0 question sur cet appareil. Repondez a celles que vous connaissez ou posez la votre.
Poser une nouvelle question sur cet appareil
Téléchargez la notice de votre Cadre photo numérique au format PDF gratuitement ! Retrouvez votre notice PF701 - GENUIS et reprennez votre appareil électronique en main. Sur cette page sont publiés tous les documents nécessaires à l'utilisation de votre appareil PF701 de la marque GENUIS.
MODE D'EMPLOI PF701 GENUIS
Introduction
Features Overview
7-inch TFT LCD Display resolution: 480(W) x 234(H)
Display mode: 4:3 and 16:9
- File format support: JPEG & Motion-JPEG (320x240 QVGA 15 fps; 640x480 VGA 6 fps.)
- Photo slide show with different speeds
- 9 thumbnails preview (3x3)
- Support photo rotation: 90^ / 180^ / 270^ and Zoom in function
- Calendar, Alarm and Real Time Display function
- Sleep mode function to increase the life of backlight (30 min /1hr /2hr /8h)
- Support three types of memory cards: SD, MMC and MS.
Video Out: Composite Video (CVBS)
Package contents
Carefully unpack your package and make sure that you have the following items. In the event that any item is missing or if you find any mismatch or damage, promptly contact your dealer.
PF-701
USB cable
Quick guide
Stand
Remote control
Power adapter
Video cable
System requirements
Intel Pentium III 200Hz CPU or above
- Minimum 40 MB hard disk space available
One free USB 1.1 port or higher
- USB storage compatible with Windows 2K/XP/Vista, Linux 2.4.2
- CD-ROM drive
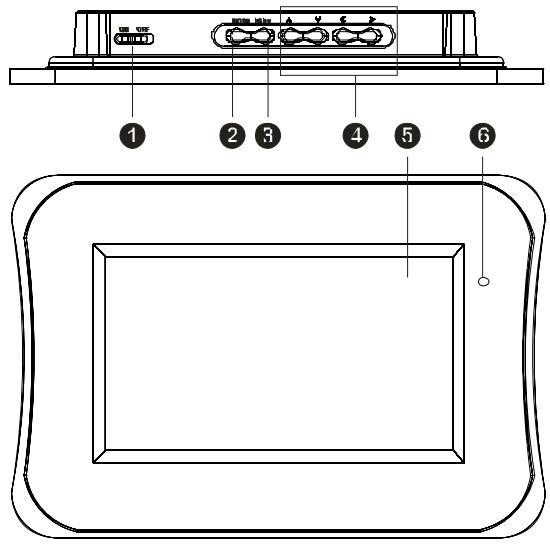
Product Overview
Product overview
Power Switch
ENTER button
3 MENU button
Navigation button (Left/Right/Up/Down)
5 7" TFT LCD panel
6 SENSOR
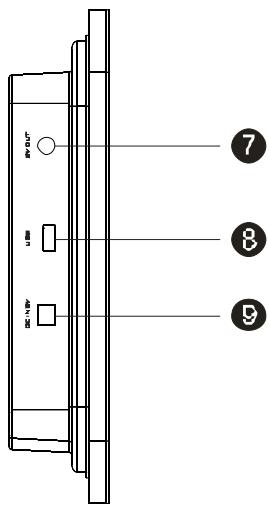
7 AV OUT jack
USB jack
9 DC IN jack
10 MS card slot
SD card slot

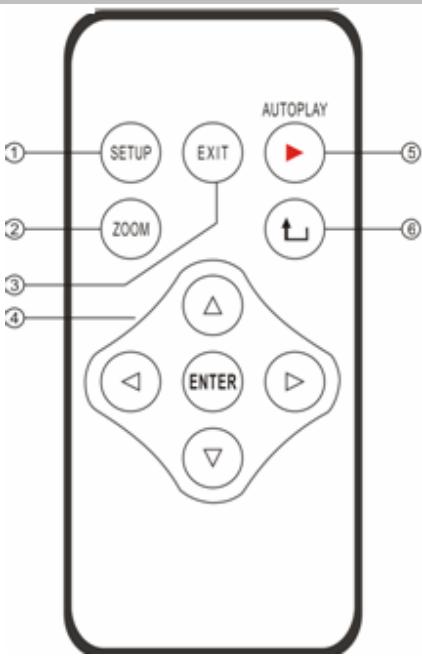
Remote Control overview
1 SETUP button: Press Setup button on Start-up screen to setup the menu.
Zoom button: Zoom in on photo for closer view.
3 EXIT button: Press EXIT button to return to the thumbnails or setup menu.
4 NAVIGATION button Press Navigation button to select and playback the photos in the thumbnails.
5 AUTOPLAY button: Press AUTOPLAY button to slideshow all pictures.
ROTATE button: Press Rotate button to rotate photo 90 degrees clockwise.
Basic Operation
Turning on/off
- Insert one end of the AC ADAPTER into DC IN, and the other end into an electrical outlet.
- Push the power switch of the player to the ON position. The button is at the top of the back cover.
- After power on, if you don't insert a card to the player, it will automatically display real-time clock after 30sec.
Insert cards to play photos
- Insert your memory card into SD/MS/ MMC card slot according to indicators on the memory card. This unit can play JPEG and AVI (Motion-JPEG) format.
- If no operation occurs when you are in the nine preview photo mode, 10 15 seconds later the screen will auto display the Slideshow feature.
3. In Preview 9 photos (Thumbnails) Mode
Press , , , button to move to the selected photo and press enter to play single photo.
4. Under Single Photo Mode
Press "L" to rotate 90 degrees clockwise in four directions.
5. Start playing slide show
(1) While viewing any photo, Press

Auto play key to start photo slide show or
(2) Press ENTER button and Photo tool bar will appear.
(3) Using Navigation button, highlight slideshow icon (third icon) and press ENTER button.
(4) Slideshow will begin.
(5) To stop slide show, press EXIT button. To return to thumbnails, press EXIT button again.
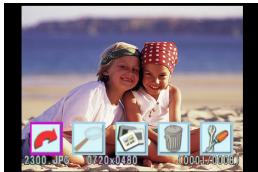
6. Zooming, rotating & deleting photos / starting slideshow
(1) While viewing any photo, press ENTER button. (2) Photo Tool Bar will appear.

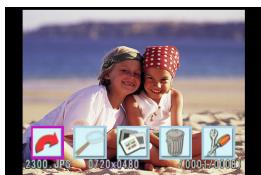
(3) Using Navigation button, highlight desired tool. Press ENTER button to effect action (photo will rotate, zoom, etc.).

Rotate: Rotate photo 90 degrees clockwise.

Slideshow: Start slideshow.
| Zoom: Zoom in on photo for closer view. | Delete: Delete photo appearing on screen. |
| Bring up Set Up screen to choose your player's properties - language, slideshow interval, TV type, and whether folders and file descriptions appear on screen. | |
AVI Motion-JPEG video playback
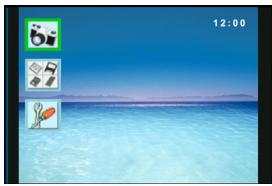
(1) Using Navigation button, highlight camera icon on the main menu. Press ENTER button.
(3) AVI files on card will appear automatically on screen as thumbnails. Choose the desired video and press Enter button to play.
(2)Two additional icons appear. Highlight the camcorder icon. Press ENTER button.
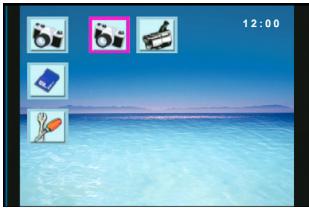
(4) Press To view next AVI, press Navigation button right. To view previous AVI, press Navigation button left.
(5) To return to thumbnails, press EXIT button.
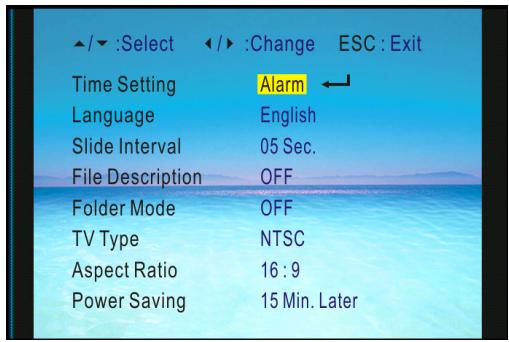
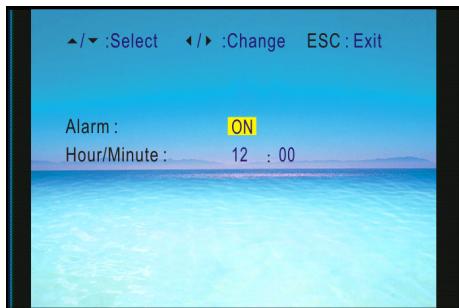
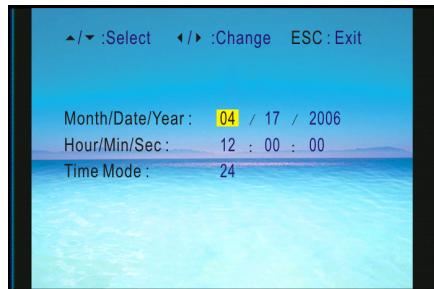
Setting Date, Timer and Alarm
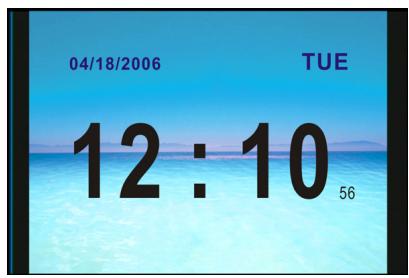
(1) In the following mode, you can select the fourth icon to show Date or Time.
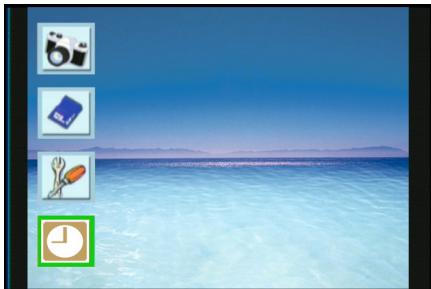
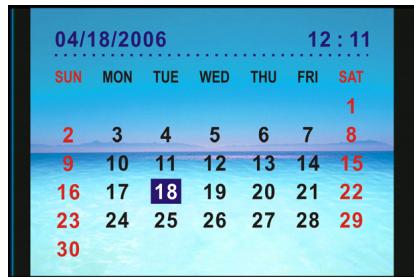
(3) When press the “ENTER” button again, you can see the calendar diagram.
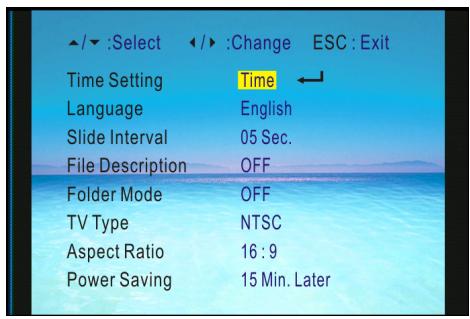
(2) After entering the clock mode, you can see (4) To change the setting, press SETUP button to enter setting mode.
(5) Use LEFT and RIGHT key to choose Alarm or Time mode.
(7) Then press ENTER key to enter setting Activating Alarm mode. Select “ON” to activate; select “OFF” to deactivate.
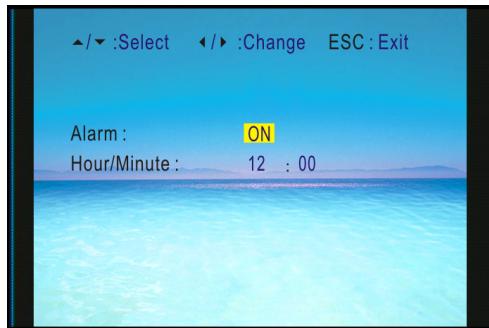
(6) Then you can use UP and Down key to chose properties, LEFT and RIGHT key to chose alarm time setting.
(8) In Time mode, you can use UP and Down key to chose properties, LEFT and RIGHT key for date and clock setting.
Other settings
(1) Change language displayed (English is default).

(2) Set interval time between photos in slideshow mode
(3) Folder Mode
(4) Yes: Both files and folders are viewable.
(5) No:Folders are hidden; only files are viewable
(6) TV type: NTSC or PAL
(7) Aspect Ratio: 16:9 or 4:3
(8) Power Saving: 15min/30min/60min. The panel lamp will automatically turn off.
Playing photos and AVI movies on TV set
1. Playing on your TV
- Always refer to your TV instruction manual before connecting any external devices.
- Turn off and unplug player and TV.
- Connect player to TV using supplied video cord as shown on the diagram on the right.
- Turn on player and TV.
- Your player's screen will now be displayed on your TV and can be operated normally.
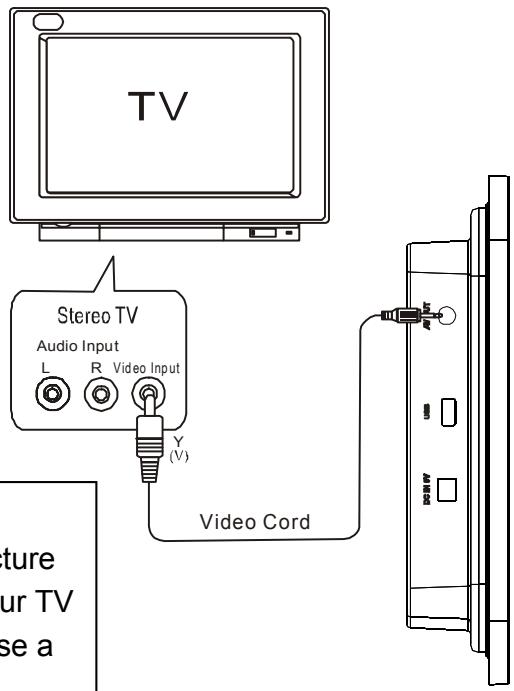
Connect PF-701 Directly To TV
Do not connect player through VCR because the picture may not be played correctly due to copy guard. If your TV does not have the proper A/V input, you can purchase a video RF Modulator at your local electronics store.