
LC1090E - Machine à laver CORBERO - Notice d'utilisation et mode d'emploi gratuit
Retrouvez gratuitement la notice de l'appareil LC1090E CORBERO au format PDF.



| Type de produit | Machine à laver |
| Marque | CORBERO |
| Modèle | LC1090E |
| Dimensions (H x L x P) | 85 x 60 x 60 cm |
| Poids approximatif | 70 kg |
| Capacité maximale de charge | 5 kg (coton), 2 kg (synthétiques), 2 kg (délicats), 1 kg (laine) |
| Vitesse d'essorage maximale | 1000 tr/min |
| Alimentation électrique | 230 V / 50 Hz |
| Puissance absorbée maximale | 2100 W |
| Fusible minimum | 10 A |
| Pression d'eau | 50 - 800 kPa |
| Programmes de lavage | Coton (blanc, couleurs résistantes, couleurs délicates), synthétiques, délicats, laine, rinçage, essorage, vidange |
| Options | Prélavage / Blanchiment, Réduction d'essorage, Demi-charge, Anti-froissement |
| Type d'ouverture | Frontale (hublot) |
| Matériau de la cuve | Inox |
| Système de contrôle d'équilibrage | Oui (détection de déséquilibre) |
| Entretien courant | Nettoyage du filtre d'arrivée d'eau, du compartiment à détergent et de la zone de vidange |
| Sécurité enfants | Oui (verrouillage de porte) |
| Disponibilité des pièces détachées | Pièces disponibles via le service technique |
| Indice de réparabilité | Non communiqué |
FOIRE AUX QUESTIONS - LC1090E CORBERO
Questions des utilisateurs sur LC1090E CORBERO
0 question sur cet appareil. Repondez a celles que vous connaissez ou posez la votre.
Poser une nouvelle question sur cet appareil
Téléchargez la notice de votre Machine à laver au format PDF gratuitement ! Retrouvez votre notice LC1090E - CORBERO et reprennez votre appareil électronique en main. Sur cette page sont publiés tous les documents nécessaires à l'utilisation de votre appareil LC1090E de la marque CORBERO.
MODE D'EMPLOI LC1090E CORBERO
Corbero
Lavadoras automaticas Washing machines
Instrucciones Instructions
LC1090E
Lea y conserve este manual de instructaciones Read and keep this instructions book
Estimado cliente,
Le rogamos leer atentamente estas instrucciones de uso y prestar particular atencion a las normas de seguridadVRTas en las primeras paginas. Le aconsejamos conservar estas instrucciones para consultas futuras y darlas al nuevo usuario en caso de vente del aparato.
Danos de transporte
Al momento del desembalaje, contrôle que el aparato no está dañado. Si tiene dudas no lo ponga en funciona y consulte la asistencia技术和a.
Algunos párafos de este libro de instructiones han sido identificados con SYMBOLOS que tienen elsignificante significado:

El triángulo de advertencia y/o los关键时刻 de signal (Atencion!, Advertencia!), subrayan instrucciones muy importantes para su seguridad o para el buen funciona del aparato. Le rogamos Respectarlas.

Las informacionesprecedidas por este-symbolo completan las instrucciones de uso y de'utilisation practica del aparato.

Este*simbolo indica consejos e instrucciones para un empleo economico del aparato que respete el ambiente.
Advertencias y consejos 4-5
Eliminación 5
Consejos para la proteccion del ambiente 5
6
Instalación 7-8
Dispositivos de seguridad para el transporte 7
Conexión hidráulica 7
Nivelación 8
Conexión electrica 8
Sureshuevalavadora 9
Descripción del aparato 9
Cubeta detergente 9
Uso 10-11
Panel de mandos 10
Mandos 10-11
Consejos para el lavado 12
Selección de las prendas 12
Temperatas 12
Antes de cargar la ropa 12
Carga maxima de ropa 12
Pesos de la ropa 12
Eliminación de las manchas 12
Detergentes y aditivos 13
Cantidad de detergente a usar 13
Símbolos internzonales para el tratimiento de los tejidos 14
Secuencia de las operaciones 15-16
Programas de lavado 17-19
Mantenimiento 20
Exterior del aparato 20
Cubeta detergente 20
Limpieza de la zona de descarga 20
Filtro del tubo de energia 21
Vaciado de emergencia 21
Precauidones contra el hielo 21
Anomalías de funciona 22-24
Estas advertencias han sido redactadas para su seguridad y la de todas las personas. Por lo tanto le rogamos leerlas atentamente antes de instalar y utiliser el aparato.
Instalación
- Antes del uso, hay que quitar todas las piezas de embalaje y de transporte; de no hacerlo asi, tanto el aparato como los muebles podrjan sufir graves daños. Consulte las instrucciones.
- Cualquier trabajo de tipo electrico necessario para la instalacion del aparato,,,, que ser realizado por un electricista especializzato o por una persona competente.
- Cualquier trabajo de tipo hidráulico funciona que ser realizado por un fontanero especializzato o por una persona competente.
- Hay que tener cuidado de que el aparato no está apoyado sobre el cable de alimentación electrica.
- Si laquina está colocada sobre piso de alfombra asegürese de que haya circulación de aire entre las patas de apoyo y el piso.
- El cable de suministro de energia solo puede ser reemplazado por una persona del Servicio Técnico.
Uso
- Este aparato ha sido proyecto para uso dométrico. No lo use con finalidades发展模式 a aquellas para las cuales ha sido proyecto.
- Lave solo aquellos tejidos que se pueda lavar en la lavadora. En caso de dudas siga las instrucciones que aparecen en la etiqueta del articulo.
- No sobrecargue el aparato. Siga las instrucciones contentsas en este manual.
- Las monidas, los imperdibles, los alfileres, los tornillos, etc. que han quedado en la ropa能把 provocar graves daños.
- No ponga en el aparato prendas manchadas con gasolina, alcohol, aguarrás, etc. Si usa这些东西 productos, antes de introducir las prendas en el aparato para lavarlas, espere que el producto se haya evaporado.
-
Agrupe las prendas pequeñas como calcetines, cinturones, etc. en un bolso de tela o en una funda. Evitará que esta ropa termine entre el cesto y el;tambor.
-
Use solamente la cantidad de suavizante indicada por el productor. Unacantidad excessiva de producto podra estropear la ropa.
- Deje la puerta entreabierta cuando no se usa el aparato. Este permite una mejor conservacion de la guarnacion de la puerta y previene los olores de moho.
- Antes deAbrir la puerta, controle siempre que el agua haya sido descargada. De lo contrario, descárguela siguiendo las instruciones dadas en el manual de uso.
- Después del uso desenchufe siempre el aparato y ciderre el grifo del agua.
Seguidad en general
- Las reparaciones deben ser efectuadas solo por personal especializzato. Las reparaciones inadequadas peuvent causar peligros notables. Para eventuales reparaciones dirijase a un centro de assistencia的技术ica autorizzato.
- Nunca desenchufe el aparato tirando del cable de alimentacion, tire directamente del enchufe.
- Durante el lavado a altas temperatas el vidrio de la puerta está caliente. ¿No lo toque!
Seguidad para los niños
- Los niños no se dan cuenta de lospeligos de los aparatos electricos. Cuando el aparato está的功能ando vigile atentamente a los niños y no los deje jugar con el aparato.
-
Las piezas de embalaje (por ej. bolsas de plástico), poder ser peligrosas para los niños.
Pelicro de asfixia! Tenga las piezas fuera del alcance de los niños. -
Conserve los detergentes en un lugar seguro bajo del alcance de los niños.
- Asegúrese de que los niños o los niños animales domesticos no entren en el tiempo de laquina.
- Cuando quiera deshacerse de la lavadora, desenchufela, corte el cable de alimentacion y elimine el enchufe con el cable restante. Inutilice el cierre de la puerta: de estaforma los niños que estan jugando no se quedaran atrapados en el aparato.

Eliminación
Materiales de embalaje
Los materiales que incluyen el símbolo 📅️onian ser reciclados.
PE<= polietileno
PS<=poliestireno
PP<=polipropileno
Para poder recuperarlos se deben depositar en los espacios apropriados (o contenedores).
Aparato
El symbolo en el producto o en su embalaje indica que este producto no se puedaatar como desperdicios normales del hogar.
Este produit se debeentar al punto de recoleccion de equipments elctricos y electronicos para reciclaje. Al asegurar de que este produit se deaeche correctamente, usted ayudar a evitar posibles consecuencias negativas para el ambiente y la salute publica, lo cui podria occurrir si este producto no se manipula de forma adequaca. Para Obtener informacion mas detallada sobre el reciclaje de este producto, pongase en contacto con la administracion de su ciudad, con su service de desechos del hogar o con la tiendaonde compró el producto.

Consejos para la proteccion del ambiente
Para ahorrar agua y energia y contribuir a la proteccion del ambiente, acontejamos atenerse a lo首位:
- Para ropa normalmente suscia es suficiente un programa sin prelimvado; de esta wayra se ahora detergente, agua y tiempo (y se protege al ambientel!).
-
El aparato trabajo en economía si se cargan las cantidades的最大as de ropa indicadas.
-
Con un tratimiento apropiado se pueda eliminar las manchas y las zonas sucias limitadas; cuando se pueda efectuar un lavado a baja temperatura.
- Adapte la dosis de detergente a la dureza del agua, a lacantidad de ropay al grado de suciedad de la misma.
Instrucciones de instalación
Es peligrosso alterar las specifications o intentar modifier este producto derialquier manera.
Hay que tener cuidado de que el aparato no está apoyado sobre el cable de alimentación electrica.
Cualquier trabajo de tipo eletrico requisiteo para la instalacion del aparato,,,, que ser realizado por un electricista especializado o por una persona competente.
Cualquier trabajo de tipo hidráulico funciona que ser realizado por un fontanero especializzato o por una persona competente.
! El cable de suministro de energia solo puede ser reemplazado por una persona del Servicio Técnico.
Característicatsécnicas
| DIMENSIONES | Altura | 85 cm |
| Anchura | 60 cm | |
| Profundidad | 60 cm | |
| CAPACIDAD DE CARGA MAXIMA | Algodón | 5 kg |
| Sintéticos | 2 kg | |
| Delicados | 2 kg | |
| Lana | 1 kg | |
| VELOCIDAD CENTRIFUGADO | 1000 rpm máximo. | |
| VOLTAJE/FRECUENCIA | 230V/50 Hz | |
| POTENCIA MAXIMA ABSORBIDA | 2100 W | |
| POTENCIA MINIMA DEL FUSIBLE | 10 A | |
| PRESION DEL AGUA | mín. | 50 kPa |
| máx. | 800 kPa |
CE Este aparato es conforme a las siguientes normas CEE: 73/23/CEE del 19/02/73 relativa al bajo voltaje 89/336/CEE del 03/05/89 relativa a la compatibiliad electromagnética.
Dispositivos de seguridad para el transporte
Antes deponer en marcha la lavadora, es indispensable quitar losositivos de seguidad para el transporte, segun las instruccionessiguientes.
Se aconteja guardar todos los dispositivos de seguridad para el transporte. En el caso de que el aparato fuese transporte otra vez en el futuro, seranecessaryvolverlosa montar.
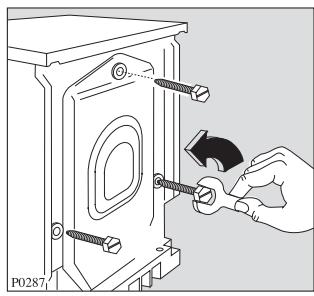
- Desatornille y quite, por medio de una llave, los tres tornillos traseros
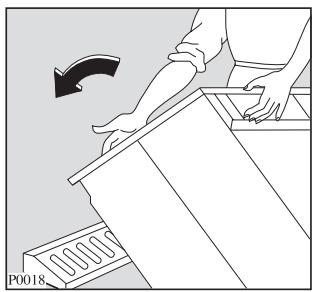
- Apoye la lavadora sobre la parte trasera, yonga entre ella y el suejo uno de los angulares de poliestireno. No aplaste los tubos.
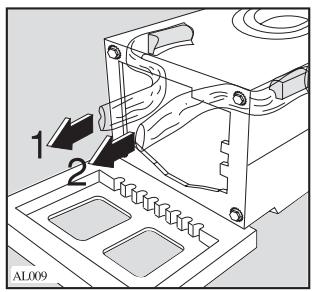
- Quite con cuidado las bolsas (1° izquierda y 2° derecha) de plástico, sacándolas hacía la parte central del aparato.
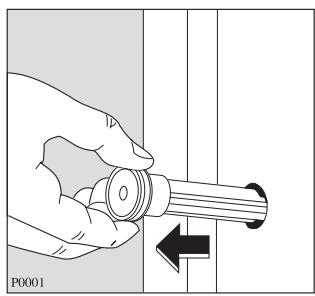
- Ponga de pie la lavadora y saque los tres pernos de plástico.
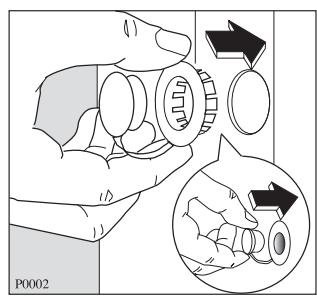
- Introduzca, en los 3 huecos que han quedado libres, los tres tapones de plástico que se suministran+junto al manual de instrucciones.
Conexión hidráulica
Cerca de la lavadoraDebe haber un grifo de AGUA FRIA con Boca roscada a 3/4" gas, para la toma de agua, y una pila, lavabo o desagüe a la pared para la descarga de agua.
Controle previamente que :
— El grifo no sea de agua caliente.
— El agua salga limpia. Si no es asi, déjela correr para que arrastre las impurezas y residuos de las tuberías.
Si hay un desagüe directamente a la pared haga controlar su buena estado por un fontanero.
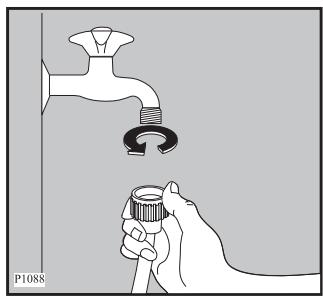
- Inicie el roscado del tubo al grifo con cuidado, para no danar la rosca y apriete la tuerca a tope, para evaporar perdidas de agua.
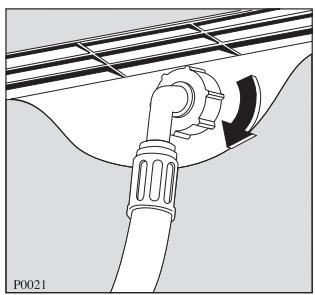
- Si esnecessary, orientecorrectamente el tuboaflojando la tuercedel respaldo de lamáquina.Despuésapriete la tuerca de nuevo para evitar perdidas.Abra el grifo y compruebe que no existen fugas.Después ciérrelo de nuevo.
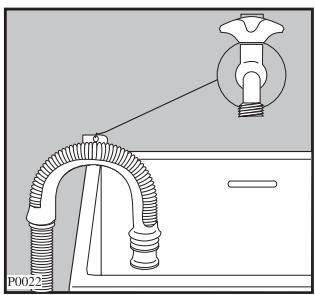
- Situe la Boca del tubo de descarga en el lavabo o pila con laapia de la pieza curva que se suministra apare. La pieza curva se monta en la Boca del tubo para facilitar su apoyo. Dicha pieza permite, mediante un orificio en su parte
superior sujetarla a la pared para que el tubo no se desplace y evaporar asi posibles caidas de este.
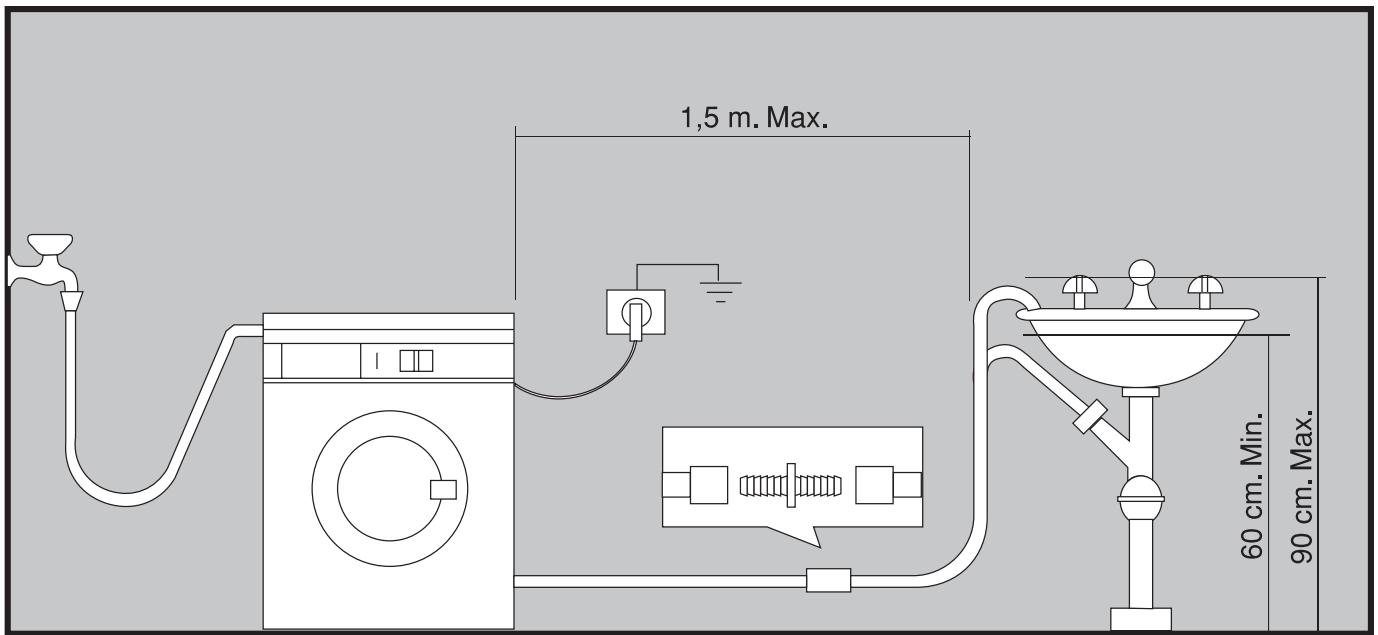
ATENTION: La parte más alta del tubo debequejar a una.altura del suejo comprehensa entre 60 y 90 cm. (La más acontejable es entre 60 y 70 cm).
El tubo no debe tener dobleces o curvas pronunciadas para estar obstrucciones. Una eventual prolongacion del tubo de descarga no debe superar 1,5 m. y debe tener el mismodiametro interior que el tubo original.
Asegürese de que los tubos no están tirantes.
Nivelación
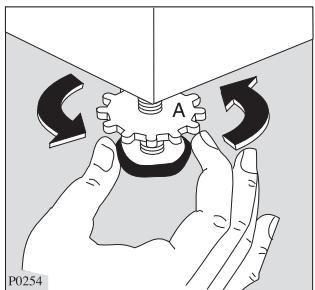
Nivele la lavadora en la posición requerida roscando o desenroscando las patas de apoyo. Una vez nivelada fije las patas aparendo las contratuercas (A) (ver grafico P0254) contra la base del mueble. Una nivelación adecuada evita vibraciones, ruidos o desplazimiento de la lavadora durante el funcionaimiento. Algo de vibración es inevitable, especially si se monta el aparato en sueño de madera. Los sueños de madera son especialmente susceptibles a vibraciones. Si es possible, colque siempre la lavadora sobre sueño sólico.
Conexión electrica
Antes de enchufar la clavija de toma de corriente asegúrese de que:
- El valor de la tension de alimentación corresponde al valor indicado en la placá decharacteristicas (la placá va pegada en el respaldo del mueble).
- El contador, los fusibles, la linea de alimentación y la toma de corriente está dimensionados para que.soportenla carga maxima indicada en la placacdecharacteristicas.
3°. La base y la clavija de toma de corriente deben ser acoplables entre ellas sin interposión de reducciones, tomas multíplés o adaptadores variedes Si esnecessary haga sustituir la base por other del tipo apropiado.
Los reglamentos en materia de seguidad exigen la connexion a una eficaz toma de tierra. La clavija de la lavadora incorpora dicha toma de tierra.
Asegürese de que la base de toma de corrente dispone también de una toma de tierra y de que esta es eficaz.
El fabricante declina toda responsabilidad en caso de accidentes o incidentes provocados por no Respectar los reglamentos de seguridad.
El cable de suministro de energia solo puede ser reemplazado por una persona del Servicio Técnico.
Su nuevo lavadora
Este nuevo aparato afronta todas las exigencias de un moderno tratamiento de la ropa con ahorro de agua, energia y detergente.
- El sistemas de control de centrifuga disminuye el riesgo de desplazamente de laquina y garantiza un funciona mas silencioso.
Descripción del aparato
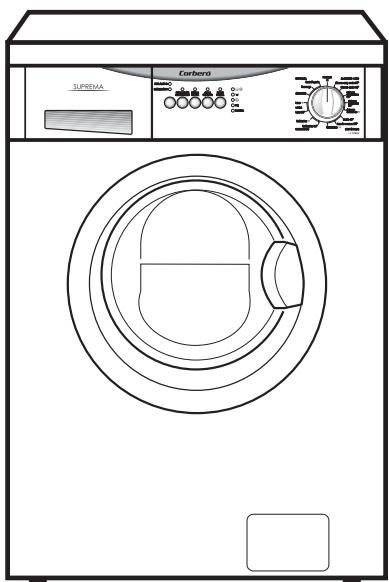
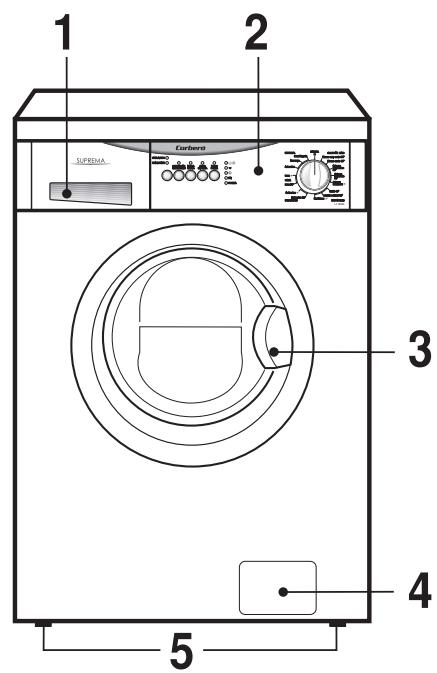
1 Cubeta del detergente
2 Panel de mandos
3 Manilla puerta
4 Puerta a la zona de descarga
5 Patas regulables
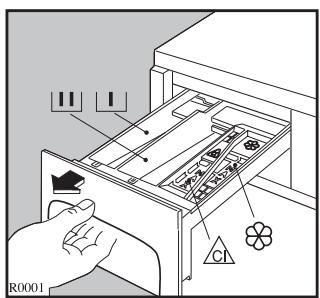
Cubeta del detergente

Prelavado

Lavado

Suavizante, almidón

Blanqueador (lejía)
Panel de mandos
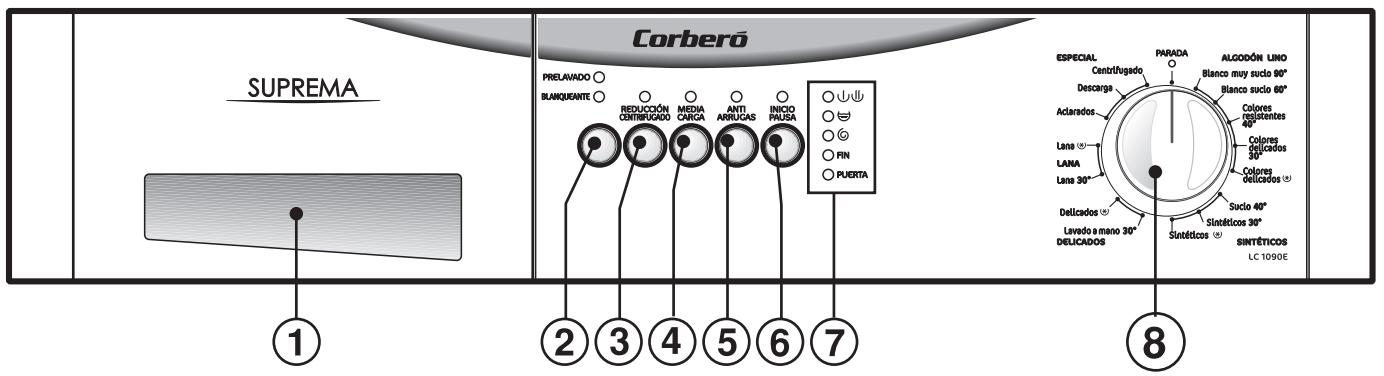
1. Cubeta del detergente
Teclas de option de programa
Dependiendo del programa, poder combinarse differsentes teclas de referencia.
Cuando las teclas son pulsadas, se iluminan los pilotos correspondientes. Cuando son pulsadas de nuevo, los pilotos se apagan. Si se selección unaopping no compatible con el programa selectionado, el correspondiente piloto parpadea durante dos segundos.
Las teclas de option: PRELAVADO o BLANQUEANTE; REDUCCION CENTRIFUGADO; MEDIA CARGA y ANTIARRUGAS deben seleccionarse afterwards de elegir el programa deseado, mediante el selector de programas (ver apartado 8) y antes deponer en marcha la lavadora, mediante la tecla INICIO / PAUSA.
2. Tecla PRELAVADO o BLANQUEANTE
Mediente esta tecla existe la posibiliad de elegir entre las dos-optiones siguientes:
- Oportun PRELAVADO: Añe una fase de prelimvado al inizio del ciclo con calentamento del agua a 30^ . En los ciclos Algodón y Sintéticos realiza un breve centrifugado antes de partir a la fase de lavado.Estaopsis no está disponible para los ciclos de Lana.
- Oportun BLANQUEANTE: Realiza la entrega de agua en el compartmento de blanqueador al起初 del primer aclarado. Utilice esta optacion solo en los programas de Algodón.
Pulse la tecla repetidas vezes hasta PSUagar la opticon deseada. El piloto correspondiente se encendera.
SI AMBOS PILOTOS (PRELAVADO Y BLANQUEANTE) NO ESTAN ILUMINADOS, EL PROGRAMA SE DESARROLLARÁ SIN PRELAVADO NI BLANQUEANTE.
3. Tecla REDUCCION DE CENTRIFUGADO
Selecciónando esta optación se reducen las velocidades de los centrifugados intermedios y final de lasuma眼看:
- Programas de Algodón-Lino: de 1000 a 500 r.p.m.
- Programas de Sintéticos y Lana: de 900 a 450 r.p.m.
- Programas de Delicados: de 700 a 450 r.p.m.
4. Tecla MEDIA CARGA
Selecciónando esta optación se reduce el consumo de agua en los ciclos de aclarados de los programas de Algodón y Lino.Esta optación es acontejable cuando la energia de ropa no exceede de los 2.25 KG.
La lavadora realizará 2 aclarados en vez de tres.
5. Tecla ANTIARRUGAS
Selecciónando esta-option, el agua delultimate aclarado no se vacía, de esta forma se evita la formación de arrugas en las prendas. El piloto correspondiente permanecerá encendido durante todo el ciclo de lavado. Cuando el programa haya terminado se iluminará, también, el piloto FIN.
Paradescendingelagua sigaestos tres pasos:
A) Gire el mando selector del programa a "O".
B) Seleccione el programa DESCARGA o CENTRIFUGADO.
C) Presione la tecla INICIO / PAUSA.
6. Tecla INICIO / PAUSA
Després de selección el programa deseado, mediante el selector de programas, pulse esta tecla para poder en marcha la lavadora; el piloto correspondiente deja de parpadear y permanecer encendido hasta el final del programa.
Para interruptir el programa en bajo, apriete la tecla INICIO / PAUSA: el piloto correspondiente comenzará a parpadear.
Para reanudar el programa desde el punto en el que fue interruptpido, pulse de nuevo la tecla
INICIO / PAUSA.
7. Indicador de las fases del programa
Durante el descarrollo del programa, el piloto correspondiente a la fase del ciclo en la que se工程技术 de incluyendo.
El piloto FIN se iluminará para indicar que el programa selecciónado ha finalizzato.
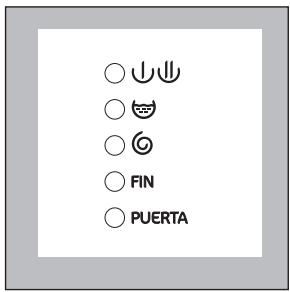
El piloto FIN parpadeará en caso de que exista algo;n problema de funcionaimiento:
- 4 parpadeos: puerta abierta.
- 2 parpadeos: problema con la descarga de agua.
- 1 parpadeo: problema con el suministro de agua. Para más información consulte el apartado "Anomalías de funciona" al final de este libro
El piloto PUERTA indica si la puerta pueda ser abierta o no:
- Con el piloto encendido: la puerta no pueda ser abierta.
- Con el piloto apagado: la puerta pueda ser abierta.
- Con el piloto parpadeando: la puerta esta en fase de aperture (entre dos y tres Minutes desde que el programa seleccionado termina).
Este piloto PUERTA permanecerá encendido durante toda la execución del programa selecciónado,indicando asi,que la puerta está bloqueada.Cuando el piloto se apague la puerta podrá ser abierta (ver page 16).
8. Mando selector del programa
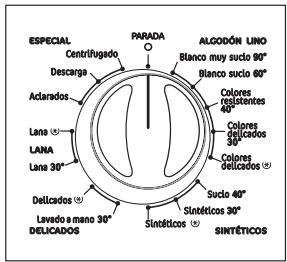
El mando selector de programasuede ser girado indistinctamente: bien en el sentido de las agujas del reloj o bien en sentido contrario a dichas agujas.
Utilice este mando para selectionar el programa deseado.
Al final de cada programa el mando selector debe ser girado a la posicion "O", para apagar la lavadora.
ATENCLON!
Si gira el mando selector de programas a另一边 posicion (programa) cuando la lavadora ya está的功能化, los pilotos indicadores de las fases del programa comienzan a parpadear. La lavadora no realizará el nuevo programa selectionado, sino que continuegará realizando el ciclo en bajo.
RECUERDE!
En el caso de que se equivoco al selectionar el programa y la lavadora ya está en marcha, proceda como sigue:
- Gire el mando selector de programas a la posicion "O".
- SeLECTIONE el nuevo programa deseado.
- Si la lavadora todas no ha realizado los aclarados en el momento en el que se decideshipsar el programa en bajo, en el nuevo programa se aprovechará el agua y el detergente del ciclo anteriormente selecciónado, con el consecuiente ahora de consumo. Si por el contrario, ya está en la fase de aclarados, deben teneradir de nuevo los aditivos (detergente, lejía...)
- Pulse la tecla INICIO / PAUSA, para inicia el nuevo ciclo.
i Consejos para el lavado
Selección de las prendas
Respete los símbolos para el tratimiento de los tejidos en las etiquetas de cada una de las prendas y las instrucciones para el lavado aconsejadas por el fabricante.
Divida la ropa de estaforma:
ropa bianca, de color, sintéticos, delicados, lana.
Temperatas
90^ para prendas blancas de lino o algodón normalmente sucías (por ej. paños de cucina, toallas, manteles, sábanas, etc.)
60^ para prendas de color que no destiñen,正常使用 susidas (por ej. camisas, camisiones, pijamas, etc.) de lino, algodón o fibras sintéticas y para prendas blancas en algodón levamente sucias (por ej. prendas intimas).
* (frío) para ropa delicada (por ej. cortinas), ropa 30^ - 40^ mixta con mezcla de fibras sintéticas y lana.
Antes de cargar la ropa
La ropa blanca y de color no se deben lavar juntas. La ropa blanca puede alterar el color con el lavado.
La ropa de color nuova puede desténir al primer lavado; la primera vez se aconseja lavarla a parte.
Controle que en la ropa no hayan quidado objetos metálicos (por ej. hebillas, imperdibles, alfileres).
Abotone las fundas, ciderre las cremalleras, los ganchos y los ojales. Ate los cinturones y lasCNTas largas.
Elimine las manchas dificiles antes del lavado.
Eventually restriegue los+puntos particulamente sucios con un detergente especial o con un jabon detergente.
Trate las cortinas con mucho cuidado. Quite los ganchos de las cortinas o átelos en una red o en una Bolsa.
Carga maxima de ropa
Las informaciones sobre las cargas de ropa se encontrartran en las tablas de programas.
Reglas generales:
Algodón y lino: llene el tambor sin recargarlo.
Sintéticos: no más de la mitad del tambor.
Tejidos delicados y lana: no más de un tercio del除外.
Con una energia maxima se aprovecha optimamente el agua y la energia.
Tratandose de ropa muy sucia, reduzca lacantidad.
Pesos de la ropa
Los pesos que se indicate a continuación tienen un valor indicativo:
albornoz de baño 1200 g
servilletas 100g
fundaplumón 700g
sábanas 500g
fundas 200g
manteles 250g
toallas de felpa 200 g
paños de cocina 100g
camisones 200g
slip de senora 100 g
mamelucos de hombre 600 g
camisas 200g
pijamas de hombre 500 g
blusas 100g
calzoncillos 100g
Eliminación de las manchas
Es posible que ciertas manchas particulares no se eliminen solamente con agua y detergente. Por lo tanto se aconseja tratarlas antes del lavado.
Sangre: las manchas todasías frescas se deben tratar con agua fria. Tratándose de manchas ya secas,letes la ropa en remojo por una noche con un detergente especial y bajo frótna en agua y jabón.
Pintura al aceite: humedezca con gasolina o detergente, haga presión sobre las manchas después de haber colocado la prenda sobre un trapo blando, trátelas varias veces con el detergente.
Manchas secas de grasa: humedezca con trementina (aguarrás), haga presión sobre las manchas con la punta de los dedos usingo un trapo de algodón, después de haber apoyado la prenda sobre una superficie blanda.
Óxido: sal oxálico disuelto en caliente o un producto antiorín en frío. Preste atencion a las manchas de orín viejas porque la estructura de celulosa ha sido ya dañada y el tejido Tiende a agujerearse.
Manchas de moho: tratelas con blanqueador, aclare bien (solamente las prendas blancas o de color resistentes al cloro).
Hierba: enjabone levamente y trate con blanqueador diluido (prendas blancas, resistentes al cloro).
Cola: humedezca con acetona (^*) , haga presión sobre las manchas cuando de haber apoyado la prenda sobre un trapo blanco.
Lápiz de labios: humedezca con acetona como arriba indicado, bajo trate las manchas con alcohol. Elimine el color en los tejidos blancos con blanqueador.
Vino:tinto:deje en remojo con detergente,aclare y trate con acido acetico o acido citrico, luego aclare. Trate eventuales residuos con blanqueador.
Tinta: según la composición de la tinta, humedezca el tejido primo con acetona (*), bajo con acido acético; trate los eventuales residuos en las prendas blancas con blanqueador y bajo aclare bien.
Manchas de alquitrán: primo trate con quitamanchas, alcohol o gasoline, bajo frote con pasta detergente.
(^*) no use la acetona en la seda artificial.
Detergentes y aditivos
Un bien的结果を lavado depende de la selección del detergente y del uso en dosis correctas. Dosificar correctamente significa evaporar despilfarros y proteger el ambiente. Avec se trate de productos biodegradables, los detergentes contienen elementos que danan el delicado equilibrio ecologico de la naturaleza.
La elección del detergente depende del tipo de tejido (delicados, lana, algodón, etc.), del color, de la temperatura de lavado y del grado de sociedad.
En esta lavadora se pueda usar todos los detergentes para lavadoras de vente habitual en los commercios:
-detergentes en polvo para todo tipo de tejidos,
- detergentes en polvo para tejidos delicados (máximo 60^ ) y lana,
- detergentes liquidos,preferiblemente para programas de lavado a baja temperatura (máximo 60^) para todo tipo de tejidos, o solamente para lana.
El detergente y el eventual aditivo deben ser echados en los componentes apropriados antes de起初 el programa de lavado.
Si se usesan detergentes concentrados en polvo o liquidos, seleccione un programa sin prelimvado.
Eche el detergente liquido inmediamente antes del inicio del programa en el compartmento [U] de la cubeta detergente.
Los eventuales aditivos liquidos para suavizar o alimidonar la ropa deben ser echados en el compartmento con el significo y el blanqueante en el compartmento antes de起初 el programa de lavado.
Para las dosis, siga lasindicaciones de los productores.
Cantidad de detergente a usar
El tipo y lacantidad de detergente dependendel tipo de tejido,de la energia de ropa, del grado de suciedad y de la dureza del agua usada.
La dureza del agua se clasifica en niveles de dureza. Las informaciones sobre dichos niveles se peuvent tener de la compañero distribuidora competente o de la administración municipal.
Siga las instrucciones para la dosificacion indicadas por el fabricante del detergente.
Use a cantidad menor de detergente si:
- se lavaoca ropa
- si la ropa no está muy sucia
- si se forma mucha espuma durante el lavado
Grados de dureza del agua
| Nivel | Characterística | Grados | |
| Alemanes °dH | Franceses °T.H. | ||
| 1 | dulce | 0-7 | 0-15 |
| 2 | media | 8-14 | 16-25 |
| 3 | dura | 15-21 | 26-37 |
| 4 | muy dura | más de 21 | más de 37 |

Símbolos internzonales para el tratimiento de los tejidos
Las etiquetas con los SYMBOLOS que estan pegadas en las prendas son muy utiles para el tratamento de las prendas malmas.
| Acción fuerte Acción delicada | 95 a 95°C | 60 a 60°C | 40 a 40°C | 30 a 30°C | Lavado a 30°C | No lavar |
| 60 | 30 |
| Blanqueo | Se puede blanquear en agua fria | No blanquear |
| Planchado | Plancha fuerteolestax 200°C | Plancha mediaolestax 150°C | Plancha flojaolestax 110°C | No planchar |
| Limpieza en seco | A Limpieza en seco conequalsolvente | P Limpieza en seco conperloro, gasolina, alcohol puro, R111y R113 | F Limpieza en seco congasolina, alcohol puro y R113 | X No limpiar en seco |
| Secado | Secar extendido | Secar colgado | Secar en perchas | Temperatura normal Temperatura reducida Puede secate en secadoras | No secaresecadoras |

Secuencia de las operaciones
Antes de efectuar el primer lavado aconsejamos realizar un ciclo algodón a 60^ , sin ropa, para eliminar los eventuales residuos de elaboración del tambor y de la cuba. Eche media medida de detergente en el compartmento de lavado y ponga en funciona el aparato.
1. Introduzca la ropa
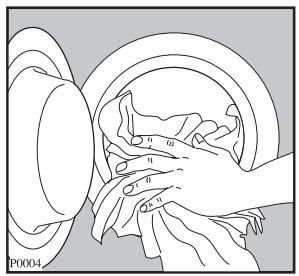
Abra la puerta tirando de la manilla de la puerta.
Introduzca la ropa en el tiempo, una por una, desplegándola lo más possible. Cierre la puerta.
2. Dosifique el detergente
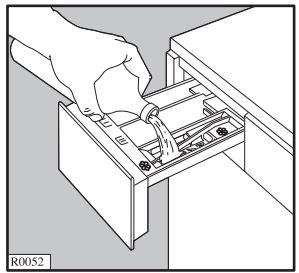
Tire hacía afuera de la cubeta del detergente hasta el tope.
Utilice un dosificador con lacantidad de detergente aconsejada, y échéelo en el compartmento de lavado principal y en el marcado con (si ha elegido laopsis
PRELAVADO).

3. Dosifique el suavizante y/o el blanqueador
Si lo desea, vierta el suavizante en el compartmento y el blanqueador en el compartmento (lacantidad usada no debe superar el nivel "MAX" de referencia de la cubeta). Cierre la cubeta suavamente.
4. Seleccione el programa deseado
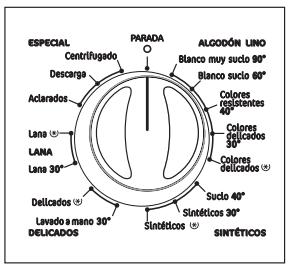
Gire el selector de programas hasta alcanczar el programa deseado.
5. Seleccion la/s tecla/s de option deseada/s
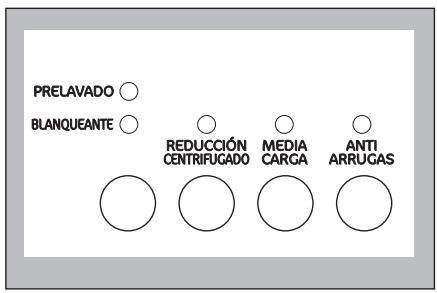
6. Ponga en marcha la lavadora
Antes de puner en marcha la lavadora verifique que:
- El aparato está conectado a la red electrica.
- El grifo del agua está abierto.
- El tubo de descarga de agua está colocado correctamente y en una posicion segura.
- La puerta y la cubeta del detergente está cerradas.
Para poder en marcha el programa selectionado, pulse la tecla INICIO / PAUSA; la luz correspondiente deja de parpadear y permanecerá encendida hasta el final del programa.
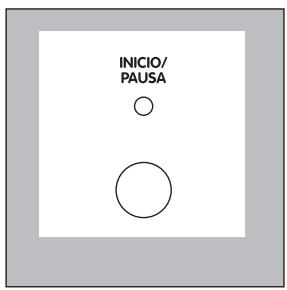
7. Modificación de un programa de lavado en bajo - la水中 - el suelo - el gólico - el gólico y el gólico - el gólico y el gólico - el gólico y el gólico - el gólico y el gólico - el gólico y el gólico - el gólico y el gólico - el gólico y el gólico - el gólico y el gólico - el gólico y el gólico - el gólico y thegolov
Una vez el programa ha empezado, solo可以选择 modifierlo girando el mando selector del programa a "O" y a continuación pourrait elegir el nuevo programa.
El agua de lavado permanecerá en la cuba, siempre y cuando la lavadora no haya llegado a la fase de aclarados, ya que, en tal caso, la lavadora descargará dicha agua automatistically.
Ponga en marcha el nuevo programa presionando la tecla INICIO / PAUSA
8. Interruption de un programa
Pulse la tecla INICIO / PAUSA para interruptir un programa en bajo, el piloto correspondiente comenzará a parpadear. Vuelva a presionar la tecla para poder en marcha de nuevo el programa.
9. Apertura de la puerta cuando de que el programa haya empezado
Primero pare la lavadora pulsando la tecla INICIO / PAUSA.
Podrá abideir la puerta pasados dos o tres Minutes. Si la puerta no se abre, significía que la temperatura de la lavadora es muy alta, que el nivel del agua supera el limite inferior de la puerta (lo que provocaría un desbordimiento) o que el nuevo está girando.
Si no可以选择 abrir la puerta, pero necesita abrirla, apague el aparato girando el selector de programas a la posicion ^ .Pasados dos o tres Minutes aproximamente podra abrir la puerta (jPRESTE ATENCION AL NIVEL Y A LA TEMPERATUREA DEL AGUA!).
10. Al final del programa
La lavadora se para automatically.
El desbloqueo de la puerta se indica mediante el encendido del piloto FIN y el apagado del piloto PUERTA.
Gire el selector del programa a la posicion "O" para apagar la lavadora.
Retire la colada del tambor y verifique cuidadosamente que esteultimate está completeness不仅要 hacerolo girar con las manos.
Si no se Tiene intencion de hacer other lavado, ciderre el grifo del agua y desenchufe el aparato.
Deje la puerta entreabierta para prevenir la formación de moho y olores desagradables.
ATENCLON!
Si la optación de ANTIARRUGAS ha sido的选择acion, los pilotos FIN y PUERTA permaneceran encendidos cuando el programa统计数据 a su fin,indicando asi que el agua delultimate aclarado no se ha vaciado. Para descargarla, realice los siguientes pasos:
- Gire el selector de programas a la posicion "O".
- Seleccione el programa DESCARGA o CENTRIFUGADO.
- Presione la tecla INICIO / PAUSA.
Ficha programs
Programas de lavado para algodón y lino
| Posición del mando de Programas | Programa delavado/Simbolo delavado | Grado de suciedad y tipo de colada | Descripción | Opções posibles | Carga |
| Blanco muy suejo90° | BLANCOS | Para prendas de algodón muy sueñas. | Lavado a 90°C3 aclaradosCentrifugado | Prelavado o blanqueanteReducción decentrifugadoMedia cargAntiarrugas(*) | 5 kg |
| Blanco suejo60° | AHORRO ENERGÍA(**) | Prendas de algodón blancas, por exemple ropa de trabajo, sábanas, ropa para la casa, ropa interior, toallas. | Lavado a 60°C3 aclaradosCentrifugado | Prelavado o blanqueanteReducción decentrifugadoMedia cargAntiarrugas(*) | 5 kg |
| Colores resistentes40° | COLORES RESISTENTES | Prendas de algodón de-coloredores resistentes o de lino sueñas, camisas, blusas, ropa inferior. | Lavado a 40°C3 aclaradosCentrifugado | Prelavado o blanqueanteReducción decentrifugadoMedia cargAntiarrugas(*) | 5 kg |
| Colores delicados30° | CUIDA LOS COLORES | Prendas de algodón de-coloredores no resistentes o de lino sueñas, camisas, blusas, ropa inferior. | Lavado a 30°C3 aclaradosCentrifugado | Prelavado o blanqueanteReducción decentrifugadoMedia cargAntiarrugas(*) | 5 kg |
| Colores delicados(*) | ALGODON EN FRÍO | Prendas de algodón poco sueñas. | Lavado en frío3 aclaradosCentrifugado | Prelavado o blanqueanteReducción decentrifugadoMedia cargAntiarrugas(*) | 5 kg |
| O | PARADA | Para cancelar el programa de lavado que se está executando y para apagar laquina. | - |
() SeLECTIONANDO esta optación, el agua delultimate aclarado no se descarga paraatar la formación de pliegues en los tejidos. Para descargar el agua selección el programa CENTRIFUGADO o DESCARGA.
(^*) Conforme a la normativa CEE 92/75, los consumos indicados en la etiqueta energia se refieren al programa Blanco sucio 60^ Algodón, para algodón a 60^ con una carga de 5 Kg.
Ficha programs
Programas de lavado para sintéticos, mixtos, delicados y lana
| Posición del mando de Programas | Programa de lavado/ Simbolo de lavado | Grado de suciedad y tipo de colada | Descripción | Opções posibles | Carga |
| Sucio 40° | PLANCHADO FÁCIL | Programa especial para tejidos sintéticos, que Facilita el planchado de las prendas. | Lavado a 40°C 4 aclarados Impulso centrifuga | Prelavado Reducción de centrifugado Antiarrugas (*) Media cargo | 2 kg |
| Sintéticos 30° | CARGA MIXTA | Tejidos sintéticos o mixtos, ropa interior, prendas de color, camisas, blusas. | Lavado a 30°C 3 aclarados Centrifugado corto | Prelavado Reducción de centrifugado Antiarrugas (*) Media cargo | 2 kg |
| Sintéticos (*) | SINTÉTICO EN FRÍO | Tejidos sintéticos delicados, poco sueños. | Lavado en frío 3 aclarados Centrifugado corto | Prelavado Reducción de centrifugado Antiarrugas (*) Media cargo | 2 kg |
| Lavado a mano 30° | LAVADO A MANO | Tejidos especialmente delicados. | Lavado a 30°C 3 aclarados Centrifugado corto | Reducción de centrifugado Antiarrugas (*) Media cargo | 1 kg |
| Delicados (*) | DELICADOS EN FRÍO | Tejidos delicados, por ejemplo cortinas. | Lavado en frío 3 aclarados Centrifugado corto | Prelavado Reducción de centrifugado Antiarrugas (*) Media cargo | 2 kg |
| Lana 30- (*) | LANA | Utilice este ciclo de lavado para lavar las prendas Woolmark de(acquierdo a las instrucciones que aparecen en la etiqueta de lavado de dichas prendas y sugiuendo el libro de instrucciones proportionscordo por el fabricante de la lavadora (M9604). | Lavado en 30°C o frío (dependiendo de la posición selecciónada) 3 aclarados Centrifugado corto | Reducción de centrifugado Antiarrugas (*) Media cargo | 1 kg |
| O | PARADA | Para cancelar el programa de lavado que se estáejecutando y para apagar laquina. | - |
(*) SeLECTIONando esta optación, el agua delultimate aclarado no se descarga paraatar la formación de pliegues en los tejidos. Paradescendingar el agua seleccione elprograma CENTRIFUGADO o DESCARGA.
Ficha programs
Programas especials
| Posición del mando de Programas | Programa delavado/Simbolo delavado | Grado de sociedad y tipo de colada | Descripción | Opções posibles | Carga |
| Aclarados | ACALARADOS | Con este programa es possible aclarar y concentrugar prendas que hayan sido lavadas a mano. La lavadora realizará 3 aclarados, y terminará con un concentrugado corto. | 3 aclaradosCentrifugado corte | Reducción decentrifugadoAntiarrugas (*) | 5 kg |
| Centrifugado | CENTRIFUGADO | Este programa puede utiliser para hacer un concentrugado corto: en prendas lavadas a mano, por exemple: para escurrirlas, antes de tenderlas. Este programa también puede ser uso para descargar y concentrugar, cuando se ha selecciónado un programa con la opcción ANTIARRUGAS. | Centrifugado corte | Reducción decentrifugado | 5 kg |
| Descarga | DESCARGA | Paradescendingel agua delultimate aclarado en los programas con la opcción ANTIARRUGAS selecciónada. | Descarga deagua | 5 kg | |
| O | PARADA | Para cancelelareprogramadelavado que se estáejecutando y paraapagar laquina. | - |
(*) SeLECTIONando esta optación, el agua delultimate aclarado no se descarga paraatar la formación de pliegues en los tejidos. Paradescendingar el agua seleccione elprograma CENTRIFUGADO o DESCARGA.
Mantenimiento
1. Exterior del aparato
Limpie la parte externa del aparato con agua tibia y un produit neutro no abrasivo. Aclare con agua limpia yooter con un trapo suave.
Importante: no use alcohol, disolventes o produits similares para la limpieza.
2. Cubeta detergente
Los detergentes y el suavizante, con el tiempo, forman incrustaciones.
De vez en cuando limpie la cubeta del detergente pasándola bajo del grifo del agua. Para extraer Completely la cubeta del aparato, apriete el botón en fondo a la izquierda.
Para poder limpiar la cubeta más fácilmente, es possible quitar la parte alta de la misma reservada a los aditivos.
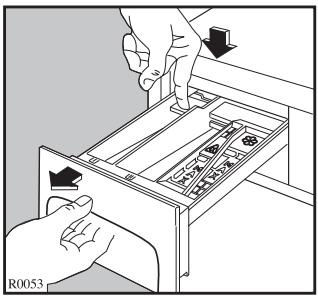
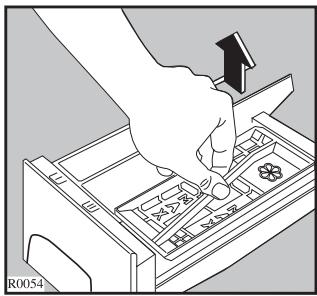
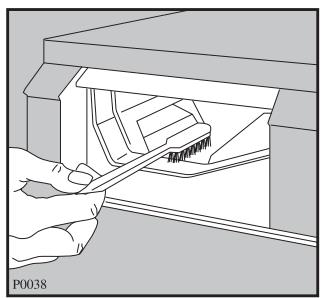
Con el pasado del tiempo, el detergente puede formar incrustaciones en la parte interna de la cubeta: limpiela con un cepillo de dientes. Vuelva a colocar la cubeta en su lugar.
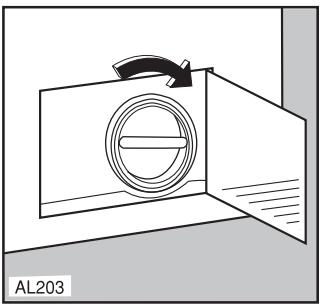
3. Limpieza de la zona de descarga
La limpieza de la zona de descarga de agua es necessitiesia en caso de que la bomba haya quedado bloqueada por cuerpos extraños (por exemple botones, grapas, clips,etc) o por haber lavado prendas que sueltan abundante pelusa cuando se lavan a temperatura demasiado elevada.
- Desconecte el cable de alimentación.
- Si esnecessary espere a que el agua de lavado se enfrie.
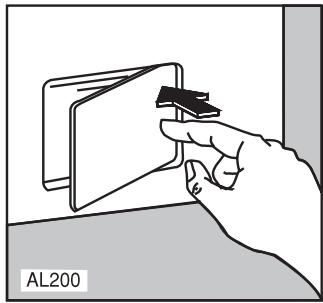
- Abra la puerta de la zona de descarga.
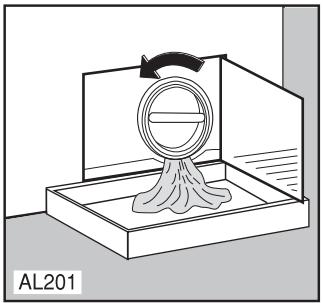
- Coloque un recipiente para recoger el agua.
- Gire lentamente la tapa del diafragma hacía la izquierda ycede que el agua de la lavadora vaya fluyendo lentamente en el recipiente.
- Cuando el recipiente está lleno, gire y ciderre el mando del diafragma.
- Vacie el recipiente y repita la secuencia de operaciones anteriores hasta vaciar por completeo la lavadora.
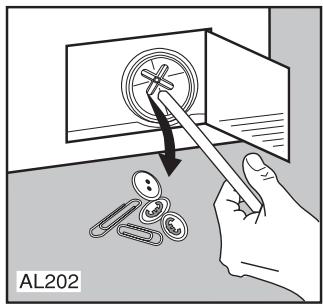
- A continuación desenosque totalmente la tapa del diafragma girándola en sentido anti-horario y tire de ella.
- Tenga a mano un paño para secar los restos de agua cuando quite la tapa del diafragma.
- Retire los cuerpos extraños como botones, monidas y las pelugas que se han acumulado en la zona de las aspas de la bomba. Para poderla limpieza gire las aspas de la bomba.
- Enrosque la tapa del diafragma en sentido horario asegurándose que queda bien apretada.
- Cierre la puerta de la zona de descarga.
4. Filtro de carga
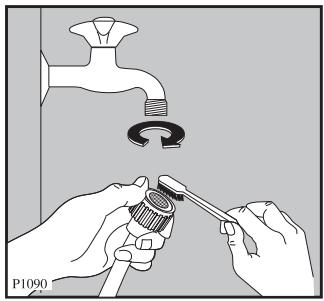
Si se da cuenta de que el aparatoemploi más tiempo para llenarse, hay que verificar que el filtro de energia del agua no se ha atascado.
Cierre el grifo del agua.
Desenosque la tuerca de fijacion del tubo de carga al grifo de agua.
Limpie con un cepillo el filtro situado en el interior del terminal del tubo que ha desenroscado.
Rosque con cuidado la tuerca del tubo de energia.
5. Vaciado de emergencia
Si el aparato no descarga (bomba desagüebloqueada o tubo desagüe obstruido), para vinciar elagua proceda de la?singularmente manera:
desenchufe el aparato;
- cierre el grifo del agua;
- espere que el agua se enfiré (si es Neededo);
- abra la puerta de la zona de descarga;
- coloque un recipiente para recoger el agua que saldrá de la lavadora;
- tire del(PC)que no tubo de descarga, colóquelo en el recipienté y quite el tapón;
- cuando el recipiente está lleno,onga el tapón al(PCPO)pequeño tubo de descarga;
- vacía el recipient e repita la secuencia de operaciones anteriores hasta vaciar por complete la lavadora;
- colocque elklequeo tubode descarga en su posicionalicial y cierre la puerta de la zona de descarga.
6. Precauciones contra el hielo
Si el aparato se instala en un cuarto donde la temperatura podra descender por debajo de 0^ , proceda como sigue:
desenchufe el aparato;
- cierre el grifo del agua;
- espere que el agua se enfiré (si es Neededo);
- abra la puerta de la zona de descarga;
- coloque un recipiente para recoger el agua que saldrá de la lavadora;
- tire del(PC)que no tubo de descarga, colóquelo en el recipienté y quite el tapón;
- cuando termine deEAR el agua,pong a el tapon al微量元素 tubo de descarga, colóquelo en su posición inicial y ciderre la puerta de la zona de descarga.
Efectuando estas operaciones el agua que ha quedado en el aparato sera evacuada, evitando la formacion de hielo y como consecuencia la rotura de las partes afectadas.
Cuando haga funciona nth nuevamente el aparato, asegurese de que la temperatura del ambiente sea superior a los 0^
Anomalías de funcionaarto
Ciertos problemas son debidos a un mantenimiento no adecuado y que pueda ser resuelslos sin lawendung de un先进技术. Antes de contactar con su Servicio de Asistencia Técnica local, por favor realice las comprobaciones indicadas en la tabla más bajo.
Durante el funciona de la lavadora es possible que el piloto FIN parpadee para indicar que algo no funciona correctamente.
- 4 parpadeos = puerta abierta.
- 2 parpadeos = el agua no se descarga.
- 1 parpadeo = el aparato noonga agua.
Una vez haya eliminado el problema, pulse la tecla INICIO / PAUSA para restuarar el programa. Si antes de realizar todas las comprobaciones Mentionadas, el problema persiste, contacte con su Servicio de Asistencia Técnica local.
Defectos que pueda resolver sin laapia de un先进技术.
| Anomalías | Posibles causas |
| - El aparato no se pone en marcha: | ·La puerta no está cerrada. ·La lavadora no está enchufada correctamente. ·No hay corriente en el enchufe. ·Los fusibles principales o los del enchufe han saltado. ·El selector de programas no esta colocado correctamente y la tecla INICIO / PAUSA no está pulsada. |
| - El aparato noarga agua: | ·El grifo del agua está cerrado. ·El filtró del tubo de energia está obstruido. ·El tubo de energia está bloqueado o doblado. ·La puerta no está cerrada. |
| - El aparatoarga agua y la descarga inmediamente: | ·La extremidad del tubo de energia se incluye desajiado bajo el respecto del aparato. ·La extremidad del tubo de energia está sumergida en agua. ·No hay entrada de aire en la instalación, entre el tubo de energia de la lavadora y el de la casa. |
| - El aparato no descarga y / o no centrífuga: | ·El tubo de energia está Bloqueado o doblado. ·La-option ANTIARRUGAS ha sido selectionada. ·La bomba de energia está obstruida. ·La extension del tubo de energia no es correcta. Siga las instrucciones para conectar al energia. ·Las tuberías del Sistema de energia está obstruidas. ·La energia de ropa está desequilibrada: redistribuya las prendas en el;tambor para que la lavadora pueda centrífuga. |
| - Hay agua en el suelo: | ·Hay demasiado detergente o se ha usedo un detergente inadequado (hace demasiada espuma). ·Verifique si hay perdidas de una de las roscas del tubo de energia. Es fácil ver el agua pasado a lo largodel tubo, controle si está humedo. ·El tubo de energia está dañado o no se ha colocado de unaforma segura para evaporar fujas. ·El distribuidor de la cubeta del detergente está taponado. ·Las tuberías delsystema dedescargarestánobstruidas. |
| Anomalías | Causas posibles |
| - El的结果をのlavado no es satisfactorio: | ·Se ha usage bajo detergente o un detergente inadequado. Una calidad insuficie de detergente pueda estar las prendas grisáceas. ·Las manos "difíciles" no se han sentido a un tratimiento preliminar. ·No se ha selección el programa de lavado adecuado. ·Se ha colocado demasiada ropa en el cesto. |
| - El aparato vibra cuando centrífuga: | ·No se han quitted todas las protecciones que sirven para el transporte. ·El aparato está en contacto con la pared o con el mobiliario adyacente. ·El aparato no está nivelado ni estable (verifiquelo diagonalmente). ·La ropa no está bien distribuía en el tambor. ·Quizás hay poca ropa en el tambor. |
| - La puerta no se abre: | ·El programa está todo/a en camino. ·El bloqueo de la puerta no se has desactivadoulton. (piloto PUERTAulton). ·Agua en la cuba: la puerta no se pueda abrir si hay agua presente en la cuba (opión ANTIARRUGAS selecciónada). |
| - El concentrúgo empieza tarde o el aparato no centrífuga: | ·El dispositivo electrónico de detectión de desequilbio ha interrupido el concentrúgo porque la carga no está distribuía uniformmente Dentro del tambor. La lavadora intentará distribuir la ropa de manière homógena, mediante algunos vueltas del tambor.Esta operación suele levarse a cabo varias vezes antes de que el desquilbio desaparezca y el concentrúgo normal puedaContinuar. Si, pasados 10 Minutes, la ropa sigue sin estar bien distribuía en el tambor, la lavadora no centralgará. En este caso, redistribuya la cargamanualmente y vuelva a selección arel本次活动 del concentrúgo. |
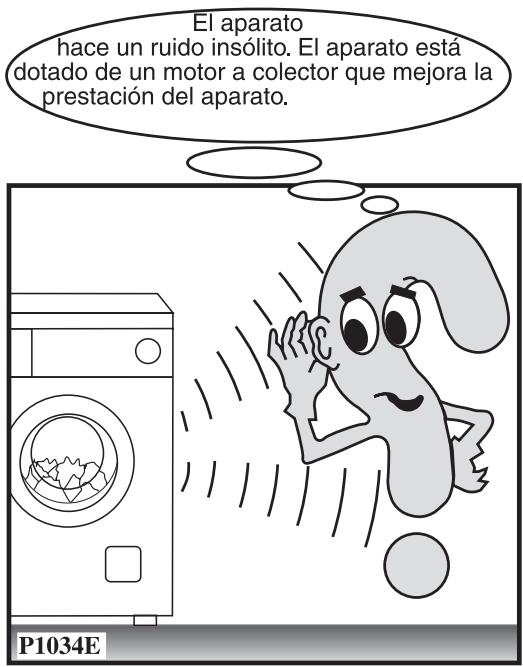
| - El aparato hace un ruido inusual: | ·La lavadora está equipada con un tipo de motor que hace un ruido inusual en comparación con otros motores. Con este nuevo motor se asegura un empiece más suave y una distribución más homogénea de la ropa en el tambor a la hora del concentrúgo, al igual que augmente la estabilidad del aparato. |
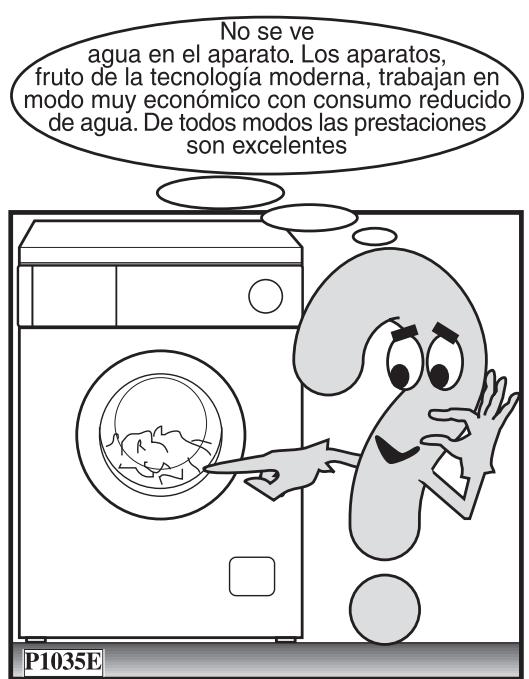
| - No se ve agua en el tambor | ·Los aparatos basados en technología moderna operan de una forma muy economica, utilizing muy poco agua, sin afectar al los resultados del lavado. |
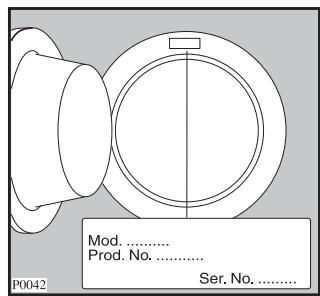
Si no se solicúa el problema, diríjase al centro de asistencia après de haber tomadonota del Modelo, del número de série y de la Fecha de compra del aparato; es Neededo podercerestos datos puis seran Solicitados.
Para España: Puede comprar recambios y accesorios on-line entre en http://www.service.electrolux.com y seleccion Tienda Virtual.
Teléfono Servicio Técnico Oficial 902 116 388
Dear customer,
Please read these operating instructions carefully and pay particular attention to the safety notes indicated in the first pages. We recommend that you keep this instruction booklet for future reference and pass it on to any future owners.
Transport damages
When unpacking the appliance, check that it is not damaged. If in doubt, do not use it and contact the Service Centre.
The symbols you will see on some paragraphs of this booklet have the following meaning:

The warning triangle and/or the key words (Warning!, Caution!) emphasize information that is particularly important for your safety or correct functioning of the appliance.

The information marked with this symbol provides additional instructions and practical tips on the use of the appliance.

Tips and information about economical and ecological use of the machine are marked with this symbol.
Contents
Warnings 27-28
Disposal 28
Tips for environmental protection 28
Technical specifications 29
Installation 30-31
Unpacking 30
Hydraulic connection 30
31
Electrical connection 31
Your new washing machine 32
Description of the appliance 32
Detergent dispenser drawer 32
Use 33
Control panel 33
Controls 33-34
35
Sorting the laundry 35
Temperatures 35
Before loading the laundry 35
Maximum loads 35
35
Removing stains 35
Detergents and additives 36
Quantity of detergent to be used 36
International wash code symbols 37
Operating sequence 38-39
Washing programmes 40-42
Maintenance 43
Bodywork 43
Detergent dispenser drawer 43
Cleaning of the drainage area 43
Water inlet filter 44
Emergency emptying out 44
Frost precautions 44
Something not working? 45-47
The following warnings are provided in the interests of overall safety. You must read them carefully before installing or using the appliance.
Installation
- All internal packing must be removed before using the appliance. Serious damage may be caused to the machine or adjacent furniture if the protective transit devices are not removed or are not completely removed. Refer to the relevant paragraph in the instruction book.
- Any electrical work required to install this appliance must be carried out by a qualified electrician.
- Any plumbing work required to install this appliance must be carried out by a qualified plumber.
- After having installed the machine, check that it is not standing on its electrical supply cable.
- If the appliance is placed on a carpeted floor, ensure that air can circulate freely between the feet and the floor.
- The power supply cable only can be replaced by a person of the Technical Service.
Use
- This appliance is designed for domestic use. It must not be used for purposes other than those for which it was designed.
- Only wash fabrics which are designed to be machine washed. Follow the instructions on each garment label.
- Do not overload the appliance. Follow the instructions in the instruction book.
- Make sure that all pockets are empty. Objects such as coins, safety pins, pins and screws can cause extensive damage.
- Do not machine wash garments saturated with petroleum, methylated spirits, trichlorethylene, etc. If such fluids have been used to remove stains prior to washing, wait until they have completely evaporated from the fabric before placing garments in the appliance.
- Place small items such as socks, belts, etc. in a cloth bag or pillowcase to prevent them getting trapped between the drum and the tub.
-
Use only the recommended quantities of fabric softener. An excessive amount could damage the laundry.
-
Leave the porthole door slightly ajar when the appliance is not in use. This preserves the door seal and prevents the formation of musty smells.
- Always check that water has emptied out before opening the door. If not, drain the water following the instructions in the instruction book.
- Always unplug the appliance and shut the water tap after use.
General safety
- Repairs to the machine must be carried out only by qualified personnel. Repairs carried out by inexperienced persons could cause serious danger. Contact your local Service Centre.
- Never pull the power supply cable to remove the plug from the socket; always take hold of the plug itself.
- During high temperature wash programmes the door glass may get hot. Do not touch it!
Child safety
- Children are often not aware of how dangerous electrical appliances can be. When the machine is working, children should be carefully supervised and not be allowed to play with the appliance.
-
The packaging components (e.g. plastic film, polystyrene) can be dangerous to children - danger of suffocation! Keep them out of children's reach.
-
Keep all detergents in a safe place out of children's reach.
- Make sure that children or pets do not climb into the drum.
- When the appliance is to be scrapped, cut off the electrical supply cable and destroy the plug with the remaining cable. Disable the door catch in order to prevent children from becoming trapped inside while playing.

Disposal
Packaging materials
The materials marked with the symbol are recyclable.
PE < = polyethylene
PS<=polystyrene
PP<=polypropylene
This means that they can be recycled by disposing of them properly in appropriate collection containers.
Machine
The symbol on the product or on its packaging indicates that this product may not be treated as household waste. Instead it shall be handed over to the applicable collection point for the recycling of electrical and electronic equipment. By ensuring this product is disposed of correctly, you will help prevent potential negative consequences for the environment and human health, which could otherwise be caused by inappropriate waste handling of this product. For more detailed information about recycling of this product, please contact your local city office, your household waste disposal service or the shop where you purchased the product.

Tips for environmental protection
To save water, energy and to help protect the environment, we recommend that you follow these tips:
- Normally soiled laundry may be washed without prewashing in order to save detergent, water and time (the environment is protected too!).
-
The machine works more economically if it is fully loaded.
-
With adequate pre-treatment, stains and limited soiling can be removed; the laundry can then be washed at a lower temperature.
- Measure out detergent according to the water hardness, the degree of soiling and the quantity of laundry being washed.
Installation instructions
It is dangerous to alter the specifications or attempt to modify this product in any way.
Care must be taken to ensure that the appliance does not stand on the electrical supply cable.
Any electrical work required to install this appliance should be carried out by a qualified electrician or competent person.
Any plumbing work required to install this appliance should be carried out by a qualified plumber or competent person.
The power supply cable only can be replaced by a person of our Service Force Centre.
Technical specifications
| DIMENSIONS | Height | 85 cm |
| Width | 60 cm | |
| Depth | 60 cm | |
| MAXIMUM RECOMMEND LOAD | Cotton, linen | 5 kg |
| Synthetics | 2 kg | |
| Delicates | 2 kg | |
| Woollens | 1 kg | |
| SPIN SPEED | 1000 rpm(Max). | |
| POWER SUPPLY VOLTAGE/FREQUENCY | 230 V/50 Hz | |
| TOTAL POWER ABSORBED | 2100 W | |
| MINIMUM FUSE PROTECTION | 10 A | |
| WATER PRESSURE | Minimum | 50 kPa |
| Maximum | 800 kPa |
C E
This appliance complies with the following EEC Directives:
73/23/EEC of 19/02/73 relating to low voltage
89/336/EEC of 03/05/89 relating to electromagnetic compatibility.
Installation
Transit security bars
Before starting the machine up, the transport security bars must be removed as follows:
You are advised to keep all the transport security bars. In case the appliance has to be transported again.
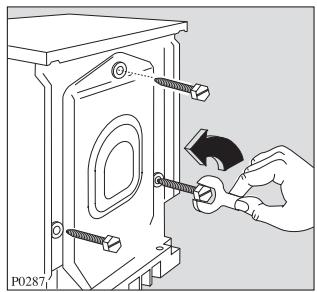
- Unscrew and remove the three rear screws by means of a key.
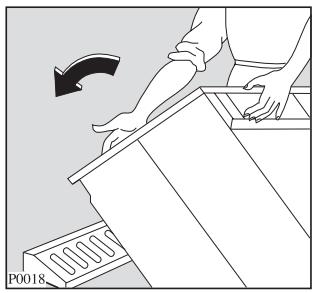
- Lean the appliance back on the rear and fit one of the polystyrene angles between the appliance and the floor.
Make sure the hoses are not squashed.

- Carefully remove the plastic bags on the left and the right, pulling them to the centre of the appliance
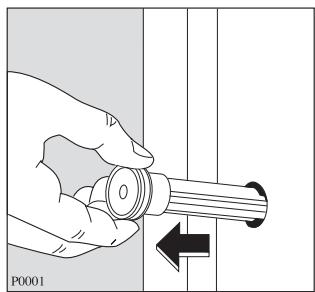
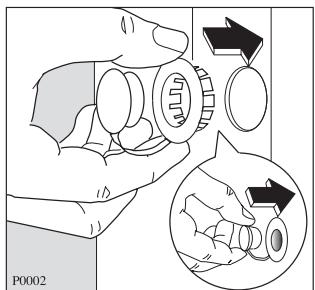
- Place the machine in an upright position and remove the three plastic bolts.
- Plug the 3 holes with the plastic plugs which you can find in the envelope containing the instruction booklet.
Hydraulic connection
There should be a COLD WATER tap near the washing machine with a screwing on connection pipe of 3 / 4 gas for the water supply, a sink, a wash basin or a drainage system in the wall.
Previously check if:
it is not a hot water tap.
the running water is clean. If not, run off a reasonable amount of water to flush out any debris that may have collected in the pipes.
Have the permanent drainage system in the wall checked by a plumber.
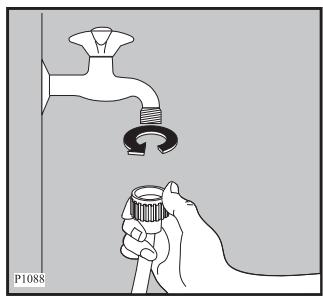
- Carefully screw the pipe to the tap taking care not to damage the screwdrive and fix the nut well on to the end in order to avoid leaking.
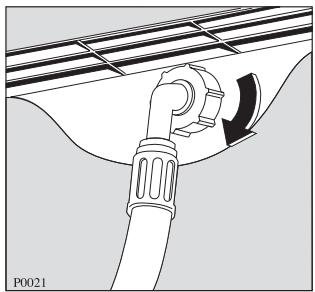
- If necessary turn the hose adequately by unscrewing the nut at the rear of the appliance. Now tighten the nut anew to avoid leaks. (Open the tap and assure that it does not leak and close it again.)
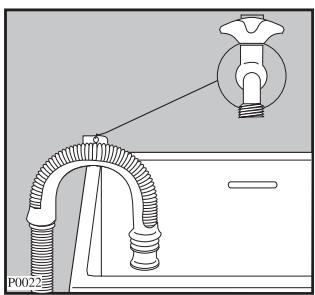
- Place the discharging hose in a washbasin or sink with the aid of the bent piece delivered separately. The bent piece has to be entered into the tube's mouth in order to assure the support. Aforesaid piece allows the hose to be
fixed to the wall by means of an opening on the upper part and that way the hose does not move and its falling is avoided.
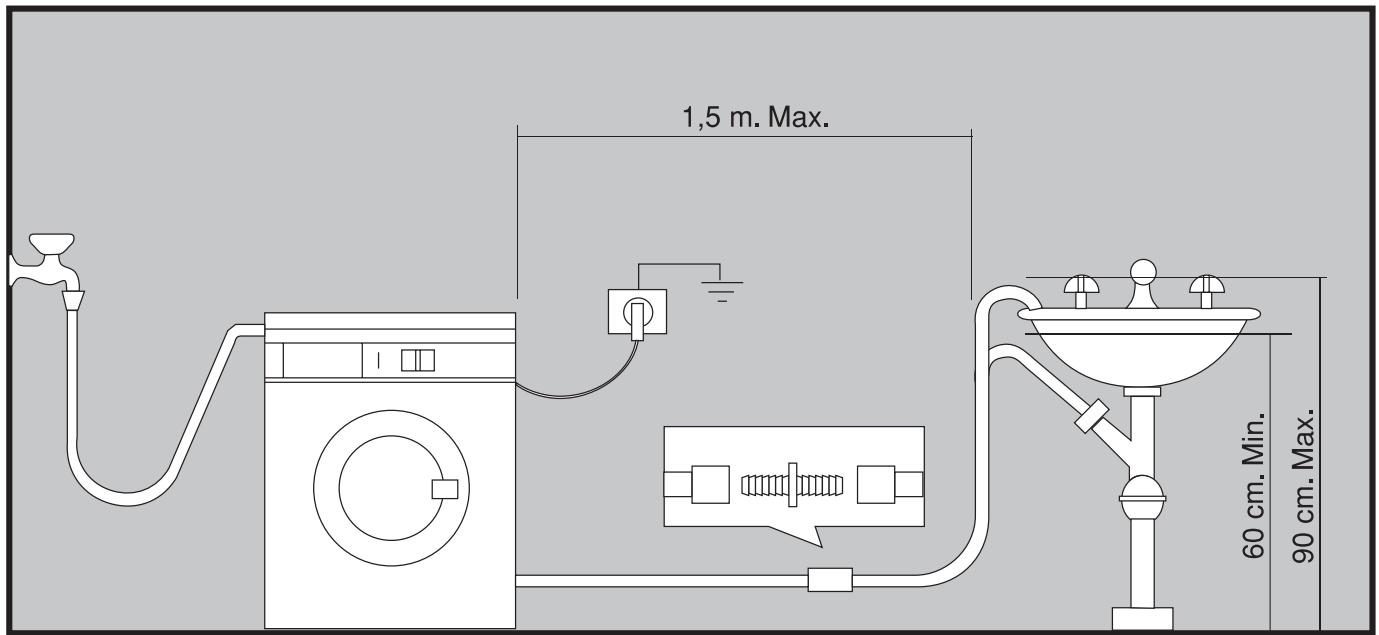
IMPORTANT: The distance from the floor to the highest part of the hose should be between 60 to 90 cm. (It is advised to be between 60 and 70 cm). The hose must not be bent nor twisted to avoid clogging. Should a prolongation of the discharging hose be unavoidable this must never surpass 1.5 m and must be of the same diameter as the original hose.
Make sure the hoses are not too tense.
Levelling
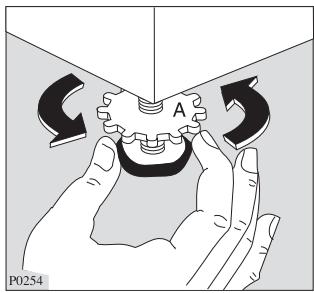
Level the appliance by loosening or tightening the feet. Once in the right position fix the feet by pushing the nuts (A) (see graphic P0254) against the base of the case. Accurate levelling will prevent vibration, noise and displacement of the appliance during operation.
Some vibration is inevitable, especially if placed on a wooden floor. Wooden floors are particularly susceptible to vibrations. If possible always place the appliance on a solid floor.
Electrical connections
Before plugging the appliance make sure that:
- the mains of your installation is the same as on the rating plate of your appliance (the plate is sticked to the rear of the appliance).
2^ . The meter, the fuses, the wiring and the socket outlet can support the max. power absorbed stated on the rating plate.
3^ . The socket base and the plug must fit in adequately without any reducing interposition, multiple outlets or adapters. If necessary replace the socket outlet by an adequate one.
The applicable rules for electrical security require an adequate earthing. The plug of the appliance is provided with such a device.
Make sure your socket outlet is provided with an adequate earthing too.
The manufacturer declines any liability in case of accidents or incidents should these safety measures not be observed.
The power supply cable only can be replaced by a person of our Service Force Centre.
Your new washing machine
This new machine meets all modern requirements for effective treatment of laundry with low water, energy and detergent consumption.
- The balance control device reduces the risk of instability in machine movement and it guarantees a quieter operation.
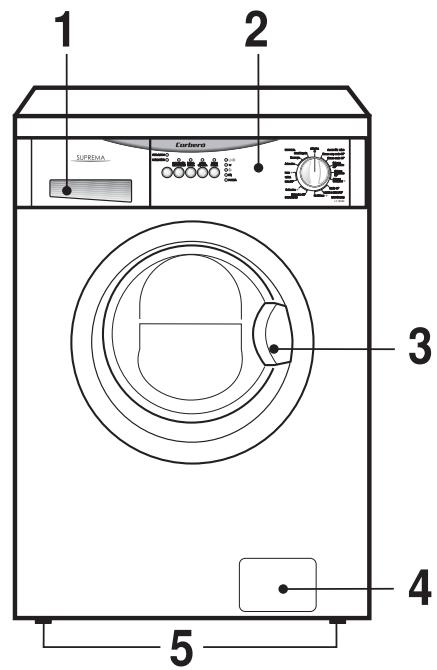
Description of the appliance
1 Detergent dispenser drawer
2 Control panel
3 Door handle
4 Drainage area door
5 Adjustable feet
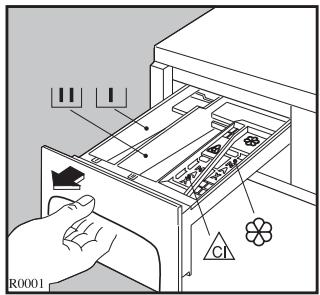
Detergent dispenser drawer
U Prewash
Main wash
Fabric softener, starch
Bleach
Control panel
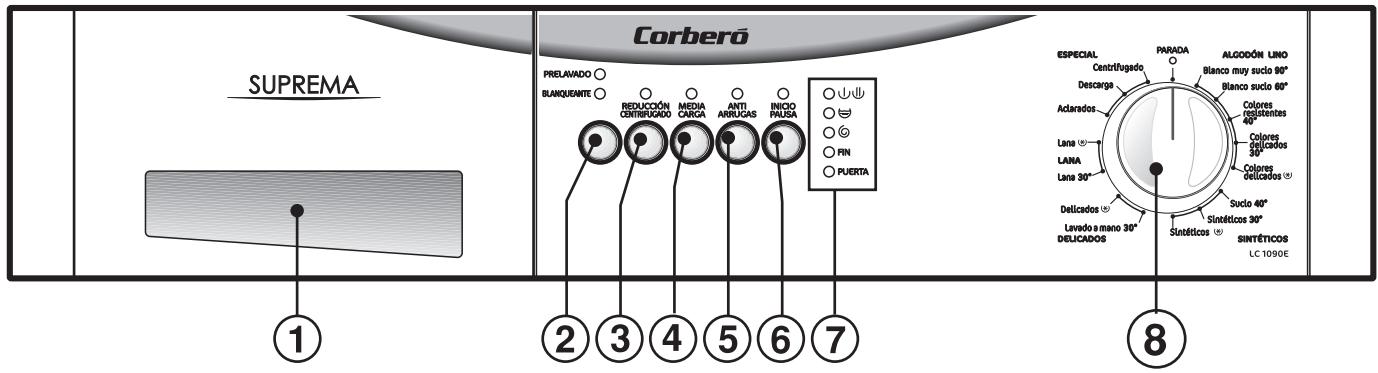
1. Detergent dispenser drawer
Programme option buttons
Depending on the programme, different option buttons can be combined.
When these buttons are pressed, the corresponding lights come on. When they are pressed again, the lights go off.
If an incompatible option with the selected programme has been chosen, the corresponding light flashes for about 2 seconds.
The option buttons: PRELAVADO or BLANQUEANTE; REDUCCION CENTRIFUGADO;
MEDIA CARGA and ANTIARRUGAS must be selected after the required programme has been chosen, by turning the programme selector (see section 8) and before starting the machine, by pressing INICIO / PAUSA button.
2. PRELAVADO OR BLANQUEANTE button
By pressing this button you have the possibility of choosing between the following options:
- PRELAVADO option: Adds a pre-wash phase at the start of the cycle with water heating to 30^ C. In COTTON and SYNTHETIC cycles, performs a short spin before passing to the washing phase.This option cannot be selected for WOOL.
- BLANQUEANTE option: Runs water through the bleach compartment at the beginning of the first rinse in COTTON cycles.
Press the button as many times as you need to get the required option. The corresponding light will come on.
IF BOTH LIGHTS (PRELAVADO AND BLANQUEANTE) ARE NOT ILLUMINATED, THE PROGRAMME WILL RUN WITHOUT EITHER PREWASH OR BLEACH.
3. REDUCCION CENTRIFUGADO button
By depressing this button you can reduce the final and the intermediate spin speeds as follows:
Cotton programmes: from 1000 to 500 r.p.m.
Synthetics and wool programmes: from 900 to 450 r.p.m.
Delicates programmes: from 700 to 450 r.p.m.
4. MEDIA CARGA button
Select this button to reduce water consumption on the rinse cycle when washing a smaller load of cottons or linens (maximum load size = 2.25 kg).
The machine will perform 2 rinses instead of 3.
5. ANTIARRUGAS button
By selecting this option, the water of the last rinse is not drained, in order to prevent the fabrics from wrinkling. The corresponding light will remain lit during the entire washing cycle. When the programme has finished, FIN light will also illuminate.
To drain the water follow these three steps:
A) Turn the programme selector dial to "O".
B) Select DESCARGA (DRAIN) or CENTRIFUGADO (SPIN) programme.
C) Press INICIO / PAUSA button.
6. INICIO / PAUSA button
After selecting the required programme, by the programme selector, press this button to start the machine; the corresponding light stops flashing and will keep lighting until the programme finishes.
To interrupt the running programme, depress INICIO / PAUSA button: the corresponding light starts to flash.
To restart the programme from the point at which it was interrupted, press INICIO / PAUSA button again.
7. Programme progress display
During programme development, the light corresponding to the cycle phase which the machine is in will illuminate. In other words, if the machine is in the pre-wash or wash phases the light will come on; if it is in the rinses phase the light will come on; and finally if it is in the spin phase the light will come on.
The light FIN will illuminate to indicate that the selected programme has finished.
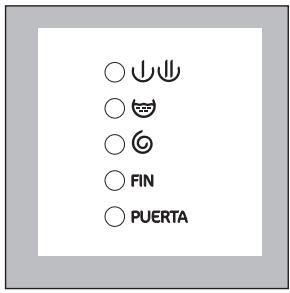
The light FIN flashes in the event of operating problems:
- 4 flashes: door open.
- 2 flashes: problem with water draining.
- 1 flash: problem with water supply.
For more information see paragraph "Something not working?" at the end of this booklet.
The PUERTA pilot light indicates if the door can be opened:
- light on: the door cannot be opened
- light off: the door can be opened
- flashing light: the door is opening
It stays on during the whole programme indicating that the door is locked.
When the light goes out, the door can be opened (see page 39).
8. Programme selector dial
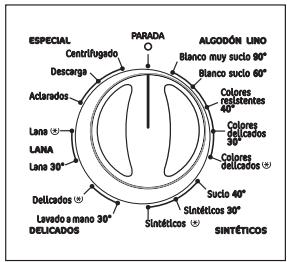
The selector dial can be turned either clockwise or counter-clockwise.
Use this selector dial to select the required programme.
At the end of each programme the selector dial must be turned to position "O", to switch off the machine.
ATTENTION!
If the programme selector dial is turned to another position (programme) when the machine is working, the lights of the programme progress display start to flash. The machine will not perform the new selected programme, but it will continue running on the same cycle.
REMEMBER!
In the event a wrong programme has been selected and the machine is already working, proceed as follows:
- Turn the programme selector dial to position "O".
- Select the new required programme.
- If the machine has not already gone through the rinse cycle, when you decide to change the running programme, in the new programme the water and the detergent from the previous cycle will be re-used, making it an energy-saving tool. On the other hand, if it is already in the rinse phase; detergent, bleach,... must be re-measured.
- Press INICIO / PAUSA button, to start the new cycle.
i Washing hints
Sorting the laundry
Follow the wash code symbols on each garment label and the manufacturer's washing instructions. Sort the laundry as follows: whites, coloureds, synthetics, delicates, woollens.
Temperatures
90° for normally soiled white cottons and linen (e.g. tea cloths, towels, tablecloths, sheets...)
60^ for normally soiled, colour fast garments (e.g. shirts, night dresses, pyjamas....) in linen, cotton or synthetic fibres and for lightly soiled white cotton (e.g. underwear).
- (cold) for delicate items (e.g. net curtains), mixed 30^ - 40^ laundry including synthetic fibres and woollens.
Before loading the laundry
Never wash whites and coloureds together. Whites may lose their "whiteness" in the wash.
New coloured items may run in the first wash; they should therefore be washed separately the first time.
Make sure that no metal objects are left in the laundry (e.g. hair clips, safety pins, pins).
Button up pillowcases, close zip fasteners, hooks and poppers. Tie any belts or long tapes.
Remove difficult stains before washing. Rub particularly soiled areas with a special detergent or detergent paste.
Treat curtains with special care. Remove hooks or tie them up in a bag or net.
Maximum loads
Recommended loads are indicated in the programme charts.
General rules:
Cotton, linen: drum full but not too tightly packed;
Synthetics: drum no more than half full;
Delicate fabrics and woollens: drum no more than one third full.
Washing a maximum load makes the most efficient use of water and energy.
For heavily soiled laundry, reduce the load size.
Laundry weights
| The following weights are indicative: | |
| bathrobe | 1200 g |
| napkin | 100 g |
| quilt cover | 700 g |
| sheet | 500 g |
| pillow case | 200 g |
| tablecloth | 250 g |
| towelling towel | 200 g |
| tea cloth | 100 g |
| night dress | 200 g |
| ladies' briefs | 100 g |
| man's work shirt | 600 g |
| man's shirt | 200 g |
| man's pyjamas | 500 g |
| blouse | 100 g |
| men's underpants | 100 g |
Removing stains
Stubborn stains may not be removed by just water and detergent. It is therefore advisable to treat them prior to washing.
Blood: treat fresh stains with cold water. For dried stains, soak overnight in water with a special detergent then rub in the soap and water.
Oil based paint: moisten with benzine stain remover, lay the garment on a soft cloth and dab the stain; treat several times.
Dried grease stains: moisten with turpentine, lay the garment on a soft surface and dab the stain with the fingertips and a cotton cloth.
Rust: oxalic acid dissolved in hot water or a rust removing product used cold. Be careful with rust stains which are not recent since the cellulose structure will already have been damaged and the fabric tends to hole.
Mould stains: treat with bleach, rinse well (whites and fast coloureds only).
Grass: soap lightly and treat with bleach (whites and fast coloureds only).
Glue: moisten with acetone (^*) , lay the garment on a soft cloth and dab the stain.
Lipstick: moisten with acetone as above, then treat stains with methylated spirits. Remove any residual marks from white fabrics with bleach.
Red wine: soak in water and detergent, rinse and treat with acetic or citric acid, then rinse. Treat any residual marks with bleach.
Ink: depending on the type of ink, moisten the fabric first with acetone (^*) , then with acetic acid; treat any residual marks on white fabrics with bleach and then rinse thoroughly.
Tar stains: first treat with stain remover, methylated spirits or benzine, then rub with detergent paste.
(^*) do not use acetone on artificial silk.
Detergents and additives
Good washing results also depend on the choice of detergent and use of the correct quantities to avoid waste and protect the environment. Although biodegradable, detergents contain substances which, in large quantities, can upset the delicate balance of nature.
The choice of detergent will depend on the type of fabric (delicates, woollens, cottons, etc.), the colour, washing temperature and degree of soiling.
All commonly available washing machine detergents may be used in this appliance:
powder detergents for all types of fabric,
powder detergents for delicate fabrics (60°C max) and woollens,
- liquid detergents, preferably for low temperature wash programmes (60°C max) for all types of fabric, or special for woollens only.
The detergent and any additives must be placed in the appropriate compartments of the dispenser drawer before starting the wash programme.
If using concentrated powder or liquid detergents, a programme without prewash must be selected.
The washing machine incorporates a recirculation system which allows an optimal use of the concentrated detergent.
Pour liquid detergent into the dispenser drawer compartment marked l just before starting the programme.
Any fabric softener or starching additives must be poured into the compartment marked 念 before starting the wash programme.
The bleaching agent (chlorine) can be used only for white or fast coloured cotton and linen items. Pour it into the compartment marked .
Follow the product manufacturer's recommendations on quantities to use and do not exceed the «MAX» mark in the detergent dispenser drawer.
Quantity of detergent to be used
The type and quantity of detergent will depend on the type of fabric, load size, degree of soiling and hardness of the water used.
Water hardness is classified in so-called "degrees" of hardness. Information on hardness of the water in your area can be obtained from the relevant water supply company, or from your local authority.
Follow the product manufacturer's instructions on quantities to use.
Use less detergent if:
you are washing a small load,
- the laundry is lightly soiled,
- large amounts of foam form during washing.
Degrees of water hardness
| Level | Characteristic | Degrees | |
| German °dH | French °T.H. | ||
| 1 | soft | 0-7 | 0-15 |
| 2 | medium | 8-14 | 16-25 |
| 3 | hard | 15-21 | 26-37 |
| 4 | very hard | more than 21 | more than 37 |
i International wash code symbols
These symbols appear on fabric labels, in order to help you choose the best way to treat your laundry.
| Energetic wash Delicate wash | 95 Max. wash temperature 95℃ | 60 Max. wash temperature 60℃ | 40 Max. wash temperature 40℃ | 30 Max. wash temperature 30℃ | Hand wash | Do not wash at all |
| 60 | 40 | 40 |
| Bleaching | Cl Bleach in cold water | Do not bleach |
| Ironing | Hot iron max 200°C | Warm iron max 150°C | Lukewarm iron max 110°C | Do not iron |
| Dry cleaning | A Dry cleaning in all solvents | P Dry cleaning in perchlorethylene, petrol, pure alcohol, R 111 & R 113 | F Dry cleaning in petrol, pure alcohol and R 113 | X Do not dry clean |
| Drying | Flat | On the line | On clothes hanger | Tumble dry | Do not tumble dry |

Operating sequence
Before washing your first load of laundry, we recommend that you run a cotton cycle at 60^ C, with the machine empty, in order to remove any manufacturing residue from the drum and tub. Pour half of the normal amount of detergent into the main wash compartment and start up the machine.
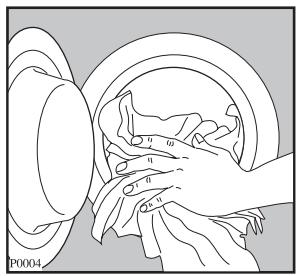
1. Place the laundry in the drum
Open the door by pulling the handle outwards. Place the laundry in the drum, one item at a time, shaking them out as much as possible. Close the door.
2. Measure the detergent
Pull out the dispenser drawer until it stops.
Measure the required amount of detergent, pour it into the main wash compartment and into the compartment marked U (if U PRE-WASH option has been chosen).
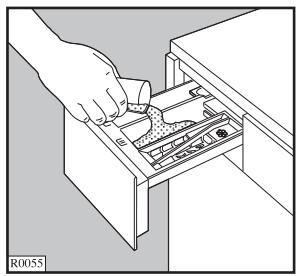
3. Measure the fabric softener and/or bleach
If required, pour fabric softener into the compartment marked 品 and bleach into the compartment
marked (the amount used must not exceed the "MAX" mark in the drawer).
Close the drawer gently.
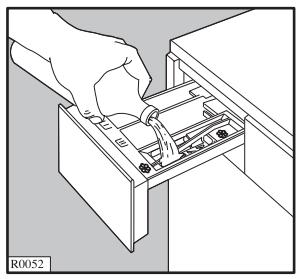
4. Select the required programme
Turn the programme selector to the required programme.
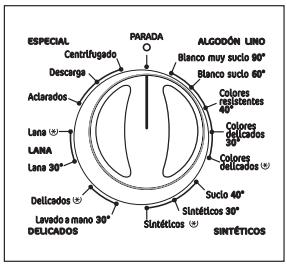
5. Select the required option push button/s
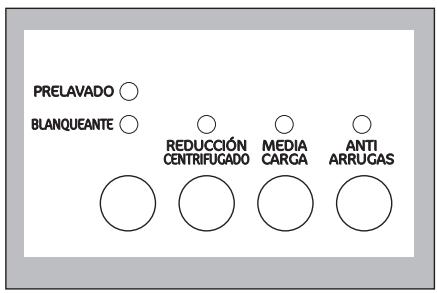
6. Start the machine
Before starting the machine check that:
- the appliance is plugged in.
- the water supply tap is turned on.
- the drain hose is correctly and securely positioned.
- the door and the detergent dispenser drawer are closed.
To start the selected programme, push
INICIO / PAUSA button; the corresponding light will stop flashing and will remain lit until the end of the programme.
7. Modification of a running washing programme
Once the programme has started, it only can be modified by turning the programme selector dial to "O" and afterwards the new programme can be chosen.
The washing water remains in the tub, provided that the machine does not reach the rinse phase, since, in this case, the machine drains it automatically.
Start the new programme by pressing INICIO / PAUSA button.
8. Interrupting a programme
Depress INICIO / PAUSA button to interrupt a running programme, the corresponding light will begin flashing. Press this button again to re-start the programme.
9. Opening the door after the programme has started
Firstly, stop the machine by pressing INICIO / PAUSA button.
After about two or three minutes the door can be opened.
If the door does not open, this means that the temperature of the water is too high, that the water level exceeds the lower limit of the door (which could cause overflowing) or that the drum is spinning.
If the door cannot be opened but you need to open it, switch the machine off by turning the selector dial to "O". After approximately two or three minutes the door can be opened. (PAY ATTENTION TO THE WATER LEVEL AND TEMPERATURE!)
10. At the end of the programme
The machine stops automatically.
Release of the lock is indicated when FIN light comes on and PUERTA light comes off.
Turn the programme selector dial to position "O" to switch the machine off.
Remove the laundry from the drum and carefully check that the drum is empty.
If you do not intend to put in another wash, turn off the water tap. Leave the door open to prevent from forming mildew and unpleasant smells.
ATTENTION!
If the ANTIARRUGAS option has been selected, the lights FIN and PUERTA are on to indicate that the water must be emptied out before opening the door. To drain the water, carry out the following steps:
- Turn the programme selector dial to "O".
- Select DESCARGA (DRAIN) or CENTRIFUGADO (SPIN) programme.
- Press INICIO / PAUSA button.
Programme table
Washing programmes for cotton and linen
| Programme selector dial position | Washing programme | Stains and type of fabric | Description | Possible option | Load |
| Blanco muy sucio 90° | BLANCOS | For heavily soiled cotton items. | Wash at 90°C 3 rinses Spin | Prelavado o blanqueante Reducción de centrifugado Media cargo Antiarrugas (*) | 5 kg |
| Blanco sucio 60° | AHORRO ENERGÍA (**) | White cotton, for example moderately soiled work garments, sheets, household linen, underwear, towels. | Wash at 60°C 3 rinses Spin | Prelavado o blanqueante Reducción de centrifugado Media cargo Antiarrugas (*) | 5 kg |
| Colores resistentes 40° | COLORES RESISTENTES | Fast coloured cotton or linen fabrics, moderately soiled, shirts, blouses, underwear. | Wash at 40°C 3 rinses Spin | Prelavado o blanqueante Reducción de centrifugado Media cargo Antiarrugas (*) | 5 kg |
| Colores delicados 30° | CUIDA LOS COLORES | Non fast coloured cotton or linen fabrics, moderately soiled, shirts, blouses, underwear. | Wash at 30°C 3 rinses Spin | Prelavado o blanqueante Reducción de centrifugado Media cargo Antiarrugas (*) | 5 kg |
| Colores delicados (*) | ALGODON EN FRÍO | For slightly soiled cotton fabrics. | Cold wash 3 rinses Spin | Prelavado o blanqueante Reducción de centrifugado Media cargo Antiarrugas (*) | 5 kg |
| O | PARADA | To cancel the running wash programme and to switch the machine off. | - |
() When this option is selected, the last rinse water does not drain to avoid wrinkling in the fabrics. To drain the water select CENTRIFUGADO (SPIN) or DESCARGA (DRAIN) programme.
(^*) In compliance with EC directive 92/75, the consumption figures indicated on the energy label refer to the 60^ C wash programme for cotton (programme Blanco sucio 60^ ) with a wash load of 5 Kg.
Programme table
Washing programmes for synthetics, mixed fabrics, delicates, wool
| Programme selector dial position | Washing programme | Stains and type of fabric | Description | Possible option | Load |
| Sucio 40° | PLANCHADO FÁCIL | Special programme for synthetic fabrics, which makes ironing easier. | Wash at 40°C 4 rinses Spin impulse | Prelavado Reducción de centroidrogado Antiarrugas (*) Media cargo | 2 kg |
| Sintéticos 30° | CARGA MIXTA | Synthetic or mixed fabrics, underwear, coloured garments, perma-press shirts, blouses. | Wash at 30°C 3 rinses Short spin | Prelavado Reducción de centroidrogado Antiarrugas (*) Media cargo | 2 kg |
| Sintéticos (*) | SINTÉTICO EN FRÍO | Slightly soiled delicate synthetic fabrics. | Cold wash 3 rinses Short spin | Prelavado Reducción de centroidrogado Antiarrugas (*) Media cargo | 2 kg |
| Lavado a mano 30° | LAVADO A MANO | Especially delicate fabrics. | Wash at 30°C 3 rinses Short spin | Reducción de centroidrogado Antiarrugas (*) Media cargo | 1 kg |
| Delicados (*) | DELICADOS EN FRÍO | Delicate fabrics, such as curtains. | Cold wash 3 rinses Short spin | Prelavado Reducción de centroidrogado Antiarrugas (*) Media cargo | 2 kg |
| Lana 30- (*) | LANA | Use this wash cycle to wash Woolmark garments according to the instructions on the garments label and following the instructions booklet provided by the manufacturer of this machine (M9604). | Cold wash or wash at 30°C (depending on the selected position) 3 rinses Short spin | Reducción de centroidrogado Antiarrugas (*) Media cargo | 1 kg |
| O | PARADA | To cancel the running wash programme and to switch the machine off. | - |
(*) When this option is selected, the last rinse water does not drain to avoid wrinkling in the fabrics. To drain the water select CENTRIFUGADO (SPIN) or DESCARGA (DRAIN) programme.
Programme table
Special washing programmes
| Programme selector dial position | Washing programme | Stains and type of fabric | Description | Possible option | Load |
| Aclarados | ACLARADOS | With this programme it is possible to rinse and spin garments which have been washed by hand. The machine performs 3 rinses, and it finishes with a short spin. | 3 rinses Short spin | Reducción de centrifugado Antiarrugas (*) | 5 kg |
| Centrifugado | CENTRIFUGADO | This programme can be used to perform a short spin: for garments washed by hand, for example: to wring them out, before hanging them up. This programme can be used to drain and spin, too, when ANTIARRUGAS option has been selected. | Short spin | Reducción de centrifugado | 5 kg |
| Descarga | DESCARGA | To drain the water from the last rinse in programmes with ANTIARRUGAS option selected. | Water drain | 5 kg | |
| O | PARADA | To cancel the running wash programme and to switch the machine off. | - |
(*) When this option is selected, the last rinse water does not drain to avoid wrinkling in the fabrics. To drain the water select CENTRIFUGADO (SPIN) or DESCARGA (DRAIN) programme.
Maintenance
1. Bodywork
Clean the outside of the machine with warm water and a neutral, non-abrasive household detergent. Rinse with clean water and dry with a soft cloth.
Important: do not use methylated spirits, solvents or similar products to clean the bodywork.
2. Detergent dispenser drawer
After a while, detergents and fabric softeners leave deposits in the drawer.
Clean the drawer from time to time by rinsing it under a running tap. To remove the drawer from the machine, press the button in the rear left-hand corner.
To facilitate cleaning, the top part of the additive compartments can be removed.
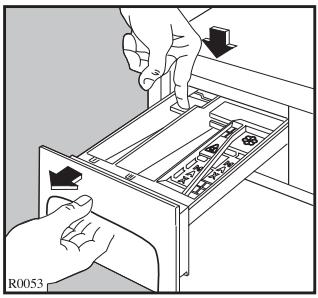
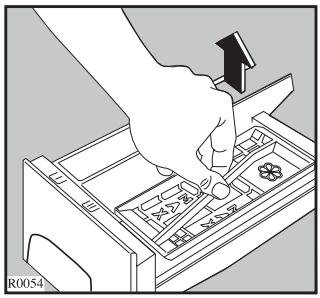
Detergent can also accumulate inside the drawer recess: clean it with an old toothbrush. Refit the drawer after cleaning.
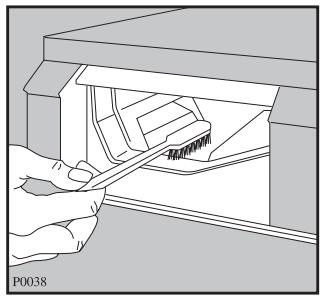
3. Cleaning of the drainage area
The drainage area must be cleaned if the pump has been blocked with objects such as buttons, safety pins, coins, etc., or if lint has built up because clothes that generate lint have been washed at high temperatures.
- Pull out the plug from the power socket.
- If necessary, wait until the water has cooled down.
- Open the drainage area door.
- Place a bowl to collect the water.
- Turn slowly the lid of the diaphragm towards left side and allow that the water of the washing machine goes flowing slowly to the bowl.
- When the bowl is full, turn and close the lid of the diaphragm.
- Empty the bowl. Repeat the procedure until you have completely emptied the washing machine.
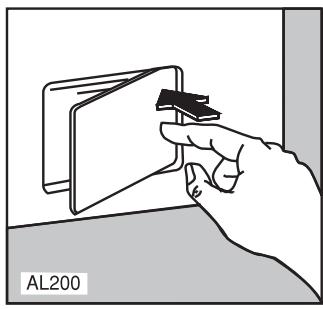
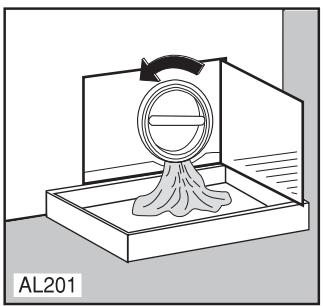
- To continue, unscrew the lid of the diaphragm by turning it counter clockwise and pull it out.
- Always keep a rag nearby to dry up spillage of water when removing the cover.
- Remove the objects such as buttons, coins and the lint that has been accumulated in the area of the pump impeller by rotating it.
- Screw the lid of the diaphragm clockwise, be sure is completely tighten.
- Close the drainage area door.
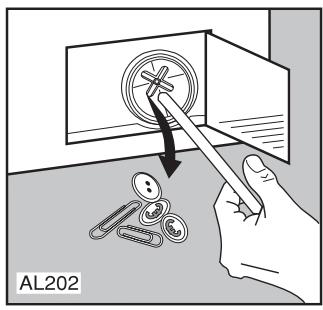

4. The water inlet hose filter
If your water is very hard or contains traces of lime deposit, the water inlet filter may become clogged. It is therefore a good idea to clean it from time to time.
Turn off the water tap. Unscrew the water inlet hose.
Clean the filter using a hard bristle brush.
Tighten up the inlet hose.
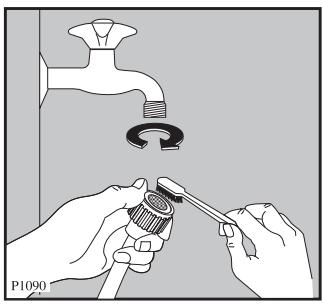
5. Emergency emptying out
If the water is not discharged (outlet pump is blocked, filter or drain hose are clogged), proceed as follows to empty out the machine:
- pull out the plug from the power socket;
close the water tap; - if necessary, wait until the water has cooled down;
- open the drainage area door;
- place a bowl to collect the water;
- release the emergency emptying hose, place it in the bowl and remove its cap, when the bowl is full put the cap back on the emergency emptying hose;
- empty the bowl, repeat the procedure until you have completely emptied the washing machine;
- replace the emergency emptying hose in its initial position and close the drainage area door.
6. Frost precautions
If the machine is installed in a place where the temperature could drop below 0^ , proceed as follows:
- disconnect the appliance;
close the water tap; - if necessary, wait until the water has cooled down;
- open the drainage area door;
- place a bowl to collect the water that will flow out;
- release the emergency emptying hose, place it in the bowl and remove its cap;
- when the water stops flowing out, put the cap back on the emergency emptying hose, replace the emergency emptying hose in its initial position and close the drainage area door.
By doing this, any water remaining in the machine is removed, avoiding the formation of ice and, consequently, breakage of the affected parts.
When you use the machine again, make sure that the ambient temperature is above 0^ .
Something not working?
Certain problems are due to lack of simple maintenance or oversights, which can be solved easily without calling technical service. Before contacting your local Service Force Centre, please check the following possible problems listed below.
During machine operation it is possible that FIN light flashes to indicate that something is not working correctly.
- 4 flashes = door open.
- 2 flashes = the water is not drained.
- 1 flash = there is no water filling.
Once the problem has been eliminated, press INICIO / PAUSA button to restart the programme. If after all checks, the problem persists, contact your local Service Centre.
Problems which can be resolved without a technician's help.
| Problems | Possible cause |
| - The machine does not start up: | ·The door has not been closed. ·The plug is not properly inserted in the power socket. ·There is no power in the socket. ·The main fuse or the fuse in the plug has blown. ·The programme selector dial is not correctly positioned and INICIO / PAUSA button has not been pressed. |
| - The machine does not fill: | ·The water tap is off. ·The filter in the inlet hose is blocked. ·The inlet hose may be squashed or kinked. ·The door has not been closed. |
| - The machine fills then empties immediately: | ·The end of the drain hose is lower than the machine. ·The end of the drain hose is submerged in water. ·There is no air circulation in the installation, between the machine drain hose and the one in the house. |
| - The machine does not drain and / or does not spin: | ·The drain hose may be squashed or kinked. ·ANTIARRUGAS option has been selected. ·The drain pump may be blocked. ·The drain hose extension is not correct. Follow the instructions to connect it to the drain. ·The drainage system pipes are blocked. ·The laundry load is off balance: redistribute the garments in the drum to allow the machine to spin. |
| - There is water on the floor: | ·There is too much detergent or an inappropriate detergent has been used (it makes too much foam). ·Check whether there are any leaks from one of the inlet hose fittings. It is not always easy to see this as the water runs down the hose; check to see if it is damp. ·The drain hose may be damaged or is not securely positioned to prevent leaks. ·The detergent dispenser drawer is clogged. ·The drainage system pipes are blocked. |
| - Unsatisfactory washing results: | ·Little detergent or an inappropriate one has been used. An insufficient amount of detergent leaves the laundry looking grey. ·Stubborn stains have not been treated prior to washing. ·The correct wash programme has not been selected. ·Too much laundry has been placed in the drum. |
| - The machine vibrates when spinning: | ·The transit bolts and packaging have not been removed. ·The machine is in contact with the wall or furniture. ·The machine is not level and stable (check diagonally). ·The laundry is not well distributed in the drum. ·There may not be enough laundry in the drum. |
| - The door does not open:: | ·The programme is still running. ·The door lock has not released yet (the PUERTA light is still on). ·Water in the tub: if there is water in the tub, the door cannot be opened (ANTIARRUGAS option selected). |
| - Spinning starts late or the machine does not spin: | ·The electronic off balance detection device has interrupted the spin because the laundry is not evenly distributed in the drum. The laundry is redistributed by reverse rotation of the drum. This may happen several times before the off balance disappears and normal spinning can resume. If, after 10 minutes, the laundry is still not evenly distributed in the drum, the machine will not spin. In this case, redistribute the load manually and re-select the spin programme. |
| - The machine makes an unusual noise: | ·The machine is fitted with a type of motor which makes an unusual noise compared to other traditional motors. This new motor ensures a smoother starting and an even distribution of the laundry in the drum when the machine is spinning. At the same time it increases the appliance stability. |
| - No water is visible in the drum: | ·Appliances using modern technology are energy efficient. They use very little water without affecting washing results. |
If you are unable to identify or solve the problem, contact our service centre. Before telephoning, make a note of the model, serial number and purchase date of your machine: the Service Centre will require this information.
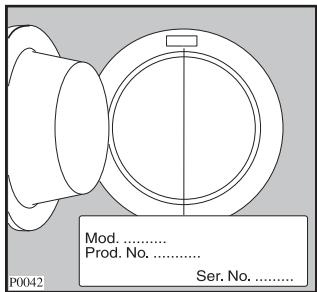
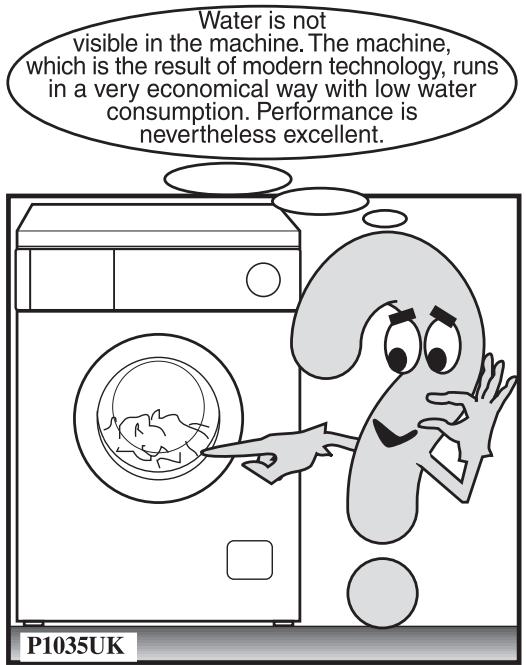
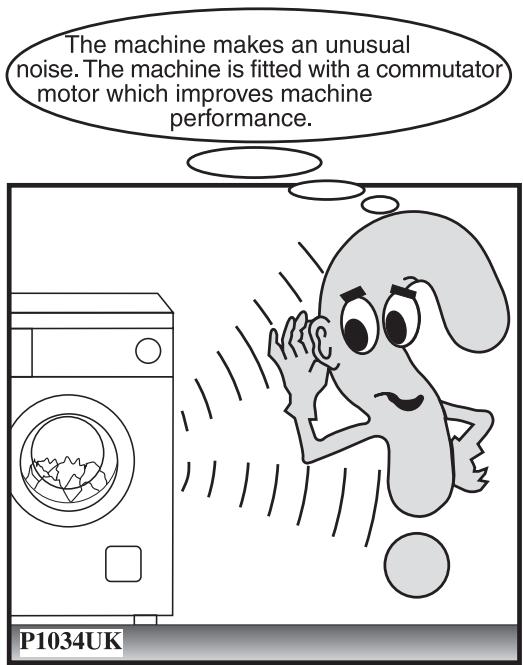
- Corbero
- Lavadoras automaticas Washing machines
- LC1090E
- Estimado cliente,
- Danos de transporte
- Advertencias y consejos 4-5
- Eliminación 5
- Consejos para la proteccion del ambiente 5
- 6
- Instalación 7-8
- Sureshuevalavadora 9
- Descripción del aparato 9
- Uso 10-11
- Mantenimiento 20
- Anomalías de funciona 22-24
- Instalación
- Uso
- Seguidad en general
- Seguidad para los niños
- Eliminación
- Materiales de embalaje
- Aparato
- Consejos para la proteccion del ambiente
- Instrucciones de instalación
- Característicatsécnicas
- Dispositivos de seguridad para el transporte
- Conexión hidráulica
- Nivelación
- Conexión electrica
- Su nuevo lavadora
- Descripción del aparato
- Cubeta del detergente
- Panel de mandos
- Cubeta del detergente
- Teclas de option de programa
- Tecla PRELAVADO o BLANQUEANTE
- Tecla REDUCCION DE CENTRIFUGADO
- Tecla MEDIA CARGA
- Tecla ANTIARRUGAS
- Tecla INICIO / PAUSA
- Indicador de las fases del programa
- Mando selector del programa
- ATENCLON!
- RECUERDE!
- i Consejos para el lavado
- Selección de las prendas
- Temperatas
- Antes de cargar la ropa
- Carga maxima de ropa
- Pesos de la ropa
- Eliminación de las manchas
- Detergentes y aditivos
- Cantidad de detergente a usar
- Símbolos internzonales para el tratimiento de los tejidos
- Secuencia de las operaciones
- Introduzca la ropa
- Dosifique el detergente
- Dosifique el suavizante y/o el blanqueador
- Seleccione el programa deseado
- Seleccion la/s tecla/s de option deseada/s
- Ponga en marcha la lavadora
- Modificación de un programa de lavado en bajo - la水中 - el suelo - el gólico - el gólico y el gólico - el gólico y el gólico - el gólico y el gólico - el gólico y el gólico - el gólico y el gólico - el gólico y el gólico - el gólico y el gólico - el gólico y el gólico - el gólico y el gólico - el gólico y thegolov
- Interruption de un programa
- Apertura de la puerta cuando de que el programa haya empezado
- Al final del programa
- Ficha programs
- Mantenimiento
- Exterior del aparato
- Cubeta detergente
- Limpieza de la zona de descarga
- Filtro de carga
- Vaciado de emergencia
- Precauciones contra el hielo
- Anomalías de funcionaarto
- Dear customer,
- Transport damages
- Contents
- Installation
- Use
- General safety
- Child safety
- Disposal
- Packaging materials
- Machine
- Tips for environmental protection
- Installation instructions
- Transit security bars
- Hydraulic connection
- Levelling
- Electrical connections
- Your new washing machine
- Description of the appliance
- Detergent dispenser drawer
- Control panel
- Detergent dispenser drawer
- Programme option buttons
- PRELAVADO OR BLANQUEANTE button
- REDUCCION CENTRIFUGADO button
- MEDIA CARGA button
- ANTIARRUGAS button
- INICIO / PAUSA button
- Programme progress display
- Programme selector dial
- ATTENTION!
- REMEMBER!
- i Washing hints
- Sorting the laundry
- Temperatures
- Before loading the laundry
- Maximum loads
- Laundry weights
- Removing stains
- Detergents and additives
- Quantity of detergent to be used
- i International wash code symbols
- Operating sequence
- Place the laundry in the drum
- Measure the detergent
- Measure the fabric softener and/or bleach
- Select the required programme
- Select the required option push button/s
- Start the machine
- Modification of a running washing programme
- Interrupting a programme
- Opening the door after the programme has started
- At the end of the programme
- Programme table
- Maintenance
- Bodywork
- Detergent dispenser drawer
- Cleaning of the drainage area
- The water inlet hose filter
- Emergency emptying out
- Frost precautions
- Something not working?
Marque : CORBERO
Modèle : LC1090E
Catégorie : Machine à laver