
6700-C - Nettoyeur de tapis BISSELL - Notice d'utilisation et mode d'emploi gratuit
Retrouvez gratuitement la notice de l'appareil 6700-C BISSELL au format PDF.

| Type de produit | Aspirateur traîneau à cylindre |
| Marque | BISSELL |
| Modèle | 6700-C (Butler Revolution™) |
| Alimentation | Secteur, 120 V, 60 Hz |
| Longueur du cordon | Environ 6 m avec rembobinage automatique |
| Dimensions (approx.) | 30 x 20 x 30 cm |
| Poids (approx.) | 4,5 kg |
| Moteur | Puissant et silencieux |
| Système de filtration | Triple filtration, filtre pré-moteur et post-moteur |
| Capacité du sac | Sac à poussière jetable avec indicateur de remplissage |
| Fonctions | Nettoyage multi-surfaces, sélecteur sol/moquette, aspiration puissante |
| Accessoires inclus | Brosse à dépoussiérer, suceur sol/moquette, rallonge télescopique, tuyau, clip porte-outil |
| Entretien | Remplacement du sac, nettoyage ou remplacement des filtres |
| Sécurité | Fiche polarisée, arrêt automatique en cas de surchauffe, ne pas utiliser sur sol mouillé |
| Garantie | 1 an (pièces et main-d'œuvre) |
| Pièces détachées disponibles | Brosse à dépoussiérer (603-2020), suceur (603-2017), tuyau (603-2018), rallonge (603-2015), clip (603-2019), bac à poussière (603-2016) |
| Utilisation prévue | Domestique, surfaces sèches intérieures |
| Pays de fabrication | Corée |
| Service client | 1-800-263-2535, www.bissell.com |
| Référence de la notice | Part Number 603-5846 |
FOIRE AUX QUESTIONS - 6700-C BISSELL
Questions des utilisateurs sur 6700-C BISSELL
0 question sur cet appareil. Repondez a celles que vous connaissez ou posez la votre.
Poser une nouvelle question sur cet appareil
Téléchargez la notice de votre Nettoyeur de tapis au format PDF gratuitement ! Retrouvez votre notice 6700-C - BISSELL et reprennez votre appareil électronique en main. Sur cette page sont publiés tous les documents nécessaires à l'utilisation de votre appareil 6700-C de la marque BISSELL.
MODE D'EMPLOI 6700-C BISSELL
Model 6700-C
■ Assembly
■ Operation
■ Maintenance
■ Troubleshooting
Thanks for buying a BISSELL Compact Canister Vacuum.
We're glad you purchased a BISSELL Butler Revolution™ Compact Canister Vacuum Cleaner. Everything we know about floor care went into the design and construction of this powerful, high-tech home vacuuming system.
Your Butler Revolution™ is well made, and we back it with a comprehensive one-year warranty. We also stand behind it with a knowledgeable, dedicated Customer Service department, so, should you ever have a problem, you'll receive fast, considerate assistance.
My great-grandfather invented the floor sweeper in 1876. Today, BISSELL is a global leader in the design, manufacture, and service of high quality homecare products like your BISSELL Butler Revolution. ™
Thanks again, from all of us at BISSELL.
man 1.7 mmell
Mark J. Bissell
President and Chief Executive Officer
■ Powerful, quiet motor
■ Multi-surface cleaning capabilities
■ Specialized tools for all vacuuming needs
■ Long cord with Automatic Rewind feature
■ Triple Filtration System
IMPORTANT SAFETY INSTRUCTIONS
When using an electrical appliance, basic precautions should be observed, including the following:
Read all instructions before using your canister vacuum cleaner.
WARNING: To reduce the risk of fire, injury or electric shock:
■ Do not leave cleaner when it is plugged in.
■ Unplug from outlet when not in use and before servicing.
■ Do not use with damaged cord or plug.
■ To unplug grasp plug not cord.
- Do not pull or carry by cord, use cord as a handle, close door on cord, pull cord around sharp corners, run cleaner over cord, or expose cord to heated surfaces.
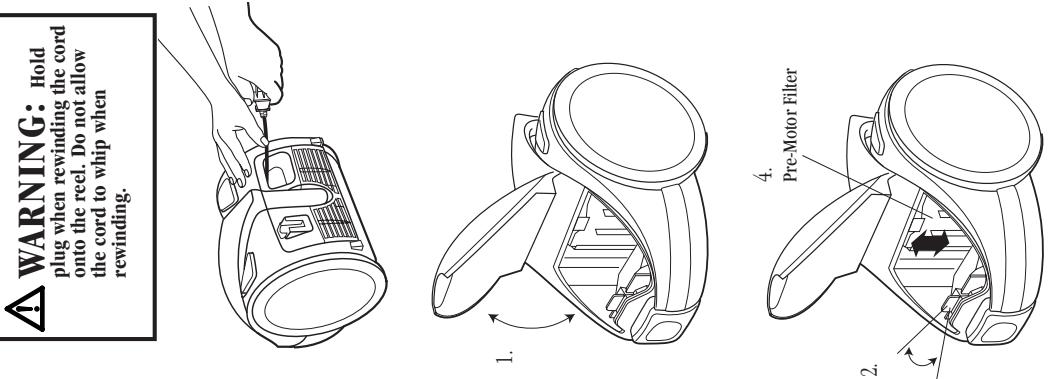
- Hold plug when rewinding the cord onto the reel. Do not allow the plug to whip when rewinding.
- Do not use cleaner if it has been dropped, damaged, left outdoors or dropped into water. Return it to an Authorized Service Centre.
■ Do not allow children to use as a toy.
■ Do not use outdoors or on wet surfaces.
■ Do not handle cleaner or plug with wet hands.
- Do not put any object into openings, use with blocked opening, or restrict air flow.
■ Do not use without dust bag and/or filters in place.
- Do not allow hair, loose clothing, fingers or body parts to get near openings or floor brush in the appliance.
- Do not pick up hot coals, cigarette butts, matches or any hot, smoking, or burning objects.
- Do not pick up hard or sharp objects such as glass, nails, screws, coins, etc.
- Do not pick up flammable or combustible materials (lighter fluid, gasoline, kerosene, etc.) or use in the presence of explosive liquids or vapour.
- Do not pick up toxic material (chlorine bleach, ammonia, drain cleaner, etc.).
- Do not use in an enclosed space filled with vapours given off by oil base paint, paint thinner, some moth proofing substances, flammable dust, or other explosive or toxic vapours.
- Do not use for any purpose other than described in this User's Guide.
■ Always turn off this appliance before connecting or disconnecting vacuum hose. - Use only manufacturer's recommended attachments.
■ Use only on dry, indoor surfaces. - Keep openings free of dust, lint, hair, etc.
- Keep appliance on a level surface.
■ Turn off all controls before plugging or unplugging cleaner.
■ Be extra careful when cleaning stairs.
■ Pay close attention when working around children.
SAVE THESE INSTRUCTIONS
THIS APPLIANCE HAS A POLARIZED PLUG.
To reduce the risk of electric shock, this appliance has a polarized plug (one blade is wider than the other). This plug will fit in a polarized outlet only one way. If the plug does not fit fully in the outlet, reverse the plug. If it still does not fit, contact a qualified electrician to install a proper outlet. Do not change the plug in any way.
This model is for household use only.
How to use this guide
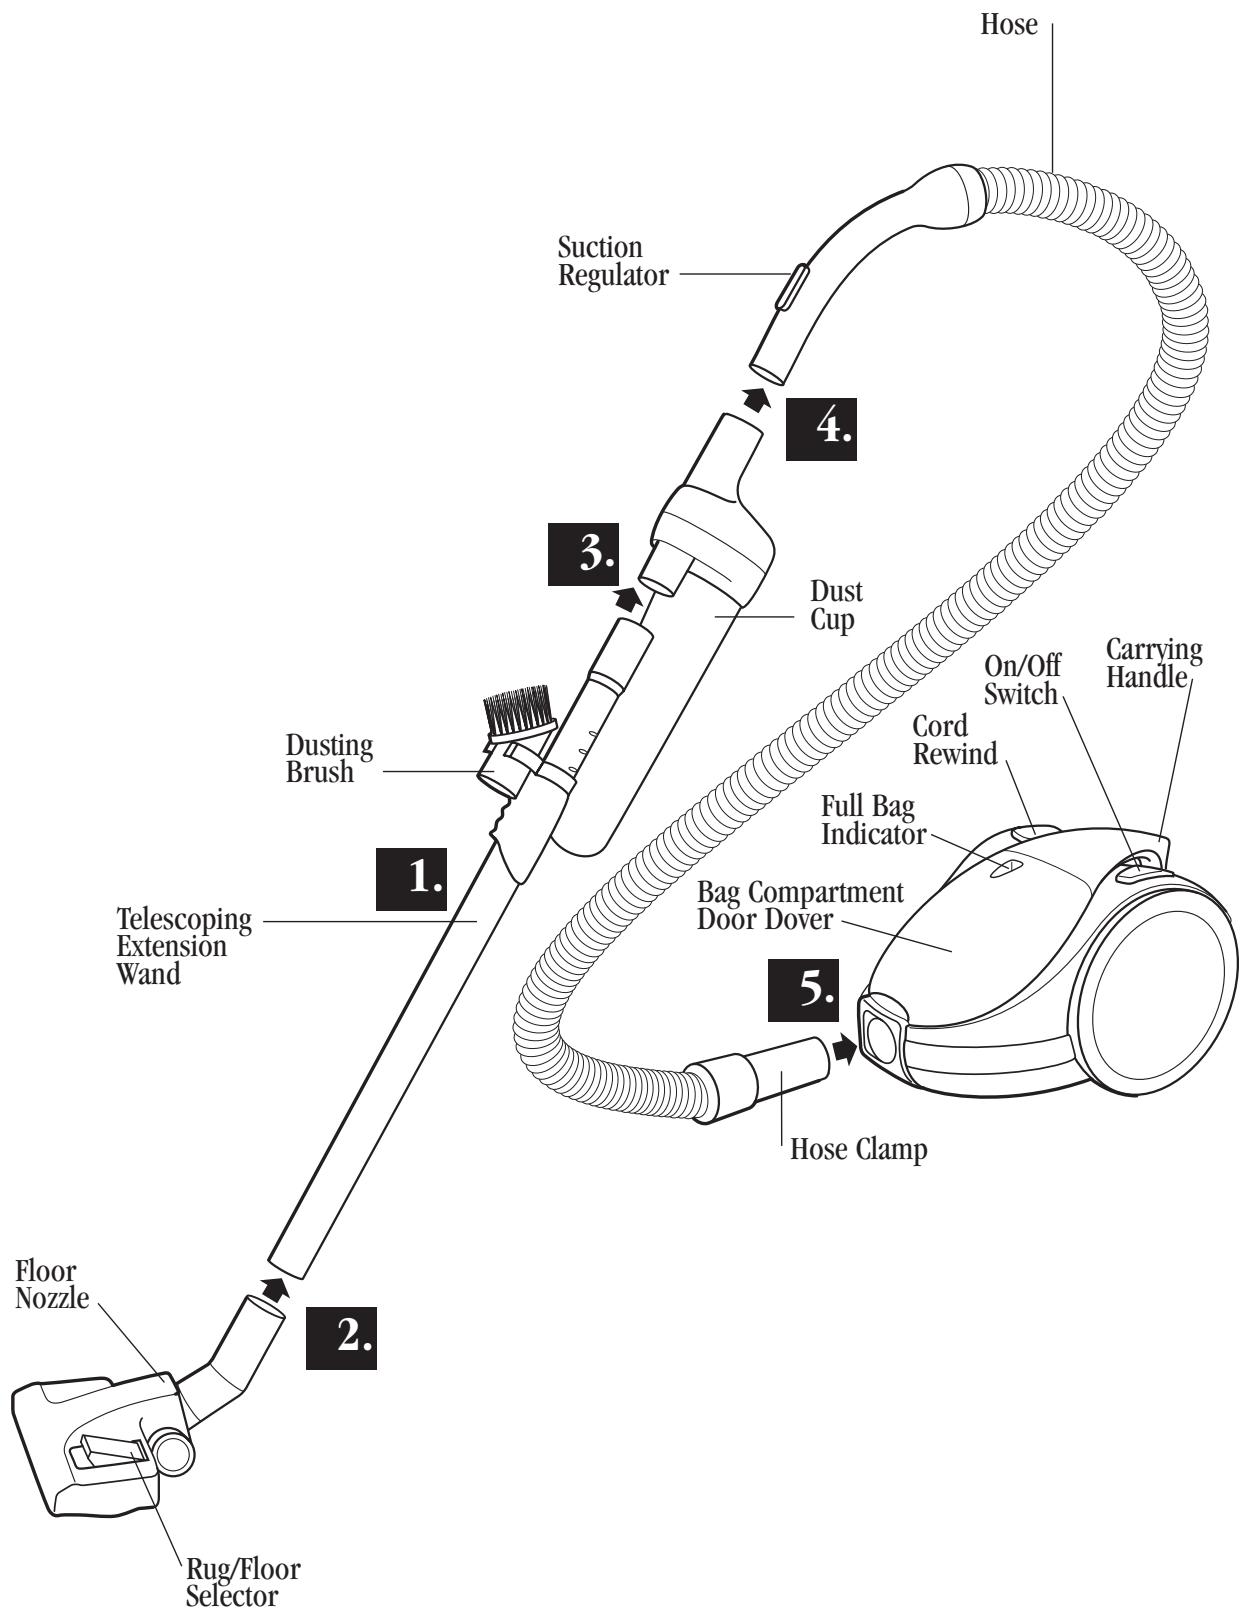
This User's Guide has been designed to help you get the utmost satisfaction from your BISSELL® Butler Revolution. You'll find assembly and operating instructions, safety precautions, as well as maintenance and troubleshooting instructions. Please read this Guide thoroughly before assembling your cleaner.
Pay particular attention to the assembly diagram, assembly instructions, and part names. Locate and organize all parts before assembly. Familiarize yourself with the parts and where they go. Following this User's Guide will greatly enhance your ability to get the most performance from your BISSELL® Butler Revolution for many years.
How to put it together
Assembling the Vacuum Cleaner for Use
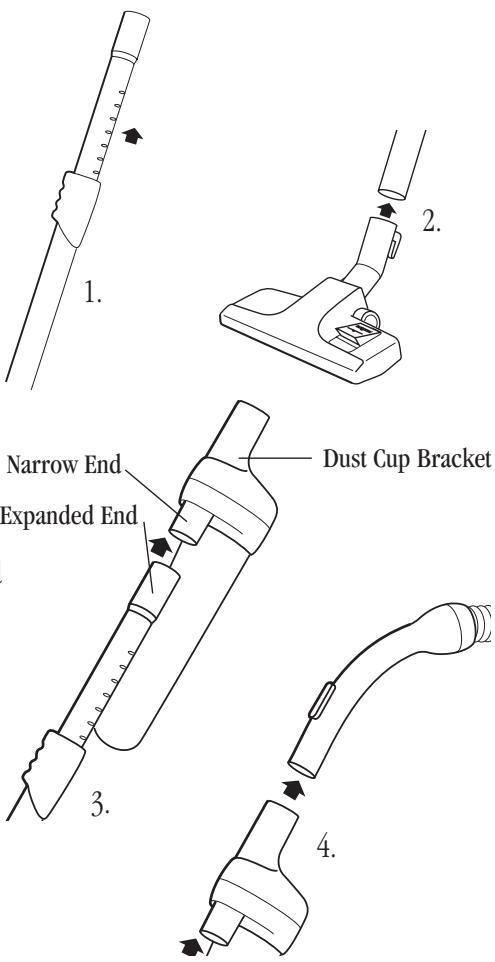
- Pick up the Extension Wand. Place one hand on the black plastic grip. Place the other hand on the expanded end. Pull to extend.
- Slide the narrow end of the Extension Wand into the Floor Nozzle Tube.
- Slide the narrow end of the Dust Cup bracket into the expanded end of the Extension Wand.
- Slide the handle end of the Hose into the large end of the Dust Cup bracket.
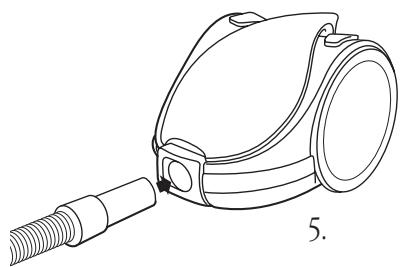
5 Slide the Hose Clamp into the suction inlet of the unit.
Special tools
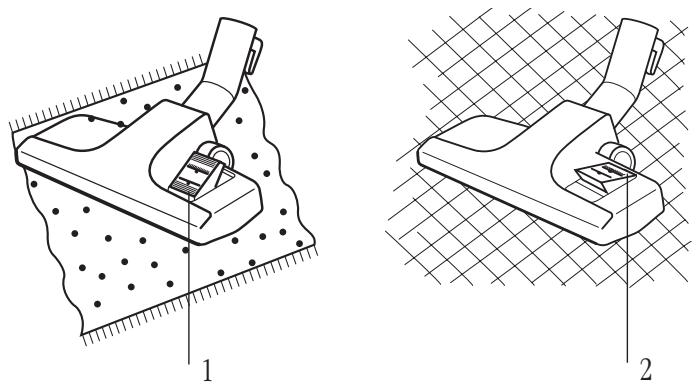
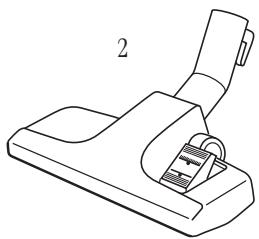
Rug/Floor Selector
Before use, make sure that the position of the select button is in the right position for the type of surface to be cleaned.
Push the side 1 when cleaning the carpets.
Push the side 2 when cleaning the floor, tile, mat, etc.
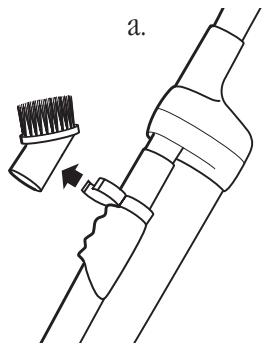
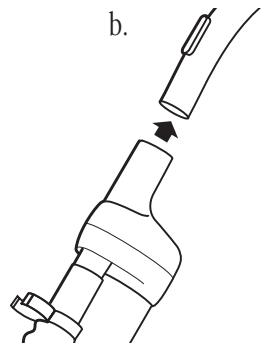
Dusting Brush
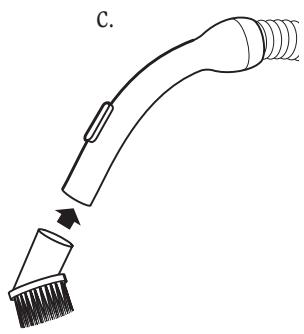
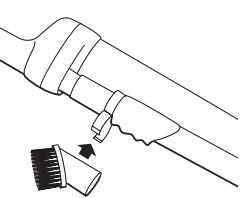
To use the Dusting Brush, remove the handle end of the Hose from the top of the Dust Cup Bracket. Attach Dusting Brush to hose end.
Index
Safety instructions .....2
Product view ....3
How to put it together .....4
Index 5
Using special tools .....5
Operating/Maintenance ....6-7
Troubleshooting .....8
Replacement parts .....9
Warranty 10
Customer Service ....10
Cord Storage
To extend the Power Cord for use, grasp the plug and gently pull out from the vacuum cleaner. When removing the Power Cord from the electrical outlet, switch off the power and grasp the plug. Your cleaner is equipped with an automatic rewind button. When cleaning is finished, switch off power and disconnect the plug from the electrical outlet, then press on the Cord Rewind Button with your hand. The Cord will be rewound automatically.
Full Bag Indicator
You may continue cleaning until the Full Bag Indicator changes into the red colour. This means the dust bag is full and needs to be replaced. If the indicator suddenly works and the cleaner loses suction power while in use, turn your cleaner off and check whether the hose, pipe or nozzle is clogged.
Dust Bag Replacement
NOTE: Hose must be disconnected before changing bag. Replace the dust bag as soon as it is full. 1. To open the Dust Bag Compartment Door, lift the cover upward.
-
Remove the dust bag from the cleaner.
-
Dispose of the full bag and insert the cardboard bag collar of the dust bag as far as it can go on the suction inlet, and press down the locker. Position the dust bag so that no part of the bag is pinched.
-
The Pre-motor inlet Filter is changed by sliding the Filter Bracket upward, and sliding the Filter out/in.
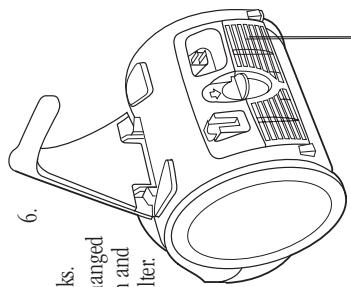
Post-Motor Filter
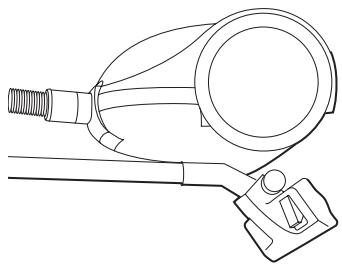
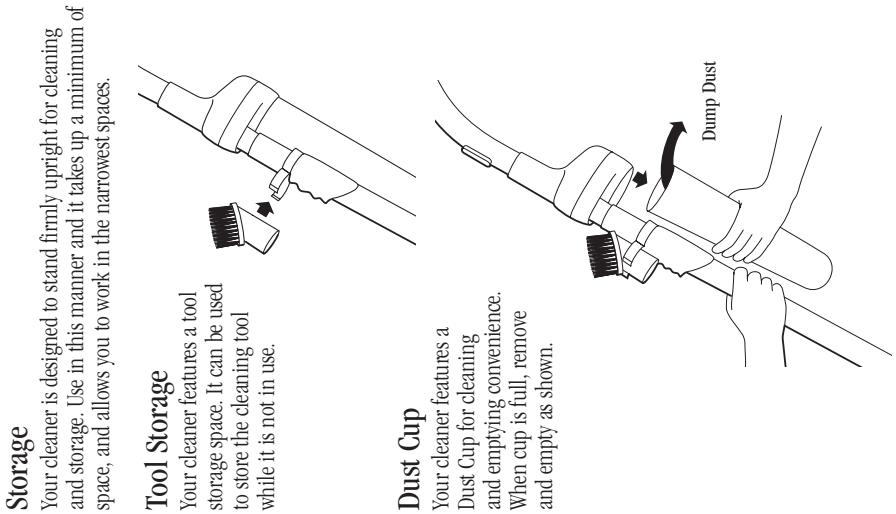
Storage
Your cleaner is des and storage. Use in space, and allows v Tool Storage
Dust Cup
Your cleaner features a
Dust Cup for cleaning
and emptying convenience.
When cup is full, remove
and empty as shown.
[Non-Text]
[Non-Text]
[Non-Text]
[Non-Text]
[Non-Text]
[Non-Text]
[Non-Text]
(No text)
(No text)
The Ground Truth image displays a single, solid horizontal line. According to Rule 2 (UNDERSCORE & LINE RULES), if the GT contains lines used for stylistic emphasis or as background elements (like ruled paper), the OCR result must ignore them. The provided OCR content is "____", which consists of four underscores. This is incorrect because underscores are not equivalent to a solid line and are not permitted under the “Stylistic/Background Lines (Ignore)” rule. Outputting underscores for a stylistic line violates the rule and constitutes an error. Therefore, the OCR result is inconsistent with the Ground Truth.
/
/
/
,
[Non-Text]
[Non-Text]
[Non-Text]
[Non-Text]
[Non-Text]
[Non-Text]
[Non-Text]
[Non-Text]
[Non-Text]
[Non-Text]
[Non-Text]
Troubleshooting
This appliance was inspected thoroughly and was in good operating condition when it was shipped from the factory. If a minor problem occurs, it usually can be solved quite easily when the cause is found. Therefore, this check list is provided for your convenience.

WARNING: To reduce the risk of injury from moving parts and/or electrical shock, turn Power Switch OFF and disconnect polarized plug from electrical outlet before performing troubleshooting checks.
Vacuum cleaner won't run.
| Possible Causes | Remedies |
| Vacuum cleaner is not fully plugged in | Plug in fully and turn switch to ON position |
| No voltage in wall plug | Check fuse or breaker |
Vacuum cleaner won't pick up dirt.
| Possible Causes | Remedies |
| Dust Bag is full | Change Dust Bag |
| Hose, Wands, Dust Cup or Floor Nozzle clogged with a large object | Remove substance |
Replacement parts
Item Part No. Part Name
| 1 | 603-2020 | Dusting Brush |
| 2 | 603-2017 | Floor Nozzle |
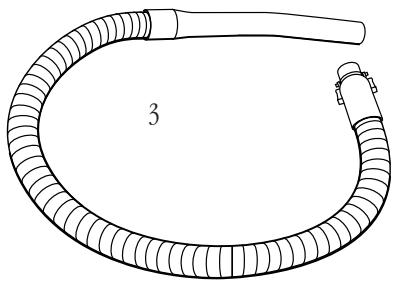
| 3 | 603-2018 | Hose |
| 4 | 603-2015 | Telescoping Extension Wand |
| 5 | 603-2019 | Tool Clip |
| 6 | 603-2016 | Dust Cup |
If suggested solutions for this or any function of the cleaner do not correct the problem, call:
BISSELL Customer Service
1-800-263-2535
Monday - Friday
8:00 A.M. - 4:30 P.M. (E.S.T.)
Or visit our Web Site @ www.bissell.com
Please have your model and part numbers of unit ready.


5

6

About your warranty
One Year Warranty
BISSELL Ltd., or an authorized BISSELL Service Centre will repair or replace, free of charge, any part which is defective or malfunctioning within 1 year of the purchase date, provided that it is used for personal, and not commercial or rental service.
Terms:
- Return the unit and/or part with proof of purchase date, to your dealer, your nearest BISSELL Authorized Service Centre, or return by mail to:
BISSELL Ltd.
6934 Kinsmen Court,
Niagara Falls, Ontario, L2E 6S5
-
Any defective or malfunctioning part will be repaired or replaced and returned postage paid.
-
This warranty does not cover bags, belts, filters or light bulbs. Damages or malfunctions caused by negligence, abuse, or use not in accordance with the User's Guide will not be covered. This warranty does not cover parts of the unit that require replacement under normal use.
For your protection, you should always insure the unit and/or part when shipping or mailing. BISSELL will reimburse you for the parcel post, CanPar or UPS charge. Any charges for packaging or insurance are your responsibility.
Tip: Attach your sales receipt to this user's Guide for future reference.
BISSELL Customer Service
If you need information about repairs or replacement parts, or questions about your warranty, call:
BISSELL Customer Service
1-800-263-2535
Monday - Friday 8 A.M. - 4:30 P.M. (E.S.T.)
Or write:
BISSELL Ltd.
ATTN: Customer Service
Box 1003
Niagara Falls, Ont., L2E 6W2
When contacting BISSELL, have model number of unit available.
Please record your Model Number: ____
Please record your Purchase Date: ____
Note: Please keep your original sales receipt. It is your warranty. It is suggested you staple your original receipt to the front of this guide.

©2000 BISSELL Inc.
BISSELL Ltd.
Niagara Falls, Ont. L2E 6W2
All rights reserved. Printed in Korea
Part Number 603-5846
Visit our Web Site at: www.bissell.com
- MODEL 6700-C
- THANKS FOR BUYING A BISSELL COMPACT CANISTER VACUUM
- IMPORTANT SAFETY INSTRUCTIONS
- WHEN USING AN ELECTRICAL APPLIANCE, BASIC PRECAUTIONS SHOULD BE OBSERVED, INCLUDING THE FOLLOWING
- WARNING: TO REDUCE THE RISK OF FIRE, INJURY OR ELECTRIC SHOCK
- SAVE THESE INSTRUCTIONS
- THIS APPLIANCE HAS A POLARIZED PLUG
- HOW TO USE THIS GUIDE
- HOW TO PUT IT TOGETHER
- ASSEMBLING THE VACUUM CLEANER FOR USE
- SPECIAL TOOLS
- RUG/FLOOR SELECTOR
- DUSTING BRUSH
- INDEX
- CORD STORAGE
- FULL BAG INDICATOR
- DUST BAG REPLACEMENT
- STORAGE
- DUST CUP
- TROUBLESHOOTING
- REPLACEMENT PARTS
- BISSELL CUSTOMER SERVICE
- 1-800-263-2535
- ABOUT YOUR WARRANTY
- ONE YEAR WARRANTY
- TERMS
Marque : BISSELL
Modèle : 6700-C
Catégorie : Nettoyeur de tapis