
K5000W - Synthétiseur KAWAI - Notice d'utilisation et mode d'emploi gratuit
Retrouvez gratuitement la notice de l'appareil K5000W KAWAI au format PDF.
| Type de produit | Synthétiseur workstation avancé (Advanced Additive Workstation) |
| Générateur de son | Additif (synthèse harmonique) + PCM (compatible General MIDI) |
| Polyphonie maximale | 64 voix (32 additifs + 32 PCM) |
| Processeur d'effets | DSP intégré : 4 effets (chorus, delay, distorsion, etc.) + réverbération + égaliseur graphique |
| Séquenceur | 40 pistes MIDI, contrôle de 32 timbres simultanés |
| Générateur de phrases automatique (APG) | Crée des parties musicales à partir d'une piste enregistrée, avec plus de 100 styles |
| Modes de fonctionnement | Performance (Single, Combi, Kit) et Composition (Compose) |
| Mémoire interne | Bancs A (additif, 120 patches max), B (PCM, 128 patches), Combi (64 patches), Kits (B117-B128), GM (128 patches) |
| Stockage | Disquette 3,5″ (format DOS 2DD/2HD), sauvegarde des patches, morceaux et données APG |
| Connectique MIDI | 2 entrées, 2 sorties, 2 thru (ports A et B) |
| Connectique audio | Sorties MAIN L/Mono et R, sorties INDIVIDUAL L/R, prise casque (PHONES) en façade |
| Pédales | Hold (footswitch) et Expression (pédale de volume) |
| Alimentation | 110-120 V (Amérique du Nord) ou 220-240 V (Europe/Asie), 50/60 Hz |
| Sécurité | Conforme FCC classe B, protection contre les chocs électriques, ne pas ouvrir le boîtier |
| Entretien et nettoyage | Débrancher avant nettoyage ; utiliser un chiffon doux légèrement humide, éviter les solvants et nettoyants abrasifs |
| Informations générales | Station de travail complète pour la composition et la performance ; manuel d'utilisation de 166 pages disponible en français |
FOIRE AUX QUESTIONS - K5000W KAWAI
Questions des utilisateurs sur K5000W KAWAI
0 question sur cet appareil. Repondez a celles que vous connaissez ou posez la votre.
Poser une nouvelle question sur cet appareil
Téléchargez la notice de votre Synthétiseur au format PDF gratuitement ! Retrouvez votre notice K5000W - KAWAI et reprennez votre appareil électronique en main. Sur cette page sont publiés tous les documents nécessaires à l'utilisation de votre appareil K5000W de la marque KAWAI.
MODE D'EMPLOI K5000W KAWAI
KAWAI
K5000W
Advanced Additive Workstation
Owner's Manual
FCC INFORMATION
This equipment has been tested and found to comply with the limits for a Class B digital device, pursuant to Part 15 of the FCC Rules. These limits are designed to provide reasonable protection against harmful interference in a residential installation. This equipment generates, uses and can radiate radio frequency energy and, if not installed and used in accordance with the instructions, may cause harmful interference to radio communications. However, there is no guarantee that interference will not occur in a particular installation.
If this equipment does cause harmful interference to radio or television reception, which can be determined by turning the equipment off and on, the user is encouraged to try to correct the interference by one or more of the following measures:
Reorient or relocate the receiving antenna.
Increase the separation between the equipment and receiver.
Connect the equipment into an outlet on a different electrical circuit from ti. receiver.
Consult the dealer or an experienced radio/TV technician for help.
- This instrument complies with the limits for a class B digital apparatus, pursuant to the Radio Interference Regulations, C.R.C., c. 1374.
AVIS : RISQUE DE CHOC ELECTRIQUE - NE PAS OUVRIR.
TO REDUCE THE RISK OF ELECTRIC SHOCK, DO NOT REMOVE COVER (OR BACK). NO USER-SERVICEABLE PARTS INSIDE. REFER SERVICING TO QUALIFIED SERVICE PERSONNEL.

The lighting flash with arrowhead symbol, within an equilateral triangle, is intended to alert the user to the presence of uninsulated "dangerous voltage" within the product's enclosure that may be of sufficient magnitude to constitute a risk of electric shock to persons.

The exclamation point within an equilateral triangle is intended to alert the user to the presence of important operating and maintenance (servicing) instructions in the literature accompanying the product.
CAUTION: TO PREVENT ELECTRIC SHOCK, MATCH WIDE BLADE OF PLUG TO WIDE SLOT, FULLY INSERT.
ATTENTION: POUR EVITER LES CHOCSELECTRIQUES, INTRODUIRE LA LAME LA PLUS LARGE DE LA FICHE DANS LA BORNE CORRESPONDANTE DE LA PRESE ET POUSSER JUSQU'AU FOND.
This musical instrument is designed for household use, not commercial use.
FCC Information
This equipment has been tested and found to comply with the limits for a Class B digital device, pursuant to Part 15 of the FCC Rules. These limits are designed to provide reasonable protection against harmful interference in a residential installation. This equipment generates, uses and can radiate radio frequency energy and, if not installed and used in accordance with the instructions, may cause harmful interference to radio communications. However, there is no guarantee that interference will not occur in a particular installation.
If this equipment does cause harmful interference to radio or television reception, which can be determined by turning the equipment off and on, the user is encouraged to try to correct the interference by one or more of the following measures:
Reorient or relocate the receiving antenna.
Increase the separation between the equipment and the receiver.
Connect the equipment into an outlet on a different electrical circuit from the receiver.
Consult the dealer or an experienced radio/TV technician for help.
Canadian Radio Interference Regulations
This instrument complies with the limits for a class B digital apparatus, pursuant to the Radio Interference Regulations, C.R.C., c. 1374.
- Read Instructions - This Owner's Manual contains valuable information that will help you make full use of the instrument's many capabilities. All the safety and operating instructions should be read before the product is operated.
- Retain Instructions - The safety and operating instructions should be retained for future reference.
- HeedWarnings - All warnings on the product and in the operating instructions should be adhered to.
- Follow Instructions - All operating and use instructions should be followed.
- Water and Moisture - The appliance should not be operated or stored near water or other moisture - for example, near a bath tub, wash bowl, kitchen sink, or laundry tub; in a wet basement; or near a swimming pool; and the like.
- Power Cord Protection - Power-supply cords should be routed so that they are not likely to be walked on or pinched by items placed upon or against them, paying particular attention to cords at plugs, convenience receptacles, and the point where they exit from the product.
- Ventilation - The appliance should be situated so that its location or position does not interfere with its proper ventilation. For example, the appliance should not be situated on a bed, sofa, rug, or similar surface that may block the ventilation openings; or similar surface that may block the ventilation openings; or placed in a built-in installation, such as a bookcase or cabinet that may impede the flow of air through the ventilation openings.
- Heat - The appliance should be situated away from heat sources such as radiators, heat registers, stoves, or other appliances (including amplifiers) that produce heat.
- Noise - Keep the appliance away from electrical motors, neon signs, fluorescent light fixtures, and other sources of electrical noise.
- Shocks - Protect the appliance from physical shocks and impact. Never move it while it is in operation.
- To reduce the risk of injury, close supervision is necessary when a product is used near a children.
- Do not touch the power plug with wet hands. There is a risk of electrical shock. Treat the power cord with care as well. Stepping on or tripping over it can break or short-circuit the wire inside.
- Do not place this product on an unstable or slant cart, stand, tripod, bracket, or table. The product may fall, causing serious injury to a child or adult, and serious damage to the product. Besides, the unit may malfunction. Use only with a cart, stand or table recommended by KAWAI, or sold with the product.
- The appliance, in combination with an amplifier and speakers or headphones, may be capable of producing sound levels that could cause permanent hearing loss. Do not operate for a long period of time at a high volume level or at a level that is uncomfortable. If you experience any hearing loss or ringing in the ears, you should consult an audiologist.
- This product may be equipped with a polarized line plug (one blade wider than the other). This is a safety feature. If you're unable to insert the plug into the outlet, contact an electrician to replace your obsolete outlet. Do not defeat the safety purpose of the plug.
- Always turn the power off when the appliance is not in use. The power supply cord of the product should be unplugged from the outlet when left unattended or unused for long period of time. Otherwise, fire or other hazards may be caused due to lightning and power-line surges, etc.
-
Care should be taken so that objects do not fall and liquids are not spilled into the enclosure through openings.
-
Unplug the appliance and power supply cord from the wall outlet immediately and refer servicing to qualified service personnel under the following conditions:
a) When the power-supply cord or plug is damaged.
b) If liquid has been spilled, or objects have been fallen into the product.
c) If the product has been exposed to rain or water.
d) If the product does not operate normally by following the operating instructions. Adjust only those controls that are covered by this manual as an improper adjustment of other controls may result in damage and will often require extensive work by a qualified technician to restore the product to its normal operation.
e) If the product has been dropped or damaged in any way.
f) When the product exhibits a distinct change in performance - this indicates a need for service.
- Protect the product from direct sunlight, extremes in temperature (such as inside your car on a warm day) or humidity, dusty environment, or vibration (especially during transportation).
- Always turn down the volume(s) of all instruments (such as guitar or keyboard) before connecting or disconnecting to the instrument.
- Make sure that all POWER switches are off before changing equipment connections.
- Check all equipment connections before applying the power.
- Do not connect to the same circuit as a heavy load or equipment that generates line noise.
- Unplug this product from the wall outlet before cleaning.
- Do not use liquid cleaners or aerosol cleaners. Use a damp cloth for cleaning. (Clean the instrument with a soft cloth, a mild detergent, and lukewarm water.) Never use harsh or abrasive cleansers or organic solvents.
- Servicing - The user should not attempt to service the appliance beyond that described in the operating instructions. All other servicing should be referred to qualified service personnel.
- Do not disassemble or attempt to modify the appliance. Opening or removing covers may expose you to dangerous voltage.
Contents
WELCOME TO THE K5000W 9
IF YOU NEED HELP. 10
K5000W FRONT PANEL 11
K5000W REAR PANEL 12
GUIDED TOUR 13
CONNECTIONS 14
PLAY THE DEMO 16
PLAYING A SONG DIRECTLY OFF THE DISK 16
PERFORMANCE MODE 17
SINGLE SOUNDS 17
COMBI SOUNDS 18
COMPOSE MODE 19
LOADING A SONG INTO MEMORY 19
PLAYING A SONG FROM MEMORY 20
ERASING A SONG FROM MEMORY 20
REAL TIME RECORDING 20
SAVING YOUR SONG TO DISK 21
AUTO PHRASE GENERATOR (APG) 22
SINGLESECTION 25
SINGLEPLAY 26
SINGLEEDIT 29
COMMON 30
DCO 31
DCO PITCH ENVELOPE 32
DCF 33
DCF (FILTER) ENVELOPE 34
DCA 36
ADDITION 38
HARMONIC LEVEL (DHL) 39
HARMONIC ENVELOPE (DHE) 42
FORMANT FILTER LEVEL (DFL) 45
FORMANT ENVELOPE (DFE) 48
MORF 51
LFO & COPY 52
CONTROL 54
VOLUME, PITCH BEND, PAN 54
KEY AND VELOCITY ZONE 55
CONTROLLER56
WRITE 60
KIT SECTION 63
KITEDIT 65
L1 KIT COMMON 65
L2 KITEFFECT 65
L3 KITINSTRUMENTSELECT 66
R1 INSTRUMENTEDIT 66
COMBI SECTION 71
COMBIPLAY 72
COMBIEDIT 74
COMMON 74
SECTION 75
WRITE 77
EFFECT SECTION 79
EFFECTPAGEPARAMETERS 80
ALGORITHMS 83
ALGORITHM 1 83
ALGORITHM 2 84
ALGORITHM 3 84
ALGORITHM 4 84
EFFECTTYPES 85
EARLY REFLECTION 1
EARLY REFLECTION 2 85
TAP DELAY 1
TAP DELAY 2 86
SINGLEDELAY 87
DUAL DELAY 88
STEREODELAY 89
CROSS DELAY 89
AUTO PAN 90
AUTO PAN & DELAY 91
CHORUS 1
CHORUS 2 92
CHORUS 1 & DELAY
CHORUS 2 & DELAY 93
FLANGER 1
FLANGER 2 94
FLANGER 1 & DELAY
FLANGER 2 & DELAY 95
ENSEMBLE 96
ENSEMBLE&DELAY 96
CELESTE 97
CELESTE&DELAY 98
TREMOLO 99
TREMOLO & DELAY 99
PHASER 1
PHASER 2 100
PHASER 1 & DELAY
PHASER 2 & DELAY 101
ROTARY 102
AUTO WAH. 103
BANDPASS 104
EXCITER 105
ENHANCER 105
OVERDRIVE 106
DISTORTION 107
OVERDRIVE & DELAY 108
DISTORTION & DELAY 109
REVERBTYPES 110
HALL 1
HALL 2
HALL 3 110
ROOM 1
ROOM 2
ROOM 3. 111
PLATE1
PLATE2
PLATE3 112
REVERSE 113
LONG DELAY 114
COMPOSE MODE 115
SONG RECORD 116
REAL TIME RECORD 116
STEPTIME RECORD 119
SONGEDIT 121
L1 PUNCH IN/OUT 121
L2 BAREDIT 122
L3 EVENTEDIT 132
L4 SONG COMMON 133
R1 TRACK INITIAL 134
R2 EFFECT 135
DISKPLAY 136
AUTO PHRASE GENERATOR (APG) 137
PLANTING THE SEED TRACK 137
TRACK SELECTION 138
STYLEselection 138
VARIATION SELECTION 140
EDIT CHORD CHANGES 141
GENERAL MIDI MODE 145
WHATISGENERALMIDI 145
GENERAL MIDI EFFECTS SETTINGS 146
QUICKMIDI 147
COMMON 149
SYSTEMSECTION 150
SYSTEM 150
RESET 151
BACKUP 151
MIDI 151
DUMP 152
DISK SECTION 153
L1 SAVE 153
L2 LOAD 156
R1 DELETE 157
R2 FORMAT 157
FILEFORMATLIST 158
APPENDIX 159
PCM WAVELIST 160
CYCLICAL (LOOPING) WAVE LIST 161
PERCUSSION INSTRUMENT LIST 162
WELCOME TO THE K5000W
The K5000W is an Advanced Additive Workstation that combines complete music composition/ performance capabilities into a single unit.
PERFORMANCE SOUND GENERATORS
ADVANCED ADDITIVE TONE GENERATOR
The K5000 series updates the famous K5 synthesizer tone generator and its unique additive harmonic synthesis approach. The ADD Tone Generator contains 32 source generators, which depending on how they are used, can yield up to 32 voice polyphony.
PCM samples can also be mixed with additive sources. As few as one or as many as six sources can be used to make a single sound. For example, a PCM wave of a piano hammer can be superimposed with the sound of the piano string created by additive harmonics.
PCM/GMTONEGENERATOR
In addition to the additive capabilities, the K5000W contains a second tone generator that utilizes traditional subtractive PCM synthesis techniques. This tone generator is also fully General MIDI compatible to ensure compatibility with other MIDI instruments. The PCM Tone Generator adds another 32 source generators, which can give an additional 32 voices of polyphony. This results in a maximum possible polyphony of 64 voices.
DIGITAL EFFECTS SYSTEM
The K5000W contains an advanced digital effects processor (DSP), which allows four individual effects of chorus, delay, distortion, etc., in addition to reverb and a graphic equalizer.
When playing a single sound, individual sources can be routed to individual effects; when playing multiple sounds in Compose mode, individual sounds can be routed to individual effects.
COMPOSING TOOLS
SEQUENCER
A 40-track MIDI sequencer can control 32 simultaneous timbres within the K5000W. The sequencer can also control multiple external MIDI devices at the same time, using its two MIDI outputs.
APG COMPOSING TOOL
The Auto Phrase Generator (APG) uses a track from the sequencer and creates a complete orchestration in any of over one hundred musical styles.
GENERAL MIDI
When the K5000W receives a General MIDI Initialize command, it automatically jumps into Compose Mode and configures itself as a General MIDI synthesizer. So whether you're playing your favorite songs, singing Karaoke, or cruising the World Wide Web, the K5000W is your willing musical accompanist.
Please consult your local Kawai representatives or contact with Kawai distributors in your country.
ABOUT THE KEYBOARD'S INTERNAL MEMORY
The contents of the keyboard's internal memory (such as tone data) and system data may be lost if you turn off the power while saving, loading or writing data.
Do not turn off the power while saving, loading or writing data.
If you lost system data, follow the procedure of the included SYSTEM DISK and load system data.
Internal song data may be lost when you load data from a disk. You may not be able to back up the internal memory. So, we recommend that you save your important data on a floppy disk.
ABOUT THE MEMORY EXPANSION KIT
MEMORY EXPANSION KIT may be available in your country. If you need it, please consult your local Kawai representatives or contact with Kawai distributors in your country.


GUIDED TOUR
The K5000W operates in two modes: Performance Mode for creating sounds, andCompose Mode for creating music. You can choose between them using the Mode buttons on the left side of the front panel.
Naturally, the first thing you ought to do with your K5000W is plug it in!
POWER
Using the cable provided, connect the POWER jack to a grounded AC outlet.
Power Specifications
North America: 110V-120V 50/60Hz
Europe/Asia/Australia: 220V-240V 50/60Hz
AUDIO
There are two pairs of audio output jacks on the back, plus the PHONES jack on the front (in front of the Pitch Bend wheel). This gives you a few choices, depending on what you're connecting to:
SOLOPLAY
Just plug your headphones into the PHONES jack on the front and go at it. There's plenty of power for phones. Use the MAIN volume slider to control the volume.
INSTRUMENT AMPLIFIER
If you are plugging into an amp, connect the MAIN L/MONO output jack on the rear panel to your amplifier. All sounds will be mixed to this single cable.
STEREO SYSTEM
To connect to a music system or amplified speakers, use the two MAIN outputs (L & R) to get stereo. You'll need adapters or adapting cable to convert the 1/4 ” Phone jacks on the K5000W to the RCA pin jacks on your stereo. Make sure to connect the K5000W to a LINE, AUX, or TAPE input on your stereo.
MIXING CONSOLE
If you've got more than two inputs available, by all means connect the two MAIN outputs and the two INDIVidual outputs to your mixer. In this way, you can route certain sounds (piano, ss'ongs, snare drum) through the reverb unit to the Main Outputs; and send others (bass drum, bass guitar) directly to the INDIVidual outputs without reverb, or for special studio processing.
When connections are made to the INDIVidual output jacks, the INDIVidual volume slider on the front panel becomes active. You can adjust each pair of outputs independently.
PEDALS
HOLD
Connect a Hold pedal to the HOLD jack on the rear panel. Use a Momentary On footswitch, like the Kawai model F-1. This acts like a piano-style damper pedal, sustaining after releasing keys.
EXPRESSION
You can connect a Volume pedal (Kawai model V-20X) to the Expression jack on the rear panel.

MIDI
There are six MIDI ports on the rear panel of the K5000W: two pairs each of IN, OUT, and THRU jacks. You don't need to connect any of them to create a musical masterpiece - the K5000W has everything built in - but if you want to talk to your other MIDI gear, here's how to connect them:
ADDITIONAL SOUND MODULES
If you want to use the K5000W to control other sound modules, connect a cable from one of the K5000W's MIDI OUT jacks to the MIDI IN jack of the other device. If you have more than one device, you can connect one to each MIDI OUT jack or loop from the MIDI THRU of the first device to the MIDI IN of the second.
EXTERNAL KEYBOARD OR DRUM CONTROLLER
If you want to play the K5000W from another keyboard, MIDI drum or Guitar controller, connect it to one of the MIDI IN jacks.
You will need to set the K5000W's Unit Channel to match the input jack and the MIDI channel the device transmits on. Press SYSTEM, then MIDI (F5), then Unit CH (L2).
SLAVING A DRUM MACHINE OR ANOTHER SEQUENCER
Besides notes, a drum machine or sequencer also needs to communicate timing with the K5000W sequencer. The K5000W supports MIDI Beat Clocks, which transmit tempo as well as start and stop commands.
NOTE:
A drum machine or sequencer must be connected to the MIDI A jack, the MIDI B jack does not transmit MIDI clock information.
Now that everything is connected, lets see what the K5000W can do!
In the package with your K5000W is a demonstration diskette (supplement disk). Playing this will give a good picture of the K5000W's capabilities.
PLAYING A SONG DIRECTLY OFF THE DISK
- Insert the floppy disk (supplement disk) into the disk drive on the left side of the instrument.
- Press the COMPOSE button on the left side of the instrument.
- In the SEQUENCER section to the left of the LCD display, press DISK PLAY. The following screen appears.

- Press the L1 key (Song) and turn the Value dial until the desired song is listed.
- Press the START button. The disk light will flash, and after a moment the song will start.
Press the PERFORM key on the front panel to enter Performance Mode.
Performance Mode is where you play sounds live from the keyboard. Performance Mode is also where the K5000W's wide range of synthesis capabilities are available for your creative sound editing.

SINGLE SOUNDS
The K5000W contains three banks of Single sounds. The banks are organized into groups of 10 patches. Each bank is unique in its own way.
ABANK
This is the ADD additive synthesis bank. There are up to 120 patches available in A Bank, but the patch memory can used up by fewer complex patches. There are 60 preset patches in this bank.
B BANK
This is the PCM synthesis bank. There are always 128 patches in this bank - with the last 12 (B117 - B128) dedicated for drums. There are 48 user editable locations in this bank.
GM BANK
This is the General MIDI bank. There are 128 preset patches in this bank.
CHOOSING A SINGLE SOUND
- Choose a bank: A, B, or GM, using the SINGLE buttons on the front panel.
- Choose a group: press one of the buttons labeled 00 - 12 on the front panel. A menu of the patches in the group appears on the screen.
- Choose a patch: press one of the buttons labeled 0 - 9 on the front panel. The single patch appears on the screen.

MODIFYING A SOUND
There are sliders on the screen of each patch, as shown in the illustration above. Push the button underneath the desired slider, then change the value with the VALUE dial. The slider image will also move according to your adjustment.
These do not change the preset values of the patch, which can only be changed by editing the patch - described starting on page 29.
The patches in A Bank have two pages of sliders - use the More and Back keys to switch pages.
COMBI SOUNDS
Combi Patches are combinations of up to four Single patches. They can be arranged in layers, key splits, velocity splits, or any combination.
No matter how they are arranged, Combis are designed to be played as a group. The entire combi responds to a single MIDI channel. Multi-timbral / multi-channel arrangements are done in theCompose Mode.
CHOOSING A COMBI
There are 64 Combi patches, C01 - C64.
- Choose the Combi bank: press the COMBI button on the front panel.
- Choose a group: press one of the buttons labeled 00 - 06 on the front panel. A menu of the patches in the group appears on the screen.

- Choose a patch: press one of the buttons labeled 0 - 9 on the front panel. An individual Combi patch appears on the screen.

MODIFYING A COMBI
On the screen there are Transpose and Volume sliders for each Section, as shown in the illustration above. Push the button underneath the desired slider, then change the value with the VALUE dial. The slider image will also move according to your adjustment.
These do not change the preset values of the patch, which can only be changed by editing the Combi patch - described starting on page 71.
Press the COMPOSE key on the front panel to enter Compose Mode.
Compose Mode is where the composer, arranger, and producer put their music together, orchestrating single sound patches into a multi-timbral canvas of color.Compose Mode is also where music recording, editing, and playback are done, with internal sounds as well as controlling external MIDI devices. The K5000W is also a General MIDI compatible sound generator, and jumps intoCompose Mode whenever a General MIDI System On message is received.

LOADING A SONG INTO MEMORY
On page 16, we played the demo song directly off the disk. If we load the song into memory, we can modify it or add additional parts.
- Insert the floppy disk (supplement disk) into the disk drive on the left side of the instrument.
- In the COMMON section to the left of the LCD display, press DISK. The following screen appears.

- Press the L2 key (Load), then the R1 key (Song). The following screen will appear.

- Press the L1 key (Format), and turn the Value dial until the format reads SMF.
- Press the F1 key (File), and turn the Value dial until the desired song is highlighted.
- Press the F8 key (Exec). Sure? Press the F8 key (Yes) to continue.
-
The screen says EXECUTING... while the song is loaded from the diskette. When loading is finished, the screen will change to COMPLETED!
-
Press the EXIT key, then the COMPOSE button on the left side of the front panel. This brings up the K5000W's sequencer.

- Press the START button in the sequencer section of the front panel. The START button will light up green and the song will play. When completed, the light will go out.
SONG INFORMATION
As the song plays, you will see the bars and beats ticking in the center of the screen.
At the bottom of the screen is information for each track. Press the Function keys (F1 - F8) to select a track, the color will reverse indicating it is selected. Once selected, you can turn the track off (mute) or on by pressing the function key again. You can turn tracks on and off while the song plays.
CHANGING SOUND PATCHES
As you select different tracks, the channel and program will be displayed on the screen (see the picture on the previous page.) You can temporarily change a track's sound patch by pressing the L3 button to the left of the screen and turning the Value dial.
ERASING A SONG FROM MEMORY
This is easy. Song memory is not maintained when power is off, so when the K5000W is turned off, all songs are erased.
Naturally, you'll want to learn how save your new song to disk before you turn off the power -- that's covered on the next page.
REAL TIME RECORDING
Lets start with a fresh song, and record a track.
FROM THE COMPOSE MODE MAIN SCREEN:
- Press the REC button - it lights up, red.
- Press the F1 key to put track 1 into record. The label above the F1 key should now indicate "1R".
- Press the START button near the REC button - this starts the recording - the START key also lights up, green (both REC and START should be lit), and the Metronome bell starts counting time.
- Play the keyboard.
- When you have finished recording, press STOP.
- To listen back, press RESET then PLAY.
SETTING A COUNT IN
Few people can press START with their left hand, and simultaneously start recording with their right, so let's give ourselves two bars to get ready to record.
FROM THE COMPOSE MODE MAIN SCREEN:
- Press Setup (R4), then Count In (L1).
- Turn the value dial, so that Count In shows 2.
- Press the EXIT button to return to the main screen.
If you want to rerecord your first track, repeat the steps in the previous section – this time the bell will count off two bars before recording starts.
CHANGING THE TEMPO
You can change the tempo without changing the pitch of the notes - that's one of the big differences between recording MIDI and audio.
Press R1 to highlight the tempo setting, the use the Value dial to change it.
OVERDUBBING
Recording a new track in sync with the first track follows the same process as recording the original one.
FROM THE COMPOSE MODE MAIN SCREEN:
- Press the REC button - it lights up, red.
- Press the F2 key highlight track 2, then press it again to put it into record. The label above the F2 key should now indicate "2R". The label above track 1 (F1) should read "1P", indicating that track 1 will play - if not, press F1 several times until it does.
- You might want to change to a different sound before recording. Make sure track 2 (F2) is selected, then press L3 and turn the Value dial to change programs. You can play the keyboard to audition the sound.
-
Press the START button near the REC button – this starts the recording – the START key also lights up, green (both REC and START should be lit), and the Metronome bell starts counting time. You should also hear track 1.
-
Play the keyboard
- When you have finished recording, press STOP.
- To listen back, press RESET then PLAY.
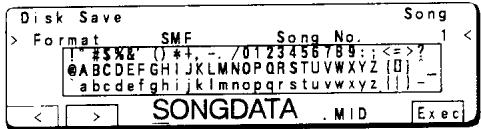
SAVING YOUR SONG TO DISK
The K5000W does not save Song data while turned off, so it is imperative to save your data to disk before turning off the unit.
The K5000W uses standard DOS format 2DD and 2HD diskettes, that can be read by Windows and MacOS computers.
PROCEDURE:
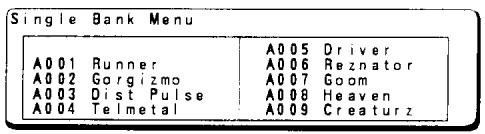
- Press DISK, then Save (L1), then Song (R1). The following screen appears:
- Name your song by using the arrows (F1 & F2) and the Value dial.
- If you want to save your song as a Standard MIDI File instead of the K5000W's own file format, press Format (L1) and turn the value dial until the format is set to SMF.
- Press Exec (F8). Sure? Press Yes (F8) to continue.
- The song is saved to disk.
AUTO PHRASE GENERATOR (APG)
The Auto Phrase Generator, or APG, creates new musical parts based on a track recorded in the sequencer.
APG takes one of your recorded tracks, analyzes the chord changes, and then creates new parts based on your chord progression in the musical style of your choice. After calculating the new parts based upon your chords and the designated pattern, the APG copies those parts onto as many as eight tracks of your already existing song. You can then pick, choose and edit the parts just like tracks you recorded yourself.
CREATING A PHRASE
RECORD THE ORIGINAL TRACK
Use the sequencer to record a new track, just as before:
- Press the REC button - it lights up, red.
- Press the F1 key to put track 1 into record. The label above the F1 key should now indicate "1R".
- Press the START button near the REC button – this starts the recording – the START key also lights up, green (both REC and START should be lit), and the Metronome bell starts counting time.
- Play the keyboard.
- When you have finished recording, press STOP.
- To listen back, press RESET then PLAY.
ANALYZE THE TRACK
After our seed track is recorded, the next step is to analyze its chord structure.
- Press the APG button. The APG Seed Setting screen appears.

- Press Length (L2), then turn the Value dial clockwise until the number stops changing. This is the total length of your track to be analyzed.
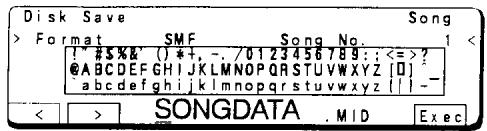
- Press Analyze (F7). The screen will read EXECUTING for a few seconds, then the Track Selection screen will appear.
- Press each track button (L1 - L4 and R1 - R4) twice, so that each part has a Track number and none of them are off.
CHOOSE A STYLE AND VARIATION
There are 107 rhythmic templates available, including two that you can create.
- Press Next (F8) to access the APG Data Selection screen.

- Press the START button to play the selected APG Phrase. While the phrase is playing, you can select different templates using the value dial.
PASTE INTO SONG
If you want to paste the APG phrases into your song, press Continue (F8), then Paste (R4). The screen will read EXECUTING for a moment, then COMPLETED!
SAVE
SAVE YOUR NEW SONG USING THE SAME PROCEDURE AS BEFORE:
- Press DISK, then Save (L1), then Song (R1). The following screen appears:
- Name your song by using the arrows (F1 & F2) and the Value dial.
- If you want to save your song as a Standard MIDI File instead of the K5000W's own file format, press Format (L1) and turn the value dial until the format is set to SMF.
- Press Exec (F8). Sure? Press Yes (F8) to continue.
- The song is saved to disk.
SINGLE SECTION
Pressing the PERFORM key on the left side of the keyboard brings up the Single Play window.
The name of the patch is displayed, as well as parameters which are described below.
CHANGING SINGLE PATCHES
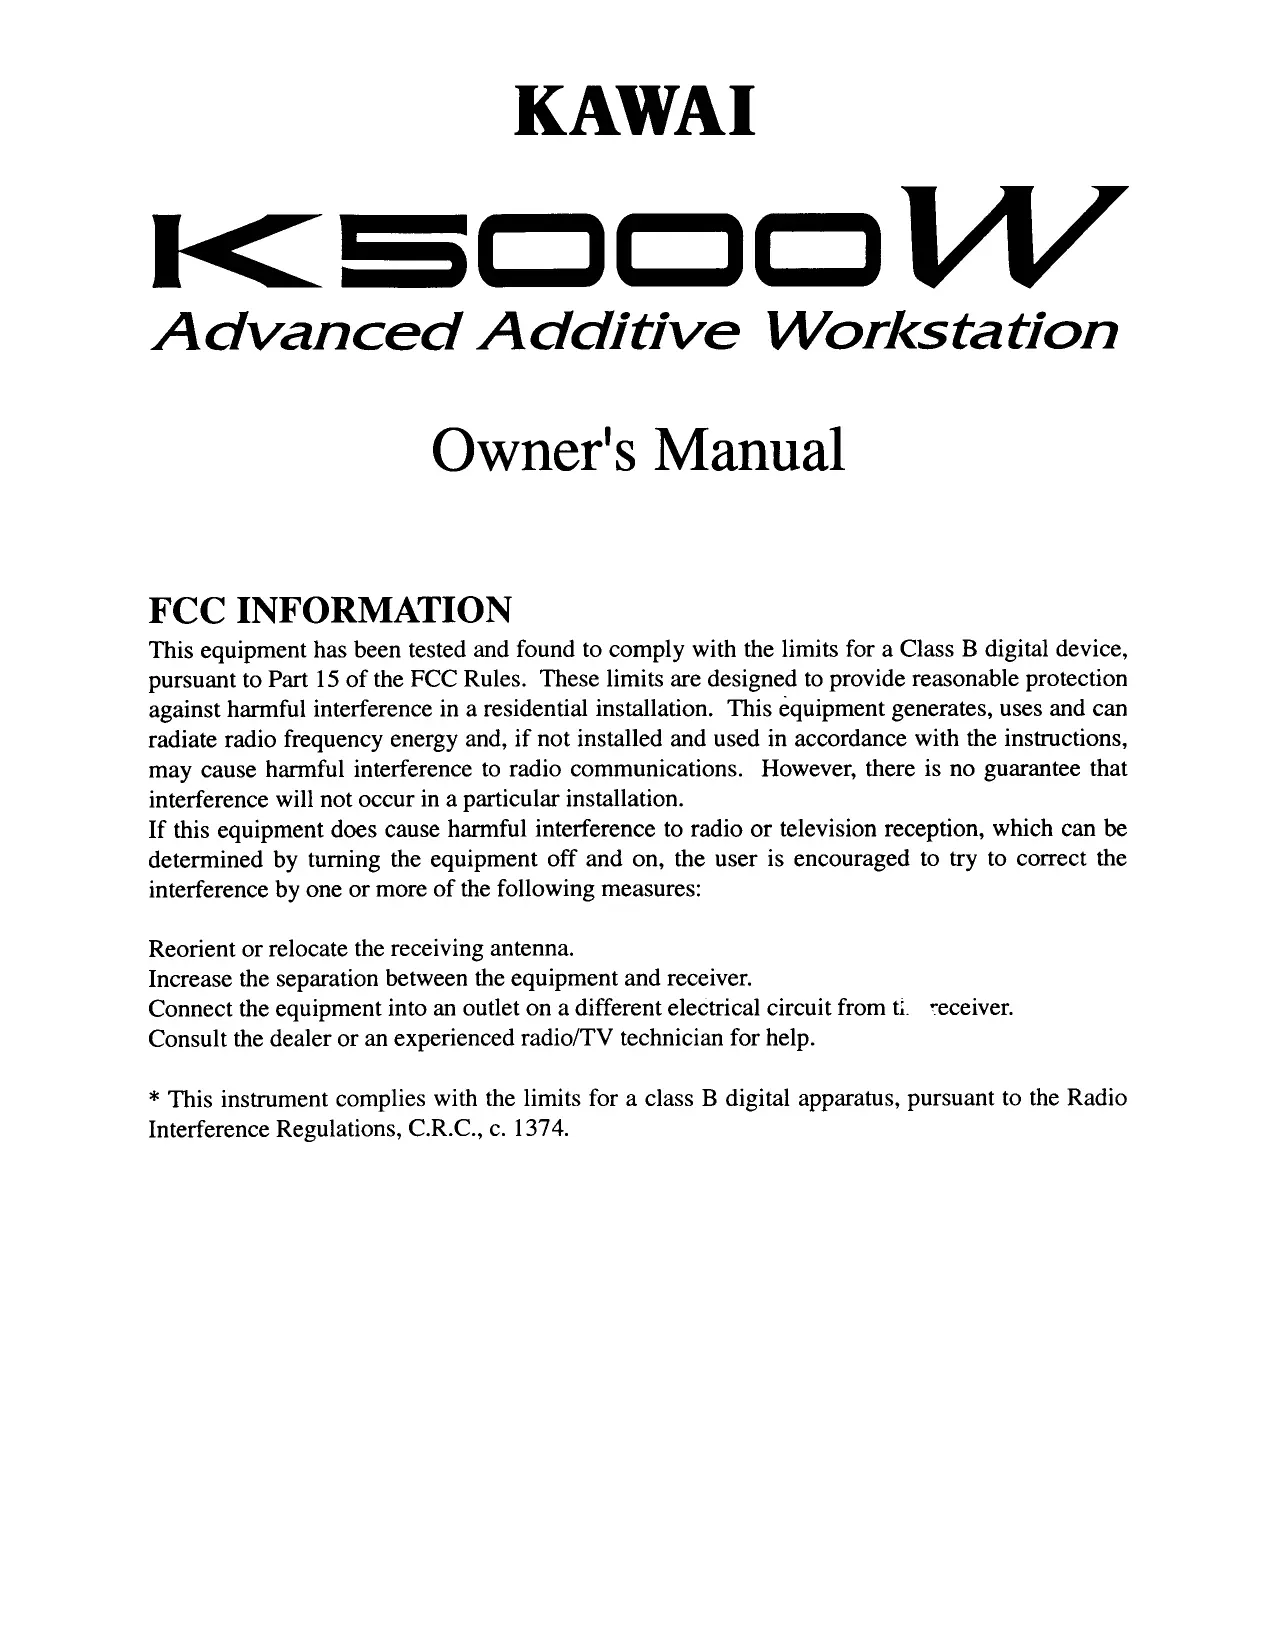
To select a different patch, use the Patch Select keys 0 through 9 on the right side of the panel. To change banks, use the Patch Select keys 00 through 12. The Bank menu screen appears as shown below.

This screen lists the patches in the selected bank. To select one press the 0-9 key corresponding to the last digit of the patch number. A different patch will play, with the display as shown at the top of this section.
NOTE:
In Bank A, there is not a fixed number of patches. Instead there is a fixed amount of memory for the patches. If your patches are simple, more of them can be stored. As a result, all patch locations may not be available.
MODIFYING PATCHES
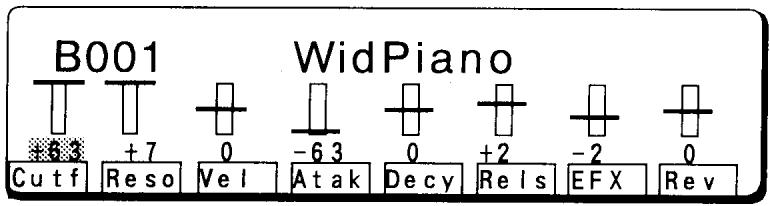
In Single Play mode, fourteen parameters are available for instant edit. Press one of the F keys as described below, then use the value dial to change the setting.
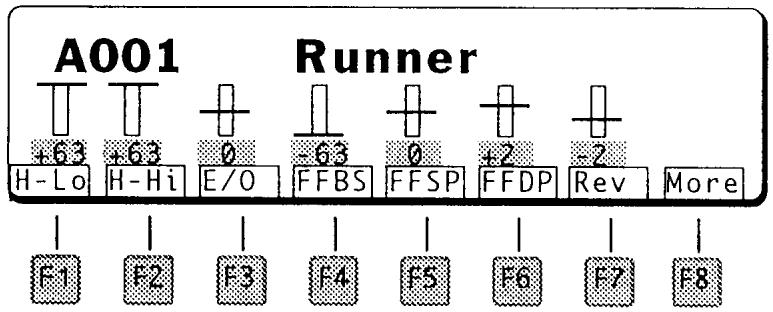
NOTES:
These parameters add and subtract from the original values contained in the patch, and affect all sources.
B and GM Banks have only one page of parameters, as shown at the top of this section.
F1 H-LO (LOW HARMONICS) (FOR BANK A ONLY)
In a patch that uses the additive sound generator, this control adjusts the level of the lower harmonics. This does not adjust the low notes, rather it adjusts the low end of any note.
F2 H-HI (HIGH HARMONICS) (FOR BANK A ONLY)
In a patch that uses the additive sound generator, this control adjusts the level of the upper harmonics. This does not adjust the high notes, rather it adjusts the high end of any note.
F3 E/O (EVEN/ODD HARMONICS) (FOR BANK A ONLY)
In a patch that uses the additive sound generator, this control adjusts the balance of even versus odd harmonics. A positive value boosts the even harmonics and cuts the odd ones, a negative value cuts the even harmonics and boosts the odd ones.
F4 FFBS (FORMANT FILTER BIAS) (FOR BANK A ONLY)
In a patch that uses the additive sound generator, this control adjusts the Formant Filter Bias.
F5 FFSP (FORMANT FILTER SPEED) (FOR BANK A ONLY)
In a patch that uses the additive sound generator, this control adjusts the Formant Filter Speed.
F6 FFDP (FORMANT FILTER DEPTH) (FOR BANK A ONLY)
In a patch that uses the additive sound generator, this control adjusts the Formant Filter Depth.
F7 REV (REVERB AMOUNT)
This adjusts the reverb level. Turn it up to add more ambience.

F8 MORE
Jumps to the next page, below.
F1 CTOF (FILTER CUTOFF)
This adjusts the filter cutoff frequency. Turn this up to make the sound brighter.
F2 RESO (FILTER RESONANCE)
This adjusts the filter resonance. The value range is -7 - +7 .
F3 VEL (VELOCITY)
Scales the velocity plus or minus. Use this control to adjust the way the patch responds to the dynamics of your playing.
F5 DECY (DECAY TIME)
This adjusts the initial decay for both the DCA and DCF envelopes. Turn it down (minus value) to make the decay sharper, turn it up to make the decay smoother.
F6 RELS (RELEASE TIME)
This adjusts the release or final decay time for both the DCF and DCA envelopes. Turn it up to make the sound fade out longer after releasing the keyboard.
F7 EFX (EFFECTS AMOUNT)
This adjusts the effects level, such as chorus and distortion.
F8 BACK
Jumps to the previous page, above.
Pressing EDIT brings up the Edit Menu. All editing pages can be accessed from this page, or by using the Patch Select buttons to the right of the screen - see the legends underneath the buttons.
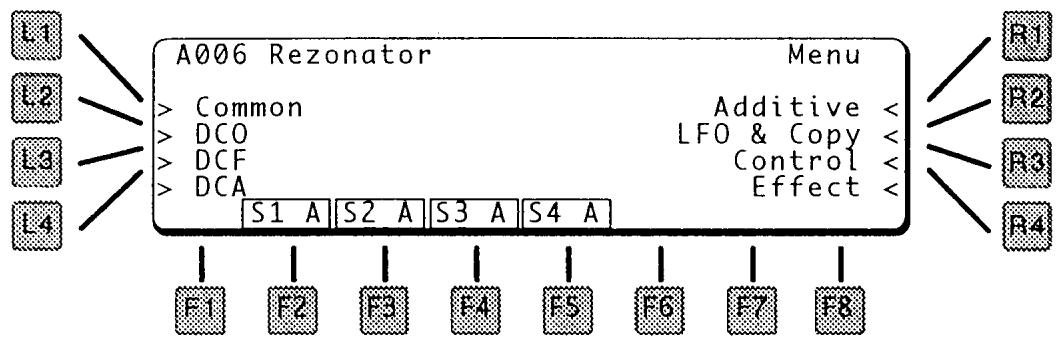
L1 COMMON Jumps to the Common section, see page 30.
L2 DCO Jumps to the DCO section, see page 31.
L3 DCF Jumps to the DCF section, see page 33.
L4 DCA Jumps to the DCA section, see page 36.
R1 ADDITIVE Jumps to the ADD section, see page 38. NOTE This is only available when editing the additive sounds in Bank A.
R2 LFO & COPY Jumps to the LFO section, see page 52.
R3 CONTROL Jumps to the Control section, see page 54.
R4 EFFECT Jumps to the Effect section, see page 79.
NOTE: Throughout the various pages of Single Edit mode, the F2 through F7 keys can be used to turn individual sound sources on or off.
EXITING EDIT MODE
Press EXIT to return to Play Mode. Depending on which page is displayed, you may need to press EXIT more than once. If you have made any changes to the patch, an alert message appears, asking if you want to "Save". Press WRITE to save, or F8 (Quit) to exit without saving. To continue editing, press EDIT.
The Common section contains several pages of basic parameters such as the patch name, below.

L1 and L2 move through the name forward and back, respectively. Use the Value dial to select a letter.
F8 MORE
Advances to the next page of Common parameters, below.
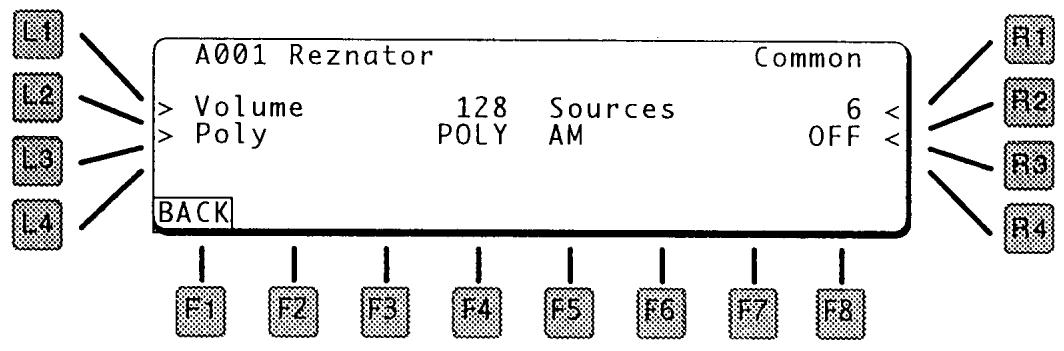
L1 VOLUME
Sets the master volume for the program.
L2 POLY
Sets the polyphonic mode for the patch.
POLY Standard polyphonic mode
SOLO1 Monophonic mode. Each key played re-triggers the envelopes.
SOL02 Monophonic mode. Sustained keys played do not retrigger the envelopes.
R1 SOURCES
Sets the number of sources for the patch. Additive patches (A Bank) can have up to six sources, other banks are fixed at 2 sources. Remember that the more sources used in a patch, the fewer notes that can be played.
R2 AM
Selects sources for Amplitude Modulation. One source can be set to modulate an adjacent source, i.e., 1 > 2 .
F1 BACK
Goes back to the previous Common page, above.
Pressing DCO in the Single Edit menu brings up the following screen which contains the DCO parameters.
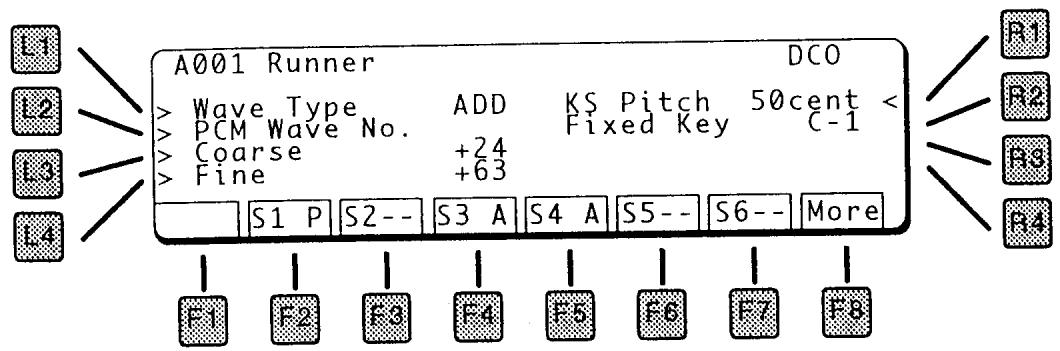
LI WAVETYPE
WAVE TYPE - Selects the wave type for the source: ADD for the additive synthesizer, PCM for sample waves.
L2 PCM WAVE NUMBER
Selects the PCM wave to be used. See page 160 for a list of waves.
NOTE:
This has no effect if ADD is the selected wave type.
L3 COARSE
The coarse frequency in semitones. The range is two octaves above or below.
L4 FINE
The fine frequency setting. Use this for detuning the wave to create beating or fullness.
RI KS PITCH
When the Fixed Key is being used (not Off, below) this parameter adds the key value to control the pitch. This can be used to play in quarter-tones, or to add "stretch" to the tuning. The reference point is the Fixed Key value.

R2 FIXED KEY
Sets the fixed pitch for the source. The range is A-1 to C7. If Off, then normal key tracking applies.
F8 MORE
Goes to the DCO Pitch En velope page, below.
The DCO Pitch envelope changes the pitch of the sound over time. Many acoustic instruments have small pitch changes during their initial attack - pulling guitar strings and embouchure in wind instruments - which can be simulated using the DCO Pitch Envelope.
Because of its function during the attack phase of the sound, the DCO Pitch Envelope has only attack and decay functions - it does not sustain.

LI STRTL (STARTING LEVEL)
Sets the starting level for the envelope.
L2 ATAKT (ATTACK TIME)
When a note is played (note on), the envelope will go from the starting level to the Attack Level in this amount of time.
L3 ATAK L (ATTACK LEVEL)
Sets the level after the initial attack.
L4 DECYT (DECAYTIME)
After reaching the attack level, the envelope will then go to zero in this amount of time.
RI LEVEL (VELOCITY TO LEVEL)
This controls how much the key velocity affects the amount of pitch envelope.
R2 TIME (VELOCITY TO TIME)
This controls how much the key velocity affects the overall time of pitch envelope.
Pressing DCF in the Single Edit menu brings up the following screen which contains the DCF parameters.

LI DCF This turns on the DCF. If Active, the signal is routed through the DCF. If set to Bypass, the sound does not pass through the DCF.
L2 CUTOFF Sets the basic filter cutoff frequency.
L3 MODE Sets the type of filter. The choices are: Lo Pass Low Pass Filter - Cuts off the high frequencies (lets the low frequencies pass thru) HiPass High Pass Filter - Cuts off the low frequencies (lets the high frequencies pass thru)
L4 VELO CURVE Selects a velocity response curve. Works with Velo to Cut to tailor how the filter cutoff is affected by the key velocity.
RI RESONANCE Sets the amount of filter resonance. The higher the setting, the more nasal the sound.
R2 DCF LEVEL Adjusts the input level to the filter.
R3 KS TO CUT Controls how much the Key Scale affects the filter cutoff frequency.
R4 VELOCITY TO CUT Controls how much the Velocity affects the filter cutoff frequency.
F8 MORE Goes to the DCF En velope page, below.
This screen controls the envelope generator for the filter.
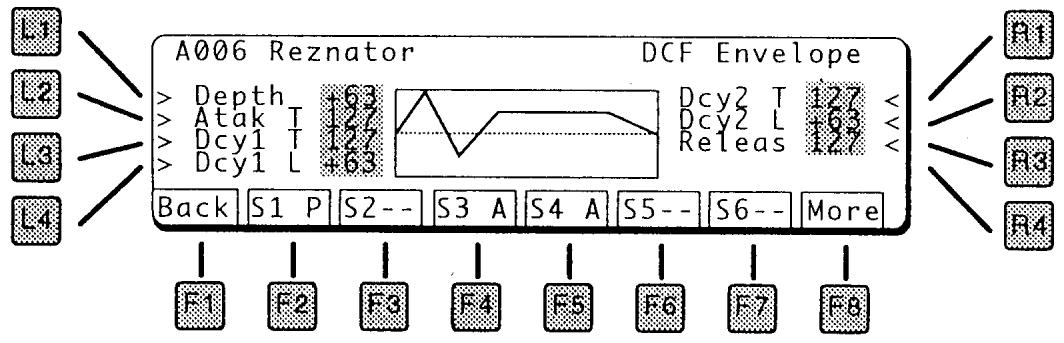

LI DEPTH
Scales the strength of the entire envelope.
L2 ATAKT (ATTACK TIME)
When a note is played (note on), the envelope will go from zero to maximum in this amount of time. A short attack time gives a sharp edge to the start of the sound like a piano. A long attack gives a more legato effect.
L3 DCYIT (DECAYTIME)
After reaching the maximum, the envelope will go to the decay1 level in this amount of time.
L4 DCYIL (DECAYI LEVEL)
After reaching the maximum, the envelope will go to this level.
RI DCY2T (DECAY2 TIME)
After reaching the decay1 level, the envelope will go to the decay2 level in this amount of time.
R2 DCY2 L (DECAY2 LEVEL)
The sustain level. After Attack, Decay1, and Decay2, if a note is still held on it will sustain at this level.
R3 RELST (RELEASE TIME)
When a note is released (goes off) the envelope will return to zero in this amount of time.
F8 MORE
Goes to the next page of parameters, which modulate the envelope.

LI KS TO ATTACK
Adds Key Scale to control the Attack time.
L2 KSTODCYI
Adds Key Scale to control the Decay 1 time.
RI VELO TO ENV
Adds Velocity to control the overall envelope level. The more velocity, the more the filter will open.
R2 VELO TO ATK
Adds Velocity to control the Attack time.
R3 VELO TO DCYI
Adds Velocity to contr of the Decay 1 time.
The Digitally Controlled Amplifier (DCA) sets the volume of the sound. It is controlled by an envelope to shape a sounds overall transient characteristics.
The DCA envelope screen shows a visual representation of the envelope.

LI VELOCITY CURVE
Selects a velocity response curve to tailor the response of the DCA to key velocity.
L2 ATTACKTIME
When a note is played (note on), the envelope will go from zero to maximum in this amount of time. A short attack time gives a sharp edge to the start of the sound like a piano. A long attack gives a more legato effect.
L3 DECAYI TIME
After reaching the maximum, the envelope will go to the decay level in this amount of time.
L4 DECAYI LEVEL
After reaching the maximum, the envelope will go to this level.
RI DECAY2 TIME
After reaching the decay1 level, the envelope will go to the decay2 level in this amount of time.
R2 DECAY2 LEVEL
The sustain level. After Attack, Decay1, and Decay2, if a note is still held on it will sustain at this level.
R3 RELEASE TIME
When a note is released (goes off) the envelope will return to zero in this amount of time.
F8 MORE
Goes to the DCA Modulation page, below.
This page offers parameters to modify the DCA envelope by key scale (which note is played) or velocity (how hard a key is played). Careful use of these parameters can add life and expression to any sound.

MODULATION BY KEY SCALE:
LI ENVELOPE LEVEL
Uses key scale to control the maximum amount of the envelope. With a positive value, a higher key will have more envelope dynamics and a lower key will have less dynamics.
L2 ATTACK TIME
Uses key scale to control the attack time. With a positive value, a higher key will have a longer attack time and a lower key will have a shorter attack time.
In nature, lower instruments (baritone sax, for example) have longer attack time than higher instruments (alto sax). Using negative amounts of this parameter will simulate this.
L3 DECAYI TIME
Uses key scale to control the decay1 time. With a positive value, a higher key will have a longer decay time and a lower key will have a shorter time.
L4 RELEESETIME
Uses key scale to control the decay1 time. With a positive value, a higher key will have a longer release time and a lower key will have a shorter time.
MODULATION BY VELOCITY:
RI ENVELOPE LEVEL
Uses velocity to control the maximum amount of the envelope. With a positive value, a harder (louder) key will have more envelope dynamics and a softer key will have less dynamics.
R2 ATTACK TIME
Uses velocity to control the attack time. With a positive value, a harder (louder) key will have a longer attack time and a softer key will have a shorter attack time.
In nature, softer notes generally have a longer attack time than louder notes. Using negative amounts of this parameter will simulate this.
R3 DECAYI TIME
Uses velocity to control the decay time. With a positive value, a harder (louder) key will have a longer decay time and a softer key will have a shorter time.
R4 RELEESETIME
Uses attack velocity to control the release time. With a positive value, a faster key release will have a longer release time and a slower release will have a shorter time. Again, negative values of this parameter are more natural.
This section presents the editing parameters for Kawai's ADD harmonic synthesizer. These parameters are only available when editing additive sources in A Bank patches. If you try to edit a PCM wave in an A Bank patch, the following message appears:

If you continue, the PCM source will be converted to an additive one.
The first ADD screen presents seven submenus for navigation.

L1 HARMONIC LEVEL
Goes to DHL page, where the level of individual harmonics can be adjusted.
L2 HARMONIC ENVELOPE
Goes to DHE page, where the harmonics can be enveloped.
L3 FORMANT LEVEL
Goes to the DFL page, where the formant filter can be adjusted.
L4 FORMANT ENVELOPE
Goes to the DFE page, where the formant filter can be enveloped.
R1 MORF
Goes to the Morfing page, which is a harmonics programming assistant.
NORMAL VS MORF
There are two programming modes, Normal and Morf. Any additive source uses one or the other. The main difference is in how the Harmonic Envelopes are utilized. For this reason, if you change to Morf mode (by executing a morf), the DHE parameters are replaced by new Morf settings. Other sections are not affected.
R3 FORMANT LEVEL
Goes to the DFL page, where the formant filter can be adjusted.
R4 FORMANT ENVELOPE
Goes to the DFE page, where the formant filter can be enveloped.
Selecting Harmonic Level from the previous page brings you to the DHL Menu page, where you can select pages for direct manipulation of the harmonic levels.
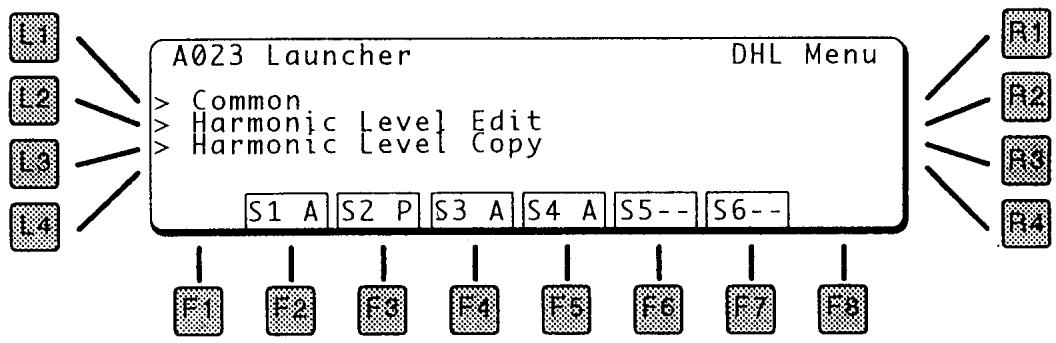
L1 COMMON
Edits parameters common to all harmonics.
L2 HARMONIC LEVEL EDIT
Goes to a visual display of harmonics, where individual harmonics can be adjusted.
L3 HARMONIC LEVEL COPY
Copies sets of harmonics from one patch to another.
COMMON
Edits parameters common to all harmonics.

L1 TOTAL GAIN
This is the master level for this harmonic group.
L2 KS TO GAIN
This adjusts how much the Key Scale controls the gain of the harmonic group. With a positive value, high notes will have a higher gain than low notes.
L3 HARMONIC GROUP
In the K5000W, each source can use a harmonic bank of 64 harmonics. This parameter selects whether the first 64 harmonics (1 - 64, starting at the fundamental) or harmonics 65 - 128 are used.
By itself, the Hi harmonics group has a tonality similar to metallic percussion instruments.
R1 VELOCITY CURVE
12 velocity curves are available to adjust the response of the harmonic envelope to the touch of your playing. This curve is used for all sections of the patch. Curve #5 (below) equals an exact 1:1 correlation, the other curves weight the response in different directions.

R2 VELOCITY DEPTH
This sets the velocity crossfade between the soft and loud harmonic groups.
HARMONIC LEVEL EDIT
Goes to a visual display of harmonics, where individual harmonics can be adjusted.

L3 NEXT HARMONIC
L4 PREVIOUS HARMONIC
These buttons select an individual harmonic. The small arrow under the harmonics displays which harmonic is selected, and its number and value can be seen on the right side of the screen (R2 and R3).
R1 EDITGROUP
Since editing harmonics one at a time can become quite cumbersome, the Edit Group function allows you to select harmonics to modify as a group.
HARMONIC GROUPS
Harmonics can be grouped in the following categories. The dots underneath the harmonic bars show which harmonics are selected.
BRIGHT
The upper 32 harmonics.
DARK
The lower 32 harmonics.
ODD
The odd numbered harmonics.
EVEN
The even numbered harmonics.
OCT
Each harmonic tuned to an octave of the fundamental pitch: 1, 2, 4, 8, 16, 32, 64 (when lo is selected) / 128 (when hi is selected).
5TH
Each harmonic tuned to a fifth above of the fundamental pitch: 3, 6, 12, 24, 48 (when lo is selected) / 96 (when hi is selected).
ALL
All 64 harmonics.
EACH Only the selected harmonic, the pointed to by the arrow under the harmonic display.
R2 HARMONIC NUMBER
Uses the Value dial to select a harmonic for display. The small arrow under the harmonics displays which harmonic is selected.
R3 LEVEL
Adjusts the level of the selected harmonic(s).
R4 SELECT
- Selects a harmonic group to edit (soft or loud). These two sets can be crossfaded by velocity.
HARMONIC LEVEL COPY
From this screen, you can copy sets of harmonics from one patch to another. Since there are so many parameters in a harmonic series, this makes creating and modifying patches less time consuming.
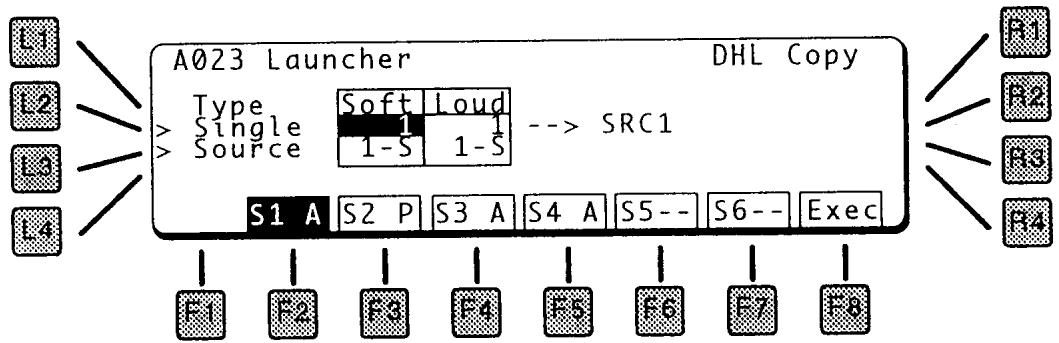
L2 SINGLE
Select the Patch to copy from. Pressing L2 switches between Soft and Loud.
L3 SOURCE
Select the Source from within the selected patch to copy from, 1 - 6. Pressing L3 switches between Soft and Loud variations.
= no copy. This means that this side (soft or loud) will not be copied.
F2~F7 DESTINATION
Press the F2~F7 buttons to select which source (of the current patch) that the copy will be made to.
F8 EXECUTE
Press this to make the copy.
This screen is the menu for Harmonic Envelope functions.
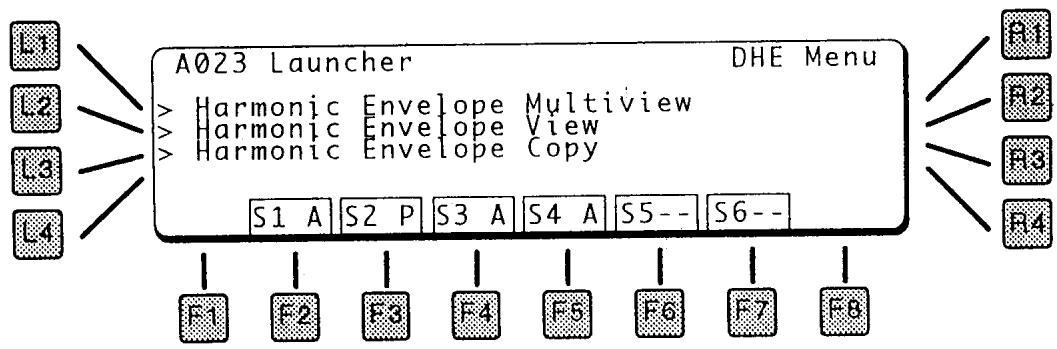
L1 HARMONICS ENVELOPE MULTIVIEW Displays individual parameters for all 64 harmonic envelopes simultaneously.
L2 HARMONICS ENVELOPE VIEW Displays all parameters of a single harmonic envelope.
L3 HARMONICS ENVELOPE COPY Copies harmonic envelopes from a Single patch in memory to the current patch being edited.
HARMONIC ENVELOPE MULTIVIEW
The Harmonic Envelope Multiview screen shows individual segments of the harmonic envelope for all harmonics side by side. The display shows the rate on the left and the level on the right. The harmonics selected for editing are shown by the dots and the arrow underneath the graphs. Compare this screen to the Harmonic Envelope View screen (described on page 44), which shows all segments of a single envelope.

L1 EDIT GROUP Since editing harmonics one at a time can become quite cumbersome, the Edit Group function allows you to select harmonics to modify as a group.
HARMONIC GROUPS Harmonics can be grouped in the following categories. The dots underneath the harmonic bars show which harmonics are selected.
BRIGHT The upper 32 harmonics.
DARK
The lower 32 harmonics.
ODD
The odd numbered harmonics.
EVEN
The even numbered harmonics.
OCT
Each harmonic tuned to an octave of the fundamental pitch: 1, 2, 4, 8, 16, 32, 64 (when lo is selected) / 128 (when hi is selected).
5TH
Each harmonic tuned to a fifth above of the fundamental pitch: 3, 6, 12, 24, 48 (when lo is selected) / 96 (when hi is selected).
ALL
All 64 harmonics.
EACH
Only the selected harmonic, the pointed to by the arrow under the harmonic display.
L2 LOOP
To enhance motion in the sound, the harmonic envelopes can loop among several settings during the sound's sustain.
OFF
No loop. Envelope goes to the Decay 2 Level and sustains there, the same as the envelopes for the DCF and DCA.
LP1
Loops between Decay 1 Level and Decay 2 Level, at the Decay 2 Rate.
LP2
Loops between Decay 1 Level and Decay 2 Level, but uses both Decay 1 and Decay 2 Rates.

L3 NEXT HARMONIC
L4 PREVIOUS HARMONIC
These buttons select an individual harmonic. The small arrow under the harmonics displays which harmonic is selected.
RI ATTACK (RATE & LEVEL)
Press R1 to switch between the Attack Rate and Attack Level. Use the Value dial to change the setting.
R2 DECAY I (RATE & LEVEL)
Press R2 to switch between the Decay 1 Rate and Level. Use the Value dial to change the setting.
R3 DECAY 2 (RATE & LEVEL)
Press R3 to switch between the Decay 2 Rate and Level. Use the Value dial to change the setting.
R4 RELEASE (RATE & LEVEL)
Press R4 to switch between the Release Rate and Level. Use the Value dial to change the setting.
HARMONIC ENVELOPEVIEW
This display shows all the envelope parameters for a single harmonic on one screen, another way of looking at the harmonic envelopes.
L2 LEVEL
Press L2 to cycle through the level settings for Attack, Decay 1, Decay 2, and Release. Use the Value dial to change the setting.
L3 RATE
Press L3 to cycle through the rate settings for Attack, Decay 1, Decay 2, and Release. Use the Value dial to change the setting.
R3 HARMONIC
This selects the harmonic to modify. Each of the 64 harmonics has its own envelope.
R4 DECAY LOOP
To enhance motion in the sound, the harmonic envelopes can loop among several settings during the sound's sustain. See the diagram on the previous page.
OFF
No loop. Envelope goes to the Decay 2 Level and sustains there, the same as the envelopes for the DCF and DCA.
LPI
Loops between Decay 1 Level and Decay 2 Level, at the Decay 2 Rate.
HARMONIC ENVELOPE COPY
From this screen, you can copy sets of harmonic envelopes from one patch into the current patch. Since there are so many parameters in a harmonic envelope, this makes creating and modifying patches less time consuming.

L1 SINGLE NUMBER
This sets the patch to copy the harmonic envelope from.
L2 SOURCE NUMBER
This sets the source from the Single patch (selected above) to copy from.
F2-F7 DESTINATION SOURCE
Press the Source function key to select which source the envelope will be copied to. The display shows the destination as -- > SRC#.
F8 EXECUTE
Press this to make the copy.
FORMANT FILTER LEVEL (DFL)
The K5000's Formant Filter is a 128-band graphic equalizer, which can be used to create additional additive effects.

CENTER FREQUENCY OF 128 BAND FORMANT FILTER (BIAS=0)
| Band 70=440Hz. If the BIAS is set to +12, Band 70=220Hz. If the BIAS is set to -12, Band 70=880Hz. The Formant Filter Envelope value works the same as the BIAS. If the Formant Filter Env. is set to a minus value, the filter moves to the right. | |||||||||||
| Band | Freq.-Hz. | Key | Band | Freq.-Hz. | Key | Band | Freq.-Hz. | Key | Band | Freq.-Hz. | Key |
| 1 | 8 | C | 33 | 52 | G# | 65 | 330 | E | 97 | 2093 | C |
| 2 | 9 | C# | 34 | 55 | A | 66 | 349 | F | 98 | 2217 | C# |
| 3 | 9 | D | 35 | 58 | A# | 67 | 370 | F# | 99 | 2349 | D |
| 4 | 10 | D# | 36 | 62 | B | 68 | 392 | G | 100 | 2489 | D# |
| 5 | 10 | E | 37 | 65 | C | 69 | 415 | G# | 101 | 2637 | E |
| 6 | 11 | F | 38 | 69 | C# | 70 | 440 | A | 102 | 2794 | F |
| 7 | 12 | F# | 39 | 73 | D | 71 | 466 | A# | 103 | 2960 | F# |
| 8 | 12 | G | 40 | 78 | D# | 72 | 494 | B | 104 | 3136 | G |
| 9 | 13 | G# | 41 | 82 | E | 73 | 523 | C | 105 | 3322 | G# |
| 10 | 14 | A | 42 | 87 | F | 74 | 554 | C# | 106 | 3520 | A |
| 11 | 15 | A# | 43 | 92 | F# | 75 | 587 | D | 107 | 3729 | A# |
| 12 | 15 | B | 44 | 98 | G | 76 | 622 | D# | 108 | 3951 | B |
| 13 | 16 | C | 45 | 104 | G# | 77 | 659 | E | 109 | 4186 | C |
| 14 | 17 | C# | 46 | 110 | A | 78 | 698 | F | 110 | 4435 | C# |
| 15 | 18 | D | 47 | 117 | A# | 79 | 740 | F# | 111 | 4699 | D |
| 16 | 19 | D# | 48 | 123 | B | 80 | 784 | G | 112 | 4978 | D# |
| 17 | 21 | E | 49 | 131 | C | 81 | 831 | G# | 113 | 5274 | E |
| 18 | 22 | F | 50 | 139 | C# | 82 | 880 | A | 114 | 5588 | F |
| 19 | 23 | F# | 51 | 147 | D | 83 | 932 | A# | 115 | 5920 | F# |
| 20 | 24 | G | 52 | 156 | D# | 84 | 988 | B | 116 | 6272 | G |
| 21 | 26 | G# | 53 | 165 | E | 85 | 1047 | C | 117 | 6645 | G# |
| 22 | 28 | A | 54 | 175 | F | 86 | 1109 | C# | 118 | 7040 | A |
| 23 | 29 | A# | 55 | 185 | F# | 87 | 1175 | D | 119 | 7459 | A# |
| 24 | 31 | B | 56 | 196 | G | 88 | 1245 | D# | 120 | 7902 | B |
| 25 | 33 | C | 57 | 208 | G# | 89 | 1319 | E | 121 | 8372 | C |
| 26 | 35 | C# | 58 | 220 | A | 90 | 1397 | F | 122 | 8870 | C# |
| 27 | 37 | D | 59 | 233 | A# | 91 | 1480 | F# | 123 | 9397 | D |
| 28 | 39 | D# | 60 | 247 | B | 92 | 1568 | G | 124 | 9956 | D# |
| 29 | 41 | E | 61 | 262 | C | 93 | 1661 | G# | 125 | 10548 | E |
| 30 | 44 | F | 62 | 277 | C# | 94 | 1760 | A | 126 | 11175 | F |
| 31 | 46 | F# | 63 | 294 | D | 95 | 1865 | A# | 127 | 11840 | F# |
| 32 | 49 | G | 64 | 311 | D# | 96 | 1976 | B | 128 | 12544 | G |

L3 NEXT
L4 PREVIOUS
These buttons select the next or previous group.
R1 EDITGROUP
The filter bands can be grouped into the following categories. The bracket underneath the bars show which filter bands are selected. The range can be adjusted with the Band control, the level of the selected band with the level control.
GRAPHIC EQ
An eight-band graphic EQ, which creates the typical elliptical EQ pattern in each band.
20 BAND
Operates on 20 of the 128 formant filter bands at one time.
15 BAND
Operates on 15 of the 128 formant filter bands at one time.
10 BAND
Operates on 10 of the 128 formant filter bands at one time.
5 BAND
Operates on 5 of the 128 formant filter bands at one time.
ALL
All 128 Bands.
EACH
Only the selected frequency band, shown by the arrow under the display.
R2 BAND
The range of the filter band to be controlled can be adjusted using the Band control. The bracket shows the selected range.
R3 LEVEL
This adjusts the level of the selected band.
R4 BIAS
The frequencies of the entire formant filter can be moved up and down using the Bias control.
L2 FORMANT FILTER LEVEL COPY
This copies the formant filter settings from a Single patch in memory into the current Single patch.

L1 SINGLE NUMBER
This sets the patch to copy the formant filter level settings from.
L2 SOURCE NUMBER
This sets the source from the Single patch (selected above) to copy from.
F2-F7 DESTINATION SOURCE
Press the Source function key to select which source the filter settings will be copied to.
The display shows the destination as --> SRC#.
F8 EXECUTE
Press this to make the copy.
FORMANT ENVELOPE (DFE)
The formant filter can be swept up and down using an envelope generator or LFO, selected from this screen.


L2 DFE ENVELOPE EDIT
This page contains the parameters for the Formant Filter Envelope. There is one envelope per source.
The envelope diagram shows the visual result of the envelope settings on the page.
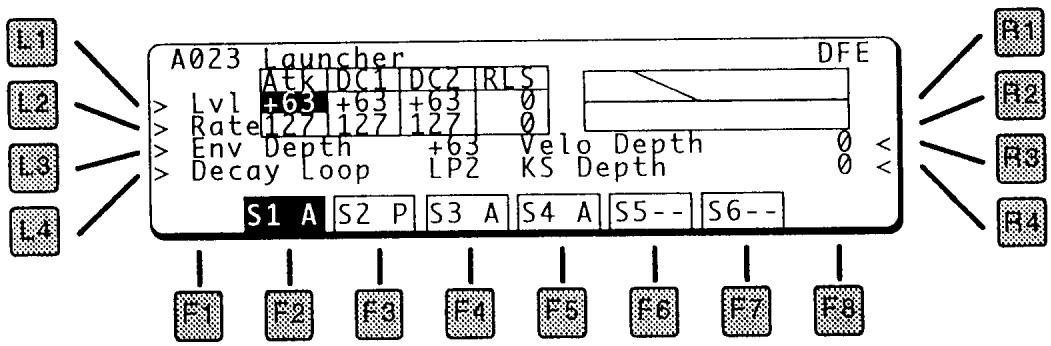
L1 LEVEL
Press L2 to cycle through the level settings for Attack, Decay 1, Decay 2, and Release. Use the Value dial to change the setting.
L2 RATE
Press L3 to cycle through the time settings for Attack, Decay 1, Decay 2, and Release. Use the Value dial to change the setting.
L3 ENV DEPTH
This is the master envelope depth control, which determines how much the envelope controls the filter.
L4 DECAY LOOP
To enhance motion in the sound, the harmonic envelopes can loop among several settings during the sound's sustain. See the diagram on page 43.
OFF
No loop. Envelope goes to the Decay 2 Level and sustains there, the same as the envelopes for the DCF and DCA.
LP1
Loops between Decay 1 Level and Decay 2 Level, at the Decay 2 Rate.
LP2
Loops between Decay 1 Level and Decay 2 Level, but uses both Decay 1 and Decay 2 Rates.
R3 VELO DEPTH
The key velocity can be used to adjust the amount of filter modulation by the envelope. With a positive value, the harder a key is played, the more the filter will be moved by the envelope.
R4 KS DEPTH
The key scale (which key is played) can also be used to adjust the amount of filter modulation by the envelope. With a positive value, the higher the note, the more the filter will be moved by the envelope.
R2 LFO EDIT

R2 LFO SHAPE
This selects the LFO waveform type:
TRI
Triangle
SAW
Sawtooth
RND
Random
R3 LFO SPEED
Sets the LFO speed.
R4 LFO DEPTH
Sets the initial LFO Depth.
Morfing lets you create new harmonic shapes by dissolving between four different harmonic snapshots. This is done by copying four sources from patches stored in the K5000W.

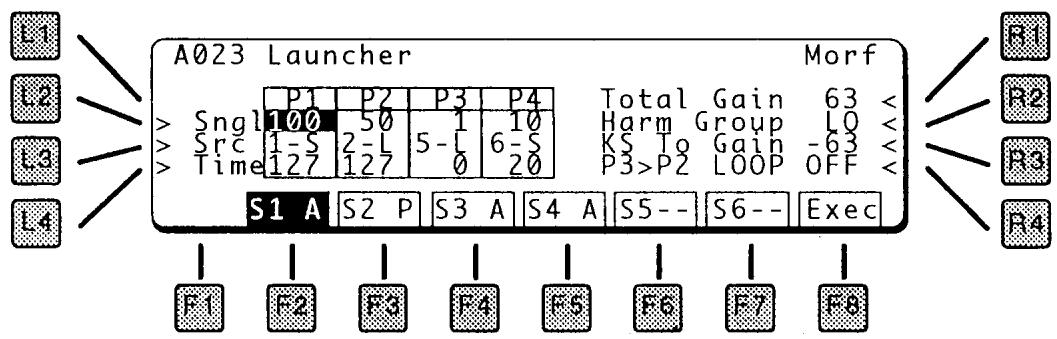
L2 SINGLE
This selects which patch the source will be copied from. Press this key repeatedly to cycle through the four phases (P1 - P4).
L3 SOURCE
This selects the source within the single patch (selected by L2) to copy. There are up to six sources, each of which contains a soft harmonic set (S), and a loud harmonic set (L). Press this key repeatedly to cycle through the four phases (P1 - P4).
L4 TIME
The transition between phases.
R1 TOTAL GAIN
The loudest harmonic will be set to this level, so it functions as a master level.
R2 HARMONIC GROUP
This selects the range of harmonics, 1-64 or 65-128.
R3 KS TO GAIN
Controls the level with the Key Scale. With a positive value, the harmonics will get louder as higher notes are played on the keyboard.
R4 P3>P2 LOOP
If OFF, the harmonics will move according to the selected on this screen, however they will freeze once the sustain point is reached. By turning ON the P3>P2 Loop, the harmonics will morf back and forth between phase 2 and phase 3 during sustain, creating constant motion and a more animated sound.
F8 EXECUTE
Creates the Morf.
The Low Frequency Oscillator is a slow moving (sub-audio) oscillator that is used to modify the DCO, DCF, or DCA to give vibrato and tremolo effects.
A Source Copy function is also included on this page.
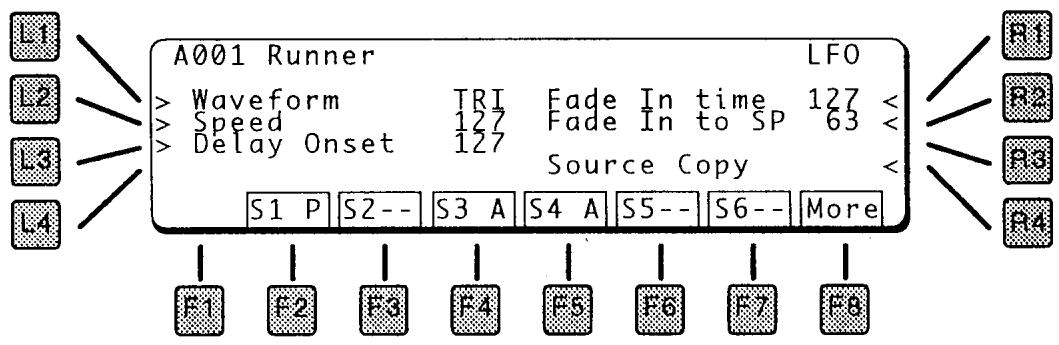
L1 WAVEFORM
This selects the LFO waveform type:
SIN
Sine
TRI
Triangle
SAW
Sawtooth
SQR
Square
RND
Random
L2 SPEED
Sets the LFO initial speed. The range is 0.1Hz to 18Hz .
L3 DELAY ONSET
This adds a delay before the LFO kicks in. The delay can be as long as 2 seconds.
R1 FADE IN TIME
After the delay, this sets the amount of time that the LFO fades in to maximum amount.
R2 FADE IN TO SPEED
After the delay, the LFO gradually speeds up to the initial speed setting.
R3 SOURCE COPY
This lets you copy an entire source from another patch.

L1 SINGLE NUMBER
Select the Patch to copy from.
L2 SOURCE NUMBER
Select the Source from within the selected patch to copy from, 1-6.
F2 - F6 Selects the destination source (in the current patch) for the copy.
F8 MORE
Goes to the LFO Modulation page, below.
LFO MODULATION
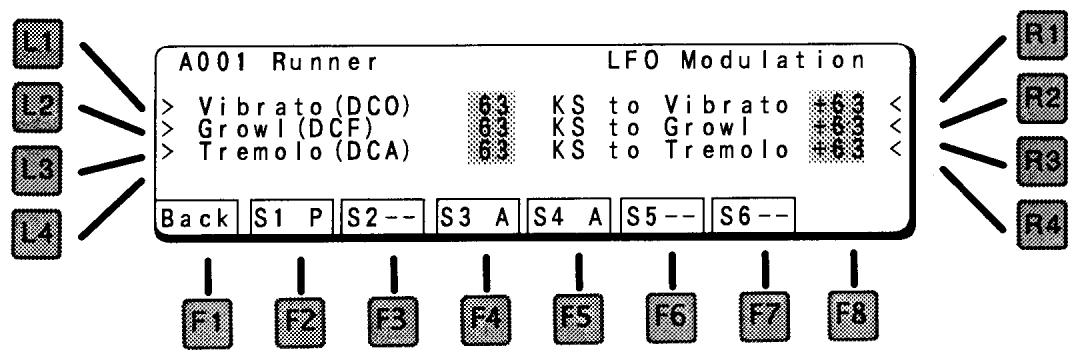
L1 VIBRATO (DCO)
Controls the amount of LFO routed to the DCO, which causes vibrato.
L2 GROWL (DCF)
Controls the amount of LFO routed to the DCF, which causes growl.
L3 TREMOLO (DCA)
Controls the amount of LFO routed to the DCA, which causes tremolo.
R1 KEY SCALE TO VIBRATO
This scales the amount of vibrato depth according to the key played. With a positive value, the amount of vibrato increases as higher notes are played.
R2 KEY SCALE TO GROWL
This scales the amount of DCF growl according to the key played. With a positive value, the amount of growl increases as higher notes are played.
R3 KEY SCALE TO TREMOLO
This scales the amount of tremolo depth according to the key played. With a positive value, the amount of tremolo increases as higher notes are played.
The Control pages contain settings for real time control of the sound.
VOLUME, PITCH BEND, PAN
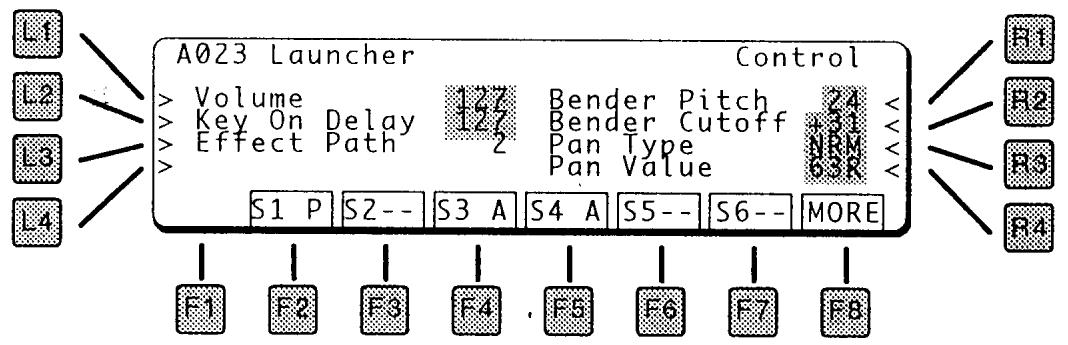
L1 VOLUME
This is the master volume for the sound source.
L2 KEY ON DELAY
This sets a delay between the time the key is struck and the sound starts.
L3 EFFECT PATH
Routes this source to one of the four inputs to the effects section. For more on effects please see page 79.

R1 BENDER PITCH
The maximum amount of pitch bend, in semitones.
R2 BENDER CUTOFF
The Pitch Bend control also can affect the filter. If you bend up, the filter cutoff goes up and the sound gets brighter. If you bend down the filter cutoff goes down and the sound gets darker.
R3 PAN TYPE
This sets the type of panning.
NRM (Normal) is a standard left to right pan, controlled by the Pan Value, below.
RND (Random) changes the panning randomly for each note played. This gives a feeling of an "ensemble of players" when used for a string patch, for example.
KS & -KS (Key Scale and Negative Key Scale) changes the panning depending upon the key played. KS pans from left to right, -KS pan from right to left. Using KS will simulate the natural panning of strings inside a piano.
R4 PAN VALUE
Places the sound left to right in the stereo field.
This screen has parameters for key and velocity range. Using these parameters, a sound can be limited to play in only a certain range of the keyboard, or only when a key is played hard or soft. By creating several sources, for example, one that plays on soft notes only and another that plays on hard notes only, a sound can be created with more lifelike variation.
L1 ZONELO
Sets the lowest note that will be played. The keyboard graphic visually shows the range.
L2 ZONE HI
Sets the highest note that will be played.
L3 VELOCITY SWITCH
Sets the velocity range. At Loud, only hard (loud) notes will sound. At Soft, only soft notes will sound. When set to OFF, the velocity switch is turned off and notes play at all velocity levels.
L4 VALUE
Sets the threshold between high and low velocity. This is the MIDI velocity number.
F1 BACK
Press to return to the previous screen.
F8 MORE
Press to go to the controller screen, below.
CONTROLLER
The next two screens contain settings for aftertouch pressure, modulation wheel, and expression pedal control of the sound. Following these is a screen for Assignable Controllers.
PRESSURE MODULATION
Channel Pressure, or aftertouch, can be routed to two destinations simultaneously (actually a third destination is possible by using the Assignable Controllers, page 59).
L1 DESTINATION 1
Selects the destination for the modulation. The destination can be any of those listed below.
L2 DEPTH1
Sets the amount of the modulation. This can be positive or negative.
L3 DESTINATION 2
Selects the destination for the modulation. The destination can be any of those listed below.
L4 DEPTH2
Sets the amount of the modulation. This can be positive or negative.
WHEEL MODULATION
The Modulation Wheel can be routed to two destinations simultaneously (actually a third destination is possible by using the Assignable Controllers, page 59). The Modulation Wheel is MIDI Controller 1.
R1 DESTINATION 1
Selects the destination for the modulation. The destination can be any of those listed below.
R2 DEPTH1
Sets the amount of the modulation. This can be positive or negative.
R3 DESTINATION 2
Selects the destination for the modulation. The destination can be any of those listed below.
R4 DEPTH2
Sets the amount of the modulation. This can be positive or negative.
F1 BACK
Press to return to the previous screen.
F8 MORE
Press to go to the expression pedal modulation screen, below.
EXPRESSION PEDAL
This screen contains settings for control of the sound using the expression pedal (MIDI controller 11).
L1 DESTINATION 1
Selects the destination for the modulation. The destination can be any of those listed below.
L2 DEPTH1
Sets the amount of the modulation. This can be positive or negative.
L3 DESTINATION 2
Selects the destination for the modulation. The destination can be any of those listed below.
L4 DEPTH2
Sets the amount of the modulation. This can be positive or negative.
F1 BACK
Press to return to the previous screen.
F8 MORE
Press to go to the Assignable Controller screen, below.
MODULATION DESTINATIONS
Any of the modulation sources on these pages can be routed to any of the following destinations:
PITCH
Modifies the pitch. With a positive value, increasing the control makes the pitch go up, with a negative value, increasing the control makes the pitch go down.
CUTOFF
Modifies the filter cutoff. With a positive value, increasing the control makes the sound brighter, with a negative value, increasing the control makes the sound darker.
LEVEL
Modifies the volume. With a positive value, increasing the control makes the sound louder, with a negative value, increasing the control makes the sound softer.
VIBRATO DEPTH
Adds Vibrato (LFO controls pitch). This parameter sets the amount of vibrato.
GROWL DEPTH
Adds Growl (LFO controls filter). This parameter sets the amount of growl.
TREMOLO DEPTH
- Adds Tremolo (LFO controls volume). This parameter sets the amount of tremolo.
LFO SPEED
Modifies the LFO speed. With a positive value, increasing the control makes the LFO faster, with a negative value, increasing the control makes the LFO slower.
ATTACK TIME
Controls the DCF & DCA Attack time. With a positive value, a higher key will have a longer attack time and a lower key will have a shorter attack time.
DECAY1 TIME
Controls the DCF & DCA Decay1 time. With a positive value, a higher key will have a longer decay time and a lower key will have a shorter time.
RELEASE TIME
Controls the DCF & DCA Release time. With a positive value, a higher key will have a longer release time and a lower key will have a shorter time.
VELOCITY OFFSET
Scales the velocity, plus and minus.
RESONANCE
Controls the amount of filter resonance.
PANPOT
Controls the Left/Right panning of the sound.
FORMANT FILTER BIAS
In a patch that uses the additive sound generator, this control adjusts the Formant Filter to Bias.
FORMANT FILTER ENV/LFO DEPTH
In a patch that uses the additive sound generator, this control adjusts the Formant Filter Depth.
FORMANT FILTER ENV/LFO SPEED
In a patch that uses the additive sound generator, this control adjusts the Formant Filter Speed.
HARMONICS LO
Controls the level of the lower harmonics. This does not adjust the low notes, rather it adjusts the low end of any note.
HARMONICS HI
Controls the level of the upper harmonics. This does not adjust the high notes, rather it adjusts the high end of any note.
HARMONICS EVEN
Controls the level of the even harmonics.
HARMONICS ODD
Controls the level of the odd harmonics, including the fundamental, or base pitch.
ASSIGNABLE CONTROLLER
Two additional controllers can be used for modulation. The controllers are assigned from the following screen.

L1 SOURCE1
Selects the source for the modulation. The source can be any of those listed above.
L2 DESTINATION1
Selects the destination for the modulation. The destination can be any of those listed on page 57.
L3 DEPTH1
Sets the amount of the modulation. This can be positive or negative.
R1 SOURCE2
Selects the source for the modulation. The source can be any of those listed above.
R2 DESTINATION2
Selects the destination for the modulation. The destination can be any of those listed on page 57.
R3 DEPTH2
Sets the amount of the modulation. This can be positive or negative.
ASSIGNABLE CONTROLLER SOURCES
The following sources can be used for modulation:
BENDER
The Pitch Bend wheel.
CH PRESS (CHANNEL PRESSURE)
Aftertouch pressure (per channel).
WHEEL
The Modulation Wheel
EXPRESSION (EXPRESSION PEDAL)
The Expression Pedal, MIDI Controller 11
MIDI VOLUME
The MIDI Volume command, MIDI Controller 7
PANPOT
The MIDI Pan command, MIDI Controller 10
G CONT 1~8 (GENERAL CONTROLLERs 1~8)
The eight MIDI General Purpose Controllers - controller numbers 16-19 & 80-83.
After editing, save your sound by pressing the WRITE button in the COMMON section of the front panel. The following screen appears.
L1 WRITE
This saves your patch to the internal memory area.
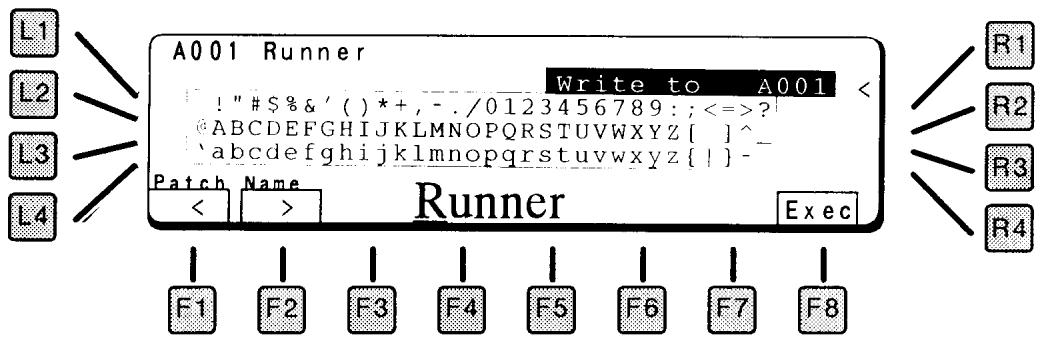
R1 WRITE LOCATION
Use the Value dial to select a location to save your patch.
F1/F2 CHARACTER
This names the patch. Use the F1 and F2 keys to select a character in the name (moves the cursor), and the Value dial to select a letter.
F8 EXECUTE
Stores the patch.
L2 DISK WRITE (A BANK ONLY)
You can also write ADD Patches to disk. This is useful if your internal memory is full.
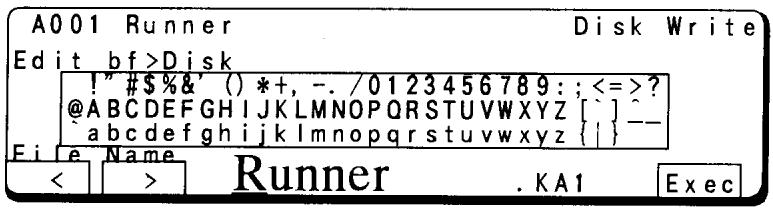
F1/F2 CHARACTER
This names the file on the disk. Use the F1 and F2 keys to select a character in the name (moves the cursor), and the Value dial to select a letter.
F8 EXECUTE
Press Execute to save the file. It will be saved with the file extension shown after the name.
R1 DELETE (A BANK ONLY)
Since there is not a fixed number of ADD patches in the A Bank, you may need to delete patches to make room for new ones.

Use the Value dial to choose the patch to delete, and press F8 (Execute). Sure? Press F8 to continue.
KIT SECTION
Single Patches B117 through B128 are reserved for drum kits. B117 is user editable, the others are preset.
| B120 | Standrd1 | B125 | Bob |
| B121 | Standrd2 | B126 | Dance |
| B122 | Room | B127 | Jazz |
| B123 | Power | B128 | Brush |
| B124 | Electric |
In Kit Play mode, eight parameters are available for instant edit. Press one of the F keys as described below, then use the value dial to change the setting.
NOTES:
These parameters add and subtract from the original values contained in the instrument patches.

F1 CTOF (FILTER CUTOFF)
This adjusts the filter cutoff frequency. Turn this up to make the sound brighter.
F2 RESO (FILTER RESONANCE)
This adjusts the filter resonance. The value range is -7 - +7 .
F3 VEL (VELOCITY SENSITIVITY)
Adjusts the velocity sensitivity. Use this control to adjust the way the patch responds to the dynamics of your playing.
F4 ATAK (ATTACK TIME)
This adjusts the envelope (DCA) attack time. Turn it down (minus value) to make the attack sharper, turn it up to make the attack smoother.
F5 DECY (DECAY TIME)
This adjusts the envelope (DCA) initial decay. Turn it down (minus value) to make the decay sharper, turn it up to make the decay smoother.
F6 RELS (RELEASE TIME)
This adjusts the envelope (DCA) release or final decay. Turn it up to make the sound fade out longer after releasing the keyboard.
F7 EFX (EFFECTS AMOUNT)
This adjusts the effects level, such as chorus and distortion.
F8 REV (REVERB AMOUNT)
This adjusts the reverb level. Turn it up to add more ambience.
Pressing EDIT brings up the Kit Edit menu:
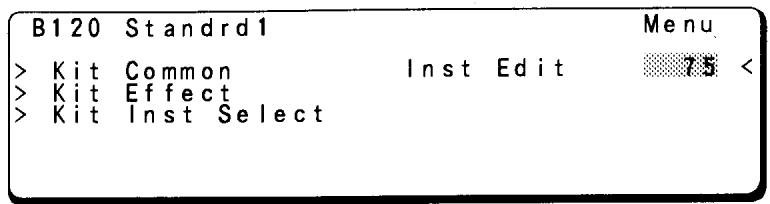
Kit Edit arranges the instruments into a kit. Instrument Edit edits the instruments themselves.
EXITING EDIT MODE
Press EXIT to return to Play Mode. An alert message appears, asking if you want to save you edit before continuing. Press WRITE to save, or F8 (Quit) to exit without saving. To continue editing, press EDIT.
L1 KIT COMMON
The Kit Common page the patch name, and volume setting for the kit, as shown below.

L1 and L2 move through the name forward and back, respectively. Use the Value dial to select a letter.
R1 VOLUME
Sets the master volume for the kit.
L2 KIT EFFECT
This sets the effects for the drum kit. See page 79 for an explanation of the effects section.

NOTE:
These effects are not used when a kit in combined into a Combi or used inCompose mode - the effects settings in the Combi or Song is used instead. When the K5000W is used in General MIDI mode, the GM preset is used.
This page routes the percussion instruments to individual keys, to create a kit of drums.
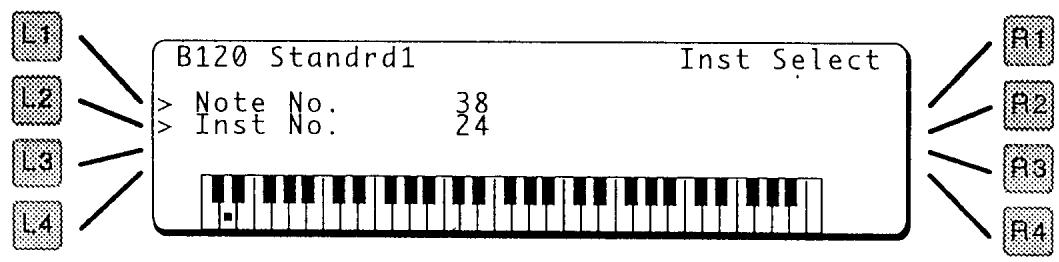
There are a total of 285 percussion instruments, 253 preset and 32 user-programmable (U1 - U32). These instruments are arranged by note to create a kit. Each kit can have a total of 64 instruments, assigned from C#0 (25) to E5 (88).
L1 NOTE NUMBER
This parameter responds to keyboard or MIDI) control of the Note Number. A dot on the keyboard in the display moves to show the key played. You can also turn the Value dial to select notes.
L2 INSTRUMENT NUMBER
As you change notes, the Instrument Number changes to show which instrument is assigned to the note. You can change the assigned instrument by turning the Value dial.
R1 INSTRUMENT EDIT
This leads to the instrument editing section. Use the Value dial or the keyboard to select an instrument number, then press R1. The Instrument Edit menu appears:
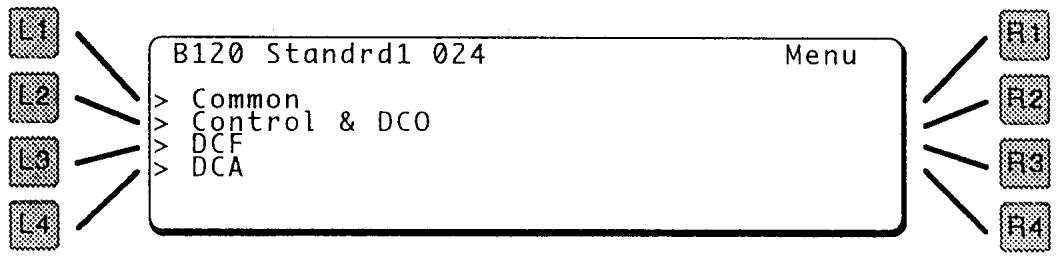
The following menus appear by pressing the buttons L1 - L4.
L1 COMMON

L2 EFFECT PATH
The instrument is routed to one of the four Effects inputs by this parameter. For more information, see the Effects section page 79.
L3 EXCL GROUP
Instruments grouped together so that only one of them will play at any one time. For example, if Open and Closed Hi Hat sounds are grouped together, then playing a closed hi-hat sound will cutoff the open sound. There are seven exclusive groups, numbers 1 - 7; when OFF, no group is assigned.
L4 GATE
Sets the response to Note On and Note Off for the instrument. The gate time can be set to a short or longer duration (1 - 32), or can stay on until the note is released (Note Off).
Percussion instruments generally do not have a deliberate end to each note - each percussion note is caused by the instantaneous attack of a stick on a head, a hammer on a string. There is no sustain, only decay.
For other instrument families, there is a deliberate start and end to each note played – the Note On and Note Off. The sax player starts blowing to begin a note and stops blowing to end it. It can sustain as long as the player can blow.
L2 CONTROL & DCO
This page has parameters to control the volume, wave, and pitch of the sound.
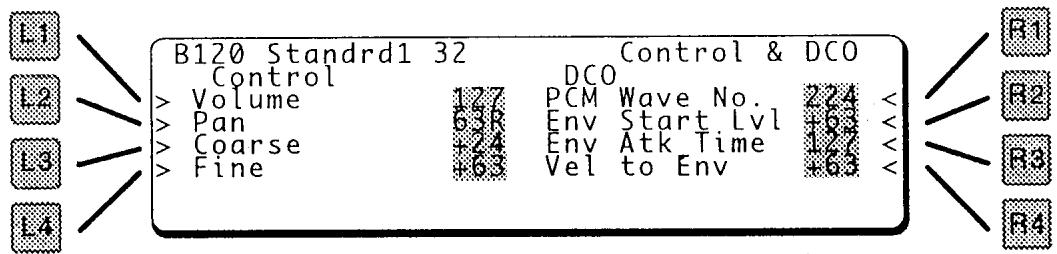
CONTROL PARAMETERS:
L1 VOLUME
This sets the volume of the selected instrument. Use this parameter to adjust the relative mix of the instruments in the kit.
L2 PAN
Sets the Pan from left to right.
L3 COARSE
Sets the coarse pitch of the sound, in semitones. 0 is the original sample pitch.
L4 FINE
Fine tuning of the sound, 0 is the original sample pitch.
DCO PARAMETERS:
R1 PCM WAVE NUMBER
Selects the PCM wave to be used. See page 162 for a list of waves.
R2 ENVELOPE START LEVEL
Most percussion instruments have some pitch change during the note attack, the DCO envelope can be used to create, accentuate, or minimize this.
Sets the starting level for the envelope. A positive number means the sound will start at a higher pitch, then come down to 0 (the Coarse pitch), A negative number means the sound will start low and come up to 0.
R3 ENVELOPE ATTACK TIME
When a note is played (note on), the envelope will go from the Start level to 0 in this amount of time.
R4 VELOCITY TO ENVELOPE LEVEL
This controls how much the key velocity affects the amount of DCO envelope.
L3 DCF
Pressing DCF in the Inst Edit menu brings up the following screen which contains the DCF parameters.

L1 CUTOFF
Sets the basic filter cutoff frequency.
L2 VELOCITY TO CUTOFF
Controls how much the Velocity affects the filter cutoff frequency.
L4 DCA
The Digitally Controlled Amplifier (DCA) sets the volume of the sound. It is controlled by an envelope to shape a sound's overall transient characteristics.
The DCA envelope screen shows a visual representation of the envelope.

L1 ATTACK TIME
When a note is played (note on), the envelope will go from zero to maximum in this amount of time. A short attack time gives a sharp edge to the start of the sound like a piano. A long attack give a more legato effect.
L2 DECAY TIME
After reaching the maximum, the envelope will then go to the decay level in this amount of time.
L3 DECAY LEVEL
After reaching the maximum, the envelope will then go to this level.
L4 RELEASE TIME
When a note is released (gate off) the envelope will return to zero in this amount of time.
MODULATION BY VELOCITY:
R1 ENVELOPE LEVEL
Uses velocity to control the maximum amount of the envelope. A harder (louder) key will have more envelope dynamics and a softer key will have less dynamics.
B2 ATTACK TIME
Uses velocity to control the attack time. With a positive value, a harder (louder) key will have a longer attack time and a softer key will have a shorter attack time.
In nature, softer notes generally have a longer attack time than louder notes. Using negative amounts of this parameter will simulate this.
B3 DECAY TIME
Uses velocity to control the decay time. With a positive value, a harder (louder) key will have a longer decay time and a softer key will have a shorter time:
WRITE
After editing, save your sound by pressing the WRITE button in the COMMON section of the front panel. The following screen appears.
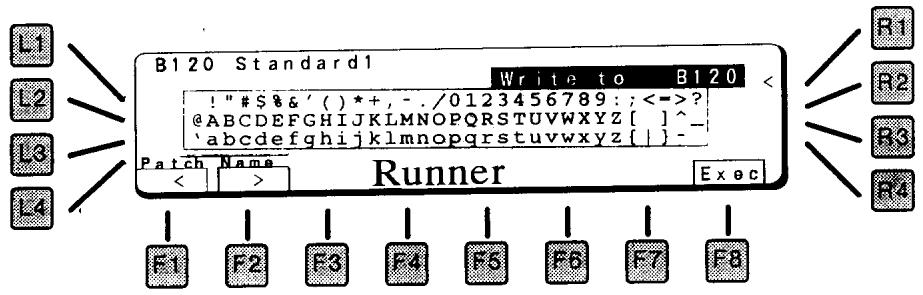
L1 WRITE
This saves your patch to the internal memory area.

B1 WRITE LOCATION
Use the Value dial to select a location to save your patch.
F1/F2 CHARACTER
This names the patch. Use the F1 and F2 keys to select a character in the name (moves the cursor), and the Value dial to select a letter.
FB EXECUTE
Stores the patch.
L2 DISKWRITE
You can also write KIT Patches to disk. This is useful if your internal memory is full.

F1/F2 CHARACTER
This names the file on the disk. Use the F1 and F2 keys to select a character in the name (moves the cursor), and the Value dial to select a letter.
FB EXECUTE
Press Execute to save the file. It will be saved with the file extension shown after the name.
R1 DELETE
Since there is not a fixed number of ADD patches in the A Bank, you may need to delete patches to make room for new ones.
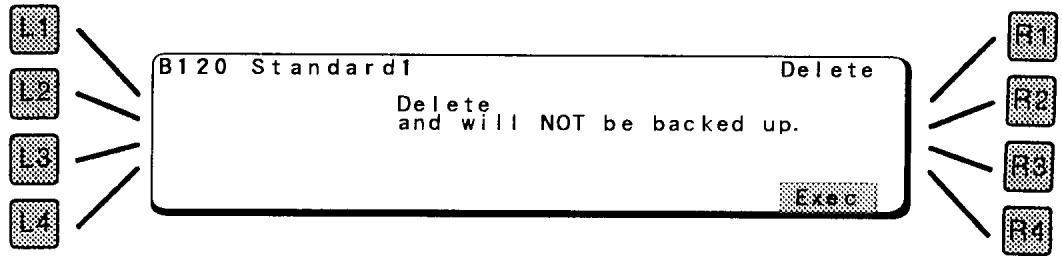
Use the Value dial to choose the patch to delete, and press F8 (Execute). Sure? Press F8 to continue.
COMBI SECTION
Combi Patches are combinations of up to four Single patches. They can be arranged in layers, key splits, velocity splits, or any combination.
No matter how they are arranged, Combis are designed to be played as a group. The entire combi responds to a single MIDI channel.
Multi-timbral / multi-channel arrangements are done in the Compose Mode.
Pressing the Perform key on the left side of the keyboard brings up the Single Play window. Press Combi to change to Combi mode.

The name of the Combi patch is displayed as well as the name, transpose, and volume for each Single patch that it contains.
SELECTINGCOMBI PATCHES
To select a one of the 64 Combi patches, use the Patch Select keys 0 through 9 on the right side of the panel. To change banks, use the Patch Select keys 00 through 06. The Bank menu screen appears as shown below.

This screen lists the patches in the selected bank. To select one press the 0-9 key corresponding to the last digit of the patch number. A different patch will play, with the display as shown at the top of this section.
MODIFYINGCOMBI PATCHES
In Combi Play mode, the transposition and volume of each single patch can be adjusted. Press one of the F keys as described below, then use the value dial to change the setting.

F1 TRANSPOSE SECTION 1
This parameter adjusts the pitch of Section 1, in semitones. To raise a sound one octave, set the transpose to 12; to lower it one octave, set the transpose to -12.
F2 VOLUME SECTION 1 This parameter adjusts the volume of Section 1.
F3 TRANSPOSE SECTION 2 This parameter adjusts the pitch of Section 2, in semitones.
F4 VOLUME SECTION 2 This parameter adjusts the volume of Section 2.
F5 TRANSPOSE SECTION 3 This parameter adjusts the pitch of Section 3, in semitones.
F6 VOLUME SECTION 3 This parameter adjusts the volume of Section 3.
F7 TRANSPOSE SECTION 4 This parameter adjusts the pitch of Section 4, in semitones.
F8 VOLUME SECTION 4 This parameter adjusts the volume of Section 4.
Pressing EDIT brings up the Combi Edit Menu, below.
C021 K-Hit! Menu
> Common
> Section
> Effect
L1 COMMON
This jumps to the Common edit, below.
L2 SECTION
This jumps to Section edit, discussed on the next page
L3 EFFECT
Jumps to the Effect section, page 79.
NOTE
Press EXIT to return to the Combi Edit Menu.
EXTINGEDIT MODE
From the Combi Edit Menu, press EXIT. An alert message appears, asking if you want to "Save and Quit". Press WRITE to save and quit to Combi Play mode, or F8 (Quit) to return to Combi Play mode without saving. To continue editing, press EDIT.
COMMON
Enter the name of the Combi patch from this page.
C021 K-Hit! Common
>> Name K-Hit!
<< " $%&' ( ) *, - ./0123456789; ; <= ?
@ABCDEFGHIJKLMNOPORSTUVWXYZ[0] -
abcdefghijklmnopqrstuvwxyz{|} -
More
L1 and L2 select which character is selected, the Value dial selects the desired letter or number.
F8 MORE
This advances to the Volume page.

L1 VOLUME
This sets the master volume for the Combi patch.
F1 BACK
This returns to the Name page.
SECTION
The Section pages contain parameters to setup each of the four sections of a Combi Patch.

SELECTINGA SECTION
The Section parameters are duplicated for each section in a Combi patch. To select a section, press the function key for the desired section (F2 - F5). In the display above, Section 1 is selected.
ENABLING/MUTINGSECTIONS
Turning individual sections on and off is useful for editing. In addition, many Combi patches do not need all four sections enabled.
With the desired section selected (highlighted), press the section function key again (F2 - F5). The Section will turn on or off each time the function button is pressed.
In the display above, Sections 1 and 2 are enabled (Sec1), Sections 3 and 4 are muted (S--4). The "ec" changes to "--" when a section is muted.
SECTION MENU FUNCTIONS
L1 SINGLE PATCH
Selects the Single patch for this section.
L2 SECTION VOLUME
Adjusts the volume for the section.
L3 SECTION PAN
Adjusts the stereo pan for the section.
L4 EFFECT PATH
Routes this section to one of the four inputs of the effects section. For more on the Effects, please see page 79.

R3 TRANSPOSE
Adjusts the transposition of the selected section, in semitone increments. A transposition of +12 is one octave higher.
B4 FINE
Adjuststhe tuning of the section.
F8 MORE
Jumps to the Zone screen, below.
SECTION KEY AND VELOCITY ZONES
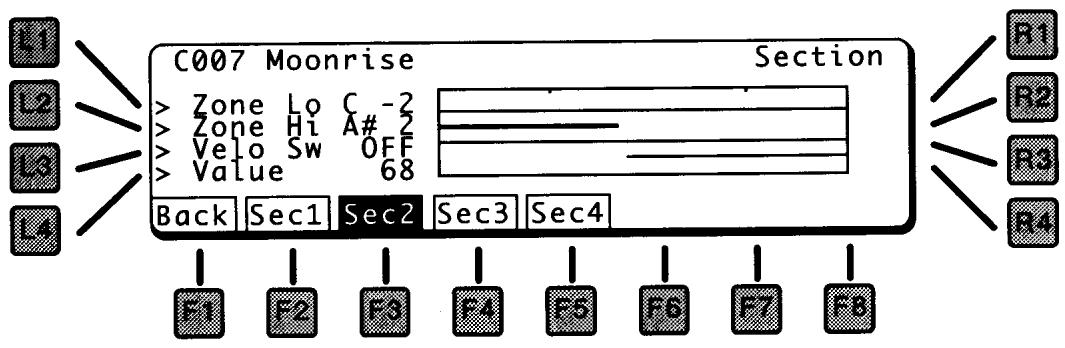
L1 ZONE LO
Sets the lowest note that will be played. The keyboard graphic visually shows the range. The selected section is highlighted.
L2 ZONE HI
Sets the highest note that will be played.
R1 VELOCITY SWITCH
Sets the velocity range. At Loud, only hard (loud) notes will sound. At Soft, only soft notes will sound. When set to OFF, the velocity switch is turned off and notes play at all velocity levels.
R2 VALUE
Sets the threshold between high and low velocity. This is the MIDI velocity number.
F1 BACK
Press to return to the previous screen.
After editing, save your Combi by pressing the WRITE button in the COMMON section of the front panel. The following screen appears.

L1 WRITE
This saves your patch to the internal memory area.

R1 WRITE LOCATION
Use the Value dial to select a location to save your patch.
F1/F2 CHARACTER
This names the patch. Use the F1 and F2 keys to select a character in the name (moves the cursor), and the Value dial to select a letter.
F8 EXECUTE
Stores the patch.
EFFECT SECTION
The Effect section contains the settings for the digital effects generator.
There is one Effect generator for the entire K5000. When in Single mode, the entire effect generator is available for the sound. When in Combi or Compose mode, the effects settings of the Single patch are disregarded, and the Combi or Song effects settings are used instead.
The main effects page displays a block diagram of the algorithm selected.

VALUE DIAL ALGORITHM SELECT
The algorithm can be selected by turning the Value dial. In Single mode, press R1 to access the Algorithm select.
FI ALGORITHM PAGE
Returns to the Algorithm Page, this page, from other effects pages.
F2 E1 (EFFECT I)
Goes to the edit parameters for the Effect 1 block. Any of the effects blocks can be assigned one of 36 different effects, which include a variety of delays, chorus, flanging, and distortion. The available controls vary from one effect to another.
See page 85 for a description of the 36 available effect types.
F3 E2 (EFFECT 2)
Goes to the edit parameters for the Effect 2 block.
F4 E3 (EFFECT 3)
Goes to the edit parameters for the Effect 3 block.
F5 E4 (EFFECT 4)
Goes to the edit parameters for the Effect 4 block.
F6 REVERB
Goes to the edit parameters for the Reverb block. The reverb block can be assigned one of 11 different reverb types, which include a variety of rooms, halls and, plates. The available controls vary from one reverb type to another.
See page 110 for a description of the available reverb types.
F7 GRAPHIC EQ
Goes to the edit parameters for the Graphic EQ block.

Use the F2 through F8 keys to select an EQ band, and the Value dial to change the amount. The slider will change to visually indicate the setting, the number underneath shows the exact amount.
F8 CONTROL
Goes to the Effect Controller page. Two controllers can be used to control effect or reverb depth. An expression pedal could be used to add reverb or aftertouch pressure could be used to add chorusing.
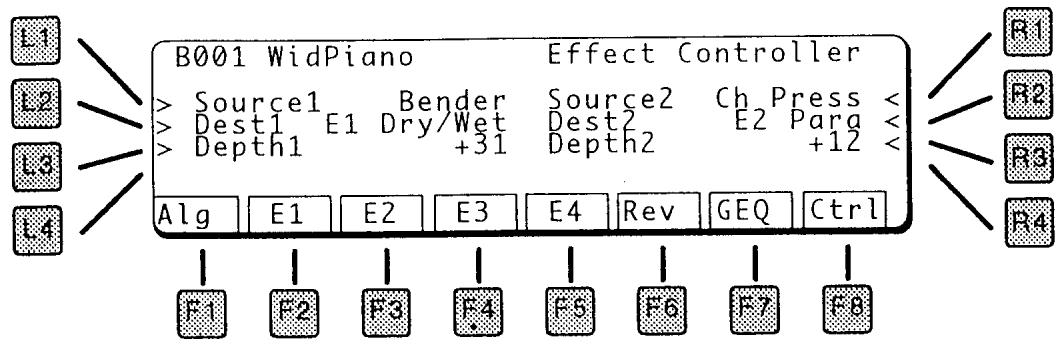
LI SOURCEI
- Selects the source for the modulation. The source can be any of those listed below.
L2 DESTINATIONI
Selects the destination for the modulation. This can be the level of the reverb, or a modulatable parameter in one of the four effects blocks (Effect1 - Effect4).
L3 DEPTHI
Sets the amount of the modulation. This can be positive or negative.
RI SOURCE2
- Selects the source for the modulation. The source can be any of those listed below.
R2 DESTINATION2
Selects the destination for the modulation. This can be the level of the reverb, or a modulatable parameter in one of the four effects blocks (Effect1 - Effect4).
R3 DEPTH2
Sets the amount of the modulation. This can be positive or negative.
MODULATION SOURCES
The sources that can be used to control the effects are:
BENDER
The Pitch Bend wheel.
CH PRESS (CHANNEL PRESSURE)
Aftertouch pressure (per channel).
WHEEL
The Modulation Wheel
EXPRESSION (EXPRESSION PEDAL)
The Expression Pedal
MIDI VOLUME
The MIDI Volume commend, MIDI Controller 7
PANPOT
The MIDI Pan commend, MIDI Controller 10
G CONT 1 ~ 8 (GENERAL CONTROLLER 1~8)
The eight MIDI General Purpose Controllers - Continuous Controllers 16-19 & 80-83.
SOURCE ASSIGNMENT GRID (SINGLE PATCH ONLY)
In Single mode, the Source Assignment Grid on the left side of the screen is used to connect the (up to) six sources in each patch to the four inputs of the effect algorithm.
Press any of the left hand buttons to access the Source Assignment Grid.

VALUE DIAL
Selects which source to assign. Sources 1 through 6 are displayed, but only the sources actually used in the Single patch can be assigned.
LI INPUT I ASSIGN
L2 INPUT 2 ASSIGN
L3 INPUT 3 ASSIGN
L4 INPUT 4 ASSIGN
After selecting a source with the value dial, press the L1, L2, L3, or L4 buttons to assign that source to input 1, 2, 3, or 4, respectively. The number 1, 2, 3, or 4 is displayed in the column indicating its assignment.
Anatomy of an Effect Algorithm

The Value dial (R1) selects the effect algorithm to be used. There are four different algorithms available, and the arrangement of the effects blocks varies depending upon the algorithm chosen.
There are four input channels into the effects algorithms. In Single mode, the left of the block diagram shows the Source Assignment Grid, with controls routing of each source to the input channels. In Combi ot Compose mode, the assignment of each single section to the four input channels is controlled by the Effect Path function in the Section menu.
ALGORITHM I

Input 1 passes through all four effects blocks, on its way to the reverb, EQ and main outputs. It merges with input 3 after the second effects block.
Input 2 goes directly to the reverb block, EQ, and main outputs. It has its own wet/ dry mix in the reverb block.
Input 3 passes through two of the four effects blocks, on its way to the reverb, EQ and main outputs.
Input 4 goes directly to the Individual outputs without any effect, reverb or EQ. This is useful for sending sounds directly out of the K5000W for external signal processing.

In this algorithm, each input goes through its own effects block, then the four are paired together for reverb and EQ.
ALGORITHM 3

In this algorithm, each input goes through its own effects block, then 1, 2, and 3 are combined for reverb and EQ.
Input 3 has its own wet/dry mix in the reverb block.
After passing through its effect, Input 4 goes directly to the Individual outputs. This could be useful for a Bass sound running through a phaser, but without reverb.
ALGORITHM 4

Input 1 passes through the E1 and E2 effects blocks, on its way to the reverb, EQ and main outputs. It merges with input 2 after the second effects block.
Input 2 goes directly to the reverb block, EQ, and main outputs.
Input 3 passes through E3 and E4 of the four effects blocks, on its way to the reverb, EQ and main outputs. It has its own wet/dry mix in the reverb block.
Input 4 goes directly to the Individual outputs without any effect, reverb or EQ.

The four effects blocks represent individual effects. Any of the effects blocks can be assigned one of 36 different effects, which include a variety of delays, chorus, flanging, and distortion. The available controls vary from one effect to another.
EARLY REFLECTION I EARLY REFLECTION 2
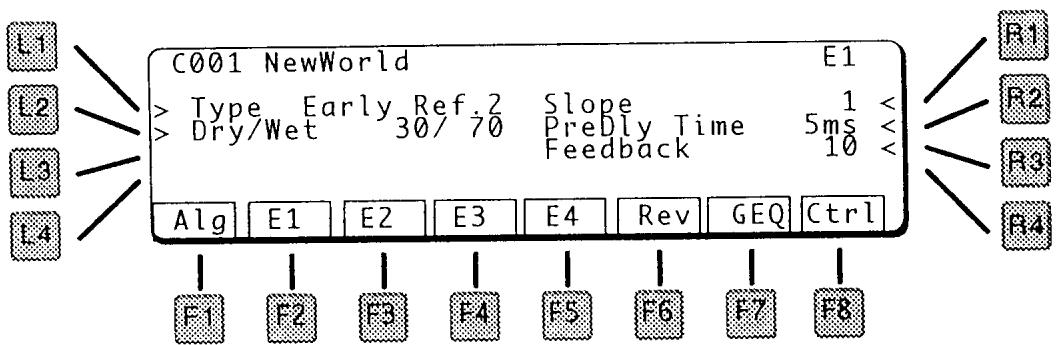
LI TYPE
Selects the type of effect. Early Reflection 1 has a shorter reflection time than Early Reflection 2.
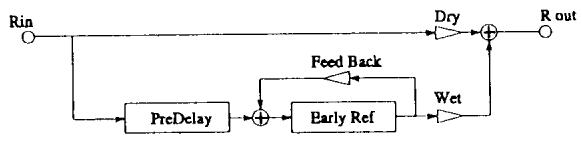

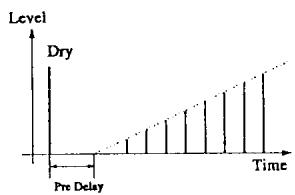
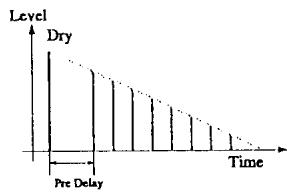
L2 DRY/WET
Controls the ratio between the original sound (dry) and the effected sound (wet).
RI SLOPE
This softens the reflection by changing the delay amplitudes. See diagram.
R2 PREDELAYTIME
The amount of delay time before the effect.
R3 FEEDBACK
Amount of delay looped back into the input. This creates a repeating delay.
TAP DELAY I
TAP DELAY 2
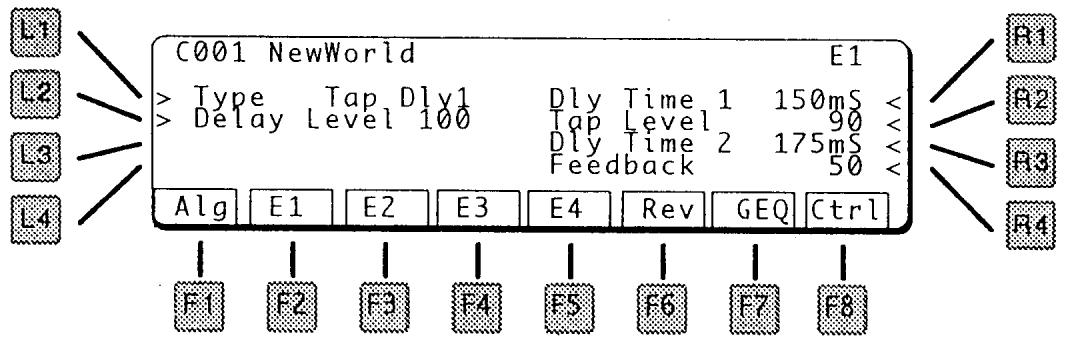
LI TYPE
Selects the type of effect.

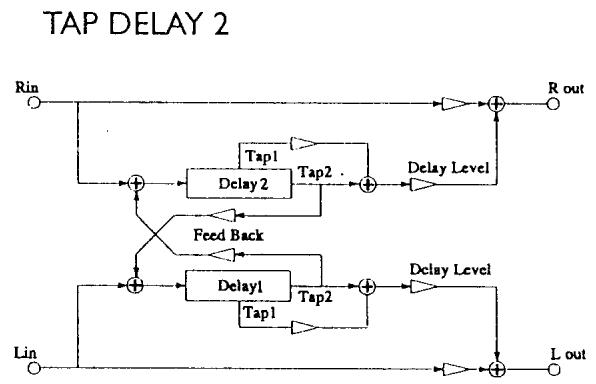
L2 DELAY LEVEL
Master level of this effect block.
RI DELAY TIME I
The delay time for delay 1.
R2 TAP LEVEL
The level of delay 1.
R3 DELAYTIME2
The delay time for delay 2.
R4 FEEDBACK
Amount of delay looped back into the input. This creates a repeating delay. The original sound (input) and Delay 1 are repeated together at the delay 2 time.
SINGLE DELAY
This effect has a single delay, with a fine time adjustment for synchronizing to the beat.

LI TYPE
Selects the type of effect.

L2 DELAY LEVEL
Master level of this effect block.
RI DELAY TIME FINE
Adjusts the delay time in 1mS increments, from 0 - 9mS .
R2 DELAYTIME COARSE
Adjusts the delay time in 10mS increments, from 0 - 1270 ms. (1.27 seconds)
R3 FEEDBACK
Amount of delay looped back into the input. This creates a repeating delay.
This effect has two delays, panned hard left and right.

LI TYPE
Selects the type of effect.


L2 DELAY LEVEL
Master level of this effect block.
RI DELAY TIME LEFT
Adjusts the delay time from 0 - 720ms.
R2 FEEDBACK LEFT
Amount of delay looped back into the input. This creates a repeating delay.
R3 DELAY TIME RIGHT
Adjusts the delay time from 0 - 720mS.
R4 FEEDBACK RIGHT
Amount of delay looped back into the input. This creates a repeating delay.
This is a single stereo delay. Repeats maintain the same stereo panning as the original signal.
LI TYPE
Selects the type of effect.

L2 DELAY LEVEL
Master level of this effect block.
RI DELAYTIME
Adjusts the delay time from 0 - 720mS
R2 FEEDBACK
Amount of delay looped back into the input. This creates a repeating delay.
CROSS DELAY
Cross Delay is a single delay, with repeats alternating left and right.

L1 TYPE
Selects the type of effect.

L2 DELAY LEVEL
Master level of this effect block.
R1 DELAY TIME
Adjusts the delay time from 0 - 720 mS
FEEDBACK
Amount of delay looped back into the input. This creates a repeating delay.
AUTOPAN
Auto Pan moves the input source back and forth across the stereo field.
L1 TYPE
Selects the type of effect.

L2 DRY/WET
Controls the ratio between the original (dry) and the panned sound (wet).
R1 SPEED
Adjuststhepanningspeed.
R2 DEPTH
Controls how wide the panning is.
R3 PREDELAY TIME
Adds a delay (up to 100mS) before the panned sound starts
R4 WAVE
Selects the LFO waveform used to control the panning. The choices are SINE or TRIangle.
AUTO PAN & DELAY
Auto Pan moves the input source back and forth across the stereo field, with an added delay.

LI TYPE
Selects the type of effect.

L2 DRY/WET
Controls the ratio between the original (dry) and the panned sound (wet).
RI SPEED
Adjusts the panning speed.
R2 DEPTH
Controls how wide the panning is.
R3 DELAYTIME
Delays the panned sound (up to 200mS ) The repeating delay does not pan.
R4 WAVE
Selects the LFO waveform used to control the panning. The choices are SINE or TRIangle.
Chorus is a slight detune of the sound, which adds depth and richness to the sound. Great for guitars, electric pianos, organs, strings, choirs.
Chorus 1 is a true stereo in / stereo out chorus - the left and right channels are independent.
Chorus 2 is a mono in / stereo out chorus - the left and right channels are summed together before entering a stereo chorus unit.
LI TYPE
Selects the type of effect.

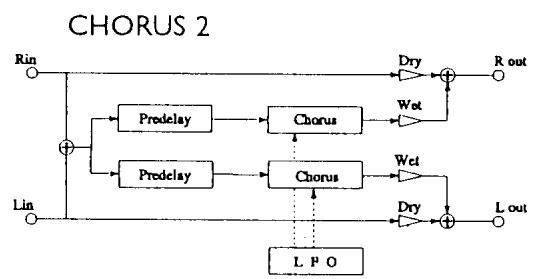
L2 DRY/WET
Controls the ratio between the original (dry) and the chorused sound (wet).
RI SPEED
Adjusts the chorus speed.
R2 DEPTH
Controls how wide the detune is.
R3 PREDELAY TIME
Adds a delay (up to 100mS ) before the chorus sound starts.
R4 WAVE
Selects the LFO waveform used to control the panning. The choices are SINE or TRIangle.
Chorus 1 is a true stereo in / stereo out chorus - the left and right channels are independent.
Chorus 2 is a mono in / stereo out chorus - the left and right channels are summed together before entering a stereo chorus unit.

L1 TYPE
Selects the type of effect.

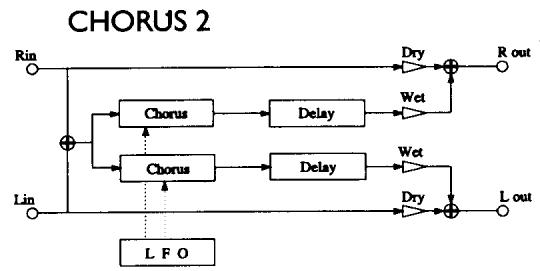
L2 DRY/WET
Controls the ratio between the original (dry) and the chorused sound (wet).
R1 SPEED
Adjusts the chorus speed.
R2 DEPTH
Controls how wide the detune is.
R3 DELAY TIME
Adds a repeating delay of the chorused sound (up to 200mS )
R4 WAVE
Selects the LFO waveform used to control the panning. The choices are SINE or TRIangle.
Flange is a slight detune of the sound, with an airy phasing, which adds depth to the sound. Great for guitars and electric pianos.
In Flanger 1, the flange control is 180^ out of phase between the left and right channels. In Flanger 2, the flange control is in phase between the left and right channels.

LI TYPE
Selects the type of effect.

L2 DRY/WET
Controls the ratio between the original (dry) and the flanged sound (wet).
RI SPEED
Adjusts the flanger speed.
R2 DEPTH
Controls how wide the detune is.
R3 PREDELAY TIME
Adds a delay (up to 100mS) before the flanger starts.
R4 FEEDBACK
Controls the feedback of the flanging sound.
In Flanger 1, the flange control is 180^ out of phase between the left and right channels. In Flanger 2, the flange control is in phase between the left and right channels.

LI TYPE
Selects the type of effect.

L2 DRY/WET
Controls the ratio between the original (dry) and the flanged sound (wet).
RI SPEED
Adjusts the flanger speed.
R2 DEPTH
Controls how wide the detune is.
R3 DELAYTIME
Adds a repeating delay of the flanged sound (up to 200mS
R4 FEEDBACK
Controls the feedback of the flanging sound. Does not affect the delay.
Ensemble is a three phase chorus, with each of the three chorus units at a different phase and frequency. This gives a slightly richer sound than the Celeste effect, below.

LI TYPE
Selects the type of effect.
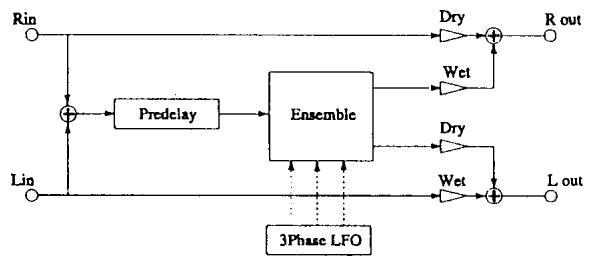
L2 DRY/WET
Controls the ratio between the original (dry) and the chorused sound (wet).
RI DEPTH
Adjusts the amount of effect.
R2 PREDELAY TIME
Adds a delay (up to 100mS ) before the ensemble starts.
ENSEMBLE & DELAY
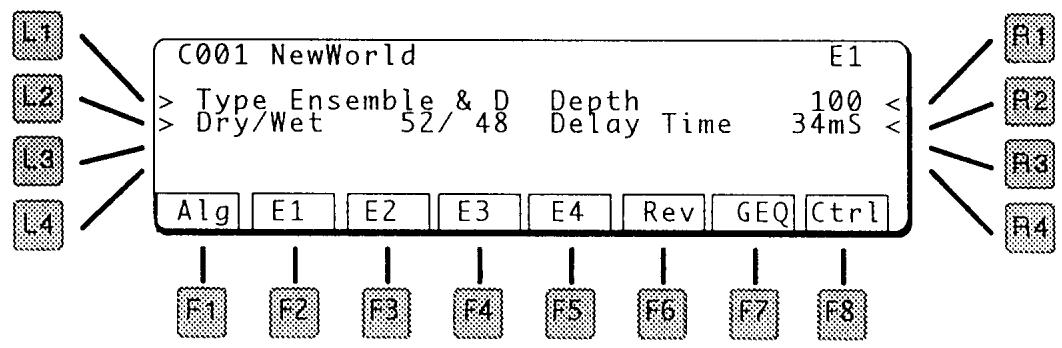
L1 TYPE
Selects the type of effect.
L2 DRY/WET
Controls the ratio between the original (dry) and the chorused sound (wet).
R1 DEPTH
Adjuststheensembledepth.
P2 DELAY TIME
Adds a repeating delay of the Ensemble sound (up to 200mS ).
CELESTE
Celeste is a three phase chorus, with each of the three chorus units at a different phase.

L1 TYPE
Selects the type of effect.
L2 DRY/WET
Controls the ratio between the original (dry) and the chorused sound (wet).
R1 SPEED
Adjusts the ensemble speed.
R2 DEPTH
Controls how wide the detune is.
R3 PREDELAY TIME
Adds a delay (up to 100mS) before the celeste starts.
CELESTE & DELAY
LI TYPE
Selects the type of effect.

L2 DRY/WET
Controls the ratio between the original (dry) and the chorused sound (wet).
RI SPEED
Adjuststheensemble speed.
R2 DEPTH
Controls how wide the detune is.
R3 DELAY TIME
Adds a repeating delay of the Celeste sound (up to 200mS
Tremolo changes the volume of the sound, making it louder and softer. Can be used for surf guitar sounds.
LI TYPE
Selects the type of effect.
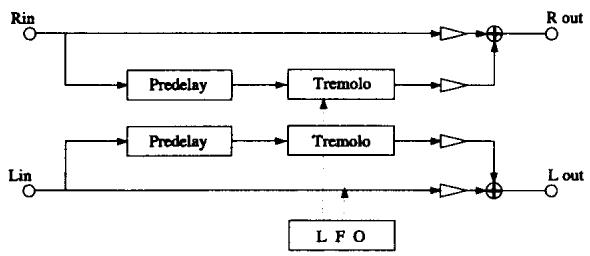
L2 DRY/WET
Controls the ratio between the original (dry) and the tremolo sound (wet).
RI SPEED
Adjuststhe tremolo speed.
R2 DEPTH
Controls how deep the tremolo is.
R3 PREDELAY TIME
Adds a delay (up to 100mS ) before the tremolo starts.
R4 WAVE
Selects the LFO waveform used to control the tremolo. The choices are SINE or TRIangle.
TREMOLO & DELAY

LI TYPE
Selects the type of effect.

L2 DRY/WET
Controls the ratio between the original (dry) and the tremolo sound (wet).
RI SPEED
Adjuststhe tremolo speed.
R2 DEPTH
Controls how deep the tremolo is.
R3 DELAY TIME
Adds a repeating delay of the tremolo sound (up to 200mS
R4 WAVE
Selects the LFO waveform used to control the tremolo. The choices are SINE or TRIangle.
PHASER I
PHASER 2
The phaser creates a phase change in the sound, adding motion to the sound. Good for any sustain sounds, such as strings and organ, as well as for electric pianos and other vintage guitar sounds.
Phaser 1 is a true stereo in / stereo out phase shifter - the left and right channels are independent.
Phaser 2 is a mono in / stereo out phase shifter - the left and right channels are summed together before go into to a stereo phase shifter.

LI TYPE
Selects the type of effect.

L2 DRY/WET
Controls the ratio between the original (dry) and the phaser sound (wet).
BI SPEED
Adjusts the phaser speed.
R2 DEPTH
Controls how wide the phasing is.
R3 PREDELAY TIME
Adds a delay (up to 100mS ) before the phasing starts.
R4 FEEDBACK
FEEDBACK Feeds the sound back into itself, creating a longer sustained sound.
PHASER I & DELAY
PHASER 2 & DELAY

LI TYPE
Selects the type of effect.

L2 DRY/WET
Controls the ratio between the original (dry) and the phaser sound (wet).
RI SPEED
Adjusts the phaser speed.
R2 DEPTH
Controls how wide the phasing is.
R3 DELAY TIME
Adds a repeating delay of the phaser sound (up to 200mS
R4 FEEDBACK
Feeds the sound back into itself, creating a longer sustained sound.
ROTARY
This offers a two speed phasing effect, designed to simulate the slow and fast switching of an organ rotary speaker.

LI TYPE
Selects the type of effect.

L2 DRY/WET
Controls the ratio between the original (dry) and the rotary sound (wet).
RI SLOW SPEED
Adjusts the slow rotary speed.
R2 FAST SPEED
Adjusts the fast rotary speed.
R3 ACCELERATION
Controls the time it takes to switch from slow to fast or fast to slow.
R4 SLOW/FAST SWITCH
Changes between slow and fast. When this parameter is changed, the rotary changes to the other speed at a rate determined by the Acceleration parameter. You can control this parameter using the Effect Controller, page 81.
AUTO WAH
The Auto Wah sweeps the filter up and down on note attack, simulating a wah wah pedal.

LI TYPE
Selects the type of effect.

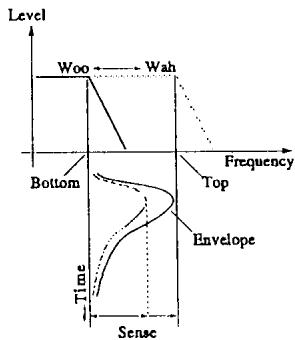

L2 DRY/WET
Controls the ratio between the original (dry) and the wah sound (wet).
RI SENSE
Adjusts the sensitivity of the wah effect to the key velocity. The harder the note is played, the higher the wah will sweep.
R2 FREQUENCY BOTTOM
Sets the starting and ending filter point.
R3 FREQUENCYTOP
Sets the peak point of the filter sweep.
R4 RESONANCE
Adjusts the filter resonance, for more of a pronounced "wah" effect.
The Bandpass effect filters out sound above and below the filter point. This can be used to create "telephone" sound, for example, or music playing out of a small radio.

LI TYPE
Selects the type of effect.


L2 DRY/WET
Controls the ratio between the original (dry) and the filtered sound (wet).
RI CENTER FREQUENCY
Adjusts the center point for the bandpass filter.
R2 BANDWIDTH
Adjusts how wide the filtering will be on either side of the Center Frequency.
The Exciter emphasizes high frequencies to make a sound more easily discernible in a mix. The exciter uses to distortion to achieve its emphasis.

LI TYPE
Selects the type of effect.
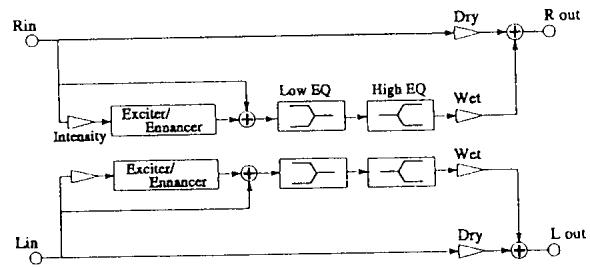
L2 DRY/WET
Controls the ratio between the original (dry) and the excited sound (wet).
RI EQ LOW
Adjust frequencies below the exciter point.
R2 EQ HIGH
Adjust frequencies above the exciter point.
R3 INTENSITY
Adjusts the amount of exciter effect.
ENHANCER
The Enhancer emphasizes high frequencies to make a sound more easily discernible in a mix. The Enhancer uses to phase shift and filtering to achieve its emphasis.

LI TYPE
Selects the type of effect.


L2 DRY/WET
Controls the ratio between the original (dry) and the enhanced sound (wet).
RI EQ LOW
Adjust frequencies below the enhanced point.
R2 EQ HIGH
Adjust frequencies above the enhanced point.
R3 INTENSITY
Adjusts the amount of enhancement.
OVERDRIVE
The overdrive effect adds distortion and sustain for electric guitar "fuzz" type sounds. It is a softer type of distortion than the Distortion effect, below.

LI TYPE
Selects the type of effect.

L2 DRY/WET
Controls the ratio between the original (dry) and the distorted sound (wet).
RI EQ LOW
Adjusts the low frequencies of the overdrive effect.
R2 EQ HIGH
Adjuststhehighfrequenciesoftheoverdriveeffect.
R3 OUTPUT LEVEL
Adjusts the level of the overdrive effect.
R4 DRIVE
Adjusts the amount of distortion.
DISTORTION
The distortion effect adds a harder distortion and sustain for electric guitar "fuzz" type sounds.
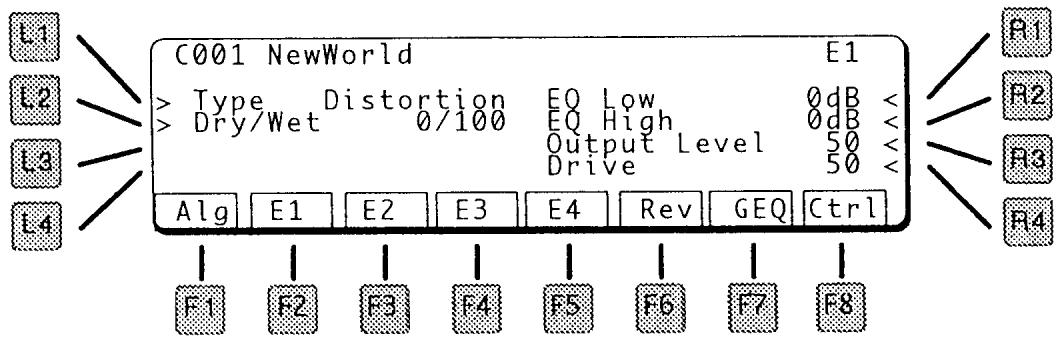
LI TYPE
Selects the type of effect.

L2 DRY/WET
Controls the ratio between the original (dry) and the distorted sound (wet).
RI EQ LOW
Adjusts the low frequencies of the distortion effect.
R2 EQ HIGH
Adjusts the high frequencies of the distortion effect.
R3 OUTPUT LEVEL
Adjusts the level of the distortion effect.
R4 DRIVE
Adjuststheamountofdistortion.
Overdrive & Delay adds a slap echo delay to the overdrive sound. The result is an even longer sustained distortion sound.

LI TYPE
Selects the type of effect.
L2 DRY/WET
Controls the ratio between the original (dry) and the distorted sound (wet).
RI EQ LOW
Adjusts the low frequencies of the overdrive effect.
R2 EQ HIGH
Adjusts the high frequencies of the overdrive effect.
R3 DELAYTIME
Adjusts the time of the delay (up to 200mS
R4 DRIVE
Adjuststheamountofdistortion.
LI TYPE
Selects the type of effect.

L2 DRY/WET
Controls the ratio between the original (dry) and the distorted sound (wet).
RI EQ LOW
Adjusts the low frequencies of the overdrive effect.
R2 EQ HIGH
Adjusts the high frequencies of the overdrive effect.
R3 DELAYTIME
Adjusts the time of the delay (up to 200mS ).
R4 DRIVE
Adjusts the amount of distortion.
=Rev
The Reverb block represents reverberation effects. Any of eleven different reverb types can be assigned, which include a variety of rooms, halls, and plates. The available controls vary from one effect to another.
As can be seen from the block diagram, there are two inputs to the reverb section. Each reverb screen has a pair of Wet/Dry parameters, one for each input. These two reverb sends allow you to adjust the reverb balance for each input independently.
HALL I
HALL 2
HALL 3
LI TYPE
Selects the type of effect.
HALL I
Standard Hall
HALL 2
Small Hall
HALL 3
Bright Hall

L2 DRY/WET I
Controls the ratio between the original sound (dry) and the reverberated sound (wet) for the top input in the algorithm.
L3 DRY/WET 2
Controls the ratio between the original sound (dry) and the effected sound (wet) for the bottom input in the algorithm.
RI REVERBTIME
Total reverberation time, in seconds.
R2 PREDELAYTIME
The amount of delay time before the effect.
R3 HIGH FREQUENCY DAMPING
In most natural acoustic spaces, high frequencies are absorbed faster than low frequencies. High Frequency Damping simulates this phenomenon by causing the high frequencies to die out faster. The more damping, the faster they die out – and sounds like there is more carpet or drapes in the room. Concrete room? Set the damping to 1.
ROOM I
ROOM 2
ROOM 3

LI TYPE
Selects the type of effect.
ROOM1
Standard Room
ROOM 2
Large Room
ROOM 3
Bright Room
L2 DRY/WET I
Controls the ratio between the original sound (dry) and the reverberated sound (wet) for the top input in the algorithm.
L3 DRY/WET 2
Controls the ratio between the original sound (dry) and the effected sound (wet) for the bottom input in the algorithm.
RI REVERBTIME
Total reverberation time, in seconds.
R2 PREDELAY TIME
The amount of delay time before the effect.
R3 HIGH FREQUENCY DAMPING
In most natural acoustic spaces, high frequencies are absorbed faster than low frequencies. High Frequency Damping simulates this phenomenon by causing the high frequencies to die out faster.
PLATE I
PLATE 2
PLATE 3

LI TYPE
Selects the type of effect.
PLATE I
Large Plate
PLATE 2
Small Plate
PLATE 3
Mellow Plate
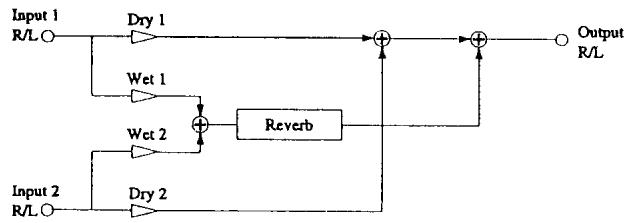
L2 DRY/WET I
Controls the ratio between the original sound (dry) and the reverberated sound (wet) for the top input in the algorithm.
L3 DRY/WET 2
Controls the ratio between the original sound (dry) and the effected sound (wet) for the bottom input in the algorithm.
RI REVERBTIME
Total reverberation time, in seconds.
R2 PREDELAYTIME
The amount of delay time before the effect.
R3 HIGH FREQUENCY DAMPING
In most natural acoustic spaces, high frequencies are absorbed faster than low frequencies. High Frequency Damping simulates this phenomenon by causing the high frequencies to die out faster.
REVERSE
Instead of decaying as natural reverb does, reverse reverb builds up as shown in the diagram below.

LI TYPE
Selects the type of effect.
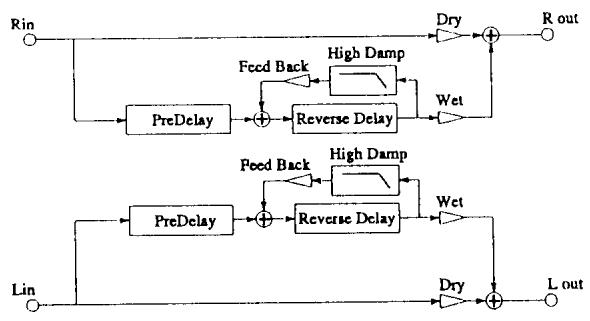

L2 DRY/WET I
Controls the ratio between the original sound (dry) and the reverberated sound (wet) for the top input in the algorithm.
L3 DRY/WET 2
Controls the ratio between the original sound (dry) and the effected sound (wet) for the bottom input in the algorithm.
RI FEEDBACK
Amount of delay looped back into the input. This creates a repeating delay.
R2 PREDELAY TIME
The amount of delay time before the effect.
R3 HIGH FREQUENCY DAMPING
Attenuates high frequencies from each repeat.
LONG DELAY
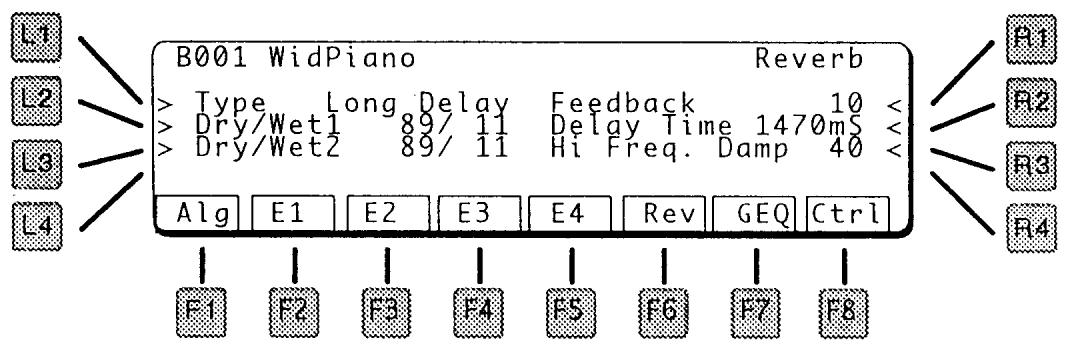
LI TYPE
Selects the type of effect.

L2 DRY/WET I
Controls the ratio between the original sound (dry) and the delayed sound (wet) for the top input in the algorithm.
L3 DRY/WET 2
Controls the ratio between the original sound (dry) and the delayed sound (wet) for the bottom input in the algorithm.
RI FEEDBACK
Amount of delay looped back into the input. This creates a repeating delay.
R2 DELAY TIME
Adjusts the delay time in 10mS increments, from 200 - 1470 mS. (1.47 seconds)
R3 HIGH FREQUENCY DAMPING
Attenuates high frequencies from each repeat.
COMPOSE MODE
Compose Mode is for creating music using the sonic timbres of the K5000W.
The K5000W Sequencer reads and writes Standard MIDI Files (SMF), so it is compatible with Standard MIDI Files found on diskette in music stores or on The Internet. Since most music sequencers read MIDI files on PC-format diskettes (even Macs!), most other computer music enthusiasts, whether professional or amateur, can play the music composed on your K5000W.
There are two main functions within Compose Mode: Recording and Editing. These functions are discussed in detail on the following pages.
The Recording Section is where music is recorded and played back. Each song is made up of 40 independent tracks, which can contain up to 40,000 notes.
The parameters on the screen control the settings for each track, while the Sequencer buttons on the front panel are the sequencer's "transport" and control the movement of the tracks: play, stop, record, etc.


There are two recording methods available in the K5000W: Real Time and Step Time. In Real Time recording, notes are recorded into the sequencer with the timing as they are played on the keyboard. In Step Time recording the timing of the notes played is disregarded, and the timing is assigned according to the settings on the Step Time recording page.
REAL TIME RECORD
Real time recording takes place on the track(s) selected for record. To record a track:
- Press the REC button. The button lights up.
- In the display, use the F1 - F8 keys to select the desired tracks for recording. Press once to select the track, then again to add the "R" next to the track number, indicating the track is enabled for recording. See the diagram at the top of this section.
- Press PLAY. Both the REC and PLAY buttons will be lit, the metronome will start counting, and recording will start.
- Press STOP to terminate the recording.
- To play back the recording, press RESET to rewind to the beginning, then PLAY to playback.
NOTE: There are 40 tracks in one song. Each track can record on only one channel, but more than one track can record at the same time.
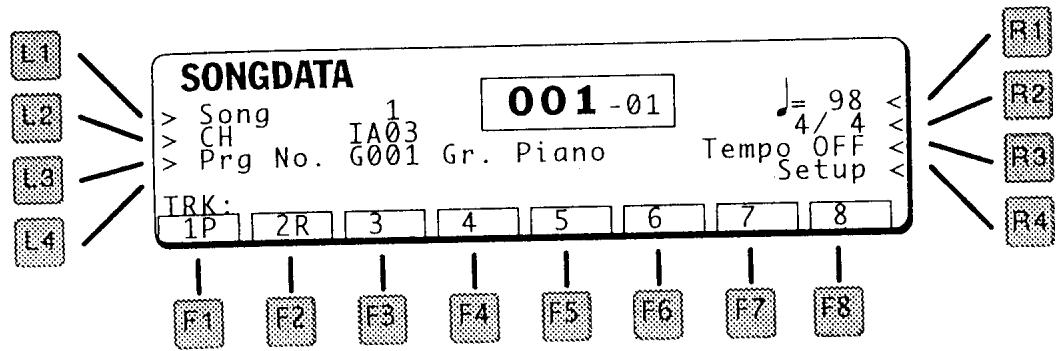
SONG NUMBER
The current Song. There are two songs available for recording in the K5000W, although more songs can be played directly from disk.
L2 CHANNEL
CHANNE Sets MIDI Channel of the selected track, whether the sound will be played by the K5000W or an external MIDI device, and through which MIDI OUT port the track will play.
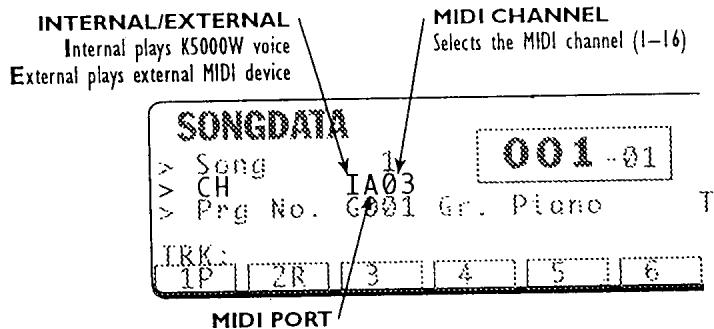
Selects MIDI A or MIDI B port on the Rear Panel
NOTE:
NOTE: ADD patches (A Bank) can only play to/from the MIDI A Port. B Bank and General MIDI patches can play to/from either MIDI port.
1.3 PROGRAM NUMBER.
Program Number and Name of the selected track.
RI TEMPO
The initial tempo of the song. This may be changed during the song, if the Tempo Track is ON (see below)
B2 TIME SIGNATURE
The initial time signature of the song.
R3 TEMPOTrack ON/OFF
The Tempo Track enables a song to change tempo during the song.
R4 SETUP
This brings up the Setup page, with parameters that apply to the Song itself:

LI COUNT IN
Sets a countdown before recording starts. This can be 1 or 2 bars, or 0 (no count in).
L2 Click
Turns the metronome sound ON or OFF during recording.
NOTE:
If the Click is OFF, but the Count In is on (i.e., 1 or 2 bars), then the Metro-nome will click during the Count In only.
L3 VOLUME
Sets the initial Volume of the selected track.
L4 PAN
Sets the left-right panning of the selected track.
RCLK
Selects the Clock Source.
INT
The K5000W is the clock source. All tempo settings in the song will be followed and transmitted.
EXT
The MIDI Beat Clock at the MIDI A INPUT is the clock source. All tempo settings in the song are overridden by the external MIDI clock.
R2 LOOP
If this is ON, a section of the song will repeat in playback. The start & end points are set below.
NOTE:
If the K5000W is placed into Record, Loop will be turned OFF.
R3 LOOP FROM
When Loop is ON, the Song will repeat starting at this bar.
NOTE:
If the Loop From point is set to a place other than the beginning of the song and the Song is played from the start, the song will play from the beginning to the Loop To point before returning to the Loop From point.
R4 LOOPTO
When Loop is ON, the Song will repeat at the completion of this bar.
FI-F8 TRACK SELECT BUTTONS
Press these buttons to select and change the status of a track. The settings are:
Blank Unrecorded
P Playback Enabled
R Record Enabled
- Recorded but Muted
Eight tracks are visible at one time. Press the Track Up and Down buttons to select additional tracks.
STEPTIME RECORD
As its name implies, step-time recording records one step at a time.
ENTERING STEP MODE
From the main recording screen, press and hold STOP, then press REC. The REC button lights up and the following screen appears:

LI RECTRACK
This selects which track to record on. There are 40 tracks in each song. Before entering this screen, you should have set a MIDI channel and sound patch for this track in the main recording screen.
L2 BEAT/MEAS
Sets the Time Signature for the step recording about to take place.
STEP RECORDING
Once everything is set, press PLAY. The REC and PLAY buttons will now be lit, and the following screen will appear:

As you play notes on the keyboard this display will update. You can record chords by playing notes at the same time.
LI NOTE/GATE/VELOCITY
Each key played will advance the sequencer by the Note value. The note will be assigned a duration (Gate) of 80% of the total note value, and a Velocity of 100. You can adjust any of these parameters during step Recording by pressing L1 to select a parameter, and the value dial to change it.

F1 TIE
While notes are held, pressing Tie makes the notes longer. That is, it ties the notes together.

F2 REST
Pressing the Rest button records a rest of the note value, rather than a note. You can change the value of a rest with the Note value parameter, the same as for notes
F3 BARREST
Pressing the Bar Rest button fills out the remainder of the measure with rests. If pressed at the beginning of a bar, it inserts an entire bar rest.

F4 DELETE
Delete removes the last event and steps back to the previous entry - it functions like an undo for step recording.
F5 CHORD
To make a chord, press and hold Chord while playing additional notes. They will all be added to the current step.

After recording, the K5000W offers a range of options for editing your MIDI performance.
While in Compose Mode, pressing EDIT brings up the Sequencer Edit menu.

LI PUNCH IN/OUT

LI TRACK
Sets the track for Punch In recording. This track is Record Enabled.
L2 LOOP
If this is ON, the K5000W will loop between the Punch In and Out points in Record. This means each repetition adds to what was recorded, it does not replace the previous recording.
RI START
Sets the starting bar for playback. This can be the same or earlier than the Punch In point. If earlier, it gives a preroll before recording starts.
R2 PUNCH IN
When Loop is ON, the Song will repeat starting at this bar.
NOTE:
If the Start Point is set earlier then the Punch In Point, the song will Play from the Start Point then start Recording at the Punch In point. If Loop is ON, the recording will loop back to the Punch In point, not the Start.
R3 PUNCH OUT
When Loop is OFF, the track will Punch Out of record at the completion of this bar. When Loop is ON, the track will jump back to the Punch In point and continue recording.
This section contains edit functions that modify an entire measure or measures. There are three pages of functions: Press More (F8) or Back (F1) to change pages.
You can edit the performance tracks as well as the special Tempo and Chord tracks. The START/STOP keys are also active in Bar Edit functions, so you can check your edits. If you don't like the results, you can UNDO the edit (F7).

PAGE ONE FUNCTIONS
LI CLOCK MOVE
This Function shifts the timing of a track relative to the others. A track can be moved ahead or behind the beat, or offset for delay effects.

LI TRACK
Selects the track to be moved.
L2 CLOCK
Sets the number of clocks to be moved. A positive value adds to the event start times, which makes them later. A negative value subtracts from the event start times, which makes them earlier.
L2 EVENT EXTRACT
Event Extract moves notes or other data from one track to another. The data is removed from the source track. This is useful for removing unwanted control data without removing the notes themselves.
L1 TRACK FROM ---> TO
Select the source track, then press the L1 button again to move to the destination track.
L2 EVENT
Selects which data will be moved.
DATA TYPES
CONTROL ALL
All continuous controllers, such as sustain, modulation wheel, volume, pan, and expression.
PROGRAM CHANGE AND BANK SELECT
Program Changes and messages to change patch banks (i.e., SingleA, SingleB, Combi)
CHANNEL PRESSURE
Standard keyboard aftertouch
POLYPHONIC KEY PRESSURE
Special aftertouch messages for individual keys. The K5000W neither transmits nor responds to these messages.
PITCH BEND
The pitch bend wheel
EXCLUSIVE
System exclusive data, such as patch data or other information unique to a particular instrument.
CONTROL EACH 000-127
Individual continuous controller, from 000 to 127. See the MIDI implementation for information about controller numbers.
L3 NOTE SPLIT
Event Extract moves a range of notes from one track to another. This is useful for splitting a 2-handed keyboard performance into separate tracks of left and right hands.
L1 TRACK FROM ---> TO
Select the source track, then press the L1 button again to move to the destination track.
L2 EVENT RANGE
Sets the range of notes to be moved. You can switch between the lower and upper range with the L2 key.
L4 DELETE
Deletes a range of measures in one or all tracks. The time is deleted as well.
LI TRACK
Selects the track for deletion. If ALL is selected, the range will be deleted from all tracks in the song.
L2 BAR
Selects the range of bars to be deleted. Press the L2 key to change between start and end measures.
In the screen above, everything from the beginning of bar 1 through the end of bar 4 will be deleted. Bar 5 will be moved to bar 1.
R INSERT
This function takes a range of measures from one track and inserts them into a second track at a specific point. The existing data on the destination track is moved to accommodate the inserted bars, nothing is erased.

LI TRACK FROM-->TO
Select the source track, then press the L1 button again to move to the destination track.
NOTE:
The Source and Destination track can be the same - this is a good way to have a musical phrase repeat several times.
L2 BAR
Selects the range of bars to be inserted, and the insertion point in the destination track. Press the L2 key to change between start and end measures.
R2 INSERT EMPTY BAR
This function adds blank space to one or all tracks.

LI TRACK Selects the track for the blank space. Tempo or Chord tracks can be added to, or All tracks can be selected.
L2 BAR Selects the starting point for the empty bars.
L3 BEAT/MEAS Sets the time signature for the empty bars to be inserted.
R2 LENGTH Sets the number of bars to be inserted.
R3 ERASE
Erases a range of measures in a track. Unlike Delete (previous page), time is not removed - blank space is left behind.

LI TRACK Selects the track for erasure. Tempo or Chord tracks can be erased as well.
L2 BAR Selects the range of bars to be erased. Press the L2 key to change between start and end measures.. In the screen above, everything from the beginning of bar 1 through the end of bar 2 will be erased.
This adds the contents of one track to another.

LI TRACK FROM-->TO
Use the L1 key to change between source and destination track. In the screen above, all data on track 1 will be combined with the data on track 2.
PAGE TWO FUNCTIONS
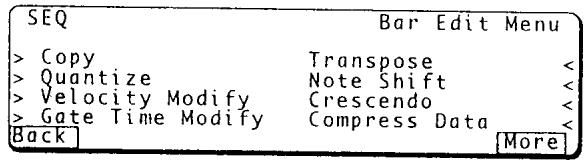
LI COPY
This function takes a range of measures from one track and copies them into a second track at a specific point. Unlike Insert (above) the existing data on the destination track is not moved, any existing data is replaced by the copy.

LI TRACK FROM-->TO
Select the source track, then press the L1 button again to move to the destination track.
NOTE:
The Source and Destination track can be the same.
L2 BAR
Selects the range of bars to be copied, and the insertion point in the destination track. Press the L2 key to change between start and end measures.
L3 FROM
Selects the Song to copy from.
L2 QUANTIZE
Quantizing lines up notes to the beats. This compensates for imperfect timing in a performance. Quantizing can also give a track a robot-like rhythmically perfect feel.
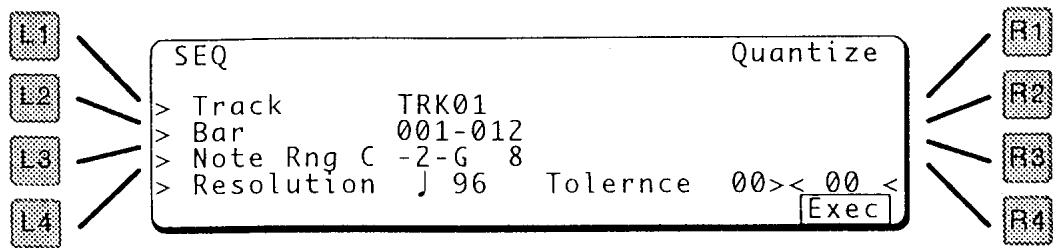
LI TRACK
Selects the track to be quantized.
L2 BAR
Selects the range of bars to be quantized. Press the L2 key to change between start and end measures.
L3 NOTE RANGE
You can limit the quantizing to a particular range of notes, for example quantizing the bass and snare drum, while leaving the hi-hat unchanged.
L4 RESOLUTION
Notes will be quantized to the nearest note of this value. If set to 1/4 notes for example, all notes will be moved to play on the 1, 2, 3, or 4 beats – no notes will play anywhere else.
R4 TOLERANCE
This opens a window around the resolution beat. Any notes outside this window will be quantized - those inside the window will be left alone. This is good for fixing the notes that are way off, without touching the ones that are closeto the beat.
L3 VELOCITYMODIFY
This function makes notes louder or softer by adding or subtracting to the key velocities. The Velocity Modify function is useful for general adjustments – if there are individual notes that need modification, its easier to use Event Edit, page 132.

LI TRACK
Selects the track to be modified.
L2 BAR
Selects the range of bars to be modified. Press the L2 key to change between start and end measures.
L3 VELOCITY
Adds or subtracts this amount to the attack velocity of each note in the region.
L4 GATETIMEMODIFY
This function makes notes longer or shorter by adding or subtracting to their gate time, or duration. Gate Time Modify is useful for general adjustments – if there are individual notes that need modification, its easier to use Event Edit, page xxx.

LI TRACK
Selects the track to be modified.
L2 BAR
Selects the range of bars to be modified. Press the L2 key to change between start and end measures.
L3 GATETIME
Adds or subtracts this percentage to the duration of each note in the region.
RI TRANSPOSE
This function transposes notes up or down by adding or subtracting to their note number.

LI TRACK
Selects the track to be modified.
L2 BAR
Selects the range of bars to be modified. Press the L2 key to change between start and end measures.
L3 TRANSPOSE
Transposes up or down by this amount. A value or +12 moves the notes up an octave.
R2 NOTE SHIFT
This function transposes individual pitches. This is useful for changing instruments on a drum track, or for shifting between major and minor.

LI TRACK
Selects the track to be modified.
L2 BAR
BAN Selects the range of bars to be modified. Press the L2 key to change between start and end measures.
L3 NOTE FROM --TO
Selects the note to be modified. Press the L2 key to change between starting pitch and shifted pitch. You can also specify C**--> C#**, which will traspose all Cs to C#s.
R3 CRESCENDO
This function creates a crescendo or decrescendo by gradually adding or subtracting to the key velocities. Beginning at the start bar, the Crescendo function gradually modifies the note velocities by the Velocity percentage - at the end bar the notes are modified by the full amount.

LI TRACK
Selects the track to be modified.
L2 BAR
BAN Selects the range of bars to be modified. Press the L2 key to change between start and end measures.
L3 VELOCITY
Gradually adjusts the note velocities from 100% (no change) to the selected percentage. The range is 10% - 200% .
This function reduces the amount of data used by controllers by reducing the number of individual changes for the selected controller.
Continuous controllers such as pitch bend, modulation or pressure generate a tremendous number of messages, taking up valuable memory space and MIDI bandwidth. You will often find that you can improve the performance of your sequence without any audible difference by simplifying controller data.
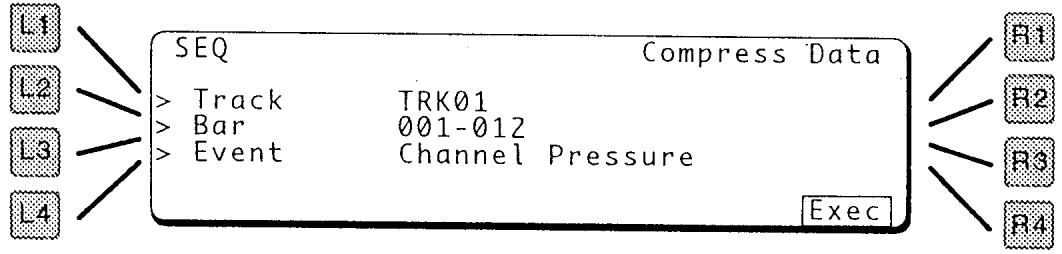
LI TRACK
Selects the track to be modified.
L2 BAR
Selects the range of bars to be modified. Press the L2 key to change between start and end measures.
L3 EVENT
Selects the controller to modified.
AVAILABLE CONTROLLER
CHANNEL PRESSURE
Standard keyboard aftertouch
POLYPHONIC KEY PRESSURE
Special aftertouch messages for individual keys.
PITCH BEND
The pitch bend wheel
MODULATION DEPTH
The modulation wheel
VOLUME
MIDI Volume, controller 7
PAN POT
MIDI Pan, controller 10
EXPRESSION
MIDI Expression pedal, controller 11
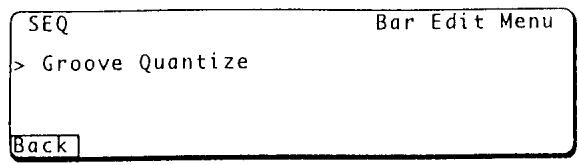
LI GROOVE QUANTIZE
Standard quantizing can give a track an undesired, robot-like feel. In an attempt to reduce this, Groove Quantize quantizes the track against a preset "groove", rather than an absolutely perfect note value.
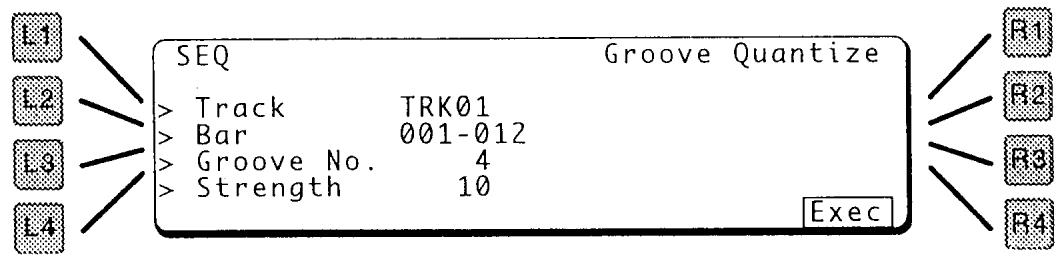
LI TRACK
Selects the track to be quantized.
L2 BAR
Selects the range of bars to be modified. Press the L2 key to change between start and end measures.
L3 GROOVE NUMBER
Select the groove to be used.
0 Off No groove
1-8 18 triplet Quantization based in eight-note triplets
9 ^1/_16 triplet Quantization based in sixteenth-note triplets
10 Swing Swing quantization
L4 STRENGTH
Adjusts much quantizing will be applied. 10 equals full (and rather random) quantizing. A small amount (less than 4) gives musical results.
Event Edit enables you to examine your performance note by note to fix or remove mistakes, adjust timings, or other fine tuning.
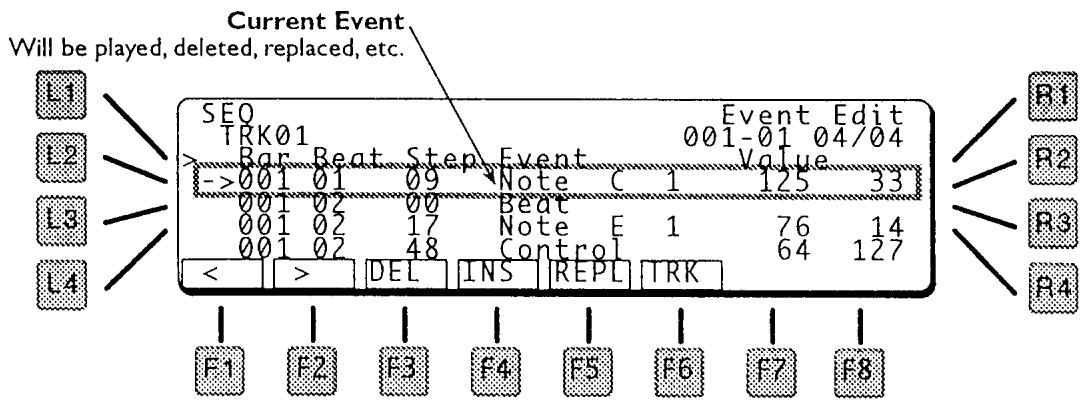
LI BAR BEAT STEP EVENT
Pressing this key, moves the cursor to the third line of display, from where you can use the F1 and F2 keys to navigate.
F1 <
F2
These move the cursor across the third line of the display, between Bar, Beat and Event. Turn the Value dial to scroll through the event list. If Event is highlighted, each note will sound as it goes by.
F3 DELETE
This deletes the current event.
F4 INSERT
Switches to the Insert Event screen. Here you can add a note or other event.

F1<
F2 >
These move the cursor across the event line of the display, between Bar, Beat Step, and Event. Turn the Value dial to adjust each parameter.
F8 EXECUTE
This inserts the event (you will hear it if it is a note) and returns to the Event Edit screen.
F5 REPLACE
Replace is similar to Insert, except the current event is replaced. See Insert, above.
F6 TRACK
This jumps up to the TRK indication at the top of the screen, where you can select another track to edit.
EVENTTYPES
NOTE A note event has a pitch, velocity, and duration.
POLYPHONIC KEY PRESSURE Aftertouch messages for individual notes. A Poly Pressure event has a pitch and a pressure amount.
The K5000W neither transmits nor responds to these messages.
CONTROL A Continuous Controller such as volume, Pan, Sustain. A control event has a controller number and value
PROGRAM CHANGE Changes to a different patch. A Program Change event has a program number.
CHANNEL PRESSURE Standard keyboard aftertouch. A Channel Pressure event has a value.
PITCH BEND Usually generated by the pitch bend wheel, a Pitch Bend event has a value.
EXCLUSIVE System exclusive data, such as patch data or other information unique to a particular instrument. A System Exclusive event has 16 Bytes of data, labeled 2nd through 16th (the first is the Exclusive message itself).
TEMPO (ONLY ON THE TEMPO TRACK)
Changes the tempo. A Tempo event has a value from 10 - 300 beats per minute.
L4 SONG COMMON
Enter the name of the Song from this page.
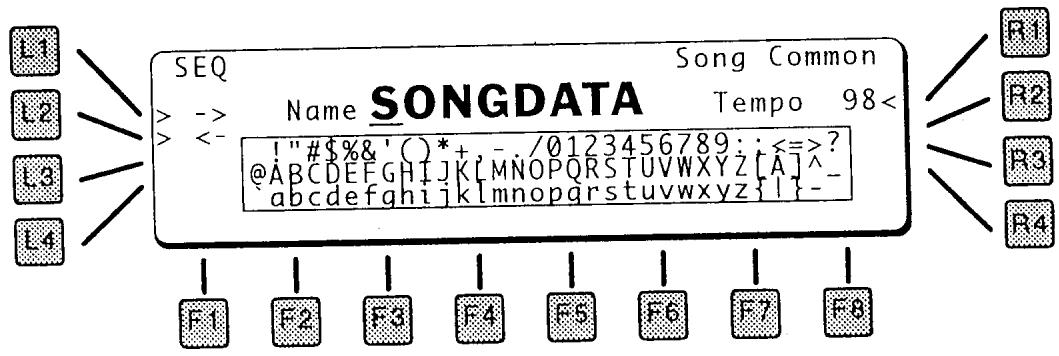
L1 and L2 select which character is selected, the Value dial selects the desired letter or number.
RI TEMPO
This sets the initial tempo for the song.
These set the initial values for each track in the Song.

The L1 - L4 keys select one of the four visible tracks, the F1 - F8 keys select a parameter, and the Value dial adjusts it. The TRACK arrows scroll up and down among the 40 tracks.
F1 CH. HIGH
This sets the channel to play internally on the K5000W or Externally on a connected MIDI device.
F2 CH. LOW
Sets the MIDI Channel for this track. A and B stand for the MIDI A and MIDI B ports on the rear panel.
F3 SINGLE
- Select a Patch number and name for the track. You can also use the Patch Select buttons to choose a patch.
NOTE:
Program changes recorded on the track don't change this initial setting.
F4 VOLUME
Adjusts the initial volume for the track.
F5 PAN
Adjusts the initial left-right pan setting for the track.
F5 COARSE TUNE
Adjusts the initial pitch of the track, in semitones.
F7 FINE TUNE
Adjusts the fine tune of the track.
F8 MORE
Displays more settings...

FI BACK
Goes back to the first page.
F2 BEND
Sets a pitch bend depth for the track. This defines the maximim range of the pitch bender, up to 24 semitones.
F3 CUTOFF
Sets an initial filter cutoff setting for the track. This modifies the patch as used in this track.
F4 ATTACK
Sets an initial envelope attack setting for the track.
F5 DECAY
Sets an initial envelope decay setting for the track.
F6 REPEAT
If on, this track will loop.
F7 EFFECT PATH
Sets the effect routing for the track.

R2 EFFECT
Jumps to the Effect section, see page 79.
NOTE:
The default effect settings for a new song are the same as for General MIDI. A list of these settings can be found on page 155.
The Direct Disk Play function lets you play songs play directly from disk, without loading them into the K5000W. You can assemble your favorite MIDI songs on a diskette, then play them one after another.
If your MIDI file contains Karaoke-style lyrics, they will appear on the screen as well.
NOTE:
The Disk Play function reads only single track Standard MIDI Files (.MID, type 0). Most sequencers (including the K5000W) can save files in this format.

The Auto Phrase Generator or APG, creates patterns based on a track recorded in the sequencer.
WHAT IT DOES
APG takes one of your recorded tracks, strips out the chord changes, and then imposes those chords on a preexisting pattern of rhythm and accompaniment. The result: a lively band playing your song!
After calculating the new parts based upon your chords and the designated pattern, the APG copies those parts onto as many as eight tracks of your already existing song. You can then pick, choose and edit the parts just like tracks you recorded yourself.
WHAT IT DOESN'T DO
Well, the APG can't think for you. It can't tell which notes you intended to play and which were mistakes. It can't figure out what chord you're playing if you don't play the root until halfway through the bar!
Think of APG as a top-forty band that you just met on stage. You hand them a chord chart and ask them to play in the style of Hootie and The Blowfish, while you sing your new song in front. The result? A little loose, a little ragged, but you'll all get to the end of the tune together. And with a couple of rehearsals...
STRATEGIES FOR BEST RESULTS
Keep your playing simple. Thin out the passing chords, the trills and little flourishes, the APG adds its own. Make it easy, as if you were teaching the song to someone.
PLANTING THE SEED TRACK
First select the track to be used as the chord source - the Seed Track. You can use the entire track or a section.

LI START BAR
Sets the starting bar of the Seed Track.
L2 LENGTH
Sets the number of bars of the Seed Track that will be analyzed.
RI SEEDTRACK
Selects which track in the current song will be used as a chord base.
F7 ANALYZE
Extracts the chords from selected seed track. This process takes a minute.
TRACK SELECTION
This screen assigns each part to a track in the Song.

Select the Track with the L and R buttons, then use the Value dial to change the channel. A “-” will appear in the display if the selected channel already contains data – you might want to select another track in this case.
You can turn the track off by pressing the button again. The display will read Off, and a phrase will not be generated for this track.
STYLE SELECTION
This is where the fun begins. This screen contains the style templates. There are 107 templates, including two that loaded from disk. The styles are listed on the next page. In addition, each style has six variations and six fill patterns.

Select a template using the Value dial, then press F8 (Continue) to access the variations and fills, below. You can play the phrase by pressing the START button.
| GROUP | # | NAME | GROUP | # | NAME | GROUP | # | NAME |
| TECHNO | 1 | Japanese | ROCK | 1 | SftRockA | WORLD1 | 1 | CountryA |
| 2 | French | 2 | SftRockB | 2 | CountryB | |||
| 3 | Detroit | 3 | HrdRockA | 3 | Modern1 | |||
| 4 | Ambient | 4 | 50sRockA | 4 | Modern2 | |||
| 5 | German | 5 | 50sRockB | 5 | Sambal | |||
| 6 | HardCore | 6 | 60sRockA | 6 | Mambol | |||
| 7 | TechnoA | 7 | 60sRockB | 7 | BosanovA | |||
| 8 | TechnoB | 8 | BoogieI | 8 | Jamaican | |||
| 9 | R&R1 | 9 | PopRegeA | |||||
| CONTEMPORARY | 1 | ContJazz | 10 | BrtshRkA | 10 | PopRegeB | ||
| 2 | WestCost | 11 | BrtshRkB | 11 | March1 | |||
| 3 | ContLatn | 12 | SuthrnRk | 12 | Tangol | |||
| 4 | ContPop | 13 | RokBaldA | 13 | Chachal | |||
| 5 | Altnativ | 14 | RokBaldB | 14 | Rhumbal | |||
| 6 | SoundTrk | 15 | ViennaWI | |||||
| 7 | FusionA | JAZZ | 1 | ModnjazA | 16 | EnglsWlz | ||
| 8 | FusionB | 2 | ModnjazB | 17 | FrenchWlz | |||
| 9 | FusionC | 3 | Swingl | 18 | Polka | |||
| 10 | FusionD | 4 | Swing2 | 19 | IrishFlk | |||
| 11 | FusionE | 5 | BigBandA | 20 | Oriental | |||
| 6 | BigBandB | 21 | Bolero1 | |||||
| DANCE | 1 | DiscoA | 7 | JazWltzA | 22 | Salsal | ||
| 2 | DiscoB | 8 | JazWltzB | 23 | Lambadal | |||
| 3 | DiscoC | 9 | DixiLndA | 24 | HawaiianA | |||
| 4 | Acid1 | 10 | DixiLndB | |||||
| 5 | Acid2 | 11 | LatnjazA | USER | 1 | |||
| 6 | Acid3 | 12 | LatnjazB | 2 | ||||
| 7 | Acid4 | |||||||
| 8 | Hiphop | BLUES | 1 | TrdBlusA | ||||
| 9 | RapA | 2 | TrdBlusB | |||||
| 10 | RapB | 3 | TrdBlusC | |||||
| 11 | RapC | 4 | TrdBlusD | |||||
| 12 | HouseA | 5 | R&B1 | |||||
| 13 | HouseB | 6 | R&B2 | |||||
| 14 | HouseC | 7 | R&B3 | |||||
| POPS | 1 | Pops1 | SOUL | 1 | Gospel | |||
| 2 | Pops2 | 2 | Motown1 | |||||
| 3 | Pops3 | 3 | Motown2 | |||||
| 4 | Pops4 | 4 | Soull | |||||
| 5 | Pops5 | 5 | Soull2 | |||||
| 6 | Pops6 | 6 | Funk1 | |||||
| 7 | PopBaldA | 7 | Funk2 | |||||
| 8 | PopBaldB |
Each template pattern has six variations, that are sometimes quite different from each other. Press the F2 - F7 keys to select a variation.

L3 EDIT CHORD CHANGES
You can view or edit the chords created from the seed track analysis, see below.
L4 BEGIN AGAIN
This takes you back to the Seed Track screen, where you can start the process over again.
R3 WITH PROGRAM
When this is ON, patterns will change to their programmed patches. If OFF, the patches will not change.
R4 PASTE
When you are happy with the created patterns, press Paste to copy them into your Song.
F8 VARIATION
Displays the Fill in Page, where you can select various fills to go with your pattern.

If the resulting APG pattern is too harmonically twisted, this can sometimes be straightened out by adjusting the chords.
Press L1 and use the Value dial to scroll through the chords. If a chord is off, use the function keys to edit it.

There are two editing modes: Edit and Advice. If Advice is used, the K5000W will make suggestions. F6 switches between the two modes. See Chord Advice, next page.
F3 CHORD DELETE
Deletes the current chord event.
F4 CHORD INSERT
Inserts a new chord. The following screen appears.
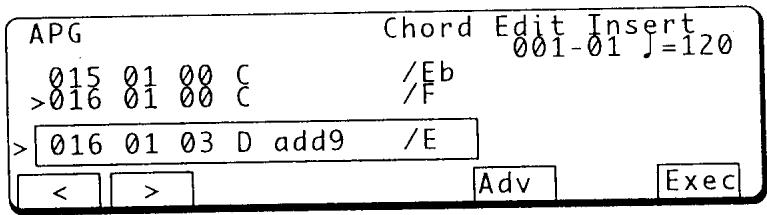
The chord and location inside the box will be inserted. Use the F1 and F2 keys to select a parameter and the Value dial to change it.
Press Execute (F8) to complete the insert or the EXIT button to cancel.
Changes the current chord event.
The chord will be replaced by the settings in the box. Use the F1 and F2 keys to select a parameter and the Value dial to change it.
NOTE:
You cannot change the time of the chord. If you want to change a chord's time, delete the chord then insert a new one.
Press Execute (F8) to complete the change or the EXIT button to cancel.
F6 CHORD ADVICE
Choosing Chord Advice enables the chord suggestion feature. After setting preferences here, several chords will be suggested when inserting or replacing.

Chords will be suggested based upon the following preferences:
KEY
Set the key of your song here: C through B, and major or minor.
R2 GROUP
Select the type of chords you prefer:
STRAIGHT
These are more simple chords: major, minor, sevenths, etc.
COMPLEX
The chords that will be suggested in this case are more complex jazz chords: ninths, elevenths, flat seventhns, etc.
CHORD ADVICE INSERT
When advice is on, pressing Insert (F4) displays the following screen instead:

A suggested chord is placed in the edit box. Use the Value dial to scroll through the other choices listed on the right side of the screen.
CHORD ADVICE REPLACE
When advice is on, pressing Replace (F5) displays the following screen instead:

A suggested chord is placed in the edit box. Use the Value dial to scroll through the other choices listed on the right side of the screen.
APG DATA CONVERT (FLOPPY DISK OPERATIONS)
The phrase (style) conversion function is a unique feature which enable the K5000W to play the phrase (style) data made not only for Kawai's other instruments, but for many other manufacturers' keyboards as well.. The Style Convert Software was developed for the personal computers by EMC Software company, which has been the recent leader in this type of technology. In collaboration with EMC, Kawai has made it possible to run this software on the K5000W. When the Phrase Convert Software is installed, the K5000W becomes capable of reading many phrase data disks currently available on the market and converting them into Kawai's data format without losing musical quality. The converted phrase data may be edited and stored as the K5000W's own phrase data. With this feature, you can expand your library of phrase data. Please read the instruction sheet that comes with the Phrase Convert Software disk for information on the format that works on the K5000W.
Operation
Loading APG DATA CONVERT Software
- Insert APG DATA CONVERT Software.
- Press DISK button.
- Press L2 (LOAD).
- Press R4 (APG DATA CONVERTER).
- Select which data to be converted with VALUE DIAL.
- Press F8 (EXEC). The screen shows "SURE?"
- Press F8 (YES) again for execution.
- Take out APG DATA CONVERT disk.
Loading STYLE DISK
- Insert STYLE disk.
- Press F8 (EXEC). The screen shows "SURE?"
- Press F8 (YES) again for execution. (Depending on the style disk, you may be able to skip this step.)
- Select desired style with VALUE DIAL.
- Press F8 (EXEC).
When the K5000W receives a General MIDI On message, it jumps into Composed mode and configures itself for General MIDI playback.
WHAT IS GENERAL MIDI
General MIDI is a multi-platform standard for musical instrumentation. The sonic counterpart to Standard MIDI Files for sequencers, it specifies that specific instruments are available at specific program numbers. This way, you can compose music using a Grand Piano, a Muted Guitar, and a Picked Bass; and be sure that the listener will hear a piano where you intended – instead of a flute.
ADVANTAGES OF GENERAL MIDI
Since MIDI sequence files (SMF) are very small (50K is an average size, one second of CD-quality audio is several times bigger), they are easily transportable – as many as 30 fit on a single floppy disk – so they can be enclosed in an e-mail message or used as background music on a web site or a CD-ROM.
This is because the MIDI sound module is doing all the "work", creating an audio experience from the recorded performance. Although there are many models of General MIDI sound modules available, they all adhere to the General MIDI standard of compatibility. Naturally they all sound slightly different - just as different bass players will sound different - but each General MIDI device sounds similar.
DISADVANTAGES
There are two main disadvantages:
1) All General MIDI devices do sound slightly different, and one of the biggest differences is in the subtle balances between instruments in a mix.
2) Since the available instruments are fixed, you cannot use original sounds - especially the very original sounds in the K5000W's A Bank.
These settings are used whenever General MIDI mode is initialized. They can be changed, but will be reset the next time General MIDI mode is initialized.

ALGORITHM

EFFECT I & 3
EFFECT 2 & 4
REVERB
GRAPHIC EQ
The result of these settings gives four useful sets of effects for instruments:
| Instrument Type | Effect Path | Chorus | Reverb |
| Strings | 1 | Hi | Hi |
| Piano | 2 | Lo | Hi |
| Guitar | 3 | Hi | Lo |
| Bass, Drums | 4 | Lo | Lo |
The following MIDI messages can be sent from this page. Messages are sent on the MIDI System Channel, set in the System MIDI page. The MIDI System Channel is shown at the top of the screen.
LI VOLUME
Sends a Volume message using Continuous Controller #7.
L2 PAN
Sends a Pan message using Continuous Controller #10.
L3 CONTROL NUMBER
There are 128 Continuous Controller channels in MIDI. Some, like the Volume, Pan, Sustain Pedal, and Bank Select messages are commonly used by all instruments. Other controllers are more specific and are used for everything from synthesizer parameters to automated mixing to controlling stage lights or even a VCR.
This parameter selects one of the Continuous Controller channels for control (0 to 127).
L4 CONTROLVALUE
This sets the value of the message sent to the Continuous Controller channel selected above.
RI PROGRAM
Sends a Program Change message, which tells a remote instrument to change to a different sound patch. There are 128 Programs available, numbered from 0 through 127.
R2 BANK
Most recently made instruments contain more than 128 patch programs in memory. MIDI gets around this limitation by dividing the available sound programs into several banks of programs. Use the Bank and Bank System messages to specify which bank to switch to. Within an individual bank, the Program Change message can be used to select individual programs.
R3 BANK SYSTEM
The Bank System parameter selects the type of bank select message to send.
NORMAL
Normal - the bank message is sent by itself
1 (MSB)
MSB - the bank message is sent with an MSB indication.
2(LSB)
LSB - the bank message is sent with an LSB indication.
F8 SEND
This transmits Bank and program change messages.
COMMON
In the Common area of the front panel, to the left of the LCD, contains controls for parameters that concern the entire instrument.
The System pages offer preference settings, that control the general behavior of the K5000W.
The five Function keys (F3 - F7) jump between the four sections of the System parameters
F3 RESET
Goes to the reset page.
F4 BACKUP
Goes to the Backup page.
F5 MIDI
Goes to the System MIDI page.
F6 SYSTEM
Goes back to the main System page, below.
F7 DUMP
Goes to the MIDI Data Dump page.
SYSTEM

LI LCD CONTRAST
This adjusts the contrast of the LCD display. Adjust it so the display can be seen clearly.
L3 PROTECT
This turns on the memory protect for the internal program memory. When Protect is on, sound programs can not be saved to internal memory.
RI TRANSPOSE
Master Transpose for the instrument.
R2 MASTERTUNE
Master Tune for the instrument.
R3 MASTERVOLUME
This sets the MIDI master volume for the instrument, MIDI controller 7.
This function reloads all patches from the backup Flash memory. This would only be necessary to restore original patches after receiving a MIDI data dump or playing a MIDI sequence with recorded MIDI patch data.
BACKUP
This function saves all patches in memory to the backup Flash memory area. This is only necessary to save a MIDI data dump, since the patch dump data is written to the working RAM memory only.
MIDI

LI LOCAL
Sets MIDI Local Control. If ON the keyboard and sequencer are attached to the sound generator. If off, the keyboard/sequencer and sound module are separated. Turning off local control is useful when an external MIDI sequencer is used.
L2 UNIT CHANNEL (SYSTEM CHANNEL)
This sets the basic MIDI channel for the unit.
L3 KEYBOARD TRANSMIT CHANNEL
Sets the Keyboard Transmit channel.
TRACK
In Single or Combi mode, the keyboard transmits on the unit channel. In Comps mode, the keyboard transmits on the channel of the selected track.
UNIT
If set to UNIT, the keyboard will always transmit on the Unit Channel.
F8 MORE
Goes to the next page of parameters.
L1 TRANSMIT PROGRAM
If on, the K5000W will transmit program changes.
L2 TRANSMIT PRESSURE
If on, the K5000W will transmit aftertouch pressure.
R1 RECEIVE PROGRAM
If on, the K5000W will receive program changes.
R2 RECEIVE PRESSURE
If on, the K5000W will receive afttouch pressure.
R3 RECEIVE EXCLUSIVE
If on, the K5000W will receive system exclusive messages.
DUMP
This page is used to initiate a MIDI System Exclusive file transfer. The program data is transmitted across MIDI.

L1 BLOCK
Selects which sound block to transfer.
BLOCKS
SINGLE A
The ADD sound bank.
SINGLE B
PCM sound Bank. (B070 to B117).
COMBI
Combination sound bank
INST
Drum Instruments (Kits are stored in Single B).
L2 ONE/ALL
Selects whether to select single program or all the programs in the selected block.
L3 PATCH NUMBER
If One is selected above, this parameter selects the individual patch to dump.
F8 EXECUTE
Initiates the data transfer. "Are You Sure?" Press YES (F8) to start, NO (F1) to cancel.
The Disk pages enable you to save your work on floppy disks. Whether to backup your patches, save a song for a studio date, load new sounds for another project, or import MIDI music files downloaded from the Internet, you'll find the K5000W's disk is your gateway to the outside world.
The K5000W uses the standard PC-Compatible file format, so files can be exchanged with PCs, Macs, and most other systems. The K5000W Sequencer reads and writes Standard MIDI Files (SMF, with the file extension .MID), so music sequences can easily be moved between the K5000W other computer sequencers.
Pressing DISK on the front panel brings up the Disk Menu screen, below.

There are four options for saving, loading, and deleting files, as well as for formatting new diskettes.
LI SAVE
This section is for saving the various types of files in the K5000W to disk.

LI SAVE SINGLE
You can save individual Single patches or an entire bank to disk.

LI ALL/ONE
Choose ALL the patches in a bank, or just ONE.
NOTE:
The single bank selected before entering the Disk Section will be the only bank available.
RI SINGLE NO.
If you want to save one patch to disk, select the patch number here.
F1/F2 CHARACTER
This names the file on the disk. Use the F1 and F2 keys to select a character in the name (moves the cursor), and the Value dial to select a letter.
F8 EXECUTE
Press Execute to save the file. It will be saved with the file extension shown after the name. See page 160 for a list of K5000W file types.
L2 SAVE COMBI
LI ALL/ONE
Choose the entire COMBI bank, or just ONE Combi patch.
RI COMBI NO.
If you want to save one patch to disk, select the patch number here.
F1/F2 CHARACTER
This names the file on the disk. Use the F1 and F2 keys to select a character in the name (moves the cursor), and the Value dial to select a letter.
F8 EXECUTE
Press Execute to save the file. It will be saved with the file extension shown after the name. See page 160 for a list of K5000W file types.
L3 SAVE DRUM KIT
This saves Drum Kit B117 to disk. This is the only editable kit, the others are preset. The individual instruments are also saved with the Kit.

F1/F2 CHARACTER
This names the file on the disk. Use the F1 and F2 keys to select a character in the name (moves the cursor), and the Value dial to select a letter.
F8 EXECUTE
Press Execute to save the file. It will be saved with the file extension shown after the name. See page 160 for a list of K5000W file types.
RI SAVE SONG
LI FILE FORMAT
You can save Songs in the K5000W's OWN format (.KSO) or in SMF (Standard MIDI File) format (.MID). Select the format here.
RI SONG NO.
Select the song number here.
F1/F2 CHARACTER
This names the file on the disk. Use the F1 and F2 keys to select a character in the name (moves the cursor), and the Value dial to select a letter.
F8 EXECUTE
Press Execute to save the file. It will be saved with the file extension shown after the name. See page 160 for a list of K5000W file types.

RI APG DATA NO.
Select the APG Data number here.
F1/F2 CHARACTER
This names the file on the disk. Use the F1 and F2 keys to select a character in the name (moves the cursor), and the Value dial to select a letter.
F8 EXECUTE
Press Execute to save the file. It will be saved with the file extension shown after the name. See page 160 for a list of K5000W file types.
L2 LOAD
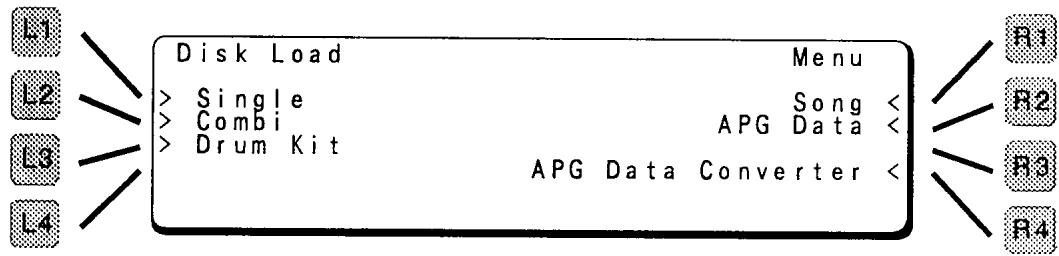
This shows the Load Single procedure. The others are similar.

LI ALL/ONE
Choose a patch bank file (.KAA or .KBA) or a file with only ONE patch (.KA1 or KB1).
RI SINGLE NO.
-FI FILE
This scrolls through the files on the disk that match the selected file type. Use the Value dial to select the desired file.
RI DELETE

This shows the Delete Single procedure. The others are similar.

LI ALL/ONE
Choose a patch bank file (.KAA or .KBA) or a file with only ONE patch (.KA1 or KB1).
RI SINGLE BANK
Select the type of Single bank to delete: A or B.
FI FILE
This scrolls through the files on the disk that match the selected file type. Use the Value dial to select the desired file.
F8 EXECUTE
Press Execute to delete the file from the disk.
R2 FORMAT

This formats a disk to be used by the K5000W. The K5000W uses the same format as IBM compatible PCs If a diskette is already formatted in standard PC format, then it is not necessary to reformat the disk.
LI FORMAT TYPE
Choose the type of disk you wish to format: 1.4MB for High Density diskettes (2HD), 720KB for older Double Density diskettes (2DD).
F8 EXECUTE
This starts the format process. Are you sure? Press F8 to continue, F1 to cancel.
FILE FORMAT LIST
The following file formats can be read and written by the K5000W:
| FUNCTION | DATA | FILE TYPE | FILE NAME | EXAMPLE | READ/WRITE |
| Save/Load | Single PCM | One | *.KBI | B120 | o |
| All | *.KBA | B70-B116 | o | ||
| Single ADD | One | *.KAI | A32 | o | |
| All | *.KAA | A1-A64 | o | ||
| Drum Kit | One | *.KDI | B117 | o | |
| Combi | One | *.KCI | CI | o | |
| All | *.KCA | CI-C64 | o | ||
| User APG | *.KPT | o | |||
| Song | Own | *.KSO | o | ||
| Q80 | *.SNG | Read Only | |||
| SMF (Type 0 or 1) | *.MID | Read: Type 0 or 1Write: Type 0 Only | |||
| Direct Disk Play | Song | SMF (Type 0 Only) | *.MID | Read Only | |
| (You can Load a Type I MIDI file, then Save it to create a Type 0 file.) | |||||
| Style Convert | *.KCN | o | |||
| Operating System | Program | STMATE.SYS | Read Only | ||
NOTE:
Q-80Ex format is not supported. Q-80Ex users will need to replace their files in Standard MIDI File format before they can be used on the K5000W.
APPENDIX
PCM WAVE LIST
| No. | Group | Wave | No. | Group | Wave | No. | Group | Wave | No. | Group | Wave | No. | Group | Wave | No. | Group | Wave | No. | Group | Wave | No. | Group | Wave | No. | Group | Wave | No. | Group | Wave | No. | Group | Wave | No. | Group | Wave | No. | Group | Wave | No. | Group | Wave | No. | Group | Wave | 0 | |||||||||||||||||||||||||||||||||||||||||||||||||||||||
| 1 | Plano | Old'p'11 | 70 | Dichthys | Homo | 139 | Alh | Checkab | 201 | Perc2 | Age | 48 | Ward | 13 | 5 | 1 | 1 | 1 | 1 | 1 | 1 | 1 | 1 | 1 | 1 | 1 | 1 | 1 | 1 | 1 | 1 | 1 | 1 | 1 | 1 | 1 | 1 | 1 | 1 | 1 | 1 | 1 | 1 | 1 | 1 | 1 | 1 | 1 | 1 | 1 | 1 | 1 | 1 | 1 | 1 | 1 | 1 | 1 | 1 | 1 | 1 | 1 | 1 | 1 | 1 | 0 | ||||||||||||||||||||||||||||||||||
| 2 | Oklipso | 72 | Dabo | 141 | Beno | 140 | Aih | Checkab | 201 | Perc2 | Age | 48 | Ward | 13 | 5 | 1 | 1 | 1 | 1 | 1 | 1 | 1 | 1 | 1 | 1 | 1 | 1 | 1 | 1 | 1 | 1 | 1 | 1 | 1 | 1 | 1 | 1 | 1 | 1 | 1 | 1 | 1 | 1 | 1 | 1 | 1 | 1 | 1 | 1 | 1 | 1 | 1 | 0 | |||||||||||||||||||||||||||||||||||||||||||||||
| 3 | G.Piano | 73 | Star | 142 | Sham | 143 | Eha | Checkab | 201 | Perc2 | Age | 48 | Ward | 13 | 5 | 1 | 1 | 1 | 1 | 1 | 1 | 1 | 1 | 1 | 1 | 1 | 1 | 1 | 1 | 1 | 1 | 1 | 1 | 1 | 1 | 1 | 1 | 1 | 1 | 1 | 1 | 1 | 1 | 1 | 1 | 1 | 1 | 1 | 1 | 1 | 1 | 1 | 2 | |||||||||||||||||||||||||||||||||||||||||||||||
| 4 | Waldro | 74 | Star | 143 | Sham | 144 | Eha | Checkab | 201 | Perc2 | Age | 48 | Ward | 13 | 5 | 1 | 1 | 1 | 1 | 1 | 1 | 1 | 1 | 1 | 1 | 1 | 1 | 1 | 1 | 1 | 1 | 1 | 1 | 1 | 1 | 1 | 1 | 1 | 1 | 1 | 1 | 1 | 1 | 1 | 1 | 1 | 1 | 1 | 1 | 1 | 1 | |||||||||||||||||||||||||||||||||||||||||||||||||
| 5 | ||||||||||||||||||||||||||||||||||||||||||||||||||||||||||||||||||||||||||||||||||||||||||||||||||||
| 6 |
| No. | Group | Wave | No. | Group | Wave | No. | Group | Wave | No. | Group | Wave |
| 267 | Sine | Sine | 285 | Square | Squelld | 306 | Organ, Redog1 | 325 | SynBass | SynBass | |
| 268 | Bowled | 286 | Squelld | 307 | continued | Accord. 1 | 326 | ||||
| 269 | Conctg102 | 287 | Squelld | 308 | Accord. 2 | 327 | |||||
| 270 | fngast3 | 288 | Squelld | 309 | Accord. 3 | 328 | SynBrass | SynBrass | |||
| 271 | FeedbG2 | 289 | Dist.Soy1 | 310 | Accord. 4 | 329 | |||||
| 272 | Timpani2 | 290 | Dist.Soy2 | 311 | Tangad1 | 330 | |||||
| 273 | Saw | Swtlead | 291 | EP | E.Pano5 | 312 | Tangad2 | 331 | |||
| 274 | Drsolo1 | 292 | E.Pano6 | 313 | Ramanica | 332 | Synth | Bowd2 | |||
| 275 | Drsolo2 | 293 | E.Pano7 | 314 | Bell | Clesta2 | 333 | ||||
| 276 | Swtled2 | 294 | Clavi | Clavi2 | 315 | MusiBox2 | 334 | ||||
| 277 | DistLal1 | 295 | Harpoed | Hrpchoed | 316 | Crystal | 335 | ||||
| 278 | DistCat2 | 296 | Hrpchoed | 317 | Crystal | 336 | Wind | Whittle1 | |||
| 279 | Odswmdl | 297 | Organ | Pecrg3 | 318 | Kalma2 | 337 | ||||
| 280 | Odswmdl | 298 | Drawnts | 319 | TinkBell1 | 338 | |||||
| 281 | Odswmdl | 299 | Detonrt2 | 320 | TinkBell2 | 339 | |||||
| 282 | Odswmdl | 300 | Detonrt2 | 321 | JazzGr | JazzGr2 | 340 | ||||
| 283 | Poly Syn2 | 301 | Detonrt2 | 322 | MelowG1 | 341 | |||||
| 284 | Swtlead3 | 302 | Detonrt2 | 323 | Hawaiian | ||||||
| 303 | Pero1g4 | 324 | MelowG1 | ||||||||
| 304 | Cucog3 | Shana2 | |||||||||
| 305 | Redog1 |
PERCUSSION INSTRUMENT LIST
| 1 | BD | Sd1 BD1 | 75 | Terry | Sd1 Hi Tom1 | 143 | Perc | Tambourne | 220 | SFX | Latching |
| 2 | SD1 BD2 | 77 | SD1 Hi Tom1 | 149 | Bab Cebull | 221 | Cebull | 221 | Pachch | Hart Beat | Feststop 1 |
| 3 | SD1 BD2 | 78 | SD1 Hi Tom1 | 149 | Bab Cebull | 223 | Cebull | 223 | Heart Beat | Feststop 1 | |
| 4 | SD1 BD2 | 79 | SD1 Hi Tom1 | 149 | Bab Cebull | 224 | Cebull | 224 | Heart Beat | Feststop 1 | |
| 5 | Reum BD2 | 80 | SD1 Low Tom1 | 151 | Bab Maceos | 225 | Bab Maceos | 225 | Feststop 2 | ||
| 6 | Reum BD2 | 81 | SD1 Low Tom1 | 152 | Bab Maceos | 226 | Bab Maceos | 226 | Feststop 2 | ||
| 7 | Power BD1 | 81 | ReumBD1 | 153 | Hube Hengge | 227 | Hube Hengge | 227 | Dover Grading | ||
| 8 | Power BD1 | 81 | ReumBD1 | 154 | Hube Hengge | 228 | Hube Hengge | 228 | Car Engg | ||
| 9 | Elect BD1 | 83 | ReumBD1 | 155 | Open Hangge | 229 | Open Hangge | 229 | Car Engg | ||
| 10 | Elect BD1 | 84 | ReumBD1 | 156 | Elec Open Hi | 230 | Elec Open Hi | 230 | Car Engg | ||
| 11 | Reum BD1 | 85 | ReumBD1 | 157 | Elec Open Hi | 231 | Elec Open Hi | 231 | Car Engg | ||
| 12 | Reum BD1 | 86 | ReumBD1 | 158 | Elec Open Hi | 232 | Elec Open Hi | 232 | Car Engg | ||
| 13 | Reum BD1 | 87 | ReumBD1 | 159 | Ward Chime | 233 | Ward Chime | 233 | Car Engg | ||
| 14 | Reum BD1 | 88 | ReumBD1 | 160 | Hube Hengge | 234 | Hube Hengge | 234 | Car Engg | ||
| 15 | Reum BD1 | 89 | ReumBD1 | 161 | Hube Hengge | 235 | Hube Hengge | 235 | Car Engg | ||
| 16 | Reum BD1 | 90 | ReumBD1 | 162 | Low Gene | 236 | Low Gene | 236 | Car Engg | ||
| 17 | Reum BD1 | 91 | ReumBD1 | 163 | Bab Hengge | 237 | Bab Hengge | 237 | Hube Gao | ||
| 18 | Reum BD1 | 92 | ReumBD1 | 164 | Bab Hengge | 238 | Bab Hengge | 238 | Hube Gao | ||
| 19 | Reum BD1 | 93 | ReumBD1 | 165 | Bab Hengge | 239 | Bab Hengge | 239 | Hube Gao | ||
| 20 | Reum BD1 | 94 | ReumBD1 | 166 | Bab Hengge | 240 | Bab Hengge | 240 | Hube Gao | ||
| 21 | Reum BD1 | 95 | ReumBD1 | 167 | Elec Hengge | 241 | Elec Hengge | 241 | Hube Gao | ||
| 22 | Reum BD1 | 96 | ReumBD1 | 168 | Elec Hengge | 242 | Elec Hengge | 242 | Hube Gao | ||
| 23 | Sicaree | 97 | ReumBD1 | 169 | Elec Hengge | 243 | Elec Hengge | 243 | Hube Gao | ||
| 24 | Sicaree | 98 | ReumBD1 | 170 | Elec Hengge | 244 | Elec Hengge | 244 | Hube Gao | ||
| 25 | Sicaree | 99 | ReumBD1 | 171 | Elec Hengge | 245 | Elec Hengge | 245 | Hube Gao | ||
| 26 | Sicaree | 100 | ReumBD1 | 172 | Low Gene | 246 | Low Gene | 246 | Hube Gao | ||
| 27 | Reum SD1 | 103 | ReumBD1 | 173 | Short Whistle | 247 | Short Whistle | 247 | Hube Gao | ||
| 28 | Reum SD1 | 104 | ReumBD1 | 174 | Short Gaze | 248 | Short Gaze | 248 | Hube Gao | ||
| 29 | Reum SD1 | 105 | ReumBD1 | 175 | Long Gaze | 249 | Long Gaze | 249 | Hube Gao | ||
| 30 | Reum SD1 | 106 | ReumBD1 | 176 | Long Gaze | 250 | Long Gaze | 250 | Hube Gao | ||
| 31 | Reum SD1 | 107 | ReumBD1 | 177 | Dacichmanian | 251 | Dacichmanian | 251 | Hube Gao | ||
| 32 | Reum SD1 | 108 | ReumBD1 | 178 | Dacichmanian | 252 | Dacichmanian | 252 | Hube Gao | ||
| 33 | Reum SD1 | 109 | ReumBD1 | 179 | Dacichmanian | 253 | Dacichmanian | 253 | Hube Gao | ||
| 34 | Reum SD1 | 110 | ReumBD1 | 180 | Dacichmanian | 254 | Dacichmanian | 254 | Hube Gao | ||
| 35 | Reum SD1 | 111 | ReumBD1 | 181 | Dacichmanian | 255 | Dacichmanian | 255 | Hube Gao | ||
| 36 | Reum SD1 | 112 | ReumBD1 | 182 | Dacichmanian | 256 | Dacichmanian | 256 | Hube Gao | ||
| 37 | Reum SD1 | 113 | ReumBD1 | 183 | Dacichmanian | 257 | Dacichmanian | 257 | Hube Gao | ||
| 38 | Reum SD1 | 114 | ReumBD1 | 184 | Dacichmanian | 258 | Dacichmanian | 258 | Hube Gao | ||
| 39 | Reum SD1 | 115 | ReumBD1 | 185 | Dacichmanian | 259 | Dacichmanian | 259 | Hube Gao | ||
| 40 | Reum SD1 | 116 | ReumBD1 | 186 | Dacichmanian | 260 | Dacichmanian | 260 | Hube Gao | ||
| 41 | Reum SD1 | 117 | ReumBD1 | 187 | Dacichmanian | 261 | Dacichmanian | 261 | Hube Gao | ||
| 42 | Reum SD1 | 118 | ReumBD1 | 188 | Dacichmanian | 262 | Dacichmanian | 262 | Hube Gao | ||
| 43 | Reum SD1 | 119 | ReumBD1 | 189 | Dacichmanian | 263 | Dacichmanian | 263 | Hube Gao | ||
| 44 | Reum SD1 | 119 | ReumBD1 | 190 | Dacichmanian | 264 | Dacichmanian | 264 | Hube Gao | ||
| 45 | Reum SD1 | 119 | ReumBD1 | 191 | Dacichmanian | 265 | Dacichmanian | 265 | Hube Gao | ||
| 46 | Reum SD1 | 120 | ReumBD1 | 192 | Dacichmanian | 266 | Dacichmanian | 266 | Hube Gao | ||
| 47 | Reum SD1 | 121 | ReumBD1 | 193 | Dacichmanian | 267 | Dacichmanian | 267 | Hube Gao | ||
| 48 | Reum SD1 | 122 | ReumBD1 | 194 | Dacichmanian | 268 | Dacichmanian | 268 | Hube Gao | ||
| 49 | Reum SD1 | 123 | ReumBD1 | 195 | Dacichmanian | 269 | Dacichmanian | 269 | Hube Gao | ||
| 50 | Reum SD1 | 124 | ReumBD1 | 196 | Dacichmanian | 270 | Dacichmanian | 270 | Hube Gao | ||
| 51 | Reum SD1 | 125 | ReumBD1 | 197 | Dacichmanian | 271 | Dacichmanian | 271 | Hube Gao | ||
| 52 | Reum SD1 | 126 | ReumBD1 | 198 | Dacichmanian | 272 | Dacichmanian | 272 | Hube Gao | ||
| 53 | Reum SD1 | 127 | ReumBD1 | 199 | Dacichmanian | 273 | Dacichmanian | 273 | Hube Gao | ||
| 54 | Reum SD1 | 128 | ReumBD1 | 200 | Dacichmanian | 274 | Dacichmanian | 274 | Hube Gao | ||
| 55 | Reum SD1 | 129 | ReumBD1 | 201 | Dacichmanian | 275 | Dacichmanian | 275 | Hube Gao | ||
| 56 | Reum SD1 | 130 | ReumBD1 | 202 | Dacichmanian | 276 | Dacichmanian | 276 | Hube Gao | ||
| 57 | Reum SD1 | 131 | ReumBD1 | 203 | Dacichmanian | 277 | Dacichmanian | 277 | Hube Gao | ||
| 58 | Reum SD1 | 132 | ReumBD1 | 204 | Dacichmanian Cash | 278 | Dacichmanian Cash | 278 | Hube Gao | ||
| 59 | Reum SD1 | 133 | ReumBD1 | 205 | Dacichmanian Cash | 279 | Dacichmanian Cash | 279 | Hube Gao | ||
| 60 | Reum SD1 | 134 | ReumBD1 | 206 | Dacichmanian Cash | 280 | Dacichmanian Cash | 280 | Hube Gao | ||
| 61 | Reum SD1 | 135 | ReumBD1 | 207 | Dacichmanian Cash | 281 | Dacichmanian Cash | 281 | Hube Gao | ||
| 62 | Reum SD1 | 136 | ReumBD1 | 208 | Dacichmanian Cash | 282 | Dacichmanian Cash | 282 | Hube Gao | ||
| 63 | Reum SD1 | 137 | ReumBD1 | 209 | Dacichmanian Cash | 283 | Dacichmanian Cash | 283 | Hube Gao |
Kawai Musical Inst. Mfg. Co., Ltd.
OW620E-R 9609
Printed in Japan
