
K5000S - Synthétiseur KAWAI - Notice d'utilisation et mode d'emploi gratuit
Retrouvez gratuitement la notice de l'appareil K5000S KAWAI au format PDF.
| Type de produit | Synthétiseur additif avancé |
| Marque | KAWAI |
| Modèle | K5000S |
| Alimentation | 110/120 V AC ou 220/240 V AC, 50/60 Hz |
| Dimensions (approx.) | 1000 x 300 x 100 mm |
| Poids (approx.) | 10 kg |
| Clavier | 61 touches (non lestées) |
| Polyphonie | Jusqu'à 32 voix (selon la complexité des patches) |
| Générateur de son | Synthèse additive avancée avec 32 générateurs sources, mélange possible avec échantillons PCM |
| Filtre | Filtre formantique 128 bandes configurable en EQ paramétrique, contrôlable par enveloppes et LFO |
| Effets numériques | Processeur DSP avec 4 blocs d'effets (chorus, delay, distortion, etc.) + réverbe + égaliseur graphique |
| Arpégiateur | Arpégiateur programmable avec 8 motifs utilisateur |
| Contrôleurs | 12 macro-commandes sur le panneau avant, 4 commandes utilisateur assignables, 2 commutateurs programmables, 2 pédales programmables |
| MIDI | Entrée, sortie, thru; réception/transmission de messages de commande, program change, aftertouch |
| Stockage | Lecteur de disquette 3.5" (format PC), mémoire interne pour patches et systèmes |
| Fonctions principales | Édition de sons simples (Single) et multicouches (Multi), morpher harmonique, enveloppes multiples, routage d'effets par source |
| Entretien et nettoyage | Essuyer avec un chiffon doux légèrement humide; ne pas utiliser de solvants ou nettoyants abrasifs |
| Sécurité | Ne pas exposer à l'eau ou à l'humidité; débrancher avant nettoyage; utiliser sur une surface stable; ne pas ouvrir le boîtier |
| Pièces détachées et réparabilité | Réparation par un technicien qualifié; aucune pièce réparable par l'utilisateur à l'intérieur |
| Informations générales | Notice d'utilisation de 132 pages disponible en téléchargement; système d'exploitation sur disquette système incluse |
FOIRE AUX QUESTIONS - K5000S KAWAI
Questions des utilisateurs sur K5000S KAWAI
0 question sur cet appareil. Repondez a celles que vous connaissez ou posez la votre.
Poser une nouvelle question sur cet appareil
Téléchargez la notice de votre Synthétiseur au format PDF gratuitement ! Retrouvez votre notice K5000S - KAWAI et reprennez votre appareil électronique en main. Sur cette page sont publiés tous les documents nécessaires à l'utilisation de votre appareil K5000S de la marque KAWAI.
MODE D'EMPLOI K5000S KAWAI
KAWAI
K5000S
Advanced Additive Synthesizer
Owner's Manual

CAUTION
RISK OF ELECTRIC SHOCK DO NOT OPEN

WARNING
TO REDUCE THE RISK OF FIRE OR ELECTRIC SHOCK,DO NOT EXPOSE THIS PRODUCT TO RAIN
AVIS: RISQUE DE CHOC ELECTRIQUE -NE PAS OUVRIR.
TO REDUCE THE RISK OF ELECTRIC SHOCK, DO NOT REMOVE COVER (OR BACK). NO USER-SERVICEABLE PARTS INSIDE. REFER SERVICING TO QUALIFIED SERVICE PERSONNEL.

The lighting flash with arrowhead symbol, within an equilateral triangle, is intended to alert the user to the presence of uninsulated "dangerous voltage" within the product's enclosure that may be of sufficient magnitude to constitute a risk of electric shock to persons.

The exclamation point within an equilateral triangle is intended to alert the user to the presence of important operating and maintenance (servicing) instructions in the literature accompanying the product.
CAUTION: TO PREVENT ELECTRIC SHOCK, MATCH WIDE BLADE OF PLUG TO WIDE SLOT, FULLY INSERT. ATTENTION: POUR EVITER LES CHOCS ELECTRIQUES, INTRODUIRE LA LAME LA PLUS LARGE DE LA FICHE DANS LA BORNE CORRESPONDANTE DE LA PRISE ET POUSSER JUSQU'AU FOND.
This musical instrument is designed for household use, not commercial use.
FCC Information
This equipment has been tested and found to comply with the limits for a Class B digital device, pursuant to Part 15 of the FCC Rules. These limits are designed to provide reasonable protection against harmful interference in a residential installation. This equipment generates, uses and can radiate radio frequency energy and, if not installed and used in accordance with the instructions, may cause harmful interference to radio communications. However, there is no guarantee that interference will not occur in a particular installation.
If this equipment does cause harmful interference to radio or television reception, which can be determined by turning the equipment off and on, the user is encouraged to try to correct the interference by one or more of the following measures:
Reorient or relocate the receiving antenna.
Increase the separation between the equipment and the receiver.
Connect the equipment into an outlet on a different electrical circuit from the receiver.
Consult the dealer or an experienced radio/TV technician for help.
Canadian Radio Interference Regulations
This instrument complies with the limits for a class B digital apparatus, pursuant to the Radio Interference Regulations, C.R.C., c. 1374.
Important Safety Instructions
- Read Instructions – This Owner's Manual contains valuable information that will help you make full use of the instrument's many capabilities. All the safety and operating instructions should be read before the product is operated.
- Retain Instructions – The safety and operating instructions should be retained for future reference.
- Heed Warnings – All warnings on the product and in the operating instructions should be adhered to.
- Follow Instructions – All operating and use instructions should be followed.
- Water and Moisture - The appliance should not be operated or stored near water or other moisture - for example, near a bath tub, wash bowl, kitchen sink, or laundry tub; in a wet basement; or near a swimming pool; and the like.
- Power Cord Protection - Power-supply cords should be routed so that they are not likely to be walked on or pinched by items placed upon or against them, paying particular attention to cords at plugs, convenience receptacles, and the point where they exit from the product.
- Ventilation – The appliance should be situated so that its location or position does not interfere with its proper ventilation. For example, the appliance should not be situated on a bed, sofa, rug, or similar surface that may block the ventilation openings; or similar surface that may block the ventilation openings; or placed in a built-in installation, such as a bookcase or cabinet that may impede the flow of air through the ventilation openings.
- Heat – The appliance should be situated away from heat sources such as radiators, heat registers, stoves, or other appliances (including amplifiers) that produce heat.
- Noise - Keep the appliance away from electrical motors, neon signs, fluorescent light fixtures, and other sources of electrical noise.
-
- Shocks – Protect the appliance from physical shocks and impact. Never move it while it is in operation.
- To reduce the risk of injury, close supervision is necessary when a product is used near a children.
- Do not touch the power plug with wet hands. There is a risk of electrical shock. Treat the power cord with care as well. Stepping on or tripping over it can break or short-circuit the wire inside.
- Do not place this product on an unstable or slant cart, stand, tripod, bracket, or table. The product may fall, causing serious injury to a child or adult, and serious damage to the product. Besides, the unit may malfunction. Use only with a cart, stand or table recommended by KAWAI, or sold with the product.
- The appliance, in combination with an amplifier and speakers or headphones, may be capable of producing sound levels that could cause permanent hearing loss. Do not operate for a long period of time at a high volume level or at a level that is uncomfortable. If you experience any hearing loss or ringing in the ears, you should consult an audiologist.
- This product may be equipped with a polarized line plug (one blade wider than the other). This is a safety feature. If you're unable to insert the plug into the outlet, contact an electrician to replace your obsolete outlet. Do not defeat the safety purpose of the plug.
- Always turn the power off when the appliance is not in use. The power supply cord of the product should be unplugged from the outlet when left unattended or unused for long period of time. Otherwise, fire or other hazards may be caused due to lightning and power-line surges, etc.
-
Care should be taken so that objects do not fall and liquids are not spilled into the enclosure through openings.
-
Unplug the appliance and power supply cord from the wall outlet immediately and refer servicing to qualified service personnel under the following conditions:
a) When the power-supply cord or plug is damaged.
b) If liquid has been spilled, or objects have been fallen into the product.
c) If the product has been exposed to rain or water.
d) If the product does not operate normally by following the operating instructions. Adjust only those controls that are covered by this manual as an improper adjustment of other controls may result in damage and will often require extensive work by a qualified technician to restore the product to its normal operation.
e) If the product has been dropped or damaged in any way.
f) When the product exhibits a distinct change in performance - this indicates a need for service.
- Protect the product from direct sunlight, extremes in temperature (such as inside your car on a warm day) or humidity, dusty environment, or vibration (especially during transportation).
- Always turn down the volume(s) of all instruments (such as guitar or keyboard) before connecting or disconnecting to the instrument.
- Make sure that all POWER switches are off before changing equipment connections.
- Check all equipment connections before applying the power.
- Do not connect to the same circuit as a heavy load or equipment that generates line noise.
- Unplug this product from the wall outlet before cleaning.
- Do not use liquid cleaners or aerosol cleaners. Use a damp cloth for cleaning. (Clean the instrument with a soft cloth, a mild detergent, and lukewarm water.) Never use harsh or abrasive cleansers or organic solvents.
- Servicing – The user should not attempt to service the appliance beyond that described in the operating instructions. All other servicing should be referred to qualified service personnel.
- Do not disassemble or attempt to modify the appliance. Opening or removing covers may expose you to dangerous voltage.
WELCOME TO THE K5000S 9
IF YOU NEED HELP. 10
ABOUT THE KEYBOARD'S INTERNAL MEMORY 10
ABOUT THE MEMORY EXPANSION KIT 10
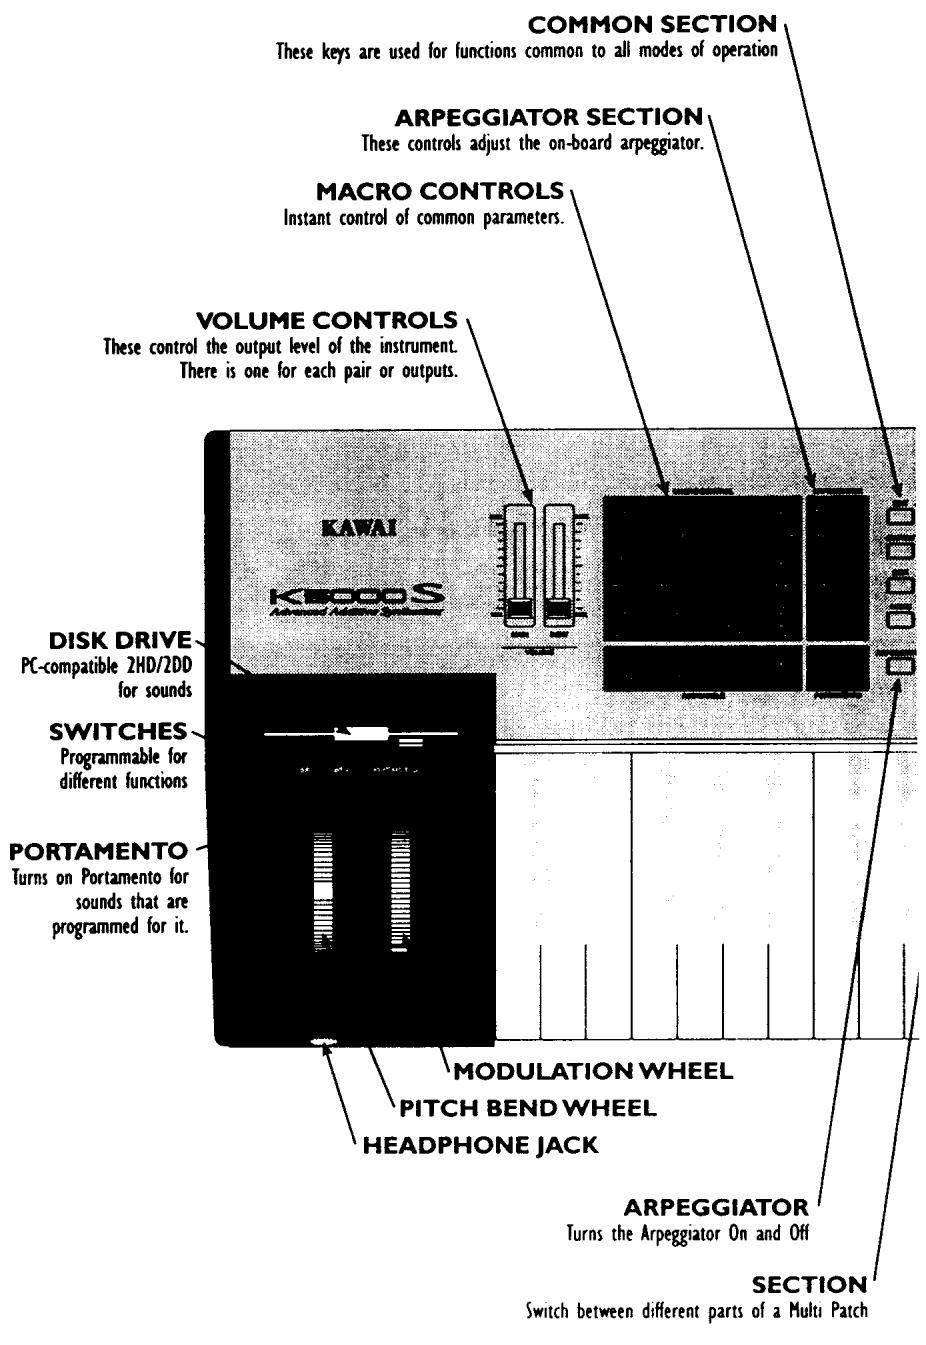
K5000S FRONT PANEL
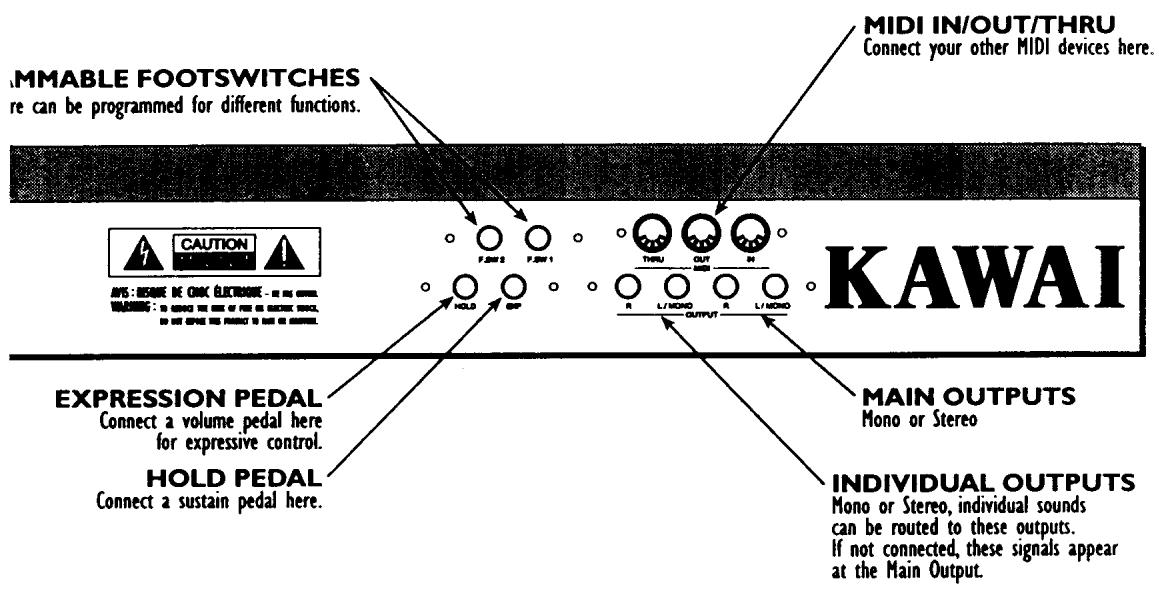
K5000S REAR PANEL 12
GUIDED TOUR 13
CONNECTIONS 14
PLAY THE DEMO 16
PLAYING THE DEMO 16
PLAYING SOUNDS 17
SINGLE SOUNDS 17
MULTI SOUNDS 18
PROGRAMMABLE
ARPEGGIATOR 19
SINGLE SECTION 21
SINGLE PLAY 22
SINGLE EDIT 24
COMMON 25
DCO 30
DCO PITCH ENVELOPE 31
DCF 32
DCF (FILTER) ENVELOPE 33
DCA 35
ADDITIVE 37
HARMONIC LEVEL (DHL) 38
HARMONIC ENVELOPE (DHE) 41
FORMANT FILTER LEVEL (DFL) 44
FORMANT ENVELOPE (DFE) 47
MORF 50
LFO & COPY 51
CONTROL 53
VOLUME, PITCH BEND, PAN 53
KEY AND VELOCITY ZONE 54
CONTROLLER55
WRITE 59
EFFECT SECTION 61
EFFECT PAGE PARAMETERS 62
ALGORITHMS 65
ALGORITHM 1 65
ALGORITHM 2 66
ALGORITHM 3 66
ALGORITHM 4 66
EFFECT TYPES 67
EARLY REFLECTION I
EARLY REFLECTION 2 67
TAP DELAY I
TAP DELAY 2 68
SINGLE DELAY
DUAL DELAY 70
STEREO DELAY
CROSS DELAY 71
AUTO PAN
AUTO PAN & DELAY 73
CHORUS I
CHORUS 2 74
CHORUS I & DELAY
CHORUS 2 & DELAY 75
FLANGER 1
FLANGER 2 76
FLANGER I & DELAY
FLANGER 2 & DELAY 77
ENSEMBLE 78
ENSEMBLE & DELAY 78
CELESTE 79
CELESTE & DELAY 80
TREMODO 81
TREMOLO & DELAY 81
PHASER 1
PHASER 2 82
PHASER I & DELAY
PHASER 2 & DELAY 93
ROTARY 84
AUTO WAH 85
BANDPASS 86
EXCITER 87
87
OVERDRIVE 89
DISTORTION 89
OVERDRIVE & DELAY 90
DISTORTION & DELAY 91
REVERB TYPES 92
HALL I
HALL 2
HALL 3 92
ROOM I
ROOM 2
ROOM 3 93
PLATE I
PLATE 2
PLATE 3 94
REVERSE 95
LONG DELAY 96
MULTI SECTION 97
MULTI PLAY 98
MULTIEDIT 100
COMMON 100
SECTION 101
WRITE 103
COMMON 105
SYSTEM SECTION 106
SYSTEM 106
FSW (PROGRAMMABLE SWITCHES) 107
ARPEGGIATOR 108
RESET 112
BACKUP 112
MIDI 113
DUMP 114
DISK SECTION 115
SAVE 115
LOAD 117
DELETE 118
FORMAT 119
FILE FORMAT LIST 119
QUICKMIDI 120
APPENDIX 123
SINGLE BANK SOUNDS 124
MULTI BANK SOUNDS 125
EFFECT PARAMETERS 126
PCM WAVE LIST 127
The K5000S is an Advanced Additive Synthesizer that combines realtime performance features and unique synthesis capabilities into a single unit.
ADVANCED ADDITIVE TONE GENERATOR
The K5000 series updates the famous K5 synthesizer tone generator and its unique additive harmonic synthesis approach. The Advanced Additive Tone Generator contains 32 source generators, which depending on how they are used, can yield up to 32 voice polyphony.
PCM samples can also be mixed with additive sources. As few as one or as many as six sources can be used to make a single sound. For example, a PCM wave of a piano hammer can be superimposed with the sound of the piano string created by additive harmonics.
I28 BAND FORMAL FILTER
A new addition to the Advanced Additive tone generator is the 128 Band Formant Filter, which can be used as a Parametric EQ or several other configurations. The Formant Filter is completely controllable by envelopes or LFOs.
MACRO CONTROL
Unique to the K5000S model are the macro controls for major sound parameters, available on the front panel for instant access. In addition, four user controls are programmable for each patch.
PROGRAMMABLE ARPEGGIATOR
The K5000S Programmable Arpeggiator, features a wide range of control, ideal for use in Tekno and other modern musical styles.
DIGITAL EFFECTS SYSTEM
The K5000S contains an advanced digital effects processor (DSP), which allows four individual effects of chorus, delay, distortion, etc., in addition to reverb and a graphic equalizer.
When playing a single sound, individual sources can be routed to individual effects; when playing multiple sounds in Multi mode, individual sounds can be routed to individual effects.
Please consult your local Kawai representative or contact the Kawai distributor in your country.
ABOUT THE KEYBOARD'S INTERNAL MEMORY
The contents of the keyboard's internal memory (such as tone data) and system data may be lost if you turn off the power while writing, saving or loading data.
Do not turn off the power while writing, saving or loading data.
If you have lost your system data, use the following procedure to reload the system data from the included SYSTEM DISK.
- Insert the SYSTEM DISK into the disk drive.
- Press the F2 button beside the LCD.
- Turn the power on while holding down the F2 button. The installation will begin.
- It will take about 8 minutes for the installation. You are now ready to use the K5000S.
NOTE:
-
If you install this SYSTEM disk, the entire memory will be reset to factory preset setting and your own personalized data you created will be lost. You may not be able to back up the internal memory. So, we recommend that you save your important data on a floppy disk.
-
It is not possible to copy this STSTEM DISK. Retain the SYSTEM DISK with proper care.
- The contents of the keyboard's internal memory may be lost if you turn off the power while installing system data.
Do not turn off the power while installing system data.
If you lost system data, take the following procedure using the included SYSTEM DISK and load system data.
ABOUT THE MEMORY EXPANSION KIT
The K5000S MEMORY EXPANSION KIT may be available in your country. For more information, please consult your local Kawai representative or contact the Kawai distributor in your country.
INTRODUCTION

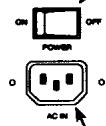
POWER SWITCH
It all starts here...
PROGRAM
Footswitches connected he
K5000 S
POWER RECEPTICLE
Apply grounded power
(North America: 110/120 V AC, 50/60Hz)
Europe, Asia, Australia: 220/240V AC, 50/60Hz)
GUIDED TOUR
Naturally, the first thing you ought to do with your K5000S is plug it in!
POWER
Using the cable provided, connect the POWER jack to an AC outlet.
AUDIO
There are two pairs of audio output jacks on the back, plus the PHONES jack on the front (in front of the Pitch Bend wheel). This gives you a few choices, depending on what you're connecting to:
SOLO PLAY
Just plug your headphones into the PHONES jack on the front and go at it. There's plenty of power for phones. Use the MAIN volume slider to control the volume.
INSTRUMENT AMPLIFIER
If you are plugging into an amp, connect the MAIN L/MONO output jack on the rear panel to your amplifier. All sounds will be mixed to this single cable.
STEREO SYSTEM
To connect to a music system or amplified speakers, use the two MAIN outputs (L & R) to get stereo. You'll need adapters or adapting cable to convert the 1/4'' Phone jacks on the K5000S to the RCA pin jacks on your stereo. Make sure to connect the K5000S to a LINE, AUX, or TAPE input on your stereo.
MIXING CONSOLE
If you've got more than two inputs available, by all means connect the two MAIN outputs and the two INDIVidual outputs to your mixer. In this way, you can route certain sounds (piano, strings) through the reverb unit to the Main Outputs; and send others (bass drum, bass guitar) directly to the INDIVidual outputs without reverb, or for special studio processing.
When connections are made to the INDIVidual output jacks, the INDIVidual volume slider on the front panel becomes active. You can adjust each pair of outputs independently.
PEDALS
HOLD
Connect a Hold pedal to the HOLD jack on the rear panel. Use a Momentary On footswitch, like the Kawai model F-1. This acts like a piano-style damper pedal, sustaining after releasing keys.
EXPRESSION
You can connect a Volume pedal (Kawai model V-20X) to the Expression jack on the rear panel.
PROGRAMMABLE FOOTSWITCHES
You can connect additional momentary footswitches, like the Kawai model F-1, to the Footswitch jacks as well. These can be programmed to do a range of things, such as change octave or turn the arpeggiator on and off.
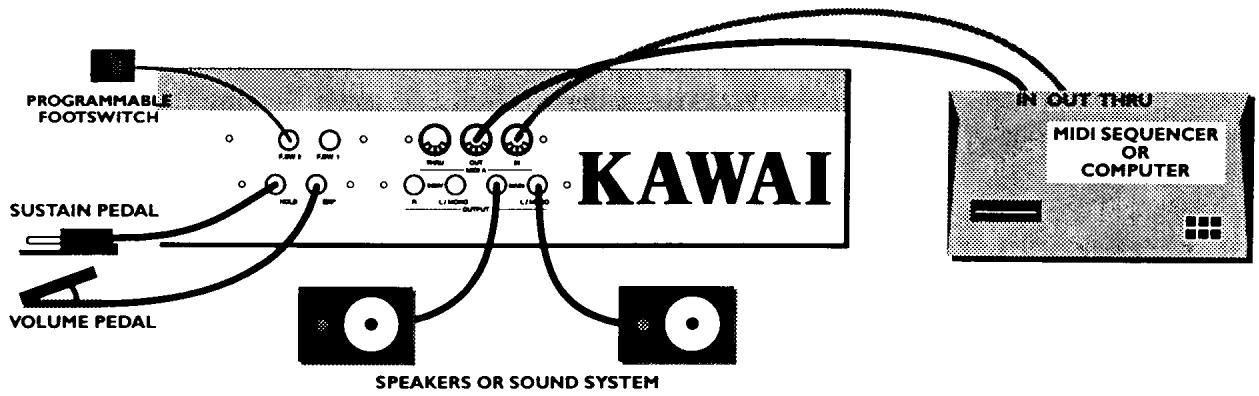
MIDI
There is a full set of MIDI ports on the rear panel of the K5000S: IN, OUT, and THRU jacks. You don't need to connect any of them, but if you want to talk to your other MIDI gear, here's how to connect them:
EXTERNAL KEYBOARD OR DRUM CONTROLLER
If you want to play the K5000S from another keyboard, MIDI drum or Guitar controller, connect it to the MIDI IN jack.
You will need to set the K5000S's Unit Channel to match the input jack and the MIDI channel the device transmits on. Press SYSTEM, then MIDI (F5), then Unit CH (L2).
SEQUencer OR COMPUTER
If you want to use the K5000S with a sequencer or computer, you will need two cables. Connect the MIDI OUT of the K5000S to the MIDI IN of the computer, and the MIDI OUT of the computer to the MIDI IN of the K5000S
You will need to adjust the K5000S's Channels (in System of Multi) to match the sequencer. Depending on your configuration, you may also want to turn Local Control OFF - press SYSTEM, then MIDI (F5), then Local (L1).
ADDITIONAL SOUND MODULES
To use the K5000S to control other sound modules, connect a cable from the K5000S's MIDI OUT jack to the MIDI IN jack of the other device. If you have more than one device, you can loop from the MIDI THRU of the first device to the MIDI IN of the second.
Now that everything is connected, let's see what the K5000S can do!
In the package with your K5000S is a demonstration diskette. Playing this will give a good picture of the K5000S's capabilities.
PLAYING THE DEMO
- With the Power OFF, insert the Supplement Disk into the disk drive on the left side of the instrument.
- Press and hold the F1 button, and while holding, turn on the power.
- The K5000S will startup, and a special Demo Play screen will appear. [screen]
- Press F2 or F3 to select a song, then press F1 to Play the song.
- Press F1 again to stop.
- Press F2 or F3 to select a new song, or F4 to exit to the K5000S main screen.
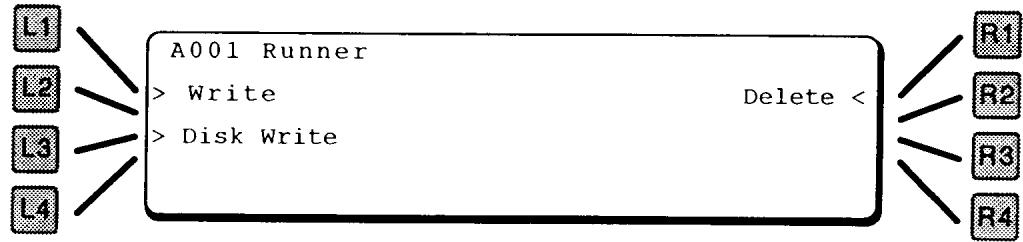
Below is the K5000S Single Play screen. This screen appears after turning on the power.
A001
Runner
| USR1 | Level | Pitch |
| USR2 | LFO spd | Pitch |
| USR3 | Vibrato | Pitch |
| USR4 | Panpot | Pitch |
| SW1 | OctUp |
| SW2 | OctDown |
| FSW1 | Arpegio |
| FSW2 | - - - - - - |
SINGLE SOUNDS
The K5000S contains two banks of Single sounds - A & D. Press the SINGLE button to switch between the two banks. Each bank is organized into groups of 10 patches.
There are up to 128 patches available in a bank, but the patch memory can used up by fewer complex patches.
What happened to B & C? They are used on the companion unit - the K5000W.
CHOOSING A SINGLE SOUND
- If not already selected, choose the SINGLE bank, using the SINGLE button on the front panel.
- Choose a group: press one of the buttons labeled 00 - 12 on the front panel. A menu of the patches in the group appears on the screen.
| Single Bank Menu | |
| A001 | Driver |
| A002 | Reznator |
| A003 | Goom |
| A004 | Heaven |
| A009 Creaturz | |
- Choose a patch: press one of the buttons labeled 0 - 9 on the front panel. The single patch appears on the screen.
| A001 | Runner | |
| USR1 | Level | Pitch |
| USR2 | IPO spd | Pitch |
| USR3 | Vibrato | Pitch |
| USR4 | Panpot | Pitch |
MODIFYING A SOUND
On the left side of the keyboard are 12 Macro Controls which can be used to instantly change the sound quality. In addition, there are four Assignable controls on the bottom row - User 1 through User 4. The screen explains the functions of these controls, as shown in the illustration above.
These do not change the preset values of the patch, which can only be changed by editing the patch - described starting on page 24.
Multi Patches are combinations of up to four Single patches. They can be arranged in layers, key splits, velocity splits, channel splits, or any combination.
CHOOSING A MULTI
There are 64 Multi patches, M01 - M64.
- Choose the Multi bank: press the MULTI button on the front panel.
- Choose a group: press one of the buttons labeled 00 - 06 on the front panel. A menu of the patches in the group appears on the screen.
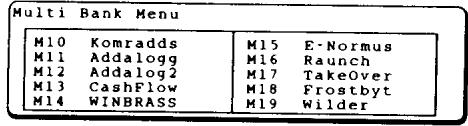
- Choose a patch: press one of the buttons labeled 0 - 9 on the front panel. An individual Multi patch appears on the screen.
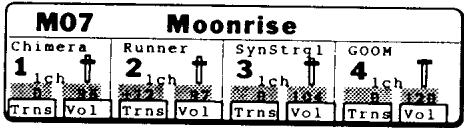
MODIFYING A MULTI
On the screen there are Transpose and Volume sliders for each Section, as shown in the illustration above. Push the button underneath the desired slider, then change the value with the VALUE dial. The slider image will also move according to your adjustment.
These do not change the preset values of the patch, which can only be changed by editing the Multi patch - described starting on page 100.
PROGRAMMABLE
ARPEGGIATOR
The Programmable Arpeggiator offers a wide range of options to mix preset control with live performance. The following explanation only hints at what is possible...
- Press SYSTEM, then F2 (Arp) to reach the Arpeggiator Common Page.
- Set the controls as shown in the screen -
Note (L1) = 48
RangeLo (R1) = C -2
Range Hi (R2) = C 3

- Select Single Patch A006 (Reznator).
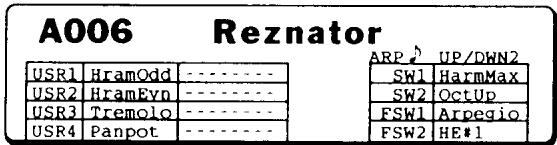

- Set the Arpeggiator Controls (left of the screen, next to the Macro Controls) as follows:
Pattern = U / D2
Mode = Hold and Retrig 1
Speed = around 12 o'clock (straight up)
- Turn on the arpeggiator by pressing the ARPEGGIATOR button - it will light up red.
ARPEGGIATOR

- In the lower half of the keyboard, play a four note chord. The notes will arpeggiate. You can release the keys and the notes will still play.
- You can play a melody on top of this arpeggio with the right hand.
SINGLE SECTION
Pressing the SINGLE key on the right side of the keyboard brings up the Single Play window.
A001
Runner
| USR1 | Level | Pitch |
| USR2 | LFO spd | Pitch |
| USR3 | Vibrato | Pitch |
| USR4 | Panpot | Pitch |
| SW1 | OctUp |
| SW2 | OctDown |
| FSW1 | Arpegio |
| FSW2 | - - - - - - |
The name of the patch is displayed, as well as the four user parameters and arpeggiator settings.
CHANGING SINGLE PATCHES
Single patches are arranged in 2 banks, A & D. To change banks, press SINGLE again. Each bank is arranged in groups of 10 patches. To select a different patch, use the Patch Select keys 0 through 9 on the right side of the panel. To change groups, use the Patch Select keys 00 through 12. A menu screen appears as shown below.
| Single Bank Menu | |
| A001 | Runner |
| A002 | Gorgizmo |
| A003 | Dist Pulse |
| A004 | Telmetal |
| A005 | Driver |
| A006 | Reznator |
| A007 | Goom |
| A008 | Heaven |
| A009 | Creaturz |
This screen lists the patches in the group. To select one press the 0-9 key corresponding to the last digit of the patch number. A different patch will play, with the display as shown at the top of this section.
NOTE:
In the Single Bank, there is not a fixed number of patches. Instead there is a fixed amount of memory for the patches. If your patches are simple, more of them can be stored. As a result, all patch locations may not be available.
MODIFYING PATCHES
In Single Play mode, the Macro Controls on the left of the instrument are available for instant edit. These controls are described below. They add and subtract from the original values contained in the patch, and affect all sources.
There are also four user controls which can be programmed as part of each patch. The programmed function is displayed on the main screen (USR1 -USR4).
A001
Runner
| USR1 | Level | Pitch |
| USR2 | LFO spd | Pitch |
| USR3 | Vibrato | Pitch |
| USR4 | Panpot | Pitch |
| ARP UP/DWN2 |
| SW1 OctUp |
| SW2 OctDown |
| FSW1 Arpegio |
| FSW2 - - - - - - - - - - - - - - - - - - - - - - - - - - - - - - - - - - - - - - - - - - - - - - - - - - - - - - - - - - - - - - - - - - - - - - - - - - - - - - - - - - - - - - - - - - - - - - - - - - - - |
HRM LO
This control adjusts the level of the lower harmonics. This does not adjust the low notes, rather it adjusts the low end of any note.
HRM HI
This control adjusts the level of the upper harmonics. This does not adjust the high notes, rather it adjusts the high end of any note.
EVEN/ODD
This control adjusts the balance of even versus odd harmonics. A positive value boosts the even harmonics and cuts the odd ones, a negative value cuts the even harmonics and boosts the odd ones.
FFBIAS
This control adjusts the Formant Filter Bias, or center frequency.
FF SPEED
This control adjusts the speed of the LFO or Envelope controlling the Formant Filter.
FF DEPTH
Adjusts the Formant Filter LFO or Envelope Depth.
CUTOFF
This adjusts the filter cutoff frequency. Turn this up to make the sound brighter.
RESONANCE
This adjusts the filter resonance.
VELOCITY
Scales the velocity plus or minus. Use this control to adjust the way the patch responds to the dynamics of your playing.
ATTACK
This adjusts the envelope attack time for the DCA and DCF. Turn it down (minus value) to make the attack sharper, turn it up to make the attack smoother.
DECAY
This adjusts the initial decay for both the DCA and DCF envelopes. Turn it down (minus value) to make the decay sharper, turn it up to make the decay smoother.
RELEASE
This adjusts the release or final decay time for both the DCF and DCA envelopes.
Turn it up to make the sound fade out longer after releasing the keyboard.
SELECTING A USER ARPEGGIATOR PATTERN
There are eight user arpeggiator patterns that can be stored in the K5000s.
TO SELECT A USER PATTERN:
- Turn the Arpeggiator Pattern control to USER.
- Tum the VALUE dial to select the desired user arpeggiator pattern.
For information about programming a pattern, see page 109
Pressing EDIT brings up the Edit Menu. All editing pages can be accessed from this page, with the knobs on the left, or by using the Patch Select buttons to the right of the screen - see the legends underneath the buttons.

LI COMMON
Jumps to the Common section, see page 25.
L2 DCO
Jumps to the DCO section, see page 30.
L3 DCF
Jumps to the DCF section, see page 32.
L4 DCA
Jumps to the DCA section, see page 35.
RI ADDITIVE
Jumps to the ADD section, see page 37.
R2 LFO & COPY
Jumps to the LFO section, see page 51.
R3 CONTROL
Jumps to the Control section, see page 53.
R4 EFFECT
Jumps to the Effect section, see page 61.
NOTE:
Throughout the various pages of Single Edit mode, the F2 through F7 keys can be used to turn individual sound sources on or off.
EXITING EDIT MODE
Press EXIT to return to Play Mode. Depending on which page is displayed, you may need to press EXIT more than once. If you have made any changes to the patch, an alert message appears, asking if you want to "Save". Press WRITE to save, or F8 (Quit) to exit without saving. To continue editing, press EDIT.
The Common section contains several pages of basic parameters such as the patch name, below.
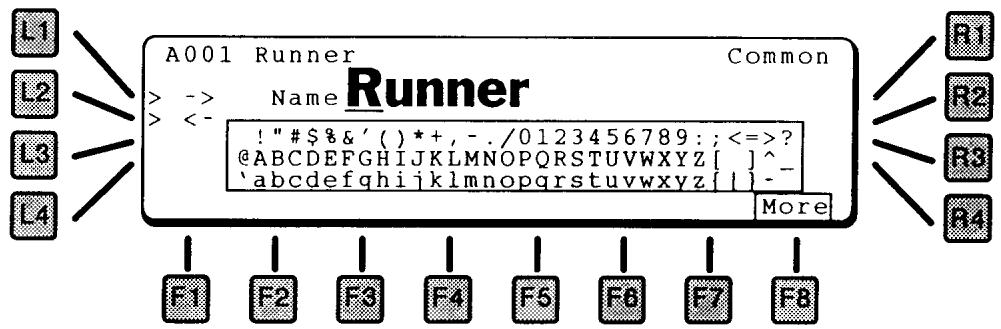
L1 and L2 move through the name forward and back, respectively. Use the Value dial to select a letter.
F8 MORE
Advances to the next page of Common parameters, below.
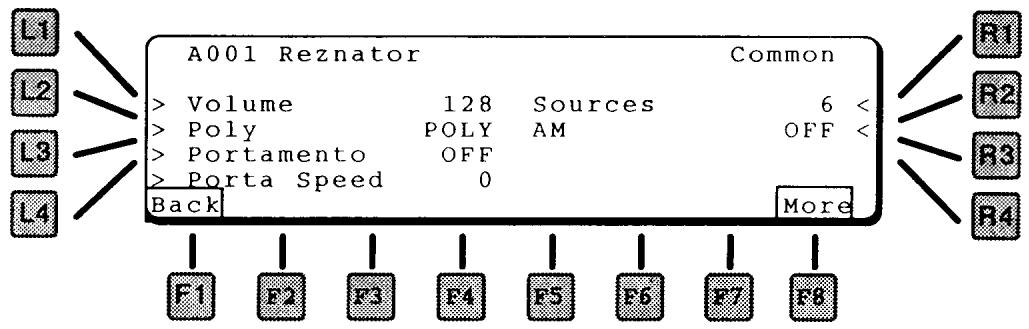
LI VOLUME
Sets the master volume for the program.
L2 POLY
Sets the polyphonic mode for the patch.
POLY Standard polyphonic mode
SOLO1 Monophonic mode. Each key played re-triggers the envelopes.
SOLO2 Monophonic mode. Sustained keys played do not retrigger the envelopes.
L3 PORTAMENTO
This turns on Portamento for the patch. When ON, the sound will slide to each new pitch.
L4 PORTAMENTO SPEED
Sets the speed of the glide. The Portamento changes pitch at a constant rate - a larger interval takes longer than a shorter one.
RI SOURCES
Sets the number of sources for the patch. Patches can have up to six sources. Remember that the more sources used in a patch, the fewer notes that can be played.
R2 AM
Selects sources for Amplitude Modulation. One source can be set to modulate an adjacent source, i.e., 1 > 2 .
FI BACK
Goes back to the previous Common page, above.
F8 MORE
Goes to the Macro and Switch Controller pages, below.
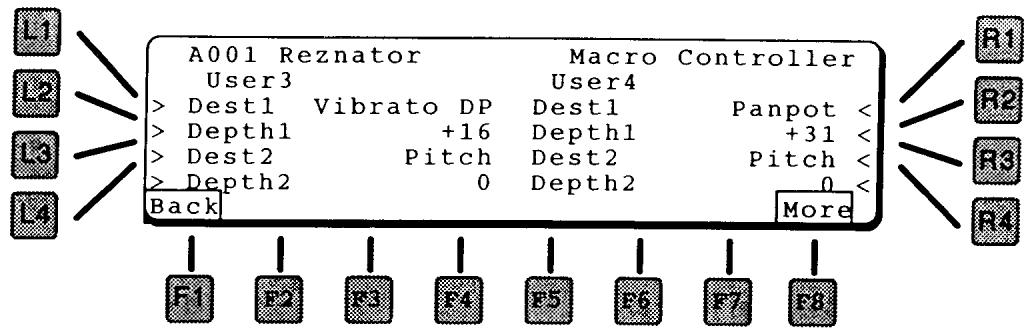
MACRO CONTROLLER
The next two pages control the functions of the four assignable user controls. Each control can manipulate two parameters.
Modulation Destinations are the same as those for the other controllers. See page 56 for a listing.

LI DESTI
Selects one (of two) destinations for User Control 1.
L2 DEPTHI
Sets the amount of control for Destination 1.
L3 DEST2
Selects the other destination for User Control 1.
L4 DEPTH2
Sets the amount of control for Destination 2.
RI DESTI
Selects one (of two) destinations for User Control 2.
R2 DEPTHI
Sets the amount of control for Destination 1.
R3 DEST2
Selects the other destination for User Control 2.
R4 DEPTH2
Sets the amount of control for Destination 2.
F8 MORE
Goes to User Controls 3 &4.
LI DESTI
Selects one (of two) destinations for User Control 3.
L2 DEPTHI
Sets the amount of control for Destination 1.
L3 DEST2
Selects the other destination for User Control 3.
L4 DEPTH2
Sets the amount of control for Destination 2.
RI DESTI
Selects one (of two) destinations for User Control 4.
R2 DEPTHI
Sets the amount of control for Destination 1.
R3 DEST2
Selects the other destination for User Control 4.
R4 DEPTH2
Sets the amount of control for Destination 2.
F8 MORE
Goes to the Switch Controller page, below.
SWITCH CONTROLLER
This page contains settings for the programmable buttons below the disk drive, and the programmable footswitch jacks on the rear panel.
NOTE:
The settings on this page take effect only if the Switches in the System page are set to Single - see page 107.

The switches can be set to any of the following functions:
OFF
Switch will have no effect.
HARM MAX
Sets all harmonics to maximum level.
HARM BRIGT
Sets all harmonics into a bright configuration (higher harmonics louder than lower harmonics).
HARM DARK
Sets harmonics into a dark configuration (first harmonic is set to maximum, other harmonics set to successively lower levels - sharp dropoff rate).
HARM SAW
Sets harmonics into a configuration that generates a Sawtooth wave (first harmonic is set to maximum, other harmonics set to successively lower levels - smooth dropout rate).
SELECT LOUD
Switches the harmonics selection to Loud, regardless of the current setting.
ADD OCT
Adds the "Octave" harmonics - those tuned to octaves above the fundamental pitch: 2, 4, 8, 16, 32 - to the current harmonic series.
ADD 5TH
Adds the "fifth" harmonics - those tuned to a fifth above the fundamental pitch: 3, 6, 12, 24, 48 - to the current harmonic series.
ADD ODD
Adds the odd numbered harmonics - 3, 5, 7, etc. - to the current harmonic series.
ADD EVEN
Adds the even numbered harmonics - 2, 4, 6, etc. - to the current harmonic series.
HE#1
Switches the harmonic envelope rapidly between odd and even harmonics – however the first three harmonics stay on constantly.
HE#2
Sets the harmonic envelope to emphasize attack, and turns on feedback.
HE LOOP
Turns on harmonic envelope looping. See page 42.
FF MAX
Sets the formant filter frequency to maximum.
FF COMBI
Turns on the formant filter LFO at a slow rate.
FF HICUT
Sets the filter frequency low to cut out all the high frequencies.
FF COMB2
Turns on the formant filter LFO at a fast rate.
LI SWITCHI
Selects the function for switch 1.
L2 SWITCH2
Selects the function for switch 2.
RI FOOTSWI
Selects the function for footswitch 1.
R2 FOOTSW2
Selects the function for footswitch 2.
Pressing DCO in the Single Edit menu brings up the following screen which contains the DCO parameters.
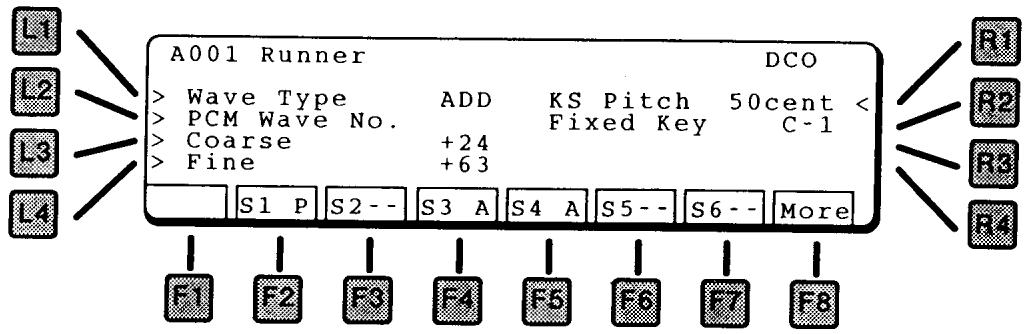
LI WAVETYPE
Selects the wave type for the source: ADD for the additive synthesizer, PCM for sample waves.
L2 PCM WAVE NUMBER
Selects the PCM wave to be used. See page 127 for a list of waves.
NOTE:
This has no effect if ADD is the selected wave type.
L3 COARSE
The coarse frequency in semitones. The range is two octaves above or below.
L4 FINE
The fine frequency setting. Use this for detuning the wave to create beating or fullness.
RI KS PITCH
When the Fixed Key is being used (not Off, below) this parameter adds the key value to control the pitch. This can be used to play in quarter-tones, or to add "stretch" to the tuning. The reference point is the Fixed Key value.
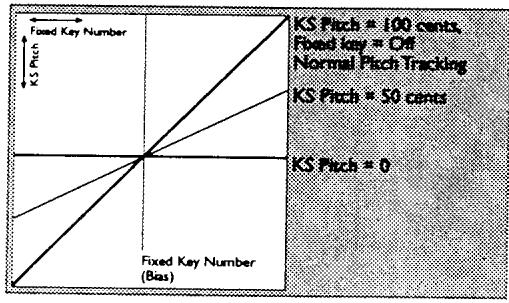
R2 FIXEDKEY
Sets the fixed pitch for the source. The range is A-1 to C7. If Off, then normal key tracking applies.
F8 MORE
Goes to the DCO Pitch Envelope page, below.
The DCO Pitch envelope changes the pitch of the sound over time. Many acoustic instruments have small pitch changes during their initial attack – pulling guitar strings and embouchure in wind instruments – which can be simulated using the DCO Pitch Envelope.
Because of its function during the attack phase of the sound, the DCO Pitch Envelope has only attack and decay functions - it does not sustain.
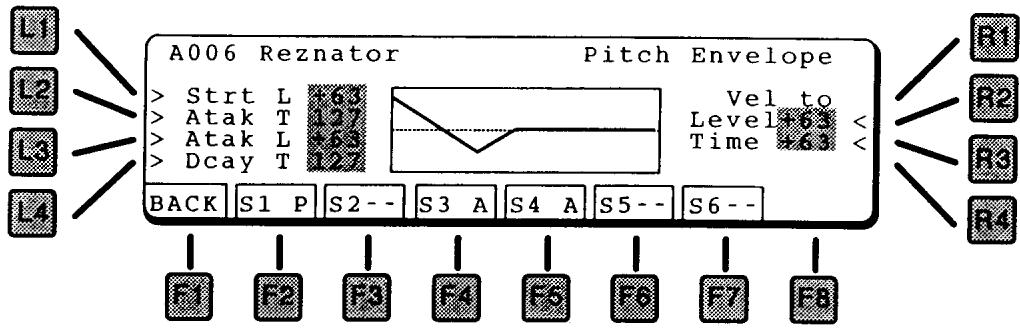
LI STRTL (STARTING LEVEL)
Sets the starting level for the envelope.
L2 ATAKT (ATTACK TIME)
When a note is played (note on), the envelope will go from the starting level to the Attack Level in this amount of time.
L3 ATAK L (ATTACK LEVEL)
Sets the level after the initial attack.
L4 DECYT (DECAYTIME)
After reaching the attack level, the envelope will then go to zero in this amount of time.
RI LEVEL (VELOCITY TO LEVEL)
This controls how much the key velocity affects the amount of pitch envelope.
R2 TIME (VELOCITY TO TIME)
This controls how much the key velocity affects the overall time of pitch envelope.
Pressing DCF in the Single Edit menu brings up the following screen which contains the DCF parameters.
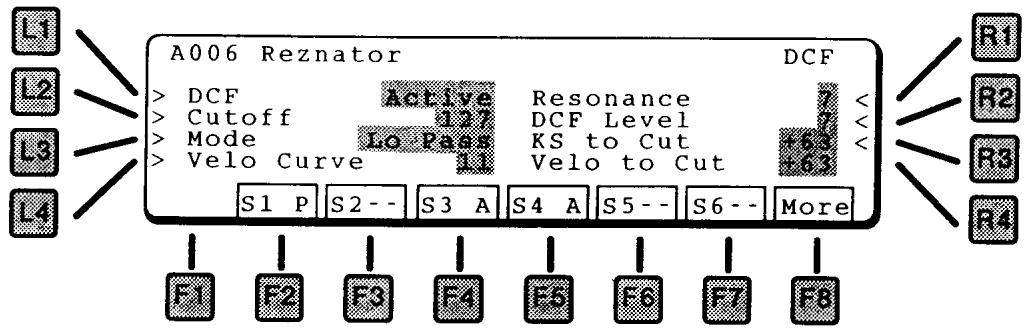
LI DCF
This turns on the DCF. If Active, the signal is routed through the DCF. If set to Bypass, the sound does not pass through the DCF.
L2 CUTOFF
Sets the basic filter cutoff frequency.
L3 MODE
Sets the type of filter. The choices are:
Lo Pass Low Pass Filter - Cuts off the high frequencies (lets the low frequencies pass thru)
Hi Pass High Pass Filter - Cuts off the low frequencies (lets the high frequencies pass thru)
L4 VELO CURVE
- Selects a velocity response curve. Works with Velo to Cut to tailor how the filter cutoff is affected by the key velocity.
RI RESONANCE
Sets the amount of filter resonance. The higher the setting, the more nasal the sound.
R2 DCF LEVEL
Adjusts the input level to the filter.
R3 KSTO CUT
Controls how much the Key Scale affects the filter cutoff frequency.
R4 VELOCITYTO CUT
Controls how much the Velocity affects the filter cutoff frequency.
F8 MORE
Goes to the DCF Envelope page, below.
This screen controls the envelope generator for the filter.

LI DEPTH
Scales the strength of the entire envelope.
L2 ATAKT (ATTACK TIME)
When a note is played (note on), the envelope will go from zero to maximum in this amount of time. A short attack time gives a sharp edge to the start of the sound like a piano. A long attack gives a more legato effect.
L3 DCYIT (DECAYI TIME)
After reaching the maximum, the envelope will go to the decay1 level in this amount of time.
L4 DCYI L (DECAYI LEVEL)
After reaching the maximum, the envelope will go to this level.
RDCY2T (DECAY2 TIME)
After reaching the decay1 level, the envelope will go to the decay2 level in this amount of time.
R2 DCY2 L (DECAY2 LEVEL)
The sustain level. After Attack, Decay1, and Decay2, if a note is still held on it will sustain at this level.
R3 RELST (RELEASE TIME)
When a note is released (goes off) the envelope will return to zero in this amount of time.
F8 MORE
Goes to the next page of parameters, which modulate the envelope.

LI KSTO ATTACK
Adds Key Scale to control the Attack time.
L2 KSTODCYI
Adds Key Scale to control the Decay 1 time.
RI VELO TO ENV
Adds Velocity to control the overall envelope level. The more velocity, the more the filter will open.
R2 VELO TO ATK
Adds Velocity to control the Attack time.
R3 VELOTO DCYI
Adds Velocity to control the Decay 1 time.
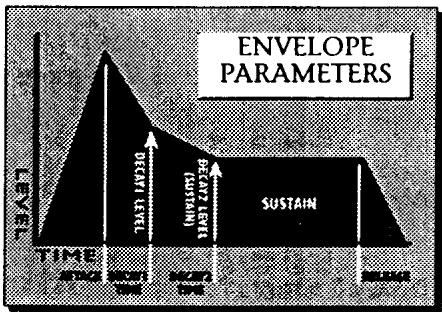
The Digitally Controlled Amplifier (DCA) sets the volume of the sound. It is controlled by an envelope to shape a sound's overall transient characteristics.
The DCA envelope screen shows a visual representation of the envelope.
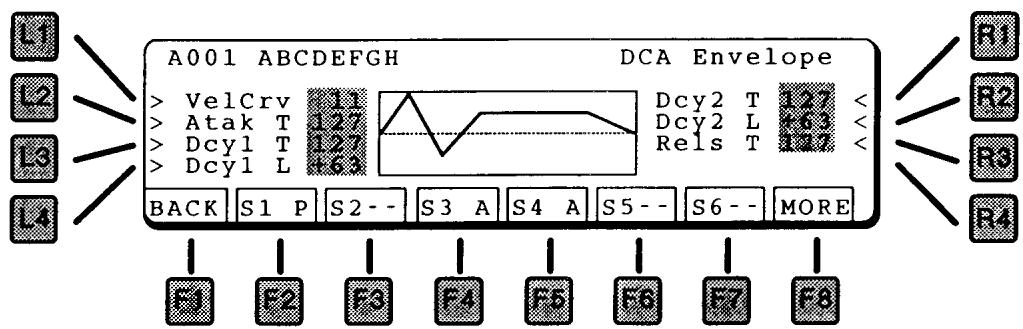
LI VELOCITY CURVE
Selects a velocity response curve to tailor the response of the DCA to key velocity.
L2 ATTACKTIME
When a note is played (note on), the envelope will go from zero to maximum in this amount of time. A short attack time gives a sharp edge to the start of the sound like a piano. A long attack gives a more legato effect.
L3 DECAYI TIME
After reaching the maximum, the envelope will go to the decay1 level in this amount of time.
L4 DECAYI LEVEL
After reaching the maximum, the envelope will go to this level.
RI DECAY2 TIME
After reaching the decay1 level, the envelope will go to the decay2 level in this amount of time.
R2 DECAY2 LEVEL
The sustain level. After Attack, Decay1, and Decay2, if a note is still held on it will sustain at this level.
R3 RELEASE TIME
When a note is released (goes off) the envelope will return to zero in this amount of time.
F8 MORE
Goes to the DCA Modulation page, below.
This page offers parameters to modify the DCA envelope by key scale (which note is played) or velocity (how hard a key is played). Careful use of these parameters can add life and expression to any sound.
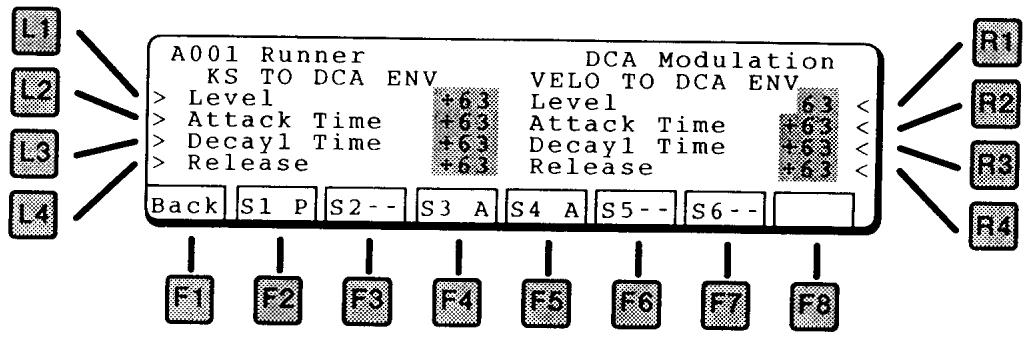
MODULATION BY KEY SCALE:
LI ENVELOPE LEVEL
Uses key scale to control the maximum amount of the envelope. With a positive value, a higher key will have more envelope dynamics and a lower key will have less dynamics.
L2 ATTACKTIME
Uses key scale to control the attack time. With a positive value, a higher key will have a longer attack time and a lower key will have a shorter attack time.
In nature, lower instruments (baritone sax, for example) have a longer attack time than higher instruments (alto sax). Using negative amounts of this parameter will simulate this.
L3 DECAI TIME
Uses key scale to control the decay1 time. With a positive value, a higher key will have a longer decay time and a lower key will have a shorter time.
L4 RELEESETIME
Uses key scale to control the decay1 time. With a positive value, a higher key will have a longer release time and a lower key will have a shorter time.
MODULATION BY VELOCITY:
RI ENVELOPE LEVEL
Uses velocity to control the maximum amount of the envelope. With a positive value, a harder (louder) key will have more envelope dynamics and a softer key will have less dynamics.
R2 ATTACKTIME
Uses velocity to control the attack time. With a positive value, a harder (louder) key will have a longer attack time and a softer key will have a shorter attack time.
In nature, softer notes generally have a longer attack time than louder notes. Using negative amounts of this parameter will simulate this.
R3 DECAYI TIME
Uses velocity to control the decay time. With a positive value, a harder (louder) key will have a longer decay time and a softer key will have a shorter time.
R4 RELEEASETIME
Uses attack velocity to control the release time. With a positive value, a faster key release will have a longer release time and a slower release will have a shorter time. Again, negative values of this parameter are more natural.
This section presents the editing parameters for Kawai's ADD harmonic synthesizer.
The first ADD screen presents seven submenus for navigation.
LI HARMONIC LEVEL
Goes to DHL page, where the level of individual harmonics can be adjusted.
L2 HARMONIC ENVELOPE
Goes to DHE page, where the harmonics can be enveloped.
L3 FORMAL LEVEL
Goes to the DFL page, where the formant filter can be adjusted.
L4 FORMALNT ENVELOPE
Goes to the DFE page, where the formant filter can be enveloped.
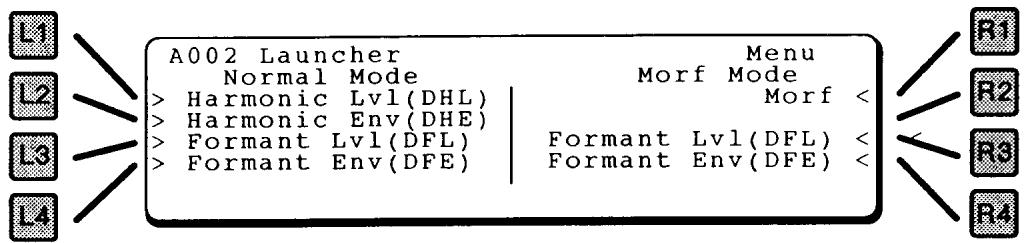
RI MORF
Goes to the Morfing page, which is a harmonics programming assistant.
NORMAL VS MORF
There are two programming modes, Normal and Morf. Any additive source uses one or the other. The main difference is in how the Harmonic Envelopes are utilized. For this reason, if you change to Morf mode (by executing a morf), the DHE parameters are replaced by new Morf settings. Other sections are not affected.
R3 FORMAL T LEVEL
Goes to the DFL page, where the formant filter can be adjusted.
R4 FORMALNT ENVELOPE
Goes to the DFE page, where the formant filter can be enveloped.
Selecting Harmonic Level from the previous page brings you to the DHL Menu page, where you can select pages for direct manipulation of the harmonic levels.

LI COMMON
Edits parameters common to all harmonics.
L2 HARMONIC LEVEL EDIT
Goes to a visual display of harmonics, where individual harmonics can be adjusted.
L3 HARMONIC LEVEL COPY
Copies sets of harmonics from one patch to another.
COMMON
Edits parameters common to all harmonics.
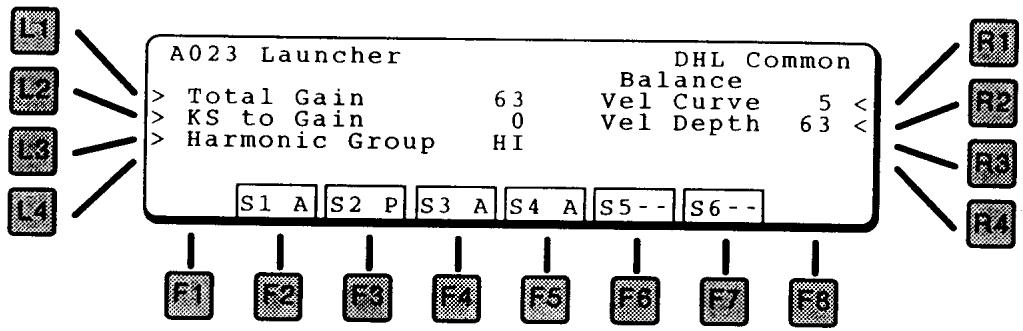
LI TOTAL GAIN
This is the master level for this harmonic group.
L2 KSTOGAIN
This adjusts how much the Key Scale controls the gain of the harmonic group. With a positive value, high notes will have a higher gain than low notes.
L3 HARMONIC GROUP
In the K5000S, each source can use a harmonic bank of 64 harmonics. This parameter selects whether the first 64 harmonics (1 - 64, starting at the fundamental) or harmonics 65 - 128 are used.
By itself, the Hi harmonics group has a tonality similar to metallic percussion instruments.
RI VELOCITY CURVE
12 velocity curves are available to adjust the response of the harmonic envelope to the touch of your playing. This curve is used for all sections of the patch. Curve #5 (below) equals an exact 1:1 correlation, the other curves weight the response in different directions.

R2 VELOCITY DEPTH
This sets the velocity crossfade between the soft and loud harmonic groups.
HARMONIC LEVEL EDIT
Goes to a visual display of harmonics, where individual harmonics can be adjusted.
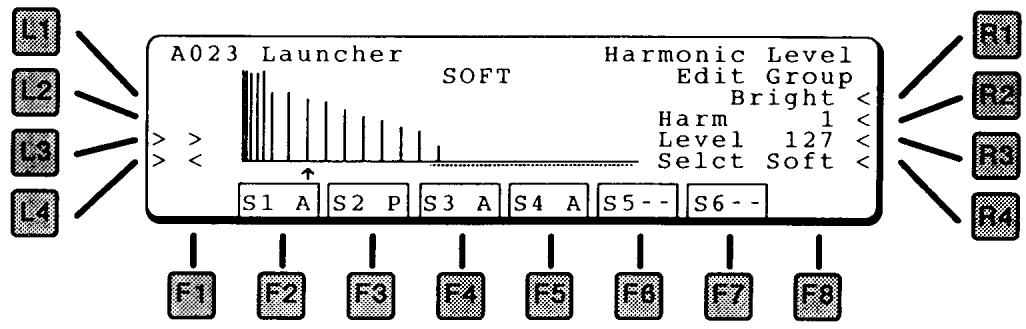
L3 NEXT HARMONIC
L4 PREVIOUS HARMONIC
These buttons select an individual harmonic. The small arrow under the harmonics displays which harmonic is selected, and its number and value can be seen on the right side of the screen (R2 and R3).
RI EDIT GROUP
Since editing harmonics one at a time can become quite cumbersome, the Edit Group function allows you to select harmonics to modify as a group.
HARMONIC GROUPS
Harmonics can be grouped in the following categories. The dots underneath the harmonic bars show which harmonics are selected.
BRIGHT
The upper 32 harmonics.
DARK
The lower 32 harmonics.
ODD
The odd numbered harmonics.
EVEN
The even numbered harmonics.
OCT
Each harmonic tuned to an octave of the fundamental pitch: 1, 2, 4, 8, 16, 32, 64 (when lo is selected) / 128 (when hi is selected).
5TH
Each harmonic tuned to a fifth above of the fundamental pitch: 3, 6, 12, 24, 48 (when lo is selected) / 96 (when hi is selected).
ALL
All 64 harmonics.
EACH
Only the selected harmonic, the pointed to by the arrow under the harmonic display.
R2 HARMONIC NUMBER
Uses the Value dial to select a harmonic for display. The small arrow under the harmonics displays which harmonic is selected.
R3 LEVEL
Adjusts the level of the selected harmonic(s).
R4 SELECT
Selects a harmonic group to edit (soft or loud). These two sets can be crossfaded by velocity.
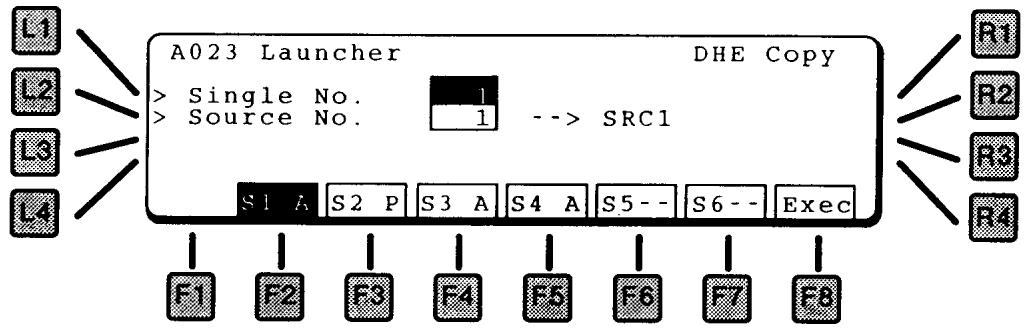
HARMONIC LEVEL COPY
From this screen, you can copy sets of harmonics from one patch to another. Since there are so many parameters in a harmonic series, this makes creating and modifying patches less time consuming.
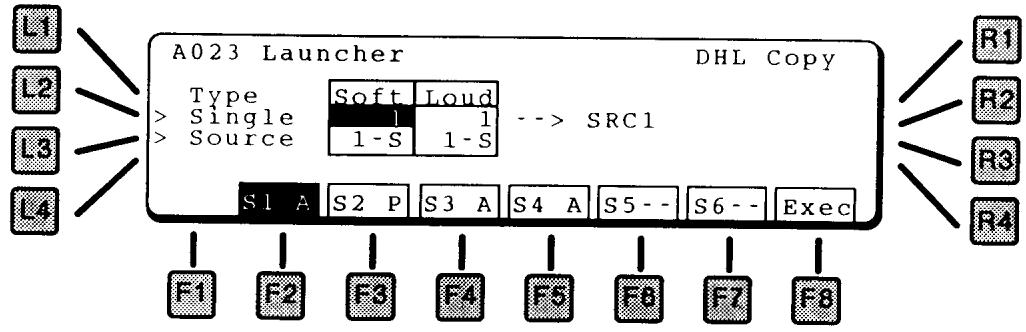
L2 SINGLE
Select the Patch to copy from. Pressing L2 switches between Soft and Loud.
L3 SOURCE
Select the Source from within the selected patch to copy from, 1 - 6. Pressing L3 switches between Soft and Loud variations.
= no copy. This means that this side (soft or loud) will not be copied.
F2~F7 DESTINATION
Press the F2~F7 buttons to select which source (of the current patch) that the copy will be made to.
F8 EXECUTE
Press this to make the copy.
This screen is the menu for Harmonic Envelope functions.

LI HARMONICS ENVELOPE MULTIVIEW
Displays individual parameters for all 64 harmonic envelopes simultaneously.
L2 HARMONICS ENVELOPEVIEW
Displays all parameters of a single harmonic envelope.
L3 HARMONICS ENVELOPE COPY
Copies harmonic envelopes from a Single patch in memory to the current patch being edited.
HARMONIC ENVELOPE MULTIVIEW
The Harmonic Envelope Multiview screen shows individual segments of the harmonic envelope for all harmonics side by side. The display shows the rate on the left and the level on the right. The harmonics selected for editing are shown by the dots and the arrow underneath the graphs. Compare this screen to the Harmonic Envelope View screen (described on page 43), which shows all segments of a single envelope.
The harmonic envelope starts at zero. However the Attack phase can go above or below zero and the release does not have to end at zero, like a DCA envelope does.
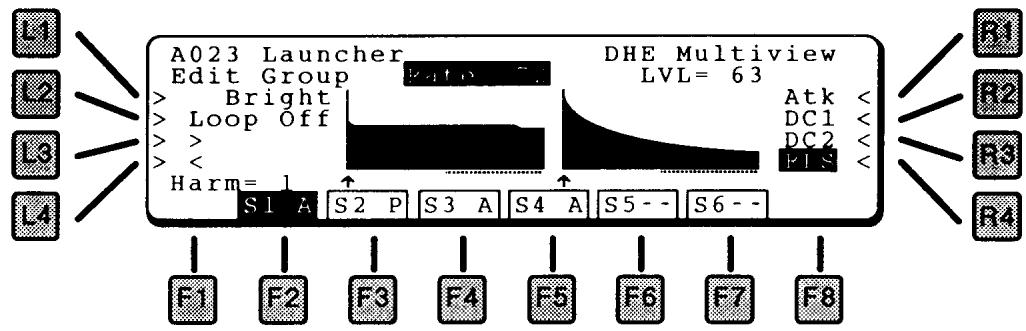
LI EDIT GROUP
Since editing harmonics one at a time can become quite cumbersome, the Edit Group function allows you to select harmonics to modify as a group.
HARMONIC GROUPS
Harmonics can be grouped in the following categories. The dots underneath the harmonic bars show which harmonics are selected.
BRIGHT
The upper 32 harmonics.
DARK
The lower 32 harmonics.
ODD
The odd numbered harmonics.
EVEN
The even numbered harmonics.
OCT
Each harmonic tuned to an octave of the fundamental pitch: 1, 2, 4, 8, 16, 32, 64 (when lo is selected) / 128 (when hi is selected).
STH
Each harmonic tuned to a fifth above of the fundamental pitch: 3, 6, 12, 24, 48 (when lo is selected) / 96 (when hi is selected).
ALL
All 64 harmonics.
EACH
Only the selected harmonic, the pointed to by the arrow under the harmonic display.
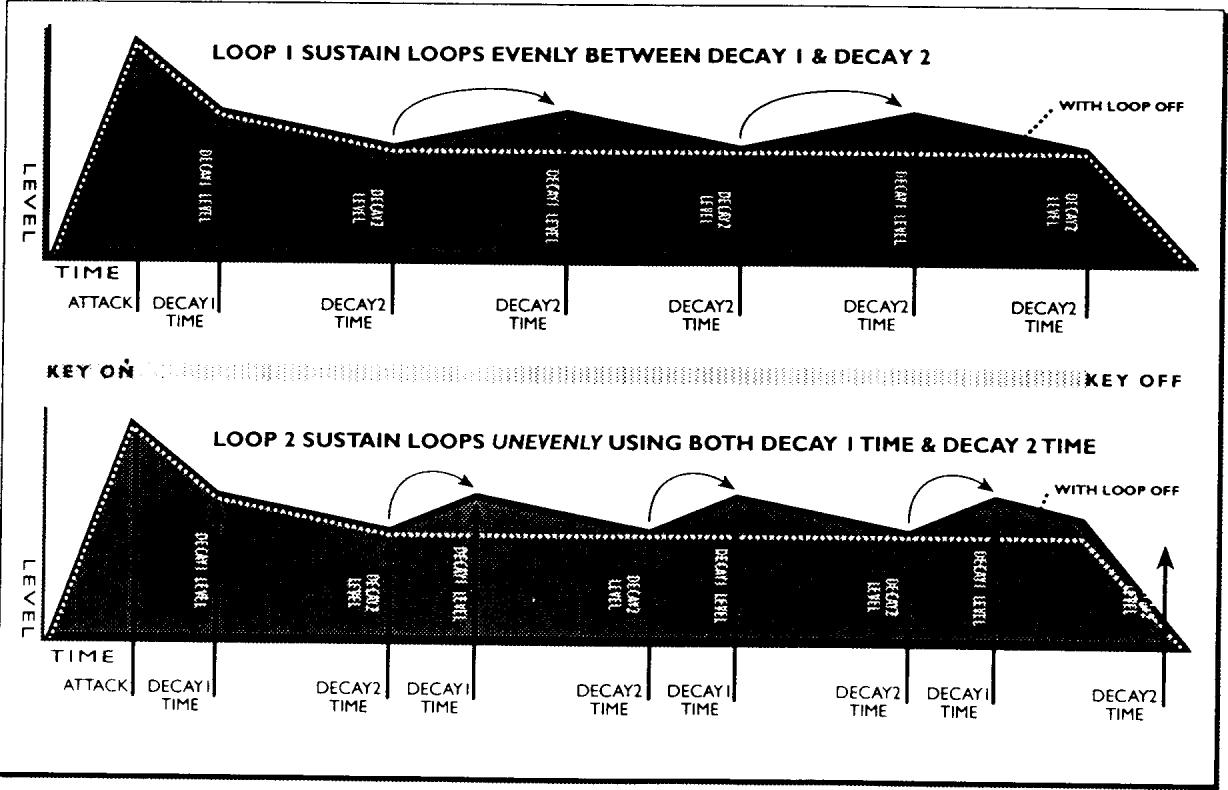
L2 LOOP
To enhance motion in the sound, the harmonic envelopes can loop among several settings during the sound's sustain.
OFF
No loop. Envelope goes to the Decay 2 Level and sustains there, the same as the envelopes for the DCF and DCA.
LPI
Loops between Decay 1 Level and Decay 2 Level, at the Decay 2 Rate.
LP2
Loops between Decay 1 Level and Decay 2 Level, but uses both Decay 1 and Decay 2 Rates.
L3 NEXT HARMONIC
L4 PREVIOUS HARMONIC
These buttons select an individual harmonic. The small arrow under the harmonics displays which harmonic is selected.
RI ATTACK (RATE & LEVEL)
Press R1 to switch between the Attack Rate and Attack Level. Use the Value dial to change the setting.
R2 DECAY I (RATE & LEVEL)
Press R2 to switch between the Decay 1 Rate and Level. Use the Value dial to change the setting.
R3 DECAY 2 (RATE & LEVEL)
Press R3 to switch between the Decay 2 Rate and Level. Use the Value dial to change the setting.
R4 RELEASE (RATE & LEVEL)
Press R4 to switch between the Release Rate and Level. Use the Value dial to change the setting.
HARMONIC ENVELOPEVIEW
This display shows all the envelope parameters for a single harmonic on one screen, another way of looking at the harmonic envelopes.

L2 LEVEL
Press L2 to cycle through the level settings for Attack, Decay 1, Decay 2, and Release. Use the Value dial to change the setting.
L3 RATE
Press L3 to cycle through the rate settings for Attack, Decay 1, Decay 2, and Release. Use the Value dial to change the setting.
R3 HARMONIC
This selects the harmonic to modify. Each of the 64 harmonics has its own envelope.
R4 DECAY LOOP
To enhance motion in the sound, the harmonic envelopes can loop among several settings during the sound's sustain. See the diagram on the previous page.
OFF
No loop. Envelope goes to the Decay 2 Level and sustains there, the same as the envelopes for the DCF and DCA.
LPI
Loops between Decay 1 Level and Decay 2 Level, at the Decay 2 Rate.
LP2
Loops between Decay 1 Level and Decay 2 Level, but uses both Decay 1 and Decay 2 Rates.
HARMONIC ENVELOPE COPY
From this screen, you can copy sets of harmonic envelopes from one patch into the current patch. Since there are so many parameters in a harmonic envelope, this makes creating and modifying patches less time consuming.
LI SINGLE NUMBER
This sets the patch to copy the harmonic envelope from.
L2 SOURCE NUMBER
This sets the source from the Single patch (selected above) to copy from.
F2-F7 DESTINATION SOURCE
Press the Source function key to select which source the envelope will be copied to. The display shows the destination as --> SRC#.
F8 EXECUTE
Press this to make the copy.
FORMANT FILTER LEVEL (DFL)
The K5000's Formant Filter is a 128-band graphic equalizer, which can be used to create additional additive effects.

CENTER FREQUENCY OF 128 BAND FORMANT FILTER (BIAS=0)
Band 70 = 440Hz
If the BIAS is set to +12 , Band 70 = 220Hz.
If the BIAS is set to -12, Band 70=880Hz.
The Formant Filter Envelope value works the same as the BIAS.
If the Formant Filter Env. is set to a minus value, the filter moves to the right.
| Band | Freq.-Hz. | Key | Band | Freq.-Hz. | Key | Band | Freq.-Hz. | Key | Band | Freq.-Hz. | Key |
| 1 | 8 | C | 33 | 52 | G# | 65 | 330 | E | 97 | 2093 | C |
| 2 | 9 | C# | 34 | 55 | A | 66 | 349 | F | 98 | 2217 | C# |
| 3 | 9 | D | 35 | 58 | A# | 67 | 370 | F# | 99 | 2349 | D |
| 4 | 10 | D# | 36 | 62 | B | 68 | 392 | G | 100 | 2489 | D# |
| 5 | 10 | E | 37 | 65 | C | 69 | 415 | G# | 101 | 2637 | E |
| 6 | 11 | F | 38 | 69 | C# | 70 | 440 | A | 102 | 2794 | F |
| 7 | 12 | F# | 39 | 73 | D | 71 | 466 | A# | 103 | 2960 | F# |
| 8 | 12 | G | 40 | 78 | D# | 72 | 494 | B | 104 | 3136 | G |
| 9 | 13 | G# | 41 | 82 | E | 73 | 523 | C | 105 | 3322 | G# |
| 10 | 14 | A | 42 | 87 | F | 74 | 554 | C# | 106 | 3520 | A |
| 11 | 15 | A# | 43 | 92 | F# | 75 | 587 | D | 107 | 3729 | A# |
| 12 | 15 | B | 44 | 98 | G | 76 | 622 | D# | 108 | 3951 | B |
| 13 | 16 | C | 45 | 104 | G# | 77 | 659 | E | 109 | 4186 | C |
| 14 | 17 | C# | 46 | 110 | A | 78 | 698 | F | 110 | 4435 | C# |
| 15 | 18 | D | 47 | 117 | A# | 79 | 740 | F# | 111 | 4699 | D |
| 16 | 19 | D# | 48 | 123 | B | 80 | 784 | G | 112 | 4978 | D# |
| 17 | 21 | E | 49 | 131 | C | 81 | 831 | G# | 113 | 5274 | E |
| 18 | 22 | F | 50 | 139 | C# | 82 | 880 | A | 114 | 5588 | F |
| 19 | 23 | F# | 51 | 147 | D | 83 | 932 | A# | 115 | 5920 | F# |
| 20 | 24 | G | 52 | 156 | D# | 84 | 988 | B | 116 | 6272 | G |
| 21 | 26 | G# | 53 | 165 | E | 85 | 1047 | C | 117 | 6645 | G# |
| 22 | 28 | A | 54 | 175 | F | 86 | 1109 | C# | 118 | 7040 | A |
| 23 | 29 | A# | 55 | 185 | F# | 87 | 1175 | D | 119 | 7459 | A# |
| 24 | 31 | B | 56 | 196 | G | 88 | 1245 | D# | 120 | 7902 | B |
| 25 | 33 | C | 57 | 208 | G# | 89 | 1319 | E | 121 | 8372 | C |
| 26 | 35 | C# | 58 | 220 | A | 90 | 1397 | F | 122 | 8870 | C# |
| 27 | 37 | D | 59 | 233 | A# | 91 | 1480 | F# | 123 | 9397 | D |
| 28 | 39 | D# | 60 | 247 | B | 92 | 1568 | G | 124 | 9956 | D# |
| 29 | 41 | E | 61 | 262 | C | 93 | 1661 | G# | 125 | 10548 | E |
| 30 | 44 | F | 62 | 277 | C# | 94 | 1760 | A | 126 | 11175 | F |
| 31 | 46 | F# | 63 | 294 | D | 95 | 1865 | A# | 127 | 11840 | F# |
| 32 | 49 | G | 64 | 311 | D# | 96 | 1976 | B | 128 | 12544 | G |

L3 NEXT
L4 PREVIOUS
These buttons select the next or previous group.
RI EDIT GROUP
The filter bands can be grouped into the following categories. The bracket underneath the bars show which filter bands are selected. The range can be adjusted with the Band control, the level of the selected band with the level control.
GRAPHIC EQ
An eight-band graphic EQ, which creates the typical elliptical EQ pattern in each band.
20 BAND
Operates on 20 of the 128 formant filter bands at one time.
15 BAND
Operates on 15 of the 128 formant filter bands at one time.
10 BAND
Operates on 10 of the 128 formant filter bands at one time.
5 BAND
Operates on 5 of the 128 formant filter bands at one time.
ALL
All 128 Bands.
EACH
Only the selected frequency band, shown by the arrow under the display.
R2 BAND
The range of the filter band to be controlled can be adjusted using the Band control. The bracket shows the selected range.
R3 LEVEL
This adjusts the level of the selected band.
R4BIAS
The frequencies of the entire formant filter can be moved up and down using the Bias control.
L2 FORMAL FILTER LEVEL COPY
This copies the formant filter settings from a Single patch in memory into the current Single patch.
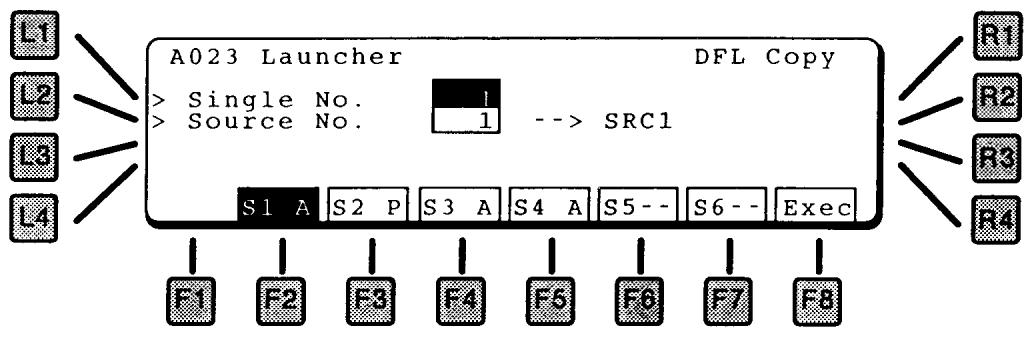
LI SINGLE NUMBER
This sets the patch to copy the formant filter level settings from.
L2 SOURCE NUMBER
This sets the source from the Single patch (selected above) to copy from.
F2-F7 DESTINATION SOURCE
Press the Source function key to select which source the filter settings will be copied to. The display shows the destination as --> SRC#.
F8 EXECUTE
Press this to make the copy.
FORMANT ENVELOPE (DFE)
The formant filter can be swept up and down using an envelope generator or LFO, selected from this screen.
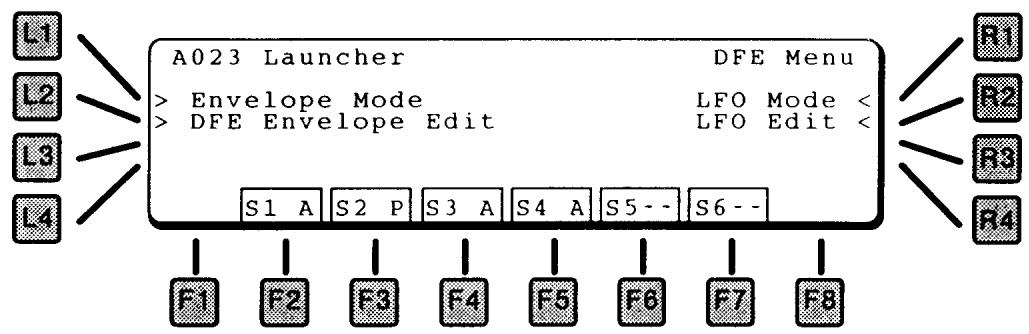

L2 DFE ENVELOPE EDIT
This page contains the parameters for the Formant Filter Envelope. There is one envelope per source.
The envelope diagram shows the visual result of the envelope settings on the page.
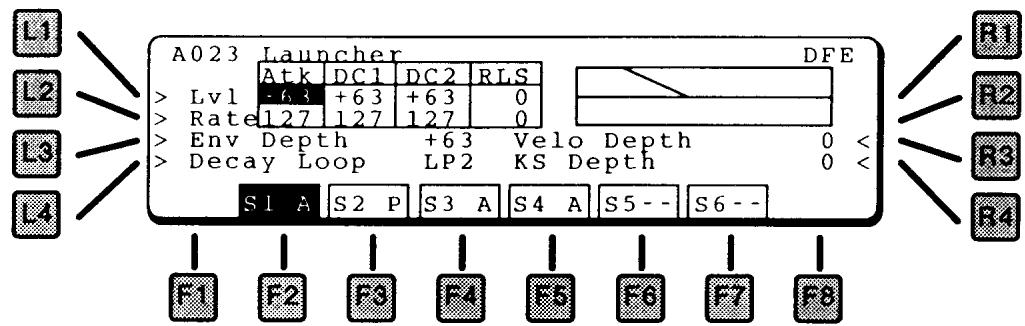
LI LEVEL
Press L2 to cycle through the level settings for Attack, Decay 1, Decay 2, and Release. Use the Value dial to change the setting.
L2 RATE
Press L3 to cycle through the time settings for Attack, Decay 1, Decay 2, and Release. Use the Value dial to change the setting.
L3 ENV DEPTH
This is the master envelope depth control, which determines how much the envelope controls the filter.
L4 DECAY LOOP
To enhance motion in the sound, the harmonic envelopes can loop among several settings during the sound's sustain. See the diagram on page 42.
OFF
No loop. Envelope goes to the Decay 2 Level and sustains there, the same as the envelopes for the DCF and DCA.
LPI
Loops between Decay 1 Level and Decay 2 Level, at the Decay 2 Rate.
LP2
Loops between Decay 1 Level and Decay 2 Level, but uses both Decay 1 and Decay 2 Rates.
R3 VELO DEPTH
The key velocity can be used to adjust the amount of filter modulation by the envelope. With a positive value, the harder a key is played, the more the filter will be moved by the envelope.
R4 KS DEPTH
The key scale (which key is played) can also be used to adjust the amount of filter modulation by the envelope. With a positive value, the higher the note, the more the filter will be moved by the envelope.
R2 LFO EDIT
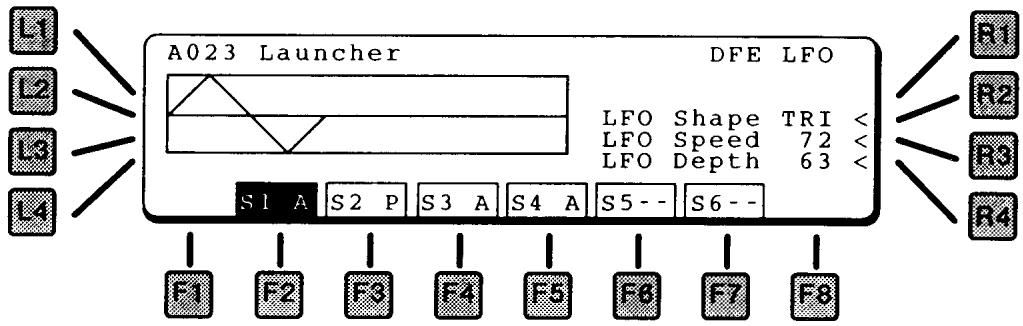
R2 LFO SHAPE
This selects the LFO waveform type:
TRI
Triangle
SAW
Sawtooth
RND
Random
R3 LFO SPEED
Sets the LFO speed.
R4 LFO DEPTH
Sets the initial LFO Depth.
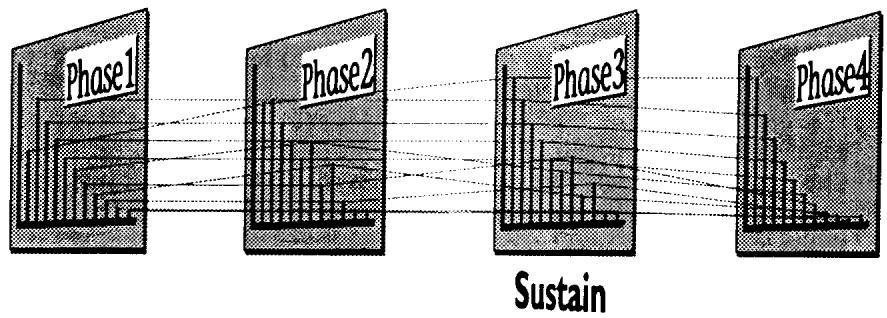
Morfing lets you create new harmonic shapes by dissolving between four different harmonic snapshots. This is done by copying four sources from patches stored in the K5000S.
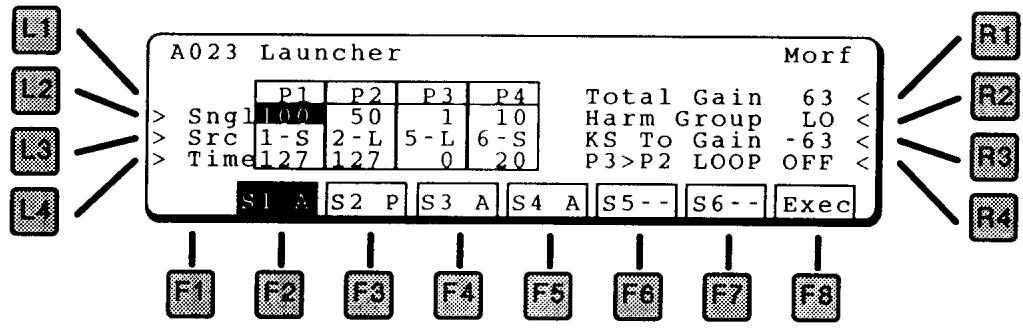
L2 SINGLE
This selects which patch the source will be copied from. Press this key repeatedly to cycle through the four phases (P1 - P4).
L3 SOURCE
This selects the source within the single patch (selected by L2) to copied. There are up to six sources, each of which contains a soft harmonic set (S), and a loud harmonic set (L). Press this key repeatedly to cycle through the four phases (P1 - P4).
L4 TIME
The transition between phases.
RI TOTAL GAIN
The loudest harmonic will be set to this level, so it functions as a master level.
R2 HARMONIC GROUP
This selects the range of harmonics, 1-64 or 65-128.
R3 KSTO GAIN
Controls the level with the Key Scale. With a positive value, the harmonics will get louder as higher notes are played on the keyboard.
R4 P3>P2 LOOP
If OFF, the harmonics will move according to the selected on this screen, however they will freeze once the sustain point is reached. By turning ON the P3>P2 Loop, the harmonics will morf back and forth between phase 2 and phase 3 during sustain, creating constant motion and a more animated sound.
F8 EXECUTE
Creates the Morf.
The Low Frequency Oscillator is a slow moving (sub-audio) oscillator that is used to modify the DCO, DCF, or DCA to give vibrato and tremolo effects.
A Source Copy function is also included on this page.
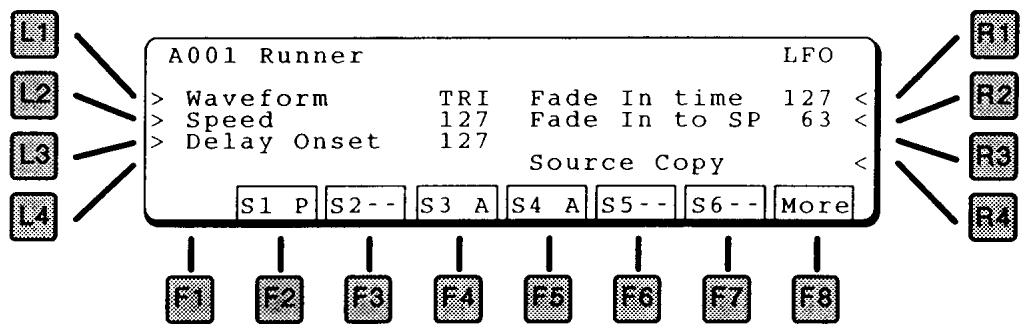
LI WAVEFORM
This selects the LFO waveform type:
SIN
Sine
TRI
Triangle
SAW
Sawtooth
SQR
Square
RND
Random
L2 SPEED
Sets the LFO initial speed. The range is 0.1Hz to 18Hz .
L3 DELAY ONSET
This adds a delay before the LFO kicks in. The delay can be as long as 2 seconds.
RI FADE INTIME
After the delay, this sets the amount of time that the LFO fades in to maximum amount.
R2 FADE INTO SPEED
After the delay, the LFO gradually speeds up to the initial speed setting.
R3 SOURCE COPY
This lets you copy an entire source from another patch.

LI SINGLE NUMBER
Select the Patch to copy from.
L2 SOURCE NUMBER
Select the Source from within the selected patch to copy from, 1-6.
F2-F6 Selects the destination source (in the current patch) for the copy.
F8 EXEC
Executes the copy.
LFO MODULATION
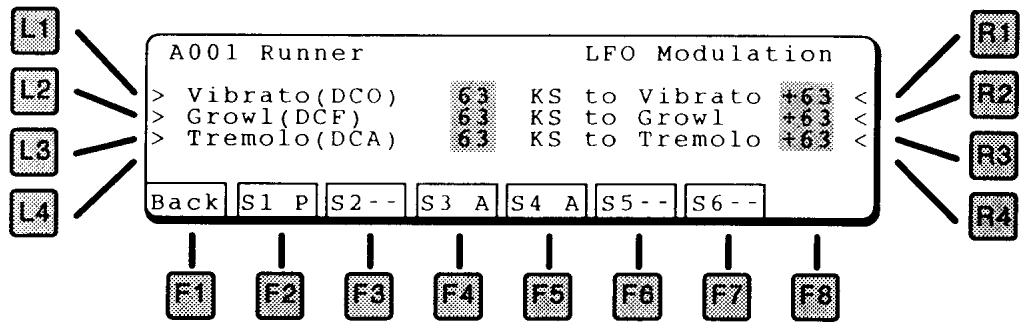
LI VIBRATO (DCO)
Controls the amount of LFO routed to the DCO, which causes vibrato.
L2 GROWL (DCF)
Controls the amount of LFO routed to the DCF, which causes growl.
L3 TREMOLO (DCA)
Controls the amount of LFO routed to the DCA, which causes tremolo.
RI KEY SCALETO VIBRATO
This scales the amount of vibrato depth according to the key played. With a positive value, the amount of vibrato increases as higher notes are played.
R2 KEY SCALETO GROWL
This scales the amount of DCF growl according to the key played. With a positive value, the amount of growl increases as higher notes are played.
R3 KEY SCALETOTREMODO
This scales the amount of tremolo depth according to the key played. With a positive value, the amount of tremolo increases as higher notes are played.
The Control pages contain settings for real time control of the sound.
VOLUME, PITCH BEND, PAN

LI VOLUME
This is the master volume for the sound source.
L2 KEY ON DELAY
This sets a delay between the time the key is struck and the sound starts.
L3 EFFECT PATH
- Routes this source to one of the four inputs to the effects section. For more on the effects please see page 61.

RI BENDER PITCH
The maximum amount of pitch bend, in semitones.
R2 BENDER CUTOFF
The Pitch Bend control also can affect the filter. If you bend up, the filter cutoff goes up and the sound gets brighter. If you bend down the filter cutoff goes down and the sound gets darker.
R3 PANTYPE
This sets the type of panning.
NRM (Normal) is a standard left to right pan, controlled by the Pan Value, below.
RND (Random) changes the panning randomly for each note played. This gives a feeling of an "ensemble of players" when used for a string patch, for example.
KS & -KS(Key Scale and Negative Key Scale) changes the panning depending upon the key played. KS pans from left to right, -KS pan from right to left. Using KS will simulate the natural panning of strings inside a piano.
R4 PANVALUE
Places the sound left to right in the stereo field.
F8 MORE
Press to go to the Zone screen, below.
KEY AND VELOCITY ZONE
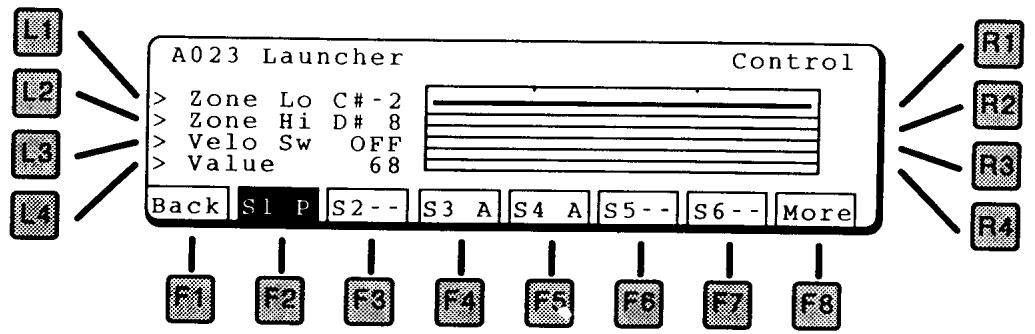
This screen has parameters for key and velocity range. Using these parameters, a sound can be limited to play in only a certain range of the keyboard, or only when a key is played hard or soft. By creating several sources, for example, one that plays on soft notes only and another that plays on hard notes only, a sound can be created with more lifelike variation.
LI ZONELO
Sets the lowest note that will be played. The keyboard graphic visually shows the range.
L2 ZONE HI
Sets the highest note that will be played.
L3 VELOCITY SWITCH
Sets the velocity range. At Loud, only hard (loud) notes will sound. At Soft, only soft notes will sound. When set to OFF, the velocity switch is turned off and notes play at all velocity levels.
L4 VALUE
Sets the threshold between high and low velocity. This is the MIDI velocity number.
FI BACK
Press to return to the previous screen.
F8 MORE
Press to go to the controller screen, below.
The next two screens contain settings for aftertouch pressure, modulation wheel, and expression pedal control of the sound. Following these is a screen for Assignable Controllers.
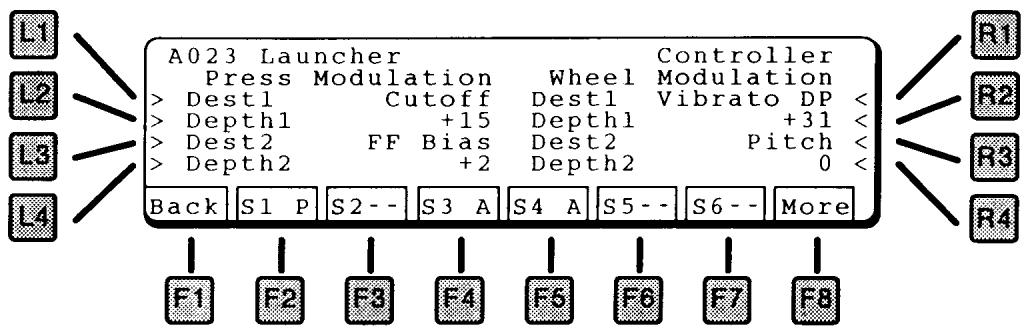
PRESSURE MODULATION
Channel Pressure, or aftertouch, can be routed to two destinations simultaneously (actually a third destination is possible by using the Assignable Controllers, page 58).
LI DESTINATIONI
Selects the destination for the modulation. The destination can be any of those listed below.
L2 DEPTH I
Sets the amount of the modulation. This can be positive or negative.
L3 DESTINATION 2
Selects the destination for the modulation. The destination can be any of those listed below.
L4 DEPTH 2
Sets the amount of the modulation. This can be positive or negative.
WHEEL MODULATION
The Modulation Wheel can be routed to two destinations simultaneously (actually a third destination is possible by using the Assignable Controllers, page 58). The Modulation Wheel is MIDI Controller 1.
RI DESTINATION I
Selects the destination for the modulation. The destination can be any of those listed below.
R2 DEPTH1
Sets the amount of the modulation. This can be positive or negative.
R3 DESTINATION 2
Selects the destination for the modulation. The destination can be any of those listed below.
R4 DEPTH 2
Sets the amount of the modulation. This can be positive or negative.
FI BACK
Press to return to the previous screen.
F8 MORE
Press to go to the expression pedal modulation screen, below.
EXPRESSION PEDAL
This screen contains settings for control of the sound using the expression pedal (MIDI controller 11).

LI DESTINATIONI
Selects the destination for the modulation. The destination can be any of those listed below.
L2 DEPTH I
Sets the amount of the modulation. This can be positive or negative.
L3 DESTINATION 2
Selects the destination for the modulation. The destination can be any of those listed below.
L4 DEPTH2
Sets the amount of the modulation. This can be positive or negative.
FI BACK
Press to return to the previous screen.
F8 MORE
Press to go to the Assignable Controller screen, below.
MODULATION DESTINATIONS
Any of the modulation sources on these pages can be routed to any of the following destinations:
PITCH
Modifies the pitch. With a positive value, increasing the control makes the pitch go up, with a negative value, increasing the control makes the pitch go down.
CUTOFF
Modifies the filter cutoff. With a positive value, increasing the control makes the sound brighter, with a negative value, increasing the control makes the sound darker.
LEVEL
Modifies the volume. With a positive value, increasing the control makes the sound louder, with a negative value, increasing the control makes the sound softer.
VIBRATO DEPTH
Adds Vibrato (LFO controls pitch). This parameter sets the amount of vibrato.
GROWL DEPTH
Adds Growl (LFO controls filter). This parameter sets the amount of growl.
TREMOLO DEPTH
Adds Tremolo (LFO controls volume). This parameter sets the amount of tremolo.
LFO SPEED
Modifies the LFO speed. With a positive value, increasing the control makes the LFO faster, with a negative value, increasing the control makes the LFO slower.
ATTACK TIME
Controls the DCF & DCA Attack time. With a positive value, a higher key will have a longer attack time and a lower key will have a shorter attack time.
DECAYI TIME
Controls the DCF & DCA Decay1 time. With a positive value, a higher key will have a longer decay time and a lower key will have a shorter time.
RELEASE TIME
Controls the DCF & DCA Release time. With a positive value, a higher key will have a longer release time and a lower key will have a shorter time.
VELOCITY OFFSET
Scales the velocity, plus and minus.
RESONANCE
Controls the amount of filter resonance.
PANPOT
Controls the Left/Right panning of the sound
FORMANT FILTER BIAS
This control adjusts the Formant Filter Bias.
FORMANT FILTER ENV/LFO DEPTH
This control adjusts the Formant Filter LFO Depth.
FORMANT FILTER ENV/LFO SPEED
This control adjusts the Formant Filter LFO Speed.
HARMONICS LO
Controls the level of the lower harmonics. This does not adjust the low notes, rather it adjusts the low end of any note.
HARMONICS HI
Controls the level of the upper harmonics. This does not adjust the high notes, rather it adjusts the high end of any note.
HARMONICS EVEN
Controls the level of the even harmonics.
HARMONICS ODD
Controls the level of the odd harmonics, including the fundamental, or base pitch.
ASSIGNABLE CONTROLLER
Two additional controllers can be used for modulation. The controllers are assigned from the following screen.
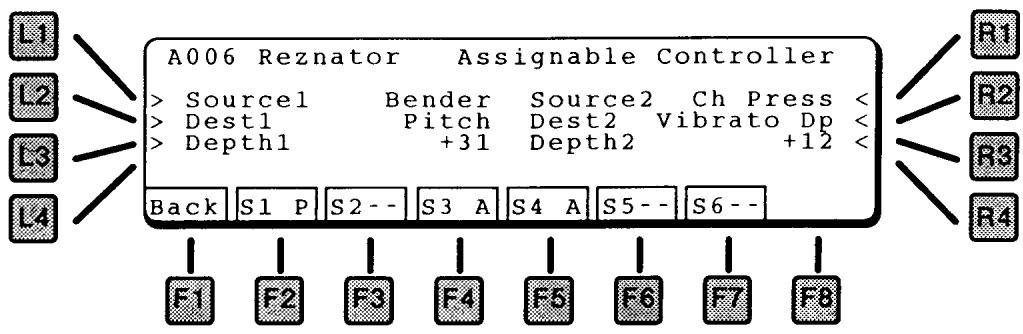
LI SOURCEI
Selects the source for the modulation. The source can be any of those listed below.
L2 DESTINATIONI
Selects the destination for the modulation. The destination can be any of those listed on page 56.
L3 DEPTHI
Sets the amount of the modulation. This can be positive or negative.
RI SOURCE2
Selects the source for the modulation. The source can be any of those listed below.
R2 DESTINATION2
Selects the destination for the modulation. The destination can be any of those listed on page 56.
R3 DEPTH2
Sets the amount of the modulation. This can be positive or negative.
ASSIGNABLE CONTROLLER SOURCES
The following sources can be used for modulation:
BENDER
The Pitch Bend wheel.
CH PRESS (CHANNEL PRESSURE)
Aftertouch pressure (per channel).
WHEEL
The Modulation Wheel
EXPRESSION (EXPRESSION PEDAL)
The Expression Pedal, MIDI Controller 11
MIDI VOLUME
The MIDI Volume command, MIDI Controller 7
PANPOT
The MIDI Pan command, MIDI Controller 10
G CONT 1 ~ 8 (GENERAL CONTROLLER 1~8)
The eight MIDI General Purpose Controllers - controller numbers 16-19 & 80-83.
After editing, save your sound by pressing the WRITE button in the COMMON section of the front panel. The following screen appears.
Ll WRITE
This saves your patch to the internal memory area.

RI WRITE LOCATION
Use the Value dial to select a location to save your patch.
NOTE:
If the message "Memory Full" appears on the display, select another bank (A or D) or use the Disk Write function (below) instead.
F1/F2 CHARACTER
This names the patch. Use the F1 and F2 keys to select a character in the name (moves the cursor), and the Value dial to select a letter.
F8 EXECUTE
Stores the patch.
L3 DISKWRITE
You can also write ADD Patches to disk. This is useful if your internal memory is full.
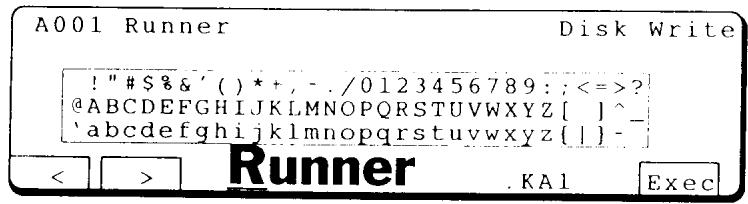
F1/F2 CHARACTER
This names the file on the disk. Use the F1 and F2 keys to select a character in the name (moves the cursor), and the Value dial to select a letter.
F8 EXECUTE
Press Execute to save the file. It will be saved with the file extension shown after the name.
RI DELETE
Since there is not a fixed number of ADD patches in the Single Bank, you may need to delete patches to make room for new ones.
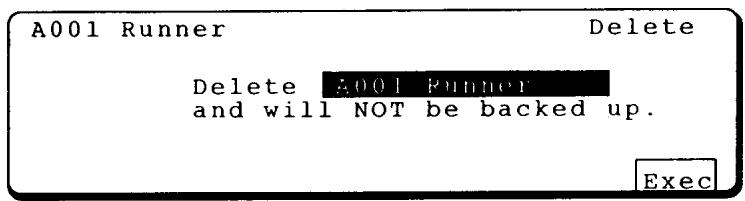
Use the Value dial to choose the patch to delete, and press F8 (Execute). Sure? Press F8 to continue.
EFFECT SECTION
The Effect section contains the settings for the digital effects generator.
There is one Effect generator for the entire K5000. When in Single mode, the entire effect generator is available for the sound. When in Multi mode, the effects settings of the Single patch are disregarded, and the Multi effects settings are used instead.
The main effects page displays a block diagram of the algorithm selected.

VALUE DIAL ALGORITHM SELECT
The algorithm can be selected by turning the Value dial. In Single mode, press R1 to access the Algorithm select.
FI ALGORITHM PAGE
Returns to the Algorithm Page, this page, from other effects pages.
F2 EI (EFFECT I)
Goes to the edit parameters for the Effect 1 block. Any of the effects blocks can be assigned one of 36 different effects, which include a variety of delays, chorus, flanging, and distortion. The available controls vary from one effect to another.
See page 67 for a description of the 36 available effect types.
F3 E2 (EFFECT 2)
Goes to the edit parameters for the Effect 2 block.
F4 E3 (EFFECT 3)
Goes to the edit parameters for the Effect 3 block.
F5 E4 (EFFECT 4)
Goes to the edit parameters for the Effect 4 block.
F6 REVERB
Goes to the edit parameters for the Reverb block. The reverb block can be assigned one of 11 different reverb types, which include a variety of rooms, halls and, plates. The available controls vary from one reverb type to another.
See page 92 for a description of the available reverb types.
F7 GRAPHIC EQ
Goes to the edit parameters for the Graphic EQ block.
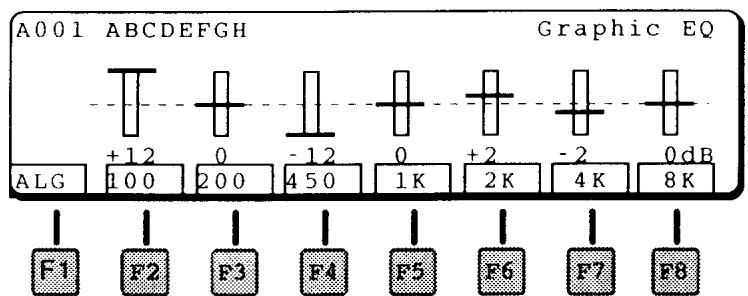
Use the F2 through F8 keys to select an EQ band, and the Value dial to change the amount. The slider will change to visually indicate the setting, the number underneath shows the exact amount.
F8 CONTROL
Goes to the Effect Controller page, below. Two controllers can be used to control effect or reverb depth. An expression pedal could be used to add reverb or aftertouch pressure could be used to add chorusing.
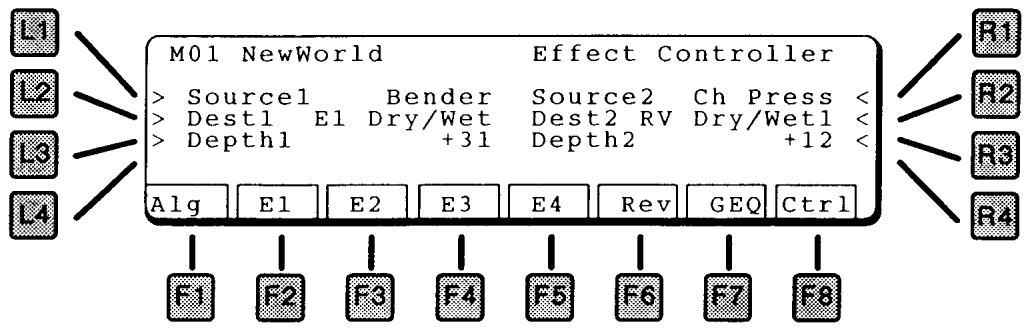
LI SOURCEI
Selects the source for the modulation. The source can be any of those listed below.
L2 DESTINATIONI
Selects the destination for the modulation. This can be the level of the reverb, or a modulatable parameter in one of the four effects blocks (Effect1 - Effect4).
L3 DEPTHI
Sets the amount of the modulation. This can be positive or negative.
RI SOURCE2
Selects the source for the modulation. The source can be any of those listed below.
R2 DESTINATION2
Selects the destination for the modulation. This can be the level of the reverb, or a modulatable parameter in one of the four effects blocks (Effect1 - Effect4).
R3 DEPTH2
Sets the amount of the modulation. This can be positive or negative.
MODULATION SOURCES
The sources that can be used to control the effects are:
BENDER
The Pitch Bend wheel.
CH PRESS (CHANNEL PRESSURE)
Aftertouch pressure (per channel).
WHEEL
The Modulation Wheel
EXPRESSION (EXPRESSION PEDAL)
The Expression Pedal
MIDI VOLUME
The MIDI Volume commend, MIDI Controller 7
PANPOT
The MIDI Pan commend, MIDI Controller 10
SOURCE ASSIGNMENT GRID (SINGLE PATCH ONLY)
In Single mode, the Source Assignment Grid on the left side of the screen is used to connect the (up to) six sources in each patch to the four inputs of the effect algorithm.
Press any of the left hand buttons to access the Source Assignment Grid.
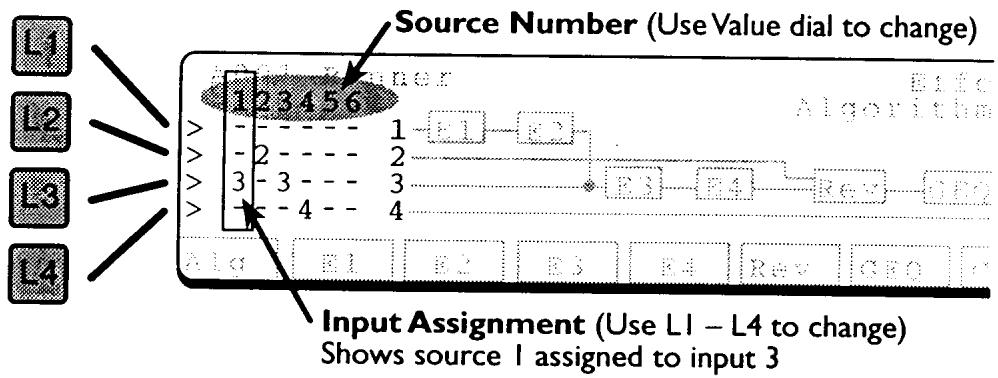
VALUE DIAL
Selects which source to assign. Sources 1 through 6 are displayed, but only the sources actually used in the Single patch can be assigned.
LI INPUT I ASSIGN
L2 INPUT 2 ASSIGN
L3 INPUT 3 ASSIGN
L4 INPUT 4 ASSIGN
After selecting a source with the value dial, press the L1, L2, L3, or L4 buttons to assign that source to input 1, 2, 3, or 4, respectively. The number 1, 2, 3, or 4 is displayed in the column indicating its assignment.
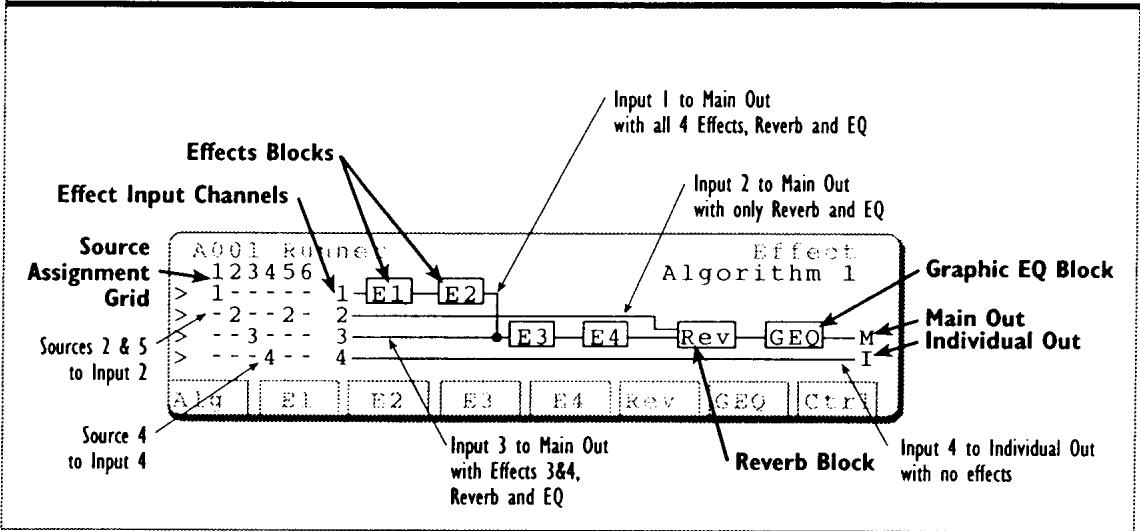
Anatomy of an Effect Algorithm
The Value dial (RI) selects the effect algorithm to be used. There are four different algorithms available, and the arrangement of the effects blocks varies depending upon the algorithm chosen.
There are four input channels into the effects algorithms. In Single mode, the left of the block diagram shows the Source Assignment Grid, with controls routing of each source to the input channels. In Multi or Compose mode, the assignment of each single section to the four input channels is controlled by the Effect Path function in the Section menu.
ALGORITHM I
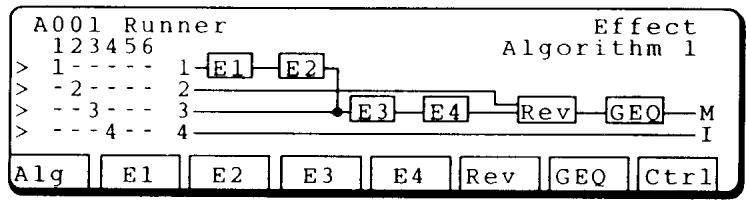
Input 1 passes through all four effects blocks, on its way to the reverb, EQ and main outputs. It merges with input 3 after the second effects block.
Input 2 goes directly to the reverb block, EQ, and main outputs. It has its own wet/ dry mix in the reverb block.
Input 3 passes through two of the four effects blocks, on its way to the reverb, EQ and main outputs.
Input 4 goes directly to the Individual outputs without any effect, reverb or EQ. This is useful for sending sounds directly out of the K5000S for external signal processing.

In this algorithm, each input goes through its own effects block, then the four are paired together for reverb and EQ.
ALGORITHM 3

In this algorithm, each input goes through its own effects block, then 1, 2, and 3 are Multined for reverb and EQ.
Input 3 has its own wet/dry mix in the reverb block.
After passing through its effect, Input 4 goes directly to the Individual outputs. This could be useful for a Bass sound running through a phaser, but without reverb.
ALGORITHM 4

Input 1 passes through the E1 and E2 effects blocks, on its way to the reverb, EQ and main outputs. It merges with input 2 after the second effects block.
Input 2 goes directly to the reverb block, EQ, and main outputs.
Input 3 passes through E3 and E4 of the four effects blocks, on its way to the reverb, EQ and main outputs. It has its own wet/dry mix in the reverb block.
Input 4 goes directly to the Individual outputs without any effect, reverb or EQ.

The four effects blocks represent individual effects. Any of the effects blocks can be assigned one of 36 different effects, which include a variety of delays, chorus, flanging, and distortion. The available controls vary from one effect to another.
EARLY REFLECTION I EARLY REFLECTION 2
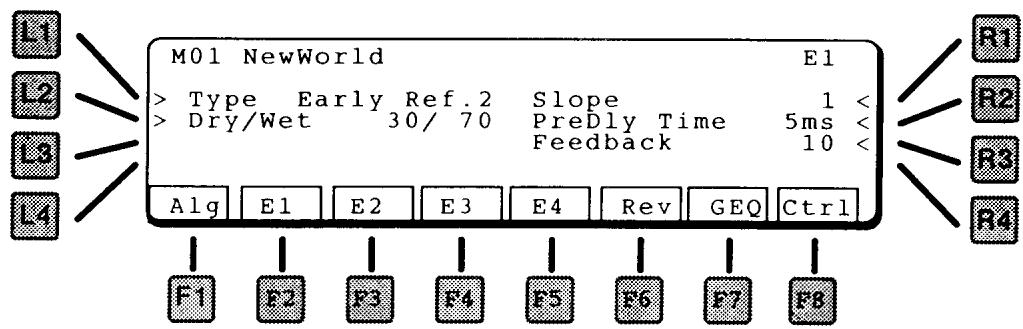
LI TYPE
Selects the type of effect. Early Reflection 1 has a shorter reflection time than Early Reflection 2.
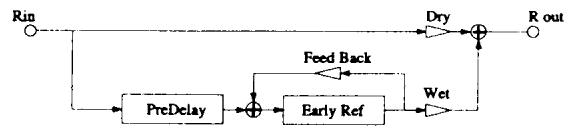
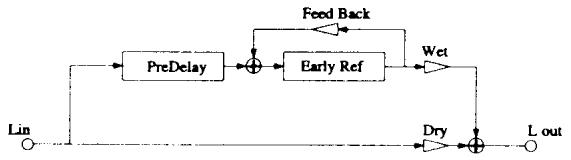
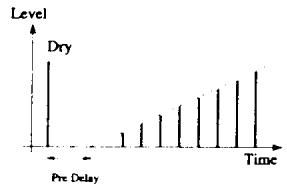
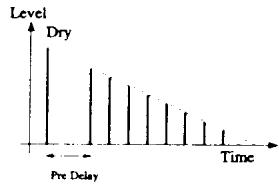
L2 DRY/WET
Controls the ratio between the original sound (dry) and the effected sound (wet).
RI SLOPE
This softens the reflection by changing the delay amplitudes. See diagram.
R2 PREDELAY TIME
The amount of delay time before the effect.
R3 FEEDBACK
Amount of delay looped back into the input. This creates a repeating delay.
TAP DELAY I
TAP DELAY 2
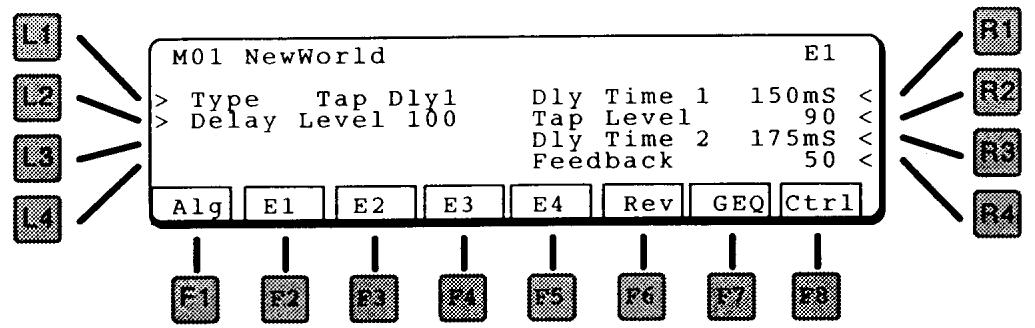
LI TYPE
Selects the type of effect.
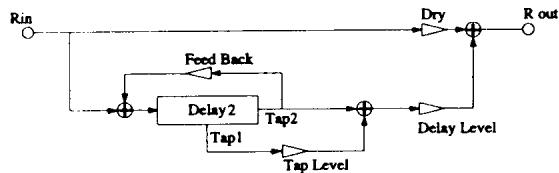
TAP DELAY I
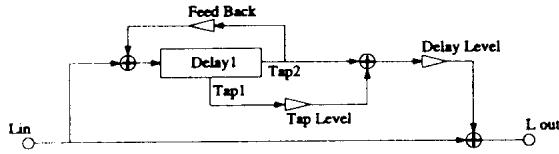

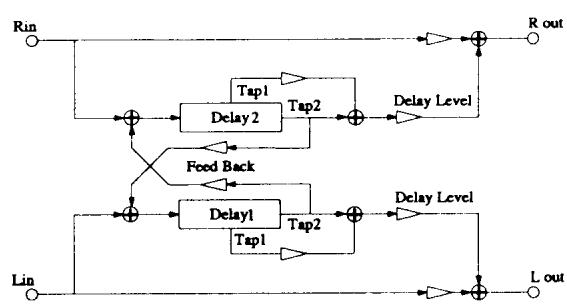
TAP DELAY 2
L2 DELAY LEVEL
Master level of this effect block.
RI DELAYTIMEI
The delay time for delay 1.
R2 TAP LEVEL
The level of delay 1.
R3 DELAYTIME2
The delay time for delay 2.
R4 FEEDBACK
Amount of delay looped back into the input. This creates a repeating delay. The original sound (input) and Delay 1 are repeated together at the delay 2 time.
This effect has a single delay, with a fine time adjustment for synchronizing to the beat.
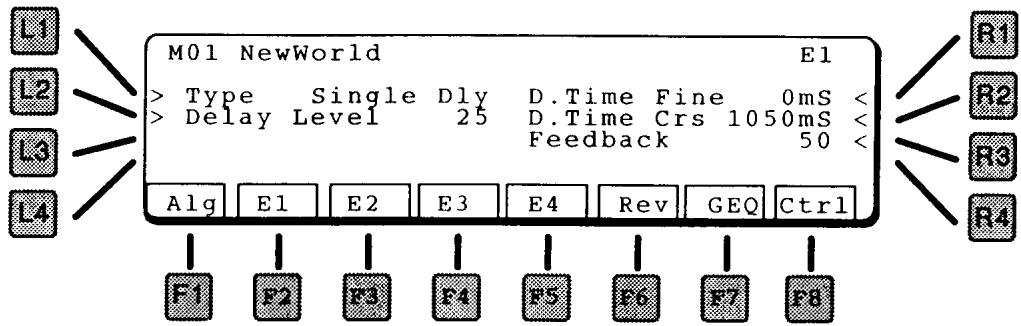
LI TYPE
Selects the type of effect.
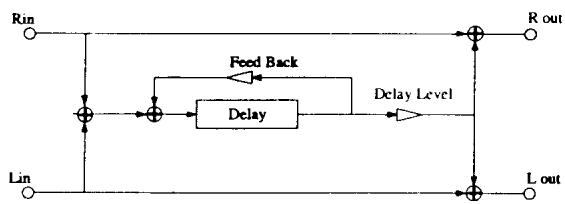
Delay Time = Delay Coarse + Delay Fine
L2 DELAY LEVEL
Master level of this effect block.
RI DELAY TIME FINE
Adjusts the delay time in 1mS increments, from 0 - 9 mS.
R2 DELAY TIME COARSE
Adjusts the delay time in 10mS increments, from 0 - 1270 ms. (1.27 seconds)
R3 FEEDBACK
Amount of delay looped back into the input. This creates a repeating delay.
This effect has two delays, panned hard left and right.

LI TYPE
Selects the type of effect.
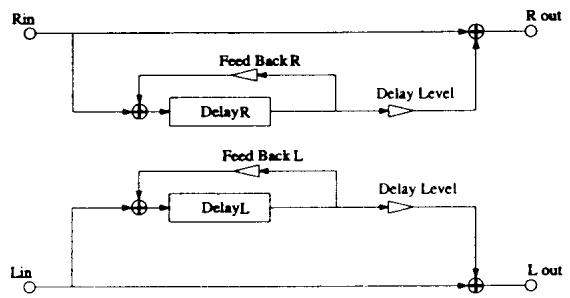
L2 DELAY LEVEL
Master level of this effect block.
RI DELAY TIME LEFT
Adjusts the delay time from 0 - 720mS.
R2 FEEDBACK LEFT
Amount of delay looped back into the input. This creates a repeating delay.
R3 DELAY TIME RIGHT
Adjusts the delay time from 0 - 720mS.
R4 FEEDBACK RIGHT
Amount of delay looped back into the input. This creates a repeating delay.
This is a single stereo delay. Repeats maintain the same stereo panning as the original signal.

LI TYPE
Selects the type of effect.
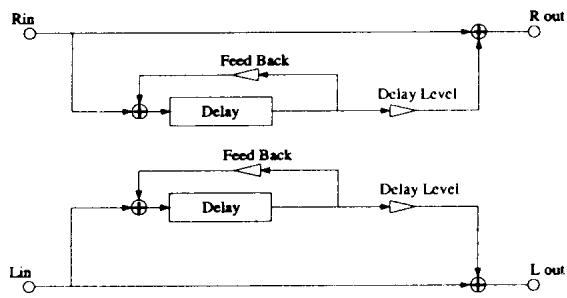
L2 DELAY LEVEL
Master level of this effect block.
RI DELAYTIME
Adjusts the delay time from 0 - 720mS
R2 FEEDBACK
Amount of delay looped back into the input. This creates a repeating delay.
CROSS DELAY
Cross Delay is a single delay, with repeats alternating left and right.
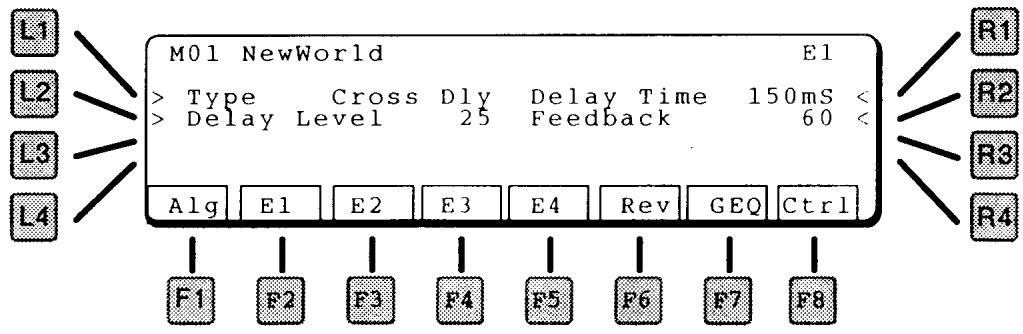
LI TYPE
Selects the type of effect.
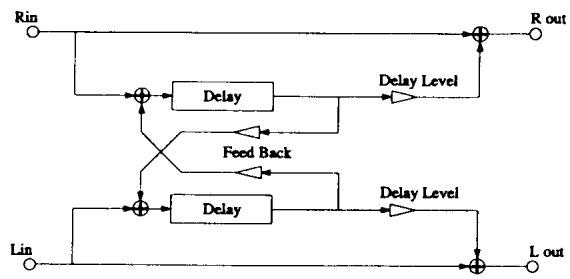
L2 DELAY LEVEL
Master level of this effect block.
RI DELAYTIME
Adjusts the delay time from 0 - 720mS
R2 FEEDBACK
Amount of delay looped back into the input. This creates a repeating delay.
AUTO PAN
Auto Pan moves the input source back and forth across the stereo field.
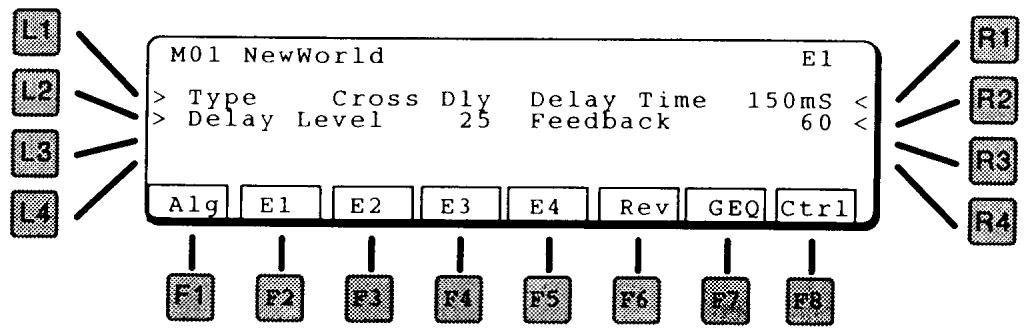
LI TYPE
Selects the type of effect.
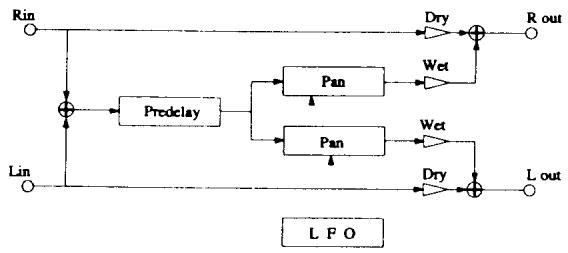
L2 DRY/WET
Controls the ratio between the original (dry) and the panned sound (wet).
RI SPEED
Adjuststhepanningspeed.
R2 DEPTH
Controls how wide the panning is.
R3 PREDELAY TIME
Adds a delay (up to 100mS ) before the panned sound starts
R4 WAVE
WAVE Selects the LFO waveform used to control the panning. The choices are SINE or TRIangle.
AUTO PAN & DELAY
Auto Pan moves the input source back and forth across the stereo field, with an added delay.
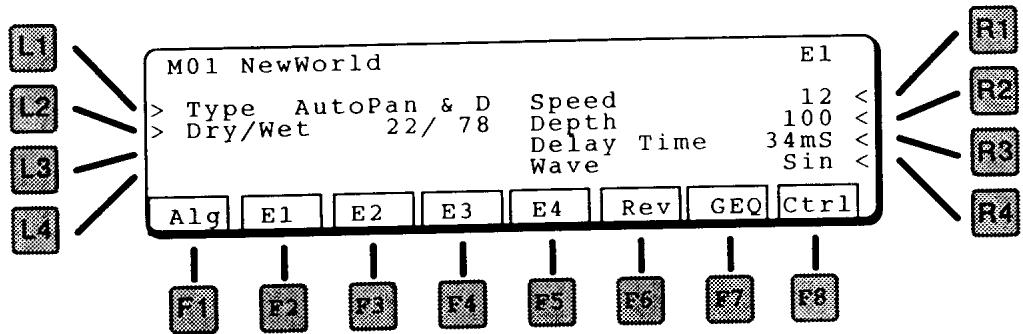
LI TYPE
Selects the type of effect.
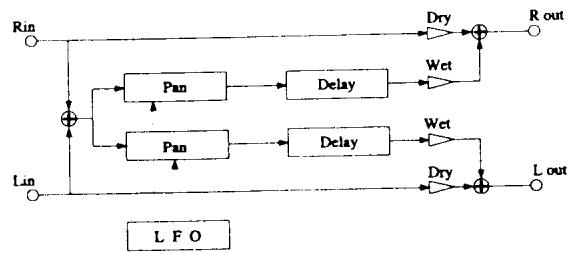
L2 DRY/WET
Controls the ratio between the original (dry) and the panned sound (wet).
RI SPEED
Adjusts the panning speed.
R2 DEPTH
Controls how wide the panning is.
R3 DELAY TIME
Delays the panned sound (up to 200mS ) The repeating delay does not pan.
R4 WAVE
WAVE Selects the LFO waveform used to control the panning. The choices are SINE or TRIangle.
Chorus is a slight detune of the sound, which adds depth and richness to the sound. Great for guitars, electric pianos, organs, strings, choirs.
Chorus 1 is a true stereo in / stereo out chorus - the left and right channels are independent.
Chorus 2 is a mono in / stereo out chorus – the left and right channels are summed together before entering a stereo chorus unit.
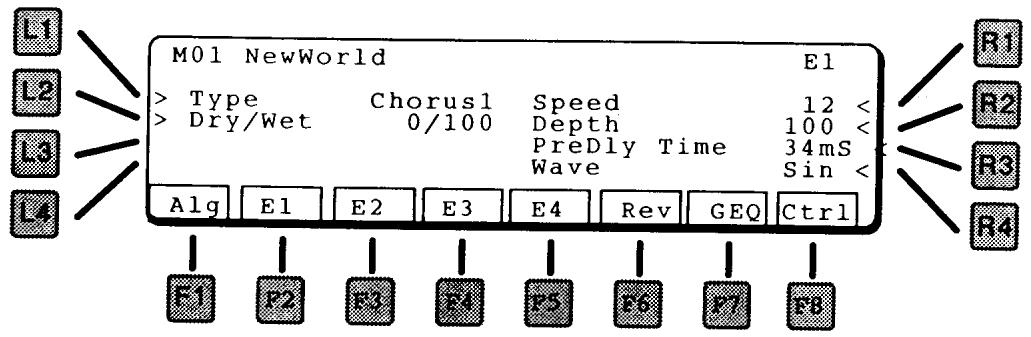
LI TYPE
Selects the type of effect.

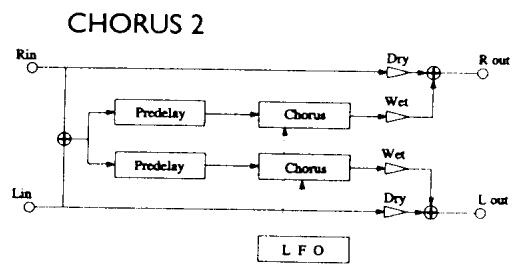
L2 DRY/WET
Controls the ratio between the original (dry) and the chorused sound (wet).
RI SPEED
Adjusts the chorus speed.
R2 DEPTH
Controls how wide the detune is.
R3 PREDELAYTIME
Adds a delay (up to 100mS ) before the chorus sound starts.
R4 WAVE
Selects the LFO waveform used to control the panning. The choices are SINE or TRIangle.
Chorus 1 is a true stereo in / stereo out chorus - the left and right channels are independent.
Chorus 2 is a mono in / stereo out chorus – the left and right channels are summed together before entering a stereo chorus unit.

LI TYPE
Selects the type of effect.
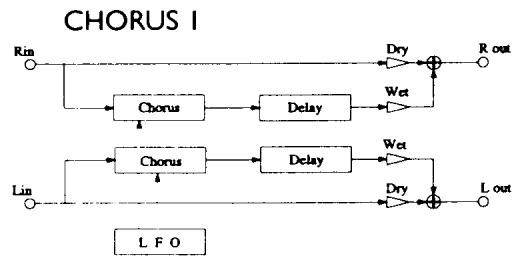

L2 DRY/WET
Controls the ratio between the original (dry) and the chorused sound (wet).
RI SPEED
Adjusts the chorus speed.
R2 DEPTH
Controls how wide the detune is.
R3 DELAY TIME
Adds a repeating delay of the chorused sound (up to 200mS
R4 WAVE
Selects the LFO waveform used to control the panning. The choices are SINE or TRIangle.
Flange is a slight detune of the sound, with an airy phasing, which adds depth to the sound. Great for guitars and electric pianos.
In Flanger 1, the flange control is 180^ out of phase between the left and right channels. In Flanger 2, the flange control is in phase between the left and right channels.
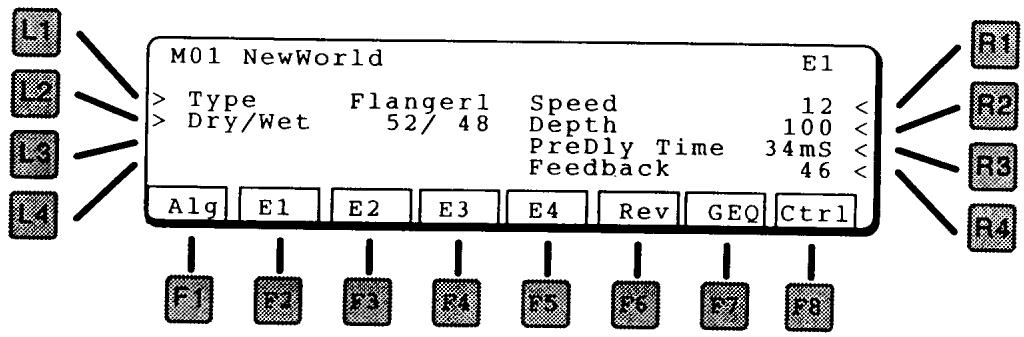
LI TYPE
Selects the type of effect.
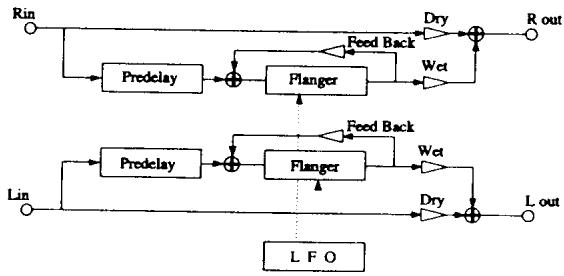
L2 DRY/WET
Controls the ratio between the original (dry) and the flanged sound (wet).
RI SPEED
Adjusts the flanger speed.
R2 DEPTH
Controls how wide the detune is.
R3 PREDELAYTIME
- Add a delay (up to 100mS) before the flanger starts.
R4 FEEDBACK
Controls the feedback of the flanging sound.
In Flanger 1, the flange control is 180^ out of phase between the left and right channels. In Flanger 2, the flange control is in phase between the left and right channels.
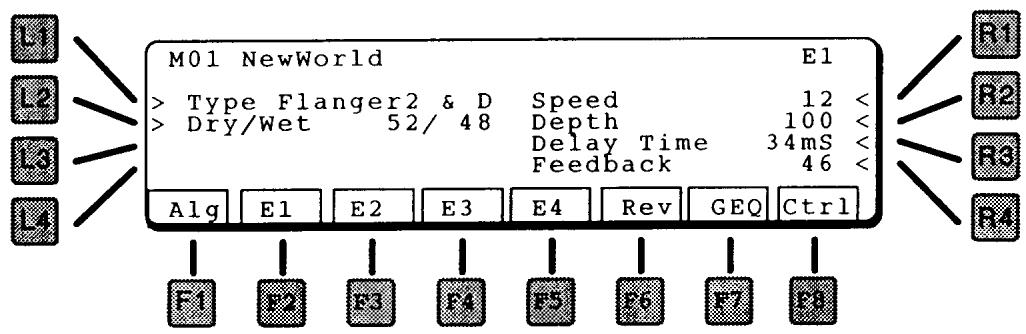
LI TYPE
Selects the type of effect.

L2 DRY/WET
Controls the ratio between the original (dry) and the flanged sound (wet).
RI SPEED
Adjusts the flanger speed.
R2 DEPTH
Controls how wide the detune is.
R3 DELAY TIME
Adds a repeating delay of the flanged sound (up to 200mS
R4 FEEDBACK
Controls the feedback of the flanging sound. Does not affect the delay.
Ensemble is a three phase chorus, with each of the three chorus units at a different phase and frequency. This gives a slightly richer sound than the Celeste effect, below.
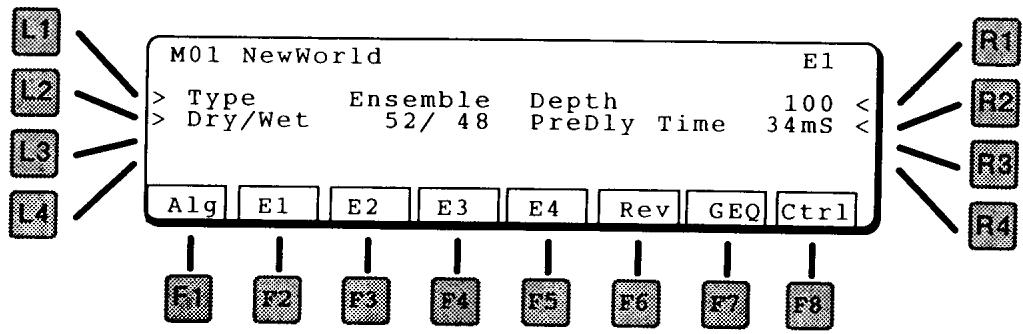
LI TYPE
Selects the type of effect.
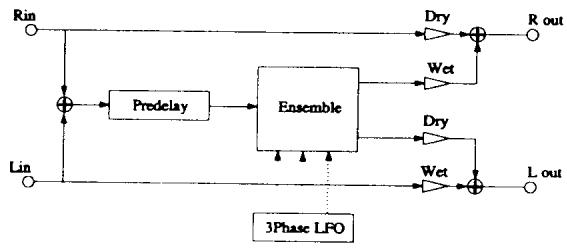
L2 DRY/WET
Controls the ratio between the original (dry) and the chorused sound (wet).
RI DEPTH
Adjuststheamountofeffect.
R2 PREDELAYTIME
Adds a delay (up to 100mS) before the ensemble starts.
ENSEMBLE & DELAY
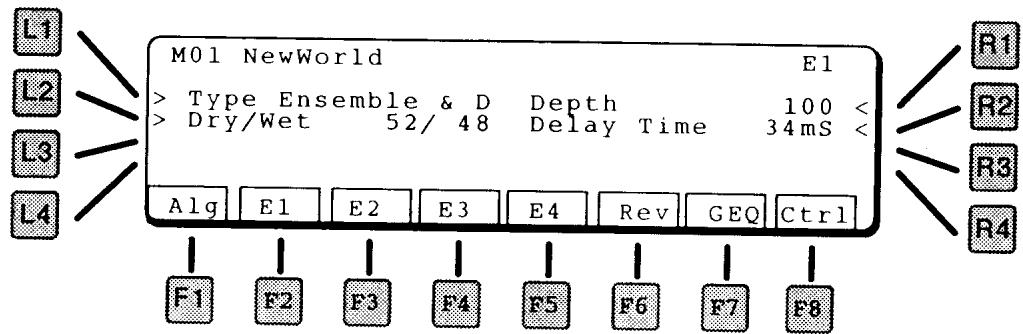
LI TYPE
Selects the type of effect.
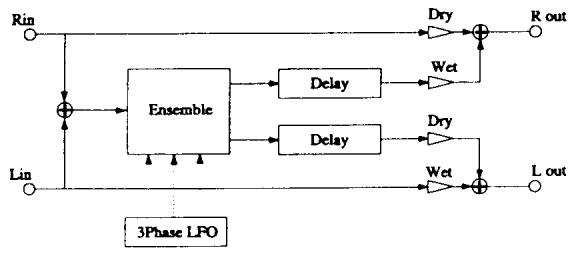
L2 DRY/WET
Controls the ratio between the original (dry) and the chorused sound (wet).
RI DEPTH
Adjusts the ensemble depth.
R2 DELAYTIME
Adds a repeating delay of the Ensemble sound (up to 200mS
CELESTE
Celeste is a three phase chorus, with each of the three chorus units at a different phase.
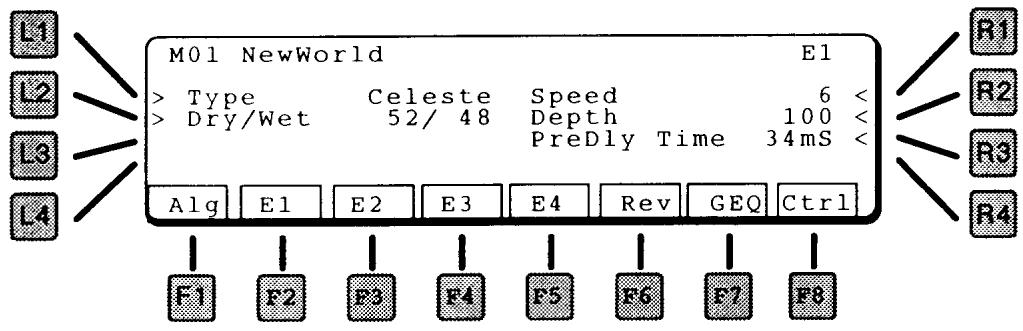
LI TYPE
Selects the type of effect.

L2 DRY/WET
Controls the ratio between the original (dry) and the chorused sound (wet).
RI SPEED
Adjuststheensemble speed.
R2 DEPTH
Controls how wide the detune is.
R3 PREDELAYTIME
Adds a delay (up to 100mS) before the celeste starts.
CELESTE & DELAY
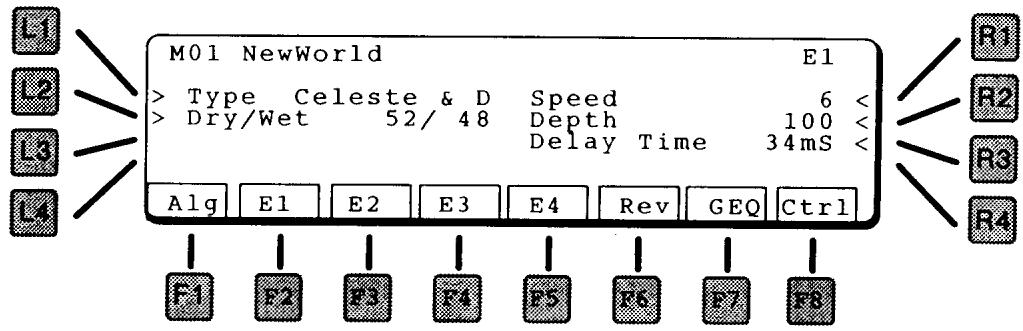
LI TYPE
Selects the type of effect.
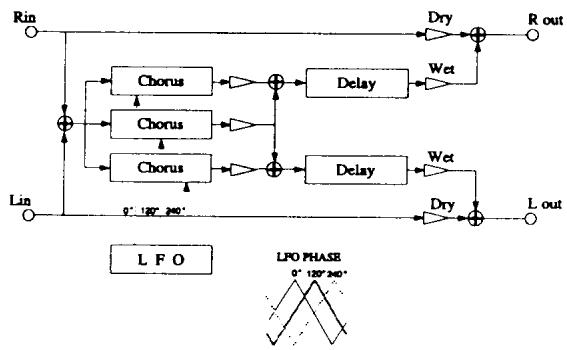
L2 DRY/WET
Controls the ratio between the original (dry) and the chorused sound (wet).
RI SPEED
Adjuststheensemble speed.
R2 DEPTH
Controls how wide the detune is.
R3 DELAY TIME
Adds a repeating delay of the Celeste sound (up to 200mS).
Tremolo changes the volume of the sound, making it louder and softer. Can be used for surf guitar sounds.
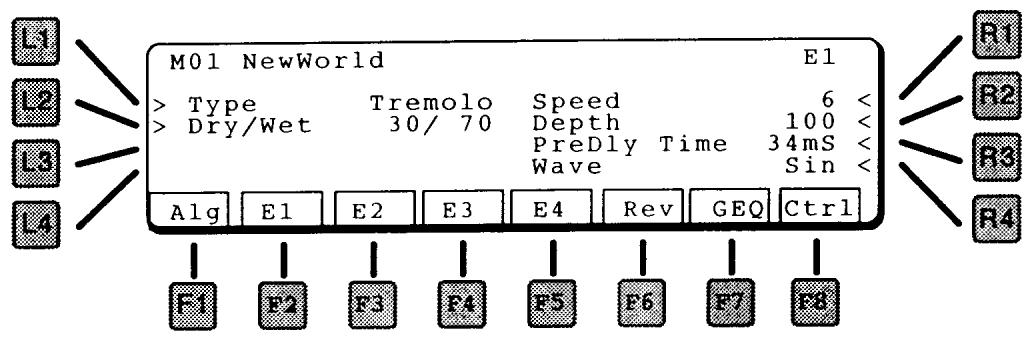
LI TYPE
Selects the type of effect.
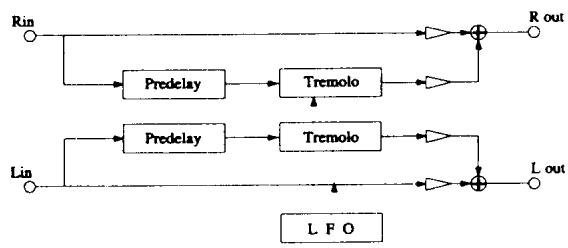
L2 DRY/WET
Controls the ratio between the original (dry) and the tremolo sound (wet).
RI SPEED
Adjusts the tremolo speed.
R2 DEPTH
Controls how deep the tremolo is.
R3 PREDELAY TIME
Adds a delay (up to 100mS) before the tremolo starts.
R4 WAVE
Selects the LFO waveform used to control the tremolo. The choices are SINe or TRIangle.
TREMOLO & DELAY
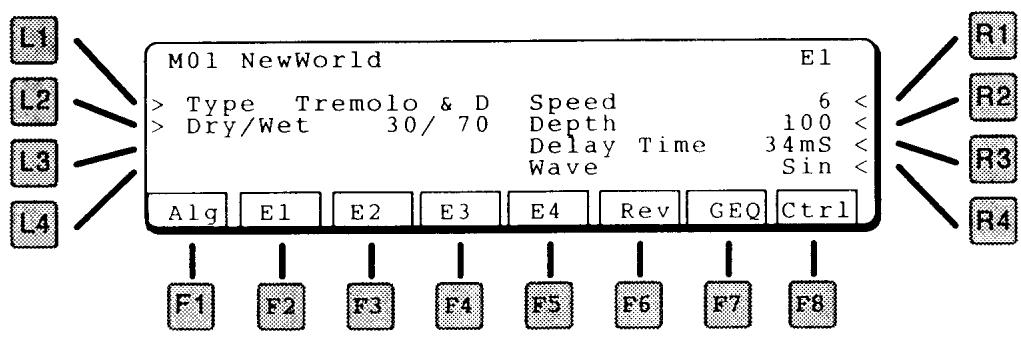
LI TYPE
Selects the type of effect.

L2 DRY/WET
Controls the ratio between the original (dry) and the tremolo sound (wet).
RI SPEED
Adjusts the tremolo speed.
R2 DEPTH
Controls how deep the tremolo is.
R3 DELAYTIME
- Adds a repeating delay of the tremolo sound (up to 200mS ).
R4 WAVE
Selects the LFO waveform used to control the tremolo. The choices are SINE or TRIangle.
PHASER I
PHASER 2
The phaser creates a phase change in the sound, adding motion to the sound. Good for any sustain sounds, such as strings and organ, as well as for electric pianos and other vintage guitar sounds.
Phaser 1 is a true stereo in / stereo out phase shifter - the left and right channels are independent.
Phaser 2 is a mono in / stereo out phase shifter - the left and right channels are summed together before go into to a stereo phase shifter.
LI TYPE
Selects the type of effect.

L2 DRY/WET
Controls the ratio between the original (dry) and the phaser sound (wet).
RI SPEED
Adjusts the phaser speed.
R2 DEPTH
Controls how wide the phasing is.
R3 PREDELAYTIME
Adds a delay (up to 100mS) before the phasing starts.
R4 FEEDBACK
Feeds the sound back into itself, creating a longer sustained sound.
PHASER I & DELAY
PHASER 2 & DELAY
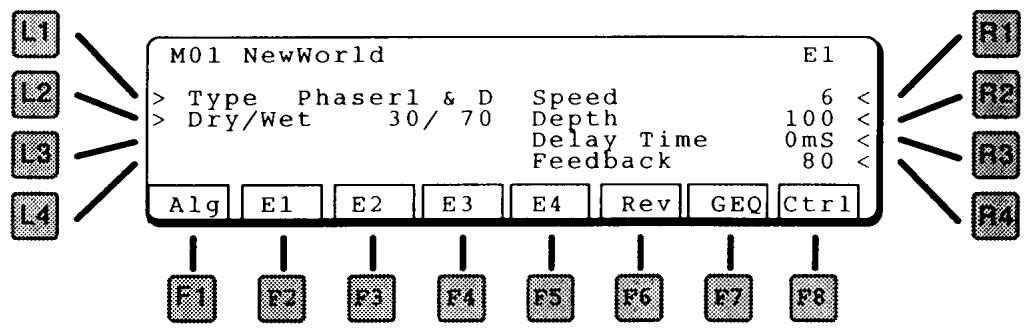
LI TYPE
Selects the type of effect.
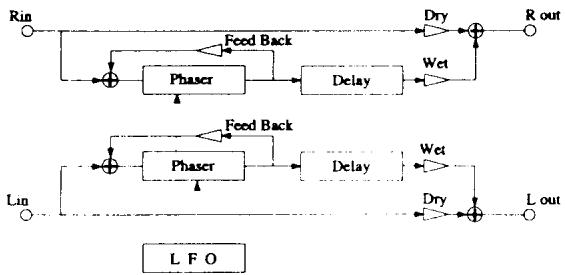
L2 DRY/WET
Controls the ratio between the original (dry) and the phaser sound (wet).
RI SPEED
Adjusts the phaser speed.
R2 DEPTH
Controls how wide the phasing is.
R3 DELAY TIME
Adds a repeating delay of the phaser sound (up to 200mS).
R4 FEEDBACK
Feeds the sound back into itself, creating a longer sustained sound.
ROTARY
This offers a two speed phasing effect, designed to simulate the slow and fast switching of an organ rotary speaker.
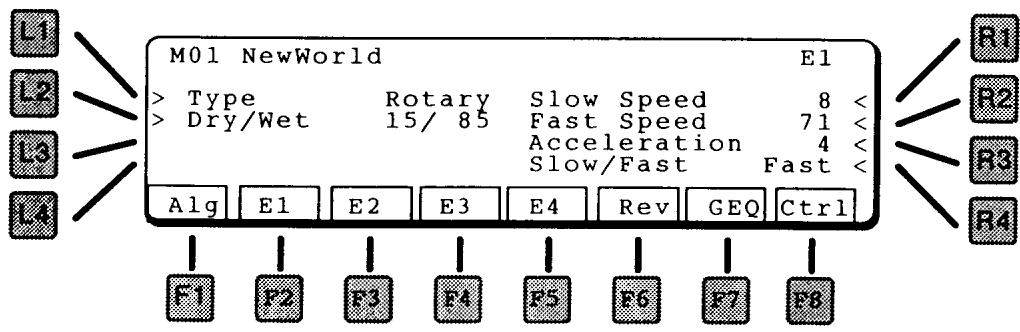
LI TYPE
Selects the type of effect.
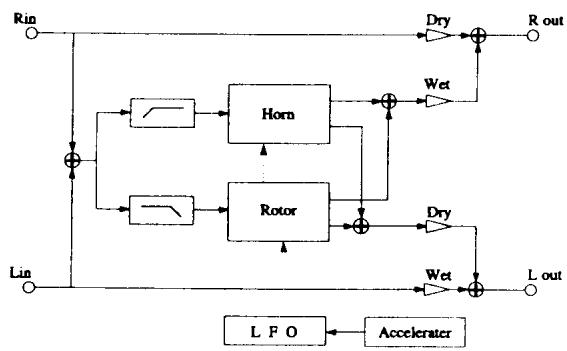
L2 DRY/WET
Controls the ratio between the original (dry) and the rotary sound (wet).
RI SLOW SPEED
Adjusts the slow rotary speed.
R2 FAST SPEED
Adjusts the fast rotary speed.
R3 ACCELERATION
Controls the time it takes to switch from slow to fast or fast to slow.
The Auto Wah sweeps the filter up and down on note attack, simulating a wah wah pedal.

LI TYPE
Selects the type of effect.
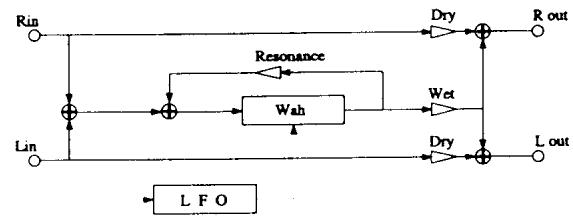
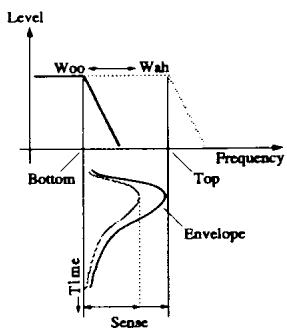
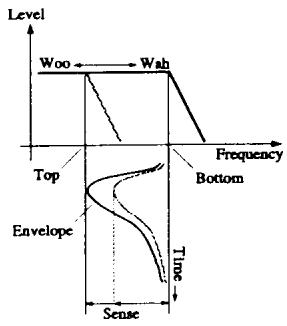
L2 DRY/WET
Controls the ratio between the original (dry) and the wah sound (wet).
RI SENSE
Adjusts the sensitivity of the wah effect to the key velocity. The harder the note is played, the higher the wah will sweep.
R2 FREQUENCY BOTTOM
Sets the starting and ending filter point.
R3 FREQUENCY TOP
Sets the peak point of the filter sweep.
R4 RESONANCE
Adjusts the filter resonance, for more of a pronounced "wah" effect.
The Bandpass effect filters out sound above and below the filter point. This can be used to create "telephone" sound, for example, or music playing out of a small radio.
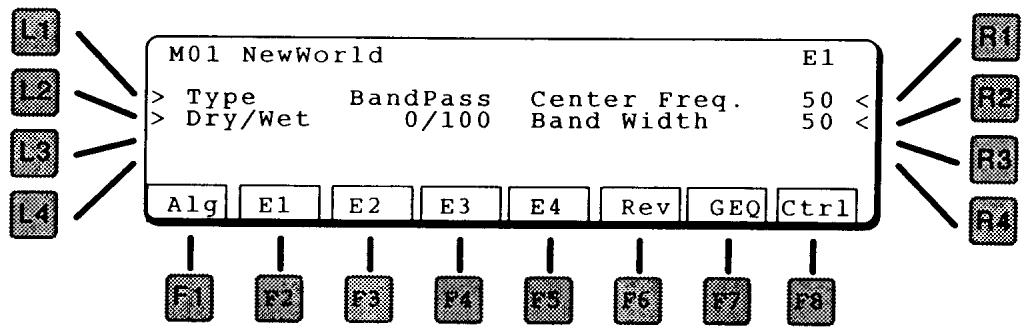
LI TYPE
Selectsthe type ofeffect.

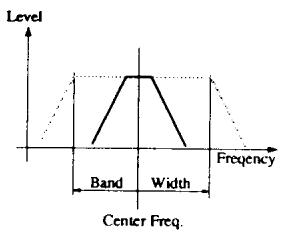
L2 DRY/WET
Controls the ratio between the original (dry) and the filtered sound (wet).
RI CENTER FREQUENCY
Adjusts the center point for the bandpass filter.
R2 BANDWIDTH
Adjusts how wide the filtering will be on either side of the Center Frequency.
The Exciter emphasizes high frequencies to make a sound more easily discernible in a mix. The exciter uses to distortion to achieve its emphasis.
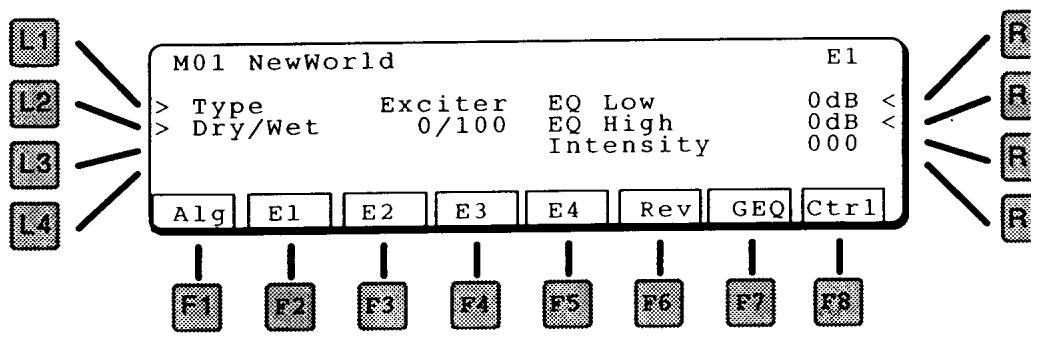
LI TYPE
Selects the type of effect.
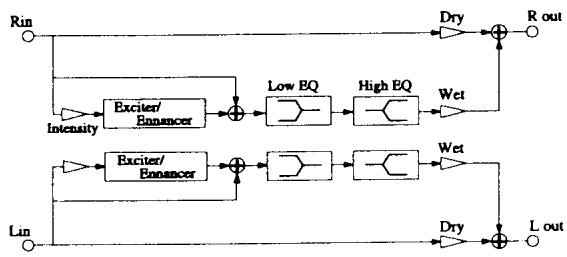
L2 DRY/WET
Controls the ratio between the original (dry) and the excited sound (wet).
R1 EQ LOW
Adjust frequencies below the exciter point.
R2 EQ HIGH
Adjust frequencies above the exciter point.
R3 INTENSITY
Adjusts the amount of exciter effect.
ENHANCER
The Enhancer emphasizes high frequencies to make a sound more easily discernible in a mix. The Enhancer uses to phase shift and filtering to achieve its emphasis.

LI TYPE
Selects the type of effect.

L2 DRY/WET
Controls the ratio between the original (dry) and the enhanced sound (wet).
RI EQ LOW
Adjust frequencies below the enhanced point.
R2 EQ HIGH
Adjust frequencies above the enhanced point.
R3 INTENSITY
Adjusts the amount of enhancement.
OVERDRIVE
The overdrive effect adds distortion and sustain for electric guitar "fuzz" type sounds. It is a softer type of distortion than the Distortion effect, below.
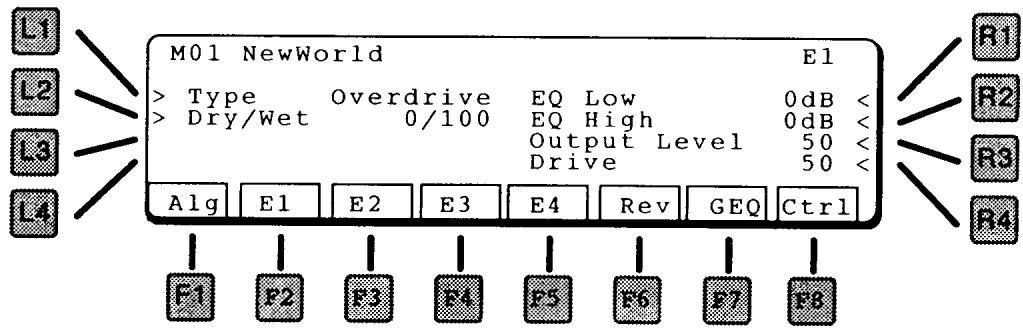
LI TYPE
Selects the type of effect.
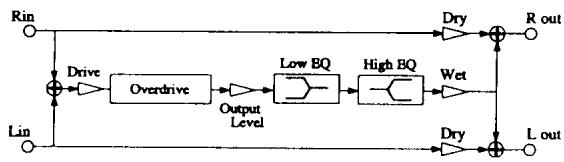
L2 DRY/WET
Controls the ratio between the original (dry) and the distorted sound (wet).
RI EQ LOW
Adjusts the low frequencies of the overdrive effect.
R2 EQ HIGH
Adjusts the high frequencies of the overdrive effect.
R3 OUTPUT LEVEL
Adjusts the level of the overdrive effect.
R4 DRIVE
Adjusts the amount of distortion.
DISTORTION
The distortion effect adds a harder distortion and sustain for electric guitar "fuzz" type sounds.

LI TYPE
Selectsthe type ofeffect.
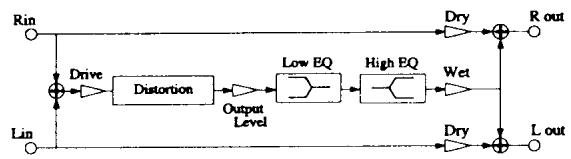
L2 DRY/WET
Controls the ratio between the original (dry) and the distorted sound (wet).
RI EQ LOW
Adjusts the low frequencies of the distortion effect.
R2 EQ HIGH
Adjusts the high frequencies of the distortion effect.
R3 OUTPUT LEVEL
Adjusts the level of the distortion effect.
R4 DRIVE
Adjusts the amount of distortion.
Overdrive & Delay adds a slap echo delay to the overdrive sound. The result is an even longer sustained distortion sound.
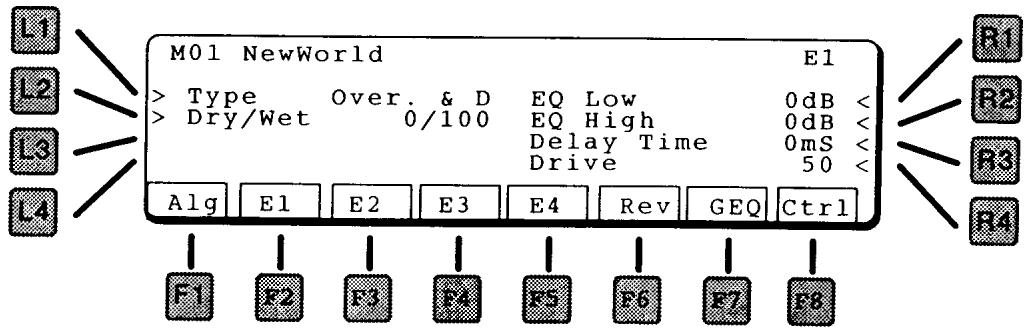
LI TYPE
Selects the type of effect.

L2 DRY/WET
Controls the ratio between the original (dry) and the distorted sound (wet).
RI EQ LOW
Adjusts the low frequencies of the overdrive effect.
R2 EQ HIGH
Adjusts the high frequencies of the overdrive effect.
R3 DELAYTIME
Adjusts the time of the delay (up to 200mS
R4 DRIVE
Adjusts the amount of distortion.
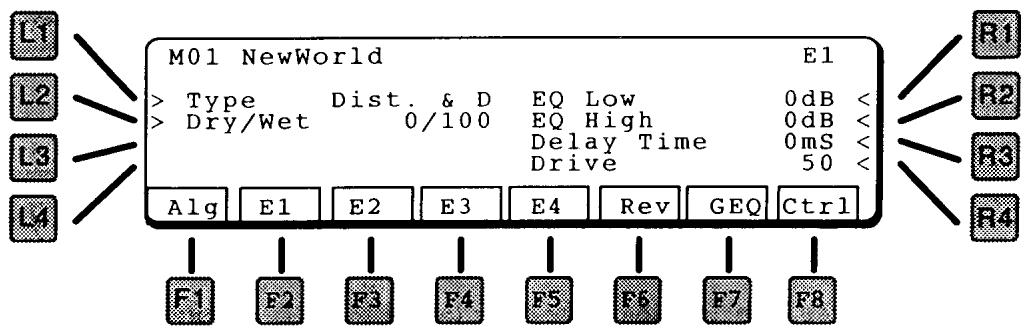
Rev
The Reverb block represents reverberation effects. Any of eleven different reverb types can be assigned, which include a variety of rooms, halls, and plates. The available controls vary from one effect to another.
As can be seen from the block diagram, there are two inputs to the reverb section. Each reverb screen has a pair of Wet/Dry parameters, one for each input. These two reverb sends allow you to adjust the reverb balance for each input independently.
HALL I
HALL 2
HALL 3
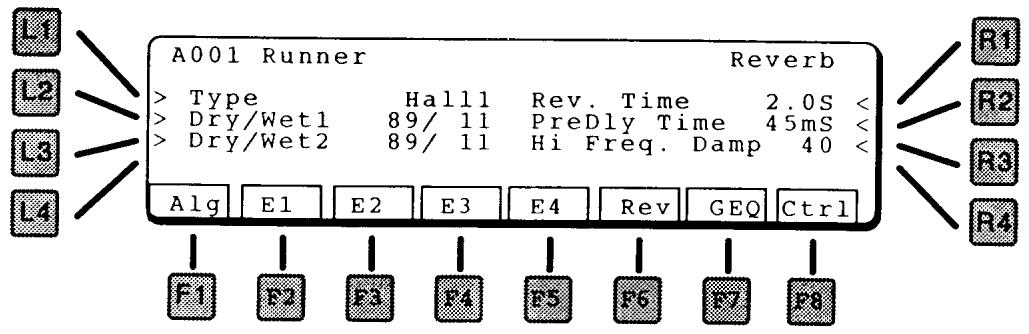
LI TYPE
Selects the type of effect.
HALLI
Standard Hall
HALL 2
Small Hall
HALL 3
Bright Hall

L2 DRY/WET I
Controls the ratio between the original sound (dry) and the reverberated sound (wet) for the top input in the algorithm.
L3 DRY/WET 2
Controls the ratio between the original sound (dry) and the effected sound (wet) for the bottom input in the algorithm.
RI REVERB TIME
Total reverberation time, in seconds.
R2 PREDELAYTIME
The amount of delay time before the effect.
R3 HIGH FREQUENCY DAMPING
In most natural acoustic spaces, high frequencies are absorbed faster than low frequencies. High Frequency Damping simulates this phenomenon by causing the high frequencies to die out faster. The more damping, the faster they die out – and sounds like there is more carpet or drapes in the room. Concrete room? Set the damping to 1.
ROOM I
ROOM 2
ROOM 3

LI TYPE
Selects the type of effect.
ROOM I
Standard Room
ROOM 2
Large Room
ROOM 3
Bright Room
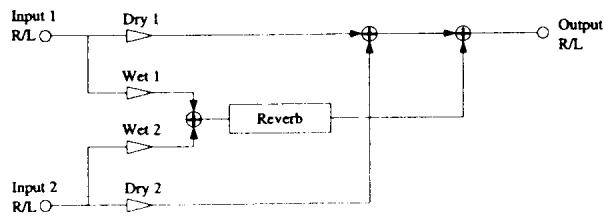
L2 DRY/WET I
Controls the ratio between the original sound (dry) and the reverberated sound (wet) for the top input in the algorithm.
L3 DRY/WET 2
Controls the ratio between the original sound (dry) and the effected sound (wet) for the bottom input in the algorithm.
RI REVERBTIME
Total reverberation time, in seconds.
R2 PREDELAYTIME
The amount of delay time before the effect.
R3 HIGH FREQUENCY DAMPING
In most natural acoustic spaces, high frequencies are absorbed faster than low frequencies. High Frequency Damping simulates this phenomenon by causing the high frequencies to die out faster.
PLATE I
PLATE 2
PLATE 3
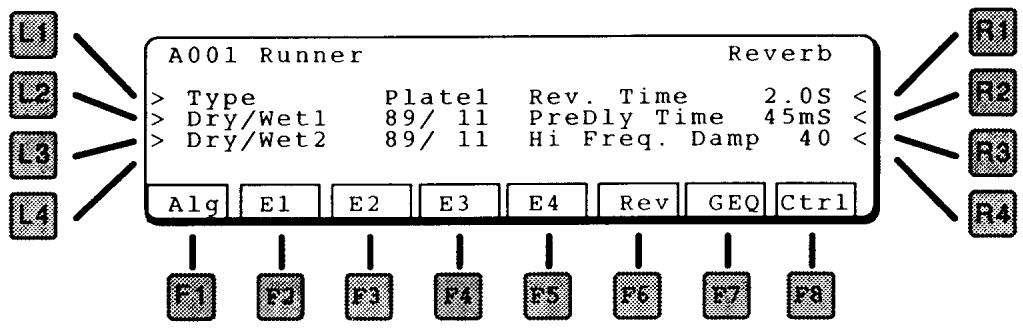
LI TYPE
Selects the type of effect.
PLATE I Large P
PLATE 2 Small Plate
PLATE 3 Mellow Plate

L2 DRY/WET I
Controls the ratio between the original sound (dry) and the reverberated sound (wet) for the top input in the algorithm.
L3 DRY/WET 2
Controls the ratio between the original sound (dry) and the effected sound (wet) for the bottom input in the algorithm.
RI REVERBTIME
Total reverberation time, in seconds.
R2 PREDELAYTIME
The amount of delay time before the effect.
R3 HIGH FREQUENCY DAMPING
In most natural acoustic spaces, high frequencies are absorbed faster than low frequencies. High Frequency Damping simulates this phenomenon by causing the high frequencies to die out faster.
REVERSE
Instead of decaying as natural reverb does, reverse reverb builds up as shown in the diagram below.

LI TYPE
Selects the type of effect.
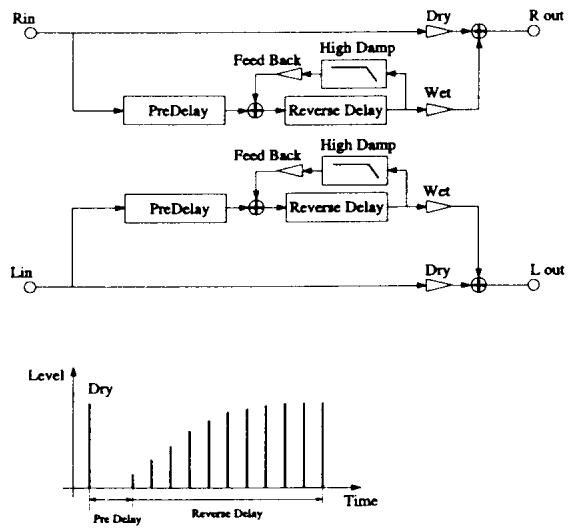
L2 DRY/WET I
Controls the ratio between the original sound (dry) and the reverberated sound (wet) for the top input in the algorithm.
L3 DRY/WET 2
Controls the ratio between the original sound (dry) and the effected sound (wet) for the bottom input in the algorithm.
RI FEEDBACK
Amount of delay looped back into the input. This creates a repeating delay.
R2 PREDELAYTIME
The amount of delay time before the effect.
R3 HIGH FREQUENCY DAMPING
Attenuates high frequencies from each repeat.
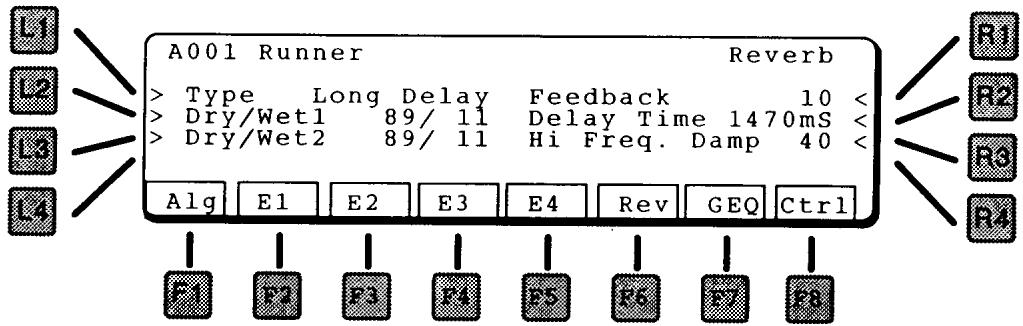
LI TYPE
Selects the type of effect.
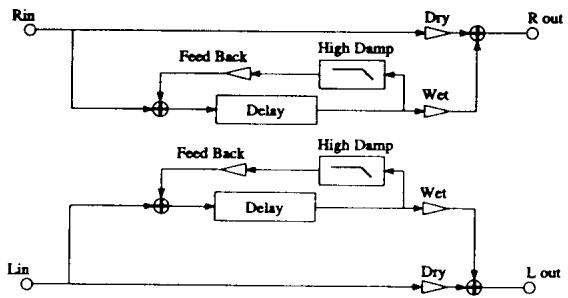
L2 DRY/WET I
Controls the ratio between the original sound (dry) and the delayed sound (wet) for the top input in the algorithm.
L3 DRY/WET 2
Controls the ratio between the original sound (dry) and the delayed sound (wet) for the bottom input in the algorithm.
RI FEEDBACK
Amount of delay looped back into the input. This creates a repeating delay.
R2 DELAYTIME
Adjusts the delay time in 10mS increments, from 200 - 1470 mS. (1.47 seconds)
R3 HIGH FREQUENCY DAMPING
Attenuates high frequencies from each repeat.
MULTI SECTION
Multi Patches are combinations of up to four Single patches. They can be arranged in layers, key splits, velocity splits, multiple channels or any combination.
Pressing the Multi key on the right side of the keyboard brings up the Multi Play window.

The name of the Multi patch is displayed as well as the name, MIDI channel, transpose, and volume for each Single patch that it contains.
SELECTING MULTI PATCHES
To select one of the 64 Multi patches, use the Patch Select keys 0 through 9 on the right side of the panel. To change banks, use the Patch Select keys 00 through 06. The Bank menu screen appears as shown below.
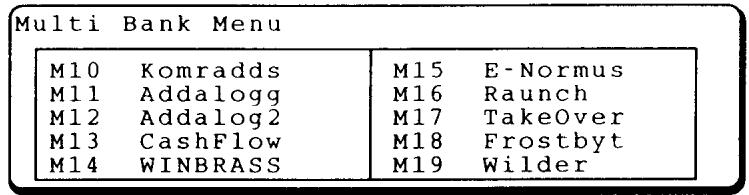
This screen lists the patches in the selected bank. To select one press the 0-9 key corresponding to the last digit of the patch number. A different patch will play, with the display as shown at the top of this section.
MODIFYING MULTI PATCHES
In Multi Play mode, the transposition and volume of each single patch can be adjusted. Press one of the F keys as described below, then use the value dial to change the setting.
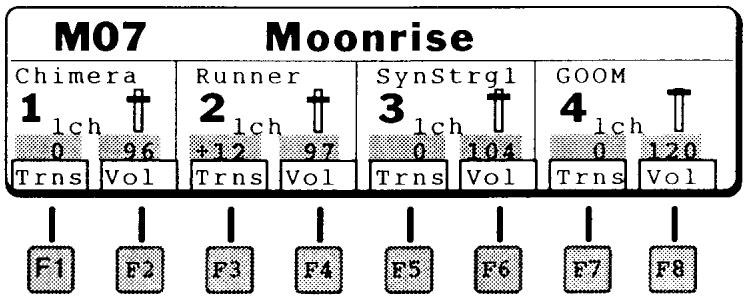
FI TRANSPOSE SECTION I
This parameter adjusts the pitch of Section 1, in semitones. To raise a sound one octave, set the transpose to 12; to lower it one octave, set the transpose to -12.
F2 VOLUME SECTION I This parameter adjusts the volume of Section 1.
F3 TRANSPOSE SECTION 2 This parameter adjusts the pitch of Section 2, in semitones.
F4 VOLUME SECTION 2 This parameter adjusts the volume of Section 2.
F5 TRANSPOSE SECTION 3 This parameter adjusts the pitch of Section 3, in semitones.
F6 VOLUME SECTION 3 This parameter adjusts the volume of Section 3.
F7 TRANSPOSE SECTION 4 This parameter adjusts the pitch of Section 4, in semitones.
F8 VOLUME SECTION 4 This parameter adjusts the volume of Section 4.
USING THE MACRO CONTROLS
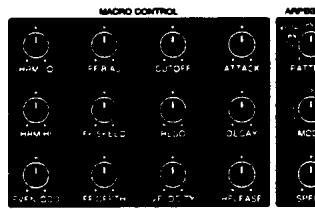


As in Single mode, the Macro and Assignable Controls on the left of the instrument are also available for instant edit in Multi mode. These controls are described on page 23. They affect only the selected Single patch (and others on the same MIDI channel), and add and subtract from the original values contained in each Single patch.
The arpeggior settings also only affect the selected Single patch, and others on the same MIDI channel.
Pressing EDIT brings up the Multi Edit Menu, below.
M21 K-Hit! Menu
> Common
> Section
> Effect
LI COMMON
This jumps to the Common edit, below.
L2 SECTION
This jumps to Section edit, discussed on the next page.
L3 EFFECT
Jumps to the Effect section, page 61.
NOTE:
Press EXIT to return to the Multi Edit Menu.
EXITING EDIT MODE
From the Multi Edit Menu, press EXIT. An alert message appears, asking if you want to "Save and Quit". Press WRITE to save and quit to Multi Play mode, or F8 (Quit) to return to Multi Play mode without saving. To continue .diting, press EDIT.
COMMON
Enter the name of the Multi patch from this page.
M21 K-Hit! Common
>> Name K-Hit!
> <-
!"#$&'()*+,-./0123456789:;<=>?
@ABCDEFGHJKLMNOPQRSTUVWXYZ[ ]^_
'abcdefghijklmnopqrstuvwxyz{|} -
More
L1 and L2 select which character is selected, the Value dial selects the desired letter or number.
F8 MORE
This advances to the Volume page.
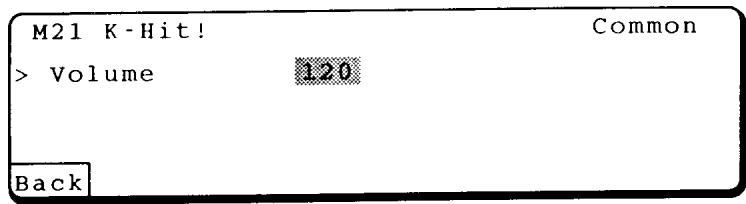
LI VOLUME
This sets the master volume for the Multi patch.
FI BACK
This returns to the Name page.
SECTION
The Section pages contain parameters to setup each of the four sections of a Multi Patch.
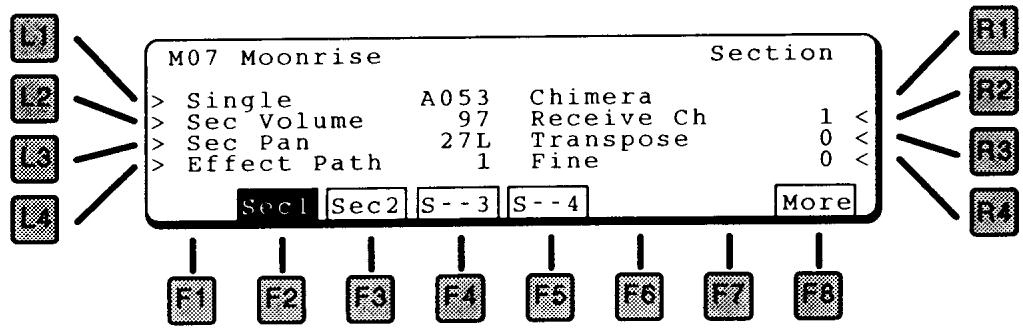
SELECTING A SECTION
The Section parameters are duplicated for each section in a Multi patch. To select a section, press the function key for the desired section (F2 - F5). In the display above, Section 1 is selected.
ENABLING/MUTING SECTIONS
Turning individual sections on and off is useful for editing. In addition, many Multi patches do not need all four sections enabled.
With the desired section selected (highlighted), press the section function key again (F2 - F5). The Section will turn on or off each time the function button is pressed.
In the display above, Sections 1 and 2 are enabled (Sec1), Sections 3 and 4 are muted (S--4). The "ec" changes to "--" when a section is muted.
SECTION MENU FUNCTIONS
LI SINGLE PATCH
Selects the Single patch for this section.
L2 SECTIONVOLUME
Adjusts the volume for the section.
L3 SECTION PAN
Adjuststhe stereopanfor the section.
L4 EFFECT PATH
Routes this section to one of the four inputs of the effects section. For more on the Effects, please see page !!!
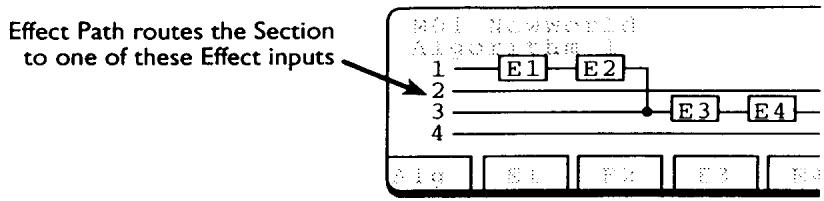
R2 SECTION CHANNEL
Sets the MIDI receive channel for the section. By setting each section to a different channel, the K5000S can play up to four independent parts when controlled from an external sequencer or computer.
R3 TRANSPOSE
Adjusts the transposition of the selected section, in semitone increments. A transposition of +12 is one octave higher.
R4 FINE
Adjuststhe tuning of the section.
F8 MORE
Jumps to the Zone screen, below.
SECTION KEY AND VELOCITY ZONES

LI ZONELO
Sets the lowest note that will be played. The keyboard graphic visually shows the range. The selected section is highlighted.
L2 ZONE HI
Sets the highest note that will be played.
RI VELOCITY SWITCH
Sets the velocity range. At Loud, only hard (loud) notes will sound. At Soft, only soft notes will sound. When set to OFF, the velocity switch is turned off and notes play at all velocity levels.
R2 VALUE
Sets the threshold between high and low velocity. This is the MIDI velocity number.
FI BACK
Press to return to the previous screen.
After editing, save your Multi by pressing the WRITE button in the COMMON section of the front panel. The following screen appears.

Ll WRITE
This saves your patch to the internal memory area.
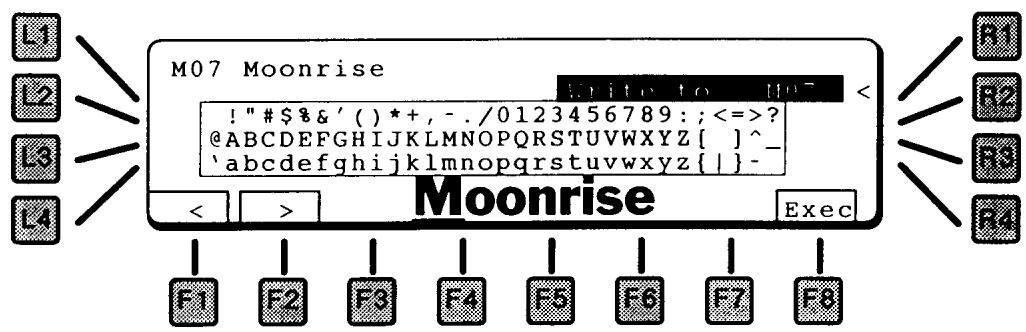
RI WRITE LOCATION
Use the Value dial to select a location to save your patch.
F1/F2 CHARACTER
This names the patch. Use the F1 and F2 keys to select a character in the name (moves the cursor), and the Value dial to select a letter.
F8 EXECUTE
Stores the patch.
COMMON
The Common area of the front panel, to the left of the LCD, contains controls for parameters that concern the entire instrument.
The System pages offer preference settings, that control the general behavior of the K5000S.
The seven Function keys (F1 - F7) jump between the seven sections of the System parameters.
FI FSW
Goes to the Switch page.
F2 ARPEGGIATOR
Goes to the Arpeggiator page.
F3 RESET
Goes to the reset page.
F4 BACKUP
Goes to the Backup page.
F5 MIDI
Goes to the System MIDI page.
F6 SYSTEM
Goes back to the main System page, below.
F7 DUMP
Goes to the MIDI Data Dump page.
SYSTEM
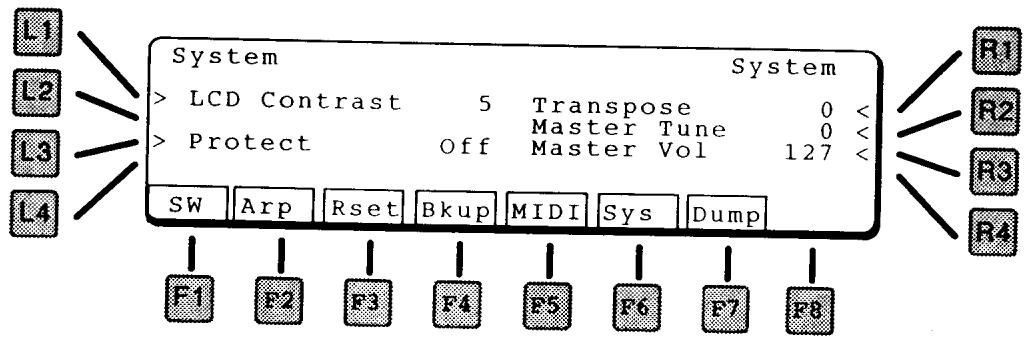
LI LCD CONTRAST
This adjusts the contrast of the LCD display. Adjust it so the display can be seen clearly.
L3 PROTECT
This turns on the memory protect for the internal program memory. When Protect is on, sound programs can not be saved to internal memory.
RI TRANSPOSE
Master Transpose for the instrument.
R2 MASTERTUNE
Master Tune for the instrument.
R3 MASTERVOLUME
This sets the MIDI master volume for the instrument, MIDI controller 7.
FSW (PROGRAMMABLE SWITCHES)
On this page, the functions of the programmable switches (under the disk drive) and programmable footswitch jacks (on the rear panel) can be set.
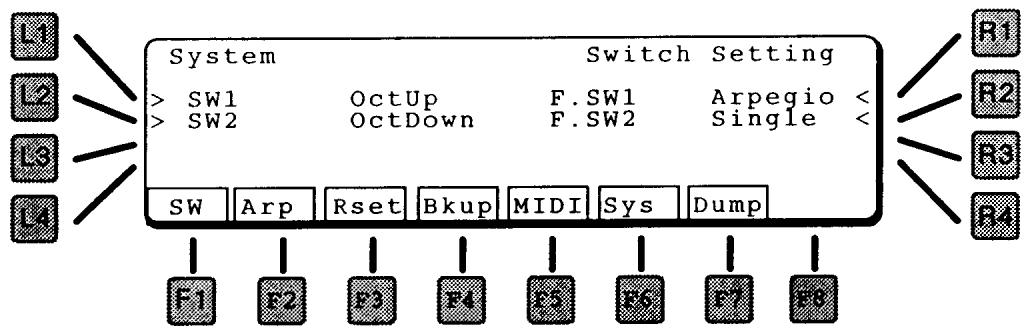
THE AVAILABLE SETTINGS ARE:
SINGLE
Set by Single Patch parameters, see page 27.
ARPEGGIO
Turns the arpeggiator on and off, same as the Arpeggiator button on the front panel.
OCTUP
Transposes the keyboard up an octave.
OCTDOWN
Transposes the keyboard down an octave.
LI SWITCHI
Selects the function for Switch 1.
L2 SWITCH2
Selects the function for Switch 2.
RI FOOTSWITCHI
Selects the function for Footswitch 1.
R2 FOOTSWITCH2
Selects the function for Footswitch 2.
One of the unique features of the K5000S is its programmable Arpeggiator, which allows a sophisticated level of programming.
COMMON PARAMETERS
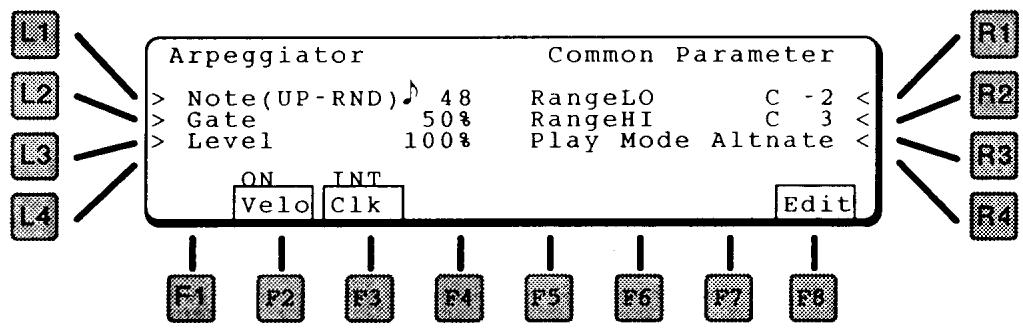
LI NOTEVALUE
This sets the note value for the arpeggiator when in Up, Down, Up/Down, Key Order, and Random modes - quarter, eighth, sixteenth notes, etc. The settings are based on a clock resolution of 96 pulses per quarter note. This results in the following possible settings:
96 Quarter Note
64 Quarter Note Triplet
48 Eighth Note
32 Eighth Note Triplet
24 Sixteenth Note
16 Sixteenth Note Triple
12 Thirty-second note
L2 GATE
This sets the duration of each note as a percentage of arpeggio time. At 100% , each note will be gated up to the start of the next note. At 50% , the gate duration will be half of the time to the next arpeggio note.
L3 LEVEL
This sets the level of each note as a percentage of the keyed velocity.
RANGELO
Sets the low note of the arpeggiator range. For example, you can set the lowest two octaves for the arpeggiator, then play over the arpeggio with the rest of the keyboard.
R2 RANGE HI
Sets the high note of the arpeggiator range.
R3 PLAY MODE
The Sequence Pattern settings (SQ.PTN1, SQ.PTN2) have a programmed number of "arpeggio positions". This parameter determines what happens if there are fewer notes to arpeggiate than positions.
REST
The extra positions are filled with rests.
LAST
The last note repeats to fill the extra positions.
FIRST
The first note repeats to fill the extra positions.
ALTERNATE
The played notes are repeated in reverse order to fill the extra positions. If the repeated notes go back all the way to the beginning, more notes will be repeated again, this time from the beginning.
F2 VELOCITY
This turns on velocity sensitivity for the arpeggiator. If On each note will play according to key velocity. If Off all notes will play at the same velocity.
F3 CLOCK
This sets the arpeggiator clock source. If set to EXT, the arpeggiator will advance in time with an external sequencer or computer.
ARPEGGIATOR EDIT
In the next two pages you can program your own arpeggio patterns. You can adjust timing, level, and gate time, to create a rhythmic sequence pattern - you select notes by playing the keyboard.
There are eight user arpeggioator patterns - select one for playback from the Single Play screen using the Value dial, see page 23.

LI MODE
There are three playback modes:
PATTERN
Notes play one at a time, with velocity controlled by the keyboard and note length (timing) controlled by the arpeggiator. You can program up to four part harmony on each step.
TRIGGER
All notes play together according to the programmed pattern. You can program velocity and timing.
GATER
You can program the volume level and length for each step, creating a rhythmic character to the chord.
L2 TOTAL STEP
This is the number of steps in the pattern. If fewer notes are played, the pattern will either insert rests or repeat notes according to the setting on the Edit Pattern page.
L3 KEY ORDER
KEY ON
Notes are arpeggiated in the order in which they are played on the keyboard.
LOW->HI
Notes are arpeggiated from low to high pitch.
L4 NOTE
This sets the note value for the arpeggiator when in Up, Down, and Random modes - quarter, eighth, sixteenth notes, etc. The settings are based on a clock resolution of 96 pulses per quarter note. This results in the following possible settings:
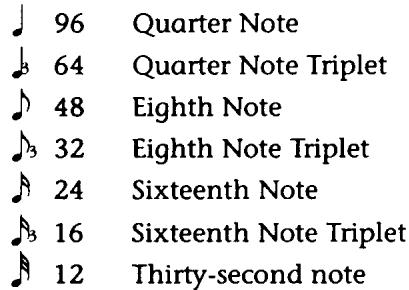
F7 WRITE
Writes the arpeggio settings to memory. The following dialog box appears:

Choose one of the eight arpeggio memory locations using the Value dial. Press Exec to continue.
Are you sure? Press F8 to continue, F1 to cancel.
NOTE:
If you exit the arpeggiator without saving, you will be prompted to save the arpeggio settings.
Press F1 to discard your changes, F8 to go to the Write screen above.
F8 MORE
Goes to the arpeggio pattern editor, below.
On this screen you can edit the arpeggio pattern itself.
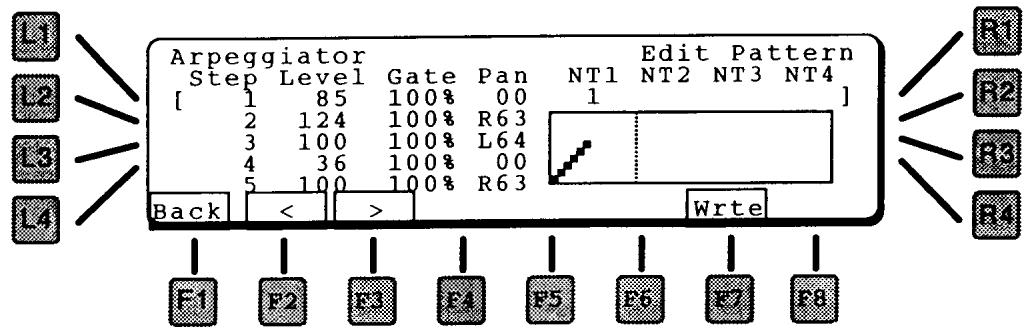
Use the arrow keys (F2 & F3) to navigate left to right in the parameter list.
STEP
This is the step number of the pattern, 1 to a maximum of 32. With Step highlighted, turn the value dial to navigate through the steps in the pattern.
DIFFERENTIATING NOTES AND STEPS
When you play a chord on the keyboard, each note is assigned a number – from bottom to top, or in the order played. These note numbers normally correspond exactly with the step numbers – the arpeggiated sequence, to give the typical ascending note arpeggiator effect.
However, the K5000S arpeggiator does not have to maintain this correspondence, as explained below. You can arrange the notes in any combination you want - which gives you the ability to preprogram a sequence pattern and then control it live from the keyboard.
LEVEL
The level of the note to be played on this step.
REST
If the Level is turned all the way down, REST appears and a rest is applied to this step.
REPEAT
If the Level is turned all the way up, REP appears and the arpeggio repeats from the start to this point, as many times as necessary up to the Total Step duration of the arpeggio.
NOTE:
Repeat cannot be select for the first step of the arpeggio.
GATE
This sets the duration of the note as a percentage of arpeggio time. At 100% , the note will be gated up to the start of the next note. At 50% , the gate duration will be half of the time to the next note.
PAN
This sets the panning of the selected note step. If the Pan is turned down all the way, "---" appears and no panning is applied.
NTI NT4 (NOTE I NOTE 4)
These parameters control which note(s) play on each step.
Up to four notes can actually play on each step - this is where the note vs. step issue becomes important. Normally the NT1 parameter has the same value as the Step Number.
For example, if you wanted to maintain a continuous bass not underneath the rest of the arpeggio, you would set NT1 to 1 on every step, then set NT2 equal to the step number on each step. The result: a two voice arpeggio with one voice playing all the notes, the other playing only the lowest (or first) note.
F7 WRITE
Saves the arpeggio settings. There are eight user arpeggio memories. Choose the desired memory location using the Value dial, then press F8 to execute.
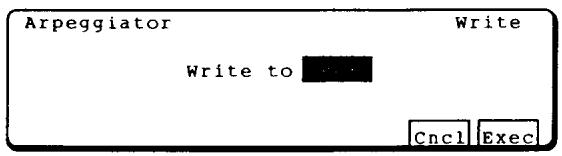
Are you sure? Press F8 to continue, F1 to cancel.
NOTE:
If you exit the arpeggiator without saving, you will be prompted to save the arpeggio settings.

Press F1 to discard your changes, F8 to go to the Write screen above.
RESET
This function reloads all patches from the backup Flash memory. This would only be necessary to restore original patches after receiving a MIDI data dump or playing a MIDI sequence with recorded MIDI patch data.
BACKUP
This function saves all patches in memory to the backup Flash memory area. This is only necessary to save a MIDI data dump, since the patch dump data is written to the working RAM memory only.
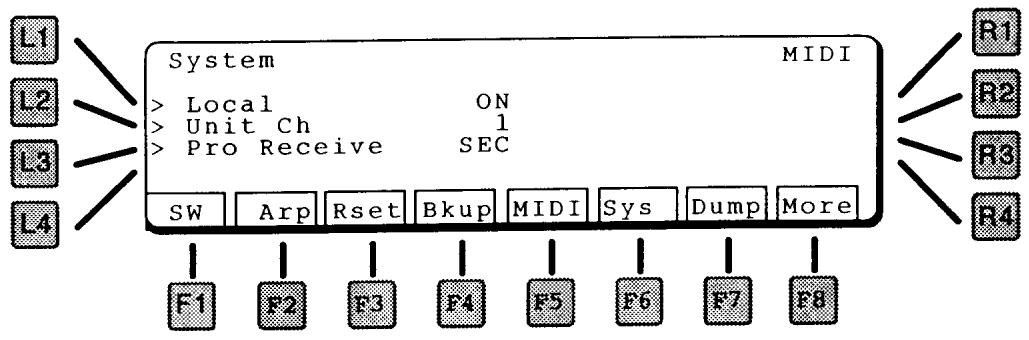
LI LOCAL
Sets MIDI Local Control. If ON the keyboard and sequencer are attached to the sound generator. If off, the keyboard/sequencer and sound module are separated. Turning off local control is useful when an external MIDI sequencer is used.
L2 UNIT CHANNEL (SYSTEM CHANNEL)
This sets the basic MIDI channel for the unit. This is the channel that will be transmitted by the keyboard, and the channel on which Normal program changes will be received.
L3 PROGRAM RECEIVE
Sets the mode for receiving program changes.
NORMAL
A received program change message causes the instrument to change patches.
SECTION
Within a Multi patch, a received program change message changes only the Single patch assigned to that channel.
F8 MORE
Goes to the next page of parameters.
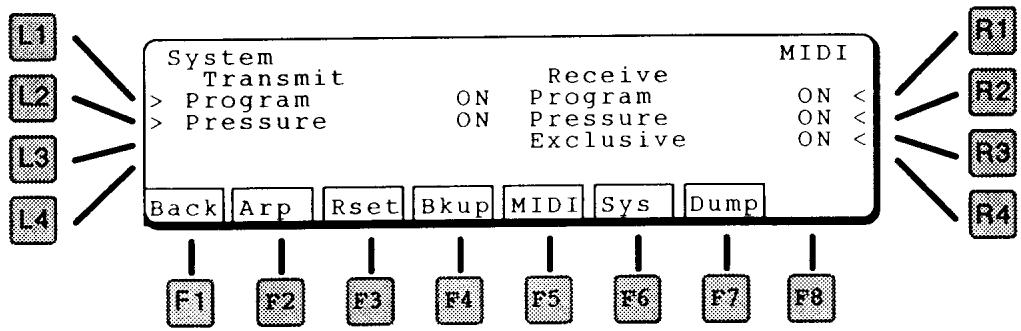
LI TRANSMIT PROGRAM
If on, the K5000S will transmit program changes.
L2 TRANSMIT PRESSURE
If on, the K5000S will transmit aftertouch pressure.
RI RECEIVE PROGRAM
If on, the K5000S will receive program changes.
R2 RECEIVE PRESSURE
If on, the K5000S will receive aftertouch pressure.
This page is used to initiate a MIDI System Exclusive file transfer. The program data is transmitted across MIDI.
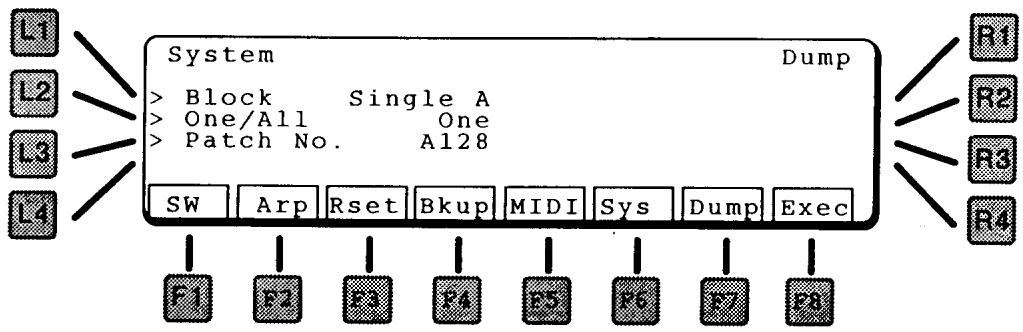
LI BLOCK
Selects which sound block to transfer.
BLOCKS
SINGLE
A Single sound bank (A or D).
MULTI
Multi combination sound bank
L2 ONE/ALL
Selects a single program or all the programs in the selected block.
L3 PATCH NUMBER
If One is selected above, this parameter selects the individual patch to dump.
F8 EXECUTE
Initiates the data transfer. Are You Sure? Press YES (F8) to start, NO (F1) to cancel.
The Disk pages enable you to save your work on floppy disks. Whether to backup your patches, save a song for a studio date, load new sounds for another project, you'll find the K5000S's disk is your gateway to the outside world.
Pressing DISK on the front panel brings up the Disk Menu screen, below.
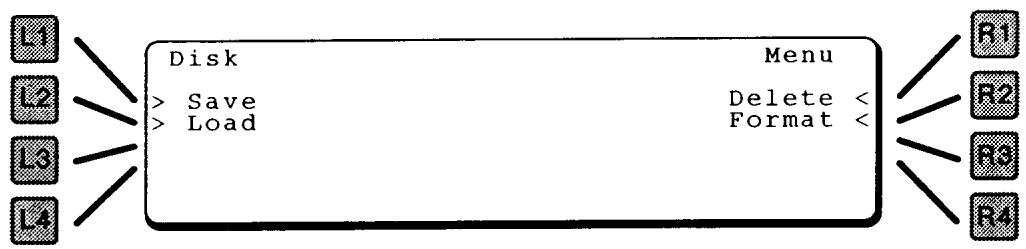
There are four options for saving, loading, and deleting files, as well as for formatting new diskettes.
LI SAVE
This section is for saving the various types of files in the K5000S to disk. Choose one of the options as described below.
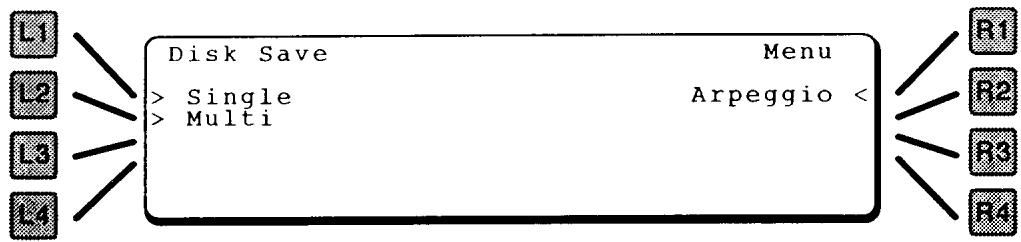
LI SAVE SINGLE
You can save individual Single patches or an entire bank to disk.
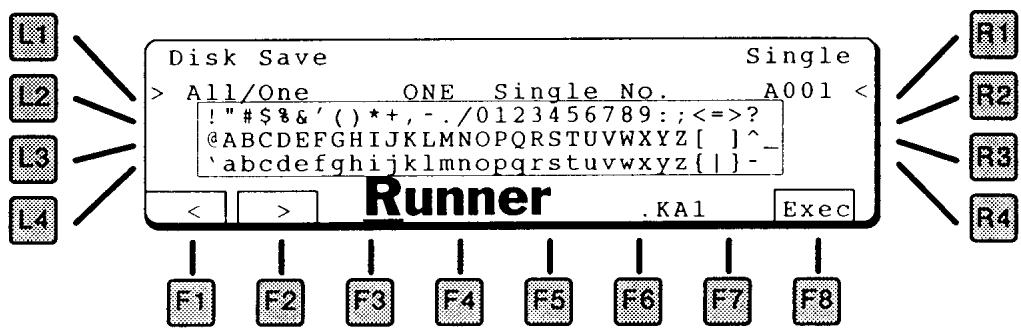
LI ALL/ONE
Choose ALL the patches in a bank, or just ONE.
NOTE:
The single bank selected before entering the Disk Section will be the only bank available.
RI SINGLE NO.
If you want to save one patch to disk, select the patch number here.
F1/F2 CHARACTER
This names the file on the disk. Use the F1 and F2 keys to select a character in the name (moves the cursor), and the Value dial to select a letter.
F8 EXECUTE
Press Execute to save the file. It will be saved with the file extension shown after the name. See page 119 for a list of K5000S file types.
L2 SAVE MULTI

LI ALL/ONE
Choose the entire MULTI bank, or just ONE Multi patch.
RI MULTINO.
If you want to save one patch to disk, select the patch number here.
F1/F2 CHARACTER
This names the file on the disk. Use the F1 and F2 keys to select a character in the name (moves the cursor), and the Value dial to select a letter.
F8 EXECUTE
Press Execute to save the file. It will be saved with the file extension shown after the name. See page 119 for a list of K5000S file types.
L3 SAVEARPEGGIO PATTERN
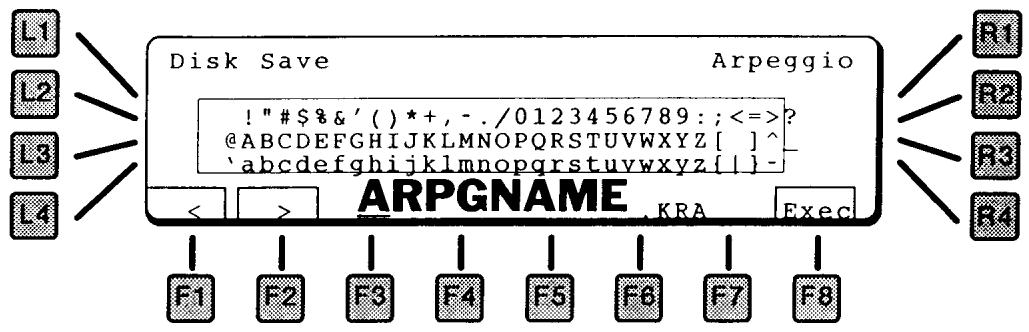
F1/F2 CHARACTER
This names the file on the disk. Use the F1 and F2 keys to select a character in the name (moves the cursor), and the Value dial to select a letter.
F8 EXECUTE
Press Execute to save the file. It will be saved with the file extension shown after the name. See page 119 for a list of K5000S file types.
L2 LOAD
This section is for loading the various types of files into the K5000S from disk. Choose one of the options as described below.
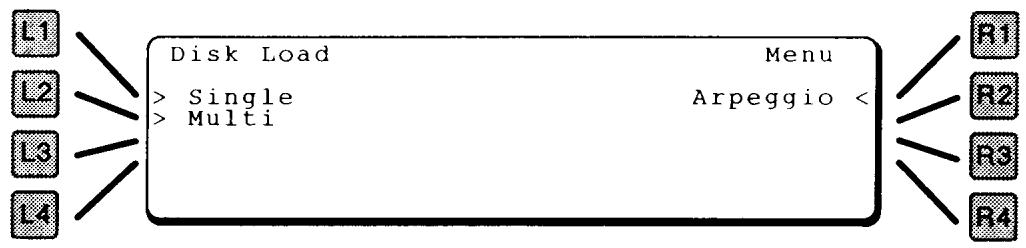
This shows the Load Single procedure. The others are similar.
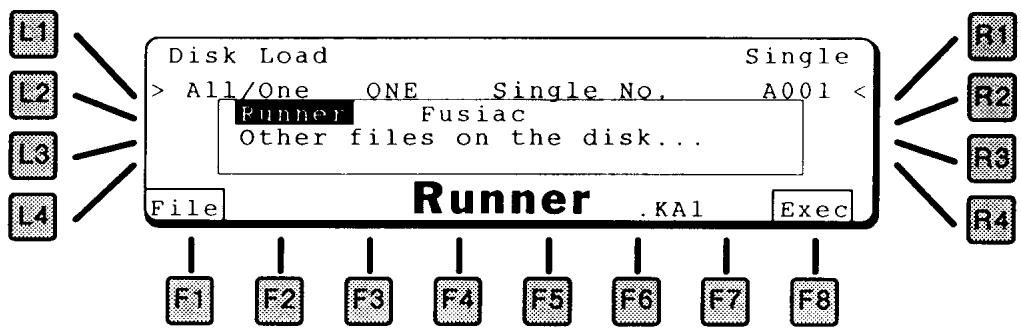
LI ALL/ONE
Choose a patch bank file (.KAA) or a file with only ONE patch (.KA1).
RI SINGLE NO.
This is the destination location for the file.
FI FILE
This scrolls through the files on the disk that match the selected file type. Use the Value dial to select the desired file.
F8 EXECUTE
Press Execute to load the file.
MAC / WIN 95 USERS NOTE:
All file names must be in standard DOS 8+3 letter format or it will not be recognized.
RI DELETE
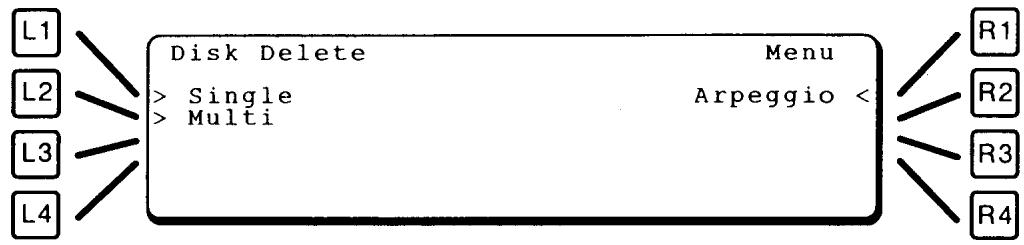
This shows the Delete Single procedure. The others are similar.

LI ALL/ONE
Choose a patch bank file (.KAA) or a file with only ONE patch (.KA1).
RI SINGLE BANK
Select the type of Single bank to delete: A or D.
FI FILE
This scrolls through the files on the disk that match the selected file type. Use the Value dial to select the desired file.
F8 EXECUTE
Press Execute to delete the file from the disk.
Disk Format
> Format 1.4MB Formatting Will Destroy All Data On The Disk. Exec
This formats a disk to be used by the K5000S. The K5000S uses the same format as IBM compatible PCs. If a diskette is already formatted in standard PC format, then it is not necessary to reformat the disk.
LI FORMATTYPE
Choose the type of disk you wish to format: 1.4MB for High Density diskettes (2HD), 720KB for older Double Density diskettes (2DD).
F8 EXECUTE
This starts the format process. Press F8 to continue, F1 to cancel.
FILE FORMAT LIST
The following file formats can be read and written by the K5000S:
| FUNCTION | DATA | FILE TYPE | FILE NAME | EXAMPLE | READ/WRITE |
| Save/Load | Single ADD | One | *.KAI | A32 | o |
| All | *.KAA | A1-A64 | o | ||
| Multi | One | *.KCI | MI | o | |
| (or Combi) | All | *.KCA | M1-M64 | o | |
| Arpeggio | All | *.KRA | o | ||
| Operating System | Program | K5000SR.SYS | Read Only |
The following MIDI messages can be sent from this page. Messages are sent on the MIDI System Channel, set in the System MIDI page. The MIDI System Channel is shown at the top of the screen.
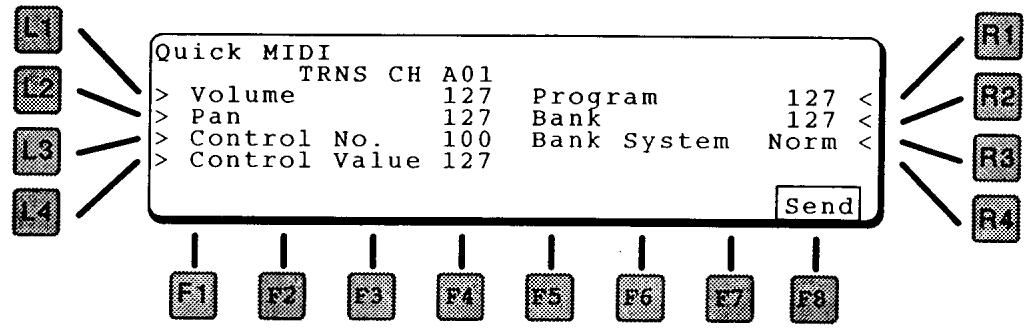
LI VOLUME
Sends a Volume message using Continuous Controller #7.
L2 PAN
Sends a Pan message using Continuous Controller #10.
L3 CONTROL NUMBER
There are 128 Continuous Controller channels in MIDI. Some, like the Volume, Pan, Sustain Pedal, and Bank Select messages are commonly used by all instruments. Other controllers are more specific and are used for everything from synthesizer parameters to automated mixing to controlling stage lights or even a VCR.
This parameter selects one of the Continuous Controller channels for control (0 to 127).
L4 CONTROLVALUE
This sets the value of the message sent to the Continuous Controller channel selected above.
RI PROGRAM
Sends a Program Change message, which tells a remote instrument to change to a different sound patch. There are 128 Programs available, numbered from 0 through 127.
R2 BANK
Most recently made instruments contain more than 128 patch programs in memory. MIDI gets around this limitation by dividing the available sound programs into several banks of programs. Use the Bank and Bank System messages to specify which bank to switch to. Within an individual bank, the Program Change message can be used to select individual programs.
R3 BANK SYSTEM
The Bank System parameter selects the type of bank select message to send.
NORMAL
Normal - the bank message is sent by itself
1 (MSB)
MSB - the bank message is sent with an MSB indication.
2 (LSB)
LSB - the bank message is sent with an LSB indication.
F8 SEND
This transmits all the messages.
APPENDIX
BANK A (BANK NO. 100) BANK D (BANK NO. 102)
| No | Name | Categori |
| A001 | Runner | SFX |
| A002 | Gorgizmo | SFX |
| A003 | DstPulse | Lead |
| A004 | TelMetal | SEQ |
| A005 | Driver | Techno |
| A006 | Reznator | Bass |
| A007 | GOOM | Lead |
| A008 | Heaven | TXT Pad |
| A009 | Creaturz | TXT Pad |
| A010 | K-Bells | Percus |
| A011 | Hardcore | Techno |
| A012 | Mentara | Lead |
| A013 | Shakkiri | Lead |
| A014 | Tweeky | Lead |
| A015 | Tangeri | Lead |
| A016 | Rasty | Lead |
| A017 | Pyper | Lead |
| A018 | Clavaxx | Polysyn |
| A019 | BrasMorf | Polysyn |
| A020 | Insyncer | Polysyn |
| A021 | Fusicac | Polysyn |
| A022 | HyprWyr | Polysyn |
| A023 | History | Polysyn |
| A024 | Launcher | Polysyn |
| A025 | Wintage | Polysyn |
| A026 | LeadVox | Polysyn |
| A027 | VooCoo | Polysyn |
| A028 | Sweepipe | Polysyn |
| A029 | Formanta | Polysyn |
| A030 | HardFaze | TXT Pad |
| A031 | TalkGlas | TXT Pad |
| A032 | Eaglelan | TXT Pad |
| A033 | Bee3Pad | TXT Pad |
| A034 | Zisch | TXT Pad |
| A035 | WheelPad | BG Pad |
| A036 | HotSweet | BG Pad |
| A037 | Engage | BG Pad |
| A038 | Starship | Techno |
| A039 | RaveRizm | Techno |
| A040 | TB5005 | Techno |
| A041 | Frogga | Techno |
| A042 | TeknoBas | Techno |
| A043 | RoboBass | Bass |
| A044 | Basstron | Bass |
| A045 | DooBass | Bass |
| A046 | YazzaY | Percus |
| A047 | Richness | Percus |
| A048 | HolyVibe | Percus |
| A049 | Plukk | Percus |
| A050 | Seaworld | SFX |
| A051 | 4thPlane | SFX |
| A052 | Moduar | SFX |
| A053 | Chimera | SFX |
| A054 | Opposite | SFX |
| A055 | Nebular | SFX |
| A056 | Melmaker | SFX |
| A057 | Rippin | SFX |
| A058 | Ultimate | SEQ |
| A059 | Talkie | SEQ |
| A060 | Mices | SEQ |
(BANK NO.101)
| M01 | NewWorld | M33 | Uglyduck |
| M02 | Halo | M34 | AttkBras |
| M03 | Yin&Jan | M35 | Midnight |
| M04 | EyesLee | M36 | Bas¥Lead |
| M05 | Horror | M37 | Dreamin |
| M06 | CHRMLead | M38 | Heather |
| M07 | BeGentle | M39 | Moonset |
| M08 | BraStack | M40 | BigWorld |
| M09 | Tibetan | M41 | H.Vibe*2 |
| M10 | Sphere | M42 | DreamHrn |
| M11 | ESP.Bass | M43 | KamAlien |
| M12 | Meltopol | M44 | FarFa |
| M13 | CybaTekn | M45 | Mallthit |
| M14 | FatPlukk | M46 | Add*Zon2 |
| M15 | Junctio2 | M47 | Sunlite |
| M16 | SuperLow | M48 | Bell-pol |
| M17 | Ota_mill | M49 | SoftLead |
| M18 | TimeWrp2 | M50 | Wavers |
| M19 | LochNess | M51 | History*3 |
| M20 | MonoPoly | M52 | CashFlo2 |
| M21 | AddSDrum | M53 | RotoPad |
| M22 | TecSplit | M54 | ThikClav |
| M23 | ASIA2 | M55 | HelpHand |
| M24 | Vantage | M56 | Sta+Crec |
| M25 | Purple-O | M57 | Submerg2 |
| M26 | HalfTone | M58 | HyprComp |
| M27 | Calmy | M59 | Fleetting |
| M28 | UnizoLD | M60 | LeadIt |
| M29 | NoHitter | M61 | Passing |
| M30 | RockLead | M62 | RawAdd1 |
| M31 | S-Pluck | M63 | AftrThot |
| M32 | London | M64 | Open2001 |
EFFECT PARAMETERS
| mode | input | parameter 1 | parameter 2 | parameter 3 | parameter 4 | parameter 5 | |||||
| name | value (def.) | name | value (def.) | name | value (def.) | name | value (def.) | name | value (def.) | ||
| rev_hall 1 (Standard) | stereo | dry/wet 1 | 0.100 (85/15) | rev_time | 0.3.505 (1.55) | predly time | 0.100mS(30mS) | hi frez demp | 1.100 (25) | ||
| rev_hall 2 (Small) | stereo | dry/wet 1 | 0.100 (40/60) | rev_time | 0.3.505 (1.55) | predly time | 0.100mS(50mS) | hi frez demp | 1.100 (5) | ||
| rev_hall 3 (Brush) | stereo | dry/wet 1 | 0.100 (70/90) | rev_time | 0.3.505 (1.55) | predly time | 0.100mS(60mS) | hi frez demp | 1.100 (25) | ||
| rev_rond 1 (Standard) | stereo | dry/wet 1 | 0.100 (85/15) | rev_time | 0.3.505 (1.65) | predly time | 0.100mS(5mS) | hi frez demp | 1.100 (15) | ||
| rev_rond 2 (Large) | stereo | dry/wet 1 | 0.100 (80/20) | rev_time | 0.3.505 (1.05) | predly time | 0.100mS(30mS) | hi frez demp | 1.100 (5) | ||
| rev_rond 3 (Bright) | stereo | dry/wet 1 | 0.100 (65/75) | rev_time | 0.3.505 (1.55) | predly time | 0.100mS(40mS) | hi frez demp | 1.100 (40) | ||
| rev_rond 4 (Large) | stereo | dry/wet 1 | 0.100 (70/90) | rev_time | 0.3.505 (1.05) | predly time | 0.100mS(5mS) | hi frez demp | 1.100 (5) | ||
| rev_rond 5 (Small) | stereo | dry/wet 1 | 0.100 (80/20) | rev_time | 0.3.505 (2.05) | predly time | 0.100mS(30mS) | hi frez demp | 1.100 (20) | ||
| rev_rond 6 (Mellow) | stereo | dry/wet 1 | 0.100 (70/90) | rev_time | 0.3.505 (2.05) | predly time | 0.100mS(40mS) | hi frez demp | 1.100 (40) | ||
| revers < no reverb | stereo | dry/wet 1 | 0.100 (0/100) | feed back | 1.100 (10) | predly time | 0.100mS(0mS) | hi frez demp | 1.100 (20) | ||
| long dry < no reverb | stereo | dry/wet 1 | 0.100 (40/60) | feed back | 1.100 (100) | dty time | 200.1470mS(500mS) | hi frez demp | 1.100 (20) | ||
| early ref. 1 | stereo | dry/wet | 0.100 (30/70) | steep | 1.100 (1) | predly time | 0.100mS(5mS) | feed back | 1.100 (10) | ||
| early ref. 2 | stereo | dry/wet | 0.100 (60/40) | steep | 1.100 (19) | predly time | 0.100mS(35mS) | feed back | 1.100 (50) | ||
| tap dry 1 | stereo | dry level | 1.100 (100) | dy time 1 | 0.720mS(150mS) | tap HV | 1.100 (90) | dty time 2 | 0.720mS(175mS) | feed back | 1.100 (50) |
| tap dry 2 | stereo | dry level | 1.100 (100) | dy time 1 | 0.720mS(150mS) | tap HV | 1.100 (80) | dty time 2 | 0.720mS(250mS) | feed back | 1.100 (55) |
| single dry | mono | dy level | 1.100 (25) | dty flux | 0.9 (0mS) | dty coarse | 0.1270mS(500mS) | feed back | 1.100 (50) | ||
| dual dry | stereo | dy level | 1.100 (35) | dy time 1 | 0.720mS(120mS) | feed back 1 | 1.100 (60) | dty time 2 | 0.720mS(230mS) | feed back 2 | 1.100 (33) |
| stereo dry | stereo | dy level | 1.100 (40) | dty time | 0.720mS(250mS) | feed back | 1.100 (33) | ||||
| cross dry | monolite | dy level | 1.100 (50) | dty time | 0.720mS(200mS) | feed back | 1.100 (55) | ||||
| auto pan | monolite | dry/wet | 0.100 (24/76) | steep | 1.100 (14) | depth | 1.100 (91) | predly time | 0.100mS(32mS) | wave | sin/dri (sin) |
| auto pan & dy | monolite | dry/wet | 0.100 (24/76) | steep | 1.100 (14) | depth | 1.100 (91) | dty time | 0.200mS(150mS) | wave | sin/dri (sin) |
| chorus 1 | stereo | dry/wet | 0.100 (50/50) | steep | 1.100 (6) | depth | 1.100 (75) | predly time | 0.100mS(28mS) | wave | sin/dri (sin) |
| chorus 2 | monolite | dry/wet | 0.100 (50/50) | steep | 1.100 (6) | depth | 1.100 (75) | predly time | 0.100mS(28mS) | wave | sin/dri (sin) |
| chorus 3 & dy | stereo | dry/wet | 0.100 (0/100) | steep | 1.100 (6) | depth | 1.100 (75) | dty time | 0.200mS(150mS) | wave | sin/dri (sin) |
| chorus2 & dy | monolite | dry/wet | 0.100 (0/100) | steep | 1.100 (6) | depth | 1.100 (75) | dty time | 0.200mS(150mS) | wave | sin/dri (sin) |
| flanger 1 | stereo | dry/wet | 0.100 (52/48) | steep | 1.100 (9) | depth | 1.100 (54) | predly time | 0.100mS(0mS) | feed back | 1.100 (46) |
| flanger 2 | stereo | dry/wet | 0.100 (50/50) | steep | 1.100 (6) | depth | 1.100 (75) | predly time | 0.100mS(0mS) | feed back | 1.100 (50) |
| flanger2 & dy | stereo | dry/wet | 0.100 (52/48) | steep | 1.100 (9) | depth | 1.100 (54) | dty time | 0.200mS(150mS) | feed back | 1.100 (46) |
| flanger2 & dy | monolite | dry/wet | 0.100 (50/50) | steep | 1.100 (6) | depth | 1.100 (75) | dty time | 0.200mS(60mS) | feed back | 1.100 (50) |
| ensemble | monolite | dry/wet | 0.100 (33/63) | depth | 1.100 (75) | dty time | 0.200mS(40mS) | ||||
| ensemble & dy | monolite | dry/wet | 0.100 (33/63) | depth | 1.100 (75) | dty time | 0.200mS(40mS) | ||||
| cokerse | monolite | dry/wet | 0.100 (50/50) | steep | 1.100 (6) | depth | 1.100 (75) | dty time | 0.200mS(200mS) | ||
| cokerse & dy | monolite | dry/wet | 0.100 (50/50) | steep | 1.100 (6) | depth | 1.100 (75) | dty time | 0.200mS(80mS) | ||
| tremolo | monolite | dry/wet | 0.100 (30/70) | steep | 1.100 (52) | depth | 1.100 (49) | predly time | 0.100mS(0mS) | wave | sin/dri (sin) |
| tremolo & dy | monolite | dry/wet | 0.100 (30/70) | steep | 1.100 (53) | depth | 1.100 (49) | dty time | 0.200mS(170mS) | wave | sin/dri (sin) |
| phaser 1 | stereo | dry/wet | 0.100 (10/90) | steep | 1.100 (5) | depth | 1.100 (93) | predly time | 0.100mS(0mS) | feed back | 1.100 (80) |
| phaser 2 | stereo | dry/wet | 0.100 (60/40) | steep | 1.100 (4) | depth | 1.100 (73) | predly time | 0.100mS(80mS) | feed back | 1.100 (80) |
| phaser 3 & dy | stereo | dry/wet | 0.100 (30/70) | steep | 1.100 (6) | depth | 1.100 (75) | dty time | 0.200mS(200mS) | feed back | 1.100 (80) |
| phaser 2 & dy | stereo | dry/wet | 0.100 (80/20) | steep | 1.100 (7) | dty, depth | 1.100 (100) | dty time | 0.200mS(150mS) | feed back | 1.100 (50) |
| rotary | monolite | dry/wet | 0.100 (15/85) | show and | 1.20 (8) | fast and | 20.10 (71) | acceleration | 1.10 (5) | slow/fast | 1.100 (50) |
| auto wah | stereo | dry/wet | 0.100 (9/100) | steep | 1.100 (60) | freak, him | 1.100 (30) | freq. log | 1.100 (80) | resonance | 1.100 (50) |
| bandpass | stereo | dry/wet | 0.100 (9/100) | center free | 1.100 (50) | band width | 1.100 (50) | ||||
| excler | stereo | dry/wet | 0.100 (9/100) | EQ, low | 12> +12dB(0 dB) | EQ, high | 12> +12dB(0 dB) | ||||
| enhancedness | stereo | dry/wet | 0.100 (9/100) | EQ, low | 12> +12dB(0 dB) | EQ, high | 12> +12dB(0 dB) | ||||
| overdrive | monol | dry/wet | 0.100 (9/100) | EQ, low | 12> +12dB(0 dB) | EQ, high | 12> +12dB(0 dB) | ||||
| distortion | monol | dry/wet | 0.100 (9/100) | EQ, low | 12> +12dB(0 dB) | EQ, high | 12> +12dB(0 dB) | ||||
| overdrive & dy | monol | dry/wet | 0.100 (9/100) | EQ, low | 12> +12dB(0 dB) | EQ, high | 12> +12dB(0 dB) | ||||
| overdrive & dy | monol | dry/wet | 0.100 (9/100) | EQ, low | 12> +12dB(0 dB) | ||||||
| Wave # | Group | Memo | Wave # | Group | Memo |
| 342 | Inst Noise Attack | Piano Noise Attack | 599 | Cyclic Loop | Syn PUM Cyc |
| 343 | EP Noise Attack | 400 | Harpshichord Cyc | ||
| 344 | Percus Noise Attack | 481 | Digi EP Cyc | ||
| 345 | Dist Gtr Noise Attack | 482 | Soft EP Cyc | ||
| 346 | Orch Noise Attack | 403 | EP Bell Cyc | ||
| 347 | Flanged Noise Attack | 404 | Bandneon Cyc | ||
| 348 | Saw Noise Attack | 405 | Chees Organ Cyc | ||
| 349 | Zipper Noise Attack | 406 | Organ Cyc | ||
| 350 | Inst Noise Looped | Organ Noise Looped | 407 | Oboe Cyc | |
| 351 | Uoliln Noise Looped | 408 | Crystal Cyc | ||
| 352 | Crystal Noise Looped | 409 | Syn Bass1 Cyc | ||
| 353 | Sax Breath Looped | 410 | Syn Bass2 Cyc | ||
| 354 | Panflute Noise Looped | 411 | Syn Saw1 Cyc | ||
| 355 | Pipe Noise Looped | 412 | Syn Saw2 Cyc | ||
| 356 | Saw Noise Looped | 413 | Syn Saw3 Cyc | ||
| 357 | Gorgo Noise Looped | 414 | Syn Square1 Cyc | ||
| 358 | Enhancer Noise Looped | 415 | Syn Square2 Cyc | ||
| 359 | Tabla Spectrum Noise Looped | 416 | Syn Pulse1 Cyc | ||
| 360 | Cave Spectrum Noise Looped | 417 | Syn Pulse2 Cyc | ||
| 361 | White Noise Looped | 418 | Pulse20 Cyc | ||
| 362 | Inst Attack | Clavi Attack | 419 | Pulse40 Cyc | |
| 363 | Digi EP Attack | 420 | Nasty Cyc | ||
| 364 | Glocken Attack | 421 | Mini Max Cyc | ||
| 365 | Uibe Attack | 422 | Bottom Cyc | ||
| 366 | Marimba Attack | 423 | Over 64th harm onics only Cyc | ||
| 367 | Org Key Click | 424 | Over 64th harmonics only Cyc | ||
| 368 | Slap Bass Attack | ||||
| 369 | Folk Gtr Attack | 425 | Percus Attack | BD Attack | |
| 370 | Gut Gtr Attack | 426 | Ana Kick | ||
| 371 | Dist Gtr Attack | 427 | SD Attack | ||
| 372 | Clean Gtr Attack | 428 | Tiny SD Attack | ||
| 373 | Muted Gtr Attack | 429 | Ana SD Attack | ||
| 374 | Cello & Violin Attack | 430 | Ana HHO Attack | ||
| 375 | Pizz Violin Attack | 431 | Simonzu Tom Attack | ||
| 376 | Pizz Double Bass Attack | 432 | Ride Cup Attack | ||
| 377 | Ooo Attack | 433 | Cowbell Attack | ||
| 378 | Trombone Attack | 434 | Conga Attack | ||
| 379 | Brass Attack | 435 | CongaMuted Attack | ||
| 380 | F.Horn1 Attack | 436 | Agogo Attack | ||
| 381 | F.Horn2 Attack | 437 | Castanet Attack | ||
| 382 | Flute Attack | 438 | Claves Attack | ||
| 383 | T.Sax Attack | 439 | Tambourine Attack | ||
| 384 | Shamisen Attack | 440 | JingleBell Attack | ||
| 385 | Analog Attack | Voltage Attack | 441 | BellTree Attack | |
| 386 | BBDigi Attack | 442 | WindowChime Attack | ||
| 387 | BBDK Attack | 443 | Atarigane Attack | ||
| 388 | BBBip Attack | 444 | Rama Attack | ||
| 389 | Techno Hit Attack | 445 | Udo Attack | ||
| 390 | Techno Attack | 446 | TablaNa Attack | ||
| 391 | K-Piano Attack | 447 | Voice Ou Attack | ||
| 392 | Analog Loop | Noisy Noise Looped | 448 | HighQ Attack | |
| 393 | Noisy Human Looped | 449 | Super Q Attack | ||
| 394 | Ravoid Looped | 450 | Glass Attack | ||
| 395 | Hyper Looped | 451 | Metal Attack | ||
| 396 | Beef Looped | 452 | Noise Attack | ||
| 397 | Texture Looped | 453 | Pop Attack | ||
| 398 | MMBass Looped | ||||
| 454 | S.E Loop | Crash Looped | |||
| 455 | Burner Looped | ||||
| 456 | Jet Engine Looped | ||||
| 457 | Omnibus Loop 1 | ||||
| 458 | Omnibus Loop 2 | ||||
| 459 | Omnibus Loop 3 | ||||
| 460 | Omnibus Loop 4 | ||||
| 461 | Omnibus Loop 5 | ||||
| 462 | Omnibus Loop 6 | ||||
| 463 | Omnibus Loop 7 | ||||
| 464 | Omnibus Loop 8 |
Kawai Musical Inst. Mfg. Co., Ltd.
OW621E-R 9611
Printed in Japan