TID889 - Téléphone fixe CURTIS - Notice d'utilisation et mode d'emploi gratuit
Retrouvez gratuitement la notice de l'appareil TID889 CURTIS au format PDF.
| Type de produit | Téléphone fixe avec répondeur numérique |
| Marque | CURTIS |
| Modèle | TID889 |
| Alimentation principale | Adaptateur secteur 9V DC 300mA (inclus) |
| Alimentation de secours | 4 piles AAA (non incluses) |
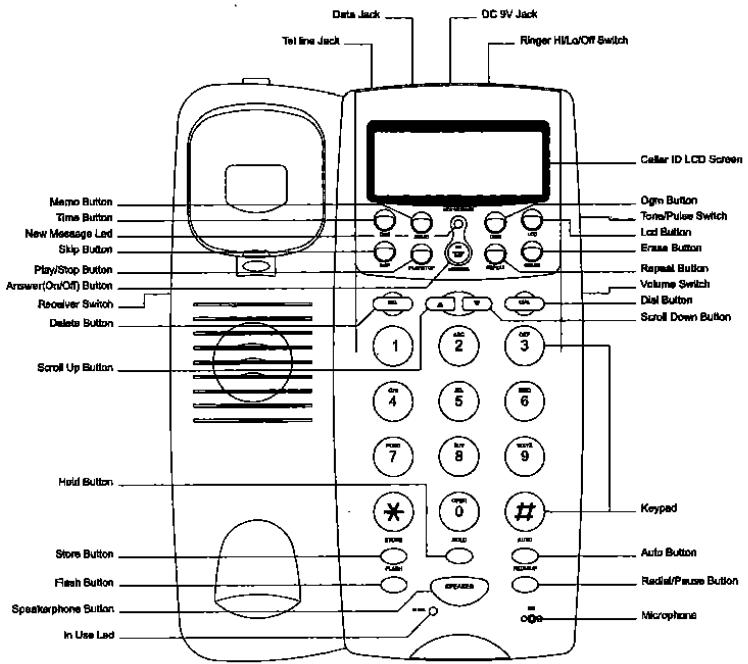
| Fonctions du combiné | Haut-parleur, réglage volume, touche Flash, rappel du dernier numéro, pause |
| Identification de l'appelant | Affichage du nom (15 caractères) et numéro (14 chiffres), horodatage, 65 mémoires |
| Mémoire de numérotation abrégée | 10 touches directes (0-9) via touche AUTO |
| Répondeur numérique | Temps d'enregistrement total : 14 minutes, jusqu'à 59 messages |
| Messages d'accueil (OGM) | 2 messages par défaut (OGM1 et OGM2), OGM1 enregistrable par l'utilisateur (max 1 minute) |
| Fonctions d'enregistrement | Mémo, conversation téléphonique (max 14 minutes), ICM |
| Commande à distance | Code de sécurité à 3 chiffres (000-999), contrôle par tonalités DTMF |
| Fonction veille (Room Monitor) | Écoute à distance pendant 15 secondes |
| Réglages | Langue (anglais/français/espagnol), indicatif régional, date/heure, contraste LCD (8 niveaux) |
| Sonnerie | Volume HI/LO/OFF |
| Affichage | LCD avec indicateur de nouveau message, batterie faible, nombre d'appels |
| Dimensions (approx.) | Base : 20 x 15 x 5 cm ; combiné : 5 x 3 x 2 cm (estimation) |
| Poids (approx.) | Base : 400 g ; combiné : 150 g (estimation) |
| Entretien et nettoyage | Débrancher avant nettoyage ; utiliser un chiffon humide sans liquide ni aérosol |
| Sécurité | Ne pas immerger, éviter l'humidité, ne pas signaler une fuite de gaz à proximité |
| Pièces détachées et réparabilité | Adaptateur secteur inclus ; piles non incluses ; ne pas modifier les composants internes |
FOIRE AUX QUESTIONS - TID889 CURTIS
Questions des utilisateurs sur TID889 CURTIS
0 question sur cet appareil. Repondez a celles que vous connaissez ou posez la votre.
Poser une nouvelle question sur cet appareil
Téléchargez la notice de votre Téléphone fixe au format PDF gratuitement ! Retrouvez votre notice TID889 - CURTIS et reprennez votre appareil électronique en main. Sur cette page sont publiés tous les documents nécessaires à l'utilisation de votre appareil TID889 de la marque CURTIS.
MODE D'EMPLOI TID889 CURTIS
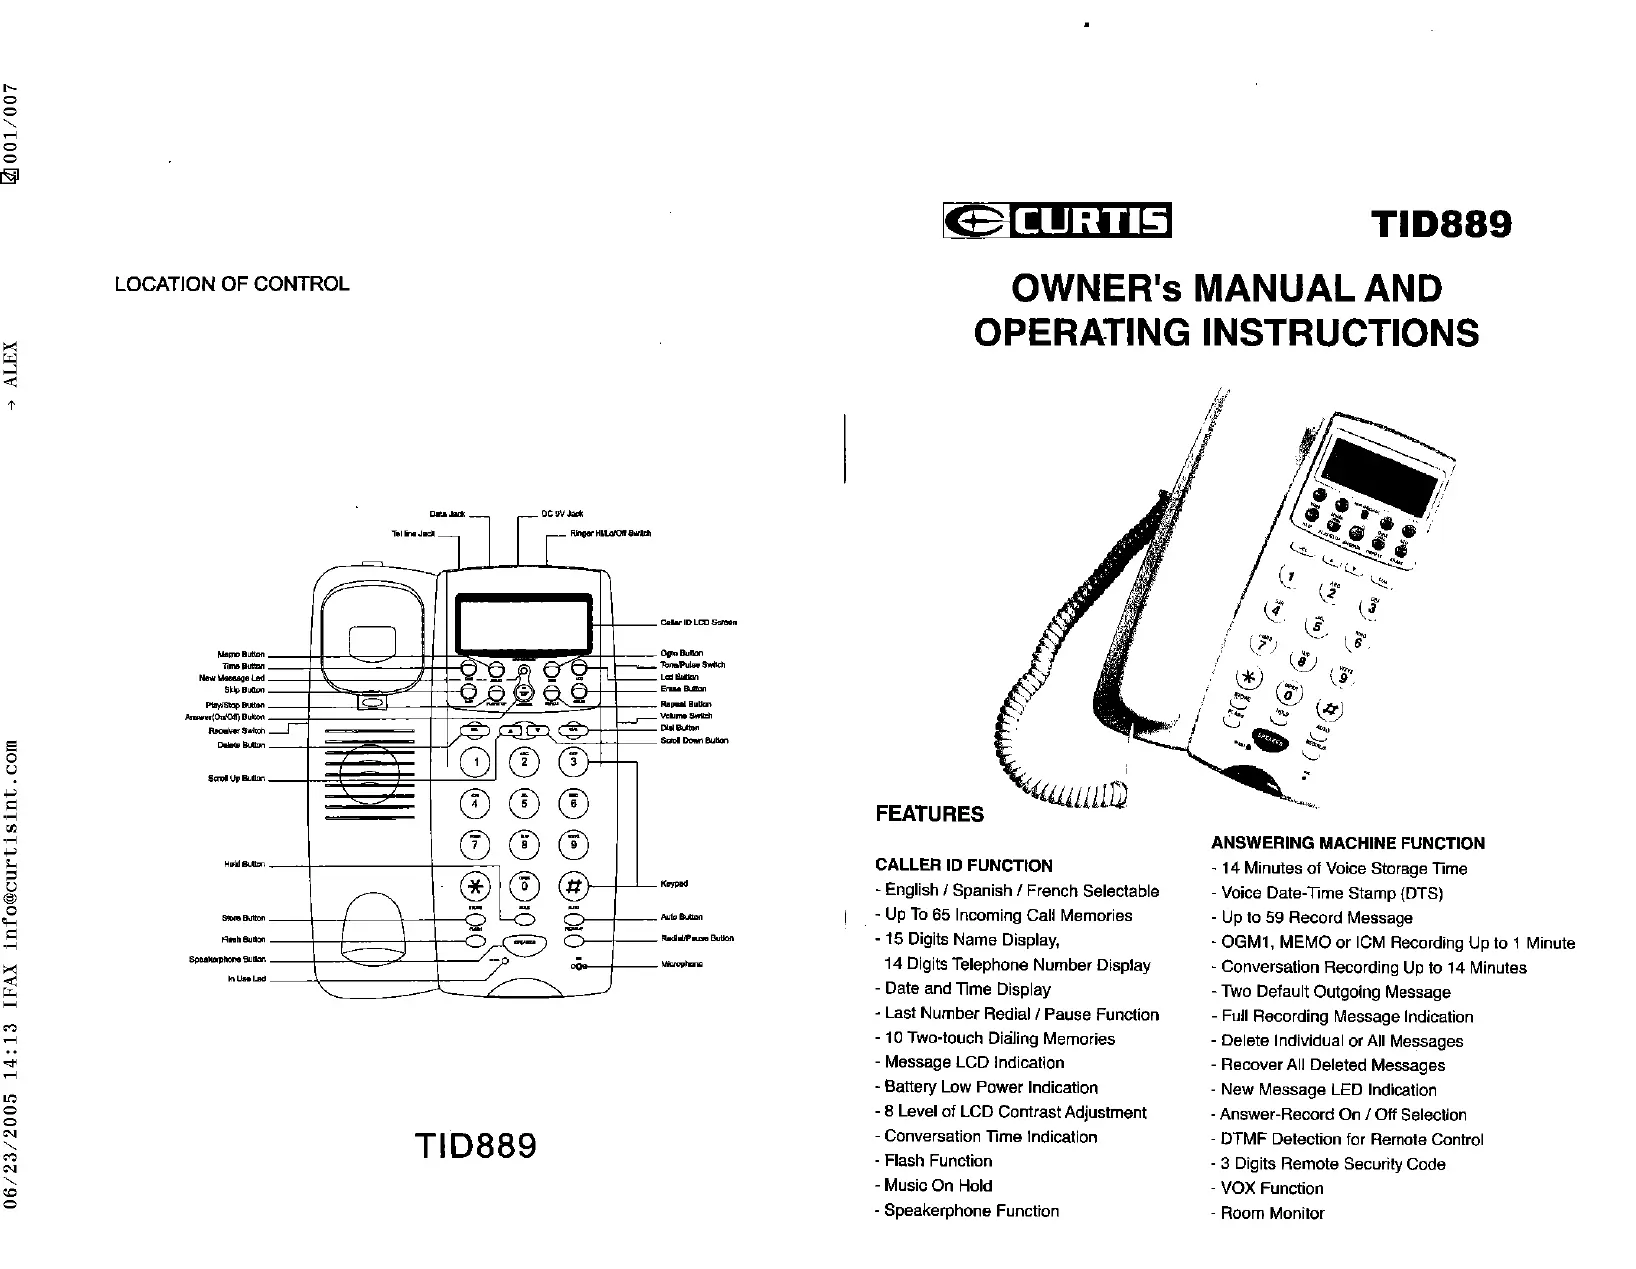
TID889
OWNER's MANUAL AND OPERATING INSTRUCTIONS

FEATURES
CALLER ID FUNCTION
- English / Spanish / French Selectable
- Up To 65 Incoming Call Memories
- 15 Digits Name Display,
14 Digits Telephone Number Display - Date and Time Display
- Last Number Redial / Pause Function
- 10 Two-touch Dialing Memories
- Message LCD Indication
- Battery Low Power Indication
- 8 Level of LCD Contrast Adjustment
- Conversation Time Indication
-Flash Function - Music On Hold
- Speakerphone Function
ANSWERING MACHINE FUNCTION
- 14 Minutes of Voice Storage Time
- Voice Date-Time Stamp (DTS)
- Up to 59 Record Message
- OGM1, MEMO or ICM Recording Up to 1 Minute
- Conversation Recording Up to 14 Minutes
- Two Default Outgoing Message
- Full Recording Message Indication
- Delete Individual or All Messages
- Recover All DeletedMessages
- New Message LED Indication
- Answer-Record On / Off Selection
-DTMF Detection for Remote Control - 3 Digits Remote Security Code
- VOX Function
- Room Monitor
INSTALLATION
-
Plug one end of coiled cord to the jack of handset and the other end to the jack of the base set
-
Plug one end of flat cord to line jack of the phone and the other end to wall jack
-
Connect the telephone with a 9V adaptor; telephone will announce 'Please wait.' to run memory check for 15 seconds. The long 'Beep' tone indicate that the checking is completed.
-
Open the battery compartment cover; install 4pcs AAA batteries (not included) to keep message.
Note: 1. Please make sure the telephone must be always connected with 9V adaptor so that all functions can be operated normally and the messages can be saved even if no batteries supply
- Adaptor was included but no batteries included for the unit.
- If no batteries and no adaptor for power supply, the speakerphone and caller ID function will unable be used. (The LCD will appear nothing.), but the dial-out and dial-in function can be operated normally.
- When the LCD display low batteries indication or the power supply was disconnected for 10 hours, please change the batteries immediately and the 9V DC adaptor must be connected first before you change the batteries, otherwise all saved messages will be lost.
SETTING
After installing the batteries, it will automatically enter the setting Language. In normal operation, press [DEL] and [ ] at the same time, then release the keys also can enter the setting manual including Language Setting, Area Code Setting, Time/Date Setting and LCD Contrast Adjustment.
1. Language Setting (English / French / Spanish)
- After installing the batteries, telephone will indicate the user to select the language with "ENGLISH" displaying on LCD
- Use [] and [] to select the appropriate language. (E = English, F = French, S = Spanish)
- Press [DEL] to confirm
2. Area Code Setting
- After the Language Setting, it will enter the area code setting, press [▲] and [▼] to set the area code.
- Press [DEL] to confirm the first digit.
- Repeat first two steps to set the second and the third code.
3. Time/Date Setting
- After area code setting, it will enter the Time/Date Setting, press [▲] and [▼] to adjust the time and date.
- Press [DEL] to confirm the time.
- Repeat first two steps to set the Date setting.
4. LCD Contrast
- After time/date setting, it will enter the LCD Contrast setting, press [▲] and [▼] to adjust the LCD contrast. There are total eight levels for the adjustment.
- Press [DEL] to confirm and exit the setting, or
- Press [LCD] button also can adjust the LCD contrast.
5. Ringer HI / LO / OFF Selectable
- Slide the [RINGER] switch to 'HI' position or 'LO' position to turn the ringer on. 'HI' for high volume and 'LO' for low volume.
- Slide the [RINGER] switch to 'OFF' position to turn the ringer off. The ringer will not be activated by any incoming calls.
6. Tone / Pulse Selectable
Select the dialing mode that your telephone requires by sliding the [T-P] switch to 'T' position for tone dialing and to 'P' position for pulse dial.
Note: Under the pulse dial state, press * to change to tone dial.
7. Speakerphone and handset Volume Adjustment
- Slide the [VOLUME] in right side of the unit to adjust the speakerphone volume from MAX (Highest Volume) to MIN (Lowest Volume).
- Slide the [VOLUME] in left side of the unit to adjust handset volume from MAX (Highest Volume) to MIN (Lowest Volume).
8. Timing Setting for Time Reporting
- Press [TIME] and hold the key for 2 seconds to start the time setting
- The telephone will announce 'Set Day' first, use [SKIP] (Up scroll) or [REPEAT] (Down scroll) to select the weekday.
- Press [TIME] to confirm.
- Then the machine will announce 'Set Hour', use the same method to set hour.
- At last the machine will announce 'Set Minute', use the same method to set minute.
- After the setting, press [TIME] once and the telephone will announce the time
Note: 1. If you don't press any key within 8 seconds after entering the time setting, it will exit the setting automatically.
- If time does not be set yet, time message will not be played and the telephone will announce 'Please set time'.
9. Setting Answer-Record On/Off
- The original Answer-Record state is 'On', press [ANSWER] once and the telephone will announce 'Answer Off'.
- Press [Answer] key again, the telephone will announce 'Answer On'.
Note: If you want the incoming person enable to leave a message, you must set answer 'On'.
10. Setting The Remote Security Code
The remote security code is initially preset to '000'. The code range is from 000 to 999. Procedure of security code setup / display is as follows:
- [Pseudo ANSWER] key for about 2 seconds, the telephone will announce 'security code 000'
After hearing one short 'beep' sound, use [SKIP] or [REPEAT] to set the digit - Press [ANSWER] to confirm the first digit and use the same method to set the rest digit.
- Press [PLAY/STOP] key to exit. (If there is no operation in 8 seconds, telephone will exit from the setting mode automatically.)
- After all digits were set the unit announce the new security code.
OPERATION
1. Making A Call
- Lift the handset or press the [SPEAKER] key, input the telephone number by pressing the corresponding digit key.
2. Receiving A Call
- Lift the handset to use as a normal phone or press the [SPEAKER] key to use as a hand-free phone
3. Flash Function
- When making an outgoing call, but the line is not through, press [FLASH] key once, telephone will enter on-hook state then re-connect, just press [REDIAL/P] key to dial out the entered number.
4. Last Number Redial
- Lift the handset or press the [SPEAKER] key, then press [REDIAL/P] key, the last outgoing number will be dialed out.
5. Music On Hold
Press [HOLD] key to put the engaging party on hold without hanging up the phone to put the engaging line back on
- Pick up the handset if you drop the hand set back to the base in the hold stage
- Press the [HOLD] key again with the hand set remains lifting in the hold state
- Press [SPEAKER] key if you drop the hand set back to the base in the hold stage and the phone enters speakerphone mode.
6. Storing and Daling Two-touch Memories
- For storing into two-touch memories, under on-hook, press [STORE] key once
- Press the number to be stored
- Press [AUTO] key and then press one digit from keypad (0-9) (Select the location which your numbers to be stored.)
- For dialing two-touch memories, pick up the handset or press [SPEAKER] key to get the dial tone
- Press [AUTO] key then followed by a number choosing from 0-9 (the location your wanted numbers have been stored) for dialing.
7. Review/Delete Incoming Calls
- Under on-hook state, press [▲] and [▼] key to review the incoming call one by one
- If you want to delete the call, press [DEL] once
- The LCD will display 'Del Call?'
- Press [DEL] once again and the call will be deleted.
- If you want to delete all incoming calls, press [DEL] for 3 seconds and the LCD will appear 'DELL ALL CALLS?', keep pressing the key and all calls will be deleted.
Note: If any new call has not been read yet, it is impossible to delete all incoming calls at once and the LCD will display 'NEW CALL PROTEC'
8. Caller ID Status Indications
'UNAVAILABLE'
The call is made through a telephone company which does not offer Caller ID service.
BLOCKEDCALL
If the call is restricted, the LCD will display 'BLOCKED CALL'
9. Dial Back the Incoming Calls
a) Dial back local call
- Use [] and [] key to select the wanted number
- Press [DIAL] to confirm
- The LCD will display 'PICK UP HANDSET' and just lift the handset or press [SPEAKER] key, the number will be automatically dialed out.
b) Dial back non-local call with adding '1'
- If you select the number is not local number, after you press [DIAL], the LCD will display 'PICKUP OR ADJ'
- Press [DIAL] once for dial out with adding '1' as first digit automatically (Press [DIAL] twice to cancel adding '1').
- Just lift the handset or press [SPEAKER] key, the number will be dialed out automatically.
10. Recording and Playing of OGM1
OGM1 is a message requesting the caller to leave a message. The record and play steps as follows:
- If no OGM1 message has been recorded, press [OGM] key once, the telephone will announce 'Hello, please leave a message after the tone.' This is a default message by the telephone.
- If you want to record your own OGM1 message, press [OGM] for about 2 seconds and release. Start record after hearing a long "beep" tone.
- Recording will stop automatically after 1 minute or stop recording by pressing [PLAY/STOP] key.
- Telephone will immediately play the OGM1 after recording stops.
- Press [OGM] once to replay the record.
- Press [PLAY/STOP] key to stop play
11. OGM2
- OGM2 is an answer-only message and cannot be changed by user. When memory full occurs during recording or the total numbers of saved messages exceed 59, OGM2 ('Memory full, please call again later, Thank you!') will be announced.
12. Recording A Memo
- Memo is a message left for others who directly access to the Answer-Record.
- If there are no messages left, press [MEMO] once will play 'You have no memos.'
- Press and hold the [MEMO] key for about 2 seconds, it will play 'Record message after tone.'
- Memo recording can start after hearing a long "beep" tone.
- Recording will stop automatically after 1 minute or stop recording by pressing [PLAY/STOP] key.
13. Recording A Two-way Telephone Conversation
- Press and hold the [MEMO] key for about 2 seconds, you hear short "beep" tone.
- Two way conversation recording can start after the tone.
- Press [PLAY/STOP] key to stop recording
Note: When there are more than 59 messages or conversation recording up to 14 minutes (except OGM), the telephone will announce 'Memory full.' and the recording will be terminated. The user have to keep on pressing the [MEMO] key after the beep tone until the red light indicator flashing for the two-way conversation start recording.
14. Play Memo Records and Conversation Records
- If there is no MEMO record and no telephone conversation record, press [MEMO] key, the telephone will announce "You have no memo."
- If there is/are new MEMO record(s) or new conversation record(s), the New Message LED will blink, press [MEMO] key once, telephone will play all records with record time sequentially (except ICM message)
- After the last record was played the telephone will announce "End of Momo".
- Press [PLAY/STOP] key to play all kinds of records including memo records, conversation records and ICM messages. Skip to the next record by pressing [OGM] or [SKIP] key once, repeat the present record by pressing [MEMO] or [REPEAT] key once, skip to the previous record by pressing [MEMO] or [REPEAT] key twice continuously.
- After the last record time was played, the telephone will announce 'End of message.'
15. ICM Recording
- When a call is received in Answer-Record 'ON' mode
a) If there is no new ICM message, the telephone will announce OGM1 message after 4 ringing sounds
b) If there is/are new ICM message(s) record already, telephone will announce OGM1 message after 2 ringing sound
c) The caller can press [] to skip OGM1 play.
- After playing OGM1, there will be a long 'beep' sound to indicate the caller to start ICM recording.
- The ICM recording will stop if any of the following events occurs:
a) Record time up to 1 minute
b) No operation in 8 seconds
c) [PLAY/STOP] key be pressed (the ICM message just recorded will not be saved)
d) Handset of the Answer-Record telephone or its parallel telephone(s) be lifted (the ICM message just recorded will be saved as a new message)
Note: Telephone announce OGM2 'Memory full, please call again later.' in following status:
a) There are 59 records yet (except OGM)
b) Conversation recording up to 14 minutes (except OGM)
16. VOX Function
ICM recording will stop automatically if telephone detects continuous 8 busy tones or no operation in 8 seconds.
17. Playing New ICM Messages
- If there is(are) new ICM message(s), the LED will blink to indicate the new message(s) received.
- Press the [PLAY/STOP] key, the telephone will first play the amount of total messages, then it will play the new messages.
- If there is no new message or all new messages have been played, the telephone will play all messages sequentially.
- After record time of the last message was played, the telephone will announce 'End of message.'
18. Erase and Save Message
- Under playing messages state, press the [ERASE] key once to erase the currently played message (the individual erased message cannot be recovered.)
- Under non-playing messages state, press the [ERASE] key for about 2 second, all the messages will be erased after hearing a long "beep" tone
- Under non-playing messages state, press the [ERASE] key again for about 2 seconds, the all erased messages will be recovered after hearing a long "beep" tone.
- If there is no message in record, then there will be two short "beep" tones to indicate that no message has been erased.
Note: If any recording action is performed after all messages have been erased, no message can be recovered and saved.
19. Remote Control
- When a call received under Answer-Record 'ON' state, telephone will play OGM1 automatically, then a long "beep" will indicate the playing is completed.
- Just input the security code (Please refer to Setting the Remote Security Code) to enter the remote control menu after hearing the long "beep" tone, then you may have the following functions by pressing the appropriate key:
Remote-Control Key Function and Description
| Key (s) | Function |
| * | Skip OGM1 play |
| 1 | Play OGM1 |
| 2 | Room Monitor |
| 3 | Repeat Memos (press twice to play previous message) |
| 4 | play call ICM messages or press again to pause |
| 5 | Play New Messages (when play ICM or MEMO record, play this key to play the next message) |
| 6 | Erase Individual Message |
| 7 | Stop play, stop OGM1 and Memo recording |
| 9 | Enter the Record Re-play Menu |
| *1 | Record OGM1 |
| *2 | Record a MEMO |
| *3 | Change Security Code |
| *4 | Erase all messages |
| *5 | Set DAM from Answer-Record On Mode to Answer-Record Off Mode |
| # | Exit From Remote Control |
20. Room Monitor
While in remote control mode, the user can monitor the room status by entering the corresponding key(s). The duration of room Monitor State is 15 seconds.
- Use another telephone to dial your telephone number
- Input the security code to enter the remote control menu
- Press [2] key to enter room monitor state
IMPORTANT NOTES:
To operate this unit, you must have 'CALLER ID SERVICE' setup with your local telephone company. Some functions such as 'CALLER NAME INDICATION' will only operate if such services are included in the user's Caller I.D. program with the local telephone company.
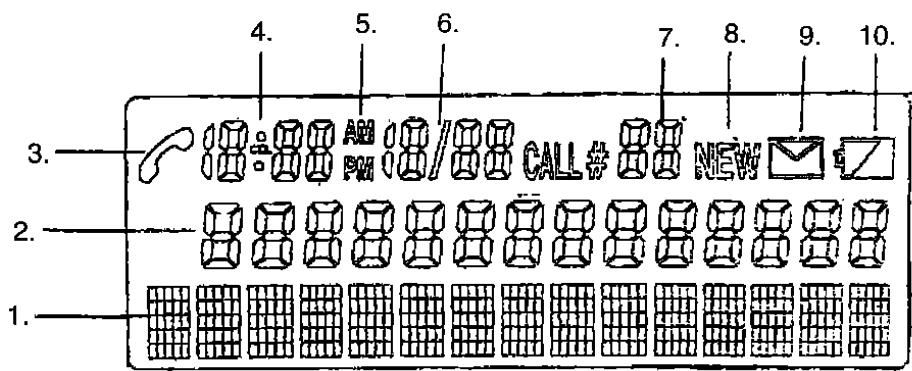
- Name 6. Date
- Number 7. Numbers of Calls
- On Call Indicator 8. New Call
- Clock 9. Message
5.AM/PM 10.Low Battery Indicator
SAFETY INSTRUCTIONS
- This telephone is an electrical device and can be hazardous if immersed in water. If the user accidentally drops it into water, first unplug it from wall jack, and remove it from water.
- Please keep the telephone dry and do not use it in moisture place. For example, near a bathtub, washbowl, kitchen sink, laundry tub and swimming pool. Do not use it in rain.
- Unplug the phone from the wall jack before cleaning with damp cloth; please do not use liquid or aerosol cleanser.
- Do not use the phone to report a gas leak in the gas vicinity. Please remove yourself immediately from the area and make the emergency phone call in a safe area.
- Handle the phone carefully. Do not drop it.
- Do not use or put the unit in extreme temperature.
- Keep the phone away from dust and dirt.
- Use the right power batteries indicated in the manual. Do not put batteries in a fire for such action can lead to an explosion.
- Do not modify or tamper with the telephone's internal components. Improper adjustment can cause damage and can be dangerous.
REMARKS:
- If the telephone is not connected with the DC 9V adaptor for more than 10 hours (batteries are installed), it may not enter normal state when the adaptor is re-connected.
- The user can first unplug the adaptor and uninstall the batteries, then plug the adaptor in; telephone will run memory check for 15 seconds and enter normal state. (All information need to be reset.)
AC ADPATOR FOR DC JACK
SPECIFICATION:OUTPUT-DC 9V.300MA