
X-TYPE - Berline JAGUAR - Notice d'utilisation et mode d'emploi gratuit
Retrouvez gratuitement la notice de l'appareil X-TYPE JAGUAR au format PDF.


| Marque | JAGUAR |
| Modèle | X-TYPE |
| Catégorie | Berline |
| Type de produit | Véhicule particulier |
| Longueur | 4 672 mm |
| Largeur | 1 789 mm |
| Hauteur | 1 392 mm |
| Empattement | 2 710 mm |
| Poids à vide | Environ 1 500 kg |
| Moteur | Essence ou Diesel selon version |
| Capacité du réservoir | 62 litres |
| Système de navigation | GPS avec écran tactile couleur |
| Guidage vocal | Oui, instructions audibles |
| Support cartographique | DVD cartographique (mise à jour possible) |
| Fonctions principales | Calcul d'itinéraire, points d'intérêt, mémoire de positions, zones d'évitement |
| Alimentation | Batterie 12 V, moteur en marche pour usage prolongé |
| Entretien et nettoyage | Nettoyer l'écran avec un chiffon doux et produit agréé |
| Sécurité | Fonctions désactivées en mouvement, avertissement de sécurité au démarrage |
| Pièces détachées et réparabilité | Consulter votre concessionnaire JAGUAR |
| Informations générales | Notice d'utilisation et manuel de navigation inclus |
FOIRE AUX QUESTIONS - X-TYPE JAGUAR
Questions des utilisateurs sur X-TYPE JAGUAR
0 question sur cet appareil. Repondez a celles que vous connaissez ou posez la votre.
Poser une nouvelle question sur cet appareil
Téléchargez la notice de votre Berline au format PDF gratuitement ! Retrouvez votre notice X-TYPE - JAGUAR et reprennez votre appareil électronique en main. Sur cette page sont publiés tous les documents nécessaires à l'utilisation de votre appareil X-TYPE de la marque JAGUAR.
MODE D'EMPLOI X-TYPE JAGUAR
X-TYPE NAVIGATION HANDBOOK



Navigation Handbook
JAGUAR CARS LIMITED, as manufacturers, are dedicated to the design and production of vehicles which meet the expectations of the world's most discerning purchasers.
To complement the features, systems and technology of your new vehicle we have produced this Navigation Handbook. In it we have undertaken to make the control of complex systems easy to understand and operate.
The information contained herein applies to a range of vehicles and not to a specific vehicle. For the specification of a particular vehicle, owners should consult their Jaguar Dealer.
The Manufacturer reserves the right to vary its specifications with or without notice, and at such times and in such manner as it thinks fit. Major as well as minor changes may be involved in accordance with the Manufacturer's policy of constant product improvement.
All rights reserved. No part of this publication may be reproduced, stored in a retrieval system or transmitted, in any form, electronic, mechanical, photocopying, recording or other means without prior written permission from the Service Division of Jaguar Cars Limited.
1. Introduction and controls
Introduction 1-1
Using the system. 1-2
Safety information. 1-2
Control panel 1-5
Loading the map DVD. 1-5
Screen displays. 1-6
Using the controls. 1-10
Text input. 1-12
2. Quick reference
Main features of the system 2-1
Route setting example. 2-2
Frequently used functions. 2-6
Menu structure. 2-7
3. Basic functions
Getting started 3-1
General menus. 3-4
Navigation menu. 3-4
Route options menu 3-5
Navigation setup menu 3-8
Display options 3-11
Quick points of interest (POI) 3-12
4. Route setting
Destination entry menu 4-1
By address 4-3
Using a memory point 4-5
Using the home position. 4-6
Using a point of interest (POI). 4-7
Using a previous destination. 4-10
Using a map location 4-11
Using a freeway entrance/exit. 4-12
Using an intersection 4-13
5. Stored locations
Working with stored locations 5-1
Memory points 5-2
Home 5-4
Avoid area 5-5
Previousdestination. 5-6
Destination and way point 5-7
6. Route calculation and guidance
Route calculation 6-1
Storing way points 6-2
Route guidance. 6-3
Screen types 6-7
A comprehensive index is located at the back of this Handbook.
Introduction
This Jaguar navigation system assists the driver by providing a route to a selected destination. Guidance is given by means of audible instructions (voice guidance), complemented by map and turn information, which is displayed on an LCD screen. Digital map information is held on a digital versatile disc (DVD), which is loaded into the navigation control unit housed in the luggage compartment.
The system has an extremely comprehensive range of features, yet is easy to use. Some time spent reading this handbook will ensure that the best results are obtained.
The LCD screen provides full information for operating the system by means of menus, text screens and map displays. Screen selections are made by the touch controls shown on the screen.
How the system works
The system uses signals from the Global Positioning System (GPS) satellites, which allow the approximate vehicle position to be calculated. This is combined with information from vehicle sensors and data from the map DVD to establish the true vehicle position.
WARNING:
-
The Database reflects reality as existing before you received the Database and it comprises data and information from government and other sources, which may contain errors and omissions. Accordingly, the Database may contain inaccurate or incomplete information due to the passage of time, changing circumstances, and due to the nature of the sources used. The Database does not include or reflect information on – inter alia – neighborhood safety; law enforcement; emergency assistance; construction work; road or lane closures; vehicle or speed restrictions; road slope or grade; bridge height, weight or other limits; road or traffic conditions; special events; traffic congestion; or travel time.
-
Only operate, adjust or view the system when it is safe to do so.
Using the system
Caution: If the system is used for an extended period of time with the vehicle stationary, ensure that the engine is running, to avoid draining the battery.
For best results, always use the latest version of the map DVD (navigable map database). Map information is regularly updated, but all areas are not necessarily covered to the same level of detail. Some areas, in particular private roads, may not be included on the database (non-digitised roads).
While driving under route guidance, only follow an instruction when it is safe to do so, as the system cannot be aware of changing conditions, for example turn restrictions, roadworks or diversions. Use voice guidance as much as possible, and only view the display when driving conditions permit.
About this handbook
This handbook shows the on-screen menus, explains how to operate the controls, and gives an example showing how to set a destination. After becoming familiar with the controls, follow the on-screen menus and prompts, to operate the system as required.
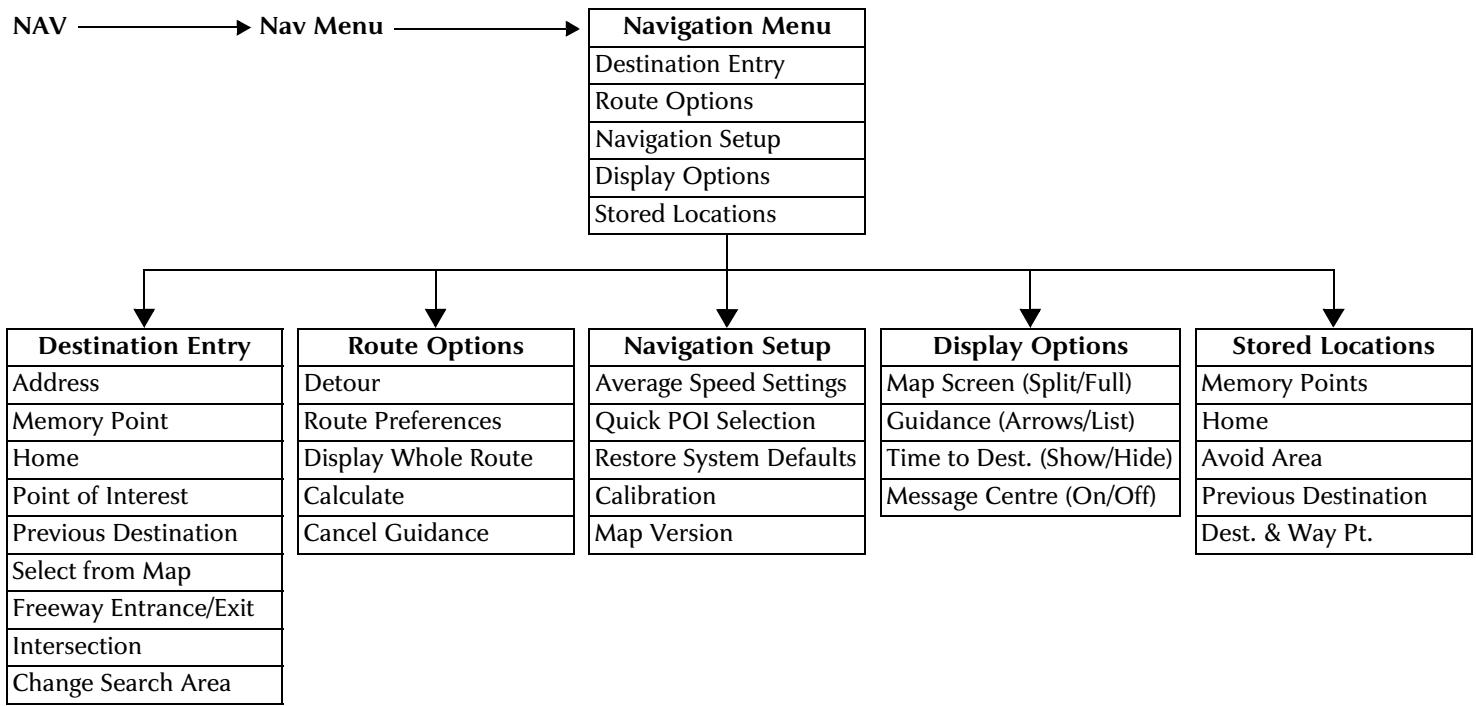
To find a particular menu, see Menu structure on page 2-7. This information is repeated in the Operating Highlights booklet supplied with the literature pack.
Throughout the handbook, the expression 'Select an item' (or similar wording), means 'Touch the on-screen touch button adjacent to the item required'.
Actions are indicated by this bullet symbol.
In-car telephone features
In this handbook, some features shown are only available when the vehicle is fitted with the Jaguar in-car phone installation. These features include the display of the phone button, the end call button, and one-touch dialling of POI numbers or memory points.
JOL.1058
Safety information
IMPORTANT: Do not use the system until you have familiarised yourself with its operation.
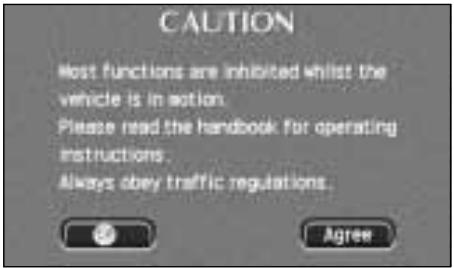
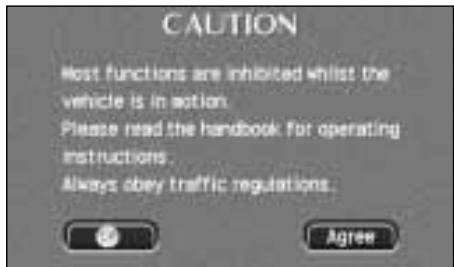
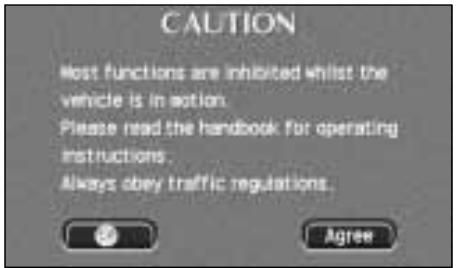
The road safety caution is displayed each time the ignition is switched on, and the navigation system is selected.
The caution screen gives the following information.
Most functions are inhibited whilst the vehicle is in motion.
Please read the handbook for operating instructions.
Always obey traffic regulations.
- To use the system, read the caution and touch Agree.
Using the system (continued)
Reception of GPS signals
GPS signals are highly directional and reception may occasionally be interrupted. Some examples of situations likely to cause problems are shown below.
- Inside tunnels.
- Inside buildings.
Roads under raised highways. - Densely tree-lined roads.
Forest roads between mountains. - Between tall buildings.
Roads under cliffs.
Metal objects placed on the rear parcel shelf. - Having the vehicle windows tinted using metal oxide tinting. Non-metal tinting should be used.
Errors in vehicle position
Under certain driving conditions, it is possible that the vehicle position shown may be incorrect. Some examples are shown below.
- When the vehicle is transported by ferry or train.
- Driving on steep roads.
- After vehicle battery removal or supply fuse failure.
- When using snow chains.
After the tyres have been replaced.
After the vehicle has been rotated on a turntable. - Where there are two roads parallel to each other.
Elevated roads in proximity to other roads. - Driving up or down circular ramps in car parks.
The position will usually be corrected automatically. If the problem persists, see Calibration on page 3-10, or consult your Jaguar Dealer.
Route guidance precision
Under certain driving conditions, it is possible that the route guidance may be inaccurate. Some examples are shown below.
- Deviation from a route may cause incorrect guidance until the route has been recalculated.
- Route guidance may occasionally be given where no turn is required.
If there is no road, or only a narrow track, to the final destination, guidance will be given to the nearest point possible.
No guidance is given while reversing.
If driving at high speed or on very dense road networks, it may not be possible to recalculate the route in time for the next instruction. - On familiar roads, personal route preferences may not always be followed.
Using the system (continued)
Jaguar dealership locations
Details of Jaguar Dealerships are held on the map DVD as a points of interest (POI) category. Certain dealers may be located in areas that are not fully mapped on the DVD. If a route is set to one of these dealers, guidance will only be possible to the nearest town centre, and a warning message will be displayed.
Alternative routes
During route calculation, up to three possible routes are calculated. The first route is calculated using the current route preference settings. The second route is also calculated using the preference settings, except that for Minimise Time/Distance, the alternative setting is used. For example, if Minimise Time is currently selected, then the second route will be calculated based on Minimise Distance, with the other settings as selected. For the third route, the system tries to find another alternative using different combinations of the preference settings. If a suitable alternative is not possible, only the first and second routes will be shown.
Languages and distance units
The screen text and voice guidance are available in a number of different languages. For the list of available languages, see Road safety caution on page 3-1.
Distances are shown on the screen, and given in voice guidance, either in Imperial units (miles) or in Metric units (kilometres and metres). For information on changing the unit selection, see the Driver's Handbook, section 1.
Time and distance to destination
When a route is calculated, the estimated time required to drive the route, and the total distance to the destination are determined. The time is based on the vehicle travelling at the current speed settings for each type of road (residential, main and freeway). The distance is based on the current route preference settings, e.g. Minimise Toll Road use. See Route options menu on page 3-5.
While driving under guidance, the estimated time (if selected) and distance remaining to the end of the route are shown on the screen.
Road junction layouts
The layout of complex road junctions may sometimes be shown in a simplified form. Some small traffic circles may not be shown.
Map DVDs
All the areas of Canada and the USA covered by the system are included on the disc supplied. For a complete list, see Changing search area on page 4-2.
Screen cleaning
For approved screen cleaners, see your Jaguar Dealer.
Using the system (continued)
Control panel
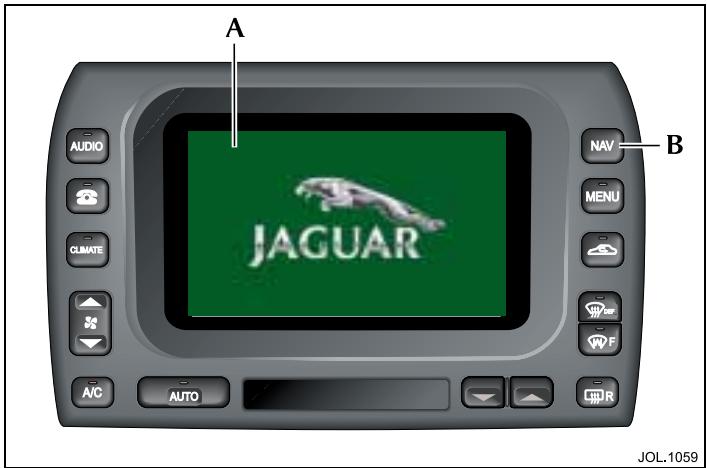
A. LCD screen
B. NAV button
Navigation forms part of the overall vehicle telematics system, having a combined front panel and LCD screen (A). Navigation is selected by pushing the NAV button (B). The ignition must be switched on (position 'I').
Note: The navigation system is operated by using the touch controls displayed on the screen. For an explanation of the basic navigation touch controls, see Using the controls on page 1-10.
Loading the map DVD
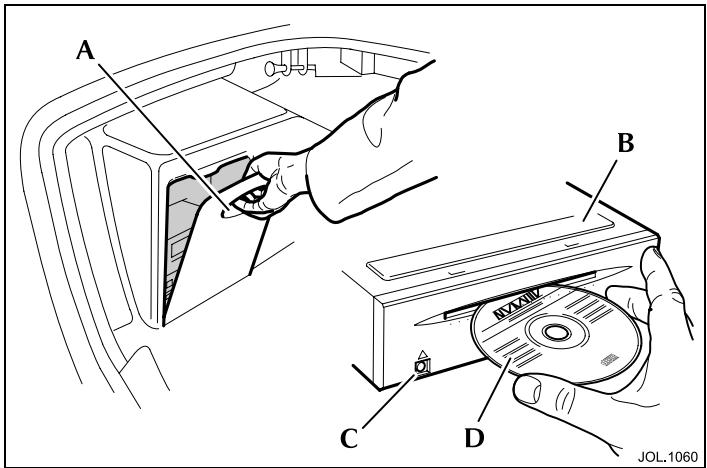
Note: The ignition must be switched on (position 'I').
- Using the finger recess below the top edge (A), pull the top of the access cover forward and fold it downwards to the fully open position.
- Identify the navigation unit (B), which is positioned above the sound system CD player (where fitted).
- If a DVD is already loaded, push the eject button (C).
- Load the DVD with the printed side upwards (D). Do not allow moisture or foreign objects to enter the slot.
- Fold the access cover to the fully closed position. Check that the magnetic catch is properly secured.
Screen displays
Initial map display
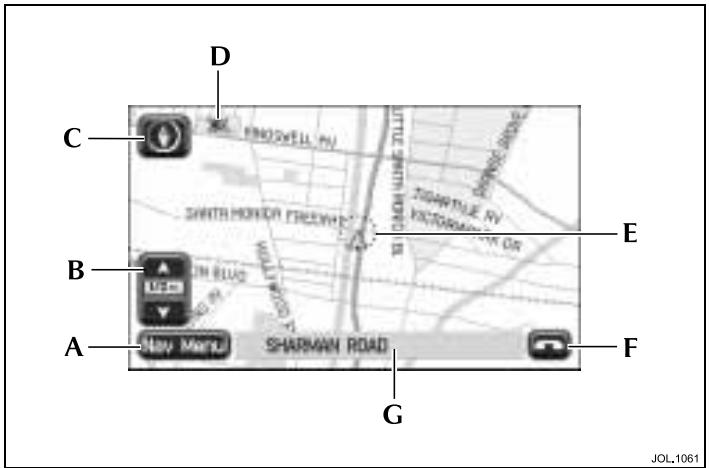
The initial map screen shows the current vehicle position. A key to the main features is given below.
A. Nav Menu button - Touch button to select the Navigation menu.
B. Zoom control - Touch control and indication of the current map zoom level. The scale length represents a distance of from 132 mile to 128 miles (50 metres to 256 kilometres).
C. Map orientation - Touch button and indication of the current map orientation (north or vehicle heading to the top of the screen). Above the 2 miles (4 kilometres) zoom level, only north orientation is available.
D. GPS symbol – Indicates that insufficient GPS satellite signals are being received for accurate map positioning. The symbol is not displayed under normal operation.
E. Map position markers - The map normally indicates the current vehicle position (navigation symbol). While the system is in use various markers are displayed, see Screen symbols on page 1-9.
F. End call button - Touch button to end a phone call. (Only displayed while a phone conversation is in progress.)
G. Lower text area - Shows the current street name (present vehicle location). While operating the system, this text area is replaced by additional touch buttons.
Note: For an explanation of the basic navigation touch controls, see Using the controls on page 1-10.
Screen displays (continued)
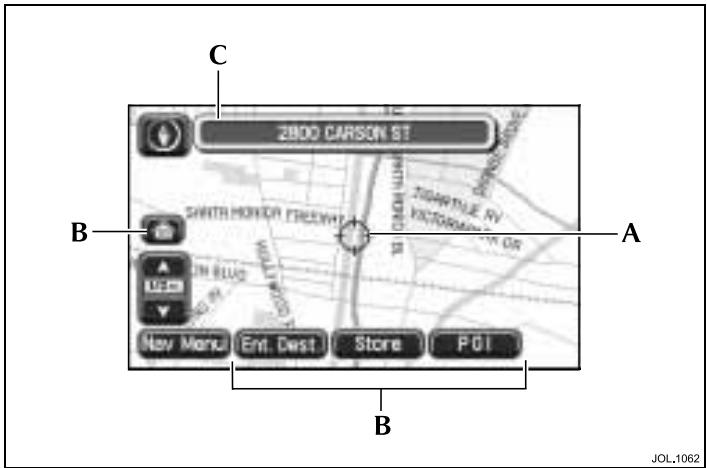
Scrolling the map
To scroll the map, use the touch screen as follows.
- Touch the screen twice within five seconds. The cross-wire marker (A) is displayed, and the map scrolls until the point touched is under the cross-wire marker.
Continuous scrolling
- Touch and hold at any point on the screen. The map continues to scroll while the screen is being touched.
Additional touch buttons
After touching the screen once, additional touch buttons (B) are displayed:
Home - Sets a route to the home position. (Only displayed when a home position is set.)
Chg. Route – Displays the Route Options menu to make changes to the route preference settings. (Only displayed when a route is set.)
Store - Stores a selected map location as a memory point.
POI - Selects the quick points of interest function to display POI icons on the map.
After touching the screen a second time within five seconds:
Ent. Dest - Stores a selected map location as a destination. (Displayed in place of the Chg. Route button.)
Map location details
After scrolling, the address details of the map location under the cross-wire marker are shown in the text area at the top of the screen (C).
- If the complete address is not visible, touch anywhere within the text area to scroll the text to left or right.
Selecting the initial map display
- Push NAV to return to the initial map display showing the current vehicle position.
Note: For an explanation of the basic navigation touch controls, see Using the controls on page 1-10.
Screen displays (continued)
JOL.1063
Menu
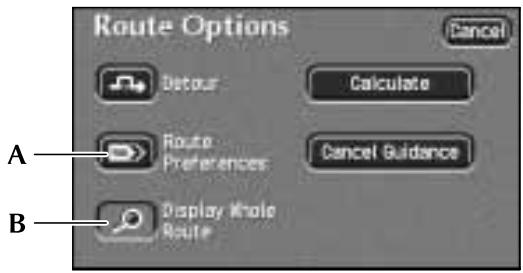
Menu screens are provided to select the various system functions. The Route Options menu is shown above as an example.
- To select a menu item, use the touch button (A) for the option required.
After selecting a menu item, the next sub-menu or screen will be displayed. If a menu item cannot currently be selected, it is indicated as shown (B).
Note: To find a particular menu, see Menu structure on page 2-7. This information is repeated in the Operating Highlights booklet supplied with the literature pack.
JOL.1064
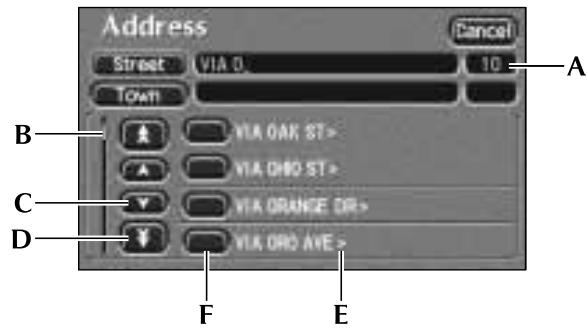
Name lists
Lists of names (for example streets, towns or points of interest), are displayed as shown in the example above. The number of items in the list is displayed (A), and the indicator (B) shows the current position in the list.
- To scroll through the list, one item at a time, touch one of the single arrow buttons (C). (The double arrow buttons (D) scroll one page at a time.)
- To view the remainder of a long entry, touch anywhere on the text. The symbol (E) at the start or end of the line indicates more text.
- To make a selection from the list, use the touch button for the item required (F).
Screen displays (continued)
Screen symbols
The screen symbols used by the system are explained below.

Navigation symbol - Indicates the current vehicle position and heading.

Cross-wire marker - This symbol is displayed when the map is scrolled to select a destination or point (map cursor location).

Destination symbol - Indicates the current route destination.

Next manoeuvre point symbol - Indicates the location of the next instruction on the route ahead.

Next turn symbol - Shows the action to be taken at the next manoeuvre point on on the route ahead. (A typical example is shown.)

North up symbol - Indicates that the map is displayed with north to the top of the screen.

Heading up symbol - Indicates that the map is displayed with the vehicle heading to the top of the screen. The position of the pointer indicates the direction of north on the map.

Avoid area or point - The left-hand symbol Indicates an area to be avoided in route calculations. The right-hand symbol indicates an avoid point.

Way point symbol - Indicates the location of a way point on the map.

Home position symbol - Indicates the location on the map, currently stored as the home position.

Stored location symbol - Indicates the location of a memory point. This is the default symbol used when the point is stored. (If required an icon of your own choice can be selected from the 15 icons available.)
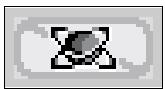
GPS symbol - Indicates that insufficient GPS satellite signals are being received for accurate map positioning. The symbol is not displayed under normal operation.
Using the controls
This is a summary of the basic navigation controls. Controls specific to a particular screen or function are explained in the appropriate section of this handbook.
All the navigation controls, except the Navigation button, are touch controls displayed on the screen.
Note: For information on how to operate the touch controls, see the Driver's Handbook, section 1.
Nav Menu
Nav Menu button
Displays the Navigation menu, see page 3-4.

Cancel button
Returns to the previous menu, text screen, or to the map display.
NAV
NAV button
The Navigation button has the following functions.
- Selects the navigation system.
While the navigation system is selected, selects the initial map display from any other screen.
After scrolling, returns to the map display of current vehicle position.
Note:
- If the navigation system was selected when the ignition was switched off, it will be selected automatically when the ignition is switched on again.
- When switching back to navigation from another touch screen system, pushing NAV will return to the particular screen being displayed before.


Map orientation buttons
These buttons select the desired map orientation (north or vehicle heading to the top of the screen). The current selection is shown on the map.
Note: Above the 2 miles (4 kilometres) zoom level, only north orientation is available.
Zoom control
Selects the desired map zoom level by touching one of the arrow symbols. The currently selected scale is shown. See Zoom control operation on page 3-3.
Using the controls (continued)

Repeat button
While under guidance, repeats the last audible instruction and shows the relevant junction diagram (if in range).
Note:
- If the manoeuvre point has been passed, the audible instruction for the next manoeuvre point will be heard.
- Repeat is also available while one of the other touch screen systems is selected (but not during a phone call).
Phone button
Calls the phone number currently shown on the screen.

End call button
Ends a phone call. (Only displayed while a phone conversation is in progress.)
Additional touch buttons
These buttons are displayed after touching the map display.

Home button
Sets a route to the home position. (Only displayed when a home position is set.)

Chg. Route button
Displays the Route Options menu to make changes to the route preference settings. (Only displayed when a route is set.)

Ent. Dest button
Stores a selected map location as a destination. See Confirm destination on page 6-1. (Displayed in place of the Chg. Route button, after touching the screen twice within five seconds.)
Store
Store button
Stores a selected map location as a memory point.
POI
POI Off
POI/POI Off buttons
POI - Selects the quick points of interest function to display POI icons on the map.
POI Off - Deselects the display of POI icons.
Note: For more information, see Quick points of interest (POI) on page 3-12.
Volume adjustment
The volume level of the audible instructions can be adjusted if required. For information on making volume adjustments, see the Driver's Handbook, section 1.
Text input
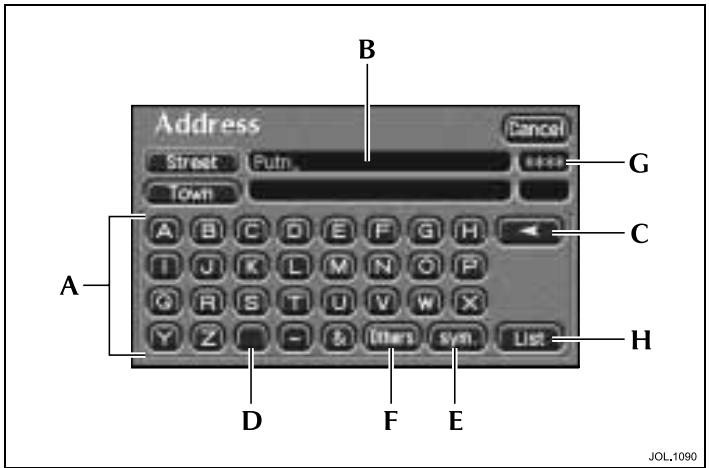
Character input
- Enter the desired name by touching each button in turn (A). The characters entered are displayed on the screen (B). As characters are entered, only the characters available to complete the name (or similar names) are shown highlighted.
- To delete the last character, touch Delete (C).
To enter a space, touch Space (D).
To enter special characters, touch Sym. (E).
To enter accented characters, touch Others (F).
It is not necessary to enter all the characters. The number of possible names from the characters entered is shown (G).
- Touch List (H) (when active) to view the available names.
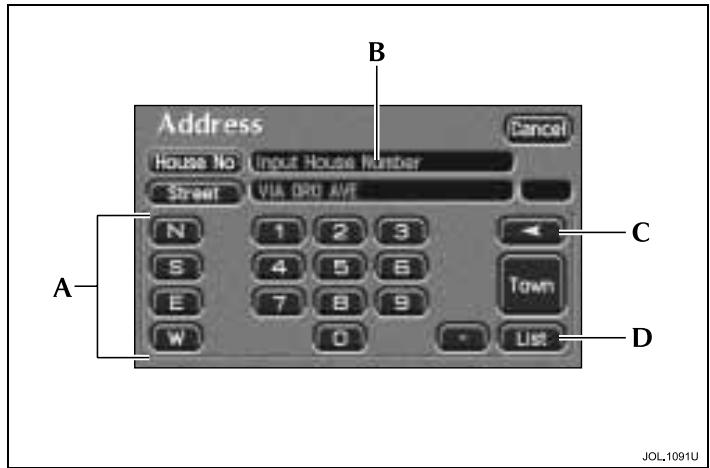
Number input
- Enter the desired number by touching each button in turn (A).
The digits entered are displayed on the screen (B).
- To delete the last digit, touch Delete (C).
- When all the digits have been input, touch List (D). The next screen is displayed.
IMPORTANT: Further information on using these screens for specific functions, e.g. entering a destination, is given in the appropriate section of this handbook.
Main features of the system
Stored locations
These are map locations (memory points) that you can store in the system memory with a personalised nametag, e.g. Doctor, or Office, for subsequent selection as a route destination or way point. If the vehicle is fitted with the voice activation system, voice nametags can be used as well.
There are several methods you can use to create a memory point, e.g. entering an address, or selecting a point of interest from the database.
Way points
Way points can be used to divide a route into a number of sections, and are entered in a similar manner to the destination. As way points are entered, they are added to a list, up to a maximum of five way points.
Way points are visited in the order in which they appear in the way points list, and the order can changed if required. After each way point has been visited, it is deleted from the way points list automatically.
Avoid areas
An area on the map can be selected as an avoid area, for example, a known area of heavy traffic. Up to 10 areas can be selected. Routes will then be calculated avoiding the area(s) selected, except where an alternative is not possible.
Points of interest (POI)
This is a database of useful names and addresses held on the map DVD, e.g. airports, hotels and restaurants. The information can be displayed on the screen and sorted by category. A POI can be selected from the list and used as a route destination or way point. Where the POI information includes a phone number, this can be called by touching the phone symbol.
Quick points of interest
When this feature is selected, the map screen shows the location of all the points of interest in a particular category. Each POI location is indicated by displaying the appropriate POI icon. The category to be displayed is selected from a list of six popular categories. These can be changed to categories of your own choice if required.
Voice guidance
One or more audible instructions and/or chimes will be heard as the vehicle approaches each manoeuvre point along the route. The instruction and chime are repeated as the vehicle reaches the manoeuvre point. Voice guidance can be turned off if required, and will be muted automatically if a phone call is in progress.
Screen guidance
Screen guidance is provided by means of the map display, and an overlay (the guidance screen) which shows one of the following: junction diagram, turn arrow, or turns list. Various combinations of these features can be selected, see Display options on page 3-11. As the route is followed, the current street name, estimated time (if selected) and distance remaining to the end of the route are displayed.
For further information, see Screen types on page 6-7.
Route setting example
This is a simple example showing how to use the basic features of the system to set a route. It describes each screen in turn and explains how to use the controls. For information relating to the other features of the system, see the relevant section in this handbook.
Note: Before using the system, check that the correct map DVD is loaded, see Loading the map DVD on page 1-5.
JOL.1058
JOL.1092
JOL.1093
1. Selecting the system
Note: The ignition must be switched on (position '1').
To select the navigation system (if necessary), push the NAV button on the bezel of the touch screen panel. The road safety caution will be displayed. To use the system, read the caution and touch Agree.
2. Map display
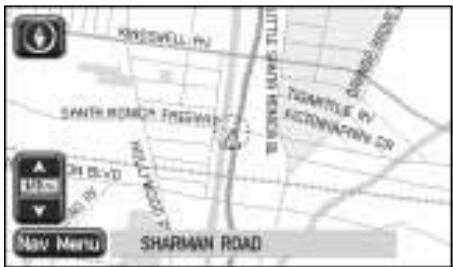
The initial map screen showing the current vehicle position is displayed.
- Touch Nav Menu to select the Navigation menu.
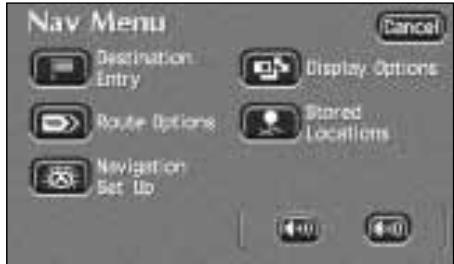
3. Navigation menu
The Navigation menu is the top level menu of the system, and shows the main functions that are available.
- Touch Destination Entry to select the Destination Entry menu.
Route setting example (continued)
JOL.1094U
JOL.1095
JOL.1097
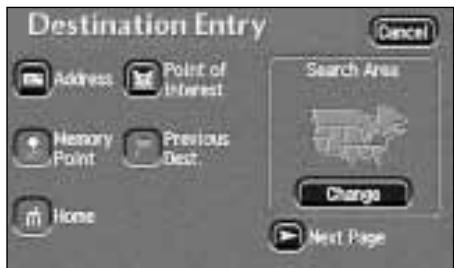
4. Destination entry menu
The Destination Entry menu shows the options available for setting a route. The map inset shows the currently selected area, which the system will use when searching for destination addresses.
- Touch Address to enter the destination details for the desired route.
Note: If your route destination is not within the area highlighted on the map, another search area must be selected, see Changing search area on page 4-2.
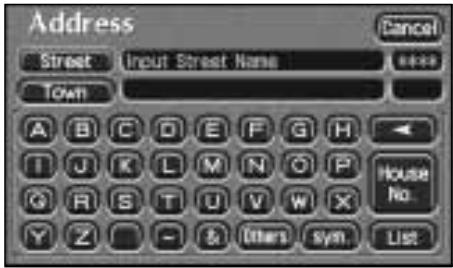
5. Enter street name
- Enter the street name by touching the buttons required.
For more information, see Character input on page 1-12. - When sufficient characters have been entered, touch List.
The list of possible streets from the characters entered is displayed.
- Select the street required.
Note: In this example the street name is entered first. Addresses can be entered in other ways, e.g. town name first.
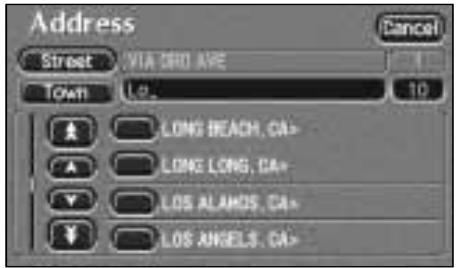
6. Select town
The screen shows the list of towns where the street name entered occurs.
- Select the town required.
Note:
- If there is only one town match, this step is omitted.
- If a large number of matches is found, the alpha keyboard screen is displayed to enter the desired town name.
Route setting example (continued)
JOL1096U
JOL.1098
JOL.1099
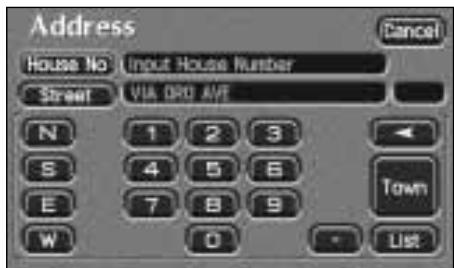
7. Enter house number
- Enter the house number by touching the buttons required.
For more information, see Number input on page 1-12.
- When all the digits have been entered, touch Enter.
Note:
- If a list of house number ranges is displayed, select the range applicable.
- If the street does not have house numbers, or the house number is not known, just touch Enter. The mid-point of the street will be used as the destination.
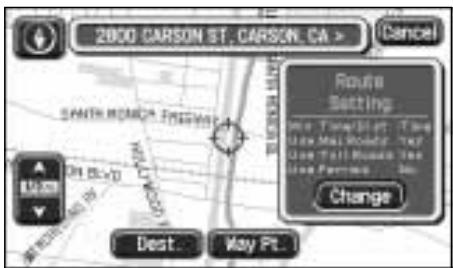
8. Confirm destination
The map screen showing the destination details, and the current route settings is displayed.
- Touch Dest. to confirm as a destination.
The screen shows 'Calculating Route' while the route is calculated.
Note: For information on using way points, see Route calculation on page 6-1.
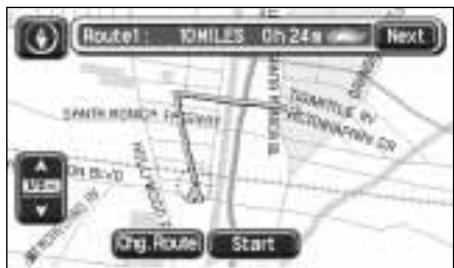
9. Start guidance
When the route calculation has been completed, the map display shows the entire route, and the route information at the top of the screen.
- Touch Start (or commence driving).
Alternative routes
The system will also calculate at least one alternative route (where possible). The alternative route(s) can be viewed and selected in place of the original route if required.
- To view an alternative route, touch Next.
Route setting example (continued)
JOL.1100
11. Arrival at destination
When the vehicle reaches the end of the route, the screen shows the destination address details. Arrival at the destination is also confirmed by voice guidance. The system is now ready for further use.
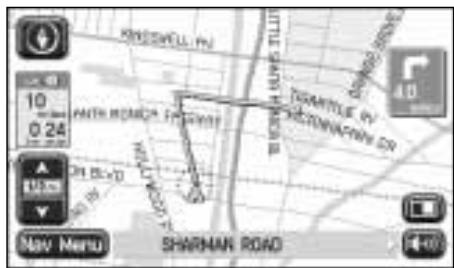
10. Route guidance

WARNING:
Only operate, adjust or view the system when it is safe to do so.
After touching Start, the initial map screen while under guidance is displayed. The route is shown highlighted, with the current road name shown in the text area at the bottom of the screen.
Drive away, following the voice guidance given by the system. Continue to follow the voice guidance until the end of the route is reached.
Frequently used functions
The starting position for all these functions is the map screen showing the current vehicle position. If any other screen is shown, push the NAV button to display the map screen.
Getting started
Entering a destination by address
Nav Menu Destination Entry Address enter the address details required Dest. Start.
Entering a destination to a town centre
Nav Menu Destination Entry Address enter the town name required Town Centre (symbol) Dest. Start.
Using a point of interest as a destination
Nav Menu Destination Entry Point of Interest select the point required Dest. Start.
Storing a location as the home position
Nav Menu Stored Locations Home Add enter the address details required Dest. Start.
Adding a memory point
Nav Menu Stored Locations Memory Points Add enter the address details required.
Options available while driving
Setting a destination to the home position
Touch the screen Home. (Only available when a home position is set.)
Storing a map location as a memory point
Scroll the screen Store.
Displaying point of interest icons
Touch the screen POI select a POI category.
Changing the map heading (north up/heading up)
Touch the Map Orientation button.
Options only available with a route set
Cancelling guidance
Nav Menu Route Options Cancel Guidance.
Repeating voice guidance
Touch the Repeat button.
Changing route preferences
Touch the screen Chg. Route Route Preferences select the preferences required.
Menu structure

Getting started

NAV button
The Navigation button is located on the bezel of the touch screen panel.
- Push the NAV button to select the navigation system.
The road safety caution is displayed.
Note: While the navigation system is selected, the NAV button has the following additional functions.
- Selects the initial map display from any other screen.
After scrolling, returns the map display to show the current vehicle position again.
JOL.1058
Road safety caution
The road safety caution is displayed the first time the navigation system is selected after turning on the ignition.
- Touch Agree to acknowledge the road safety information.
The screen now shows the initial map display.

Language button
The screen text and voice guidance are available in a number of different languages.
- To select a different language, touch the language button.
- Select the language required from the list displayed.
The languages available are:
- German
- English
- English (US)
- Spanish
-French
-Italian - Dutch
- Danish
- Swedish
Note: This procedure changes the on-screen language for all the touch screen systems. For more information, see the Driver's Handbook, section 1.
Getting started (continued)
JOL.1092
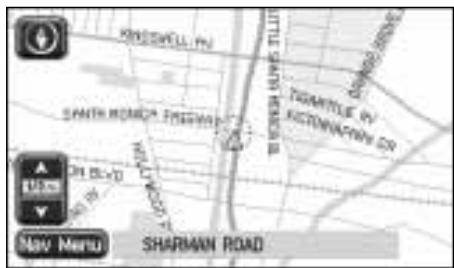
Initial map display
After touching Agree, the initial map screen showing the vehicle location is displayed, with the current road name shown in the text area at the bottom of the screen.
Distance units
Distances are shown on the screen, and given in voice guidance, either in Imperial units (miles) or in Metric units (kilometres and metres). For information on changing the unit selection, see the Driver's Handbook, section 1.
Touch controls
The touch controls displayed on the initial map screen are as follows.

Nav Menu button
Displays the Navigation menu, see page 3-4.

End call button
Ends a phone call. (Only displayed while a phone conversation is in progress.)

Map orientation buttons
These buttons select the desired map orientation (north or vehicle heading to the top of the screen). The current selection is shown on the map.
Note: Above the 2 miles (4 kilometres) zoom level, only north orientation is available.
Zoom control
Selects the desired map zoom level by touching one of the arrow symbols. The currently selected scale is shown. See Zoom control operation on page 3-3.
Getting started (continued)
Additional touch buttons
These buttons are displayed after touching the map display.
Ent. Dest.
Ent. Dest button
Stores a selected map location as a destination. See Confirm destination on page 6-1. (Displayed after touching the screen twice within five seconds.)
Store
Store button
Stores a selected map location as a memory point.
POI
POI button
Selects the quick points of interest function to display POI icons on the map. For more information, see Quick points of interest (POI) on page 3-12.
JOL.1105
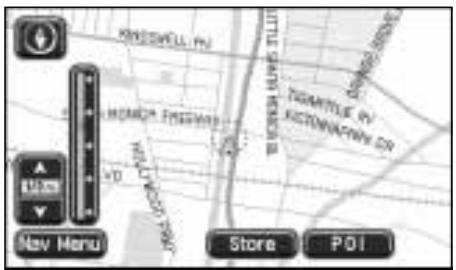
Zoom control operation
When the control is touched, the scale indicator is shown on the screen. The scale markings shown on the indicator are: 1 / 32 1 / 2 4, 128 miles (50 m, 1 km, 8 km, 256 km).
The zoom control can be used in a number of ways as follows.
- Touch and hold one of the arrow buttons. The map is redisplayed at each zoom level in turn.
- Touch one of the arrow buttons repeatedly. The map is only redisplayed at the final zoom level.
- Touch one of the segments of the scale indicator. The map is redisplayed at the zoom level selected.
General menus
JOL.1093
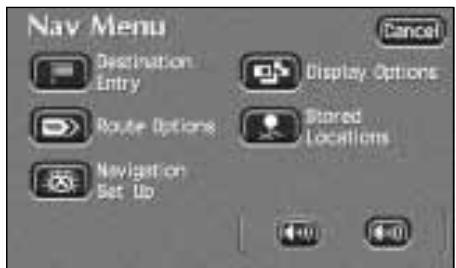
Navigation menu
The Navigation menu is the top level menu of the system, showing the functions that are available.
Destination Entry - See page 4-1.
Route Options - See page 3-5.
Navigation Setup - See page 3-8.
Display Options - See page 3-11.
Stored Locations - See page 5-1.
- Select the menu item required.


Audible instructions
The highlighted symbol shows whether the setting for voice guidance is currently On or Off.
- To change the voice guidance setting, touch the symbol required.
Functions available on the move
For safety reasons, only certain functions are available while the vehicle is on the move.
General menus (continued)
JOL.1107
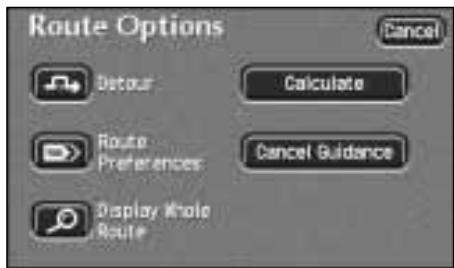
Route options menu
The menu shows the route options available.
Detour
Route Preferences
Display Whole Route
Calculate
Cancel Guidance
- Select the menu item, or touch the button for the option required.
These options are described as follows.
Detour
While driving under guidance, this feature allows you to make a detour from the calculated route for a specified distance. The screen shows the detour distance settings available for residential roads and freeways. The current selections are shown highlighted.
Residential: 1, 2, 3, 4, 5, 10, 15 miles (or kilometres).
Freeway: 5, 10, 15, 20, 25, 50, 100 miles (or kilometres).
- Touch the appropriate screen items to change the detour settings as required.
Route detour
- Touch the Detour button.
The route ahead is recalculated using the current detour distance settings.
Alternative route
- Touch the NewRoute button.
The system uses different combinations of the route preference settings to calculate an alternative route (where possible).
Note: The detour settings are only used when you touch Detour and only apply to the current route.
Route preferences
The screen shows the route preferences available, with the current settings highlighted.
Minimise Time/Dist. - Time/Dist.
Use Major Roads - Yes/No.
Use Toll Roads - Yes/No.
Use Ferries - Yes/No.
- To select a route preference, touch the button for the setting required.
- Touch Save As User Setting to apply the new settings.
- Touch Calculate to apply the new settings and calculate a route.
- Touch Cancel to keep the old settings.
Note: The system will use your route preference settings wherever possible. However in some circumstances, to calculate a satisfactory route, one or more of the alternatives may have to be used.
Route options menu (continued)
JOL.1163

JOL.1164
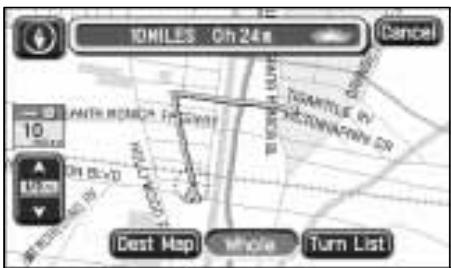
1. Display whole route
After selecting Display Whole Route, the screen shows the whole route, with the total route distance, and estimated travelling time displayed at the top of the screen. Where the route includes a ferry crossing, a ferry symbol is shown.
- To view the destination, touch Dest Map.
- To view the turn list, touch Turn List.
2. End of route display
After touching Dest Map, the screen shows the last portion of the route, with the destination address displayed at the top of the screen.
- To return to the whole route display, touch Whole.
- To view the turn list, touch Turn List.
JOL.1165
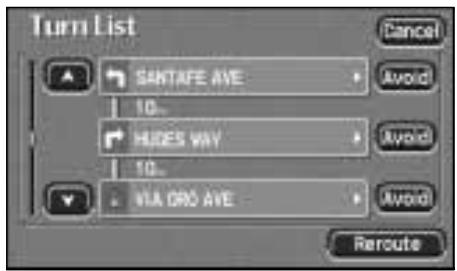
3. Turn list
After touching Turn List, the first portion of the route turn list is displayed.
- To view the rest of the entries, scroll the list as required.
- To recalculate the route, touch Reroute. See Calculating the route on page 6-1.
Avoid point/area - See next page.
Route options menu (continued)
Turn list (continued)
Avoid point/area - Any point on the route can be avoided if required.
- Touch the Avoid button next to the required entry in the turn list.
The map screen is displayed showing the location and address of the selected point.
- Scroll the map to adjust the location if required.
- Use the Enlarge and Reduce buttons to create an avoid area if required.
- Touch OK to confirm.
Note:
- The points or areas selected in this way are only avoided for the current route. Permanent avoid areas are created from the Store Avoid Area menu. See Avoid area on page 5-5.
- In some circumstances, to calculate a satisfactory route, it may not be possible to avoid all the selected points or areas.
Calculate
This is a quick way to start a route calculation after making changes to the route preferences. For more information, see Route calculation on page 6-1.
Note: The route will be calculated using the destination and/or way point addresses previously entered.
Cancel guidance
The map showing the whole route is displayed.
- Touch Yes to cancel the route.
General menus (continued)
JOL.1108
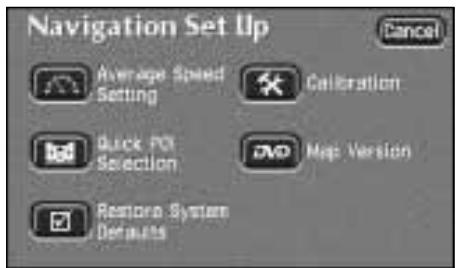
Navigation setup menu
The menu shows the setup options available.
Average Speed Settings
Quick POI Selection
Restore System Defaults
Calibration
Map Version
- Select the menu item required.
These options are described as follows.
Average speed settings
The screen shows the current average speed settings. Speeds can be selected in the range from 5 mph (5 km/h) to 150 mph (240 km/h). The default settings are:
Residential Road: 25 mph (40 km/h).
Main Road: 35 mph (60 km/h).
Freeway: 55mph (100km / h)
- Select the average speeds required using the touch arrows.
- Touch OK to apply the new settings.
- Touch Default to apply the default settings if required.
Note: These settings do not affect route calculation, they are only used in displaying the time to destination. Choose your own usual speeds, so that the time shown matches your own driving style as closely as possible.
Quick POI selection
The six default quick POI categories, can be changed as required. The screen shows the icons for the six current categories.
- Select the category icon that you wish to replace.
The screen shows the full list of POI categories.
- Select the new category required from the list.
The screen shows the new selection of category icons.
- Repeat for another category icon if required.
- Touch OK to apply the new settings.
Navigation setup menu (continued)
Restore system defaults
The default settings are as follows.
Guidance Voice: On.
Search Area: 10.
Route preferences
- Minimise Time/Distance: Time.
- Use Major Roads: Yes.
- Use Toll Roads: Yes.
- Use Ferries: No.
Detour
- Residential Road: 4 miles (4 km).
-Freeway: 20 miles (20km)
Average speed settings
- Residential Road: 20mph (30km / h)
- Main Road: 40 mph (60 km/h).
-Freeway: 60mph (100km / h)
System defaults (continued)
Quick POI categories
-Gas Station
Grocery Store
- ATM
- Restaurant
- Park/Recreation
- Hotel
Display Options
-MapScreen:SplitScreen.
Guidance Screen: Turn Arrows.
- Distance to Destination: Show.
- Message Centre Guidance: On.
- To select the complete set of default settings, touch OK.
Calibration
See next page.
Map version
The screen shows the issue date of the map DVD currently loaded.
Navigation setup menu (continued)
JOL.1109
JOL.1110
JOL1111
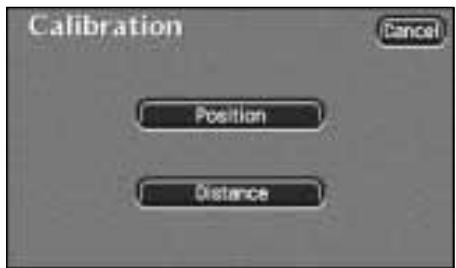
Calibration
Sometimes the vehicle position may not be correct. This can occur, for example, if the vehicle has been moved on a trailer or by ferry. If the new position is not found automatically by the system, it can be corrected by using the calibration procedures (Position first).
- Touch Position to adjust the vehicle position. See Position procedure on this page.
- Touch Distance to recalibrate the system.
The screen briefly shows 'Distance Calibration is in Progress'. Calibration is carried out during normal driving. No notification is given that distance calibration has been completed.
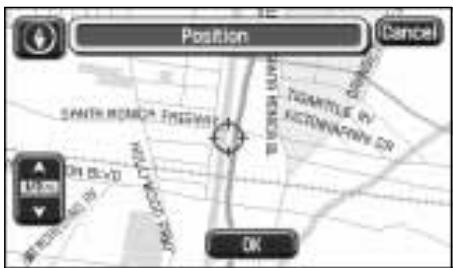
Position procedure
The map showing the current vehicle position is displayed.
- Scroll the map until the navigation symbol (vehicle position) is in the correct geographical location.
- Touch OK to confirm the new position and display the map screen for heading adjustment.
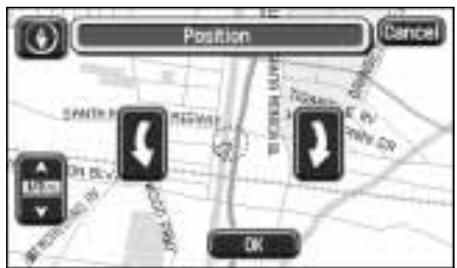
Position (heading)
The map screen showing the heading adjustment arrows is displayed.
- Adjust the vehicle heading using the arrows (clockwise or anticlockwise), until the navigation symbol is shown in the correct alignment.
- Touch OK to confirm the new heading.
General menus (continued)
JOL.1112
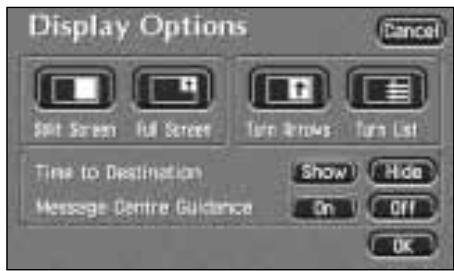
Display options
The screen shows the display options available, with the current selections highlighted.
Map Screen - Split Screen/Full Screen.
Guidance Screen - Turn Arrows/Turn List.
Time to Destination - Show/Hide.
Message Centre Guidance - On/Off.
- To select a guidance setting, touch the button for the setting required.
- When finished, touch OK to apply the new settings.
These settings are described as follows.
Map screen
Split Screen - When set to Split Screen, the map display always shows the guidance screen overlay when a route is set.
Full Screen - When set to Full Screen, the screen normally shows the map display, with the next turn symbol in the top right-hand corner. Before each manoeuvre point, the guidance screen overlay is displayed automatically. (The overlay can also be displayed manually by touching the guidance screen button.)
Guidance screen
Turn Arrows - When set to Turn Arrows, the guidance screen overlay shows the on-route arrow and next turn symbol. Before each manoeuvre point, the next junction diagram is displayed automatically.
Turn List - When set to Turn List, the guidance screen overlay shows the current portion of the route turn list. Before each manoeuvre point, the next junction diagram is displayed automatically.
Time to destination
When set to Show, the estimated time to destination will be shown on the map display.
Message centre guidance (where fitted)
This refers to the display of navigation information on the instrument panel message centre while driving under guidance.
Quick points of interest (POI)
JOL.1113U
JOL.1114
JOL.1115U
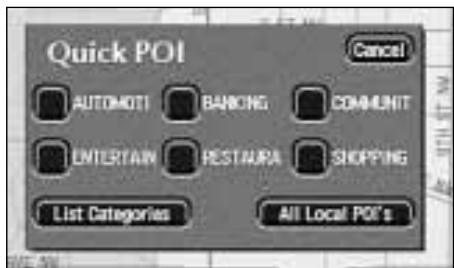
Selecting a category
After touching POI, the screen shows the six categories currently selected for quick points of interest.
- Select a POI category.
The map screen is displayed with POI icons. See POI icon display on this page.
Other categories
You can also select from the complete list of POI categories.
- Touch List Categories and select a category from the list displayed.
Local POI search
This selects the points of interest in all categories within 20 miles (32 kilometres) of the vehicle.
- Touch the All Local POI's button.
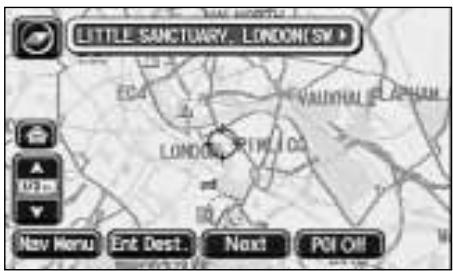
POI icon display
After selecting a category, the map display shows the location of each POI in the selected category, indicated by the appropriate POI icon.
- For information about a particular POI, touch the desired POI icon. See POI information on this page.
Note: POI icons can only be displayed up to the 1/2 mile (1 km) zoom level.
Next button
If some POI locations are very close to one another, it may not be possible to select a particular icon to display the information.
- Touch Next (when active) to select one of the icons in a group and display its information. Repeat for the other icons as required.
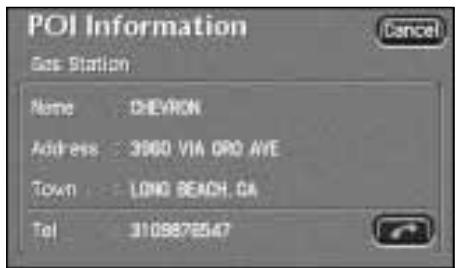
POI information
After touching a POI icon, the name of the selected POI is displayed at the top of the screen.
POI details
- Touch Info. to display the details of the selected POI.
The details include Icon, Name, Position and Phone number.
Phone number - The phone number can be called by touching the phone symbol.
Destination entry
- Touch Ent. Dest. to store the POI location as a destination.
The destination details are displayed for confirmation of the address, see Confirm destination on page 6-1.
Quick points of interest (continued)
Changing the categories
Any of the six categories can be changed from the Navigation Setup menu, see Quick POI selection on page 3-8.
Cancelling POI icon display
If the display of POI icons is no longer required, they can be turned off as follows.
- Touch the map screen to display the additional touch buttons.
- Touch POI Off to cancel the display of POI icons on the map.

Destination entry menu
JOL.1094U
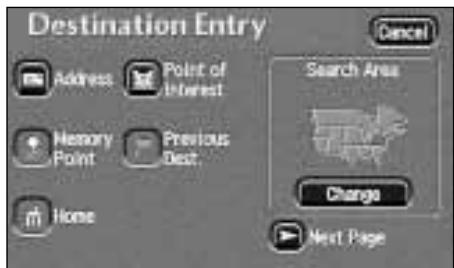
Destination entry menu
The menu shows all the methods available for route setting.
Address
Memory Point
Home
Point of Interest
Previous Destination
Select from Map
Freeway Entrance/Exit
Intersection
All these methods are described in the following pages.
Next/previous page
The Destination Entry menu consists of two pages.
- To select a menu item that is not being displayed, touch Next Page or Prev. Page.
Search area
To reduce the time taken to calculate a route, the map database is divided into a number of regions. When setting a route, the destination (or way point) being entered must be in the currently selected search area. See Changing search area on page 4-2.
Using the menu
The Destination Entry menu is used for both destination and way point entry. (Way points and the destination can be entered in any order.)
- Select an item from the menu. (For example, to use a point of interest as the destination, select Point of Interest.)
Destination entry menu (continued)
Changing search area
To change the search area, touch Change.
The current area is shown highlighted on the map, and the details of coverage are shown at the bottom of the screen. See the following list.
From the list displayed, select the touch button required for the new area.
The screen shows the new area highlighted and the details of coverage.
Area
States/Countries
1 Idaho, Oregon, Washington
2 California, Nevada
3 Arizona, Colorado, Montana, New Mexico, Utah, Wyoming
4 Iowa, Kansas, Minnesota, Missouri, North Dakota, Nebraska, South Dakota
5 Oklahoma, Texas
Illinois, Indiana, Kentucky, Michigan, Ohio, Wisconsin
7 Alabama, Arkansas, Louisiana, Mississippi, Tennessee
8 Florida, Georgia, North Carolina, South Carolina
9 Connecticut, Maine, Massachusetts, New Hampshire, New Jersey, New York, Rhode Island, Vermont
10 DC, Delaware, Maryland, New Jersey, Pennsylvania, Virginia, West Virginia
11 Canada
Display
ID, OR, WA
CA, NV
AZ, CO, MT, NM, UT, WY
IA, KS, MN, MO, ND, NE, SD
OK, TX
IL, IN, KY, MI, OH, WI
AL, AR, LA, MS, TN
FL, GA, NC, SC
CT, MA, ME, NH,
NJ, NY, RI, VT
DC, DE, MD, NJ, PA, VA, WV
Canada
By address
JOL.1095
JOL.1097
JOL.1096U
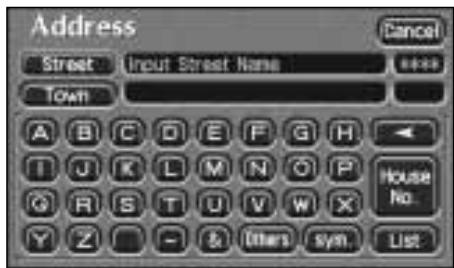
1. Street entry
After selecting Address from the Destination Entry menu, the alpha keyboard screen is displayed, showing 'Input Street Name'.
- Enter the street name required, see Text input on page 1-12.
- Touch List to display the list of possible streets.
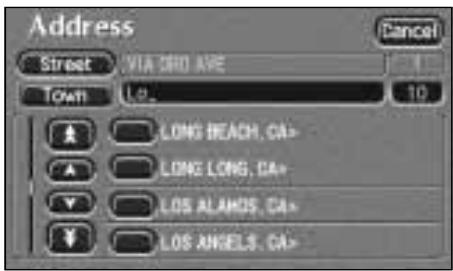
The list of possible streets from the characters entered is displayed.
- Select the street required.
2. Select town
The screen shows the list of towns where the street name entered occurs.
- Select the town required.
Note:
- If there is only one town match, this step is omitted.
- If a large number of matches is found, the alpha keyboard screen is displayed to enter the desired town name.
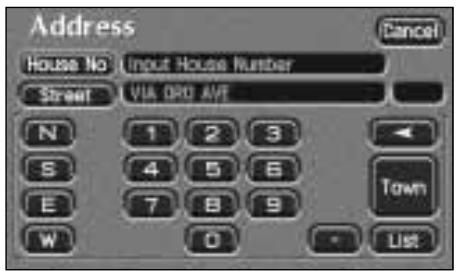
3. House number entry
The number pad screen is displayed, showing the house number range for the street selected.
- Enter the house number required and touch Enter, see Number input on page 1-12.
The destination details are displayed for confirmation of the address, see Confirm destination on page 6-1.
Note:
- If a list of house number ranges is displayed, select the range applicable.
- If the street does not have house numbers, or the house number is not known, just touch Enter. The mid-point of the street will be used as the destination.
By address (continued)
Order of address entry
The example on the previous page shows how to enter an address with the street name first, followed by selecting the town, and finally the house number.
You should find this the best method in most cases, however other methods are possible.
Entering town name first
In this example, the town name is entered first.
From the Destination Entry menu, select Address.
The alpha keyboard screen is displayed, showing 'Input Street Name'.
- Touch the Town button.
The screen now shows 'Input Town Name'.
- Enter the town (or district) name required, see Text input on page 1-12.
- Touch the List button.
The list of towns possible from the characters entered is displayed.
- Select the town required.
The alpha keyboard screen is displayed, showing 'Input Street Name'.
- Enter the street name required, see Text input on page 1-12.
- Touch the List button.
The list of streets possible from the characters entered is displayed.
- Select the street required.
The number pad screen is displayed, showing the possible house number range for the street selected.
- Enter the house number required, see Number input on page 1-12.
- Touch the Enter button.
The destination details are displayed for confirmation of the address, see Confirm destination on page 6-1.
Town centre button
When displayed after a town name, this touch button selects the town centre as a destination.

List button
The button becomes active when the characters entered reduces the possible entries to a small enough number. (The list is displayed automatically when the number of entries reduces to four or less.)
Address entry messages
While entering an address, you may encounter one of the following messages.
- 'House Number not Found. Show Mid-Point of Street? Yes/No.'
- 'The address does not exist. Show centre of this street? Yes/No.'
- 'Street Found in Many Towns. Please Input the Town Name.'
- Select one of the touch buttons (Yes or No) or enter a town name, as required.
Using a memory point
JOL.1119
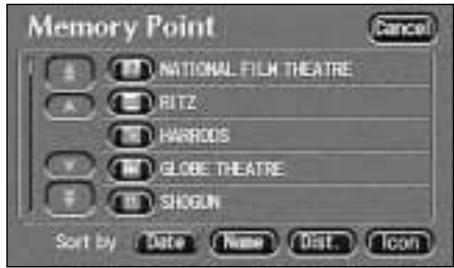
Memory point
After selecting Memory Point from the Destination Entry menu, the screen shows the list of stored memory points.
- Select the item required.
The destination details are displayed for confirmation of the address, see Confirm destination on page 6-1.
Note:
- The list can be sorted by Date, Name, Distance or Icon by touching the button required.
- When sorting by Icon, the icons are listed in the order they appear on the icon selection screen (left to right, top row first). See Icon list on page 5-3.
Using the home position
JOL.1120
Home
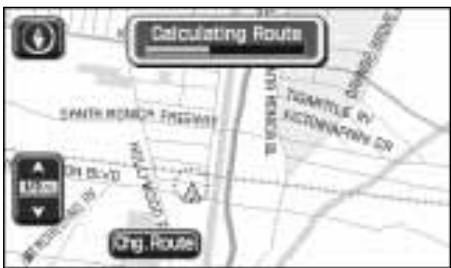
After selecting Home from the Destination Entry menu, a route is calculated to the stored home position.
The location of the home position is displayed, and the screen shows 'Calculating Route' while the route is being calculated.
Note: If a home position has not been entered, this function cannot be selected.
Using a point of interest (POI)
JOL.1121
JOL.1122
JOL,1123
Entry by POI name
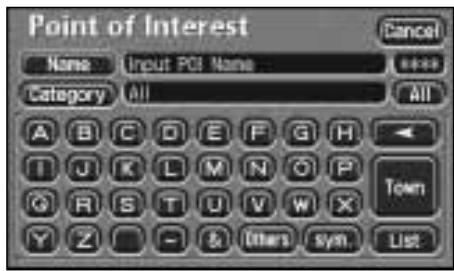
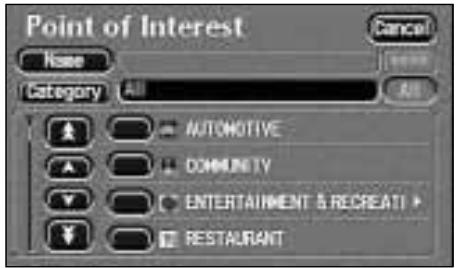
After selecting Point of Interest from the Destination Entry menu, the alpha keyboard screen is displayed, showing 'Input POI Name'.
- Enter the POI name required. See Text input on page 1-12.
- Touch List to display the list of matching points of interest. See POI list on page 4-9.
- Select the POI required.
The map location of the POI is displayed. See Confirm destination on page 6-1.
Note: If entering a POI name results in too many matches being listed, try entering the town name first. If you do not know the name of the POI you want, try selecting a POI category. These methods are described as follows.
Entry by town
If a town name is entered first, the points of interest listed will be restricted to that town.
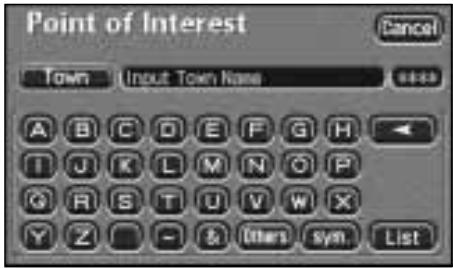
From the Input POI Name screen, touch Town.
The screen now shows 'Input Town Name'.
- Enter the town name required. See Text input on page 1-12.
- Touch List to display the list of possible towns.
- Select the town required.
The Input POI screen is displayed again.
- Enter the POI name required. See Entry by POI name on this page.
Entry by category
If a POI category is selected first, the points of interest listed will be restricted to that category.
From the Input POI Name screen, touch Category.
The screen shows the list of main POI categories.
- Select the category required. The screen now shows the list of sub-categories under the selected main category.
- Select the sub-category required. The Input POI Name screen is displayed again.
- Enter the POI name required. See Entry by POI name on this page.
Using a point of interest (continued)
Other selection methods
The examples on the previous page show the three basic methods of searching the POI database, i.e. POI name only, town before POI name, and category before POI name. You can refine the search even further, as described in the following examples.
Town followed by category
In this example the order is: town, followed by category, then POI name.
From the Input POI Name screen, touch Town.
- Enter the town name required. See Entry by town on page 4-7.
The Input POI Name screen is displayed again.
From the Input POI Name screen, touch Category.
- Select the category and sub-category required. See Entry by category on page 4-7.
The Input POI Name screen is displayed again.
- Enter the POI name required. See Entry by POI name on page 4-7.
Category followed by town
In this example the order is: category, followed by town, then POI name.
From the Input POI Name screen, touch Category.
- Select the category and sub-category required. See Entry by category on page 4-7.
The Input POI Name screen is displayed again.
From the Input POI Name screen, touch Town.
The screen now shows 'Input Town Name'.
- Enter the town name required. See Entry by town on page 4-7.
The Input POI Name screen is displayed again. - Enter the POI name required. See Entry by POI name on page 4-7.
Town centres
The POI database also holds town centre locations. To select a town centre, proceed as follows.
- From the Input POI Name screen, enter the town name required. (Do not select the Input Town Name screen.)
- Touch List to display the list of matches.
- For the town centre, select the entry showing the town name only.
The map is displayed showing the town centre location. See Confirm destination on page 6-1.
Note: In some cases, more than one town centre location may be listed.
Using a point of interest (continued)
JOL.1124
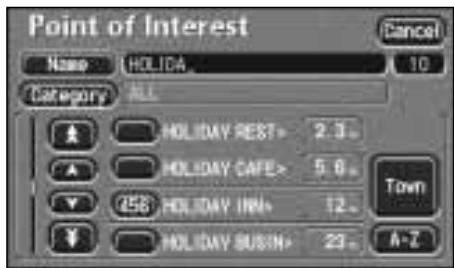
POI list
The screen shows the list of points of interest found in the database search.
- Select the POI required.
The map showing the location of the selected POI is displayed.
Note: Some entries in the list may have a further sub-list following.
POI details
- To view the details of the selected POI, touch Info. from the map display.
The details include Icon, Name, Position and Phone number.
Phone number - The phone number can be called by touching the phone symbol.
List sorting
The list can be sorted by Name or Distance.
- Touch the desired button to sort the list as required.
Note: When the list is sorted by distance, the distance shown is the straight line distance from the current vehicle location.
Categories/sub-categories
The POI database is divided into a number of categories. Each main category is further divided into a number of sub-categories.
The first entry in the list of Restaurant sub-categories, is 'All'. This selects all of the Restaurant sub-categories.
Search area
When searching the database, only points of interest in the current search area are included, except for the sub-categories marked 'All search areas' in the POI category list.

List button
The List button becomes active, when the characters entered reduce the possible entries to a small enough number. (The list is displayed automatically when the number of entries reduces to four or less.)
You can also select List (when active) without entering a POI name. All the relevant points of interest will be displayed, e.g. in a selected town or category.

All button
The All button returns to searching all categories after selecting one category.
POI entry messages
While searching for points of interest, you may encounter one of the following messages.
- 'There are no POI's in this Category.'
- 'No POI's Found in this Town.'
Using a previous destination
JOL.1126
Previous destination
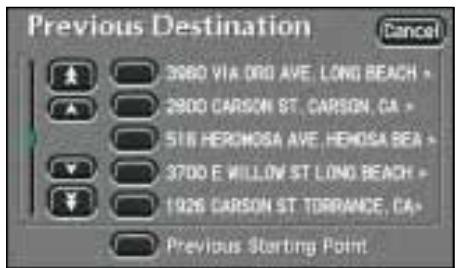
After selecting Previous Destination from the Destination Entry menu, the screen shows the list of stored previous destinations.
- Select the item required.
The destination details are displayed for confirmation of the address, see Confirm destination on page 6-1.
Previous starting point
If the Previous Starting Point button is selected, the location used for the destination will be the starting point of your last journey, irrespective of whether you were driving under guidance or not.
Using a map location
JOL,1128
Select from map
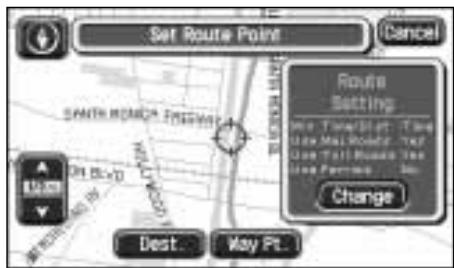
After selecting Set by Map from the Destination Entry menu, the map screen showing the current vehicle location is displayed.
- Scroll the map until the required location is under the cross-wire marker.
The location can be stored as a destination or as a way point, see
Confirm destination on page 6-1.
Using a freeway entrance/exit
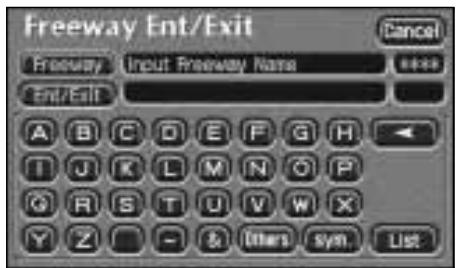
JOL.1129U
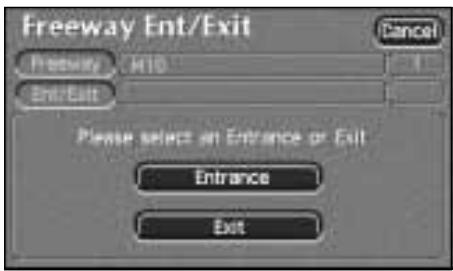
JOL.1130U
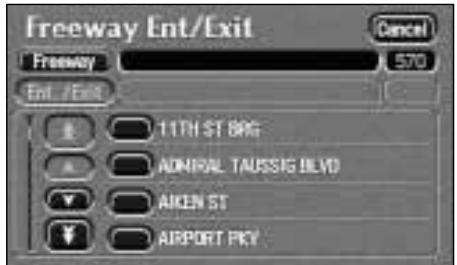
JOL.1131U
1. Enter freeway name
After selecting Freeway Entrance/Exit from the Destination Entry menu, The alpha keyboard screen is displayed showing 'Input Freeway Name'.
- Enter the freeway name required and touch List. See Text input on page 1-12.
The list of possible freeways from the characters entered is displayed.
- Select the freeway required.
Note: To enter numbers in the freeway name, touch Sym. to select the special characters keyboard screen.
2. Select entrance/exit
- Touch Entrance if you wish to join the freeway at this junction.
- Touch Exit if you wish to leave the freeway at this junction.
3. Select junction
The screen shows the list of junction entrances or exits on the freeway.
- Select the entrance or exit required. The destination details are displayed for confirmation of the address, see Confirm destination on page 6-1.
Using an intersection
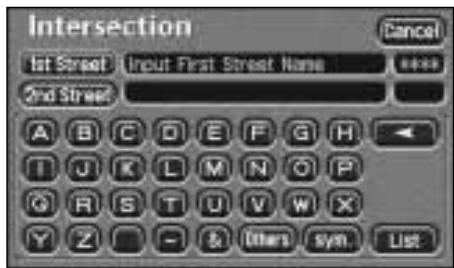
JOL.1132
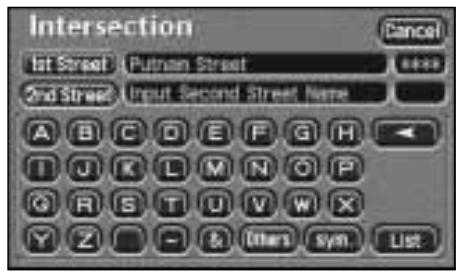
JOL.1133
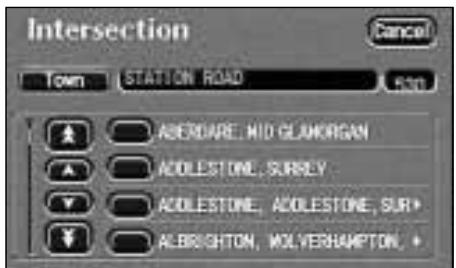
JOL.1134
1. Enter first street name
After selecting Intersection from the Destination Entry menu, the alpha keyboard screen is displayed showing 'Input First Street Name'.
- Enter the name required for the first street and touch List. See Text input on page 1-12.
The list of possible streets from the characters entered is displayed.
- Select the street required.
2. Enter second street name
The alpha keyboard screen is displayed showing the name of the first street and 'Input Second Street Name'.
- Enter the name required for the second street and touch List. See Text input on page 1-12.
The list of possible streets from the characters entered is displayed.
- Select the street required.
3. Select town
The screen shows the list of towns where the selected intersection occurs.
- Select the town required.
The destination details are displayed for confirmation of the address, see Confirm destination on page 6-1.

Working with stored locations
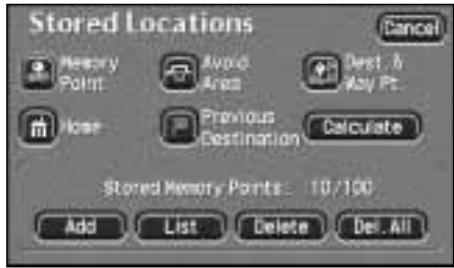
JOL.1135
Stored locations menu
In the upper portion of the menu, the various types of stored location are shown.
Memory Points
Home
Avoid Area
Previous Destination
Destination and Way Point
- Select the type of stored location required.
In the lower portion of the screen, the current number of stored locations of the selected type/maximum number, is now displayed.
Add
List
Delete
Del. All
Stored location actions
The four touch buttons (Add, List, Delete, Delete All), operate in a similar manner for all types of stored location.
- Touch the action button required.
These actions are described in the following pages for each type of stored point.
Note: If an action is not available for the stored location you have chosen, its touch button will be shown shaded.
For example, if a home position has already been stored, another one cannot be added.
Calculate
Calculate
If required, a new route calculation can be made.
Memory points
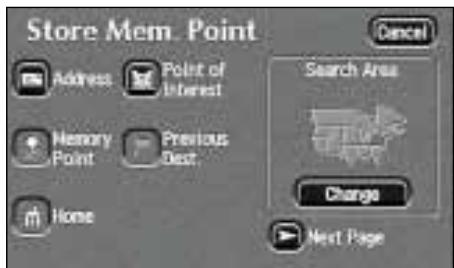
JOL1138U
JOL.1139
JOL.1140
1. Add
After touching Add, the Store Memory Point menu is displayed.
- Select the menu item you wish to use.
- Enter or select the details required.
The new point is added to the list of stored memory points.
Note:
- The Store Memory Point menu is used in the same way as the Destination Entry menu. For more information, see Destination entry menu on page 4-1.
- To identify the new memory point, select it from the list, touch Name, and enter the name required. See List on this page.
2. List
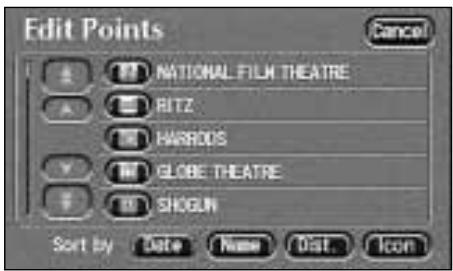
After touching List, the list of stored memory points is displayed showing 'Edit Points' at the top of the screen.
- Select an entry to view its location details.
List sorting
- Touch the desired button to sort the list as required (Date, Name, Distance or Icon).
Note:
- When the list is sorted by Distance, the points are shown ordered by distance from the current vehicle location.
- When sorting by Icon, the icons are listed in the order they appear on the icon selection screen (left to right, top row first). See Icon list on page 5-3.
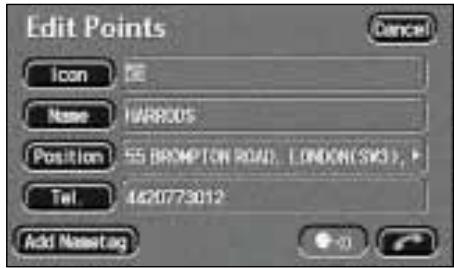
3. Location details
The location details include Icon, Name, Position and Phone number.
- Select the appropriate touch button to change or enter any of the location details as required. (For details of the icons available, see Icon list on page 5-3.)
- Touch the phone icon to call the phone number (where listed).
Navigation nametags
This feature is part of the voice activation system (where fitted).
- Touch the Add Nametag or Play Nametag button as required. For more information, see the Voice Activation Handbook.
Memory points (continued)
JOL.1141
JOL.1142
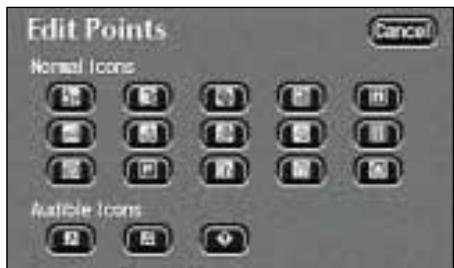
4. Icon list
After touching Icon, the 15 normal icons, and three audible icons are displayed.
To select, touch the icon required.
Normal icon
This is the icon displayed on the map to indicate the map location of the memory point. It replaces the default symbol, used when the point is stored.
Audible icon
When an audible icon is selected, a distinctive chime will be heard when the vehicle is approaching the map location of the memory point.
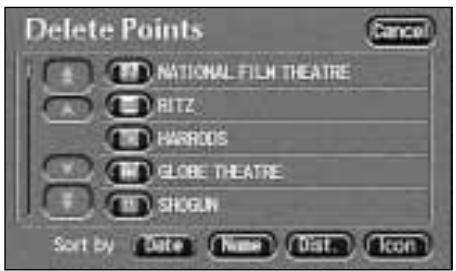
Delete
After touching Delete, the list of memory points is displayed showing
'Delete Points' at the top of the screen.
- Select the entry to be deleted.
The screen shows the details of the selected point and 'Delete this Memory Point? Yes/No'.
- Touch Yes to confirm.
The screen briefly shows 'Memory Point Deleted'.
Delete all
After touching Delete All, the screen shows 'Delete all Memory Points?
Yes/No'.
- Touch Yes to confirm.
The screen briefly shows 'All Memory Points Deleted'.
Home
JOL1143U
JOL.1144
JOL.1145
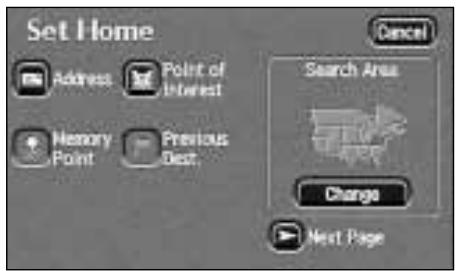
Add
After touching Add, the Set Home menu is displayed.
- Select the menu item you wish to use.
- Enter or select the details required.
The home position is stored.
Note: The Set Home menu is used in the same way as the Destination Entry menu. For more information, see Destination entry menu on page 4-1.
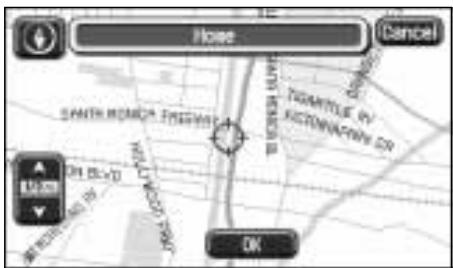
List
After touching List, the map screen is displayed, showing the location and address of the stored home position.
- Scroll the map to adjust the location if required.
- Touch OK to continue.
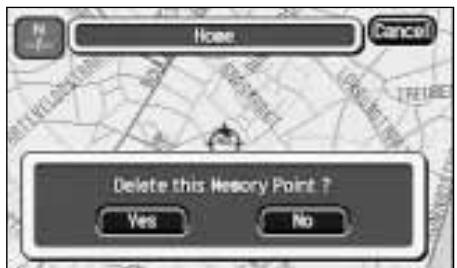
Delete
The screen shows the location of the current home position and 'Delete this Memory Point? Yes/No'.
- Touch Yes to confirm.
The screen briefly shows 'Home Deleted'.
Delete all
The Delete All touch button cannot be used with home position.
Avoid area
JOL.1146U
JOL.1147
JOL.1148
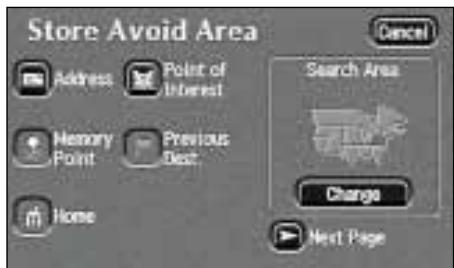
Add
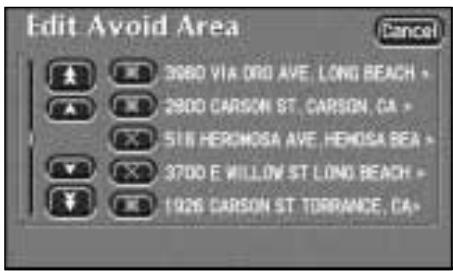
After touching Add, the Store Avoid Area menu is displayed.
- Select the menu item you wish to use.
- Enter or select the details required.
The new area is added to the list of stored avoid areas.
Note:
- The Store Avoid Area menu is used in the same way as the Destination Entry menu. For more information, see Destination entry menu on page 4-1.
- In some circumstances, to calculate a satisfactory route, it may not be possible to avoid all the selected areas.
List
After touching List, the list of stored avoid areas is displayed.
- Select the item required.
The map screen is displayed, showing the location and address of the selected area.
- To adjust the size of the area, touch the Enlarge or Reduce button.
- To adjust the position of the area, scroll the map as required.
- When finished, touch OK.
Delete
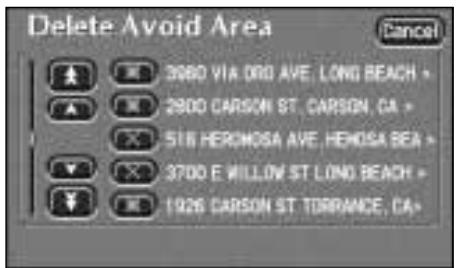
After touching Delete, the list of avoid areas is displayed, showing 'Delete Avoid Area' at the top of the screen.
- Select the item to be deleted.
The screen shows 'Delete this Avoid Area? Yes/No'. - Touch Yes to confirm.
The screen briefly shows 'Avoid Area Deleted'.
Delete all
After touching Delete All, the screen shows 'Delete all Avoid Areas? Yes/No'.
- Touch Yes to confirm.
The screen briefly shows 'All Avoid Areas Deleted'.
Previous destination
Add
The Add touch button cannot be used with previous destinations. These are added automatically to the list of previous destinations when the destination is entered.
List
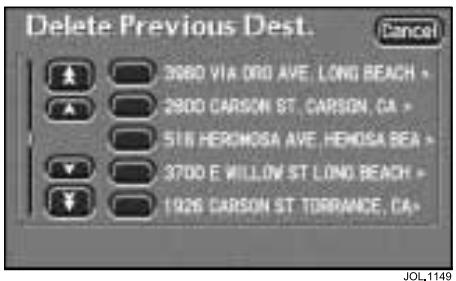
The List touch button cannot be used with previous destinations. These can only be viewed by using the Delete touch button.
Delete
After touching Delete, the list of previous destinations is displayed showing 'Delete Previous Dest.' at the top of the screen.
- Select the entry to be deleted.
The screen shows 'Delete this Previous Destination? Yes/No'. - Touch Yes to confirm.
The screen briefly shows 'Previous Destination Deleted'.
Delete all
After touching Delete All, the screen shows 'Delete all Previous Destinations? Yes/No'.
- Touch Yes to confirm.
The screen briefly shows 'All Previous Destinations Deleted'.
Destination and way point
JOL.1150U
JOL.1151
Add
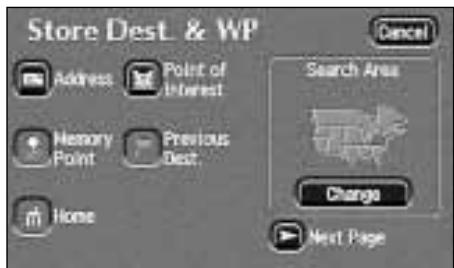
After touching Add, the Store Dest. & Way Point menu is displayed.
- Select the menu item you wish to use.
- Enter or select the details required. If a destination was entered, it will be stored as the current destination. If a way point was entered, it will be added to the list of way points.
Note:
- The Store Dest. & Way Point menu is used in the same way as the Destination Entry menu. For more information, see Destination entry menu on page 4-1.
- The Store Dest. & Way Point menu is used after a destination or way point has been entered for the first time using the Destination Entry menu.
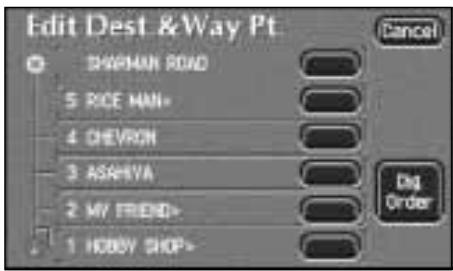
List
After touching List, the list showing the stored way points and destination (if entered) is displayed. The first way point to be visited is at the bottom of the list and the destination at the top.
- Select an entry to view its map location.
On the map, the location details for the selected way point (or the destination), are displayed at the top of the screen.
- To adjust the position of the way point (or destination), scroll the map as required.
- When finished, touch OK.
Way point order
If required, the order in which the way points are visited can be changed.
- Select the Chg. Order touch button.
- Touch the button against each way point in turn, to select the new order required, starting with the first way point to be visited.
- When finished, touch OK.
- To return to the previous screen, touch Chg. Location.
Destination and way point (continued)
JOL.1152
Delete all
After touching Delete All, the screen shows 'Delete all Way Points? Yes/No'.
- Touch Yes to confirm.
The screen briefly shows 'All Way Points Deleted'.
Note: The Delete All touch button does not delete the destination.
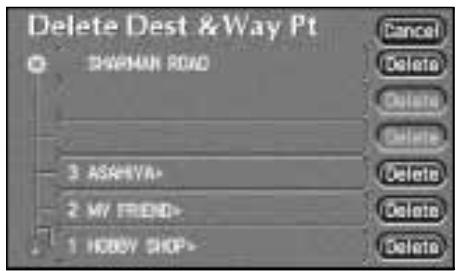
Delete
After touching Delete, the list of way points and the destination (if entered) is displayed, showing 'Delete Dest. & Way Pt.' at the top of the screen.
- Select the entry to be deleted.
The screen shows 'Delete Destination?
Yes/No', or 'Delete this Way Point? Yes/No'.
- Touch Yes to confirm.
The screen briefly shows 'Destination Deleted', or 'Way Point Deleted'.
Note: The Delete touch button does not delete the destination.
Route calculation
JOL,1098
JOL.1120
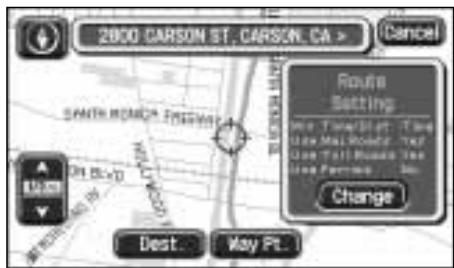
1. Confirm destination
After entering an address, or selecting a map location, the map screen is displayed showing its location. The address details are shown at the top of the screen. The address can be stored as a destination or as a way point.
If required, scroll the map to adjust the location.
- To store as a destination touch Dest. See Calculating the route on this page.
- To store as a way point touch Way Pt. See Storing way points on page 6-2.
Route settings
- To change the route settings, touch Change. See Route preferences on page 3-5.
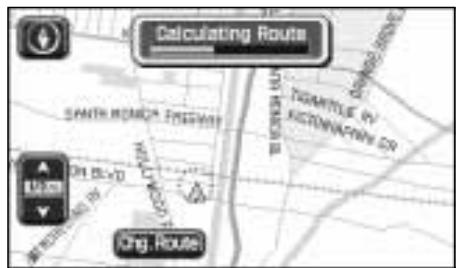
2. Calculating the route
After storing the destination (or final way point), the map screen shows 'Calculating Route' while the route is calculated.
- To change route settings, touch Chg. Route. See Route options menu on page 3-5.
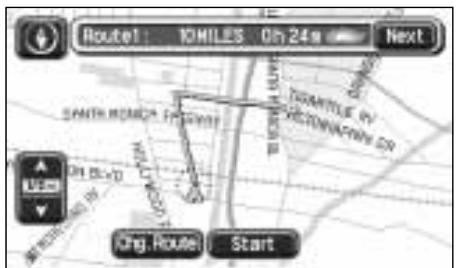
JOL.1099
3. Confirm route
Following calculation, the screen shows the whole route, with the total route distance, and estimated travelling time displayed at the top of the screen. Up to three possible routes are calculated. Where the route includes a ferry crossing, a ferry symbol is shown.
- To view an alternative route, touch Next.
- To change route settings, touch Chg. Route. See Route options menu on page 3-5.
To accept a route, touch Start (or commence driving). See Following guidance on page 6-3.
Note: Only one route is calculated if the route has way points set, or if the route is over 1000 miles (1000 km) long.
Storing way points
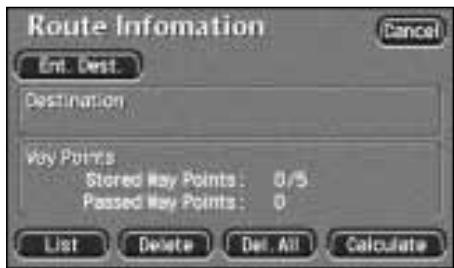
JOL.1156
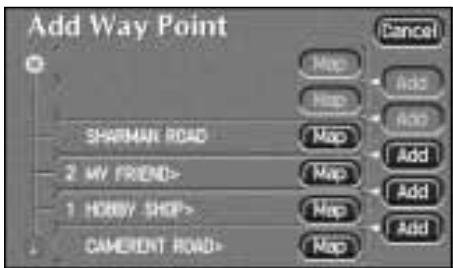
JOL.1157
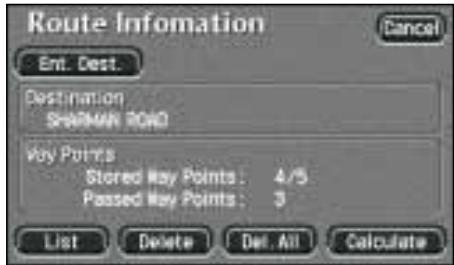
JOL,1158
1. First way point
After selecting Way Pt. for the first time from the Confirm Destination screen, the address entered is stored as the first way point, and the Route Information screen is displayed, as shown above. This screen also shows details of the destination (if entered).
- To enter another way point (or the destination), touch Ent. Dest. The Destination Entry menu is displayed, see Destination entry menu on page 4-1.
Editing way points
For information on using the List, Delete and Delete All buttons, see Destination and way point on page 5-7.
2. Additional way points
After selecting Way Pt. again from the Confirm Destination screen, the Add Way Point screen is displayed. This screen lists the way points already entered, and the destination (if entered).
- Choose the position required in the list for the way point you are about to add, and touch the appropriate Add button.
The Route Information screen is displayed again, showing the number of way points entered. From this screen you can enter another way point, the destination, or start the route calculation.
Map location
- To view the map location of a way point or destination, touch the appropriate Map button.
3. Calculate route
If the destination has been entered, then, after storing the final way point, the route calculation can be started from the Route Information screen. This screen should now show details of the destination, and the number of way points entered.
- To start the route calculation, touch Calculate. See Calculating the route on page 6-1.
Note: If the destination has not been entered at this stage, touch Ent. Dest. When the destination has been entered, the route will be calculated after touching Dest. from the Confirm Destination screen. See Confirm destination on page 6-1.
Route guidance
JOL.1100
Following guidance

WARNING:
Only operate, adjust or view the system when it is safe to do so.
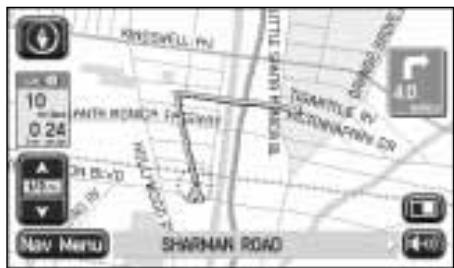
After touching Start, the initial map screen while under guidance is displayed. The route is shown highlighted, with the current road name shown in the text area at the bottom of the screen.
Drive away, following the voice guidance given by the system. Continue to follow the voice guidance until the end of the route is reached.
The touch controls, types of guidance screen and other guidance features are described in the following pages.
Distance units
Distances are shown on the screen, and given in voice guidance, either in Imperial units (miles) or in Metric units (kilometres and metres). For information on changing the unit selection, see the Driver's Handbook, section 1.
Time/distance to destination
While driving under guidance, the estimated time (if selected) and distance remaining to the end of the route are shown on the screen.
While off-route - Before the vehicle reaches the start of the highlighted route, and during route recalculation, the straight-line distance and direction to the destination are shown.
Message centre guidance (where fitted)
Route guidance information can be displayed on the instrument panel message centre. The display of this information on the message centre can be selected or deselected as required, see Display options on page 3-11.
Breaks in journey
While driving under guidance, the journey can be broken without affecting the stored route. When the journey is continued, the route guidance will resume automatically.
Whole route display
The map screen showing the entire route can be displayed. This is selected from the Route Options menu, see Display whole route on page 3-6. From this screen the display of the last portion of the route and the route turn list can be selected.
Avoiding points and areas
At any time while a route is set, you can select a point to be avoided on the current route. This can be enlarged into an avoid area if required. When the route is recalculated, the points or areas selected will be avoided (where possible). See Turn list on page 3-6.
Avoid areas can also be set up to be avoided permanently in all route calculations. See Avoid area on page 5-5.
Route guidance (continued)
Touch controls
The touch controls displayed on the guidance map screen are as follows.

Nav Menu button
Displays the Navigation menu, see page 3-4.

Repeat button
Repeats the last audible instruction. If the manoeuvre point has been passed, the audible instruction for the next manoeuvre point will be heard.

End call button
Ends a phone call. (Displayed in place of the Repeat button, while a phone conversation is in progress.)

Guidance screen button
Displays the guidance screen overlay in place of the next turn arrow symbol. See Screen types on page 6-7.

Turn arrow button
Displays the next turn arrow symbol in place of the guidance screen overlay. See Screen types on page 6-7.


Map orientation buttons
These buttons select the desired map orientation (north or vehicle heading to the top of the screen). The current selection is shown on the map.
Note: Above the 2 miles (4 kilometres) zoom level, only north orientation is available.
Zoom control
Selects the desired map zoom level by touching one of the arrow symbols. The currently selected scale is shown. See Zoom control operation on page 3-3.
Route guidance (continued)
Additional touch buttons
These buttons are displayed after touching the map display.

Chg. Route button
Selects the Route Options menu, to make changes to the route preference settings. See Route options menu on page 3-5.

Ent. Dest button
Stores a selected map location as a destination. (Displayed in place of the Chg. Route button, after touching the screen twice within five seconds.)

Store button
Stores a selected map location as a memory point.

POI button
Selects the quick points of interest function to display POI icons on the map. For more information, see Quick points of interest (POI) on page 3-12.

Home button
Sets a route to the home position. (Only displayed when a home position is set.)
Note: If the Ent. Dest button or the Home button is touched, the current route will be cancelled and a new route calculated.
Route guidance (continued)
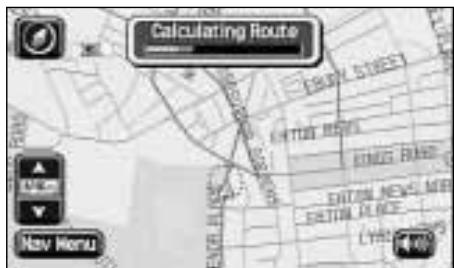
JOL.1170
Auto reroute
While under guidance, if the vehicle deviates from the route, a new route will be calculated automatically. While the route is being recalculated the screen shows 'Calculating Route' and the time and distance to destination information is replaced by the straight-line distance and direction to the destination.
Note: If the vehicle is within 1/4 mile (400 metres) of the destination or next way point, the route recalculation will not occur.
Way points
When the vehicle arrives at a way point, the screen shows 'You have arrived at your Way Point'. When the journey is resumed, route guidance continues automatically, either to the next way point or to the final destination.
After way points have been visited (or the route cancelled), they will be deleted from the way points list.
Note: As way points are entered, they are automatically added to the list of previous destinations.
Arrival guidance
When the vehicle arrives at the destination, the screen shows the destination location details. This is confirmed by voice guidance. The system is now ready for further use.
Road coverage in Canada
In Canada, only the major road network is covered by the system, and route guidance is restricted to these roads. While driving under guidance you may wish to deviate from the route, for example at a service area. As the area of coverage does not extend far from each major road, it is possible that you may be outside the coverage area. In this situation, route guidance will continue only when you have rejoined the highlighted route.
Screen types
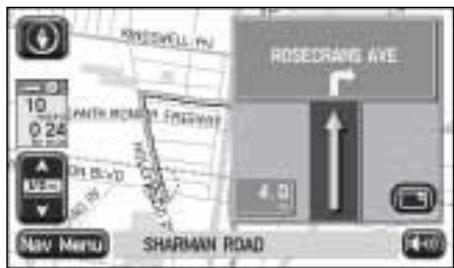
JOL.1166
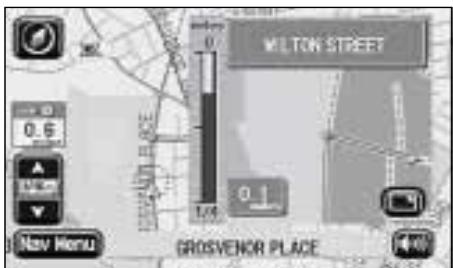
JOL.1167
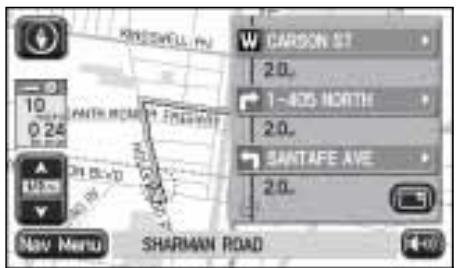
JOL.1168
Map screen
Two map screen options are available: Split Screen and Full Screen.
To select an option, choose Display Options from the Navigation menu.
Split Screen
When set to Split Screen, the map display always shows the guidance screen overlay while a route is set.
Full Screen
When set to Full Screen, the screen normally shows the map display, with the next turn symbol in the top right-hand corner. Before each manoeuvre point, the guidance screen overlay is displayed automatically. (The overlay can also be displayed manually by touching the Guidance Screen button.)
Guidance screen (turn arrows)
The guidance screen overlay is always displayed while the Split Screen option is selected, and is also displayed when selected manually while the Full Screen option is selected.
Two guidance screen options are available: Turn Arrows and Turn List.
To select an option, choose Display Options from the Navigation menu.
When set to Turn Arrows, before each manoeuvre point, the guidance screen overlay shows the next junction diagram.
Guidance screen (turn list)
When set to Turn List, the guidance screen overlay shows the current portion of the route turn list. Before each manoeuvre point, the next junction diagram is displayed.

About this handbook 1-2
- in-car telephone features 1-2
Control panel 1-5
Destination entry menu 4-1
- address 4-3
- freeway entrance/exit 4-12
- home 4-6
- intersection 4-13
memory point 4-5
point of interest 4-7
- previous destination 4-10
- select from map 4-11
Display options 3-11
guidance screen 3-11
- map screen 3-11
- message centre guidance 3-11
time to destination 3-11
Frequently used functions 2-6
Functions available on the move 3-4
Getting started 3-1
- initial map display 3-2
road safety caution 3-1 - touch controls 3-2
- zoom control operation 3-3
How the system works 1-1
Loading the map DVD 1-5
Main features of the system 2-1
- avoid areas 2-1
- points of interest 2-1
- screen guidance 2-1
- stored locations 2-1
-voice guidance 2-1
way points 2-1
Menu structure 2-7
Navigation menu 3-4
Navigation setup menu 3-8
- average speed settings 3-8
- calibration 3-10
- map version 3-9
- quick POI selection 3-8
- restore system defaults 3-9
Points of interest
- categories/sub-categories 4-9
- entry by category 4-7
- entry by POI name 4-7
- entry by town 4-7
- other selection methods 4-8
- POI list 4-9
Quick points of interest 3-12
- cancelling POI icon display 3-13
- changing the categories 3-13
- POI icon display 3-12
- POI information 3-12
- selecting a category 3-12
Route calculation 6-1
- calculating the route 6-1
- confirm destination 6-1
- confirm route 6-1
Route guidance 6-3
-arrival guidance 6-6
- auto reroute 6-6
- avoiding points 6-3
- breaks in journey 6-3
distance units 6-3
- message centre guidance 6-3
road coverage in Canada 6-6
time/distance to destination 6-3
- touch controls 6-4
- way points 6-6
Route options menu 3-5
- calculate 3-7
-cancel guidance 3-7 - detour 3-5
display whole route 3-6 - route preferences 3-5
Route setting example 2-2
Safety information 1-2
Screen displays 1-6
- initial map display 1-6
- menus 1-8
name lists 1-8
screen symbols 1-9 - scrolling the map 1-7
Screen types 6-7
guidance screen 6-7
- map screen 6-7
Search area 4-1
Stored locations menu 5-1
- avoid area 5-5
- destination and way point 5-7
- home 5-4
memory points 5-2
- previous destination 5-6
Storing way points 6-2
- additional way points 6-2
- calculate route 6-2
- first way point 6-2
Text input 1-12
- character input 1-12
number input 1-12
Using the controls 1-10
volume adjustment 1-11
Using the system 1-2
- alternative routes 1-4
errors in vehicle position 1-3 - Jaguar Dealership locations 1-4
languages and distance units 1-4
map DVDs 1-4 - reception of GPS signals 1-3
road junction layouts 1-4 - route guidance precision 1-3
screen cleaning 1-4
time and distance to destination 1-4

JJM 18 05 20/15




- X-TYPE NAVIGATION HANDBOOK
- Navigation Handbook
- Introduction and controls
- Quick reference
- Basic functions
- Route setting
- Stored locations
- Route calculation and guidance
- Introduction
- How the system works
- WARNING:
- Using the system
- About this handbook
- In-car telephone features
- Safety information
- Using the system (continued)
- Reception of GPS signals
- Errors in vehicle position
- Route guidance precision
- Jaguar dealership locations
- Alternative routes
- Languages and distance units
- Time and distance to destination
- Road junction layouts
- Map DVDs
- Screen cleaning
- Control panel
- Loading the map DVD
- Screen displays
- Initial map display
- Screen displays (continued)
- Scrolling the map
- Continuous scrolling
- Additional touch buttons
- Map location details
- Selecting the initial map display
- Menu
- Name lists
- Screen symbols
- Using the controls
- Nav Menu
- Nav Menu button
- Cancel button
- NAV
- NAV button
- Note:
- Map orientation buttons
- Zoom control
- Using the controls (continued)
- Repeat button
- Phone button
- End call button
- Home button
- Chg. Route button
- Ent. Dest button
- Store
- Store button
- POI
- POI Off
- POI/POI Off buttons
- Volume adjustment
- Text input
- Character input
- Number input
- Main features of the system
- Stored locations
- Way points
- Avoid areas
- Points of interest (POI)
- Quick points of interest
- Voice guidance
- Screen guidance
- Route setting example
- Selecting the system
- Map display
- Navigation menu
- Route setting example (continued)
- Destination entry menu
- Enter street name
- Select town
- Enter house number
- Confirm destination
- Start guidance
- Arrival at destination
- Route guidance
- Frequently used functions
- Getting started
- Menu structure
- Road safety caution
- Language button
- Getting started (continued)
- Distance units
- Touch controls
- Ent. Dest.
- POI button
- Zoom control operation
- General menus
- Navigation menu
- Audible instructions
- Functions available on the move
- General menus (continued)
- Route options menu
- Detour
- Route detour
- Alternative route
- Route preferences
- Route options menu (continued)
- Display whole route
- End of route display
- Turn list
- Turn list (continued)
- Calculate
- Cancel guidance
- Navigation setup menu
- Average speed settings
- Quick POI selection
- Navigation setup menu (continued)
- Restore system defaults
- System defaults (continued)
- Calibration
- Map version
- Position procedure
- Position (heading)
- Display options
- Map screen
- Guidance screen
- Time to destination
- Message centre guidance (where fitted)
- Quick points of interest (POI)
- Selecting a category
- Other categories
- Local POI search
- POI icon display
- Next button
- POI information
- POI details
- Destination entry
- Quick points of interest (continued)
- Changing the categories
- Cancelling POI icon display
- Destination entry menu
- Next/previous page
- Search area
- Using the menu
- Destination entry menu (continued)
- Changing search area
- Area
- States/Countries
- Display
- By address
- Street entry
- Select town
- House number entry
- By address (continued)
- Order of address entry
- Entering town name first
- Town centre button
- List button
- Address entry messages
- Using a memory point
- Memory point
- Using the home position
- Home
- Using a point of interest (POI)
- Entry by POI name
- Entry by town
- Entry by category
- Using a point of interest (continued)
- Other selection methods
- Town followed by category
- Category followed by town
- Town centres
- POI list
- List sorting
- Categories/sub-categories
- All button
- POI entry messages
- Using a previous destination
- Previous destination
- Previous starting point
- Using a map location
- Select from map
- Using a freeway entrance/exit
- Enter freeway name
- Select entrance/exit
- Select junction
- Using an intersection
- Enter first street name
- Enter second street name
- Select town
- Working with stored locations
- Stored locations menu
- Memory Points
- Add
- List
- Delete
- Del. All
- Stored location actions
- Add
- List
- Location details
- Navigation nametags
- Memory points (continued)
- Icon list
- Normal icon
- Audible icon
- Delete all
- Avoid area
- Destination and way point
- Way point order
- Destination and way point (continued)
- Route calculation
- Confirm destination
- Route settings
- Calculating the route
- Confirm route
- Storing way points
- First way point
- Editing way points
- Additional way points
- Map location
- Calculate route
- Route guidance
- Following guidance
- Time/distance to destination
- Breaks in journey
- Whole route display
- Avoiding points and areas
- Route guidance (continued)
- Guidance screen button
- Turn arrow button
- Auto reroute
- Arrival guidance
- Road coverage in Canada
- Screen types
- Split Screen
- Full Screen
- Guidance screen (turn arrows)
- Guidance screen (turn list)
- Points of interest
- Quick points of interest 3-12
- Route calculation 6-1
- Route guidance 6-3
- Route options menu 3-5
- Route setting example 2-2
- Safety information 1-2
- Screen displays 1-6
Marque : JAGUAR
Modèle : X-TYPE
Catégorie : Berline