
DC-630I - Appareil photo numérique AGFAPHOTO - Notice d'utilisation et mode d'emploi gratuit
Retrouvez gratuitement la notice de l'appareil DC-630I AGFAPHOTO au format PDF.

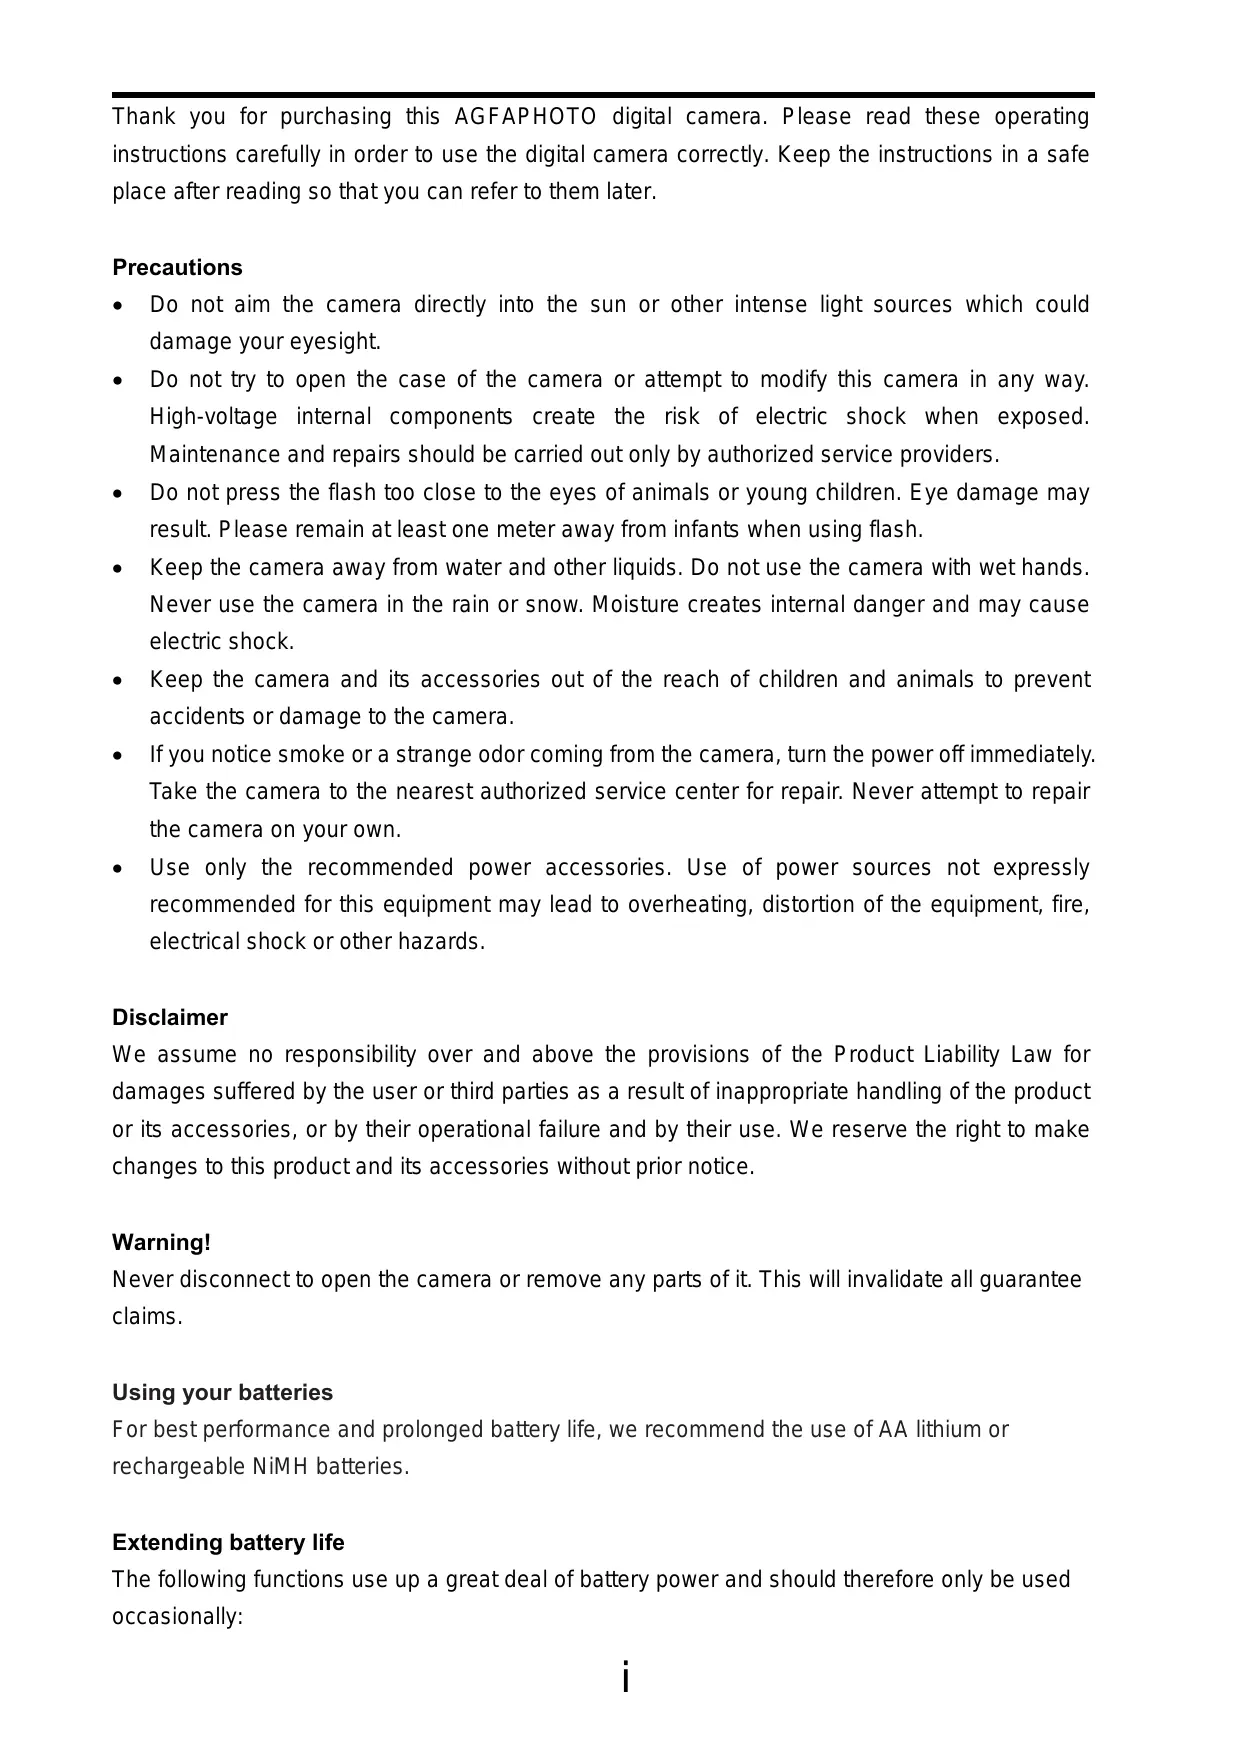

| Type de produit | Appareil photo numérique |
| Marque | AGFAPHOTO |
| Modèle | DC-630I |
| Capteur | CCD 6 mégapixels, taille 1/2,5 pouce |
| Objectif | Focale : 5,8 mm (grand-angle) à 17,4 mm (télé), ouverture F/2.8 (W) – F/4.9 (T) |
| Zoom optique | 3x |
| Zoom numérique | 4x |
| Écran LCD | 2,5 pouces TFT |
| Résolution maximale | 2864 x 2144 pixels (6M) |
| Formats de fichier | Photo : JPEG (EXIF 2.2) ; Vidéo : AVI ; Audio : WAV |
| Modes scène | Programme, Film, Enregistrement vocal, Coucher de soleil, Contre-jour, Mode Q, Paysage, Portrait, Neige, Feux d'artifice, Scène de nuit, Enfants, Aliments, Immeuble, Texte |
| Sensibilité ISO | Auto, 50, 100, 200, 400 |
| Balance des blancs | Auto, Lumière du jour, Nuageux, Tungstène, Fluorescent (H/L), Personnalisé |
| Flash | Auto, Réduction d'yeux rouges, Forcé, Synchro lente, Désactivé |
| Stockage | Mémoire interne 16 Mo + carte SD/SDHC (jusqu'à 4 Go) |
| Alimentation | 2 piles AA alcalines ou NiMH rechargeables |
| Dimensions (L x H x P) | 89,5 x 61,3 x 27 mm |
| Poids (sans batterie) | Environ 120 g |
| Entretien et nettoyage | Nettoyer les contacts des piles avec un chiffon sec ; éviter l'humidité et les températures extrêmes ; utiliser un souffleur pour l'objectif. |
| Sécurité | Ne pas viser le soleil ; tenir hors de portée des enfants ; ne pas ouvrir le boîtier ; utiliser uniquement les accessoires recommandés. |
| Pièces détachées et réparabilité | Service après-vente via plawa-fewertechnik ; batterie remplaçable par l'utilisateur ; réparation par centre agréé. |
FOIRE AUX QUESTIONS - DC-630I AGFAPHOTO
Questions des utilisateurs sur DC-630I AGFAPHOTO
0 question sur cet appareil. Repondez a celles que vous connaissez ou posez la votre.
Poser une nouvelle question sur cet appareil
Téléchargez la notice de votre Appareil photo numérique au format PDF gratuitement ! Retrouvez votre notice DC-630I - AGFAPHOTO et reprennez votre appareil électronique en main. Sur cette page sont publiés tous les documents nécessaires à l'utilisation de votre appareil DC-630I de la marque AGFAPHOTO.
MODE D'EMPLOI DC-630I AGFAPHOTO
Thank you for purchasing this AGFAPHOTO digital camera. Please read these operating instructions carefully in order to use the digital camera correctly. Keep the instructions in a safe place after reading so that you can refer to them later.
Precautions
- Do not aim the camera directly into the sun or other intense light sources which could damage your eyesight.
- Do not try to open the case of the camera or attempt to modify this camera in any way. High-voltage internal components create the risk of electric shock when exposed. Maintenance and repairs should be carried out only by authorized service providers.
- Do not press the flash too close to the eyes of animals or young children. Eye damage may result. Please remain at least one meter away from infants when using flash.
- Keep the camera away from water and other liquids. Do not use the camera with wet hands. Never use the camera in the rain or snow. Moisture creates internal danger and may cause electric shock.
- Keep the camera and its accessories out of the reach of children and animals to prevent accidents or damage to the camera.
- If you notice smoke or a strange odor coming from the camera, turn the power off immediately. Take the camera to the nearest authorized service center for repair. Never attempt to repair the camera on your own.
- Use only the recommended power accessories. Use of power sources not expressly recommended for this equipment may lead to overheating, distortion of the equipment, fire, electrical shock or other hazards.
Disclaimer
We assume no responsibility over and above the provisions of the Product Liability Law for damages suffered by the user or third parties as a result of inappropriate handling of the product or its accessories, or by their operational failure and by their use. We reserve the right to make changes to this product and its accessories without prior notice.
Warning!
Never disconnect to open the camera or remove any parts of it. This will invalidate all guarantee claims.
Using your batteries
For best performance and prolonged battery life, we recommend the use of AA lithium or rechargeable NiMH batteries.
Extending battery life
The following functions use up a great deal of battery power and should therefore only be used occasionally:
- Excessive use of flash
- Editing images on the camera display
The battery life can be affected by soiling. Please clean the contacts with a clean and dry cloth before putting the batteries in the camera. Battery performance drops at temperatures below 5^ (41^) . If you use the camera at low temperatures you should have replacement batteries to hand and ensure they do not get too cold. Please note: you should not dispose of cold and seemingly flat batteries because these batteries may work again at room temperature.
Contents
GETTING STARTED 1
USING THIS MENU 1
SCOPE OF DELIVERY 2
PARTS OF THE CAMERA 3
INSERTING THE BATTERIES 5
LOW BATTERY INDICATOR 5
ABOUT BATTERY TYPE 5
INSERTING THE MEMORY CARD 6
ABOUTCAMERA MEMORY 6
DCF PROTOCOL 6
SETTING THE DISPLAY LANGUAGE/ DATE &
TIME 7
SETTING THE DISPLAY LANGUAGE 7
SETTING THE DATE & TIME 7
USING THE LCD MONITOR 9
REC MODE 9
PLAYBACK MODE 10
CHANGING THE LCD STATUS 11
BASIC OPERATION 12
TURING THE POWER ON/ OFF 12
POWERSAVINGFUNCTION 12
CHANGING THE MODE 13
SWITCHING BETWEEN REC MODE AND
PLAYBACK MODE 13
SELECTING THE REC MODE 13
SELECTING THE ASM MODE 14
USING THE MENUS 15
REC MENU 15
SETUP MENU 16
BASIC RECORDING 19
RECORDING STILL IMAGES 19
USING THE Q MODE 20
SETTING IMAGE SIZE AND QUALITY 21
USING THE ZOOM FUNCTION 22
USING THE FLASH 23
USING THE MACRO 24
USING THE SELF-TIMER & BURST 25
USING THE APERTURE PRIORITY 26
USING THE SHUTTER PRIORITY 26
USING THE MANUAL EXPOSURE 27
RECORDING MOVIE CLIPS 28
SETTING THE MOVIE SIZE 28
RECORDING AUDIO CLIPS 29
PLAYING BACK AUDIO CLIPS 29
RECORDING A VOICE MEMO 30
PLAYING BACK A VOICE MEMO 30
OTHER RECORDING FUNCTIONS 31
SETTING THE METERING 31
SETTING THE WHITE BALANCE 31
SETTING THE ISO 32
SETTING THE EXPOSURE 32
SETTING THE AEB 32
SETTING THE HIGHLIGHT 32
SETTING THE SHARPNESS 33
SETTING THE PHOTO EFFECT 33
SETTING DATE STAMP 33
SETTING STABILIZER 34
SETTING FACE TRACKING 34
SETTING PHOTO FRAME 34
PLAYBACK 35
PLAYING BACK IMAGES 35
PLAYING BACK MOVIE CLIPS 35
MAGNIFYING & TRIMMING STILL IMAGES 36
VIEWING IN THUMBNAIL 37
PLAYING A SLIDE SHOW 37
DELETEING FILES 38
DELETING A SINGLE FILE 38
DELETING MULTIPLE FILES 39
DELETEINGALLFILES 39
PROTECTING A SINGLE FILE 40
PROTECTING ALL FILES 40
PROTECTING MULTIPLE FILES 41
EDITING IMAGES 42
ROTATING STILL IMAGES 42
CHANGING THE IMAGE SIZE 42
CHANGING THE IMAGE WITH EFFECTS 43
CHOOSING THE IMAGE WITH PHOTO FRAME 43
COPYING THE FILES 44
SETTING THE DPOF 45
CHOOSING A START-UP IMAGE 46
MAKING CONNECTIONS 47
CONNECTING THE CAMERA TO A TV 47
CONNECTING THE CAMERA TO A PC 48
USING THE CARD READER 48
CONNECTING THE CAMERA TO A
COMPUTER WITH THE USB CABLE 48
APPENDIX 49
ABOUT THE FOLDER & FILE NAME 49
FOLDER STRUCTURE 49
FILE NAMING 49
TROUBLESHOOTING 50
SPECIFICATIONS 51
FUNCTION AVAILABLE LIST 52
CUSTOMER CARE 57
DISPOSAL OF WASTE EQUIPMENT BY
USERS IN PRIVATE HOUSEHOLDS IN THE
EUROPEAN UNION 57
DECLARATION OF CONFORMITY 58
FCC COMPLIANCE AND ADVISORY 58
Getting Started
Using This Menu
Getting Started
This section contains information you should know before using this camera.
Basic Operation
This section explains all recording features of this camera.
Basic Recording
This section explains how to record still images, movies, and audio files.
Other Recording Functions
This section explains common operations about recording images.
Playback
This section explains playback, delete, and edit functions of still images, movies and audio files.
Making Connections
This section tells you how to connect this camera to a computer or TV.
Appendix
This section describes the troubleshooting and the camera specification.
The meanings of the symbols used in this user's manual are explained below:
| Caution | This indicates cautions that should be read before using these functions. |
| Tips | This indicates the useful information when using this camera. |
| This indicates the reference page. |
Scope of delivery
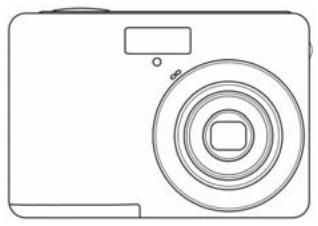
AGFAPHOTO Camera
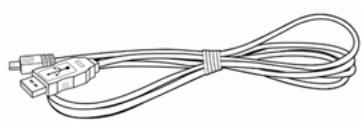
USB Cable
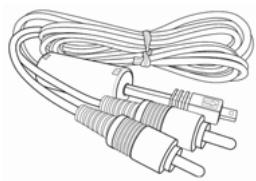
AV Cable
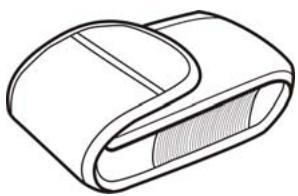
Pouch
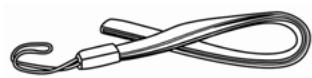
Hand Strap

2 x AA Batteries
Software Installation CD-ROM
Quick Guide

Caution
- Note that the shape of the charger plug depends on the area where you purchased the camera.
- Do not swing the camera around by the strap.
Parts of the Camera
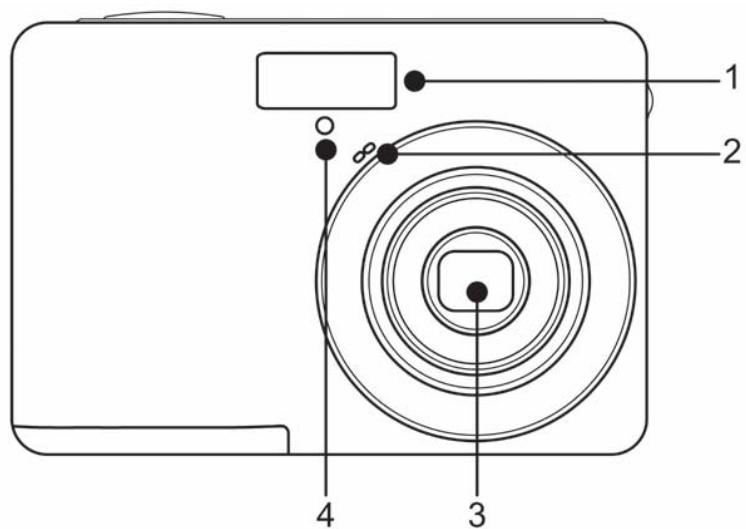
- Flash (page 23)
- Microphone
- Lens
- Self-timer Lamp
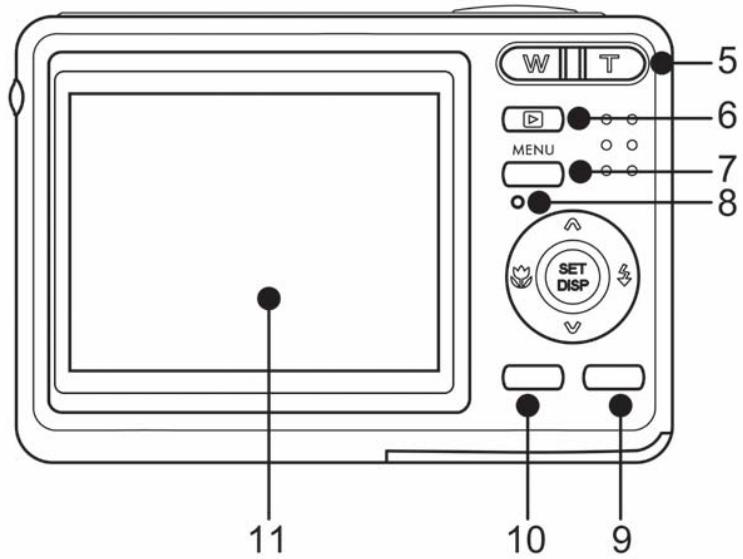
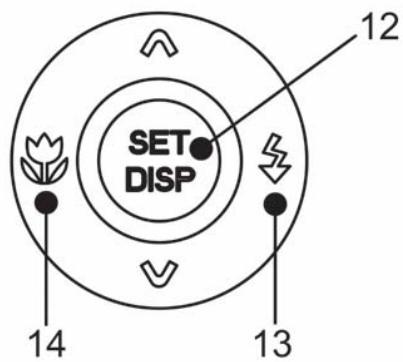
Four-way Control
-
Zoom Button (page 22)
-
Thumbnail (page 37)
- Playback Zoom
( page 36)
- Playback Button
page 13)
- Menu Button (page 15)
- Operation Lamp
- Mode Button (page 13)
-
ASM Button (page 14)
-
Delete Button (S page 38)
-
LCD Monitor (page 9)
- SET/DISP Button
( page 11)
- Flash Button (page 23)
- Macro Button (S page 24)
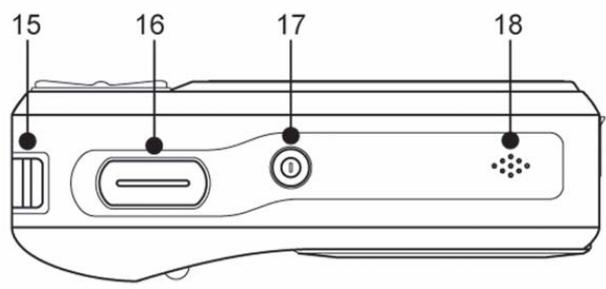
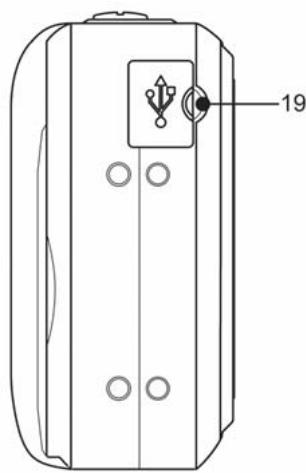
- Strap Ring
16.Shutter Button
page 19, 28)
- Power Button (S page 12)
-
Speaker
-
USB/AV Terminal
page 18, 48)
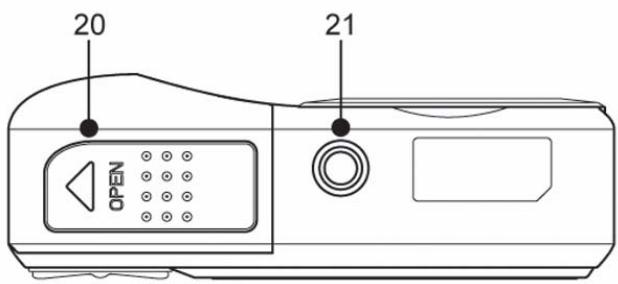
- Battery Cover (S page 5)
- Tripod Socket
Inserting the Batteries
The camera is powered by two AA-size alkaline batteries or rechargeable NiMH batteries.
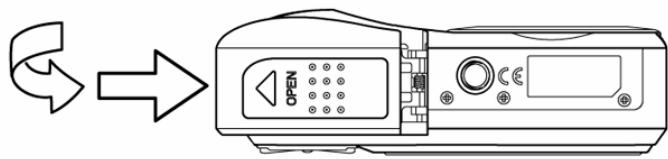
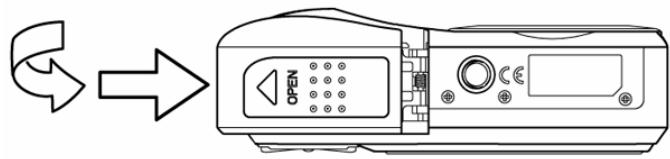
1 Open the battery cover.
- Slide the battery cover in the direction indicated by the arrow.
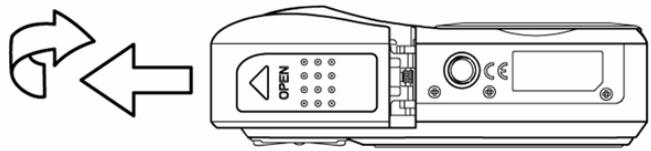
2 Insert the batteries.
- Insert two AA-size batteries with the positive (+) and negative (-) poles matching the directions indicated inside the battery room.
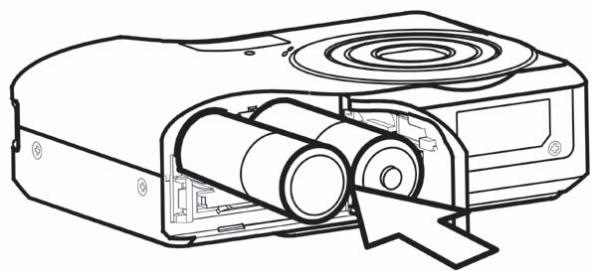
3 Close the battery cover.
Low Battery Indicator
A low battery indicator appears on the LCD screen when the batteries are nearly exhausted. Batteries should be replaced promptly when the low battery indicator appears.

Caution
- Risk of explosion if battery is replaced by an incorrect type dispose of used batteries according to the instructions.
- Be sure to turn off the camera power before insert or remove batteries.
- Use only Alkaline or NiMH battery to power this camera. Use of any other type battery is not recommended.
- Replace all batteries at the same time. Never mix old and new batteries.
- Remove batteries if you will not be using them for a long time.
- The camera body may feel warm after extended use. This is normal.
About Battery Type
After replacing the batteries, please check the Battery Type in the setup menu (page 18).
Inserting the Memory Card
You can use SD Card with this digital camera. The memory card slot is located beneath the battery cover, adjacent to the battery compartment.
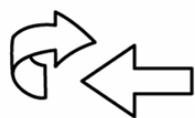
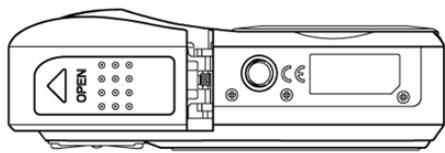
1 Open the battery cover.
- Slide the battery cover in the direction indicated by the arrow.
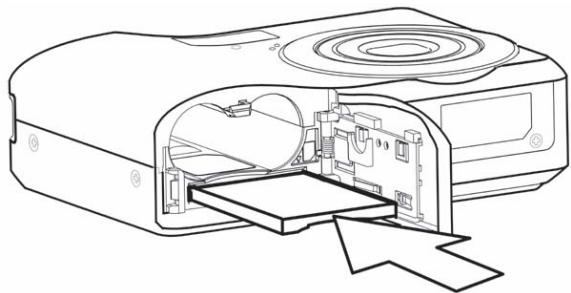
2 Insert the card.
- Insert the card with the label facing up and the arrow pointing in.

Tips
- To remove the card, gently press on the edge of the card and release it. Pull the card out and close the battery cover.
3 Close the battery cover.

Caution
It may cause damage to the card if removed while the camera is on.
- Do not touch the connection terminals on the back side of the card.
About Camera Memory
This camera is equipped with internal memory. If the memory card is not inserted in the camera, all images and movie clips recorded by the camera will be stored in the internal memory. If the memory card is inserted, images and movie clips are stored on the memory card.
DCF Protocol
The DCF protocol defines the format for image file data as well as the directory structure for the memory card. Images that are taken by a DCF camera can be viewed on DCF-compatible cameras from other manufacturers.
Setting the Display Language/ Date & Time
When using the camera for the first time after purchasing, be sure to choose a language and set the date & time before using the camera.
Setting the Display Language

Turn the power on, and set the camera to the Setup Menu ( page 16).

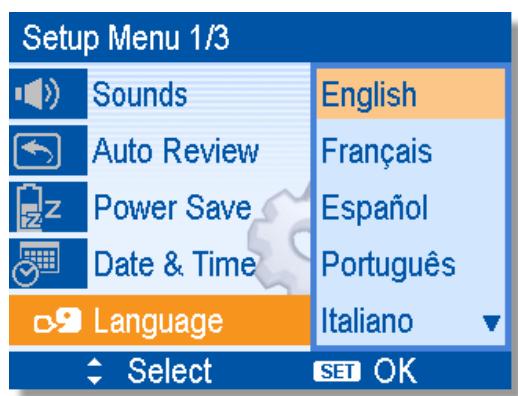
Select [Language].
- Press or to select [LANGUAGE] then press or the SET button to launch the submenu.

Select a language.
- Press or to select a language and press or the SET button to apply the setting.

Press the MENU button to close the menu.
Setting the Date & Time
1
Turn the power on, and set the camera to the Setup Menu (page 16).
2
Select [Date & Time].
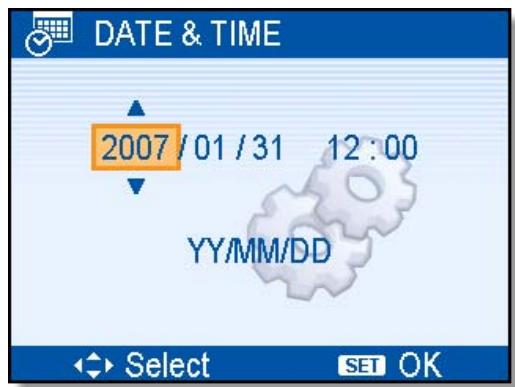
- Press or to select [Date & Time] then press or the SET button to launch the submenu.
3
Set date and time.
- Press or to change the value of the cursor located. Press or to move the cursor between settings.

Tips
- Holding down or changes the values continuously.
- For date stamp setting (S page 33).
4
Apply the setting.
- After adjusting the settings, press the SET or the MENU button to apply the setting.

Caution
- If the batteries are removed for longer than 48 hours, the Date and Time will need to be re-set.
Using the LCD Monitor
The LCD monitor is used to compose images while recording, adjust settings and replay images. The following indicators may appear on the LCD monitor while recording or playing back images.
REC mode
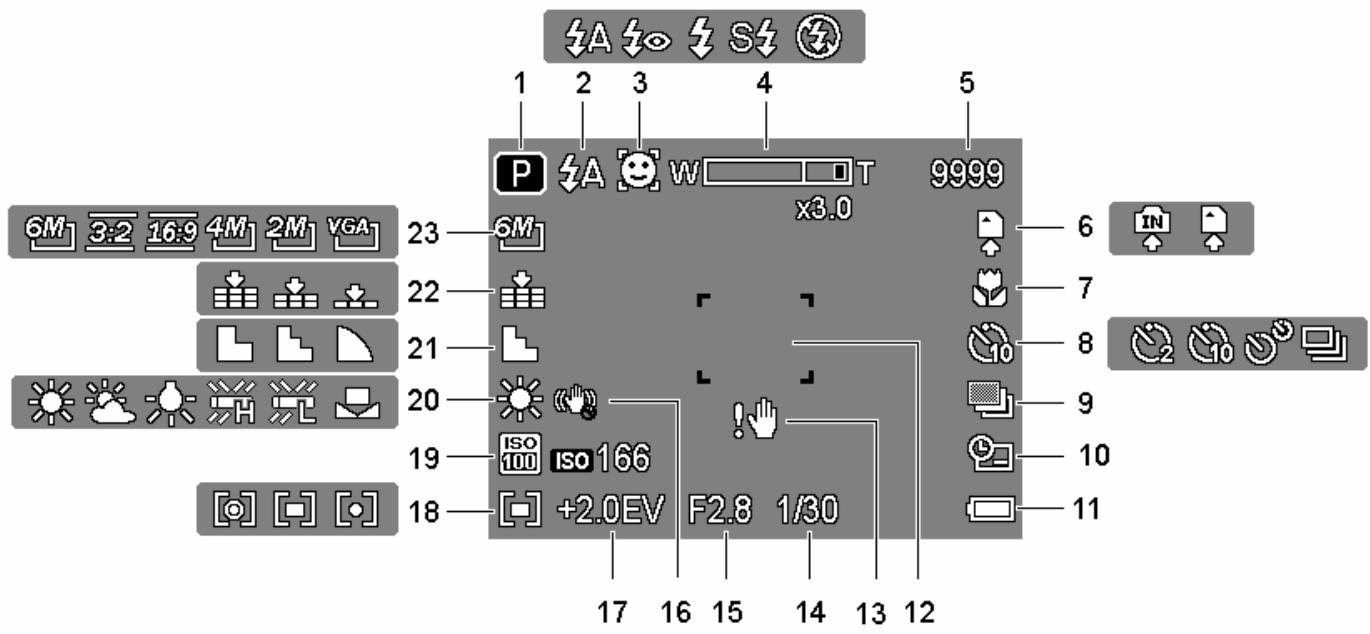
1 Recording mode (page 13) 13 Shake warning (page 19)
2 Flash (page 23) 14 Shutter speed (page 19)
3 Face tracking ( page 34 ) 15 Aperture value ( page 19)
4 Zoom indicator (page 22) 16 Stabilizer
5 Shots remaining 17 Exposure ( page 32)
6 Storage media 18 Metering ( page 31)
7 Macro ( page 24) 19 ISO ( page 32)
8 Self-timer / Burst ( page 25) 20 White balance ( page 31)
9 AEB (page 32) 21 Sharpness (page 33)
10 Date stamp ( page 33) 22 Quality ( page 21)
11 Battery ( page 5) 23 Resolution ( page 21)
12 Focus area (page 19)
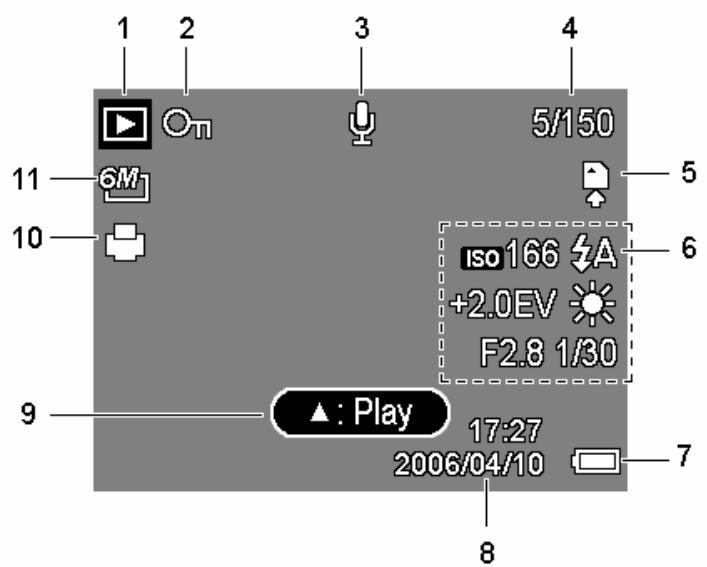
1 Playback mode (page 13)
2 Protect (page 40)
3 Voice memo ( page 30)
4 File number / Total
5 Storage media
6 Recording info (page 11)
7 Battery (page 5)
8 Captured Date & Time
9 Voice memo control (page 30)
10 DPOF (S page 45)
11 Resolution ( page 21)

Caution
- Some information may not display correctly if you display images captured by other camera model.
Press the SET/DISP button changes the LCD status as shown below:
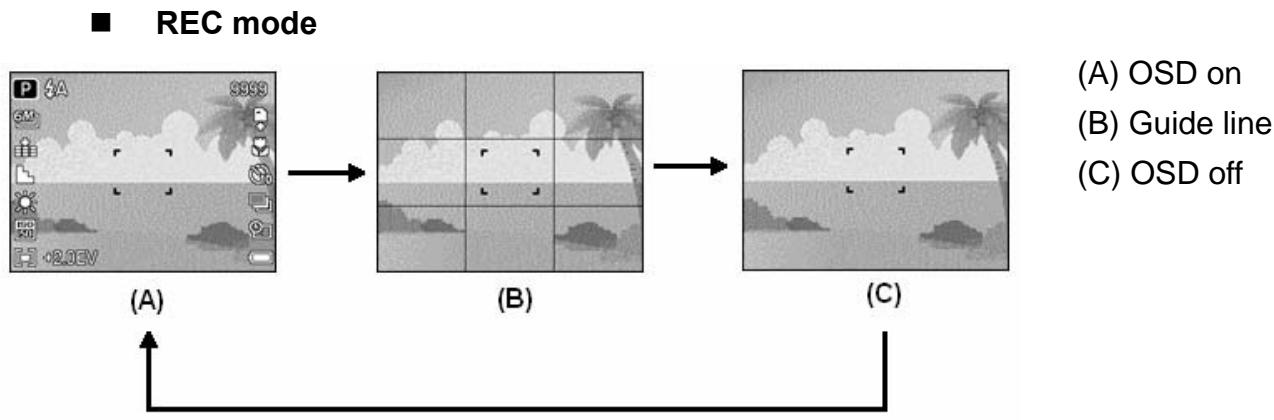

Tips
- Use the "Guide line" to compose images easily before shooting images.
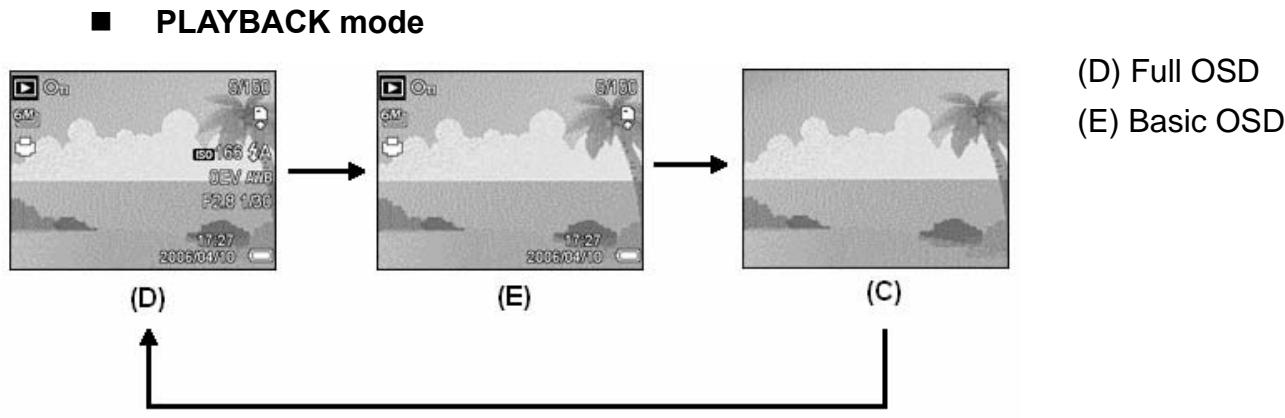

Caution
- You cannot change the LCD status in the following situation:
Manual exposure
Recording movie clips or audio files
Playing movie clips or audio files
Playing the slideshow
Viewing in thumbnail
。 Trimming a still image
- When the LCD status is not in "OSD on", press Macro (▲) or Flash (▶) will change the display mode to "OSD on" automatically.
Turning the Power On/ Off
1
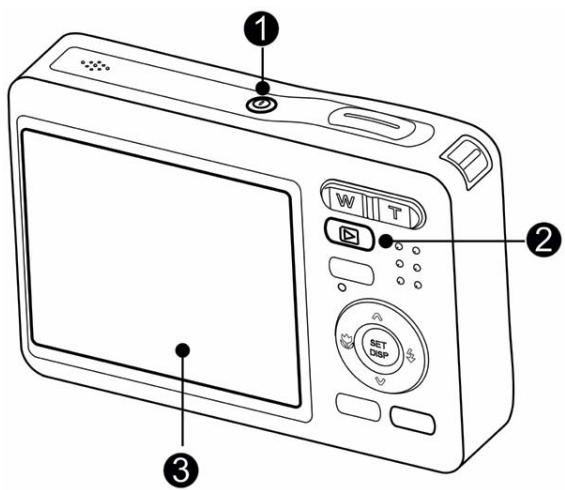
Press the POWER button (0) to turn on the camera in the REC mode.
- The power turns on, the lens extends and the LED lights in green.
Press the PLAYBACK button (2) to turn on the camera in the PLAYBACK mode.
- The power turns on, and an image displays on the LCD monitor (3).
2
Press the POWER button (O) again to turn the power off.
- The power turns off, the lens retracts and the LED turns off.
?
Tips
- You can turn on the camera without the start-up and operating sound by pressing and holding the POWER (①) or the PLAYBACK (②) button over 1.5 seconds.
- Switch between REC mode and PLAYBACK mode (page 13).
Power Saving Function
For saving the battery power, the LCD monitor automatically turns off 1 minute after the last control accessed (factory-preset setting). Press any button other than the power button to turn on the LCD monitor. You can change the power save setting in Setup menu (S page 17).
After the power saving function has been active for 1 minute, the power will turn off completely. Press the POWER (①) or the PLAYBACK (②) button to restore the power.
The power save feature will not activate in the following situation:
- Recording movie clips or audio files
- Playing movie clips or audio files
- Playing the slideshow
- Connecting the camera to a computer or printer with the USB cable
Changing the Mode
You can record images and voices in the REC mode. And using the PLAYBACK mode to replay, delete, or edit images on the LCD monitor.
Switching between REC mode and PLAYBACK mode
In REC mode: press the PLAYBACK button (0) to switch to the PLAY mode.
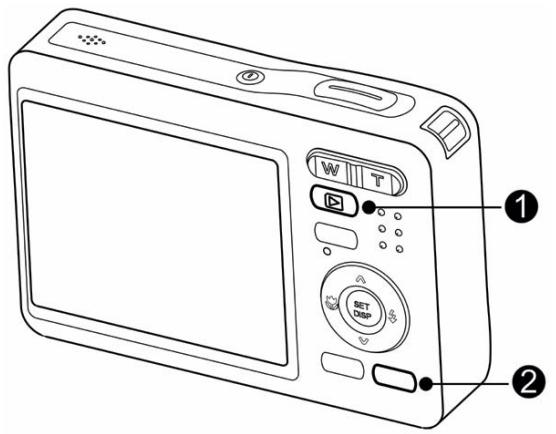
In PLAY mode: press the PLAYBACK (0) or the MODE (2) button to switch to the REC mode.
Selecting the REC mode
1 Set the camera to the REC mode
page 13).
2 Launch the mode palette.
- Press the MODE button (②) to show the scene mode palette.
3 Select a mode.
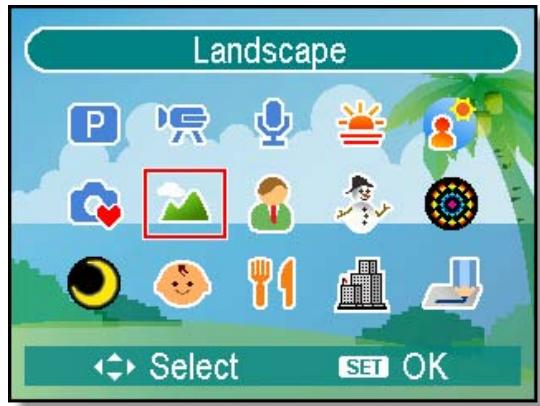
- Use the four-way control to select a desired mode and press the SET button to confirm the setting.
| Display | Title | Description |
| P | Program | The camera makes settings suitable for the shooting conditions. |
| R | Movie | For recording movie clips. |
| Q | Voice REC | For recording audio. |
| S | Sunset | Enhance the red tone for recording sunset images. |
| B | Backlight | Shooting the image of backlight object by changing metering. |
| Q Mode | Allows beginners to take pictures easily. | |
| Landscape | Used for the wide scenic views. | |
| Portrait | Blurring the background to focus on the subject. | |
| Snow | Used for the beach or snow scenes. | |
| Fireworks | Slow shutter speed to take fireworks exploding. | |
| Night Scene | Shooting the subject while keeping the background night scenery. | |
| Kids | Take a still image to capture moving kids. | |
| Food | Higher saturation makes food more appetizing. | |
| Building | Enhance the edges of the subject. | |
| Text | Enhance the black & white contrast. |
Selecting the ASM mode
1
Set the camera to the REC mode (page 13).
- It cannot be switch to ASM mode while in Movie or Voice REC mode.
2
Launch the ASM mode.
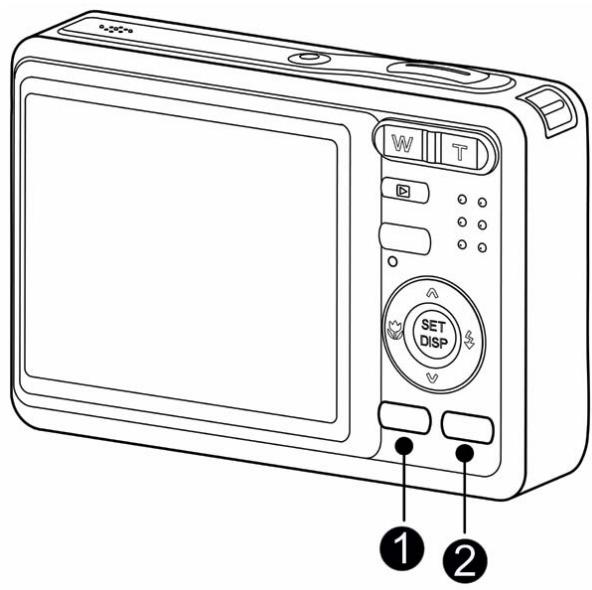
-
Press the ASM button (0) to toggle switch between Aperture Priority, Shutter Priority, Manual Exposure mode.
-
For detail operation (page26).
3
Exit the ASM mode.
- Press the MODE button (2) to show the scene mode palette, and select a REC mode (page 13).
Using the Menu
When a menu is displayed, the four-way control and the SET button are used to make the desired settings.
REC menu

Turn the power on, and set the
camera to the REC mode
page 13).

Open the REC menu.
- Press the MENU button (0) to
display the menu.

Select an item.
Press or (2) to select
a menu item.
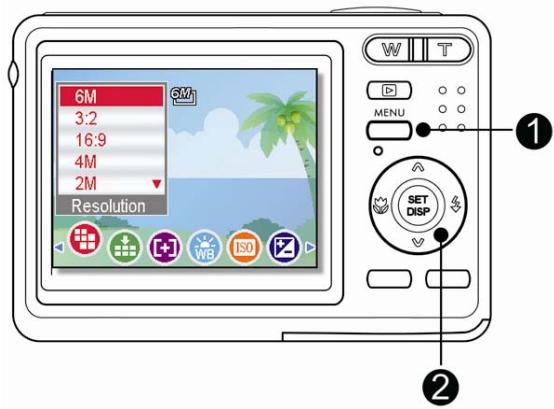

Change the setting.
- Press or (2) to change the setting.

Press the MENU (0) or the SET (2) button to save the settings and close the menu.
REC menu list (Still Image)
| Menu Item | Available Setting | Page |
| Resolution | 6M1 / 3:2 / 16:9 / 4M1 / 2M1 / VGA1 | 21 |
| Quality | / / / / | 21 |
| Metering | [◎] / [■] / [●] | 31 |
| White Balance | Auto / / / / / / / / / / | 31 |
| ISO | Auto / ISO 50 / ISO 100 / ISO 200 / ISO 400 | 32 |
| Exposure | -2.0EV ... +2.0EV | 32 |
| Drive Mode | Off / 2 / 10 / 8 / 4 | 25 |
| AEB | Off / □ | 32 |
| Highlight | Off / □ / □ / □ | 32 |
| Sharpness | / / / | 33 |
| Effect | Off / B&W / Sepia / Negative / Red / Green / Blue | 33 |
| Date Stamp | Off / Date / Date & Time | 33 |
| Stabilizer | Off / On | 34 |
| Face Tracking | Off / On | 34 |
| Photo Frame | Off / Frame 1 ~ 10 | 34 |
| Digital Zoom | Off / On | 22 |
REC menu list (Movie)
| Menu Item | Available Setting | Page |
| Movie Size | 16:9 / 640 / 320 | 28 |
| Metering | [◎] / [■] / [◆] | 31 |
| White Balance | Auto / 漂 / 淡 / 潜 / 淫 / 淋 | 31 |
Setup menu
1
Turn the power on, and set the camera to the REC or PLAYBACK mode (page 13).
2
Press the MENU button (O) to open the REC or PLAYBACK menu.
- The menu displays depends on whether you are in the REC mode or the PLAYBACK mode.
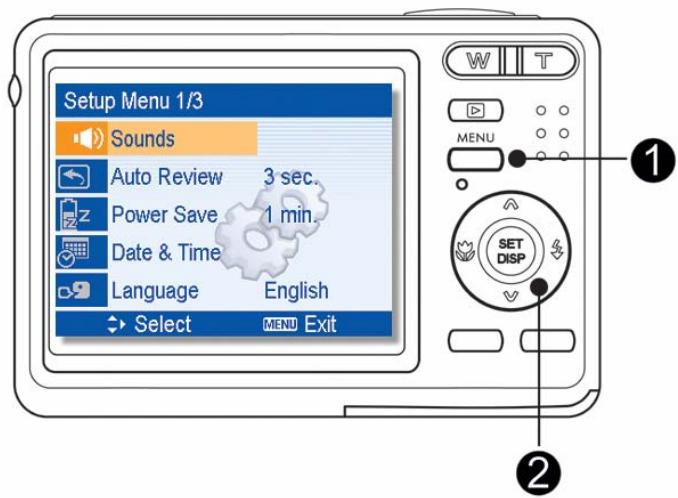
3
Open the Setup menu.
- Press four-way control (2) to select Setup ( ) and then press the SET (2) button to display the Setup menu.
4
Select an item.
- Press or (±b2) to select a menu item and then press or the SET (2) button to launch the submenu.
5
Change the setting.
- Press or (2) to select an option and press or the SET (2) button to apply the setting.
6
Press the MENU (O) button to close the menu.
Setup menu list
| Menu Item | Functions | |
| Sounds | [Shutter]: Sets the shutter sound on and off. [Start-up]: Sets a type of the start-up sound. [Beep]: Sets the operation sound on and off. [Volume]: Adjusts the volume of the shutter sound, start-up sound, beep and playback sound. | |
| Auto Review | [Off]: The captured image will not automatically display after shooing. [3 sec.]: The captured image will display for 3 seconds after shooting. [5 sec.]: The captured image will display for 5 seconds after shooting. | |
| Power Save | [1 min.] / [3 min.] / [5 min.]: For power consumption, the camera is turned off automatically for a period of time. • The power save feature will not activate in some situation (page 12). | |
| Date & Time | Sets the date & time (page 7). | |
| Language | Select a language for display menus and other information from the following 21 languages: (page 7) [English]: English [繁體中文]: T. Chinese [Deutsch]: German [Espanol]: Spanish [Italiano]: Italian [François]: French [Nederlands]: Dutch [Português]: Portuguese [Magyar]: Hungarian [Čestina]: Czech [Türk]: Turkish [Polski]: Polish [Svenska]: Swedish [Риский]: Russian [Rumänisch]:Romanian [Еλληνικά]: Greek [Ευβεύς]: Arabic [日本語]: Japanese [Пиц]: Thai [「体中文」]: S. Chinese [한국어]: Korean | |
| Menu Item | Functions | |
| File No. | Use this function if the camera experiences a “Folder cannot be created” error or if you want to restart numbering, for example, after erasing all files. [Series]: Store the latest used file number no matter deleting files or inserting a new memory card. [Reset]: Reset file numbering each time the memory card is changed. | |
| • Resetting the file number is useful for avoiding the file name duplication when images are downloaded to a computer (¯page 49). | ||
| TV Out | You can review images on a television with a supplied AV cable (¯page 47). TV Out should be set to either NTSC or PAL depending on your region. [NTSC]: America, Japan and others [PAL]: Europe, Oceania and others | |
| USB | [Computer] / [Printer]: Sets the USB mode to connect the camera with a printer or computer (¯page 48). | |
| S.Image | Sets a recorded image as the start-up image (¯page 46). | |
| Format | To erase all data stored in the memory card if you are using a card, or all data stored in the internal memory if there is no card inserted. • A “BUSY...PLEASE WAIT” message displays and the memory card is starting format. • A “COMPLETED” message displays when finish formatting. • All data will be deleted including protected files. Be sure to download important files to your computer before formatting. | |
| Battery Type | To ensure the camera displays battery level correctly, set the type to match the batteries used. [Alkaline]: When use alkaline batteries. [NiMH]: When use NiMH batteries. | |
| Reset All | Reset the entire menu and button operation settings to initial default. The following settings do not change after Reset All: • Date & Time setting • Language setting • TV out setting • Battery Type | |
Recording Still Images
1
Turn the power on, and set the camera to the REC mode
page 13).
2
Compose the subject on the monitor.
- Aim the focus area (0) to the subject that you want to take.
3
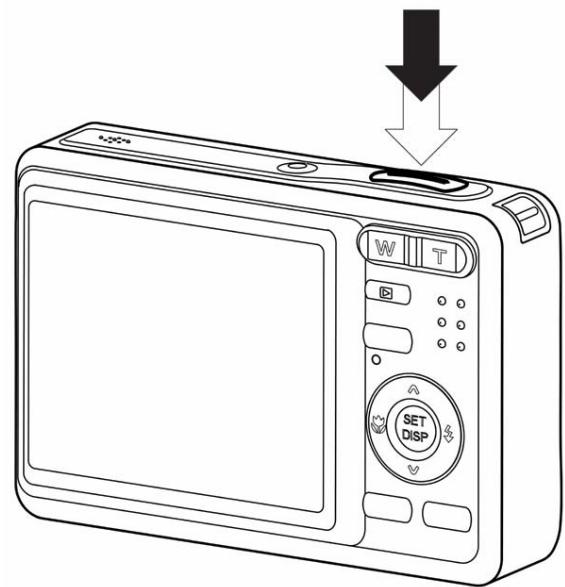
Half press the shutter button to focus the image.
- The focus area (1) becomes green while in focus, then shutter speed (2) , aperture value (3) and ISO value (4) are displayed.
- If the shutter speed is slow or the possibility that image may be blurred, the shake warning icon! may appear on the LCD monitor. To avoid this, use a tripod to stabilize the camera when recording images.
4
Take a picture.
- Press the shutter button fully to take a picture.

Caution
- Make sure that your fingers or the wrist strap does not block the lens.
The Q mode provides a simplified camera interface. Larger icons and fewer controls make it easier to take pictures anytime, especially for the beginners and elder users.
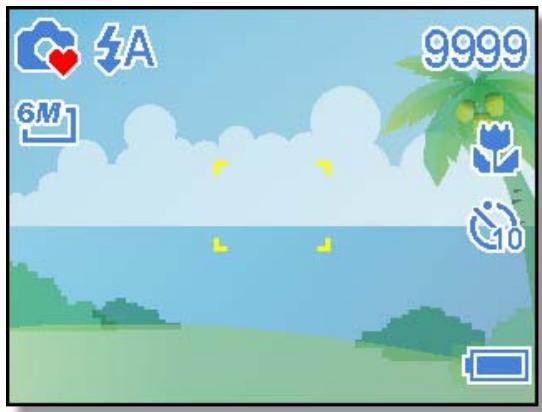
You can use only the basic settings in the Q mode:
| Button | Flash: Auto / Red eye / Force on / Slow sync / Force off |
| Macro: Off / On | |
| SET/DISP: OSD on / Guide line / OSD off | |
| Menu | Resolution: 6M / 3:2 / 16:9 / 4M / 2M / VGA |
| Drive Mode: Off / 2 sec. / 10 sec. / Double / Burst | |
| Stabilizer: Off / On | |
| Face Tracking: Off / On | |
| Photo Frame: 10 frames can be selected | |
| Beep: Off / On | |
| Auto Review: Off / 3 sec. / 5 sec. |
Rest of settings will not be controlled as below:
| Fixed setting (*) | • Quality: S.Fine • Metering: Multi • White balance: Auto • ISO: Auto • Exposure: Auto • AEB: Off | • Highlight: Off • Sharpness: Normal • Effect: Off • Date Stamp: Date & Time • Digital Zoom: Off |
| Utility setting (**) | • Shutter sound • Start-up sound • Power save • Date & Time • Language | • File No. • TV out • USB • Start-up image |
(*)Fixed setting: Settings are fixed in Q mode.
(^**) Utility setting: Use the same setting as last mode used.
Setting Image Size and Quality
You can select lower image resolution and quality to decrease the image size to capture more images. Choose a suitable setting according to the desired image quality and purpose. For details, see page 15.
Resolution Values
| Image Size | Print Size | ||
| 6M | 2864 x 2144 | Printing larger than A4-size. | Larger |
| 3:2 | 2864 x 1904 | ||
| 16:9 | 2864 x 1616 | ||
| 4M | 2272 x 1704 | ||
| 2M | 1600 x 1200 | ||
| VGA | 640 x 480 | Printing to postcards or attaching to e-mail. | Smaller |
Quality Values
| Compression | Purpose | ||
| ↓ | Super Fine | Shoot higher quality images. | Higher Quality ↓Lower Quality |
| ↓ | Fine | Shoot normal quality images. | |
| ↓ | Normal | Shoot for more images. | |
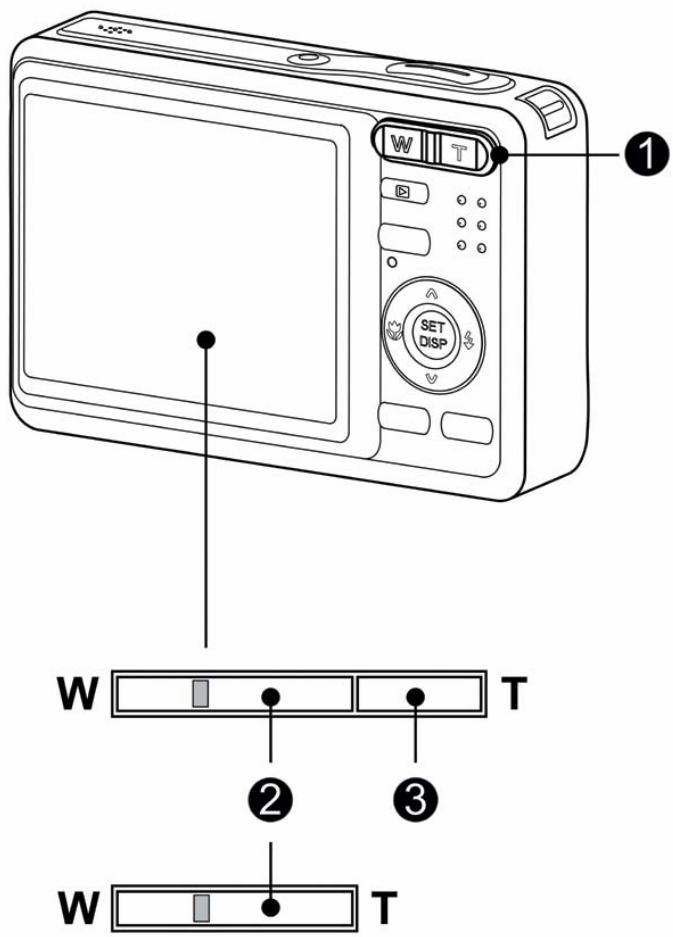
Your camera has a combination of optical and digital zoom functions that allows you to zoom in on far away subjects or zoom out for a wide angle shot.
The optical zoom is achieved by mechanically adjusting the lens of the camera. The digital zoom enlarges or shrinks the image using a software process.
1 Select the zoom setting, and point the camera at the subject.
2 Press the zoom button (0) to compose the image.
[W]: zoom out for a wide-angle shot.
[T]: zoom in for a telephoto shot.
- When the zoom button is pressed, the zoom bar appears on the LCD monitor.
- When the optical zoom (2) factor is at maximum, zooming stops temporarily. Press the [T] again, the camera switches to the digital zoom (3) automatically and zooming continues.
- The digital zoom (€) will not activate in movie recording.
3 Press shutter button to take a picture.
Tips
- Digital zoom works by enlarging the center portion of an image through a software interpolation process.
- The digital zoom is used to achieve magnification levels up to approx. 4 times.
Using the Flash
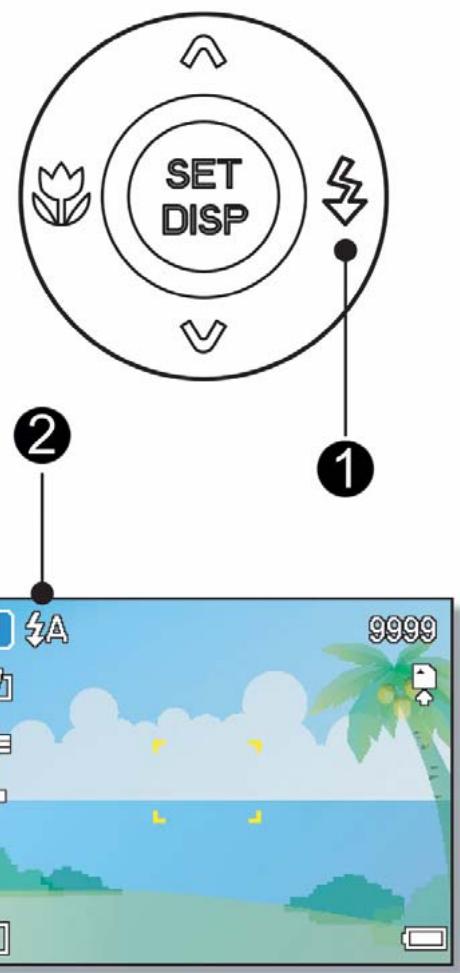
The flash is not only for taking pictures when there is insufficient light, but also when the subject is in shade or in backlight conditions. Press the flash button to cycle your camera through the various flash modes. The flash will not activate when continuous shooting or movie recording.
1
Turn the power on, and set the camera to the REC mode (page 13).
2
Press the flash button (0) to change the flash mode.
Each time the flash button is pressed, the flash icon (2) changes.
#
Auto flash:
The flash flashes automatically when shooting conditions require extra lighting.
40
Red-eye reduction:
Flash strobes to let the subject's eyes adjust to the flash, then press again to take the actual image. Your camera will detect the subject brightness and use the flash only when required.
#
Force on:
The Flash flashes every time you take a photo, regardless of lighting conditions.
S4
Slow sync:
Flash flashes with a slow shutter speed.
②
Force off:
The flash does not work in the dark.
3
Press shutter button to take a picture.
Caution
- The flash charging time may increase when the battery is low.
- The available flash settings are limited depending on the REC mode you selected (page 52).
Using the Macro
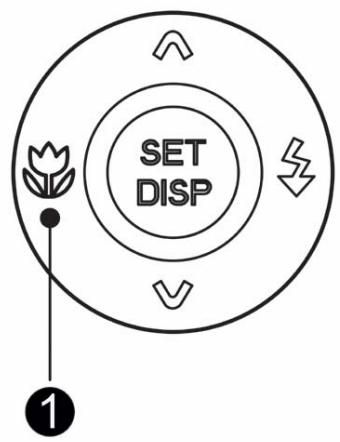
Your camera is equipped with a macro function that allows you to focus on very close subjects. In macro mode you can focus on subjects 10 cm from the lens when in the maximum wide angle setting and 40 cm in the maximum telephoto setting.

Turn the power on, and set the camera to the REC mode (page 13).

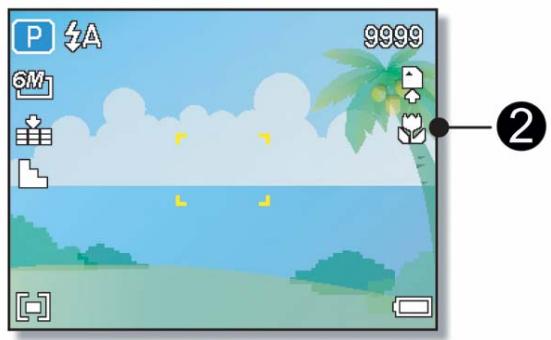
Press the macro button (0) enters the macro mode.
- The macro icon (②) displays in the LCD monitor.
- To leave the macro mode, press the macro button (0) again.

Press shutter button to take a picture.

Tips
- Distances referred to measure the distance between the camera lens surface and the subject.
Using the Self-timer & Burst
Use the self-timer to set a delay from the time the shutter button is pressed to the time the image is shot. Use the burst to record continuous still images shooting.
1
Turn the power on, and set the camera to the REC mode (page 13).
2
Open the REC menu (page 15).
- Use or to select [Drive mode] from the REC menu.
3
Change the setting.
- Press or to select a drive mode, then press the SET button.
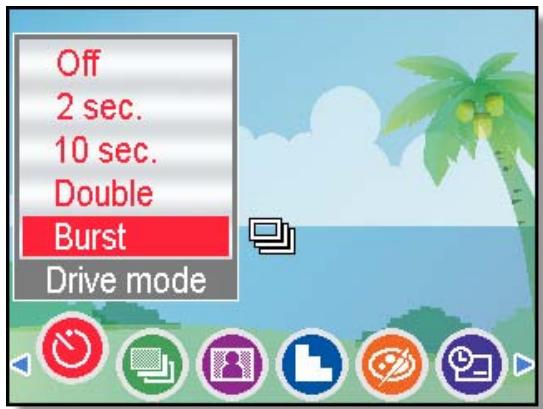
Off:
Record a single image.

2 sec.:
The shutter release will be delay for 2 seconds.

10 sec.:
The shutter release will be delay for 10 seconds.

Double:
Record two images in a shot after pressing the shutter release button 10 and 12 seconds.

Burst:
Keep pressing the shutter button fully to take continuous shooting. Release the shutter button to stop shooting.
4
Press shutter button to take a picture.

Tips
- When using the self-timer function, be sure to use a tripod or place the digital camera on a level, stable surface.
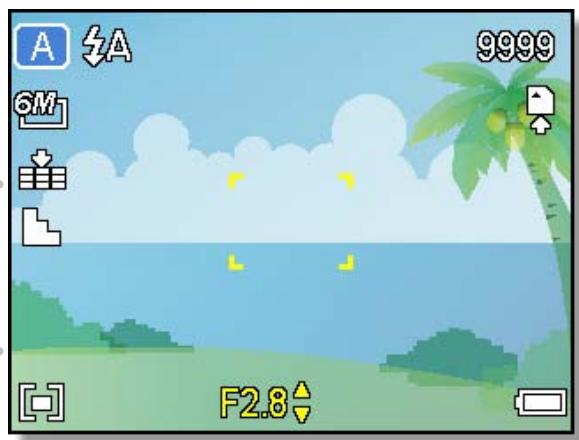
Using the Aperture Priority
In this mode, you can set an aperture value to match the brightness. A higher aperture value brings the background out of focus. Selecting a lower aperture value allows you to soft the background.
1 Turn the power on, and set the camera to the Aperture Priority ( page 14).
2 Adjust the aperture value by pressing or button.
3 Press shutter button to take a picture.

Tips
- The larger the aperture value the smaller the lens opening, allowing less light to enter the camera.
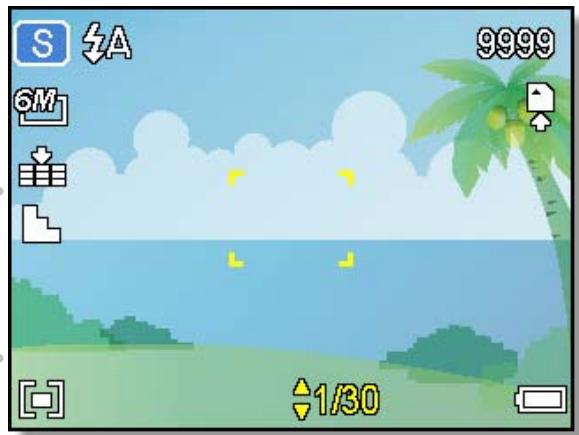
Using the Shutter Priority
In this mode, you can set a shutter speed to match the brightness. Faster shutter speeds allow you to take a sharp picture of a moving subject while slower speeds create a trail effect and allow you to shoot without a flash in dark areas.
1 Turn the power on, and set the camera to the Shutter Priority ( page 14).
2 Adjust the shutter speed by pressing or button.
3 Press shutter button to take a picture.
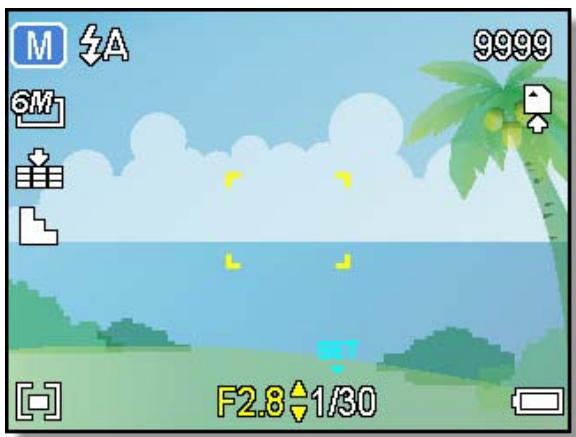
You can manually set the shutter speed and aperture to achieve a particular effect.

Turn the power on, and set the camera to the Manual Exposure ( page 14).

Use the SET button to switch between aperture value and shutter speed control. Press or to adjust the setting.

Press shutter button to take a picture.
- Press the shutter button halfway, the difference between the standard exposure and the selected exposure appears in red.
Recording Movie Clips
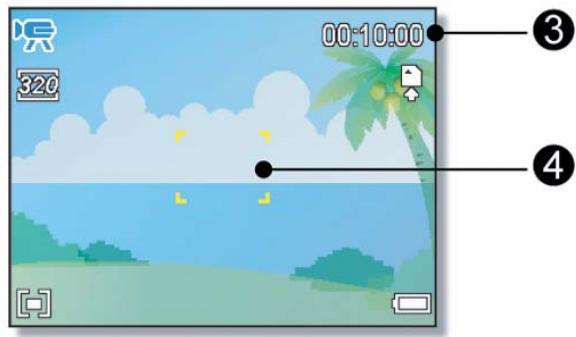
1
Turn the power on, and set the camera to the Movie mode (page 13).
2
Compose the subject on the monitor.
- Aim the focus area (4) to the subject that you want to take.
- The LCD monitor displays the available recording time (3).
3
Start recording.
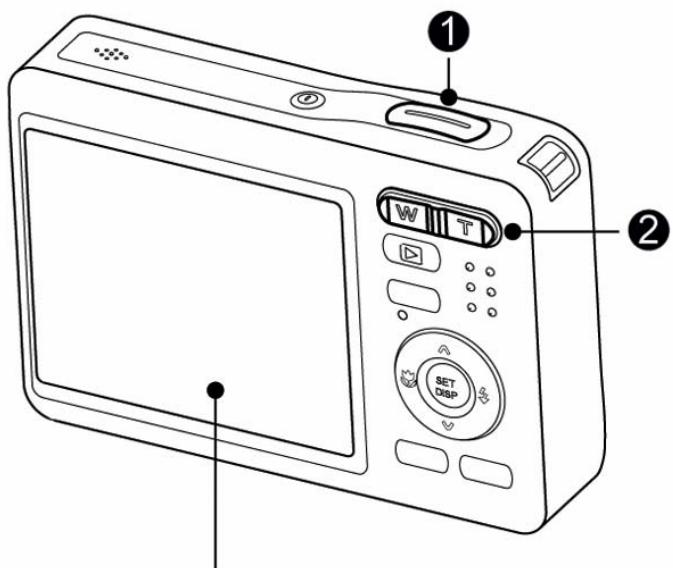
- Press the shutter button (0) to start recording.
Using the zoom button (2) to adjust the image size. - The White Balance is set and locked to the settings of the first frame
Caution
Sound cannot be recorded while pressing the zoom button..
- The digital zoom cannot be used in Movie mode.
4
Finish recording.
- Press the shutter again to end recording.
- The camera will stop recording automatically when the memory capacity has been reached.
Setting the Movie Size
Movie Size and Frame Rate
| Resolution | Frame Rate | ||
| 16:9 | 720 x 400 | 30 frames/sec. | Higher Quality ↓ Lower Quality |
| 640 | 640 x 480 | ||
| 320 | 320 x 240 | ||
Recording Audio Clips
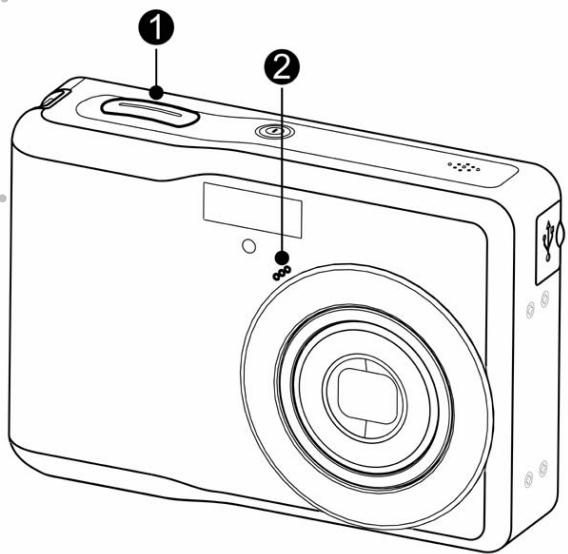
1
Turn the power on, and set the camera to the Voice REC mode (page 13).
2
Press the shutter button (0) to start recording.
- The voices are recorded from the microphone (2) of the camera. Be careful to avoid touching the microphone while recording.
3
Press the shutter button again to end recording.
- The camera will stop recording automatically when the memory capacity has been reached.
Playing Back Audio Clips
1
Turn the power on, and set the camera to the PLAYBACK mode (page 13).
2
Press or to select the audio clip that you want to playback.
3
Start playing back.
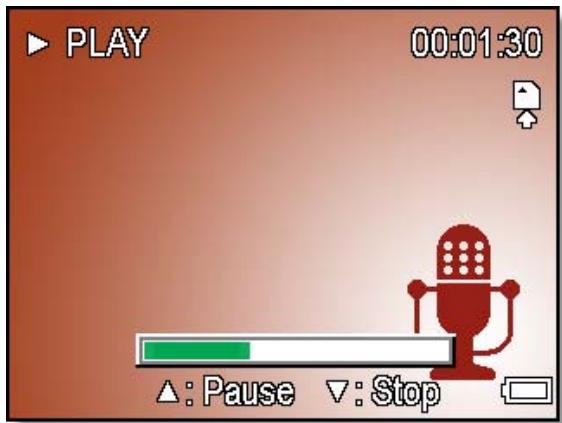
- Press to start playing the audio clip.
- Press to stop the audio clip, or press to pause it. When audio clip paused, press again to resume.
Recording a Voice Memo
You can add a voice memo to the still images after you record it.

Turn the power on, and set the camera to the PLAYBACK mode (page 13).

Press or to select a still image that you want to add a voice memo.
- If the image already has the voice memo recorded, the appears on the LCD monitor. The new recording will replace the previous one.
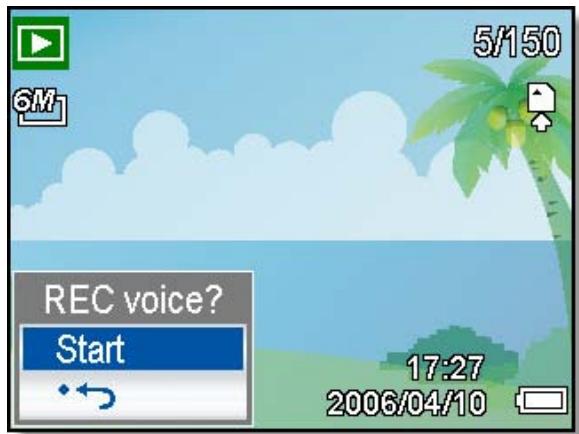

Open the PLAYBACK menu.
- Press the MENU button, using four-way control to select Voice Memo (E) and press the SET button.

Press the SET button to start recording for 30 seconds.
- Press the SET button again to end recording.

- The voice memo cannot be added to a movie clip or a protected image.
- You cannot delete only the voice memo. When you delete the image, the attached voice memo is also deleted.
Playing Back a Voice Memo

Turn the power on, and set the camera to the PLAY mode (S page 13).

Press or to select the image that has the voice memo recorded.

Start playing back.
- Press to start playing the voice memo.
- Press to stop the voice memo, or press to pause it. When voice memo paused, press again to resume.
Other Recording Functions
Setting the Metering
There are 3 different light metering options available on your camera.
| Option | Description |
| [◎] | Light is measured from the entire shooting screen, but gives more importance to the values near the center. |
| [■] | Selects an exposure based on readings from multiple points in the subject area. |
| [◆] | Selects an exposure based on a single reading taken from the center of your picture. |
Setting the White Balance
Adjust the white balance to match different light sources such as sunlight, incandescent (tungsten) lighting or, fluorescent lighting.
| Option | Description |
| AUTO | Automatically corrects white balance. Ideal for general photography. |
| Adjusts for bright sun conditions, or natural light conditions. | |
| Adjusts for cloudy days or twilight conditions. | |
| Adjusts for normal indoor lighting conditions. Corrects the orange hue of household light bulbs. Ideal for indoor photos under tungsten or halogen lighting without a flash. | |
| Adjusts for fluorescent lighting. Corrects the green hue of fluorescent lighting. Ideal for indoor photos under fluorescent lighting without a flash. | |
| For more accurate adjustment or when the light source cannot be specified. |

Tips
- Point the camera at a white piece of paper or similar object under the lighting conditions for which you want to set the white balance, and then press the Shutter button.
Setting the ISO
With the initial settings, the ISO sensitivity is automatically set according to the brightness of the subject.
| Option | Description |
| Auto | Sets the ISO sensitivity automatically. |
| ISO 50 | Sets the sensitivity to ISO 50 equivalent. |
| ISO 100 | Sets the sensitivity to ISO 100 equivalent. |
| ISO 200 | Sets the sensitivity to ISO 200 equivalent. |
| ISO 400 | Sets the sensitivity to ISO 400 equivalent. |

Tips
- Higher ISO speeds increase the image noise. To take clean images, use as low an ISO speed as possible.
Setting the Exposure
Set the exposure value manually to compensate for unusual lighting conditions such as indirect indoor lighting, dark backgrounds, and strong backlighting.
Setting the AEB
Sets the auto exposure bracketing (AEB) to shoot 3 continuous images, each with a different exposure setting: correctly exposed, underexposed, and overexposed.
Setting the Highlight
Make the subject stand out from its surroundings. The subject will be in focus in three different ranges: / /
Setting the Sharpness
You can select whether you want the image to have sharp or soft outlines.
| Option | Description |
| L | The edges of the image are emphasized. The edges will become sharp, but noise may occur in the recording image. |
| E | The edges of the image are sharp. This is suitable for printing. |
| A | The edges of the image are softened. This is suitable for editing images on PC. |
Setting the Photo Effect
You can add special effects to your images in Record mode or in Playback mode.
| Option | Description |
| Off | No effect is added to the image. |
| B&W | Convert image to black & white. |
| Sepia | Recorded image will be stored in a sepia tone. |
| Negative | Opposite what they were in the original image. |
| Mosaic | Add mosaic tiles to the images. (Playback only) |
| Red | The image becomes reddish. |
| Green | The image becomes greenish. |
| Blue | The image becomes bluish. |
Setting Date Stamp
The Date Stamp function can be used to add a date to your pictures as you take them.
| Option | Description |
| Off | Do not add the recorded date & time to printed images. |
| Date | Only add the recorded date to printed images. |
| Date & Time | Add the recorded date & time to printed images. |
Setting Stabilizer
With more sensibility and faster shutter speed to bright up the pictures, effectively prevent blur image caused by hand shack or target movement, one can take good pictures with little effort.
Setting Face tracking
After initializing face tracking function, the lens will lock the main character in the picture and follow the movements. Also use auto digital zoom technology to retract and extract zoom lens that allows you to become the focus of lens.

Tips
- Pressing the shutter halfway showing green AF area means focus is complete.
- Face tracking is powered by Arcsoft.
- Under some environmental influences, face tracking function may be limited.
Setting Photo Frame
You can add 10 kinds of frames to still images, making them more interesting.

Tips
- This feature only available with still images (except 3:2 and 16:9).
Playing Back Images
1
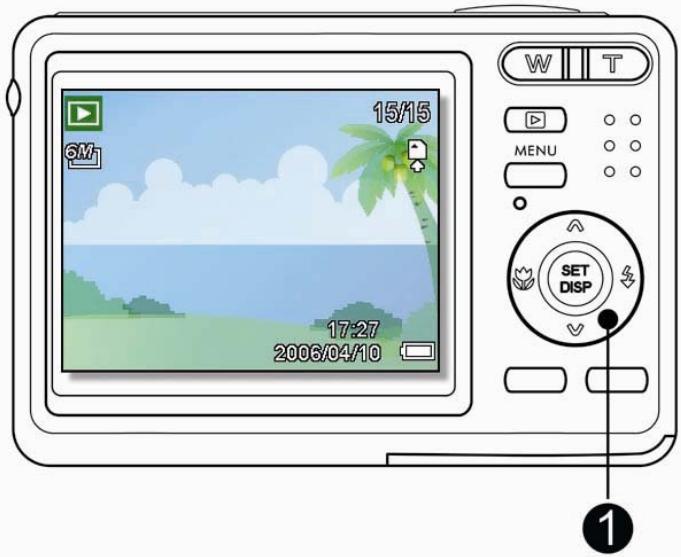
Turn the power on, and set the camera to the PLAYBACK mode (S page 13).
- The latest recorded image appears on the LCD monitor.
- If there are no images stored, a message [No image] appears.
2
Press the four-way control or (0).
: displays the previous image.
: displays the next image.
#
Tips
- Holding down or scrolls images in a high speed.
Playing Back Movie Clips
1
Turn the power on, and set the camera to the PLAYBACK mode (page 13).
2
Press or to select a movie clip that you want to playback.
3
Start playing back.
- Press to start playing the movie clip.
- Press to stop the movie clip, or press to pause it. When the movie paused, press again to resume.
?
Tips
- During movie playing back, press to fast forward or press to rewind it.
- Press the shutter to capture the still image from the movie clip while it had paused.
1
Turn the power on, and set the camera to the PLAYBACK mode (page 13).
2
Select an image.
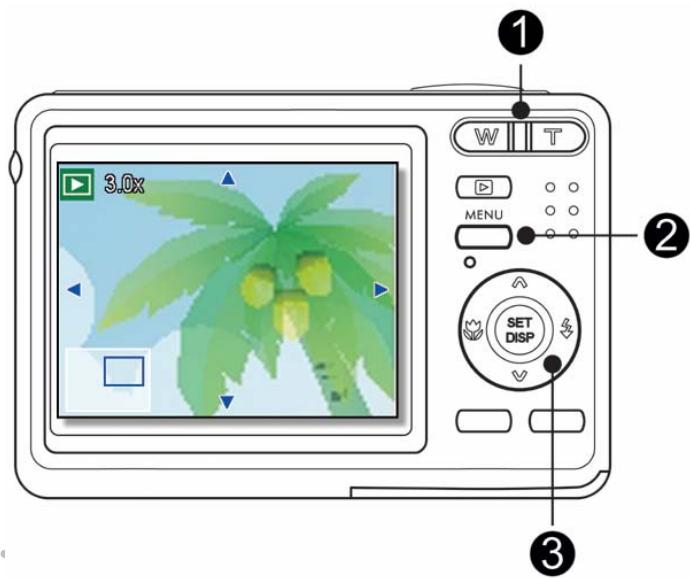
- Press or (3) to select the image that you want to magnify or trimming.
- Only still images can be magnified and trimmed.
3
Magnify the image.
- Press [T] (1) to magnify the image, and the central portion of the image is displayed. You can use the arrow button (3) to view different parts of the magnified image.
- Press the MENU button (2) to return to the normal size.
4
Trim the image.
- Press the SET button (3) to set the image trimming.
5
Save the image.
- Press the SET button (3) again to trim the selected image and save it as a new one.
1
Turn the power on, and set the camera to the PLAYBACK mode (page 13).
2
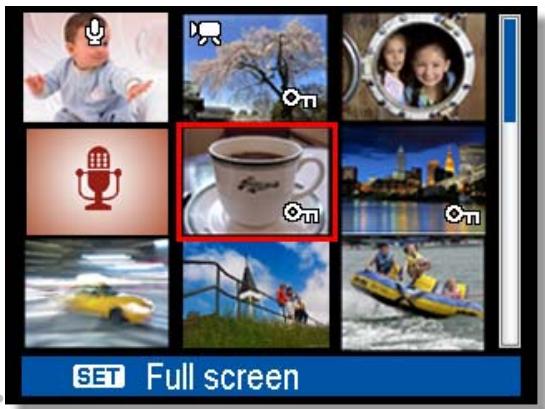
Press the zoom button [W], a thumbnail screen is displayed.
3
Use the four-way control to select the desired image, and press [T] or the SET button to show the selected image in full screen.

Tips
- You can protect or delete multiple images in thumbnail, see page 39, 41.
Playing a Slide Show
1
Turn the power on, and set the camera to the PLAYBACK mode (page 13).
2
Enter the slide show.
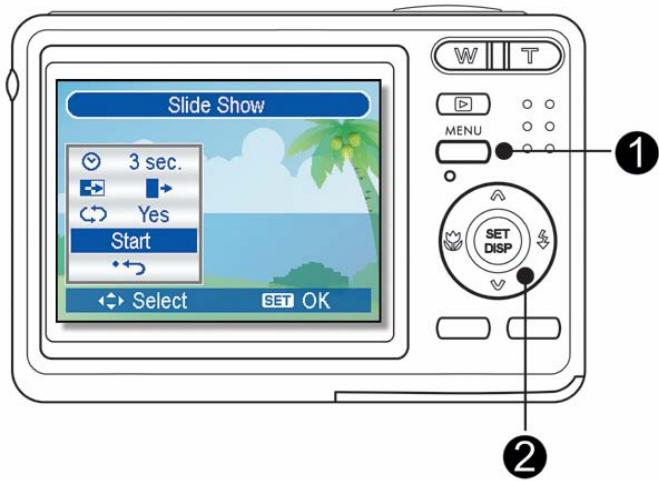
- Press the MENU button (1), use the four-way control (2) to select Slide Show (3) and press the SET button (2).
3
Change the slide show settings.
- Use the four-way control (2) to set the slideshow interval () , effect () and repeat () .
- You can set the interval between 1~10 seconds.
4
Playing the slide show.
- Press the SET button (2) to start the slideshow.
- During the slideshow, press the SET button (2) to pause the slideshow and press the SET button again to resume.
Deleting a Single File
1 Turn the power on, and set the camera to the PLAYBACK mode (page 13).
2 Open the menu.
- Press the MENU button (1), then use the four-way control (2) to select Delete (3) and press the SET button (2).
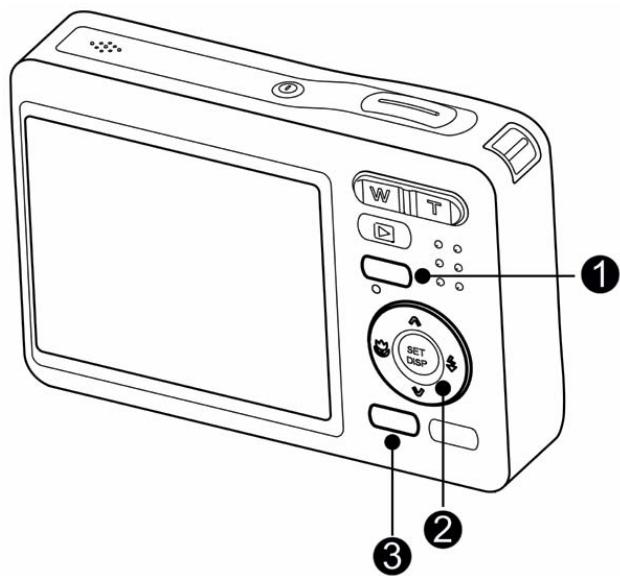
3 Press or (±b) to select [SINGLE], and then press the SET button () .
Press or (2) to select the image you want to delete.
Press the SET button (2) to delete the image.
- Repeat step 4~5 to delete images.
Tips
-
To quickly delete the current display image
-
Select the image you want to delete.
- Press the Delete button (3) to show a confirmation.
-
Press the SET button (2) to delete the current display image.
-
Protected images cannot be deleted with this function.
1 Turn the power on, and set the camera to the thumbnail screen ( page 37).
2 Open the menu.
- Press the MENU button, then Press or to select to select Delete (W) and press the SET button.
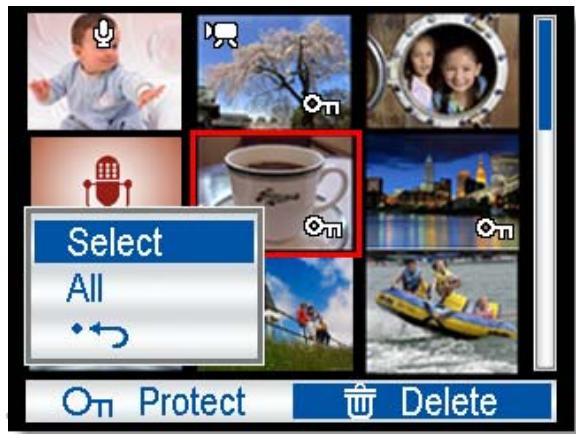
3 Press or to select [Select], and then press the SET button.
- The frame of the selected image turns green.
4 Select multiple images.
- Use the four-way control to select the image.
- Press the SET button toggles the on and off. Repeat this step until all images that you want to delete are displayed with an icon
5 Delete images.
- Press the MENU button, then select [Yes] and press the SET button. All selected images will be deleted.
- To cancel delete, press the MENU button in this step.
Deleting All Files
1 Turn the power on, and set the camera to the PLAYBACK mode ( page 13).
2 Open the menu.
- Press the MENU button, then use the four-way control to select Delete (W) and press the SET button.
- You can open the menu in full screen or in thumbnail.
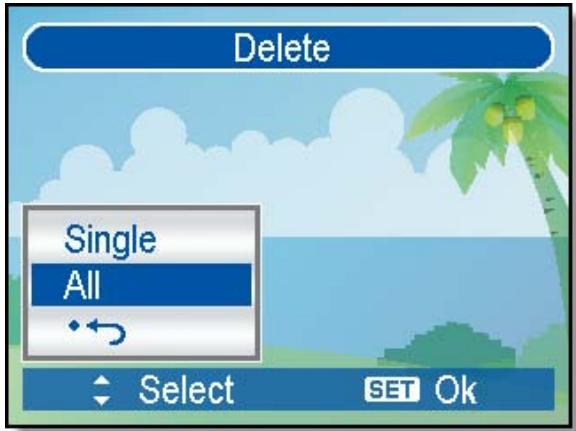
3 Press or to select [ALL], and then press the SET button.
4 Press the SET button to delete all unprotected images.
1 Turn the power on, and set the camera to the PLAYBACK mode
page 13).
2 Open the menu.
- Press the MENU button, then use the four-way control to select Protect (Oπ) and press the SET button.
3 Press or to select [SINGLE], and then press the SET button.
Press or to select the image you want to protect.
Press the SET button to protect the image.
- When the file is locked, the On displays on the LCD monitor.
- Repeat step 4~5 to protect images.
- To unlock the file, press the SET button again in step 5. The On will disappear and the file is unlocked.
Protecting All Files
1 Turn the power on, and set the camera to the PLAYBACK mode (page 13).
2 Open the menu.
- Press the MENU button, then use the four-way control to select Protect (Oπ) and press the SET button.
- You can open the menu in full screen or in thumbnail.
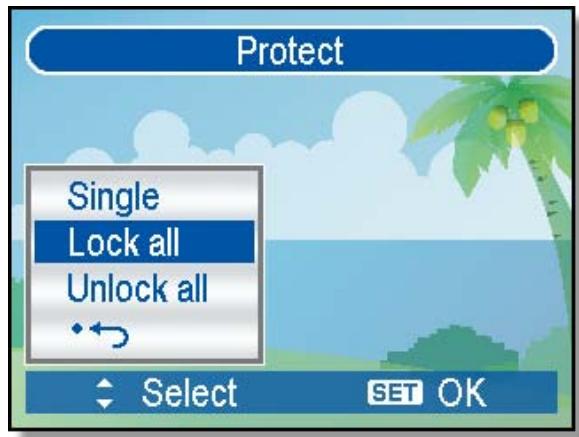
3 Press or to select [Lock all], and then press the SET button.
- To unlock all files, select [Unlock all] in this step, then press the SET button.
4 Press the SET button to protect all images.
1 Turn the power on, and set the camera to the thumbnail screen ( page 37).
2 Open the menu.
- Press the MENU button, then Press or to select to select Protect (Oπ) and press the SET button.
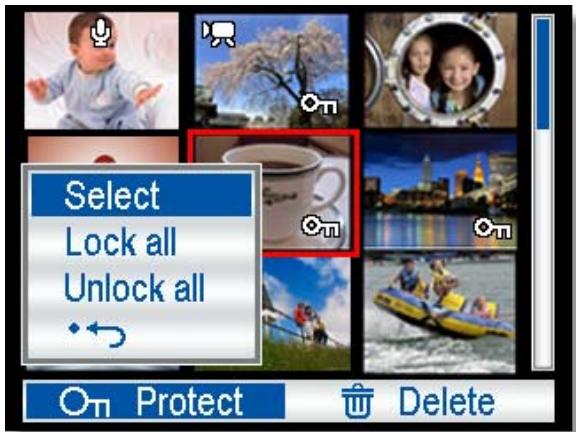
3 Press or to select [Select], and then press the SET button.
The frame of the selected image turns green.
4 Select multiple images.
- Use the four-way control to select the image.
- Press the SET button toggles the On on and off. Repeat this step until all images that you want to protect are displayed with an icon On.
5 Protect images.
- Press the MENU button, then select [Yes] and press the SET button. All selected images will be protected.
- To cancel protect, press the MENU button in this step.
Editing Images
Rotating Still Images
1 Turn the power on, and set the camera to the PLAYBACK mode (page 13).
2 Press or to select the image you want to rotate.
3 Open the menu.
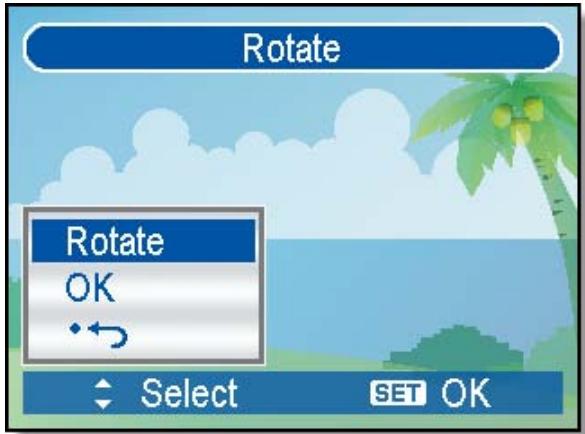
- Press the MENU button, then use the four-way control to select Rotate (□) and press the SET button.
4 Press the SET button to rotate the image.
Each press rotates the image 90 degrees in clockwise.
Press or to select OK, and then press the SET button to finish rotating.
Changing the Image Size
1 Turn the power on, and set the camera to the PLAYBACK mode (page 13).
Press or to select the image you want to resize.
3 Open the menu. Press the MENU button, then use the four-way control to select Resize ( ) and press the SET button.
4 Press or to select an option, and then press the SET button.
- The resized image will be saved as a new file.
Caution
- Only a large size image can be resize to a smaller one.
Changing the Image with Effects
1 Turn the power on, and set the camera to the PLAYBACK mode (page 13).
Press or to select the image you want to add the effect.
3
- Press the MENU button, then use the four-way control to select Effect ( ) and press the SET button.
4
Press or to select an option, and then press the SET button.
- The edited image will be saved as a new file.
Choosing the Image with Photo Frame
1 Turn the power on, and set the camera to the PLAYBACK mode (page 13).
Press or to select the image you want to add the photo frame.
3 Open the menu.
- Press the MENU button, then use the four-way control to select Photo Fames ( ) and press the SET button.
4
Press or to select the image you want, then press the SET button to apply the choice.
- The edited image will be saved as a new file.
Copying the Files
You may copy the data from the camera's internal memory to the memory card for convenience.

Be sure you have inserted a memory card into your digital camera. Set the camera to the PLAYBACK mode. (page 13).

Open the menu.
- Press the MENU button, then use the four-way control to select
Copy to card ( ) and press the SET button.
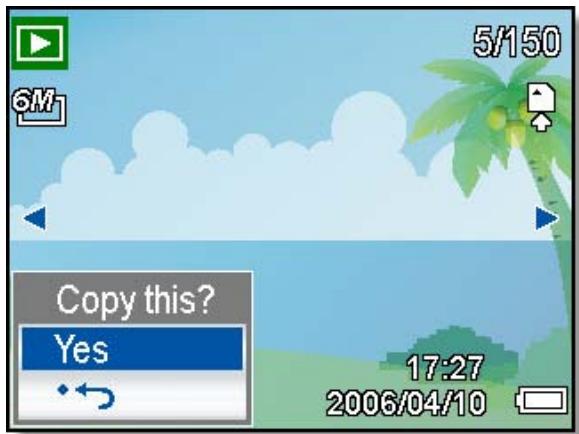

Press or to select [Single], then press the SET button.
- To copy all images to a memory card, select [All].

Press or to select the image you want to copy to a card.

Select [Yes] and then press the SET button to start copy.
- Repeat step 4~5 to copy other images.
- Press the MENU button to complete the setting.
Setting the DPOF
The Digital Print Order Format (DPOF) setting allows you to select images on the memory card for printing and specify the number of print copies in advance using the camera. This is extremely convenient for sending the images to a photo developing service or for printing on a direct print function compatible printer.

Turn the power on, and set the camera to the PLAYBACK mode (S page 13).

Open the menu.
- Press the MENU button, then use the four-way control to select DPOF (D) and press the SET button.
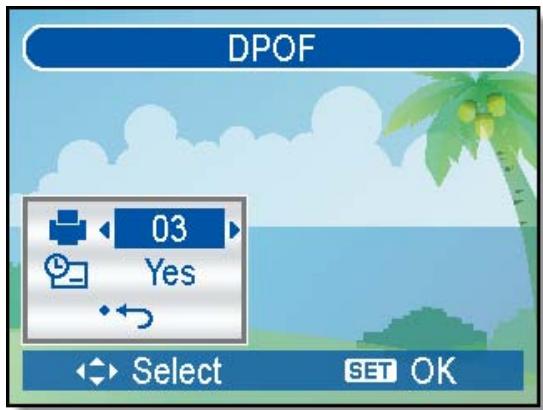

Press or to select [Single], then press the SET button.
- To set the DPOF setting for all images, select [All] in this step.
- To reset all DPOF settings to initial default, select [Reset] in this step.

Press or to select the image you want to print out, then press the SET button.

Set the number of copies.
- Press or to specify the number of copies.
The number of copies can be set from 0 to 30. - To cancel this image DPOF setting, set the number of copies to 0.

Print the date stamp out.
- Press and then press or to set or cancel the date stamp of current image.
- Repeat step 4~6 to other images for printing.

Press and then press the SET button to apply the setting or press the MENU button to cancel.

After you finished all image settings, select [^+] and press the SET button to apply it.
Choosing a Start-up Image
1
Turn the power on, and set the camera to the PLAYBACK mode (page 13).
2
Open the menu.
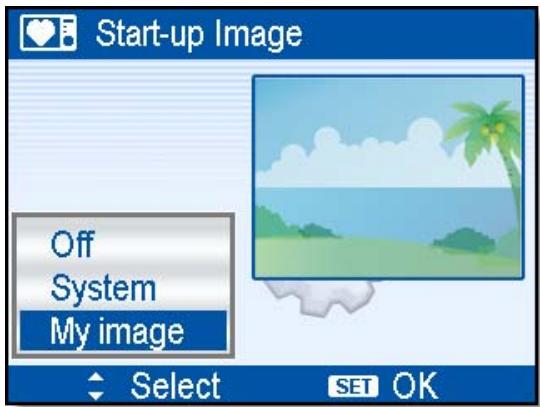
- Press the MENU button, then use the four-way control to select Start-up Image (❤) and press the SET button.
3
Press or to select the image you want, then press the SET button to apply the choice.
- A message "Completed" appears.
4
Set the camera to the Setup Menu (page 16).
5
Press or to select Start-up Image (♥) then press or the SET button.
6
Press or to select a desired option and press the SET button to apply the setting.
[Off]: Disable the start-up image.
[System]: Use camera default image.
[My image]: Use the image that you just specified in step 3.
7
Press the MENU button to close the menu.

Caution
- The start-up image will not be deleted even if the original image is deleted or memory formatted.
Connecting the Camera to a TV
You can display recorded images on a television with a supplied AV cable.
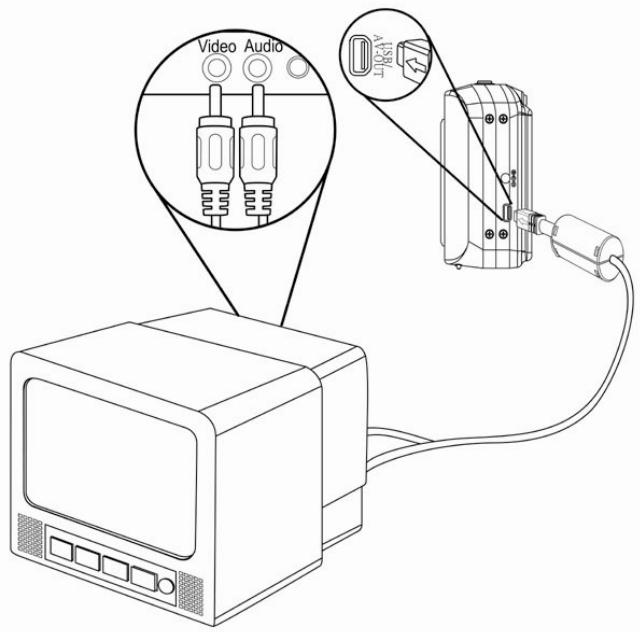
1 Set the TV out to match the TV system that you are using ( page 18).
2 Turn off the camera and the TV.
3 Use the supplied AV cable to connect the camera to the TV set.
4 Set the TV input signal to Video In.
Refer to the documentation included with your TV for more information.
5 Display on TV.
- Everything that would normally appear on the camera's LCD screen, such as photo and video clip playback, slide shows, and image or video capture, appears on the TV.
Connecting the Camera to a PC
There are two ways to download files from the camera's internal memory or memory card to a computer:
- Inserting the memory card into a card reader
- Connecting the camera to a computer using the supplied USB cable
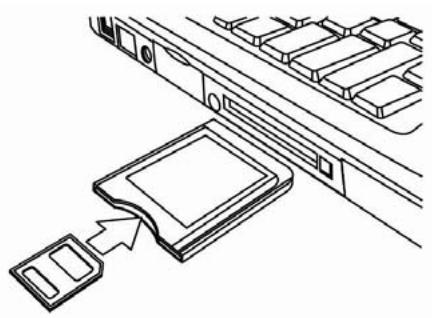
Using the Card Reader
1
Eject the memory card from the camera and insert it in a card reader that is connected to a computer.
2
Open [My Computer] or [Windows Explorer] and double-click the removable drive icon that represents the memory card.
3
Copy images from the card into a directory of your choice on the computer's hard disk.
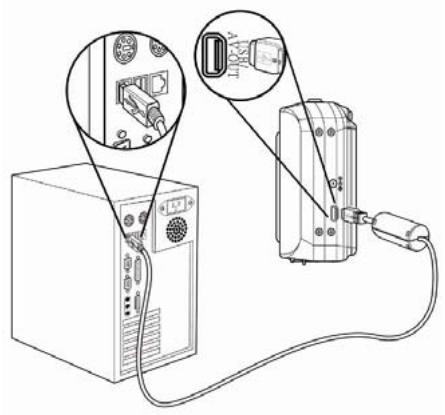
Connecting the Camera to a Computer with the USB Cable
1
Install the USB software driver included with the bundled CD-ROM.
2
Connect the supplied USB cable to the computer's USB port and turn on the camera.
- The LCD screen turns off when the connection to the computer has been successfully completed.
3
Open [My Computer] or [Windows Explorer]. A "Removable Disk" appears in the drive list.
4
Double-click the "Removable Disk" icon to view its contents.
- Files stored on camera are located in the folder name "DCIM".
Appendix
About the Folder & File Name
Your digital camera automatically creates a directory of folders in the internal memory or memory card that it uses to organize still images, movie clips and other information.
Folder Structure
Folder name begins with a 3-digit number from 100 to 999 and followed by "DICAM", each folder holds up to 9999 files. If new files are made, a new folder named in sequence will be made automatically.
INTERNAL (F)
DCIM
100DICAM
DSCI0001.JPG
DSCI0002.JPG
DSCI0003.JPG
DSCI0004.AVI
DSCI0005.WAV
101DICAM
102DICAM
MISC
AUTPRINT.MRK
File Naming
File name begins with "DSCI" and are followed by a 4-digit number that increases in sequence. File numbering starts from 0001 when a new folder is created.
If the highest folder number is 999 and highest file number exceeds 9999, the camera will display the warning message "Folder cannot be created". When it appears, try one of the following ways:
- Reset the file number and plug in a new memory card.
- The folder number and file number are initialized and renumbered from 100 and 0001 respectively.

Caution
- Do not change the folder and file names in the memory card using your computer. It may be unable to playback the data using the digital camera.
Troubleshooting
| Problem | Cause | Solution |
| Power does not turn on. | Battery is inserted in the wrong direction. | Reload battery in the correct direction. |
| Batteries are dead. | Replace or recharge batteries. | |
| The battery compartment door is open. | Make sure the battery compartment door is securely closed. | |
| The camera does not take pictures. | The flash is charging. | Wait for the flash to charge. |
| Memory is full. | Insert a new memory card. | |
| Memory card is not formatted correctly. | The card may be defective, use a new card. | |
| Image is not recorded when the shutter button is pressed. | The Flash is charge. | Wait for the flash to charge. |
| Memory is full. | Insert a new memory card. | |
| The flash does not fire. | Flash is set to OFF. | Set the flash to any mode except off. |
| Image is blurry or out of focus. | The camera was moving when the image was captured. | Hold the camera steady when shooting picture. |
| The subject was beyond the range within which the camera can focus. | Turn the Macro mode on it the subject is within 10 cm or 40 cm. Do not use Macro mode when shooting distant subjects. | |
| Image is not displayed on the LCD monitor. | A memory card with non-DCIF images (recorded with other camera) is loaded. | This camera cannot display non-DCIF images. |
| Recorded images are not saved in memory. | The camera was turned off / powered down before the image was stored in memory. | If the battery low indicator appears on the LCD monitor, replace the battery immediately. |
| Cannot transfer images to a computer after connecting the USB cable. | USB driver is not installed. | Install the USB driver before you connect the camera to a computer / turn the camera on. |
| Card error | The memory card format may not be correct. | Re-format the memory card to the FAT format using a card reader in Windows. |
Specifications
| Sensor | 6 megapixels CCD, Size: 1/2.5 inch |
| Lens | Focal length: f = 5.8 (W) ~ 17.4 (T) mm, 3X optical zoom, 4X digital zoom |
| LCD display | 2.5" LCD TFT |
| Focus Range | Normal: 80 cm ~ Infinity Macro: (W) 10 cm ~ 80 cm / (T) 40 cm~ 80 cm |
| Aperture | F/ 2.8 (W), 4.9 (T) |
| Shutter | 8 ~ 1/2000 sec. |
| File Format | Still Image: EXIF 2.2 compatible format (JPEG compression), DCF compatible. Support DPOF, (PictBridge available) Video: AVI, Audio: WAV |
| Resolution | Still Image: 2864 x 2144 (6M) / 2864 x 1904 (3:2) / 2864 x 1616 (16:9) / 2272 x 1704 (4M) / 1600 x 1200 (2M) / 640 x 480 (VGA) , Video: 720 x 400 / 640 x 480 / 320 x 240 |
| Scene Mode | Program /Movie / Voice REC / Sunset / Backlight / Q. Mode / Landscape / Portrait / Snow / Fireworks / Night scene / Kids / Food / Building / Text |
| Sensitivity | Auto / ISO 50 / ISO 100 / ISO 200 / ISO 400 |
| White Balance | Auto / Daylight / Cloudy / Tungsten / Fluorescent (H) / Fluorescent (L) / Custom |
| Exposure Control | -2EV to +2EV in 1/3 step |
| Metering | Center-weighted / Multi / Spot |
| Burst | Depends on the capacity of the memory. (no limit) |
| Self-timer | 2 sec. / 10 sec. / Double |
| Flash | Auto / Red eye reduction / Always on / Slow sync / Always off |
| Photo Effect | Black & White / Sepia / Negative / Mosaic / Red / Green / Blue |
| Storage | 16 MB internal memory / External: SD Card (2 GB)/ SDHC (4 GB) |
| TV system | NTSC / PAL |
| Power Supply | AA rechargeable NiMH battery X2 (option) AA alkaline battery X2 |
| Ambient temperature | Operating: 0° C to 40° C Storage: -20 to 60° C |
| Microphone | Built-in |
| Speaker | Built-in |
| Dimension | Camera Body (W x H x T): 89.5 x 61.3 x 27 mm |
| Weight | Camera Body w/o battery: Approx. 120 (g) |
*These specifications are subject to change without notice.
Function Available List
| Function | Mode | Still Capture | ! | ! | |||||||||||||||||||
| P | A | S | M | ||||||||||||||||||||
| Shutter & Lens | Focus | One time AF | ● | ● | ● | ● | ● | × | ● | × | ● | ● | ● | × | ● | × | × | ● | ● | ● | ● | × | |
| Continuous AF | × | × | × | × | × | × | × | × | × | × | × | × | × | ● | ● | × | × | × | × | × | |||
| Infinity Fixed | × | × | × | × | × | ● | × | ● | × | × | ● | × | × | × | × | × | × | × | × | × | |||
| Shutter Speed | 8~1/2000 | 8~1/2000 | 8~1/2000 | 8~1/2000 | 1~1/2000 | 1~1/2000 | 1~1/2000 | 1~1/2000 | 1~1/2000 | 1~1/2000 | 2 sec. fixed | 8~1/2000 | 1~1/2000 | 1~1/2000 | 1~1/2000 | 1~1/2000 | 1~1/2000 | 1/15~1/2000 | × | ||||
| Button | Macro | Off | ● | ● | ● | ● | ● | ● | ● | ● | ● | ● | ● | ● | ● | ● | ○ | ● | × | ● | × | ||
| On | ○ | ○ | ○ | ○ | ○ | × | × | × | × | × | × | × | × | ● | × | ● | ○ | × | × | ||||
| Flash | Auto | ◇ | × | × | × | ○ | × | × | × | × | ● | × | × | × | ● | ● | ● | × | × | × | |||
| Red eye | ○ | ○ | ○ | ○ | ○ | × | × | × | ● | × | × | × | ● | × | × | × | × | × | × | ||||
| Force on | ○ | ○ | ○ | ○ | ○ | × | ● | × | × | × | × | × | × | × | × | × | × | × | × | ||||
| Slow sync | ○ | ○ | × | × | ○ | × | × | × | × | × | × | ● | × | × | × | × | × | × | × | ||||
| Force off | ○ | ● | ● | ● | ○ | ● | ○ | ● | ○ | ○ | ● | ○ | ○ | ○ | ○ | ● | × | × | |||||
| Up & Down | Aperture Value | × | ○ | × | × | × | × | × | × | × | × | × | × | × | × | × | × | × | × | × | |||
| Shutter Speed | × | × | ○ | × | × | × | × | × | × | × | × | × | × | × | × | × | × | × | × | ||||
| Menu | Resolution | 6M | ○ | ○ | ○ | ○ | ○ | ○ | ○ | ○ | ○ | ○ | ○ | ○ | ○ | ○ | ○ | ○ | ○ | × | × | ||
| 3:2 | ○ | ○ | ○ | ○ | ○ | ○ | ○ | ○ | ○ | ○ | ○ | ○ | ○ | ○ | ○ | ○ | ○ | × | × | ||||
| P | A | S | M | ||||||||||||||||||||
| Mean | Resolution | 16:9 | ○ | ○ | ○ | ○ | ○ | ○ | ○ | ○ | ○ | ○ | ○ | ○ | ○ | ○ | ○ | ○ | ○ | ○ | × | × | |
| 4M | ○ | ○ | ○ | ○ | ○ | ○ | ○ | ○ | ○ | ○ | ○ | ○ | ○ | ○ | ○ | ○ | ○ | ○ | × | × | |||
| 2M | ○ | ○ | ○ | ○ | ○ | ○ | ○ | ○ | ○ | ○ | ○ | ○ | ○ | ○ | ○ | ○ | ○ | ○ | × | × | |||
| VGA | ○ | ○ | ○ | ○ | ○ | ○ | ○ | ○ | ○ | ○ | ○ | ○ | ○ | ○ | ○ | ○ | ○ | ○ | × | × | |||
| Movie Size | 16:9 | × | × | × | × | × | × | × | × | × | × | × | × | × | × | × | × | × | × | ○ | × | ||
| 640 | × | × | × | × | × | × | × | × | × | × | × | × | × | × | × | × | × | × | ○ | × | |||
| 320 | × | × | × | × | × | × | × | × | × | × | × | × | × | × | × | × | × | × | ◇ | × | |||
| Quality | S.Fine | ○ | ○ | ○ | ○ | ● | ○ | ○ | ○ | ○ | ○ | ○ | ○ | ○ | ○ | ○ | ○ | ○ | × | × | |||
| Fine | ◇ | ○ | ○ | ○ | × | ○ | ○ | ○ | ○ | ○ | ○ | ○ | ○ | ○ | ○ | ○ | ○ | × | × | ||||
| Normal | ○ | ○ | ○ | ○ | × | ○ | ○ | ○ | ○ | ○ | ○ | ○ | ○ | ○ | ○ | ○ | ○ | × | × | ||||
| Metering | Center | ○ | ○ | ○ | ○ | × | ○ | ○ | ○ | ○ | ○ | × | ○ | ○ | ○ | ○ | ○ | ○ | ○ | × | |||
| Multi | ◇ | ○ | ○ | ○ | ● | ● | × | ● | ● | ● | ● | ● | ● | ● | ● | ● | ● | ○ | × | ||||
| Spot | ○ | ○ | ○ | ○ | × | × | ● | × | × | × | × | × | × | × | × | × | × | ○ | × | ||||
| White Balance | Auto | ◇ | ○ | ○ | ○ | ● | ● | ● | ● | ● | ● | ● | ● | ● | ● | ● | ● | ● | ○ | × | |||
| Daylight | ○ | ○ | ○ | ○ | × | × | × | × | × | × | × | × | × | × | × | × | × | ○ | × | ||||
| Cloudy | ○ | ○ | ○ | ○ | × | × | × | × | × | × | × | × | × | × | × | × | × | ○ | × | ||||
| Function | Mode | Still Capture |  | |||||||||||||||||||
| P | A | S | M | C | B | A | C | B | C | D | E | F | G | H | I | J | ||||||
| Menu | White Balance | Tungsten | O | O | O | O | ✘ | ✘ | ✘ | ✘ | ✘ | ✘ | ✘ | ✘ | ✘ | ✘ | ✘ | ✘ | ✘ | ✘ | O | ✘ |
| Fluor_H | O | O | O | O | ✘ | ✘ | ✘ | ✘ | ✘ | ✘ | ✘ | ✘ | ✘ | ✘ | ✘ | ✘ | ✘ | ✘ | O | ✘ | ||
| Fluor_L | O | O | O | O | ✘ | ✘ | ✘ | ✘ | ✘ | ✘ | ✘ | ✘ | ✘ | ✘ | ✘ | ✘ | ✘ | ✘ | O | ✘ | ||
| Custom | O | O | O | O | ✘ | ✘ | ✘ | ✘ | ✘ | ✘ | ✘ | ✘ | ✘ | ✘ | ✘ | ✘ | ✘ | ✘ | O | ✘ | ||
| ISO | Auto | ◇ | O | O | ✘ | ● | ● | ● | ● | ● | ● | ● | ● | ● | ● | ● | ● | ● | ● | ✘ | ✘ | |
| 50 | O | O | O | O | ✘ | ✘ | ✘ | ✘ | ✘ | ✘ | ✘ | ✘ | ✘ | ✘ | ✘ | ✘ | ✘ | ✘ | ✘ | ✘ | ||
| 100 | O | O | O | ● | ✘ | ✘ | ✘ | ✘ | ✘ | ✘ | ✘ | ✘ | ✘ | ✘ | ✘ | ✘ | ✘ | ✘ | ✘ | ✘ | ||
| 200 | O | O | O | O | ✘ | ✘ | ✘ | ✘ | ✘ | ✘ | ✘ | ✘ | ✘ | ✘ | ✘ | ✘ | ✘ | ✘ | ✘ | ✘ | ||
| 400 | O | O | O | O | ✘ | ✘ | ✘ | ✘ | ✘ | ✘ | ✘ | ✘ | ✘ | ✘ | ✘ | ✘ | ✘ | ✘ | ✘ | ✘ | ||
| Exposure | +0.3 ~ +2.0 | O | O | O | ✘ | ✘ | ✘ | ✘ | ✘ | ✘ | ✘ | ✘ | ✘ | ✘ | ✘ | ✘ | ✘ | ✘ | ✘ | ✘ | ✘ | |
| 0EV | ◇ | O | O | ✘ | ● | ● | ● | ● | ● | ● | ● | ● | ● | ● | ● | ● | ● | ✘ | ✘ | ✘ | ||
| -0.3 ~ -2.0 | O | O | O | ✘ | ✘ | ✘ | ✘ | ✘ | ✘ | ✘ | ✘ | ✘ | ✘ | ✘ | ✘ | ✘ | ✘ | ✘ | ✘ | ✘ | ||
| Drive Mode (*) | Off | ◇ | O | O | O | O | O | O | O | O | O | O | O | O | O | O | O | O | ✘ | ✘ | ||
| 2 sec. | O | O | O | O | O | O | O | O | O | O | O | O | O | O | O | O | O | ✘ | ✘ | |||
| 10 sec. | O | O | O | O | O | O | O | O | O | O | O | O | O | O | O | O | O | ✘ | ✘ | |||
| P | A | S | M | C | ||||||||||||||||||
| Meana | Drive Mode (*) | Double | O | O | O | O | O | O | O | O | O | O | O | O | O | O | O | O | O | ✘ | ✘ | |
| Burst | O | O | O | O | O | O | O | O | O | O | O | O | O | O | O | O | O | ✘ | ✘ | |||
| AEB | Off | ● | ● | ● | ● | ● | ● | ● | ● | ● | ● | ● | ● | ● | ● | ● | ● | ● | ✘ | ✘ | ||
| On | O | O | O | ✘ | ✘ | ✘ | ✘ | ✘ | ✘ | ✘ | ✘ | ✘ | ✘ | ✘ | ✘ | ✘ | ✘ | ✘ | ✘ | |||
| Highlight | Off | ● | ● | ● | ● | ● | ● | ● | ● | ● | ● | ● | ● | ● | ● | ● | ● | ● | ✘ | ✘ | ||
| \( \square \) | O | O | O | O | ✘ | ✘ | ✘ | ✘ | ✘ | ✘ | ✘ | ✘ | ✘ | ✘ | ✘ | ✘ | ✘ | ✘ | ✘ | |||
| \( \square \) | O | O | O | O | ✘ | ✘ | ✘ | ✘ | ✘ | ✘ | ✘ | ✘ | ✘ | ✘ | ✘ | ✘ | ✘ | ✘ | ✘ | |||
| \( \square \) | O | O | O | O | ✘ | ✘ | ✘ | ✘ | ✘ | ✘ | ✘ | ✘ | ✘ | ✘ | ✘ | ✘ | ✘ | ✘ | ✓ | |||
| Sharpness | Hard | O | O | O | O | ✘ | ● | ✘ | ● | ✘ | ✘ | ✘ | ✘ | ✘ | ✘ | ✘ | ● | ✘ | ✘ | ✘ | ||
| Normal | ◇ | O | O | O | ● | ✘ | ● | ✘ | ● | ● | ● | ● | ● | ● | ● | ✘ | ● | ✘ | ✘ | |||
| Soft | O | O | O | O | ✘ | ✘ | ✘ | ✘ | ✘ | ✘ | ✘ | ✘ | ✘ | ✘ | ✘ | ✘ | ✘ | ✘ | ✘ | |||
| Effect | Off | ● | ● | ● | ● | ● | ● | ● | ● | ● | ● | ● | ● | ● | ● | ● | ● | ● | ✘ | ✘ | ||
| B&W | O | O | O | O | ✘ | ✘ | ✘ | O | O | ✘ | ✘ | ✘ | O | O | O | ✘ | ✘ | ✘ | ✘ | |||
| Sepia | O | O | O | O | ✘ | ✘ | ✘ | O | O | ✘ | ✘ | ✘ | O | O | O | ✘ | ✘ | ✘ | ✘ | |||
| Negative | O | O | O | O | ✘ | ✘ | ✘ | O | O | ✘ | ✘ | ✘ | O | O | O | ✘ | ✘ | ✘ | ✘ | |||
| Function | Mode | Still Capture | ! | ! | ||||||||||||||||||
| P | A | S | M | |||||||||||||||||||
| Effect | Red | ○ | ○ | ○ | ○ | × | × | × | ○ | ○ | × | × | × | × | ○ | ○ | ○ | × | × | × | × | |
| Green | ○ | ○ | ○ | ○ | × | × | × | ○ | ○ | × | × | × | × | ○ | ○ | ○ | × | × | × | × | ||
| Blue | ○ | ○ | ○ | ○ | × | × | × | ○ | ○ | × | × | × | ○ | ○ | ○ | × | × | × | × | × | ||
| Date Stamp | Off | ◇ | ○ | ○ | ○ | × | ○ | ○ | ○ | ○ | ○ | ○ | ○ | ○ | ○ | ○ | ○ | ○ | × | × | × | |
| Date | ○ | ○ | ○ | ○ | × | ○ | ○ | ○ | ○ | ○ | ○ | ○ | ○ | ○ | ○ | ○ | ○ | × | × | × | ||
| Date & Time | ○ | ○ | ○ | ○ | ● | ○ | ○ | ○ | ○ | ○ | ○ | ○ | ○ | ○ | ○ | ○ | ○ | × | × | × | ||
| Stabilizer | Off | ◇ | ○ | ○ | ○ | ○ | ○ | ○ | ○ | ○ | ○ | ○ | ○ | ○ | ○ | ○ | ○ | ○ | × | × | × | |
| On | ○ | ○ | ○ | ○ | ○ | ○ | ○ | ○ | ○ | ○ | ○ | ○ | ○ | ○ | ○ | ○ | ○ | × | × | × | ||
| Face Tracking | Off | ◇ | ○ | ○ | ○ | ○ | ○ | ○ | ○ | ○ | ○ | × | ○ | ○ | ○ | ○ | ○ | ○ | × | × | × | |
| On | ○ | ○ | ○ | ○ | ○ | ○ | ○ | ○ | ○ | ○ | × | ○ | ○ | ○ | ○ | ○ | ○ | × | × | × | ||
| Photo Frame(*) | Off | ◇ | ○ | ○ | ○ | ○ | ○ | ○ | ○ | ○ | ○ | ○ | ○ | ○ | ○ | ○ | ○ | ○ | × | × | × | |
| Frame 1 ~ 10 | ○ | ○ | ○ | ○ | ○ | ○ | ○ | ○ | ○ | ○ | ○ | ○ | ○ | ○ | ○ | ○ | ○ | × | × | × | ||
| Digital Zoom | Off | ◇ | ○ | ○ | ○ | ● | ○ | ○ | ○ | ○ | ○ | ○ | ○ | ○ | ○ | ○ | ○ | ○ | × | × | × | |
| On | ○ | ○ | ○ | ○ | × | ○ | ○ | ○ | ○ | ○ | ○ | ○ | ○ | ○ | ○ | ○ | ○ | × | × | × | ||
Customer care
More information con the complete AGFAPHOTO digital camera product range can be found under www.plawa.com
Service & Repair Hotline (EU):
00800 752 921 00 (from a landline only)
Service & Support Hotline (Germany):
0900 1000 042 (1.49 Euro/ min. from a German landline only)
Online Service / International contact:
support-apdc@plawa.com
Manufactured by
plawa-feinwerktechnik GmbH & Co. KG
Bleichereistraße 18
73066Uhingen
Germany
AGFAPHOTO is used under license of Agfa- Gevaert NV & Co. KG. Agfa- Gevaert NV & Co. KG. does not manufacture this product or provide any product warranty or support. For service, support and warranty information, contact the distributor or manufacturer. Contact: AgfaPhoto Holding GmbH, www.agfaphoto.com
Disposal of Waste Equipment by Users in Private Households in the European Union
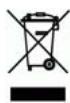
This symbol on the product or on its packaging indicates that this product must not be disposed of with your other household waste. Instead, it is your responsibility to dispose of your waste equipment by handing it over to a designated collection point for the recycling of waste electrical and electronic equipment. The separate collection and recycling of your waste equipment at the time of disposal will help to conserve natural resources and ensure that it is recycled in a manner that protects human health and the environment. For more information about where you can drop off your waste equipment for recycling, please
contact your local city office, your household waste disposal service or the shop where you purchased the product.
Batteries and rechargeable batteries should not be thrown in the trash can. Please return used batteries to the store or take it to where they collets such items. Following this guideline we are helping not to polluting our environment.
Declaration of Conformity
We herewith confirm the following designated product: AGFAPHOTO digital camera DC-630i has been tested and found to comply with the requirements set up in the council directive on the approximation of the law of members' states relating to the EMC Directive 2004/108/EC. For the evaluation regarding to the electromagnet compatibility, the following standards were applied:
EN 55022:2006, Class A
EN 55024:1998+A1:2001+A2:2003
IEC61000-4-2:2001
IEC61000-4-3:2006
IEC61000-4-4:2004
IEC61000-4-6:2006
IEC61000-4-8:2001
The device is marked with CE Logo.
FCC Compliance and Advisory
This device complies with Part 15 of the FCC Rules. Operation is subject to the following two conditions: 1.) this device may not cause harmful interference, and 2.) this device must accept any interference received, including interference that may cause unsatisfactory operation. This equipment has been tested and found to comply with the limits for a Class B peripheral, pursuant to Part 15 of the FCC Rules. These limits are designed to provide reasonable protection against harmful interference in a residential installation. This equipment generates, uses, and can radiate radio frequency energy and, if not installed and used in accordance with the instructions, may cause harmful interference to radio communication. However, there is no guarantee that interference will not occur in a particular installation. If this equipment does cause harmful interference to radio or television reception, which can be determined by turning the equipment off and on, the user is encouraged to try to correct the interference by one or more of the following measures.
- Reorient or relocate the receiving antenna.
- Increase the separation between the equipment and receiver.
- Connect the equipment to an outlet on a circuit different from that to which the receiver is connected.
- Consult the dealer or an experienced radio/TV technician for help.
Any changes or modifications not expressly approved by the party responsible for compliance could void the user's authority to operate the equipment. When shielded interface cables have been provided with the product or when specified additional components or accessories have elsewhere been designated to be used with the installation of the product, they must be used in order to ensure compliance with FCC regulations.