
TWINTOUCH PLUS OPTICAL - Souris optique GENIUS - Notice d'utilisation et mode d'emploi gratuit
Retrouvez gratuitement la notice de l'appareil TWINTOUCH PLUS OPTICAL GENIUS au format PDF.


| Type de produit | Souris optique sans fil avec clavier |
| Technologie de connexion | Radio fréquence (RF) via récepteur PS/2 |
| Alimentation souris | 2 piles AA |
| Alimentation clavier | 2 piles AA |
| Portée recommandée | 20 cm du récepteur, jusqu'à 10 mètres |
| Canaux de communication | 256 codes ID, réglage automatique |
| Boutons souris | Gauche, droit, molette (Magic-Roller), boutons latéraux (2) |
| Fonctions spéciales souris | Assignation des boutons, EasyJump, Auto-Panning, Zoom, défilement horizontal |
| Touches spéciales clavier | Multimédia (lecture/pause, arrêt, suiv./préc.), volume, favoris, email, navigation Web, veille |
| Logiciel inclus | MouseMate (Personnalisation des boutons, vitesse, pointeurs, modes Office/Genius) |
| Systèmes d'exploitation compatibles | Windows (DOS non pris en charge avant installation du pilote) |
| Surface recommandée | Surface plane, non réfléchissante (éviter verre, miroir, fer, velours noir) |
| Installation matérielle | Connecter le récepteur aux ports PS/2, insérer les piles, régler le canal |
| Indicateur de batterie faible | Témoin rouge clignotant sur le récepteur |
| Entretien | Nettoyer avec un chiffon doux et sec |
| Précautions d'emploi | Ne pas utiliser sur bureau métallique sans tapis ; éloigner des autres appareils électriques |
FOIRE AUX QUESTIONS - TWINTOUCH PLUS OPTICAL GENIUS
Questions des utilisateurs sur TWINTOUCH PLUS OPTICAL GENIUS
0 question sur cet appareil. Repondez a celles que vous connaissez ou posez la votre.
Poser une nouvelle question sur cet appareil
Téléchargez la notice de votre Souris optique au format PDF gratuitement ! Retrouvez votre notice TWINTOUCH PLUS OPTICAL - GENIUS et reprennez votre appareil électronique en main. Sur cette page sont publiés tous les documents nécessaires à l'utilisation de votre appareil TWINTOUCH PLUS OPTICAL de la marque GENIUS.
MODE D'EMPLOI TWINTOUCH PLUS OPTICAL GENIUS
Hardware Installation
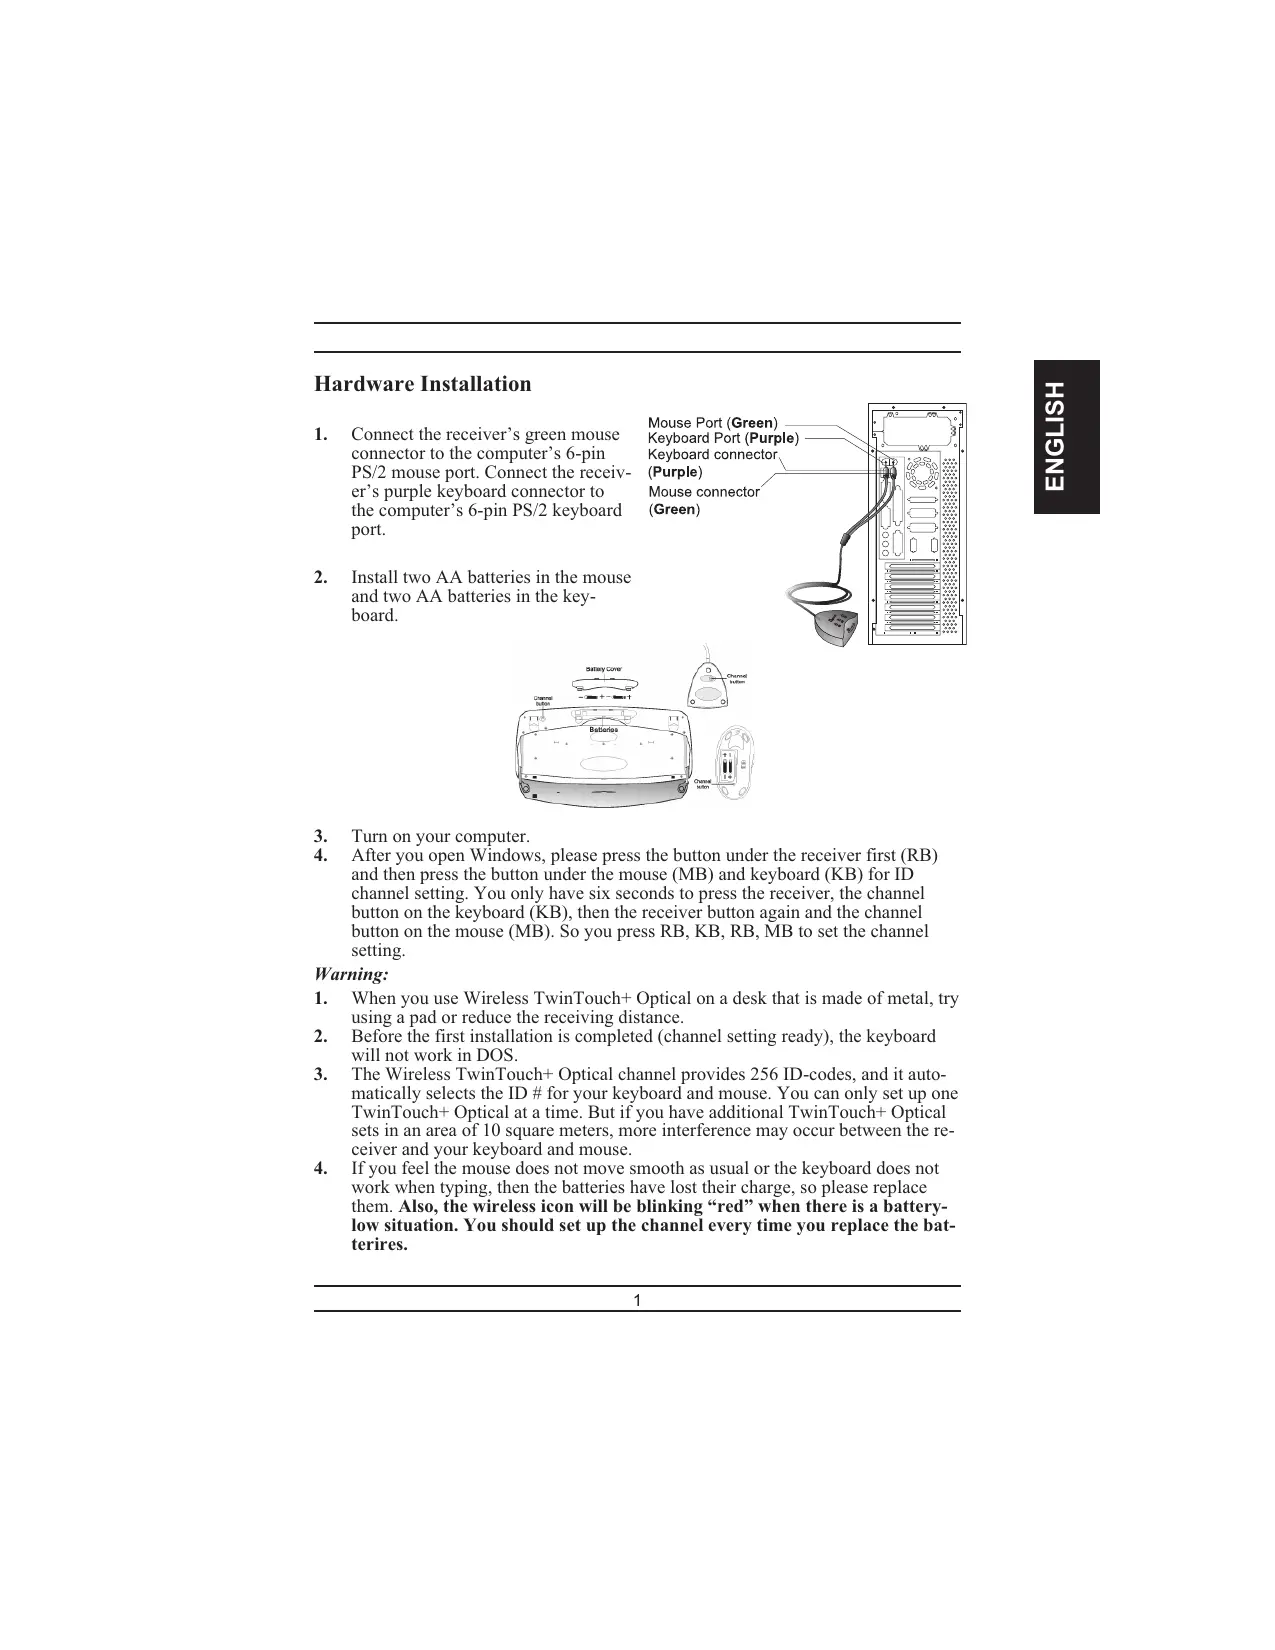
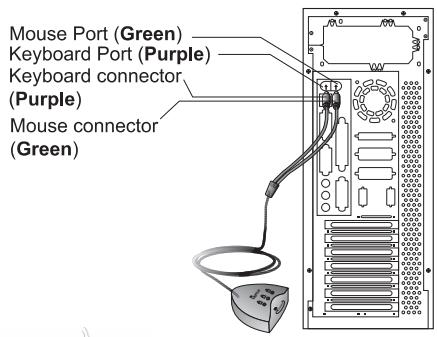
- Connect the receiver's green mouse connector to the computer's 6-pin PS/2 mouse port. Connect the receiver's purple keyboard connector to the computer's 6-pin PS/2 keyboard port.
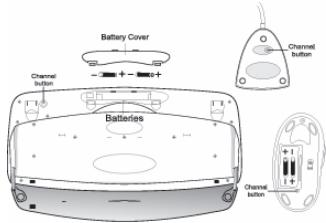
- Install two AA batteries in the mouse and two AA batteries in the keyboard.
- Turn on your computer.
- After you open Windows, please press the button under the receiver first (RB) and then press the button under the mouse (MB) and keyboard (KB) for ID channel setting. You only have six seconds to press the receiver, the channel button on the keyboard (KB), then the receiver button again and the channel button on the mouse (MB). So you press RB, KB, RB, MB to set the channel setting.
Warning:
- When you use Wireless TwinTouch+ Optical on a desk that is made of metal, try using a pad or reduce the receiving distance.
- Before the first installation is completed (channel setting ready), the keyboard will not work in DOS.
- The Wireless TwinTouch+ Optical channel provides 256 ID-codes, and it automatically selects the ID # for your keyboard and mouse. You can only set up one TwinTouch+ Optical at a time. But if you have additional TwinTouch+ Optical sets in an area of 10 square meters, more interference may occur between the receiver and your keyboard and mouse.
- If you feel the mouse does not move smooth as usual or the keyboard does not work when typing, then the batteries have lost their charge, so please replace them. Also, the wireless icon will be blinking "red" when there is a battery-low situation. You should set up the channel every time you replace the batteries.


- The TwinTouch+Optical with radio frequency gives you free movement and an enjoyable experience. For optimal performance, place the receiver at least 8 inches (about 20~cm ) away from the mouse and other electrical devices, such as the computer, monitor, and etc.
- Please do not use this optical mouse on a desk which is made of glass, mirror, iron, or black velvet. Also, a flat surface is necessary or the optical sensor will not work properly.
Software Installation
- Make sure the mouse and keyboard is connected to the computer.
- Put the Setup disk (or CD) into the disk drive.
- Follow the instructions on the screen to finish the software installation.
Factory Setting
1. Mouse:
Button Assignments
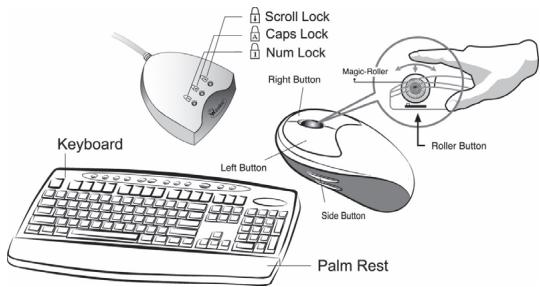
The Button Assignment feature lets you work in a more efficient way because you can assign the most frequently used commands in Windows to the mouse buttons.
Magic-Roller Press the "Magic-Roller" to surf the Internet and Windows documents
Left Button Provides traditional mouse functions such as click, double click and drag.
Right Button You can assign this button frequently used keyboard and mouse functions in addition to features like EasyJump, Auto-Panning, Zoom, etc.
Roller Button You can assign this button frequently used keyboard and mouse functions in addition to features like EasyJump, Auto-Panning, Zoom, etc.
Side Buttons You can assign certain functions (Application/Document, Horizontal Scroll, Last/Next Page, and Zoom in/out) to the upper or lower side button with the roller.
2. Keyboard:

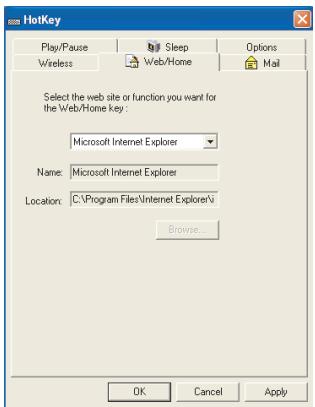
- Rewind: Previous track of audio or video CD's
- Play & Pause: Play and pause of audio or video CD's
- Stop: Stop play of audio or video CD's
- Forward: Next track of audio or video CD's
- Vol.-&+: decrease or increase volume
- My favorite: Open my favorite folder
- E-mail: Open mail folder
- Back: See last page when viewing the Internet
- www: Open browser in Netscape or IE
- Forward: Go to next page when viewing the Internet
- Sleep: Turn system into wake up mode
MouseMate Software Features


Browsing Speed You can adjust the browsing speed when you surf the Internet or Windows documents.
Browsing Direction
Button Find
Trails
Move the "Magic-Roller" forward and the screen will browse to the top of the document. Move it in reverse and the document will go in the opposite direction
Automatically positions the cursor on the default button, usually the OK button, when the dialog box appears on your screen.
This option makes it easier to find the cursor when using an LCD monitor. This option cannot be used if your monitor does not support it.
| Loop | When you move the cursor to the top (or bottom) of the screen, it will automatically move the cursor to the bottom (or top) of the screen. |
| Mouse Speed | This function lets you adjust the speed at which the pointer moves across the screen. |
| Double Click Speed | Use this function to set the double click speed of the mouse. |
| Swap Left/Right | Select this option if you want to have the mouse operate with the right mouse button as the primary button. |
| Pointers Folders | This lets you change the shape of the cursor. |
| Office Mode | Only supports Microsoft Office along with some new applications. Features include zoom, scrolling and Auto-Scrolling features. It's similar to Microsoft's IntelliMouse. |
| Genius Mode | Supports all applications that use scrollbars, including Office, with zoom, Auto-panning, and scrolling functions. |
| About | Click here to open the Genius Homepage “www.genius-net.com.tw” |
| Orientation | This function lets you set the angle when you move the mouse upward. It gives you a more comfortable angle when holding the mouse. This function works best with a portable trackball. |
EasyJump for Windows
EasyJump lets you open eight special functions quickly.
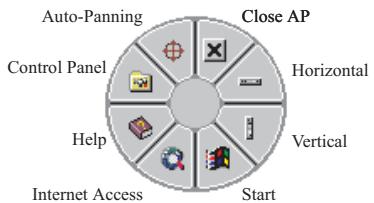
Close AP Close the application you are using.
Horizontal Moves the cursor to the horizontal scroll bar.
Vertical Moves the cursor to the vertical scroll bar.
Start Activates the Windows Start menu.
Internet Access This function opens Browser to access the Internet.
Help This opens the Help menu.
Control Panel Opens the mouse control panel.
Auto-Panning Move the mouse, and the document will move in the direction you move the mouse.
Switch Applications
When the right-button or Magic-Roller is set to "Switch AP", you can quickly switch from one open application to another without moving the mouse. To switch to a specific application, press the the right button or the Magic-Roller to select the application.
Zoom function for Office and IE Applications
Press the "Ctrl" key and move the "Magic-Roller" forward (or backward) to set the Zoom In/Out function. You can also use just one hand to Zoom In/Out: set the right button to be the "Ctrl" function, press the right button and move the "Magic-Roller" forward (or backward) to enlarge (or decrease) the document window.
Auto-Panning
You can set this function in the Button Assignment menu. Move the mouse, and the document moves in the direction you just moved.
Uninstall the Software
Follow these instructions to remove the software from your hard disk. In Windows, click on the Start button, select Programs and move to the mouse software. Then click on Uninstall software.
Customize the Software
This section shows you how to customize the software. To open the software control panel, you can double-click on the icon in the task bar or select the "Software" icon from the program group.
Close the Software
Click the right button on the taskbar, and select "Close Software" to close the software.
Marque : GENIUS
Modèle : TWINTOUCH PLUS OPTICAL
Catégorie : Souris optique