
TRIO RACER F1 - Volant de jeu vidéo GENIUS - Notice d'utilisation et mode d'emploi gratuit
Retrouvez gratuitement la notice de l'appareil TRIO RACER F1 GENIUS au format PDF.


| Type de produit | Volant de jeu vidéo avec pédale |
| Marque | GENIUS |
| Modèle | TRIO RACER F1 |
| Compatibilité | PC (Windows 7/Vista/XP/ME/2000/98), PlayStation 3, Wii, Gamecube |
| Connexion | USB (PC/PS3), port Gamecube (Wii/Gamecube) |
| Nombre de boutons | 11 boutons programmables |
| Croix directionnelle | 8 directions |
| Pédale | 1 pédale (accélérateur/frein) |
| Fixation | Serre-joint en forme de C |
| Alimentation | Via USB (bus-powered) |
| Indicateur LED | LED multicolore pour l'état et le mapping |
| Entretien | Chiffon sec, éviter liquides et détergents |
| Précautions | Ne pas exposer au soleil, ne pas renverser de liquide |
| Fonction de remappage | Oui, via boutons Select et Mode |
| Contenu du paquet | Volant, pédale, serre-joint, guide multilingue |
FOIRE AUX QUESTIONS - TRIO RACER F1 GENIUS
Questions des utilisateurs sur TRIO RACER F1 GENIUS
0 question sur cet appareil. Repondez a celles que vous connaissez ou posez la votre.
Poser une nouvelle question sur cet appareil
Téléchargez la notice de votre Volant de jeu vidéo au format PDF gratuitement ! Retrouvez votre notice TRIO RACER F1 - GENIUS et reprennez votre appareil électronique en main. Sur cette page sont publiés tous les documents nécessaires à l'utilisation de votre appareil TRIO RACER F1 de la marque GENIUS.
MODE D'EMPLOI TRIO RACER F1 GENIUS
- Package Contents:
Trio Racer F1 steering wheel
Trio Racer F1 Pedal
Mounting clamp (C typed)
Multi-language user's guide
- System Requirements:
For PC
- IBM PC Pentium 166MHz compatibles or higher
- Microsoft Windows 7/VISTA/XP/ME/2000/98
For PlayStation
PlayStation 3
For Wii / Gamecube
Game Cube gamepad port
- Setting-up your Trio Racer F1 series
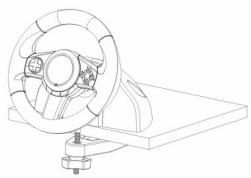
Connect and tightly screw the "C-typed" mounting clamp to the edge of the table through the two hidden holes in front of the wheel's chassis.
- Installation
Installation for PC system
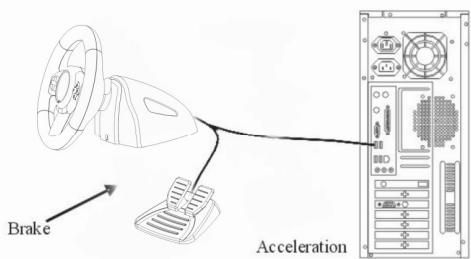
a. Plug in the USB connector of the cable to the USB port on your computer. Trio Racer F1 wheel will recognize that you have plugged it into the PC system automatically as LED light will be lit.
b. Plug in the pedal's connector to the steering wheel.
c. You can calibrate and test your game controller in the "Game controller" or "Gaming Options" screen and complete the installation.
Installation for PlayStation 3
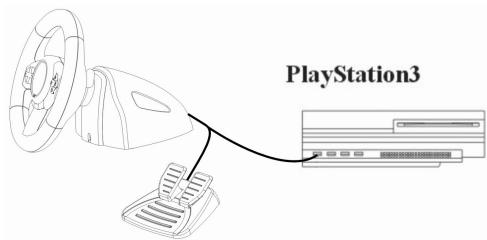
a. Turn the PlayStation 3 on and plug in Trio Racer F1's USB cable to the PlayStation 3.
b. Trio Racer F1 will recognize you have plugged it into PlayStation 3 and the LED indicator will be lit automatically.
c. When you finish the connection, you can play games now.
d. The game controller's function is according to the game software you are using.
- Installation for Wii/Gamecube
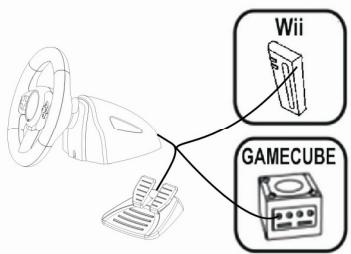
a, Turn the Wii/Gamecube on and plug in Trio Racer F1's Gamecube cable to the Wii or Gamecube.
b, Trio Racer F1 will recognize you have plugged it into Wii or Gamecube and the LED indicator will be lit automatically.
c, When you finish the connection, you can play games now.
d, The game controller's function is according to the game software you are using.
-
Operation and function
-
Basic button function setting
There are 11 functioning buttons built in to the Trio Racer F1, and each button has a different function depending on your game software.
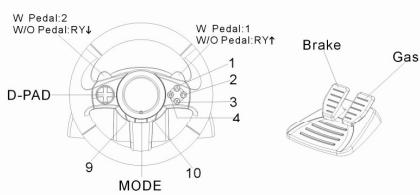
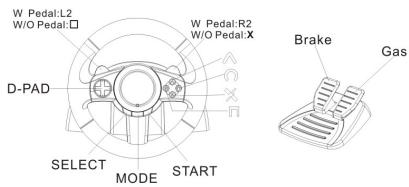
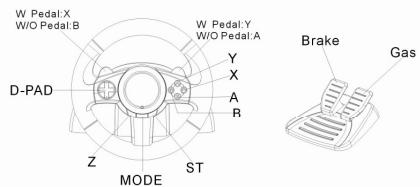
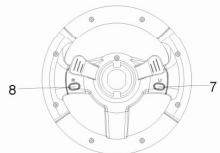
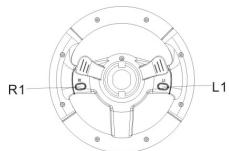
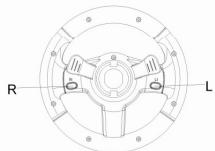
| PC | PlayStation3 | Wii/Gamecube |
| Eight ways D-Pad | Eight ways D-Pad | Eight ways D-Pad |
| Button 1, 2, 3, 4 | X,○,□,△ | Y,X,A,B |
| Button 5, 6 | L2, R2 | X, Y |
| Button 7, 8 | L1, R1 | L, R |
| Button 9, 10 | Select, Start | Z, ST |
| MODE Button | PS Button | MODE Button |
Note: Under PlayStation 3 console, "MODE" Button will be the "PS button" function.
6. Button Mapping
To change the function of particular button, you can follow below tips.
Create a mapping
a. Press the "Select" button and stay 3 seconds.
b. Three colour LED blinks quickly.
c. Press the control to be mapped
d. The Red LED blinks quickly.
e. Press the destination control
e. The Red LED stops blinking and return to its initial state, and you can go on button mapping.
Example :
| Stage | Direction | Then : |
| 1 | Press "Select" 3 seconds | Three colour LED blinks quickly |
| 2 | Press "L1" | Blue LED blinks quickly |
| 3 | Press " X " | Blue LED stops blinking |
| Result | Now "L1" is " X" & " X " is "X" | |
Exiting program mode
Method 1: Auto-exiting program after 6 second when unpressing any button.
Method 2: Exiting program by pressing "Select" button.
Erase the mapping (PS3/PC/Wii/GC)
A, Pressing "Mode" button staying 2 seconds,
B. The red LED blinks quickly and then return to its initial state
C. The mapping has been erased.
7. Care Of the Unit
The Trio Racer F1 is a well-designed mechanical device. However, it still requires a degree of care in its use and storage. Follow these guidelines when using, connecting or storing the Trio Racer F1:
a. Do not expose the unit to direct sunlight for long periods of time, as this will cause the plastic to fade and become brittle.
b. Do not spill liquids on the unit. If you accidentally spill anything on the Trio Racer F1, use a dry cloth immediately to clean it.
c. Do not use any detergents or cleaners on the Trio Racer F1.
Marque : GENIUS
Modèle : TRIO RACER F1
Catégorie : Volant de jeu vidéo