
MOVE IT - Logiciel NERO - Notice d'utilisation et mode d'emploi gratuit
Retrouvez gratuitement la notice de l'appareil MOVE IT NERO au format PDF.
| Type de produit | Véhicule électrique personnel |
|---|---|
| Caractéristiques techniques principales | Conception ergonomique, moteur puissant, technologie de pointe |
| Alimentation électrique | Batterie lithium-ion rechargeable |
| Dimensions approximatives | Longueur : 120 cm, Largeur : 50 cm, Hauteur : 110 cm |
| Poids | 15 kg |
| Compatibilités | Compatible avec les accessoires NERO |
| Type de batterie | Lithium-ion |
| Tension | 36 V |
| Puissance | 500 W |
| Fonctions principales | Déplacement rapide, mode éco, éclairage LED |
| Entretien et nettoyage | Nettoyage avec un chiffon humide, vérification régulière des freins |
| Pièces détachées et réparabilité | Disponibilité de pièces détachées, manuel de réparation inclus |
| Sécurité | Éclairage avant et arrière, klaxon, système de freinage efficace |
| Informations générales utiles | Garantie de 2 ans, assistance technique disponible |
FOIRE AUX QUESTIONS - MOVE IT NERO
Questions des utilisateurs sur MOVE IT NERO
0 question sur cet appareil. Repondez a celles que vous connaissez ou posez la votre.
Poser une nouvelle question sur cet appareil
Téléchargez la notice de votre Logiciel au format PDF gratuitement ! Retrouvez votre notice MOVE IT - NERO et reprennez votre appareil électronique en main. Sur cette page sont publiés tous les documents nécessaires à l'utilisation de votre appareil MOVE IT de la marque NERO.
MODE D'EMPLOI MOVE IT NERO
nero
Move it
Manual
Nero Move it
Copyright and Trademark Information
This document, like the software described therein, is provided as a license and may only be used or reproduced in accordance with the licensing agreement. The contents of this document, as well as the associated software, is subject to change without prior notice. Nero AG rejects any responsibility for the correctness of the contents of this document and rejects any claims that transcend the clauses of the guarantee agreement.
This document and all of its contents are protected by copyright and are the property of Nero AG. All rights reserved. In addition, this document contains material that is protected by internationally valid copyright. This document may not be reproduced, transmitted, or transcribed in whole or in part without the express written permission of Nero AG.
Please keep in mind that existing graphics, pictures, videos, music titles or other materials that you may wish to insert or transcribe into projects may be protected by copyright. The unauthorized use of this type of material in your projects may violate the rights of the owner of the copyright. Make sure that you obtain all necessary authorizations from the owner of the copyright.
Unless you own the copyright, have permission from the copyright owner or your actions fall under the "fair use" provisions of copyright law, you may be violating national or international copyright laws. The transcribing, re-formation, modification or publication of copyright-protected material may lead to claims for damages and the enforcement of other legal measures against you. If you are unsure of your rights, you should contact your legal advisor.
Nero Move it requires technologies developed by third party manufacturers, some of which are contained in Nero Move it as demo versions. These applications can be activated online free of charge or by sending an activation fax to have unlimited use of the version. Only the data necessary for activation of technology licensed from third parties will be transmitted. For unlimited use of Nero Move it, it is therefore necessary to have an Internet connection or a fax machine.
Copyright © 2006 - 2008 Nero AG and its licensors. All rights reserved.
Nero, the Nero logo, Nero Digital, Nero Essentials, Nero Express, Nero ImageDrive, Nero LiquidTV, Nero MediaHome, Nero PhotoSnap, Nero Recode, Nero RescueAgent, Nero ShowTime, Nero SecurDisc, Nero StartSmart, Nero Vision, InCD, Move it, and UltraBuffer are trademarks or protected trademarks of Nero AG.
Adobe, Acrobat, Acrobat Reader and Premiere are trademarks or protected trademarks of Adobe Systems, Incorporated.
AMD Athlon, AMD Opteron, AMD Sempron, AMD Turion, ATI Catalyst and ATI Radeon are trademarks or registered trademarks of Advanced Micro Devices, Inc.
ATSC is a trademark of the Advanced Television Committee.
ICQ is a registered trademark of AOL, LLC.
Apple, iPhoto, iPod, iTunes, iPhone, FireWire, and Mac are brands or registered trade names of Apple, Inc.
ARM is a registered trademark of ARM, Ltd.
AudibleReady is a registered trademark of Audible, Inc.
BenQ is a trademark of the BenQ Corporation.
Blu-ray Disc is a brand of Blu-ray Disc Association.
CyberLink is a registered trademark of CyberLink Corp.
DLNA is a registered trademark of Digital Living Network Alliance.
DivX and DivX Certified are registered trademarks of DivX, Inc.
Dolby, Pro Logic and the double-D symbol are brands or registered trademarks of Dolby Laboratories, Inc.
DTS and DTS Digital Surround are trademarks or registered trademarks of DTS, Inc.
DVB is a registered trademark of the DVB Project.
Freescale is a trademark of Freescale Semiconductor, Inc.
Google and YouTube are trademarks of Google, Inc.
WinTV is a registered trademark of Hauppauge Computer Works, Inc.
Intel, Pentium and Core are trademarks or registered trademarks of Intel Corporation.
Linux is a registered trademark of Linus Torvalds.
Memorex is a registered trademark of Memorex Products, Inc.
ActiveX, ActiveSync, DirectX, DirectXShow, Internet Explorer, Microsoft, HDI, MSN, Outlook, Windows, Windows Mobile, Windows
NT, Windows Server, Windows Vista, Windows Media, Xbox, Xbox 360, the Windows Vista start button and the Windows logo are trademarks or registered trademarks of Microsoft Corporation.
My Space is a trademark of MySpace, Inc.
NVIDIA, GeForce and ForceWare are brands or registered trademarks of NVIDIA Corporation.
Nokia is a registered trademark of Nokia Corporation.
CompactFlash is a registered trademark of SanDisk Corporation.
Sony, Memory Stick, PlayStation, PLAYSTATION and PSP are brands or registered trademarks of Sony Corporation.
HDV is a trademark of Sony Corporation and Victor Company of Japan, Limited (JVC).
UPnP is a registered trademark of the UPnP Implementers Corporation.
Labelflash is a registered trademark of Yamaha Corporation.
The trademarks mentioned here are named for information purposes only. All trade names and trademarks are the property of their respective owners.
Nero AG, Im Stoeckmaedle 13-15, D-76307 Karlsbad, Germany
Table of contents
1 Start Successfully 4
1.1 About the manual 4
1.2 About This Application 4
1.3 Installing Nero Move it 5
1.4 Working with Nero Move it 7
1.4.1 Organizing Categories (Container) 8
1.4.2 Managing Media Files (Workspace) 10
1.4.3 Exchanging media files 11
2 Main window 13
2.1 Device List 15
2.2 Containers 15
2.3 Workspace 17
2.3.1 Thumbnail view 19
2.3.2 Table view 20
2.3.3 Context menu 21
2.3.4 Details window 22
2.3.5 Control panel 24
2.4 Comparison window 25
3 Settings 27
3.1 General Settings Window 27
3.1.1 Color Schemes Tab 28
3.1.2 Indexed Folders Tab 28
3.1.3 Media Folders Tab 29
3.1.4 Quality Tab 30
3.1.5 Other Tab 31
3.2 Device Settings 32
3.2.1 [Recognized Device] Tab 33
3.2.2 User-Defined Device Tab 35
3.3 Online Settings 36
4 Technical Information 38
4.1 System requirements 38
5 Index 39
6 Contact 41
1 Start Successfully
1.1 About the manual
This manual is intended for all users who want to learn how to use Nero Move it. It is process-based and explains how to achieve a specific objective on a step-by-step basis.
In order to make best use of this documentation, please note the following conventions:
| ○ | Indicates warnings, preconditions or instructions that have to be precisely followed. |
| ○ | Indicates additional information or advice. |
| 1. Start ... | A number at the beginning of a line indicates a request for action. Carry out these actions in the order specified. |
| → | Indicates an intermediate result. |
| → | Indicates a result. |
| OK | Indicates text passages or buttons that appear in the program interface. They are displayed in bold print. |
| (see...) | Indicates references to other chapters. They are executed as links and are shown in red and underlined. |
| [...] | Indicates key combinations for entering commands. |
1.2 About This Application
Nero Move it is an all-in-one solution for iPods, PSPs, handheld devices, digital cameras and cellular phones. It allows you to transcode and synchronize your digital content for use with supported mobile devices. Simply connect your mobile device to your PC and Nero Move it transfers the files automatically in the ideal format - even if you copy them directly from one device to another.
Even if you're an inexperienced user, you have a clear overview of both the sources for your files and of the corresponding data volumes thanks to the software's intuitive interface. You can access all pictures, videos and music files with no problem whatsoever, as well as organize them according to your preferences, e.g. according to artist or date.
1.3 Installing Nero Move it

To install Nero Move it, you need administrator rights for all operating systems.
An installation wizard walks you through the quick and uncomplicated installation process. To install Nero Move it, proceed as follows:
- Close all Microsoft Windows programs and exit any anti-virus software that may be running.
- Start the installation process by double-clicking the downloaded installation file.
The files are automatically unzipped and stored on the C:\ drive in a temporary folder from which they are automatically deleted once they have been used.
The installation is prepared and the installation wizard is displayed.

If you purchased Nero Move it as a Box Version, insert the disc into your computer's drive and start the installation process by clicking the button.
If the program does not start automatically, select the drive with the disc in Windows Explorer. You can start the installation wizard manually by double-clicking the setup.exe file.
- Click the Next button.
The Installation of Nero Ask Toolbar screen is displayed. - If you want to use the Ask Toolbar, please read the licensing agreement carefully and choose the first option button.
If you do not want to use the Ask Toolbar, choose the second option button. - Click the Next button.
The License Conditions (EULA) screen is displayed. - Please read the license agreement carefully and select the appropriate check box if you agree to the terms of the agreement. Installation is not possible without this agreement.
- Click the Next button.
The Personalize Nero Move it screen is displayed. - Enter your name and serial number in the input fields. Corporate customers should also include their company's name.

The serial number can be found on the back of the disc jacket. If you are using the download version you will have received the serial number per e-mail.
- Click the Next button.
The Select Installation Type screen is displayed.
Here it is possible to choose between Default, i.e. standard installation or User-Defined installation. In the user-defined installation, you can determine the languages and choose the installation path.
- Choose the required installation type and click the Next button.
If you choose a default installation, the Optional Settings screen is displayed. If you choose custom installation, the User-defined Installation screen is displayed.
-
If you have chosen the user-defined installation:
-
Select the required folder and click the OK button.
-
Click the Next button.
The Select Application Language screen is displayed.
- Select the check boxes for the languages you wish to install and click the Next button.
The next screen is displayed.
- If you want to define the installation folder, click the Change button.
The Browse Folder window is displayed.
The Optional Settings screen is displayed.

If applications are found on your computer that could conflict with the software to be installed, the Uninstallation of the Products Required screen is displayed. It is recommended that these applications be uninstalled before proceeding with the installation.

Nero Move it checks the availability of required components, such as DirectX on your PC. If applications are missing, then the Missing Components screen is displayed. Please select the components you want to download and install.
-
if you want to adapt optional settings, select or clear the required check boxes.
-
Click the Next button.
The Ready to Start Installation Process screen is displayed.
- Click the Next button.
The installation process is started. Nero Move it is installed in the selected folder, and a progress bar informs you of the progress of the installation process.
- Click the Next button.
The Help Us to Improve Our Software screen is displayed.
To offer a better service, Nero collects anonymous data to determine which features are used and what problems, if any, occur.
- If you want to take part in the anonymous collection of data, select the check box and click the Next button.
The final screen of the installation wizard is displayed.
- Click the Exit button.
The installation wizard is closed.
You have now installed Nero Move it. The Nero Move it link is now available on the computer's desktop.

Nero ControlCenter
The Nero Move it application is installed with Nero ControlCenter.
With Nero ControlCenter, you can determine whether new updates are available for your Nero products and can download them if required. In addition, you can select an installed language and enter or remove serial numbers. You can find further information in the Nero ControlCenter manual.
1.4 Working with Nero Move it
Nero Move it is an all-in-one solution for iPods, PSPs, handheld devices, digital cameras and cellular phones. It allows you to transcode and synchronize your digital content for use with supported mobile devices. The application reacts automatically as soon as a new device is connected to the PC, and includes the device in the device list with an appropriate icon.

A list of the devices supported by Nero Move it is available at www.nero.com.
All devices that have been connected with Nero Move it at least once are displayed in the device lists. Accordingly, you can access the container and workspace for a device even if the device is not currently connected to your PC.
Nero Move it makes a note of all process steps and automatically starts the actual update as soon as the device is connected to the computer again. Every device that is waiting for an update is marked in the device list.
As soon as you reconnect the known device to the PC, Nero Move it also starts an automatic data synchronization process. New media files are copied to your hard drive once a day by default.
Of course, you can make changes to the default settings at any time under Settings. There, you can systematically configure any sharing options and quality settings you want, as well as define where media files should be saved on your computer.

Update device profile
The database of supported devices is constantly being expanded. Nero Move it updates the device profiles automatically every time it is restarted at no cost to you.
Clicking the About button (in the main window menu bar) displays contact and copyright information. You can also find the Update device profile link, which establishes a connection to the Internet, requests the latest device profiles and saves them in Nero Move it.
Work in Nero Move it basically deals with two different activities:
Collecting and managing data
Choose a device of your preference in the device list and organize the pictures, videos and music files on it according to your preferences. Thanks to its intuitive interface, you have a clear overview of the sources for your files and of the corresponding data volumes.
Transferring and publishing data
You can exchange data between the PC and a device, between two devices or between online services and a device/PC.
Choose the source and target in both device lists and transfer selected media files with a simple click. Nero Move it synchronizes data contents for you, transfers files to every device connected to the PC and automatically makes adjustments to use the ideal format during the process.
To use online services such as My Nero directly from the device list, you must store you user name and password in Online Settings once.

New to the online service?
If you do not have a user account for the required online service yet, you can set up an account directly from Nero Move it. Clicking the Sign up to [Online Service] button establishes a connection to the Internet and opens the corresponding registration form.
See also:
Organizing Categories (Container) 8
Managing Media Files (Workspace) 10
Exchanging media files 11
1.4.1 Organizing Categories (Container)
You can use Nero Move it to organize the media files on your devices according to your preferences in a simple and straightforward manner. Thanks to its intuitive interface, you have a clear overview of the sources for your files and of the corresponding data volumes.
The following requirement has to be fulfilled:
The device is supported by Nero Move it and is available in the device list.
To organize the categories on your device according to your preferences, proceed as follows:
- Use the and buttons to navigate through the device list and click the icon for the required device.
The container and the workspace for the selected device are displayed.
You can find all the media files available on the device inside the container, sorted inside folders under the following categories: Pictures, Videos and Music. Nero Move it automatically sorts music for you by using folders from A to Z and sub folders with the name of the corresponding Artist.

All devices that have been connected with Nero Move it at least once are displayed in the device lists. Accordingly, you can access the container and workspace for a device even if the device is not currently connected to your PC.

If a device is not currently connected to the PC, Nero Move it makes a note of all process steps and automatically starts the actual update as soon as the device is connected to the computer again. Every device that is waiting for an update is marked in the device list.
- Choose the required category inside the container: Music, Pictures or Videos.
The media files contained are displayed inside the workspace, and any existing sub folders are displayed in the container.
- If you want to add a category, folder or subfolder, click the button in the container.
A new folder is created.
-
If you want to rename a folder:
-
Select the folder inside the container and click the button.
A text box is displayed instead of the name.
- Enter the required name.
The name of the folder is changed.

The categories and folders included by default cannot be renamed.
- If you want to delete a folder, select the folder inside the container and click the button.
The folder is deleted together with all its content.

The categories and folders included by default cannot be deleted.
You have organized the categories on your device according to your preferences. Now you can simply select the required folders or sub folders in the container, and the media files they contain are displayed in the workspace.
See also:
Working with Nero Move it 7
Managing Media Files (Workspace) 10
Exchanging media files 11
1.4.2 Managing Media Files (Workspace)
You can use Nero Move it to organize the media files on your devices according to your preferences in a simple and straightforward manner. Thanks to its intuitive interface, you have a clear overview of the sources for your files and of the corresponding data volumes.
The following requirement has to be fulfilled:
The device is supported by Nero Move it and is available in the device list.
To manage the pictures, videos and music files on a device, proceed as follows:
- Use the and buttons to navigate through the device list and click the icon for the required device.
The container and the workspace for the selected device are displayed.

All devices that have been connected with Nero Move it at least once are displayed in the device lists. Accordingly, you can access the container and workspace for a device even if the device is not currently connected to your PC.

If a device is not currently connected to the PC, Nero Move it makes a note of all process steps and automatically starts the actual update as soon as the device is connected to the computer again. Every device that is waiting for an update is marked in the device list.
- If you want to see a picture or play a video or music file, open (by right-clicking) the file's context menu and click the button.
The window with the control panel opens and displays the picture or plays the video or music file.
-
If you want to see the available detailed information for a file and want to store additional information:
-
Open (by right-clicking) the file's context menu and click the button.
The Details window opens. All known information in the display and input fields is displayed based on the selected file. -
Make any additions and/or changes you want and click the OK button.
Additions or changes are applied and the window is closed. -
If you want to rate a file or want to change the rating for a file:
-
Open (by right-clicking) the file's context menu and click the button.
The input field opens.
2. Assign the required number of stars and close the context menu.
The assigned stars are displayed in the workspace.
- If you want to delete a media file from the device, open (by right-clicking) the file's context menu and click the × button.
The file is deleted from the device.
You have organized the pictures, videos and music files on your device according to your preferences.
Now you can synchronize the media files on different devices in a simple and straightforward manner or exchange files between your PC and a device or between two devices.
See also:
Working with Nero Move it 7
Organizing Categories (Container) 8
Exchanging media files 11
1.4.3 Exchanging media files
You can use Nero Move it to synchronize the media files of different devices in a simple and straightforward manner or to exchange data between the PC and a device, between two devices or between online services and a PC/device.
The following requirements have to be fulfilled:
The device or devices that you want to use for exchanging media files are supported by Nero Move it and are available in the device list.
- Online services that you want to use for exchanging media files are available in the device list. In order for this to happen, you must store your user name and password under Online Settings once.
To exchange pictures, videos or music files between the PC and a device, between devices or between an online service and a device/PC, proceed as follows:
- Use the and buttons to navigate through the left device list and click the icon for the required device (or f applicable, the icon for your PC or for the required online service).
The container and the workspace for the selected device are displayed.

All devices that have been connected with Nero Move it at least once are displayed in the device lists. Accordingly, you can access the container and workspace for a device even if the device is not currently connected to your PC.
-
Use the and buttons to navigate through the right device list and click the icon for the required device.
The container and the workspace for the selected device are displayed. -
Choose the Music, Pictures or Videos category in the container area as required.
The media files contained are displayed in the respective workspace and any existing sub folders are displayed on the container. - If you want to copy files to any existing sub folders, choose the required sub folders.
The media files contained are displayed on the respective workspace. - If you want to copy media files from the left workspace to the right workspace, select the
required files on the left workspace and click the button.
The media files are copied to the right workspace. Nero Move it automatically transfers the data in the format that is ideal for the target device. A window notifies you as soon as the transfer has ended successfully.
- If you want to copy media files from the right workspace to the left workspace, select the required files on the right workspace and click the button.
The media files are copied to the left workspace. Nero Move it automatically transfers the data in the format that is ideal for the target device. A window notifies you as soon as the transfer has ended successfully.
- If you want to synchronize both workspaces, click the button.
The media files on both workspaces are synchronized. Nero Move it automatically transfers the data in the format that is ideal for the respective target device. A window notifies you as soon as the transfer has ended successfully.

If selected media files already exist on the target device or the device does not have enough free disk space for them, the Comparison window opens. You can decide which files should be replaced or updated individually in this window.

If a device is not currently connected to the PC, Nero Move it makes a note of all process steps and automatically starts the actual update as soon as the device is connected to the computer again. Every device that is waiting for an update is marked in the device list.
You have transferred the required files.
See also:
Working with Nero Move it 7
Organizing Categories (Container) 8
Managing Media Files (Workspace) 10
2 Main window
The Nero Move it main window is divided into several clearly laid out areas and a menu bar on its top border. All devices available on Nero Move it are displayed in lists on the right and left areas of the window. You can use these lists to select the devices from which and to which you want to copy media files.
You can find information on the selected device both in a small container (in the device list) and next to it, inside the large workspace. The different pictures, videos and music files stored on the device are listed here. You can, for instance, search for files and reorganize them into groups. The available disk space on the device is also displayed in the workspace.

Main Window with Two Workspaces
The following buttons are available at the center of the window to enable the exchange of media files between the right and left workspaces:
| Transfers or copies selected media files from the left workspace to the right workspace. A window notifies you as soon as the transfer is completed successfully. If selected media files already exist on the target device or the device does not have enough free disk space for them, the Comparison window opens. You can decide which files should be replaced or updated individually in this window. | |
| Synchronizes all media files between both selected workspaces. The required category must be selected on both workspaces. |

Transfers or copies selected media files from the right workspace to the left workspace. A window notifies you as soon as the transfer is completed successfully.
If selected media files already exist on the target device or the device does not have enough free disk space for them, the Comparison window opens. You can decide which files should be replaced or updated individually in this window.
The following buttons are available on the menu bar:
| Settings | Opens the Device Settings screen. Here you can define the conversion settings for devices that are not recognized by Nero Move it. |
| Help | Displays the online help. |
| About | Displays contact and copyright information. |

Update device profile
The database of supported devices is constantly being expanded. Nero Move it updates the device profiles automatically every time it is restarted at no cost to you.
Clicking the About button (in the main window menu bar) displays contact and copyright information. You can also find the Update device profile link, which establishes a connection to the Internet, requests the latest device profiles and saves them in Nero Move it.
See also:
DeviceList 15
Containers 15
Workspace 17
Comparison window 25
2.1 Device List
You can use the device lists to select the devices from and to which you want to copy media files. You can navigate through the lists by using the and buttons. Clicking the icon for the required device chooses the device. Nero Move it assigns the appropriate icons automatically and distinguishes, for example, between the local PC, digital cameras, cellular phones and online services such as My Nero. The User-Defined type is assigned to unknown device types.

Update device profile
The database of supported devices is constantly being expanded. Nero Move it updates the device profiles automatically every time it is restarted at no cost to you.
Clicking the About button (in the main window menu bar) displays contact and copyright information. You can also find the Update device profile link, which establishes a connection to the Internet, requests the latest device profiles and saves them in Nero Move it.
All devices that have been connected with Nero Move it at least once are displayed in the device lists. Accordingly, you can access the container and workspace for a device even if the device is not currently connected to your PC. In this case, the container and workspace display the files that were enabled during the last connection.
Nero Move it makes a note of all process steps (e.g. copying or deletion processes) and automatically starts the actual update as soon as the device is connected to the computer again. Every device that is waiting for an update is marked in the device list.
See also:
Main window 13
Containers 15
Workspace 17
2.2 Containers
You can find information on a selected device in the container first, and then in the workspace next to it. The container is displayed as soon as you click the required device in the device list.
Nero Move it displays all devices that have been connected with the application and were created once, even if they are not currently connected to the PC, in the device list. The files that were enabled during the last connection are displayed in the workspace.
You can find all the media files available on the device inside the container, sorted inside folders under the following categories: Pictures, Videos and Music. Nero Move it automatically sorts music for you by using folders from A to Z and sub folders with the name of the corresponding Artist. Double-clicking a required folder displays the contained media files in
the workspace and displays any existing sub folders in the container. You can click the button to navigate a level up.
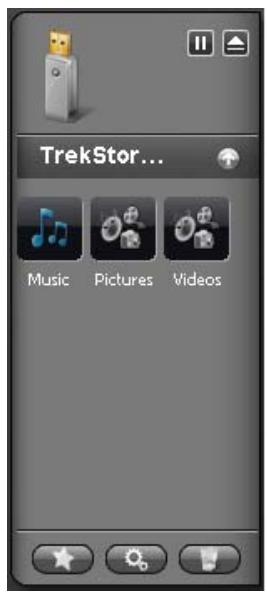
Containers
The known icon from the device list displays the device type on the top area of the container. The following buttons are available:
| + | Adds folders that Nero Move it should monitor for media files. The Select folders for indexing window opens. Only available for local hard drives. |
| II / ▶ | Interrupts the scanning process or continues the device scan in search of newly added folders. Only available for external devices. |
| △ | Ensures that no data is being exchanged with the device before removal, so that no accidental data losses occur. Only available for external devices. |
You can of course add, edit or delete folders for all data files according to your preferences. The following buttons are available on the lower area of the container:
| X | Creates a new folder or a new category |
| Displays a text box instead of the name for the selected folder. You can enter the required name for the folder here. Only available if at least one folder has been selected in the container. The categories and folders included by default cannot be renamed. |
Deletes a selected folder and all the media files it contains from the container and from the selected device.
Only available if at least one folder has been selected in the container. The categories and folders included by default cannot be deleted.
See also:
Main window 13
DeviceList 15
Workspace 17
2.3 Workspace
You can find information on a selected device in the container first, and then in the workspace next to it. The container is displayed as soon as you click the required device in the device list. Nero Move it lists all media files available on the device, sorted according to categories, here. You can switch between table view and thumbnail view.
Double-clicking a media file opens a window with a control panel for playing a preview in Nero Move it. Right-clicking a media file opens its context menu, which allows quick access to basic features.

Workspace
When you move the mouse over the device icon in the top corner, an information area with a pie chart and a table key is displayed. The following columns are available:
Pie chart
Represents the value of both the disk space used up by different file types and of free available disk space as part of a circle.
| Media | Lists the file types stored on the device. Free disk space is also listed. |
| Percent | Shows, for each file type included in the pie chart, as well as for free disk space, the available value as a percent. |
| Size | Shows, for each file type included in the pie chart, as well as for free disk space, the available value in MBs. |
| Files | Lists the number of detected files for the respective file type. |
The following setting options are available in the workspace:
| Check box x | Closes the workspace and the container. |
| Check box Displays | If the check box is enabled, all available media files for the selected category are displayed. If the check box is disabled, the media files belonging to the corresponding category are hidden. The following category check boxes are available: Music, Pictures and Videos. All check boxes are enabled by default. |
| Button | Switches to table view, where all media files are displayed, sorted, in a table with columns (sorted according to title, date, etc.) Thamburger view is selected by default. |
| Button | Switches to thumbnail view, in which all media files are displayed with a thumbnail or an appropriate large icon and their file name. Thamburger view is selected by default. |
| Button Select All | Selects all media files displayed in the workspace. |
| Button Delete | Deletes selected media files from the workspace and from the selected device. Only available if at least one file has been selected in the workspace. |
| Button Details | Opens the Details window. Here you can see existing detailed information on the files and store additional information. Only available if at least one file has been selected in the workspace. |
See also:
Main window 13
Containers 15
Thumbnail view 19
Table view 20
Context menu 21
Details window 22
Control panel 24
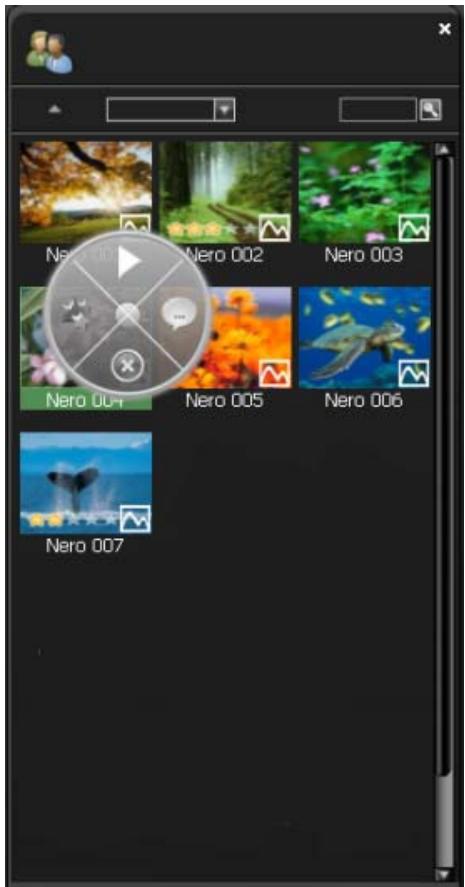
2.3.1 Thumbnail view
In the workspace thumbnail view, all media files are displayed with their file name and a thumbnail or an appropriate large icon. You can find the small icon that allows you to recognize the respective file type immediately in the lower bottom corner of every thumbnail. If you have assigned a rating for individual files, the assigned stars are also displayed.

Workspace with Thumbnail View
The following setting options are available in thumbnail view:
| Button with drop-down menu Sort | Sorts the displayed media files according to a required criterion: Title, Date, Artist, Album or Rating. Files are sorted according to title by default. |
| Input field Search | Displays the required search terms. You can enter one or more keywords here. |
| Button | Starts the search process. Nero Move it displays the search results in the workspace. All other media files stored on the corresponding device are hidden. |
See also:
Workspace 17
Table view 20
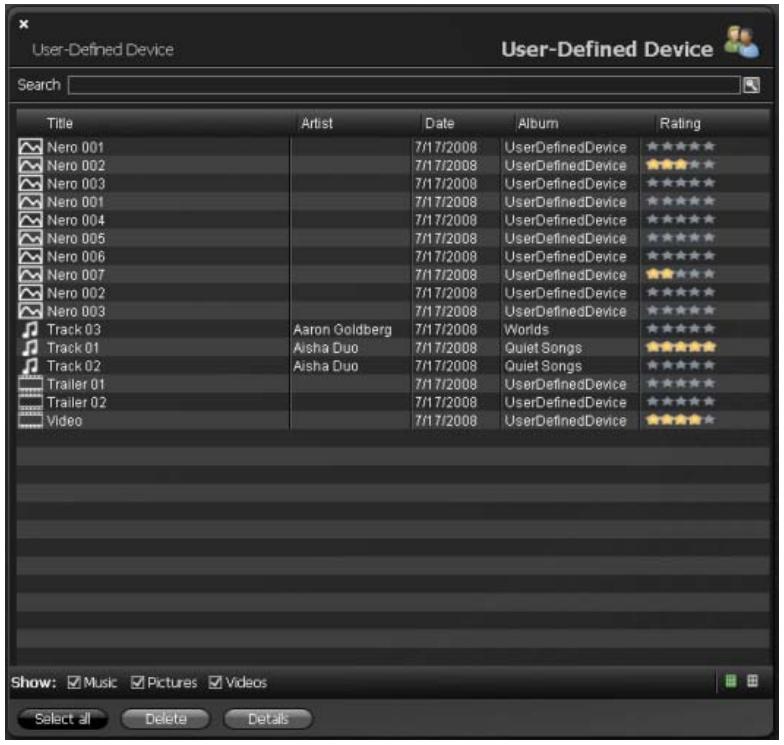
2.3.2 Table view
In the workspace table view, all media files are displayed, sorted, in a table. You can find the small icon that allows you to recognize the respective file type immediately on the left, next to the file name in the first column.
Clicking the title row of a column sorts the displayed media files according to the criterion of the selected column - Title, Date, Artist, Album or Rating. Clicking the title row again reverses the order (e.g. lists files sorted according to their date from the newest one to the oldest one, instead of the opposite order).
If you have assigned a rating to individual files, the stars assigned are displayed under the Rating column. You can also assign new ratings or change the number of assigned stars here.
Workspace with Table View
The following setting options are available in table view:
| Input field Search | Displays the required search terms. You can enter one or more keywords here. |
| Button | Starts the search process.Nero Move it displays the search results in the workspace. All other media files stored on the corresponding device are hidden. |
See also:
Workspace 17
Thumbnail view 19
2.3.3 Context menu
Right-clicking a media file in the workspace opens its context menu.
The following buttons are available:
| Opens a window with a control panel for media file playback in Nero Move it. | |
| Displays a star-based rating that has already been assigned to the media file or defines the latter's rating with up to 5 stars. You can change the number of as-signed stars at any time. | |
| Opens the Details window. Here you can see existing detailed information on the files and store additional information. | |
| Deletes selected media files from the workspace and from the selected device. Only available if at least one file has been selected in the workspace. |
See also:
Workspace 17
Details window 22
Control panel 24
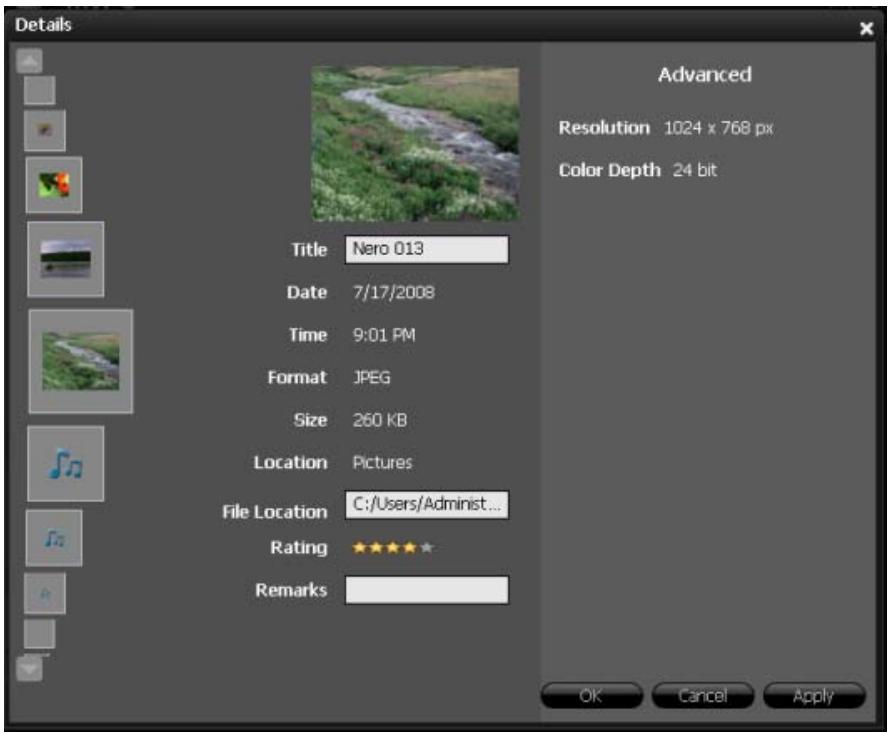
2.3.4 Details window
You can use the Details window to see existing detailed information on files and store additional information.
All media files available on the device are displayed on a list on the left side of the window.
You can navigate through the list with the and buttons to switch from the selected, centrally positioned file to the next one.
All known information in the display and input fields is displayed based on the selected file. Nero Move it also displays the respectively selected file as a thumbnail in the window's upper left area. If no preview picture is available (if, for instance, there is no known album cover for the respective music files), Nero Move it uses the known icon for the file type.
Details window
The following setting options are available:
| Display panel Album Cover | Displays the full file path of the file recognized as an album cover. Only available for music files. |
| Button Browse | Opens a browser window. You can look for the right album cover for the music file in this window. Only available for music files. |
| Button Remove | Replaces the album cover for the music file with the known file type icon. The picture file on your computer or connected device is not deleted. By clicking the Remove button, you are simply choosing not to use the picture as a cover for your music file. You can assign a corresponding album cover to the music file at any time. Only available for music files. |
| Input field Title | Displays the file name under which the media file is stored. You can change the title at any time. |
| Input field Artist | Displays the name of the artist. You can add, correct or change the name of the artist at any time. Only available for music files. |
| Input field Album | Displays the title of the corresponding album. You can add, correct or change the name of the album at any time. Only available for music files. |
| Display panel Date | Displays when the media file was created. Only available for photo and video files. |
| Display panel Time | Displays when the media file was created. Only available for photo and video files. |
| Display panel Length | Displays the media file's playing time. Only available for music files. |
| Display panel Format | Displays the media file's storage format. |
| Display panel Size | Displays the media file's memory size. |
| Display panel Location | Displays the name of the higher-level folder in which the media file is stored. |
| Input field File Location | Displays the media file's full file path. |
| Input field Rating | Displays a star-based rating that has already been assigned to the media file or defines the latter's rating with up to 5 stars. You can change the number of assigned stars at any time. |
| Input field Remarks | Makes it possible to enter further comments in a free-text field. |
| Display panel Advanced | Lists further information, depending on the file type, provided that this information can be recognized from the respective metadata (e.g. bit rate or resolution information). |
| Button OK | Applies all changes made and closes the window. |
| Button Cancel | Closes the window without saving the changes made. |
| Button Apply | Applies all changes made without closing the window. |
See also:
Workspace 17
2.3.5 Control panel
Double-clicking a media file opens a window with a control panel that makes it possible to play your media files directly in Nero Move it both quickly and in a straightforward manner.
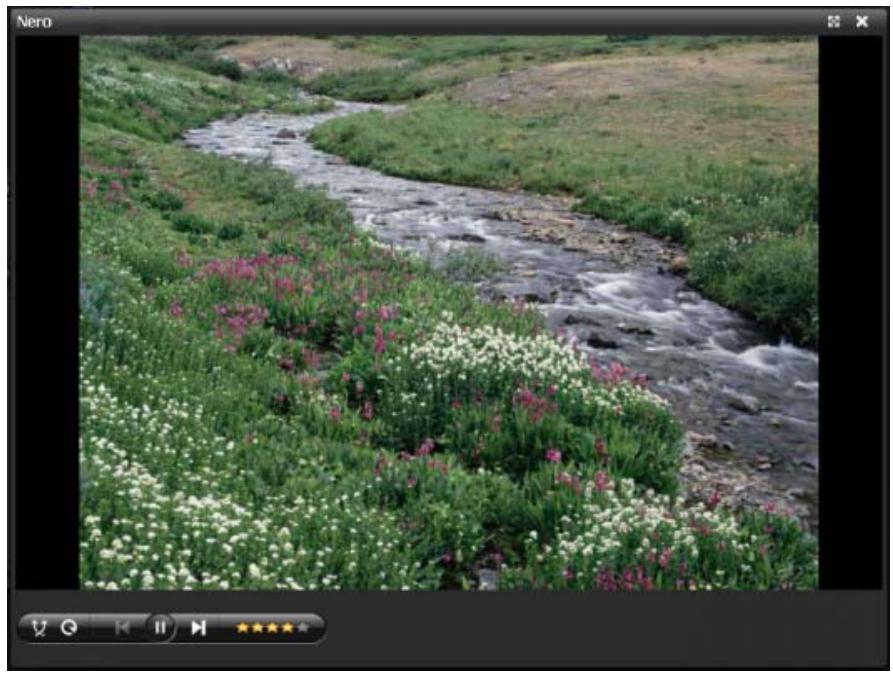
Window with Control Panel
The following buttons are available:
| × | Plays existing media files in a random sequence. Pictures are displayed in a slide show. |
| ◎ | Plays the same file again. |
| ▷ | Starts playback. Pictures are displayed in a slide show. |
| ∥ | Pauses playback. |
| Jumps to the previous/next chapter or to the previous/next media file. | |
| Turns audio playback off/on. Only available for videos and music files. | |
| Adjusts the volume. Only available for videos and music files. | |
| Displays a star-based rating that has already been assigned to the media file or defines the latter's rating with up to 5 stars. You can change the number of assigned stars at any time. | |
See also:
Workspace 17
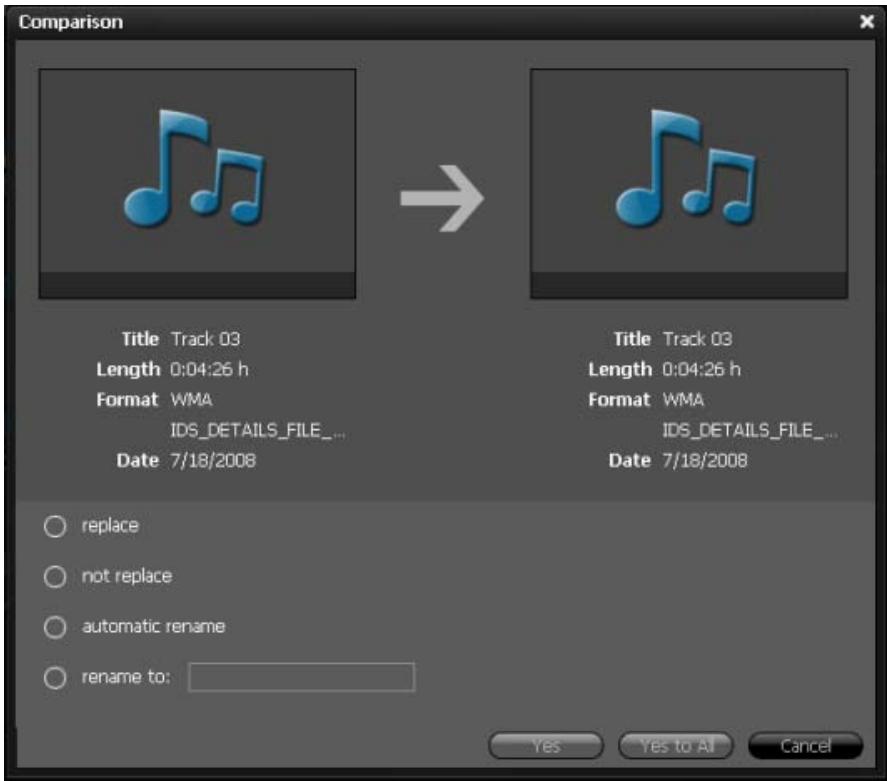
2.4 Comparison window
The Comparison window opens as soon as Nero Move it runs into media files featuring the same title, and which you might not want to replace or create two copies of, during the copying or synchronization process.
The media files found on both devices are placed next to each other in the top area of the window. Here you can compare the files' Title, Length, Format and Size. You can use the lower area of the window to decide how to proceed on a case-by-case basis.
Comparison window
The following setting options are available:
| Option button replace | Replaces the file on the target device with the file on the source device. |
| Option button not replace | Keeps the file on the target device; the source file is not copied. |
| Option button automatic rename | Copies the file from the source device without replacing the file on the target device. To differentiate between both files, the source file is renamed. Nero Move it assigns the new file name automatically. |
| Option button Rename to: | Copies the file from the source device without replacing the file on the target device. To differentiate between both files, the source file is renamed. You can enter the required file name into the input field. |
| Button Yes | Continues with the copying or synchronization process. The selected option is used accordingly. Only available when an option button has been selected. |
| Button Yes to All | Continues with the copying or synchronization process. The selected option is used automatically for all other files that require a decision of this type. Only available when the replace, not replace or automatic rename option button has been selected. |
| Button Cancel | Cancels the remaining copying or synchronization process. |
See also:
Main window 13
3 Settings
3.1 General Settings Window
You can use the General Settings window to configure the appearance of Nero Move it and define the actions that the application should take regarding your media files.
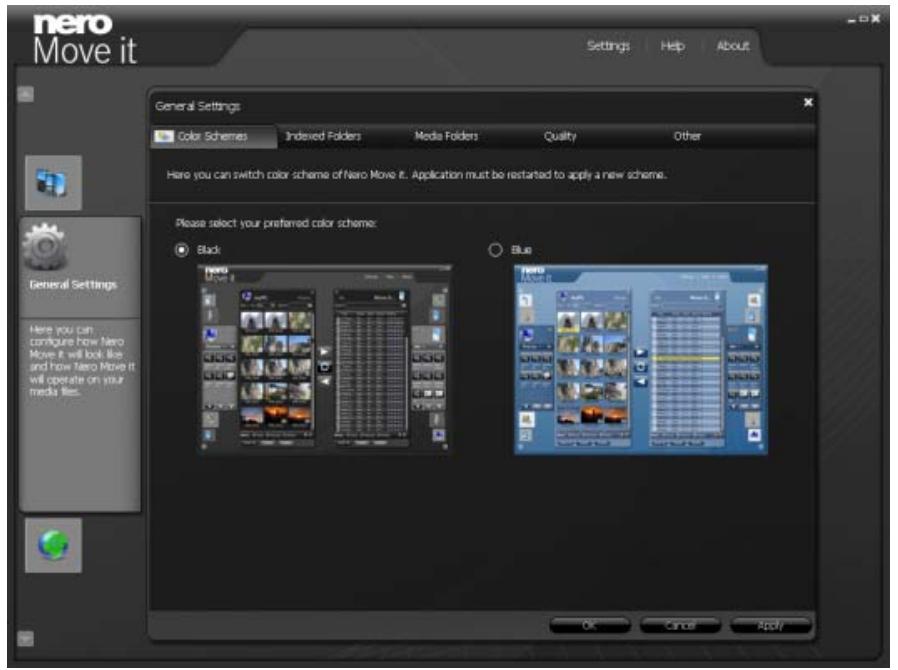
General Settings Window
The following tabs are available:
| Color Schemes | Specifies a color scheme for the Nero Move it user interface. |
| Indexed Folders | Defines the folders that Nero Move it should monitor for media files. |
| mediaFolders | Defines the location where Nero Move it should store the media files on a local computer. |
| Quality | Specifies the quality with which files are converted when being copied to a target device. |
| Other | Configs other settings. |
The following buttons are available:
| Default | Restores, for all file types, the file path created by default. Only available on the Media Folders tab. |
| x | Closes the window. |
| OK | Applies all changes made and closes the window. |
| Cancel | Closes the window without saving the changes made. |
| Apply | Applies all changes made without closing the window. |
See also:
Color Schemes Tab 28
Indexed Folders Tab 28
Media Folders Tab 29
Quality Tab 30
Other Tab 31
3.1.1 Color Schemes Tab
You can select a color scheme for the Nero Move it user interface under the Color Schemes tab.
The Black and Blue templates are available. The black color scheme is selected by default. The change takes effect only after restarting Nero Move it.
See also:
General Settings Window 27
3.1.2 Indexed Folders Tab
You can define the folders that Nero Move it should monitor for media files under the Indexed Folders tab.
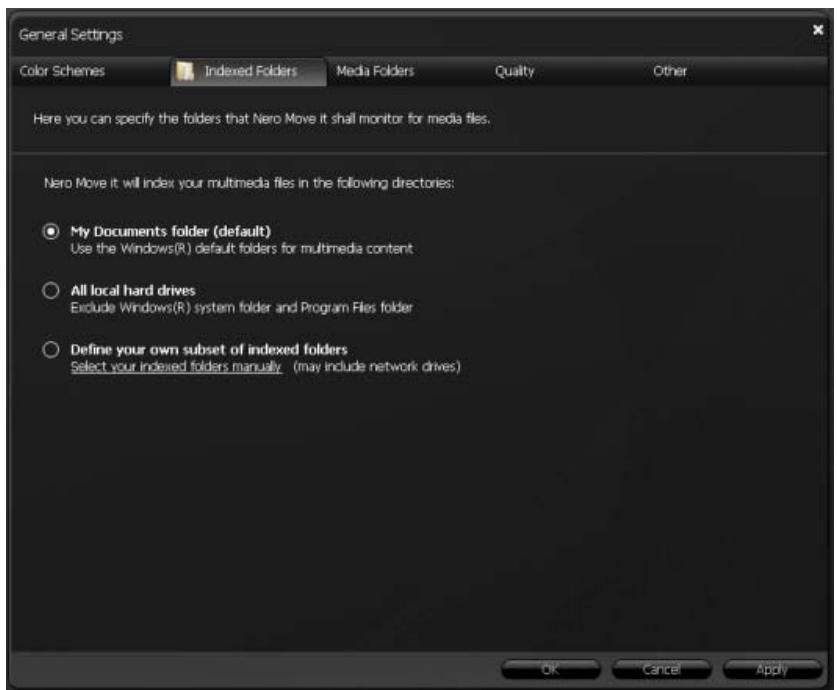
Indexed Folders Tab
The following option buttons are available:
| My Documents folder (default) | Takes into account multimedia files from files stored in the My Documents folder on your local hard drive for the purpose of indexing. This option button is selected by default. |
| All local hard drives | Takes into account all multimedia files on your local hard drive for the purpose of indexing. |
| Define your own subset of indexed folders | Takes into account media files in folders selected by you for the purpose of indexing. To select the folders, click the Select your indexed folders manually link and select the check box for the required folders in the navigation tree. |
See also:
General Settings Window 27
3.1.3 Media Folders Tab
You can define the location where Nero Move it should save the media files on a local computer under the Media Folders tab.
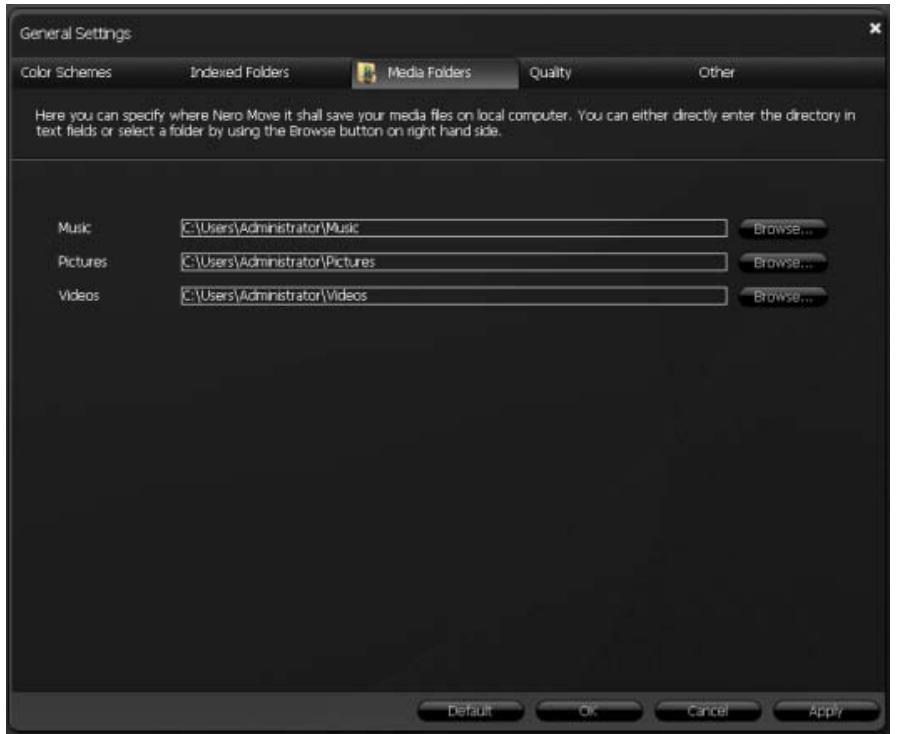
Media Folders Tab
The following setting options are available:
| Input field Music | Defines the file path or folder in which music files are stored. |
| Input field Images | Defines the file path or folder in which pictures are stored. |
| Input field Videos | Defines the file path or folder in which video files are stored. |
| Button Browse | Opens the Browse folder window. You can define the file path or folder in which you want to save the media files here. |
See also:
General Settings Window 27
3.1.4 Quality Tab
You can define the quality with which files should be converted when being copied to a target device under the Quality tab.
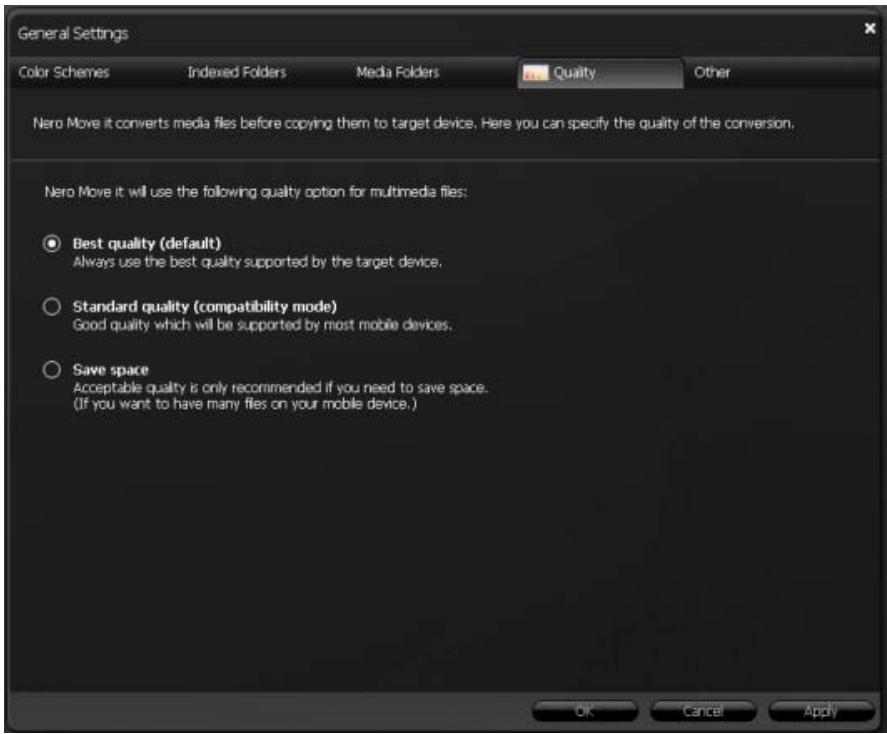
Quality Tab
The following option buttons are available:
| Best quality (default) | Stores copied media files with the best quality supported by the target device. This option button is selected by default. |
| Standard quality (compatibility mode) | Stores copied media files with a good level of quality that is supported by most mobile devices. |
| Save space | Stores copied media files with an acceptable level of quality. This option is only recommendable if you want to save disk space. |
See also:
General Settings Window 27
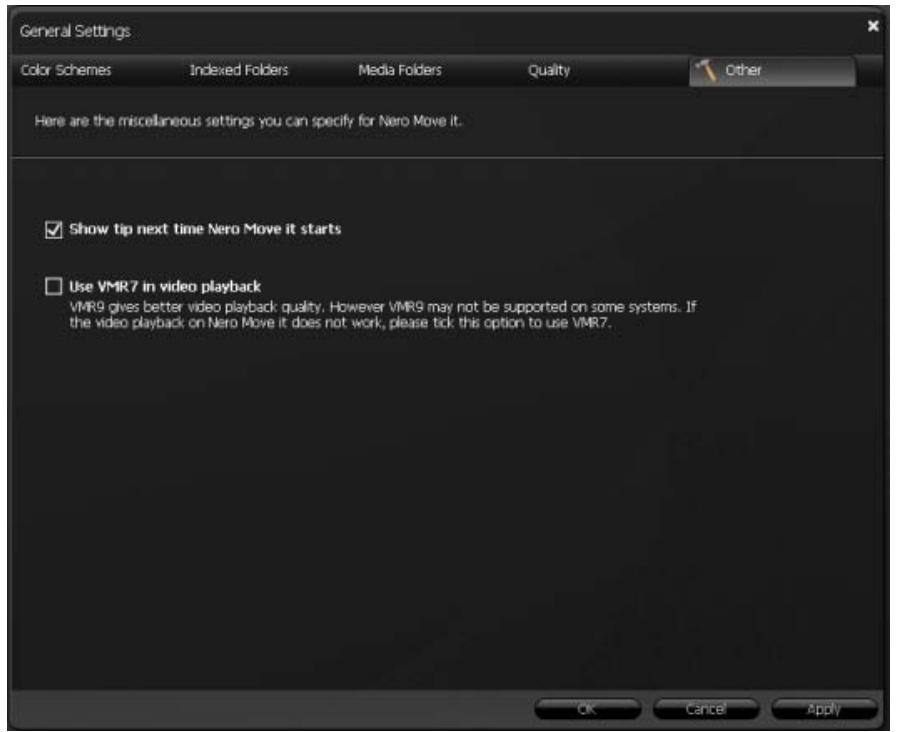
3.1.5 Other Tab
You can configure various settings under the Other tab.
Other Tab
The following check boxes are available:
| Show tip next time Nero Move it starts | If this check box is enabled, useful tips are displayed every time the application is started. This box is checked by default. |
Use VMR 7 in video playback
If this check box is enabled, VMR 7 is used during video playback. This box is deactivated by default.
See also:
General Settings Window 27
3.2 Device Settings
You can use the Device Settings window to enter conversion settings for all devices used with Nero Move it. A tab is created automatically for each device, and you can access this tab at any time to add or change settings. Please choose the appropriate device on which you want to change the settings.
You can enter conversion settings for devices not recognized by Nero Move it under the U- ser-Defined Device tab.
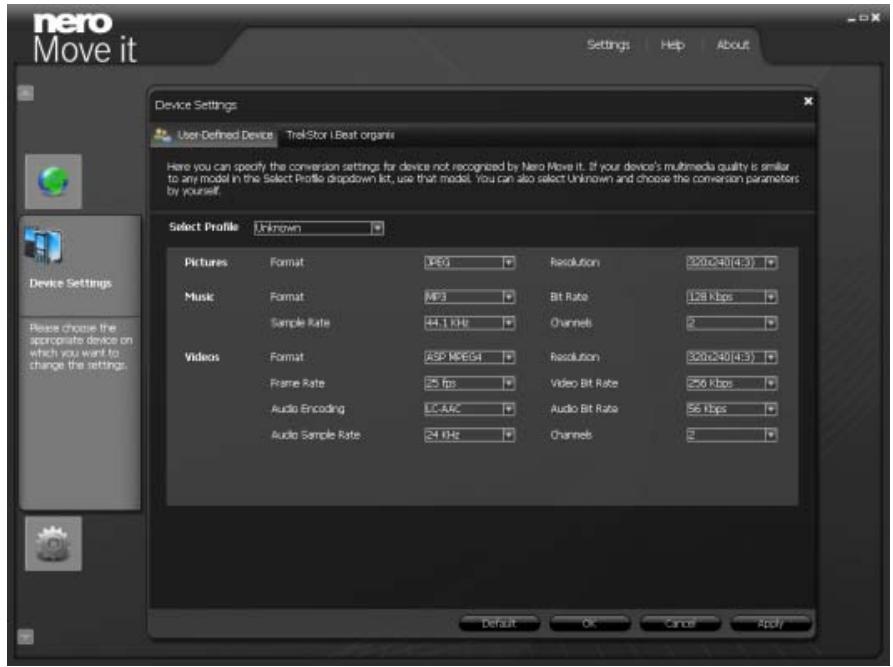
Device Settings Window
The following buttons are available:
| Default | Restores a profile's default settings. Only available under the User-Defined Device tab. |
| x | Closes the window. |
| OK | Applies all changes made and closes the window. |
| Cancel | Applies all changes made without closing the window. |
| Apply | Closes the window without saving the changes made. |

Update device profile
The database of supported devices is constantly being expanded. Nero Move it updates the device profiles automatically every time it is restarted at no cost to you.
Clicking the About button (in the main window menu bar) displays contact and copyright information. You can also find the Update device profile link, which establishes a connection to the Internet, requests the latest device profiles and saves them in Nero Move it.
See also:
[Recognized Device] Tab 33
User-Defined Device Tab 35
3.2.1 [Recognized Device] Tab
You can add or change conversion settings under a device-specific tab at any time.
![NERO MOVE IT - [Recognized Device] Tab - 1](/content/2025/01/175409/images/fd7bb0f04ccb2da360d059c4e79534382855c5672d06a2d4f0282bbbf8f111f2.jpg)
[Recognized Device] Tab
If the Automatically copy new content from [recognized device] to [local PC] check box is enabled, Nero Move it automatically scans the device's files as soon as it is connected to the PC. New media files are copied to your hard drive.
The following option buttons are available in the How often should the media be copied? area:
| Each time the device is connected | Copies new media files every single time that the device is connected to the computer. The Once per day option button is selected by default. |
| Once per day | Copies new media files once daily, provided that the device is connected to the computer. |
If the Automatically copy new content from [hard drive] to [recognized device] check box is enabled, Nero Move it automatically scans the files on your hard drive and copies media files to the device. The following setting options are available:
| Option button Random automatic | Copies a random selection of your media to your device. The Custom check box is enabled by default. |
| Option button User-defined | Copies media files to the device based on the settings that you configure in the lower area of the tab. |
| Area How much media should be copied? | Defines how much media should be copied. You can specify the data volume with the slider or enter the required volume in MB into the input field. The amount of music files, pictures and minutes of video that the defined data volume can hold is displayed under the input field. |
| Drop-down menu Which source media should be copied? | Defines the location from which media should be copied. Only available when the User configured option button is selected. |
| Area What media type should be copied? | Defines the ratio according to which different media file types should be copied. You can configure this ratio by using the sliders. The pie chart displays the corresponding percent-based distribution. Only available when the User configured option button is selected. |
See also:
Device Settings 32
3.2.2 User-Defined Device Tab
You can add conversion settings for a device that does not recognize under the User-Defined DeviceNero Move it tab. If your device's multimedia properties correspond to a model found in the Select Profile list box, select this model. You can also select Unknown and select the conversion parameters yourself.
User-Defined Device Tab
See also:
Device Settings 32
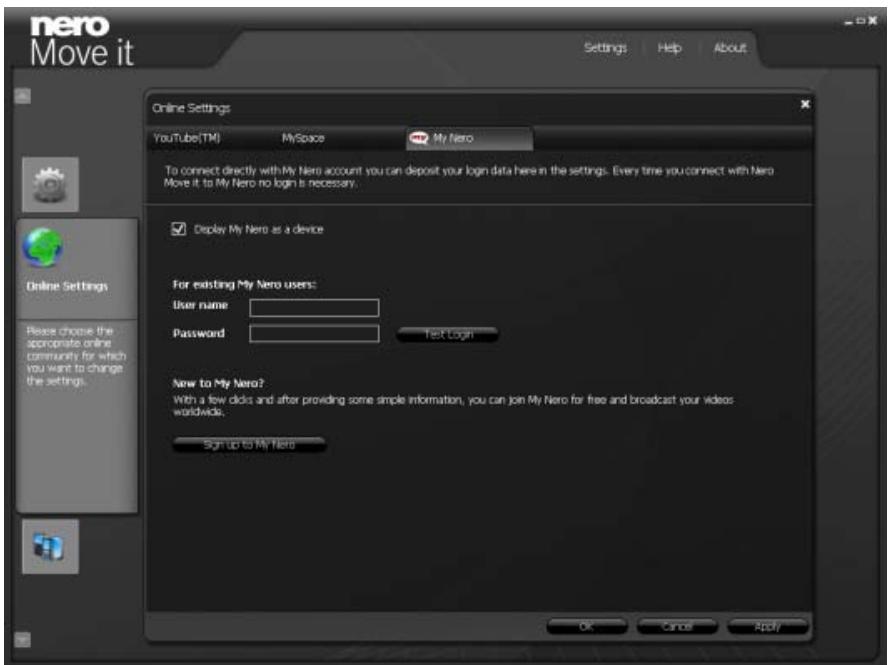
3.3 Online Settings
If you have service accounts for the My Nero, MySpace or YouTube online services, you can have them displayed as devices in Nero Move it. You can store your account information in the Online Settings window; each online service is listed with its own tab here.
You can also store your account information in Nero Move it in order not to have to log on every time that you start Nero Move it.
Online Settings Window
The following settings are available:
| Check box Display [online service] as a device | If this check box is enabled, the online service is displayed in the device list as a device. You can use direct application-based access as soon as you have stored your access information in Nero Move it. |
| Input field User name | Saves your user names. |
| Input field Password | Saves your password. |
| Button Test Login | Checks your account information. |

New to the online service?
If you do not have a user account for the required online service yet, you can set up an account directly from Nero Move it. Clicking the Sign up to [Online Service] button establishes a connection to the Internet and opens the corresponding registration form.
The following buttons are available:
| x | Closes the window. |
| OK | Applies all changes made and closes the window. |
| Cancel | Closes the window without saving the changes made. |
| Apply | Applies all changes made without closing the window. |
4 Technical Information
4.1 System requirements
General System Requirements
CD-ROM drive for the installation.
Windows XP (SP 2 or higher), Windows Vista.
Windows Internet Explorer 6.0 or higher.
Intel Pentium III 1 GHz or faster processor, AMD Sempron 2200+ or equivalent (Intel Pentium IV 2 GHz or faster processor for Windows Vista).
At least 512 MB of RAM (at least 1 GB of RAM for Windows Vista).
200 MB hard drive space for standard installation.
1 GB of available disk space is recommended.
- Graphics card with at least 32 MB video memory and a minimum resolution of 1024 × 768 pixels and 16-bit color settings. However, we recommend 24-bit or 32-bit for true color.
- Broadband connection with a minimum speed of 1 Mbit/s for registering; updating Nero Move it, the Help file and other features; and activating the program's full range of features. This activation is free of charge. The costs for the Internet connection are carried by the user.
Optional System Requirements
Windows-compatible sound device and speakers.
To be able to use Windows Portable Devices (WPDs), Windows Media Player 11 must be installed.
iTunes for communications between the Apple iPhone or iPod and the PC.
Microsoft ActiveSync (Windows XP) or Windows Mobile Device Center (Windows Vista) for communications between Windows Mobile Devices and the PC.
To exchange data with cellular phones, the driver (connectivity cable driver) provided by the respective cellular phone manufacturer must be installed.
5 Index
A
Adding folders 16
Administrator rights 5
Ask Toolbar 5
Aspect ratio and quality settings 30
Assigning a rating. 17, 20, 21, 23, 25
automatic rename 26
Automatic update 7, 9, 10, 12
B
Browsing the workspace. 13, 19, 20
C
Categories. 8, 10, 13, 16, 18, 34
Categorizing 8
Cellular phone 7, 15
Choosing a color scheme. 27, 28
Choosing a device 15
Comparing files 13, 25
Comparing media files 13, 25
Comparison. 12, 13, 25
Comparison window. 12, 13, 25
Contact information. 14
Containers. 7, 13, 15
Context menu 17, 21
Conventions, manual 4
Conversion Settings. 32, 33, 35
Copying contents 34
Copying files. 8, 11, 13, 34
Copying media files. 8, 11, 13, 34
D
Deleting media files. 18, 21
Details 18,21,22
Details window 18, 21, 22
Device lists. 7, 13, 15
Device Settings 32, 33
Device type 16
Device types. 15
Devices 13
Digital cameras 7, 15
Displaying media files 17, 19, 20
Displaying ratings. 19, 20, 21, 23, 25
Displaying tips 31
E
Exchanging files. 8, 11, 13
Exchanging media files. 8, 11, 13
F
File type. 8, 10, 13, 16, 17, 34
Find files. 13, 19, 20
G
General settings 27
H
Handheld devices. 7
Help. 14
1
Indexed Folders 28
Indexing folders 16, 27, 28
install 5
Installation 5
Installing Nero Move it 5
iPod 7
L
License agreements. 5
M
Manual, conventions 4
mediaFolders 29
Memory 8, 13, 17, 34
Menu Bar. 13
Mobile devices 7
My Nero. 36
MySpace 36
N
Nero ControlCenter 7
New category 16
0
Online Help 14
Online Services 15,36
Organizing files 8, 10
Organizing media files 8, 10
P
Playback. 17, 21, 24
Playing files. 17, 21, 24
Playing media files 21, 24
Portable devices. 7
Preview 17,21,24
PSP 7
R
Random automatic. 34
Remove Files 18, 21
Remove folder 16
Removing a device. 16
Renaming folders 16
Replace files. 13, 25
S
Save space 31
Search. 13, 19, 20
Searching for media files 13, 19, 20
Seeing detailed information .... 18, 21, 22
Seeing metadata. 18, 21, 22
Select Profile 35
Selecting a file path 29
Selecting a save location 29
Selecting conversion settings 35
Serial number. 5
Setting up a My Nero user account... 8, 37
Setting up a user account 8, 37
Settings 7, 14, 27, 32, 33, 35
Settings window 14, 27, 32
Showing online services in the device list 8,36
Shuffle playback 24
Sign up to My Nero 8,37
Sort. 19, 20
Sorting files 16, 19, 20
Sorting media files. 16, 19, 20
Storingaccountinformation. 8,36
Storing detailed information .... 18, 21, 22
Storing metadata. 18, 21, 22
Supported devices 7, 14, 15, 33
Synchronization. 8, 11, 13
System requirements 38
T
Table view. 18, 20
Thumbnail view 18, 19
U
Unknown device. 35
Update device profile 7, 14, 15, 33
Updating files 13, 25
User Defined Device 35
V
Video playback 32
VMR 7 32
W
Workspace 7, 13, 17, 19, 20, 21
Y
YouTube 36
6 Contact
Nero Move it is a Nero AG product.
nero Move it
Nero AG
Im Stoeckmaedle 13-15
76307 Karlsbad
Germany
Web: www.nero.com
Help http://support.nero.com
Fax: +49 724 892 8499
Nero Inc.
330 N Brand Blvd Suite 800
Glendale, CA 91203-2335
USA
Web: www.nero.com
Help http://support.nero.com
Fax: (818) 956 7094
E-mail: US-CustomerSupport@nero.com
Nero KK
Rover Center-kita 8F-B, 1-2-2
Nakagawa-chouu Tsuzuki-ku
Yokohama, Kanagawa
Japan 224-0003
Web: www.nero.com
Help http://support.nero.com
Copyright © 2008 Nero AG and its licensors. All rights reserved.