
BURNRIGHTS 9 - Logiciel de gravure NERO - Notice d'utilisation et mode d'emploi gratuit
Retrouvez gratuitement la notice de l'appareil BURNRIGHTS 9 NERO au format PDF.
| Type de produit | Logiciel de gravure de CD, DVD et Blu-ray |
| Caractéristiques techniques principales | Gravure de disques, création d'images ISO, copie de disques, support de divers formats de médias |
| Compatibilités | Windows 10, 8, 7 |
| Fonctions principales | Gravure de données, création de disques audio, gravure de vidéos, sauvegarde de fichiers |
| Interface utilisateur | Interface intuitive et conviviale, assistance intégrée |
| Maintenance et mises à jour | Mises à jour régulières disponibles via le site officiel |
| Sécurité | Protection par mot de passe pour les projets de gravure, vérification des données après gravure |
| Informations générales | Version 9, support technique disponible, documentation en ligne |
FOIRE AUX QUESTIONS - BURNRIGHTS 9 NERO
Questions des utilisateurs sur BURNRIGHTS 9 NERO
0 question sur cet appareil. Repondez a celles que vous connaissez ou posez la votre.
Poser une nouvelle question sur cet appareil
Téléchargez la notice de votre Logiciel de gravure au format PDF gratuitement ! Retrouvez votre notice BURNRIGHTS 9 - NERO et reprennez votre appareil électronique en main. Sur cette page sont publiés tous les documents nécessaires à l'utilisation de votre appareil BURNRIGHTS 9 de la marque NERO.
MODE D'EMPLOI BURNRIGHTS 9 NERO
nero 9
Manual
Nero BurnRights
Copyright and Trademark Information
This document, like the software described therein, is provided as a license and may only be used or reproduced in accordance with the licensing agreement. The contents of this document, as well as the associated software, is subject to change without prior notice. Nero AG rejects any responsibility for the correctness of the contents of this document and rejects any claims that transcend the clauses of the guarantee agreement.
This document and all of its contents are protected by copyright and are the property of Nero AG. All rights reserved. In addition, this document contains material that is protected by internationally valid copyright. This document may not be reproduced, transmitted, or transcribed in whole or in part without the express written permission of Nero AG.
Please keep in mind that existing graphics, pictures, videos, music titles or other materials that you may wish to insert or transcribe into projects may be protected by copyright. The unauthorized use of this type of material in your projects may violate the rights of the owner of the copyright. Make sure that you obtain all necessary authorizations from the owner of the copyright.
Unless you own the copyright, have permission from the copyright owner or your actions fall under the "fair use" provisions of copyright law, you may be violating national or international copyright laws. The transcribing, re-formation, modification or publication of copyright-protected material may lead to claims for damages and the enforcement of other legal measures against you. If you are unsure of your rights, you should contact your legal advisor.
Some Nero Suite applications require technologies developed by third-party manufacturers, some of which are contained in the Nero Suite as demo versions. These applications can be activated online free of charge or by sending an activation fax to have unlimited use of the version. Nero will only transmit the data necessary for activation of the technology licensed from third parties. For unlimited use of Nero Suite, it is therefore necessary to have an Internet connection or a fax machine.
Copyright © 2006 - 2008 Nero AG and its licensors. All rights reserved.
Nero, the Nero logo, Nero Digital, Nero Essentials, Nero Express, Nero ImageDrive, Nero LiquidTV, Nero MediaHome, Nero PhotoSnap, Nero Recode, Nero RescueAgent, Nero ShowTime, Nero SecurDisc, Nero StartSmart, Nero Vision, InCD, Move it, and UltraBuffer are trademarks or protected trademarks of Nero AG.
Adobe, Acrobat, Acrobat Reader and Premiere are trademarks or protected trademarks of Adobe Systems, Incorporated. AMD Athlon, AMD Opteron, AMD Sempron, AMD Turion, ATI Catalyst and ATI Radeon are trademarks or registered trademarks of Advanced Micro Devices, Inc. ATSC is a trademark of the Advanced Television Committee. ICQ is a registered trademark of AOL, LLC. Apple, iPhoto, iPod, iTunes, iPhone, FireWire, and Mac are brands or registered trade names of Apple, Inc. ARM is a registered trademark of ARM, Ltd. AudibleReady is a registered trademark of Audible, Inc. BenQ is a trademark of the BenQ Corporation. Blu-ray Disc is a brand of Blu-ray Disc Association. CyberLink is a registered trademark of CyberLink Corp. DLNA is a registered trademark of Digital Living Network Alliance. DivX and DivX Certified are registered trademarks of DivX, Inc. Dolby, Pro Logic and the double-D symbol are brands or registered trademarks of Dolby Laboratories, Inc. DTS and DTS Digital Surround are trademarks or registered trademarks of DTS, Inc. DVB is a registered trademark of the DVB Project. Freescale is a trademark of Freescale Semiconductor, Inc. Google and YouTube are trademarks of Google, Inc. WinTV is a registered trademark of Hauppauge Computer Works, Inc. Intel, Pentium and Core are trademarks or registered trademarks of Intel Corporation. Linux is a registered trademark of Linus Torvalds. Memorex is a registered trademark of Memorex Products, Inc. ActiveX, ActiveSync, DirectX, DirectXShow, Internet Explorer, Microsoft, HDI, MSN, Outlook, Windows, Windows Mobile, Windows NT, Windows Server, Windows Vista, Windows Media, Xbox, Xbox 360, the Windows Vista start button and the Windows logo are trademarks or registered trademarks of Microsoft Corporation. My Space is a trademark of MySpace, Inc. NVIDIA, GeForce and ForceWare are brands or registered trademarks of NVIDIA Corporation. Nokia is a registered trademark of Nokia Corporation. CompactFlash is a registered trademark of SanDisk Corporation. Sony, Memory Stick, PlayStation, PLAYSTATION and PSP are brands or registered trademarks of Sony Corporation. HDV is a trademark of Sony Corporation and Victor Company of Japan, Limited (JVC). UPnP is a registered trademark of the UPnP Implementers Corporation. Labelflash is a registered trademark of Yamaha Corporation.
The trademarks mentioned here are named for information purposes only. All trade names and trademarks are the property of their respective owners.
Nero AG, Im Stoeckmaedle 13-15, D-76307 Karlsbad, Germany
Table of contents
1 Start Successfully 4
1.1 About Nero BurnRights 4
1.2 About the manual 4
2 Launching the program 5
3 Nero BurnRights window 6
4Assigning Burn Rights 8
5 Index 9
6 Contact 10
1 Start Successfully
1.1 About Nero BurnRights
Nero BurnRights in combination with Windows 2000 and later allows a system administrator to authorize users without administrator rights to burn discs and connect new burners. This is necessary as users without administrator rights do not have access to the drivers needed for burning discs or for connecting new burners.
1.2 About the manual
This manual is intended for all users who want to learn how to use Nero BurnRights. It is process-based and explains how to achieve a specific objective on a step-by-step basis.
To make best use of this documentation, please note the following conventions:
| ○ | Indicates warnings, preconditions or instructions that have to be precisely followed. |
| ○ | Indicates additional information or advice. |
| 1. Start ... | The number at the beginning of a line indicates a prompt for action. Carry out these actions in the order specified. |
| → | Indicates an intermediate result. |
| → | Indicates a result. |
| OK | Indicates text passages or buttons that appear in the program interface. They are shown in boldface. |
| (see...) | Indicates references to other chapters. They are executed as links and are shown in red and underlined. |
| [...] | Indicates keyboard shortcuts for entering commands. |
2 Launching the program
To start Nero BurnRights via Nero StartSmart, proceed as follows:
- Click the StartSmart icon.
The Nero StartSmart window opens.

Click the

The list of Nero applications appears.
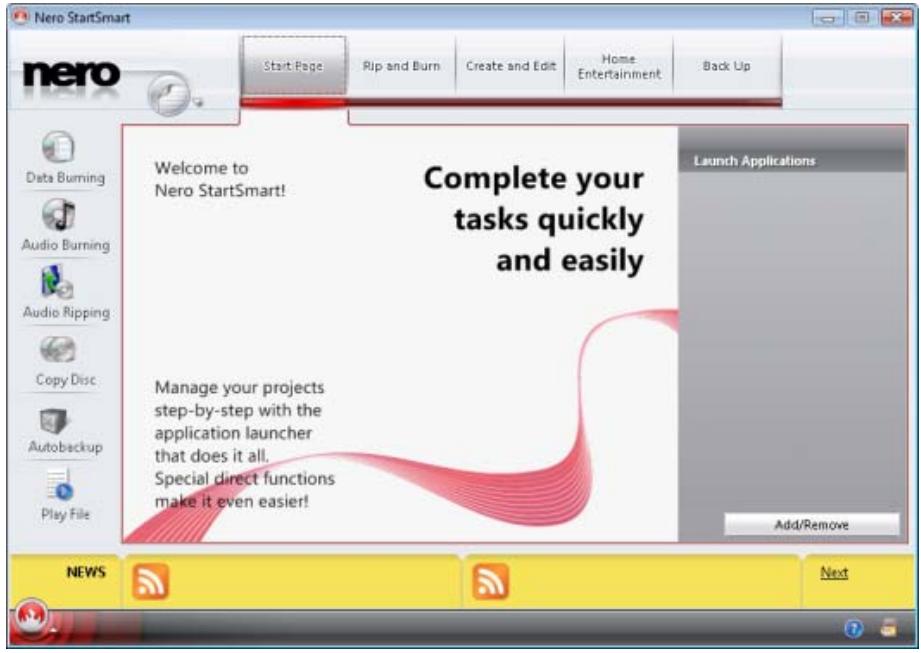
Nero StartSmart window
- Select the Nero BurnRights entry in the selection list.
- The Nero BurnRights window opens.
You have launched Nero BurnRights via Nero StartSmart.
3 Nero BurnRights window
When you have started Nero BurnRights, the Nero BurnRights screen appears.
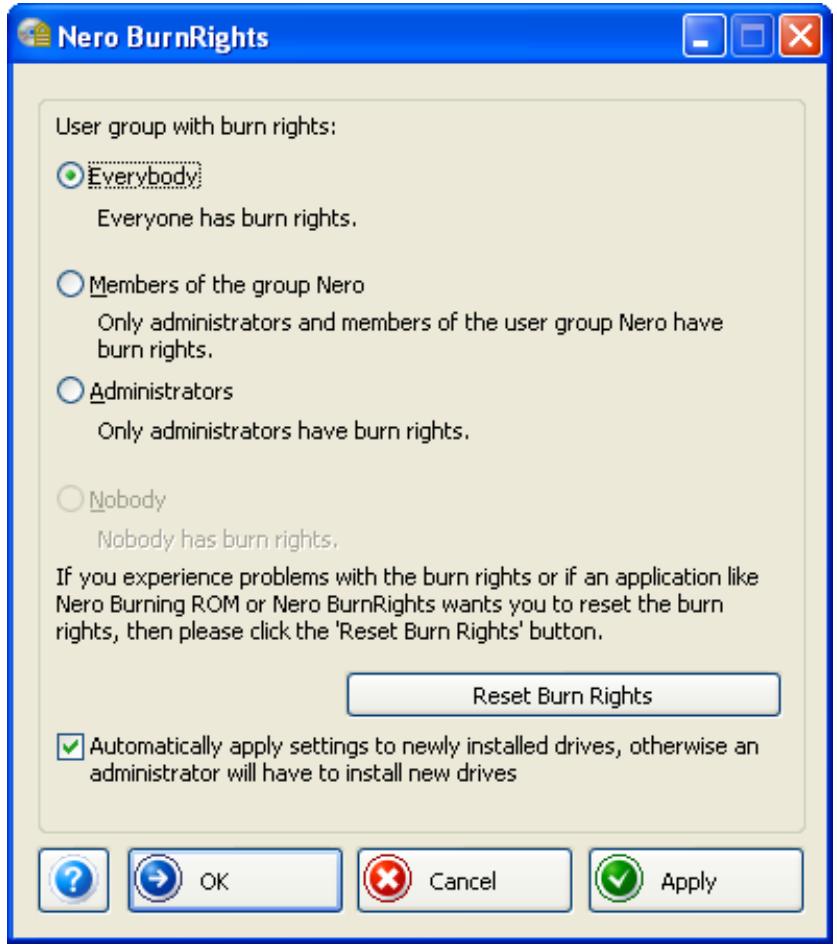
Nero BurnRights window
The following setting options are available:
| Option button All | Assigns burn rights to all users. |
| Option button Members of the Nero group | Only assigns members of the Windows group Nero burn rights. If the Nero group has not yet been created in Windows, then Nero BurnRights automatically creates the group. |
| Option button Administrators | Only administrators are assigned burn rights. According to the Windows user profile, administrators are users who have administrator rights. |
| Option button Nobody | Assigns burn rights to no one. |
| Button Reset burn rights | Opens the Reset Burn Rights window. Here you can change the settings for the burn rights back to their original state. |
| Check box Automatically apply settings to the drives just installed. | Automatically applies the burn rights to the drives just installed. If the check box is not enabled, users must have administrator rights to install new drives. |
| Launches the online help. | |
| Button OK | Applies the settings made and closes the Nero BurnRights window. |
| Button Cancel | Discards the settings made and closes the Nero BurnRights window. |
| Button Apply | Applies the settings made. |

Groups to which users can be assigned are only available or can only be created if the computer is assigned to a domain.

If users are refused burn rights, such users cannot burn any discs using the installed recorder. They only have access to the Image Recorder with the option of burning CD or DVD images.

In a network with user administration via Active Directory, burn rights must be assigned to all users. This is achieved by clicking the All option button. Otherwise, only local users can be assigned user rights.
4 Assigning Burn Rights
To assign user rights, proceed as follows:
- If you want to assign all users user rights, enable the All radio button.
- If you want to assign burn rights only to members of the Nero user group and administrators, click the Members of the group Nero option button.
If the group Nero has not been created yet, the following message is displayed: "The group Nero does not exist. Would you like to create the group now?"
-
To create the group Nero:
-
Click on Yes in the Nero BurnRights dialog box.
The Nero group is created.
- If you only want to assign burn rights to administrators, enable the Administrators radio button.
-
If you want to reset existing burn rights:
-
Click on the Reset burn rights button.
The Reset burn rights window opens. -
Click on the Reset burn rights button.
-
If you want to automatically apply the settings in the Nero BurnRights window to the drives just installed, select the Automatically apply settings to the drives just installed check box.
- If you want to confirm the settings made and close the Nero BurnRights window, click on the OK button.
- If you want to discard the settings made and close the Nero BurnRights window, click on the Cancel button.
-
If you want to confirm the settings made, click on the Apply button.
-
Restart the computer to save the changed settings.
- Once you have created the user group Nero, add the desired users from the group Nero in the Windows Control Panel > User Accounts.
You have assigned rights for the entire Nero Suite.
5 Index
A
Active Directory 6
B
Burn rights 6
Assign. 8
C
Control panel. 8
Conventions, manual 4
M
Manual, conventions 4
P
Program
Launching the Program. 5
Startup 5
S
Startup
Program 5
U
User accounts 8
6 Contact
Nero BurnRights is a Nero AG product.
Nero AG
Im Stoeckmaedle 13-15
76307 Karlsbad
Germany
Internet: www.nero.com
Help: http://support.nero.com
Fax: +49 724 892 8499
Nero Inc.
330 N Brand Blvd Suite 800
Glendale, CA 91203-2335
USA
Internet: www.nero.com
Help: http://support.nero.com
Fax: (818) 956 7094
E-mail: US-CustomerSupport@nero.com
Nero KK
Rover Center-kita 8F-B, 1-2-2
Nakagawa-chouu Tsuzuki-ku
Yokohama, Kanagawa
Japan 224-0003
Internet: www.nero.com
Help: http://support.nero.com
Copyright © 2008 Nero AG and its licensors. All rights reserved.