DVDSLIM-5520 - Lecteur dvd YAMADA - Notice d'utilisation et mode d'emploi gratuit
Retrouvez gratuitement la notice de l'appareil DVDSLIM-5520 YAMADA au format PDF.
| Marque | YAMADA |
| Modèle | DVDSLIM-5520 |
| Type de produit | Lecteur DVD |
| Formats lus | DVD, CD, MP3, JPEG, Kodak Picture CD |
| Région | 2 |
| Système TV | PAL / 3.58 NTSC |
| Sorties vidéo | Composite, S-Vidéo, Composante (Y/Pb/Pr), SCART |
| Sorties audio | Stéréo analogique, 5.1 canaux, Coaxiale numérique, Optique numérique |
| Fonctions spéciales | Zoom, Rotation d'image, Diaporama avec 16 effets, Contrôle parental, Karaoké (optionnel) |
| Alimentation | Secteur (110-240V, 50/60Hz) |
| Télécommande | Oui, avec piles AAA fournies |
| Accessoires fournis | Câbles RCA, télécommande, piles, manuel |
| Entretien | Débrancher avant nettoyage, utiliser un chiffon doux et humide |
| Sécurité | Ne pas exposer à l'humidité, ne pas ouvrir le boîtier, risque de choc électrique |
| Pièces détachées | Contacter un service agréé pour les réparations |
FOIRE AUX QUESTIONS - DVDSLIM-5520 YAMADA
Questions des utilisateurs sur DVDSLIM-5520 YAMADA
0 question sur cet appareil. Repondez a celles que vous connaissez ou posez la votre.
Poser une nouvelle question sur cet appareil
Téléchargez la notice de votre Lecteur dvd au format PDF gratuitement ! Retrouvez votre notice DVDSLIM-5520 - YAMADA et reprennez votre appareil électronique en main. Sur cette page sont publiés tous les documents nécessaires à l'utilisation de votre appareil DVDSLIM-5520 de la marque YAMADA.
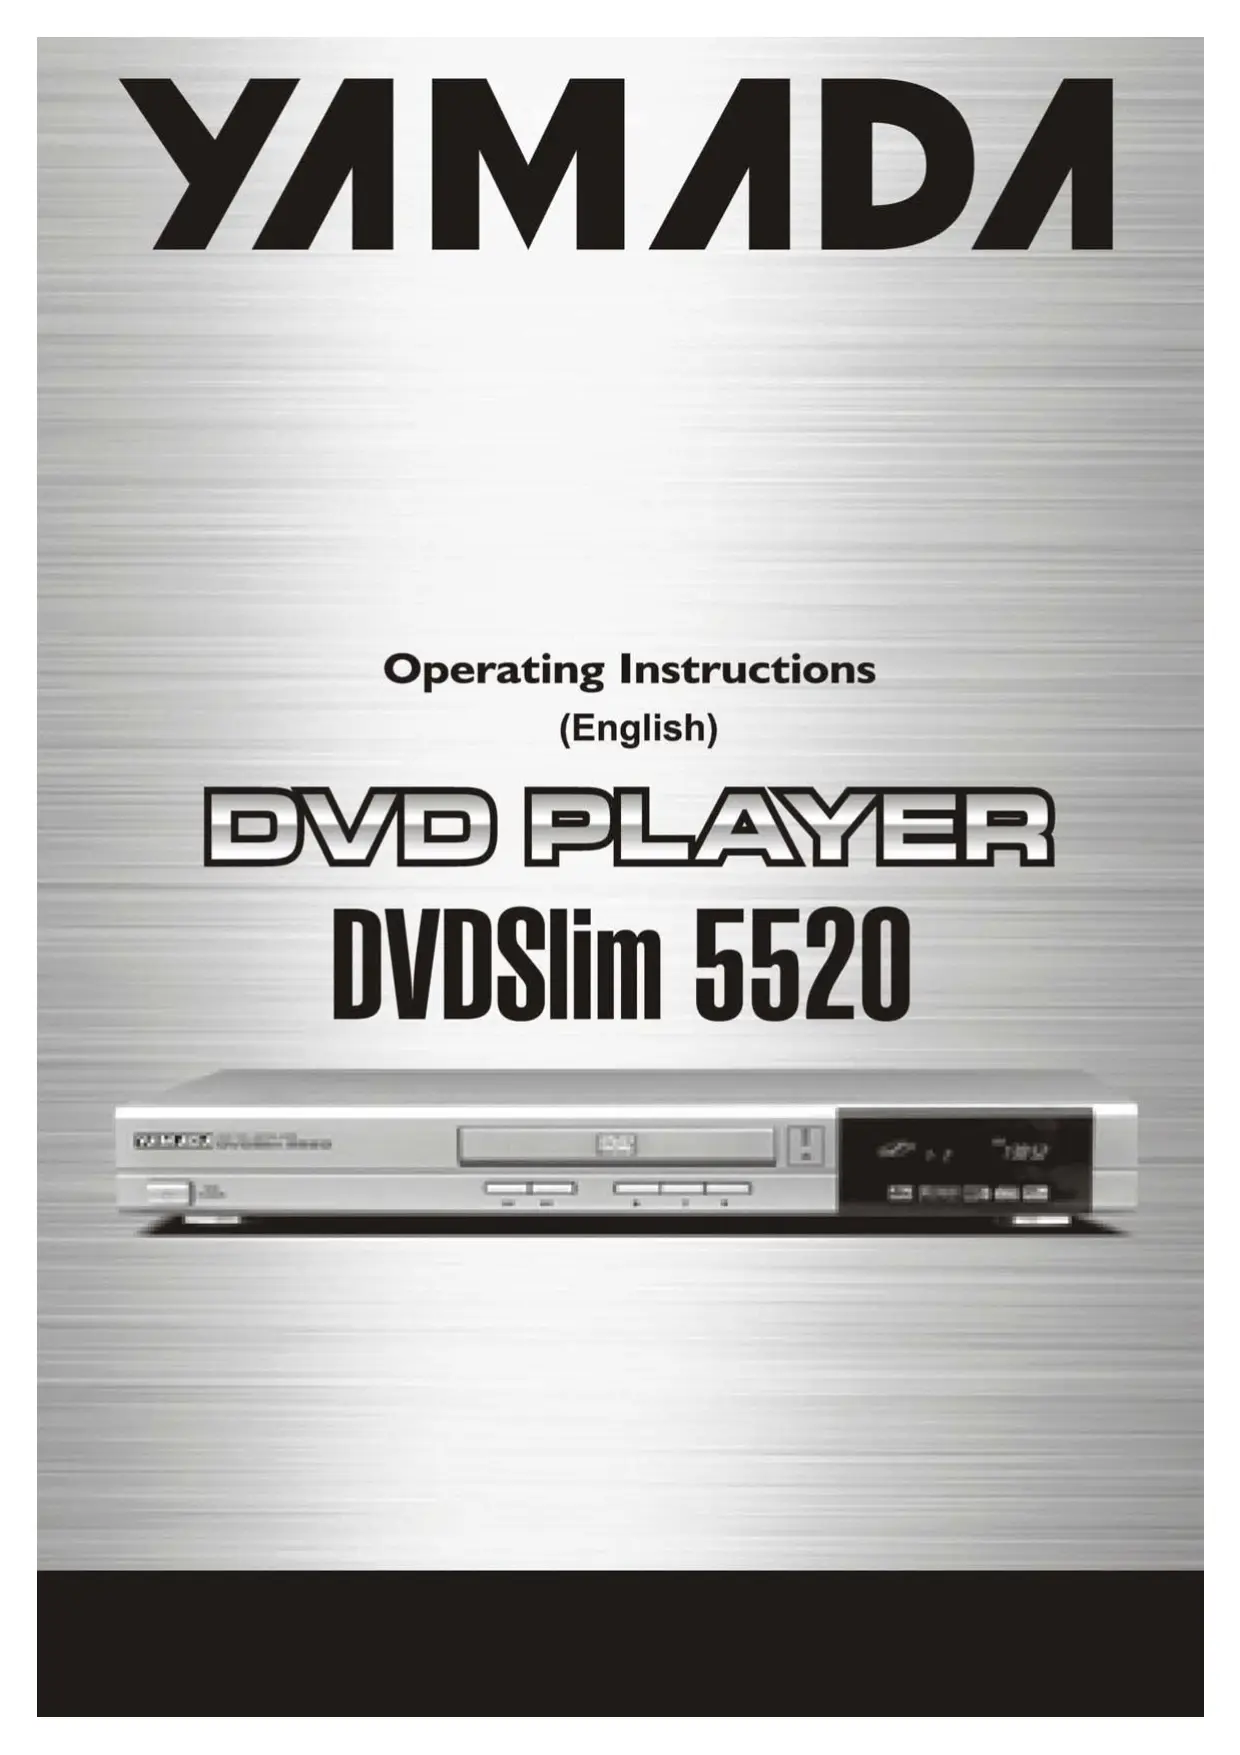
MODE D'EMPLOI DVDSLIM-5520 YAMADA
YAMADA
Operating Instructions
(English)
DVD PLAYER
DVDSlim 5520

Important Safety Instructions 01
Introduction
Front Panel 04
Rear Panel 04
Display Window 05
Remote Control Functions 06
Prepare the remote Control. 06
Getting Started
Connecting to a TV. 07
Connecting to an Audio System or TV Component Video Input 08
Digital Audio Output. 09
Operating DVD player with the remote control. 09
Basic Operation
Playing a DVD 10
Front Panel Operation 10
Karaoke Function (only for those players with KARAOKE functions) 10
Special Operation
What is MP3. 11
MP3 Operation 11
What is JPEG. 12
Playing Your JPEG Files 12
System Configuration
General Setup Page 13
Audio Setup Page 14
Video Setup Page 18
Preference Page 20
Password Setup Page 21
Exit Setup Menu. 21
Specifications are based on the latest information available at the time of printing and are subject to change without notice.

The lightning flash with an arrowhead symbol within an equilateral triangle is intended to alert the user to the presence of uninsulated "dangerous voltage" within the product's enclosure that may be of sufficient magnitude to constitute a risk of electric shock to persons.

The exclamation point within an equilateral triangle is intended to alert the user to the presence of important operating and maintenance (servicing) instructions in the literature accompanying the appliance.
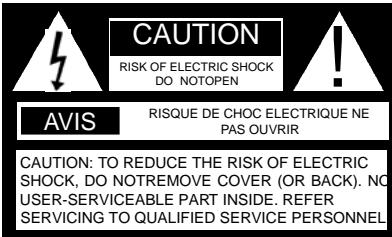
WARNING: DO NOT EXPOSE THIS APPLIANCE TO RAIN OR MOISTURE, DUE TO THE HIGH RISK OF FIRE OR ELECTRIC SHOCK, DO NOT OPEN THE CABINET DANGEROUS HIGH VOLTAGES ARE PRESENT INSIDE THE ENCLOSURE. ONLYQUALIFIED SERVICE PERSONNELSHOULD ATTEMPT THIS.
CAUTION: TO PREVENT ELECTRIC SHOCK, MATCH WIDE BLADE OF PLUG TO WIDE SLOT, AND FULLY INSERT.
CAUTION: This Digital Video Disc Player employs a Laser System. To prevent direct exposure to the laser beam, do not try to open the enclosure.Visible laser radiation when open and interlocks defeated. Use of controls or adjustments or performance of procedures other than those specified herein may result in hazardous radiation exposure.
DO NOT STAREINTO BEAM.
To ensure proper use of this product, please read this owner's manual carefully and retain for future reference. Should the unit require maintenance, contact an authorized service location, or contact us.only qualified service personnel should remove the cover.
FCC NOTICE This equipment has been tested and found to comply with the limits for a Class B digital device. Pursuant with the FCC Rules, Part 15. These limits are designed to provide reasonable protection against harmful interference in a residential installation.
This equipment generates, uses and can radiate radio frequency energy and, if not installed and used in accordance with the instructions, may cause harmful interference to radio communication. However, this is no guarantee that interference will not occur in a particular installation. If this equipment does cause harmful interference to radio or television reception, which can be determined by turning the equipment off and on, the user is encouraged to try to correct the interference by one of the following measures:
- Reorient or relocate the receiving antenna.
- Increase the separation between the equipment and receiver.
- Connect the equipment into an outlet on a circuit different from that to which the receiver is connected.
- Consult the dealer or an experienced radio/TV technician for help.
FCC Caution:To assure continued compliance,(example - use only shielded interface cables when connecting to computer or peripheral devices).Any changes or modifications not expressly approved by the party responsible for compliance could void the user's authority to operate this equipment.
WARNING: Changes or modifications made to this equipment, not expressly approved by us or parties authorized by us will void all the manufacture warranties.
For Customer Use:
In spaces provided below, record the Model and Serial No. located on the rear panel of your DVD video player.
Model No. Serial No.
Retain this information for future reference.
CAUTION: Use of controls or adjustments or performance of procedures other than those specified herein may result in hazardous radiation exposure.
Please carefully study this manual and always keep it available. There are, however, some installation and operation precautions which you should be aware of.
- Read Instructions - All the safety and operating instructions should be read before the product is operated.
2.Retain Instructions - The safety and operating instructions should be retained for future reference.
3.Heed Warnings - All warnings on the product and in the operating instructions should be adhered to.
4.Follow Instructions - All operating and use instructions should be followed.
-
Cleaning - Unplug this product from the wall outlet before cleaning. Do not use liquid cleaners or aerosol cleaners. Use a damp cloth for cleaning.
-
Attachments - Do not use attachments not recommended by the product manufacturer as they may cause hazards.
-
Water and Moisture - Do not use this product near water - for example, near a bath tub, wash bowl, kitchen sink, or laundry tub; in a wet basement; or near a swimming pool; and the like.
8.
-
A product and cart combination should be moved with care. Quick stops, excessive force, and uneven surfaces may cause the product and cart combination to overturn.
-
Ventilation - Slots and openings in the cabinet are provided for ventilation and to ensure reliable operation of the product and to protect it from overheating, and these openings must not be blocked or covered. The openings should never be blocked by placing the product on a bed, sofa, rug, or other similar surface. This product should not be placed in a built-in installation such as a bookcase or rack unless proper ventilation is provided or the manufacturer's instructions have been adhered to.
-
Power Sources - This product should be operated only from the type of power source indicated on the marking label. If you are not sure of the type of power supply to your home, consult your product dealer or local power company. For products intended to operate from battery power, or other sources, refer to the operating instructions.
-
Grounding or Polarization - This product may be equipped with a polarized alternating-current line plug (a plug having one blade wider than the other). This plug will fit into the power outlet only one way. This is a safety feature. If you are unable to insert the plug fully into the outlet, try reversing the plug. If the plug should still fail to fit, contact your electrician to replace your obsolete outlet. Do not defeat the safety purpose of the polarized plug. Alternate Warnings - This product is equipped with a three-wire grounding-type plug, a plug having a third (grounding) pin. This plug will only fit into a grounding-type power outlet. This is a safety feature, if you are unable to insert the plug into the outlet, contact your electrician to replace your obsolete outlet. Do not defeat the safety purpose of the grounding-type plug.
-
Power-Cord Protection - Power-supply cords should be routed so that they are not likely to be walked on or pinched by items placed upon or against them, paying particular attention to cords at plugs, convenience receptacles, and the point where they exit from the product.
-
Protective Attachment Plug - The product is equipped with an attachment plug having overload protection. This is a safety feature. See Instruction Manual for replacement or resetting of protective device. If replacement of the plug is required, be sure the service technician has used a replacement plug specified by the manufacturer that has the same overload protection as the original plug.
-
Outdoor Antenna Grounding - If an outside antenna or cable system is connected to the product, be sure the antenna or cable system is grounded so as to provide some protection against voltage surges and built-up static charges. Article 810 of the National Electrical Code, ANSI/NFPA 70, provides information with regard to proper grounding of the mast and supporting structure, grounding of the lead-in wire to an antenna discharge unit, size or grounding conductors, location of antenna-discharge unit, connection to grounding electrodes, and requirements for the grounding electrode. See Figure 131.1.
-
Lightning - For added protection for this product during a lightning storm, or when it is left unattended and unused for long periods of time, unplig it from the wall outlet and disconnect the antenna or cable system. This will prevent damage to the product due to lightning and powerline surges.
17.Power Lines - An outside antenna system should not be located in the vicinity of overhead power lines or other electric light or power circuits, or where it can fall into such power lines or circuits. When installing an outside antenna system, extreme care should be taken to keep from touching such power lines or circuits as contact with them might be fatal.
- Overloading - Do not overload wall outlets, extension cords, or integral convenience receptacles as this can result in a risk of fire or electric shock.
19.Object and Liquid Entry - Never push objects of any kind into this product through openings as they may touch dangerous voltage points or short-out parts that could result in a fire or electric shock. Never spill liquid of any kind on the product.
-
Servicing - Do not attempt to service this product yourself as opening or removing covers may expose you to dangerous voltage or other hazards. Refer all servicing to qualified service personnel.
-
Damage Requiring Service - Unplug this product from the wall outlet and refer servicing to qualified service personnel under the following conditions: a. When the power-supply cord or plug is damaged.
b. If liquid has been spilled, or objects have fallen into the product.
c. If the product has been exposed to rain or water.
d. If the product does not operate normally by following the operating instructions. Adjust only those controls that are covered by the operating instructions as an improper adjustment of other controls may result in damage and will often require extensive work by a qualified technician to restore the product to its normal operation.
e. If the product has been dropped or damaged in any way, and
f . When the product exhibits a distinct change in performance - this indicates a need for service.
-
Replacement Parts - When replacement parts are required, be sure the service technician has used replacement parts specified by the manufacturer or have the same characteristics as the original part. Unauthorized substitutions may result in fire, electric shock, or other hazards.
-
Safety Check - Upon completion of any service or repairs to this product, ask the service technician to perform safety checks to determine that the product is in proper operating condition.
24.Wall or Ceiling Mounting - The product should be mounted to a wall or ceiling only as recommended by the manufacturer.
- Heat - The product should be situated away from heat sources such as radiators, heat registers, stoves or other products (including amplifiers) that produce heat.
2
Your new DVD player is designed for you to enjoy several different forms of disc media. Your player will allow you to enjoy full-length motion pictures with "at-the-movies" picture and cinema quality sound.
Your new player also supports CD, and MP3. Your player also has several unique features, including S-video and component video output for greater picture clarity, Parental Control (to prevent children from viewing inappropriate content) and Kodak Picture CD compatibility (so you can show photos on your TV). This is a true multimedia machine designed for the multimedia world to enjoy.


UNPACKING
First check and identify the contents of your DVD video player package, as listed below:
DVD video player
- Remote control handset with separately packed batteries
- RCA cables (3) (1 yellow, 1 red, and 1 white)
- Owner's manual
- Size AAA batteries (2)
If any item should be damaged or missing, please inform your supplier without delay.
Keep the packaging materials, you may need them to transport your player in the future.
ABOUT THIS OWNER'S MANUAL
This owner's manual explains the basic instructions of this DVD video player. Some DVD video discs are produced in a manner that allows specific or limited operation during playback. As such, the DVD video player may not respond to all operating commands. Refer to instruction notes of disc.
"O" may appear on TV screen during operation.
"O" means that the operation is not permitted by the DVD video player.
NOTES ON REGIONAL NUMBERS
DVDs are divided into separate regions. Your DVD video player plays region 2 DVDs only.

TYPE OF TV SYSTEM
Connect this DVD video player to a TV compatible with PAL/3.58 NTSC system.
This section describes a full-function high performance DVD Player that is microprocessor-controlled and also allows users to place their own settings into memory via external setting. The setting status is indicated on the screen.

Front Panel
(1)POWER
(2)DISPLAY WINDOW
(3)TRAY DOOR
(4)OPEN/CLOSE
(5)PLAY
(6)PAUSE
(7)STOP
(8)PREV./ NEXT
Rear Panel

5.1 Channel (Scart)
(1) OPTICAL OUTPUT (Option)
(2) COAXIAL OUTPUT
(3) S-VIDEO OUTPUT
(4) COMPOSITE OUTPUT
(5) SCART OUTPUT
(6) 5.1 CHANNELS AUDIO OUTPUT
(7) STEREO AUDIO OUTPUT

Display Window
(1) PLAYING
(4) ANGLE
(7) REPEAT CHAPTER
(10) TIME
(13) KARAOKE (Option)
(2) CURRENT DISC
(5) PAUSE
(8) TITLE NUMBER
(11) PROGRAM
(14) DTS (Option)
(3) PLAY
(6) REPEAT ALL
(9) CHAPTER NUMBER
(12)DOLBY DIGITAL
(15) DIVIDING CONTROL
Remote Control Functions


(FOR KARAOKE FUNCTION)
(1) POWER
(2)PBC
(3) DISPLAY
(4) EJECT
(5) SUBTITLE
(6) SEARCH
(7) ANGLE
(8) LANGUAGE
(9)SETUP
(10) TITLE
(11) MENU
(12) ZOOM
(13) RESUME
(13A) NTSC / PAL (FOR KARAOKE FUNCTION)
(14) PAUSE
(15) SLOW
(16) STOP
(17) PLAY/ENTER
(18) PREVIOUS / NEXT
(19) F.F./F.R.
(20) 1/ALL
(21) A-B
(22) VOL + / VOL -
(23) MUTE
(23A)RESUME(FOR KARAOKE FUNCTION)
(24) P-Scan Option)/VOCAL-ASSIST(Option)
(25) PROGRAM
(27) MUTE(FOR KARAOKE FUNCTION)
(26) KARAOKE (FOR KARAOKE FUNCTION)
(28) KEY SHIFT (FOR KARAOKE FUNCTION)
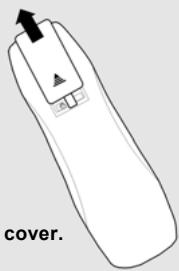
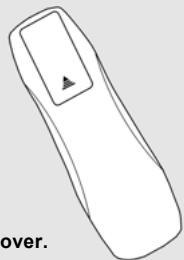
Prepare the Remote Control
To operate the DVD player, you must place the batteries in the remote control first.
1
2
- Insert batteries (size
AAA). Make sure the
position of ^+ and - on the
batteries match the marks inside
the battery compartment.

3
3. Close the cover.
- Open the cover.
GOOD, BETTER, BEST
Connecting the DVD video player to your TV.
- How to setup the sound output
From the SETUP MENU, set the "AUDIO OUTPUT" to "ANALOG".
GOOD
BETTER
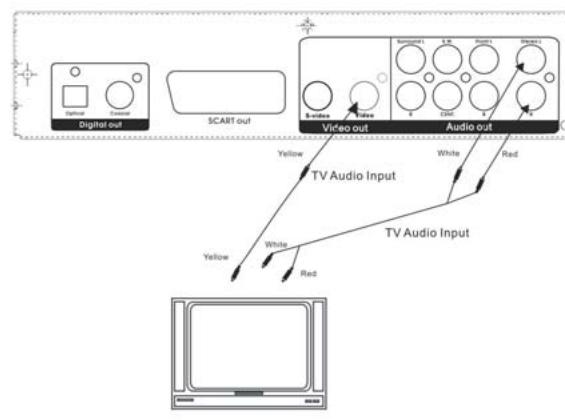

Connect the DVD video player with the S-video cable, if the TV has an S video input. Do not connect the yellow video cable if using the S-Video cable.

- It will be helpful to also refer to the manual of the connected TV.
- Turn off the power and unplug both units before setting up any connections.
- The playback picture will be distorted, if you do not connect the DVD video player directly to your TV because DVD video discs are protected by Macrovision.
- Therefore, if you connect the DVD video player to a video cassette recorder (VCR), or TV/VCR combination, the playback picture will be distorted.
BEST PICTURE
The Component Video input allows you to enjoy the best picture quality of the DVD video discs.
- How to setup the sound output
From the SETUP MENU, set the "AUDIO OUT" To "ANALOG".
- How to setup the video output
From the SETUP MENU, set the "SET VIDEO OUT" to "YPrPb VIDEO" when using the Component Video output jacks.


- It will be helpful to also refer to the manual of the connected TV.
- Turn off the power and unplug both units before setting up any connections.
- Keep the DVD video player away from any tuner or radio to avoid any static or distorted sound during a broadcast.
- When connecting or disconnecting the DVD video player, be sure to turn off the amplifier to avoid any speaker damage.
- Due to the wide dynamic range of sound output of the DVD video player, adjust the volume of your receiver to a comfortably moderate listening level to avoid any speaker damage.

COMPONENTVIDEOOUTPUT
Component input terminals when connected to selected TVs and monitors will produce a higher quality picture playback. Depending on the selected TVs and monitors, the wording of the component input terminals may vary. (ie:R-Y, Y, B-Y, etc.) If there are any fluctuations with the color played back adjust the TV or monitor to achieve the best audio and/or picture.
Digital Audio Output
If you have another audio decoder which can decode Dolby Digital / Dts, connect the optical jack of the DVD player to the audio decoder (such as amplifier) via optical cable.
Then set the SPDIF "on" on OSD. you can use the optical digital audio output to enjoy the original audio.The instruction is as follows:

Operating DVD player with the remote control


When using the remote control, point to the remote sensor on the DVD player.
Distance:
Maximum of 7m
Angle:
Approximately 30^ from each direction.
*Do not expose the remote sensor directly to direct sunlight or lighting appliances. The DVD player will be malfunctioned if you do so.
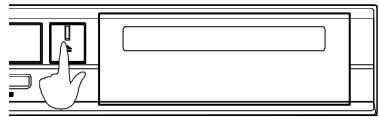
Playing a DVD

- Press the Power button to turn on the player.
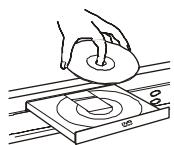
3.Insert a disc.
- Press the Eject button ( ) to open the tray door.

- Press the Eject button (▲) to close the tray door.
Front Panel Operation

1.POwER
Turn on or turn off the player.
3.PLAY/PAUSE
Play or momentarily stop the program on the disc.
5.PREV.and NEXT
Press NEXT during play
Go to the next chapter or track.
Press PREVIOUS during play
Go back to the preceding chapter or track.
2. OPEN/CLOSE
Open or close the tray.
4.STOP
Stop playing.
Karaoke Function (only for those players with KARAOKE functions)
KEY
Press " # " or " b " on the remote controller to adjust the tone of the music. Choose " b " to have a lower tone. Choose " # " to have a higher tone.
1-MIC-2
Connect the microphones to MIC1 and MIC2 / or MIC2 jack(s) so that the machine can play the source.
What is MP3
MP3 is a new music format which is capable to play the music on the internet.
MP3 Operation
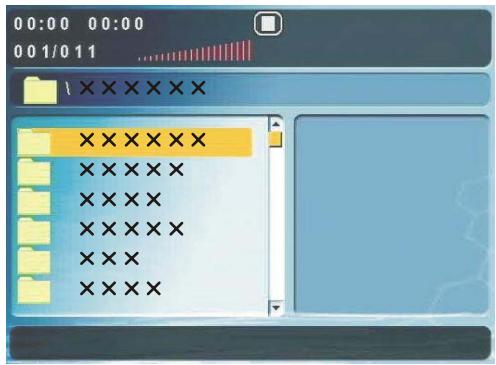
- Turn on the TV and insert an MP3 CD, the MP3 menu folder will be shown on the screen when the tray is closed. (picture 1)
- Press "▲/▼" to select the desired folder. (picture 1)
- Press "PLAY/▶" to see the MP3 list under the selected folder. Press "PLAY/▶" to return to the previous page. (picture 2)
- Press "▲/▼" to select the desired MP3 file. (picture 2)
- Press "PLAY" to play the selected MP3 file. (picture 3)
- Select " " mark and press "PLAY/▶" to return to the previous page.
- You can also press "PROGRAM" to see all the MP3 files in the disc and press / to select the desired MP3 file and press "PLAY" to play the selected MP3 file. (picture 4)
- Press "▶" or "▶" to go to the next/previous page.
- Press "1/ALL" to select different play modes including: Single, Repeat Folder, Folder, Shuffle, Random and Repeat One.
(picture 1)

(picture 2)

(picture 3)

(picture 4)
- The " " sign in front of a file name indicates that this is a folder, not an MP3 file.
- The "MP3" sign in front of a file name indicates that this is an MP3 file.
What is JPEG
JPEG is short for the "Joint Photographic Experts Group", a group of experts nominated to produce standards for continuous tone image coding.
The best known standard from JPEG is IS 10918-1 (ITU-T T.81), which is the first of a multi-part set of standards for still image compression. This allows you to create files (such as photographs, drawings, and most clip-art) that can be archived on a CD-R for viewing on the RDV650, computer, or the web.
Playing Your JPEG Files
Normal Slide Show Presentation
When a JPEG disc is loaded into the player, a menu will appear on screen. (the same as the on screen menu of MP3) Each picture in the current directory will be displayed consecutively in a slideshow presentation and will be automatically displayed using the largest size that fits in your television screen. Sixteen slideshow "transition" modes are provided. Use the "PROGRAM" button to select one of the following transition effects:
mode 1: Wipe Top (by default)
mode 3: Wipe Left
mode 5: Diagonal Wipe Left Top
mode 7: Diagonal Wipe Left Bottom
mode 9: Extend From Center H
mode 11: Compress To Center H
mode 13: Window H
mode 15: Wipe From Edge To Center
mode 2: Wipe Bottom
mode 4: Wipe Right
mode 6: Diagonal Wipe Right Top
mode 8: Diagonal Wipe Right Bottom
mode 10: Extend From Center V
mode 12: Compress To Center V
mode 14: Window V
mode 16: Move In From Top
Press "1/ALL" button to select different play modes including: Random, Repeat One, Repeat All, Repeat Off, Single and Shuffle.
Image Rotation
There are four modes to rotate a picture: Invert, Mirror, Left, and Right. These operations are allowed only when a picture is being displayed normally, and will be cancelled automatically when the next picture is displayed (press"next" or "prev") The arrow key are used to select the different rotation modes:
Up-Mirror/Vertical
Down-Mirror/Horizontal
Left -Turn left
Right -Turn right
Zoom
This features allows you to view a picture at 50% - 200% in several increments. Press the “ZOOM” button. An on screen message (“Zoom 100% ) will verify your selection. Use “F.F” and “F.R” keys to control the amount of zoom in and out. Press the direction keys to move the picture in any direction. Press “Zoom” button again to exit the “Zoom” mode and back to normal operation.
Note: When in the "ZOOM" mode, the slideshow transition and image transformation features are disabled.
Menu
When JPEG CD is played, the "MENU" key is used to display JPEG folders and the corresponding files. During the playback, press "STOP" to access thumbnail menu.
Use the Setup Menu display to change the system configuration. In this section, each item on the Setup Menu display will be described. Use “▲/▼/▲” buttons to select the item that you want and press “PLAY” or “ENTER” button to confirm.
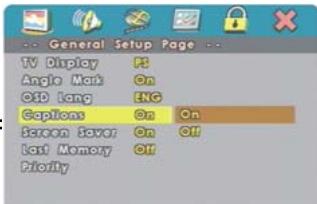
General Setup Page

Go to General Setup Page

Tei TV Display Mode

Sel Angle Mat
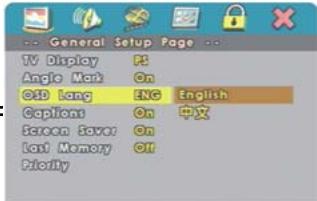
Sei 8D language
Closed Caplion

Serenan Faver

Sel Last Memory Date

Priority
TV Display
The type TV set (4:3 or 16:9) connected to the player and the wide-screen picture type for a 4:3 TV can be set. Select "General Setup Page". You will see the following table on the screen. Press "▲/▼" to select "TV Display". Press "PLAY" to confirm your choice. This setting can only be changed on the setup menu.
Normal/PS
Select this option when you connect a normal TV to the player. Displays the wide picture with a portion automatically cut off (the left and right edges).
Normal/LB
Select this for a conventional sized TV set. Black bands appear in both upper and down sides. (Letter-Box Style)
Wide
Select this for a wide-screen TV set, played in full size. Setting the side-screen TV to FULL mode is also necessary.
Angle Mark
Press "▲/▼" to select "Angle Mark". This function can be set to "On" or "Off." This function only works on the discs that support the multiple angle view feature.
OSD Lang
The setup menu can be shown in other languages. You can choose another language by pressing “▲/▼” to select “OSD Lang”. Turning the power off will not effect the setting. The setting can only be changed on the setup menu.
Note: Some DVD may not include the pre-selected languages. In this case, the player automatically displays menu which is consistent with the disc's initial language setting.
Captions
Press “ / ” to select “Captions”. This function allows you to turn the subtitles on or off.
Screen Saver
Press "▲/▼" to select "Screen Saver". This function can be set to "On" or "Off."
Last Memory
Press “▲/▼,” to select “Last Memory”. When the setting is “On”, the player starts memorizing the last memory of the last disk. This function only works when the player is powered on.
Priority (option)
The deluxe version model which supports DVD-Audio. You have to set "DVD-Audio" as the first "Priority" while playing "DVD-Audio" disc.
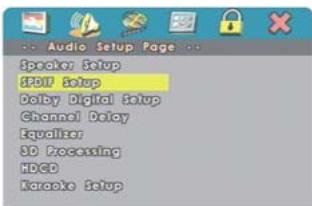
Audio Setup Page
Audio setup options should only be changed if the DVD player is connected to a LEFT or RIGHT surround sound processor.
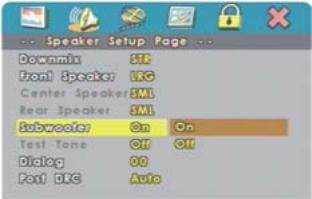
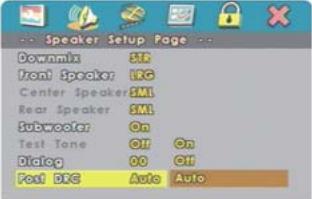
Speaker Setup

Go To Speaker Setup Page


Go to Audio Setup Page

Set Downnia Mode
Setup Heat Speaker

Setup Center Speaker

setup kear surround speaker
Setup Subwoofer

Genie

Bialog Volume
Post DXG
Downmix
Switches the mixing down methods when you play a DVD with rear signal components. This function can be set to "LT/RT", "Stereo", "V SURR", "Off".
Front Speaker
These functions allow you to determine the front, center, rear or subwoofer speaker is "Large" or "Small" depends on your need.
Center Speaker
These functions allow you to determine the front, center, rear or subwoofer speaker is "Large", "Small" or "Off" depends on your need.
Rear Speaker
These functions allow you to determine the front, center, rear or subwoofer speaker is "Large", "Small" or "Off" depends on your need.
Subwoofer
These functions allow you to determine the front, center, rear or subwoofer speaker is "On" or "Off" depends on your need.
Test Tone
This item allows you to open or close the test tone function. Downmix had to be set as "Off". And there is no disc in the player.
Dialog
Press / to adjust the dialog volume while setting Downmix as "LT/RT" or "Stereo".
Post DRC
This is selected to adjust post dynamic range compression function to obtain the different compression results.
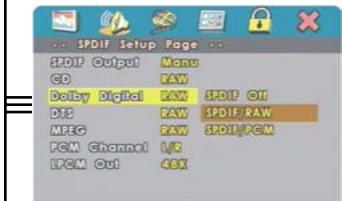
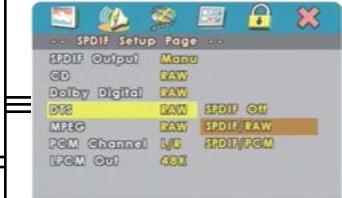
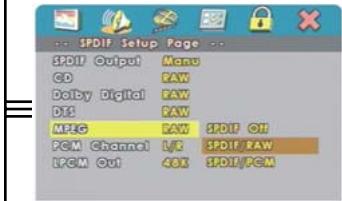
SPDIF Setup
Go to fill setup page

Setup #DF

Geno
to1
Right surround
Right

image
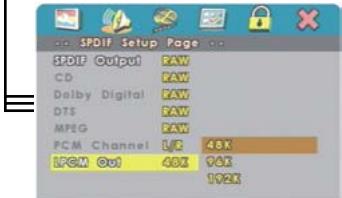
SPDIF Output
Press “▲/▼” to select “SPDIF Output”.
CD
Press "▲/▼" to select "CD" digital output while "SPDIF Output" is set to "Manual".
Dolby Digital
Press / to select "Dolby Digital" output while "SPDIF Output" is set to "Manual".
DTS
Press / to select "DTS" digital output while "SPDIF Output" is set to "Manual".
MPEG
Press / to select "MPEG" digital output while "SPDIF Output" is set to "Manual".
PCM Channel
This function only works when "SPDIF Output" is set to "Manual"
LPCM Out
Press "▲/▼," to select "LPCM Out" frequency. The 2 channel model can afford 48K and 96K. The 5.1 channel model can afford 48K,96K and 192K.
Dolby Digital Setup

Go To Baby Digital Setup
三
( 2)
m = 311
图1
m = 311
( 2)
19/19
2 : x^ ( x) = 1.
( x - 2x) t - xy^2 = ( x - 2x) f^ t
.
.
m = 311
m = 311
.
一
.
1
.
WI
1e
图1
1
1e
L
3w
D
1
5
cha
an
and
el.
.
#
如:
…
…
…
1
…
…
1
10
at
图1
IS
[Tab]
1e
:III
ne
can
.
m = 311 ;
.
-
4
.
.
:
…
e
OT
tr
1e
S
19
na
.
.
.
.
.
to
D S
se
le
ct
th
。
.
.
“
11
”
e
SS
A
17
1
to
661
D
.
M
”
e:
SS
。
PI
A
A
-
-1
…
。
1
12
3
to
S
else
ec
ct t
。
1
1
m = 311 ;
m = 311 ;
…
D.
…
…
.
1
引.
P
ref
55
1
12 × 12
.
.
.
3F
es
SS
D
el
a.
m
11.
12
一
/
ch
3.
st
61
ha
图
is
m = 311
1 + u7 = 70%
f
K
/
1
”
(1)
-
ST
.
ha
.
IS
m = 311
3
12
1y
由
116
0
D
B.
m = 311
1 + u7 = 70%
m = 311
:
1 + u8 = 8 + 1u
i
e
m = 311 ;
。
C.
E
图1
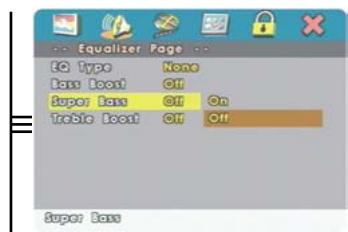

Super Bass
Enable the "Super Bass" function. This function only works when "Bas Boost" is on.
Treble Boost
Enable "Treble Boost" function.

3D Processing
Go To 3D Processing Pages
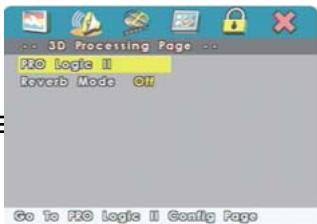
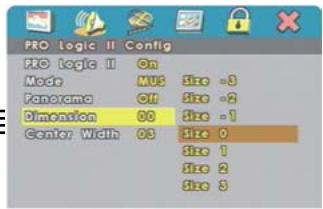
PRO Logic II (Option)
The deluxe version model supports prologic virtual surround sound effect.

Pre logic II

code Re Logic II Mode

Jol Rie Logic II Panorama Control
Set R# Logic II Dimension 10

Set Pto Logic II Genitor Width
PRO Logic II (Option)
Press "▲/▼," to select "PRO Logic II".
Mode (Option)
Press "▲/▼" to select "Mode". This function only works when the "PRO Logic II" setting is selected to "On" or "Auto".
Panorama (Option)
Press / to select "Panorama". This function only works when the "PRO Logic II" setting is selected to "On" or "Auto".
Dimension (Option)
Press / to select "Dimension". This function only works when the "PRO Logic II" setting is selected to "On" or "Auto".
Center Width (Option)
Press / to select "Center Width". This function only works when the "PRO Logic II" setting is selected to "On" or "Auto".
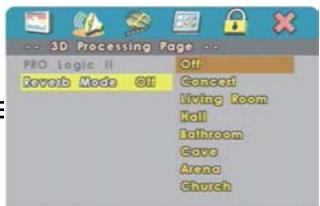
Reverb Mode
Reverb Mode
3D PROCESSING MODE selection. There are 7 options including, "Concert, Living Room, Hall, Bathroom, Cave, Arena, Church".
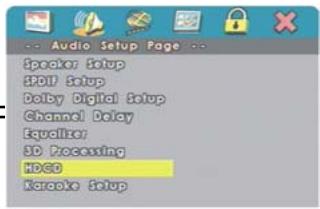
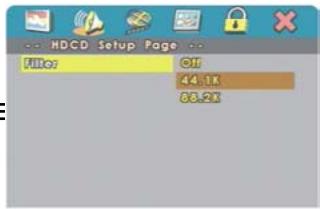
Go To HDEO Setup
1107
HDCD(Option)
Select "HDCD" to have better sound quality while playing HDCD format CD. (This function only works when the "Filter" is selected to 88.2K.)
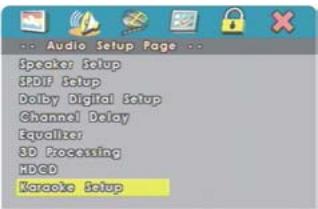
Go to Karaoke Setup Page

Go to MIE setup Page
Karaoke Setup(Option)
Select "Karraoke Setup" while the player supports this function.

MIC Threshold
MIC Threshold (Option)
Press / to select "MIC Threshold".
Video Setup Page

Go To Video Setup Page

Component
Component
Enable component video output. Please note that VGA is an option.
Note:
If the player is with SCART output, the factory setting will be set to "SCART". Besides, if the TV supports P-Scan function and you would like to enable P-Scan function, please change the "Component" setting into Yuv, then select "P-Scan" in TV Mode.

Set F-SCAN On/OH
TV Mode
Select the interlace or P-SCAN (Option) TV mode. (Component should be set to YUV.)
Quality
Adjust the video output quality.

Go To Video Quality Setup Page

sharpness

Brightness

Contact

Gamm
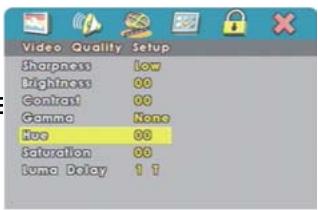
Hue

Saturation
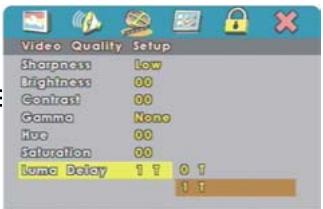
Luma Delay
Sharpness
Press / to adjust "Sharpness".
Brightness
Press / to adjust "Brightness". Press "PLAY" to return to "Brightness".
Contrast
Press "▶" to adjust "Contrast". Press "PLAY" to return to "Contrast".
Gamma
Press / to adjust "Gamma".
Hue
Press / to adjust "Hue". Press "PLAY" to return to "Hue".
Saturation
Press / to adjust "Saturation". Press "PLAY" to return to "Saturation".
Luma Delay
Press "▲/▼" to adjust "Luma Delay".
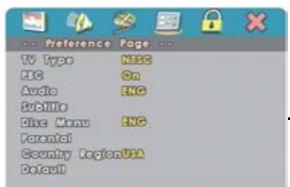
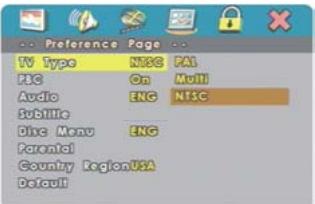
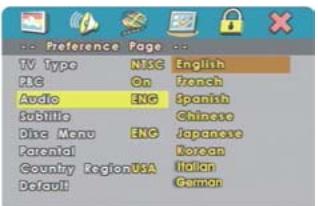
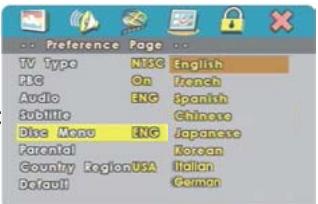
Preference Page
6a 13 Ptolence Lape
Sei TV Standard

git PRG date
图
Preferred Audio Language

Preferred Subtle Language
Preferred Menu Language
Sol Parental Contol

FG Country Region Code
TV Type
Press "▲/▼" to select "TV Type". Select the TV type according to the TV set. (Including NTSC, PAL and Multi.)
PBC
Playback control. This is the function especially for VCD. Press "PBC" (On) to allow to program selected chapter. After this material is completed, the root menu will appear. Press "PBC" (Off) to play movie uninterrupted.
Audio
This function can be set to "English", "French", "Spanish", "Chinese", "Japanese" or "German" and etc. (depending on the DVD format).
Subtitle
This function can be set to "English", "French", "Spanish", "Chinese", "Japanese" or "German" and etc. (depending on the DVD format).
Disc Menu
This function can be set to "English", "French", "Spanish", "Chinese", "Japanese" or "German" and etc. (depending on the DVD format).
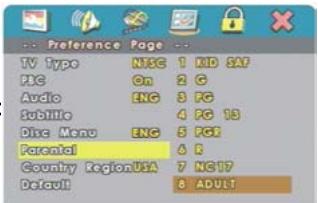
Parental
Move the arrow to "Parental". There are 8 options of selections. Parental control only works with DVD discs that have this protection system encoded. Parental control does not work for VCD or audio CD discs.
Country Region
Set up the parental control country region.

Load Factory Selling
Default
This function will change all parameter to the default setting.
Password Setup Page


Password Mode

Password Mode
Press "▲/▼" to select "Password Mode" to "On" or "Off".
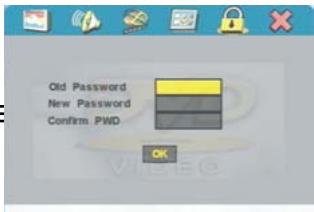
Password
The initial factory setting for "Old Password" is 123456 for 5.1CH DVD player. You need to enter this number if you want to change the password.
Note:
Do not forget your password. Currently, there is no way to override the password.
Exit Setup Page


Call Setup Menu
Exit Setup Menu
Press "PLAY" to exit the Setup Menu.