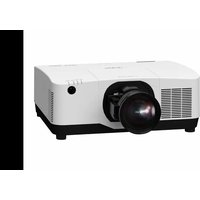
LT140 - Projecteur NEC - Notice d'utilisation et mode d'emploi gratuit
Retrouvez gratuitement la notice de l'appareil LT140 NEC au format PDF.

| Intitulé | Valeur / Description |
|---|---|
| Type de produit | Projecteur LCD portable |
| Résolution native | 1024 x 768 pixels (XGA) |
| Luminosité | 2000 lumens |
| Contraste | 500:1 |
| Technologie d'affichage | LCD |
| Alimentation électrique | 100-240V AC, 50/60Hz |
| Dimensions approximatives | 290 x 230 x 80 mm |
| Poids | 2.5 kg |
| Compatibilités | PC, Mac, consoles de jeux, lecteurs DVD |
| Type de batterie | Non applicable (projecteur alimenté par secteur) |
| Fonctions principales | Projection d'images et de vidéos, connectivité VGA et HDMI |
| Entretien et nettoyage | Nettoyage régulier de la lentille, remplacement du filtre selon les besoins |
| Pièces détachées et réparabilité | Disponibilité de pièces de rechange, réparabilité limitée selon les réparateurs |
| Sécurité | Conforme aux normes de sécurité électrique, protection contre la surchauffe |
| Informations générales | Idéal pour les présentations en entreprise et les projections à domicile |
FOIRE AUX QUESTIONS - LT140 NEC
Questions des utilisateurs sur LT140 NEC
0 question sur cet appareil. Repondez a celles que vous connaissez ou posez la votre.
Poser une nouvelle question sur cet appareil
Téléchargez la notice de votre Projecteur au format PDF gratuitement ! Retrouvez votre notice LT140 - NEC et reprennez votre appareil électronique en main. Sur cette page sont publiés tous les documents nécessaires à l'utilisation de votre appareil LT140 de la marque NEC.
MODE D'EMPLOI LT140 NEC
Precautions
Please read this manual carefully before using your NEC MultiSync LT84/LT140 Projector and keep the manual handy for future reference.
Your serial number is located under the name plate label on the left side of your MultiSync LT84/LT140. Record it here:
| CAUTION |
| To turn off main power, be sure to remove the plug from power outlet. The power outlet socket should be installed as near to the equipment as possible, and should be easily accessible. |
| CAUTION |
| TO PREVENT SHOCK, DO NOT OPEN THE CABINET. NO USER-SERVICEABLE PARTS INSIDE. REFER SERVICING TO QUALIFIED NEC SERVICE PERSONNEL. |
| This symbol warns the user that uninsulated voltage within the unit may be sufficient to cause electrical shock. Therefore, it is dangerous to make any kind of contact with any part inside of the unit. |
| This symbol alerts the user that important information concerning the operation and maintenance of this unit has been provided. The information should be read carefully to avoid problems. |
WARNING
TO PREVENT FIRE OR SHOCK, DO NOT EXPOSE THIS UNIT TO RAIN OR MOISTURE.
DO NOT USE THIS UNIT'S GROUNDED PLUG WITH AN EXTENSION CORD OR IN AN OUTLET UNLESS ALL THREE PRONGS CAN BE FULLY INSERTED.
DO NOT OPEN THE CABINET. THERE ARE HIGH-VOLTAGE COMPONENTS INSIDE. ALL SERVICING MUST BE DONE BY QUALIFIED NEC SERVICE PERSONNEL.
DOC Compliance Notice
This Class A digital apparatus meets all requirements of the Canadian Interference-Causing Equipment Regulations.
3. GSGV Acoustic Noise Information Ordinance:
The sound pressure level is less than 70 dB (A) according to ISO 3744 or ISO 7779.
RF Interference
WARNING
The Federal Communications Commission does not allow any modifications or changes to the unit EXCEPT those specified by NEC Technologies in this manual. Failure to comply with this government regulation could void your right to operate this equipment.
This equipment has been tested and found to comply with the limits for a Class A digital device, pursuant to Part 15 of the FCC Rules.
These limits are designed to provide reasonable protection against harmful interference in a commercial installation. This equipment generates, uses and can radiate radio frequency energy and, if not installed and used in accordance with the instructions, may cause harmful interference to radio communications. Operation of this equipment in a residential area is likely to cause harmful interference in which case the user will be required to correct the interference at their own expense.
In UK, a BS approval power cable with moulded plug has a Black (five Amps) fuse installed for use with this equipment. If a power cable is not supplied with this equipment please contact your supplier.
Important Safeguards
These safety instructions are to ensure the long life of your projector and to prevent fire and shock. Please read them carefully and heed all warnings.
Installation
- For best results, use your projector in a darkened room.
- Place the projector on a flat, level surface in a dry area away from dust and moisture.
- Do not place your projector in direct sunlight, near heaters or heat radiating appliances.
- Exposure to direct sunlight, smoke or steam can harm internal components.
- Handle your projector carefully. Dropping or jarring can damage internal components.
- Do not place heavy objects on top of the projector.
- If you wish to have the projector installed on the ceiling:
a. Do not attempt to install the projector yourself.
b. The projector must be installed by qualified technicians in order to ensure proper operation and reduce the risk of bodily injury.
c. In addition, the ceiling must be strong enough to support the projector and the installation must be in accordance with any local building codes.
d. Please consult your dealer for more information.
Power Supply
- The projector is designed to operate on a power supply of 100-120 or 200-240 V 50/60 Hz AC. Ensure that your power supply fits this requirement before attempting to use your projector.
- Handle the power cable carefully and avoid excessive bending. A damaged cord can cause electric shock or fire.
- If the projector is not to be used for an extended period of time, disconnect the plug from the power outlet.
Cleaning
- Unplug the projector before cleaning.
- Clean the cabinet periodically with a damp cloth. If heavily soiled, use a mild detergent. Never use strong detergents or solvents such as alcohol or thinner.
- Use a blower or lens paper to clean the lens, and be careful not to scratch or mar the lens.
Lamp Replacement
- To replace the lamp, follow all instructions provided on page E-33.
- Be sure to replace the lamp when the Status light comes on. If you continue to use the lamp after 1000 hours of use, the lamp bulb may shatter, and pieces of glass may be scattered in the lamp case. Do not touch them as the pieces of glass may cause injury. If this happens, contact your NEC dealer for lamp replacement.
- Allow a minimum of ONE minute to elapse between turning the lamp off and on.
High voltage is applied to the lamp immediately when the power is turned on.
Therefore turning the power off and quickly back on may shorten the life of your lamp and result in damage to your projector.
Fire and Shock Precautions
- Ensure that there is sufficient ventilation and that vents are unobstructed to prevent the build-up of heat inside your projector. Allow at least 3 inches (10cm) of space between your projector and a wall.
- Prevent foreign objects such as paper clips and bits of paper from falling into your projector. Do not attempt to retrieve any objects that might fall into your projector. Do not insert any metal objects such as a wire or screwdriver into your projector. If something should fall into your projector, disconnect it immediately and have the object removed by a qualified NEC service personnel.
- Do not place any liquids on top of your projector.
Warnings
- Do not look into the lens while the projector is on. Serious damage to your eyes could result.
- Keep any items such as magnifying glass out of the light path of the projector. The light being projected from the lens is extensive, therefore any kind of abnormal objects that can redirect light coming out of the lens, can cause unpredictable outcome such as fire or injury to the eyes.
- Do not cover the lens with the supplied lens cap or equivalent while the projector is on. Doing so can lead to melting of the cap and possibly burning your hands due to the heat emitted from the light output.
- Do not hold the lens part. Doing so may cause the risk of injuly.
For the optional full function remote control with the laser pointer
- Do not look into the laser pointer while it is on and do not point the laser beam at another person. Serious injury could result.
1. INTRODUCTION
Introduction to the MultiSync LT84/LT140 Projector .... E-6
Getting Started E-6
Getting to Know Your MultiSync LT84/LT140 Projector .... E-7
Front Features. E-7
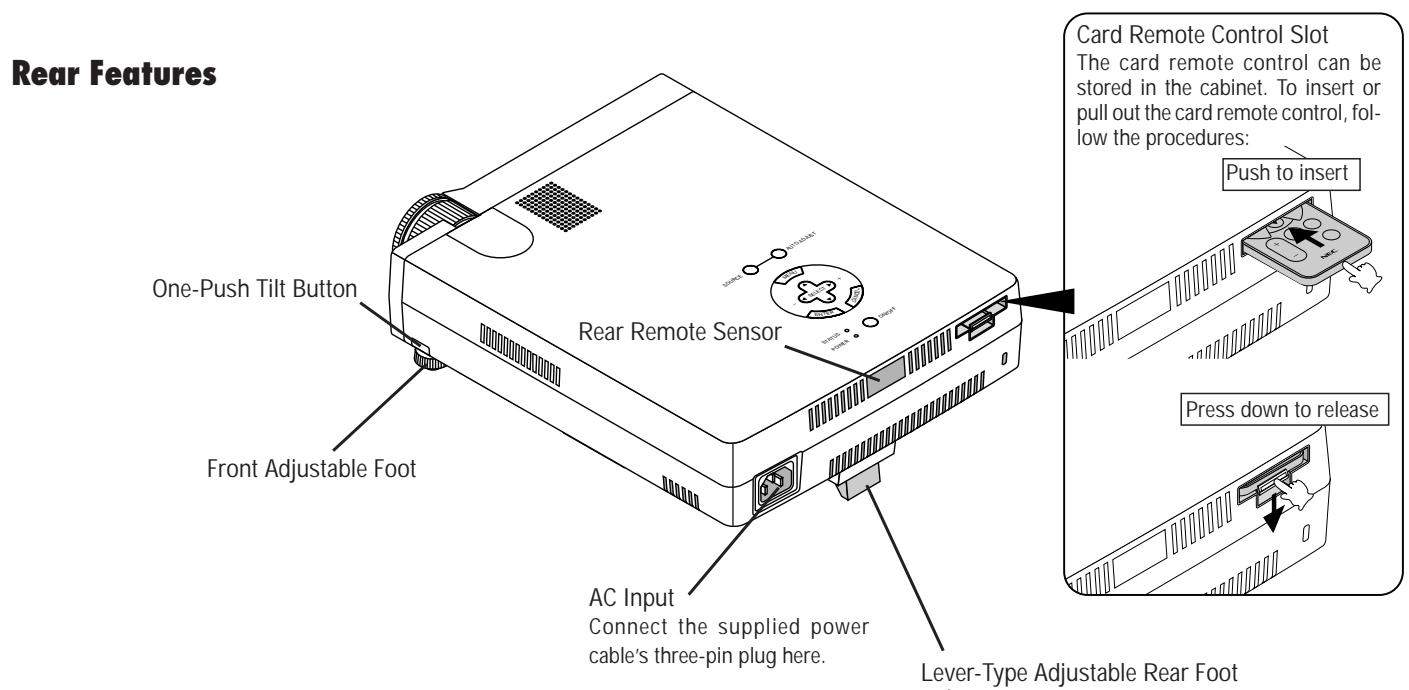
Rear Features E-7
Bottom Features. E-7
Top Features E-8
Terminal Panel Features E-9
Remote Control Features. E-10
2. INSTALLATION
Setting Up Your Projector. E-12
Selecting a Location E-12
Using a Tabletop or Cart E-12
Distance Chart. E-13
Ceiling Installation E-14
Reflecting the Image. E-14
Wiring Diagram. E-15
3. OPERATION
General Controls E-17
Using the Menus. E-17
Using a USB Mouse E-17
Menu Tree E-18
Menu Elements. E-19
Menu Descriptions & Functions E-20
Source Select E-20
RGB E-20
Video/S-Video E-20
PC Card Viewer. E-20
Adjustments E-20
Picture E-20
Volume E-20
Image E-20
Auto Adjust E-21
Position E-21
Pixel Adjust E-21
Resolution. E-21
Color Temperature E-21
Keystone E-21
Factory Default E-21
Image Options E-21
Image Mode E-21
Aspect Ratio E-21
Video Mode E-22
Gamma. E-22
Noise Reduction E-22
Color Matrix E-22
Projector Options. E-22
Menu E-22
Language E-22
Source Display E-22
Projector Pointer E-22
Setup E-23
Orientation E-23
Background E-23
Signal Select E-23
Auto Start E-23
Power Management. E-23
Power Off Confirmation. E-23
Mouse Settings E-23
Keystone Save E-23
White Segment E-23
Clear Lamp Hour Meter E-23
PC Card Viewer Options E-24
Capture Options E-24
Tools E-24
Capture E-24
PC Card Files. E-25
ChalkBoard E-25
Help E-25
Contents. E-25
Source Information. E-25
Projector Information. E-25
Using the PC Card Viewer Fucntion E-26
Features E-26
Inserting and Ejecting a CompactFlash™ Card.... E-26
Installing the PC Card Viewer
Software E-27
Starting Up the PC Card Viewer Software
on your PC (PC Card Viewer Utility 1.0) E-27
Operating the PC Card Viewer Function
from the Projector (playback) E-28
Capturing Images Displayed on the Projector..... E-30
Viewing Digital Images. E-31
Uninstalling the PC Card Viewer Software .E-31
Terminology. E-32
4. MAINTENANCE
Replacing the Lamp. E-33
Remote Control Battery Installation. E-34
Operating Range E-34
5. TROUBLESHOOTING
Status Light Messages E-35
Common Problems & Solutions. E-35
When Using the PC Card Viewer Function. E-36
6. SPECIFICATIONS
Optical/Electrical/Mechanical. E-37
Cabinet Dimensions E-38
D-Sub Pin Assignments. E-40
TimingChart E-41
PC Control Codes E-42
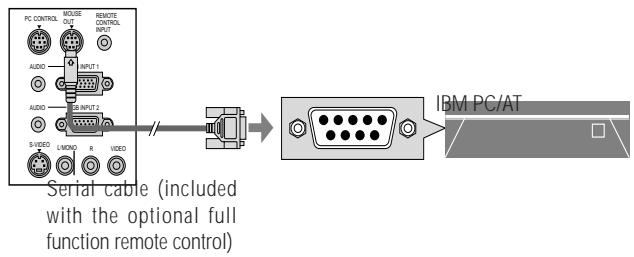
Cable Connection E-43
CompactFlash is a trademark of San Disk Corporation.
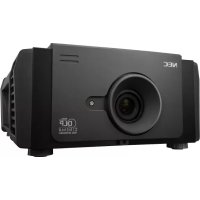
Introduction to the MultiSync LT84/LT140 Projection
This section introduces you to your new MultiSync LT84 (SVGA)/ LT140 (XGA) Projector describes the features and controls.
Congratulations On Your Purchase Of The MultiSync LT84/ LT140 Projector
The MultiSync LT84/LT140 is one of the very best projectors available today. The MultiSync LT84/LT140 enables you to project precise images up to 300 inches across (measured diagonally) from your PC or Macintosh computer (desktop or notebook), VCR, DVD player, document camera, a laser disc player, or PC Card Viewer.
You can use the projector on a tabletop or cart, you can use the projector to project images from behind the screen, and the projector can be permanently mounted on a ceiling*1. The remote control can be used wirelessly.
Features you'll enjoy:
- Simple set up and operation.
- Hot air blown from the vents does not bother the audience during your presentation since the vents are located on the front and bottom.
A high-performance AC120 watt P-VIP lamp. - A wireless card remote control that can be stored in the projector.
- The manual zoom control enables you to adjust the image to be between 25 and 300 inches (measured diagonally).
- Keystone correction allows you to correct trapezoidal distortion so that the image is square.
- You can choose between video modes depending on your source: "normal" for a typical picture, "natural" for true color reproduction.
- The built-in PC Card Viewer allows you to start your presentation even when a PC is not available at the site.
- The "Capture" enables you to capture the current projected image.
- An image can be projected from in front or behind a screen, and the projector can even be installed on the ceiling.
- NEC's exclusive Advanced AccuBlend intelligent pixel blending technology - an extremely accurate image compression technology - offers a crisp image with SXGA (1280× 1024) resolution ^*3 . You can select any point on the screen with the pointer and enlarge the selected area.
Supports most IBM VGA, SVGA, XGA*2 , SXGA(with Advanced AccuBlend)*3, Macintosh, component signal (YCbCr / YPbPr) or any other RGB signals within a horizontal frequency range of 15 to 85kHz and a vertical frequency range of 50 to 85 Hz. This includes NTSC, PAL, PAL60, SECAM and NTSC4.43 standard video signals.
NOTE: Composite video standards are as follows:
NTSC: U.S. TV standard for video in U.S. and Canada.
PAL: TV standard used in Western Europe.
PAL60: TV standard used for NTSC playback on PAL TVs.
SECAM: TV standard used in France and Eastern Europe.
NTSC4.43: TV standard used in Middle East countries.
- The supplied card remote control can be used without a cable, and you can even use the optional full function remote control and mouse adapter to operate your PC or Macintosh mouse wirelessly from across the room with the built-in remote mouse receiver.
- You can control the projector with a PC using the PC Control port.
- The contemporary cabinet design is light, compact, easy to carry, and complements any office, boardroom or auditorium.
Eight kinds of pointers are available for your presentation. - USB terminal allows USB mouse operation*4.
1 Do not attempt to mount the projector on a ceiling yourself. The projector must be installed by qualified technicians in order to ensure proper operation and reduce the risk of bodily injury. In addition, the ceiling must be strong enough to support the projector and the installation must be in accordance with any local building codes. Please consult your dealer for more information.
2 An XGA image (1024 × 768) is converted into an 800 × 600 crisp image with NEC's Advanced AccuBlend on LT84.
3 An SXGA image ( 1280 × 1024 ) is converted into a 1024 × 768 crisp image with NEC's Advanced AccuBlend on LT140.
4 The USB terminal meets the USB1.0 specification and accepts a USB mouse only.
Getting Started
The fastest way to get started is to take your time and do everything right the first time. Take a few minutes now to click through the CD-ROM and review the user's manual. This may save you time later on. At the beginning of each section of the manual you'll find an overview. If the section doesn't apply, you can skip it.
Getting To Know Your MultiSync LT84/LT140 Projector
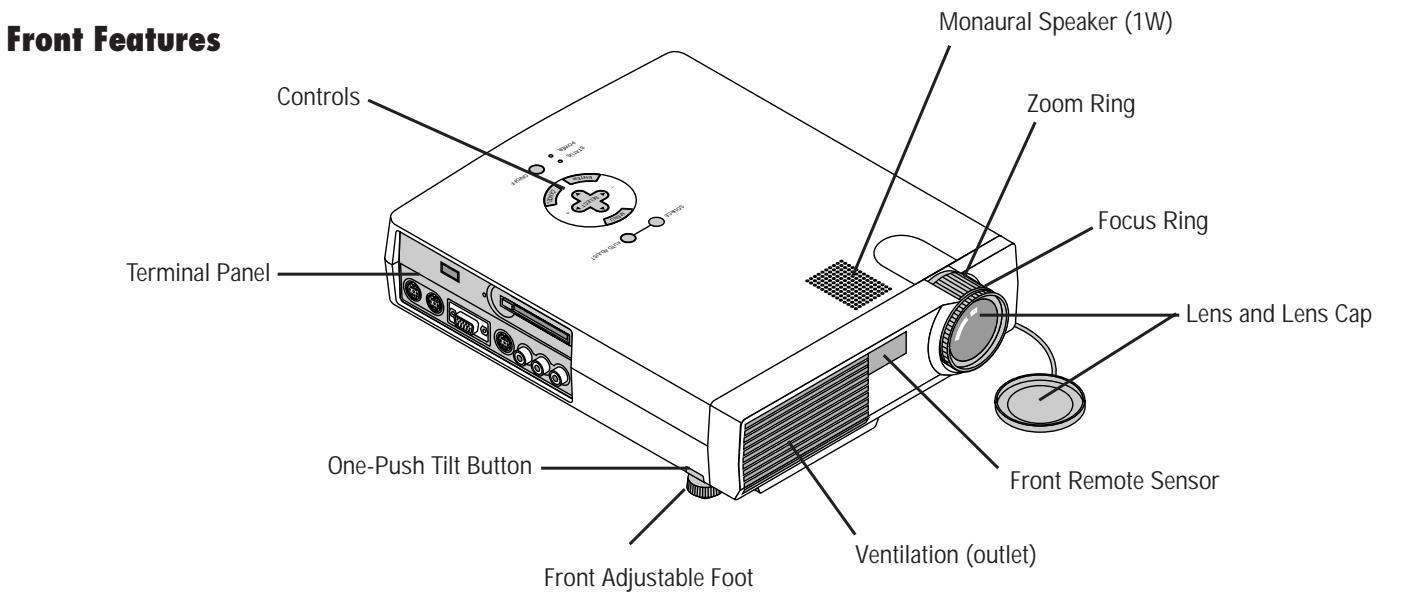
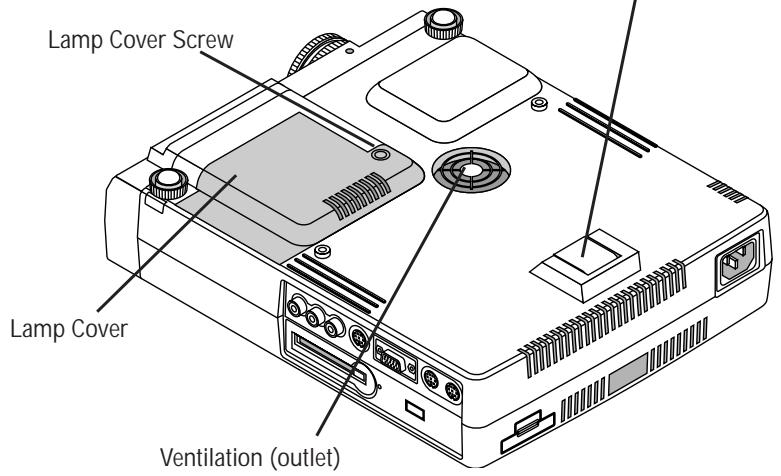
Bottom Features
Top Features
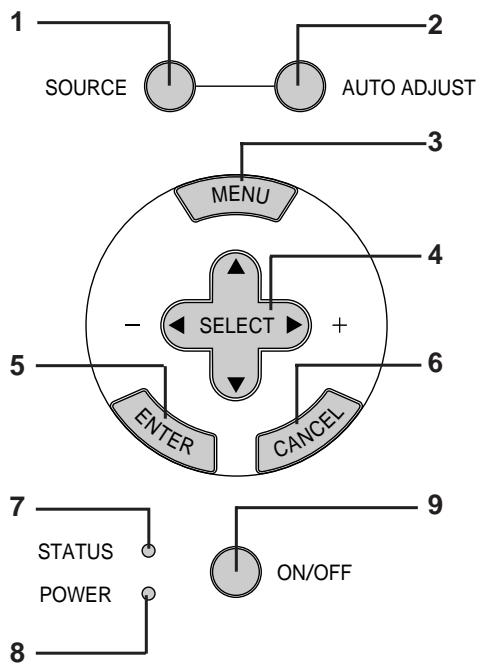
1 Source Button
Use this button to select a video source such as a PC, VCR, DVD player or PC Card Viewer (CompactFlash card installed).
2 Auto Adjust Button
Use this button to adjust Position-H/V and Pixel Clock/Phase for an optimal picture. Some signals may not be displayed correctly or take time to switch to another.
3 Menu Button
Displays the main menu for operation.
4 Select ( ) / (+)(-) Buttons
: Use these buttons to select the menu of the item you wish to adjust.
: Use these buttons to change the level of a selected menu item.
A press of the button executes the selection. When no menus appear, these buttons work as a volume control.
When the pointer is displayed, these buttons move the pointer.
5 Enter Button
Executes your menu selection and activates items selected from the menu.
6 Cancel Button
Press this button to exit "Menu". Press this button to return the adjustments to the last condition while you are in the adjustment or setting menu.
7 Status Indicator
When this is lit red continually, it's warning you that the projection lamp has exceeded 1000 hours of service. After this light appears, it is advisable to replace the projection lamp as soon as possible.(See page E-33)
In addition the message "LAMP USAGE XX HOURS" appears continually when the on-screen menu is not displayed. If this light blinks red rapidly, it indicates that the lamp cover is not attached properly or the projector is overheated. See the Status Light Messages on page E-35 for more details.
8 Power Indicator
When this indicator is green, the projector is on; when the indicator is amber, it is in standby mode.
9 Power Button
Use this button to turn the power on and off when the power is supplied and the projector is in standby mode.
NOTE: To turn off the projector, press and hold this button for a minimum of two seconds.
Terminal Panel Features
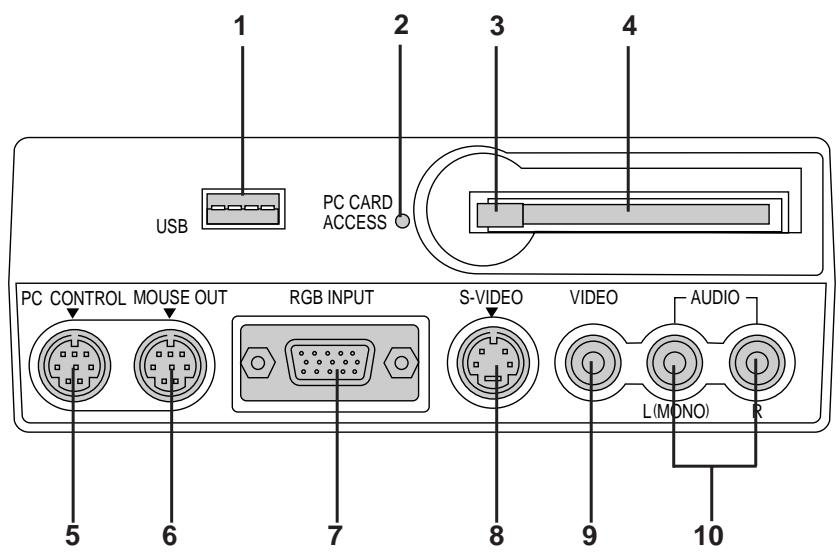
Slot for Kensington MicroSaver Security System
This panel is located on the left side and is where you connect your cables.
1 USB (Mouse) Terminal
Connect a commercially available mouse that supports USB. You can operate the menu or PC Card Viewer with the USB mouse via this terminal.
Note that this terminal is not used with a computer and that there may be some brands of USB mouse that the projector does not support.
2 PC Card Access Indicator
Lights while accessing a CompactFlash memory card.
3 Eject Button
Press to eject a CompactFlash memory card.
4 PC Card Access Slot
Insert a CompactFlash memory card here.
5 PC Control Port (Mini DIN 8 Pin)
Use this port to connect your PC to control your projector. This enables you to use your PC and serial communication protocol to control the projector. If you are writing your own program, typical PC control codes are on page E-42.
A cap is put on the port at the factory. Remove the cap when using the port.
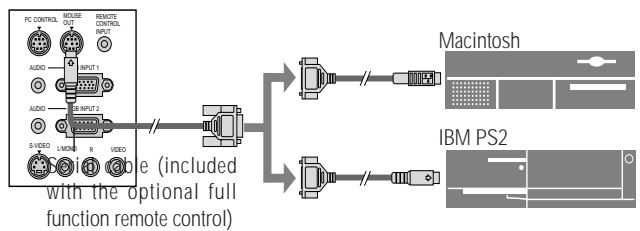
6 Mouse Output Port (Mini DIN 8 Pin)
Not available when the supplied card remote is used.
Use this port to operate your computer's mouse functions from the NEC optional full function remote control. When your computer is connected here with the NEC optional full function remote control (LT40RT), the remote sensors on the projector cabinet will receive your mouse commands.
7 RGB Input/ Component Input Connector (Mini D-Sub 15 pin)
Connect your PC or other RGB equipment such as IBM or compatible computers. Use the signal cable that's supplied to connect to a PC. Or connect a Macintosh or compatible computer here using the signal cable and the pin adapter that is supplied. This also serves as a component input connector which allows you to connect a component video output of a component equipment such as a DVD player.
8 S-Video Input (Mini DIN 4 Pin)
Here is where you connect the S-Video input from an external source like a VCR.
NOTE: S-Video provides more vivid color and higher resolution than the traditional composite video format.
9 Video Input (RCA)
Connect a VCR, DVD player, laser disc player, or document camera here to project video.
10 Left Channel/Mono Audio Input Jack (RCA)
This is the left channel audio input for stereo sound coming from video equipment or audio system. This also serves as your monaural audio input. (Video and S-video only)
Right Channel Audio Input Jack (RCA)
This is the right channel audio input for stereo sound. (Video and S-video only)
NOTE: Although stereo Audio input jacks are provided, the projector will only produce Mono sound. This is due to one speaker limitation of the projector.
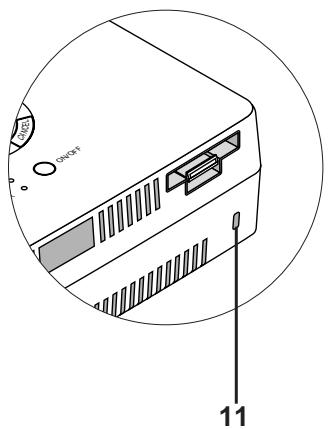
11 Built-in Security Slot (R)
This security slot supports the MicroSaver® Security System. MicroSaver® is a registered trademark of Kensington Microwave Inc. The logo is trademarked and owned by Kensington Microwave Inc.
Remote Control Features
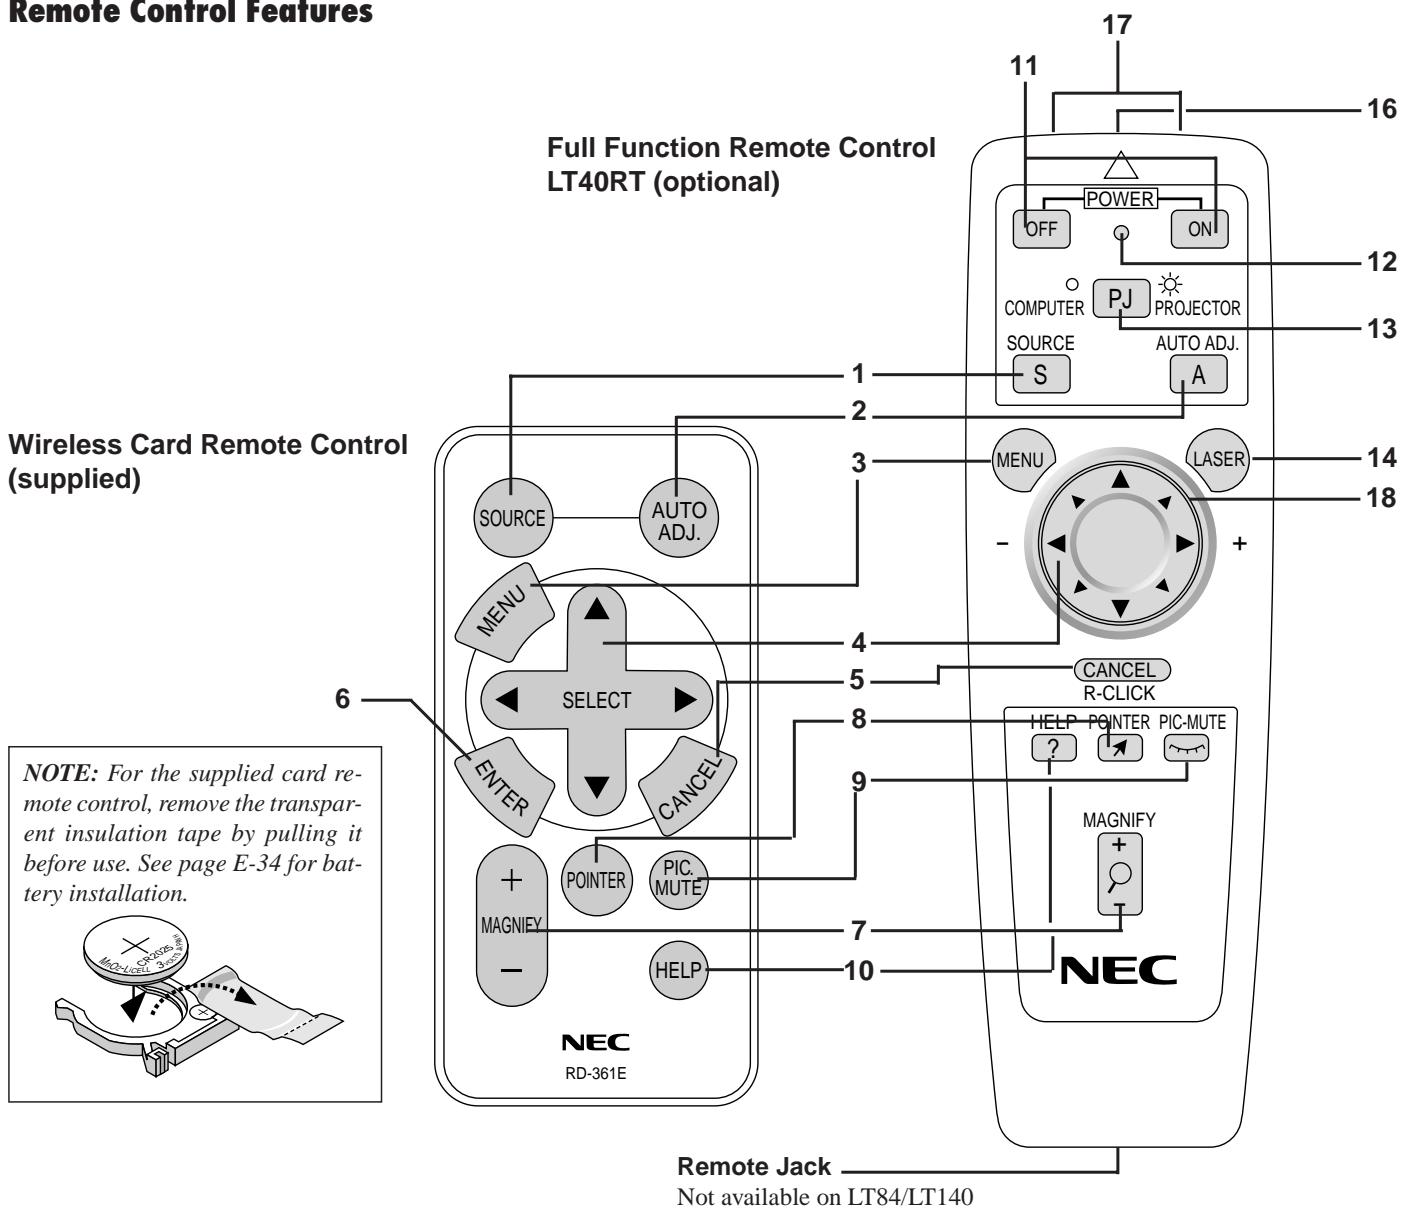
Wireless Card Remote Control
1 Source Button
Press to select a video source.
2 Auto Adjust Button
Use this button to adjust Position-H/V and Pixel Clock/Phase for an optimal picture. Some signals may not be displayed correctly, or in some cases it may take some time for a source to be switched to another.
3 Menu Button
Displays the main menu for operation.
4 Select ( ) / Mouse / (+) (-) Buttons
: Use these buttons to select the menu of the item you wish to adjust.
: Use these buttons to change the level of a selected menu item.
A press of the button executes the selection. When no menus appear, these buttons work as a volume control.
When the pointer is displayed, these buttons move the pointer. The Mouse button is available on the full function remote control only.
NOTE: The Mouse Output port is not available on the card remote control because mouse codes are not output.
5 Cancel/Right Click Button
Press this button to exit "Menu". Press this button to return the adjustments to the last condition while you are in the adjustment or setting menu. The Right-Click button is available on the full
function remote control only.
6 Enter Button
Executes your menu selection and activates items selected from the menu.
7 Magnify Button
Use the (+) or (-) button to adjust the image size up to 400% . When the Pointer is displayed, the magnified image is displayed at the center of the Pointer. When the Pointer is not displayed, the magnified image is displayed at the center of the screen.
8 Pointer Button
Press this button to display one of the eight pointers; press again to hide the pointer.
9 Picture Mute Button
This button turns off the image and sound for a short period of time. Press again to restore the image and sound.
10 Help Button
Provides information about operation and adjustment procedures or the set information for the current menu or adjustment during menu operation. This also displays information how to use the Help.
Wireless Full Function Remote Control (Optional)
You can use your optional full function remote control wireless to operate your projector.
With the mouse output port connected to your computer, you can also use the projector's remote control to operate your computer's mouse wireless. (See page E-16 to connect your computer to the mouse output port.)
NOTE: If you are using a Macintosh computer, you can click either the right or left button to activate the mouse.
11 Power On And Off
If power is applied, you can use this button to turn your projector on and off.
NOTE: To turn off the projector, press and hold the POWER ON button for a minimum of two seconds.
12 LED
Flashes when any button is pressed.
13 Computer/Projector Select
Use this button to switch between "Computer" and "Projector". When "Computer" is selected, the remote control works as your computer mouse. In this mode only Mouse pad, Laser, R-Click and L-Click buttons are available.
14 Laser Button
Press and hold this button to activate the laser pointer. When lit, you can use the laser to draw your audience's attention to a red dot that you can place on any object within 30 feet (10 m).
15 Left Click Button
Use this button to enter your menu selection. It works the same as the "Enter" button on the cabinet or the card remote control.

16 Laser Pointer
Beams a laser light when "Laser" button is pressed.
17 Infrared Transmitter
Direct the remote control toward the remote sensor on the projector cabinet.
18 Mouse Pad(▲▼
Works as a mouse for your projected computer image. This pad is also used to adjust position.
This pad selects the submenu you want to adjust.
After you make your on-screen menu selection, use this pad to adjust the level up or down.
Remote Control Precautions
- Handle the remote control carefully.
- If the remote control gets wet, wipe it dry immediately.
- Avoid excessive heat and humidity.
- If you will not be using the remote control for a long time, remove the batteries.
- Do not place the batteries upside down.
NOTE: Before you use the card remote control for the first time, be sure to remove the insulation tape from the card remote control.
- Keep the coin cell battery out of reach of children so as not to allow them to swallow the cell battery.
Also observe the following when using the optional full function remote:
- Do not look into the laser pointer while it is on.
- Do not point the laser beam at a person.
NOTE:
The optional full function remote control package (LT40RT) includes:
1) Full function remote control
2) Mouse adapter for Macintosh
3) Mouse adapter for IBM PS/2
4) Serial cable
5) Two batteries (AA)
6) Remote control case
The LT40RT optional remote control mouse kit can be obtained from your dealer at additional cost.
This section describes how to set up your MultiSync LT84/LT140 projector and how to connect video and audio sources.
Setting up Your Projector
Your MultiSync LT84/LT140 Projector is simple to set up and use. But before you get started, you must first:
- Determine the image size.
-
Set up a screen or select a non-glossy white wall onto which you can project your image.
-
Carrying The Projector: Always carry your projector in the supplied soft carrying case.
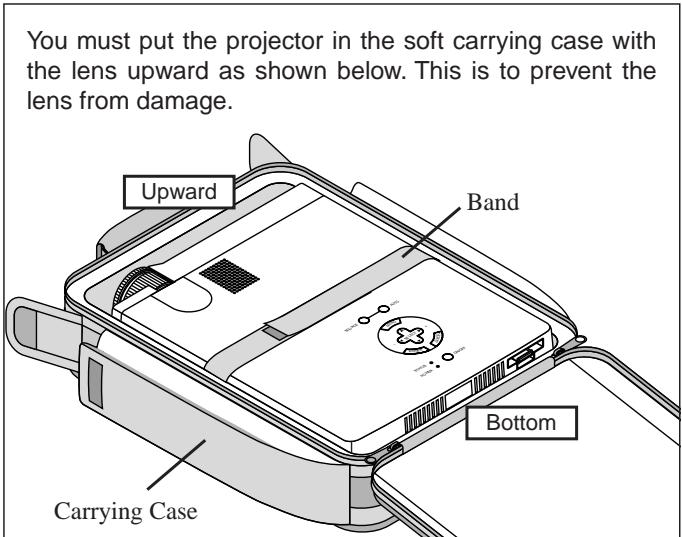
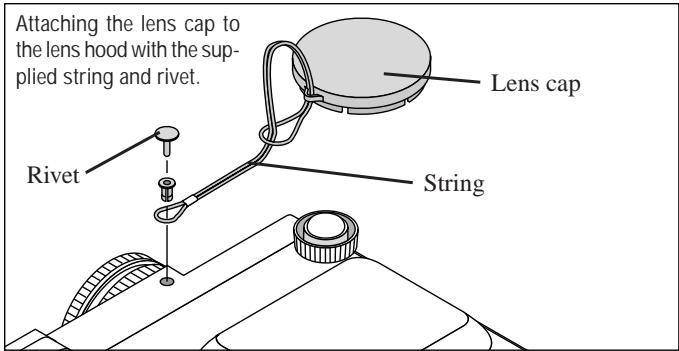
NOTE: Do not put a notebook computer in the soft carrying case. Doing so can cause damage to the computer. When moving the projector or when it is not in use, cover the lens cap.
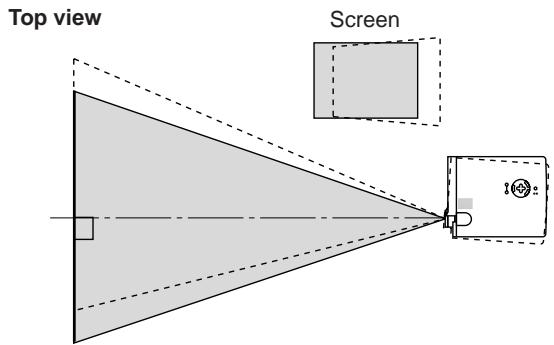
Selecting a Location
The further your projector is from the screen or wall, the larger the image. The minimum size the image can be is approximately 25^ (0.6m) measured diagonally when the projector is roughly 4 feet (1.2m) from the wall or screen. The largest the image can be is 300^ (7.6m) when the projector is about 40 feet (12.2m) from the wall or screen.
Using a Tabletop or Cart
-
Place your projector on a flat level surface at the optimal distance from the screen or wall so you realize the size image you want. (Avoid having bright room lighting or sun light directly on the screen or wall where you'll be projecting the image.)
-
Connect the power cable, remove the lens cap and turn the projector on. (If no input signal is available, the projector will display a background image.)
- Ensure that the projector is square to the screen.
- Move the projector left or right to center the image horizontally on the screen.
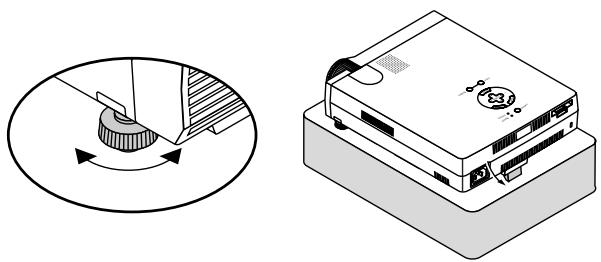
- To center the image vertically, lift the front edge of the projector and press the One-Push Tilt buttons on the front side of the projector, just above the feet, to release the Front Adjustable feet. (There is approximately 5 degrees of up and down adjustment for the front of the projector.)

- If necessary, adjust the front or rear feet to properly position the projected image on the screen.
If the projected image does not appear square to the screen then use keystone correction for proper adjustment. The Lever-Type Adjustable Rear foot height can be changed up to 3 degrees.
- Adjust the size of the image using the Zoom ring on the lens.
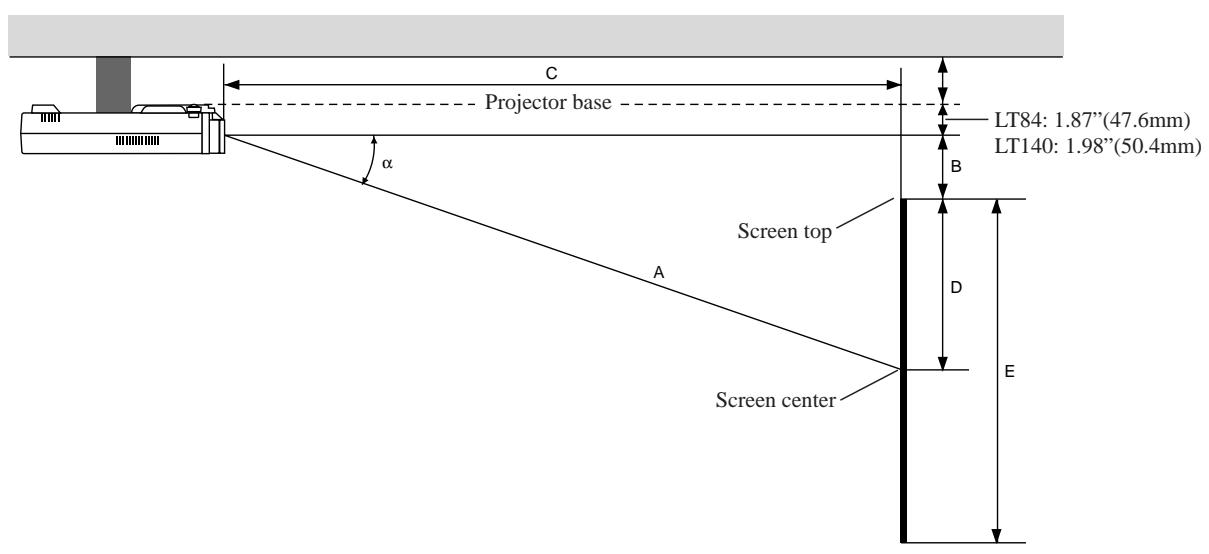
Distance Chart

Screen (inch)
LT84:1.87"(47.6mm)
LT140: 1.98" (50.4mm)
Unit (inch)
A=C/cosα
B=3.7H/25.4
C(XGA:tele) = (2.41 x H) - 2.0 or C(XGA:wide) x 1.2
C(XGA:wide) = (2.0 × H) - 2.0
C(SVGA:tele) = (2.43 x H) - 1.75 or C(SVGA:wide) x 1.2
C(SVGA:wide)=(2.0 x H)-1.9
D=E/2
E=H/4×3
a=H/4×5
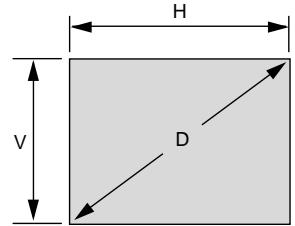
A: Distance between lens center and screen center
B: Vertical distance between lens center and screen bottom (screen top for ceiling mount)
C: Horizontal throw distance between screen surface and projector lens
D: Vertical distance between screen center and screen bottom (screen top for ceiling mount)
E: Screen Height
Unit (mm), H= inch
A=C/cosα
B=3.7H
C(XGA:tele)={(2.41 x H)-2.0} x 25.4 or C(XGA:wide) x 1.2
C(XGA:wide)={(2.0 x H)-2.0} x 25.4
C(SVGA:tele)={(2.43 x H)-1.75} x 25.4 or C(SVGA:wide) x 1.2
C(SVGA:wide)={(2.0xH)-1.9}x25.4
D=E/2
E=H/4×3
a=H/4×5
Installation Angle
The installation angle for the projector must not exceed + / - 15^ .
Deviating from this angle could degrade the performance of the projector and may cause reliability problems.
S-VGA (LT84)
| Screen Size (inch) | Projection Distance | V. Distance between Lens Center and Screen Bottom | ||||||||
| a | H | E | C(mm) | C(inch) | C(mm) | C(inch) | B(mm) | B(inch) | B(mm) | B(inch) |
| Screen size (Diagonal) | Screen Width | Height of screen | WIDE | TELE | WIDE | TELE | ||||
| 25 | 20 | 15 | - | - | 1190 | 46.9 | - | - | 74 | 2.9 |
| 40 | 32 | 24 | 1600 | 63.0 | 1930 | 76.0 | 117 | 4.6 | 117 | 4.6 |
| 60 | 48 | 36 | 2420 | 95.3 | 2910 | 114.6 | 176 | 6.9 | 176 | 6.9 |
| 80 | 64 | 48 | 3240 | 127.6 | 3900 | 153.5 | 235 | 9.3 | 235 | 9.3 |
| 100 | 80 | 60 | 4060 | 159.8 | 4890 | 192.5 | 294 | 11.6 | 294 | 11.6 |
| 120 | 96 | 72 | 4880 | 192.1 | 5870 | 231.1 | 352 | 13.9 | 352 | 13.9 |
| 150 | 120 | 90 | 6110 | 240.6 | 7350 | 289.4 | 440 | 17.3 | 440 | 17.3 |
| 200 | 160 | 120 | 8170 | 321.7 | 9820 | 386.6 | 587 | 23.1 | 587 | 23.1 |
| 240 | 192 | 144 | 9820 | 386.6 | 11790 | 464.2 | 705 | 27.8 | 705 | 27.8 |
| 300 | 240 | 180 | 12280 | 483.5 | - | - | 881 | 34.7 | 881 | 34.7 |
XGA (LT140)
| Screen Size (Inch) | Projection Distance | V. Distance between Lens Center and Screen Bottom | ||||||||
| a | H | E | C(mm) | C(inch) | C(mm) | C(inch) | B(mm) | B(inch) | B(mm) | B(inch) |
| Screen size (Diagonal) | Screen Width | Height of screen | WIDE | TELE | WIDE | TELE | ||||
| 25 | 20 | 15 | - | - | 1170 | 46.1 | - | - | 74 | 2.9 |
| 40 | 32 | 24 | 1580 | 62.2 | 1910 | 75.2 | 119 | 4.7 | 119 | 4.7 |
| 60 | 48 | 36 | 2400 | 94.5 | 2890 | 113.8 | 178 | 7.0 | 178 | 7.0 |
| 80 | 64 | 48 | 3220 | 126.8 | 3870 | 152.4 | 237 | 9.3 | 237 | 9.3 |
| 100 | 80 | 60 | 4030 | 158.7 | 4850 | 190.9 | 297 | 11.7 | 297 | 11.7 |
| 120 | 96 | 72 | 4850 | 190.9 | 5830 | 229.5 | 356 | 14.0 | 356 | 14.0 |
| 150 | 120 | 90 | 6080 | 239.4 | 7300 | 287.4 | 445 | 17.5 | 445 | 17.5 |
| 200 | 160 | 120 | 8120 | 319.7 | 9750 | 383.9 | 593 | 23.3 | 593 | 23.3 |
| 240 | 192 | 144 | 9750 | 383.9 | 11710 | 461.0 | 712 | 28.0 | 712 | 28.0 |
| 300 | 240 | 180 | 12200 | 480.3 | - | - | 890 | 35.0 | 890 | 35.0 |
NOTE: Distances may vary +/-5%.
Ceiling Installation
WARNING
- Installing your projector on the ceiling must be done by a qualified technician. Contact your NEC dealer for more information.
- Do not attempt to install the projector yourself.
- Only use your projector on a solid, level surface. If the projector falls to the ground, you can be injured and the projector severely damaged.
- Do not use the projector where temperatures vary greatly. The projector must be used at temperatures between 41^ ( 5^ ) and 95^ ( 35^ ).
- Do not expose the projector to moisture, dust, or smoke. This will harm the screen image.
- Ensure that you have adequate ventilation around your projector so heat can dissipate. Do not cover the vents on the side or the front of the projector.
If your projector is mounted on the ceiling and your image is upside down, use the "Menu" and "Select" buttons on your projector cabinet or button on your remote control to correct the orientation. (See page E-23.)
Reflecting the Image
Using a mirror to reflect your projector's image enables you to enjoy a much larger image. Contact your NEC dealer if you need a mirror. If you're using a mirror and your image is inverted, use the "Menu" and "Select" buttons on your projector cabinet or buttons on your remote control to correct the orientation. (See page E-23.)
Wiring Diagram
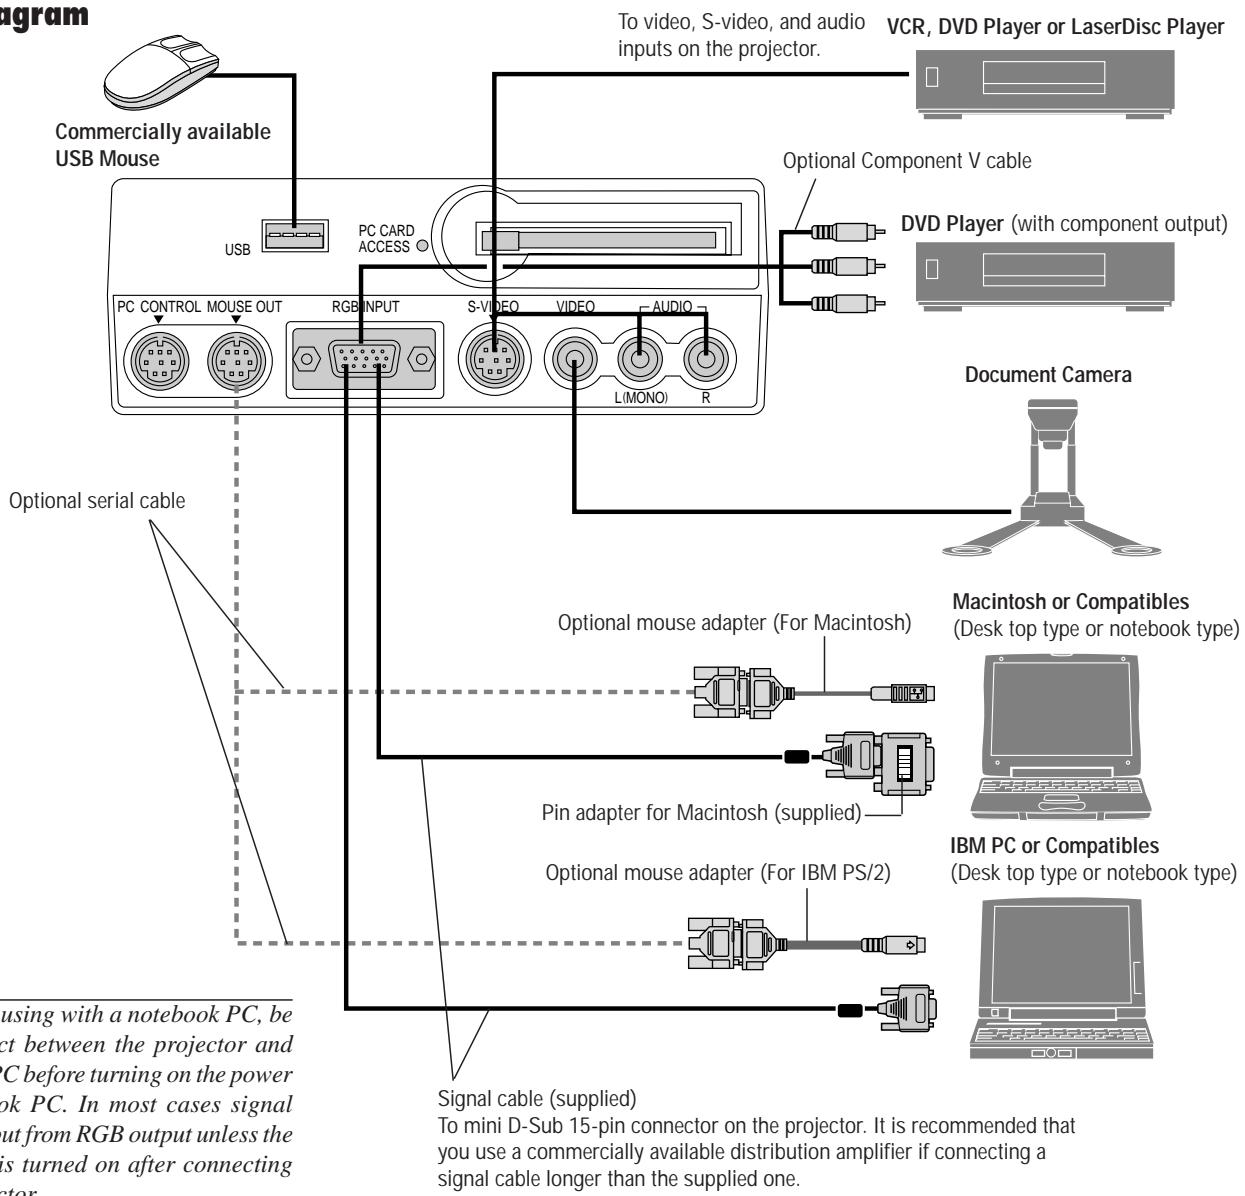
NOTE: When using with a notebook PC, be sure to connect between the projector and the notebook PC before turning on the power to the notebook PC. In most cases signal cannot be output from RGB output unless the notebook PC is turned on after connecting with the projector.
Remote Control Guideline for the Optional Full Function Remote Control
- Plug the optional serial cable with the mouse output port of the projector into your computer's mouse port and restart your computer to gain remote mouse control.
- When using the remote control's built-in infrared mouse on a laptop computer, the laptop's mouse, trackball or trackpad will be disabled. Disconnect the optional serial cable from the mouse output port and restart your computer to regain trackball or trackpad mouse control.
- If the screen goes blank while using your remote control, it may be the result of the computer's screen-saver or power management software.
- If you accidentally hit the OFF button on the remote control, wait one full minute and then press the ON button to resume.
Connecting Your PC or Macintosh Computer
Connecting your PC or Macintosh computer to your MultiSync LT84 (SVGA)/LT140 (XGA) projector will enable you to project your computer's screen image for an impressive presentation.
To connect to a PC or Macintosh, simply:
- Turn off the power to your projector and computer.
- Use the signal cable that's supplied to connect your PC or Macintosh computer to the projector. For older Macintosh, use the supplied pin adapter to connect to your Mac's video port.
NOTE: The new Macintosh computer such as G3 will have the 15 pin HD connector. The LT84/LT140's "Plug and Play" data will be downloaded to the Macintosh. Therefore, the Mac adapter will not be necessary.
- Turn on the projector and the computer.
- If the projector goes blank after a period of inactivity, it may be caused by a screen saver installed on the computer you've connected to the projector.
When using a Macintosh with the projector, set the DIP switches of the supplied pin adapter according to your resolution. After setting, restart your Macintosh.
See the following pages for setting of the DIP switches.
- When using with a Macintosh, SVGA (800 × 600) /XGA (1024 × 768) is recommended if your Macintosh supports this mode.
- When using with a Macintosh PowerBook, output may not be set to 800 × 600 unless "mirroring" is off on your PowerBook. Refer to owner's manual supplied with your Macintosh computer for mirroring.
NOTE: A Video Adapter cable manufactured by Apple Computer is needed for a PowerBook which does not have a mini D-Sub 15-pin connector.
Settings for Monitor Mode
| Number of DIP switch Resolution | 1 | 2 | 3 | 4 | 5 | 6 |
| 13" multi-scan mode /16"-13" | ON | ON | ON | ON | ||
| 17" multi-scan mode /19"-13" | ON | ON | ON | |||
| 21" multi-scan mode /21"-13" | ON | ON | ON | |||
| 13" fixed mode /640x480 | ON | ON | ||||
| VGA/SVGA mode | ON | ON | ||||
| 16" fixed mode /832x624 | ON | ON | ||||
| 19" fixed mode /1024x768 | ON | ON | ||||
| 21" fixed mode /1152x870 | ON | ON | ON | ON |
NOTE: For settings other than display modes supported by your Macintosh and the projector, use of the DIP switch may bounce an image slightly or may display nothing. If this happens, set the DIP switch to the 13^ fixed mode and then restart your Macintosh. After that, restore to a displayable mode and then restart the Macintosh again. Make sure that the projector and your Macintosh are connected with the pin adapter and the supplied signal cable (mini D-Sub 15-pin connector) and then restart your Macintosh.
Examples of DIP switch setting
| 17" multi-scan mode | VGA/SVGA mode | 19" fixed mode | ||||||||||||||||||
| ON↑ | 1 | 2 | 3 | 4 | 5 | 6 | ON↑ | 1 | 2 | 3 | 4 | 5 | 6 | ON↑ | 1 | 2 | 3 | 4 | 5 | 6 |
NOTE: Refer to your computer's owner's manual for more information about your computer's video output requirements and any special identification or configuring your projector's image and monitor may require.
Connecting Your DVD Player
You can connect your projector to a DVD player with component outputs or Video output. To do so, simply:
- Turn off the power to your projector and DVD player.
-
If your DVD player has the component video (Y,Cb,Cr) output, use the optional 15-pin-to-RCA x 3 cable to connect your DVD player to the RGB INPUT connector on the projector. For a DVD player without component video (Y,Cb,Cr) outputs, use common RCA cables (not provided) to connect a composite VIDEO output of the DVD player to the Video Input of the projector.
-
Turn on the projector and the DVD player.
NOTE: Refer to your DVD player's owner's manual for more information about your DVD player's video output requirements.
Connecting Your VCR or Laser Disc Player
Use common RCA cables (not provided) to connect your VCR or laser disc player to your projector. To make these connections, simply:
- Turn off the power to the projector and VCR or laser disc player.
- Connect one end of your RCA cable to the video output connector on the back of your VCR or laser disc player, connect the other end to the Video input on your projector. Use standard RCA audio patch cords to connect the audio from your VCR or laser disc player to the projector (if your VCR or laser disc player has this capability). Be careful to keep your right and left channel connections correct for stereo sound.
- Turn on the projector and the VCR or laser disc player.
NOTE: Refer to your VCR or laser disc player owner's manual for more information about your equipment's video output requirements.
Connecting Your Computer to the Mouse Output Port (only when using the optional full function remote control)
NOTE: To use the Mouse Output port, you need the optional serial cable, the optional mouse adapter(for IBM PS/2 or Macintosh), and the optional full function remote control.
The built-in remote mouse receiver enables you to operate your computer's mouse functions from the optional full function remote control. It is a great convenience for clicking through your computer-generated presentations.
To connect the mouse output port:
- Turn off your computer.
- For PCs: Remove your current mouse and connect the optional serial cable from the mouse output to your PC's mouse port. (Use the 6-pin adapter for connecting to a PS/2 computer.)
For Macintosh: Remove your current mouse from your computer, attach the Macintosh adapter to the mouse output port's serial cable, and connect the projector to your mouse port. - When the built-in remote mouse receiver is available, it will disable your regular mouse, disconnect the serial cable and restart your computer.
NOTE: Some computers or software programs may not work with the MOUSE OUT port.
This section describes how to select a computer or video source, how to adjust the picture, and how to customize the menu or projector settings.
General Controls
Before you turn on your projector, ensure that the computer or video source is turned on and that your lens cap is removed.
1. Turn on the Projector
Plug the supplied power cable in the wall outlet. The projector will go into its standby mode and the power indicator will glow amber.
Only after you press the "On" button on the projector cabinet or the optional full function remote control will the power indicator turn to green and the projector become ready to use.
NOTE: To turn the projector on by plugging in the power cable, use the menu and enable the "Auto Start" feature. (See page 23.)
2. Select the Computer, Video Source or PC Card Viewer
Press the Source button on the remote control or the projector cabinet to select "Video" (VCR, document camera, or laser disc player), S-Video", RGB" (computer or DVD with component output) or "PC Card Viewer" (CompactFlash Card) to display the image.
Or press the "Menu" button on the remote control or the cabinet and use the menu to select your video source: "Video", "S-Video", "RGB", or "PC Card Viewer".
NOTE:The standard video signal NTSC4.43 and PAL60 must be manually selected from the pull-down menu for Video System on Setup because it cannot be automatically detected.
3. Adjust the Image Size and the Focus
Use the Zoom ring to adjust the image size, then use the Focus ring knob to obtain the best focus.
Use the "Magnify" button (+) or (-) on the remote control to make the image larger up to 400% .
4. Turning off the Projector
First press and hold the POWER button on the cabinet or the "OFF" button on the remote control for a minimum of two seconds.
The power indicator will glow amber. Then, unplug the power cable. The power indicator will go out.
IMPORTANT:
- The projector should be unplugged if it will not to be used for an extended period.
- To turn off the image and sound briefly (five minutes or less), use the "Picture Mute" button instead of turning the projector off and on.
- The projector will display a black, blue image or logo if no input signal is present.
- Do not turn the projector off and then immediately back on. The projector needs to cool for a minute before it can be restarted.
Using the Menu
NOTE: The on-screen menu may not be displayed correctly while interlaced motion video image is projected.
- Press the "Menu" button on the remote control or projector cabinet to display the Main Menu.
NOTE: When using a USB mouse, click the mouse button to display the main menu. For other operations, do the same way as you use your PC mouse.
- Press the buttons on the card remote control, the mouse pad on the full function remote control or the projector cabinet to highlight the menu for the item you want to adjust or set.
- Press the button or the "Enter" button on the projector cabinet or the card remote control or the "Left Click" button on the optional full function remote control to select a submenu or item.
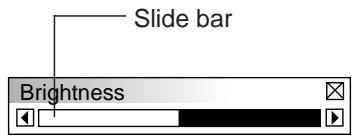
- Adjust the level or turn the selected item on or off by using "Select" or buttons on the cabinet, the card remote control or the "Mouse pad" on the optional full fucntion remote control. The on-screen slide bar will show you the amount of increase or decrease.
- The change is stored until you adjust it again.
ENTER: Stores the setting or adjustments.
CANCEL: Return to the previous screen without storing settings or adjustments.
6. Repeat steps 2-5 to adjust an additional item, or press "Cancel" on the projector cabinet or the remote control to quit the menu display.
Using a USB Mouse
Using a USB mouse gives you a smooth operation. A commercially available USB mouse is required.
NOTE: There may be some brands of USB mouse that the projector does not support
Operate the Menu using the USB mouse
Mouse Cursor
When connecting a USB mouse to the projector, you get a mouse cursor on the screen.
Unless you use your USB mouse within 10 seconds, the mouse cursor disappears.
Menu Display
Clicking with a mouse button displays the main menu.
Clicking l displays the pull-down menu.
To close the menu, click anywhere in the background.
Adjusting and Setting Display
You can select a menu item and click with a mouse button to make adjustments and setting.
Examples
Click (or press and hold) the mouse button or to adjust the brightness.
Or click and drag the mouse button on the slide bar horizontally to adjust it.
To save the adjustments, click × . The display is closed.
If you click anywhere in the background while displaying adjustment and setting menu or dialog box, you will get the main menu at the clicking point.

Menu Tree
Menu Elements:
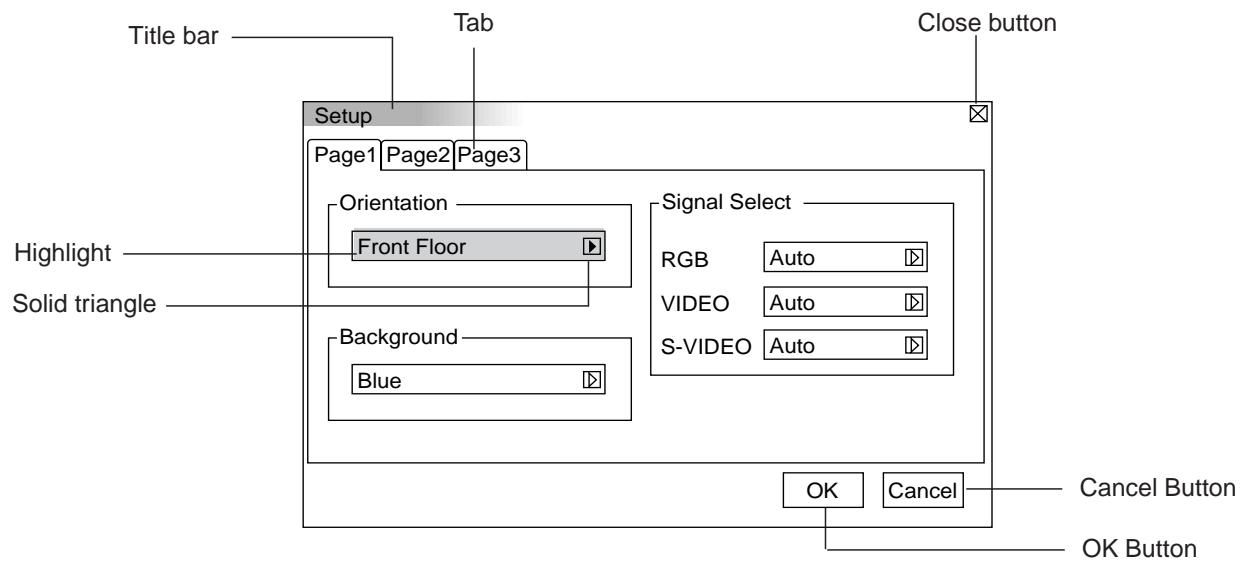
Menu windows or dialog box typically have the following elements:
Title bar: Indicates the menu title.
X Close button: Click to close the window with saving changes. (USB mouse only)
Highlight: Indicates the selected menu or item.
Solid triangle: Indicates further choices are available. A highlighted triangle indicates the item is active.
Tab: Indicates a group of features in a dialog box. Clicking on any tab brings its page to the front.
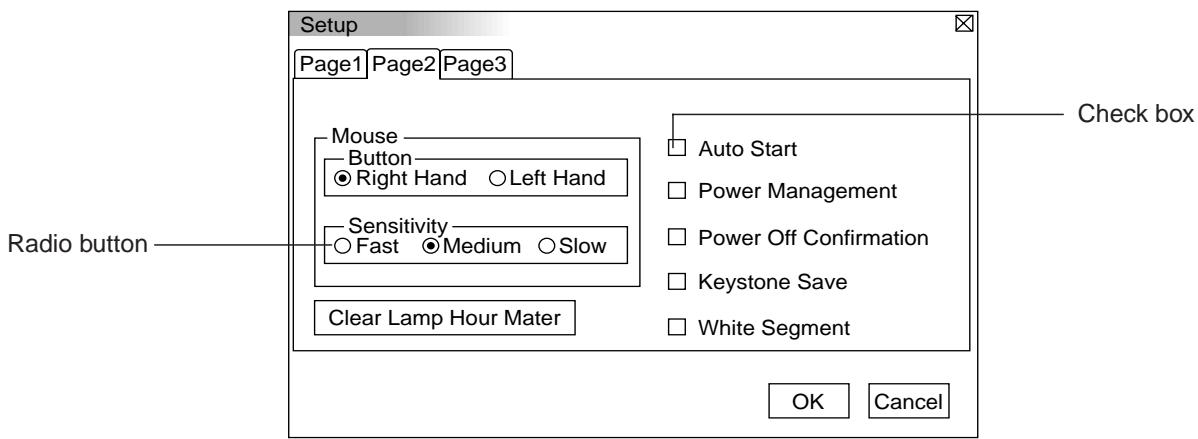
Radio button: Use this round button to select an option in a dialog box.
Check box: Place a checkmark in the square box to turn the option On.
Slide bar: Indicates settings or the direction of adjustment.
OK button: Press to confirm your setting. You will return to the previous menu.
Cancel button: Press to cancel your setting. You will return to the previous menu.
Menu Descriptions & Functions
Source Select
Source Select RGB
Video
S-Video
PC Card Viewer
Enables you to select a video source such as a VCR, DVD player, laser disc player, computer or document camera depending on what is connected to your inputs. Press the "Select" button on the projector cabinet or buttons on your remote control to highlight the menu for the item you want to adjust.
RGB
Selects the computer connected to your RGB or component signal.
NOTE: An optional component cable (Component V cable) is needed for a component signal.
Video
Selects what is connected to your Video input-VCR, laser disc player, DVD player or document camera.
S-Video
Selects what is connected to your S-Video input-VCR, DVD player, or laser disc player.
PC Card Viewer
This feature enables you to make presentations using a CompactFlash card that contains captured images and slides created with the exclusive PC Card Viewer Utility contained in the CD-ROM. See page E-27 for installing the PC Card Viewer Utility. The starting screen for the PC Card Viewer varies depending on the settings of the Setup's Page 3. See Setup on page E-24.
NOTE: Even if you switch the current PC Card Viewer source to another source, the current slide is retained. When you return back to the PC Card Viewer, you will get the slide that has been retained.
A launcher will appear when you press the MENU button.
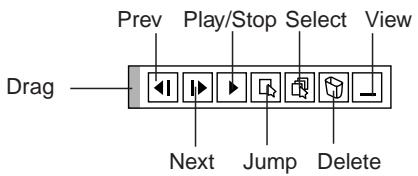
The launcher is a tool bar including the following buttons:
Drag: Drags to move the tool bar. (for USB mouse operation only)

Prev: Returns to the previous slide or folder.

Next: Advances to the next slide or folder.

Play/Stop: Plays back automatically or manually depending on the setting on PC Card Viewer Options of the menu.
This allows you to stop Auto Play while you are playing back and to resume playing from the selected slide or folder when "Auto Play" is selected. This allows you to move on to the next slide when "Manual Play" is selected.

Jump: Displays a list of slides while you are playing back.

Select: Displays a list of folders while you are playing back.

Delete: Deletes a captured slide(s) or all the captured slides in the selected folder.

View: Hides the tool bar while you are playing back. Clicking with the right button of a mouse shows it again.
Adjustments
| Adjustments |
| Picture |
| Volume |
| Image |
| Color Temperature |
| Keystone |
| Factory Default |
Provides access to controls for your image and sound. Use the buttons on your remote control to highlight the menu for the item you want to adjust.

Picture (not available for PC Card Viewer)
Brightness: Adjusts the brightness level or the back raster intensity.
Contrast: Adjusts the intensity of the image according to the incoming signal.
Color: Increases or decreases the color saturation level (not valid for RGB).
Hue: Varies the color level from + / - green to + / - blue. The red level is used as reference. This adjustment is only valid for Video and Component inputs (Not RGB).
Sharpness: Controls the detail of the image for Video (Not for RGB and Component).
Volume (not available for PC Card Viewer and RGB)
Adjusts the sound level of the projector.
Image (not available for PC Card Viewer)
| Image |
| Auto Adjust |
| Position |
| Pixel Adjust |
| Resolution |
Allows for adjustments of the image position and stability.
Auto Adjust:
When "Auto Adjust" is set to "On", the projector automatically determines the best resolution for the current RGB input signal to project an image using NEC's Advanced AccuBlend Intelligent Pixel Blending Technology.
The image can be automatically adjusted for position and stability; "Horizontal Position", "Vertical Position" and "Pixel Adjust."
On: Automatically adjusts image "Horizontal Position", "Vertical Position" and "Pixel Adjust."
Off: User can adjust the image display functions ("Horizontal Position", "Vertical Position" and "Pixel Adjust") manually.
Horizontal/Vertical Position (when Auto Adjust is off):
Adjusts the image location from left to right.
This adjustment is made automatically when the Auto Adjust is turned on.
Pixel Adjust (when Auto Adjust is off):
Displays the Clock and Phase adjustments.
Clock: Use this item with the "Auto Adjust on" to fine tune the computer image or to remove any vertical banding that might appear. This function adjusts the clock frequencies that eliminate the horizontal banding in the image. Press the and buttons until the banding disappears. This adjustment may be necessary when you connect your computer for the first time. This adjustment is made automatically when the Auto Adjust is turned on.
Phase: Use this item to adjust the clock phase or to reduce video noise, dot interference or cross talk. (This is evident when part of your image appears to be shimmering.) Use the and buttons to adjust the image.
Use "Phase" only after the "Clock" is complete.
This adjustment is made automatically when the Auto Adjust is turned on.
Resolution (when Auto Adjust is off):
This allows you to activate or deactivate the Advanced AccuBlend feature.
Auto: Turns on the Advanced AccuBlend feature. The projector automatically reduces or enlarges the current image to fit the full screen.
Native: Turns off the Advanced AccuBlend feature. The projector displays the current image in its true resolution.
NOTE: While you are displaying an image with higher resolution than the projector's native resolution, even when you are in the Native mode, the image is displayed full screen using the Advanced AccuBlend feature.
Color Temperature
This feature adjusts the color temperature using the slide
Move the slide bar to the right to increase the color temperature for a bluish image; to the left to decrease it for a reddish image.

Keystone
This feature corrects the keystone (trapezoidal) distortion to make the top of the screen longer or shorter to be the same as the bottom.
Use the or buttons on the slide bar to correct the keystone (trapezoidal) distortion.
NOTE: The maximum keystone angle that can be corrected is 15 degrees upward and downward with the projector placed horizontally. However, a picture will be blurred if you correct the keystone angle beyond +12 degrees or more for SXGA signal on LT84.
Factory Default

Changes all adjustments and setting to the factory preset for each source individually except Lamp Usage Hours. (To reset the lamp usage time, see "Clear Lamp Hour Meter" on page E-33.
All Data:
Reset all the adjustments and settings for all the signals to the factory preset.
Current Signal:
Resetstheadjustmentsfor thecurrent signal to thefactory preset levels.
Image Options
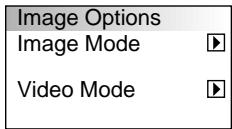
Provides optional controls such as aspect ratio, gamma correction, and color matrix noise reduction features.
Image Mode
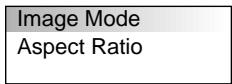
Allows you to select the item you want to adjust.
NOTE: Aspect Ratio is not available for “PC Card Viewer” and RGB source.
Aspect Ratio:
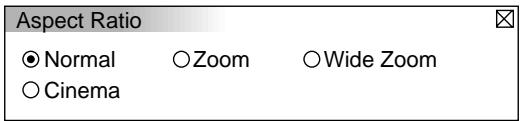
Allows you to choose the best screen size mode to fit on the screen.
Normal: Displays normal video picture with a 4-to-3 aspect ratio as is.
Zoom: Displays DVD's video picture with a 16-to-9 aspect ratio expanded in the horizontal and vertical direction, maintaining the original proportion.
Wide Zoom: Displays DVD's squeezed video picture with a 16-to-9 aspect ratio expanded in the horizontal direction, converted to 4-to-3 aspect ratio.
Cinema: Displays DVD's squeeze video picture with a 16-to-9 aspect ratio compressed in the vertical direction, maintaining the 16-to-9 aspect ratio.
Video Mode
Video Mode
Gamma
Noise Reduction
Color Matrix
Gamma:
Gamma
O Natural 1 O Natural 2
Use the or buttons to choose "Normal" when in a lighted room and "Natural 1&2" when in a darkened room. "Natural 1" for better flesh tone; "Natural 2" for true reproduction of middle tones.
Each mode is recommended for :
Normal: TV programs
Natural1: Movie such as an action film
Natural2: Movie with many dark scenes
NOTE: A frame may freeze for a brief period of time when a video is played back in fast-forward or fast-rewind with a Video or S-Video source. If this happens, select the Natural 1 or 2 mode.
Noise Reduction:

You can select one of the following three levels for reducing video noise to your preference.
NOTE: The lower the Noise Reduction level, the better the image quality by way of higher video bandwidth.
Color Matrix
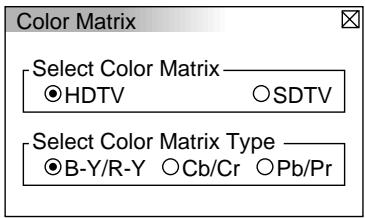
First select an appropriate color matrix to fit your component signal for HDTV or SDTV. Then select an appropriate matrix type from B-Y/R-Y, Cb / Cr or Pb / Pr .
NOTE: The Color Matrix feature is available for composite video, S-Video, and component signals only.
Projector Options
Projector Options
Menu
Setup
Enables you to set preferences and other operating options.
Menu
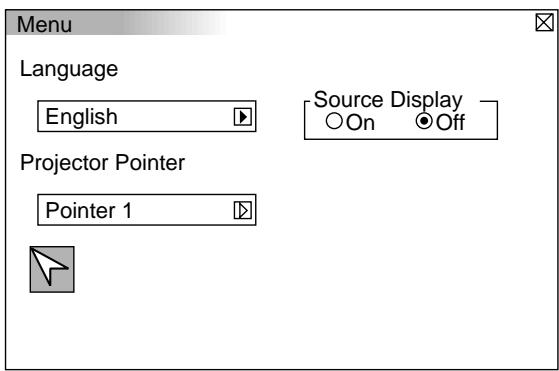
Allows you to set preferences for the on-screen menu.
Language:
You can choose one of seven languages for on-screen instructions. The options are: English, German, French, Italian, Spanish, Swedish and Japanese.
Projector Pointer:
This enables you to select from eight different Pointer icons for the "Pointer" button on your remote control.
After moving your Pointer icon to the area you want on the screen, press the Magnify button on the remote control to enlarge the selected area on the screen.


NOTE: There may be cases where the Pointer function is not available for a non-interlace signal at 15kHz such as video game.
Source Display:
You can turn on and off the information for input name such as VIDEO and RGB.
When this option is on, the current input will be displayed each time you switch sources or turn on the projector.
Setup
Enables you to set operating options.
Press "OK" to save your changes for all the features of Page1, Page2 and Page3.
[Page1]
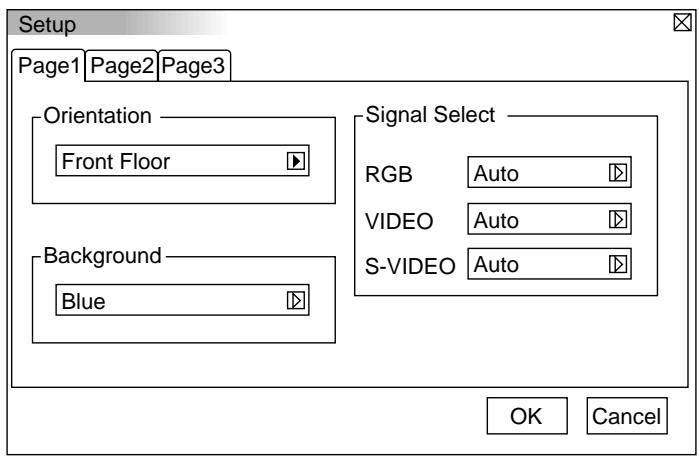
Orientation:
This reorients your image for your type of projection.
The options are: front floor projection, rear ceiling projection, rear floor projection, and front ceiling projection.
Background:
Use this feature to display a black, blue screen or logo when no signal is available.
Signal Select:
Allows you to choose "RGB" for an RGB source such as a computer, or "Component" for a component video source such as a DVD player. Normally select "Auto" and the projector automatically detects a component signal. However there may be some component signals that the projector is unable to detect. If this is the case, select "Component".