
AT400731 - Climatiseur GAGGENAU - Notice d'utilisation et mode d'emploi gratuit
Retrouvez gratuitement la notice de l'appareil AT400731 GAGGENAU au format PDF.
| Type de produit | Hotte de ventilation (système de ventilation de dosseret) |
| Marque | GAGGENAU |
| Modèle | AT400731 |
| Utilisation | Montage mural, recirculation d'air |
| Nombre de vitesses | 3 vitesses + 1 mode intensif |
| Éclairage | Lampe fluorescente intégrée |
| Type de filtres | Filtres à graisse centrifuges, filtre fin à graisse (non-tissé), filtre à charbon actif |
| Indicateur de saturation des filtres | Oui, témoin F clignotant après 10 heures d’utilisation |
| Arrêt différé | Oui, durée réglable de 10 minutes |
| Ventilation par intervalles | Oui, activation périodique de 5 minutes toutes les heures |
| Dimensions (L x H x P) | Adapté pour plans de travail de 106 cm ou 136 cm (selon accessoires) |
| Matériau | Acier inoxydable |
| Tension | 120 V (USA) / 230 V (Europe) |
| Accessoires inclus | Non, accessoires spéciaux en option (plaque de verre, planche à découper, etc.) |
| Entretien | Nettoyage régulier des filtres ; remplacer le filtre à charbon actif tous les 6 mois |
| Sécurité | Instructions contre les feux de graisse, sécurité enfants, arrêt d’urgence |
| Réparabilité | Réparations exclusivement par un technicien agréé |
| Garantie | Standard (voir conditions) |
FOIRE AUX QUESTIONS - AT400731 GAGGENAU
Questions des utilisateurs sur AT400731 GAGGENAU
0 question sur cet appareil. Repondez a celles que vous connaissez ou posez la votre.
Poser une nouvelle question sur cet appareil
Téléchargez la notice de votre Climatiseur au format PDF gratuitement ! Retrouvez votre notice AT400731 - GAGGENAU et reprennez votre appareil électronique en main. Sur cette page sont publiés tous les documents nécessaires à l'utilisation de votre appareil AT400731 de la marque GAGGENAU.
MODE D'EMPLOI AT400731 GAGGENAU
Backsplash Ventilation AT 400-700/730
Table of Contents
Important Safety Instructions 4
Fire Safety 4
Child Safety 5
Cleaning Safety 5
Combination with a Gas Cooktop 5
Proper Installation and Maintenance 5
Operating for the First Time 6
Maintenance 6
Features of your New Appliance 7
Accessories 8
Special Accessories 8
Accessories for Installation 8
Operating Principle 9
Operation 10
Ventilation 10
Intensive Mode 10
Light 10
Special Functions 11
Setting the Intensive Mode Duration 11
Delayed Shutoff 11
Interval Ventilation 11
Cleaning and Care 12
Cleaning the Housing 12
Cleaning the Grease Filters 13
Replacing the Activated Carbon Filter 14
Replacing the Grease Fine Filter 14
Lamp Replacement 15
Fire Safety
Read and save these instructions.
Always have a working smoke detector near the kitchen.

WARNING – TO REDUCE THE RISK OF A GREASE FIRE:
a) Never leave surface units unattended at high settings. Boilovers cause smoking and greasy spillovers that may ignite. Heat oils slowly on low or medium settings.
b) Always turn hood ON when cooking at high heat or when flambéing food (i.e. Crepes Suzette, Cherries Jubilee, Peppercorn Beef Flambé).
c) Clean ventilating fans frequently. Grease should not be allowed to accumulate on fan or filter.
d) Use proper pan size. Always use cookware appropriate for the size of the surface element.
In the event that personal clothing or hair catches fire, drop and roll immediately to extinguish flames.
Smother flames from food fires other than grease fires with baking soda. Never use water on cooking fires.

WARNING – TO REDUCE THE RISK OF INJURY TO PERSONS IN THE EVENT OF A GREASE FIRE, OBSERVE THE FOLLOWING:
a) SMOTHER FLAMES with a close-fitting lid, cookie sheet, or metal tray, then turn off the burner. BE CAREFUL TO PREVENT BURNS. If the flames do not go out immediately, EVACUATE AND CALL THE FIRE DEPARTMENT.
b) NEVER PICK UP A FLAMING PAN – You may be burned.
c) DO NOT USE WATER, including wet dishcloths or towels – a violent steam explosion will result.
d) Use an extinguisher ONLY if:
1) You know you have a Class ABC extinguisher, and you already know how to operate it.
2) The fire is small and contained in the area where it started.
3) The fire department is being called.
4) You can fight the fire with your back to an exit.
Whenever possible, do not operate the ventilation system during a cooktop fire. However, do not reach through fire to turn it off.
Only operate the backsplash ventilation with the florescent lamp fitted.
Use pots which fit the appliance. The top of the pot should not touch the top of the ventilator.
Child Safety
When children become old enough to use the appliance, it is the legal responsibility of the parents or legal guardians to ensure that they are instructed in safe practices by qualified persons.
Do not allow anyone to climb, stand, lean, sit, or hang on any part of an appliance, especially a door, warming drawer, or storage drawer. This can damage the appliance, and the unit may tip over, potentially causing severe injury.
Do not allow children to use this appliance unless closely supervised by an adult. Children and pets should not be left alone or unattended in the area where the appliance is in use. They should never be allowed to play in its vicinity, whether or not the appliance is in use.
CAUTION – Items of interest to children should not be stored in an appliance, in cabinets above an appliance or on the backsplash. Children climbing on an appliance to reach items could be seriously injured.
Cleaning Safety
WARNING – Be sure the entire appliance (including the grease filters and light bulbs, if applicable) has cooled and grease has solidified before attempting to clean any part of the appliance.
Do not pour any liquid into the housing. If liquid accidentally enters the housing, it will come out at the base. You can continue using the appliance.
Combination with a Gas Cooktop
When operating a gas cooktop in combination with the backsplash ventilation, the AA 409-200/230 glass cover (special accessory to be ordered separately) must be placed on top of the backsplash.
CAUTION – The housing of the backsplash ventilation and the lamp cover will get hot during use.
WARNING – Do not place the AA 400-010 wooden cutting board or any other inflammable objects on top of the backsplash during use.
Proper Installation and Maintenance
Have the installer show you the location of the circuit breaker or fuse. Mark it for easy reference.
This appliance must be properly installed and grounded by a qualified technician. Connect only to properly grounded outlet. Refer to Installation Instructions for details.
This appliance is intended for normal family household use only. It is not approved for outdoor use. See the Warranty. If you have any questions, contact the manufacturer.
Do not store or use corrosive chemicals, vapors, flammables or nonfood products in or near this appliance. It is specifically designed for use when heating or cooking food. The use of corrosive chemicals in heating or cleaning will damage the appliance and could result in injury.
Before servicing or cleaning unit, switch power off at service panel.
Do not operate this appliance if it is not working properly, or if it has been damaged. Contact an authorized service center.
Do not repair or replace any part of the appliance unless specifically recommended in this manual. Refer all servicing to a factory authorized service center.
CAUTION – Grease left on filters can remelt and move into the vent.
Operating for the First Time
Remove the packaging from the appliance and dispose of it according to local regulations. Be careful to remove all accessories from the packaging. Keep packaging elements and plastic bags away from children.
The appliance must be installed and connected by an authorized specialist before operation. Observe the installation instructions!
Thoroughly clean the appliance and accessories before using them for the first time. This will eliminate any ‘newness’ smells and soiling.
When installing together with Vario appliances, the appliance cover (VD 400) needs to be removed. The frying basket holder cannot be used when operating the deep fryer VF 411 in front of the backsplash ventilation.
Maintenance
If the appliance does not function correctly, check the household fuses first.
If the power supply is functioning correctly, but your appliance still does not work, please contact your Gaggenau dealer who will provide you with the address and telephone number of your nearest manufacturer's authorized service agent or contact Gaggenau USA on 877.4GAGGENAU. Specify the appliance type (see identification plate).
Repairs may only be carried out by licensed technicians, in order to guarantee the safety of the appliance.
Non compliance with these recommendations results in the warranty coverage becoming invalid.
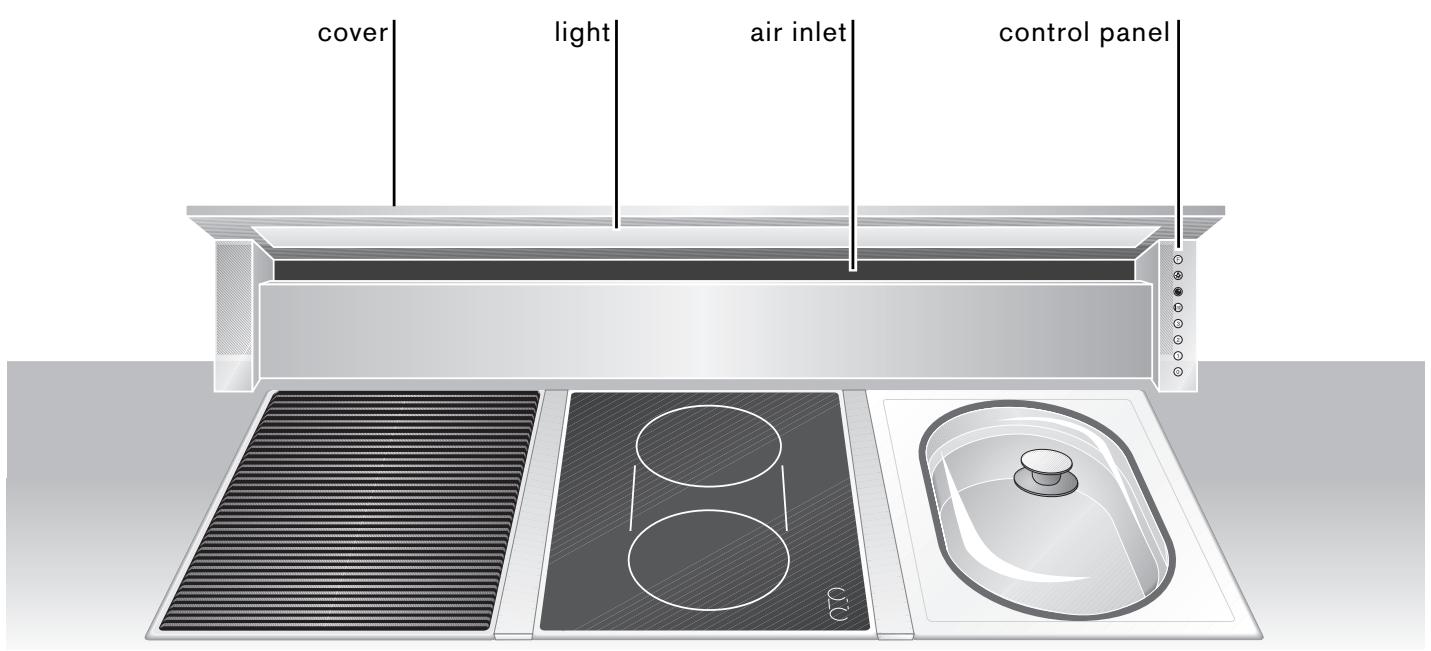
Combination of AT 400-730 with three Gaggenau Vario 400 series appliances
text_image
cover light air inlet control panelControl Panel
grease filter saturation display
light
delay shut off
intensive mode
ventilation level 3
ventilation level 2
ventilation level 1
ventilation off
Special Accessories
You can order the following special accessories:
● AA 409-100: Activated carbon filter and grease fine filter for AT 400-700
AA 409-130: Activated carbon filter and grease fine filter for AT 400-730
- AA 400-200: Glass cover, frosted, 41^5/8 (106 cm), thickness 1/4 (6 mm) with spacers
- AA 400-230: Glass cover, frosted, 53 58 (136 cm), thickness 1/4 (6 mm) with spacers
AA 400-010: Wooden cutting board, beech, 20 ^7/8 (53 cm)
Accessories for Installation
You can order the following accessories for installation:
- AA 409-400: Furniture support 33 ^7/8 " (86 cm) for AT 400-700
AA 409-430: Furniture support 45 ^11/16 (116 cm) for AT 400-730
Recommended as bearer for the countertop, instead of a cabinet frame, or to support the fan housing, replacing the need for a cabinet base.
● AA 409-900: Telescopic extension for AT 400-700
● AA 409-930: Telescopic extension for AT 400-730
Telescopic extension max. 4 ^5/16 " (110 mm) between backsplash ventilation and fan housing.
- AA 010-410: Air exhaust grille for AT 400-700/730. Stainless steel color, 36" (90 cm). Including installation fittings. Height adjustable.
- ZB 020-090: Additional louvre for air exhaust grille AA 010-410. Height 1^3/16 (30 mm), several louvres can be installed.
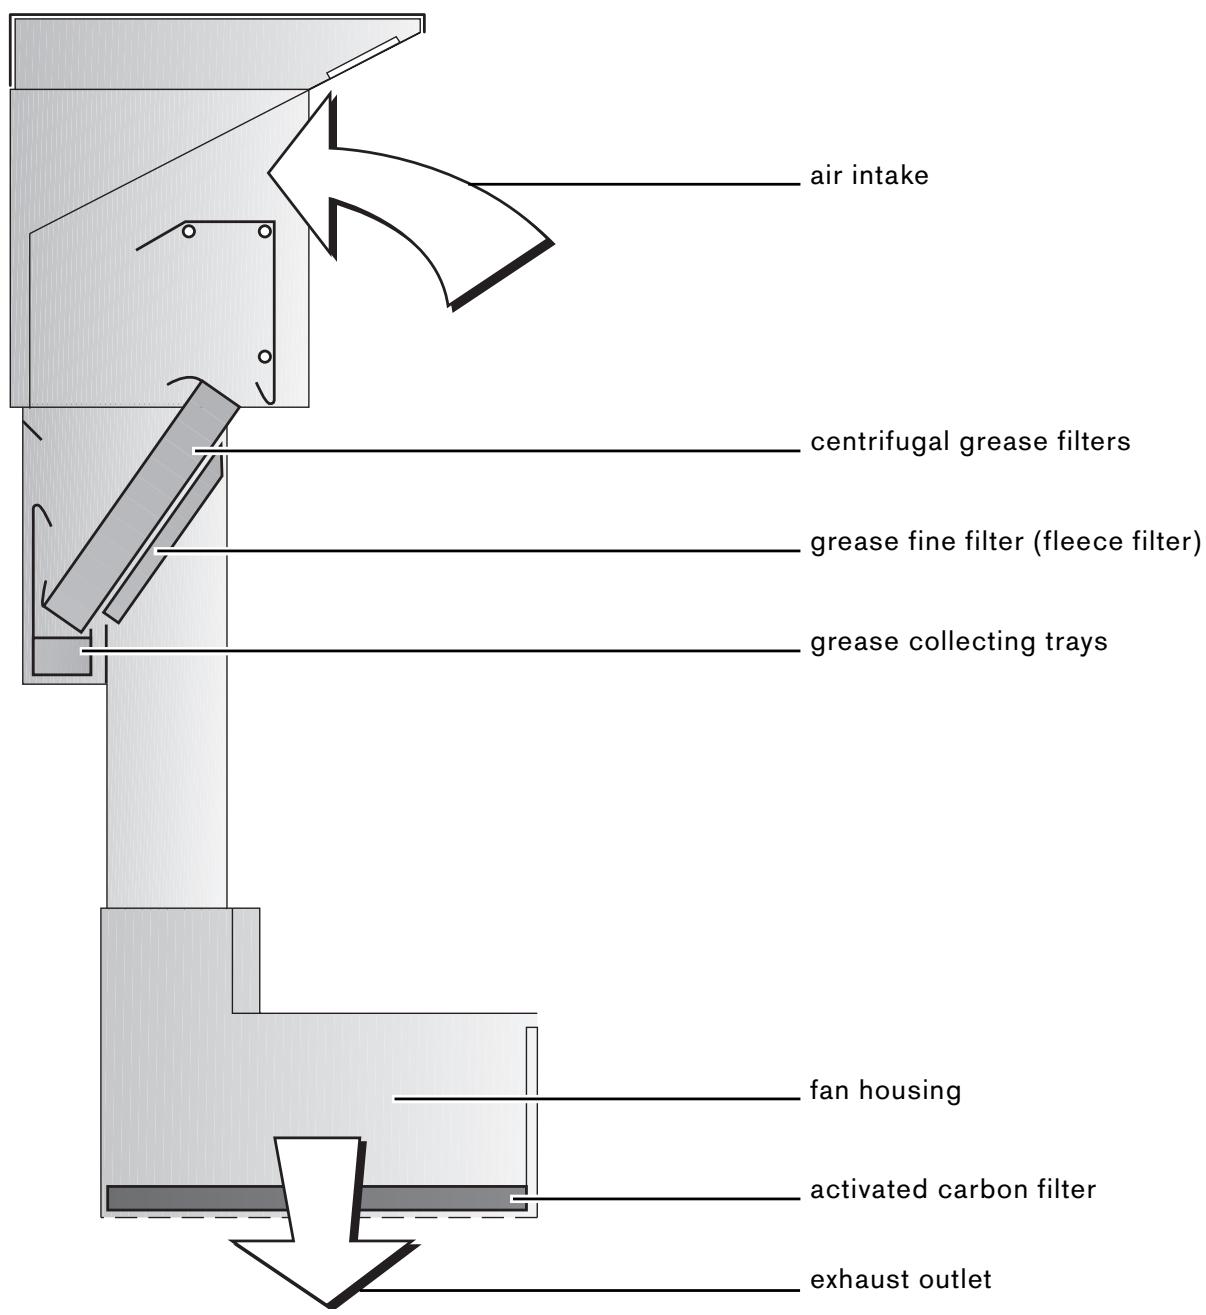
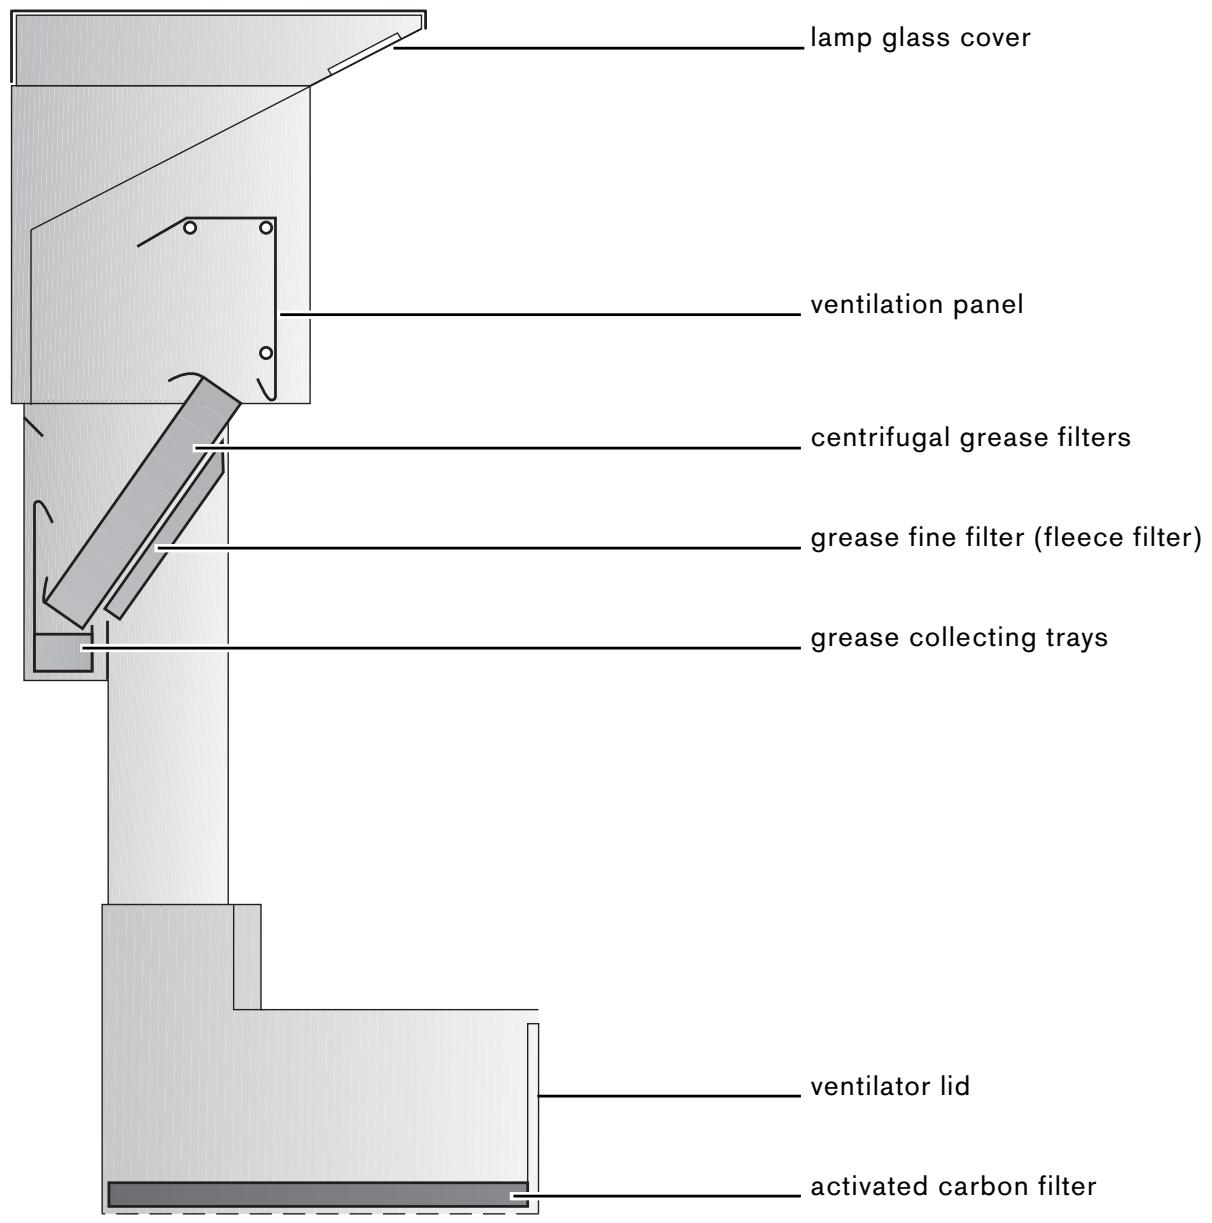
The backsplash ventilation is an effective air recirculation system, which extracts the vapors directly behind the cooktop towards the rear. The centrifugal grease filters separate the greasy components from the extracted air. The grease is collected in the trays. The grease fine filter absorbs any remaining grease particles. The activated carbon filter in the fan housing traps odors, the exhaust outlet for the clean air is in the furniture cabinetry toekick.
text_image
air intake centrifugal grease filters grease fine filter (fleece filter) grease collecting trays fan housing activated carbon filter exhaust outletWhen pressed, all function selection keys are backlit in green, except 0 ("Motor off").
Ventilation
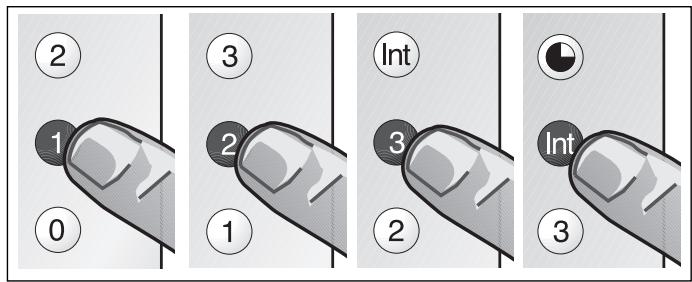
Three fan speeds and one intensive speed are available. You set the fan speed required for each respective cooking process by pressing the function selector keys 1, 2, 3 or Int.
text_image
2 1 0 3 2 1 Int 3 2 3 Int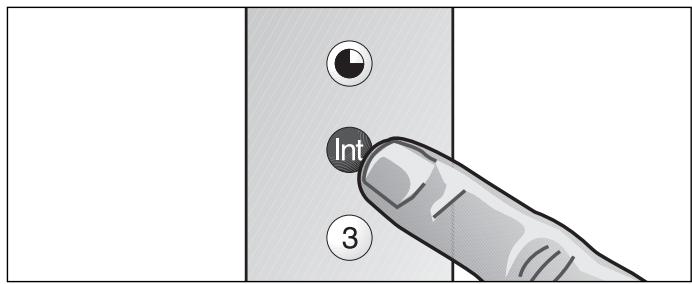
text_image
Int ③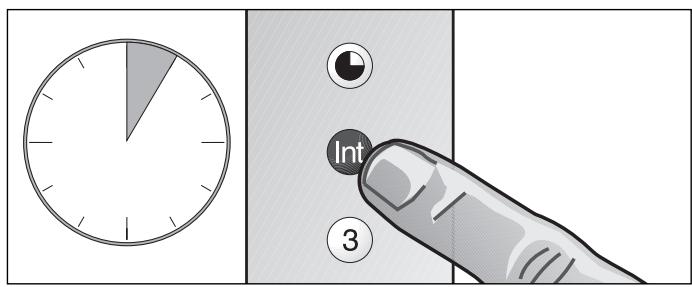
text_image
Int ③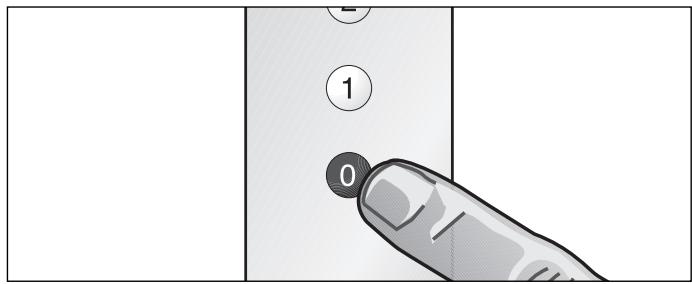
text_image
- 1 0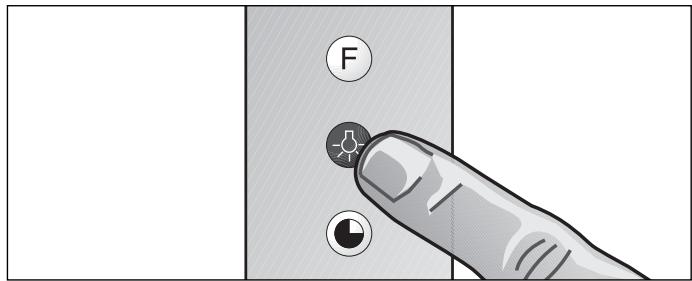
text_image
FIntensive Mode
The Int key for the intensive level should be pressed when browning and frying in an open pan. If you have switched on the ventilator by selecting the intensive level, it will be switched off again automatically after 5 minutes.
If you press the Int key while the ventilator is running at fan level 1, 2 or 3, the electronic control will switch back automatically to the previously selected fan level after 5 minutes.
If you would like to end the intensive level before the 5 minutes have elapsed, press the 0 key ("Motor off") or select a different level. It is possible to switch off the fan at any time by pressing the 0 key ("Motor off").
Light
The lighting can be switched on or off, regardless of whether the backsplash ventilation is in operation, by pressing the ⏻ key.
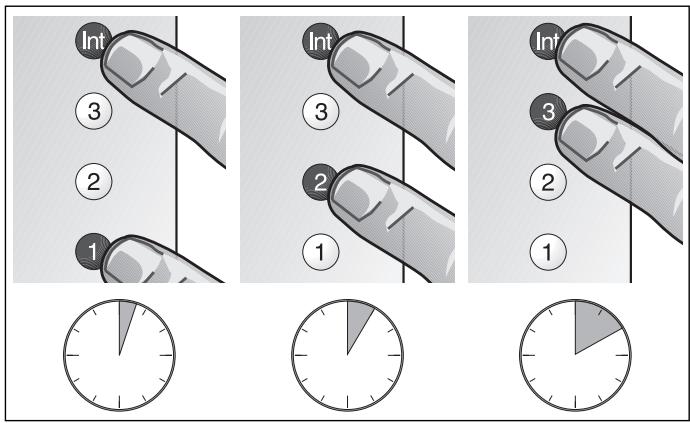
Setting the Intensive Mode Duration
You can select an intensive level running time of 3, 5 or 10 minutes by simultaneously pressing the Int key and the 1, 2 or 3 key. When delivered, the appliance is set to five minutes, i.e. the combination of the Int key and the key 2.
text_image
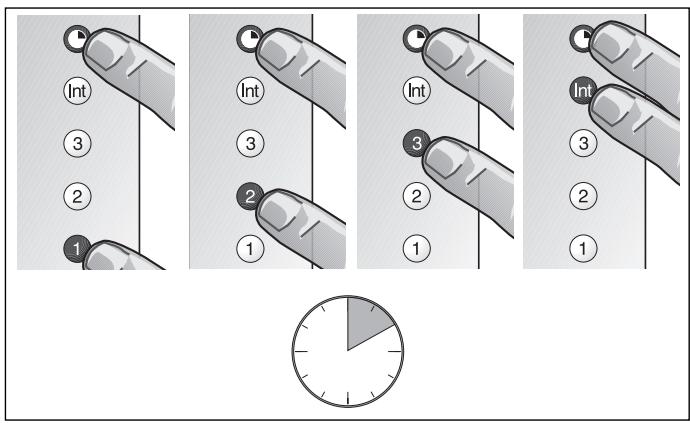
Int ③ ② 1 Int ③ 2 ① Int ③ ② ① 0 0 0 0 0 0Delayed Shutoff
Delayed shutoff is possible at any level. First press the required key 1, 2, 3 or Int and then press the Ⓞ key.
The delayed shutoff time for all levels is ten minutes. After these ten minutes, the fan switches off, but the lighting stays on.
text_image
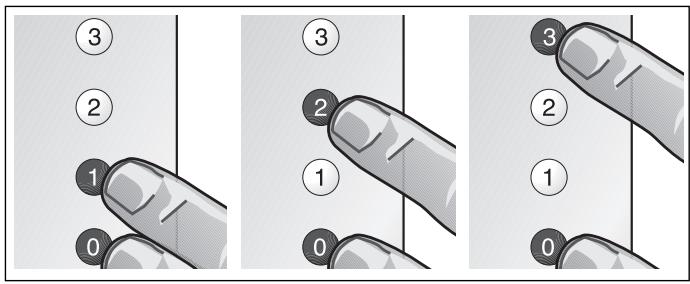
Int 3 2 1 Int 3 2 1 Int 3 2 1Interval Ventilation
Interval ventilation is a special feature of this appliance which periodically activates the fan for five minutes every hour. You can activate this function by simultaneously pressing the 0 key and, depending on the required extraction capacity, the 1, 2 or 3 key.
This mode of operation is indicated by alternating illumination of the Ⓞ key together with the corresponding fan level indicator.
You can switch off interval ventilation by pressing the 0 key.
text_image
③ ② ① ① ① ③ ② ① ①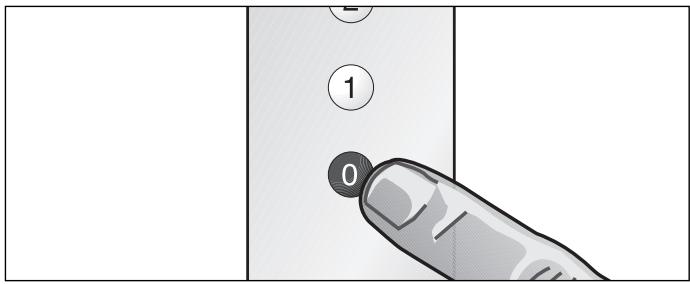
text_image
1 0Cleaning the Housing
Clean the stainless steel surface of the ventilator housing with mild detergent solution or a non-scouring stainless steel cleaner. Only wipe in the direction of the brushed surface. To finish, apply some stainless steel care agent with a soft cloth.
Do not use aggressive, abrasive or caustic cleaning agents. Do not use cleaning agents that contain sand or chloride. Do not use scouring pads or brushes.
Use glass cleaner and a soft cloth to clean the lamp glass cover. Do not put stainless steel cleaner onto the lamp glass cover.
text_image
lamp glass cover ventilation panel centrifugal grease filters grease fine filter (fleece filter) grease collecting trays ventilator lid activated carbon filter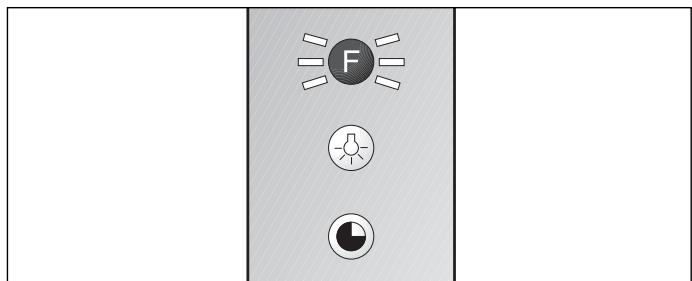
text_image
Diagram showing three icons: a sun with 'F', a gear symbol, and a circular icon, arranged vertically on a diagonal background.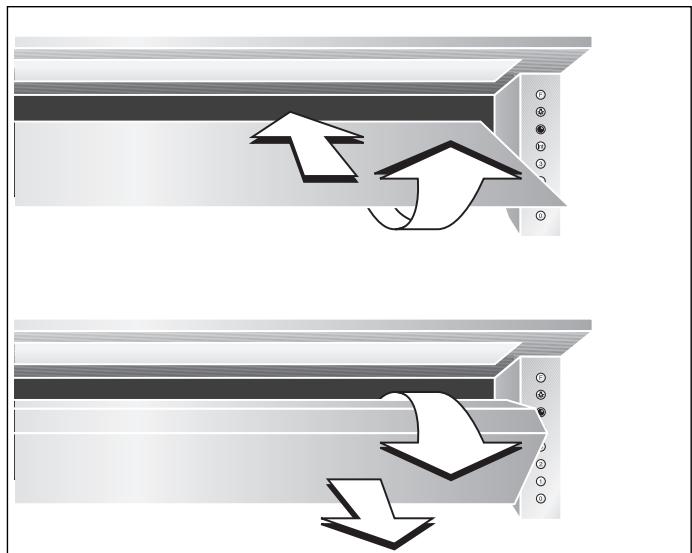
natural_image
Diagram showing two mechanical components with directional arrows indicating motion or force (no text or symbols)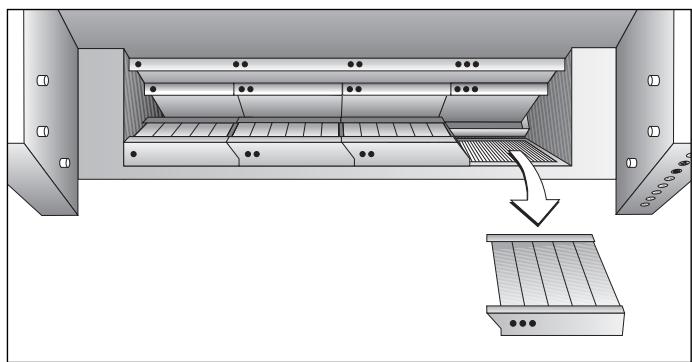
natural_image
Diagram of a mechanical assembly with internal components and a separate panel (no text or symbols)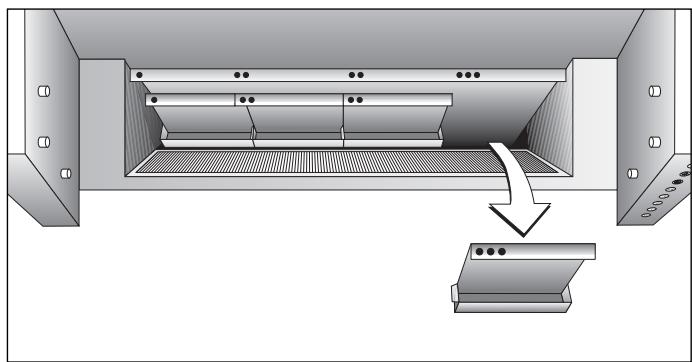
natural_image
Diagram of a mechanical assembly with a component being inserted into a housing (no text or symbols present)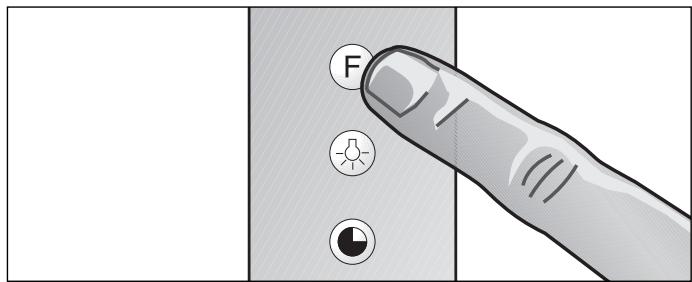
text_image
FCleaning the Grease Filters
The grease filter saturation display F flashes after an operating time of 10 hours to indicate that you should clean the grease filters.
Depending on the cooking habits it may be necessary to clean the grease filters at shorter intervals (for example if kitchen smells appear when the ventilation is switched off).
The centrifugal grease filters can be easily removed for cleaning:
1 Disconnect the appliance from the power supply (switch off fuse).
2 Tilt the ventilation panel to the rear. For easier cleaning you can remove the panel: On both sides of the panel at the top, lift over the studs and remove to the front.
3 Remove the centrifugal grease filters one by one (from right to left).
4 Remove the grease collecting trays (from right to left) and empty.
You can clean the centrifugal grease filters and the grease collecting trays in a dishwasher. Place the filters upright in the dishwasher, with the opening face down.
Wipe out the inner parts of the housing with a moist cloth and some detergent when removing the filters. Caution: Beware of protruding parts when cleaning the inside of the housing.
Do not pour any liquid into the housing. If liquid accidentally enters the housing, it will reappear at the base.
Refit the grease filters in the correct order (from left to right). Refit the parts so that the markings correspond with the markings on the housing.
Press the F key to reset the counter. Flashing of the indicating lamp goes off.
natural_image
Technical line drawing of a mechanical assembly with no visible text or symbols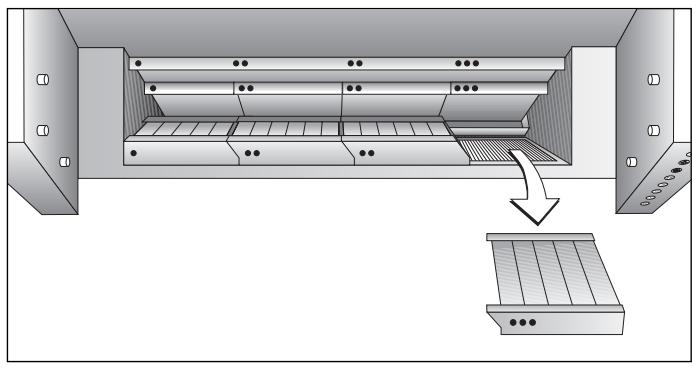
natural_image
Diagram of a storage or rack system with labeled components and an arrow indicating flow direction (no text or symbols present)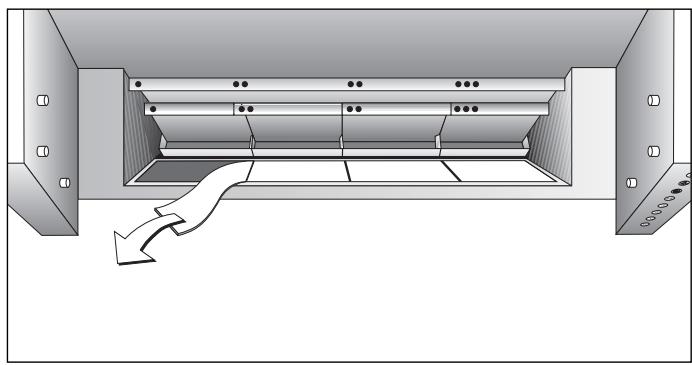
natural_image
Diagram of a structural beam with supports and a directional arrow indicating force or motion (no text or symbols)Replacing the Activated Carbon Filter
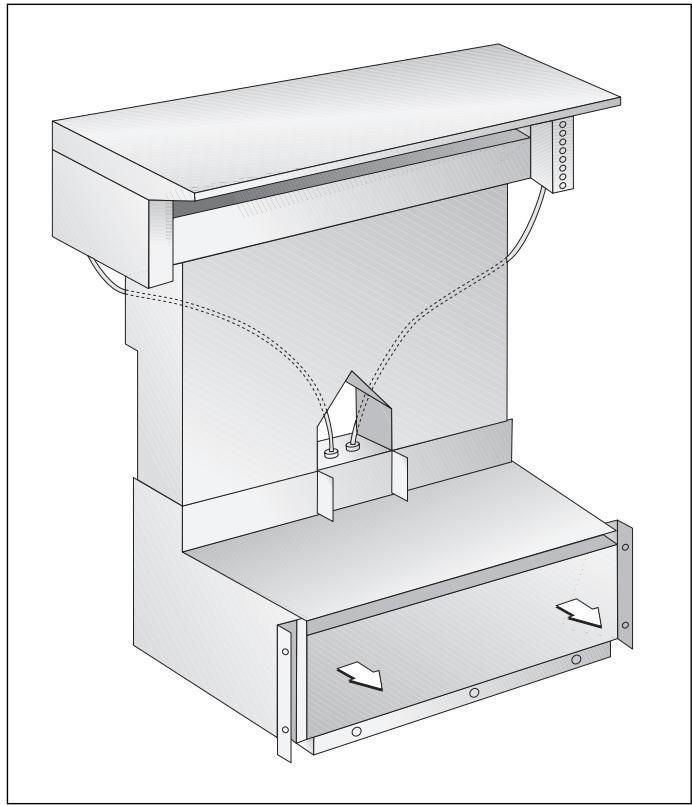
The activated carbon filter in the fan housing (lower part of the appliance) eliminates smells from the extracted air. For hygienic reasons, change the activated carbon filter together with the grease fine filter at least every six months or when kitchen smells appear. The activated carbon filter with the grease fine filter is available from your specialist dealer. Only use original filters.
Note: If no activated carbon filter is fitted or if it is saturated, no odors can be removed from the circulating air.
1 Disconnect the appliance from the power supply (switch off fuse).
2 Open the latches on the bottom of the fan housing. Take off the ventilator lid by pulling the bottom edge.
3 Remove activated carbon filter. Insert new activated carbon filter. The filter mat must lie flat.
4 Refit the ventilator lid.
Activated carbon filters do not contain any polluting substances. They can be disposed of through the household refuse collection.
Replacing the Grease Fine Filter
The grease fine filter (fleece filter) is fitted behind the centrifugal grease filters.
1 Disconnect the appliance from the power supply (switch off fuse).
2 Tilt the ventilation panel to the rear.
3 Remove the centrifugal grease filters one by one (from right to left).
4 Pull out the grease fine filter from the mounting.
5 Push the new grease fine filter under the braces. Refit the centrifugal grease filters in the reverse order (from left to right).
Grease fine filters do not contain any polluting substances. They can be disposed of through the household refuse collection.
natural_image
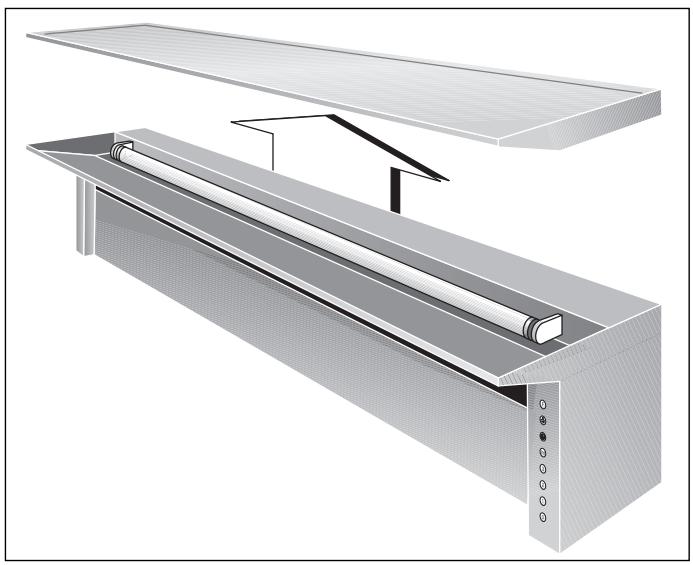
Technical illustration of a mechanical assembly with layered components and a central roller (no text or symbols)Wait until the appliance has cooled down before replacing lamp.
1 Disconnect the appliance from the power supply (switch off fuse).
2 Remove loose objects from the cover.
3 Lift off cover.
4 First turn fluorescent lamp in the socket, then lift off fluorescent lamp.
5 Only replace defective fluorescent lamp by lamp of the same type.
6 Insert the new fluorescent lamp into the socket. Turn the fluorescent lamp in the socket until it engages.
7 Evenly replace cover onto the appliance.
8 Connect the unit to the power supply again.
Gaggenau
780 Dedham Street
Canton, MA 02021
Telephone: 877.4GAGGENAU
USA
www.gaggenau-usa.com
Gaggenau Hausgeräte GmbH
Carl-Wery-Straße 34
81739 München
Germany
www.gaggenau.com