
PH-PGPUKT4.0 - Composant informatique Phanteks - Notice d'utilisation et mode d'emploi gratuit
Retrouvez gratuitement la notice de l'appareil PH-PGPUKT4.0 Phanteks au format PDF.


Questions des utilisateurs sur PH-PGPUKT4.0 Phanteks
0 question sur cet appareil. Repondez a celles que vous connaissez ou posez la votre.
Poser une nouvelle question sur cet appareil
Téléchargez la notice de votre Composant informatique au format PDF gratuitement ! Retrouvez votre notice PH-PGPUKT4.0 - Phanteks et reprennez votre appareil électronique en main. Sur cette page sont publiés tous les documents nécessaires à l'utilisation de votre appareil PH-PGPUKT4.0 de la marque Phanteks.
MODE D'EMPLOI PH-PGPUKT4.0 Phanteks
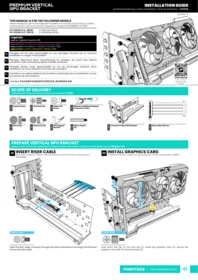
THIS MANUAL IS FOR THE FOLLOWING MODELS
Dieses Handbuch gilt für die folgenden Modelle | Ce manuel concerne les modèles suivants | Este manual es para los siguientes modelos | 此手册适用于以下型号
PH-PGPUKT4.0_DBK01
D-RGB Satin Black
PH-PGPUKT4.0_DWT01
D-RGB Matte White
Legenda
Legende | Légende | Leyenda | 传奇
Remove | Entfernen | Retirer | Eliminar | 移除
Install | Installieren | Installer | Instalar | 安装
Loosen | Lösen | Desserrer | Aflojar | 拧松
EN
Phanteks will not take responsibility for any damages incurred due to incorrect installation or usage of this product.
DE
Phanteks übernimmt keine Verantwortung für Schäden, die durch eine falsche Installation oder Verwendung dieses Produkts entstehen.
FR
Phanteks décline toute responsabilité en cas de dommages résultant d'une installation ou d'une utilisation incorrecte de ce produit.
ES
Phanteks no se responsabilizará de los daños ocasionados por la instalación o el uso incorrectos de este producto.
CN
Phanteks 不会对安装中失误造成的任何损失负责,请仔细阅读本手册。

VERSION 1.0
SCOPE OF DELIVERY
Lieferumfang | Contenu de la livraison | Alcance de la entrega | 供货范围

Chassis Screw

Thumb Screw
x3

x1 Stand-Off Screw

600mm D-RGB Motherboard Connection Cable

x2 GPU Screw

x2 Bracket Screw

xl GPU Support Bracket

xl 50mm Stand-Off
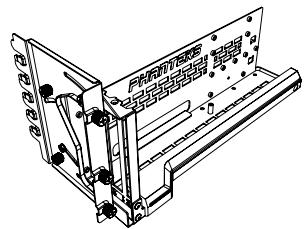
Premium Vertical GPU Bracket

Riser Cable 220 mm
PREPARE VERTICAL GPU BRACKET
Bereiten Sie die vertikale GPU-Halterung vor | Préparer le support GPU vertical | Preparer el soporte de GPU vertical | 准备垂直GPU支架
01
INSERT RISER CABLE
Riser-Kabel einführen | Insérer le câble de colonne montante | Insertar cable elevator | 插入转接电缆

Insert the riser cable connector through the area at the bottom and align the PCIe and secure the riser cable.
02
INSTALL GRAPHICS CARD
Grafikkarte einbauen | Installer la carte graphique | Instalar tarjeta gráfica | 安装显卡

Push down the clip on the PCIe slot (1), install the graphics card (2). Secure the graphics card with two thumbscrews (3).
03 INSTALL BRACKET | UNIVERSAL
Installieren Sie die Universalhalterung | Installez le support universel | Instale el soporte universal | 安装通用支架

If the manufacturer is AMD or an other brand, please align the bracket with the top of the graphics card. Depending on the amount of PCIe connectors on the card itself, use one of the two positions to secure the graphics card with the thumb screw.
03 INSTALL BRACKET | NVIDIA Frontblende | Panneau avant | Panel frontal | 前面板


When using a NVIDIA graphics card, some cards have the option to secure the bracket with a screw directly to the graphics card. Depending on the size, you can slide the bracket to align with the card for the best fit.
CHOOSE VERTICAL OR ANGLED POSITION
Wählen Sie eine vertikale oder abgewinkelte Position | Choisissez la position verticale ou inclinée | Elija la posición vertical o en ángulo | 选择垂直或倾斜位置
VERTICAL POSITION » STEP 5
Vertikale GPU | GPU vertical | GPU verticales | 立式GPU

ANGLED POSITION » STEP 6
Abgewinkelte GPU | GPU coudé | GPU en ángulo | 倾斜的 GPU

05 A MOTHERBOARD OFFSET
Motherboard-Offset | Décalage de la carte mère | Desplazamiento de la placa base | 主板偏移

First install the motherboard offset into the motherboard.

Then secure the bracket with the motherboard screw. This is only possible if the bracket is not in an angled stand.
05 B
PSU COVER
Netzteilabdeckung | couverture d'alimentation | cubierta de la fuente de alimentación | 电源盖

Some Phanteks chassis have an extra support option that can be secured with a motherboard screw.

Only available for the following Phanteks cases:
Eclipse G300A | Eclipse G360A | Eclipse G500A

Nur für folgende Phanteks-Hüllen verfügbar:
Eclipse G300A | Eclipse G360A | Eclipse G500A

Uniquement disponible pour les étuis Phanteks suivants:
Éclipse G300A | Éclipse G360A | Éclipse G500A

Solo disponible para los siguientes estuches Phanteks:
Eclipse G300A | Eclipse G360A | Eclipse G500A

仅适用于以下 Phanteks 手机壳:
Eclipse G300A | Eclipse G360A | Eclipse G500A
06
SET BRACKET ANGLE
Halterungswinkel einstellen | Définir l'angle du support | Establecer ángulo de soporte | 设置支架角度

First remove the three thumb screws, then loosen the top thumb screw and hex screw to rotate the bracket freely.
02

The Premium Vertical GPU Bracket can also be set in an angle of 15° . This can be done by removing the bottom right screw and loosen the blue highlighted screws. Gently slight the bracket, secure the bracket by fasten all hex screws again. Set the angle to 30° . To confirm the right angle, align the bottom right screw hole from the GPU bracket with the bottom right screw hole of the bracket. Secure the GPU bracket again with the previously removed thumb screws.
INSTALL GPU BRACKET
Installieren Sie die GPU-Halterung | Installer le support GPU | Instale el soporte de GPU | 安装GPU支架

Unscrew the all PCI brackets from the chassis, next secure the riser cable by connecting it to the motherboards' PCI-E slot. Align the GPU bracket with the open space and secure the GPU bracket with the thumbscrews.
REMOVE GRAPHIC CARD
Grafikkarte entfernen | Retirer la carte graphique | Quitar tarjeta gráfica | 卸下显卡

REMOVE D-RGB STRIP
Entfernen Sie den D-RGB-Streifen | Supprimer la bande D-RGB | Retire la tira D-RGB | 删除 D-RGB 条带


Before it is possible to remove the D-RGB bar, please remove the hex screw (1). Slide the D-RGB strip gently towards the back until it can't go any further (2). Then tilt the D-RGB strip upwards to fully remove the D-RGB strip (3).

REMOVE GRAPHICS CARD
Grafikkarte entfernen | Retirer la carte graphique | Retire la tarjeta gráfica | 卸下显卡


Unscrew the bracket screws on the back (1) of the bracket, and the two top thumb screws (2). With the D-RGB strip removed, unlock the graphics card lock by gently pushing it down (3). Now it is possible to remove the graphics card by pulling it upwards (4).
Phanteks Taiwan Inc.
11F., No. 150, Jian 1st Rd.,
Zhonghe Dist. New Taipei City 235
Taiwan
Importer EU
Axpertec Int. B.V. (EU)
Sydneystraat 33
3047 BP Rotterdam
The Netherlands
Importer US
Axpertec Inc. (US)
20465 E Walnut Dr. N
City of Industry, California 91789
United States

- THIS MANUAL IS FOR THE FOLLOWING MODELS
- LEGENDA
- SCOPE OF DELIVERY
- PREPARE VERTICAL GPU BRACKET
- INSERT RISER CABLE
- INSTALL GRAPHICS CARD
- INSTALL BRACKET | UNIVERSAL
- INSTALL BRACKET | NVIDIA FRONTBLENDE | PANNEAU AVANT | PANEL FRONTAL | 前面板
- CHOOSE VERTICAL OR ANGLED POSITION
- VERTICAL POSITION » STEP
- ANGLED POSITION » STEP
- A MOTHERBOARD OFFSET
- B
- PSU COVER
- SET BRACKET ANGLE
- INSTALL GPU BRACKET
- REMOVE GRAPHIC CARD
- REMOVE D-RGB STRIP
- REMOVE GRAPHICS CARD
Marque : Phanteks
Modèle : PH-PGPUKT4.0
Catégorie : Composant informatique