
TEW-413APBO - Point d'accès sans fil TRENDNET - Notice d'utilisation et mode d'emploi gratuit
Retrouvez gratuitement la notice de l'appareil TEW-413APBO TRENDNET au format PDF.

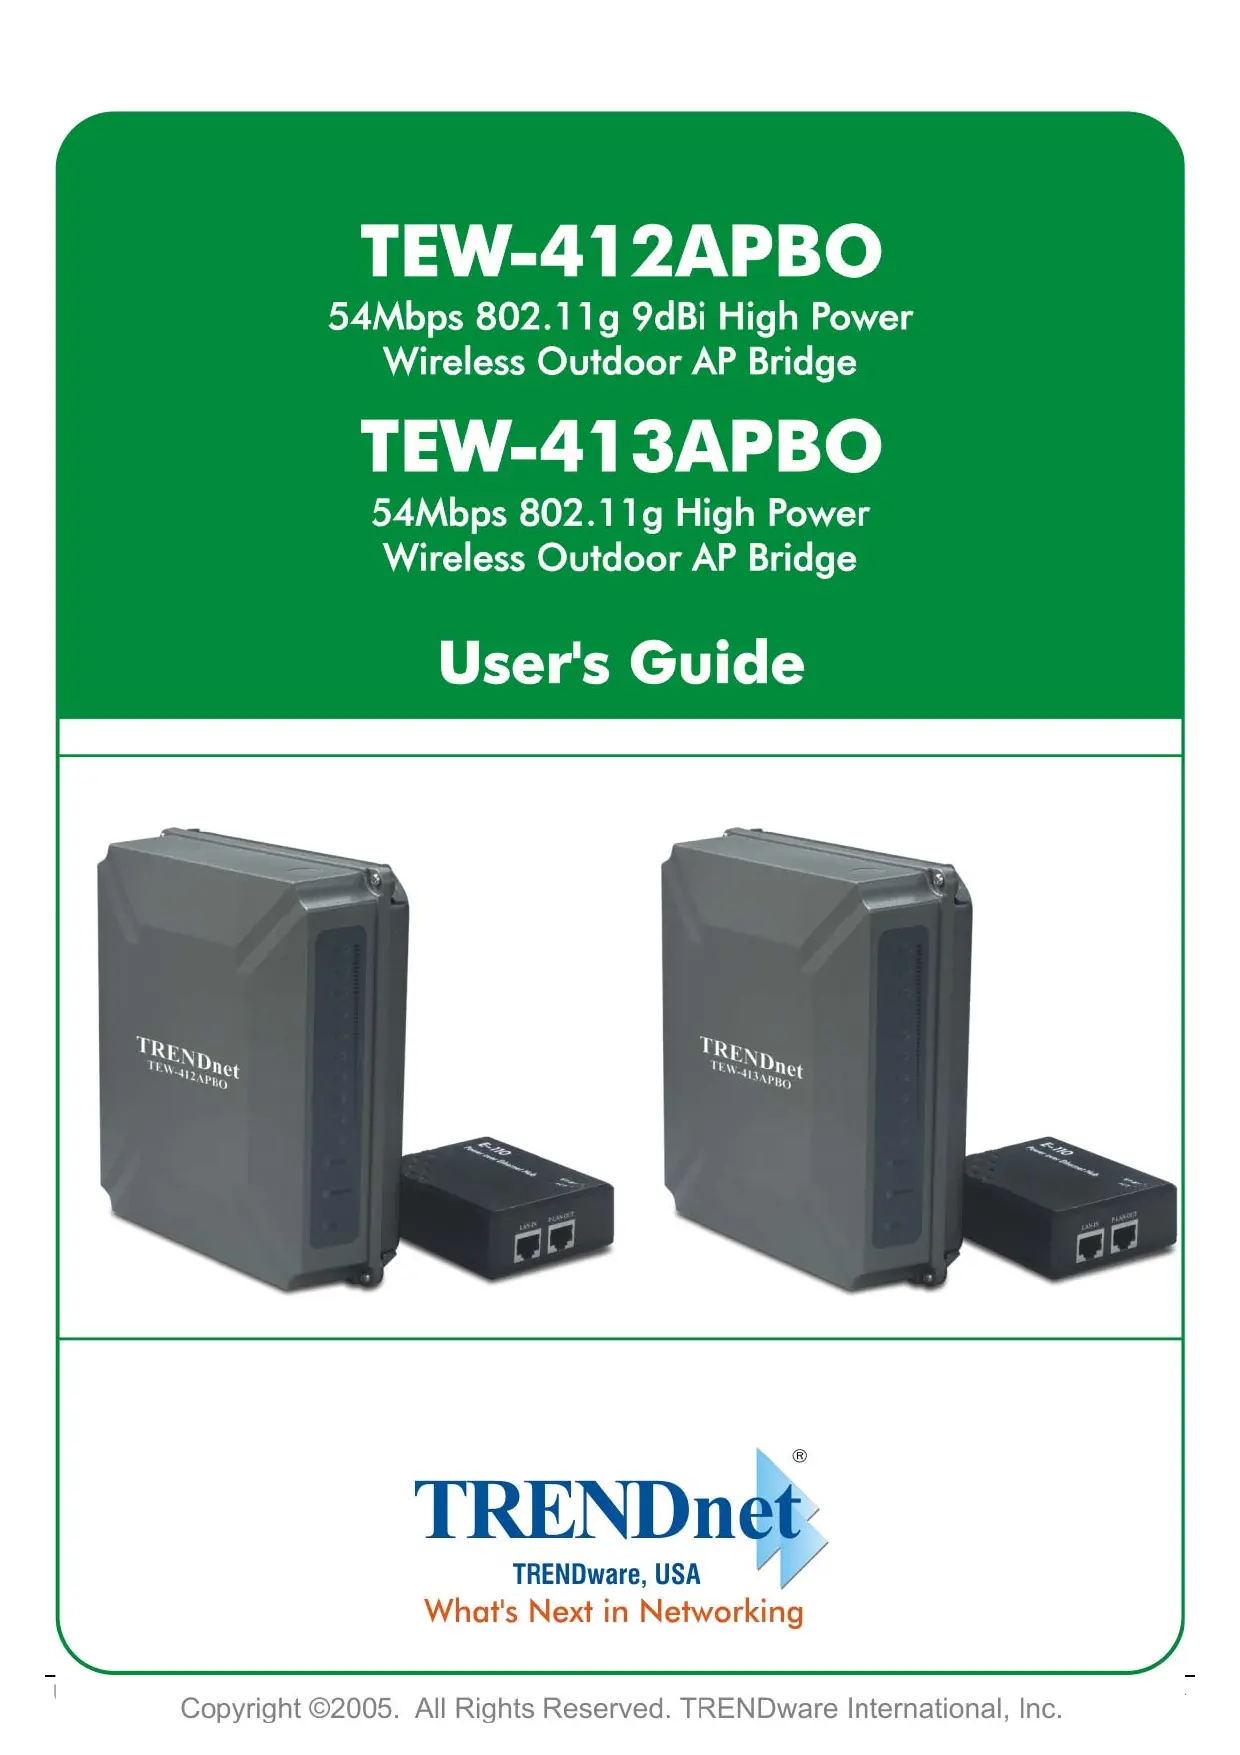

| Type de produit | Point d'accès sans fil extérieur / Pont sans fil |
| Marque | TRENDNET |
| Modèle | TEW-413APBO |
| Norme sans fil | IEEE 802.11g |
| Débit maximal | 54 Mbps |
| Antenne | Connecteur N mâle, antenne externe incluse (câble N mâle-mâle 2 m) |
| Alimentation | Power over Ethernet (PoE) via adaptateur inclus |
| Interface réseau | 1 port Ethernet 10/100 Mbps |
| Gestion | Interface web (HTTP) |
| Modes de fonctionnement | Point d'accès, Répéteur AP, Pont sans fil |
| Sécurité sans fil | WEP 64/128 bits, WPA-PSK (TKIP/AES), WPA-RADIUS |
| Adresse IP par défaut | 192.168.1.250 |
| Identifiant / mot de passe par défaut | admin / admin |
| SSID par défaut | ap11g |
| Contenu de l'emballage | Point d'accès, adaptateur PoE, câble Ethernet 1,5 m, câble N mâle-mâle 2 m, kit de montage, guide d'installation rapide, CD-ROM |
| Température de fonctionnement | 5 °C à 40 °C |
| Garantie | 3 ans |
FOIRE AUX QUESTIONS - TEW-413APBO TRENDNET
Questions des utilisateurs sur TEW-413APBO TRENDNET
0 question sur cet appareil. Repondez a celles que vous connaissez ou posez la votre.
Poser une nouvelle question sur cet appareil
Téléchargez la notice de votre Point d'accès sans fil au format PDF gratuitement ! Retrouvez votre notice TEW-413APBO - TRENDNET et reprennez votre appareil électronique en main. Sur cette page sont publiés tous les documents nécessaires à l'utilisation de votre appareil TEW-413APBO de la marque TRENDNET.
MODE D'EMPLOI TEW-413APBO TRENDNET
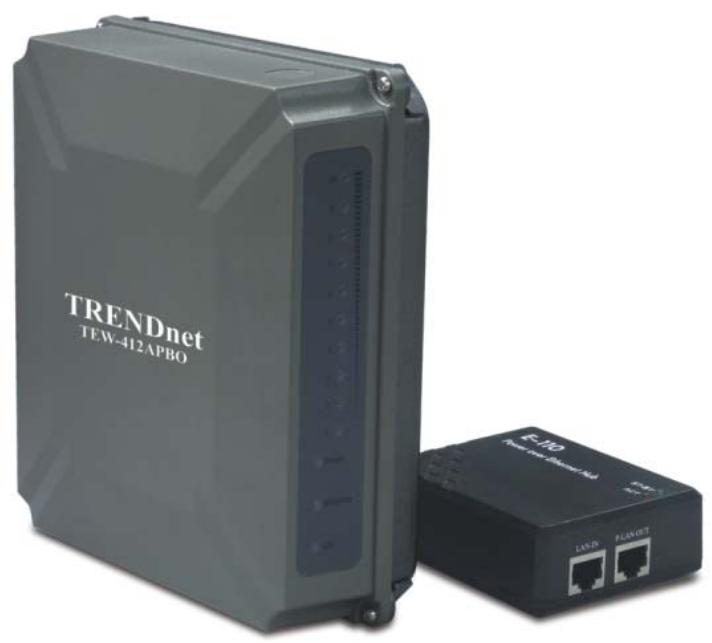
TEW-412APBO
54Mbps 802.11g 9dBi High Power
Wireless Outdoor AP Bridge
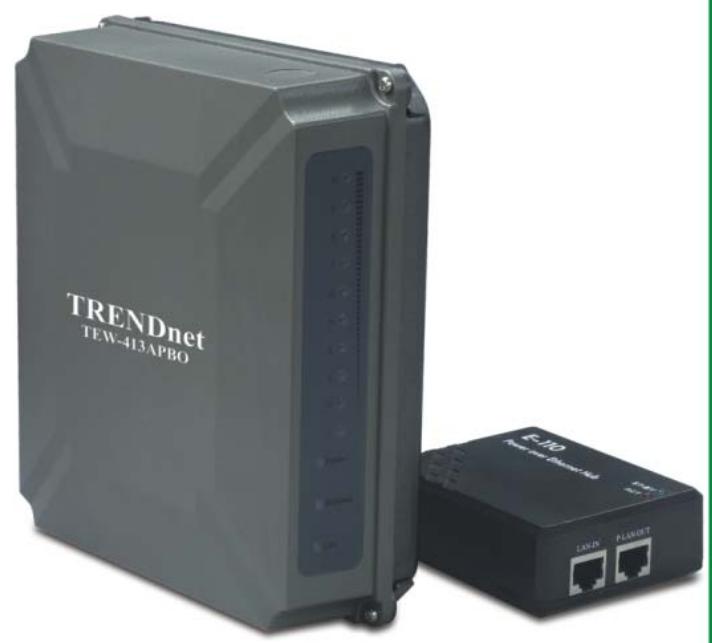
TEW-413APBO
54Mbps 802.11g High Power
Wireless Outdoor AP Bridge
User's Guide
Copyright Statement
No part of this publication may be reproduced, stored in a retrieval system, or transmitted in any form or by any means, whether electronic, mechanical, photocopying, recording, or otherwise without the prior writing of the publisher.
JUL. 2004

Contents
- Introduction 4
- Safety Notification 5
3.AP Default Settings 6 - Web Management Settings 7
4.1. Primary Setup. 8
4.2. System 12
4.3. Operating Mode 13
4.4.Status 15
4.5 Traffic Log. 16
4.6 Access Control 17
4.7 Advanced Wireless 18
4.8.SNMP INFO 20
4.9. Upgrade Firmware 21
- Troubleshooting 23
1. Introduction
Thank you for purchasing TRENDnet's Wireless 802.11g Outdoor AP Bridge.
This user guide will assist you with the installation procedure.
The package you have received should contain the following items:
For TEW-412APBO
- TEW-412APBO
User's Guide CD-ROM
Quick Installation Guide
POE Host & Power Cord
Mounting Kit
Cat.5 Ethernet Cable (1.5m/5ft.)
For TEW-413APBO
TEW-412APBO
User's Guide CD-ROM
Quick Installation Guide
POE Host & Power Cord
N-type Male to N-type Male Cable (2meters)
Mounting Kit
Cat.5 Ethernet Cable (1.5m/5ft.)
Note: if anything is missing, please contact your vendor.
2. Safety Notification
This device should be professionally installed; the installer shall be responsible for ensuring that the proper antenna is employed without exceeding local regulation.
Your Wireless AP should be placed in a safe and secure location. To ensure proper operation, please keep the unit away from water and other damaging elements. Please read the user manual thoroughly before you install the device. The device should only be repaired by authorized and qualified personnel.
Please do not try to open or repair the device yourself.
- Do not place the device in a damp or humid location, i.e. a bathroom.
The device should be placed in a sheltered and non-slip location within a temperature range of 5° 40°C .
- Please do not expose the device to direct sunlight or other heat sources. The housing and electronic components may be damaged by direct sunlight or heat sources.
3. AP Default Settings
The default settings are shown following.
| User | admin |
| Password | admin |
| AP IP Address | 192.168.1.250 |
| AP Subnet Mask | 255.255.255.0 |
| RF ESSID | ap11g |
| 11g RF Channel | 6 |
| Mode | 11b+g |
| Encryption | Disabled |
4. Web Management Settings
TURNS ON POWER SUPPLY
Quick power cycle can caused system corruption. When power on, be careful not to shut down in about 5 seconds, because data is writing to the flash.
START UP & LOGIN
In order to configure the outdoor Wireless 11g AP, you must use your web browser and manually input http://192.168.1.250 into the Address box and press Enter. The Main Page will appear.
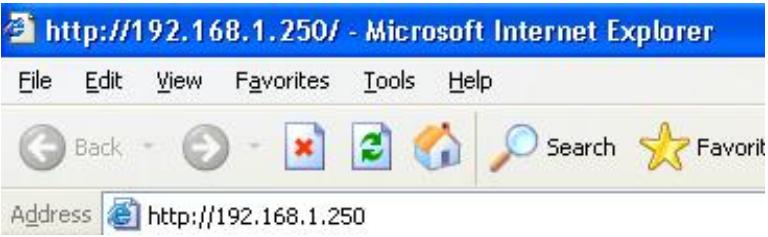
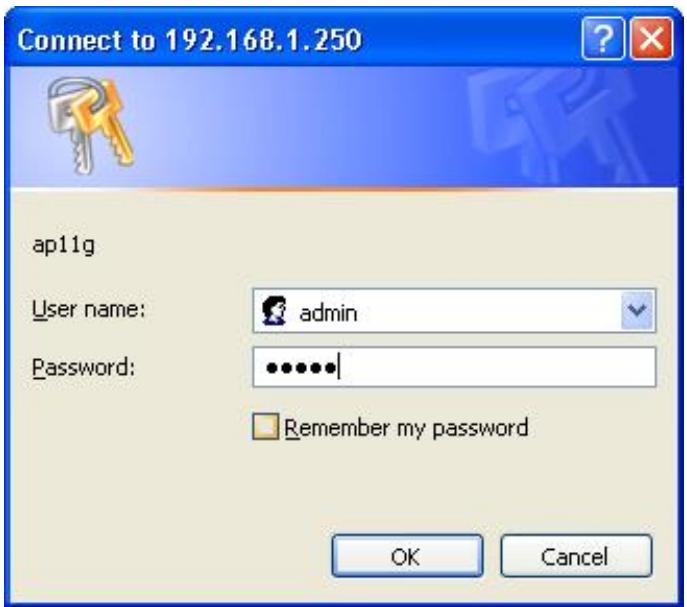
To start configure the outdoor Wireless 11g AP, you must login as "admin" in the User Name box. And input password "admin" on the password section.
Once you have logged-in as administrator, it is a good idea to change the administrator password to ensure a secure protection to the outdoor Wireless 11g AP. The Security Settings section described later in this manual describes how to change the password.
Once you have input the correct password and logged-in, the screen will change to the Setup page screen.
4.1. Primary Setup
MAKE CORRECT NETWORK SETTINGS OF YOUR COMPUTER
To change the configuration, use Internet Explorer (IE) or Netscape Communicator to connect the WEB management 192.168.1.250.
Primary Setup
This screen contains all of the AP's basic setup functions.
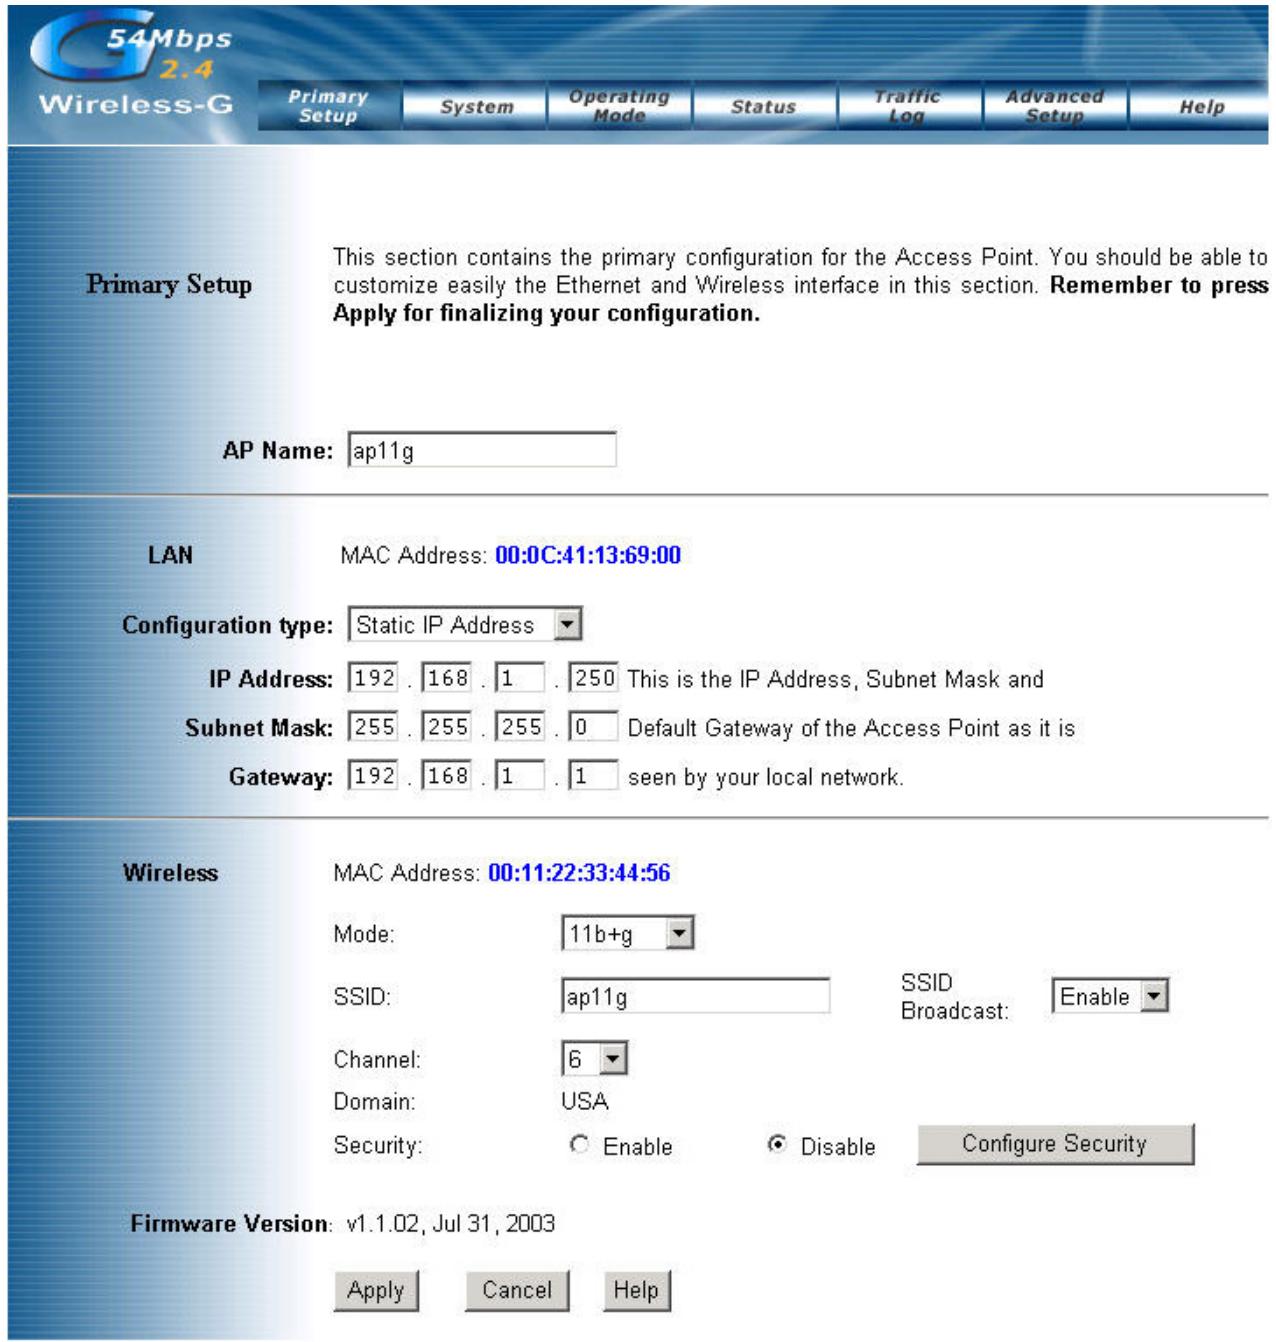
Most users will be able to configure the AP and get it working properly using the settings on this screen.
LAN IP Address and Subnet Mask: This is the AP's IP Address and Subnet Mask as seen on the internal LAN. The default value is 192.168.1.250 for IP Address and 255.255.255.0 for Subnet Mask.
Wireless: This section provides the Wireless Network settings for your WLAN
Wireless Settings
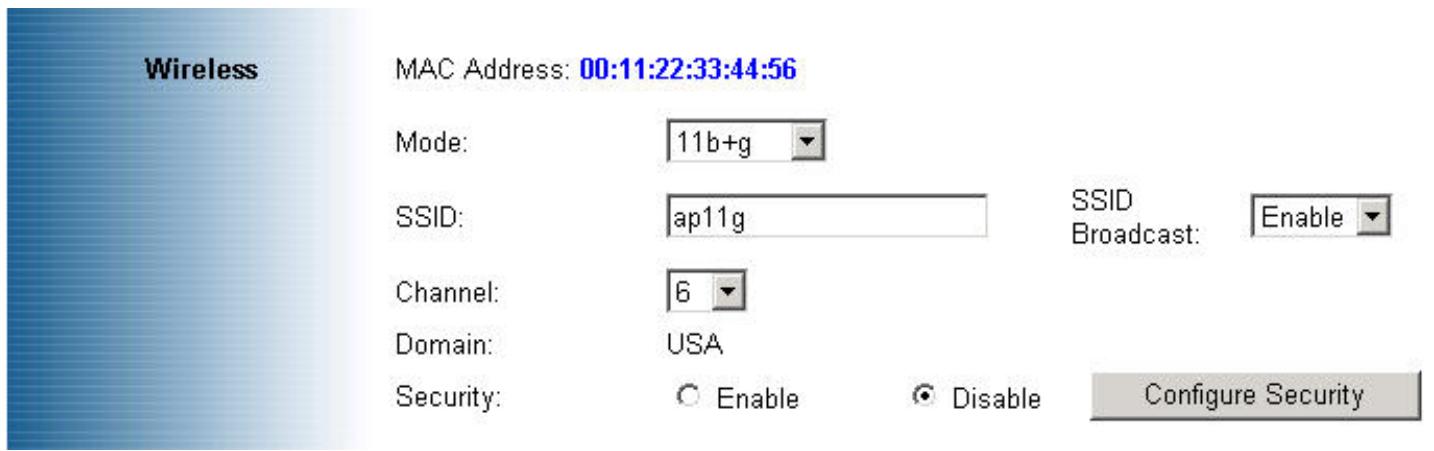
SSID: The service set identifier (SSID) or network name. It is case sensitive and must not exceed 32 characters, which may be any keyboard character. You shall have selected the sameSSID for all the APs that will be communicating with mobile wireless stations.
Channel: Select the appropriate channel from the list provided to correspond with your network settings. You shall assign a different channel for each AP to avoid signal interference.
Security: There are 3 types of security to be selected. To secure your Wireless Networks, it's strongly recommended to enable this feature.
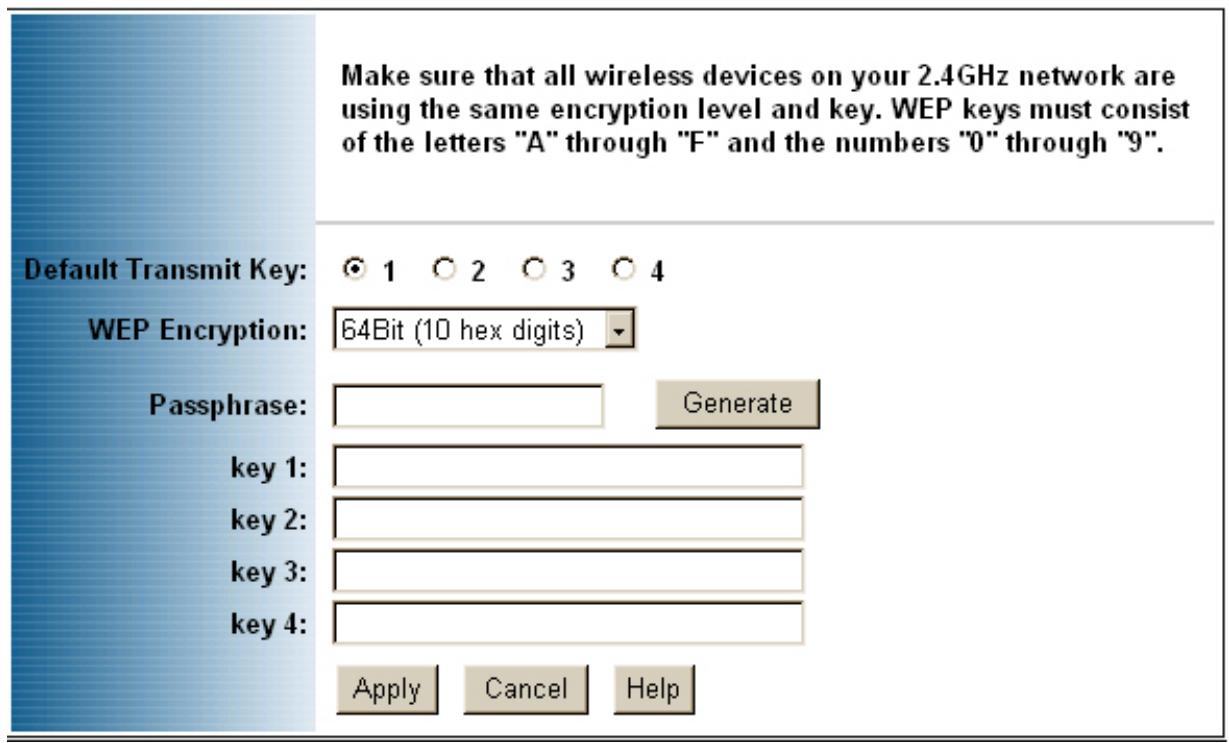
-WEP
Make sure that all wireless devices on your network are using the same encryption level and key. WEP keys must consist of the letters "A" through "F" and the numbers "0" through "9."
Important Notice
In order to make right use of WPA, please ensure that your current Wireless Adapter's driver, and Wireless Utility can support it, WPA needs 802.1x authentication (when RADIUS mode is chosen), though the Operating System must also support 802.1x protocol. For Microsoft's OS family, only Windows XP has incorporated this by default. The rest of the OS must installed 3er party's client software such as Funk OdySSey.
-WPA-Preshared key
There are two encryption options for WPA Pre-Shared Key, TKIP and AES. TKIP stands for Temporal Key Integrity Protocol. TKIP utilizes a stronger encryption method and incorporates Message Integrity Code (MIC) to provide protection against hackers. AES stands for Advanced Encryption System, which utilizes a symmetric 128-Bit block data encryption.
To use WPA Pre-Shared Key, enter a password in the WPA Shared Key field between 8 and 63 characters long. You may also enter a Group Key Renewal Interval time between 0 and 99,999 seconds.
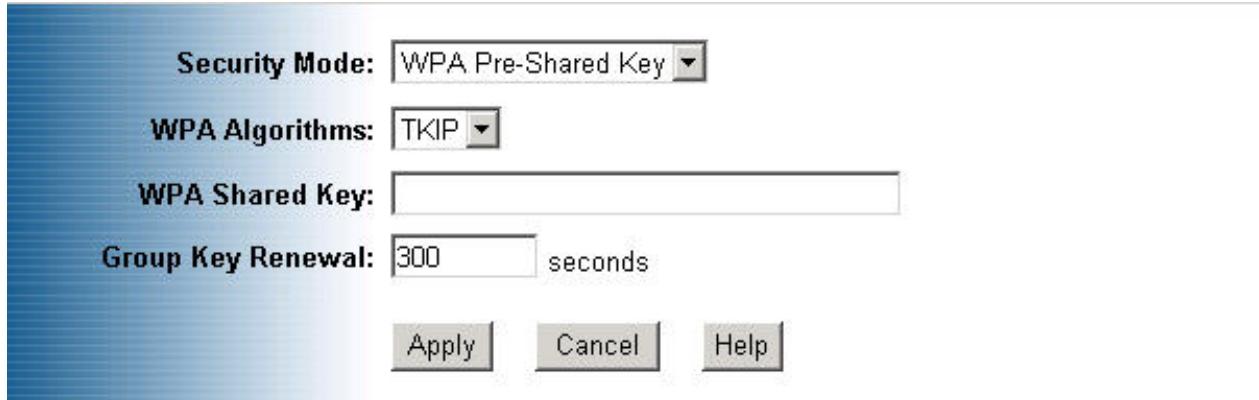
| WPA Algorithms | Please choose your algorithms method. You can select between TKIP or AES. |
| WPA Shared Key | Please input the Pre-Shared Key. The key should be 8 characters or 63 characters in alphanumeric. |
| Group Key Renewal | Please input the period of renewal time. The default selection is 300 seconds. |
-WPA RADIUS
WPA RADIUS uses an external RADIUS server to perform user authentication. To use WPA RADIUS, enter the IP address of the RADIUS server, the RADIUS Port (default is 1812) and the shared secret from the RADIUS server.
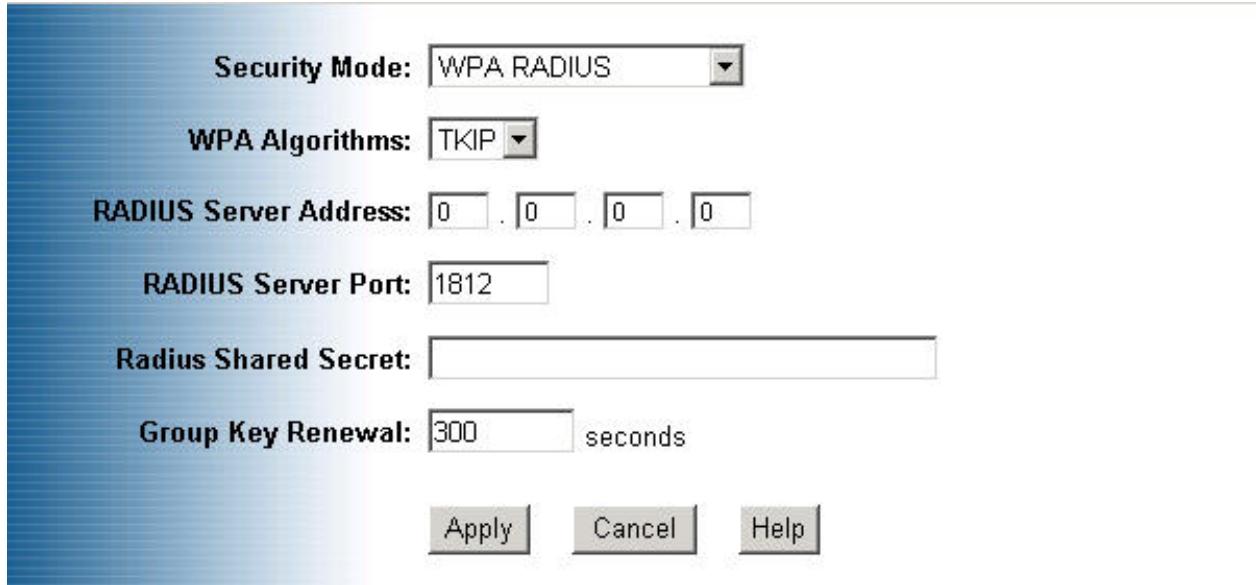
| WPA Algorithms | Please choose your algorithms method. You can select between TKIP or AES. |
| Radius Server Address | Please input your RADIUS Server IP address. |
| RADIUS Server Port | Please input the Authentication port of your RADIUS server. The default port being used is 1812 |
| RADIUS Shared Key | The RADIUS server will accept the authentication if both Shared Key matched. |
| Group Key Renewal | Please input the period of renewal time. The default selection is 300 seconds. |
- Click Apply to save your settings.
4.2. System
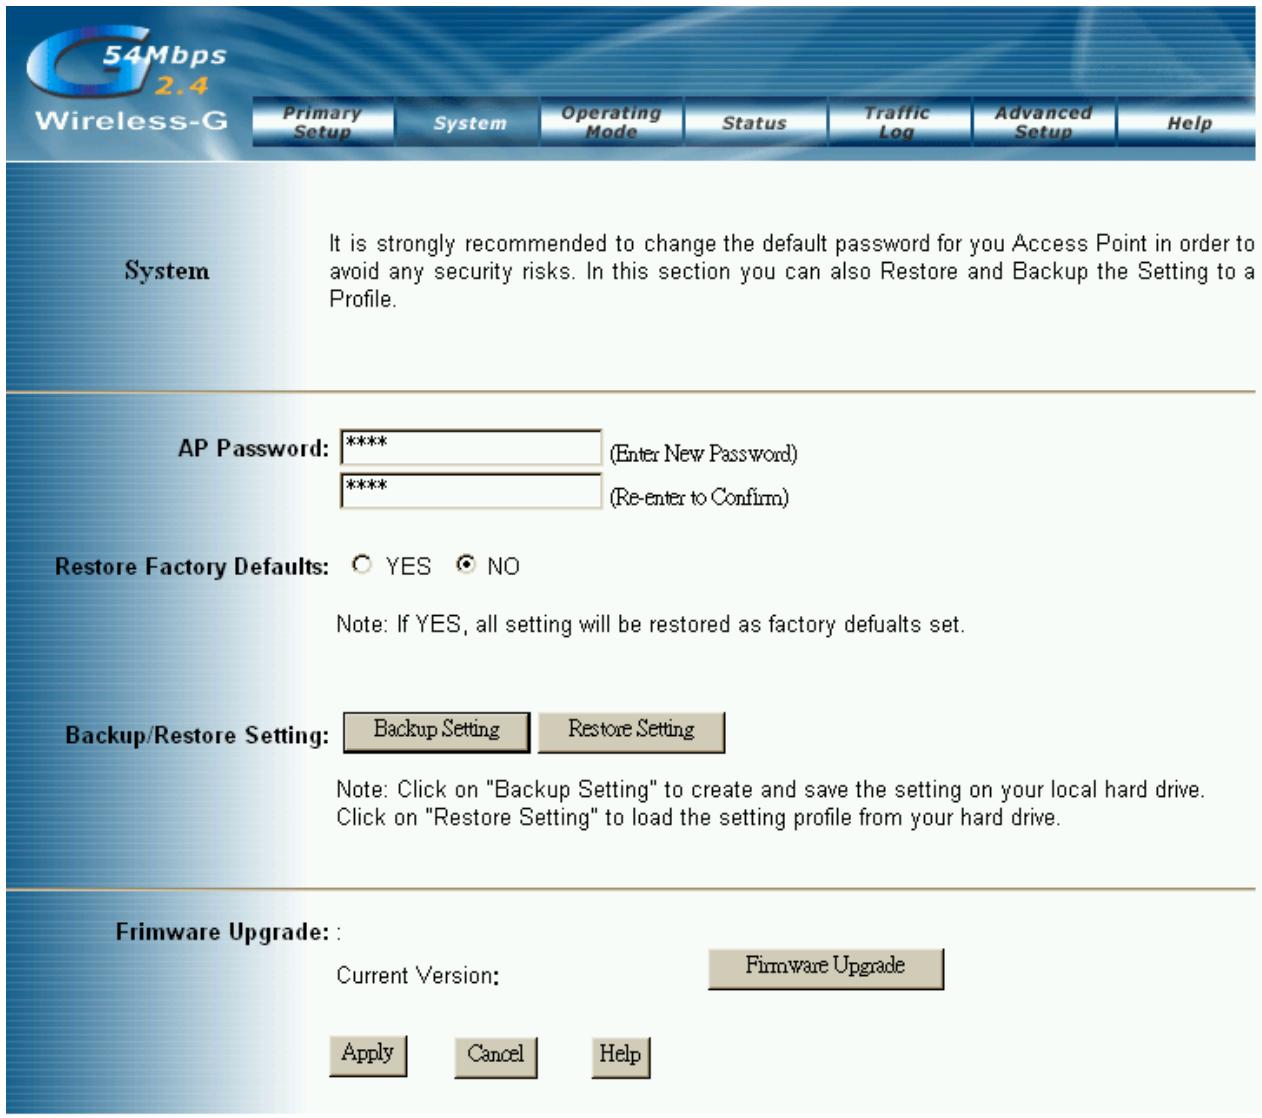
AP Password: Changing the password for the AP is as easy as typing the password into the Enter New Password field. Then, type it again into the Re-enter to confirm.
- Click the Apply button to save the setting.
Use the default password when you first open the configuration pages, after you have configured these settings, you should set a new password for the AP (using the Password screen). This will increase security, protecting the AP from unauthorized changes.
Restore Factory Defaults: Click the Yes button to reset all configuration settings to factory default values. Note: Any settings you have saved will be lost when the default settings are restored. Click the No button to disable the Restore Factory Defaults feature.
Click the Apply button to save the setting.
-
Backup/Restore Setting: Click Backup to store the Access Point's configuration on your local PC. Click Restore to restore Access Point's configuration from your local PC
-
Check all the settings and click Apply to save them.
4.3. Operating Mode
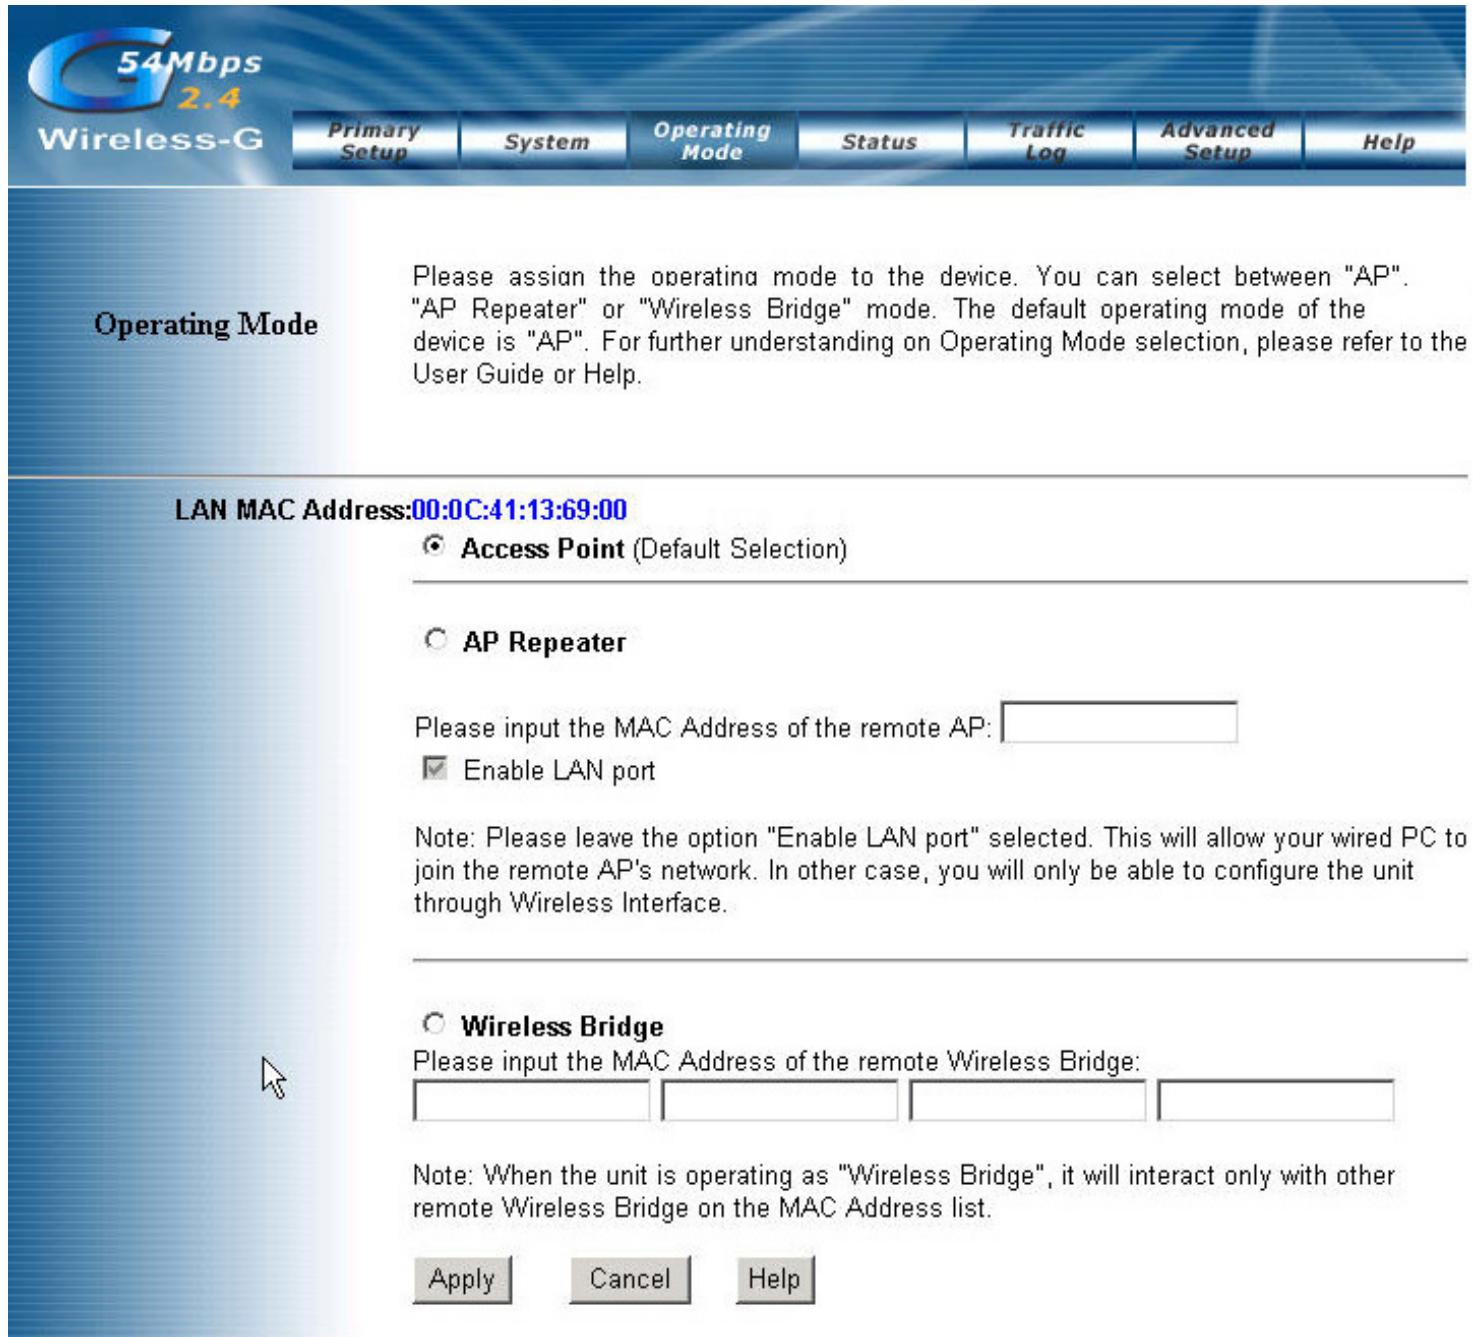
Access Point: This mode provides access for wireless stations to wired LANs and from wired LANs to wireless stations.
Important
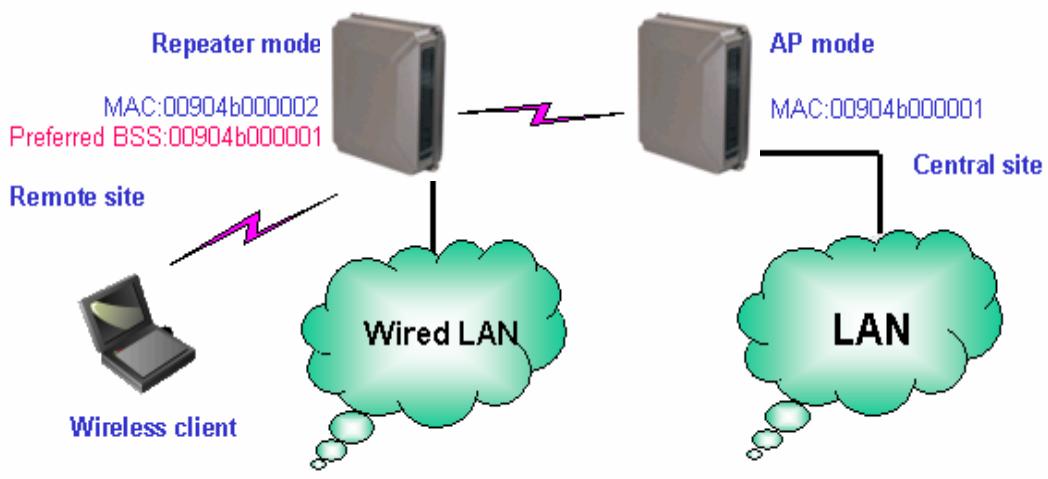
Both units must be selected as AP Repeater mode in order to establish the Wireless link communication. The remote AP MAC address to be filled at this selection should be the LAN MAC address that is displaying at the Operating Mode's web pages
AP Repeater: This mode allows the AP to keep the AP function role and at the same time performing a communication with other 802.11g AP to establish and extend your Wireless Network cover. Please enter the Remote Access Point's MAC address to enable this feature.
Repeater Application
Wireless Bridge: This mode allows the connection of one or more remote LANs with a central LAN.
Bridge Application
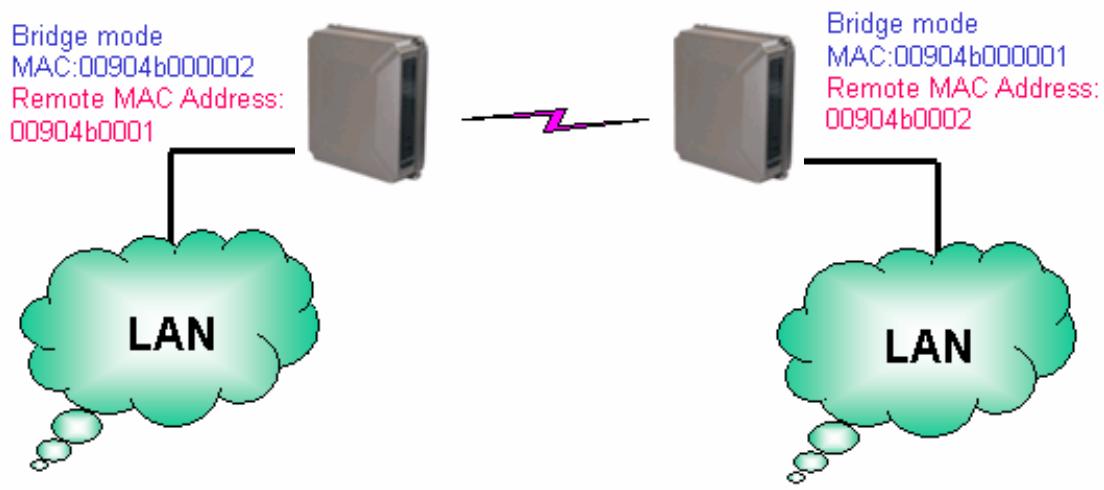
- Click Apply to save your settings.
4.4. Status
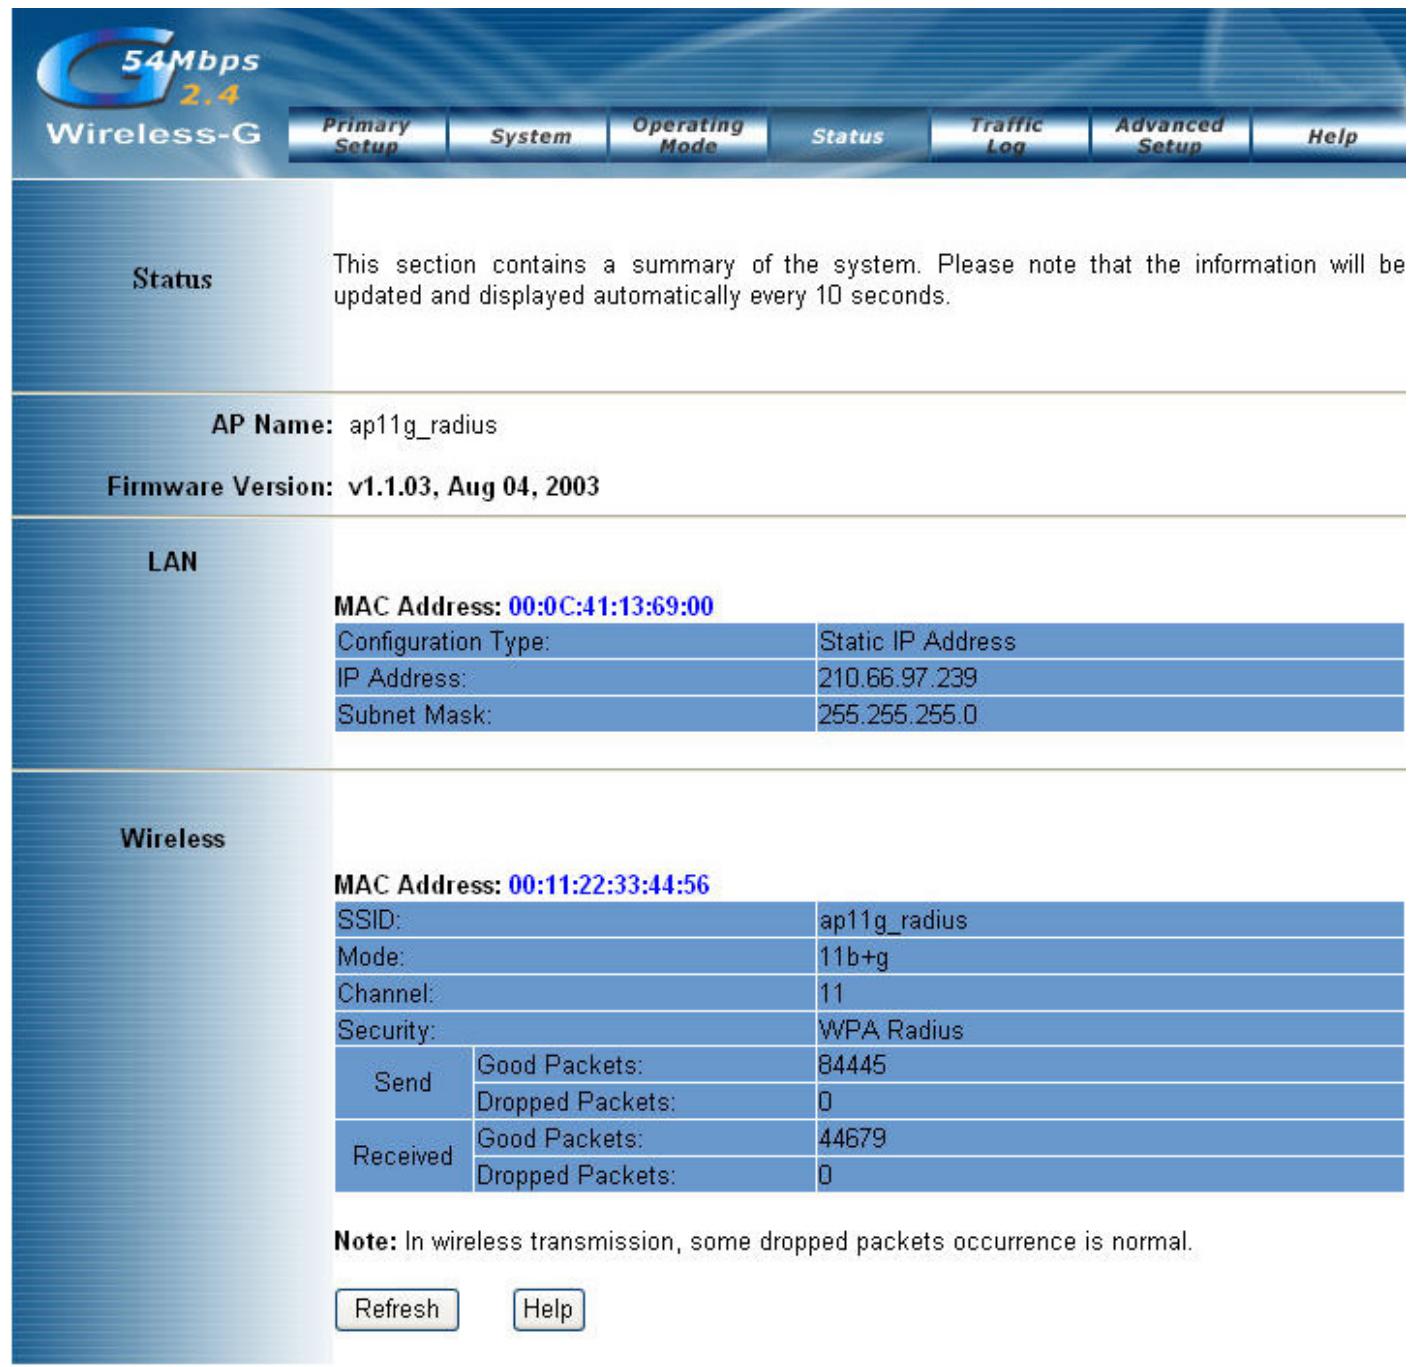
This screen displays the IEEE 802.11g AP's current status and settings. This information is read-only. This page will auto re-flash every 5 seconds to keep most update information.
LAN section will be displaying all information related on AP, such as the IP address and the current configuration type.
Wireless section will be displaying information related on the Wireless interface, such as SSID, Channel, Encryption and statistics of network traffic.
*Click the Refresh button to refresh the AP's status and settings.
4.5 Traffic Log
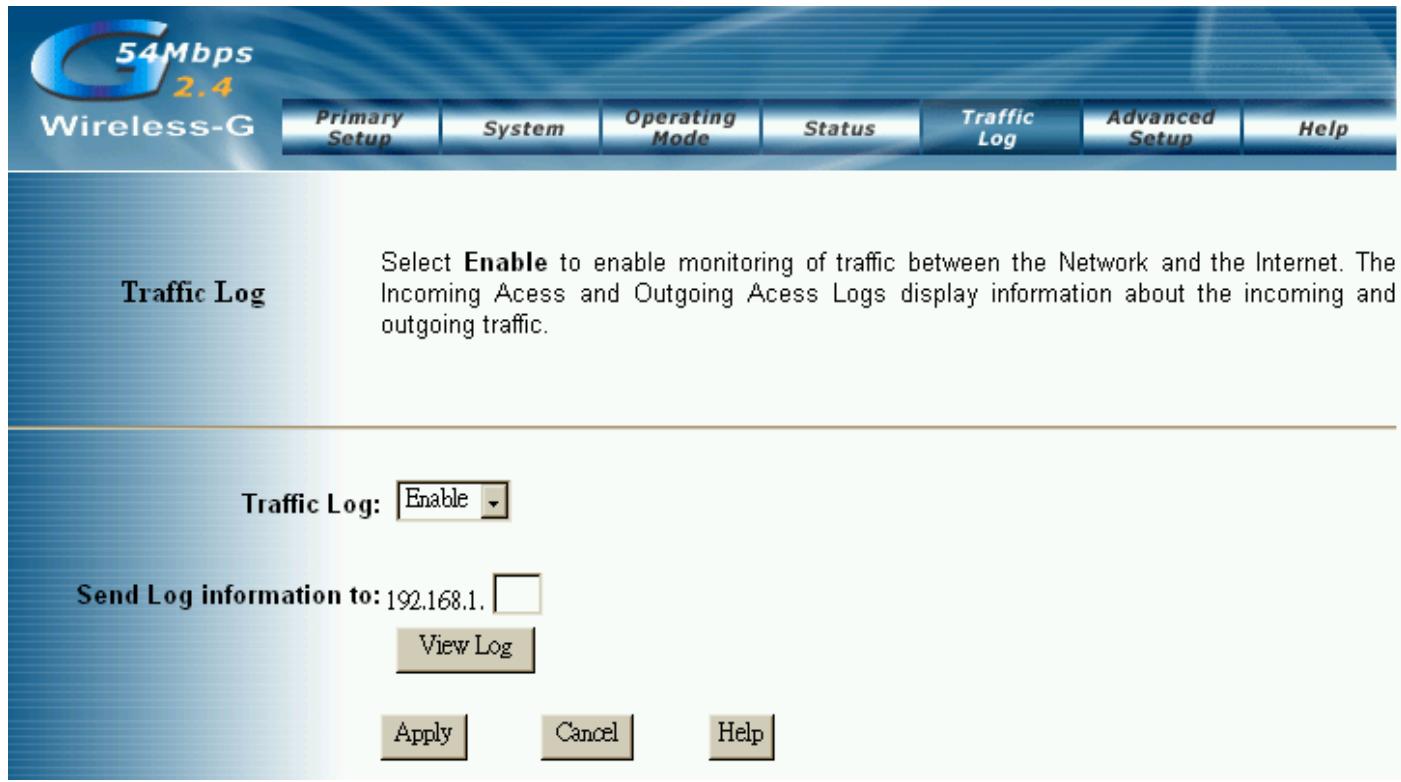
Traffic Log: The AP can keep logs of all incoming or outgoing traffic for your network traffic. This feature is disabled by default. To keep activity logs, select Enable.
To keep a permanent record of activity logs as a file on your PC's hard drive, Log viewer software must be used. In the Send Log to field, enter the fixed IP address of the PC running the Log viewer software. The AP will send updated logs to that PC.
To see a temporary log of the AP's most recent traffic, click the View Log button..
Click the Apply button to save the setting.
4.6 Access Control
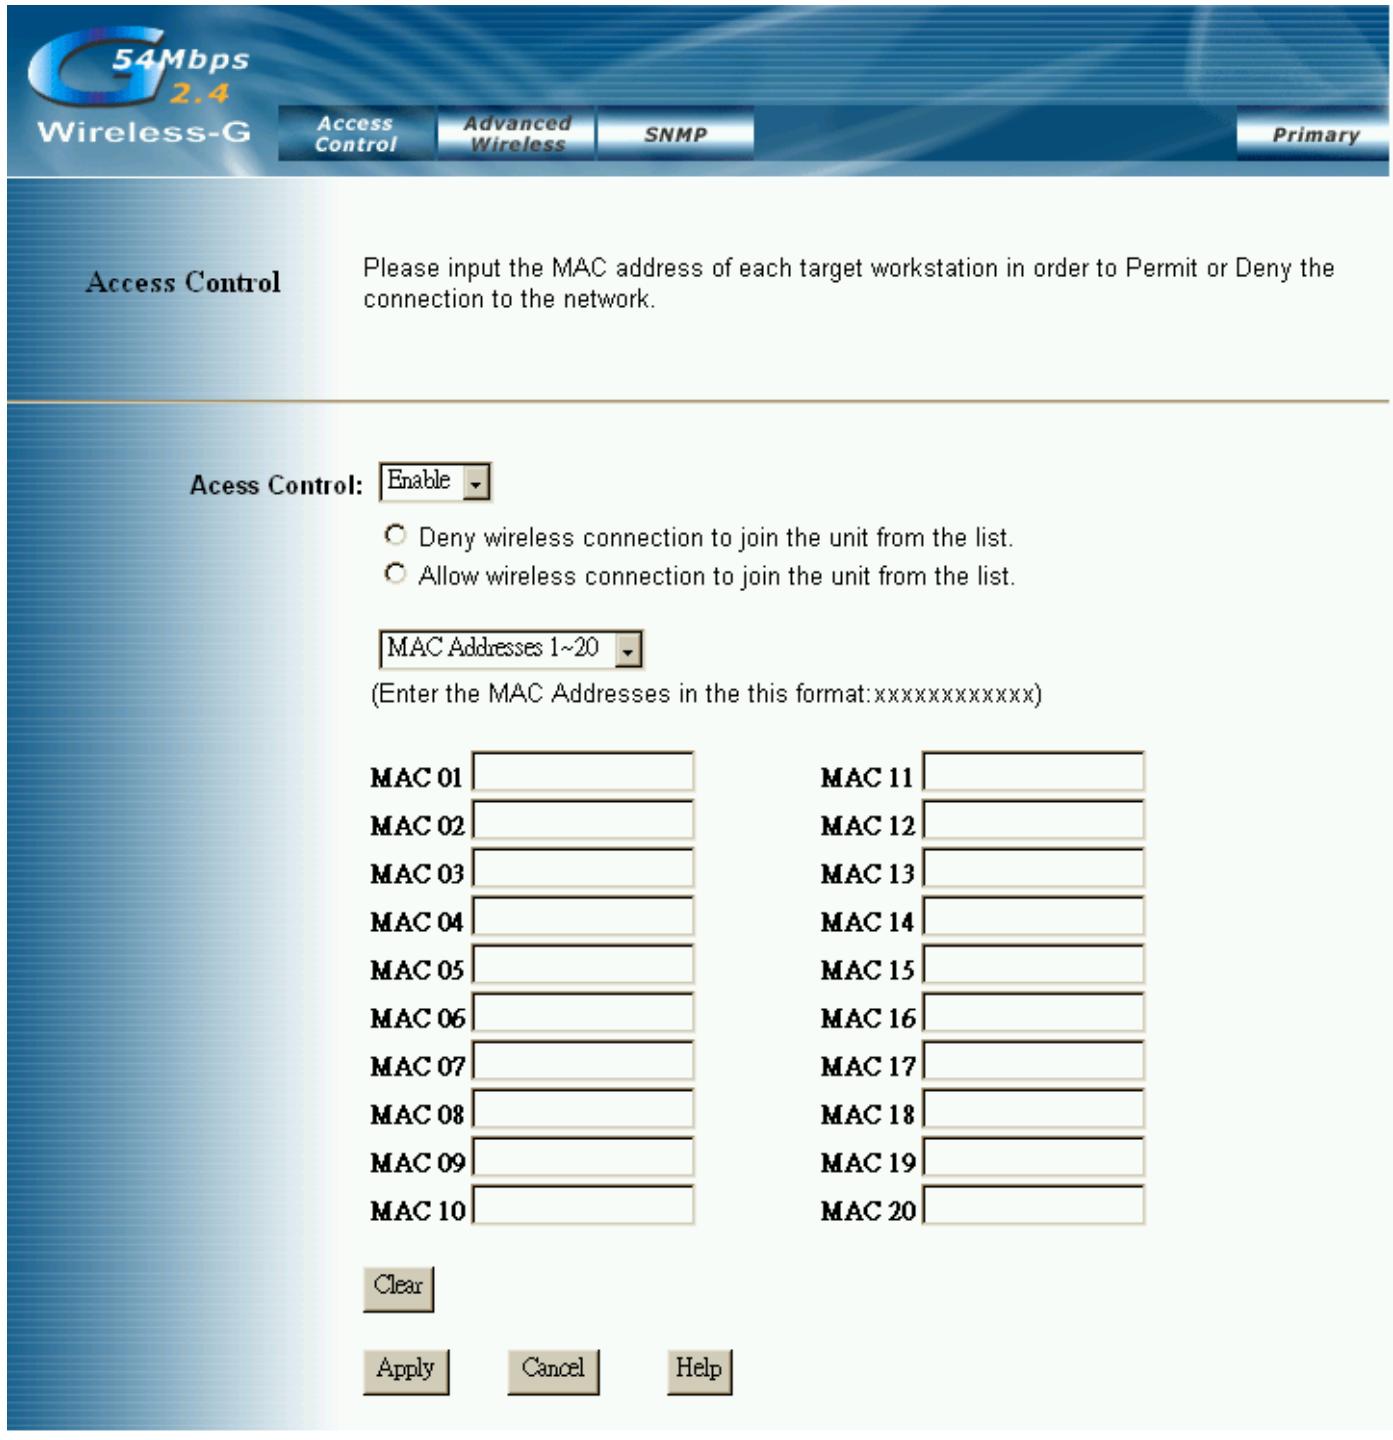
Access Control: This function will allow administrator to have access control by enter MAC address of client stations. When Enable this function, two new options will show up.
Depend on the filtering propose, it can be selected to Deny or Allow. Fill the client stations MAC list to complete the configuration. The table could store up to 40 different MAC addresses. Please follow the format that it required when an address is input.
- Click Apply to save your settings.
4.7 Advanced Wireless
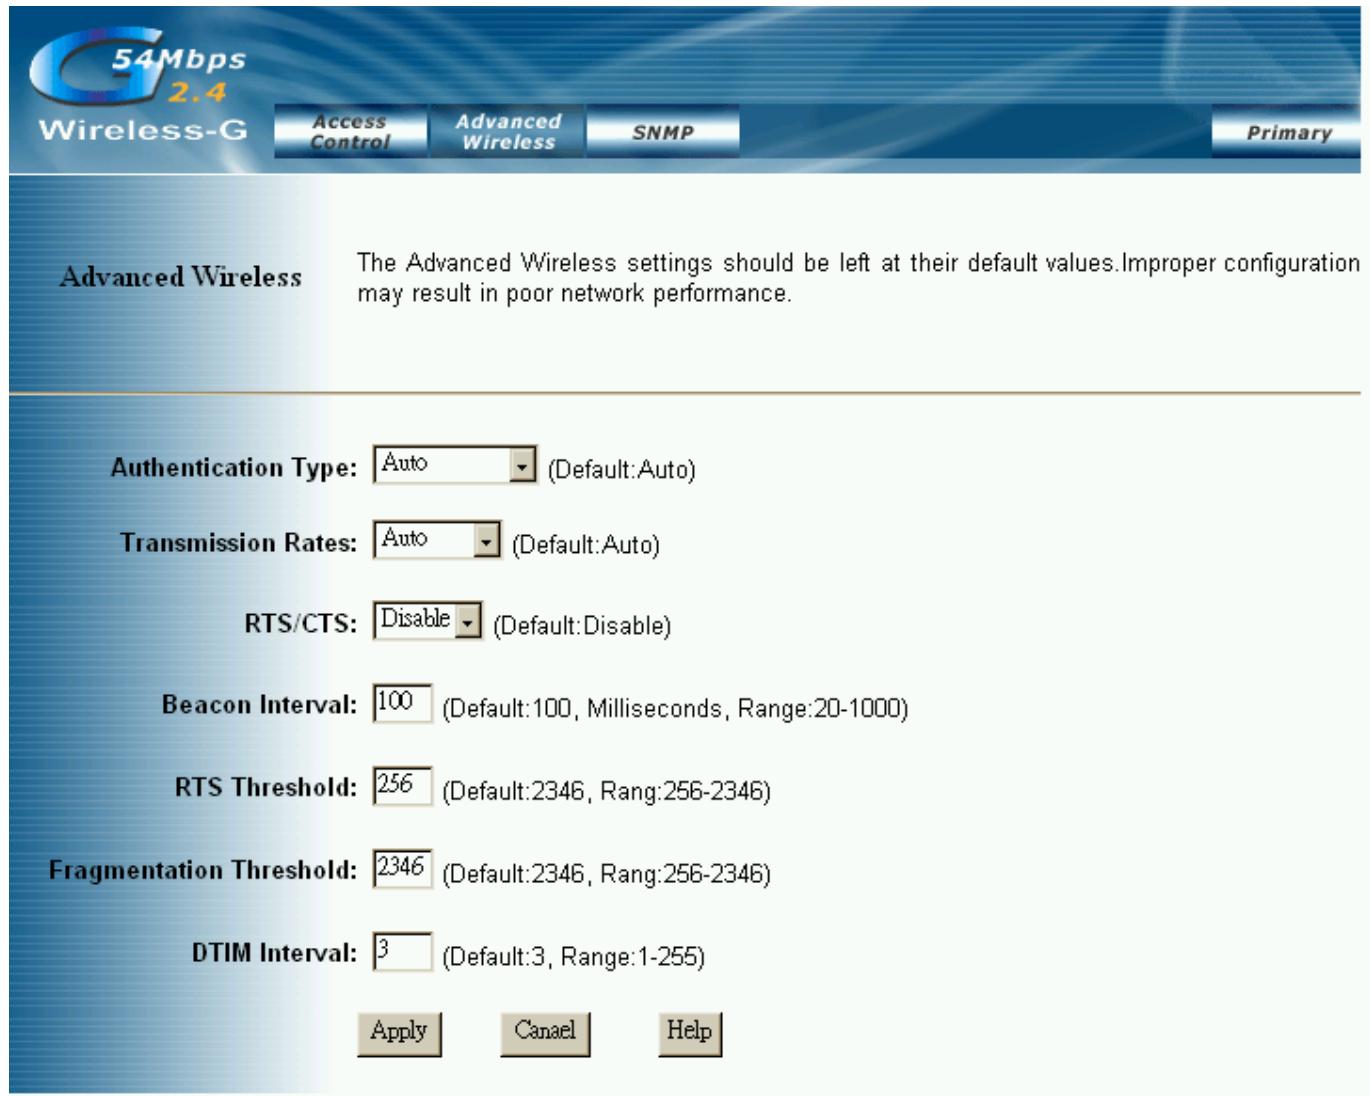
Authentication Type:
Auto: Auto is the default authentication algorithm. It will change its authentication type automatically to fulfill client's requirement.
Open System: Open System authentication is not required to be successful while a client may decline to authenticate with any particular other client.
Shared Key: Shared Key is only available if the WEP option is implemented. Shared Key authentication supports authentication of clients as either a member of those who know a shared secret key or a member of those who do not. IEEE 802.11 Shared Key authentication accomplishes this without the need to transmit the secret key in clear. Requiring the use of the WEP privacy mechanism.
Transmission Rate: The rate of data transmission should be set depending on the speed of your wireless network. You can select from a range of transmission speeds, or you can select AUTO to have the AP automatically use the fastest possible data rate and enable the Auto-Fallback feature. Auto-Fallback will negotiate the best possible connection speed between the AP and a wireless client. The default setting is AUTO.
Beacon Interval: The Beacon Interval value indicates the frequency interval of the beacon. Enter a value between 20 and 1000. A beacon is a packet broadcast by the AP to synchronize the wireless network. The default value is 100.
RTS Threshold: This value should remain at its default setting of 2346. Should you encounter inconsistent data flow, only minor modifications are recommended. If a network packet is smaller than the preset RTS threshold size, the RTS/CTS mechanism will not be enabled. The AP sends Request to Send (RTS) frames to a particular receiving station and negotiates the sending of a data frame. After receiving an RTS, the wireless station responds with a Clear to Send (CTS) frame to acknowledge the right to begin transmission.
Fragmentation Threshold: This value specifies the maximum size for a packet before data is fragmented into multiple packets. It should remain at its default setting of 2346. If you experience a high packet error rate, you may slightly increase the Fragmentation Threshold. Setting the Fragmentation Threshold too low may result in poor network performance. Only minor modifications of this value are recommended.
DTIM Interval: This value indicates the interval of the Delivery Traffic Indication Message (DTIM). A DTIM field is a countdown field informing clients of the next window for listening to broadcast and multicast messages. When the Access Point has buffered broadcast or multicast messages for associated clients, it sends the next DTIM with a DTIM Interval value.
Access Point Clients hear the beacons and awaken to receive the broadcast and multicast messages.
- Click Apply to save your settings.
4.8. SNMP INFO
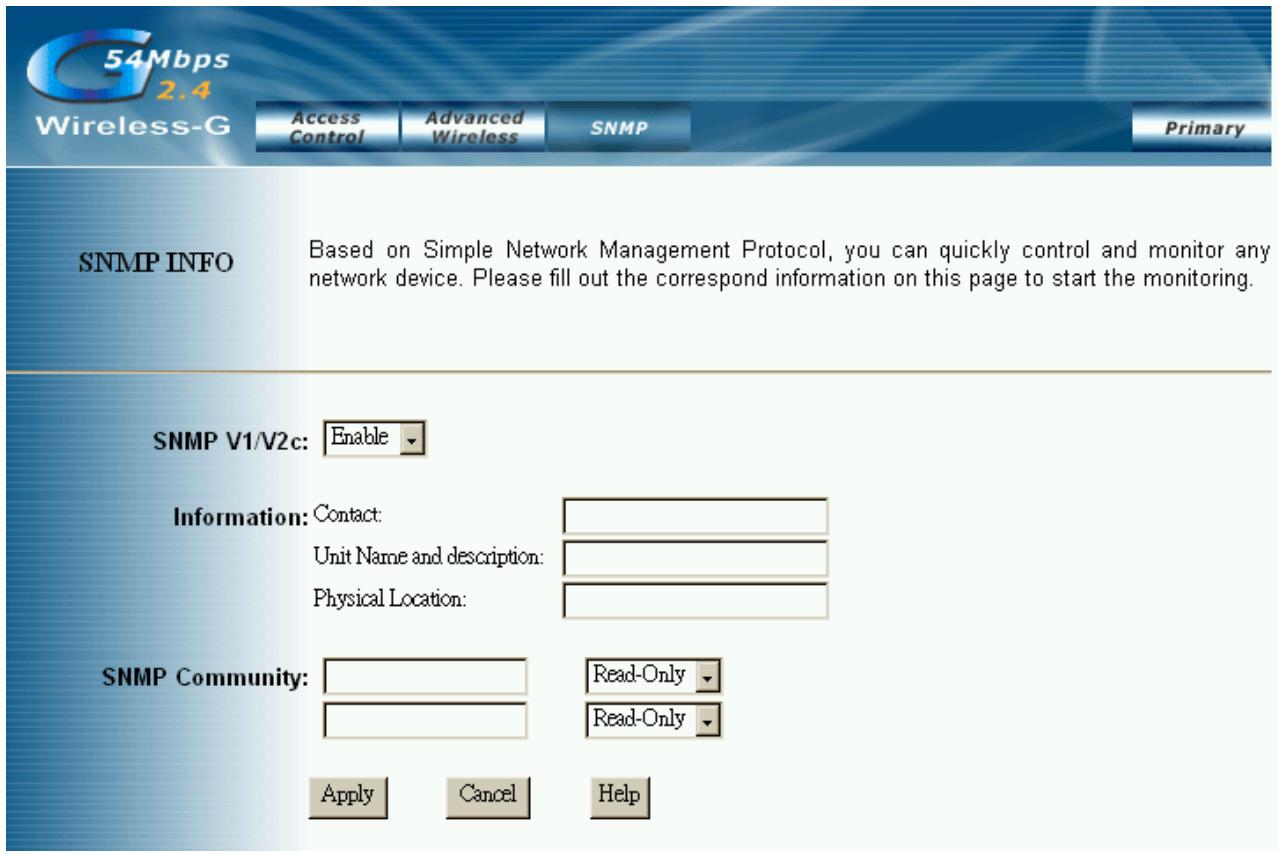
SNMP INFO: The SNMP screen allows you to customize the Simple Network Management Protocol (SNMP) settings. SNMP is a popular network monitoring and management protocol.
| SNMPv2c | To enable the SNMP support feature, select Enable. Otherwise, select Disable. | |
| Identification | Contact | In the contact field, enter contact information for the AP. |
| Unit Name and description | In the Unit Name and description field, enter the name of the AP or AP description. | |
| Physical Location | In the Physical Location field, specify the area or location where the AP resides. | |
| SNMP Community | public | You may change the SNMP Community's name from its default, public. Then configure the community's access as either Read-Only or Read-Write. |
| private | You may change the SNMP Community's name from its default, public. Then configure the community's access as either Read-Only or Read-Write. |
Click Apply to save your settings.
4.9. Upgrade Firmware
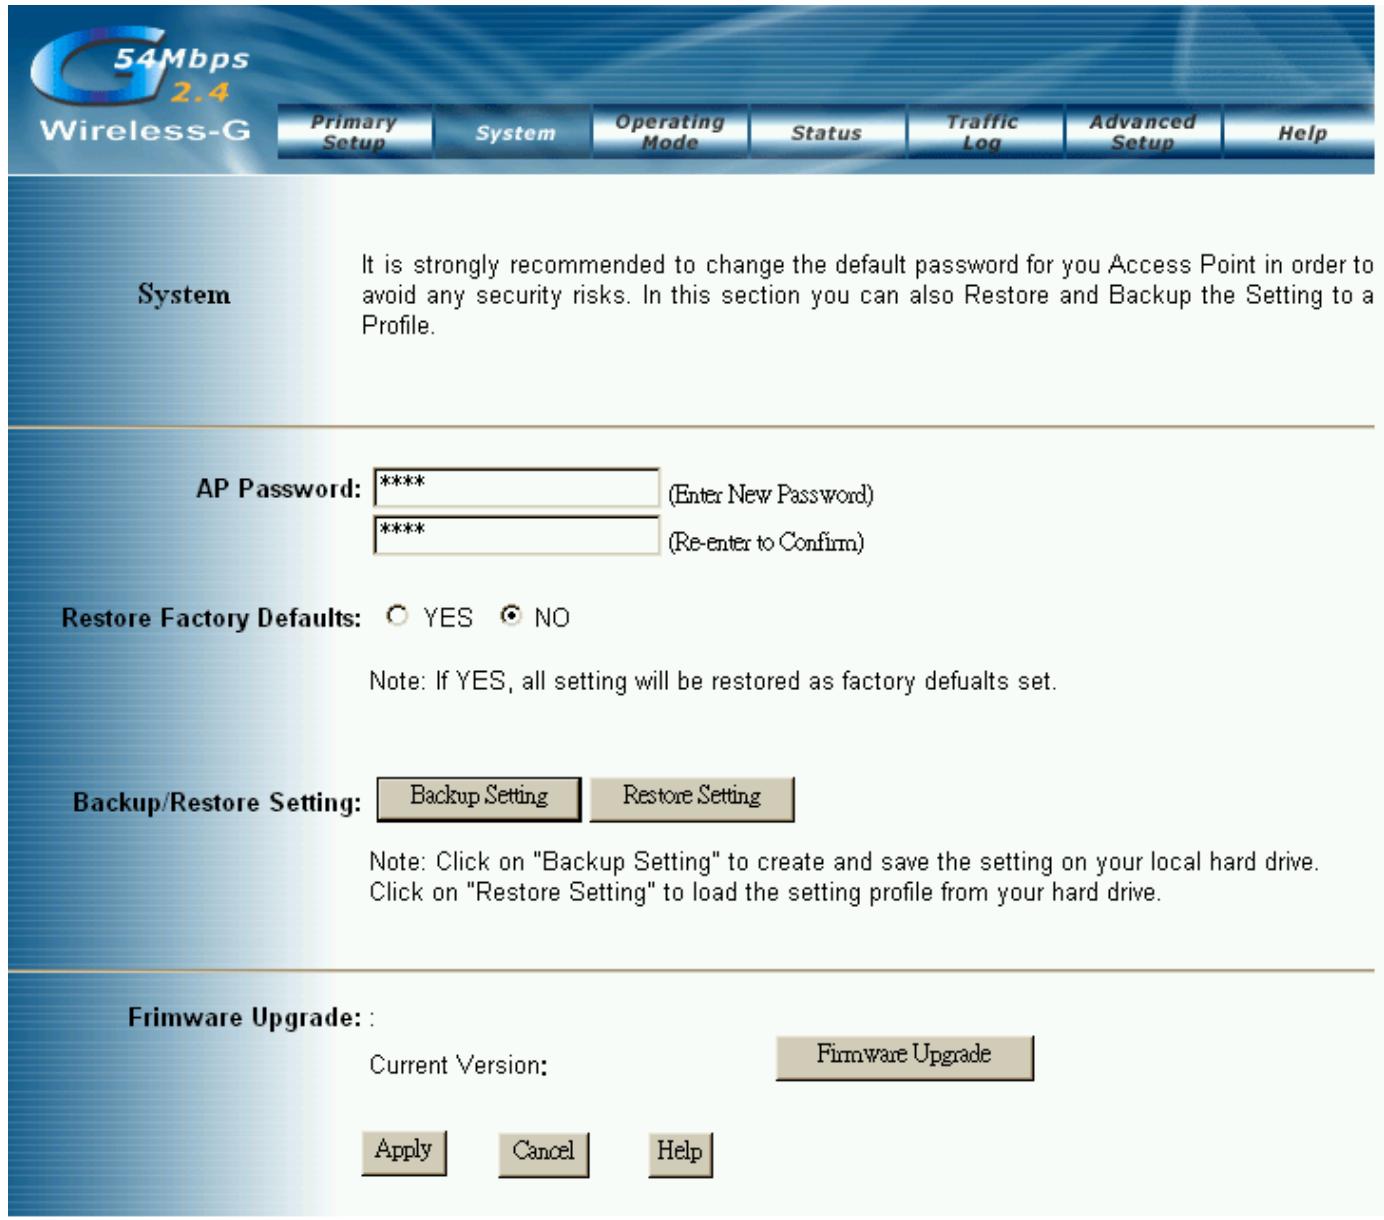
To perform the firmware upgrade action, please go to the System section.
Firmware Upgrade: Click the Firmware Upgrade button to load new firmware onto the AP. If the AP is not experiencing difficulties, then there is no need to download a more recent firmware version, unless that version has a new feature that you want to use.
Note: When you upgrade the AP's firmware, you may lose its configuration settings, so make sure you write down the AP's settings before you upgrade its firmware.
To upgrade the AP's firmware:
- Download the firmware upgrade file from the internet.
- Extract the firmware upgrade file.
- Click the Firmware Upgrade button.
- On the Firmware Upgrade screen, click the Browse button to find the firmware upgrade file.
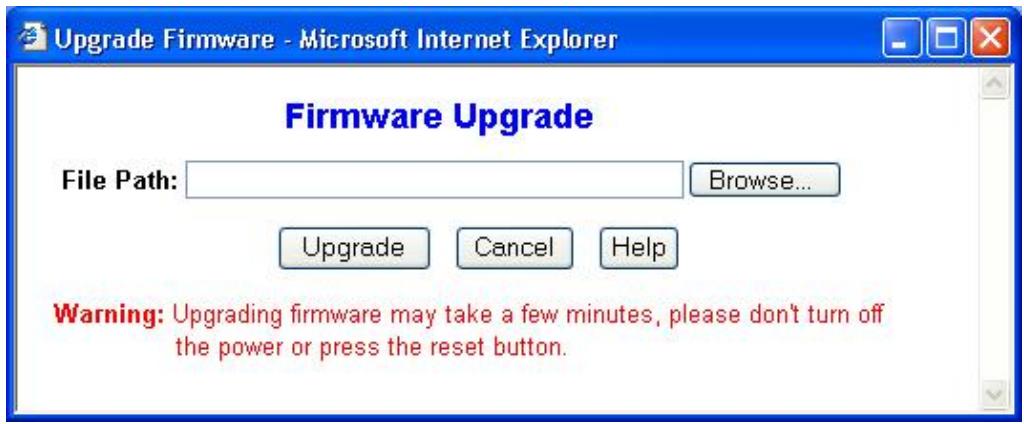
- Double-click the firmware upgrade file.
- Click the Upgrade button, and follow the on-screen instructions.
Note: Do not power off the AP or press the Reset button while the firmware is being upgraded.
5. Troubleshooting
Basic Functions
My Wireless AP will not turn on. No LED's light up.
Cause:
The power is not connected.
Resolution:
- Connect the PoE adapter to your AP and plug it into the power outlet.
Note: Only use the PoE adapter provided with your AP. Using any other adapter may damage your AP.
LAN Connection Problems I can't access my AP.
Cause:
The unit is not powered on.
There is not a network connection.
The computer you are using does not have a compatible IP Address.
Resolution:
- Make sure your AP is powered on.
- Make sure that your computer has a compatible IP Address. Be sure that the IP Address used on your computer is set to the same subnet as the AP. For example, if the AP is set to 192.168.1.250, change the IP address of your computer to 192.168.1.15 or another unique IP Address that corresponds to the 192.168.1.X subnet.
Use the Reset button located on the rear of the AP to revert to the default settings.
I can't connect to other computers on my LAN.
Cause:
The IP Addresses of the computers are not set correctly.
Network cables are not connected properly.
- Windows network settings are not set correctly.
Resolution:
- Make sure that each computer has a unique IP Address. And the IP must be in the same subnet as the AP.
- Make sure that the Link LED is on. If it is not, try a different network cable.
- Check each computer for correct network settings.
Wireless Troubleshooting
I can't access the Wireless AP from a wireless network card
Cause:
Out of range.
IP Address is not set correctly.
Resolution:
- Make sure that the Mode, SSID, Channel and encryption settings are set the same on each wireless adapter.
- Make sure that your computer is within range and free from any strong electrical devices that may cause interference.
- Check your IP Address to make sure that it is compatible with the Wireless AP.
Limited Warranty
TRENDware warrants its products against defects in material and workmanship, under normal use and service, for the following lengths of time from the date of purchase.
Wireless Products - 3 Years Warranty
If a product does not operate as warranted above during the applicable warranty period, TRENDware shall, at its option and expense, repair the defective product or part, deliver to customer an equivalent product or part to replace the defective item, or refund to customer the purchase price paid for the defective product. All products that are replaced will become the property of TRENDware. Replacement products may be new or reconditioned.
TRENDware shall not be responsible for any software, firmware, information, or memory data of customer contained in, stored on, or integrated with any products returned to TRENDware pursuant to any warranty.
There are no user serviceable parts inside the product. Do not remove or attempt to service the product by any unauthorized service center. This warranty is voided if (i) the product has been modified or repaired by any unauthorized service center, (ii) the product was subject to accident, abuse, or improper use (iii) the product was subject to conditions more severe than those specified in the manual.
Warranty service may be obtained by contacting TRENDware office within the applicable warranty period for a Return Material Authorization (RMA) number, accompanied by a copy of the dated proof of the purchase. Products returned to TRENDware must be pre-authorized by TRENDware with RMA number marked on the outside of the package, and sent prepaid, insured and packaged appropriately for safe shipment.
WARRANTIES EXCLUSIVE: IF THE TRENDWARE PRODUCT DOES NOT OPERATE AS WARRANTYED ABOVE, THE CUSTOMER'S SOLE REMEDY SHALL BE, AT TRENDWARE'S OPTION, REPAIR OR REPLACEMENT. THE FOREGOING WARRANTYES AND REMEDIES ARE EXCLUSIVE AND ARE IN LIEU OF ALL OTHER WARRANTYES, EXPRESSED OR IMPLIED, EITHER IN FACT OR BY OPERATION OF LAW, STATUTORY OR OTHERWISE, INCLUDING WARRANTYES OF MERCHANTABILITY AND FITNESS FOR A PARTICULAR PURPOSE. TRENDWARE NEITHER ASSUMES NOR AUTHORIZES ANY OTHER PERSON TO ASSUME FOR IT ANY OTHER LIABILITY IN CONNECTION WITH THE SALE, INSTALLATION MAINTENANCE OR USE OF TRENDWARE'S PRODUCTS.
TRENDWARE SHALL NOT BE LIABLE UNDER THIS WARRANTY IF ITS TESTING AND EXAMINATION DISCLOSE THAT THE ALGED DEFECT IN THE PRODUCT DOES NOT EXIST OR WAS CAUSED BY CUSTOMER'S OR ANY THIRD PERSON'S MISUSE, NEGLECT, IMPROPER INSTALLATION OR TESTING, UNAUTHORIZED ATTEMPTS TO REPAIR OR MODIFY, OR ANY OTHER CAUSE BEYOND THE RANGE OF THE INTENDED USE, OR BY ACCIDENT, FIRE, LIGHTNING, OR OTHER HAZARD.
LIMITATION OF LIABILITY: TO THE FULL EXTENT ALLOWED BY LAW TRENDWARE ALSO EXCULES FOR ITSELF AND ITS SUPPLIERS ANY LIABILITY, WHETHER BASED IN CONTRACT OR TORT (INCLUDING NEGLIGENCE), FOR INCIDENTAL, CONSEQUENTIAL, INDIRECT, SPECIAL, OR PUNITIVE DAMAGES OF ANY KIND, OR FOR LOSS OF REVENUE OR PROFITS, LOSS OF BUSINESS, LOSS OF INFORMATION OR DATE, OR OTHER FINANCIAL LOSS ASING OUT OF OR IN CONNECTION WITH THE SALE, INSTALLATION, MAINTENANCE, USE, PERFORMANCE, FAILURE, OR INTERRUPTION OF THE POSSIBILITY OF SUCH DAMAGES, AND LIMITS ITS LIABILITY TO REPAIR, REPLACEMENT, OR REFUND OF THE PURCHASE PRICE PAID, AT TRENDWARE'S OPTION. THIS DISCLAIMER OF LIABILITY FOR DAMAGES WILL NOT BE AFFECTED IF ANY REMEDY PROVIDED HEREIN SHALL FAIL OF ITS ESSENTIAL PURPOSE.
Governing Law: This Limited Warranty shall be governed by the laws of the state of California.
Technical Support
You can find the most recent driver/firmware/software and user documentations on the TRENDware website. TRENDware provides FREE technical support for all customers for the duration of the warranty period on this product.
TRENDware Technical Support
Tel: +1-310-626-6252
Fax: +1-310-626-6267
E-mail: support@trendware.com
www.TRENDnet.com
Monday ~ Friday, 7:30AM ~ 6:00PM Pacific Standard Time
(Except holidays)
TRENDnet TRENDware, USA What's Next in Networking
Product Warranty Registration
Please take a moment to register your product online. Go to TRENDware's website at http://www.TRENDNET.com
TRENDware International, Inc.
3135 Kashiwa Street
Torrance, CA 90505
http://www.TRENDNET.com
- TEW-412APBO
- TEW-413APBO
- USER'S GUIDE
- COPYRIGHT STATEMENT
- CONTENTS
- INTRODUCTION
- FOR TEW-412APBO
- FOR TEW-413APBO
- SAFETY NOTIFICATION
- AP DEFAULT SETTINGS
- WEB MANAGEMENT SETTINGS
- TURNS ON POWER SUPPLY
- START UP & LOGIN
- PRIMARY SETUP
- MAKE CORRECT NETWORK SETTINGS OF YOUR COMPUTER
- WIRELESS SETTINGS
- WEP
- IMPORTANT NOTICE
- WPA-PRESHARED KEY
- WPA RADIUS
- SYSTEM
- OPERATING MODE
- IMPORTANT
- REPEATER APPLICATION
- BRIDGE APPLICATION
- STATUS
- 4.5 TRAFFIC LOG
- 4.6 ACCESS CONTROL
- 4.7 ADVANCED WIRELESS
- AUTHENTICATION TYPE
- SNMP INFO
- UPGRADE FIRMWARE
- TROUBLESHOOTING
- BASIC FUNCTIONS
- CAUSE
- RESOLUTION
- LAN CONNECTION PROBLEMS I CAN'T ACCESS MY AP
- I CAN'T CONNECT TO OTHER COMPUTERS ON MY LAN
- WIRELESS TROUBLESHOOTING
- I CAN'T ACCESS THE WIRELESS AP FROM A WIRELESS NETWORK CARD
- LIMITED WARRANTY
- TECHNICAL SUPPORT
- TRENDNET TRENDWARE, USA WHAT'S NEXT IN NETWORKING
- PRODUCT WARRANTY REGISTRATION
Marque : TRENDNET
Modèle : TEW-413APBO
Catégorie : Point d'accès sans fil