
M4-P - Appareil photo argentique LEICA - Notice d'utilisation et mode d'emploi gratuit
Retrouvez gratuitement la notice de l'appareil M4-P LEICA au format PDF.

| Type de produit | Appareil photo télémétrique argentique 35 mm |
| Marque | Leica |
| Modèle | M4-P |
| Dimensions approximatives | 138 x 77 x 38 mm |
| Poids approximatif | 500 g (sans objectif) |
| Monture d'objectif | Monture Leica M à baïonnette |
| Viseur | Viseur télémétrique à cadre lumineux avec correction de parallaxe automatique |
| Cadres de champ | Automatiques pour 28 + 90 mm, 35 + 135 mm, 50 + 75 mm; sélecteur manuel |
| Télémètre | Couplé, mise au point par coïncidence ou double image |
| Obturateur | Plan focal à rideaux, vitesses de 1 s à 1/1000 s + pose B |
| Synchro flash | Prise M (flash à ampoule) et X (flash électronique); contact sur sabot accessoire |
| Armement et avancement du film | Levier d'armement rapide, avance manuelle |
| Compteur de vues | Automatique, remise à zéro manuelle |
| Alimentation | Mécanique, sans pile |
| Fonctions principales | Prise de vue argentique 35 mm, objectifs interchangeables, télémètre couplé, vitesses lentes et poses longues |
| Entretien et nettoyage | Dépoussiérage avec pinceau doux ou tissu microfibre; ne pas utiliser de produits chimiques |
| Sécurité | Ne pas exposer l'objectif au soleil (effet loupe); ranger à l'abri de l'humidité et de la poussière |
| Pièces détachées et réparabilité | Objectifs et accessoires Leica disponibles; service après-vente Leitz |
| Informations générales | Appareil légendaire de la gamme Leica M, fabriqué au Canada et en Allemagne |
FOIRE AUX QUESTIONS - M4-P LEICA
Questions des utilisateurs sur M4-P LEICA
0 question sur cet appareil. Repondez a celles que vous connaissez ou posez la votre.
Poser une nouvelle question sur cet appareil
Téléchargez la notice de votre Appareil photo argentique au format PDF gratuitement ! Retrouvez votre notice M4-P - LEICA et reprennez votre appareil électronique en main. Sur cette page sont publiés tous les documents nécessaires à l'utilisation de votre appareil M4-P de la marque LEICA.
MODE D'EMPLOI M4-P LEICA
INSTRUCTIONS

natural_image
Silhouette of a submarine on a red background (no text or symbols)LEICA M 4-P

110-142
a Engl.
You are the owner
of a LEICA®
We hope that you will obtain as much enjoyment from it as all the many LEICA fans in every country of the globe.
As a LEICA owner you have the benefit of a universal photographic system, which also covers the technical and scientific field. In its widest sense, it includes the well-known LEITZ enlargers and LEITZ miniature projectors. The projected image, huge, luminous, and realistic, reveals the full beauty of your colour photographs, and never fails to fascinate you and your friends. May your LEICA be a constant source of pleasure to you.
Yours sincerely
ERNST LEITZ WETZLAR GMBH
Contents
Page
Description of the LEICA M 4-2....4
Fitting the carrying strap....6
How to hold the LEICA....6
The bright-line measuring viewfinder .....8
The field-of-view selector ....10
The rangefinder....12
The rapid transport lever, release
button, and shutter speed dial....14
The depth-of-field scale....15
The distance scale. The aperture scale .....16
Taking out the lens. Inserting the lens.....17
Flash synchronization ....18
Flash table 19
Inserting the film....20
Removing the film ....21
Looking after your LEICA and its
lenses....22
Page
The LEICA system
The exposure meter....23
The interchangeable lenses....24
LEICA M 4-2 winder....25
VISOFLEX ^® . Focusing bellows .....26
Lens hoods. Cases 27
Enlargers 28
Projectors....29
LEITZ Service 30
LEICA Fotografie Magazine....30
LEITZ Information Service ....31
LEICA School 31

1 Automatic frame counter
2 Shutter release button
3 Rapid transport lever
4 Film rewind release
5 Shutter speed dial
6 Rangefinder window
7 Lens bayonet lock
8 Red locating knob for lens insertion
9 Accessory shoe with flash contact
10 Depth-of-field scale
11 Distance scale
12 Aperture scale
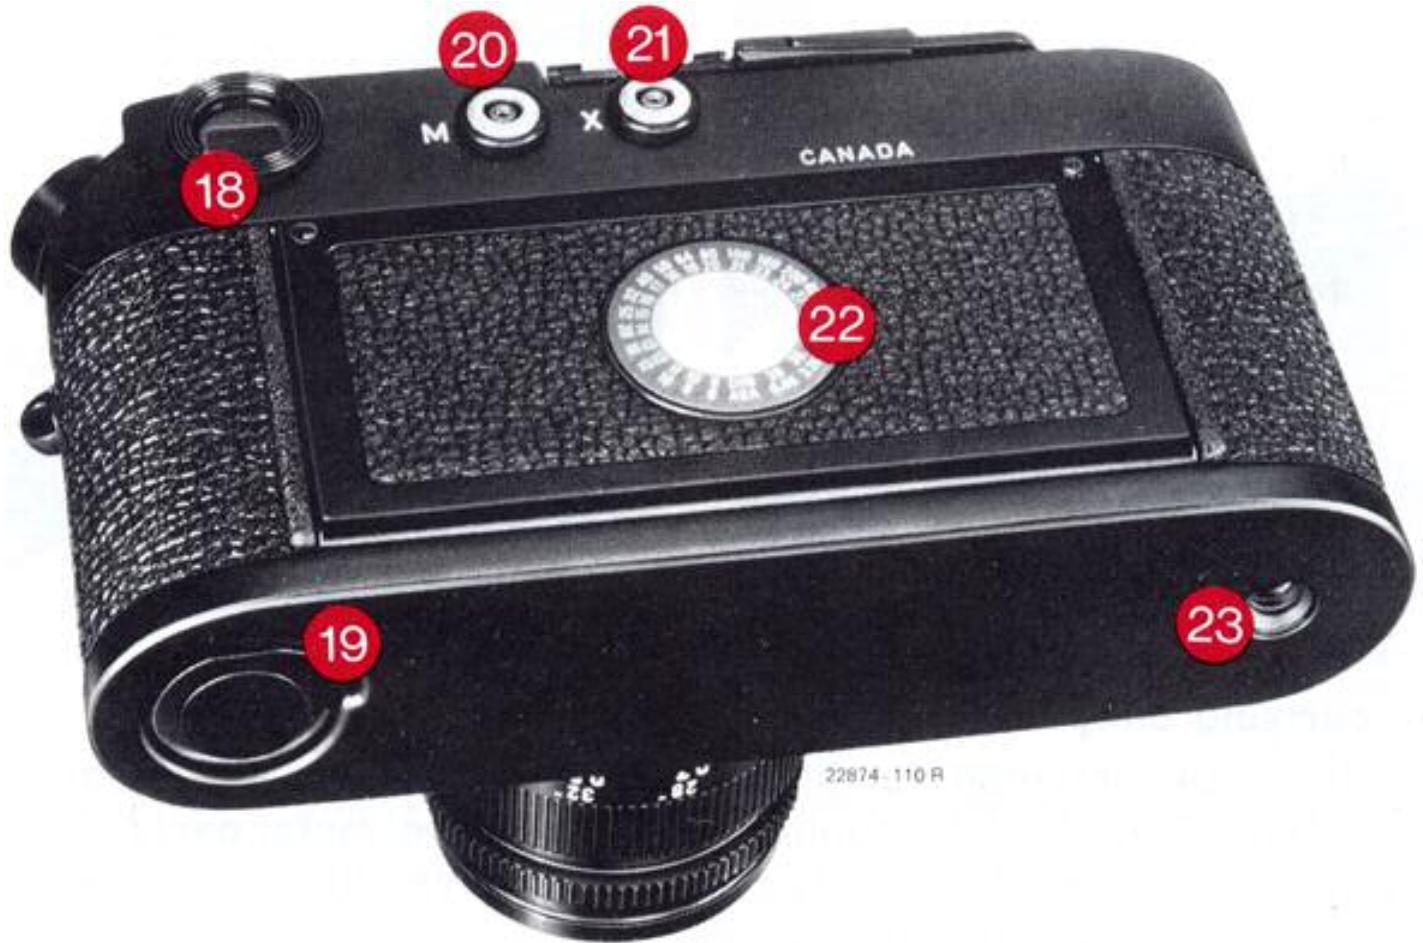
13 Window illuminating the bright-line frames
14 Field-of-view selector
15 Viewfinder field window
16 Folding rewind crank
17 Carrying-strap eyelets
18 Measuring-viewfinder eyepiece
19 Baseplate lock
20 Contact bush for flashbulbs
21 Contact bush for electronic flash units
22 Film indicator (takes ball-pen writing) with DIN/ASA comparison scale
23 Tripod thread A ^1/4 ( ^1/4 )
Not For Resale – Free Download at http://homepage.ntlworld.com/joechan/manuals
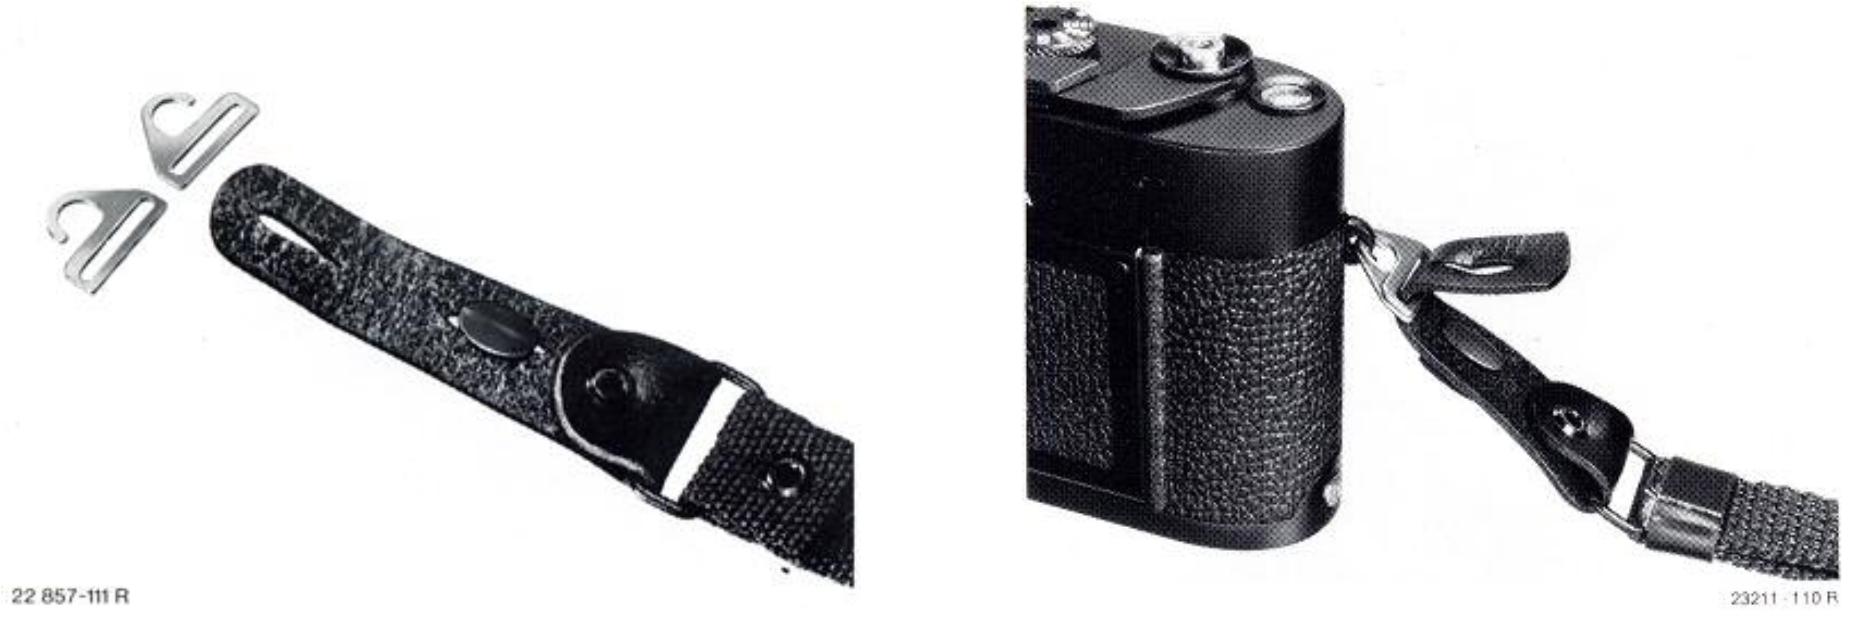
Fitting the carrying strap
The eyelets (17) are provided for fitting the carrying strap. Release the double d-back length of leather from the round part of the shackle, push off both metal parts and hook them in the eyelets of the camera in opposite directions.
Thread the leather holders through the slots in the metal parts and secure them with the round part of the shackle.
natural_image
Black-and-white photo of a man holding a vintage camera, no visible text or symbols on the device or backgroundRet.-Nr. L 24780-110

natural_image
Black-and-white photo of a person adjusting a vintage camera lens, no visible text or symbolsRet.-Nr. L 24779-110
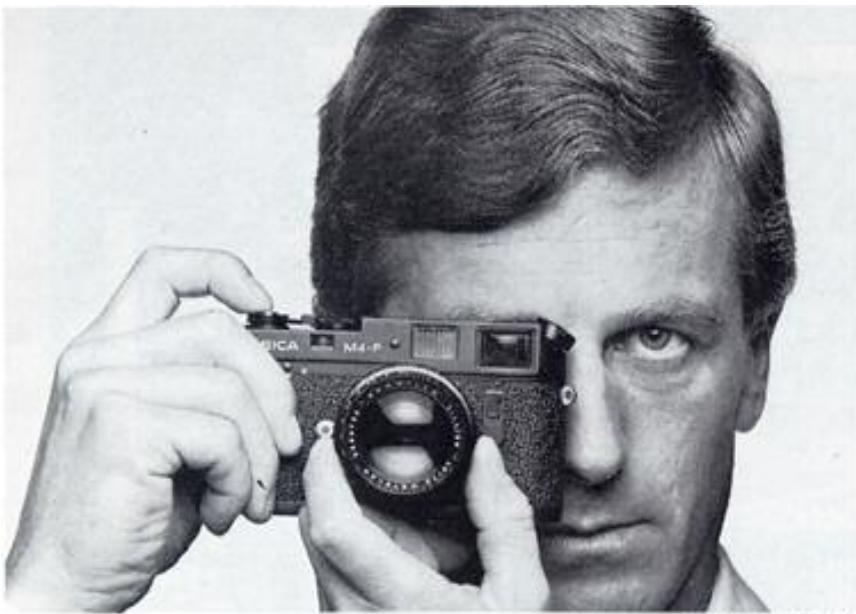
How to hold the LEICA
For steady three-point support hold your camera with your right hand, your index finger resting on the release button, your thumb on the rapid-transport lever. The left hand either supports the lens from below, ready for quick refocusing, or it grasps the camera. In addition press the camera against your forehead.
For upright views all you have to do is to rotate the camera through 90^ . The position of your hands is the same as for horizontal views.
You can also rotate the camera in the opposite direction, then you must use your thumb to release the shutter.
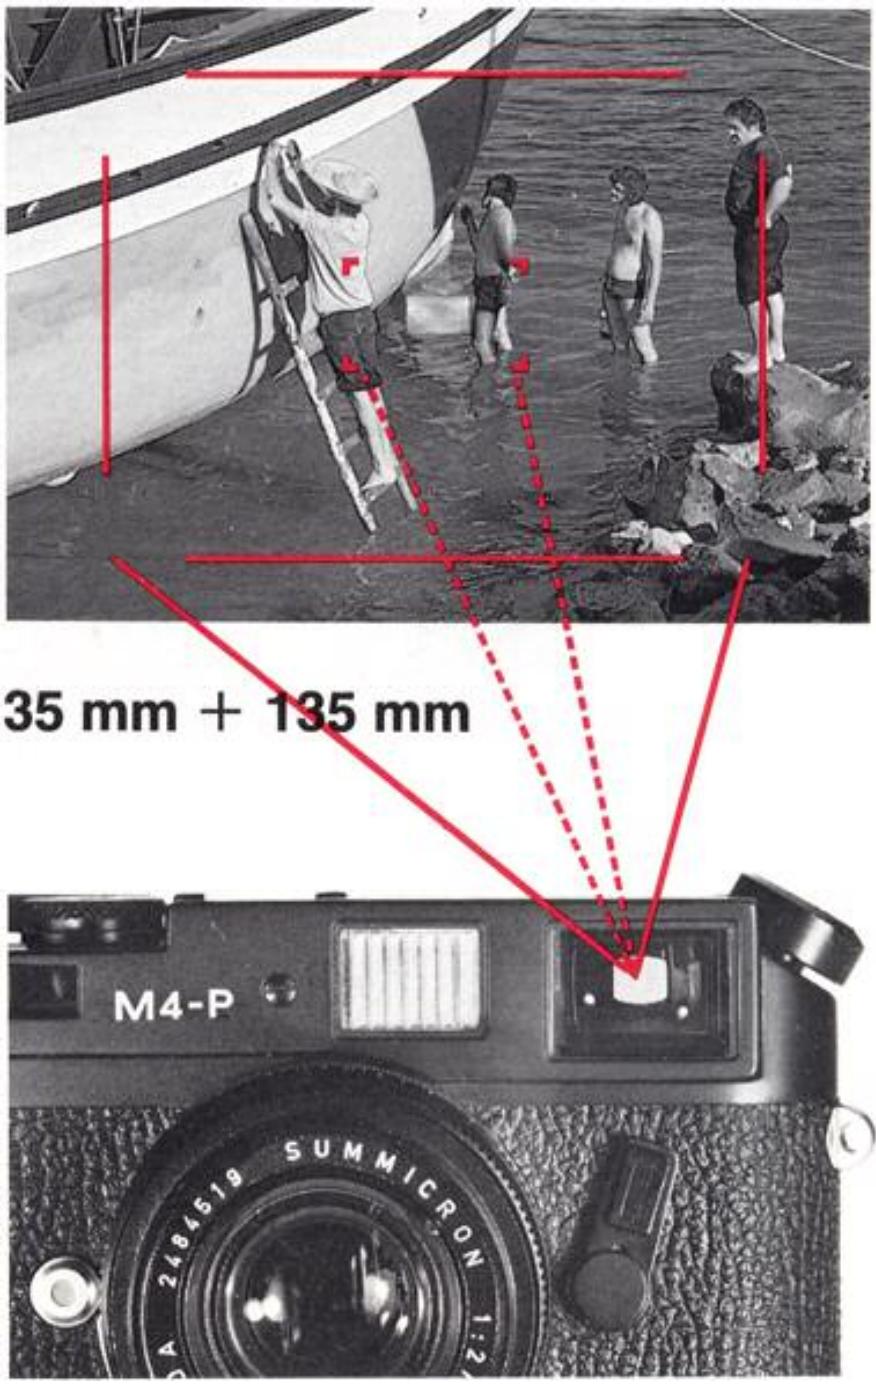
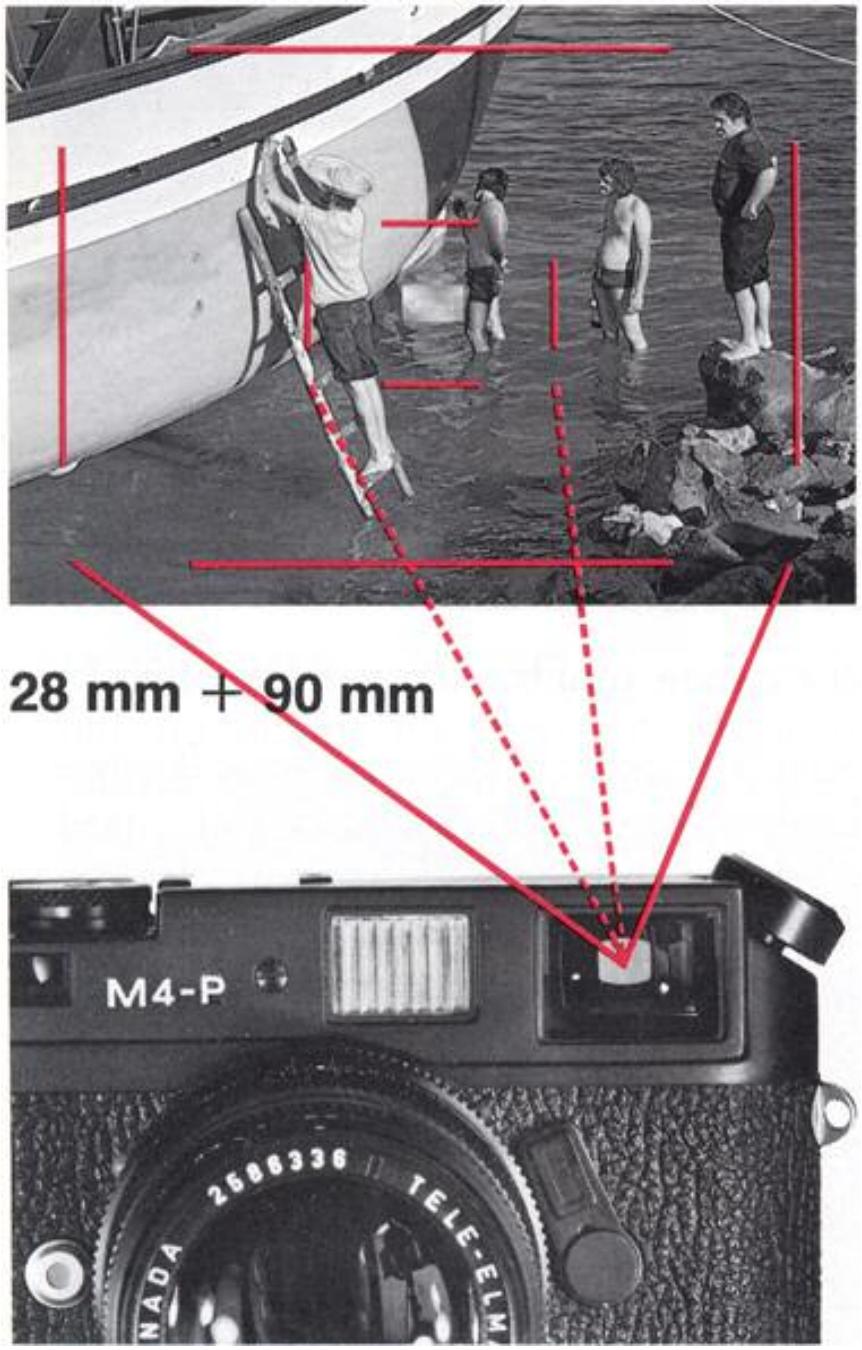
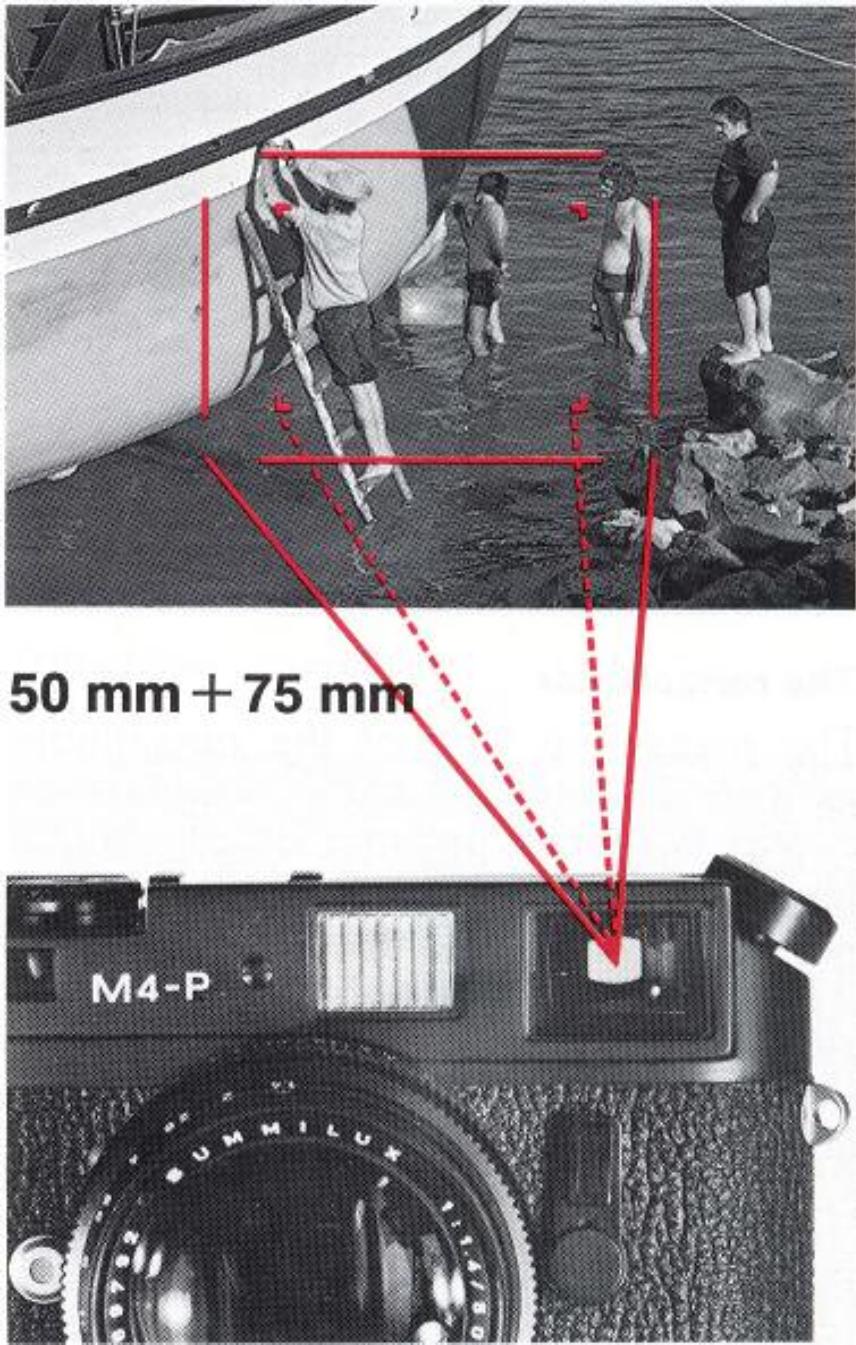
The bright-line measuring viewfinder
The bright-line measuring viewfinder of the LEICA M4-P has been designed to combine the functions of a coupled rangefinder and of a viewfinder of outstanding quality. Whatever you see within the bright frame will appear on your exposed film. The bright-line frame is coupled with the range-finder so that the parallax - the difference between the lens axis and the viewfinder axis - is automatically compensated.
The measuring field, brighter than the surrounding field, is located in the centre of the viewfinder field. All the lenses of
21-135mm focal length are coupled with the rangefinder on insertion in the LEICA. When lenses of 28 (from serial No. 2314921), 35, 50, 75, 90 and 135 mm focal length are inserted, the appropriate bright-line frames will automatically appear in the viewfinder image in the combinations 28 + 90mm, 35 + 135mm, and 50 + 75mm.
Not For Resale – Free Download at http://homepage.ntlworld.com/joechan/manuals
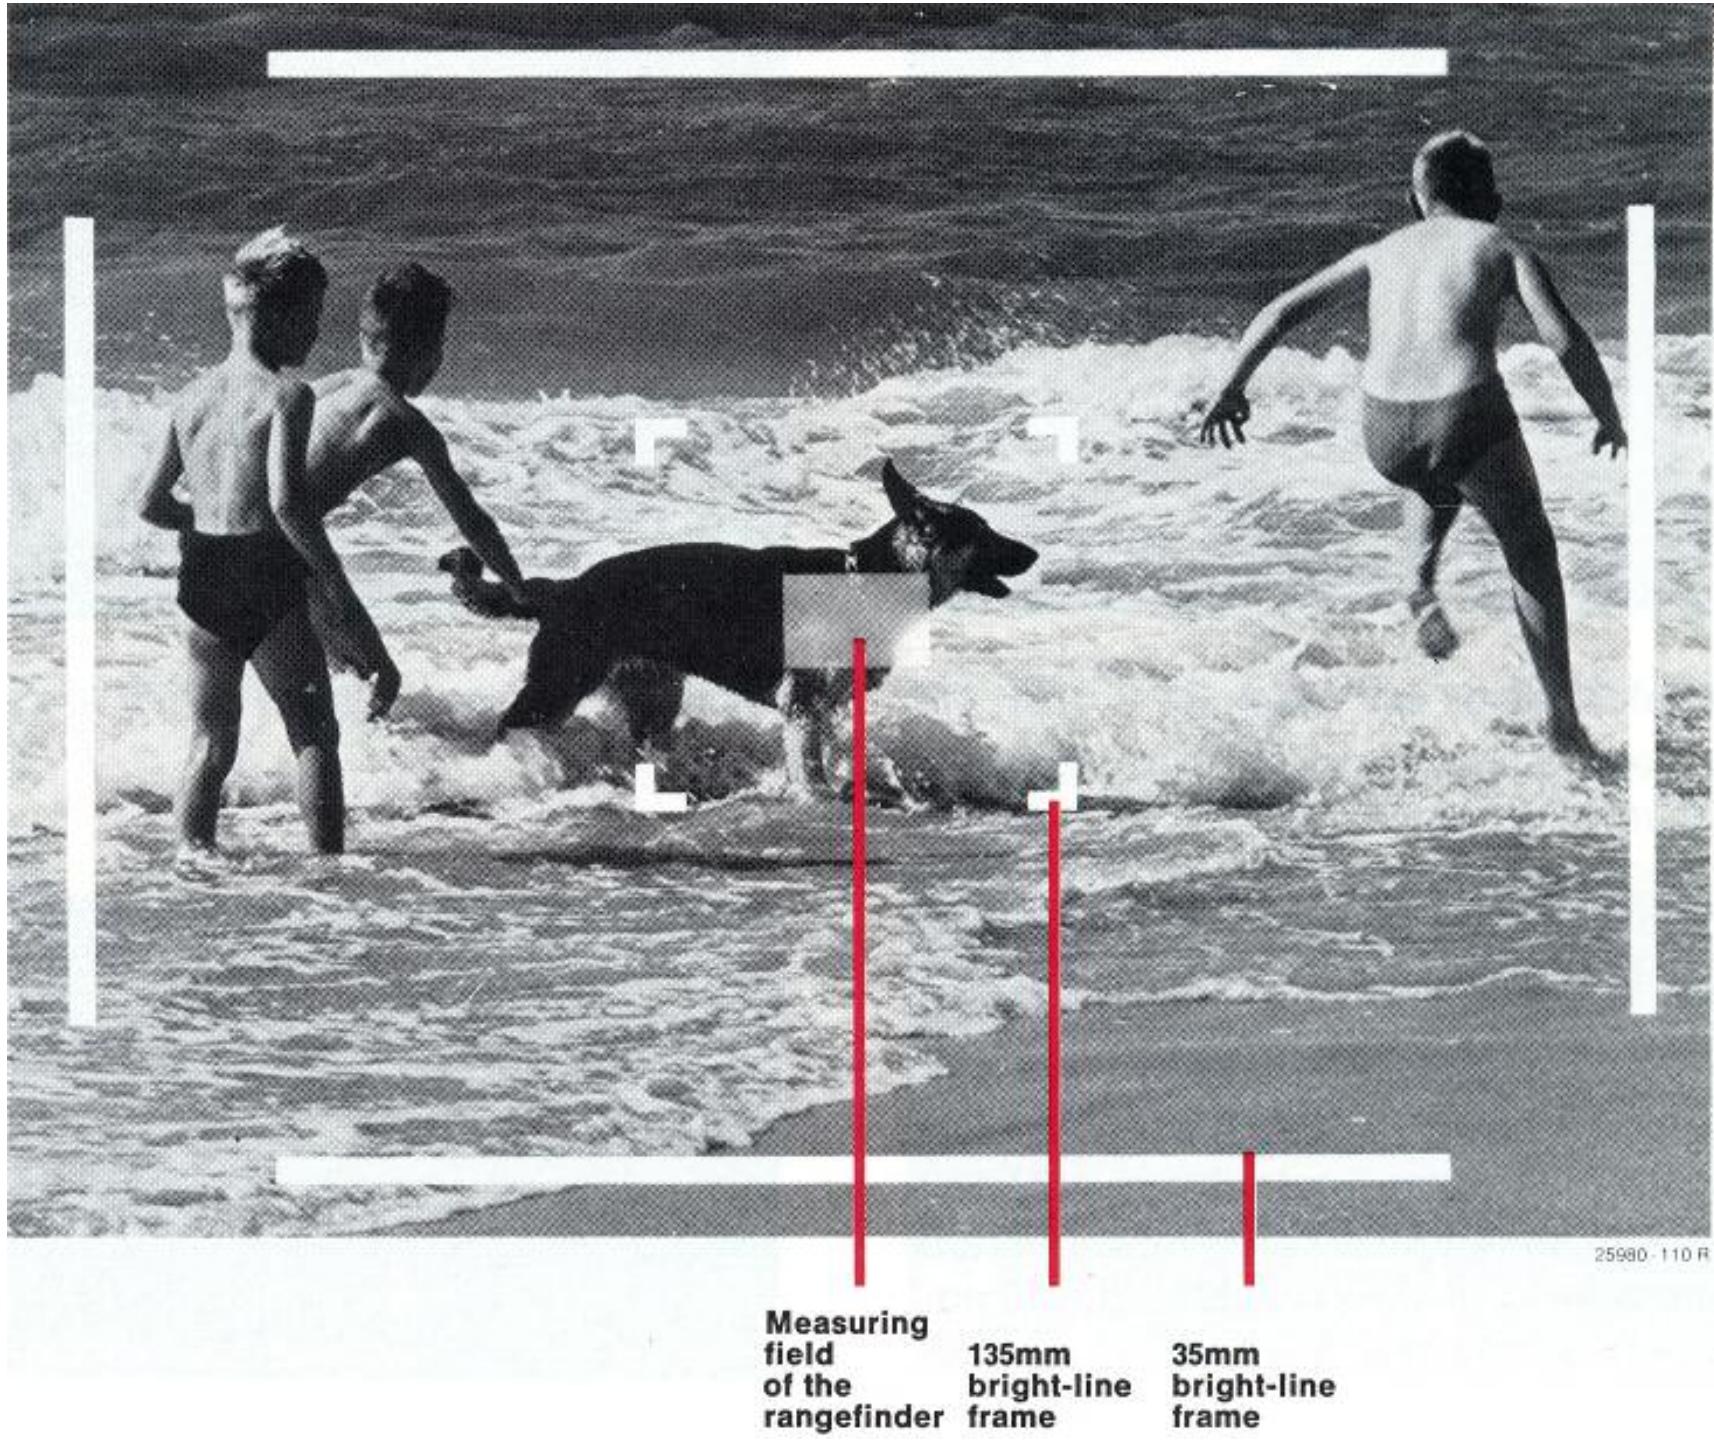
The field-of-view selector
The field-of-view selector (14) functions as a universal viewfinder; it enables the LEICA owner at any time to reflect into the viewfinder field the frames outlining the fields-of-view other than that of the lens that happens to be in the camera. Lever outward: field-of-view frames for 35 and 135mm focal lengths. Lever inward: field-of-view frame for the 28 and 90 mm focal lengths. Lever in the middle position: field-of-view frame for the 50 and 75 mm focal lengths.
Not For Resale – Free Download at http://homepage.ntlworld.com/joechan/manuals
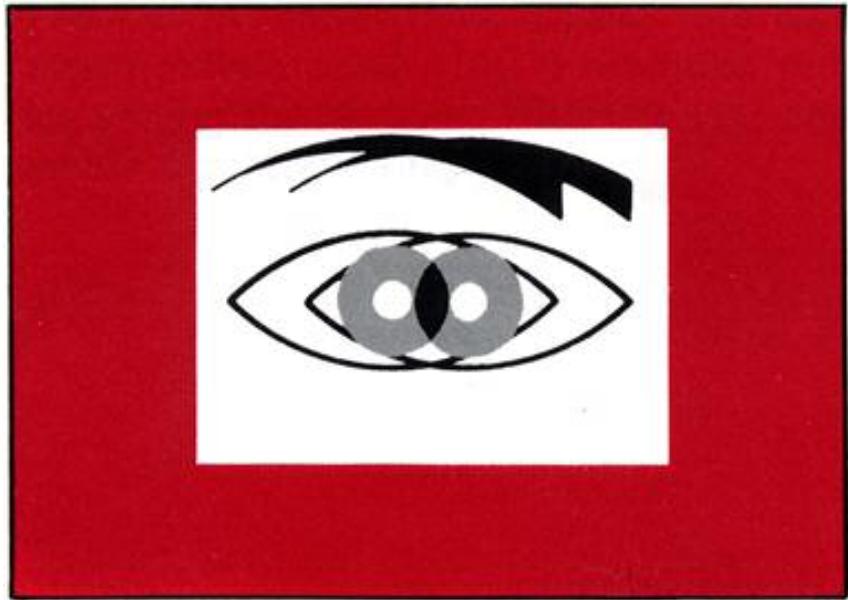
The rangefinder
The measuring field of the rangefinder appears in the centre of the viewfinder as a bright, sharply outlined oblong. If you block the large field window (15) of the viewfinder, only the reflected bright-line frame and the measuring field remain visible. Focusing can be carried out according to the coincidence or to the split-image method.
Coincidence (double image) focusing: in portraiture, for instance, focus on the highlight in the sitter's eye. Observe the subject through the viewfinder and rotate the lens until the double contours in the measuring field coincide.
Split-image focusing: Sight an edge or any other clearcut line; if you find that this line is offset sideways as it enters the measuring field, rotate the lens until the line becomes continuous as it passes from the viewfinder- into the measuring field and out again. This method is to be preferred because of its superior accuracy.
Not For Resale – Free Download at http://homepage.ntlworld.com/joechan/manuals
natural_image
Stylized illustration of a human eye with black outline and gray inner circles, set against red background (no text or symbols)Double image = unsharp

natural_image
Abstract geometric composition with red background, white rectangle, black vertical stripe, and gray horizontal band (no text or symbols)Offset line = unsharp

natural_image
Simple black-and-white eye symbol inside a white rectangle with red border (no text or symbols)Coincident image = sharp

natural_image
Abstract geometric composition with red and white rectangles separated by a black vertical line (no text or symbols)Continuous line = sharp
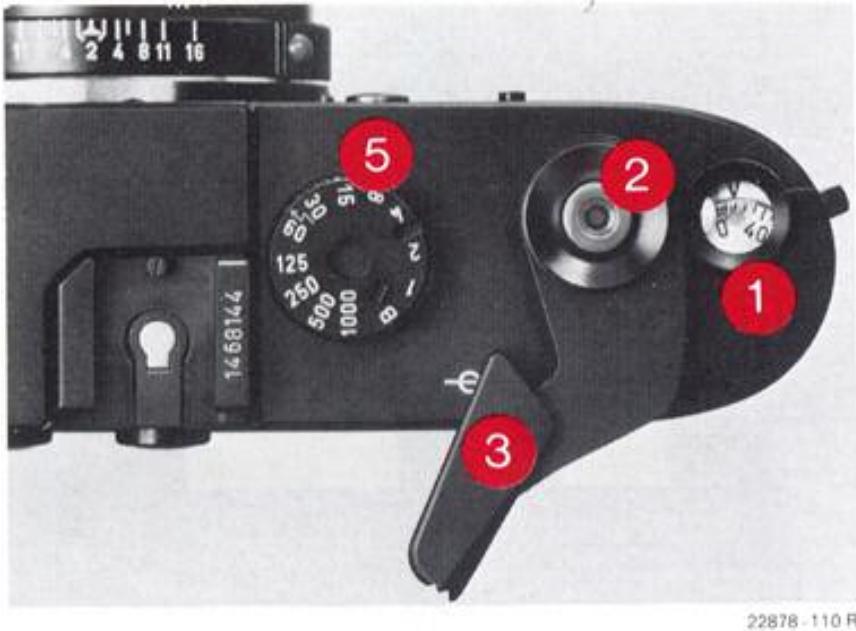
The rapid winding lever (3) at each full lever movement transports the film through one frame, winds the shutter and advances the frame counter to the next number. The film can also be transported by several short strokes of the transport lever. ( = film plane indication).
The release button (2) has a thread for a cable release (Code No. 14067). It should be pressed smoothly, without a jerk, until its soft click indicates that the shutter is released.
The shutter speed dial (5) controls the shutter speed and can be set either before or after the shutter is wound. It clicks home at every engraved speed value and except for the range between 8 and 15 any intermediate speeds can be set and are fully effective. At the "B" setting the shutter remains open as long as the release button is pressed. The dial must be set at the symbol = 150 sec. when electronic flash is used.
The LEICA lenses have a fixed ring with depth-of-field scale (10), a rotatable ring for setting the focusing distance (11) and an iris diaphragm ring (12).
The distance scale
The distance scale (11) indicates the distance on which the lens is set, and, in connection with the depth-of-field scale (10), the extent of the depth of field. The distance is also important to the calculation of the guide number during the use of flash equipment.
The aperture scale
The aperture scale is internationally laid
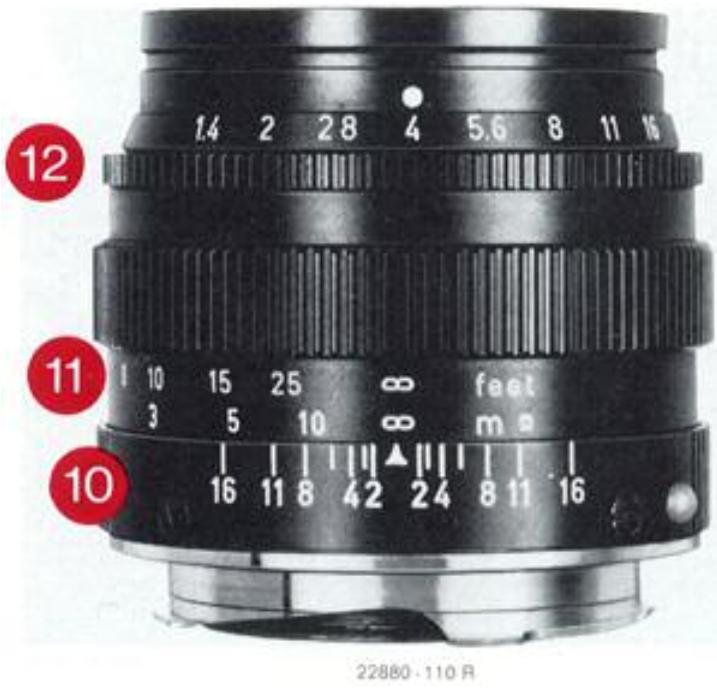
down; the values have been chosen so that the quantity of light reaching the film is halved every time the lens is stopped down one step. One aperture step is equivalent to one step on the shutter speed dial (5) regarding the adjustment of the light quantity to which the film is exposed. Like the shutter speed dial, the lens diaphragm ring clicks into position opposite each number (some diaphragm rings also at half values). This will enable you, after some practice, to identify the setting of the diaphragm even in the dark.
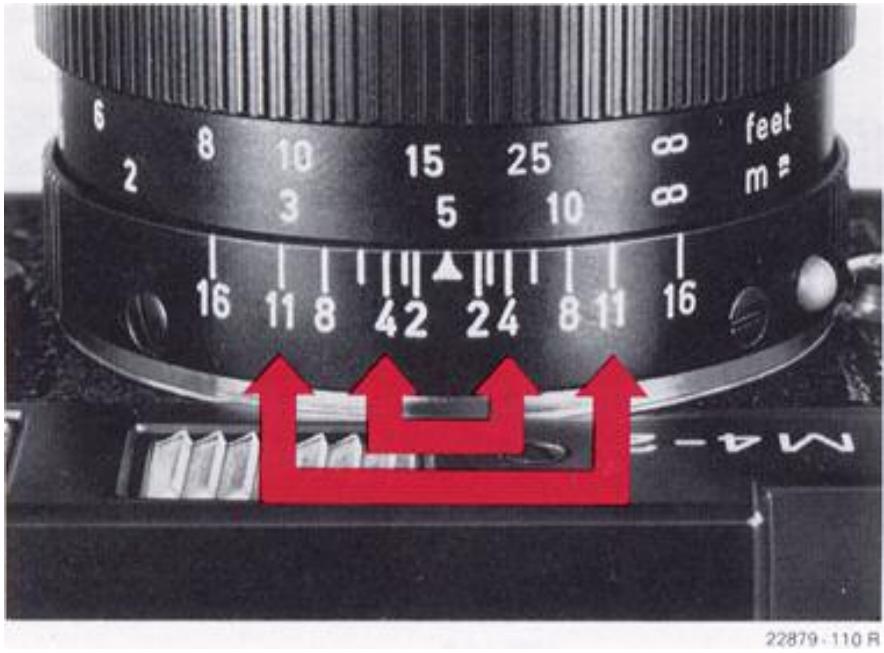
The depth-of-field scale
The lens reproduces at maximum sharpness the plane, parallel to the film, on which it is focused. This maximum sharpness falls off gradually towards the front and rear; within a certain depth, then, the subject will appear sharp. This depth of field depends on the camera distance, the focal length of the lens, and the lens stop set. Stopping down the lens increases, opening it up decreases the depth of field.
The depth-of-field scale indicates the depth-of-field zone for the object distance on which the lens is focused.
With the 50mm SUMMICRON® f/2 focused on 5m (16ft, Sin), sharpness at f/4 extends from 4m to about 8m (13ft. 4in to about 26ft. Sin). However, if you stop down to f/11 at the same focusing distance, sharpness will extend from 3m to about 20m (10ft. to about 67ft.).
natural_image
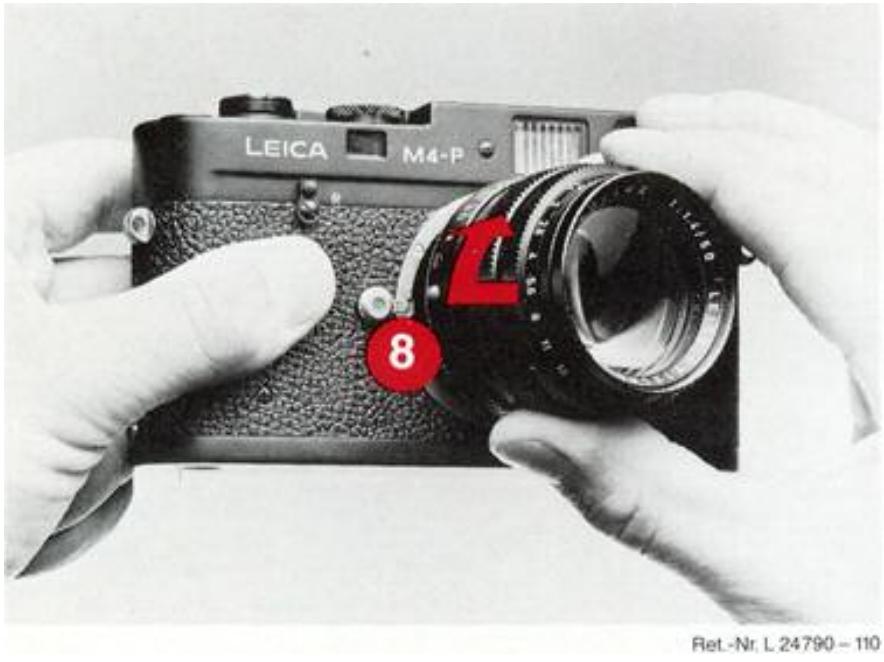
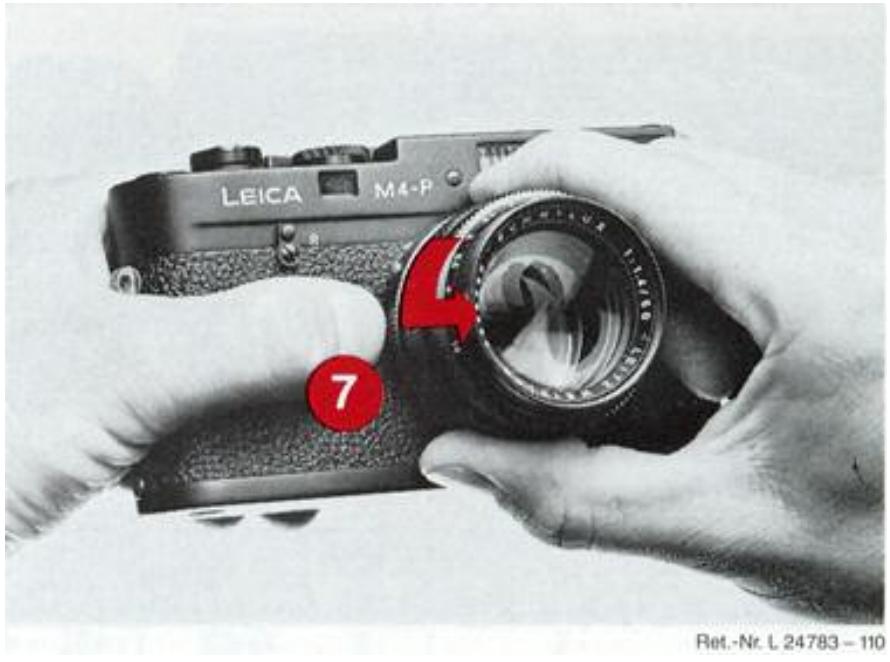
Close-up of hands holding a black LEICA M4-P camera with a red number 8 tag, no visible text or symbols on the device itself.Inserting the lens
The red knob on the lens mount (8) must face the red dot on the camera body. After a short turn to the right the lens will engage in the bayonet mount with a click. Change lenses in the shade (e.g. of your own body).
Remove the lens cap before you take pictures.
natural_image
Close-up of hands holding a Leica M4-P camera with red adjustment knob (no visible text or symbols on device)Taking out the lens
Grip the rear, fixed ring (10) of the lens. Depress arresting button (7), rotate the lens to the left and take it out.

22881-110R
Flash synchronization
The LEICA M 4-P accepts all flash units on the market with standard flash plugs (coaxial plug) or with accessory-shoe contact.
The bushes for the cable connection of flash units are arranged on the back of the camera. Flashbulbs are connected to the left-hand bush (20) marked "M", and electronic flash units on the right-hand bush marked "X" (21).
Flash units and adapters without cable connection can be connected through the "X" flash contact in the accessory shoe (9).
Flash cubes and certain types of flash-bulb are fired through the X contact bush. The table on the right offers information about the various possibilities. Three flash units may be used simultaneously through the 3 flash connections.
Flash table
| Electronic flash | X | B → ∉ (=1/50) | |
| Flashbulbs | AG 1Flash CubesAG 3M 2 | X | B → 1/30 |
| XM 1PF 1XM 5PF 5 | M | B → 1/60 | |
| M 3 | M | B → 1/125 | |
| GE 525 | M | B → 1/500 | |
| X = Contact or accessory shoeelectronic flashM = Contact for flashbulbs | |||
natural_image
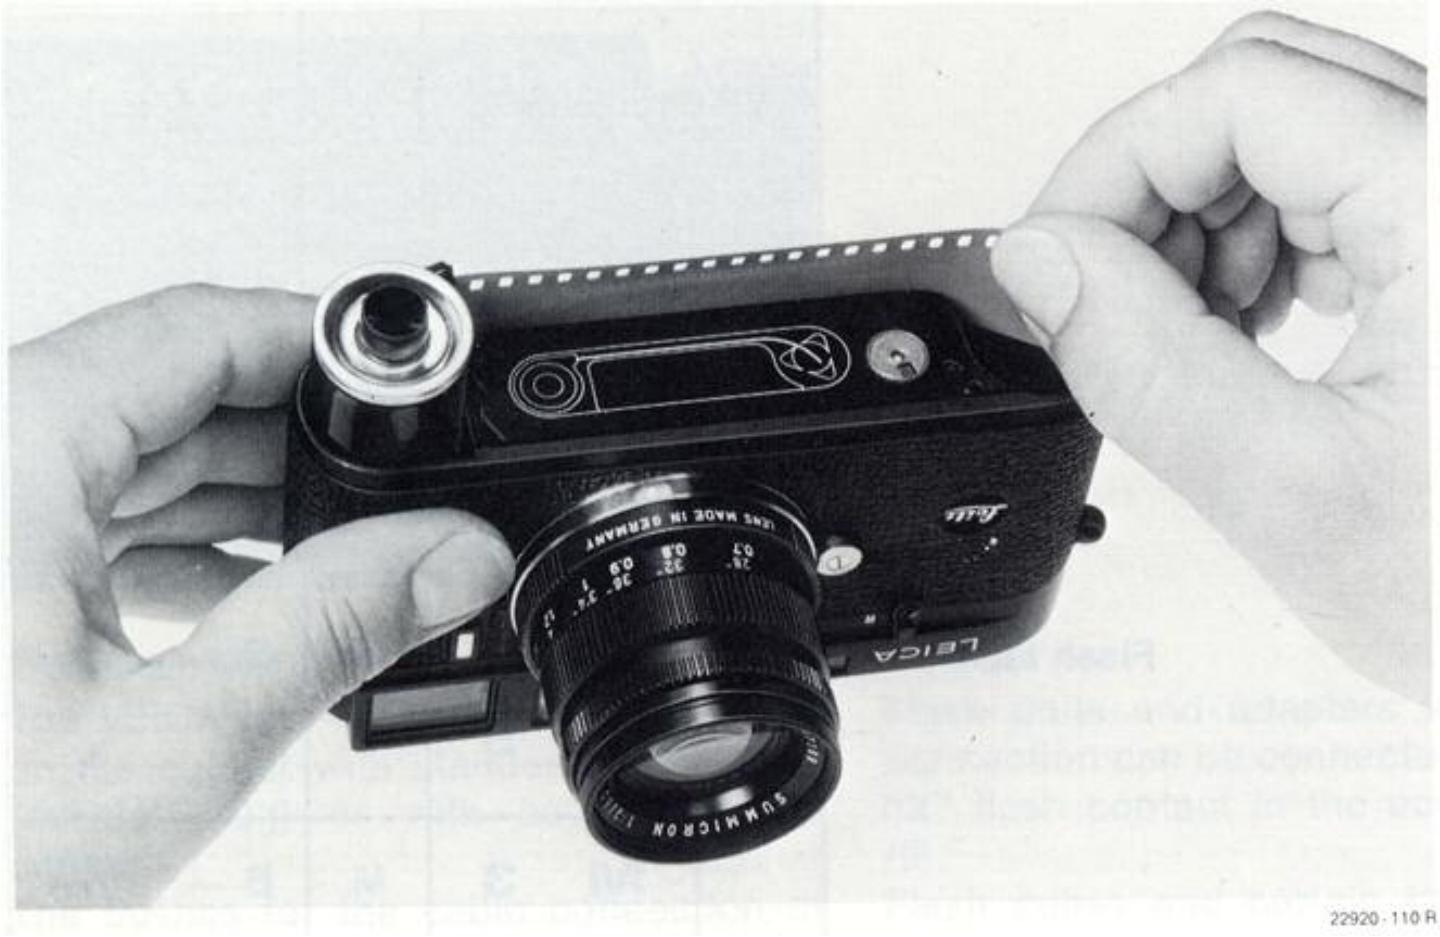
Close-up of hands adjusting a black LiDGA digital camera with lens and control panel (no visible text or symbols on the device itself)Inserting the film
First make sure, by turning the rewind crank (16) in the direction of the arrow, that the camera is empty. If you feel any resistance, proceed as described on the following page.
Take the camera in your left hand, base- plate facing you. Pull out the toggle in the baseplate (19), turn it to the left, and re- move the baseplate. The film lead must be trimmed like that of all films sold in cartridges.
Take the cartridge or cassette in your right hand and insert it about halfway into the space provided for it in the camera, grip the film lead, and pull it into the take-up spool*. Push film cartridge and lead into the camera with the palm of your hand. Hinge the baseplate on to the lug at the side of the camera, close it, and lock it by means of the toggle (19). The baseplate is designed so that after it is fixed on the camera it adjusts the film in its correct position. Transport the film through two frames and release the shutter. Tension the film after the second shutter-wind by rotating the rewind crank (16). The film is transported correctly if the rewind crank (16) turns against the direction of the arrow during film transport. After the third shutter-wind the automatic frame counter (1) points at 1 and the camera is ready for action.
* Only at temperatures below freezing must the film be inserted in the LEICA according to the diagrammatic representation, i.e. the film lead must be caught by only one slot of the take-up spool; any portion protruding through the second slot beyond the take-up spool is liable to break off at low temperatures. In normal conditions the film lead can be threaded through the take-up spool until it touches the wall of the housing.
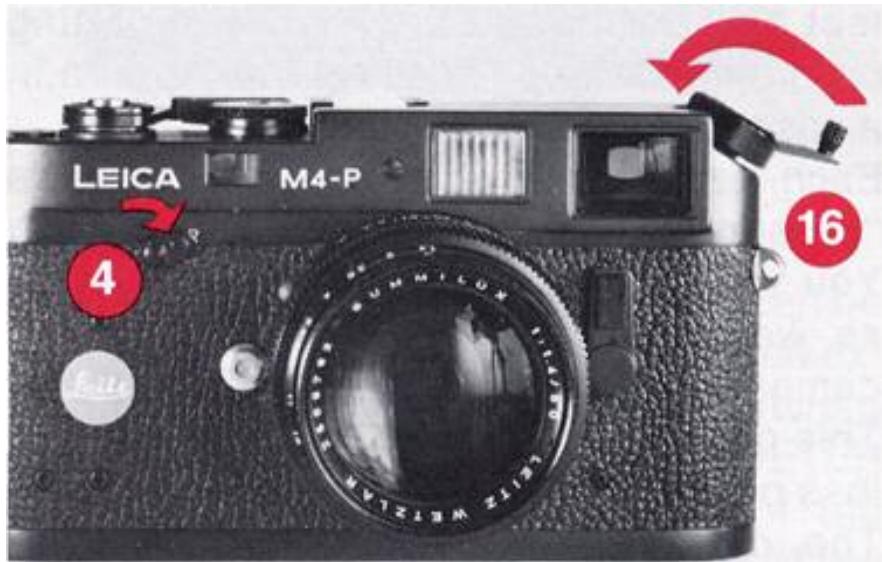
Removing the film
After the exposure of the last frame the rapid transport lever (3) can no longer be moved. The film must now be rewound. Move the lever (4) to "R". Unfold the rewind crank (16) and rotate it in the direction of the arrow until the film is wound back into the cassette. Open baseplate and remove the film cassette.
Ret.-Nr. L 24788-110
If the film is not securely attached to the cartridge spool, e.g. when bulk film is used, the film is liable to tear off, when it will have to be removed from the take-up spool.
Remove the baseplate of the camera in a completely dark room. Hold the camera with the open bottom facing downwards. Actuate the rapid transport lever slowly several times until the film protrudes from the camera far enough to be gripped by hand and taken out. If necessary, tap the camera against your hand slightly to assist this movement.
Looking after your LEICA and its lenses
LEICA lenses act like burning glasses if the LEICA lies with the lens face upwards in full sunlight. You must therefore protect the housing and the shutter by putting on the lens cap or keeping the camera in a case, or in the shade.
Each lens has, in addition to its type, its "personal" serial number engraved on it. You should make a note of this number as well as of the serial number of the camera engraved on the top of the LEICA. This can be very helpful indeed in case of loss or theft.
The coating of LEICA lenses, together with the use of special UV-absorbing cement, achieves effective exclusion of ultraviolet light. This ensures consequently that all lenses possess the same colour-transmitting properties, irrespective of focal length. The external anti-reflection coatings are wipe-resistant.
Dust should be removed with a soft sable brush, a piece of cotton cloth (e.g. a hand-kerchief) washed several times, or lens tissue. Special cleaning cloths, such as are used for the cleaning of spectacles, are not recommended, as they are chemically impregnated and might attack the lens surface (glass used for spectacles has a composition different from that of optical glass for high-quality lenses).
A colourless UVa filter can be left permanently on the lens, where it will protect the front element from external influences, e.g. of sand or sea water spray on the beach.
The lens hood, too, protects the lens from accidental finger marks and raindrops. Protect your precious lenses with the appropriate lens caps.
The LEICA system
natural_image
Black LEICA M4-P camera with visible lens and control panel (no text or symbols on body)Ret.-Nr. L 24782-110
Exposure meter
The LEICAMETER® exposure meter can be coupled with the LEICA M 4-P for aimed exposure measurement. The clearly outlined measuring field of the LEICAMETER corresponds to the picture area of the 90mm LEICA lenses. Independently of the lens in the camera it can be reflected into the field of view with the field-of-view selector (14) at anytime.
natural_image
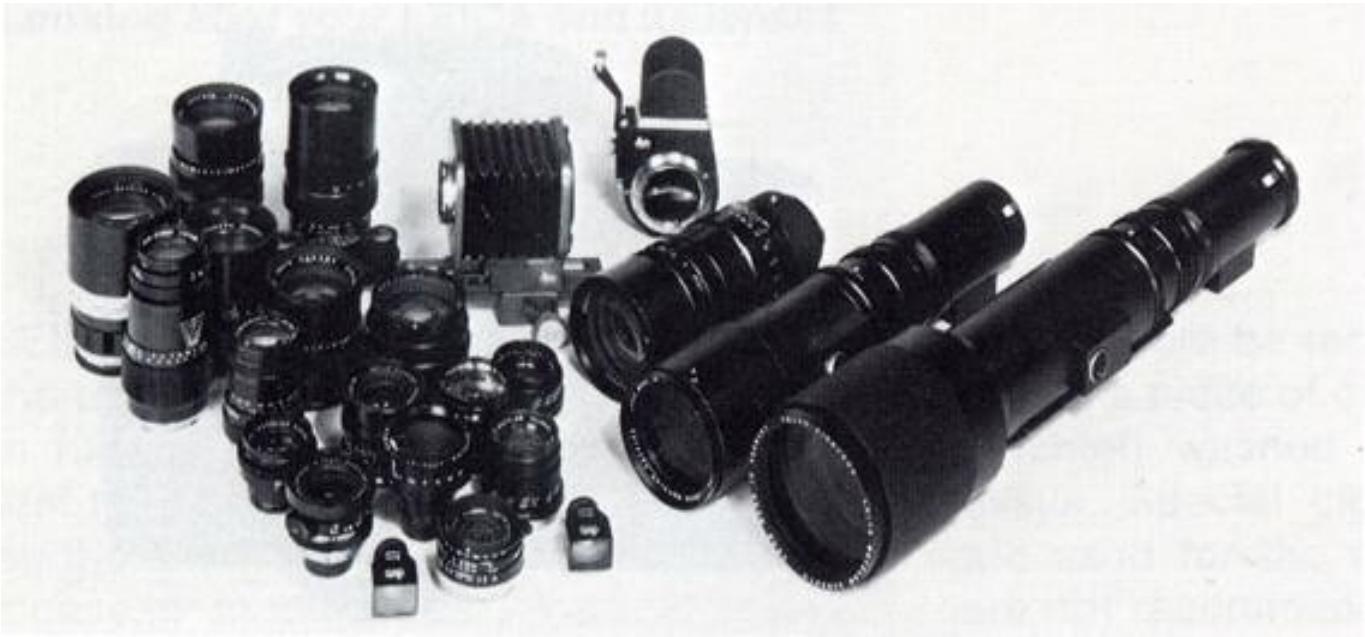
Collection of various black-and-white cameras and optical components, including lenses, a camera, and a lens (no visible text or labels)23014·110H
Interchangeable lenses
Besides the lenses of 28 to 135 mm focal lengths the LEICA owner has a whole range of interchangeable lenses of shorter and longer focal lengths at his command.
The optical units of the 135 mm lenses can be unscrewed and used for ground-glass screen focusing with the VISOFLEX 3 and on the Focusing Bellows 2.
natural_image
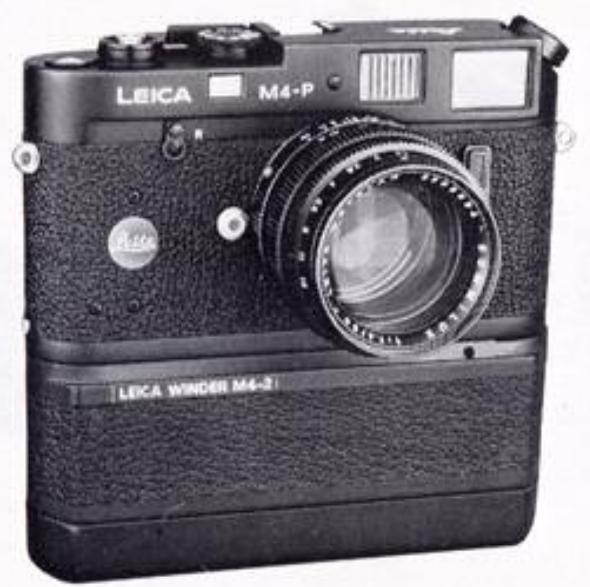
Black LEICA M4-P and LEICA WINDER M4-2 digital camera with lens (no visible text or symbols beyond branding)Ret.-Nr. 24614-110
The LEICA-Winder
A winder for automatic shutter-wind and film transport for single frames of up to 3 fps can be connected to the LEICA M 4-P. It is attached to the bottom of the camera housing in place of the baseplate. The winder is suitable for all shutter speeds from
1 to ^1/_1000 sec including B. When the winder is disconnected or the batteries are exhausted the film and the shutter can also be wound manually. Remote control via the cable release bush.
natural_image
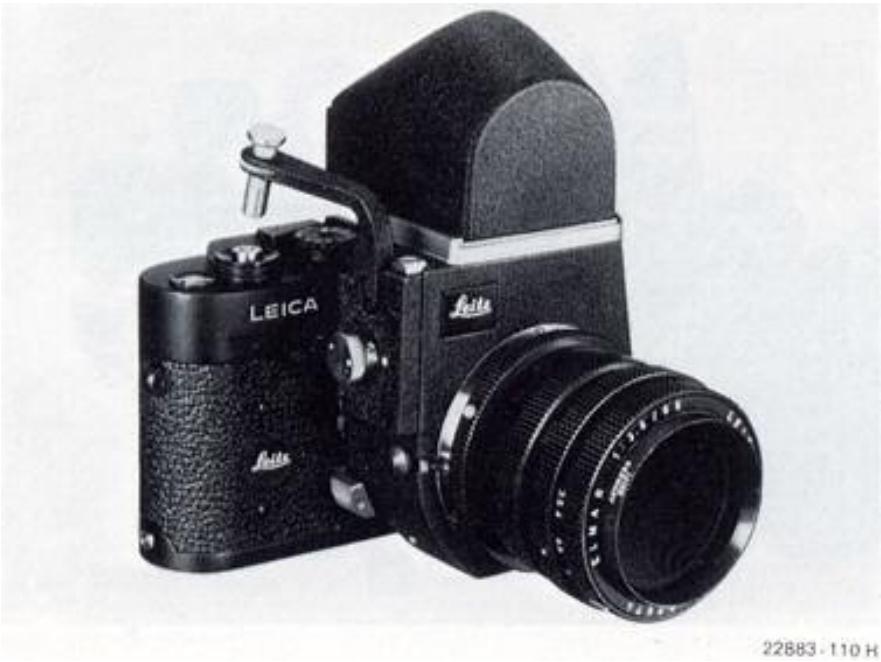
Black LEICA F-160 camera with external lens and control panel (no visible text or symbols on body)VISOFLEX
The long-focal-length telephoto lenses of 200mm focal length and more, the 65mm ELMAR® f/3.5, and the optical units of the 135 mm lenses are used in conjunction with the groundglass screen of the VISOFLEX® attachment. Here as in macro-photography a groundglass screen offers genuine advantages.
Further details are contained in our list 160—3.
natural_image
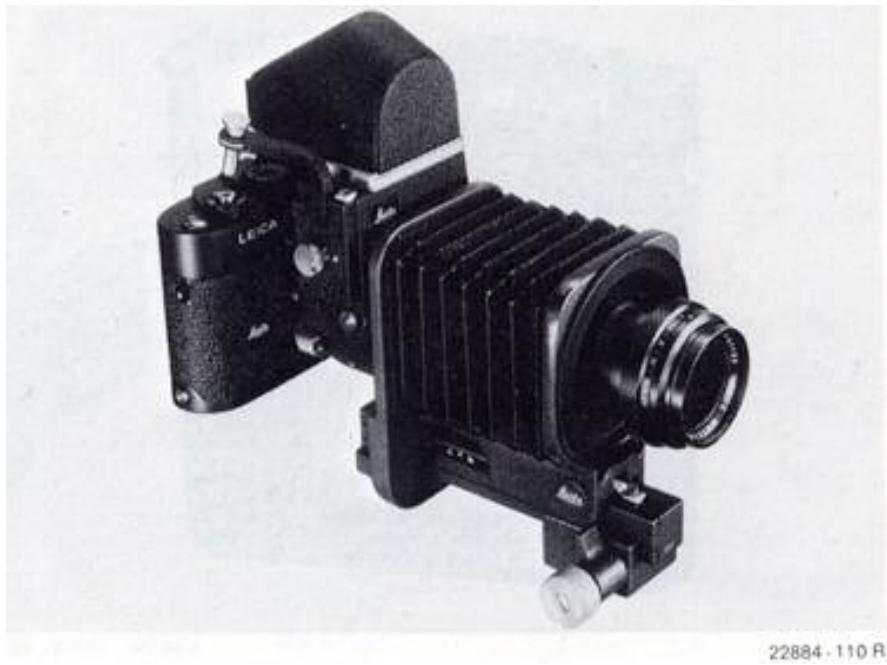
Black LEICA vintage camera with visible lens and mounting bracket (no text or symbols on body)The focusing bellows
The Focusing Bellows II permits the use of almost all the LEICA lenses. High magnifications are possible with the 35 and 50mm lenses, with the 90mm lenses the reproduction range from 30 to 1:1, and with the 135 mm lenses the continuous focusing range from o" to 1:1,5 is obtained.
Our list No. 160—1 contains further information.
natural_image
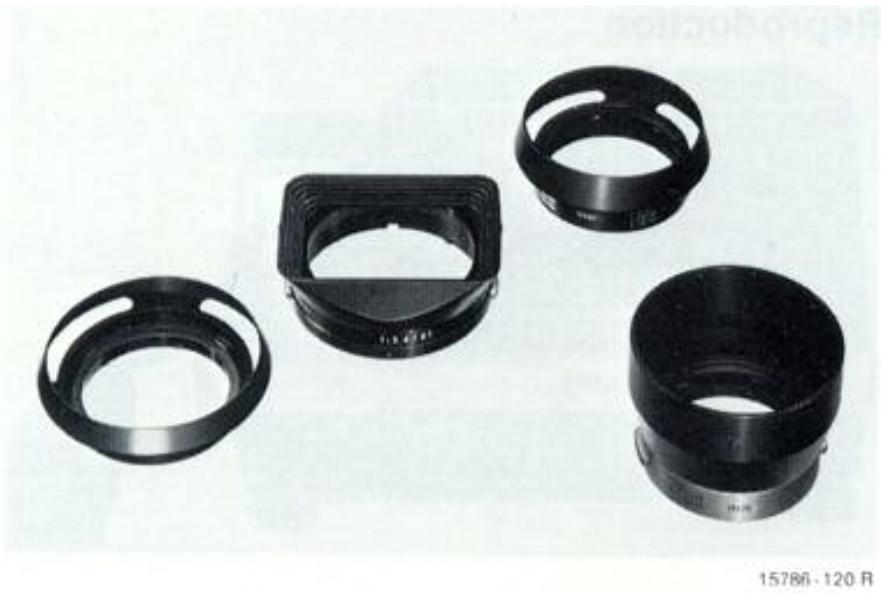
Five black plastic mechanical components arranged in a fan-like pattern (no text or symbols visible)Lens hoods
Various lens hoods of functional design are available for the range of LEICA lenses. Some of them can be reversed on the lens. To the long-focal-length lenses the lens hoods are permanently attached and can be extended like a telescope. The lens should never be used without a lens hood, which offers effective protection against stray light and flare, as well as against rain drops and finger marks.
Camera cases
For the LEICA with standard lens the ever-ready case (Code No. 14546) is recommended. In addition, combination cases are available for extensive photographic outfits.
Reproduction
natural_image
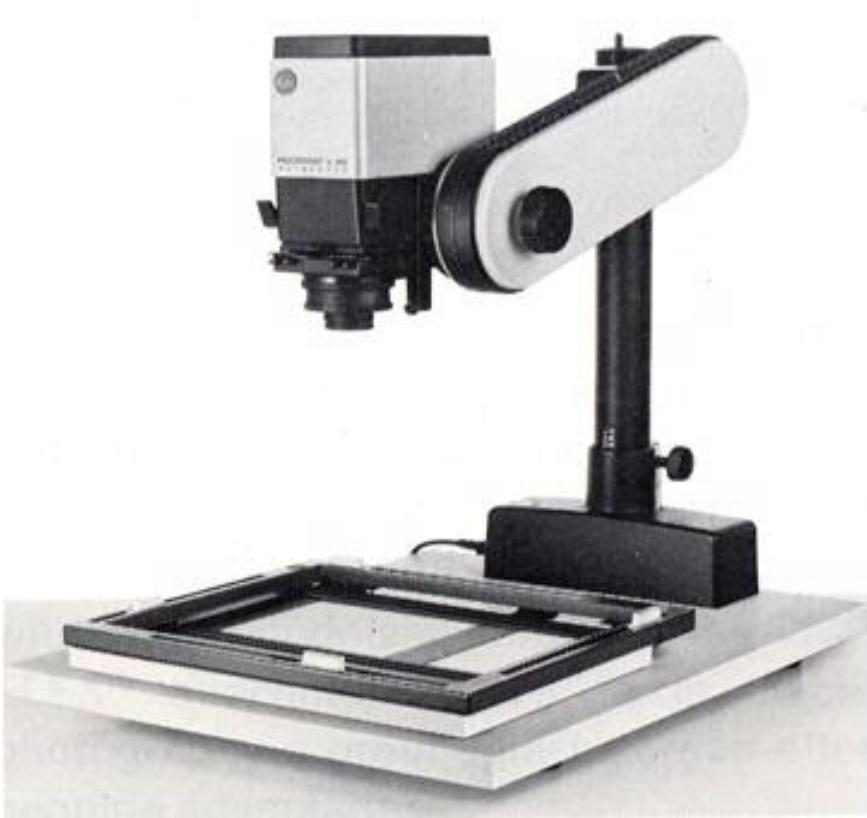
Laboratory optical instrument with mounted lenses and baseplate (no visible text or symbols)Enlargers
A high-quality camera such as the LEICA calls for an enlarger of matching performance if this quality is not to be wasted. LEITZ have offer two well-tried top-quality models with automatic focusing, the 35mm-only FOCOMAT® V 35 enlarger for the 35mm format only, and the FOCOMAT lie accommodating all film formats from 12x 17mm to 6 x 9cm.
For detailed information please consult our Lists No. 170-019 and 170-015.
natural_image
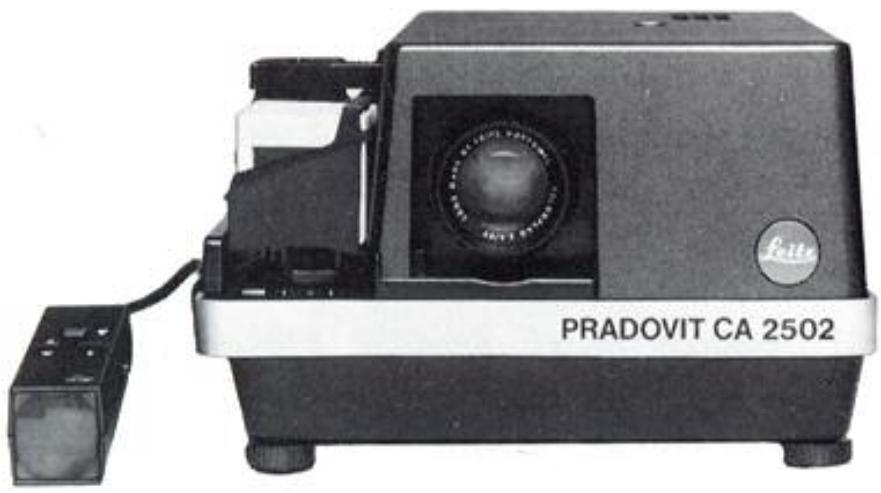
Exterior view of a Pradovit CA 2502 projector with visible lens and control panel (no text or symbols on device body)Projectors
A large selection of projectors is available depending on the user's preference and purposes. They are extremely convenient to operate and can be adapted to a versatile range of uses. The most outstanding common characteristic of all LEITZ projectors is their unsurpassed optical performance coupled with traditional LEITZ precision. Please ask for descriptive literature.
LEITZ Service
In cases of damage our After-Sales Service is at your disposal.
Address:
Ernst Leitz Wetzlar GmbH Technical Service Department P.O.B. 2027 D-6330 Wetzlar Germany
or your national LEITZ Agency.
Each LEICA camera is accompanied by a list of the LEITZ Agencies. Cases of damage are settled according to the International LEITZ Guarantee.
Read "LEICA FOTOGRAFIE"
Enclosed with every LEICA is a free voucher for sample copies of "LEICA FOTOGRAFIE", the topical magazine of 35mm technique, available in German, English, and French. Please forward the completed voucher direct to:
LEICA FOTOGRAFIE Umschau Verlag Stuttgarter Strasse 18—24 D-6000 Frankfurt/Main Germany
The LEITZ Information Service
The LEITZ Information Service is available from 8 to 12 a. m. and 1 to 4 p. m. from Monday to Friday, telephone (06441) 292436, and will answer all questions connected with 35mm photography, projection, enlarging techniques and binoculars. Letters should be addressed to:
ERNST LEITZ WETZLAR GMBH
Information Service
P.O. Box 2020
D-6330 Wetzlar
Germany
The LEICA School
The LEICA School is part of the service given by Leitz. It was established to meet the wishes of many committed photo-graphers to receive a thorough further grounding in the fields of photography, projection, and enlarging.
The courses offer the members a comprehensive photographic programme and many suggestions, items of information, and pieces of practical advice. Further information and booking forms obtainable from
ERNST LEITZ WETZLAR GMBH
LEICA-School
P.O. Box 2020
D-6330 Wetzlar
Germany

Leitz means Precision.
Worldwide.
Read LEICA-Fotografie, the up-to-date journal on 35mm technique.
® = Registered Trademark
Design subject to alterations without notice.
ERNST LEITZ WETZLAR GMBH
D-6330 Wetzlar Tel.: (0 64 41) 29-0 Telex: 4 83 849 leiz d
Subsidiaries: Ernst Leitz (Canada) Ltd., Midland, Ont.
Leitz-Portugal S. A. R. L., Vila Nova de Famalicão
- INSTRUCTIONS
- You are the owner
- of a LEICA®
- Contents
- Page
- The LEICA system
- Fitting the carrying strap
- How to hold the LEICA
- The bright-line measuring viewfinder
- The field-of-view selector
- The rangefinder
- The distance scale
- The aperture scale
- The depth-of-field scale
- Inserting the lens
- Taking out the lens
- Flash synchronization
- Inserting the film
- Removing the film
- Looking after your LEICA and its lenses
- Exposure meter
- Interchangeable lenses
- The LEICA-Winder
- VISOFLEX
- The focusing bellows
- Lens hoods
- Camera cases
- Reproduction
- Enlargers
- Projectors
- LEITZ Service
- Read "LEICA FOTOGRAFIE"
- The LEITZ Information Service
- ERNST LEITZ WETZLAR GMBH
- The LEICA School
Marque : LEICA
Modèle : M4-P
Catégorie : Appareil photo argentique