
XPC 1G - Autoradio SCOTT - Notice d'utilisation et mode d'emploi gratuit
Retrouvez gratuitement la notice de l'appareil XPC 1G SCOTT au format PDF.
| Type de produit | Autoradio |
| Marque | SCOTT |
| Modèle | XPC 1G |
| Dimensions (L x P x H) | 178 x 175 x 50 mm |
| Alimentation électrique | 11-16 V DC, <10 A |
| Puissance de sortie | 4 x 40 W max |
| Impédance de charge | 4-8 ohms |
| Formats audio supportés | CD audio, MP3, WMA, OGG |
| Mémoire interne | 1 Go flash |
| Supports de stockage externes | USB, SD/MMC |
| Tuner FM | 87.5-108 MHz, 18 présélections |
| Tuner AM/MW | 522-1620 kHz, 12 présélections |
| Système anti-choc | CD 8s, MP3 100s, WMA 300s |
| DSP (processeur sonore numérique) | 5 modes (Classique, Rock, Pop, Plat, etc.) |
| Fonction RDS | TA, AF, PTY, EON |
| Enregistrement | Sur mémoire flash, USB ou SD |
| Connectique | Sorties ligne, entrée AUX, antenne |
| Panneau avant | Amovible |
| Nettoyage | Chiffon doux et sec (pas d'alcool) |
| Sécurité | Utiliser fusible de même calibre, ne pas exposer à l'humidité |
| Installation | Horizontale, angle inférieur à 30° |
FOIRE AUX QUESTIONS - XPC 1G SCOTT
Questions des utilisateurs sur XPC 1G SCOTT
0 question sur cet appareil. Repondez a celles que vous connaissez ou posez la votre.
Poser une nouvelle question sur cet appareil
Téléchargez la notice de votre Autoradio au format PDF gratuitement ! Retrouvez votre notice XPC 1G - SCOTT et reprennez votre appareil électronique en main. Sur cette page sont publiés tous les documents nécessaires à l'utilisation de votre appareil XPC 1G de la marque SCOTT.
MODE D'EMPLOI XPC 1G SCOTT
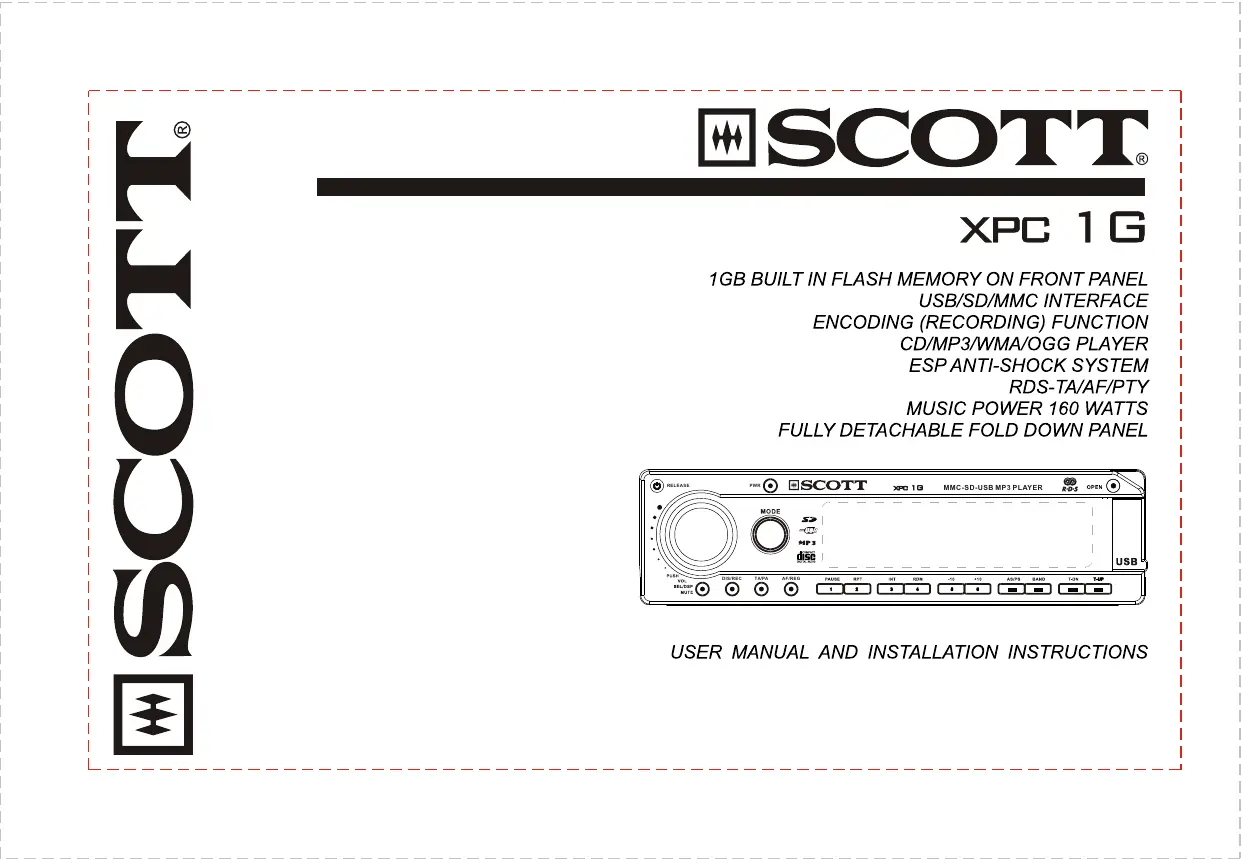
SCOTT®
XPC 1G
1GB BUILT IN FLASH MEMORY ON FRONT PANEL
USB/SD/MMC INTERFACE
ENCODING (RECORDING) FUNCTION
CD/MP3/WMA/OGG PLAYER
ESP ANTI-SHOCK SYSTEM
RDS-TA/AF/PTY
MUSIC POWER 160 WATTS
FULLY DETACHABLE FOLD DOWN PANEL
text_image
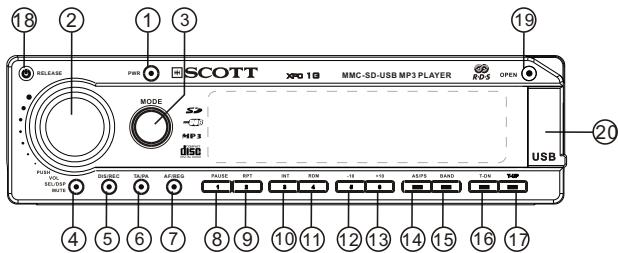
RELEASE PWR SCOTT XPO 1G MMC-SD-USB MP3 PLAYER RDS OPEN MODE S2 MP3 DISD PWR VOL SEL/OSI MUTI DIS/REC TA/PA AF/REG PA/UE RPT INT ROM -10 +10 AS/PS BAND T.ON TMP USBUSER MANUAL AND INSTALLATION INSTRUCTIONS
PRECAUTION
This unit is designed and manufactured with the user's safety in mind, however any improper use or operation may result in a certain dangers. It is therefore highly recommended to read this manual thoroughly and adhere to the following precautions.
SAFETY PRECAUTIONS
To prevent an electrical shock, do not open the housing of the unit.
In any case of malfunctioning, only have the unit serviced by an approved and qualified service centre.
Do not expose to any water or to a very humid environment. Do not operate the unit when your hands are wet. as this may cause a short circuit.
For safe driving, keep the volume low in order to concentrate on traffic conditions.
Do not clean the unit with alcohol, only clean with a soft dry cloth.
If the unit has been kept at a high temperature or in a high humidity environment, cool down the car interior before turning on the unit.
Do not use the unit for a long time without running the vehicle engine, it may drain the battery and the engine's vehicle may not be able to start
Before final installation in the dashboard opening, connect the wiring and make sure the unit is working properly.
Only use parts provided with the unit to ensure proper installation.
Do not route wiring in places that the heat my melt the wiring insulation
When replacing the fuse, be sure to use only the same fuse rating
PRECAUTION
OPERATION PRECAUTIOINS
Do not operate the player with scratched, bent or broken discs When a disc is not loaded properly, do not force it into the disc loader.
✿ Never insert any other objects into the disc loader like a coin or pin, etc as this It may cause
|☆ damage or a short circuit.
Do not use different disc formats other than 8 cm or 12 cm round discs.
Please dispose of used batteries according to the regulations in your country.
If the unit is disconnected to the battery, it will lose memorized data.
If the source disc has poor sound quality due to scratches, dirt or abad recording, the playback sound quality may be poor.
● Some Models of USB storage devices or MP3 player may not be played
● Technical characteristics are for illustrative purposes only may be changed without prior notice.
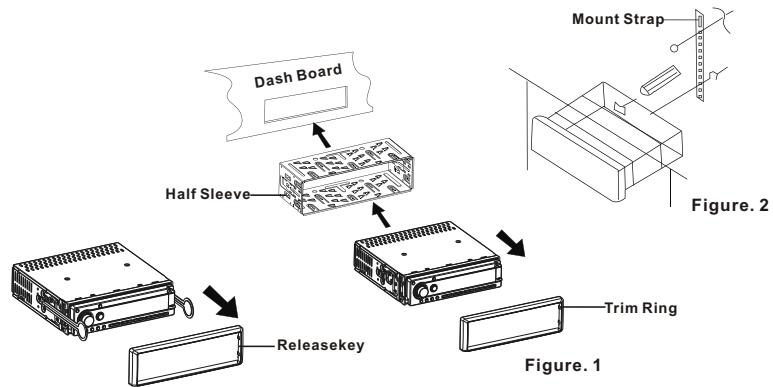
INSTALLATION (installation/remova)
NOTE : Unit should be installed horizontally at an angle of less than 30^
(1) Installation (Figure 1)
Insert Half Sleeve into the dashboard opening and bend the mount tabs to fix it
If necessary, place the mount strap at the rear of the unit and fix it with the washer provided as shown in figure 2.
✿ Push the unit into the Half Sleeve until you hear a click sound
Place Trim Ring over the unit to complete installation
(Some vehicles may not need a Trim Ring)
(2) Remova (Figure 3)
Remove Trim Ring and insert Release Keys into left and right side-end holes as shown figure 3 and pull the unit out of the dash-board.
flowchart
graph TD
    A["Dash Board"] --> B["Half Sleeve"]
    B --> C["Releasekey"]
    C --> D["Trim Ring"]
    D --> E["Figure. 1"]
    D --> F["Figure. 2"]
Figure. 3
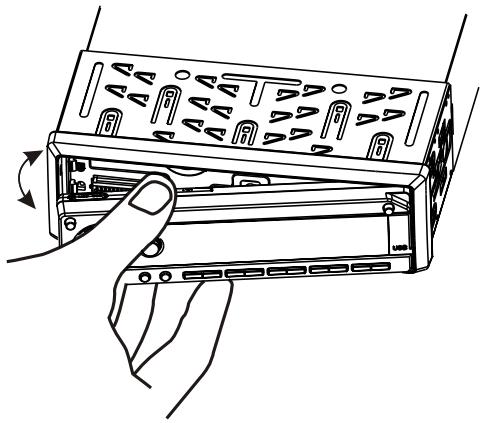
DETACHING & ATTACHING THE FRONT PANEL
Detaching the Front Panel
✿ Press THE RELEASE button to detach the front panel. (It is highly recommended to keep the front panel in the carrying case provided)
Attaching the Front Panel
First Insert the right side of the front panel as shown in the figure below and gently push the left side of the front panel onto the unit unit you hear a 'click' sound, which confirms that the front panel is firmly attached
natural_image
Line drawing of hands inserting a device into a rack (no text or symbols)CONTROL PANEL
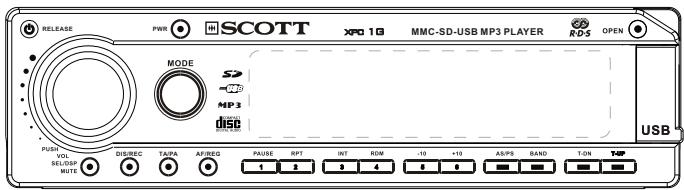
text_image
RELEASE PART SCOTT XP0 19 MMC-SD-USB MP3 PLAYER ROS OPEN MODE SP MP2 USB PUERT VOUT VOLT VOLT MUST DH/MCC TACM AP/DC PAUDE RPT INT MODE -18 +13 ASPB BAND T-ON 4 5 6 7 8 9 10 11 12 13 14 15 16 17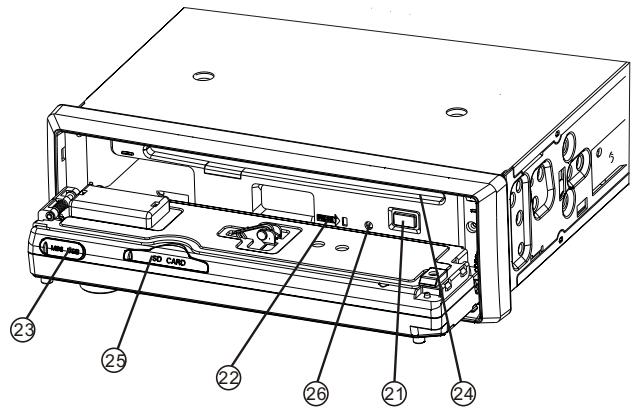
text_image
Technical diagram of an electronic device rear panel with numbered components for identification-
POWER
-
VOLUME / SELECTION BUTTON
-
MODE
-
MUTE
-
DISPLAY / REC ORD
-
TA(Traffic Announcement)/TP(Traffic Program)
7.AF(AlternativerFrequency)/Regional Frequency
-
PRESET 1 / PAUSE
-
PRESET 2 / REPEAT
-
PRESET 3 / INTRO
-
PRESET 4 /s
-
PRESET 5 / -10 TRACK DOWN
-
PRESET 6 / +10TRACK UP
-
AS / PS(Automatic Store/Preset Scan)
-
BAND / ENTER
-
TUNE DOWN/PREVIOVS TRACK
-
TUNE UP/NEXT TRACK
-
RELEASE
-
OPEN
-
USB SOCKET
-
DISC EJECT
-
RESET
-
MINI USB
-
DISC SLOT
-
SD / MMC CARD SOCKET
-
FLASHING LED LIGHT
BASIC OPERATION
1. POWER
Press the [POWER] button to turn on the unit. Press again to turn the unit off.
2. VOLUME SELECT BUTTON
(1) Volume Control
Adjust the volume by turning the knob clockwise or counterclockwise.
(2) Select Audio Settings
Push the Volume/SEL knob to go through the audio settings in the following sequence.
Volume -> Bass -> Treble -> Balance -> Fader
Turn the volume knob to select each mode.
(3) Select Function Menu
Hold down the Volume/SEL knob for more than 2 seconds to enter the menu. Push this knob to go through the items in the following sequence
DSP -> INVOL -> STEREO-> LOC -> LOUD -> CT -> TAVOL -> EON-> NEWS-> PTY
iTurn the Volume knob to adjust the selected option( FUNCTION MENU ITEM )
- DSP (Digital Sound Processor)
Select the desired sound effect, among NONE / CLASSIC/ ROCK/ POP/FLAT
- INVOL:
Define default volume level when the unit is turned on
BASIC OPERATION
- STEREO/ MONO
Turn the knob to select STEREO or MONO
- LOC OFF/ON(turn local search on/off)
Enable (“LOC ON”) or disable (“LOC OFF”) the local search function.(the default is “LOC OFF”)
-LOUD
Select Loudness On / Off
CT(adjusting the time)
Turn the VOLUME/SELECT BUTTON to the right to increase the hours or to the left to increase the minutes
- TAVOL
Define default TA (Traffic Annoubcement) Volume Level.
- EON(Extended Other Networks)
Switch EON function ON/OFF
- NEWS/ PTY(Program Type)
(1) NEWS (Program Type)
Many radio stations give codes to programs according to their type, this car radio allows you to select the type of program required and will search for a station broadcasting that type of program.
BASIC OPERATION
(2) PTY(Program Type)
select PTY ON/OFF
3. MODE
Change mode in the following sequence: TUNER -> CD -> NAND flash meory -> (* SD/MMC) -> (*USB) -> AUX -> TUNER. (* only available if an SD/MMC card or USB device is inserted car radio).
4. MUTE
Press this button to switch Mute On/ Off. When muted, sound output is suppressed.
5. DIS (Display) / REC (Record)
- Display
Press to show current display information .This is the sequence of the menu Name of the station (Default setting) -> PTY -> Radio Frequency -> CT (Clock/Time) -> Name of the station - Record (Encoding) (* Refer to _ "File Management Operation " _for further details)
6. TA/TP
Enable or disable (default) TA mode.
When TA or TP RDS signal is available for the current station, the TP icon appears on the display.
When TA is enabled (on), but no traffic announcement is transmitted, the TP icon is not displayed and the TA icon keeps blinking.
BASIC OPERATION
7. AF/REG (Alternative Frequencies/Regional frequencies)
Press this button to enable or disable the AF mode and hold down the button for more than 2 seconds to enable or disable REG mode. (Default setting is on for AF and off for REG)
Lf the AF mode is enabled (on) and is available with the current station, the AF icon is shown on LCD display and the AF icon blinks if there are no alternative frequencies
When REG is enabled (on), the receiver accepts regional variants of the tuned station and the icon appears on the LCD display. When REG mode is disabled (off), the receiver ignores regional variants.
8 \~13. PRESET STATIONS No. 1 \~ 6 /
Pause, RPT, INT, SHF, +10, -10
- Preset Buttons (in radio mode)
Press a button from 1-6 to listen to the radio station memorized to the corresponding buttons. Hold down for more than 2 seconds to memorize the current station to the corresponding preset number (manual station store)
- In CD, USB, SD/MMC Slot mode, each button performs as below function.
[PAUSE] : pause or -> play
[RPT] : Press to play the current track repeatedly, and press again to cancel
[INT] : Play the first 10 seconds of each track
[SHF] : Play every track randomly(shuffle)
[-10 / +10 ] : Prees this button to move up or down by 10 tracks
BASIC OPERATION
14. AS (Auto Store) / PS (Preset Scan/File search)
File Search Start Button
- AS : In tuner mode, hold down this button for longer than 2 seconds to automatically store the radio stations with the best reception
- PS : In tuner mode, press this button to scan through the preset memorized stations,and listen to each of them for 5 seconds. Press this button again to stop the operation.
- In CD, NAND flash memory USB or SD/MMC Card mode, press this button to enter the Music File Search Menu. Press this button again and to go through the menu is in the following sequence.
File Number Search -> File Name
Search -> ROOT -> EXIT Search
(* Refer to File Management Operation for further detail)
15. BAND / ENTER
- BAND (in Radio Mode only)
Select the radio band in the following sequence FM1 -> FM2 -> FM3 -> MW1 -> MW2
- ENTER
Activate search function, play after search and start/ stop recording, confirm deletion of a music file. (* Refer to File Management Operation for further detail)
BASIC OPERATION
16 & 17. T (Tune UP/DOWN, Track UP / DOWN)
- Tune up / down in radio mode.
Manual Tuning Mode :Hold down one of these buttons for more than 2 seconds to enter manual station search mode.then press one of these buttons briefly to tune each frequency a step upward or downward
|Seek Tuning Mode : Press to search for the next or previous station automatically
- Track Up (FF) / Down (REW) In CD, NAND flash memory, SD/MMC or USB Mode,
Track Up / down : Press to move to next or previous track
Track FF / REW : Hold down this button for more than 2 seconds to activate fast forward (FF) or fast reverse (REW) search in a track
18. RELEASE
Press to detach the front panel.
19. OPEN (Front Panel Open)
Press to open the front panel and load or unload a disc
20. USB SOCKET
Open the rubber cover of theUSB port and insert a USB Flash Storage Device Music will starts to play automatically. If there is no music file on the USB device, "NO FILES" appears on the LCD display.
* Supported music file formats : MP3, WMA, OGG Files.
BASIC OPERATION
21. DISC EJECT
Press this button to eject the disc inside the CD slot. If a disc is not removed after ejecting, the disc is re-loaded automatically but it will not play.
22. RESET
Press OPEN button and make sure there is no disc inside the unit.
Press the reset button with a pin or pointed object to reset the unit to the factory default setting.
23. MINI USB PORT (For downloading)
To download music files detach the front panel and connect the mini USB port to you PC with the Mini USB Cable provided.
(* Refer to ‘File Downloading to Front Panel Built-in flash memory’ for more detail)
24. DISC SLOT
Insert a disc into this slot.
* Supported disc type : MP3, WMA, OGG File formal Audio CDs/ CD-Rs/ CD-RW/ audio DISC.
If a disc is not inserted easily, there may be another disc already.
25. SD CARD SOCKET
Insert a SD / MMC Card and music starts to play automatically. If there is no music file, "NO FILES" is shown on LCD display
* Support Music File Format: MP3, WMA, OGG
26. FLASHING LED LIGHT
Red LED light will be flickered if the front panel is detached.
FILE MANAGEMENT OPERATION
FILE / FOLDER SEARCH FUNCTION
In CD, NAND flash memory, USB, or SD/MMC card mode, press the AS/PS button to enter the search mode. The search mode options are displayed in the following sequence.
|File Number Search -> File Name Search -> Folder Search -> Exit search mode (* Audio-CDs only support File number Search)
◆ File Number Search
Press the AS/PS button once to enter file number search A3 digit of number ("001") appears on the LCD display and the right end digit is blink which means that you must enter the diqit number
Press the T-UP or T-DN button to select a number (from 0 to 9). Press the Volume/SEL knob to move to the tens diqit (If necessary repeat the operation to go to the hundreds diqit. After input press the BAND button to commence play.
◆ File Name Search
Press the AS/PS button twice to show ("A**") on the LCD display (the letter"A"blinks).
Press the T-UP or T-DN button to select the desired letter (from A to Z) or number (from 0 to 9) Push the Volume/SEL knob to move to the next character After you have inputted the information press the BAND button to display files that contain the characters you have entered. Press the T-UP or T-DN buttons to show the next/previous searched file.
If no file is found, "NO MATCH"appears on the LCD and the unit returns to initial input ready mode automatically.
After you have selected the desired file,pressthe BAND button to commence play
FILE MANAGEMENT OPERATION
◆ Folder Search
Press the AS/PS button until the message “ROOT” is displayed on the LCD, This means that you are in folder search mode ,and you can move between the Root Folder and the Sub Folder directly by pressing T-UP or T-DN buttons,but only if there are Sub Folders.
ENCODING (RECORDING) FUNCTION
The 0encoding (recoding) function enables the recording of sound source from the radio ,a CD, AUX-in, NAND Flash Memory, USB device or SD card on to NAND Flash Memory, a USB device or an SD/MMC Card.
(* The Default recording location is NAND Flash Memory)
◆ Recoding at Radio / AUX-IN Mode
1) If no SD/MMC card or USB devicePress
(2) Hold down DIS/REC button for more than 2 seconds to start recording the current audio file or radio station, An ‘R’ will blink on the LCD display. TO stop recording, press the BAND button once.
3) If an SD/MMC card or/and USB device in inserted into the radio.
Hold down DIS/REC button for more than 2 seconds and the unit displays 'REC NAND' (record onto built-in flash memory).you can then select the location of the recording. Press the DIS/REC button once to select the recording device in the sequence of NAND -> SD/MMC -> USB. Press the DIS/REC to cancel cancel recording.
To start recording, press the BAND and a blinking 'R' appears on the LCD.
Press the BAND/ENTERbutton to stop recording.
FILE MANAGEMENT OPERATION
◆ Recording in Audio CD Mode
Hold down the DIS/REC button for more than 2 seconds The unit will asks you to select the recording location . Press the DIS/REC button to select among the desired locations in the following order.
NAND ALL -> * MMC ALL -> * USB ALL -> NAND ONE -> * MMC ONE -> * USB ONE
(* If SD/MMC card or USB device is available)
NAND ALL : Recording all tracks in the disc to NAND Flash Memory
IMMC ALL : Record all tracks in the disc to an SD/MMC Card.
USB ALL : Record all tracks in the disc a USB Storage Device.
NAND ONE : Recording current track to NAND Built-in Flash Memory
MMC ONE : Record current track to an SD/MMC Card.
USB ONE : Record current track to a USB Storage Device.
To exit, hold down the DIS/REC button for more than 2 seconds.
To start recording, press the BAND button and press again to stop recording.
(* Sound is heard during recording and a blinking “R” is displayed on the LCD)
◆ Recording in MP3 CD Mode
Hold down the DIS/REC button for more than 2 seconds. The unit asks you to select the location to of the recording. Press the DIS/REC button to select the location in the following order.
(* If no USB device or SD/MMC card is detected, the unit directly copies to NAND flash memory)
NAND flash memory-> MMC -> USB
To exit recording, hold down the [DIS/REC] button for more than 2 seconds.
To start recording, press the BAND button and press again to stop recording.
(* There is no sound heard when an MP3 file is copied from a CD to a Storage Device)
FILE MANAGEMENT OPERATION
◆ Recording in NAND Flash Memory/USB/ SD-MMC Mode
In NAND Flash Memory mode:
Encoding to SD/MMC or USB flash device is available.
Hold down the DIS/REC button more than 2 seconds and the unit asks to select recording location.
I(* If no SD/MMC card or USB flash device is detected, no encoding is available)
Select intended location by pressing the DIS/REC button(MMC or USB) To exit recording mode, hold down the DIS/REC button for more than 2 seconds, To start recording, press the BAND button and press again to stop recording.
In SD/MMC mode.
Recording to NAND Flash Memory or a USB flash device is available.
In USB mode, encoding to NAND Flash Memory or SD/MMC card is available.
Hold down DIS/REC button for more than 2 seconds and the unit asks to select recording location.
I(* In all the cases above, encoding is available if a USB device or SD/MMC card is detected)
Select the intended location by pressing the DIS/REC button in the following sequence of NAND flash memory-> MMC (or USB).
To exit recording mode, hold down the DIS/REC button for more than 2 seconds, To start recording, press the BAND button and press again to stop recording.
(* The delete function is also displayed in this operation, please refer to the "File Delete' section)
NOTE: Do not remove the detachable panel during recording.
FILE MANAGEMENT OPERATION
FILE DELETE
To delete Music File in NAND flash memory. USB, or SD/MMC mode, hold down the DIS/REC button for more than 2 seconds and LCD display shows "DELETE" after the Encoding Menu. Press the BAND button to activate delete or press the DIS/REC for more than 2 seconds to cancel delete.
The list below shows the available function in each mode.
| Source Memory Media | RADIO | AUX-IN | CD | NAND Flash memory | SD/MMC | USB |
| NAND flash meory | O | O | O | X | O | O |
| SD/MMC | O | O | O | O | X | O |
| USB | O | O | O | O | O | X |
| DeleteE Files | X | X | X | O | O | O |
FILE MANAGEMENT OPERATION
FILE DOWNLOAD TO FRONT PANEL BUILT-IN NAND FLASH MEMORY
Enjoy music directly from pre-recorded memory on the front panel.
Please copy music files from a computer using the USB cable provided.
Check your computer Operating System - Supported Operating Systems : Windows - XP, Windows 2000, Windows 98 (*Windows XP supports Plug-N-Play, but Windows 2000 and 98 require the installation of a driver from the web-site before downloading).
NOTE: Please go to website:
http://www.keyjet.com.cn/drivers/TCC76x UMS Win98 Driver.zip
to download USB driver and install that for OS Windows 98, 98SE, ME, 2000 operating
systems, Except in Windows XP, the Front Panel can not be connected to your PC if you don't install the driver Windows XP no need driver.
Detach the Front Panel and connect the mini USB port on the Front Panel of the radio to your computer USB port using the mini USB cable. (Supports 1.1 and 2.0 USB port connections)
Computer detects new driver automatically.
◇ Copy music files to the ront panel. (Compatible music file formats : MP3, WMA, OGG)
(* Copy speed is compliant with USB 1.1 version)
Replace the Front Panel onto the unit and select the NAND flash memory mode to listen to your music file.
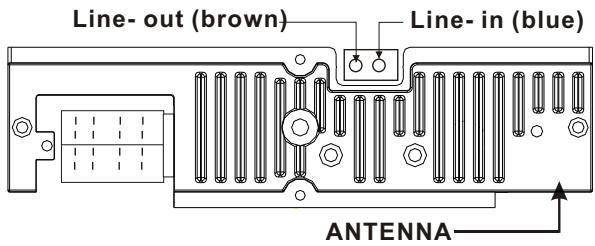
ELECTRICAL CONNECTION
Many vehicles are fitted with ISO connectors behind the dashboard, including all the electrical cabling for a car radio In such cases, the connections fitted to the vehicles can be directly plugged into the car radio connectors. Should your car not be fitted with these connectors, we strongly advise you to obtain AN ISO wiring loom that is compatible with the male of your car audio either from a specialist shop or from your vehicle dealer.Once you have this cable, you will need to connect your loudspeakers and the power supply to the ISO connector, following the connection instructions below.
NOTE:
INCORRECT WIRING OR OPERATION WILL VOID THE WARRANTY OF THIS UNIT.
text_image
Line- out (brown) Line- in (blue) ANTENNA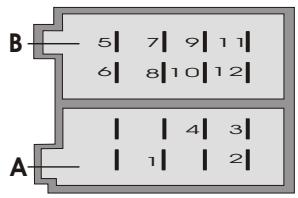
text_image
B 5 | 7 | 9 | 11 | 6 | 8 | 10 | 12 | A | | 4 | 3 | | | 1 | | 2 |Speaker
Connector
Power
Supply
Connector
Power Supply Connector
- Memory
- Ground
- Power+12 volt
- Electrical Antenna
Speaker Connector
5.Rear right speaker+ 9.Front left speaker+
6.Rear right speaker- 10.Front left speaker-
7.Front right speaker+ 11.Rear leftspeaker+
8.Front right speaker+ 12.Rear left speaker+
SPECIFICATION and FEATURES
FM TUNER
Frequency Range 87.5 \~ 108 MHZ
Usable Sensitivity 15 dBui
Stereo Separation 28dB
18 Preset Station Memory
IAM (MW) TUNER
Frequency Range 522 \~ 1620 KHz
Usable Sensitivity 30 dBu
12 Preset Station Memory
CD PLAYER
THD(Total Harmonic Distortion) < 0.5%
Signal-to-Noise Ratio 60 dB
Frequency Range 20 Hz \~ 20 KHz
Anti-shock system CD 8 sec. MP3 100 sec.WMA 300 sec
ELECTRIC
Power Supply DC 11 \~ 16 Vol
Current Consumption < 10 Ampere
Load Impedance 4 \~ 8 Ohm
Dimensions 178mm (W) x 175mm (D) x 50mm (H)
Power Output 4 x 40W (Max)
Line Output (CD 1KHz) 3.0V (1KHz, 0 Db vox max)
AUDIO
DSP –Digital Sound Processor(5 modes)
4 x 40W (Max Power)
TROUBLSHOOTING
| Problem | Cause | Solution | |
| GENERAL | Power does not turn on. (No sound.) | Fuse is blown | Replace with a fuse of the same amperage rating.Ifthe fuse blows again,consult you retailer |
| Incorrect wiring | Consult your retailer. | ||
| Nothinghappens when Buttons are pressed.Display Show Sincoherent characters . | The microprocessor Hasmalfunctioned Due to interference, etc. | Switch the unit off.Then press the OPEN button to remove the front panel.Hold down the reset button for about 2 second with a pointed object. | |
| Panel or main unit connectors are dirty. | Wipe the dirt off with a soft cloth moistened with cleaning alcohol. | ||
| CD | Sound skips or is noisy | CD is dirty | Clean the CDwithout scratching it. |
| CD is heavily scratched or warped | Replace with a CD without scratches. | ||
| Sound is poor directly after unit is switched _ on. | Water droplets may form on the internal lens when the car is parked in a humid location | Let it dry forabout 1 hour with the power on |

natural_image
Simple line drawing of a trash bin with crossed lines indicating no waste or restriction (no text or symbols)If at any time in the future you should need to dispose of this product please note that Waste Electrical Product should not be disposed of with household waste. Please recycle where facilities exist. Check with your Local Authority or retailer for recycling advice.(Waste Electrical and Electronic Equipment Directive)