
SRX 280 - Autoradio SCOTT - Notice d'utilisation et mode d'emploi gratuit
Retrouvez gratuitement la notice de l'appareil SRX 280 SCOTT au format PDF.
| Type de produit | Autoradio |
| Marque | SCOTT |
| Modèle | SRX 280 |
| Dimensions | 178 mm (L) x 175 mm (P) x 50 mm (H) |
| Poids | Environ 1 kg |
| Alimentation | 11-16 V DC |
| Fusible | 10 A |
| Puissance de sortie max | 4 x 40 W |
| Impédance de charge | 4-8 Ω |
| Gamme de fréquences FM | 87.5 - 108 MHz |
| Sensibilité FM | -15 dBµV |
| Formats CD compatibles | CD, CD-R/RW, CD-DA, MP3, WMA |
| Formats USB/SD compatibles | MP3, WMA |
| Capacité max USB | 2 Go |
| Capacité max SD/MMC | 2 Go |
| Compatibilité iPod | iPod nano (1ère, 2e, 3e gén.), iPod vidéo 5e gén., iPod classic, iPod touch |
| Fonctions RDS | PTY, TA, AF, REG |
| Fonctions audio | Volume, Basses, Aigus, Balance, Fader, Loudness, DSP (Classique, Rock, Pop, Plat) |
| Entretien | Nettoyer avec un chiffon doux et sec. Ne pas utiliser d'alcool. |
| Sécurité | Ne pas ouvrir le boîtier. Utiliser un fusible de même calibre. Éviter l'eau et l'humidité. |
| Réparabilité | Faire réviser uniquement par un centre de service agréé. |
| Accessoires fournis | Câble d'extension USB, clés de démontage, support de montage, cadre de garniture |
FOIRE AUX QUESTIONS - SRX 280 SCOTT
Questions des utilisateurs sur SRX 280 SCOTT
0 question sur cet appareil. Repondez a celles que vous connaissez ou posez la votre.
Poser une nouvelle question sur cet appareil
Téléchargez la notice de votre Autoradio au format PDF gratuitement ! Retrouvez votre notice SRX 280 - SCOTT et reprennez votre appareil électronique en main. Sur cette page sont publiés tous les documents nécessaires à l'utilisation de votre appareil SRX 280 de la marque SCOTT.
MODE D'EMPLOI SRX 280 SCOTT
SCOTT®
SRX 280
RDS CAR AUDIO CD/MP3/SD/MMC/USB PLAYER
FM STEREO
RDS FUNCTION (PTY/TA/AF)
ESP FUNCTION FOR CD PLAYBACK
USB/SD/MMC INTERFACE ON FRONT PANEL
ANTI-THEFT FOLD DOWN DETACHABLE PANEL
iPodCOMPATIBLE
POWER 4 X 40 WATTS
USER MANUAL AND INSTALLATION INSTRUCTIONS
CONTENTS
ACCESSIONS 2
SAFETY PRECAUTIONS 3
INSTALLATION AND ELECTRICAL CONNECTIONS 4
ATTACH AND DETACH THE FRONT PANEL 6
LOCATION AND FUNCTION OF CONTROLS. 7
BASIC OPERATION. 8
MP3/WMA OPERATION 12
CHARGE YOUR iPod AND PLAY ITS CONTENT 13
TECHNICAL SPECIFICATIONS. 14
TROUBLESHOOTING 15
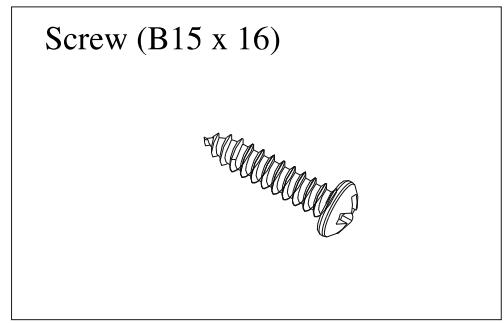
- Installation accessories
Operation Accessories
SAFETY PRECAUTIONS
This unit is designed and manufactured with the user's safety in mind, however any improper use or operation may be dangerous. It is highly recommended that you read this manual thoroughly and adhere to the following precautions.
SAFETY PRECAUTIONS
To prevent an electrical shock, do not open the casing of the unit.
In any case of malfunctioning, only have the unit serviced by an approved and qualified service centre.
Do not expose the appliance to water or, high humidity, and do not operate when your hands are wet, as this may cause an electrical short-circuit.
For safety driving, keep the volume low in order to concentrate on traffic conditions.
Do not clean the unit with alcohol, only clean with a soft and dry cloth.
If the unit has been exposed to a high temperature or high humidity, cool down the car interior before turning on the unit.
Do not use the unit for a long time without running vehicle's engine, as it may drain the battery and the vehicle may not be able to start the engine.
Before final installation in the dashboard opening, connect the wiring and make sure the unit is working properly.
Use only the parts provided with the unit to ensure proper installation.
Do not route wiring in places that get hot, otherwise the insulation around the wiring may melt.
When replacing the fuse, be sure to use the same rating recommended by the manufacturer.
OPERATION PRECAUTIONS
- Do not operate the player with scratched, bent or broken discs and when a disc is not loaded properly, do not force it into the disc loader.
- Never insert any other object into the disc loader like a coin or pin, etc, as it may damage the appliance or cause an electrical short-circuit.
- Only use round discs with a diameter of 8cm or 12cm .
- If the unit is disconnected from the battery, it will lose memorized data.
- Playback of discs recorded with a PC using the correct format is possible but depending on the application software, environmental settings, CD recording device and other factors, playback may not be possible.
- If source disc is scratched, dirty is badly recorded, the playback may result in poor sound quality.
- Some external hard disks may not be supported. Hard disks that have built-in power supply should be favored.
- Due to different formats, some models of USB, SD/MMC storage devices or MP3 players may take longer to be read or even may not be read. Design and specifications may vary in the operation manual from the actual product.
INSTALLATION AND ELECTRICAL CONNECTIONS
PRECAUTIONS
- Choose the mounting location carefully so that the unit will not interfere with the normal driving functions of the driver.
- Avoid installing the unit where it will be exposed to high temperatures, such as from direct sunlight or hot air from the heater, or where it will be subject to dust, dirt, or excessive vibration.
- Use only the supplied mounting hardware for a safe and secure installation.
- Be sure to remove the front panel before installing the unit.
- If the installation angle exceeds 30^ from the horizontal, the unit might not provide optimum performance.
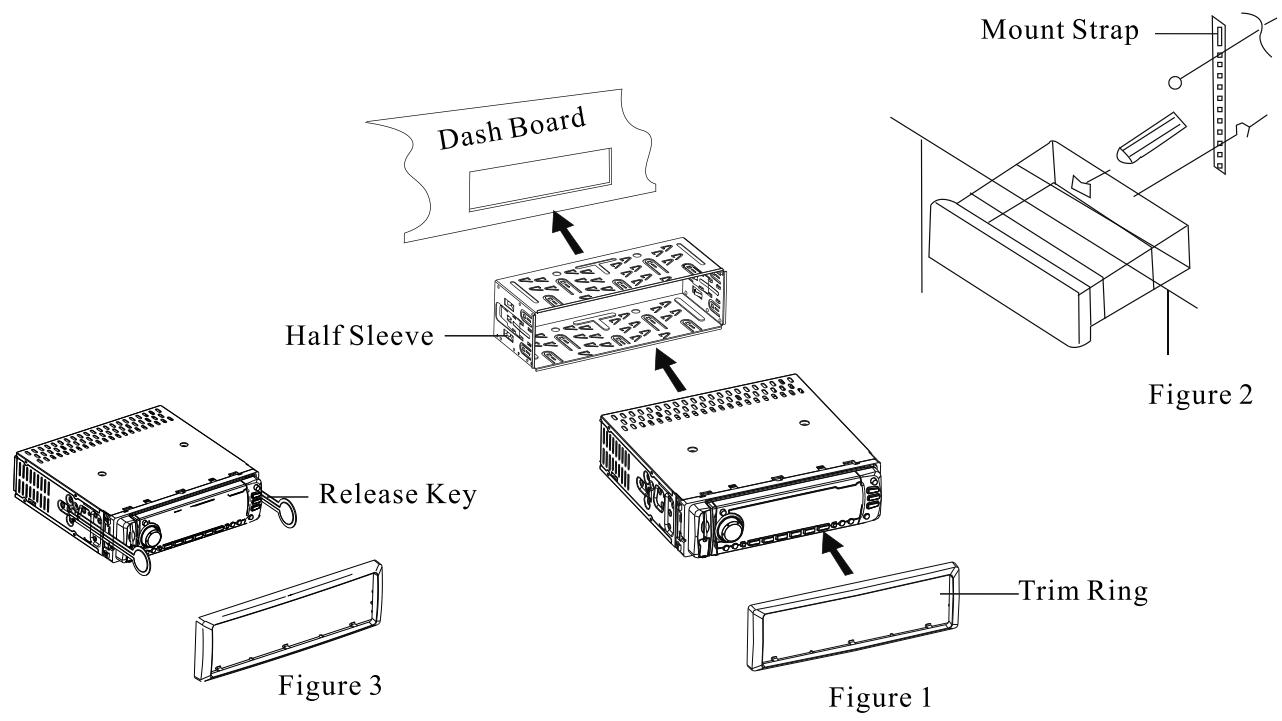
INSTALLATION (Figure 1)
-Insert the half sleeve into the dashboard hole and bend tabs outwards to fix it.
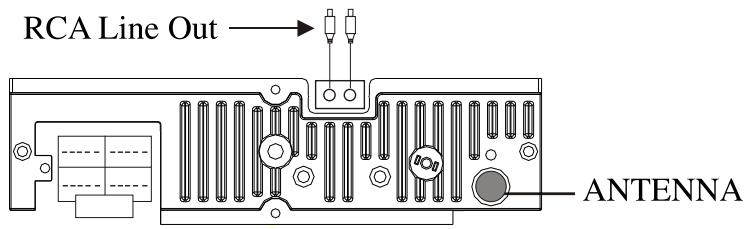
-Make the electrical connections.
Most vehicles are pre-fitted with ISO connectors behind the dashboard, including all the electrical cabling for a car radio. In such cases, the connections fitted to the vehicle can be directly plugged into the car radio connectors. If your car is not pre-fitted with these connectors, we strongly advise you to obtain the ISO wiring loom fitted with the male connector for connection to your car audio either from a specialist shop or from the concessionaire for your vehicle. Once obtained, you will only need to connect your loudspeakers and the power supply to the ISO connector, following the connection instructions below.

Power Supply Connector
- TEL MUTE
- Memory
- Dimmer
- Ground
- Power+12 volt
- Electrical Antenna
Speaker Connector
- Rear right speaker +
- Rear right speaker -
- Front right speaker +
- Front right speaker -
- Front left speaker +
- Front left speaker -
- Rear left speaker +
- Rear left speaker -
1 Telephone Mute: When you use your telephone, the car radio sound mutes automatically. "PHONE-IN" is displayed on the LCD (for vehicles pre-fitted with a telephone installation).
3 Dimmer control for the car radio: When the car head lamps switch on, the backlighting on the front panel is dimmed (controls and display).
- Push the unit into the half sleeve until you hear a click sound.
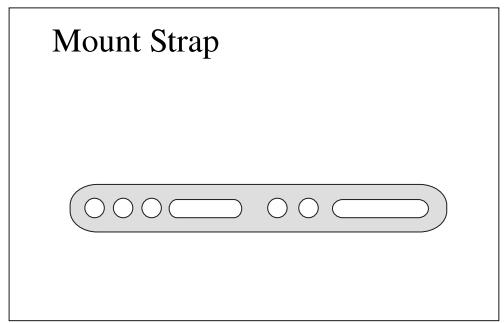
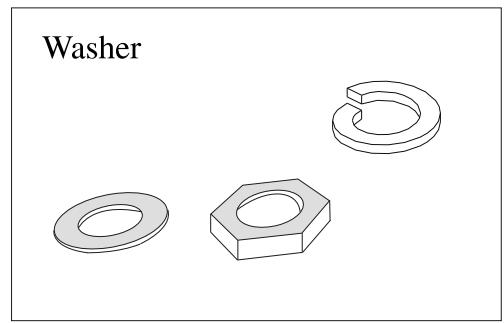
- If necessary, place the mount strap at the rear of the unit and fix it with provided washer as in figure 2.
- Place the trim ring over the unit and the installation is complete.
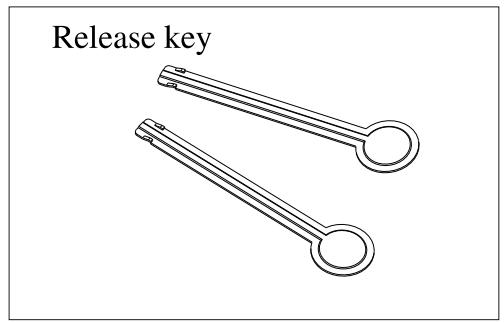
DETACH THE UNIT (Figure 3)
Remove Trim Ring and insert release keys into the left and right side-end holes as shown in figure 3 and pull the unit out of the dashboard.
ATTACH AND DETACH THE FRONT PANEL
ATTACH AND DETACH THE FRONT PANEL (Figure A)
ATTACH: Insert the right side of the panel first and push the left side of the panel into the unit until a "click" sound is heard.
DETACH: Turn off the unit. Press the [OPEN] button. Press the center of the panel (marked "RELEASE") and pull out the panel. Then push back the metal flap.
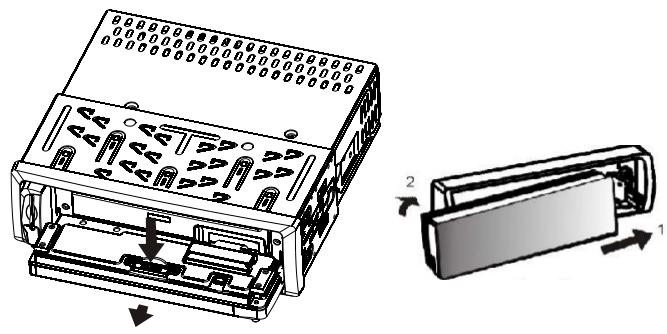
Figure A
FRONT PANEL Open / Close (Figure B)
Press the [OPEN] button to remove the front panel. Replace it once you have inserted a disc or removed a disc from.
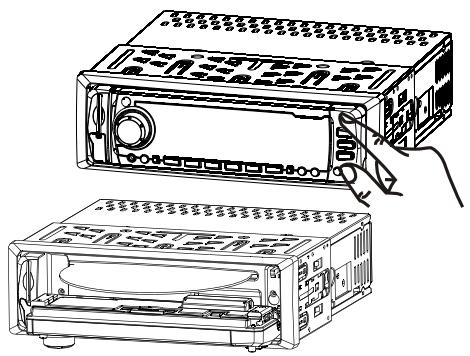
Figure B
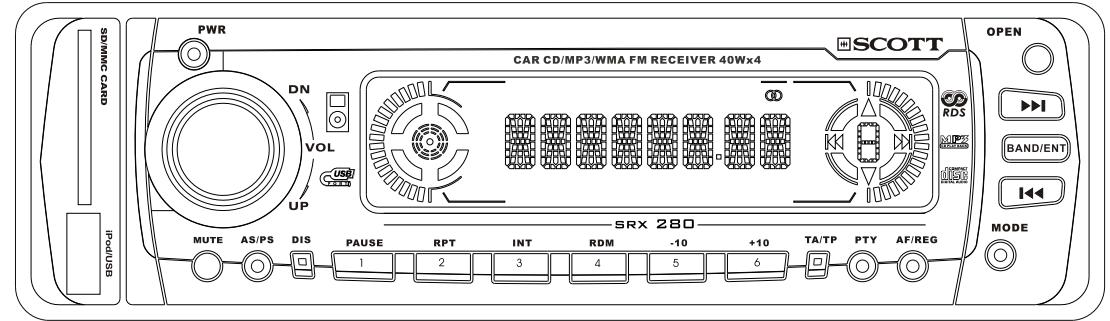
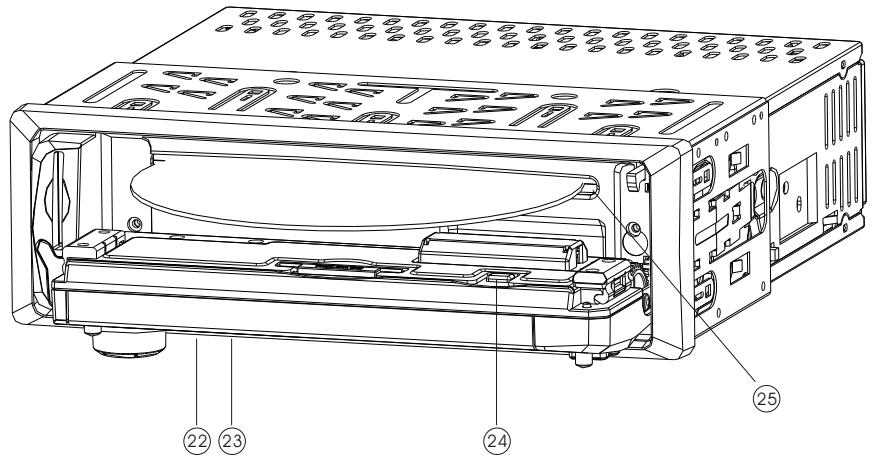
LOCATION AND FUNCTION OF CONTROLS
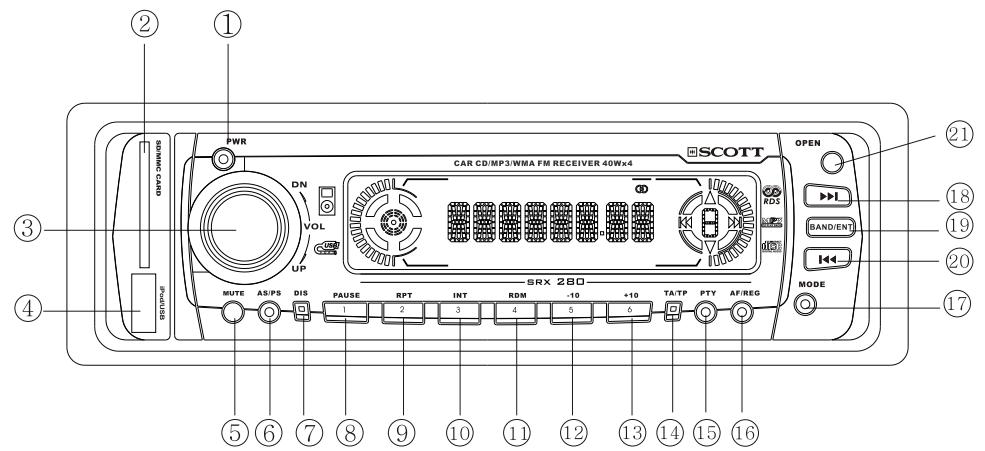
- PWR (POWER)
- SD/MMC CARD SLOT
- VOL (VOLUME) KNOB/ PUSH SEL
- iPod/USB SOCKET
- MUTE
- AS/PS
- DIS (DISPLAY)
- PRESET 1/ PAUSE
- PRESET 2/RPT (REPEAT)
- PRESET 3/ INTRO
- PRESET 4/ RDM (RANDOM)
- PRESET 5/ -10 TRACK DOWN
- PRESET 6/+10 TRACK UP
- TA/TP
- PTY
- AF/REG
- MODE
- T-UP
- BAND/ENT
- T-DN
- OPEN
- FLASHING LED LIGHT
- RESET
- DISC EJECT
- DISC SLOT
BASIC OPERATION
1. PWR (POWER)
Press the button to turn on the unit. Press it again to turn off the unit.
Note: Press any button to turn on the unit.
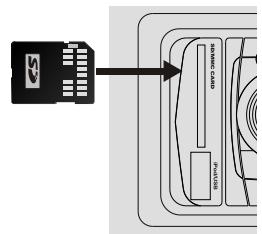
2. SD/MMC CARD SOCKET
Insert an SD / MMC Card and it will be read automatically.
Note: If the card is not ejected enough when you press on it (insufficient spring effect), please try to remove it carefully from the socket with your fingers.
SD/MMC card contactSide must face upward on insertion.
3. VOLUME KNOB (PUSH SEL)
(1) Volume Control
Adjust the volume by turning the knob.
(2) Select Audio Level
Press the [VOL] (PUSH SEL) knob repeatedly, and the audio level selection options are displayed in the following sequence:
VOL (VOLUME) -> BAS (BASS) -> TRE (TREBLE) -> BAL (BALANCE) -> FAD (FADER)
Turn the volume knob to select each level intended.
(3) Select Function Menu
Press the [VOL] (PUSH SEL) knob more then 2 seconds to enter the Function Menu. Press the [VOL] knob repeatedly to display the menu options in the following sequence.
INVOL -> ADJ -> TAVOL -> EON -> DSP -> LOUD -> LOC -> STEREO
Turn the [VOL] knob to adjust the item.
INVOL: Set the volume level when the unit is turned on
ADJ: Set the clock time - Turn [VOL] knob clockwise to set the hour and turn it anticlockwise to set the minute.
TAVOL: Set the volume level of the traffic announcement.
EON ON: Select EON ON/OFF (Default is ON)
DSP: Select intended sound effect, sequence is NONE-->CLAS (Classic)-->ROCK-->POP-->FLAT
LOUD: Select Loudness ON/OFF (Default is OFF)
LOC: Select LOC ON/OFF (Default is OFF). LOC ON: Receive the local stations only. LOC OFF: When this function is switched off, you can receive long distance stations.
Note: This function works in radio mode only.
STEREO/MONO: (Default is STEREO) When the signal is weak, select "MONO" mode to improve the sound quality.
Note: This function works in radio mode only.
4. iPod/USB SOCKET
Open the rubber cover on the socket.
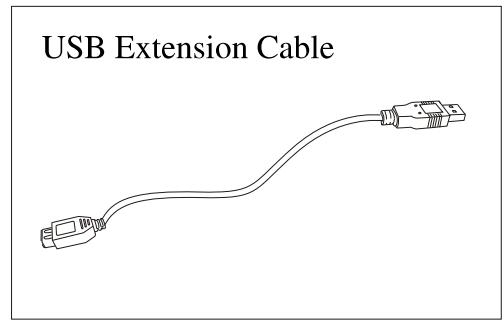
USB: Connect the USB extension cable (supplied) to the unit and to your USB Flash Storage Device.
iPod: Connect the iPod cable (not supplied) to the unit and to your iPod.
5. MUTE
Press to switch the Mute on/ off. When muted, all audio output is suppressed.
- AS (Auto Store) / PS (Preset Scan) / WMA/MP3 File Search Button (cf. page GB10)
AS: In tuner mode, press this button for longer than 2 seconds to store best reception radio station under the preset buttons automatically.
PS: In tune mode, press this button to scan through the preset memorized stations for 5 seconds. When you reach the desired station, press the AS/PS button again to stop scanning and listen to the station.
- DIS(Display)
In any mode, press the DIS button to display the time and the information available on the chosen radio station. Below is the sequence of menu:
CT (Clock/Time) -> PTY -> PS -> Radio Frequency
8 ~13. PRESET BUTTONS (1~ 6) / PAUSE, RPT, INT, RDM, -10, +10
(1) Preset Button In Radio mode
Press one of the number buttons [1-6] to select the preset radio station memorized under this button. Press for more than 2 seconds to memorize the current station.
(2) In CD, iPod/USB, SD/MMC mode
The following are the functions of these buttons in CD, iPod/USB, SD/MMC mode
[PAUSE]: Pause the playback. Press it again to resume playback.
[RPT]: Press to play the same track repeatedly, press again to cancel.
[INT]: Play the first 10 seconds of each track.
[RDM]: Play every track randomly
[-10 / + 10] :Skip forwards or back by 10 tracks.
14. TA (Travel Announcement)/TP (Travel Program Identification)
Enable or disable TA mode: (Default is OFF)
1) Press the TA button once to activate the function. Press it again to turn off the function.
2) When the TA function is activated, it will search for a station with TA information automatically. If there is no TA information, it will return to the previous station after searching.
3) When the car radio receives a station with TP information but without TA information, the TP icon appears and the TA icon keeps blinking. When receiving a station with TP and TA information, both TP and TA icons appear.
4) When you are not in radio mode and TA information is received, the radio will change to radio mode automatically. The AS/PS / Preset [1-6] / PTY / MODE / T-UP▶/ T-DN▶ and Band/ENT buttons are locked. Press the TA button once to turn off the function and return to the previous mode.
15. PTY (Program Type)
Use this button to switch PTY search ON/OFF (Default is OFF)
When PTY Search is on (PTY icon is displayed), use the / buttons to search the station for a particular program type.
Press and hold the PTY button to display the program type and then turn the [VOL] knob to select the program type. After selection, press the PTY button to search for the station. If the car radio does not find a station broadcasting the type of program chosen, t, "NOT FND" is displayed and the radio returns to the previous station.
16. AF (Alternative Frequency)/ REG (Regional)
(1) AF Press the AF / REG button briefly to switch the AF function on/off If the AF option is available at the current station, the AF icon appears and otherwise it blinks. (Default is ON).
(2) REG: Press this button for longer than 2 seconds to switch the regional mode ON/OFF. The default is OFF. When the regional mode is ON, the receiver accepts RDS stations with regional variants and when regional mode is OFF, the receiver ignores regional variants.
17. MODE
This button allows you to change the mode in the following sequence:
TUNER -> CD) -> ( SD/MMC) -> (*iPod/USB) -> TUNER
(* available only if there is a media device in CD, SD/MMC, iPod/USB slot)
18 & 20. T (Tune, Track) UP/ DOWN, /
(1) Tune Up / Down in Radio Mode
Manual Tuning Mode: Press the or button more than 2 seconds to activate the manual tuning. The message "MANUAL" appears briefly. Press these buttons again to tune each frequency up or down and search for a station manually. After a few seconds, the radio will go back to automatic search mode. The word "AUTO" will appear briefly.
Seek Tuning Mode: Briefly press the or button to search for the next or previous station automatically.
(2) Track Up (FF)/Down (REW) In CD, SD-MMC, iPod/USB Mode.
Track UP/ DOWN: Press the or button to move to the next or previous track
Track FF/ REW: Press the or button more than 2 seconds to activate fast forward (FF) or fast reverse (REW) search in a track
- BAND/ENT(ENTER)
Selecting a band: Press this button to select one of the following bands:
FM1 -> FM2 -> FM3
Confirming the selection:
(Refer to MP3/WMA OPERATION: FILE MANAGEMENT OPERATION for further detail)
- OPEN (Front Panel Open)
Press to open the front panel.
- FLASHING LED LIGHT
The red LED light will flicker if the front panel is detached.
- RESET
Press the [OPEN] button to remove the front panel and press the [RESET] button with a paperclip or pen to set the unit back to the factory default settings.
- DISC EJECT
Press to eject the disc inside the disc slot. If a disc is not removed after ejecting, a disc is re-loaded automatically without playing.
- DISC SLOT
Insert a disc into the slot.
DISPLAY INFORMATION
When an MP3/WMA media source (CD/ USB Storage Device/ SD/MMC Card) is inserted, the TAG ID3 information available scrolls automatically.
FILE MANAGEMENT OPERATION
FILE / FOLDER SEARCH FUNCTION
In CD, USB, SD/MMC mode, press the [AS/PS] button to enter search mode.
The different search options available are listed below:
File Number Search -> File Name Search -> Folder Search -> Exit search
(1) File Number Search
Press the [AS/PS] button. The three digits "001" are displayed and the "1" blinks.
Turn the [VOL] knob to select another number. Press the [VOL] knob to confirm your choice. The second number blinks. Repeat the procedure. After you have entered three digits, press the [BAND/ENT] button to confirm the selection and play the file.
(2) File Name Search
Press the [AS/PS] button twice and "A**" is displayed with "A" blinking.
Turn the [VOL] knob to select a letter of the alphabet (from A to Z) or a number (from 0 to 9). Press the [VOL] knob to confirm your choice and move to the next character.
After you have entered three letters, press the [BAND/ENT] button to display the results of the search. Press the [or ] button to select the next/ previous result. Then press the [BAND/ENT] button to confirm the selection and play the file.
If there is no file matching your search, "A**" appears again.
(3) Folder Search
Press the [AS/PS] button three times and "ROOT" is displayed on the LCD. You can now search the different folders and move between the root folder and any subFolders by turning the [VOL] button.
CHARGING YOUR iPod AND READING ITS CONTENT
In iPod mode
- Connect one end of the iPod cable (not supplied) to the USB port on your car radio and the other end to your iPod. The internal iPod battery will start to charge.
- Press the AS/PS button to access the iPod menu.
- Turn the [VOL] knob to select a sub-menu and press it to confirm and enter the sub-menu.
- Turn the [VOL] knob again to select the music in the sub-menu and press it to play the music file.
- Press the AS/PS button to return to the previous Menu.
- During playback, press the , buttons to move to the previous or next track.
Note:
- Adjust the volume control on this unit to your desired level.
- To prevent sound distortion during iPod playback on this unit, the EQ function in your iPod must be set to "Off".
- When your iPod is connected to the car radio, you cannot use the iPod controls.
TECHNICAL SPECIFICATIONS
GENERAL
Power supply DC 11-16 Volt
Current Consumption - < 10A
Load Impedance 4\~8 Ohm
Dimensions 178mm (W) x 175mm (D) x 50mm (H)
Maximum Power Output 4 x 40W
Line Output (CD 1kHz 0dB) 500mV (At speaker out 10%THD)
FM
Frequency Range 87.5 - 108 MHZ
Usable Sensitivity -15 dBuV
Stereo Separation 28 dB
CD/USB/SD/MMC
Compatible files and discs CD, CD-R/RW, CD-DA, MP3, WMA
Distortion < 0.5%
Signal-to-Noise Ratio 60 dB
Frequency response 20 Hz - 20 kHz
USB socket type 1.1 (2.0 compatible)
USB maximum handling capacity 2Gb
Card type SD/MMC
Card maximum handling capacity 2Gb
iPod
Compatible iPod - iPod nano (1st 2nd and 3rd generation), 5th generation iPod with video, iPod classic, iPod touch
Note: Due to continuing improvements, the specifications are subject to change without notice.

If at any time in the future you should need to dispose of this product please note that waste electrical products should not be disposed of with household waste. Please recycle where facilities exist. Check with your local authority or retailer for recycling advice. (Waste Electrical and Electronic Equipment Directive)
TROUBLESHOOTING
To solve the most common problems, read the troubleshooting list. If you still can not solve the problem, consult your nearest service center.
| Symptom | Cause | Solution |
| No power | The car ignition is not on | Turn the ignition key to “Accessory”, so that the unit has a power supply. |
| The fuse is blown | Replace the fuse with a new fuse that has the same capacity. | |
| Disc cannot be loaded | There is already a disc inside the player. | Remove the disc in the player, then insert a new one. |
| Disc cannot be read | The disc has been inserted upside down. | Insert the disc with the label facing upward. |
| The disc is extremely dirty or defective. | Clean the disc or try to play a new one. | |
| The temperature inside the car is too high. | Cool off until the ambient temperature returns to normal. | |
| No sound | The volume is set to minimum. | Adjust the volume to the desired level. |
| The wiring is not properly connected. | Check the connections. | |
| Mute is switched on. | Press the MUTE button to switch the mute off. | |
| The operation keys do not work | 1.The built-in micro-processor is not operating properly due to electrical interference. 2. The front panel is not properly fixed in place. | 1. Press the RESET button. 2. Reinstall the front panel. |
| Sound skips | The installation angle is over 30 degrees. | The installation angle must be below 30 degrees. |
| This disc is extremely dirty or defective. | Clean the disc/ try to play a new one. | |
| The radio does not work | The antenna cable is not connected. The signals are too weak. | Insert the antenna cable firmly and select a station manually |
| Can not charge or play the iPod | The iPod model is incompatible with this unit. | Use an iPod nano (1st, 2ndor 3rdgeneration), a 5thgeneration iPod with video, an iPod classic or an iPod touch. |