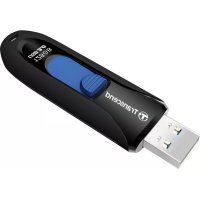
TS128MJF-DSC - Clé USB TRANSCEND - Notice d'utilisation et mode d'emploi gratuit
Retrouvez gratuitement la notice de l'appareil TS128MJF-DSC TRANSCEND au format PDF.


| Intitulé | Détails |
|---|---|
| Type de produit | Clé USB |
| Capacité de stockage | 128 Go |
| Interface | USB 3.1 Gen 1 |
| Vitesse de lecture | Jusqu'à 130 Mo/s |
| Vitesse d'écriture | Jusqu'à 20 Mo/s |
| Dimensions approximatives | 60 x 20 x 10 mm |
| Poids | 10 g |
| Compatibilités | Windows, macOS, Linux |
| Fonctions principales | Stockage de données, transfert de fichiers |
| Entretien et nettoyage | Essuyer avec un chiffon doux, éviter l'humidité |
| Garantie | 2 ans |
FOIRE AUX QUESTIONS - TS128MJF-DSC TRANSCEND
Questions des utilisateurs sur TS128MJF-DSC TRANSCEND
0 question sur cet appareil. Repondez a celles que vous connaissez ou posez la votre.
Poser une nouvelle question sur cet appareil
Téléchargez la notice de votre Clé USB au format PDF gratuitement ! Retrouvez votre notice TS128MJF-DSC - TRANSCEND et reprennez votre appareil électronique en main. Sur cette page sont publiés tous les documents nécessaires à l'utilisation de votre appareil TS128MJF-DSC de la marque TRANSCEND.
MODE D'EMPLOI TS128MJF-DSC TRANSCEND
USB USD
128MB-256MB JetFlash™ DSC
User's Manual
P/N TS128/256MJF-DSC
Transcend
Your Supplier, Your Partner, Your Friend.
Table of Contents
Introduction
Package Contents....1
Features....1
System Requirements .... 1
Reminders .... 1
Data Storage Function
Driver Installation for Windows 98SE ...... 2
Driver Installation for Windows Me, 2000, and XP ....3
Driver Installation for Mac OS 9.0 or Later ....3
Driver Installation for Linux Kernel 2.4 or Later....4
Status Indications (Connected to Computer) 4
Warning 4
Digital Camera Function
Product Overview 5
Power Supply 6
Charging the Camera Battery 6
Power On....6
Power Off....6
Taking Pictures ....7
Status Indications 8
View / Transfer Pictures in Windows....8
View / Transfer Pictures in Mac OS 9
Photo Explorer 8.0
System requirements 9
Installing Photo Explorer 8.0....10
Enhance Image Quality 11
Adjust Image 13
Learn More 14
Safely Remove Your JetFlash
Remove JetFlash in Windows 98SE....15
Remove JetFlash in Windows Me, 2000, and XP ....15
Remove JetFlash in Mac OS....15
Remove JetFlash in Linux....15
Troubleshooting 16
Specifications 19
Ordering Information....19
JetFlash Limited Warranty
Introduction
Thank you very much for purchasing Transcend's JetFlash™ DSC. This small device is more than a USB Flash Drive. It combines a USB Flash Drive with the function of a Digital Camera. As a USB flash drive, it can expedite exchanging huge amounts of data between any desktop or laptop computer. Easily fitting into a pocket or purse, the Digital Camera function lets you take pictures anytime you want. Transcend's new JetFlash™ DSC will bring you a whole new experience in mobile data storage.
Package Contents
The JetFlash package includes the following items:
- JetFlash
- Neck Strap
- Driver CD
- Label
• USB Extension Cable
• Quick Installation Guide
Features
- Compliant with USB specification 1.1, True Plug and Play
- Driverless (only Windows® 98SE needs the enclosed driver)
• Camera Function: Enhance up to 1.3 mega pixel image quality - Direct battery recharging via USB port
• LEDs indicate the power & storage status of JetFlash
System Requirements
• Hardware: Desktop or notebook computer with USB port
- Operating System: Windows® 98SE, Windows® Me, Windows® 2000 or Windows® XP
Mac™ OS 9.0 or later, Linux™ kernel 2.4 or later
Reminders
- Keep your JetFlash away from heat, direct sunlight, and moisture.
- Do not bend, flex, or drop your JetFlash.
- Avoid touching the lens and viewfinder with your fingers. To remove dust or fingerprints, use a soft, damp cloth.
- Do not look at the sun through the viewfinder!
- Remember to charge the battery before taking pictures.
Data Storage Function
Driver Installation for Windows 98SE
- Drivers are required for Windows 98SE. Insert the Driver CD into the CD-ROM (Auto-Run supported). Select the Win98 Driver button.
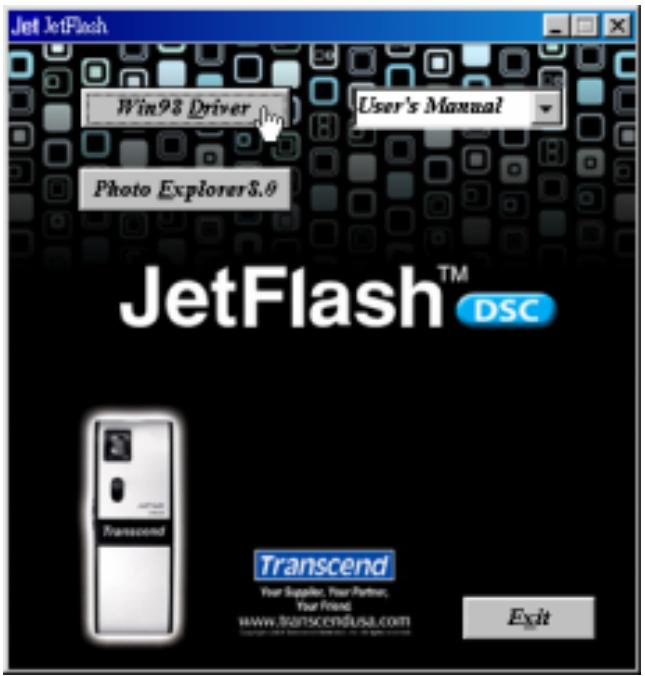
text_image
Jet JetFlash Win98 Driver User's Manual Photo Explorer8.9 JetFlash™ DSC Transcend Your Supplier, Your Partner, Your Friend www.transcendusa.com Exit- The "USB Mass storage Driver – InstallShield Wizard" window will appear. Select Next to continue.
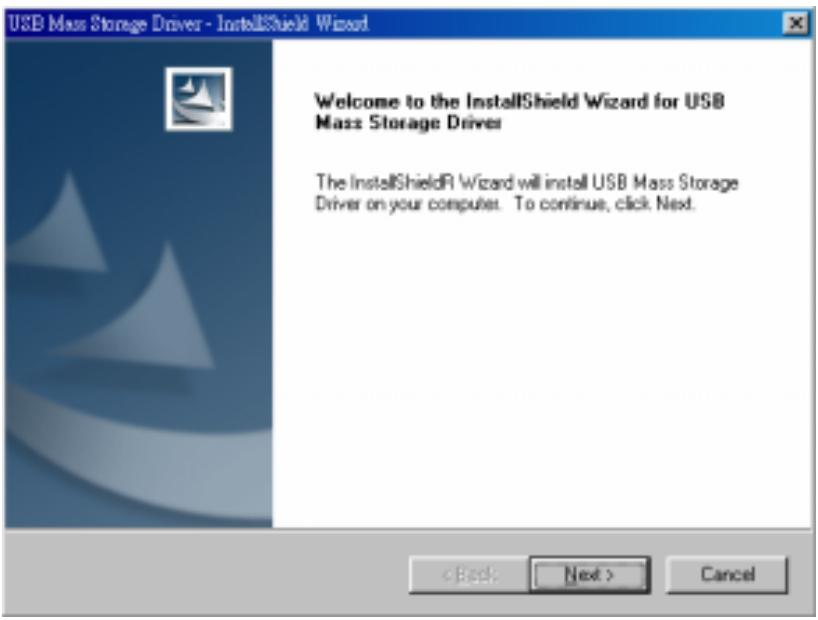
text_image
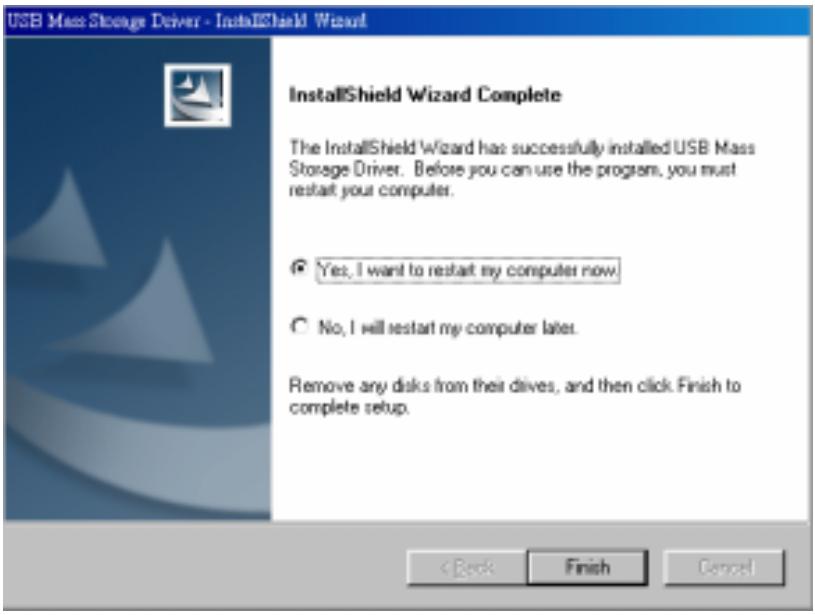
USB Mass Storage Driver - InstallShield Wizard Welcome to the InstallShield Wizard for USB Mass Storage Driver The InstallShield® Wizard will install USB Mass Storage Driver on your computer. To continue, click Next.- Select the "Yes, I want to restart my computer" option. Then select Finish to restart your computer.
text_image
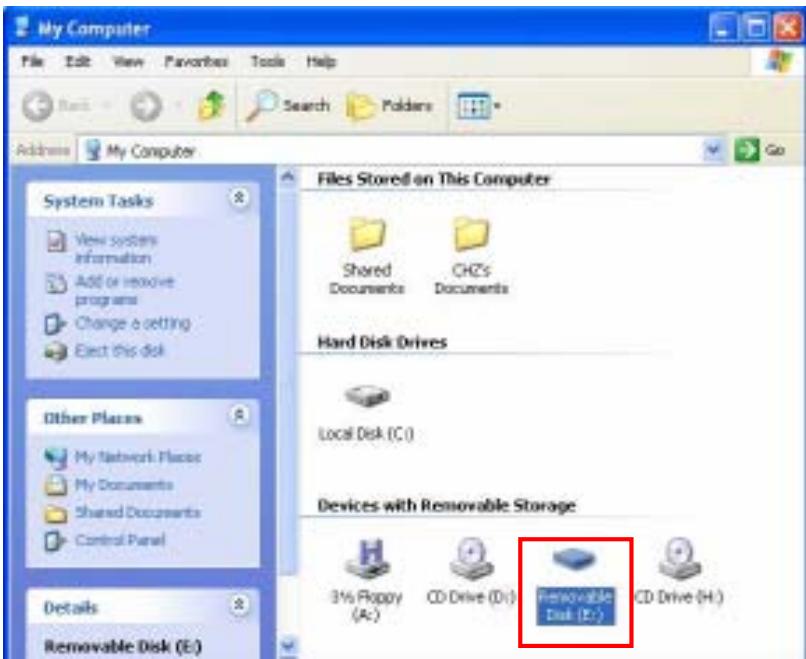
USB Mass Storage Driver - InstallShield Wizard InstallShield Wizard Complete The InstallShield Wizard has successfully installed USB Mass Storage Driver. Before you can use the program, you must restart your computer. Yes, I want to restart my computer now. No, I will restart my computer later. Remove any disks from their drives, and then click Finish to complete setup. < Back Finish Cancel- After restarting your computer, plug your JetFlash into an available USB port. Your computer will automatically detect the new device. A new Removable Disk drive with a newly assigned drive letter will appear in the My Computer window.
Driver Installation for Windows Me, 2000, and XP
No drivers are required. These Windows operating systems have built-in drivers to support the data portion of your JetFlash. Simply plug your JetFlash into an available USB port, and Windows will install the files needed to use it as an external hard drive. A new Removable Disk drive with a newly assigned drive letter will appear in the My Computer window.
text_image
My Computer File Edit View Favorites Tools Help Back Search Folders Address My Computer System Tasks View system information Add or remove programs Change a setting Elect this disk Other Places My Network Places My Documents Shared Documents Control Panel Details Removable Disk (E:) Files Stored on This Computer Shared Documents CHZ's Documents Hard Disk Drives Local Disk (C:) Devices with Removable Storage 3½ Propy (Ac) CD Drive (D:) Renovable Disk (E:) CD Drive (H:)Driver Installation for Mac OS 9.0 or Later
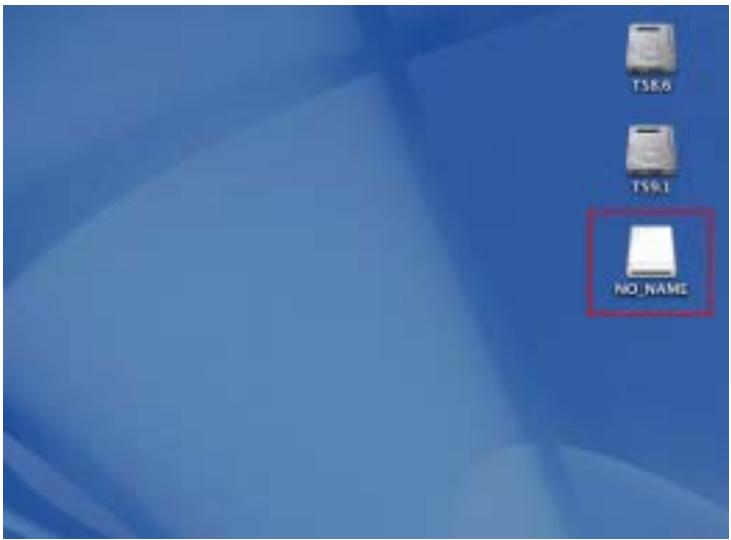
No drivers are required. Simply plug your JetFlash into an available USB port and your computer will automatically detect it. A new Disk icon will appear on the Desktop.
text_image
TSR6 TSR1 NO_NAMEAvoid using the USB connection in your Mac keyboard, it does not have sufficient power to detect your JetFlash. Please use an available USB port in your Mac Desktop.
Driver Installation for Linux Kernel 2.4 or Later
No drivers are required. Simply plug your JetFlash into the USB port and mount it.
Example: 1. Create directory for JetFlash first
mkdir /mnt/jetflash
- Mount JetFlash
mount -a -t msdos /dev/sda1 /mnt/jetflash
Status Indications (Connected to Computer)
| Indications | Status | |
| Buzzer | Beep | JetFlash is plugged into the USB port |
| Power LED (Red) | Blinking | Camera battery charging |
| Off | Camera battery fully charged | |
| Memory LED (Green) | Blinking | Data transferring |
| Off | Standby | |
Warning

To prevent loss of data and/or damage to your JetFlash, NEVER remove your JetFlash from a device while the Memory LED is blinking.
Digital Camera Function
Product Overview
text_image
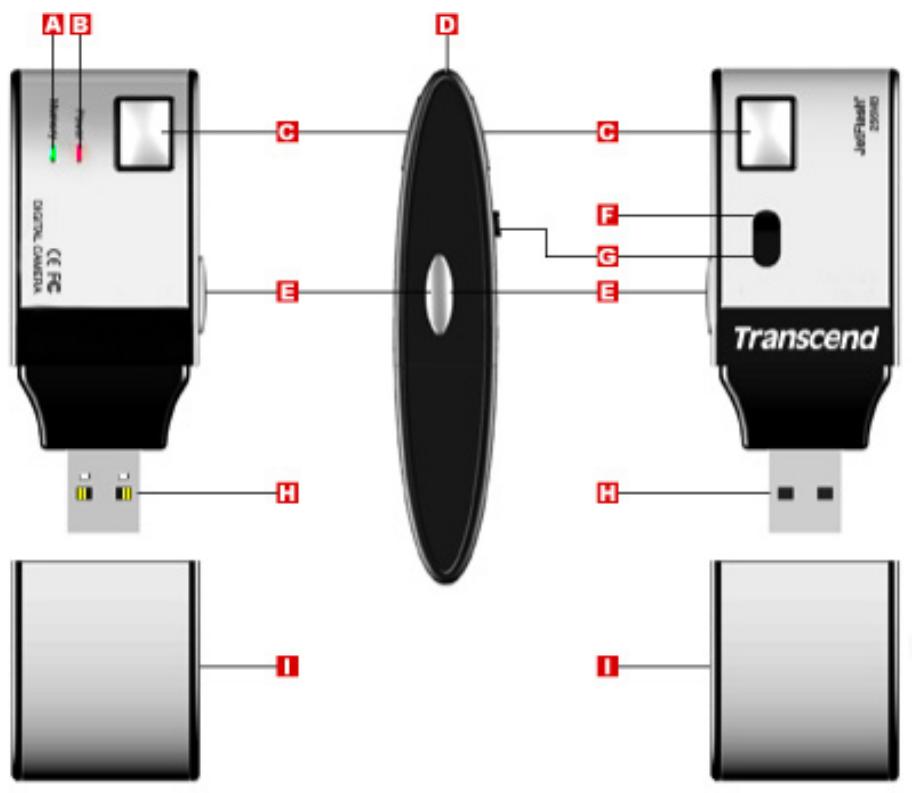
A B Digital Camera C D C F G E E Transcend JocFlash® 20080 H H I I| Components | Controls |
| A Memory LED (Green) | Show the status of the USB Flash Drive status. |
| B Power LED (Red) | Shows the power status of the camera. |
| C Viewfinder Window | To help frame your picture. |
| D Strap Hole | Attach the supplied neck strap here. |
| E Shutter Button | Press down to take your picture. |
| F Lens | Automatically opens when the power is on. The lens is closed when the power is off. |
| G Power Switch (Lens Cover) | Pull down (open) to turn the power on.Pull up (close) to turn the power off. |
| H USB Connector | Connect to your computer's USB port to charge your JetFlash and transfer files. |
| I USB Cover | Detach the protective USB cover to reveal your JetFlash's USB connector. |
Power Supply
JetFlash is powered by a built-in rechargeable lithium battery, which you can charge directly from your computer via the USB port.
When you use your JetFlash as a Digital Camera for the very first time, you'll need to charge the battery approximately two (2) hours before taking pictures. A fully charged battery will last approximately five (5) hours with constant use.
Charging the Camera Battery
- Verify the Camera Lens is closed and the Power LED is off. (Power off)
- Plug your JetFlash into an available USB port. You will hear a beep.
- Charging will start immediately. While charging, the Power LED will blink with a red light.
- After the battery is fully charged, the Power LED will stop blinking and turn off.
- Unplug your JetFlash to complete the battery charging.
- Verify you have installed the Win98 drivers from the enclosed Driver CD before initial use in a Windows 98SE computer. See the “Driver Installation for Windows 98SE” section for reference.
Power On
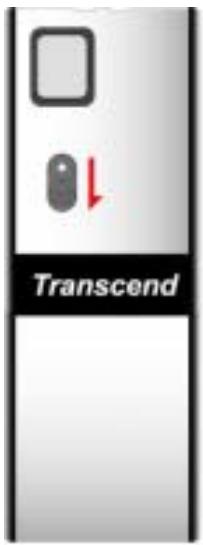
Pull down (open) the Power Switch (Lens Cover) until the Lens is revealed. You will hear a beep and the Power LED will light up.
text_image
TranscendIf the Power LED is blinking red, the power is low and you need to recharge your JetFlash.
Power Off
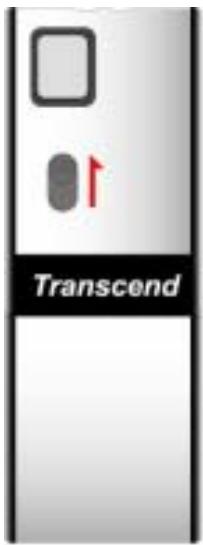
Pull up (close) the Power Switch (Lens Cover) until the Lens is covered. The Power LED light will turn off.
text_image
TranscendAlways close the camera lens cover of your JetFlash when not taking pictures. This will conserve power and protect the camera lens.
Taking Pictures
- Disconnect your JetFlash from the USB port of your computer.
- Open the lens cover to power on your JetFlash and verify the Power LED is solid (red).
- Verify the Memory LED is solid (green). (Available memory is over 100KB.)
- Look though the viewfinder to frame your subject inside the window.
- Keep your JetFlash steady and press the shutter button all the way down to capture and store your picture.
- Your JetFlash will double beep after a picture is taken.
When you use your JetFlash for the very first time, you must charge the battery approximately two (2) hours before taking pictures.
Pictures cannot be taken when your JetFlash is connected with your computer. When you connect your JetFlash to your computer via the USB port, the computer operating system will recognize your JetFlash as a USB Mass Storage Device.
The JetFlash image files are stored in JPEG format as below:
\DCIM\100-IMG\Img-xxxx.jpg
where xxxx is a JPEG file number (0001 to 9999)
When the Memory LED is off, your JetFlash can only take one more picture at the most. To free up storage space, you must transfer and store your pictures onto your computer.
Status Indications
| Indications | Status | |
| Buzzer | Beep | JetFlash is powered on |
| Double Beep | Picture taken | |
| Power LED (Red) | Solid | Full power |
| Blinking | Low Power | |
| Off | Power off | |
| Memory LED (Green) | Solid | Space available for pictures |
| Off | Not enough space available for pictures | |
View / Transfer Pictures in Windows
- Plug your JetFlash into an available USB port. (Verify you have installed the Win98 drivers from the enclosed Driver CD before initial use in a Windows 98SE computer. See the "Driver Installation for Windows 98SE" section for reference.)
- Launch Windows File Manager to access the Removable Disk.
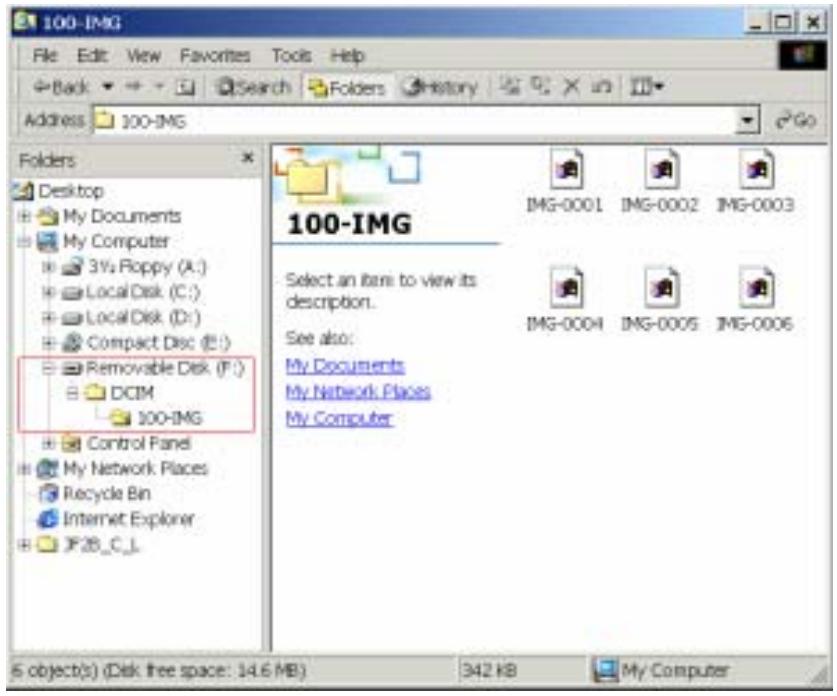
- Double-click Removable Disk \ DCIM \ 100-IMG to access your pictures.
text_image
100-IMG File Edit View Favorites Tools Help Back Search Folders History Address 100-IMG Folders Desktop My Documents My Computer 3½ Floppy (A:) Local Disk (C:) Local Disk (D:) Compact Disc (E:) Removable Disk (F:) DCIM 100-IMG Control Panel My Network Places Recycle Bin Internet Explorer P2B_C_L 100-IMG Select an item to view its description. See also: My Documents My Network Places My Computer 6 object(s) (Disk free space: 14.6 MB) 342 KB My Computer- Double-click on the file you want to view. You can copy, move, delete, or rename any files at this time.
- After viewing, refer to the "Safely Remove Your JetFlash" section to unplug your JetFlash.
To enhance the image quality or edit your pictures, refer to the "Photo Explorer 8.0" section
for detailed instructions.
View / Transfer Pictures in Mac OS
- Plug your JetFlash into an available USB port on Mac. (Avoid using the USB connection in your Mac keyboard.)
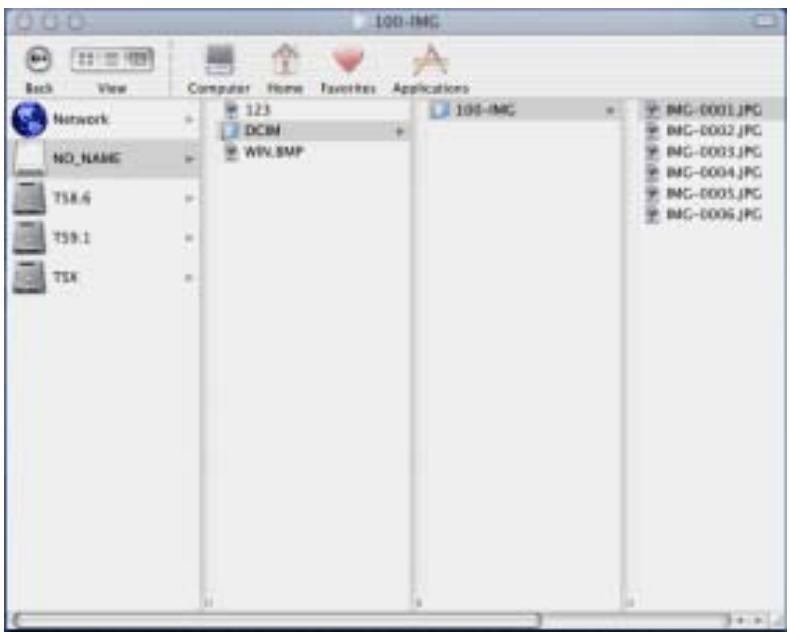
- Double-click on the Disk icon of your JetFlash, and select DCIM \ 100-IMG to access your pictures.
text_image
100-IMG Back View Computer Home Favorites Applications Network 123 100-IMG IMG-0001.JPG NO_NAME DCIM TSB.6 WIN.BMP IMG-0002.JPG TSB.1 TSX IMG-0003.JPG IMG-0004.JPG IMG-0005.JPG IMG-0006.JPG-
Double-click on the file you want to view. You can copy, move, delete, or rename any files at this time.
-
After viewing, refer to the "Safely Remove Your JetFlash" section to unplug your JetFlash.
Photo Explorer 8.0
For Windows OS users, Photo Explorer 8.0 provides an efficient way to move, categorize, browse, and adjust your pictures. Also, Photo Explorer 8.0 can create slideshow presentations, calendars, web albums, or burn the pictures onto CD or DVD.
✿ Photo Explorer 8.0 is not supported for the Mac OS or Linux.
System Requirements
• Intel® Pentium® III or faster processor
- Windows® 98SE, Windows® Me, Windows® 2000 or Windows® XP
- 64MB RAM or more
• 35MB available hard drive space for program files
• 800 X 600 minimum display resolution
Installing Photo Explorer 8.0
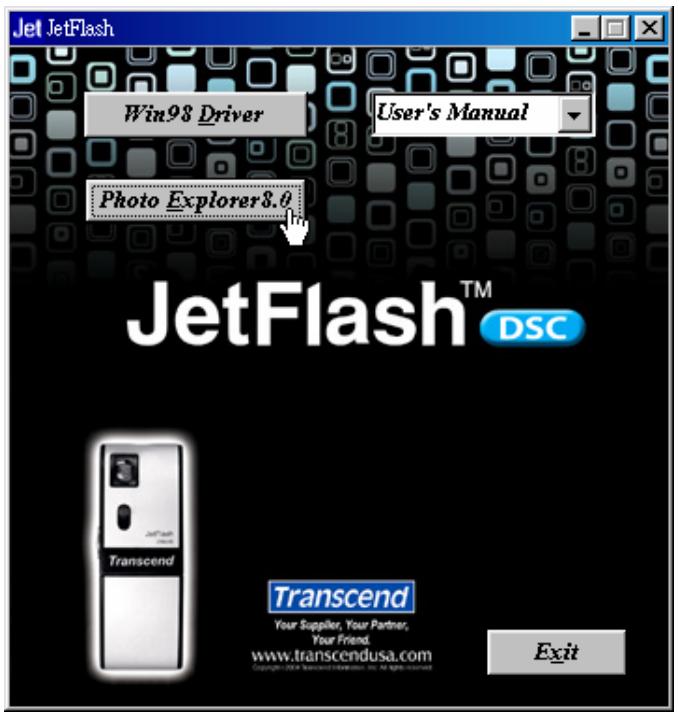
- Insert the Driver CD into the CD-ROM (Auto-Run supported). Select the Photo Explorer 8.0 button.
text_image
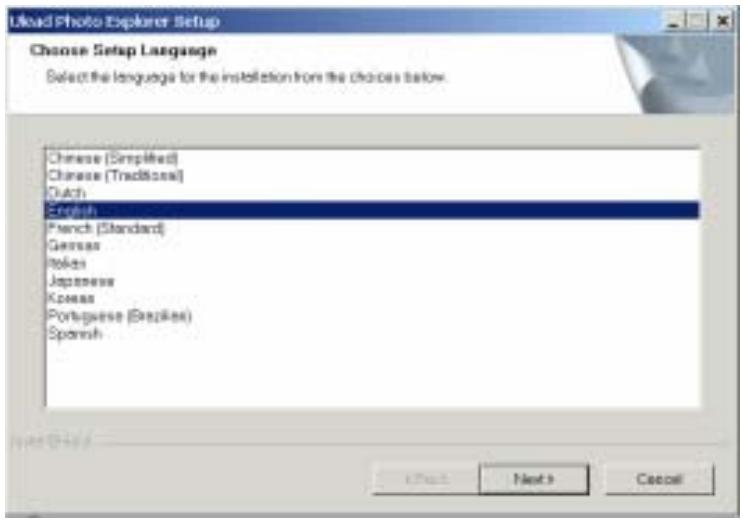
Jet JetFlash Win98 Driver User's Manual Photo Explorer 8.0 JetFlash™ DSC Transcend Your Supplier, Your Partner, Your Friend. www.transcendusa.com Copyright: DSC Transcend Information, Inc. All rights reserved Exit- Select your local language and select Next to continue.
text_image
Load Photo Explorer Setup Choose Setup Language Select the language for the installation from the choices below. Chinese (Simplified) Chinese (Tradition) Dutch English French (Standard) Germanes Italian Japanese Korean Portuguese (English) Spanish- Follow the on-screen instructions to complete the installation.
After the installation is complete, the Photo Explorer 8.0 Explorer 8 icon will appear on your desktop.
On the task bar, the AutoDetector icon will appear in the system tray. This will detect your JetFlash and launch the Photo Explorer 8.0 automatically each time you plug your JetFlash into your computer.
Enhance Image Quality
- Double-click the Photo Explorer 8.0 8.0.
icon on your desktop to execute Photo Explorer
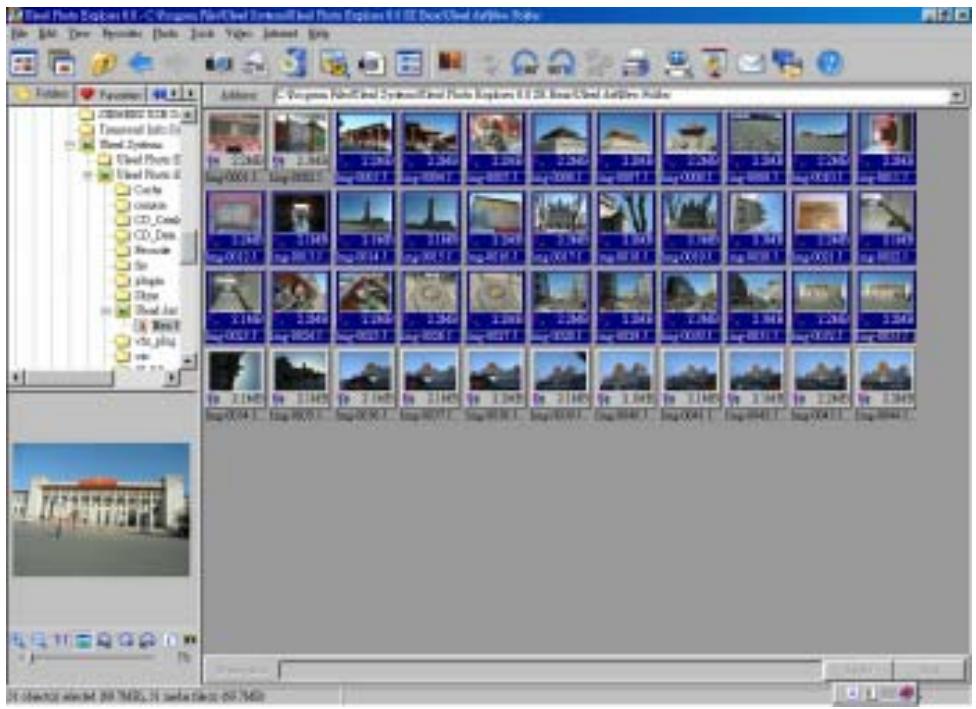
- Select the picture(s) that you want to enhance the image quality.
text_image
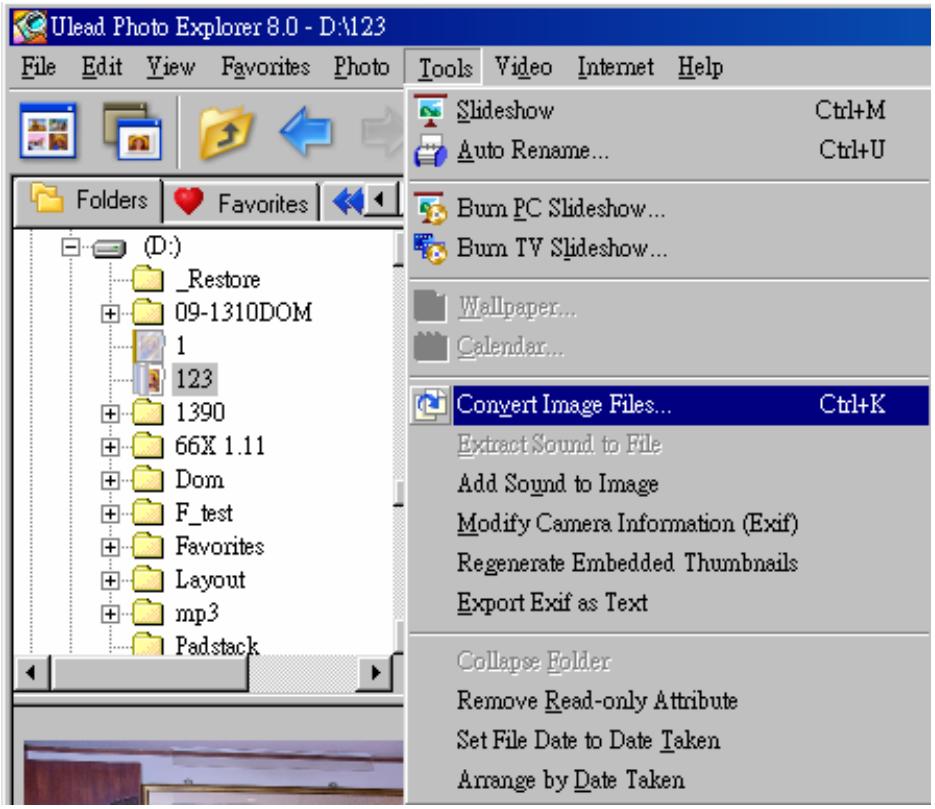
3D Image Photo Explorer 8.0 - Progma Pixel/Cell System/Cell Photo Explorer 8.1.2.2.2.2.2.2.2.2.2.2.2.2.2.2.2.2.2.2.2.2.2.2.2.2.2.2.2.2.2.2 File Edit View Options Tools Tools Window Internet Help Add: Progma Pixel/Cell System/Cell Photo Explorer 8.1.2.2.2.2.2.2.2.2.2.2.2.2.2.2.2.2.2.2.2.2 16:00:04:11 16:00:04:11 16:00:04:11 16:00:04:11 16:00:04:11 16:00:04:11 16:00:04:11 16:00:04:11 16:00:04:11 16: 16:00:04:11 16:00:04:11 16:00:04:11 16:00:04:11 16:00:04:11 16:00:04:11 16:00:04:11 16:00:04:11 16:35:35:35 16:35:35:35 16:35:35:35 16:35:35:35 16:35:35:35 16:35:35:35 16:35:35:35 16:35:35:35 16:35:35:35 16: 16: 16: 16: 16: 16: 16: 16: 16: 16: 16: 16: 16: 16: 16: 16: 16: 16: 16: 16: 16: 16: 16: 16: 16: 16: 16: 16: 16: 16: 16: 16: 16: 16:- From the Tools pull down menu, select Convert Image Files.... The Convert window will appear.
text_image
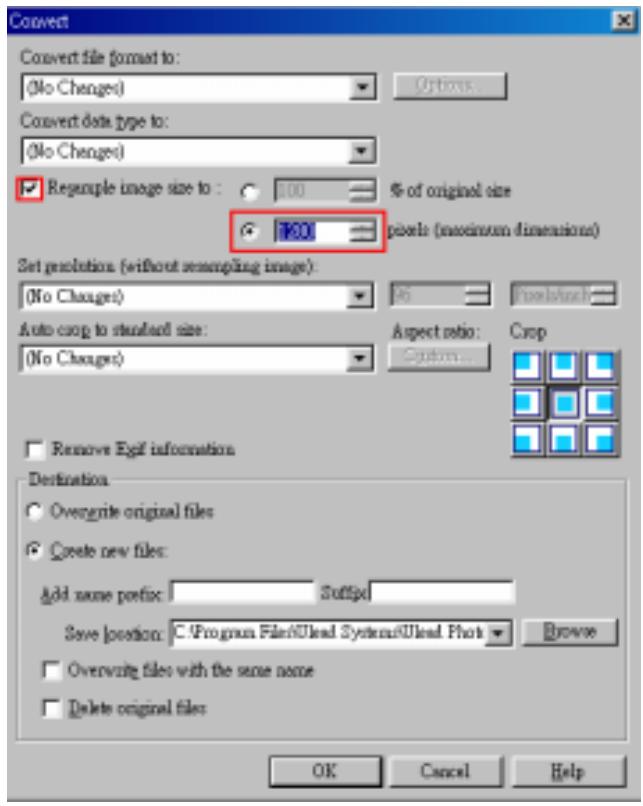
Ulead Photo Explorer 8.0 - D:\123 File Edit View Favorites Photo Tools Video Internet Help Folders Favorites (D:) _Restore 09-1310DOM 1 123 1390 66X 1.11 Dom F_test Favorites Layout mp3 Padstack Slideshow Ctrl+M Auto Rename... Ctrl+U Burn PC Slideshow... Burn TV Slideshow... Wallpaper... Calendar... Convert Image Files... Ctrl+K Extract Sound to File Add Sound to Image Modify Camera Information (Exif) Regenerate Embedded Thumbnails Export Exif as Text Collapse Folder Remove Read-only Attribute Set File Date to Date Taken Arrange by Date Taken- Select the Resample image size to: checkbox and select the pixels option. Refer to following table and type in the suitable value to enhance the image quality.
text_image
Convert Convert file (format to: (No Changes) Convert data type to: (No Changes) ✓ Requuple image size to: 100 % of original size ● 100 pixels (maximum dimensions) Set projection (without sketching image): (No Changes) Auto comp to standard size: (No Changes) Aspect ratio: Crop □ Remove Egypt information Destination ○ Overwrite original files ● Create new files: Add name prefix: Suffp Save location: C:\Program Files\Ulead Systems\Ulead Phot Browse □ Overwrite files with the same name □ Delete original files OK Cancel Help| Input Value | Image Resolution | Image Size |
| 640 | 0.3M pixels | 640 x 480 pixels |
| 1280 | 1.3M pixels | 1280 x 960 pixels |
| 1600 | 2M pixels | 1600 x 1200 pixels |
| 2048 | 3.3M pixels | 2048 x 1536 pixels |
| 2288 | 4.1M pixels | 2288 x 1712 pixels |
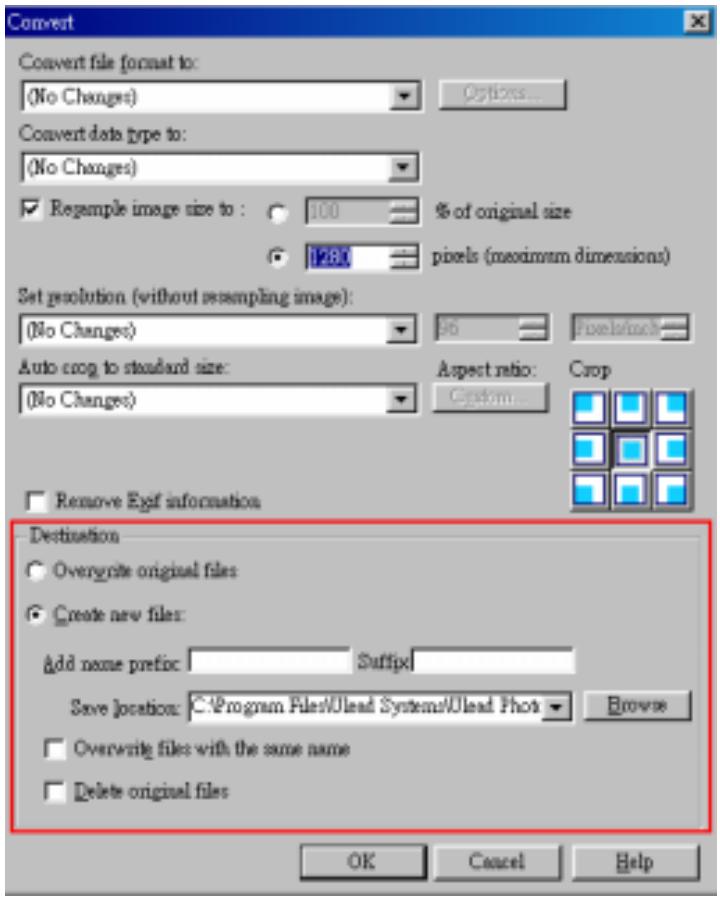
- In the Destination section, select the option(s) you want to save your picture. Select OK to enhance the image quality.
text_image
Convert Convert file format to: (No Changes) Convert data type to: (No Changes) ✓ ReSample image size to : 100 % of original size ● 1281 pixels (maximum dimensions) Set resolution (without resampling image): (No Changes) Auto crog to standard size: (No Changes) Aspect ratio: Crop Custom... Remove Exit information Destination Overwrite original files Create new files: add name prefix: Suffix Save location: C:\Program Files\Ulead Systems\Ulead Phot Browse Overwrite files with the same name Delete original files OK Cancel HelpAdjust Image
- Double-click the Photo Explorer 8.0 Explorer 8.0 icon on your desktop to execute Photo Explorer 8.0.
- Select the picture that you want to adjust.
- From the Photo pull down menu, select Adjust Image.... The Adjust Image window will appear.
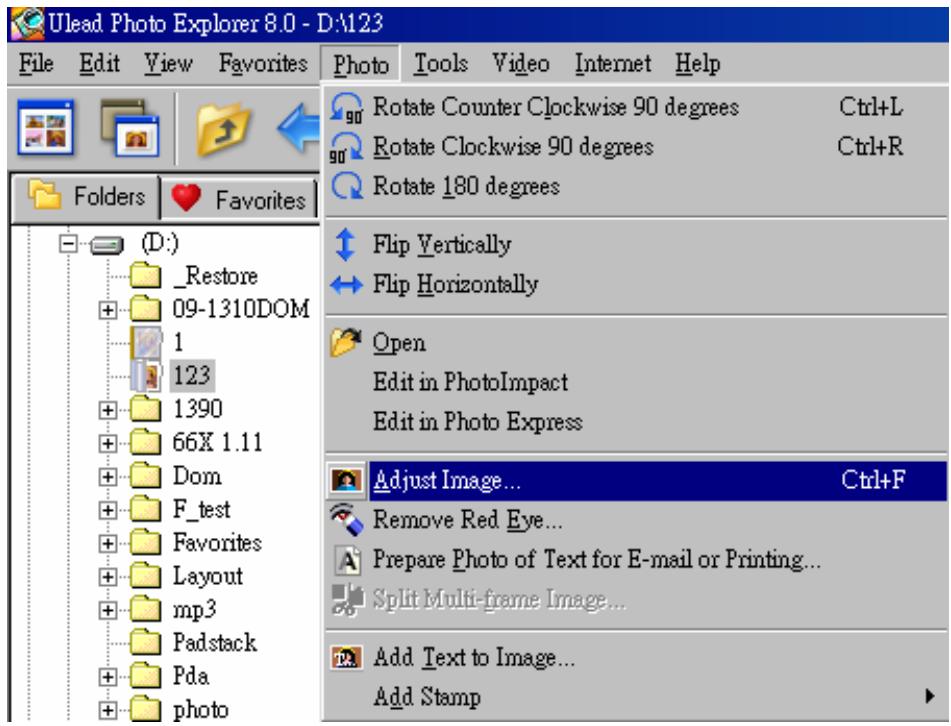
text_image
Ulead Photo Explorer 8.0 - D:\123 File Edit View Favorites Photo Tools Video Internet Help 90 Rotate Counter Clockwise 90 degrees Ctrl+L 90 Rotate Clockwise 90 degrees Ctrl+R Rotate 180 degrees Flip Vertically Flip Horizontally Open Edit in PhotoImpact Edit in Photo Express Adjust Image... Ctrl+F Remove Red Eye... Prepare Photo of Text for E-mail or Printing... Split Multi-frame Image... Add Text to Image... Add Stamp (D:) _Restore 09-1310DOM 1 123 1390 66X 1.11 Dom F_test Favorites Layout mp3 Padstack Pda photo- Select any the following tabs in the Adjust Image window to make your adjustments:
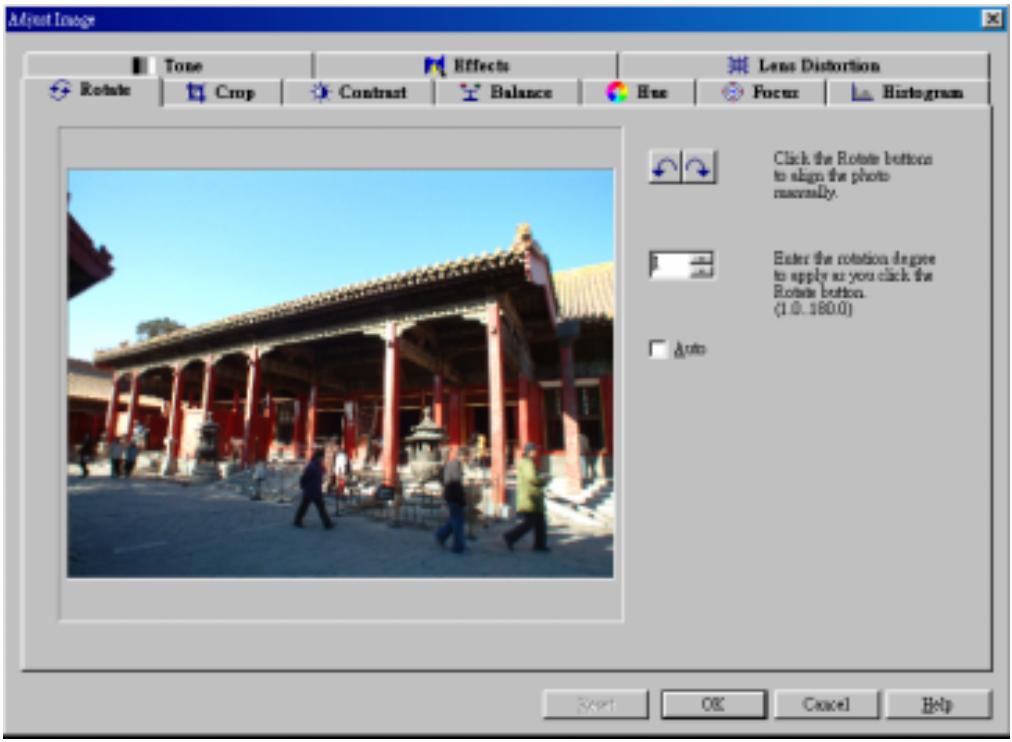
text_image
Adjust Image Tone Effects Lens Distortion Rotate Crop Contract Balance Eye Focus Histogram Click the Rotate button to align the photo macrally. Enter the rotation degree to apply as you click the Rotate button. (1.0. 180.0) Auto Start OK Cancel Help- Rotate – Spins an image until the desired appearance
• Crop -- Cuts out undesired parts from an image - Contrast -- Makes an image look lighter or darker
- Balance -- Adjusts the existing colors in an image to make it look more accurate or to change the overall tone of the image
- Hue -- Shifts colors to come up with a different range of colors for the image and also adjusts the intensity (or strength) of the colors
• Focus -- Makes an image look sharper or blurrier - Histogram -- Lets you correct color imbalances by adjusting the Master channel or the individual Red, Green, or Blue channel
- Tone -- Applies sepia, duotone, and monochrome effects to images
• Effects -- Applies artistic effects to images - Lens Distortion -- Corrects the distortion in images
Learn More
To learn more about Photo Explorer's functions, execute Photo Explorer 8.0 and select Ulead Photo Explorer Help... from the Help pull down menu to get the necessary information.
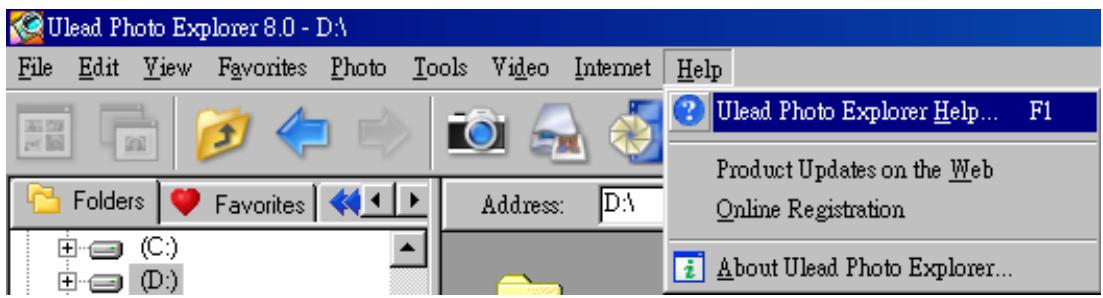
text_image
Ulead Photo Explorer 8.0 - D:\ File Edit View Favorites Photo Tools Video Internet Help Folders Favorites Address: D:\ Product Updates on the Web Online Registration About Ulead Photo Explorer...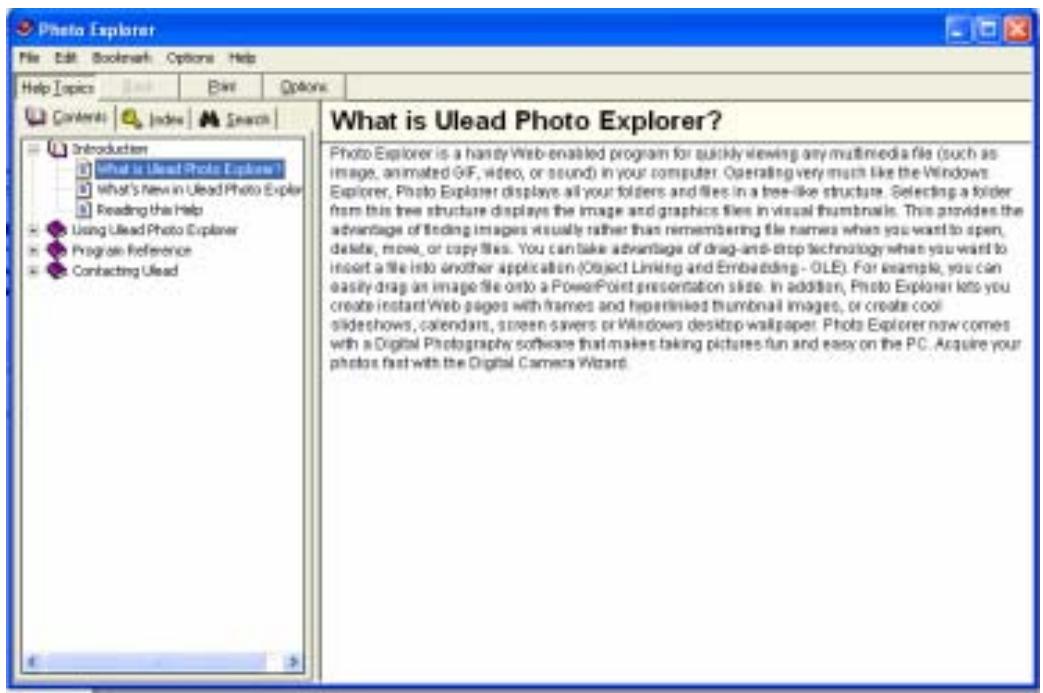
text_image
Photo Explorer File Edit Bookshelf Options Help Help Topics Edit Options Contents Index Search Introduction What is Ulead Photo Explorer? what's New in Ulead Photo Explorer Reading the Help Using Ulead Photo Explorer Program Reference Contacting Ulead What is Ulead Photo Explorer? Photo Explorer is a handy Web-enabled program for quickly viewing any multimedia file (such as image, animated GIF, video, or sound) in your computer. Operating very much like the Windows Explorer, Photo Explorer displays all your folders and files in a tree-like structure. Selecting a folder from this tree structure displays the image and graphics files in visual thumbnails. This provides the advantage of finding images visually rather than remembering the names when you want to open, delete, more, or copy files. You can take advantage of drag-and-drop technology when you want to insert a file into another application (Object Linking and Embedding - OLE). For example, you can easily drag an image file onto a PowerPoint presentation slide. In addition, Photo Explorer lets you create instant Web pages with frames and hyperlinked thumbnail images, or create cool slideshows, calendars, screen savers or Windows desktop wallpaper. Photo Explorer now comes with a Digital Photography software that makes taking pictures fun and easy on the PC. Acquire your photos fast with the Digital Camera Wizard.Safely Remove Your JetFlash
Remove JetFlash in Windows 98SE
Unplug JetFlash from your system directly when data is not transferring.
Remove JetFlash in Windows Me, 2000, and XP
- Select the 📄 icon in the system tray.

- The Safely Remove Hardware pop-up menu will appear. Select to continue.

text_image
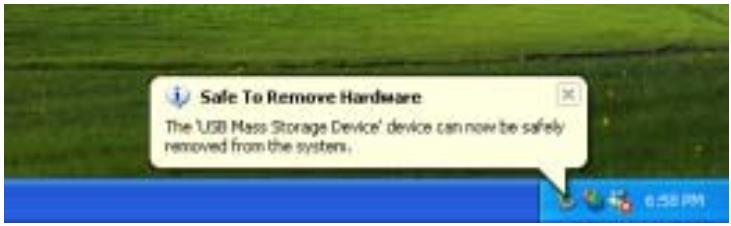
Safely Remove Hardware 10:19 AM- The Safe To Remove Hardware message balloon will appear. You may now safely unplug your JetFlash from your computer.
text_image
Safe To Remove Hardware The 'USB Mass Storage Device' device can now be safely removed from the system.Remove JetFlash in Mac OS
Drag and drop the Disk icon corresponding to JetFlash into the trashcan. `Then unplug your JetFlash from the USB port.
Remove JetFlash in Linux
Un-mount the device from Linux environment.
Example: umount /mnt/jetflash
Troubleshooting
If an error occurs, first check the points listed below before taking your JetFlash for repair. If you are unable to remedy a problem from the following hints, please consult your dealer or service center.
How long will the Camera battery last?
With constant use, a fully charged camera battery will last approximately five (5) hours. Assuming it is completely depleted, it takes approximately two (2) hours to fully charge the camera battery.
Driver CD cannot auto-run in Windows
Enter Device Manager in Control Panel and enable the Auto-Insert function of the CD-ROM drive. Alternatively, you can execute the JetFlash.EXE in the driver CD manually.
Operating system cannot detect JetFlash
Check followings:
- Is your JetFlash properly connected to the USB port? If not, unplug it and plug it in again.
- Is your JetFlash connected to the Mac keyboard? If yes, unplug it and plug it into an available USB port on your Mac Desktop instead.
- Is the USB port enabled? If not, refer the user's manual of your computer (or motherboard) to enable it.
- Is the necessary driver installed? If your computer is equipped with Windows 98SE, you must insert the Driver CD into the CD-ROM and refer to the "Driver Installation for Windows 98SE" section to complete the driver installation before using your JetFlash.
Cannot power on
The battery power is worn out. Refer to the “Charge Battery” section to recharge your JetFlash.
Cannot take pictures
Check followings:
- If the Memory LED is off, there isn't sufficient storage space for taking pictures. To free the storage space, you must transfer and store your pictures files onto your computer.
- If the Power LED is off, the battery power is worn out. Refer to the "Charge Battery" section to recharge your JetFlash.
- If your JetFlash is connected to the USB port of your computer, you must unplug it.
Pictures are poor, blurred, or dark
Please note the following:
-
Keep your hand steady when pressing the shutter button.
-
Avoid touching the lens and viewfinder with your fingers.
- Avoid taking pictures in low lighting conditions.
Make use of Photo Explorer 8.0 to improve the image quality.
AutoDetector always pop-up
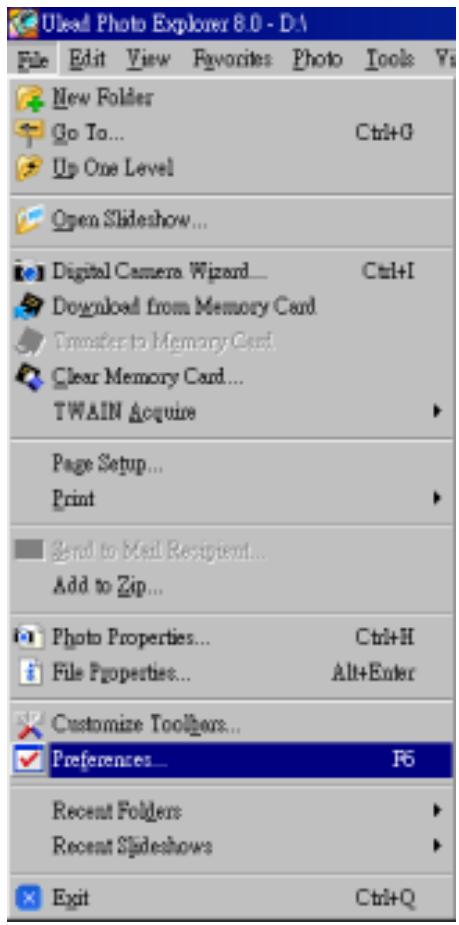
It is a default feature to allow you easily manage your pictures. To remove the AutoDetector program, you must execute Photo Explorer 8.0 and select Preferences... from the File pull down menu.
text_image
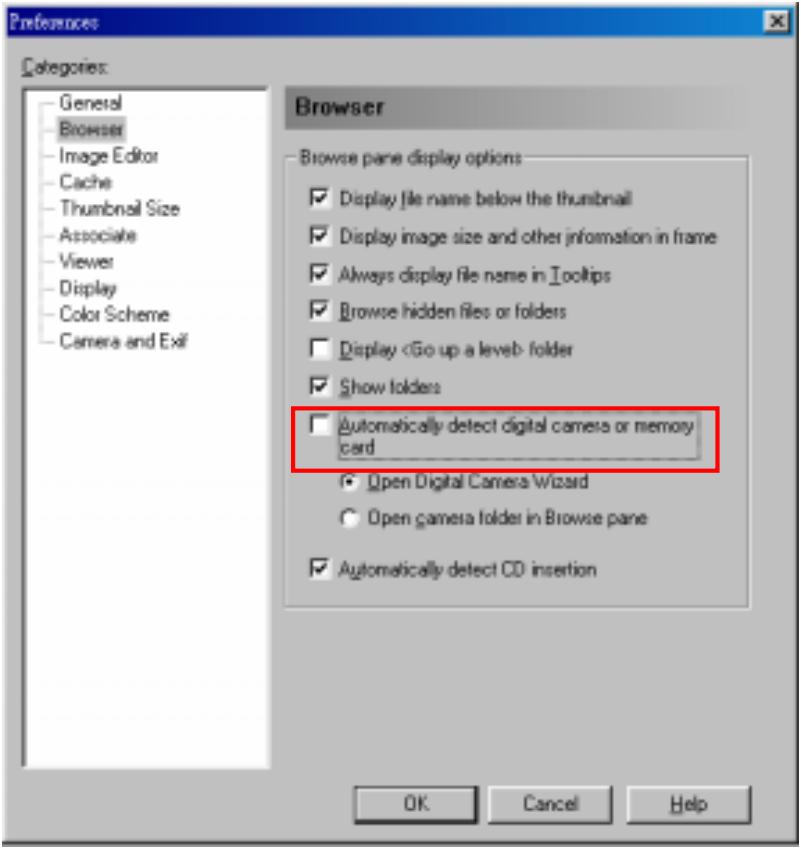
Ulead Photo Explorer 8.0 - D:\ File Edit View Favorites Photo Tools Vis New Folder Go To... Ctrl+G Up One Level Open Slideshow... Digital Camera Wizard... Ctrl+I Download from Memory Card Transfer to Memory Card Clear Memory Card... TWAIN Acquire Page Setup... Print Send to Mail Recipient... Add to Zip... Photo Properties... Ctrl+H File Properties... Alt+Enter Customize Toolters... Preferences... F6 Recent Folders Recent Slideshows Exit Ctrl+QThe Preferences window will appear. Select Browser in the directories and clear the check box "Automatically detect digital camera or memory card", and then select OK. The AutoDetector program will be removed.
text_image
Preferences Categories: General Browser Image Editor Cache Thumbnal Size Associate Viewer Display Color Scheme Camera and Exit Browser Browse pane display options ✓ Display file name below the thumbnail ✓ Display image size and other information in frame ✓ Always display file name in Tooltips ✓ Browse hidden files or folders □ DisplaySpecifications
- Host Interface: USB 1.1 • Dimension: 29 (W) x 80 (L) x 16 (H) mm • Weight: 26g • Sensor Resolution: 640 X 480 pixels (VGA) • Optical Image Size: 1/4" • Optical Lens: Fixed focus length • Built-in Battery: Rechargeable lithium battery • Power On Time: Under 3 seconds - Shot to Shot Time: Under 2 seconds • Certificates: CE, FCC, BSMIOrdering Information
| Memory Size | Transcend P/N |
| 128MB | TS128MJF-DSC |
| 256MB | TS256MJF-DSC |