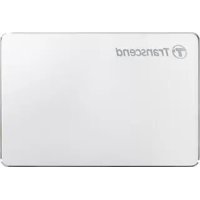
TS0GSJ35 - Disque dur externe TRANSCEND - Notice d'utilisation et mode d'emploi gratuit
Retrouvez gratuitement la notice de l'appareil TS0GSJ35 TRANSCEND au format PDF.


| Type de produit | Disque dur externe 3,5 pouces |
| Marque | Transcend |
| Modèle | TS0GSJ35 (IDE) / TS0GSJ35-S (SATA) |
| Interface | USB 2.0 Hi-Speed (rétrocompatible USB 1.1) |
| Capacité | Variable (disque dur non inclus dans le boîtier nu) |
| Dimensions (L x l x H) | 198,5 mm x 123,4 mm x 35 mm |
| Poids | 450 g maximum (sans disque dur) |
| Alimentation | Adaptateur secteur externe : entrée AC 100-240 V, sortie DC 12 V / 5 V |
| Matériau du boîtier | Aluminium |
| Voyant LED | Indique la mise sous tension et le transfert de données |
| Systèmes d'exploitation supportés | Windows 2000/XP/Vista, Mac OS 9.0 ou ultérieur, Linux noyau 2.4 ou ultérieur |
| Formats de disque dur compatibles | IDE (P/N TS0GSJ35) ou SATA (P/N TS0GSJ35-S) |
| Caractéristiques principales | Installation Plug and Play, vitesses de transfert jusqu'à 480 Mbits/s (60 Mo/s), boîtier aluminium, logiciel StoreJet elite inclus |
| Contenu du paquet | Boîtier StoreJet 3.5, câble USB type B vers A, adaptateur secteur, câble d'alimentation, support vertical, guide d'installation rapide, vis (x4) |
| Sécurité | Ne pas exposer à des températures extrêmes (>60°C ou <5°C), éviter l'humidité, utiliser l'adaptateur fourni, ne pas débrancher pendant le transfert |
| Entretien et nettoyage | Nettoyer avec un chiffon sec ; ne pas utiliser de produits liquides ou abrasifs |
| Température de fonctionnement | 5°C à 60°C |
| Température de stockage | -40°C à 70°C |
| Humidité | 8 % à 90 % HR |
| Certifications | CE, FCC, BSMI |
| Garantie | 2 ans (sous réserve des conditions de la garantie limitée Transcend) |
| Réparabilité | Boîtier ouvrable pour installation du disque dur ; pas de pièces détachées officielles, réparation par un centre agréé recommandée |
FOIRE AUX QUESTIONS - TS0GSJ35 TRANSCEND
Questions des utilisateurs sur TS0GSJ35 TRANSCEND
0 question sur cet appareil. Repondez a celles que vous connaissez ou posez la votre.
Poser une nouvelle question sur cet appareil
Téléchargez la notice de votre Disque dur externe au format PDF gratuitement ! Retrouvez votre notice TS0GSJ35 - TRANSCEND et reprennez votre appareil électronique en main. Sur cette page sont publiés tous les documents nécessaires à l'utilisation de votre appareil TS0GSJ35 de la marque TRANSCEND.
MODE D'EMPLOI TS0GSJ35 TRANSCEND
USB2.0
StoreJet ^TM 3.5
User's Manual
(Version 1.0)
Transcend
Exceeding Your Expectations
Table of Contents
Introduction ....3
Package Contents....3
Features......4
System Requirements......4
Safety Precautions ....5
General Use....5
Backing Up Data....5
Transporting....5
Power....5
Reminders....5
Product Overview....6
Installing a Hard Drive....7
Driver Installation....10
Driver Installation for Windows ^® 2000, XP and VISTA ....10
Driver Installation for Mac ^™ OS 9.0, or Later .....10
Driver Installation for Linux ^™ Kernel 2.4, or Later .....10
Connecting to a Computer ....11
Disconnecting from a Computer....13
Removing the StoreJet ^™ 3.5 in Windows ^® 2000, XP and VISTA....13
Removing the StoreJet ^™ 3.5 in Mac ^™ OS 9.0, or Later....13
Removing the StoreJet ^™ 3.5 in Linux ^™ Kernel 2.4, or Later....13
Formatting the Hard Drive ....14
Troubleshooting 16
StoreJet™ 3.5 series ....17
Transcend Limited Warranty 18
Introduction
Congratulations on purchasing Transcend's StoreJet™ 3.5. This portable, Hi-Speed USB storage device is the perfect data management system for uploading, downloading, storing, transferring and backing up your vital data and information. With a huge storage capacity and Hi-Speed USB 2.0 data transfer rates, the StoreJet™ 3.5 is ideal for storing and transferring your files, folders, documents, photos, music and e-work between it and any desktop, or notebook computer. In addition, the StoreJet™ 3.5 comes with a very useful software (please see the Software User's Manual for detailed instructions) pack that can (used in Windows®) increase your productivity. The User's Manual and accompanying Software User's Guide are written to help you get the most from your new device, please read both in detail before using the StoreJet™ 3.5.
Package Contents
The StoreJet™ 3.5 package includes the following items:
- StoreJet™ 3.5
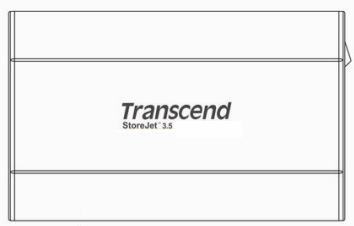
text_image
Transcend StoreNet 3.5CD
- USB B-Type to USB A-Type cable

- Power Adapter
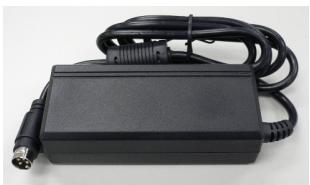
natural_image
Black electronic device with attached cable and connector (no visible text or symbols)- Power Cable
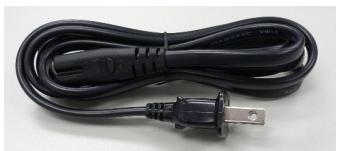
natural_image
Coiled black electrical power plug with terminal terminal (no text or symbols visible)- Vertical stand
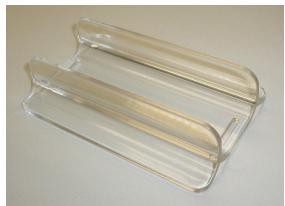
natural_image
Clear plastic tray with two upright handles, no text or symbols visible- Quick Instruction Guide
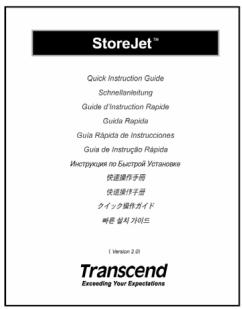
text_image
StoreJet™ Quick Instruction Guide Schneitierung Guide d'Instruction Rapide Guida Rapida Guia Rapida de Instrucciones Guia de Instruption Rapida Инструкция по Быстрой Установке 快递操作手册 快递操作手册 タイプ操作ガイド 빠른 설치 거로드 ( Version 2.8) Transcend Exceeding Your Expectations- Screws x 4

Features
● Hi-Speed USB 2.0 compliant and USB 1.1 backwards compatible
● Easy Plug and Play installation
● Hi-Speed data transfer rates up to 480Mbits (60MB) per second
- Aluminum case
● LED indicates Power On and data transfer activity
- Additional StoreJet Software pack: StoreJet™ elite (helps you manage your data)
System Requirements
Desktop or notebook computer with a working USB port.
One of following Operating Systems (OS):
- Windows® 2000
- Windows® XP
- Windows® VISTA
- Mac™ OS 9.0, or later
- Linux™ Kernel 2.4, or later
Safety Precautions
These usage and safety guidelines are IMPORTANT! Please follow them carefully.

Your StoreJet ^™ 3.5 is connected to a computer using a USB B-Type (on the StoreJet ^™ ) to USB A-Type (on a Desktop/Notebook) cable. Please ensure that you connect the cable ends to the ports correctly.
General Use
- Carefully unpack the contents of the StoreJet™ package.
- During operation avoid exposing your StoreJet™ to temperature extremes above 60°C, or below 5°C.
- Do not drop your StoreJet™.
- Do not allow your StoreJet™ to become damp or wet from water or any other liquids.
- Do not use a damp/wet cloth to wipe or clean the exterior case.
-
Do not use or store your StoreJet™ in any of the listed environments:
-
Direct sunlight
- Next to an air conditioner, electric heater or other heat sources
- In a closed car that is in direct sunlight
Backing Up Data
- Transcend does NOT take any responsibility for data loss, or damage during operation. If you decide to store data on your StoreJet™ we strongly advise that you regularly backup the data to a computer, or other storage medium.
- To ensure High-Speed USB 2.0 data transfer rates when using your StoreJet™ 3.5 with a computer, please check the computer has the relevant USB drivers. If you are unsure on how to check this, please consult the computer or motherboard User's Manual for USB driver information.
- The StoreJet™ 3.5's internal hard drive comes formatted for NTFS. If you want to backup a Mac computer you will need to format the drive for HFS+ using the Mac Disk Utility.
Transporting
- Do not pack your StoreJet™ 3.5 into luggage without the proper padded support. Other items in the luggage may damage your StoreJet™ 3.5 without the proper protection.
- Avoid squeezing your StoreJet™ 3.5 to prevent damage to the internal HDD.
- Avoid placing objects onto your StoreJet™ 3.5 to prevent damaging it.
Power
- The StoreJet™ 3.5 is powered from the mains using the Power Adapter.
- Ensure nothing is resting on the Power cables and that the cables are not located where they can be tripped over or stepped on.
Reminders
Always follow the procedures in the “Disconnecting from a Computer” section to remove your StoreJet ^™ from a computer.
Product Overview
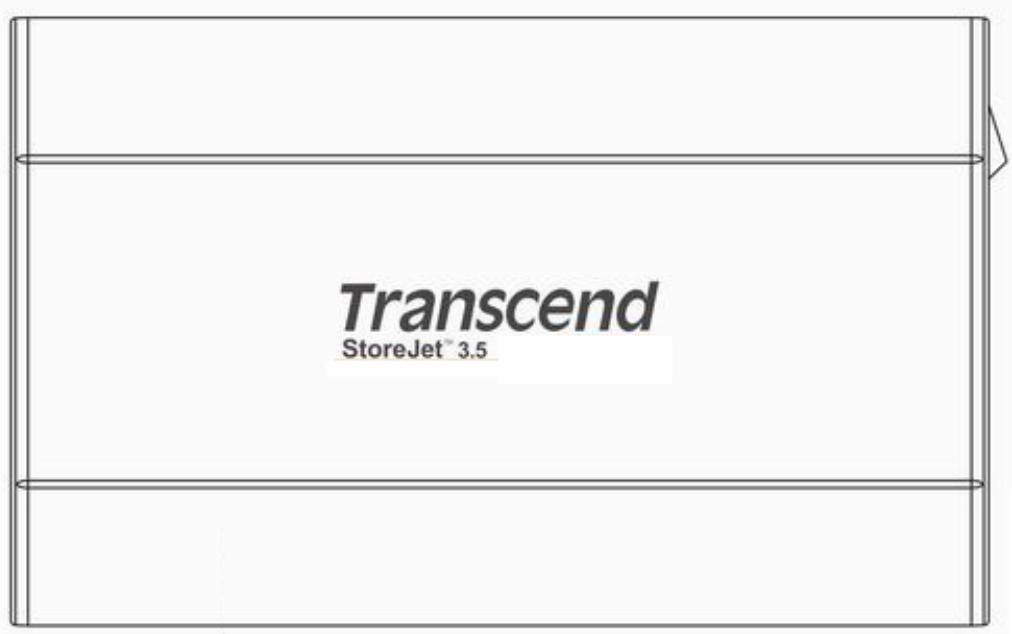
text_image
Transcend StoreJet™ 3.5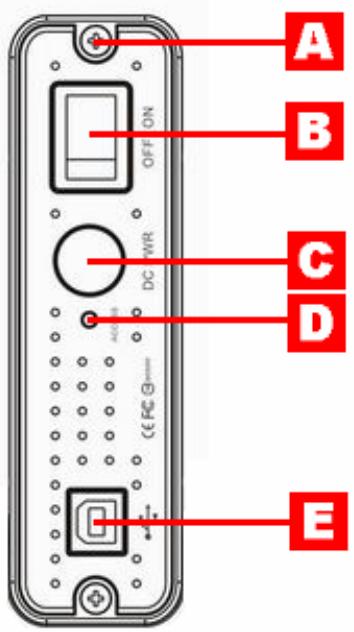
text_image
A B C D EFigure 1. StoreJet 3.5
A Screws x 2
B Power ON/OFF Switch
C Power Jack
D LED
USB B-Type Port
Installing a Hard Drive

Your StoreJet™ 3.5 HDD Enclosure is capable of supporting an IDE, or a SATA Hard Disk Drive. It is IMPORTANT! that you match and install the correct Hard Drive to the correct enclosure.
Installing a Hard Drive
If you purchased a Transcend StoreJet™ 3.5 HDD Enclosure that does not have a Hard Disk Drive already installed, please read this section, otherwise you can skip to the "Driver Installation" section. Your Transcend StoreJet™ 3.5 HDD Enclosure is capable of supporting an IDE, or a SATA Hard Drive, it is important that you match and install the correct hard drive to the correct enclosure. You can identify the type of enclosure by its part number. Enclosures with the Transcend part number TS0GSJ35-S support SATA Drives, while enclosures with the part number TS0GSJ35 support IDE Drives.
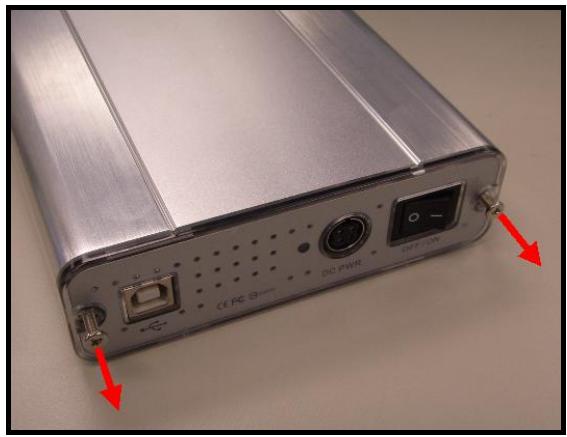
- Open the StoreJet ^™ 3.5 by removing the two screws from either side of the top cover, as indicated in the diagram.
natural_image
Close-up of a silver USB drive rear panel with ports and buttons, showing red arrows pointing to ports (no readable text or symbols)Figure 2. Remove the screws from the top cover
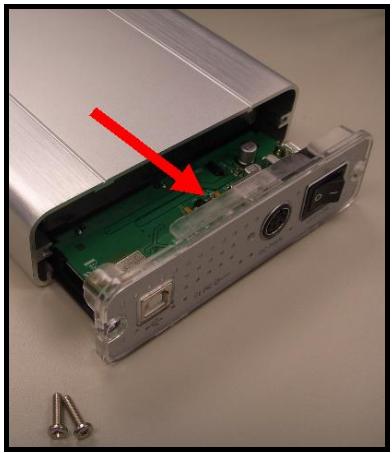
- Remove the cover revealing a control board adapter; this converts the IDE, or SATA interface connector of the hard drive to a USB 2.0 B-Type interface. Slide out the control board.
natural_image
Interior view of an electronic device showing a green circuit board with a red arrow pointing to a component, and screws attached (no text or symbols visible)Figure 3. Remove the top cover revealing the IDE/SATA adapter
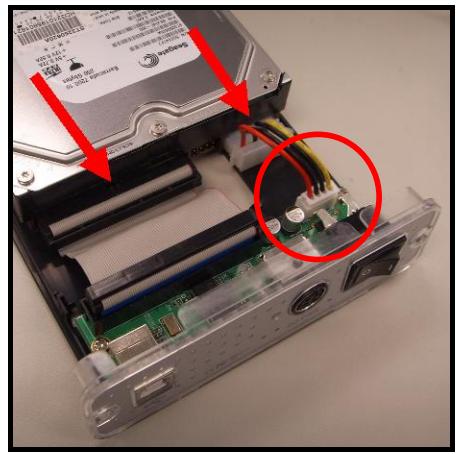
- IDE Connection: Carefully line up and plug in the IDE connector on the control board to the hard drive. Do NOT force the IDE connector into the hard drive and do NOT insert the connector at an angle, otherwise you may damage it. After you have connected the control board, attach the power cable to the IDE hard drive.
natural_image
Internal view of a computer hard drive showing internal components and wiring, with red arrows indicating assembly direction (no text or symbols visible)Figure 4. Connect the IDE control board and power cable to the IDE hard drive
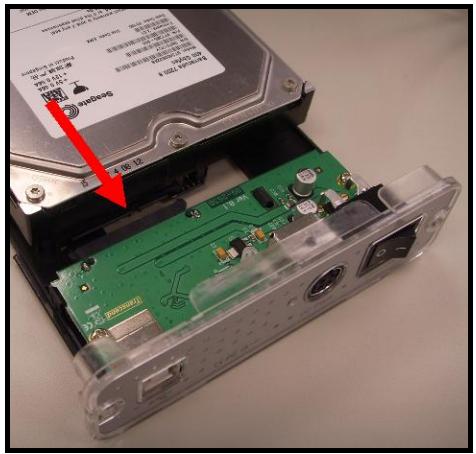
- SATA Connection: Carefully line up and plug in the SATA connector on the control board to the hard drive. Do NOT force the SATA connector into the hard drive and do NOT insert the connector at an angle, otherwise you may damage it.
natural_image
Interior view of an open hard drive into a green circuit board, showing internal components and a red arrow indicating a component (no readable text or symbols)Figure 5. Connect the SATA hard drive to the SATA adapter
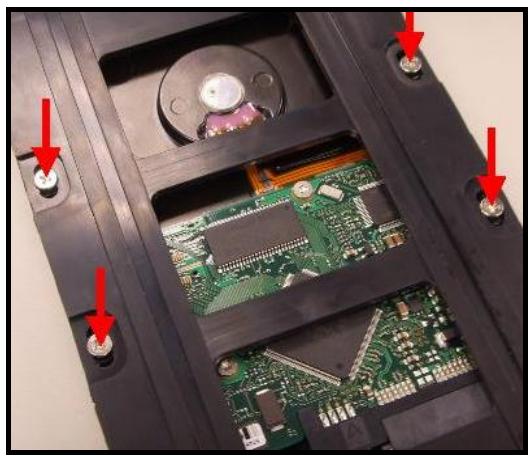
- Using the screws that are provided, secure the hard drive to the control board's plastic panel; this will allow you to slide the hard drive into the StoreJet™ 3.5 more easily.
natural_image
Interior view of a black electronic device showing internal components and red arrows pointing to pins (no text or symbols visible)Figure 6. Secure the hard drive to the panel using the provided screws
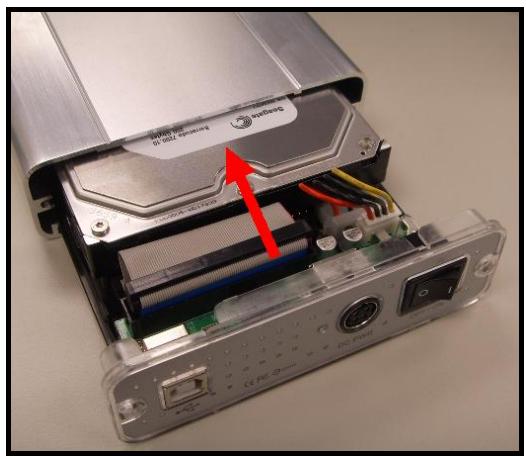
- Carefully reinsert the IDE/SATA adapter and its connected 3.5" hard drive into the StoreJet™ 3.5 and reattach the screws to the top cover.
natural_image
Interior view of a computer hard drive showing internal components and a red arrow indicating a component (no text or symbols visible)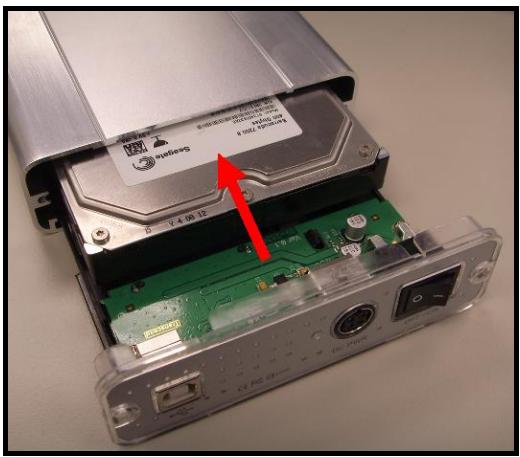
natural_image
Interior view of an electronic device showing a green circuit board and a metallic case with a label, no readable text or symbols present.Figure 7. Reinsert the IDE/SATA adapter plus drive and reattach the screws
Driver Installation
Driver Installation for Windows ^® 2000, XP and VISTA
No drivers are required. These Windows ^® Operating Systems have built-in drivers to support the StoreJet ^™ 3.5. Plug your StoreJet ^™ into an available USB port. Connect the Power Adapter to the StoreJet ^™ 3.5 enclosure's power jack and connect the power cable to the adapter, then turn on the unit's power switch. Windows will install the necessary files and a new Local Disk drive with a newly assigned drive letter representing the StoreJet ^™ 3.5 will appear in the My Computer window.
Driver Installation for Mac ^TM OS 9.0, or Later
No drivers are required. Plug your StoreJet ^™ 3.5 into an available USB port. Connect the Power Adapter to the StoreJet ^™ 3.5 enclosure's power jack and connect the power cable to the adapter, then turn on the unit's power switch and your computer will automatically detect it.

text_image
NO NAME 本機磁碟 Macintosh HD 網路 Macintosh... NO N... 桌面 DDisk NO NAMEFigure 8. Mac Driver Installation
Driver Installation for Linux ^™ Kernel 2.4, or Later
No drivers are required. Plug your StoreJet™ 3.5 into a USB port. Connect the Power Adapter to the StoreJet™ 3.5 enclosure's power jack and connect the power cable to the adapter, then turn on the unit's power switch and mount it.
- First create a directory for the StoreJet™ 3.5.
Example: mkdir /mnt/Storejet
- Then, mount the StoreJet ^TM 3.5.
Example: mount -a -t msdos /dev/sda1 /mnt/Storejet
Connecting to a Computer
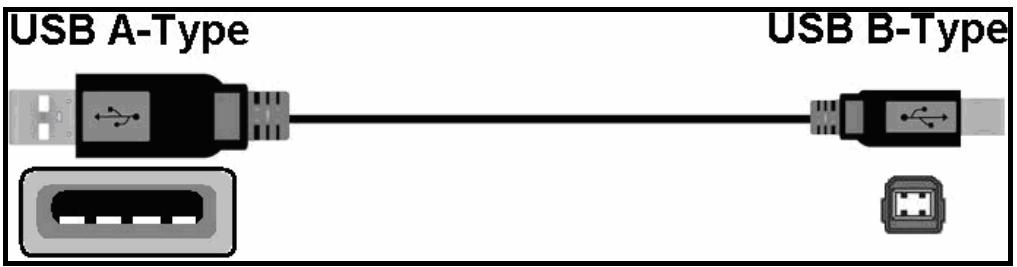
If you want to use the StoreJet™ 3.5 as an External Hard Disk Drive to upload/download data to, or from your computer you need to connect it to a USB port on the computer using the provided USB B-Type to USB A-Type cable.
- Plug the small end of the USB B-Type to USB A-Type cable into the USB B-Type port on the StoreJet™ 3.5.
text_image
USB A-Type USB B-TypeFigure 9. USB B-Type to USB A-Type Cable
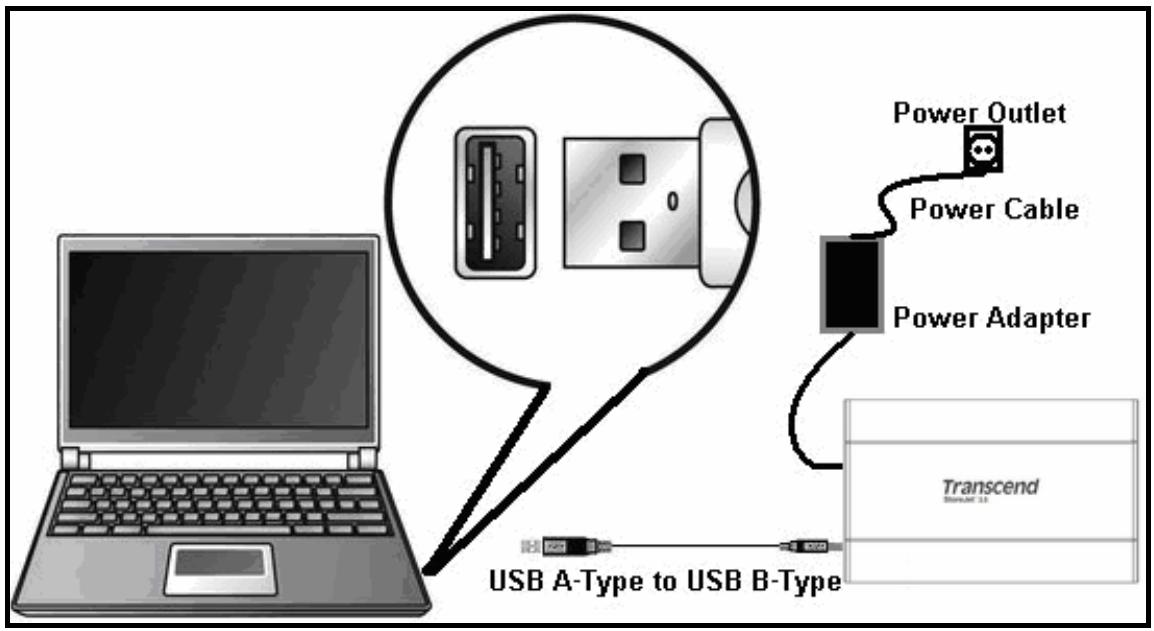
- Plug the large end of the cable into an available USB port on your desktop, or notebook computer.

WARNING! Keep in mind that the StoreJet ^™ must be powered from the mains using the Power Adapter.
text_image
Power Outlet Power Cable Power Adapter USB A-Type to USB B-Type TranscendFigure 10. Connecting to a Computer
-
Connect the Power Adapter to the StoreJet™ 3.5 enclosure's power jack and connect the power cable to the adapter, then turn on the unit's power switch.
-
When the StoreJet™ 3.5 is successfully connected to a computer and powered on, the StoreJet™'s Power LED will light up, a new Local Disk drive with a newly assigned drive letter representing the StoreJet™ 3.5 will appear in the My Computer window and a Hardware icon will appear on the Windows System Tray. The StoreJet™ 3.5's internal hard drive comes formatted for NTFS.

text_image
My Computer File Edit View Favorites Tools Help Back Search Folders History Address My Computer Go Local Disk (C:) Local Disk (D:) Local Disk (F:) Control Panel My ComputerFigure 11. *F: is an example drive letter, the letter in your "My Computer" window may differ
- At this stage the StoreJet ^™ 3.5 is a Peripheral device and can be used as an external hard drive to upload/download data. You can download data to the StoreJet ^™ 3.5 simply by dragging and dropping files, or folders onto the Local Disk drive letter that represents the StoreJet ^™ 3.5.
Disconnecting from a Computer

NEVER disconnect the StoreJet ^™ from a Computer, or turn off the power switch when its LED is flashing.
Removing the StoreJet™ 3.5 in Windows® 2000, XP and VISTA
- Select the Hardware 📋 icon on the system tray.
- The Safely Remove Hardware pop-up window will appear. Select it to continue.

text_image
Safely Remove Hardware EN 1 12:04 PMFigure 12. Safely Remove Hardware
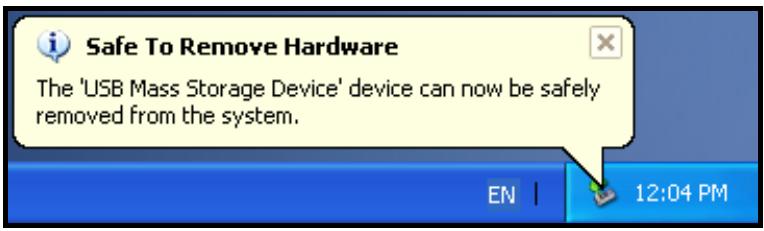
- A message window will appear stating, The 'USB Mass Storage Device' device can now be safely removed from the system. Unplug the StoreJet™ 3.5 and turn off its power switch.
text_image
Safe To Remove Hardware The 'USB Mass Storage Device' device can now be safely removed from the system. EN | 12:04 PMFigure 13. Safe to Remove Hardware

WARNING! To prevent data loss, always use this procedure to remove the StoreJet ^™ from Windows ^® 2000, XP and VISTA.
Removing the StoreJet ^™ 3.5 in Mac ^™ OS 9.0, or Later
Drag and drop the Disk icon that represents your StoreJet ^™ 3.5 into the trashcan. Then unplug your StoreJet ^™ 3.5 from the USB port and turn off its power switch.
Removing the StoreJet ^™ 3.5 in Linux ^™ Kernel 2.4, or Later
Execute umount /mnt/Storejet to un-mount the device. Then unplug your StoreJet ^™ 3.5 from the USB port and turn off its power switch.
Formatting the Hard Drive
The StoreJet ^™ 3.5 contains a Hard Disk Drive and can therefore be formatted. The StoreJet ^™ 3.5's internal hard drive comes formatted for NTFS.

WARNING! Formatting the Disk will erase all of the data on your StoreJet™ 3.5.
- Plug the StoreJet™ 3.5 into an available USB port. Connect the Power Adapter to the StoreJet™ 3.5 enclosure's power jack and connect the power cable to the adapter, then turn on the unit's power switch.
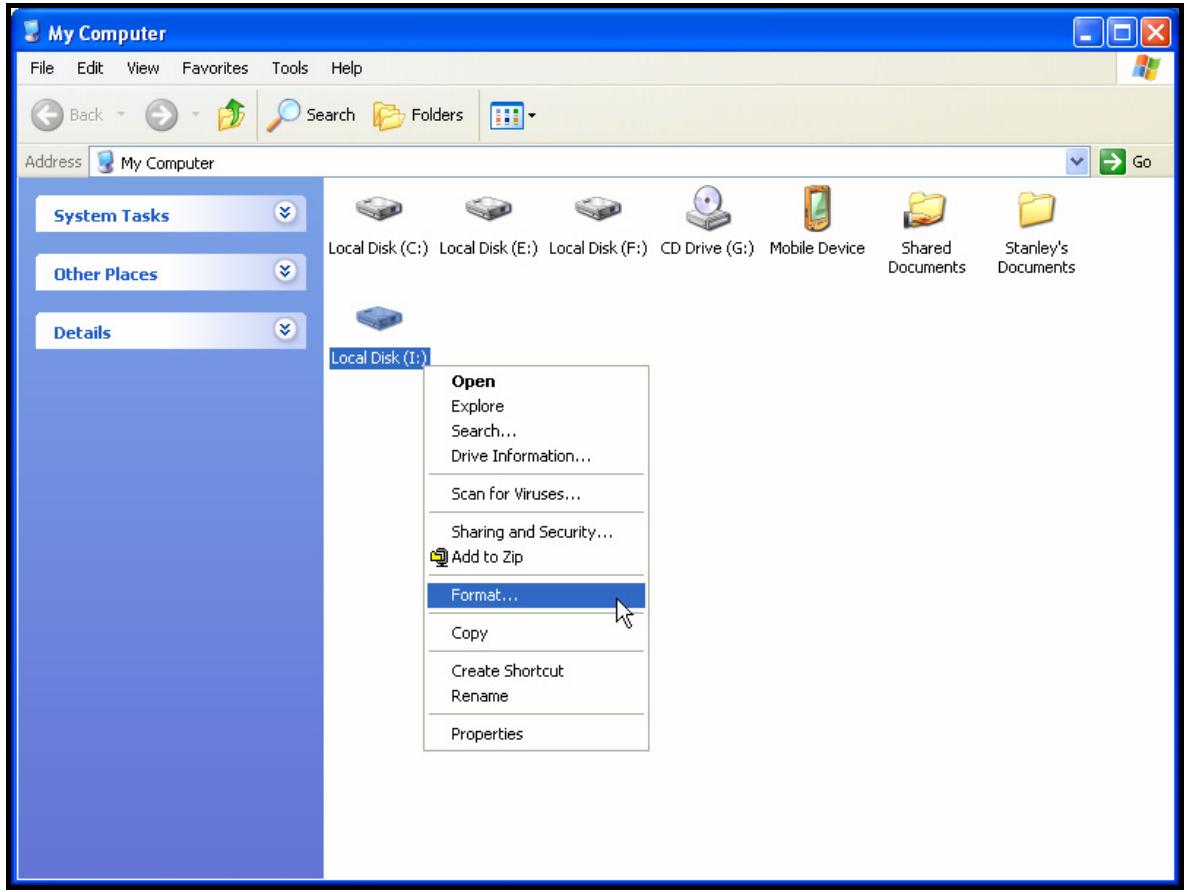
- In the Windows ^® OS, open My Computer and right-click on the new Local Disk that represents the StoreJet ^™ 3.5.
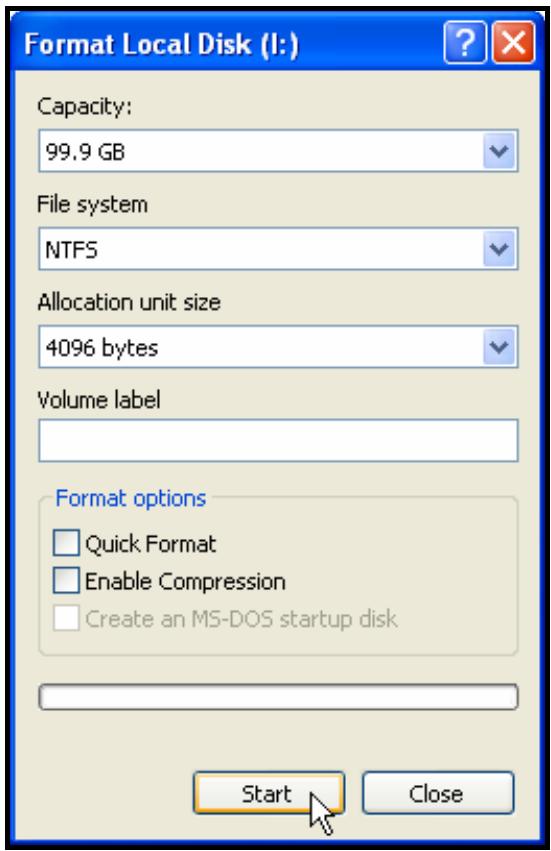
- Select "Format" in the drop down menu to format the StoreJet™ 3.5.
text_image
My Computer File Edit View Favorites Tools Help Back Search Folders Address My Computer System Tasks Other Places Details Local Disk (C:) Local Disk (E:) Local Disk (F:) CD Drive (G:) Mobile Device Shared Documents Stanley's Documents Local Disk (I:) Open Explore Search... Drive Information... Scan for Viruses... Sharing and Security... Add to Zip Format... Copy Create Shortcut Rename PropertiesFigure 14. Formatting the drive
text_image
Format Local Disk (I:) Capacity: 99.9 GB File system NTFS Allocation unit size 4096 bytes Volume label Format options Quick Format Enable Compression Create an MS-DOS startup disk Start Close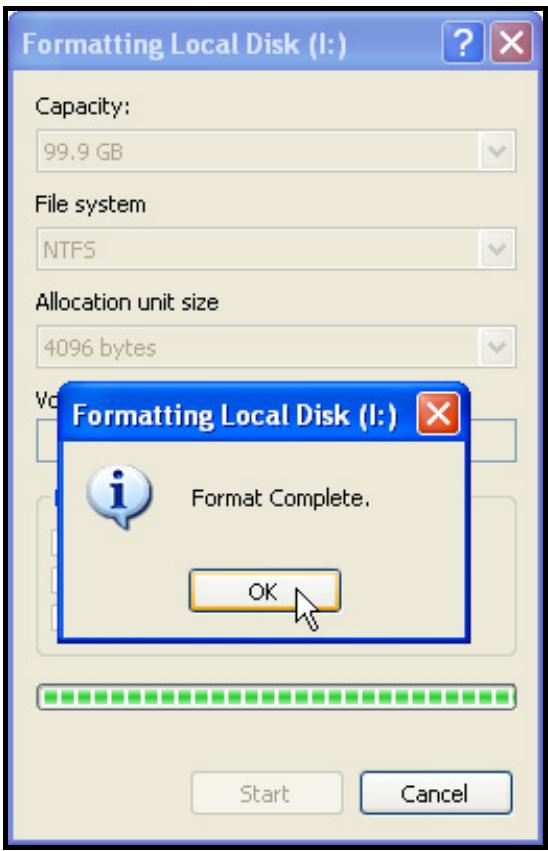
text_image
Formatting Local Disk (I:) Capacity: 99.9 GB File system NTFS Allocation unit size 4096 bytes Formating Local Disk (I:) Format Complete. OK Start CancelFigure 15. Format options
- Click on the "OK" button to complete it.
Troubleshooting
If a problem occurs with your StoreJet ^™ 3.5, please first check the information listed below before taking your StoreJet ^™ 3.5 for repair. If you are unable to remedy a problem from the following hints, please consult your dealer, service center, or local Transcend branch office. We also have FAQ and Support services on our websites.
Software CD cannot auto-run in Windows®
Go to the Device Manager in the Control Panel and enable the Auto-Insert function of the CD-ROM drive. Alternatively, you can manually run the “StoreJet.EXE” file on the Software CD.
Operating system cannot detect the StoreJet ^™ 3.5
Check the following:
- Is your StoreJet™ 3.5 properly connected to the USB port? If not, unplug it and plug it in again. If it is properly connected, try using another available USB port.
- Are you using the USB cable that came in the StoreJet ^™ 3.5 pack? If not, try using the Transcend USB cable to connect the StoreJet ^™ to the computer.
- Is the Power Adapter connected to the StoreJet ^™ power jack and the power cable connected to the power outlet, and the power switch turned on? If not, plug the Power Adapter into the StoreJet ^™ , connect the power cable to the power outlet and turn on the power switch.
- Is your StoreJet ^™ 3.5 connected to the Mac ^™ keyboard? If yes, unplug it and plug it into an available USB port on your Mac ^™ Desktop.
- Is the USB port enabled? If not, refer to the user's manual of your computer (or motherboard) to enable it.
Cannot Power ON
The StoreJet ^™ 3.5 must be powered from the mains using the power adapter and the power switch turned on. If you cannot power on the StoreJet ^™ and you have ensured that all the cables are connected properly and the power switch is on, try plugging the power cable into another power outlet.
Cannot back up my Mac™
The StoreJet ^™ 3.5's internal hard drive comes formatted for NTFS. If you want to backup a Mac computer you will need to format the drive for HFS+ using the Mac Disk Utility.
Cannot detect the StoreJet™ 3.5 in Linux
The StoreJet ^™ 3.5's internal hard drive comes formatted for NTFS. Linux CANNOT support the NTFS file system, please reformat the hard drive to the FAT file system.
StoreJet™ 3.5 series Specifications
| • Size (L x W x H): | 198.5mm × 123.4mm × 35mm |
| • Weight: | Max. 450g (without hard drive) |
| • Storage Media: | 3.5 inch IDE, or SATA Hard Disk Drive |
| • Power Supply: | AC input: 100V-240VDC output: 12V/5V Switching Power Adapter |
| • Max. Transfer Speeds: | 480Mbits (60MB) per second |
| • Operating Temperature: | 5°C (41°F) to 60°C (140°F) |
| • Storage Temperature: | -40°C (-40°F) to 70°C (158°F) |
| • Humidity: | 8% to 90% RH |
| • Certificates: | CE, FCC, BSMI |
| • Warranty: | 2-years |
Ordering Information
| Device Description | Memory Size | Transcend P/N |
| StoreJetTM 3.5 IDE | 0GB | TS0GSJ35 |
| StoreJetTM 3.5 IDE | 0GB | TS0GSJ35-EU |
| StoreJetTM 3.5 SATA | 0GB | TS0GSJ35-S |
| StoreJetTM 3.5 SATA | 0GB | TS0GSJ35-SEU |
Transcend Limited Warranty
“Above and Beyond” is the standard we set ourselves for customer service at Transcend. We consistently position ourselves to be significantly above the industry norm, which is all part of our commitment to Customer Satisfaction.
All Transcend information, Inc. (Transcend) products are warranted and tested to be free from defects in material and workmanship and to conform to the published specifications. During the warranty period should your Transcend StoreJet™ 3.5 fail under normal use in the recommended environment due to improper workmanship or materials, Transcend will repair the product or replace it with a comparable one. This warranty is subject to the conditions and limitations set forth herein.
Duration of Warranty: The Transcend StoreJet ^™ 3.5 is covered by this warranty for a period of two (2) years from the date of purchase. Proof of purchase including the date of purchase is required to collect on the warranty. Transcend will inspect the product and decide whether to repair or replace it. Transcend reserves the right to provide a functional equivalent product, or a refurbished replacement product.
Limitations: This warranty does not apply to product failure caused by accidents, abuse, mishandling, improper installation, alteration, acts of nature, improper usage, or problems with electrical power. In addition, opening or tampering with the product casing, or any physical damage, abuse or alteration to the product's surface, including all warranty or quality stickers, product serial or electronic numbers will also void the product warranty. Transcend is not responsible for recovering any data lost due to the failure of a hard drive device. Transcend's StoreJet™ 3.5 must be used with devices that conform to the recommended industry standards. Transcend will not be liable for damages resulting from a third party device that causes the Transcend StoreJet™ 3.5 to fail. Transcend shall in no event be liable for any consequential, indirect, or incidental damages, lost profits, lost business investments, lost goodwill, or interference with business relationships as a result of lost data. Transcend is also not responsible for damage or failure of any third party equipment, even if Transcend has been advised of the possibility. This limitation does not apply to the extent that it is illegal or unenforceable under applicable law.
Disclaimer: The foregoing limited warranty is exclusive. There are no other warranties, including any implied warranty of merchantability or fitness for a particular purpose. This warranty is not affected in any part by Transcend providing technical support or advice.
Online Registration: To expedite the warranty service, please register your Transcend Product within 30 days of purchase.
Register online at http://www.transcendusa.com/registration
❖ The specifications mentioned above are subject to change without notice.
Transcend
Exceeding Your Expectations
Transcend Information, Inc.
www.transcendusa.com
*The Transcend logo is a registered trademark of Transcend Information, Inc.
*All logos and marks are trademarks of their respective companies.