
RA122 - Montre connectée OREGON - Notice d'utilisation et mode d'emploi gratuit
Retrouvez gratuitement la notice de l'appareil RA122 OREGON au format PDF.

| Type de produit | Montre connectée |
| Marque | OREGON |
| Modèle | RA122 |
| Affichage | LCD avec rétroéclairage |
| Fonctions principales | Horloge, calendrier, boussole, chronomètre, alarme, verrouillage des touches |
| Boussole | 16 directions cardinales/ordinales, 36 segments, calibration magnétique |
| Précision de la boussole | Indication directionnelle (non professionnelle) |
| Chronomètre | 00:00:00 à 59:59:59 (h:min:s) |
| Alarme | Quotidienne, activation/désactivation, silence par tout bouton |
| Rétroéclairage | 5 secondes |
| Verrouillage des touches | Oui, maintien de la touche / pendant 2 secondes |
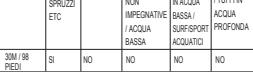
| Résistance à l'eau | 30 mètres (98 pieds) |
| Alimentation | 1 pile CR2032 3V |
| Température de fonctionnement | 0°C à 40°C (32°F à 104°F) |
| Température de stockage | -20°C à 60°C (-4°F à 140°F) |
| Format d'heure | 12/24 heures |
| Matériau du boîtier | Plastique/résine (estimation) |
| Nettoyage | Chiffon doux légèrement humide, savon doux, eau tiède |
| Précautions d'usage | Éviter chocs, poussière, températures extrêmes, exposition solaire prolongée |
| Homologation | Directive CEM 89/336/CE |
| Contenu de la boîte | Montre, pile installée, manuel d'utilisation |
FOIRE AUX QUESTIONS - RA122 OREGON
Questions des utilisateurs sur RA122 OREGON
0 question sur cet appareil. Repondez a celles que vous connaissez ou posez la votre.
Poser une nouvelle question sur cet appareil
Téléchargez la notice de votre Montre connectée au format PDF gratuitement ! Retrouvez votre notice RA122 - OREGON et reprennez votre appareil électronique en main. Sur cette page sont publiés tous les documents nécessaires à l'utilisation de votre appareil RA122 de la marque OREGON.
MODE D'EMPLOI RA122 OREGON
INTRODUCTION
Thank you for selecting the Oregon Scientific™ TRACKER Digital Compass Watch (RA122). The RA122 has been designed for the urban professional who enjoys an active lifestyle. Equipped with real-time clock, stopwatch, backlight and keypad lock functions, this versatile watch can be used in the urban jungle while the built in compass makes it the perfect companion when venturing into the great outdoors.
IMPORTANT
The measurement functions built into the RA122 are not meant to substitute professional measurement or industrial precision devices. Values produced by this device should be considered as reasonable representations only.
When engaging in mountain climbing or other activities in which losing your way can create a dangerous or life-threatening situation, always be sure to use a second compass to confirm direction readings. Oregon Scientific™ assumes no responsibility for any loss, or any claims by third parties that may arise through the use of this device.
- Replace the lid by screwing it back into place using a Phillips screwdriver.
The Ground Truth image displays a single, solid horizontal line. According to Rule 2 (UNDERSCORE & LINE RULES), if the GT contains lines used for stylistic emphasis or as background elements (like ruled paper), the OCR result must ignore them. The line in the GT is clearly a stylistic or background line, not a placeholder for text. Therefore, the OCR should not have output any underscores. Outputting \`\_\_\_\_\` constitutes an error under Rule 2, as it hallucinates placeholder symbols where none are semantically intended. Hence, the OCR result is inconsistent with the Ground Truth.
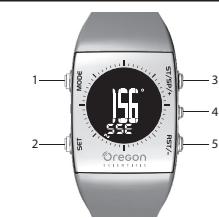
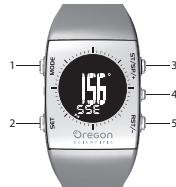
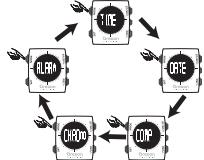
OPERATING MODES
Press MODE to switch between:
• Time Mode
• Date Mode
• Compass Mo
+ Chrono (Stopwatch) Mode
* Alarm Mode
TO SET TIME AN
- Press MODE to navigate to Time Mode
-
Press and hold SET to alternatives
-
Press and hold SET to enter settings.
-
Page 2T / OP / type PCT / tool
-
Press ST / SP / + or RST / - to change values of the setting. Press and hold ST / SP / + or RST / - to rapidly change values.
-
Press SET to confirm and move to the next setting. Repeat steps 3-4 for each setting option. The setting options are as follows: 12 / 24-hour time; hour; minute; year; day-month / month-day; month; day; beep on/off.
- Press MODE anytime to confirm and exit settings.
DATE MODE
This mode is used for viewing the current date. Press MODE to navigate to Date Mode.
COMPASS MODE
ABOUT THE COMPASS The compass shows the bearing in degrees due North together with 16 cardinal / ordinal directions. The outer circumference of the display consists of 36 segments that graphically show the bearing. N indicates North as shown below.

TO VIEW COM
• Press MODE to navigate to Compass Mode
NOTE The compass display is active for 30 seconds at a time. After this, the display will automatically return to time display.
NOTE Always take bearings in the open air, not inside buildings, tents, caves, or other shelters.
NOTE Compass readings should be performed away from magnetic materials. Avoid large magnetic objects, power lines, loudspeakers, electric motors etc.
COMPASS SENSOR CALIBRATION There is a start-up calibration guide when the watch is turned on the first time, or after battery replacement. User can also calibrate the compass by following the steps below.
To calibrate the compass sensor: 1. Press MODE to navigate to Compass Mode.
- Press and hold SET to begin calibration of the compass.

- Rotate the watch counter clockwise (as per arrow ☐) at the same speed as the moving segments around the circumference of the display. The rotation will be finished once you have performed 1½ turns and return to compass display.
NOTE DONE indicates calibration has been successfully completed. Repeat steps 2-3 again if FAIL is displayed.

NOTE The compass should be calibrated:
[Non-Text]
• Before you use it for the first time.
• When the battery is replaced.
- When changing environments. Different environments (populated / outdoor) have varying magnetic fields affecting the common reading
- Whenever it is supposed to strong magnetic source
- Whenever it is exposed to strong magnetic sources, extreme cold, or you suspect that other environmental conditions have affected the compass readings.
• If you notice that the compass is not showing the direction correctly.
STOPWATCH MODE
ST. MARRA MOZZ
TO START STOPWATCH
-
Press MODE to navigate to Chrono Mode.
-
Press ST / SP / + to start / stop stopwatch
TO RESETS
Press RST / - to reset stopwatch
NOTE Stopwatch can be reset to 00:00:00 only if it has been stopped or paused.
ALARM MODE
ALARM MODE
TO SET ALARM
-
Press MODE to navigate to Alarm Mode
-
Press and hold SET to enter settings.
-
Press ST / SP / + or RST / - to change values of the setting. Press and hold ST / SP / + or RST / - to rapidly change values.
-
Press SET to confirm and move to the next setting. Repeat steps 3-4 for each setting option. The setting options are as follows: hour: minute.
-
Press MODE anytime to confirm and exit settings.
TO ACTIVATE / DEACTIVATE ALARM
-
Press MODE to navigate to Alarm Mode
-
Press ST / SP / + or BST / - to activate / deactivate
alarm.
-
Indicates that the alarm has been activated
-
Press MODE to confirm and exit
TO SILENCE ALARM
When the place
When the alarm clock is activated, it will sound at the set time every day. Press any button to stop the alarm for that day.
• • • • • •
NOTE The alarm clock is still active and will set off again the
following day.
BACKLIGHT AND KEYPAD LOCK
To activate backlight:
Press 🏠 / 🔒 to turn backlight On for 5 seconds
1.2.3.4.5.6.7.8.9.10.11.12.13.14.15.16.17.18.19.20.21.22.23.24.25.26.27.28.29.30.31.32.33.34.35.36.37.38.39.40.41.42.43.44.45.46.47.48.49.50.51.52.53.54.55.56.57.58.59.60.61.62.63.64.65.66.67.68.69.70.71.72.73.74.75.76.77.78.79.80.81.82.83.84.85.86.87.88.89.90.91.92.93.94.95.96.97.98.99.100
NOTE The backlight function will not operate if "☐" or
“□” is displayed.
To toggle keypad lock On or Off:
Press and hold 🏠 / 🔒 for 2 seconds. 🔒 indicates keypad
is locked.
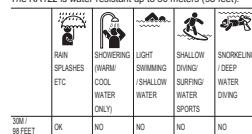
USE IN THE WATER
The RA122 is water-resistant up to 30 meters (98 feet)
NOTE: Out the article before a review of the research paper.
NOTE Set the watch before exposing it to excessive water. Pressing the keys while in the water or during heavy rainstorms may cause water to enter the watch.
SPECIFICATIONS
(No text)
Real time clock 12/24 hour with hour / minute /
second
Stopwatch 00:00:00 to 59:59:59 (hr:min:sec)
Power 1 x CR2032 3V batteries
Operating 0°C to 40°C
temperature (32°F to 104°F)
Storage -20°C to 60°C
temperature (41 to 140 t)
PRECAUTIONS
To ensure you use your product correctly and safely, read these warnings and the entire user manual before using the product:
• Use a soft, slightly moistened cloth. Do not use abrasive or corrosive cleaning agents, as these may cause damage. Use luke warm water and mild soap to clean the watch. Never use the products in hot water or store them when wet.
- Do not subject the product to excessive force, shock, dust, temperature changes, or humidity. Never expose the product to direct sunlight for extended periods. Such treatment may result in malfunction.
- Do not tamper with the internal components. Doing so will terminate the product warranty and may cause damage. The main unit contains no user-serviceable parts.
- Do not scratch hard objects against the LCD display as this may cause damage.
• Take precautions when handling all battery types.
- Remove the batteries whenever you are planning to store the product for a long period of time.
- When replacing batteries, use new batteries as specified in this user manual.
- The product is a precision instrument. Never attempt to take this device apart. Contact the retailer or our customer service department if the product requires servicing.
• Do not touch the exposed electronic circuitry, as there is a danger of electric shock.
- Check all major functions if the device has not been used for a long time. Maintain regular internal testing and cleaning of your device. Have your watch serviced by an approved service center annually.
- When disposing of this product, do so in accordance with your local waste disposal regulations.
• Due to printing limitations, the displays shown in this manual may differ from the actual display.
• The contents of this manual may not be reproduced without the permission of the manufacturer.
NOTE The technical specifications for this product and the contents of the user manual are subject to change without notice.
ABOUT OREGON SCIENTIFIC
Visit our website (www.oregonscientific.com) to learn more about Oregon Scientific products. If you're in the US and
would like to contact our Customer Care department directly, please visit: www2.oregonscientific.com/service/support
OR
Call 1 800 853 8883
Evi interventiva
For international inquiries, please visit. www2.org/Scientific.org/about/international
WWW.Eorgoscientific.com/AboutInternational
The Ground Truth image displays a single, solid horizontal line. According to Rule 2 (UNDERSCORE & LINE RULES), if the GT contains lines used for stylistic emphasis or as background (like ruled paper), the OCR result must ignore them. The provided OCR content is "____", which consists of four underscores. This is incorrect because underscores are not equivalent to a solid line and are not permitted under the “Stylistic/Background Lines (Ignore)” rule. Outputting underscores for a stylistic line violates the rule and constitutes an error. Therefore, the OCR result is inconsistent with the Ground Truth.
EU-DECLARATION OF CONFORMITY
Hereby, Oregon Scientific, declares that this TRACKER
Digital Compass Watch (Model RA122) is in compliance with
EMC directive 89/336/CE. A copy of the signed and dated
Declaration of Conformity is available on request via our Oregon Scientific Customer Service.
cc
“
TRACKER
Orologio Bussola Digitale
Modello: RA122
MANUALE PER L'UTENTE
[Non-Text]
IT
“
NTRODUZIONE
Grazie per aver scelto TRACKER Orologio bussola digitale di Oregon Scientific™(RA122). Il modello RA122 è stato progettato per chi ama il design e pratica uno stile di vita attivo. Dotato di orologio, retroilluminazione e blocco dei tasti, questo versatile orologio può essere usato nella giungla metropolitana, mentre la bussola incorporata lo rende il compagno ideale per le uscite all'aperto.
IMPORTANTE
Le funzioni di rilevazione dell'unità RA122 non sostituiscono quelle di dispositivi professionali e industriali di misurazione o di precisione. I valori rilevati da questo orologio devono essere considerati puramente indicativi.
Quando si effettuano scalate o si praticano altre attività in cui smarrirsi può dare luogo a situazioni rischiose e di pericolo, utilizzare sempre una seconda bussola per confermare il rilevamento delle direzioni.
Oregon Scientific™ declina ogni responsabilità per qualsiasi perdita o per eventuali richieste di danni da parte di terzi che possano sorgere dall'uso di questo orologio.
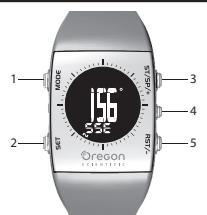
PULSANTI DI CONTROLLO
. MODE: consente di passare ad un'altra visualizzazione e di abbandonare rapidamente una modalità di impostazione . SET: consente di accedere alla modalità di impostazione, di confermare il valore dell'impostazione e di avviare la calibrazione della bussola
. ST / SP / + : consente di aumentare il valore dell'impostazione e di avviare/interrompere il cronometro . - / 🔒 : consente di attivare la retroilluminazione e il blocco dei tasti
. RST / - : consente di diminuire il valore dell'impostazione e di azzerare il cronometro
[Non-Text]
. CD 1 ____ ____ 7
![OREGON RA122 - [Non-Text] - 1](/content/2019/07/162850/images/945e25714d5e0683262bdda5b67b0095bc0e2a65175a9f7fee6e4b8e8b3e5def.jpg)
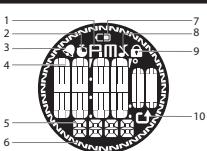
PM: orologio in formato 12 ore
indica che il cronometro viene visualizzato o che è in funzione
indica che la sveglia è attiva
Visualizza orologio / calendario, cronometro, rilevamento della bussola, ora della sveglia o banner della modalità Visualizza la direzione con punto cardinale o ordinale
. Segmenti della bussola: indica il nord e lo stato della calibrazione
. CD indica che la batteria è in esaurimento
. indica che il segnale acustico è disattivato
indica che il blocco dei tasti è attivo
- Indica la direzione da dare durante la calibrazione della bussola
OPERAZIONI PRELIMINARI
ACCENSIONE DEL DISPOSITIVO (SOLO LA PRIMA VOLTA) ter attivare il display LCD, premere un tasto qualsiasi per secondi.
m = 311
SOSTITUZIONE DELLE BATTERIE Unità RA122 funziona con 1 batteria da 3 V di tipo CR2032, già inserita. Cfr. Fate riferimento alla tabella sottostante per le informazioni relative alla batteria.
ICONA BATTERIA IN ESAURIMENTO DESCRIZIONE
CD or CD La batteria è in esaurimento. --- Appare quando la carica è troppo debole per mettere in funzione l'unità. "-" viene visualizzato al posto dei valori della bussola.
IOTA Mentre viene visualizzata l'icona della batteria in saurimento, la funzione di bussola, di calibrazione della ussola, il segnale acustico della sveglia e la retroilluminazione ono disattivati. La visualizzazione ritornerà alla normalità oppo aver sostituito la batteria.
IOTA Quando la batteria viene sostituita, è importante calibrare il sensore magnetico della bussola. (Cfr. paragrafo Bussola")
IOTA Se è necessario sostituire la batteria, si consiglia i contattare il proprio rivenditore o il nostro servizio di
ssistenza clienti.
Sostituzione delle batterie:
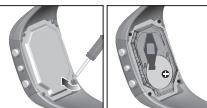
. Con un piccolo cacciavite Phillips, togliere la copertura del vano batterie. Una volta aperto, mettere le viti in un
. Togliere la batteria vecchia ed inserire quella nuova rispettando le polarità.
Riavvitare la copertura con il cacciavite Phillips
MODALITÀ DI FUNZIONAMENTO
Promere MODE per scorrere tra
Maralith Ora
Modalità Orà Modalità Dat
Modalità Bussola
Modalita Svegila
NORVETI SPA
MOBAENA ORA
IMPOSTAZIONE DI ORA E DATA 1. Premere MODE per navigare fino alla Modalità Ora. 2. Tenere premuto SET per accedere alle impostazioni.
-
Premere ST / SP / + o RST/ - per cambiare i valori dell'impostazione. Tenere premuto ST /SP / + o RST / - per modificare rapidamente i valori.
-
Premere SET per confermare e passare all'impostazione successiva. Ripetere i punti 3-4 per ciascuna opzione di impostazione, la apioni di impostazione cono formato
ura 12/24, ore, mese giorno se
- Premere MODE per confermare e abbandonare le impostazioni in qualsiasi momento
MODALITÀ DATA
Questa modalità viene usata per visualizzare la data corrente. Premere MODE per passare alla Modalità Data.
MODALITÀ BUSSOLA
INFORMAZIONI SULLA BUSSOLA La bussola indica la posizione in gradi rispetto al nord, e 16 direzioni con punti cardinali/ordinali. La circonferenza esterna del display consta di 36 segmenti che indicano graficamente la propria posizione. N indica il nord, come mostrato qui sotto.

VISUALIZZAZIONE DELLA BUSSOLA
• Premere MODE per passare alla Modalità Bussola
NOTA La visualizzazione della bussola rimane attiva per 30 secondi alla volta. Successivamente, la visualizzazione tornerà automaticamente a quella dell'ora.
NOTA Eseguire sempre il rilevamento della posizione all'aperto non all'interno di edifici, tende, grotte o altri luoghi chiusi.
NOTA I rilevamenti della bussola devono essere eseguit lontano da materiali magnetici. Evitare grandi oggett magnetici, linee elettriche, altoparlanti, motori elettrici etc.
CALIBRAZIONE DEL SENSORE DELLA BUSSOLA La prima volta che l'orologio viene acceso, o dopo la sostituzione della batteria, seguire questi semplici passi per la calibrazione.
Calibrazione del sensore della bussola
- Premere MODE per passare alla Modalità Bussola.
- Tenere premuto SET per avviare la calibrazione della bussola.

- Ruotare l'orologio in senso antiorario (seguendo la direzione della freccia ⬆) alla stessa velocità de segmenti che si muovono intorno alla circonferenza del display. La rotazione terminerà dopo 1 ^1/4 di giro e riapparirà la visualizzazione della bussola.
NOTA La scritta DONE indica che la calibrazione è stata completata con successo. Se appare la scritta FAIL, ripetere nuovamente i passaggi 2-3.

NOTA È necessario calibrare la bussola
• Prima di utilizzarla per la prima volta
• Dopo la sostituzione della batteria.
- Quando si cambia ambiente. Ambienti diversi (abitati all'aperto) hanno campi magnetici diversi che condizionando il rilevamento della bussola.
- Ogni volta che viene esposta a forti sorgenti elettromagnetiche, freddo estremo, o se si sospettano altre condizioni ambientali che potrebbero influenzarne le rilevazioni.
• Se ci si rende conto che la bussola non sta indicando la direzione corretta.
MODALITÀ CRONOMETRO
AVVIO DEL CRONOMETRO
- Premere MODE per passare alla Modalita Chrono.
- Premere ST / SP / + per avviare e interrompe cronometro.
AZZERAMENTO DEL CRONOMETRO
Premere RST / - per azzerare il cronomet
NOTA Il cronometro può essere riportato a 00:00:00 solo se
è stato interrotto o n
MODALITA SVEGLIA
IMPOSTAZIONE DELLA SVEGLIA 1. Premere MODE per passare alla Modalità Sveglia.
-
Tenere premuto SET per accedere alle impostazioni.
-
Premiere ST / SP / + o RST / - per camblare I valor dell'importazioni. Tenere promuto ST / SP / + o RST / -
modificare rapidamente i valori. 4. Premere SET per confermare e passare all'impostazione successiva. Ripetere i passaggi 3-4 per ciascuna opzione di impostazione. Le opzioni di impostazione sono: ore, minuti.
- Premere MODE per confermare e abbandonare le impostazioni in qualsiasi momento.
ATTIVAZIONE / DISATTIVAZIONE DELLA SVEGLIA
- Premere MODE per passare alla Modalita Sveglià.
-
Provena 3T / 2P / 1 - 2 PCT (elettivi o disfetti in
-
Premiere ST / SP7 + o RST7 - per attivare o disattivare la svaglia.
-
indica
-
Promero MODE per conformare
-
Promere MODE per conformare e usabile.
SILENZIAMENTO DELLA SVEGLIA
Quando la sveglia è attiva, suonerà ogni giorno all'ora impostata. Premere un tasto qualsiasi per interrompere la sveglia per il giorno corrente.
NOTA La sveglia è ancora attiva e suonerà nuovamente il giorno successivo.
RETROILLUMINAZIONE E BLOCCO DEL TASTI
Attivazione della retroilluminazione:
Premere
secondi. NOTA La retroilluminazione non funziona se sul display sono
visualizzate le icone" [■] "o " [□]".
Attivazione / disattivazione del blocco dei tasti:
Tenere premuto “/” per 2 secondi. L'icona indica che i tasti sono bloccati.
10.2.11.1.20
USO IN ACQUA
L'orologio RA122 è resistente all'acqua fino a 30 metri.
图 1
| ▲ | □ ▼ |
HUGGIA DOCCIA NOOTATE TORTI LUZFUN
NOTA Impostare l'orologio prima di esporlo ad acqua eccessiva. Se i pulsanti vengono premuti mentre si è in acqua o durante forti temporali, l'acqua potrebbe entrare nell'unità.
SPECIFICHE
(No text)
Formato orologio 12/24 ore con ore / minuti
7 second
Cronometro Da 00:00:00 a 99:59:59
(ure.min.sec)
Alimentazione
Temperatura di esercizio da 0°C a 40°C
temperatura di stoccaggio | da -20 °C a 60 °C
2.5 修正后可折旧
AVVERTENZE
Per utilizzare il prodotto in modo sicuro e corretto, leggere
queste avvertenze e tutto il manuale prima dell'uso.
• Utilizzare un panno morbido, leggermente inumidito. Non utilizzare prodotti di sullizio obresivi e corresponsivi in
Non utilizzare prodotti di pulizia abrasivi o corrosivi, in quanto potrebbero causare danni. Non utilizzare mai i
prodotti in acqua calda né riporli se bagnati.
• Non sottoporre il prodotto a forza eccessiva, urti.
polvere, variazioni di temperatura o umidità. Non esporre
Il prodotto a luce solare diretta per lunghi periodi. On similo trattamento può comportare il malfunzionamento
simile trattamento può compensare i manzianamento del prodotto.
• Non manomettere i componenti interni. In questo modo si
invalida la garanzia del prodotto e si possono provocare
danni. L'unità principale non contiene componenti che
possono essere riparati dall'utente.
• Non graffiare il display LCD con oggetti duri in quanto si
potrebbero causare danni.
• Manipolare le batterie con attenzione. • Tagliare la batteria ogni volta che si prevendo di lavorare
- fogliere le inutilizzato
• Al momento della sostituzione delle batterie utilizzare
batterie nuove come indicato in questo manuale per
l'utente.
• Il prodotto è uno strumento di precisione. Non tentare
mai di apnio. Contattare il proprio rivenditore o il nostro
servizio clienti se il prodotto necessita di riparazioni. Non taccara il circuite elettrico concepto, poiché queste
Non tocare in circuito elettrico esposto, poliche questo può provocare scosse elettriche.
• Controllare tutte le funzioni più importanti se il prodotto
non è stato
Controllare e pulire l'apparecchio regolarmente.
• Al momento dello smaltimento di questo prodotto, agire
In conformita con i regolamenti locali sullo smaltimento dei sifiuti.
der minuti.
- A causa di limitazioni di stampa, le immagini di questo manuale persone differire dalle realtà.
• Il contrastiva di questo manuale, non può essere
ristampato senza l'autorizzazione del fabbricante
—
NOTA Le specifiche tecniche del prodotto e il contenuto del
manuale per ruterile possono essere modificati senza preavviso.
INFORMAZIONI AGLI UTENTI DEL PRODOTTI DI
TIPO "DOMESTICO"
INFORMAZIONE AGLUITENTI
2.2.1.3.
√
X
ai sensi dell'art. 13 del Decreto Legislativo 25 luglio 2005, n. 151"Attuazione delle Direttive 2002/95/CE, 2002/96/CE e 2003/108/CE, relative alla riduzione dell'uso di sostanze pericolose nelle apparecchiature elettriche ed elettroniche, nonché allo smaltimento dei rifiuti"
[Non-Text]
The Ground Truth image displays a single, solid horizontal line. According to Rule 2 (UNDERSCORE & LINE RULES), this is a stylistic or background line, not a placeholder underscore. Therefore, the OCR result must ignore it and output nothing or only meaningful text. The provided OCR content is "____", which consists of four underscores. This is an incorrect interpretation of the line as a placeholder, violating the rule that stylistic lines must be ignored. The OCR has hallucinated underscores where none should exist based on the GT's visual context. Hence, the OCR result is inconsistent with the Ground Truth.
ES
The Ground Truth image displays a single, solid horizontal line. According to Rule 2 (UNDERSCORE & LINE RULES), this is a stylistic or background line, not a placeholder underscore. Therefore, the OCR result must ignore it. The provided OCR content is "____", which consists of four underscores. This is an incorrect interpretation of the line as a placeholder, violating the rule that stylistic lines must be ignored. The OCR has hallucinated text (underscores) where none should exist. Hence, the result is inconsistent with the Ground Truth.
INTRODUCCIÓN
Service analytical TRACKER, Provider, Provider Digital
Gracias por elegir el TRACKER Reloj con Brujula Digital
(RA122) de Oregon Scientific™. El RA122 ha sido diseñado
para el profesional urbano con un estilo de vida activo.
Dispone de reloi a tiempo real, cronómetro, retroiluminación
v bloqueo de botones Este reloi tan versátil se puede
utilizar en la jungla urbana, mientras que la hagiula que lleva
utilizar en la jungia urbana, mientras que la brujula que lleva incorporada la seguiente en el perfecte campeñores para
incorporada lo convierte en el perfecto compañero para
recorrer el ancho r
IMPORTANTE
IMPORTANTE
• Las funciones de medición del RA122 no están pensadas
para sustituir mediciones profesionales ni dispositivos
de precisión industrial. Los valores procedentes de
este reloi deben considerarse únicamente indicaciones
zazopahles
Tazonables.
• Si realiza escalada o hace alguna otra actividad en
que perderse puede provocar una situación peligrosa,
asegúrese de confirmar las lecturas con una segunda
brújula.
• Oregon Scientific™ no asume ninguna responsabilidad
por pérdidas ni reclamaciones de terceros derivadas del
por perdaídas ni reciamaciones de terceros derivadas del uso de este relei.
uso de este reloj.
(No text)
BOTONES DE CONTROL
BOTONES DE CONTROL
The Ground Truth image displays a single, solid horizontal line. According to Rule 2 (UNDERSCORE & LINE RULES), this is a stylistic or background line, not a placeholder underscore. Therefore, the OCR result must ignore it and output nothing or only meaningful text. The provided OCR content is "____", which consists of four underscores. This is an incorrect interpretation of the line as a placeholder, violating the rule that stylistic lines must be ignored. The OCR has hallucinated underscores where none should exist based on the GT's visual context. Hence, the OCR result is inconsistent with the Ground Truth.
The Ground Truth image displays a single, solid horizontal line. According to Rule 2 (UNDERSCORE & LINE RULES), this is a stylistic or background line, not a placeholder underscore. Therefore, the OCR result must ignore it. The provided OCR content is "____", which consists of four underscores. This is an incorrect interpretation of the line as a placeholder, violating the rule that stylistic lines must be ignored. The OCR has hallucinated underscores where none should exist based on the GT's visual context. Hence, the OCR result is inconsistent with the Ground Truth.
广力云智慧零售收银系统
m - 1 0 ;
-
(1)
g = 2(1 - 32)
1
MP10
-
-
-
-
-
-
-
-
-
-
-
-
-
-
-
-
-
-
-
-
-
-
-
-
-
-
-
-
-
-
-
-
-
-
-
-
-
-
-
-
-
-
-
-
-
-
-
-
-
-
-
-
-
-
-
-
-
-
-
-
-
-
-
-
-
-
-
-
-
-
-
-
-
-
-
-
-
-
-
-
-
-
-
-
-
-
-
-
-
-
-
-
-
-
-
-
-
- 99.
-
-
-
-
-
-
-
-
-
-
-
-
-
-
-
-
-
-
-
-
-
-
-
-
-
-
-
-
-
-
-
-
-
-
-
-
-
-
-
-
-
-
-
-
-
-
-
-
-
-
-
-
-
-
-
-
-
-
-
-
-
-
-
-
-
-
-
-
-
-
-
-
-
-
-
-
-
-
-
-
-
-
-
-
-
-
-
-
-
-
-
-
-
-
-
-
-15
4
1
336
2—1| 5
- 10" ©cosoo
Oregon
(No text)
m = 311
-
-
The Ground Truth image displays a single, solid horizontal line. According to Rule 2 (UNDERSCORE & LINE RULES), this is a stylistic or background line, not a placeholder underscore. Therefore, the OCR result must ignore it and output nothing or only meaningful text. The provided OCR content is "____", which consists of four underscores. This is an incorrect interpretation of the line as a placeholder, violating the rule that stylistic lines must be ignored. The OCR has hallucinated placeholder underscores where none should exist in the GT. Hence, the OCR result is inconsistent with the Ground Truth.
The Ground Truth image displays a single, solid horizontal line. According to Rule 2 (UNDERSCORE & LINE RULES), if the GT contains lines used for stylistic emphasis or as background elements (like a ruled line on paper), the OCR result must ignore them. The line in the GT is clearly a stylistic or background line, not a placeholder for text. Therefore, the OCR should not have output any underscores. Outputting `____` constitutes an error under Rule 2, as it hallucinates placeholder symbols where none are semantically intended. Hence, the OCR result is inconsistent with the Ground Truth.
- MODE: Pasar a otra pantalla: salir rápidamente durante
cualquier modo de ajuste
-
- Acondal chelada de 2015, eniziato 2015
-
SET: Acceder al modo de configuracion; confirmar
ajuste; iniciar calibración de la brújula
- ST / SP / +: Incrementar valor del ajuste: Iniciar / detener
cropómetro
Figure 16: The following table provides the data presented in a table with columns labeled 'a' and 'b'.
-
- / : Activar retroiluminación; Bloqueo de botones
5 RST / -: Reducir valor del ajuste: Reiniciar cronómetro
- 12.17.1928
LOR
LCD
•
1 7
2 8
-
3
- 1986年1月
4
2 111111111111111
员 111111111111111111
5 11 11 11 11 11 11
3
2 1 1 1 3 10
5 10
3
- 2015
6
[Non-Text]
1 BM - Reloi
-
Pim: Naloj de 12 horas
-
Indica que el cronómetro se muestra o está en
marcha
-
Indica que la alarma está activada
-
Indica que la alarma esta activada
-
Indica reloj/calendario, cronómetro, brújula, hora de la
alarma o modo anuncios
-
Muestra dirección cardinal / ordinal
-
- Muestra direction cardinal/ordinal
-
Segmentos de brújula: muestra norte; estado de calibración
7 Indica que la pila se está acabando.
- = final que la pila se esta adabando
-
Y indicante a elitido antía de la
-
Indica que el pitido esta desactivado
-
Indica que los botones están bloqueados
-
CA Indian disposición para inicios colibanciación de bróvula
-
Indica direction para inicial calibración de brujula
· = 0
PARA EMPEZA
PARA EMI EEAR
PARA PONER EN MARCHA EL DISPOSITIVO (SÓLO LA
PARATUNER EN MARCHA EL DISP. 031NO (0526 LA PRIMERA VEZ QUE SE USA)
PRIMERA VEZ QUE SE USA)
Pulse cualquier botón durante 2 segundos para activar la
pantalla LCD.
- 2017年1月1日
1.4 NO TEXTILE TESTS & PIN
COMO REEMPL
ELRA122 funciona con 1 pila CR2022 que va lleva instalada
ETRA122 funciona con 1 pilla CRZ052 que ya lleva instalada.
Consulte la tabla que aparece bajo estas líneas para ver el
significado de los iconos de la pila.
10.2015 37:51
ICONO DE PILA | DESCRIPCIÓN
GASTADA | DESCRIPCION
-
-
-
-
-
-
-
-
-
-
-
-
-
-
-
-
-
-
-
-
-
-
-
-
-
-
-
-
-
-
-
-
-
-
-
-
-
-
-
-
-
-
-
-
-
-
-
-
-
-
-
-
-
-
-
-
-
-
-
-
-
-
-
-
-
-
-
-
-
-
-
-
-
-
-
-
-
-
-
-
-
-
-
-
-
-
-
-
- 90.
-
-
-
-
-
-
-
-
-
-
-
-
-
-
-
-
-
-
-
-
-
-
-
-
-
-
-
-
-
-
-
-
-
-
-
-
-
-
-
-
-
-
-
-
-
-
-
-
-
-
-
-
-
-
-
-
-
-
-
-
-
-
-
-
-
-
-
-
-
-
-
-
-
-
-
-
-
-
-
-
-
-
-
-
-
-
-
La pilla del dispositivo esta casi
gastada.
-
-
-
-
-
-
-
-
-
-
-
-
-
-
-
-
-
-
-
-
-
-
-
-
-
-
-
-
-
-
-
-
-
-
-
-
-
-
-
-
-
-
-
-
-
-
-
-
-
-
-
-
-
-
-
-
-
-
-
-
-
-
-
-
-
-
-
-
-
-
-
-
-
-
-
-
-
-
-
-
-
-
-
-
-
-
-
-
- 90.
-
-
-
-
-
-
-
-
-
-
-
-
-
-
-
-
-
-
-
-
-
-
-
-
-
-
-
-
-
-
-
-
-
-
-
-
-
-
-
-
-
-
-
-
-
-
-
-
-
-
-
-
-
-
-
-
-
-
-
-
-
-
-
-
-
-
-
-
-
-
-
-
-
-
-
-
-
-
-
-
-
-
-
-
-
-
-
Aparece cuando la pila está
| demasiado gastada para operar.
Se muestra "--" en lugar de los.
valores de bríjula
valores de brujula.
The Ground Truth image displays a single, solid horizontal line. According to Rule 2 (UNDERSCORE & LINE RULES), this is a stylistic or background line, not a placeholder underscore. Therefore, the OCR result must ignore it and output nothing or only meaningful text. The provided OCR content is "____", which consists of four underscores. This is an incorrect interpretation of the line as a placeholder, violating the rule that stylistic lines must be ignored. The OCR has hallucinated placeholder underscores where none exist in the GT, violating the rule to ignore such lines. Hence, the OCR result is inconsistent with the Ground Truth.
NOTA Mientras se muestra el icono de pila casi gastada,
la función de brújula, la calibración de brújula y la
retroiluminación estarán desactivadas. Una vez cambie la
pila, volverá a la normalidad
phi, Torrara & de
NOTA Una vez colocada la pila nueva, es importante volver
NOTA una vez colocada la pila nueva, es importante volver
a calibrar el sensor magnético de la brujula. (Consulte la
sección "Brújula")
(No text)
NOTA Le recomendamos que se ponga en contacto con el
vendedor o el departamento de atención al público si tiene
que cambiar la pila
que cambiar la pila:
Dare recompleted
Para reemplazar la pila:
(2) (3)
| |
| |
| |
| | |
-
-
-
-
-
-
-
-
-
-
-
-
-
-
-
-
-
-
-
-
-
-
-
-
-
-
-
-
-
-
-
-
-
-
-
-
-
-
-
-
-
-
-
-
-
-
-
-
-
-
-
-
-
-
-
-
-
-
-
-
-
-
-
-
-
-
-
-
-
-
-
-
-
-
-
-
-
-
-
-
-
-
-
-
-
-
-
-
-
-
-
-
-
-
-
-
-
- 99.
-
-
-
-
-
-
-
-
-
-
-
-
-
-
-
-
-
-
-
-
-
-
-
-
-
-
-
-
-
-
-
-
-
-
-
-
-
-
-
-
-
-
-
-
-
-
-
-
-
-
-
-
-
-
-
-
-
-
-
-
-
-
-
-
-
-
-
-
-
-
-
-
-
-
-
-
-
-
-
-
-
-
-
-
-
-
-
-
-
-
-
-
-
-
-
-
|
| | |
| | |
-
|
| |
[EMPTY]
- Use un destornillador Phillips pequeño para retirar la
cubierta del compartimiento para pila. Una vez abierto.
guarde los tornillos para no perderlos
guarde los tomillos para no peruchen.
- Retire la pila vieja e introduzca la nueva cuidando de
que las polaridades sean las adecuadas.
- Vuelva a colocar la tapa y fiiela con los tornillos usando
un destornillador
2.1.3.2017
The Ground Truth image displays a single, solid horizontal line. According to Rule 2 (UNDERSCORE & LINE RULES), if the GT contains lines used for stylistic emphasis or as background elements (like ruled paper), the OCR result must ignore them. The line in the GT is clearly a stylistic or background line, not a placeholder for text. Therefore, the OCR should not have output any underscores. Outputting `____` constitutes an error under Rule 2, as it hallucinates placeholder symbols where none are semantically intended. No punctuation mismatch or formatting transformation applies here because the content is purely symbolic and not textual.
MODOS DE OPE
Sub-HEBT
Pulse MODE para
• Modo Hora
• Modo Fecha
• Modo Brújula
Modo Brajala
[Non-Text]
[Non-Text]
[Non-Text]
[Non-Text]
[Non-Text]
A122 EU R10.indd 2
2.1.3.
[Non-Text]
-
Pulse MODO para navegar por el Modo de Alarma
-
Puls M25 para analgesar por el mode de normal
-
Pulse SET y mantengalo pulsado para entrar en
configuración.
-
Pulse ST / SP / + o BST / - para modificar los valores
-
Pulse ST / SP / - 0 RST / - para modalizar los valores del pivuto. Pulse ST / SP / + o PST / - y montárgalo
der ajuste. Pulse ST/SP/+0 RST/-y mantengalo
pulsado para cambiar rapidamente los valores.
- Pulse SET para confirmar y pasar al siguiente. Repita los
nares 3.4 para cada opción de configuración. Las opciones
pasos 3-4 para cada opción de configuración. Las opciones
de configuración son las siguientes: hora; minuto.
- Pulse MODE en cualquier momento para confirmar y salir.
(1) 2017年1月1日,公司与关联方发生的交易金额为人民币4,000万元。
PARA ACTIVAR O DESACTIVAR LA ALAPHA
PARA ACTIVAR O DESACTIVAR LA ALARMA
-
Pulse MODO para navegar por el Modo de Alarma.
-
Pulse ST / SP / + o RST / - para activar o desactivar la
-
Pulse 017 of 7 - o RCT - para activar o desactivar la
alarma.
-
indica que la alarma está activada.
-
Pulse MODE port confirms up: p15
-
Pulse MODE para confirmar y salir.
[Non-Text]
TRACKER
Políria com Rúscula Digital
Relogio com Bussola Digital
Modelo: RA122
Modelo. KAT22
MANUAL DO USUÁRIO
MANUAL DO USUARIO
[Non-Text]
-
R
m = 311
RODUÇAO
davonou, aufa, Aviis, uib, TRACKER, RuVain, com
decemos a preferencia pelo TRACKER Relogio com
ola Digital Oregon Scientific™ (RA122). O RA122 foi
nyolvido para profissionais urbanos que apreciam um
a de vida ativo. Equinado com as funções de relógio.
de vida ativo. Equipado com as ranções de relogio,
ometro, luz de fundo e bloqueio dos bolões, este versati
jo pode ser usado dentro da cidade, enquanto a bússola
utida o toma a perfeita companhia ao aventurar-se em
s mais distantes
- This is distinguished.
RDTANTE
ORTANTE
As funções de medicão embutidas no RA122 não
devem substituir os dispositivos de medicação profissional
sevem substituir os dispositivos de medição profissional ou do prosição industrial. Os valores produzidos por
ou de precisão industrial. Os valores produzidos por
este relógio devem ser considerados apenas como
representacã
Quando você for praticar alpinismo ou outras atividades
quando você for praticar alpinismo ou outras atividades
em que perder o caminho pode criar uma situação
perigosa ou de ameaça à vida, sempre use uma
segunda bússola para confirmar as leituras de direcção.
A. Oranges, Scientific™, also as researchers are
A Oregon Scientific—had se responsabiliza por
qualquer perda ou reclamação de terceiros que possa
surgir a partir do uso deste relógio.
(1) 2017年1月1日
TÃO DE CONTROL
TOES DE CONTROLE

ajuste, inficia a calibragem da bussola
ST / SP/ + : aumenta o valor do ajuste; inicia / pára o
cronômetro
^1 ^2
- 📞 - 7 🔒 : ativa a luz de fundo; bloqueia os botoes
RST / - : diminui o valor do aiuste: zera o cronômetro
(1) 2017年 ,公司及子公司累计实现净利润为人民币3,569.4万元,较2016年增长18.4%。
m = 311
0
-
HIII: relógio de 12 horas
indica que o cranômetro está sendo exibido o
indica que o cronometro esta sendo exibido e
correndo
indica que o alarme está ativado
Esche, a relaia de school, 1986. Amele, Fisella de