
M555C - Téléphone mobile BENQ - Notice d'utilisation et mode d'emploi gratuit
Retrouvez gratuitement la notice de l'appareil M555C BENQ au format PDF.

| Marque | BENQ |
| Modèle | M555C |
| Type de produit | Téléphone mobile |
| Réseaux supportés | GSM 900 / DCS 1800 |
| GPRS | Oui |
| WAP | Oui (WAP 1.2.1) |
| Services de messagerie | SMS, EMS (icônes, animations, sonneries), Chat SMS |
| Écran | Couleur 4096 couleurs |
| Composeur de mélodies | Oui, polyphonique 16 sons, jusqu'à 3 canaux |
| Fonctions supplémentaires | Q.Access (raccourcis), Profils (Normal, Réunion, Extérieur, Silencieux), Réveil, Minuteur, Calculatrice, Golf Genius, Mini Mouse |
| Alimentation | Batterie Lithium-ion rechargeable, chargeur secteur inclus |
| Temps de charge | Environ 4 heures |
| Autonomie en veille | Variable selon réseau et utilisation |
| Kit mains-libres | Oui, écouteur fourni |
| Entretien et nettoyage | Utiliser un chiffon doux et sec. Ne pas utiliser de détergents agressifs. Éviter l'humidité et les températures extrêmes. |
| Sécurité | Respecter les consignes : utiliser uniquement des accessoires agréés, éviter les zones explosibles, éteindre dans les avions et hôpitaux, tenir à plus de 15 cm d'un stimulateur cardiaque. |
| Pièces détachées et réparabilité | Contacter le revendeur ou le service agréé BenQ. Utiliser uniquement des batteries et chargeurs BenQ d'origine. |
| Informations générales | Notice d'utilisation disponible en téléchargement. Poids et dimensions non spécifiés dans le manuel. |
FOIRE AUX QUESTIONS - M555C BENQ
Questions des utilisateurs sur M555C BENQ
0 question sur cet appareil. Repondez a celles que vous connaissez ou posez la votre.
Poser une nouvelle question sur cet appareil
Téléchargez la notice de votre Téléphone mobile au format PDF gratuitement ! Retrouvez votre notice M555C - BENQ et reprennez votre appareil électronique en main. Sur cette page sont publiés tous les documents nécessaires à l'utilisation de votre appareil M555C de la marque BENQ.
MODE D'EMPLOI M555C BENQ
BenQ M555C
Mobile Phone User's Manual
Copyright
© 2003. BENQ Corporation. All rights reserved. No part of this publication may be reproduced, transmitted, transcribed, stored in a retrieval system or translated into any language or computer language, in any form or by any means, electronic, mechanical, magnetic, optical, chemical, manual or otherwise, without the prior written permission of BENQ Corporation.
- This publication includes images from CorelDRAW® 9 which are protected by the copyright laws of the U.S., Canada and elsewhere. Used under license.
Disclaimer
BENQ Corporation makes no representations or warranties, either expressed or implied, with respect to the contents thereof and specifically disclaims any warranties, merchantability or fitness for any particular purpose. Further, BENQ Corporation reserves the right to revise this publication and to make changes from time to time in the contents thereof without obligation of BENQ Corporation to notify any person of such revision or changes.
BenQ (Hong Kong) Limited
Unit 207 2/F Hing Wah Centre
82-84 Tokwawan Rd
Hong Kong
852-2330-6929 (general enquiry)
852-2330-6188 (technical support)
SAFETY INFORMATION
For your safety, please read the guidelines below carefully before you use your phone:
Exposure to Radio Frequency Signals
Max. SAR measurement: GSM900: 1.22 W/Kg; DCS1800: 0.065 W/Kg.
Your wireless handheld portable telephone is a low power transmitter and receiver. When it is ON, it receives and also sends out radio frequency (RF) signals.
European and international agencies have set standards and recommendations for the protection of public exposure to RF electromagnetic energy.
International Commission on Non-Ionizing Radiation Protection (ICNIRP) 1996
- Verband Deutscher Elektringenieure (VDE) DIN-0848
- Directives of the European Community, Directorate General V in Matters of Radio Frequency Electromagnetic Energy
- National Radiological Protection Board of the United Kingdom, GS 11, 1988
American National Standards Institute (ANSI) IEEE. C95.1- 1992
- National Council on Radiation Protection and Measurements (NCRP). Report 86
Department of Health and Welfare Canada. Safety Code 6
These standards are based on extensive scientific review. For example, over 120 scientists, engineers and physicians from universities, government health agencies and industry reviewed the available body of research to develop the updated ANSI Standard.
The design of your phone complies with these standards when used normally.
Antenna Care
Use only the supplied or approved replacement antenna. Unauthorized antennas, modifications or attachments may damage the phone and violate FCC regulations.
Phone Operation
Normal Position: Hold the phone as you would any other telephone with the antenna pointed up and over your shoulder.
For your phone to operate most efficiently, do not touch the antenna unnecessarily when the phone is in use. Contact with the antenna affects call quality and may cause the phone to operate at higher power level than otherwise needed.
Batteries
All batteries can cause property damage, injury or burns if a conductive material such as jewelry, keys or beaded chains touches exposed terminals. The material may complete electrical circuit and become quite hot. To protect against such unwanted current drain, exercise care in handling any charged battery, particularly when placing it inside your pocket, purse or other container with metal objects. When battery is detached from the phone, your batteries are packed with a protective battery cover; please use this cover for storing your batteries when not in use.
Driving
Check the laws and regulations on the use of wireless telephones in the areas where you drive. Always obey them. Also, if using your phone while driving, please:
- Give full attention to driving--driving safety is your first responsibility.
- Use hands-free operation, if available.
- Pull off the road and park before making or answering a call if driving conditions so require.
Electronic Devices
Most modern electronic equipment is shielded from RF signals. However, certain electronic equipment may not be shielded against the RF signals from your wireless phone.
Pacemakers
The Health Industry Manufacturers Association recommends that a minimum separation of six (6") inches be maintained between a handheld wireless phone and a pacemaker to avoid potential interference with the pacemaker. These recommendations are consistent with the independent research by and recommendations of Wireless Technology Research.
Persons with pacemakers:
- Should ALWAYS keep the phone more than six inches from their pacemaker when the phone is turned ON.
- Should not carry the phone in a breast pocket.
- Should use the ear opposite the pacemaker to minimize the potential for interference.
If you have any reason to suspect that the interference is taking place, turn your phone OFF immediately.
Hearing Aids
Some digital wireless phones may interfere with some hearing aids. In the event of such interference you may want to consult your hearing aid manufacturer to discuss alternatives.
Other Medical Devices
If you use any other personal medical device, consult the manufacturer of your device to determine if they are adequately shielded from external RF energy. Your physician may be able to assist you in obtaining this information.
Turn your phone OFF in health care facilities when any regulations posted in these areas instruct you to do so. Hospitals or health care facilities may be using equipment that could be sensitive to external RF energy.
Vehicles
RF signals may affect improperly installed or inadequately shielded electronic systems in motor vehicles. Check with the manufacturer or its representative regarding your vehicle. You should also consult the manufacturer of any equipment that has been added to your vehicle.
Posted Facilities
Turn your phone OFF in any facility where posted notice so require.
Aircraft
FCC regulations prohibit using your phone while in the air. Switch OFF your phone before boarding an aircraft.
Blasting Areas
To avoid interfering with blasting operations, turn your phone OFF when in a "blasting area" or in area posted "TURN OFF TWO-WAY RADIO". Obey all signs and instructions.
Potentially Explosive Atmospheres
Turn your phone OFF and do not remove the battery when in any area with a potentially explosive atmosphere and obey all signs and instructions. Sparks, from your battery, in such areas could cause an explosion or fire resulting in bodily injury or even death.
Areas with a potentially explosive atmosphere are often, but not always clearly marked. They include fueling areas such as gasoline stations; below deck on boats; fuel or chemical transfer or storage facilities; vehicles using liquefied petroleum gas (such as propane or butane); areas where the air contains chemicals or particles, such as grain, dust, or metal powders; and any other area where you would normally be advised to turn off your vehicle engine.
For Vehicles Equipped with an Air Bag
An air bag inflates with great force. DO NOT place objects, including both installed or portable wireless equipment, in the area over the air bag or in the air bag deployment area. If in-vehicle wireless equipment is improperly installed and the air bag inflates, serious injury could result.
TABLE OF CONTENTS
SAFETY INFORMATION. I
TOURING YOUR PHONE 1
Appearance. 1
Idle mode screen 3
Idle screen icons 3
Keypad operations 5
Functional keys. 5
Alphanumeric keys. 9
PREPARING YOUR PHONE 11
Your SIM card. 11
Inserting your SIM card. 11
Removing your SIM card. 12
The battery 12
Fitting the battery. 12
Removing the battery. 13
Charging the battery. 13
The handsfree headset 15
Inserting handsfree headset 15
USING YOUR PHONE 16
Turning on your phone. 16
Making a phone call. 17
Correcting a phone number to be dialled 17
Ending a phone call 18
Answering a phone call. 18
Rejecting an incoming call 19
Turning off the phone 19
Speed dialling 19
Redialling the last number 19
Listening to a voicemail 20
Making an international call 21
Making an emergency call. 22
Dialing an extension number 22
Last missed, dialed, and received calls 22
Your phone book 24
Adding Phone book contacts from idle screen 29
Using the location number. 29
Operations during a call 30
Adjusting the earpiece volume 30
Accessing your phone book 30
Accessing the last dialed/received calls. 30
Putting a call on hold * 30
Making a second call * 31
Swapping between two calls * 31
Incoming call waiting ^ 青 31
In-call menu 32
Receiving a message 35
Keypad lock. 38
Silent profile 38
INPUT MODES 40
iTAP input. 40
ABC input. 43
SYM input 44
123 input 44
Message templates and EMS objects. 45
Q.Access 47
MOBILE INTERNET 50
Logging on to the Internet. 50
Surfing the Internet 51
Logging off the Internet 51
Using the browser menu 52
URL Direct Dial (UDD) 57
MENUS. 62
Navigating the menus. 62
Phone book 63
Recent Calls 63
All Calls. 63
Missed Calls 63
Received calls 64
Dialled numbers 64
Delete call logs.. 64
Call costs 64
View names. 65
Search 66
Add name. 66
Speed dial. 66
Caller group 67
Copy record 69
SIM to phone 69
Phone to SIM 71
Save nos. to 72
SIM card. 72
Choice. 72
Phone memory. 72
Used space. 73
Delete all 73
Own number 74
SDN. 74
Messages 75
Inbox. 75
Delete 75
Save EMS. 76
Save Melody 76
Chat. 76
Edit. 76
Forward. 78
Text reply. 78
Call to Sender. 78
Extract nos. 79
Outbox. 79
Backup 79
Create message. 80
Quick Message 80
Ring Message 81
Animation Message 81
Icon Message 82
SMS Chat 82
Message settings. 84
Message center 84
Message lifetime 85
Message format 85
Reply Path. 85
Notification 85
Voicemail 86
Cell Broadcast. 89
CB switch 89
Read Cell Broadcast. 89
Settings 90
Services 92
WAP 92
S.T.K. 92
Schedule. 93
Set reminder 93
View all. 95
View today 95
Delete all 95
Tools 96
Alarm 96
Set time 96
Set tone. 96
Vibration 97
Alarm period 97
Stop Watch 97
Hour Minder 97
98
Auto Time Zone 99
Golf Genius. 100
Mini Mouse 104
Settings 105
Phone settings. 105
Language 105
Color Scheme 106
There are five different color schemes for you to choose: Blue, Orange, Purple, Red, and Green. 106
Wallpaper 106
Backlight Level. 106
Backlight Period 106
Screen Contrast 106
Display 107
IdleClock. 108
Default input 108
Auto Redial 108
Connected Alert. 108
Auto Keylock. 109
Call settings. 109
Call waiting. 109
Show your number 109
Minute minder. 109
Call Divert. 110
Network settings. 112
Network options 112
Change network password 112
Security settings 113
Set PIN1 113
Handset lock 114
Handset call barring. 114
Network call barring 115
Fixed dialling 117
Privacy Code 118
Blacklist 118
SIM Lock. 119
Quick Access 119
Wap Settings 120
GPRS Settings 121
Clock settings. 122
Set time 122
Set date 122
Time format. 122
Date format 122
Display 122
Set time zone. 122
Daylight saving. 123
Reset settings. 123
Profiles. 123
Select profile 123
Normal 123
Meeting 123
Outdoor 123
Silent 124
Edit profile. 124
Melody composer. 126
Download 132
Wallpaper. 132
Melody 132
EMS. 132
Format file system 132
Baud rate setting. 133
Turn Modem off/on 133
THE MENU MAP 134
CARE AND MAINTENANCE 135
WHAT TO DO IF. 136
APPENDIX 140

TOURING YOUR PHONE
Appearance
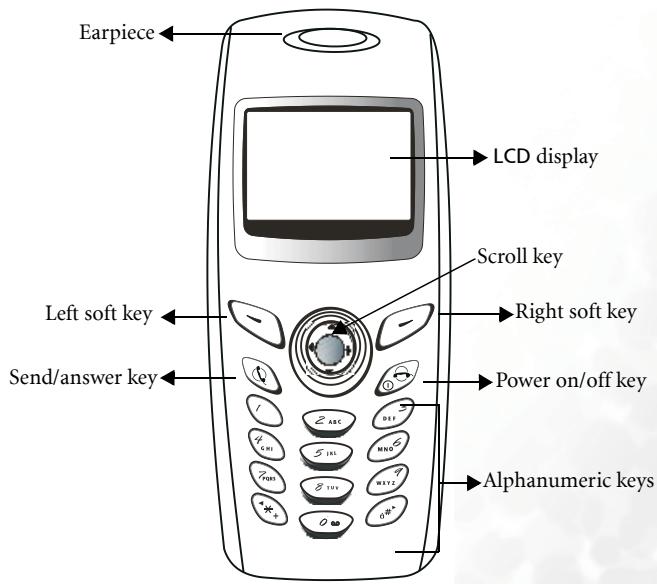
Front
Back
*For connection to the optional handsfree headset.
Idle mode screen
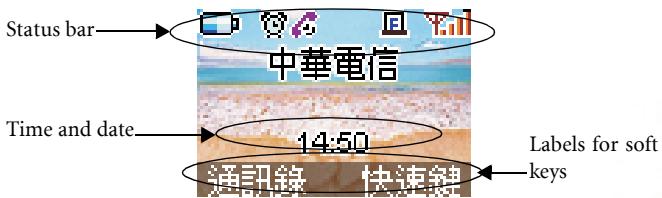

- M555C offers you two different idle mode screens. You can choose to show the time in numbers or in the clock format. To switch between two modes, go to the menu: Settings--->Phone settings--->Idle Clock. See page 90.
- To set the current time and date and determine how they are displayed on the idle screen, go to the menu: Settings --> Clock settings. See page 122.
- You can have your name displayed on the idle screen. Go to the menu: Phone book --> Own number. See page 74.
- You can personalize the way the idle screen is displayed. Go to the menu: Settings -> Phone settings -> Display. See page 122.
- If you turn on the Privacy Code, then you will not be able to access phone book directly from the idle screen. See page 120.
Idle screen icons
Icons often shown on the idle screen:
| Icon | Function | Description |
| # | Signal Strength | Signal strength of your designated network. The more the bars displayed, the stronger the signal. |
| Short message | Receiving a short text message or having unread messages (see page 75). | |
| Incoming call diverted | Incoming calls are diverted to a designated phone number (see page 110). | |
| Ringing off | ·When you choose to mute the ring volume of the currently active profile in the Profiles menu, this icon appears. See page 124. ·If you long press → to activate the Silent profile from the idle screen, this icon will appear at the top left. See page 38. | |
| Battery status | Battery power level, the more the bars, the more the battery power. Four bars: full. No bars: Recharging immediately. The icon scrolls during charging until the battery is full. | |
| Alarm clock | The alarm clock is on. To set the alarm, go to menu: Tools -> Alarm. See page 96. | |
| During a call | You are on a phone call. | |
| Keypad lock | The keypad lock is activated. For how to activate the keypad lock see page 38 and 109. | |
| Roaming | When your phone is not used on your home network, this icon will appear. | |
| GPRS connected successfully | Red G appears when you get accessed to GPRS service successfully. | |
| On GPRS service | Green G appears when you are on stable GPRS service. |
Keypad operations

- Pressing any key turns on the backlight after your phone is powered on. To adjust various backlight settings, go to menu: Settings -> Phone settings. See page 106 for details.
- Your phone beeps with any key press on the keypad. To activate/deactivate the keypad tone, go to menu: Profiles -> Edit profile, select the activated profile and choose Keypad tones. See page 125.

In this user guide, "long press" means "pressing and holding a key for about 2 seconds", while "press" means "pressing and releasing a key immediately".

The lists below include the most commonly used functions of each key. Refer to related sections of this user's manual for information on other key commands.
Functional keys
In idle mode
| Key | Commands and functions |
| Power on/off key •Long press to switch your phone on/off. •Press to reject/cancel a call. | |
| Send/answer key •Press to send or answer a call. •Long press and your phone will automatically call the number last dialled. •Press to access the list of last missed/dialed/received calls. | |
| Left soft key •Press to access your phone book (as NAMES shows). •Long press to launch the browser and connect to the Internet. •Press to save the phone number keyed in from the idle screen to your phone book. (as SAVE shows). | |
| Right soft key •Press to access the Q.Access menu (as Q.Access shows). •Press to clear wrong digits entered (as CLEAR shows). •Long press to activate/deactivate the Silent profile settings. | |
| Scroll key •Press the up/down/left/right keys to enter the main menu. | |
| Asterisk key •Press to enter **”. •Dialing an international call: long press until "+" is displayed, and enter the recipient's national code, area code and phone number. •When the keypad lock is activated, press ➔ (UNLOCK) and then this key to unlock the keypad. | |
| Voicemail key •Press to enter "0" •Long press to dial your voicemail box number. | |
| Lock key •Press to enter "#". •Long press to initiate the keypad lock. •Extension: After entering a phone number, long press to enter "P", then enter the extension. | |
| 1 ~ 9wxtx | Alphanumeric keys •Press to enter phone number digits. •Personalized speed dial key: Long press to dial the phone number it represents. |
In the menus
| Key | Commands and functions |
| Power on/off key ·If the right soft key ➔ does not have the “EXIT” command--that is, when “EXIT” is not displayed at the bottom right of the screen, pressing the power on/off key will take you back to the previous menu. ·Long press to switch your phone off. | |
| Send/answer key ·In the phone book press to dial the first/highlighted number of a selected contact. | |
| Left soft key ·Executes the commands shown at the bottom left of the screen (as SELECT/OK/OPTION/VIEW/CHANGE shows). ·Press to select or activate an option. | |
| Right soft key ·Executes the commands shown at the bottom right of the screen (as EXIT/BACK/CONFIRM shows). ·Press to leave an option or abort a selection/operation and return to the previous menu or screen. | |
| Scroll key ·Press to scroll the menus and options. | |
| 2ABC ~ 9WXY | Alphanumeric keys ·When viewing your phone book, press the number key that matches the first letter of the desired contact's name the appropriate number of times to highlight the contact. |
During a call
| Key | Commands and functions |
| Power on/off key • Press to end a call. • Long press to switch your phone off. | |
| Send/answer key •Press to hold an active call/resume a held call. •Press to switch between active and held calls. | |
| Left soft key •Press to access the call options (as OPTIONS shows). | |
| Right soft key •Press to access your phone book (as NAMES shows). | |
| Scroll key •Press the upper key to access the list of the last received calls; press the lower key to access the last dialled calls. •Press the right/left keys to adjust the earpiece volume. |
Input mode
| Key | Commands and functions |
| Power on/off key •Press to abort input and data entered and return to the previous menu or screen. •Long press to switch your phone off. | |
| Send/answer key •When editing a message, long press to choose to add icons, animations, ring tones or Quick Message templates. | |
| Left soft key •Press to confirm text/data entered (as OK shows). | |
| Right soft key •Press to clear one digit/character; long press to clear all digits/characters (as CLEAR shows). | |
| Scroll key •Press to move cursor to the next/last insertion point. | |
| # | Lock key •Press to change the input mode. •Long press to key in “#”. |
| Zero key •In iTAP and ABC modes, press to shift between upper case and lower case. •Long press to key in a space between characters. |
Alphanumeric keys
Following is a list of the alphanumeric keys and their corresponding characters and symbols in the idle mode and ABC input:
| Key | Number | Key | Number/Symbol/Function |
| 1 | 1 | 7PQRS | 7 |
| 2ABC | 2 | 8TUV | 8 |
| 3DEF | 3 | 9WXYL | 9 |
| 4CHI | 4 | 000 | 0 |
| 5HL | 5 | 4*+ | * + (long press) |
| 6MWD | 6 | 6# | # P (long press after entering a phone number) |
Press each of the following keys the appropriate number of times to get the character you want.
| Key | Characters |
| 1 | , , ; / - _ @ & ? i ! i , " |
| 2ABC | A B C a b c A A A E C à à à à β |
| 3DES | D E F d e f é é |
| 4GHI | G H I g h i l |
| 5JKL | J K L j k l |
| 6MNO | M N O m n o N ñ ñ ñ ñ ñ ñ ñ ñ ñ ñ ñ ñ ñ ñ ñ ñ ñ ñ ñ ñ ñ ñ ñ ñ ñ ñ ñ ñ ñ ñ ñ ñ ñ ñ ñ ñ ñ ñ ñ ñ ñ ñ ñ ñ ñ ñ ñ ñ ñ ñ õ ñ ñ ñ ñ ñ ñ ñ ñ ñ ñ ñ ñ ñ ñ ñ ñ ñ ñ ñ ñ ñ ñ ñ ñ ñ ñ ñ ñ ñ ñ ñ ñ ñ ñ ñ ñ ñ ñ ñ ñ ñ ñ ñ ñ ñ ñ ñ ñ ñ ÿ |
| 7PQRS | P Q R S p q r s |
| 8TUV | T U V t u v Ü û ü |
| 9WNTL | W X Y Z w x y z |
| 000 | (Press to switch between uppercase and lowercase; long press to enter a space.) |
| *+ | *+/()<= > % £ ¥ @ & |
| G# | # (Long press) |

PREPARING YOUR PHONE
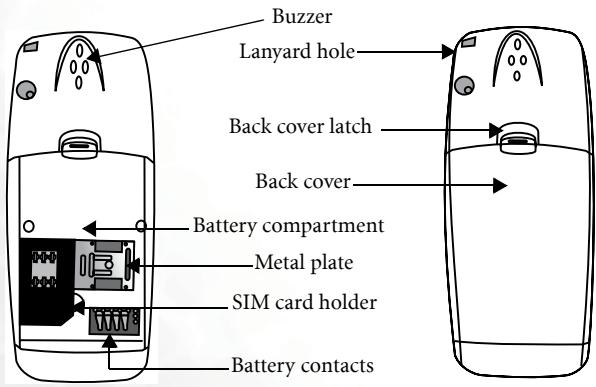
Your SIM card
To successfully use your phone, you must insert a SIM card (Subscriber Identification Module) supplied by your network operator. Your SIM card contains your PIN and phone number as well as a memory in which you can store phone numbers, messages, etc. Please contact your operator immediately if your SIM card is missing.
Inserting your SIM card

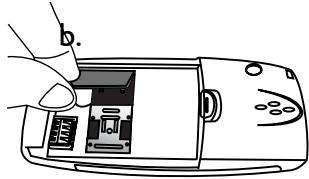
Scratches can easily damage the gold contacts of the SIM card. Be careful when handling and inserting the SIM card.
- Locate the SIM card holder in the battery compartment of your phone. Place the SIM card into the SIM card holder with the gold contacts facing downwards and the cut corner at the bottom right.
- Slide the metal plate across to secure the SIM card in place.


b.
Removing your SIM card
Slide the metal plate back and pick up the card from the SIM card holder.

a.
The battery

Do not remove the battery when your phone is on--you may lose all your personal settings stored either in your SIM card or phone memory.
Fitting the battery
- Place the battery onto the back of the phone, with the battery's contacts facing downwards and the tab on its top edge in alignment with the hole in the battery compartment.
- Push the battery against the top of the compartment and press it down to click it into the compartment.

a.

b.
Removing the battery
Push the battery against the top of the compartment and lift the battery up from the bottom end.
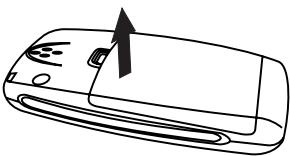
a.

b.
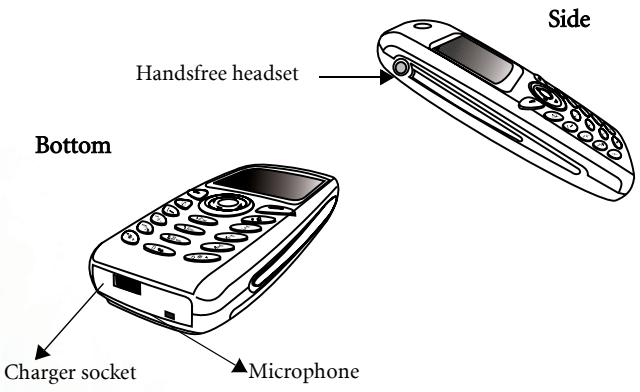
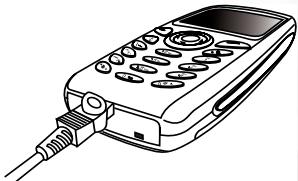
Charging the battery
- Insert the travel charger connector into the charger socket at the bottom left of your phone. Be sure you insert the connector in the right direction (the arrow sign on the top).
- Plug the charger into a mains outlet.
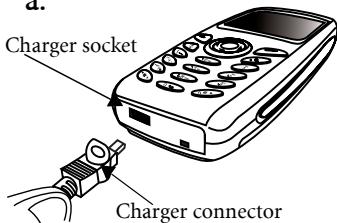
a.
b.
- After your phone is fully charged, disconnect the charger from your phone and the mains outlet.

- It takes approximately four hours to fully charge the battery.
During charging, on the LCD will blink until the battery is

appears in the middle of the screen if
the battery is being charged when powered off). When the battery is low, you will hear a warning tone and Battery Low will appear on the screen. When the battery is running out of power, Battery Empty will appear to remind you to recharge immediately. Then your phone will power off automatically.

- Use only approved batteries, charger and accessories to ensure proper function of your phone and battery life. Any malfunction or damage caused by the use of any third-party accessories will result in warranty being void.
- If batteries need to be replaced or additional batteries are requested, please make sure the same type of battery that was included with your package is ordered.
- For safety concerns, when the temperature of the phone goes over 45^ C (113^ F) or below 0^ C (32^ F), charging will come to a halt. When the phone temperature returns to a normal range, charging will resume.
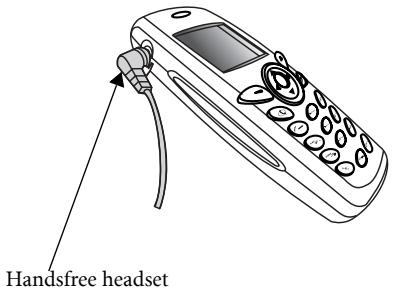
The handsfree headset
Inserting handsfree headset
Turning on your phone
- Long press to turn your phone on.
- When prompted, enter your PIN using the alphanumeric keys. If you type a wrong digit while entering your PIN, press the (CLEAR) to delete. Long pressing deletes all digits entered. When you are done entering your PIN, press OK to confirm OK.

What is PIN?
PIN (Personal Identification Number) is a password provided by your network operator. Once activated, your PIN protects your SIM card from being used by unauthorized people, even if it is inserted in another phone, unless the correct PIN is given the moment the phone is switched on. This PIN check prevents a thief from making calls and accessing network services at your expense and protects the information in your phonebook if your phone with your SIM inserted is stolen.
To disable the PIN check, go to menu: Settings --> Security settings -- > Set PIN1.

- If you have entered a wrong PIN three times in a row, your SIM card will be blocked. To unblock the SIM card, you need to enter the PUK (Personal Unblocking Key) of the card. Please call the operator, and ask for PUK.
-
Your phone can only be used to make emergency calls when your SIM card is locked.
-
Once your PIN is accepted, the phone starts searching for your designated network automatically, as "Searching network" indicates. This may take a few seconds. When receiving network signals successfully, the phone gives out a ring tone with its screen showing the network you connect to, then goes into idle mode.
If network services are not available, no signal level is displayed on the screen.
Your phone will not display signal strength when receiving signals from a network you do not have access to. You can make emergency calls, though.
Making a phone call
To make a call using your phone, check your phone is powered on showing the idle screen. Dial a desired number using the alphanumeric keys on the keypad. Then press to send your call.

During a call, you can use the in-call menu options described on page 32.
Correcting a phone number to be dialled
To correct a phone number, press to move the cursor to the right of the wrong digit and press (CLEAR) once to delete. To remove all the digits you entered, long press or simply press to return to the idle screen.
Ending a phone call
Press to hang up a phone call. When you end a phone call, the screen shows "Last call," the total call time, as well as the number or phone book name of the person you just spoke with, then returns to the idle mode.

The screen will show the phone book name of the person you spoke with only if he or she is a contact stored in your phone book.

If you have more than one call on the handset (for example, one active and one on hold), pressing will end all of the calls.
You can press or (END) if you want to drop a call after dialing.
Answering a phone call
When a call comes in, your phone rings or vibrates with the screen displaying the name or the phone number of the caller (Network support dependent). The name displayed depends on the data in the phone book. Do either of the following to answer the call:
- Press to answer.

You can change the answering mode to pressing any key for an incoming call. Go to menu: Profiles Edit profile Select the currently active profile Answer Mode Any key. See page 125.
- Press (OPTIONS) and select from the following options:
Answer: Answers the call.
Reject: Rejects the call.
I am busy: Your operator automatically diverts your call to your voice mailbox.
Rejecting an incoming call
If you receive an incoming call that you do not want to answer and you are not in another call, you can do one of the following:
- Press to reject the incoming call.
- Press (END) and your operator automatically diverts the incoming call to your voice mailbox.
- Press (OPTIONS) and select Reject to simply reject the call or select I am busy to have the call diverted to your voicemail box.
Turning off the phone
Long press to turn your phone off.
Speed dialling

You must set up a number key as the speed dial key of a phone number which you want to call through speed dialing. You can choose a speed dial key when editing the entry of a phone book number. You can also go to menu: Phone book Speed dial to do the speed dial settings. See page 24 and 66.
After you choose a speed dial key for a number saved in the phone book, you can long press the key from the idle screen and your phone will automatically dial the number that the key represents. For example, if
2ABC
has been chosen as a speed dial key for a phone number, long press
2ABC
to dial that number.
Redialling the last number
Long press and the number you last dialled will be dialled again automatically. Last number radial allows you to call the last number you dialled without keying in the whole number again.
Listening to a voicemail
When your voicemail box receives a voicemail, your operator gives you a call or sends you an SMS alert (i.e. a text message) to remind you of the waiting voicemail.

You can ask your operator to alert you to a waiting voicemail either by a telephone call or by a text message. Please go to menu: Messages Voicemail Voicemail settings. See page 87. However, some operators do not allow users to choose how to be alerted.
Depending on how you are alerted, you can respond to the waiting voicemail in one of the following scenarios:
- If your operator sends you an SMS alert to inform you of a waiting voicemail, and the text of the SMS alert sent by your operator matches the text of the SMS alert previously stored in your phone--this is called Alert Match--your phone will recognize this SMS alert as a reminder of a new voicemail and the prompt screen as above will pop up. To listen to the voicemail, simply press (SELECT) and your phone will automatically dial the voicemail box number for you. If you do not want to listen to the voicemail at this point, press (EXIT) to return to the previous screen. Then the voicemail icon ( ) will appear to remind you of the waiting voice mail.

The rationale of the Alert Match feature is that, once you've got an SMS alert from your operator saying that you have a waiting voicemail, you can
press (SELECT) directly to listen to the voicemail, instead of having to return to the idle screen to dial your voicemail box number digit by digit.

To successfully use the Alert Match feature, you must save your operator's SMS alert in advance. Please do so in the menu option: Messages Voicemail Voicemail settings Alert match. See page 88.
- If the text of the operator's SMS alert does not match the text of the SMS alert stored in the Alert match option, or if your operator calls to inform you of a new voicemail, you can call your voicemail box simply by long pressing Q_ao from the idle screen to listen to the voice mail. Alternatively, you can go to the menu: Messages Voicemail Get voicemail to make a voicemail call. See more details on page 86.
- You can also set up a number key other than Doo as the speed dial key for your voicemail box number. Then you can long press this number key from the idle screen to call your voicemail box. For how to set up a speed dial key, see Speed dial on page 66.

You cannot call your voicemail box by long pressing ① from the idle screen if the box number is not stored in your SIM card or phone memory. In general your operator will save the box number into your SIM card before they deliver the card to you. So you can long press ① to dial your voicemail box number without having to save the number first. However, if there is no box number previously stored in your SIM card, you will have to save the box number on your own. To save or change your voicemail box number, go to menu: Messages Voicemail Voicemail settings Box numbers. See details on page 87.
Making an international call
- Enter the outgoing international code, or long press 水 _ + until "+" is displayed.
- Enter the recipient's national code, area code and phone number. Send out your call by pressing .
Making an emergency call
To call the emergency services, enter 112 (the international emergency number) and press to make the call. You can make an emergency call even if your phone is locked or cannot register with a network, or there is no SIM card inserted, so long as you are within the coverage of the type of network used by your phone.
Dialing an extension number
After you key in the telephone number, long press 0 for a second and "P" will display on the screen. Enter the extension number and press to make the call.
Last missed, dialed, and received calls
Network support dependent.
There are two scenarios in which you can review the most recently missed, answered and dialed phone numbers as well as the time and date information associated with the calls:
- If for any reason incoming calls were not answered, a missed call message along with the number of calls will appear to remind you.
Press (NAMES) and the most recently missed calls are displayed first. Press to highlight the missed call you want in the black bar.
- In idle mode, you can press to access a list of last missed/dialed/ received calls. Press to scroll to the call you want.
is displayed next to a missed call, next to a dialled call and next to a received call.
If the number of a missed/dialed/received call has been saved to your phone book under a contact's name, the screen will show the contact's name followed by the number.
When a missed/dialed/received call is highlighted in the black bar, you can do the following:
-
Press to radial the phone number of the call.
-
Press (VIEW) to display the number as well as time and date information of the call highlighted in black. (If the number is already stored under a phone book contact, the contact's name will be displayed as well.) Here from this view screen you can press right/left keys of to view the details of the next/previous call. Then you can either press to dial the displayed number, or press (OPTION) for the following options:
-
Delete: Deletes the displayed phone number.
- Save: Saves the number into your phone book. Follow the prompts to enter the contact's name and confirm the number shown on the screen and press (OK) to save the number.

From the idle screen you can use the phone book feature to specify a caller group for a new phone book contact. See details below. A variety of options under the Phone book menu also allow you to choose a caller group for a phone book contact. See page 63.
Your phone book
From the idle screen press (NAMES) to access your phone book, then you can choose to dial a number directly from your phone book or modify the details of a phone book contact.

If you turn on the Privacy Code setting, you are not able to view the phone book directly from the idle screen. You will need to go to the main menu first, choose Phone book, key in your handset lock code, and then you will be able to view your phone book. For more information on Privacy Code, see "Privacy Code" on page 118
You can find a phone book entry in two ways. Either use the up/down keys of to scroll through the names of the contacts (listed in alphabetical order), or press the number key that corresponds to the first letter of the contact's name you want the appropriate number of times to highlight the contact. For example, if you want to find a name that starts with "K", press twice for "K". The names starting with "K" will appear with the first one highlighted in the black bar. Use to scroll the names until the one you want is highlighted in the black bar.

The icon to the left of a contact's name indicates the caller group the contact belongs to. An empty frame will appear to the left of a name that is not assigned to a caller group. For how to specify a caller group for a phone book contact, see details below.
When the desired contact is highlighted in the black bar, you can do either of the following:
- Press to dial the first phone number saved under the selected contact.
- Press (OPTION) to manage the contact's data using the available options as described below:
View number
Press (SELECT) to view the phone number(s) and e-mail address of the contact. You can press the up/down keys of to scroll to highlight the phone number you want or the contact's e-mail address.

Again, here you can press the right/left keys of to view the details of the next/previous contact, or simply press the key that matches the first letter of the desired contact's name the appropriate number of times, and the screen will automatically show the phone book details of the contact you want.

appears on the left of the name if the record you display is stored in the SIM card memory, while shows up if the record is stored in the phone memory. The icon on the left of the phone number indicates the number's call type. To select the memory where phone book contacts are stored, go to the menu: Phone book Save nos. to. See page 72. For how to specify a call type for a phone number, see details below.

For how to save a contact's e-mail address, see page 26 and the Edit section on page 26.
- When a phone number is highlighted in the black bar, you can press to dial the number, or press (OPTION) to revise the details of the number. Options are as follows:
Edit Number: Modify the phone number. Enter the number to be saved and press OK), then press to choose an icon indicating the number's call type: Mobile, Home Office, Fax, Pager. When done, press OK) and the newly entered number will pop up along with the chosen call type icon to its left.
-
Delete: As prompted, press OK) to delete the selected number from the phone book.
-
Add to speed: Here you can set up the selected number's speed dial key. Entries 1 9 represent keys 1 9_ west . For example, If you want to assign 1 as the number's speed dial key, scroll to highlight entry 1 and press (SELECT) to store the number in entry 1.
When a phone number is stored in the entry of a speed dial key, the entry will display the number's call type icon followed by a contact's name under which the number is stored, rather than the number itself.
- If the e-mail address is highlighted, you can press (OPTION) and select Edit to modify the e-mail address, or select Delete to erase the e-mail address.
Search
Search for another contact saved in your phone book. Type the full name or just the first letter(s) of the contact you are looking for if unsure of spelling and press (OK).
Edit
You can scroll and edit the following details of the highlighted contact:
The contact's name: Enter the name of the phone book record.
The contact's number(s): Three phone number entries are allowed for each contact. You can select an entry and enter the number to be saved, then press to choose a particular icon indicating the call type of the number and press (OK): Mobile, Home Office, Fax, Pager. The newly entered number will pop up along with the specified call type icon to its left.
- The contact's caller group: Assign the contact to a particular caller group. Scroll to highlight the caller group you want to add the contact to and press (SELECT) to select.
You can also go to the menu: Phone book Caller group to select a caller group for the contact. See page 67 for details.
- The contact's e-mail address: If the contact is stored in the phone memory, you can add an e-mail address to the contact's entry.
You cannot add the e-mail address if the contact is stored in the SIM card memory.
When you have finished editing the details of the selected contact in the Edit option you must press (SAVE), and when the prompt "Save?" appears press (OK) to save all of the new changes you made to your phone book. Then the modified contact entry will appear in the phone book, together with its caller group icon on the left.
If you don't want to save the modified record, press twice to abort.
Delete
Deletes the entire entry of the contact from the phone book. Press OK) to delete as your are prompted to do so.
Add name
Adds a new contact to the phone book. You can create a new contact's entry in the same way you edit an existing contact's details. See page 26.
Set group
Adds the phone book contact to a preferred caller group list.

What is a caller group?
A caller group is a group of callers who share the same incoming-call settings, i.e. ring tone, image, backlight color, etc. When a member of a particular caller group phones you, your phone makes the group's ring tone and displays the image and backlight color assigned to the group, so you can identify immediately which group the caller belongs to before you answer the call.
When you save a new contact to your phone book you can choose a particular caller group for the contact.

Each contact in the phonebook can belong to only one caller group.
- You can also go to menu: Phone book Caller group to select a caller group for the contact. See page 67 for details.
- To customize the settings of each caller group, go to menu: Phone book Caller group. See page 67 for details.
Adding Phone book contacts from idle screen
Enter a phone number and press (SAVE). Then you can enter the contact name and other phone numbers, and choose a caller group for the newly saved contact. The steps are the same as described on page 26.
Finally you must press (SAVE) and press (OK) in order to save the contact to your phone book.
Using the location number
If you want to find a telephone number stored in your phone book from the idle screen, you can key in the phone number's location number and
press ^# . The phone book details of the desired number are then displayed.

What is a location number?
The location number of a telephone number stored in your phone book points to the location where the number is saved in your SIM card or your phone memory.
When you access the details of a phone book contact, the location number of the highlighted phone number is displayed at the top of the screen, as the screenshot on the right shows.
For example if you want to access a number that is stored in location 5.
Press 5_ms and then _0^# to display the desired number.

However, you can't find phone numbers stored in your phone memory in this way.
As the number you want is highlighted in the black bar, you can press to dial the number, or
press (OPTION) to revise the details of the number. Options are the same as described on page 25.
Operations during a call

The following options marked * are network support and subscription dependent.
Adjusting the earpiece volume
During a call you can press the right/left keys of to adjust the earpiece volume. When done, press or to return to the in-call screen.
Accessing your phone book
When you are on a phone call you can press (NAMES) to access your phone book. For details on the phone book feature, see page 24. To exit from your phone book press (EXIT) or .
Accessing the last dialed/received calls
When you are on a phone call, you can press the upper key of for the list of last received calls and press the lower key of for the list of last dialled calls. For details on how to handle the dialed/received calls, see "Last missed, dialed, and received calls" on page 22.
Putting a call on hold *
You can place a call on hold by pressing while a second call is to be made or answered. The screen will show "Held" when the current call is placed on hold. To make a call on hold active again, press, if you only have a held call.
These options are also available in the in-call menu which is accessed by pressing (OPTIONS). See "In-call menu" on page 32.
Making a second call *
You can make a second call while you are already on another call. To do this, key in the second phone number and press . When the second call is made, the first call is automatically put on hold.
Swapping between two calls *
To switch between two calls, press . To end one of the two calls, make the call you want to end active (i.e., not on hold), then press (OPTIONS) to access the in-call menu and select End current. When the active call ends, the call on hold will resume.
Pressing will end all calls.
Incoming call waiting *
If another call comes in while you are on the phone, a tone sounds in the earpiece, and the screen shows a second call that is currently waiting. Then you can do the following to manage the waiting call and the call that is currently active:
- Put the active call on hold and answer the waiting call either by pressing , or by pressing (OPTIONS) to access the in-call menu and then selecting Answer.
- End the active call and answer the waiting call by pressing (OPTIONS) to access the in-call menu and then selecting End & next.
- Reject the waiting call either by pressing (END), or by pressing the (OPTIONS) and selecting Multiparty--->Reject. Alternatively, you can inform the caller that you are currently busy by pressing (OPTIONS) and selecting Multiparty--->I am busy, and your phone will give a 'busy' tone to the caller.
You can also manage active and waiting calls using the following keys:
- Press ① and to reject the waiting call.
- Press 1 and to end the active call and answer the waiting call.
- Press 2_sec and to hold the active call and answer the waiting call.
In-call menu
Your phone provides an in-call menu which is made up of a number of control functions that you can use during a call. By pressing (OPTIONS) during a call the following in-call menu will be available.
Press to scroll the menu and press (SELECT) to access a highlighted option; press (EXIT) to leave a selected option and return to the previous menu.
The options marked ** are network support and subscription dependent.
Volume
You can use to adjust the earpiece volume.
Hold*
Places the currently active call on hold.
End current
Ends the currently active call.
Mute
Mutes the microphone so the person you are speaking with cannot hear your voice. "Calls mute" appears when this mode is on. To unmute the microphone, press (OPTIONS) to enter the in-call menu again, scroll to highlight the Unmute option, and press (SELECT).
DTMF on/off
DTMF (Dual Tone Modulation Frequency) tones can be sent during a telephone conversion. They are the keypad tones which the microphone gives out as you dial another number during a call. Your phone sends DTMF tones to communicate with answering machines, pagers, computerized telephone services, etc.
Main menu
By selecting this item you can access the Phone book and Messages menus during a call. For details on the Phone book an Messages menus, see page 63 and 75.

The Copy record and Delete all options are not available in the Phone book menu which you access during a phone call.
Multiparty\*
The multiparty or conference services allow you to have a simultaneous conversation with more than one caller. The multiparty menu has the following options:

The maximum number of parties allowed during a multiparty (conference) call varies, depending on the network you choose.
Join all
This function allows you to set up a multiparty call. You can connect a call on hold to the currently active call to form a multiparty call.

Once a multiparty call is set up, you can press to scroll through the numbers of the callers who make up a multiparty call.
Hold all calls
Puts a multiparty call on hold.
Private
To talk privately with one participant during a multiparty call, press
to display the number of the caller you wish to talk to on the screen, then select this option to put all the other callers on hold.
Exclude
Places one selected caller (whose number is currently displayed on the screen) of a multiparty call on hold.
End current
During a multiparty call, you can end the call on one of the parties. The currently displayed caller of a multiparty call can be disconnected by selecting this option.
End all calls
Pressing , or selecting this option will end all the active and held calls.
Transfer
This function allows you to end your own call and connect the active and held calls, so the callers of the active and held calls can speak with each other alone.
Receiving a message
Your phone supports the concatenated Short Message Service (SMS) and Enhanced Messaging Service (EMS), which allows you to send and receive text messages as well as EMS objects--icons, animations and ring tones.
SMS text message
When you have received a new text message your phone will sound to alert you. The screen will show a note reminding you of the last received messages, together with popping up at the top.

When a new message arrives it is stored on your SIM card. If there is no room to store the message on your SIM card, will flash, and the network will hold the message until you make space for it by deleting another message from your SIM card.
- To read a new message press (INBOX). The screen will show a list of last received messages, each entry displaying its respective sender's phone number. (If the sender is a contact that has been saved in your phone book, the screen will display the sender's phone book name rather than the phone number). The icon to the left of an message entry indicates whether an incoming message has been read (☑) or not (☑). Scroll to highlight the message entry you want.

If you want to erase all of the received messages from your SIM card, you can scroll down to the end of the message list and select Delete all to erase all of the received messages.
When an entry is highlighted in the black bar the first line of the message will flash. Press (READ) to view the entire message as well as the arrival time and date associated with the message.
Having read a message, press (OPTIONS) and choose to delete, edit, forward or reply to the message, or start a chat session using the message. For details, see the main menu option Messages on page 75.
- To read the message later, press (EXIT). will remain at the top of the idle screen until the message has been read.

- To read a message, you can also go to menu: Messages -> Inbox. Please refer to page 75 for details.
To write a new message, go to menu: Messages Create Message. See page 79 for details. - You can determine whether your phone alerts you or not as it receives a message. Go to the menu: Profiles Edit profile, select a profile you want, then go to Message alert. See page 125.
EMS message
When your phone has received a message which contains an EMS object such as an icon, animation or ring tone, press (INBOX) and the screen will show "Enhanced Message" in the highlighted entry of the message.
Press (READ) to view the message and the animation or icon along with the text will appear on the screen. If the message contains a ring tone, your phone will sound the ring tone as you open up the message.
Then you can press (OPTIONS) to determine how to manage this message.
If the EMS object is not the one already stored in your phone memory, you can select Save EMS and give the EMS object a name to save the object to its respective EMS library of your phone, that is, if the object is an animation, it will be automatically saved to an available entry of your phone's animation library. The next time you can insert this saved EMS object in the message you want to send.

You can add an icon, ring tone or animation to the message you are editing. For how to edit an message containing EMS objects, see page 45. You can also go to the Messages menu and select Ring Message, Animation Message, or Icon Message to insert a ring tone, animation, or icon into the message you want to send.
Ringing melody
Your phone is able to receive and send ring melodies. It allows you to save the received melody for future use as well as send the melody that you have composed on your own to others.
When your phone has received a ringing melody, press (INBOX) and the screen will show "Download Melody" in the highlighted entry of the message. Press (READ) and your phone will play the received melody. The icon indicates the received melody. The melody stops as you move the cursor and will start playing again if you move the cursor to the right of the icon or to the line where the icon is positioned.
You can then press (OPTIONS) and determine how to manage the melody. If you do not have this melody stored in your phone memory, you can select Save Melody to save the melody as a choice in the menu: Profiles Edit Profile Ringing tone. The next time you can set this newly saved melody as your phone's ringing melody. For details on setting your phone's ringing melody, see page 124.
Chat message
When receiving a chat message, your phone's screen will pop up a chat invitation. Press to show the sender's nickname followed by the message as "nickname >> message". Press (Chat) to join the chat and follow the screen prompts to enter your nickname and a chat message.

To start a chat session, you can also go to: Messages --> Inbox ---> Chat, or Messages ---> SMS Chat. For details on the SMS Chat, see page 76 and 82.
Keypad lock
On the idle screen, long press to activate the keypad lock.
appears as the keypad is locked. To unlock the keypad, press (UNLOCK) and then *_+ .

Your phone also has a auto keylock which can automatically lock the keypad if you leave your phone untouched for 20 seconds in the idle mode. To set the auto keylock, go to the menu: Settings --> Phone settings --> Auto Keylock. See page 109.
Silent profile
On the idle screen, long press to activate the silent profile. When you long press to activate the silent profile, the phone will vibrate for two seconds, and a prompt will show up on the screen: "Silent Profile
activated". After two seconds the screen will return to idle, with displayed on the upper left corner of the screen.

Your phone will only vibrate to alert you to an incoming call when the silent profile is activated. To deactivate the silent profile and return to the previous profile, long press .

The feature of long-pressing to switch to the silent profile is very convenient for profile switch during a meeting.

The silent profile activated by long pressing from the idle screen is the same as the one you activate from the menu: Profiles Select profile ->Silent.
Therefore, if you go to: Profiles ---> Edit profile ---> Silent and adjust the ringing volume to the desired level between level 1 and Loudest, long
pressing from the idle screen will not activate the silent mode. Likewise, if you follow the same path to disable the silent profile's vibration, long pressing from the idle screen will not turn on the vibration.

To set up and choose profiles, please open the main menu and select the Profiles menu. See page 123.

INPUT MODES
Your can select a text input method whenever you need to add or edit text, for example:
Write short messages.
- Enter names or numbers in your phone book.
- Jot down notes in the Schedule feature, etc.

For details on these features, see related sections of this user's manual.
Your phone provides four different input modes that you can use to enter text. On the editor screen, press 6 # to switch to the text input mode you want to use. The text input mode you are in is indicated at the bottom center of the screen. Your phone is preset to enter text using iTAP. This is your phone's predictive input mode.

You can set the default input mode that comes along with the editor screen. See page 108.
Additionally, while editing a message, you can long press to choose to add quick message templates or EMS objects to the message (see page "Message templates and EMS objects" on page 45).

The input mode options may vary from market to market.
iTAP input
ITAP is the predictive input system which analyzes letters as they are being typed to come up with the right words, making text entry quick and easy. iTAP is an efficient alternative to the traditional multi-tapping input, which requires you to press a key several times for an appropriate letter.
Features of iTAP
- Just one key press per letter; no multi-pressing for entering letters.
-
Comprehensive word database including common names.
-
Widely used punctuation and symbols included.
Tips on using iTAP
- Press the alphanumeric key once that relates to the first letter of the word you want, without having to consider the order of the alphabets shown on the key. Press the key that relates to the second letter of the word and so on and so forth. Your phone then looks at the combination of letters you have entered, and predicts what your word is. The word that your phone predicts appears along the bottom left of the screen. Accordingly, the word changes as you type letters--disregard what's on the screen until you enter an entire word.
- If the word displayed is not the one you want when you have entered all the letters in the word, press to scroll through the other word candidates.
- If you want to lock some letters that you typed, press 水 _ + . Then the letters that you locked will not change as you enter other letters.
- Press ① to shift among the following:
Uppercase (as ITAP at the bottom center of the screen indicates).
■ Lowercase (as itap at the bottom center of the screen indicates).
- Press (OK) when the correct word is displayed along the bottom left. The word will then appear in the text followed by a space. You can also long press to leave a space for the next word to be entered.
- In the text, press the right/left keys of to move the cursor to the insertion point of the next/previous character. Press up/down keys of to move the cursor up/down between lines of text.

If you only have one line of text, pressing up/down keys of will move the cursor to the beginning/end of the line.

- If you type a wrong letter, press to move the cursor to the right of the letter and press (CLEAR) to delete; long pressing (CLEAR) deletes all text entered.
- Press (OK) to confirm entered text. Alternatively, while entering text you can press to abort anytime and return to the previous page. All the text previously entered will then be lost.
Demo of iTAP
To enter "Come home." on the message editor screen:
- Press to access the message editor screen. iTAP Input appears as the default input mode.
- Press ① for the upper case "C". Then press ① for lower case "o""m""e".
- Press (OK) or to enter "Come" into the text.
- A space will automatically appear following the word “Come”. Alternatively, you can also long press ① to leave a space for the next word.
- Press 4_CH 6w0 6w0 3 for "home".
- "good" isn't the word you want, so press the down/right key of for the next candidate "home".
- Press (OK) to put "home" inside the text.
ABC input
If iTAP doesn't provide the word you want, you can press to switch to the ABC input, which is the standard input mode. In the ABC input, each alphanumeric key has a number of different characters assigned to it. When you press the same key several times, you scroll through the assigned characters.

Please see "Alphanumeric keys" on page 9 for a listing of the alphabets and symbols represented by each key in the ABC Input.
Tips on using ABC input:
- To enter a word you must press an appropriate key the correct number of times to get the letter you want. Follow the order of the letters shown on each key to enter letters. Press once to get the first letter shown on a particular key, twice for the second letter, and so on and so forth.
- When you have entered a letter and want to enter the next one, you can wait for about two seconds until the cursor moves to the insertion point of the next letter, or simply press a key immediately to enter it.
- Press ① to shift among the following:
■ Uppercase (as ABC at the bottom center of the screen indicates).
- Lowercase (as abc at the bottom center of the screen indicates).
- You can long press to get #.
- When you have entered a word, you can long press ① to key in a space for the next word to be entered.
- If you type a wrong letter, press to move the cursor to the right of the letter and press (CLEAR) to delete; long pressing (CLEAR) deletes all text.
For example, to enter "Love":
-
Press 5_ three times for "L".
-
Press ① to shift to lowercase.
- Press 6^MIMO three times for "o".
- Press 8_rw three times for "v".
- Press 3out twice for "e".
SYM input
This is an input mode to enter symbols only. When you switch to the SYM input, a bar of punctuation and symbols will appear. Use to highlight the symbol you want to insert and press OK). You can also press a number key (1~7pors), as corresponding to the order of symbols shown from left to right on the screen) to insert the desired symbol directly.
123 input
This is a numeric input mode that allows you to enter numbers using the alphanumeric keys 1

While entering a phone number using the 123 input, you can press _+ to key in special symbols such as + and .
Message templates and EMS objects

What is EMS?
Your phone supports EMS (Enhanced Messaging Service), which allows users to send and receive EMS objects including icons, animations, sound effects and melodies, along with SMS text messages.
EMS services are network support dependent.
When editing a message, you can long press any time and choose to add icons, animations, ring tones as well as quick message templates to your text message:
- Quick Message: This is a list of quick message templates that can be used instead of having to compose a whole new text message. You can use the factory preset templates or the templates that you previously stored in the last five entries. To insert a quick message in your text
message, scroll to the quick message you want to use and press (SELECT) to insert the quick message into your text.

For how to save your personal message templates, see Quick Message on page 80.
- Icon Message: This is a library of icons for you to choose from and add to your text messages. Scroll to display the icon you want to use and
press (SELECT) to insert the icon into your text message. You can also scroll towards the end of the icon library and choose from the last five images that you previously received and stored.

For how to save the icons that you received from another phone or your operator, see page 36 and 76.
- Animation Message: This is a library of animated images for you to choose from and add to your text. Scroll to display the animation you want to use and press (SELECT) to insert the animation into your text message. You can also scroll towards the end of the animation library and choose from the last five animations that you previously received and stored.

For how to save the animations that you received from another phone or your operator, see page 36 and 76.
- Ring Message: This is a list of ring tones for you to choose from and add to your text message. When the recipient reads your message, the ring tone attached to the message will sound in her phone. Scroll to highlight the ring tone you want to use and press (SELECT) to insert the ring tone into your text. The inserted ring tone is then indicated by a bell icon in the text.
You can also use the ring tones that your received and stored in the last five entries.

For how to save the ring tones that you received from another phone or your operator, see page 36 and 76.

You can place an icon or animated image anywhere in your text message.

Q.ACESS
Q.Access (Quick Access) is a ready menu of the nine most frequently used features. The Quick Access menu takes you directly to these features by minimizing the number of key presses required in the main menu.
Using the Q.Access menu
- From the idle screen, press (Q. ACCESS) to display the Q.Access menu. The default menu items and their functions are as follows:
| No. | Option | Functionality |
| 1 | Speed Dial | Choosing speed dial keys for phone numbers saved in your phone book. |
| 2 | Backlight Color | Selecting a desired backlight color. |
| 3 | Normal | Activating the Normal audio profile settings. |
| 4 | Silent | Activating the Silent audio profile settings. |
| 5 | Meeting | Activating the Meeting audio profile settings. |
| 6 | Outdoor | Activating the Outdoor audio profile settings. |
| 7 | Set Time | Setting the current time to be displayed on the idle screen. |
| 8 | Set Alarm | Setting the alarm clock. |
| 9 | Calculator | Using the Calculator feature. |
The default Q.Access menu may vary from market to market.
- Press to scroll through the menu and press (SELECT) to access an highlighted option. To exit from a Q.Access option or operation, press (EXIT).
Programming the Q.Access menu
You can set up a Q.Access menu of your own by choosing which features you want readily available. To set up your Q.Access menu, you must go to: Settings Quick Access (see also page 119) and the screen will display a configuration list of preset features as options for you to add to the Q.Access menu:
| Option | Functionality |
| Speed Dial | Choosing speed dial keys for phone numbers saved in your phone book. |
| Backlight Color | Selecting a desired backlight color. |
| Normal | Activating the Normal audio profile settings. |
| Silent | Activating the Silent audio profile settings. |
| Meeting | Activating the Meeting audio profile settings. |
| Outdoor | Activating the Outdoor audio profile settings. |
| Set Time | Setting current time to be displayed on the idle screen. |
| Set Alarm | Setting the alarm clock. |
| Calculator | Using the Calculator feature. |
| New Message | Writing a new message. |
| Inbox | Reading incoming messages. |
| Outbox | Reading outgoing or saved messages. |
| Accum. Cost | Showing the total cost of all calls. |
| Schedule | Access the Schedule feature. |
| Call Divert | Access the Call Divert menu. |
When the configuration list appears, scroll through the list using until you find the feature you wish to store in the Quick Access menu. Press (SELECT) to select the highlighted item. You will be asked to designate a location in the Q.Access menu for the selected item. Enter a location number (1-9) and press OK). The Item that is listed in the Q.Access menu will be marked by a location number.

- The Q.Access menu always has exactly nine options.
- You can replace any of the nine Q.Access options with a different preset item selected from the configuration list.
Each feature in the Q.Access menu can only be assigned to one single location. There is no repetition of the same feature in the Q.Access menu.

MOBILE INTERNET
Your phone supports WAP (Wireless Application Protocol) technology and enables you to log on to the mobile Internet on both GSM and GPRS networks, so you can browse various on-line services available from your service provider, for example, financial, sport, travel, and entertainment information.

The mobile Internet is a network and subscription dependent feature. Contact your network operator for details about the mobile Internet services based on the WAP technology they provide.

In order to successfully connect to the mobile Internet using your phone, you must subscribe to WAP services with your operator and do proper settings in your phone. If you use your phone on a GSM network you must do related settings in Settings -> Wap Settings. If you use your phone on a GPRS network you must do the settings in both Settings-> Wap Settings and GPRS settings. See page 120 and 121.
Logging on to the Internet
You can launch your phone's browser and start a mobile Internet session in two ways:
1.From the idle screen long press
2. Go to the menu: Services --> Wap. See also page 92.
When you launch the browser, the browser greeting screen as shown below will come up.
Surfing the Internet
After you log on successfully, the homepage you connect to will appear. Use the following keys to navigate through Web pages:

- You can specify a homepage of your own. See page 53. Your network service provider specifies the default homepage.
-
The Internet service you connect to determines the layout and information that appears on the display. Accordingly, actual ways of navigating the Internet may differ from the following scenarios.
-
Press the up/down keys of to scroll up and down the Web menu, and right/left keys of to scroll to the right and left.
- Press to return to the previous page.
- Press to execute the command displayed at the bottom left of the browser screen; press to execute the command displayed at the bottom right.

You can edit text while navigating the Web if the label Edit appears at the bottom left of the browser screen. While editing text on the browser screen you can press and select ABC. Then you can enter text using the same input methods as described in chapter 4 "Input modes". See page 40.
Logging off the Internet
Long press to terminate your Internet connection and close the browser.
Using the browser menu
When you browse Web pages, press to access the browser menu, which contains the options below. Scroll and press, or press a number key to select the desired option directly. To return from the current browser menu to the previous screen or Web content, press. You can also press to execute the command displayed at bottom left of the browser screen and press for the command shown at bottom right.
Long pressing will close the browser and take you back to the main menu or idle screen.
The browser options are:
1 Back
Selecting this option will bring you to the previous Web page you browsed. This option works the same as pressing .
2 Home
Go back to the homepage. To specify a homepage, go to: 9 Settings ---> 1 Homepage.
3 Exit
Selecting this option will closer the browser and take you back the main menu or idle screen. This option works the same as long pressing .
4 Mark Site
Bookmarks the current website or Web page to the list of your favorite websites.
5 Bookmarks
You can open the Bookmarks list to choose a Web bookmark. (The Bookmarks list is stored in the remote server. It can be used only when you are connected to network.).
6 Inbox
When your phone receives a message that can only be viewed on the WAP browser, you can see the message in this Inbox option.
7. Save Image
When your phone browses the pages containing an image designed to be downloaded as an EMS object, you can select this option to save the image to your phone as an EMS object.
8 Reload
Reloads the current Web page.
9 Settings
You can enter this menu to choose from the following settings:

Please contact your service provider for details of the following settings.
1 Homepage
Specifies a homepage. The homepage you specified is opened every time you connect to the Web main screen or select Home from the browser menu. You can select this item to get to the editor screen and specify a desired homepage by entering its Web address.

However, some network service providers do not allow the user to specify the homepage.
2 Proxy
Each proxy number represents the setting data of a WAP server (or UPLINK). There are three different WAP servers available in your phone. Here you can select a proxy number that represents the server you want to activate as the default server. Your phone connects to the default server during an Internet session.
You can also go the menu: Settings --> Wap settings to select the server you want to activate. See page 120.
WAP Proxy 1 => UPLINK1
WAP Proxy 2 => UPLINK2
WAP Proxy 3 => UPLINK3
3 Circuit Prompt
The Circuit Prompt is a message displayed before each circuit data call is made. It reads "Circuit is down. Start data call?". You may enable and disable it by selecting ON or OFF.
4 Circuit Linger
The Circuit Linger is length of time that the phone waits before terminating a circuit data call. You may set it to any length of time between 30 and 9999 seconds.
5 Scroll Mode
You can select the scroll mode in Block or Smooth. In the Block Scroll mode, as many of the words that fit on a line are displayed for a few seconds then the next line is displayed, then the next and so on. In the Smooth Scroll mode, the content scrolls smoothly on the display.
6 Scroll Speed
Adjusts the scroll speed to Fast, Medium, or Slow.
7 Key Press Timeout
The key Press Timeout sets the amount of time the phone waits during text entry, before automatically advancing the cursor to the next entry position. As long as the same key is re-pressed within the Key Press Timeout, the last character cycles between all the choices for they key. The Key Press Timeout is adjustable.
8 Security
1 Connection Prompt
The Connection Prompt is a message displayed when a secure session is established. It reads "Secure connection established."
2 Secure Prompt
The secure prompt is a message displayed before leaving a secure area. It says "Entering a non-secure area. OK?" You may enable and disable it by selecting ON or OFF.
3 Current Certificate
Shows the current certificate.
4 CA Certificates
A certificate is a digital ID. It is issued by a trusted third party known as certificate authority (CA). The phone uses CA certificates to authenticate websites that send information to the phone.
5 Encryption
Views the encryption information. This function is for security. There is a security key stored in the browser. The key is used to encrypt data when transmitting data between the handset and server. Press to show the following options:
Verify Key
Verifies the checksum of the key.
New Key
Requests a new key from the server.
9 Advanced
1 Show URL
Shows the Web address of the current page. It can be used to save the current page as your homepage, which can quickly bring you to the page without waiting the next time you activate the browser from idle mode.
2 Restart Browser
Restarts the browser.
3 Offline Services
Your phone saves the last browsed Web pages in its temporary memory (Cache). You can access a desired Web page off-line by selecting this item. If the Web page you want is not stored in the temporary memory, you will be prompted to connect to the Web service. If the temporary memory is cleared, all Web content stored in it will be erased.
4 Outbox
Displays the outbox status screen. The unsent information (such as an unsent Web-based e-mail) is stored here when you navigate the Web. You can come here to see if there is any unsent information and send it again the next time you link to the Web.
About...
You can read related information about the browser version.
URL Direct Dial (UDD)
M770GT has defined a shortcut key(), called ".com key," for URL speed input. This feature makes your digital life easier and more fun. With the shortcut key, you can key in numeric URL directly under the idle screen. For example, to key in http://123.com, you only need to key in "123" first, then long press , and "http://123.com" would immediately show up on the screen. (.com key) automatically adds "http://" in front of the numbers, and ".com" in the end. After URL input is complete, you only need to press or to connect to the website.
| ! | To activate the .com key, you have to long press after you key in numbers under the idle screen. If you only short press after keying in numbers, you would be prompted to save the numbers as a phone book entry instead. |
When you key in a URL, the .com key also has the below functions:
- After long pressing once, you can press for a few more times to have different output:
| Time | Output |
| 0 | . com |
| 1 | . net |
| 2 | . com.tw |
| 3 | . net.tw |
| 4 | . org |
| 5 | . org.tw |
| 6 | . gov.tw |
| 7 | . com.cn |
| 8 | . net.cn |
| 9 | .org.cn |
| 10 | .gov.cn |
| 11 | .info |
| 12 | .biz |
- can turn (_+)() into "dot(.)". For example, you key in "123456" under idle screen, then long press , and you would get http:// 123.456.com.
- After long pressing and see "http://"/" on the screen, you can press ^# to get"/". For example, first you key in "123", long press once, and the screen displays "http://123.com". Press ^# once and the URL becomes http://123.com/.
- After the screen displays the standard URL(ex. http://123.com), you can press to start the WAP service, and connect to this particular website directly.
Input Examples:
1. ".com"
Key in "123" under the idle screen, and the screen displays "123". Long press once, and the screen shows "http://123.com".
2. ".net"
Key in "123" under the idle screen, and the screen displays "123". Long press once, then short press once, and the screen shows "http://123.net".
3. " .com.tw"
Key in "123" under the idle screen, and the screen displays "123". Long press once, then short press twice, and the screen shows "http://123.com.tw".
4. "net.tw"
Key in "123" under the idle screen, and the screen displays "123". Long press once, then short press 3 times, and the screen shows "http://123.net.tw".
5. ".org"
Key in "123" under the idle screen, and the screen displays "123". Long press once, then short press 4 times, and the screen shows "http://123.org".
6. "org.tw"
Key in "123" under the idle screen, and the screen displays "123". Long press once, then short press 5 times, and the screen shows "http://123.org.tw".
7. ".gov.tw"
Key in "123" under the idle screen, and the screen displays "123". Long press once, then short press 6 times, and the screen shows "http://123.gov.tw".
8. ".com.cn"
Key in "123" under the idle screen, and the screen displays "123". Long press once, then short press 7 times, and the screen shows "http://123.com.cn".
9. "net.cn"
Key in "123" under the idle screen, and the screen displays "123". Long press once, then short press 8 times, and the screen shows "http://123.net.cn".
10".org.cn"
Key in "123" under the idle screen, and the screen displays "123". Long press once, then short press 9 times, and the screen shows "http://123.org.cn".
11."gov.cn"
Key in "123" under the idle screen, and the screen displays "123". Long press once, then short press 10 times, and the screen shows "http://123.gov.cn".
12. ".info"
Key in "123" under the idle screen, and the screen displays "123". Long press once, then short press 11 times, and the screen shows "http://123.info".
13. ".biz"
Key in "123" under the idle screen, and the screen displays "123". Long press once, then short press 12 times, and the screen shows "http://123.biz".
14. Advanced ".com" URL input
Key in "123256" under the idle screen, and the screen displays "123456". Long press once, and the screen shows "http:// 123.456.com".
15. Advanced ".net" URL input
Key in "123256" under the idle screen, and the screen displays "123456". Long press once, then short press once, and the screen shows "http://123.456.net".
16. Advanced".com.tw"URL input
Key in "123256" under the idle screen, and the screen displays "123456". Long press once, then short press twice, and the screen shows "http://123.456.com.tw".
17. URL ending with "/n
Key in "123" under the idle screen, and the screen displays "123". Long press once, and the screen shows "http://123.com. Then press once, and the screen shows "http://123.com/".

MENUS
Your phone's menus cover a wide variety of features. The main menu is made up of 8 animated images. Each represents a specific menu consisting of related submenus.
Navigating the menus
- Press the up/down/right/left keys of to access the main menu from the idle screen.
- Scroll right and left in the main menu using the right/left keys of to highlight a desired option; press the up/down keys of to scroll up and down in the main menu. Then press (SELECT) to access a highlighted main menu option.
- In the submenus, press the up/down keys of to scroll the screen up and down to a desired option. Then press to select the option you want.
- Press to abort a selection/operation and return to the previous menu or screen.
For example, when you want to change the language setting:
- Press the up/down/right/left keys of to access the main menu from the idle screen.
- Press to scroll to Settings, and press (SELECT) to access its menu.
-
Phone settings is the first option of the Settings menu, so press (SELECT) to access the Phone settings option. And Language is the first option of the Phone Settings menu. Press (SELECT) to access the Language menu.
-
The options under the Language menu appear. Press to scroll to a desired language and press (SELECT) to confirm. For example, if you want to change the language setting to Complex Chinese, scroll to highlight 繁體中文 and press (SELECT). The screen automatically returns to the Phone settings menu displayed in Complex Chinese
- Press a couple times to return to the idle screen.
Phone book

The Phone book menu allows you to view your phone book as well as records of recent calls. You can also add and delete entries of phone book contacts.

If you want to prevent others from reading your phone book accidentally, you can turn on the Privacy Code setting. See "Privacy Code" on page 118.
Recent Calls
Network support dependent.
This menu contains lists of the calls you missed, sent and received, as well as records of call cost and duration.
All Calls
Displays all of the last missed/received/dialed calls. Scenarios are the same as described in the section "Last missed, dialed, and received calls" on page 22.
Missed Calls
Displays the last missed calls.
Scenarios are the same as described in the section "Last missed, dialed, and received calls" on page 22.
Received calls
Displays the last received calls.
Scenarios are the same as described in the section "Last missed, dialed, and received calls" on page 22.
Dialled numbers
Displays the last dialed calls.
Scenarios are the same as described in the section "Last missed, dialed, and received calls" on page 22.
Delete call logs
Deletes the records of recent calls all together or by the types of calls.
Delete all: deletes the records of all recent calls.
Delete missed: Deletes the records of all last missed calls.
Delete received: deletes the records of all last received calls.
Delete dialled: Deletes the records of all last dialled calls.
Call costs
Here you can view the duration and cost of the calls you made as well as set up the unit price for calculating the cost.

Network support dependent.
Last call: Shows the duration and cost of the last call. Once you scroll to this option, press (STATUS) to display the call cost along with duration.
All calls: Shows the total duration and cost of all calls. Once you scroll to this option, press (STATUS) to display the call cost along with duration.
Once the call cost and duration is displayed, you can press (CLEAR) and choose to delete the total time, cost or both by scrolling to the respective option and ticking its box pressing
CHANGE). When the box of the time or cost record that you want to delete has been checked, press (CONFIRM) and the selected record will return to zero.
You must enter PIN 2 before you are allowed to delete the call cost.

What is PIN2?
PIN2 is a second set of PIN that is mainly used to control limited services such as call cost limitation and fixed dialing numbers.
- If entered incorrectly three times in a row, PIN2 will be locked up. To unlock PIN2, you need to enter the PUK2 code. Please call the operator, and ask for PUK2.
Cost Units: This option allows you to first enter the unit price for calculating the cost and then a preferred currency base for calculating the cost of your calls.

PIN2 is required.
Max cost: You can set a limit to the total call cost. If the call cost goes beyond that limit, the phone cannot be used to make a pay call. When this function is activated, the remaining cost will appear on the screen.

PIN2 is required.
View names
Views the contacts of your phone book. Scenarios are the same as described in the section "Your phone book" on page 24.
Search
Searches for a contact saved in your phone book. Type the full name or just the first letter(s) of the contact you are looking for if unsure of spelling and press (OK).
Add name
Adds another contact to the phone book. You can add a new contact's entry in the same way you edit the information of an existing contact in your phone book. See page 26.
Speed dial
You can assign the number key 1 9wxt as a speed dial key for any phone number stored in the Phone book. A long press on a speed dial key from the idle screen will automatically dial the phone number that the key represents. For example, if 5 s is set as a speed dial key, long press 5 s to make the speed dial of the phone number which is linked to 5 s . In this option you will see the list of entries 1 9 , which represent keys 1 9wxt respectively. You can choose a number key as the speed dial key for a phone number by selecting the entry that represents the number key you want.
For example, If you want to choose 2_ABC as the speed dial key for a particular phone number:
- Scroll to highlight entry 2 and press (OPTION).
-
Select Assign to display the contacts stored in your phone book. Scroll to highlight the contact you want and press (SELECT) to view the number(s) saved under the selected contact.
-
Scroll to highlight the phone number you want 2_ABC to be the speed dial key for and press (SELECT). The list of entries will appear again with entry 2 showing the call type icon and contact name of the selected number, indicating that 2_ABC has been chosen as the speed dial key for the number.
- If you want to set up more speed dial keys, you can repeat the above steps. If you want to change 2_ABC back to a general number key, select entry 2 again and select Delete. The entry where the number was previously stored will become empty again.
- When you have finished, press (EXIT) to exit the entries and a dialogue box will pop up asking if you want to save the settings. Press (OK) to save all of the settings. If you want to give up all of the speed dial settings, press (EXIT).
You must press (EXIT) then press (OK) in order to save all of the speed dial settings to your phone memory.
Caller group
A caller group is a group of phone settings that you can select to identify a particular group of contacts, such as work colleagues, family members or friends. For example you can choose a special ring tone for one group which will sound when a member of that group calls.
Each profile option is a caller group. There are six caller groups available-- Family, Friends, Business, Colleagues, VIP, Leisure--plus a group made up of contacts not assigned to any of the six caller groups.
Each caller group profile is represented by a particular icon as shown to the left of the profile option. Scroll to highlight the profile of the caller group you want to select the settings for and press (SELECT). The following profile settings will be displayed.
You can change the list of the selected caller group and select a ring tone, image and backlight color in order to help identify incoming calls from the selected group.
You must press (EXIT), then press OK) as the prompt Save?" appears in order to save the changes you have made to the following profile settings.
View List
Views the phonebook contacts in the selected caller group.
1.If no contacts are found, List empty will appear.
2.If the group already has a list of contacts in it, you can scroll to highlight the one you want and either press to dial the first number saved under the selected contact, or press (OPTION) to choose from the following:
- Select View number to display all of the contact's numbers. Scroll to highlight the number you want. Then you can press to dial the number, or press (OPTION) to set up a speed dial key for the number.
- Select Search to find another contact in the current caller group.
- Select Set group to assign the selected contact to another caller group. Scroll to highlight the caller group you want the contact to go to and press (SELECT).
Rename
Changes the name of the selected caller group.
Ring Type
Selects a ring tone for this group. Your phone will ring in the tone you choose when a member from the selected group calls you.
Image type
Selects the image you want to appear on the screen when a member of the selected caller group calls you. Press to scroll through the images until the one you want appears. Press (SELECT) to select the image for the caller group.
Copy record
Your phone has two memories where you save details of phone book contacts: your SIM card memory and your phone memory. This feature allows you to copy or move your phone book contacts between SIM and phone memories so that you can take them with you if you change phone. You can copy your phone book contacts to a different memory one entry at a time or copy all the contacts stored in one memory to another memory.
SIM to phone
Copy or move phone book entries from the SIM memory to the phone memory.
Copy one
Copy or move a single entry from the SIM memory to the phone memory.
Keep original
Copy a single entry from the SIM memory to the phone memory, while the original is kept in the SIM memory. Scroll through the entries stored in the SIM memory. When the desired one is highlighted, press (COPY) and the entry will be copied into the phone memory.
Erase original
Copy a single entry from the SIM memory to the phone memory and delete the original. Scroll through the entries stored in the SIM memory. When the desired one is highlighted, press (COPY) and the entry will be moved into the phone memory.
Copy all
Copy or move all phone book entries from the SIM memory to the phone memory.
Keep original
Copy all of the entries from the SIM memory to the phone memory, while the originals remain in the SIM memory.
Press (OK) and all the entries will be copied to the phone memory.
Erase original
Copy all of the entries from the SIM memory to the phone memory and delete the originals.

If the target memory does not have enough capacity for all of the entries to be copied, the screen will show the number of available entries indicating only the displayed number of entries can be copied. For example, if you want to copy totally 40 entries to the phone memory where only 32 entries are available, your phone will show "32 available, copy?" If you press (OK), your phone will simply copy the first 32 entries to the phone memory.
Phone to SIM
Copy or move phone book entries from the phone memory into the SIM memory.
Copy one
Copy or move a single phone book entry from the phone memory to the SIM memory.
Keep original
Copy a single entry from the phone memory to the SIM memory, while the original is kept in the phone memory. Scroll through the entries stored in the phone memory.
When the desired one is highlighted, press (COPY) and the entry will be copied to the SIM memory.
Erase original
Copy a single entry from the phone memory to the SIM memory and delete the original. Scroll through the entries stored in the phone memory. When the desired one is highlighted, press (COPY) and the entry will be copied to the SIM memory.
Copy all
Copy or move all phone book entries from the phone memory to the SIM memory.
Keep original
Copy all of the entries from the phone memory to the SIM memory, while the originals remain in the phone memory.
Press (OK) and all the entries will be copied to the SIM memory.
Erase original
Copy all the original entries from the phone memory to the SIM memory and delete the originals.
Save nos. to
You can select the memory where details of phone book contacts are stored:

Your phone memory can store up to 500 numbers. The capacity of your SIM card depends on the network service your subscribe to with your operator.
SIM card
Your phone book entries will be stored in your SIM card, as shows on the left of a contact's name in the phone book.

Choice
Before you save a number to your phone book your will be asked whether you want to store the number in the SIM card memory or phone memory.
Phone memory
Your phone book entries will be stored in your phone memory, as shows on the left of a contact's name.

The benefit of saving numbers to your SIM card memory is that you can easily remove your card with all your stored information and insert it into another phone at a later date.
However if you need to change your SIM card or need more memory for phone book entries you can use your phone memory.
Used space
You can view the number of occupied phone book entries and the total number of entries available in your SIM card and phone memory, as well as in the memory where fixed dialed numbers are stored (shown as FDN on the screen). The phone memory can store up to 500 phone numbers, while the number of available entries in the SIM memory varies, depending on the network service you subscribe to.

For information on setting fixed dialed numbers, go to the menu: Settings Security settings Fixed dialling. See page 117.
Delete all
You can delete data of all phone book contacts.

- To protect the data stored in your phone, you must enter the handset code before you can access this option. The default handset code is 1234.
- To change the handset code, go to menu: Settings -> Security settings -> Handset lock. See page 114.
After entering the handset code, you can choose to delete all of the contact data from your SIM card or phone memories.
Own number
This feature allows you to store your name and SIM card phone number in your SIM card memory. The name stored in the SIM card memory is then displayed on the idle screen.
- If no own number records are saved in the memory, you will see 2 lines of "
" displayed on the screen. Press (EDIT) and enter your name and phone number. Finally press OK. - If your name and SIM card number have already been stored in the SIM card memory, it will be displayed when you choose this option. You can then press (EDIT) to edit the current record.

- The name stored in your SIM card will be displayed on the idle screen.
- As the name of the own number record is stored in the SIM memory, the name displayed on the idle screen will change accordingly if you insert a different SIM card into your phone.
SDN
You can access the service phone number (SDN) provided by your operator.

This feature is network operator support dependent.
Messages

You can use the following message features to keep in touch when you can't make a voice call, or when you only want to convey a short, simple message.

If you want to prevent others from reading your personal messages accidentally, you can turn on the Privacy Code setting.
Inbox
Here you can view the messages you have received recently.
The screen will show entries of last received messages, each entry displaying the respective sender's phone number. (If the sender is a contact saved in your phone book, the screen will display the sender's phone book name rather than the number). The icon to the left of a message entry indicates whether the message has been read (☑) or not (☑). Scroll to highlight the message entry you want.

If you want to erase all of the received messages from your SIM card, you can scroll down to the end of the message list and select Delete all to erase all the received messages.
When an entry is highlighted in the black bar the first line of the message will flash. (If the message contains an EMS object such as an icon or animation, or a ringing melody, "Enhanced Msg" or "Download Melody"
will flash instead). Press (READ) to view the entire message as well as the arrival time and date associated with the message.
Having read a message, press (OPTIONS) and choose from the following options to handle the message:
Delete
Deletes the message. Select Yes to delete the message; select No if you want to keep the message.
Save EMS
If the message contains an EMS object like an icon or animation which has not been stored in your phone, you can select this option to save this EMS object. Give the EMS object a file name and press
(OK) to save the object to its EMS library in your phone. For example, if the object is an animation, it will be automatically saved to an available entry in the animation library for future use.
This option is only available when the message has an EMS object in it.
Save Melody
When you have received a melody, you can choose this option to save the melody to the menu: Profiles --> Edit Profile --> Ringing tone. For how to choose a ringing melody for your phone, see page 124.
This option is only available when you have received a ringing melody.
Chat
This feature allows you to initiate a chat session by replying to a received message. For how to start a chat session, see "Starting a chat session" on page 82.
Edit
You can edit the received message.
For how to edit a message using the available input methods in your phone, see "Input modes" on page 40.
When you have finished a message, press OK) and choose from the following options:
Save to SIM
Press (SELECT) to save the message to the Outbox. For details on the Outbox option, see page 79.
When a new message arrives it is stored on your SIM card. If your SIM card has no room available for storing the message, will flash, and the network will hold the message until you make space for it by deleting another message from your SIM card.
Send To
You can send the message to a single recipient. Simply enter the recipient's phone number as you are asked to do so and press OK) to send the message directly. Alternatively, you can long press to access your phone book and select a contact you want to send the message to. Scroll to highlight the desired contact and press VIEW) to display the contact's phone book information. Scroll to highlight the number you want to dial and press SELECT) to enter the number. Press OK) to send the message.
Send by Name
You can send the message to the recipients you choose from your phone book. Scroll the list of the contacts and press (CHANGE) to tick the contacts to whom you want to send message. You can also press (CHANGE) to deselect a recipient. When done, press (CONFIRM) to show the mailing list of the selected contacts. You can then scroll to highlight the contact you want and press (OPTIONS) to choose from the options below:
■ Send: Sends your message to the selected contacts.
- Add: You can add the number of another recipient you want to send the message to.
- Delete. Removes the highlighted contact's name or phone number from the mailing list.
Send by Group
You can send the message to the members you select from a particular caller group. Choose a preferred group and select recipients in the same way you select by name from your phone book.
Forward
Forwards the message to other recipients. You can forward the message in the same way you send a modified message from the Edit option.
Text reply
You can reply to the received message by writing a whole new message in this option. When the reply message is done, press OK),the sender's phone number will appear. Press OK) again to send the message to the sender.
Call to Sender
You can call the sender using the number by which the message was sent.
Extract nos
Displays the number(s) contained in the received message. Scroll to highlight the number you want and press (OPTIONS). Then choose to dial the number (CALL) or save the number to your phone book (SAVE).

How do Call to Sender and Extract nos function differently? For example, a friend sends you a message via 0922277585, which says "Hello, long time no see. Please call 0287654321 or 0212345678." When you finish reading the message and select Call to Sender, your phone will dial 0922277585 automatically. If you select Extract nos, your phone will list 0922277585, together with 0287654321 and 0212345678 extracted from the text of the message. Then you can choose to dial or save one of the numbers.
Outbox
This feature allows you to read the messages you previously sent or saved. Upon entering this option, you will see the entries of the last saved messages. The icon to the left of an message entry indicates whether an outgoing message has been sent ( ) or not ( ). Scroll to highlight the message entry you want.

If you want to erase all of the outgoing messages from your SIM card, you can scroll down to the end of the message list and select Delete all to erase all of the outgoing messages.
When the desired entry is highlighted, press (VIEW) to read the message. After you read the message, press (OPTIONS) to manage the message using the options similar to those for Inbox.
Backup
You can back up your messages here. The total message capacity is 256k, around 566 messages.
Create message
This feature allows you to write a new message. When you have finished writing your new message, press OK) to choose to send or save the message. Options are the same as those for Edit in the Inbox menu. See page 76.
Quick Message
You can write a message using the message templates (called Quick Messages) stored in your phone memory. There are also 5 blank spaces available for you to compose and store your own message templates.
-
To write a message using the factory preset templates:
-
Press the up/down keys of to scroll to the message template you want to use.
-
Press (SELECT) to choose from the following:
-
Send: You can send the message template in the same way you send a message. See options for Edit in the Inbox menu.
■ Edit Context: You can modify the message template into the message that you want to send. When you have finished, press OK) and choose to send or save the message. Options are the same as those for Edit in the Inbox menu. -
To create and save a message template of your own:
- Scroll towards the end of the template list to highlight a blank entry where you want to save the message you create and press (SELECT).
- Press (SELECT) to select Edit and write the message template you want to store. When you have finished, press OK to save the template in the selected entry for future use.
-
To use or modify a template that you created previously:
-
Press the up/down keys of to scroll to a message template that you created.
-
Press (SELECT) to choose from the following
■ Send: To send your message template.
■ Edit Context: You can modify the message template into the message that you want to send. When you have finished, press OK) and choose to send or save the message.
Edit: You can modify your template. When you have finished press (OK) to save the modified template.
- Delete: deletes the message template that you created. Press (SELECT) to select Yes to delete the template from the phone memory, or select No to keep the template.
Ring Message
This is a library of EMS ring tones for you to choose from and add to your text messages. Scroll to highlight the ring tone you want and press (SELECT) to do either of the following:
- Send: To send the selected ring tone without a text message. You can send the ring tone the same way you send a message. See options for Edit in the Inbox menu.
■ Edit Context: You can send the selected ring tone along with a text message. The bell icon displayed on the screen indicates that the ring tone has been attached to the message you are going to write. Write down your message and when you have finished press (OK) to choose to save or send the message. Options are the same as those for Edit in the Inbox menu.
Animation Message
This is a library of EMS animations for you to choose from and add to your text messages. You can send an animation either with or without a text message. Scroll to show the animation you want and press (SELECT) to choose to send the animation alone or with a text message. Options are the same as those for Ring Message.
Icon Message
This is a library of EMS icons for your to choose from and add to your text messages. You can send an icon with or without a text message. Scroll to show the icon you want and press (SELECT) to choose to send the icon alone or with a text message. Options are the same as those for Ring Message.

Alternatively, when writing a new message or editing a received or saved message, you can long press to insert ring tones, animations and icons anywhere in the text.
SMS Chat
This feature is network support and subscription dependent.
You can engage in a peer-to-peer chat session by writing short messages to another mobile phone user. This feature allows you to have a continuous text conversation with someone without having to key in the number of the recipient each time you have something new to say. The text conversation is recorded so you can review what has been said in the chat session.
Starting a chat session
There are two ways of initiating a chat session.
- You can come to this SMS Chat menu and select New Chat to open a chat session. Follow the steps below to start a chat session:
a. Enter the nickname you want to use during a chat session.
b. Enter the phone number of the person you want to chat with. Alternatively, when asked to enter the number, you can long press to select a phone book contact as your chat partner. Scroll to highlight the desired contact and press (VIEW) to access the details of the contact. Scroll to highlight the number you want to use and press (SELECT) to enter the number.
c. Write your message. When you have finished, press (OK) to send the message to invite the recipient to a chat.
d. When the chat message has been sent your nickname followed by the sent message will appear on the screen as "name>message". You can enter the next chat message and press OK). The message will automatically be sent to the person you sent the first message to. Repeat the same process to send more messages to the same person.
- Alternatively, to set up a chat session, you can select a previously received message from the Inbox option and choose Chat. You can start a chat using a received message like you start a chat by selecting New Chat in the SMS Chat menu, but in this way you don't have to enter the recipient's phone number before you send a chat message. See also page 76.
Receiving a reply to your chat message
When your phone receives a reply from your chat partner, the screen will show your partner's name and message, followed by the previous message(s) you sent. You can now talk with your chat partner by entering
what you are going to say and press (OK).
Your words will automatically be sent back to your chat partner. You can continue the chat session by repeating the same process. All of the text conversation will be displayed on the screen.
Receiving a request for a new chat
When your phone receives a chat request from another person, a dialogue box pops up on the screen asking if you want to join the chat. Follow the steps below to reply to the chat message:
-
Press to view the chat message. The screen shows the name of the sender followed by her message as "name>>message".
-
Press (Chat) to join the chat. Enter your nickname and message and press (OK) to send your message. The screen will show your name and message followed by your partner's the previous message.
Leaving a chat session
If you want to leave a chat session, press (EXIT). This will take you back to the SMS Chat menu. You phone will keep the record of the last chat session. To review the previous chat session, scroll to select Previous
Chat. Then you can resume the previous chat session by pressing (CHAT).
If you want start a new chat, press (EXIT) to get back to the SMS Chat menu, and select New Chat.
When you are interrupted by an incoming call during a chat session
- Answer the call. Upon ending the call, the screen returns to the idle mode. Then you may resume the chat session by selecting Previous Chat from the SMS Chat menu.
- Reject the incoming call and continue the chat by selecting Previous Chat from the SMS Chat menu.
Message settings
This menu includes several options to adjust message settings:
Message center
This feature stores the phone number of the message center for sending your text messages. The message you send is transmitted via this message center to the receiver.
Enter the message center number provided by your operator. When done, press (OK) to confirm.
Message lifetime
You can select the length of time ranging from one hour to six months that your text messages are stored at the message center while the message center attempts to deliver them.
Message format
You can ask your network operator to convert your text messages into different formats. For example, when you have sent a message to an ERMES pager user, your message is automatically converted to ERMES protocol.
Select from the following formats: Normal text, Fax, Voicemail, ERMES, National paging, X.400, Internet. When done, press (SELECT) to confirm.
Reply Path
You can ask the network to set the route of the reply message via your own message center. If you set this function on and send a message to someone and the person replies, the reply message will follow the path of the previous message that you sent. Select "On" or "Off".
Notification
If you activate this function, your network will send you a delivery report.
Voicemail
You can call the voice mailbox provided by your operator and listen to the voicemail left by a caller.

Your network operator provides your voicemail box number as well as the numbers for accessing other voicemail services they have. Please check with your operator for details of their voicemail services and see if you need to set up your voicemail box by saving particular numbers to your phone.

To set up your voicemail box, go to Voicemail settings. See details on page 87.
Listening to a voicemail
When your voicemail box receives a voicemail, your operator gives you a call or sends you an SMS alert to remind you of the waiting voicemail. If the text of the SMS alert sent by your operator matches the text of the SMS alert previously stored in your phone--this is called Alert Match--your phone will recognize this SMS alert as a reminder of a new voicemail and a prompt screen showing "New voicemail" will pop up.
To listen to the voicemail simply press (SELECT) and your phone will automatically dial your voicemail box number for you. Press (EXIT) to return to the previous screen if you don't want to call the voicemail box, then the voicemail icon ( ) will appear on the screen.

The rationale of the Alert Match feature is that, once you've got an SMS alert from your operator saying that you have a waiting voicemail, you can press (SELECT) directly to listen to the voicemail, instead of having to return to the idle screen to dial your voicemail box number digit by digit.

To set up the Alert Match feature, you must save your operator's SMS alert in advance. Please do so in Voicemail settings Alert match. See page 88.
Alternatively, if the text of the operator's SMS does not match the text of the SMS alert stored in the Alert match option, or if your operator calls you to inform you of a new voicemail, you can access your voicemail by selecting Voicemail ---> Get voicemail, or long press 0ae directly from the idle screen.
You can also set up a number key as a speed dial key for your voicemail box number. For how to set up a speed dial key, see Speed dial on page 66.
Voicemail settings
You can use the following options in Voicemail ---> Voicemail settings to determine how your voicemail box works:
Box numbers
Here you can store your voicemail box number as well as the numbers controlling the voicemail feature:
Home Mbox: This is your voicemail box number that you dial to listen to a voicemail.
- Roam Mbox: This is the number you dial to listen to a voicemail when roaming on another network.
■ Voice no.: This is the number you dial to request the operator to give you a call upon receiving a new voicemail.
■ Message no.: This is the number you dial to request the operator to send you an SMS alert upon receiving a voicemail.
■ Disable no.: This is the number you dial to disable the voicemail feature.
■ Enable no.: This is the number you dial to enable the voicemail feature.
When these numbers have been set correctly, you can check your voicemails, turn the voicemail feature on or off, or change the way of the voicemail notification simply by selecting the respective menu option. Your phone will automatically dial the number you set up for each option to inform your operator of your choice.
Alert by call
Here you can request your operator to inform you of a new voicemail with a telephone call. Select this option and your phone will automatically dial the number previously stored in Box numbers --> Voice no..
Alert by SMS
Here you can request your operator to inform you of a new voicemail with a SMS alert. Select this option and your phone will automatically dial the number previously stored in Box numbers --> Message no..
Alert match
If it is not already set, you can manually store the SMS alert to match the one sent by your operator when a new voicemail is received. To do so turn the voicemail feature on and set the alert mode to Alert by SMS, then ring your phone using another phone and leave yourself a voicemail message. Your operator will then send an SMS alert saying that a new voicemail is waiting. Jot down the SMS alert and come to this Alert match option to enter and save the SMS alert. It is not necessary to enter the whole message, just enough of it to provide a reliable match for your phone to identify an SMS message as an SMS alert for a new voicemail.
If the text of the SMS alert varies according to the number of voicemails the network is holding for you--for example it may sometimes read "1 new voice mail" and at other times read "2 new voice mails"-you can set a wildcard in the Alert match option by inserting a "?". And the SMS alert you enter will be like "? new voice message." Your phone can then use this saved message to identify the SMS alert sent by your operator.
Activating/deactivating the voicemail feature
You can request your operator to activate the voicemail feature by selecting Voicemail ---> Voicemail on. Your phone will call your operator by dialing the number saved in Voicemail settings ---> Box numbers ---> Enable no..
Select Voicemial off to ask your operator to deactivate the voicemail feature. Your phone will call your operator by dialing the number saved in Voicemail settings --> Box numbers --> Disable no..
Cell Broadcast
Cell broadcast messages are the general messages that your network operator broadcasts to all phones in a particular area. These messages are broadcast in numbered channels. For example, channel 030 might be for local weather, 060 for traffic reports, 080 for information of local hospitals, taxis, pharmacies, etc., and so on and so forth.
You can receive cell broadcast messages that your operator broadcasts to you, and choose preferred subjects and languages.

Please contact your operator for a list of available channels and the information they provide.
CB switch
Activates/deactivates the cell broadcast feature.
Read Cell Broadcast
Here you can read the messages that you want your operator to broadcast to you regularly. The name of the subject and the information will be displayed on the screen.

To select the messages that you'd like to be sent regularly by your operator, go to Settings Set CB subjects.
Settings
Immediate Display CB
After your activate this option, your phone will immediately display the contents of the cell broadcast message it has just received.
Language
You can ask your operator to broadcast the information only in the languages you select.
In this option you will see a list of languages that you previously selected. If the list is empty, you can do either of the following to add a desired language to the list:
- Select Insert and scroll to highlight the language you want and press (SELECT). The selected language will be added to the top of the list.
- Select Add to end and scroll to highlight the language you want and press (SELECT). The selected language will be added to the end of the list.
You can repeat the either of the above processes if you want to add more languages to the list.
If you want to remove a language from the list, scroll to select the language you don't want in the list and select Delete.
Set CB subjects
Here you can determine what information you wish to get from your operator's cell broadcast. This is a twofold process:
Create subject
Here you can list all of the cell broadcast subjects available from your operator.
If no subjects have been saved before, you can enter a new subject by selecting Add. Enter the subject code which is available from your operator followed by a name that you create for the subject. The name you enter will serve as a reminder of what the subject is about. For example, if the subject is about weather, you can enter "weather" for the subject.
Once the list has subjects stored in it, you can select a subject you want from the list and press (SELECT) to choose to add a new subject to the list (Add), edit the information of the selected subject (View/Edit), or remove the selected subject from the list (Delete).
Current list
This is where you decide what broadcast information you want from your operator. The subjects on the Current list are the ones that you've chosen to be regularly broadcast to you by your operator.
If the list is empty, select Add, then choose a subject you previously saved in the Create subject list. The subject you choose will be added to the Current list.
Once the list contains subjects in it, you can select a subject you want from the list and choose to add a new subject to the list (Add), or remove the selected subject (Delete).
Services

In this menu you can start a mobile Internet session using your WAP-enabled phone and enjoy the on-line services available from your operator or Internet Service Provider (ISP).
Additionally, you can enjoy the value-added SIM Tool Kit services available from your operator.
WAP
Here you can launch your phone's browser to log on to the mobile Internet.

If you wish to successfully connect to the mobile Internet using your phone, you must subscribe to WAP services with your operator and do proper settings in your phone. If you use your phone on a GSM network you must do the settings in the menu: Settings Wap Settings. If you use your phone on a GPRS network you must do the settings in both Settings Wap Settings and GPRS settings. See page 120 and 121.

For details on the mobile Internet, see "Mobile Internet" on page 50.
S.T.K.
Your network operator provides this STK (SIM Tool Kit) menu. Depending on your SIM card and the services provided, there will be several extra options under this menu. However, if your network operator does not offer STK services, this menu will not be displayed on the screen. For details, please contact your operator.
Schedule

The Schedule feature is designed to make it easy for you to keep track of time and plan your day. Your phone will work as a personal secretary to remind you about the meetings or
appointments you have previously scheduled.
When you are in this option the calendar screen appears, showing the current month, year and weekday at the top. The current date is marked in the black box. You can jump to the previous or next month's calendar screen using 艹 and 艹 , and press 艸 to move the black box horizontally or vertically on the screen in order to select a date. When the
date you want is highlighted, press (SELECT) to enter its options:

If you haven't set the current date yet, please do so in the menu: Settings Clock settings Set date. See page 122.
Set reminder
The reminder comes in three different forms:
- Notes: You can jot down things you need to do or remember on the selected date, such as a previously scheduled meeting, appointment, a friend's birthday, etc. As the selected date comes the notes will pop up at the time you set to alert you.
- Alarm: You can set up your phone to sound its alarm to remind you as the selected day arrives.
- Vibrator: You can set up your phone to vibrate to alert you as the selected date comes.
Date
You can set the date on which the note, alarm or vibrator will remind you of the things you have scheduled. When you enter this option the screen displays the date you have selected. You can press the appropriate number keys to reset the date.
Time
You can determine what time your phone sounds its alarm or vibrates as the selected date arrives. Enter the time at which you
want to be alerted using appropriate number keys and press (OK).


You can determine whether the time is displayed in the 12 hours or 24 hours format by going to: Settings -> Clock settings -> Time format.
If the time is displayed in the 12 hours format, you can switch between AM and PM by pressing *_+ when you set the time.
Notes
Here you can jot down things scheduled for the date, such as meetings, appointments, etc. When the selected date comes, The notes you wrote will pop up on the screen at a specified time.
Repeat
You can decide whether the alarm, notes or vibrator will regularly alert you to the things you must remember for not just the selected date, but also the days following it. For example, if a meeting is held every Monday starting 5/7/02, you can firstly select 5/7/02 and then by selecting Weekly set the reminder to go off on Mondays beginning with 5/7/02.
Alarm state
Enables/Disables the alarm.
Tone
Selects a tone for the alarm.
Vibrator
Enables/Disables the vibrator.
Save
Confirms and saves all of the above settings.
Viewall
Browsing all reminders in the Schedule. You can press the left and right keys of to browse another reminder. When you have browsed a reminder, you can press (OPTION) to choose from following:
Edit this one
Edits the settings of the selected reminder.
Send By SMS
Sends the note of the selected reminder to one or more recipients. You can send the note in the same way you would a SMS message.
Delete this one
Deletes the selected reminder.
View today
Works the same as "View all", but only shows the reminder of the chosen day.
Delete all
Deletes all types of reminders including notes as well as alarm and vibrator settings.
Tools

This menu has the following features to bring convenience and enjoyment to your wireless life, including the alarm, stopwatch, hour minder, calculator, games, etc.
Alarm
Sets the alarm clock.

When the alarm time is reached, your phone rings the tone you select, flashes its backlight and vibrates--if you have activated the vibration mode. "Alarm expired" also pops up on the screen. You can do either of the following while the alarm is going off:
- Press any key to shut off the ring tone, vibration and backlight, but leave the words "Alarm expired" on the screen to remind you that the alarm has already gone off.
- Press (OK) to shut off the ring tone, vibration and backlight, and get back to the idle screen.
Set time
Press the corresponding number keys to set the alarm time you want and press (OK).

You can determine whether the time is displayed in the 12 hours or 24 hours format by going to the menu: Settings Clock settings Time format.
If the time is displayed in the 12 hours format, you can switch between AM and PM by pressing (_+) when you set the time.
Set tone
Here you can select the desired ring tone for the alarm. Scroll through the options and wait for about one second to hear the highlighted
ring tone and press (SELECT) to confirm your choice.
Vibration
Sets the vibration mode for the alarm. Your phone will vibrate as the alarm time is reached.
Alarm period
Always on
Sets the alarm to go off daily when the alarm time is reached, even if your phone is powered off.
Once
Sets the alarm to go off only once.
Off
Turns off the alarm clock.

When you have activated the alarm feature, appear on the top of the idle screen.

will
Stop Watch
This option allows you to use your phone as a stopwatch. Press (START/STOP/RESUME) to start/stop/resume the stopwatch. When the stopwatch is on, you can press (PAUSE) to save one record at a time, and the screen will show the record number being saved. The stopwatch can store up to 10 records. When the stopwatch stops, use the right/left keys of to check the records. To reset, press (RESET). To exit from the stopwatch feature, press (EXIT).
Hour Minder
Sets the hour minder. After you activate this feature, the phone beeps once an hour like a digital watch.
Calculator
You can use your phone as a handy calculator. You can also use this feature to convert currency values.
Using the calculator feature
Follow the chart below to enter numbers and arithmetic symbols.
| Key | Number | Key | Number/Symbol/Function |
| 1 | 1 | 9wxtL | 9 |
| 2ABC | 2 | 00 | 0 |
| 3DET | 3 | *+ | + - * / |
| 4CHI | 4 | 0# | Entering a decimal point |
| 5JL | 5 | - | Clearing numbers or symbols/back to previous screen. |
| 6MND | 6 | - | Displaying result. |
| 7PQRS | 7 | Press the up key for *Press the down key for /Press the left key for +Press the right key for - | |
| 8TUV | 8 | Back to previous screen. |
There are two scenarios in which you calculate numbers.
If you calculate a formula consisting of only two numbers, say, 2x5:
- Press 2_ABC and press either the up key of once or three times, and then press 5_MS .
- Press (OPTIONS) and select Equal to display the result as "10".
If you calculate a formula consisting of more than two numbers, say, 2 × 5 + 6 :
- Press 2_ABC and press the up key of once or _+ three times, and press 5_JHL .
- Press the left key of or _+ once and the screen automatically shows the result of 2x5 followed by "+" as 10+ .
- Press 6mm and press (OPTIONS). Then select Equal to display the result as "16".
Converting currency values
- When the calculator screen appears, press (OPTIONS). Select Exchange Rate and press (SELECT). Choose Local to Foreign or Foreign to Local to set the exchange rate. If you set Local to Foreign as "2", for example, the rate in Foreign to Local will become "0.5" automatically, and vice versa.
When the rate is set, press (EXIT) to return to the calculator screen. Enter the sum you want to convert and press (OPTIONS). Then choose To Foreign or To Local to see the converted figure. According to the rate above, for example, if you enter "20" and choose To Local, the outcome will be 200.5 = 10 . If you choose To Foreign, the outcome will be 202 = 40 .
Auto Time Zone
If you travel to a city in a different time zone, your operator will send you a reminder of the city's local time zone and reset the time shown on the screen of your phone, so your phone can display the exact local time.

This feature is network support dependent. If you wish to manually reset your phone's current time for a particular time zone, go to Settings Clock settings Set time zone. See page 122.
On
The time displayed on your phone will be reset automatically according to your operator's time zone reminder.
Off
Your phone will continue to display the local time of your home country, ignoring the time zone reminder from your operator.
Golf Genius
Golf Genius is the first ever built-in handset program that allows you to record your performance on a golf course. This program enables you to keep track of your strokes when you play golf, and save your past records. When you enter this program, you will see the following options:
New round
When you want to start recording your golf performance, please select this option to start a new round of records. Next you need to choose which course you are at, and then you will see the following options:

You have to set up at least one course's information in New/ Edit Course before you can use the New round function.
Date
The handset will display today's date automatically, or you can key in another date.
Hdcp
Handicap. You should key in your handicap here, and when you finish a game and want to calculate the strokes, the handset will automatically deduct your handicap from the total strokes.
Tee off
Choose this option and you can tee off and start to enter your records. You will see the following options under this option:
Enter Score
After choosing this option, you can choose again which hole you want to establish records.
After choosing a hole, you have the following options:
Score
Key in the total strokes you make at this hole.
Putts
Key in the total puts you make at this hole. This number cannot exceed your score.
Fairway
Record whether you successfully hit the ball to the fairway when teeing off.
Hit on Green
Record whether you successfully hit on green at this hole.
Approach
Record whether you successfully make approach to the green at this hole.
O.B
Record your out-of-bound strokes at this hole. This number cannot exceed your score.

Under Enter Score you can press the left and right keys of to increase/decrease the strokes, and to switch between yes/no.
You can also press (0^#) or (_+) to switch among the holes.
Score Card
You can see your current score here. After choosing this option you can see the following table:
| Ho | Sc | Pa |
| 1 | 4 | 4 |
| 2 | 5 | 5 |
| 3 | 4 | 5 |
| 4 | 5 | 5 |
| 5 | 6 | 7 |
| 6 | 5 | 5 |
| 7 | 5 | 5 |
| 8 | 6 | 5 |
| 9 | 7 | 4 |
| 10 | 6 | 4 |
| 11 | 5 | 5 |
| 12 | 5 | 3 |
| 13 | 6 | 5 |
| 14 | 4 | 4 |
| 15 | 6 | 5 |
| 16 | 6 | 5 |
| 17 | 5 | 4 |
| 18 | 6 | 4 |
Ho: Hole.
Sc: Score. The total strokes you make.
Pa: Par. The par numbers.
T: Total strokes
Statistic
After choosing this option you can see the following table:
| Eagles | 0 |
| Birdies | 2 |
| Pars | 8 |
| Bogeys | 5 |
| D-Bogeys | 2 |
| T+Bogeys | 1 |
| One Putt | 2 |
| 2 Putts | 9 |
| 3+ Putts | 7 |
| Hit on Green | 8/18 |
| Fairway | 7/18 |
| Approach | 5/11 |
| O.B | 8 |
Save
Save the current records.
Load Round
You can read, delete or edit the past records. All your saved records can be seen here, be it records of a complete 18-hole round, or unfinished rounds. When you enter this option, the screen will display the names of the courses and the dates. You can choose any record to read or edit.
New/Edit Course
You can add or edit a course's information here. You have to set up at least one course's information to start recording your performance.
Course Name
Key in the name of the course here.
Course Tel.
Key in the telephone number for this course.
Green Fee
Key in the green fee the course charges.
Caddie Fee
Key in the caddie fee the course charges.
Cart Fee
Key in the cart fee the course charges.
Tee Info.
You can key in detailed information for each hole here. After you select a hole, you can see the following options:
Yard
Key in the distance for this hole.
Par
Key in the par numbers for this hole.
Hcp
Key in the difficulty level for this hole. This number should be between 1 18 and cannot be repeated in another hole.
Save
After all above information is established, you can save information. You can save up to information of 5 courses.

If you delete a course's information, the records in it will be deleted as well.
Query Course
You can query a course's information here.
Mini Mouse
Mini mouse is an exciting hitting game. When you enter the game, the greeting screen will pop up. Press (SELECT) and you will see the game's pull-down menu consisting of the options listed below.. Scroll to the option you want using the up/down keys of and press to select:
START: Starts a new game.
RECORD: Shows the game's latest scores listed from the highest to the lowest.
■ HELP: Reads the instructions of the game. The screen will show how to play the game using particular keys.
■OPTION: Adjusts the settings of the game:
Sound: Adjusts the volume of the sound effects using the right/left keys of .
Vib.: Activates/deactivates vibration.
- Exit: Leaves the OPTION menu.
CONTINUE: Resumes the previous game.
- EXIT: Leaves the game's greeting screen and returns to the game menu.
- If you want to quit a game while playing, press or .
- After a game is over you can press (SMS) to send your score to others via SMS.
Settings

This menu allows you to program your phone's various settings as needed.
Phone settings
Under this menu you can customize the way your phone works.
Language
You can select the language used to display information.

If you wish to use the default language setting locked in the phone memory, select Automatic.
Color Scheme
There are five different color schemes for you to choose: Blue, Orange, Purple, Red, and Green.
Wallpaper
You can set the display wallpaper playing style,playing period, and playing list here.
Playing style
You can set the wallpaper to be Static or Active on handset display.
Playing period
If you choose active wallpaper display, you can select the play cycle to be 10sec, 20sec, 30 sec, or 60sec.
Playing list
There are 10 preset wallpapers for you rto choose, you can check to select the wallpapers you want.
Backlight Level
Adjusts the brightness of your phone's backlight. The backlight will be turned on the moment you touch any key on the keypad, or when your phone receives a call, message, etc.
Backlight Period
Adjusts the duration of your phone's backlight.
Screen Contrast
Adjusts your phone's screen contrast.
Display
You can personalize the way the idle screen is displayed. You can also select an animation to be displayed on the idle screen.
Standard
The LCD screen will always display phone and network information by default.
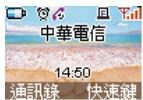
Off
If no incoming call is received and you leave the keypad untouched for about 30 seconds during idle mode, the screen goes blank automatically to save power. The display function will be turned on automatically if there is an incoming call received by the phone or when you touch any key on the keypad.
Digital Clock
If no incoming call is received and you leave the keypad untouched for about 30 seconds during idle mode, a digital clock will appear on the idle screen showing the current time and date. The display will be switched back to the default idle mode if there is an incoming call received by the phone or when you touch any key on the keypad.
You can choose Preview to see what the digital clock looks like, and choose Save to display the digital clock on the idle screen.

To customize the way the current date shows at the bottom of the Analog Clock, go to menu: Settings Clock settings Date format. See page 122.
Starry Night
If no incoming call is received and you leave the keypad untouched for about 30 seconds during idle mode, Starry Night will be displayed on the idle screen. The display will be switched back to the default mode if there is an incoming call received by the phone or when you touch any key on the keypad.
You can choose Preview to see what Starry Night looks like, and choose Save to display Starry Night on the idle screen.
Idle Clock
On
Turn on the idle clock, and you will see an analogue clock on right side of the idle screen.
Off
Turn off the idle clock, and the time on the idle screen is shown in arabic numbers.
Default input
You can set the default input mode that comes along with the editor screens of the phone book, message, and calendar features. Scroll to
highlight the input mode you want and press (SELECT) to confirm.
Auto Redial
If you make a call that is not answered, your phone will redial the number continuously.
Off
Disables the Auto Redial feature.
Auto Redial
If you make a call that is not answered, your phone will automatically redial up to 10 times before the call is answered.
Prompt radial
Your phone will ask for your confirmation before it redials.
Connected Alert
This feature allows your phone to sound a ding-dong, vibrate or flash its backlight when a call you make is answered.
Auto Keylock
You can set your phone to automatically lock its keypad after you leave the keypad untouched for 20 seconds during the idle mode.
After you press (UNLOCK) and to unlock the keypad and leave your phone idle for anther 20 seconds, your phone will lock its keypad again.
Call settings
This menu provides a number of options to manage your calls.
Call waiting
When you are speaking over your phone and another call comes in, an incoming call number and a call-waiting message will appear to remind you. Choose to activate, cancel or check the status of this feature.

The call waiting feature is network support and subscription dependent.
Show your number
You can decide whether or not to show your number on the recipient's phone when you make a call.

However, you may not be able to make calls on certain networks if you select Off to disable the feature. In that case please activate it by selecting On.
Minute minder
Your phone will beep every minute during a call.
Call Divert
You can choose from the following Call Divert modes as needed.

The Call Divert feature is network support and subscription dependent.

Once the divert mode is activated, will appear on the screen when a call is connected.
Divert all calls
Diverts incoming calls to a designated phone number at all times.
On
Enables this divert mode. All types of network services including voice calls, SMS messages, fax and data calls will be diverted to the designated phone number.
To enable this divert mode, enter the phone number to divert to and press OK). Alternatively, you can long press to access your phone book and scroll to highlight the desired contact and press again to display the contact's phone book information. Scroll to highlight the number you want to divert to and press (SELECT) to enter the number. Finally press to confirm.
Off
Disables this divert mode.
Status
Shows the status of this divert mode.
By service
Here you can decide the service type you wish to divert. The options are:
All services: Diverts all services.
Voice calls: Diverts voice calls.
Data: Diverts data calls.
Fax: Diverts fax calls.
Messages: Diverts SMS messages.
All except msgs: Diverts all calls except SMS messages.
In each of the above options you will also have to enter the phone number to divert to.
Divert when busy
Incoming calls are sent to a designated number when your phone is busy. Settings are the same as for Divert all calls.
Divert on no answer
When an incoming call is not replied, it will be sent to a designated phone number. Settings are the same as for Divert all calls.
Divert when not found
When your phone is off or located outside the network service area, incoming calls will be sent to a designated number. Settings are the same as for Divert all calls.
Cancel all
Cancel all Call Divert settings.
Network settings
Normally the selection of the network used by your phone is automatic. When turning on your mobile phone, it automatically connects to the network you have registered on or the one currently available for you when roaming in an area beyond the coverage range of your original network.
This menu enables you to select an appropriate network if you wish to change the network you are connected to.

Network support dependent.
Network options
Automatic
The phone will perform another network search to select the most appropriate network available to you.
Manual
Allows you to select a particular network. Your phone will list all of the networks it has found for you to choose from.

Not all of the networks listed may be available to you ( indicates the unavailable network). Please refer to your network operator for further details.
Change network password
You may change your network password. The network password is available from your network operator. It is also used for setting Network Call Barring services and is not the same as your SIM card PIN1.

This option is only available for the European version.
Security settings
This menu ensures the security of your phone by setting PIN check, phone code, SIM lock etc., as well as limitations on particular outgoing and incoming phone calls.

- To protect your phone, the Security settings menu requires you to enter the handset code before you can access the menu to set options. The default handset code is 1234.
- To change the handset code, go to the Handset lock option.
Set PIN1
PIN (Personal Identification Number) is a password provided by your network operator. Once activated, your PIN protects your SIM card from being used by unauthorized people, even if it is inserted in another phone, unless the correct PIN is given when the phone is switched on.
On
Enables the PIN check. You must enter your PIN to enable the PIN check.
Off
Disables the PIN check. You must enter your PIN to disable the PIN check.
Change PIN1
This option is only available when the PIN check is activated.
To increase your phone's security you can change the preset PIN to a number only you know.
To change PIN, first enter the original PIN and press
Then enter the new PIN and press (OK). Enter the new PIN again and press (OK) to confirm.
Handset lock
Your phone can be locked to prevent calls being made by unauthorized people, unless the correct handset lock code is entered when your phone is switched on. Your phone remains locked if a wrong code is entered, even if your SIM card is removed and replaced with another one. Only emergency calls can be made when your phone is locked.
You must enter your phone lock code every time you power on your phone when the phone lock is on (there is no limitation on the number of wrong attempts when you enter the phone code).
You can set the phone lock in the same way you set PIN check in Set PIN1.
Handset call barring
You can set up call barring limitations on your own to block outgoing and incoming calls.

The call barring settings made in this option are saved in your phone memory and, unless manually changed, will remain the same even if your use a different SIM card.
Bar incoming
Stops all incoming calls to your phone.
Baroutgoing
Bars outgoing calls from your phone. You can choose from the following:
Bar all
Bars all outgoing calls from your phone.
Bar prefixes
You can specify the phone numbers that can't be dialed using your phone.
"List empty" appears if no numbers are found. Press (OK) and select Add to enter the number. You can either enter a full number or, if you want to bar the outgoing calls of a few numbers that start with the same digits, enter the starting digits of these numbers. For example, enter 0800 to bar outgoing calls of 08001234, 08002345, etc.

You can enter “+” to bar all of the outgoing international numbers that start with “+”.
Once the Bar outgoing list have numbers on it, you can choose to add another number, edit or delete a selected number, or delete all numbers on the list.
Off
Disables the Bar outgoing feature.
Network call barring
You can ask your operator to block certain types of calls. The following call barring services may be available from your network operator.
Bar foreign calls
Bars all outgoing international calls from your phone.
Here you can decide the type of outgoing international calls you wish to restrict. The options are:
All services: Stops all types of outgoing international calls.
Voice calls: Stops outgoing international voice calls.
Data: Stops outgoing international data calls.
Fax: Stops outgoing international fax calls.
Messages: Stops outgoing international SMS messages.
All except msgs: Stops all types of outgoing international calls except SMS messages.
You must enter the network password available from your operator to enable/disable any of the above options.
Only local and home country
Stops all outgoing calls except local calls and those to your home country. Settings are the same as those in Bar foreign calls.
Bar incoming calls
Stops all incoming calls to your phone. Settings are the same as those in Bar foreign calls.
Bar incoming if abroad
Stops incoming calls to your phone when roaming (when you are traveling abroad). Settings are the same as those in Bar foreign calls.
Bar outgoing calls
Bars all outgoing calls from your phone. Settings are the same as those in Bar foreign calls.
Clear all
Cancel all of the call barring settings. You must enter the network password to cancel the settings.
Fixed dialling
Fixed dialling allows you to limit the use of your phone, typically by a friend or family member, to only the numbers stored on your fixed dialling list. If a number being dialed does not match any of the numbers on the list, the call is blocked.

You will be required to enter PIN2 when your are using fixed dialling.

If entered incorrectly three times in a row, PIN2 will be locked up and you will need the PUK2 code to unlock PIN2. Please call your operator, and ask for the PUK2 code.
Fixed dial settings
Enables/disables the fixed dialling feature. You will be prompted to enter PIN2 when you enable/disable fix dialling.
Fixed dial list
Before you can use fixed dialling, you must set up a fixed dialing list in this option. Enter PIN2 and add numbers to your fixed dial list. Add names and numbers in the same way you would a phone book entry.
You can then add, edit and delete entries of your fixed-dial numbers.
When you have fixed dialling activated your phone can only be used to call numbers on the fixed dial list.
Change PIN2
To increase your phone's security you can change the preset PIN2 to a number only you know.
Privacy Code
This setting enables you to lock up your phone book and messages with handset lock code, so that you can prevent others from reading your private information. The setting is off by default. Once it is turned on, you will not be able to access your phone book directly under the idle screen. If you want to access the phone book or messages from the main menu, choose either, and your handset will request the handset lock code first. You can view the information only after you key in the code correctly.
Blacklist
The blacklist feature enables you to setup a blacklist of phone numbers not allowed to call you. Incoming calls identified as members of the blacklist will be transferred to your voicemail box.
Blacklist settings
- Groups: The blacklist is made up of the members of the selected caller groups. To select the caller groups that you want to block, please go to the Select Group option.
- No caller ID: Incoming calls not showing their phone numbers on the screen as well as numbers not stored in your phone book will be put in the blacklist.
- Both: The blacklist includes incoming calls with no phone number displayed, numbers not stored in your phone book, and the caller groups you have chosen to reject.
Off: Turns the blacklist feature off.
Select group
You can choose the caller groups you want to put in the blacklist.
Press (CHANGE) to check the groups you want to block and press (CONFIRM).
If you select "No Group", the phone book contacts not belonging to any caller group will become part of the blacklist.
SIM Lock
With this SIM lock feature, you can prevent unauthorized use of your phone with an unknown SIM card.
When you have the SIM lock activated your phone will only work with the SIM card used to enable the lock. If a new SIM card has been inserted into your phone, "Insert Correct SIM" will pop up after you power on and enter the PIN. Press and the SIM lock code will be requested.
If the incorrect code is entered when a new SIM card has been inserted into your phone, "Insert Correct SIM" will be displayed again, and the phone will not be enabled until the correct SIM lock code is entered.

If you have entered the wrong SIM lock code 10 times in a row, you will never be able to enable your phone using the new SIM card.
If the correct code is entered the SIM card will be recognized and you can use the phone as normal. The next time your phone is switched on with this newly recognized SIM card, you will not be asked to enter the SIM lock code again.
Your phone can recognize up to 3 different SIM cards.
To activate the SIM lock you need to key in and save a number only you know as the SIM lock code. (There is no factory preset SIM lock code). The length of the code must be set between 8 to 12 digits.
To deactivate the SIM lock you also need to enter the SIM lock code that you previously saved in your phone memory.
To change the SIM lock code you must firstly deactivate the SIM lock and then enter the new code you want when activating the SIM lock again.
Quick Access
In this option, the screen displays a configuration list containing features for you to choose from and add to the Q.Access menu discussed in chapter 5. For how to set up your Q.Access menu, see page 48.
Wap Settings

- Your phone allows you to get access to the mobile Internet on both GSM and GPRS networks. If you have registered on a GSM network you must complete WAP settings in order to connect to the Internet. If you have registered on a GPRS network you will need to do both WAP and GPRS settings.
- Your network operator may have completed necessary WAP and GPRS settings for you when you have registered with them for WAP services. Please contact your operator and see if you need to do the settings on your own.
You can do WAP settings for three different WAP servers--UP.Link 1~3. Settings for each UP.Link are as follows:
Activate Setting
Sets the selected UP.Link as the default server that your phones connect to during an Internet session.
Auto Setting
Requests your operator to complete necessary WAP settings for you.
Manual Setting
You can do the settings below on your own:
- Bearers: Select bearer GSM_CSD if you register on a GSM network. Select GSM_GPRS if you register on a GPRS network.
■ ISP Name: This is the name of your ISP (Internet Service Provider).
Home Page: Designates the home page which your phone connects to when logging on to the Web.
■User Name: This is your user ID, given by your ISP.
Skip this option if you are on a GPRS network.
■ Password: key in the password provided by your ISP.
Skip this option if you are on a GPRS network.
- Gateway Address: This is the IP address of the gateway (ISP main server) through which you access the mobile Internet. The IP address is in the format 123.456.789.123.
■Port Number: Enter the port data given by your service provider.
■ Dial Number: This is the number that your phone will dial to access the Internet. Your ISP issues this number.
Skip this option if you are on a GPRS network.
GPRS Settings
There are three sets of GPRS settings available for three different WAP servers--GPRS1~3. Settings are as follows:
APN Name
Enter the APN (Access Point Name) provided by your ISP.
User ID
Enter the user ID given by your ISP if required.
Password
Enter the password given by your ISP if required.
Activate
Activates the selected GPRS group for use.
Clock settings
This menu allows you to set time and date as well as customize the ways they are displayed on the idle screen.
Set time
Sets current time to be displayed on the idle screen. To set current time, enter the hour and minute using appropriate number keys and press OK).

If you select 12 hours format in Time Format you can switch between AM or PM by pressing ( x_+) .
Set date
Sets the current date to be displayed on the idle screen and Schedule feature. Press number keys to enter the year, month and day and press

(OK).
Time format
Determines whether current time is displayed in the 12 hours or 24 hours format on the idle screen.
Date format
Determines how the current date is displayed on the idle screen.
Display
You can choose to display the current time or date only, or both. You can also choose not to display either time or date on the screen.
Set time zone
This is a time zone conversion feature that allows you to convert your
phone's current time to the time in a particular time zone. Use to roll over the map to the desired time zone. The city that indicates a particular time zone will be displayed at the bottom of the screen.
Daylight saving
Your phone's clock is turned forward by one hour on the first Sunday in April and turned back on the last Sunday of October.
Reset settings
Reset all settings to factory default. When "Confirm?" appears on the screen, press (YES) to change all settings back to factory default.
Profiles

A profile is a group of settings that determine how your phone works and sounds. A profile contains settings such as ring tone, ring volume, vibration and alert tones. You can choose from five different profiles and customize each profile to suit
your circumstances. By personalizing your phone you can ensure that it will alert you in a way that best fits the environment you are in.
Select profile
You can select the profile that best suits your environment from the following:
Normal
This is the default profile.
Meeting
Settings are predefined for the circumstances of a meeting. (e.g. vibrator on, minimum ringing volume, keypad tones off, etc.)
Outdoor
Settings are predefined for outdoor activities. (e.g. loudest ringing volume, vibrator on, Keypad tones on, etc.)
Silent
Settings are predefined for occasions where silence is required. (e.g. ringing volume off, vibrator on, keypad tones off).

There is a headset profile available for use with a handsfree headset connected to your phone. However, when you use your phone with a headset, this headset profile is the only profile available. So you will not see the Select profile option in the Profiles menu, and the Headset option will only appear in the following Edit profile menu.
Edit profile
You can change the settings of each profile to suit a particular environment. Scroll to highlight the profile you want to change and press

(EDIT). You then have the following settings to change:
Ringing tone
Your phone comes with a number of ringing melodies consisting of a 16-chord progression. These 16-chord melodies produce a variety of beautiful tunes. The melodies you composed or received from someone else are listed in this option as well.
Scroll to the melody you want and wait for about 1 second to hear the highlighted melody. Press (SELECT) to confirm your choice.
Ringing volume
Adjusts ringing volume or mutes the ringing tone. If you choose Off,

will pop up on the upper left of the idle screen.
Earpiece volume
Adjusts earpiece volume or mutes the earpiece.
Vibrator
Your phone vibrates to alert you to an incoming call. Your phone will vibrate when you choose to turn the vibrator on in this option.
Keypad tones
Determines whether or not keypad tones are sounded by any key presses.
Warning tones
Determines whether warning tones will be made to alert you to various conditions in your phone. (e.g. network registration, battery low).
DTMF tones
Determines whether DTMF tones are sounded with any key presses during a call.
Message alert
Determines whether your phone will sound to alert to you an incoming message.
Answer Mode
Allows you to accept a call either by pressing or by pressing any key except , which is used to reject a call.

There is an auto answer mode available when you change the answering mode for the Headset profile. If you activate the auto answer mode your phone will answer an incoming call after it rings once. This auto answer mode is only effective when a handsfree headset is connected to your phone.
Melody composer
You can create up to five chord melodies to serve as ringing tones for incoming calls.
A chord melody is made up of two or more different tones. This melody composer feature allows you to create up to 3 different tones and mix them up to produce a chord melody.
Key presses for editing musical notes
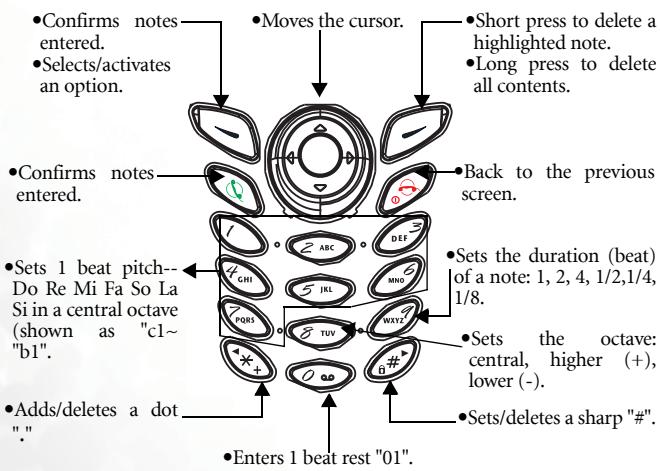
Note format
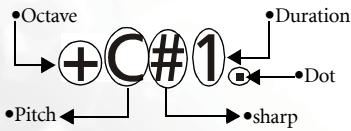
Editing musical notes
Entering a default pitch note
Press the appropriate number key 1 to enter the 1 beat Do Re Mi Fa So La Si in a central octave. The screen shows: c1, d1, e1, f1, g1, a1 and b1 respectively.
The number "1" you see on the right of a pitch symbol indicates 1 beat. Nothing is shown on the screen for the central octave as the central octave does not have a representative symbol.
Entering a rest
Press ⑦ to enter an 1 beat rest: 01.
Adjusting the duration of a note
The default duration is 1 beat. Press the appropriate number of times to adjust the note duration, which is indicated by the number shown on the right of a pitch note: 2 (2 beat), 4 (4 beat), 1/2 (1/2 beat), 1/4 (1/4 beat), 1/8 (1/8 beat), 1 (1 beat).
Following are examples:
| Description | Shown as |
| Central Octave 1 beat So | g1 |
| Central Octave 2 beat So | g2 |
| Central Octave 4 beat So | g4 |
| Central Octave 1/2 beat So | g/2 |
| Central Octave 1/4 beat So | g/4 |
| Central Octave 1/8 beat So | g/8 |
Adjusting the octave of a note
The default is the central octave. Press 8_ruv the appropriate number of times to adjust the octave: "+" (higher octave), "-" (lower octave):
| Description | Shown as |
| Central octave 1 beat So | g1 |
| Higher octave 1 beat So | +gl |
| Lower octave 1 beat So | -g1 |
Adding a sharp to a note
Press to add a note sharp "#". To remove a sharp from a note, press again.
The sharp "#" is not available for the pitch notes e and b.
Adding a dot to a note
Press to add a dot ".". The dot "." represents half the duration it follows. Press again to remove a dot.
Following are examples:
| Description | Shown as |
| Central octave 3/8 beat So | g/4. |
| Central octave 1 and 1/2 beat So | g1. |
Steps for composing a chord melody
- When you first enter the melody composer menu, select Add entry. You will see three channels available for you to choose from. Each channel is used to save one single tone that you have composed.
Scroll to highlight the channel you want and press (SELECT) to enter its composer screen.
2.To compose a tone:
Press the appropriate number key, 1 to 7_POSS to enter a corresponding 1 beat pitch note in the central octave. Press 0.00 for an 1 beat rest. Then you can adjust the octave, duration, or add a sharp or dot if you want to.
■ When finishing editing a note, directly press the appropriate number key (0.0) ~ 7p8s to start editing another note.
If you want to modify a note when a few notes has been entered, press to scroll the cursor to highlight the note you wish to modify. Then press the appropriate keys to adjust the note's duration, octave, sharp, etc.
To insert a new note in between, scroll to highlight the note immediately following the note you are going to insert, and press the appropriate number key (0.0) (7_pors) to enter a new note.
Press (CLEAR) to delete a note highlighted by the cursor. Long press to delete all notes.
3.When an initial tone is complete, press (OPTIONS) to edit the tone using the following setting options:
Play: Plays the tone you wrote.
Instruments: Selects the desired instrument used to play the tone.

- The 16 musical instruments that the screen shows are part of the 128 instrument choices stored in your phone memory.
To choose from the instruments other than those displayed on the screen, scroll to select the Inst. NO option, enter the number corresponding to the instrument you want to use and press OK). Please refer to "Appendix" on page 140 for the list of the available musical instruments and their corresponding numbers, as well as the list of the instruments which are displayed on the screen.
Time beat: Adjusts the time beat of the tone to the rhythm you want.
- End: Saves the tone to the selected channel and returns to the list of channels.
- When you have finished editing a tone press End. This will take you back to the list of channels. Then you can write another tone by repeating the above steps.
- When you have created the tones you want and returned to the list of channels, scroll down to the end of the list and select Finish. Your phone will automatically mix the tones you created into a chord melody, and take you back to the melody composer menu showing the newly produced melody as User1.
- In the melody composer menu you can choose from the following:
Add entry
Composes another chord melody.
User1
Selecting this newly created melody will bring you to the following options:
You will have User2, User3 and so on if there is more than one melody produced.
Play: Plays the melody.
Edit: Edits the melody.
■ Rename: Changes the name of the melody.
Time beat: Adjusts the time beat of the melody to the rhythm you want.
- Delete: Deletes the melody.
■ Send melody: Sends the melody to someone else like you send a message.
Memory size
Views free and occupied memories of the melody composer feature.
Erase
You can choose either One by One to delete a selected melody or Erase all to delete all melodies produced.
Download

This Download menu allows you to manage the EMS objects--icons, animations, ring tones (sound effects)--as well as the ringing melodies stored in your phone memory.
Wallpaper
M775C has inbuilt Manager Software, you can download wallpapers or ringtones by data cable from your computer or the internet. Or you can download them by WAP service. M775C can save 50 size 98*64, 4096 pixels wallpapers at most.
About WAP service, please go to your local operators for more information.
M775C active wallpaper list allows you to have 30 different choices at most.
Melody
The ringing melodies downloaded from WAP websites are stored here in this melody library. You can check out each melody file and press to choose to delete the selected file or change its file name.
EMS
The EMS objects--icons, animations and ring tones which you have saved to your phone--are stored here in this EMS library. You can press to view each EMS object, checking its file size and the amount of space it takes. Then press (OPTIONS) and choose to delete the selected file, edit its file name, or switch between the full screen mode (PreView) and list mode (List mode).
Format file system
Deletes all of the files in your phone memory, including backup messages, downloaded ringtones and wallpapers, and EMS, etc.
Baud rate setting
This Baud rate setting option is used to adjust transmission speed between your phone and PC. There are three baud rates to choose from: 19200 bps, 57600 bps, 115200 bps, 130400bps, and 460800bps.
The baud rate varies according to different types of computers. Older computers may not be able to transmit data at the highest speed. You should adjust the baud rate accordingly. After you make adjustment to the baud rate of your phone, you need to re-configure the baud rate on your PC, too.
Turn Modem off/on
Your M555C phone supports data transmission service and, once turned on, is ready to work as a modem to let you connect your PC to the Internet.
As your phone is ready to be used as a modem whenever turned on, the screen only shows the Turn Modem off option. After you select the Turn Modem off option to deactivate the modem feature, the Turn Modem on option will appear.

To transmit data between your phone and PC, you firstly have to deactivate your phone's modem feature so you can establish a link to your PC.

When you have turned the modem feature off and left your phone disconnected from your PC for more than 5 minutes, the modem feature will be automatically switched on again.

THE MENU MAP
Have a look at the menu map below for a breakdown of the menus.
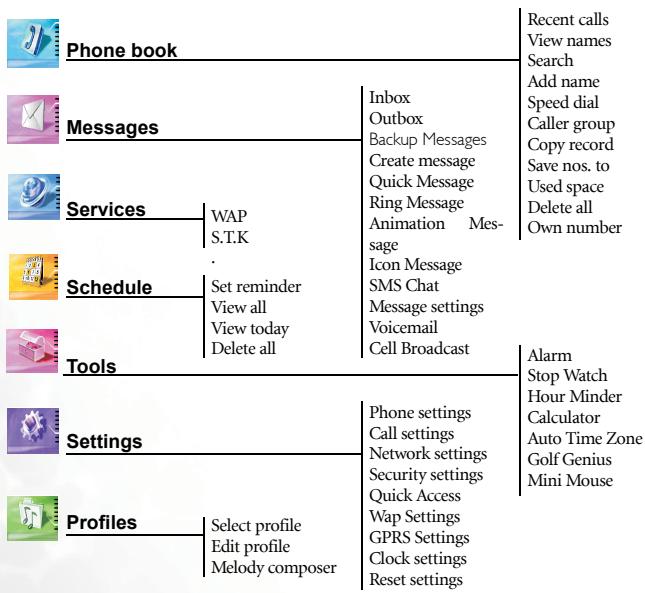

Download
Wallpaper
Melody
EMS
Formatting file system
Baud rate setting
Turn Modem off/on

CARE AND MAINTENANCE
Please note the following guidelines to ensure the optimum life and usage of your mobile phone:
- Keep your mobile phone and its accessories out of small children's reach.
- Keep your phone dry. Do not use at extreme temperatures. Temperatures above 55^ (131^) or below -20^ (-4^) may cause damage to your phone.
- Do not use or store your phone in dusty or dirty areas if possible.
- Do not disassemble the phone.
- Do not use harsh detergents to clean the phone.
- If your mobile phone or its accessory is not working properly, contact your dealer immediately.
- Use only genuine BenQ batteries, battery chargers and accessories to ensure proper phone function and battery life. Any malfunction or damage caused by the use of third-party accessories will void the product warranty.
- Keep battery contacts and the charging socket at the bottom of your phone away from direct contact with conductive objects which may cause a short circuit and result in danger.

WHAT TO DO IF...
If you encounter any problems using your mobile phone, please refer to the following table. If the problem persists, please contact your dealer.
| Problem | Possible cause | Solution |
| Poor signal reception | ·You are using your mobile phone in a location (e.g. in the basement or building) where signal is weak. | Move to a location where signal can be received properly. |
| ·You are using your mobile phone in a call-crammed time (e.g. the rush hour). | Avoid using your mobile phone in such time, or try later. | |
| ·You are too far from the base station of your network operator. | You can ask your network operator for a service range map. | |
| Echo or noise | ·The network trunk quality of your network operator. | Hang up the phone and dial again. You can be switched to a better-quality network trunk or line. |
| ·Poor local telephone line quality. | ||
| The standby time becomes short | ·The standby time depends on the system settings of your network operator. | If you are in a location where the signal is weak, turn your phone off for the time being. |
| ·The battery needs to be replaced. | Use a new battery. | |
| ·If the phone cannot get connected to a network, it will continue searching for the signal from the base station, which consumes battery capacity. | Change your location or turn off your phone temporarily. | |
| You can’t switch your phone on | ·Battery has run out. | Recharge the battery if necessary. |
| SIM card error | ·SIM card is out of order. | Send it to your network operator for test. |
| ·SIM card is not inserted properly. | Insert SIM card correctly. | |
| ·SIM card contacts are dirty. | Clean the SIM card contacts using a soft, dry cloth. | |
| You can’t connect to the network | ·SIM card is invalid. | Contact your network operator. |
| ·You are away from the service area. | Check the service area with your network operator. | |
| ·Poor signal. | Move to an open space or, if you are in a building, move closer to a window. | |
| You can’t send messages | ·Your network operator does not support this service. | Contact your network operator. |
| You can’t answer incoming calls. | ·You have put certain kind(s) of calls on the blacklist. | Go to the menu: Settings->Security settings ->Blacklist->Blacklist settings, and turn off the option. |
| ·You have barred incoming calls. | Go to the menu: Settings->Security settings ->Handset call barring ->Bar incoming, and turn the option off. | |
| ·You have asked the operator to bar certain types of incoming calls. | Go to the menu: Settings->Security settings ->Network call barring, and select Clear all. | |
| You can't make phone calls | ·You have barred outgoing calls. | Go to the menu: Settings->Security settings->Handset call barring->Bar outgoing, and turn the option off. |
| ·You have asked the operator to bar certain types of outgoing calls. | Settings --> Security settings --> Network call barring, and select Clear all. | |
| ·You have turned on the fixed dialling option. | Go to the menu: Settings --> Security settings --> Fixed dialling --> Fixed dial settings, and turn the option off. | |
| You can't dial extensions | ·You have turned off DTMF tones. | Go to the menu: Profiles --> Edit profile --> select the activate profile and then go to DTMF tones to turn on the option. |
| You can't hear the person on the other side after the call is established. | ·If you have turned on Ding tone in the menu: Settings --> Phone settings --> Connected Alert setting, the tone might interfere with phone calls. | Wait for a few seconds and see whether the call returns to normal. |
| You can't connect to WAP via the GPRS service. | ·You didn't set WAP to use GPRS service. | Go to the menu: Settings-->Wap Settings, select a UPLink (network service), then go to Manual Setting --> Bearers, and select GSM_GPRS. Finally return to the previous menu and select Activate Setting. |
| Your PIN is blocked | ·You have entered a wrong PIN three times in a row. | Contact your network operator, or use the PUK code of the SIM card if provided by your network operator. |
| The battery won't charge | ·The battery or charger is out of order. | Contact your dealer. |
| ·The phone temperature goes below 0°C or above 45°C. | Change the charging environment. | |
| ·Poor connection. | Check if the charger is properly connected. | |
| The phone automatically shuts down. | ·The battery is not properly installed. | Please make sure the battery fits perfectly into the compartment. |
| You can't key in data into your Phone book | ·Your Phone Book memory is full. | Delete some data from the Phone Book. |
| You are not able to use certain functions | ·Your network operator doesn't support these functions, or you do not subscribe to them. | Contact your network operator. |

APPENDIX
- Appendix 1: Below is a list of the musical instruments you can choose from while composing your own melody. To select an instrument you wish to use, simply key in its corresponding number and press OK.
| 01=Acoustic Grand Piano | 09=Celesta | 17=Drawbar Organ |
| 02=Bright Acoustic Piano | 10=Glockenspiel | 18=Percussive Organ |
| 03=Electric Grand Piano | 11=Music Box | 19=Rock Organ |
| 04=Honky-tonk Piano | 12=Vibraphone | 20=Church Organ |
| 05=Electric Piano 1 | 13=Marimba | 21=Reed Organ |
| 06=Electric Piano 2 | 14=Xylophone | 22=Accordion |
| 07=Harpsichord | 15=Tubular Bells | 23=Harmonica |
| 08=Clavichord | 16=Dulcimer | 24=Tango Accordion |
| 25=Acoustic Guitar (nylon) | 33=Acoustic Bass | 41=Violin |
| 26=Acoustic Guitar (steel) | 34=Electric Bass (finger) | 42=Viola |
| 27=Electric Guitar (jazz) | 35=Electric Bass (pick) | 43=Cello |
| 28=Electric Guitar (clean) | 36=Fretless Bass | 44=Contrabass |
| 29=Electric Guitar (muted) | 37=Slap Bass 1 | 45=Tremolo Strings |
| 30=Overdriven Guitar | 38=Slap Bass 2 | 46=Pizzicato Strings |
| 31=Distortion Guitar | 39=Synth Bass 1 | 47=Orchestral Harp |
| 32=Guitar Harmonics | 40=Synth Bass 2 | 48=Timpani |
| 49=String Ensemble 1 | 57=Trumpet | 65=Soprano Sax |
| 50=String Ensemble 2 | 58=Trombone | 66=Alto Sax |
| 51=SynthStrings 1 | 59=Tuba | 67=Tenor Sax |
| 52=SynthStrings 2 | 60=Muted Trumpet | 68=Baritone Sax |
| 53=Choir Aafs | 61=French Horn | 69=Oboe |
| 54=Voice Oohs | 62=Brass Section | 70=English Horn |
| 55=Synth Vox | 63=Synth Brass 1 | 71=Bassoon |
| 56=Orchestra Hit | 64=Synth Brass 2 | 72=Clarinet |
| 73=Piccolo | 81=Lead 1 (square) | 89=Pad 1 (new age) |
| 74=Flute | 82=Lead 2 (sawtooth) | 90=Pad 2 (warm) |
| 75=Recorder | 83=Lead 3 (calliope) | 91=Pad 3 (polysynth) |
| 76=Pan Flute | 84=Lead 4 (chiff) | 92=Pad 4 (choir) |
| 77=Blown Bottle | 85=Lead 5 (charang) | 93=Pad 5 (bowed) |
| 78=Shakuhachi | 86=Lead 6 (voice) | 94=Pad 6 (metallic) |
| 79=Whistle | 87=Lead 7 (fifts) | 95=Pad 7 (halo) |
| 80=Ocarina | 88=Lead 8 (bass + lead) | 96=Pad 8 (sweep) |
| 97=FX 1 (rain) | 105=Sitar | 113=Tinkle Bell |
| 98=FX 2 (soundtrack) | 106=Banjo | 114=Agogo |
| 99=FX 3 (crystal) | 107=Shamisen | 115=Steel Drums |
| 100=FX 4 (atmosphere) | 108=Koto | 116=Woodblock |
| 101=FX 5 (brightness) | 109=Kalimba | 117=Taiko |
| 102=FX 6 (goblins) | 110=Bag pipe | 118=Melodic Tom |
| 103=FX 7 (echoes) | 111=Fiddle | 119=Synth Drum |
| 104=FX 8 (sci-fi) | 112=Shanai | 120=Reverse Cymbal |
| 121=Guitar Fret Noise 122=Breath Noise 123=Seashore 124=Bird Tweet 125=Telephone Ring 126=Helicopter 127=Applause 128=Gunshot |
- Appendix 2: Your phone displays the following musical instruments which are selected from the above list.
| Piano=05=Electric Piano 1 | Trumpet=57=Trumpet |
| Glockenspiel=10=Glockenspiel | Saxophone=65=Soprano Sax |
| Music Box=11=Music Box | Clarinet=72=Clarinet |
| Marimba=13=Marimba | Flute=74=Flute |
| Organ=19=Rock Organ | Crystal=99=FX 3 (crystal) |
| Guitar=27=Electric Guitar (jazz) | Sitar=105=Sitar |
| Violin=41=Violin | Steel drum=115=Steel Drums |
| Harp=47=Orchestral Harp | Drums=119=Synth Drum |
- BenQ M555C
- Copyright
- Disclaimer
- BenQ (Hong Kong) Limited
- SAFETY INFORMATION
- Exposure to Radio Frequency Signals
- Antenna Care
- Phone Operation
- Batteries
- Driving
- Electronic Devices
- Pacemakers
- Hearing Aids
- Other Medical Devices
- Vehicles
- Posted Facilities
- Aircraft
- Blasting Areas
- Potentially Explosive Atmospheres
- For Vehicles Equipped with an Air Bag
- TABLE OF CONTENTS
- Messages 75
- TOURING YOUR PHONE
- Appearance
- Idle mode screen
- Idle screen icons
- Keypad operations
- Functional keys
- In the menus
- During a call
- Alphanumeric keys
- PREPARING YOUR PHONE
- Your SIM card
- Inserting your SIM card
- Removing your SIM card
- The battery
- Fitting the battery
- Removing the battery
- Charging the battery
- The handsfree headset
- Inserting handsfree headset
- Turning on your phone
- What is PIN?
- Making a phone call
- Correcting a phone number to be dialled
- Ending a phone call
- Answering a phone call
- Rejecting an incoming call
- Turning off the phone
- Speed dialling
- Redialling the last number
- Listening to a voicemail
- Making an international call
- Making an emergency call
- Dialing an extension number
- Last missed, dialed, and received calls
- Your phone book
- View number
- Search
- Edit
- Delete
- Add name
- Set group
- What is a caller group?
- Adding Phone book contacts from idle screen
- Using the location number
- What is a location number?
- Operations during a call
- Adjusting the earpiece volume
- Accessing your phone book
- Accessing the last dialed/received calls
- Putting a call on hold *
- Making a second call *
- Swapping between two calls *
- Incoming call waiting *
- In-call menu
- Volume
- Hold*
- End current
- Mute
- DTMF on/off
- Main menu
- Multiparty\*
- Join all
- Hold all calls
- Private
- Exclude
- End all calls
- Transfer
- Receiving a message
- SMS text message
- EMS message
- Ringing melody
- Chat message
- Keypad lock
- Silent profile
- INPUT MODES
- For details on these features, see related sections of this user's manual.
- You can set the default input mode that comes along with the editor screen. See page 108.
- The input mode options may vary from market to market.
- iTAP input
- Features of iTAP
- Tips on using iTAP
- Demo of iTAP
- ABC input
- Tips on using ABC input:
- For example, to enter "Love":
- SYM input
- input
- Message templates and EMS objects
- For how to save the animations that you received from another phone or your operator, see page 36 and 76.
- For how to save the ring tones that you received from another phone or your operator, see page 36 and 76.
- Q.ACESS
- Using the Q.Access menu
- The default Q.Access menu may vary from market to market.
- Programming the Q.Access menu
- MOBILE INTERNET
- Logging on to the Internet
- Surfing the Internet
- Logging off the Internet
- Using the browser menu
- Back
- Home
- Exit
- Mark Site
- Bookmarks
- Inbox
- Save Image
- Reload
- Settings
- Homepage
- Proxy
- Circuit Prompt
- Circuit Linger
- Scroll Mode
- Scroll Speed
- Key Press Timeout
- Security
- Connection Prompt
- Secure Prompt
- Current Certificate
- CA Certificates
- Encryption
- Verify Key
- New Key
- Advanced
- Show URL
- Restart Browser
- Offline Services
- Outbox
- About...
- URL Direct Dial (UDD)
- Input Examples:
- ".com"
- ".net"
- " .com.tw"
- "net.tw"
- ".org"
- "org.tw"
- ".gov.tw"
- ".com.cn"
- "net.cn"
- 10".org.cn"
- 11."gov.cn"
- ".info"
- ".biz"
- Advanced ".com" URL input
- Advanced ".net" URL input
- Advanced".com.tw"URL input
- URL ending with "/n
- MENUS
- Navigating the menus
- Phone book
- Recent Calls
- All Calls
- Missed Calls
- Received calls
- Dialled numbers
- Delete call logs
- Call costs
- Network support dependent.
- What is PIN2?
- PIN2 is required.
- View names
- Speed dial
- Caller group
- View List
- Rename
- Ring Type
- Image type
- Copy record
- SIM to phone
- Copy one
- Keep original
- Erase original
- Copy all
- Phone to SIM
- Save nos. to
- SIM card
- Choice
- Phone memory
- Used space
- Delete all
- Own number
- SDN
- Messages
- Inbox
- Save EMS
- Save Melody
- Chat
- Save to SIM
- Send To
- Send by Name
- Send by Group
- Forward
- Text reply
- Call to Sender
- Extract nos
- Outbox
- Backup
- Create message
- Quick Message
- Ring Message
- Animation Message
- Icon Message
- SMS Chat
- This feature is network support and subscription dependent.
- Starting a chat session
- Receiving a reply to your chat message
- Receiving a request for a new chat
- Leaving a chat session
- Message settings
- Message center
- Message lifetime
- Message format
- Reply Path
- Notification
- Voicemail
- Voicemail settings
- Box numbers
- Alert by call
- Alert by SMS
- Alert match
- Cell Broadcast
- CB switch
- Read Cell Broadcast
- Settings
- Immediate Display CB
- Language
- Set CB subjects
- Create subject
- Current list
- Services
- WAP
- S.T.K.
- Schedule
- Set reminder
- Date
- Time
- Notes
- Repeat
- Alarm state
- Tone
- Vibrator
- Save
- Viewall
- Edit this one
- Send By SMS
- Delete this one
- View today
- Tools
- Alarm
- Set time
- Set tone
- Vibration
- Alarm period
- Always on
- Once
- Off
- Stop Watch
- Hour Minder
- Calculator
- Using the calculator feature
- Converting currency values
- Auto Time Zone
- On
- Golf Genius
- New round
- Hdcp
- Tee off
- Enter Score
- Score Card
- Statistic
- Load Round
- New/Edit Course
- Course Name
- Course Tel.
- Green Fee
- Caddie Fee
- Cart Fee
- Tee Info.
- Yard
- Par
- Hcp
- Query Course
- Mini Mouse
- Phone settings
- Color Scheme
- Wallpaper
- Playing style
- Playing period
- Playing list
- Backlight Level
- Backlight Period
- Screen Contrast
- Display
- Standard
- Digital Clock
- Starry Night
- Idle Clock
- Default input
- Auto Redial
- Prompt radial
- Connected Alert
- Auto Keylock
- Call settings
- Call waiting
- Show your number
- Minute minder
- Call Divert
- Divert all calls
- Status
- By service
- Divert when busy
- Divert on no answer
- Divert when not found
- Cancel all
- Network settings
- Network options
- Automatic
- Manual
- Change network password
- Security settings
- Set PIN1
- Change PIN1
- Handset lock
- Handset call barring
- Bar incoming
- Baroutgoing
- Bar all
- Bar prefixes
- Network call barring
- Bar foreign calls
- Only local and home country
- Bar incoming calls
- Bar incoming if abroad
- Bar outgoing calls
- Clear all
- Fixed dialling
- Fixed dial settings
- Fixed dial list
- Change PIN2
- Privacy Code
- Blacklist
- Blacklist settings
- Select group
- SIM Lock
- Quick Access
- Wap Settings
- Activate Setting
- Auto Setting
- Manual Setting
- GPRS Settings
- APN Name
- User ID
- Password
- Activate
- Clock settings
- Set date
- Time format
- Date format
- Set time zone
- Daylight saving
- Reset settings
- Profiles
- Select profile
- Normal
- Meeting
- Outdoor
- Silent
- Edit profile
- Ringing tone
- Ringing volume
- Earpiece volume
- Keypad tones
- Warning tones
- DTMF tones
- Message alert
- Answer Mode
- Melody composer
- Key presses for editing musical notes
- Note format
- Editing musical notes
- Entering a default pitch note
- Entering a rest
- Adjusting the duration of a note
- Adjusting the octave of a note
- Adding a sharp to a note
- Adding a dot to a note
- Steps for composing a chord melody
- Add entry
- User1
- Memory size
- Erase
- Download
- Melody
- EMS
- Format file system
- Baud rate setting
- Turn Modem off/on
- THE MENU MAP
- CARE AND MAINTENANCE
- WHAT TO DO IF...
- APPENDIX
Marque : BENQ
Modèle : M555C
Catégorie : Téléphone mobile