
P1500 - Projecteur DELL - Notice d'utilisation et mode d'emploi gratuit
Retrouvez gratuitement la notice de l'appareil P1500 DELL au format PDF.


| Type de produit | Projecteur |
| Marque | DELL |
| Modèle | P1500 |
| Résolution native | XGA (1024 x 768) |
| Luminosité | 2000 lumens ANSI |
| Contraste | 2000:1 |
| Durée de vie de la lampe | Jusqu'à 3000 heures (mode normal), 4000 heures (mode économique) |
| Alimentation | 100-240 V CA, 50-60 Hz, 260 W (max) |
| Dimensions (L x P x H) | 315 x 230 x 95 mm |
| Poids | 2,5 kg |
| Connectivité | VGA, S-Vidéo, Composite, USB (pour la souris), entrée audio 3,5 mm |
| Haut-parleur intégré | Oui, 1 x 2 W |
| Niveau sonore | 32 dB (mode normal), 28 dB (mode économique) |
| Entretien | Nettoyer le filtre à air tous les 100 heures d'utilisation ; remplacer la lampe après épuisement |
| Sécurité | Arrêt automatique en cas de surchauffe ; câble de sécurité Kensington |
| Pièces détachées et réparabilité | Lampe de rechange (réf. Dell P1500-LAMP), filtre à air (réf. Dell P1500-FILTER) |
| Accessoires inclus | Câble VGA, câble d'alimentation, télécommande, pile, guide de démarrage rapide |
FOIRE AUX QUESTIONS - P1500 DELL
Questions des utilisateurs sur P1500 DELL
0 question sur cet appareil. Repondez a celles que vous connaissez ou posez la votre.
Poser une nouvelle question sur cet appareil
Téléchargez la notice de votre Projecteur au format PDF gratuitement ! Retrouvez votre notice P1500 - DELL et reprennez votre appareil électronique en main. Sur cette page sont publiés tous les documents nécessaires à l'utilisation de votre appareil P1500 de la marque DELL.
MODE D'EMPLOI P1500 DELL
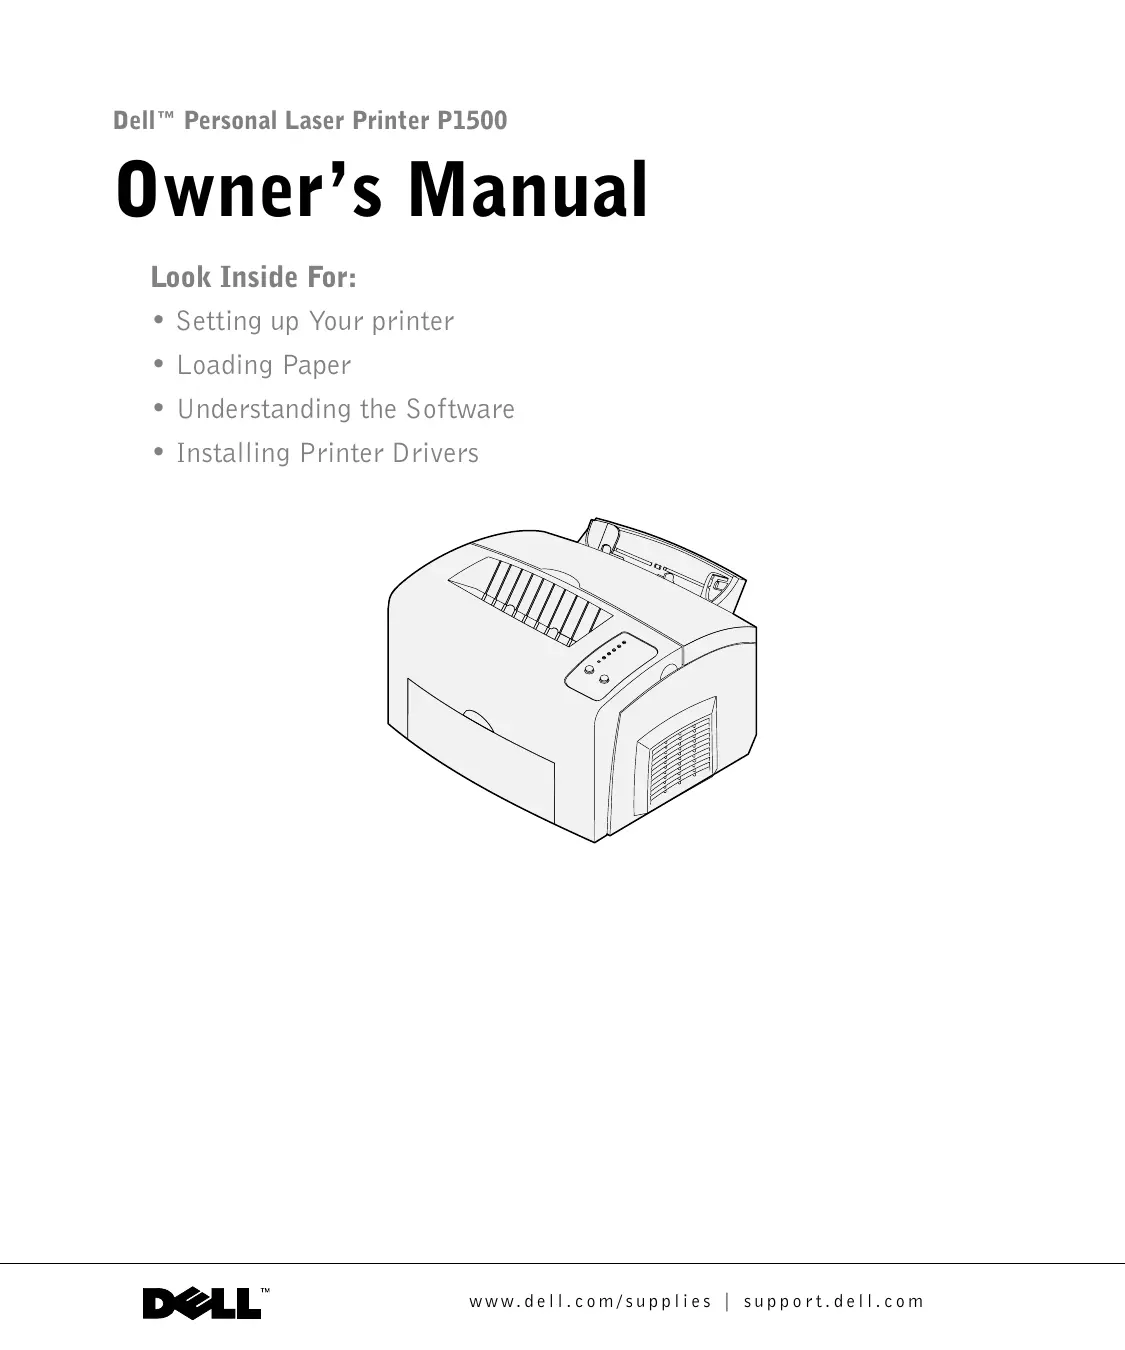
Owner's Manual
Look Inside For:
- Setting up Your printer
- Loading Paper
- Understanding the Software
- Installing Printer Drivers
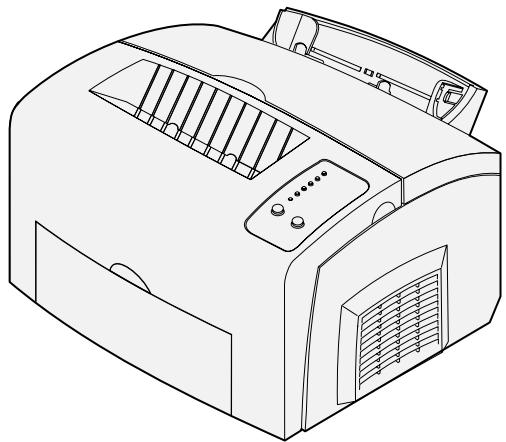
Order toner cartridges
Dell™ toner cartridges are available only through Dell. You can order toner cartridges online at www.dell.com/supplies or by phone.
| USA | 877-465-2968 |
| (877-Ink2You) | |
| Canada | 877-501-4803 |
| Mexico | 001-800-210-7607 |
| Puerto Rico | 800-805-7545 |
| UK | 0870 907 4574 |
| Ireland | 1850 707 407 |
| France | 0825387247 |
| Italy | 800602705 |
| Spain | 902120385 |
| Germany | 0800 2873355 |
| Austria | 08 20 - 24 05 30 35 |
| Netherlands | 020 - 674 4881 |
| Belgium | 02.713 1590 |
| Sweden | 08 587 705 81 |
| Norway | 231622 64 |
| Denmark | 3287 5215 |
| Finland | 09 2533 1411 |
| Switzerland | 0848 801 888 |
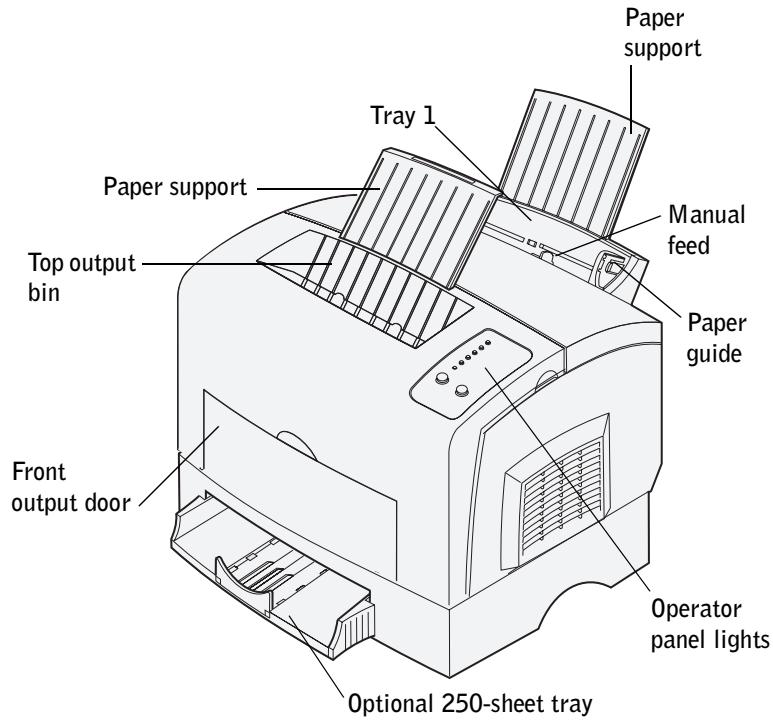
| Use this feature: | When you want to: |
| Tray 1 | Load up to 150 sheets of paper or 10 sheets of other media. |
| Paper support | Support media in tray 1 or the top output bin. |
| Manual feed | Load a single sheet of paper or other media. Use for transparencies, labels, envelopes, and card stock. |
| Paper guides | Adjust the width of the media in tray 1 and the manual feed. |
| Operator panel lights | Check the status of your printer. |
| Top output bin | Stack printed documents face down. |
| Front output door | Print on specialty media (for example, labels or card stock). |
| Optional 250-sheet tray | Increase your paper capacity. |
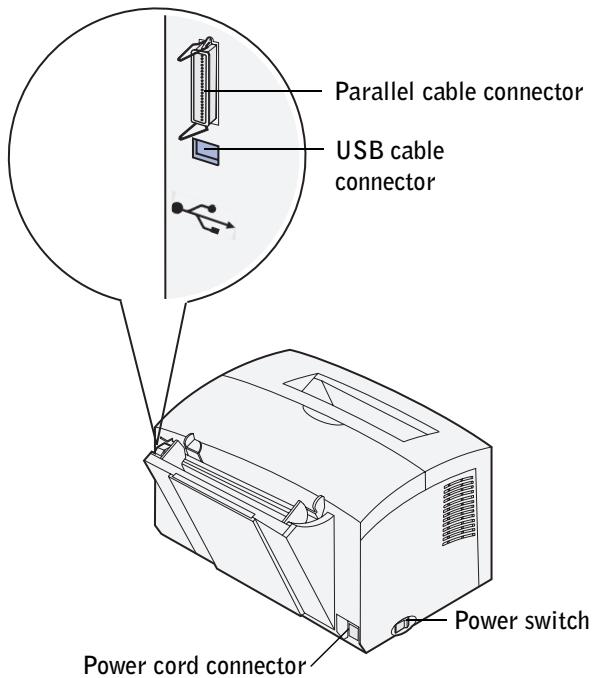
| Use this feature: | When you want to: |
| Parallel cable connector | Connect your computer to your printer parallel port if you are using a parallel cable. |
| USB cable connector | Connect your computer to your printer USB port if you are using a USB cable. |
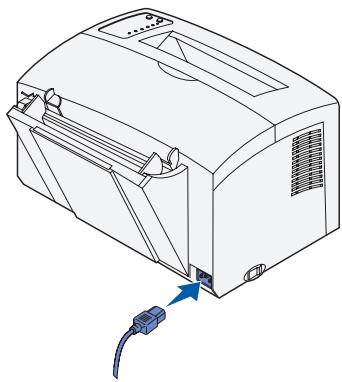
| Power cord connector | Plug your printer into a properly grounded electrical outlet with the power cord (after all other peripherals have been connected). |
| Power switch | Turn your printer on or off. |
| NOTE: You can use either a parallel cable or a USB cable, but do not use both. | |
Accessing your User's Guide
To access your User's Guide, click Start Programs Dell Printers Dell Laser Printer P1500 User's Guide.
Notes, Notices, and Cautions
NOTE: A NOTE indicates important information that helps you make better use of your printer.
NOTICE: A NOTICE indicates either potential damage to hardware or loss of data and tells you how to avoid the problem.
CAUTION: A CAUTION indicates a potential for property damage, personal injury, or death.
Information in this document is subject to change without notice.
© 2003 Dell Computer Corporation. All rights reserved.
Reproduction in any manner whatsoever without the written permission of Dell Computer Corporation is strictly forbidden.
Trademarks used in this text: Dell and DELL logo are trademarks of Dell Computer Corporation; Microsoft, Windows and Windows NT are registered trademarks of Microsoft Corporation.
Other trademarks and trade names may be used in this document to refer to either the entities claiming the marks and names of their products. Dell Computer Corporation disclaims any proprietary interest in trademarks and trade names other than its own.
UNITED STATES GOVERNMENT RESTRICTED RIGHTS
This software and documentation are provided with RESTRICTED RIGHTS. Use, duplication or disclosure by the Government is subject to restrictions as set forth in subparagraph (c)(1)(ii) of the Rights in Technical Data and Computer Software clause at DFARS 252.227-7013 and in applicable FAR provisions: Dell Computer Corporation, One Dell Way, Round Rock, Texas, 78682, USA.
FCC emissions information
This equipment has been tested and found to comply with the limits for a Class B digital device, pursuant to Part 15 of the FCC rules. Refer to the Drivers and Utilities CD for details.

CAUTION: Safety instructions
- Your product uses a laser.

CAUTION: Use of controls or adjustments or performance of procedures other than those specified herein may result in hazardous radiation exposure.
- Your product uses a printing process that heats the print media, and heat can cause certain media to release emissions. You must understand the section in your operating instructions that discusses the guidelines for selecting appropriate print media to avoid the possibility of harmful emissions.

CAUTION: If your product is not marked with this symbol , it must be connected to an electrical outlet that is properly grounded.
- The power cord must be connected to an electrical outlet that is near the product and easily accessible.
- Refer service or repairs, other than those described in the operating instructions, to a professional service person.
- This product is designed to meet safety standards with the use of specific Dell-authorized components. The safety features of some parts may not always be obvious. Dell disclaims liability associated with use of non-Dell-authorized components.
Contents
Accessing your User's Guide 4
FCC emissions information 5
CAUTION: Safety instructions 7
1 Unpack the printer
Attaching an operator panel overlay 15
2 Install printer supplies
Installing the print cartridge 18
Removing toner cartridge packaging 18
3 Install the optional 250-sheet drawer
4 Install optional memory cards
Removing the printer side cover 26
Removing the system board shield 28
Installing a memory card 29
Reinstalling the system board shield 31
Reattaching the printer side cover 32
5 Load paper
Loading tray 1 36
Loading the optional 250-sheet tray 40
Loading the manual feed 45
6 Connect your printer
Attaching a cable 48
Turning on the printer 49
Software overview 50
Status Monitor. 51
Printing Status window 51
Toner Re-order window 51
Dell Local Printer Setup Utility 52
Dell Printer Software Uninstall 52
Driver Profiler 53
Installing printer drivers 53
If you purchased your Dell printer and computer together 53
If you purchased your Dell printer separately 54
Using Windows XP with a USB or parallel cable 54
Using Windows 2000 with a USB or parallel cable. 55
Using Windows Me with a USB or parallel cable. 56
Using Windows NT with a parallel cable 57
Using Windows 98 with a USB or parallel cable 57
Sharing your printer 59
7 Configure paper trays
Type and size settings 62
8 Verify printer setup
Printing a menu settings page 66
9 Appendix
Contacting Dell 70
Dell Software License Agreement 80
SECTION 1
Unpack the printer
Attaching an operator panel overlay
1 Select a location for your printer.
- Leave enough room to open the printer cover, output door, and optional 250-sheet tray. It is also important to allow space around the printer for proper ventilation.
- Provide the proper environment:
A firm, level surface - Away from the direct airflow of air conditioners, heaters, or ventilators
- Free of sunlight, humidity extremes, or temperature fluctuations
Clean, dry, and free of dust
2 Remove all items from the box. Make sure you have the following items:
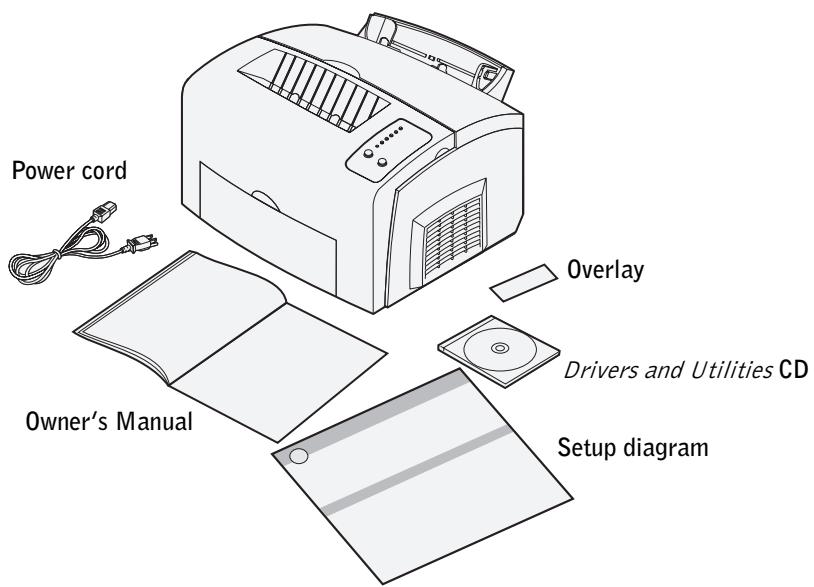
- Setup diagram
- Printer with toner cartridge installed
Power cord
Owner's Manual - Drivers and Utilities CD
Operator panel overlay (non-English only)
If any items are missing or damaged, contact Dell at support.dell.com for assistance. Save the carton and packing material in case you need to repack the printer.
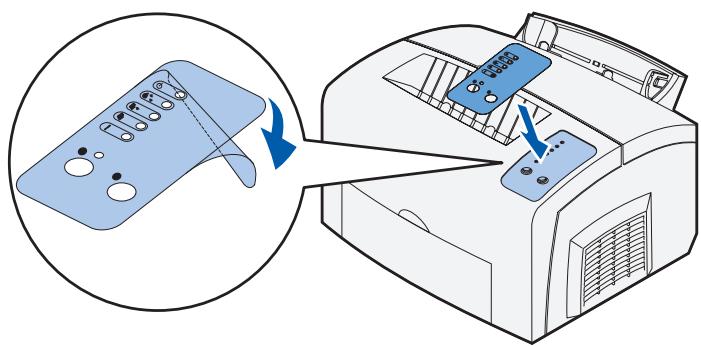
Attaching an operator panel overlay
If you have a non-English operator panel overlay in your printer box and want to use it, peel it off, align it with the operator panel, and press it into place.
SECTION 2
Install printer supplies
Installing the print cartridge
Installing the print cartridge
Removing toner cartridge packaging
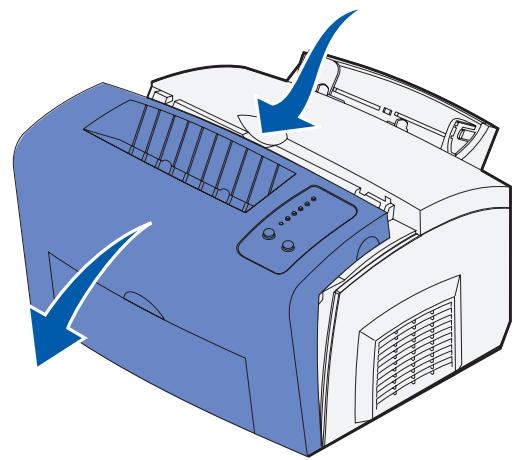
1 Use the finger tab to pull down the printer cover.
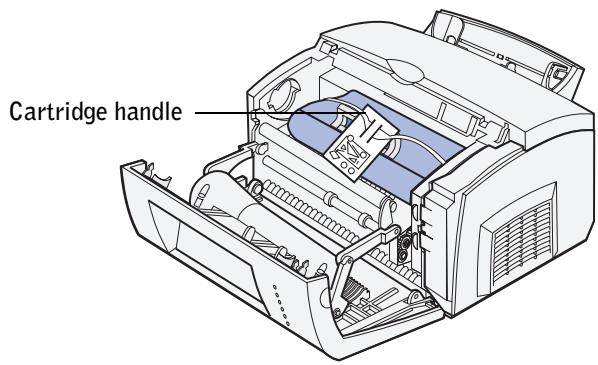
2 Grasp the cartridge handle (behind the packaging tag in the illustration) and pull the toner cartridge straight up.
3 Remove the protective foam packaging from the toner cartridge.
4 Pull off the plastic piece attached to the ends of the toner cartridge. Discard the plastic piece, foam and paper.
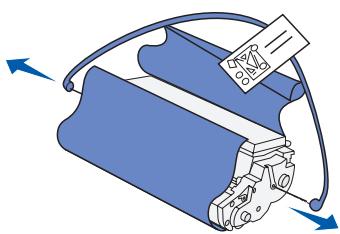
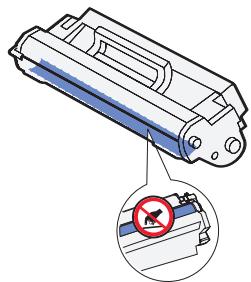
NOTE: Do not touch the photoconductor drum on the bottom of the toner cartridge.
5 Gently shake the cartridge to distribute the toner evenly.
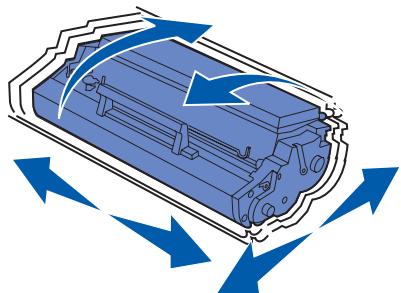
6 Insert the toner cartridge:
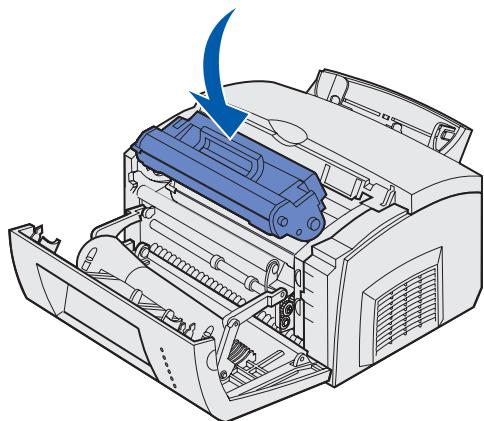
a Align the colored arrows on either side of the cartridge with the corresponding arrows in the printer.
b Holding the cartridge by the handle, tilt the cartridge down and guide it between the toner cartridge grooves.
Push down on the cartridge until it is firmly in place.
7 Close the printer cover.
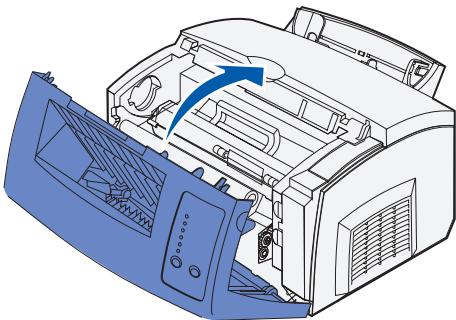
If you cannot close the printer cover, make sure the toner cartridge is positioned correctly. Do not force the cover closed.
SECTION 3
Install the optional
250-sheet drawer
To increase paper capacity, you can purchase the optional 250-sheet drawer, which consists of a base and a tray.
NOTE: If you install the optional 250-sheet drawer at a later time, be sure to turn off the printer before installing it.
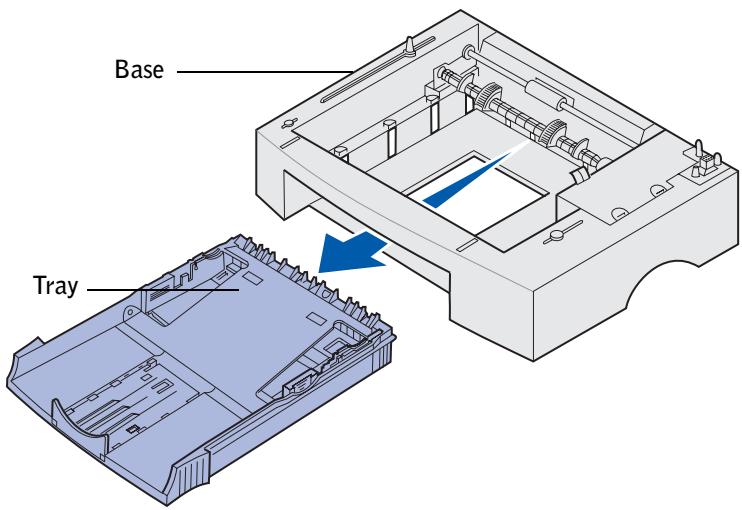
If you ordered this optional drawer, follow the instructions below to install it.
1 Remove the tray from the base.
2 Remove all packing material and tape from the tray and the base.
3 Place the base in the location you have chosen for your printer.
4 Align the printer with the front of the base and place it on top of the base.
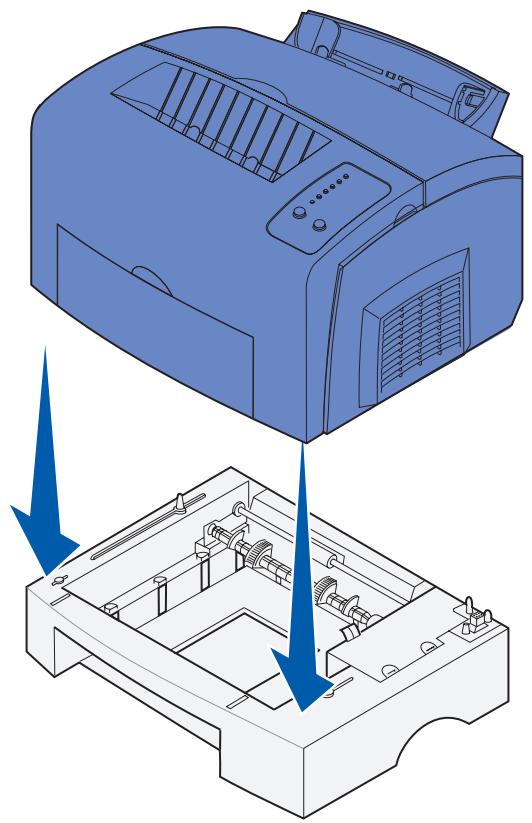
Make sure the base is firmly in place.
5 Insert the tray.
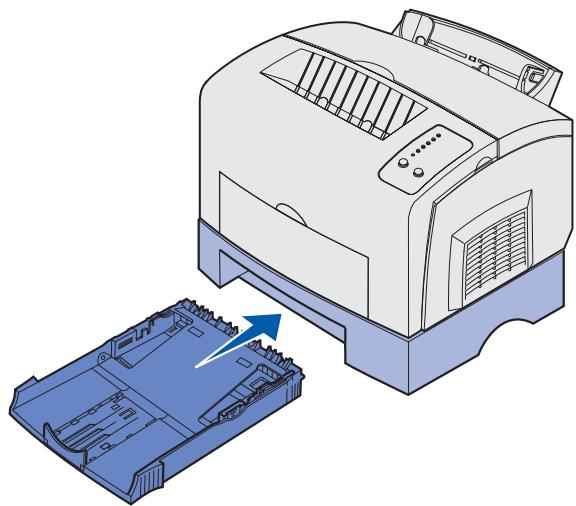
When you complete setting up the printer, print a menu settings page to verify the 250-sheet drawer is listed under Installed Features (see page 66).
For more information on loading the 250-sheet drawer, see "Loading the optional 250-sheet tray" on page 40.
For more information on configuring the 250-sheet drawer for printing, see "Configure paper trays" on page 61.
SECTION 4
Install optional memory cards
Removing the printer side cover
Removing the system board shield
Installing a memory card
Reinstalling the system board shield
Reattaching the printer side cover
You can customize your printer memory capacity and connectivity by adding optional cards.

CAUTION: If you are installing memory cards sometime after setting up the printer, turn the printer off and unplug the power cord before continuing.
Removing the printer side cover
Before installing any memory options, you must remove the printer side cover.
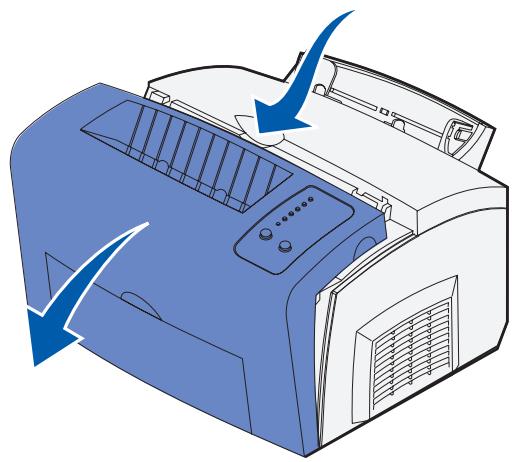
1 Open the printer front cover.
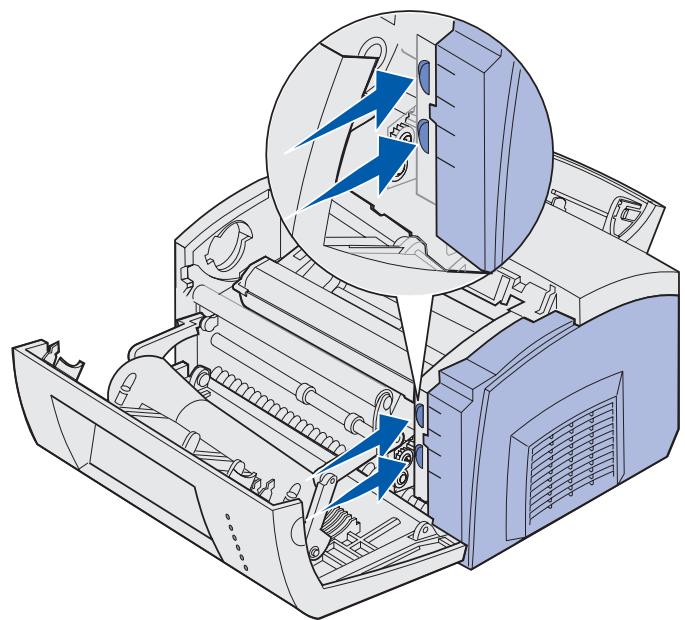
2 Firmly push in the two oval tabs as you pull open the side cover.
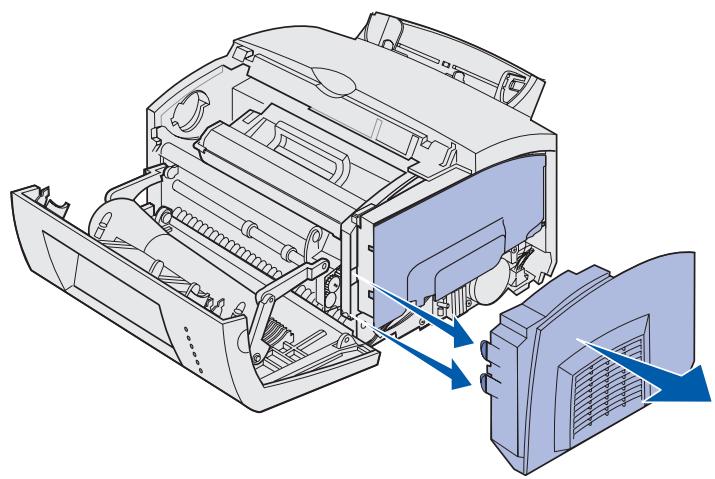
3 Gently pull off the cover and set it aside.
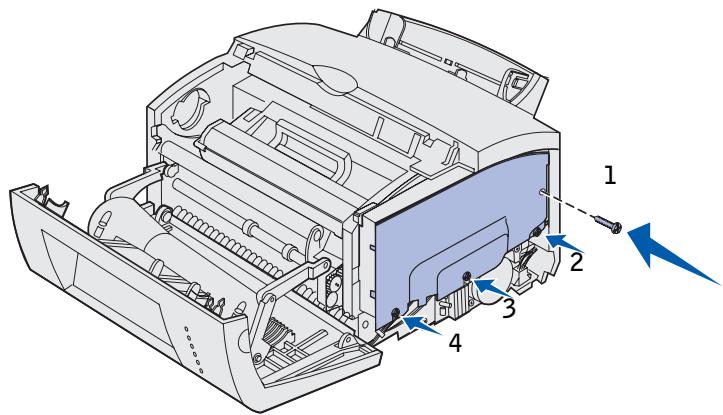
Removing the system board shield
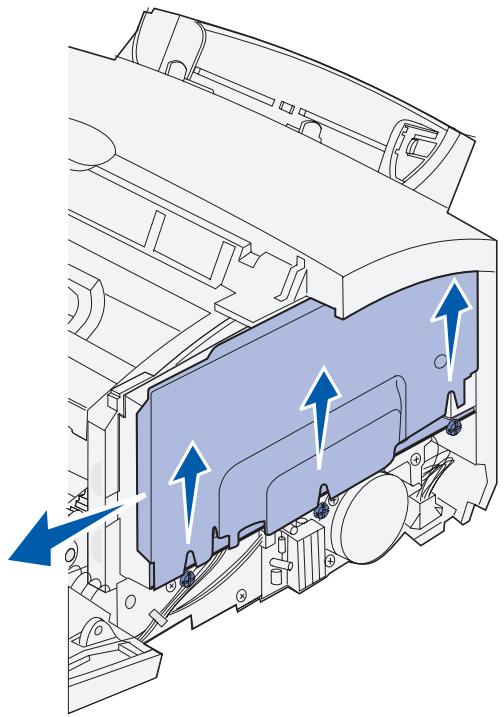
Use a No. 2 Phillips screwdriver to remove the system board shield.
1 Remove screw #1 and set it aside.
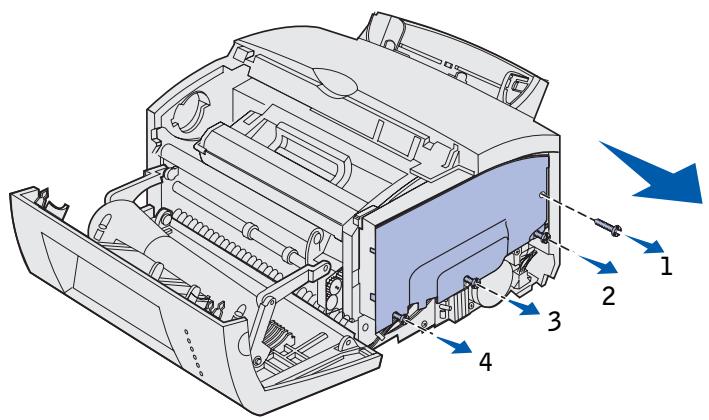
2 Loosen screws #2, #3, and #4, but do not remove them.
3 Lift the system board shield up over the screws, slide it toward the front of the printer, and set it aside.
Installing a memory card
Follow the instructions in this section to install either a printer memory card or a flash memory card.
The system board has two connectors for optional memory cards. You can install a card in either connector.

NOTICE: Memory cards are easily damaged by static electricity. Touch something metal on the printer before you touch a memory card.
1 Complete the steps in "Removing the system board shield" on page 28.
2 Unpack the printer memory card.
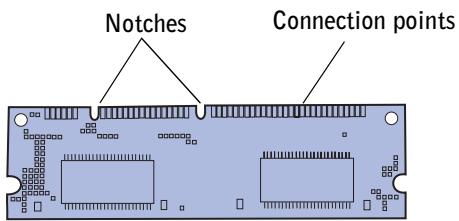
Avoid touching the connection points along the edge of the card. Save the packaging.
3 Align the notches on the bottom of the card with the notches on the connector.
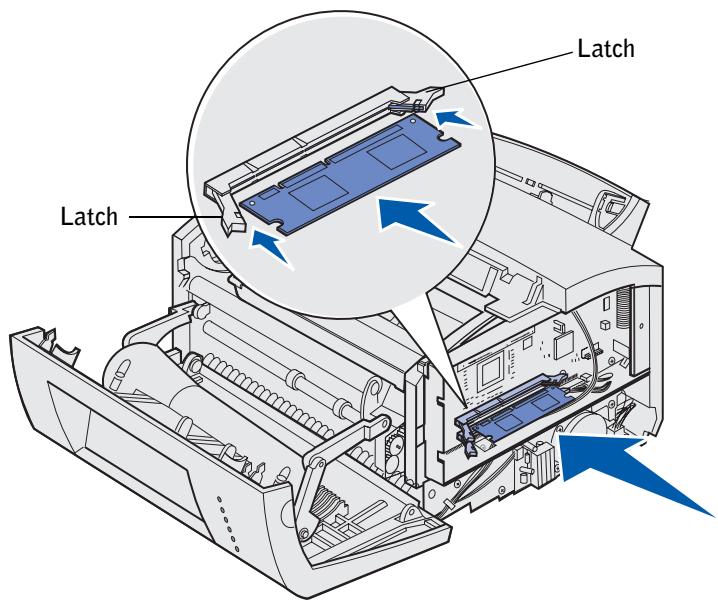
4 Guide the card between the latches on each end of the connector and push the card firmly into the connector.
5 Make sure each latch fits over the notch on each end of the memory card.
6 Reattach the metal shield and side cover. See page 31 for instructions.
Reinstalling the system board shield
1 Align the shield over the bottom screws, slide it toward the back of the printer, and lower it down onto the screws.
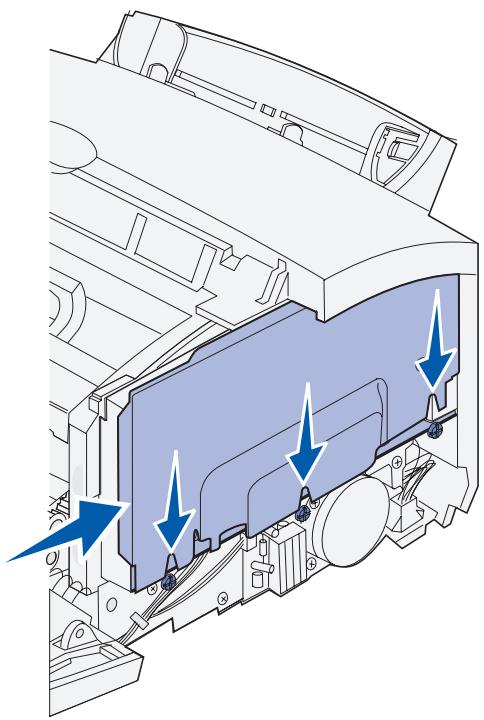
2 Tighten screws #2, #3, and #4, and reattach screw #1 to keep the shield in place.
Reattaching the printer side cover
1 Align the top and bottom tabs with the corresponding slots.
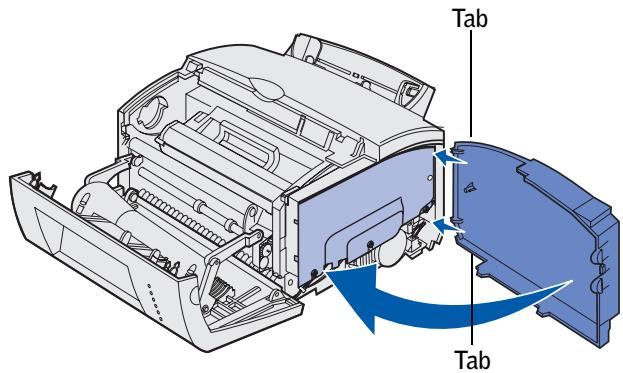
2 As you close the printer side cover, push the oval tabs firmly into the slots.
3 Close the printer front cover.
SECTION5
Load paper
Loading tray 1
Loading the optional 250-sheet tray
Loading the manual feed
Your printer has two standard paper sources: tray 1, which holds up to 150 sheets of plain paper, and a single-sheet manual feed. Use tray 1 for most print jobs. Use the manual feed to feed a single page, transparency, envelope, label, or card stock.
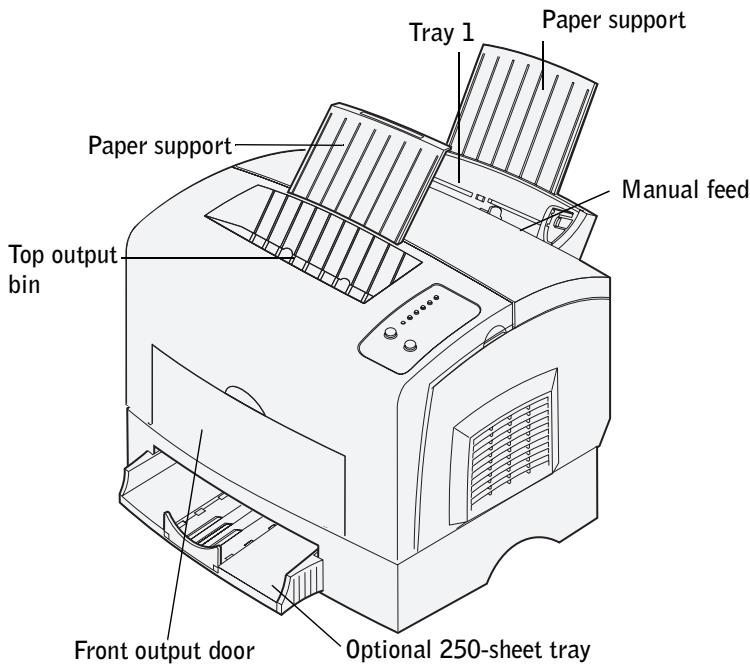
You can increase your printer's paper capacity with the optional 250-sheet tray.
An output bin on top of the printer holds up to 100 sheets. The single-sheet front output door provides a straight-through paper path for specialty media, reducing curling and potential paper jams.
The following table lists page numbers where you can find loading instructions for each tray.
| Source | Capacity (sheets) | Paper sizes supported | Paper types supported | Go to page... |
| Tray 1 | 150 | Plain paper, transparencies, labels, card stock | 36 | |
| Optional 250-sheet tray | 250 | A4, A5, B5, letter, legal, executive, folio | Plain paper | 40 |
| Manual feed | 1 | Plain paper, transparencies, envelopes, labels, card stock | 45 |
Loading tray 1
Use tray 1, which is behind the manual feed, to feed paper and specialty media.
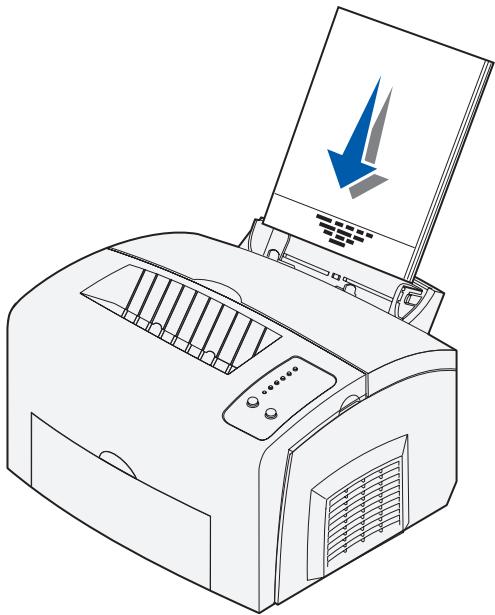
Tray 1 holds up to 150 sheets of paper, 10 sheets of transparencies or labels, 10 envelopes, 10 sheets of card stock.
1 Extend the rear paper support until you hear it click twice.

2 Flex the sheets back and forth to loosen them, fan the sheets on all four sides, and flex them again.
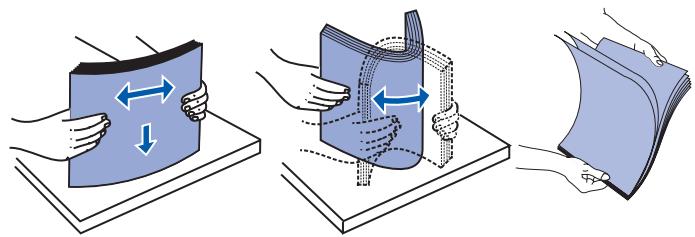
3 If loading:
letterhead paper, insert letterhead with the top of the page pointing down, facing you
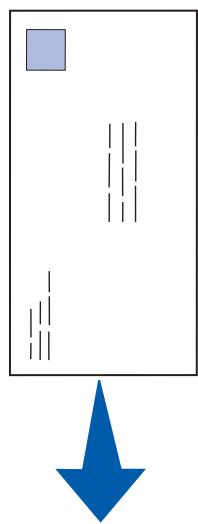
- envelopes, insert them vertically, flap side down with the stamp area in the top left corner
To reduce paper jams, do not use envelopes that:
- Have excessive curl
- Are stuck together
- Are damaged in any way
- Contain windows, holes, perforations, cutouts, or embossing
- Use metal clasps, string ties, or metal folding bars
- Have postage stamps attached
- Have any exposed adhesive when the flap is in the sealed position
4 Slide the paper guides against the edges of the paper or envelopes.
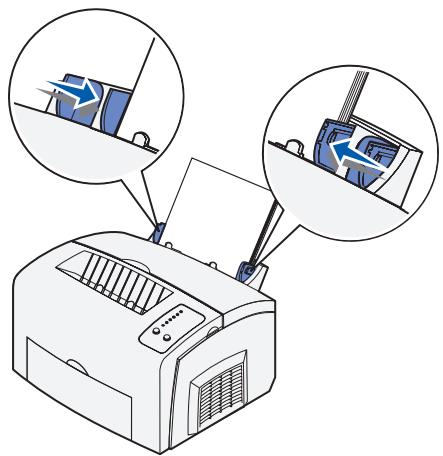
NOTE: Do not forget to select the paper type and paper size from your software application.
5 Extend the front paper support on the top output bin until you hear it click once.
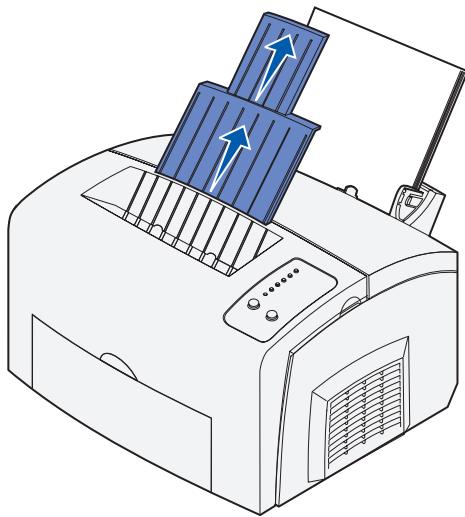
6 If you are printing on legal size paper, extend the front paper support until you hear it click twice.
7 Open the front output door for a straight-through paper path if you are printing on specialty media.
Loading the optional 250-sheet tray
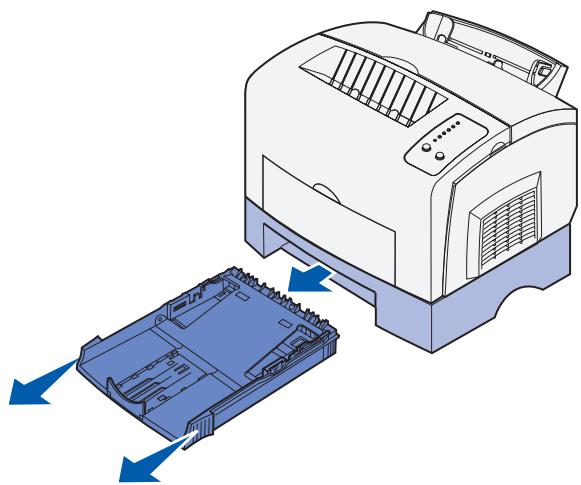
1 Grasp the tabs on either side of the tray and pull it completely out of the printer.
2 Make sure the metal plate is pressed down before inserting the tray into the printer.
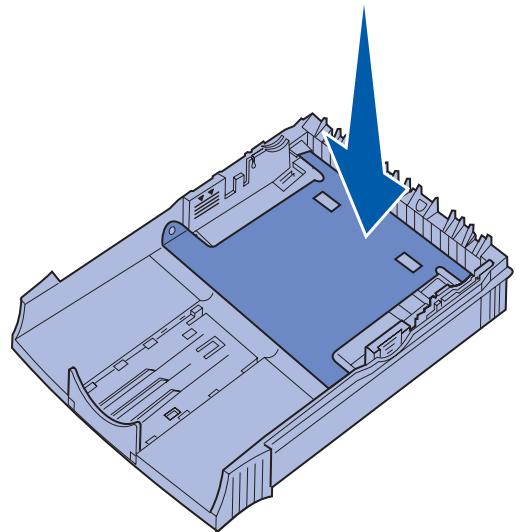
After the tray is inserted, the metal plate springs back up so the paper can feed into the printer.
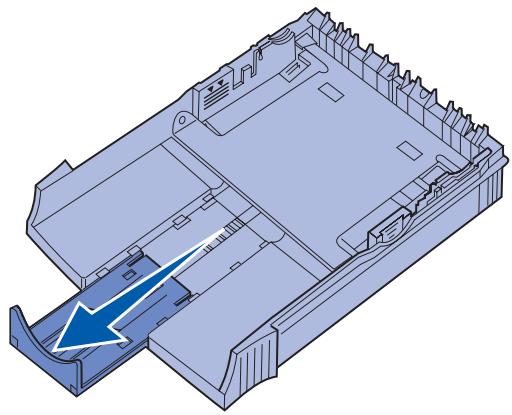
3 If loading A4 or legal size paper, extend the paper support on the front of the tray.
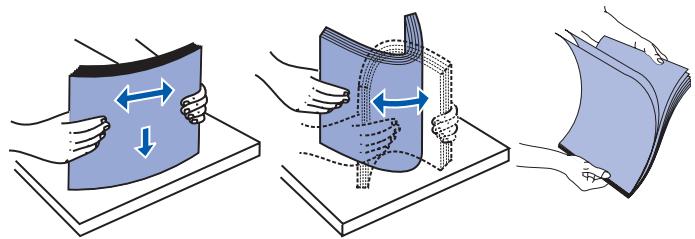
4 Flex the sheets back and forth to loosen them, fan the sheets on all four sides, and flex them again.
5 If loading letterhead paper, insert letterhead face down with the top of the page entering the printer first.
6 Make sure the paper is under both corner bucklers and lying flat in the tray.
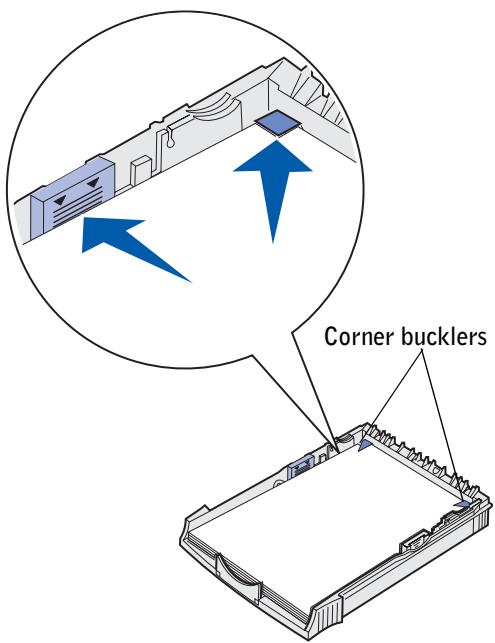

NOTE: When you load the tray, do not exceed the maximum stack height indicated by the label in the tray. Overfilling the tray may cause paper jams.
7 Slide the paper guides flush against the edges of the paper.

8 Reinstall the tray, making sure it is pushed all the way in.
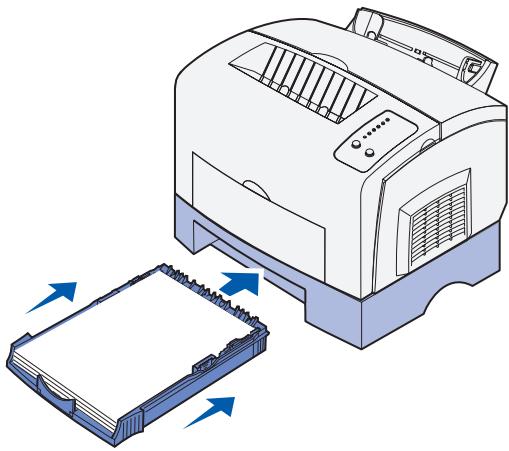
NOTE: Do not forget to select the paper type and paper size from your software application.
Loading the manual feed
Use the manual feed to feed media, one sheet at a time, into your printer.
If you experience problems feeding envelopes or card stock in tray 1, try printing them one at a time from the manual feed.
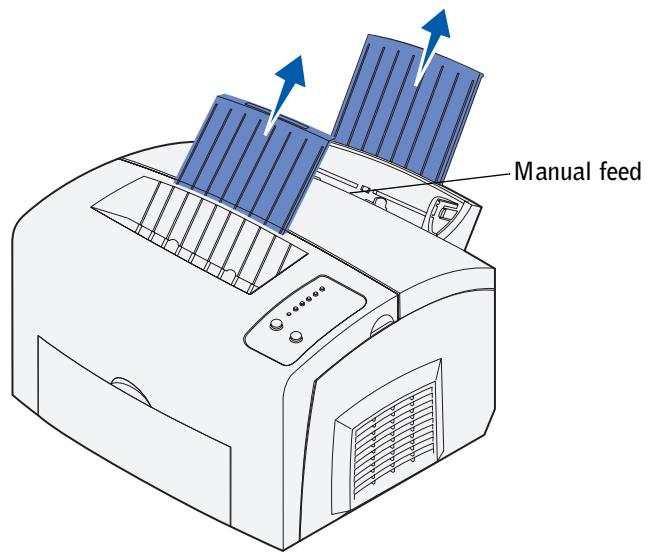
1 Extend the rear paper support until you hear it click twice.
2 Extend the front paper support on the top output bin until you hear it click once.
3 If loading legal size paper, extend the paper support until you hear it click twice.
4 Open the front output door if you are printing on specialty media.
5 If loading:
letterhead paper, insert one sheet of letterhead with the top of the page pointing down, facing you
card stock, insert one card or sheet vertically
- envelopes, insert one envelope vertically, flap side down with the stamp area in the top left corner
To reduce paper jams, do not use envelopes that:
- Have excessive curl
- Are stuck together
- Are damaged in any way
- Contain windows, holes, perforations, cutouts, or embossing
- Use metal clasps, string ties, or metal folding bars
- Have postage stamps attached
- Have any exposed adhesive when the flap is in the sealed position
6 Slide the paper guides flush against the edges of the paper or envelope.
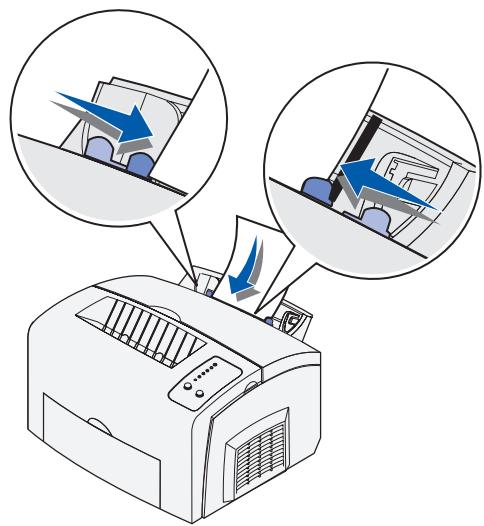
NOTE: Do not forget to select the paper type and paper size from your software application.
SECTION 6
Connect your printer
Attaching a cable
Turning on the printer
Software overview
Installing printer drivers
Sharing your printer
Attaching a cable
NOTE: Before you connect your printer to your computer, you must first complete the Microsoft® Windows® operating system setup. Refer to the documentation that came with your computer for instructions.
You can attach your printer using either a USB or parallel cable, but do not use both.
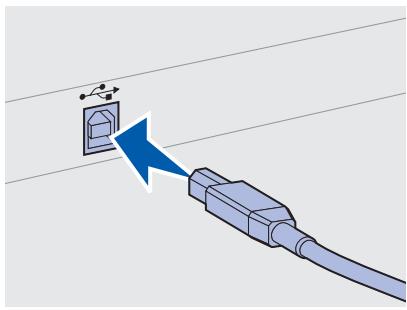
- A USB port requires a USB cable. Be sure to match the USB symbol on the cable to the USB symbol on the printer.
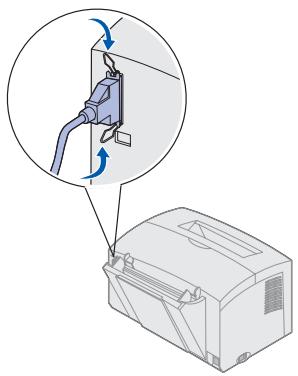
- A parallel port requires an IEEE-1284 compliant parallel cable.
CAUTION: Ensure that the printer, computer, and any attached devices are turned off and disconnected from electrical outlets before you connect your printer to your computer.
To attach the printer to a computer:
1 Connect the printer to the computer using a USB or parallel cable.
If you are using a USB cable, plug the printer into a USB port on the back of the computer, not the USB keyboard.
If you are using a parallel cable, snap down the clips on the printer to secure the parallel cable.
Turning on the printer
1 Plug one end of the printer cord into the power cord connector at the back of the printer and the other end into a properly grounded wall outlet.
2 Turn on the printer.
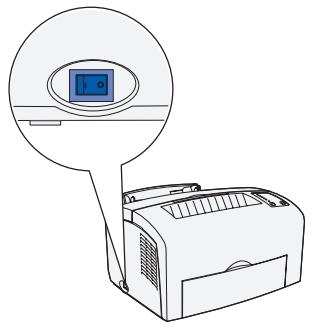
All operator panel lights cycle (each light blinks, from top to bottom, and then cycles again).
If the operator panel lights do not come on when the printer is turned on, make sure the power cord is firmly plugged in at the back of the printer and at the electrical outlet.
If the printer is on but nothing prints, or if print jobs are not printing and the Error light is on solid, make sure the toner cartridge is installed.
Software overview
Use the Drivers and Utilities CD that came with your printer to install a combination of software applications, depending on your operating system.
| Operating System | Status Monitor | Printing Status Window | Dell Toner Re-order Window | Local Printer Setup Utility | Dell Printer Software Uninstall | Driver Profiler |
| Windows 98, Windows Me | Y | N | N | Y | Y | Y |
| Windows NT® 4.0 | N | N | N | Y | Y | Y |
| Windows 2000, Windows XP | N | Y | Y | Y | Y | Y |
NOTE: If you purchased your printer and computer separately, you must use the Drivers and Utilities CD to install these software applications.
Status Monitor
The Status Monitor alerts you when an error or warning occurs, for example, when the top cover is open or toner is running low.
The Status Monitor launches when you send a print job to the printer and only appears on the computer screen when an error or warning occurs.
Printing Status window
The Printing Status window displays the status of the printer (Printer Ready, Printer Offline, and Error-Check Printer) and the name of the job when you send a job to print. The Printing Status window also displays the level of toner so you can:
Monitor the toner level for your printer.
- Click Order Toner to order replacement toner cartridges. See "Toner Re-order window" on page 51 for more information.
Toner Re-order window
The Order Toner Cartridges dialog box can be launched from the Printing Status window, the Programs window, or the desktop icon.
You can order toner by phone or from the Web.
1 Click Start Programs or All Programs Dell Printers Dell Laser Printer P1500 Dell Toner Re-Order Application. The Order Toner Cartridges window appears.
2 If ordering from the Web:
a Choose your printer model from the drop-down list on the screen.
b Enter your Dell printer Service Tag number in the field provided. Your Service Tag number is located on your printer.
c Click Visit Dell's cartridge ordering web site.
3 If ordering by phone, call the number that appears under the By Telephone heading.
Dell Local Printer Setup Utility
Use the Dell Local Printer Setup Utility to change and save printer settings not available from the printer driver. When you change these settings, they remain in effect until you make another selection and apply it, or until you restore the original printer settings (called factory default settings). The settings are organized by menu, much like a printer operator panel.
The Dell Local Printer Setup Utility is installed automatically on your computer when you install the Dell printer driver. Click Start Programs Dell Printers Dell Laser Printer P1500 Dell Local Printer Setup Utility.
Dell Printer Software Uninstall
Use the Uninstall software utility to remove any currently installed printer software or printer objects.
For Windows 98, Windows 2000, Windows Me, or Windows NT 4.x you can access the Uninstall software utility two ways:
1 Click Start Settings Printers.
a Select the printer object to uninstall, and then right-click the mouse.
b Select Dell Software Uninstall.
c Select the components to uninstall, and then click Next.
d Click Uninstall Now.
e Click OK when the uninstall is complete.
2 Click Start Programs Dell Printers Dell Laser Printer P1500.
a Select Dell Printer Software Uninstall.
b Select the components to uninstall, and then click Next.
Click Uninstall Now.
d Click OK when the uninstall is complete.
For Windows XP:
1 Click Start All Programs Dell Printers Dell Laser Printer P1500.
2 Select Dell Printer Software Uninstall.
3 Select the components to uninstall, and then click Next.
4 Click Uninstall Now.
5 Click OK when the uninstall is complete.
Driver Profiler
Use the Driver Profiler to create driver profiles that contain custom driver settings. A driver profile can contain a group of saved printer driver settings and other data for things such as:
- Print orientation and N-Up (document settings)
- Installation status of an output tray (printer options)
- User-defined paper sizes (custom papers)
Simple text and watermarks - Overlay references
- Font references
- Form associations
Installing printer drivers
A printer driver is software that lets your computer communicate with your printer.
If you purchased your Dell printer and computer together
The printer drivers and utilities described in the Software Overview are automatically installed--you are ready to print!
If you purchased your Dell printer separately
To obtain all the features described in the Software Overview, use the Drivers and Utilities CD to install it. Use the following table to find the instructions you need for your operating system.
| Computer operating system | Go to page ... |
| Windows XP | 54 |
| Windows 2000 | 55 |
| Windows Me | 56 |
| Windows NT 4.x | 57 |
| Windows 98 | 57 |
You need to complete Microsoft's Plug and Play before installing the driver from your printer drivers CD.
Using Windows XP with a USB or parallel cable

NOTE: Business versions of Windows XP require that you have administrative access to install printer drivers on your computer.
When you attached the cable and turned on the printer, the Found New Hardware Wizard appeared on your computer screen.
1 Insert the Drivers and Utilities CD into your computer.
The Wizard automatically searches for an appropriate driver.
2 Scroll through the list of drivers until you see D:\drivers\win_2000\dkaaelda.inf selected in the Location column. Instead of D:\you will see the letter of your CD-ROM drive.
3 Click Next.
The wizard copies all of the necessary files and installs the printer drivers.
4 Click Finish when the software is installed.
5 Launch the Drivers and Utilities CD: click Start Run and browse your CD drive (for example, type D:\where D is the drive letter of your CD).
6 Select SETUPEXE, and then click OK.
7 When the Dell Drivers and Utilities screen appears, click Install to install the additional software for your printer.
When all of the files are installed on your computer, the Congratulations screen appears.
8 Click Print a Test Page to verify printer setup.
9 Click Finish when the test page prints successfully.
10 Close the Drivers and Utilities CD screen.
Using Windows 2000 with a USB or parallel cable
When you attached the cable and turned on the printer and computer, the Found New Hardware Wizard screen appeared on your computer screen.
1 Insert the Drivers and Utilities CD, and then click Next.
2 Select Search for a suitable driver, and then click Next.
3 Only select Specify a location, and then click Next.
4 Browse to the location of the printer driver on the Drivers and Utilities CD.
D:\Drivers\Win_2000\
Replace D:\ with the letter of your CD-ROM drive (for example, type D:\ where D is the drive letter of your CD).
5 Click Open, and then click OK.
6 Click Next to install the driver that is displayed.
7 Click Finish when the software is installed.
8 When the Dell Drivers and Utilities CD screen appears, choose Install to install the additional software for your printer.
When all the files are installed on your computer, the Congratulations screen appears.
9 Click Print a Test Page to verify printer setup.
10 Click Finish when the test page prints successfully.
11 Close the Drivers and Utilities CD screen.
Using Windows Me with a USB or parallel cable

NOTE: Depending on the software and printers already installed on your computer, your screens may vary from those in the instructions.
If you attached a USB cable, you must install both a USB port driver and a custom print driver.
When you attached the cable and turned on the printer and computer, the Add New Hardware Wizard screen appeared on your computer screen.
1 Insert the Drivers and Utilities CD.
The Wizard automatically searches for the USB driver on the CD and installs it.

NOTE: If you are using a parallel cable, skip to step 3.
2 After the USB port driver is found, click Finish.
3 Select Automatic search for the best driver (recommended), and then click Next.
The wizard searches for a printer driver.
4 Select your printer and driver from the list on the screen, and then click OK. Use the following table to identify the driver for your language.
| If your computer uses this language | Select the driver from the list (Replace the D:\ in the table with the letter of your CD-ROM drive) |
| English | D:\DRIVERS\WIN_9X\ENGLISH\LMPCL5C.INF |
| French | D:\DRIVERS\WIN_9X\FRENCH\LMPCL5C.INF |
| German | D:\DRIVERS\WIN_9X\GERMAN\LMPCL5C.INF |
| Italian | D:\DRIVERS\WIN_9X\ITALIAN\LMPCL5C.INF |
| Spanish | D:\DRIVERS\WIN_9X\SPANISH\LMPCL5C.INF |
5 Use the default printer name (for example, Dell Laser Printer P1500) or type a unique name for your printer, and then click Next.
6 A test page will print automatically. Click YES when the test page prints successfully.
7 Click Finish to complete the installation and close the wizard. You are now ready to print.
8 Launch the Drivers and Utilities CD: click Start Run and browse your CD drive (for example, type D:\ where D is the drive letter of your CD).
9 Select SETUPEXE, and then click OK.
10 When the Dell Drivers and Utilities CD screen appears, click Install to install the additional software for your printer.
If you are prompted to restart your computer, click Yes.
Otherwise, the Congratulations screen appears.
11 Close the Drivers and Utilities CD screen.
Using Windows NT with a parallel cable
NOTE: USB support is not available for Windows NT operating systems.
NOTE: You need administrative access to install printer drivers on your computer.
1 Insert the Drivers and Utilities CD.
2 Click Install.
When all the files are installed on your computer, the Congratulations screen appears.
3 Click Finish to complete the installation and close the wizard. You are now ready to print.
4 Close the Drivers and Utilities CD screen.
Using Windows 98 with a USB or parallel cable
NOTE: Depending on the software and printers already installed on your computer, your screens may vary from those in the instructions.
If you attached a USB cable, you must install both a USB port driver and a custom print driver.
When you attached the cable and turned on the printer and computer, the Add New Hardware Wizard screen appeared on your computer screen.
1 Insert the Drivers and Utilities CD, and then click Next.
NOTE: If you are using a parallel cable, skip to step 7.
2 Select Search for the best driver for your device (recommended), and then click Next.
3 Select CD-ROM drive only, and then click Next.
4 After the wizard finds the USB port driver, click Next.
5 When the USB port driver is installed, click Finish.
The wizard prompts you to search for new drivers.
6 Click Next to search for a printer driver.
7 Select Search for the best driver for your device (recommended), and then click Next.
8 Only select Specify a location and browse to the location of the printer driver on the Drivers and Utilities CD, and then click OK.
Use the following table to identify the driver for your language.
| If your computer uses this language | Select the driver from the list (Replace the D:\ in the table with the letter of your CD-ROM drive) |
| English | D:\DRIVERS\WIN_9X\ENGLISH\LMPCL5C.INF |
| French | D:\DRIVERS\WIN_9X\FRENCH\LMPCL5C.INF |
| German | D:\DRIVERS\WIN_9X\GERMAN\LMPCL5C.INF |
| Italian | D:\DRIVERS\WIN_9X\ITALIAN\LMPCL5C.INF |
| Spanish | D:\DRIVERS\WIN_9X\SPANISH\LMPCL5C.INF |
9 Highlight the driver, and then select to install the updated driver (recommended).
10 Click Next.
11 Click Next to complete installation.
12 Use the default printer name (for example, Dell Laser Printer P1500) or type a unique name for your printer, and then click Next.
13 Click Finish.
14 A test page will print automatically. Click YES when the test page prints successfully.
15 Click Finish to complete the installation. You are now ready to print.
16 Launch the Drivers and Utilities CD: click Start Run and browse your CD drive (for example, type D:\ where D is the drive letter of your CD).
17 Select SETU.EXE, and then click OK to launch the Dell Drivers and Utilities CD.
18 When the Dell Drivers and Utilities screen appears, click Install to install the additional software for your printer.
If you are prompted to restart your computer, click Yes.
Otherwise, the Congratulations screen appears.
19 Close the Drivers and Utilities CD screen.
Sharing your printer
To share your new printer with other users, you need to set it up to be shared, and then copy the printer drivers to their computers:
1 Click Start Settings Printers.
2 Select the Dell Laser Printer P1500 icon.
3 Click File Sharing.
4 Check the Shared as check box, and then type a name in the Shared Name text box.
5 Click Additional Drivers and select the operating systems of all other users printing to this printer.
6 Click OK.
If you are missing files, you are prompted to insert the computer operating system CD. To check that the printer was successfully shared:
- Make sure the printer object in the Printers folder shows it is shared. For example, in Windows 2000, a hand is shown underneath the printer icon.
- Browse Network Neighborhood. Find the host name of the server and look for the shared name you assigned to the printer.
Other users who want to connect to your printer need to install the printer drivers on their computer:
1 Insert the Drivers and Utilities CD that came with the shared printer, and then click Install.
2 Click I am installing software for a printer that is shared through another computer.
3 Type the name of the computer and printer share name. For example, \server1\dell printer
To find out the computer name, browse Network Neighborhood. Find the name of the computer and look for the shared name you assigned to the printer.
When all the files are installed on your computer, the Congratulations screen appears.
4 Click Print a Test Page to verify printer setup.
5 Click Finish when the test page prints successfully.
SECTION 7
Configure paper trays
Type and size settings
Type and size settings
Set the driver and Dell Local Printer Setup Utility to the type and size of paper loaded in the paper trays.
1 Launch the Dell Local Printer Setup Utility (Start Programs Dell Printers Dell Laser Printer P1500 Dell Local Printer Setup Utility).
2 Select your Dell Laser Printer P1500.
3 Click OK.
4 In the left column, click Paper.
5 In the right column, go to the Tray 1 section. Specify what size and type of media you loaded into tray 1.
6 In the right column, go to the Tray 2 section. Specify what size and type of media you loaded into tray 2.
7 On the Menu Bar, Click Actions Apply Settings.
8 Close the utility.
NOTE: If you change the size or type of media loaded into either tray, use the Local Printer Setup Utility to reconfigure the tray.
9 Update your driver by following the instructions in the table.
| Windows XP | 1 Click Start →Settings →Printers and Faxes. 2 Right-click the Dell Laser Printer P1500 icon. 3 Click Properties →Device (or Options) →Update (or Update Now). 4 Click OK →OK. Close the Printers folder. |
| Windows 2000 Windows NT 4.0 | 1 Click Start →Settings →Printers. 2 Right-click the Dell Laser Printer P1500 icon. 3 Click Properties →Device (or Options) →Update (or Update Now). 4 Click OK →OK. Close the Printers folder. |
| Windows Me Windows 98 | 1 Click Start →Settings →Printers. 2 Right-click the Dell Laser Printer P1500 icon. 3 Click Properties →Device (or Features) →Update (or Update Now). 4 Click OK →OK. Close the Printers folder. |
If Update is unavailable, follow these steps:
a In the Available Options list, click 250-sheet tray or 500-sheet tray.
b Click Add.
c Click OK, and then close the Printers folder.
If Update Now is unavailable, follow these steps:
a In the Options list, find 250-sheet tray or 500-sheet tray.
b Change the setting from Not Installed to Installed.
c Click OK, and then close the Printers folder.
SECTION 8
Verify printer setup
Printing a menu settings page
Printing a menu settings page
Print a menu settings page for a list of current printer settings.
1 When the Ready/Data light is on solid, press and release Continue to print the page.
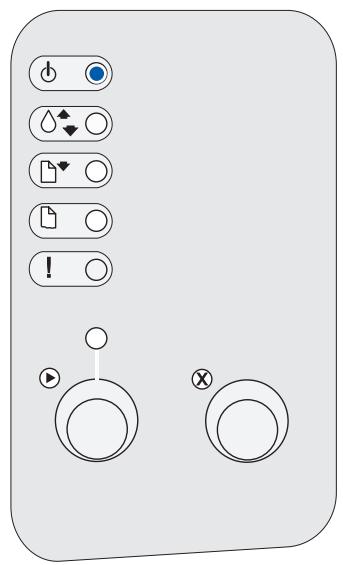
2 On the menu settings page:
- Verify that the options you installed are correctly listed under "Installed Features." If an option you installed is not listed on the menu settings page, turn the printer off, unplug the power cord, and reinstall the option.
- Verify that the amount of memory installed is correctly listed under "Printer Information." Verify that the paper trays are configured for the sizes and types of paper you loaded.

NOTE: When you add or remove the optional 250-sheet tray, remember to update the printer's configuration through your printer driver.
For tips on successful printing, examples of common operator panel light sequences, ways to improve print quality, solutions for printing problems, and instructions for replacing supplies, refer to the Dell Personal Laser Printer P1500 User's Guide on the Drivers and Utilities CD (Start Programs Dell Printers Dell Laser Printer P1500 User's Guide).
3 Update your driver by following the instructions in the table. If the printer is on the network, update the driver for each client.
| Windows XP | 1 Click Start →Settings →Printers and Faxes. 2 Right-click the Dell Laser Printer P1500 icon. 3 Click Properties →Device (or Options) →Update (or Update Now). 4 Click OK →OK. Close the Printers folder. |
| Windows 2000 Windows NT 4.0 | 1 Click Start →Settings →Printers. 2 Right-click the Dell Laser Printer P1500 icon. 3 Click Properties →Device (or Options) →Update (or Update Now). 4 Click OK →OK. Close the Printers folder. |
| Windows Me Windows 98 | 1 Click Start →Settings →Printers. 2 Right-click the Dell Laser Printer P1500 icon. 3 Click Properties →Device (or Features) →Update (or Update Now). 4 Click OK →OK. Close the Printers folder. |
If Update is unavailable, follow these steps:
a In the Available Options list, click 250-sheet tray.
b Click Add.
c Click OK, and then close the Printers folder.
If Update Now is unavailable, follow these steps:
a In the Options list, find 250-sheet tray.
b Change the setting from Not Installed to Installed.
c Click OK, and then close the Printers folder.
SECTION 9
Appendix
Contacting Dell
Limited Warranties and Return Policy
Dell Computer Corporation Ink and Toner Cartridges Limited Warranties
Dell Software License Agreement
Contacting Dell
To contact Dell electronically, you can access the following websites:
www.dell.com
- support.dell.com (technical support)
- premiersupport.dell.com (technical support for educational, government, healthcare, and medium/large business customers, including Premier, Platinum, and Gold customers)
For specific web addresses for your country, find the appropriate country section in the table below.
NOTE: Toll-free numbers are for use within the country for which they are listed.
When you need to contact Dell, use the electronic addresses, telephone numbers, and codes provided in the following table. If you need assistance in determining which codes to use, contact a local or an international operator.
| Country (City) International Access Code Country Code City Code | Department Name or Service Area, Website and E-Mail Address | Area Codes, Local Numbers, and Toll-Free Numbers |
| Belgium (Brussels) | Website: support.euro.dell.com | |
| International Access Code: 00 | E-mail: tech_be@dell.com | |
| Country Code: 32 | E-mail for French Speaking Customers: support.euro.dell.com/be/fr/emaildell/ | |
| City Code: 2 | Technical Support | 02 481 92 88 |
| Customer Care | 02 481 91 19 | |
| Corporate Sales | 02 481 91 00 | |
| Fax | 02 481 92 99 | |
| Switchboard | 02 481 91 00 | |
| Canada (North York, Ontario) | Online Order Status: www.dell.ca/ostatus | |
| International Access Code: 011 | AutoTech (automated technical support) | toll-free: 1-800-247-9362 |
| TechFax | toll-free: 1-800-950-1329 | |
| Customer Care (Home Sales/Small Business) | toll-free: 1-800-847-4096 | |
| Customer Care (med./large business, government) | toll-free: 1-800-326-9463 | |
| Technical Support (Home Sales/Small Business) | toll-free: 1-800-847-4096 | |
| Technical Support (med./large bus., government) | toll-free: 1-800-387-5757 | |
| Sales (Home Sales/Small Business) | toll-free: 1-800-387-5752 | |
| Sales (med./large bus., government) | toll-free: 1-800-387-5755 | |
| Spare Parts Sales & Extended Service Sales | 1 866 440 3355 | |
| Denmark (Copenhagen) | Website: support.euro.dell.com | |
| International Access Code: 00 | E-mail Support (portable computers): | |
| Country Code: 45 | den_nbk_support@dell.com | |
| E-mail Support (desktop computers): | ||
| den_support@dell.com | ||
| E-mail Support (servers): | ||
| Nordic_server_support@dell.com | ||
| Technical Support | 7023 0182 | |
| Customer Care (Relational) | 7023 0184 | |
| Home/Small Business Customer Care | 3287 5505 | |
| Switchboard (Relational) | 3287 1200 | |
| Fax Switchboard (Relational) | 3287 1201 | |
| Switchboard (Home/Small Business) | 3287 5000 | |
| Fax Switchboard (Home/Small Business) | 3287 5001 | |
| Finland (Helsinki) | Website: support.euro.dell.com | |
| International Access Code: 990 | E-mail: fin_support@dell.com | |
| Country Code: 358 | E-mail Support (servers): Nordic_support@dell.com | |
| City Code: 9 | Technical Support | 09 253 313 60 |
| Technical Support Fax | 09 253 313 81 | |
| Relational Customer Care | 09 253 313 38 | |
| Home/Small Business Customer Care | 09 693 791 94 | |
| Fax | 09 253 313 99 | |
| Switchboard | 09 253 313 00 | |
| France (Paris) (Montpellier) | Website: support.euro.dell.com | |
| International Access Code: 00 | E-mail: support.euro.dell.com/fr/fr/emaildell/ | |
| Country Code: 33 | Home and Small Business | |
| City Codes: (1) (4) | Technical Support | 0825 387 270 |
| Customer Care | 0825 823 833 | |
| Switchboard | 0825 004 700 | |
| Switchboard (calls from outside of France) | 04 99 75 40 00 | |
| Sales | 0825 004 700 | |
| Fax | 0825 004 701 | |
| Fax (calls from outside of France) | 04 99 75 40 01 | |
| Corporate | ||
| Technical Support | 0825 004 719 | |
| Customer Care | 0825 338 339 | |
| Switchboard | 01 55 94 71 00 | |
| Sales | 01 55 94 71 00 | |
| Fax | 01 55 94 71 01 | |
| Germany (Langen) | Website: support.euro.dell.com | |
| International Access Code: 00 | E-mail: tech_support_central_europe@dell.com | |
| Country Code: 49 | Technical Support | 06103 766-7200 |
| City Code: 6103 | Home/Small Business Customer Care | 0180-5-224400 |
| Global Segment Customer Care | 06103 766-9570 | |
| Preferred Accounts Customer Care | 06103 766-9420 | |
| Large Accounts Customer Care | 06103 766-9560 | |
| Public Accounts Customer Care | 06103 766-9555 | |
| Switchboard | 06103 766-7000 | |
| Greece | Website: support.euro.dell.com | |
| International Access Code: 00 | E-mail: support.euro.dell.com/gr/en/emaildell/ | |
| Country Code: 30 | Technical Support | 080044149518 |
| Gold Technical Support | 08844140083 | |
| Switchboard | 2108129800 | |
| Sales | 2108129800 | |
| Fax | 2108129812 | |
| India | Technical Support | 1600 33 8045 |
| Sales | 1600 33 8044 | |
| Ireland (Cherrywood) | Website: support.euro.dell.com | |
| International Access Code: 16 | E-mail: dell_direct_support@dell.com | |
| Country Code: 353 | Ireland Technical Support | 1850 543 543 |
| City Code: 1 | U.K. Technical Support (dial within U.K. only) | 0870 908 0800 |
| Home User Customer Care | 01 204 4014 | |
| Small Business Customer Care | 01 204 4014 | |
| U.K. Customer Care (dial within U.K. only) | 0870 906 0010 | |
| Corporate Customer Care | 1850 200 982 | |
| Corporate Customer Care (dial within U.K. only) | 0870 907 4499 | |
| Ireland Sales | 01 204 4444 | |
| U.K. Sales (dial within U.K. only) | 0870 907 4000 | |
| Fax/SalesFax | 01 204 0103 | |
| Switchboard | 01 204 4444 | |
| Italy (Milan) | Website: support.euro.dell.com | |
| International Access Code: 00 | E-mail: support.euro.dell.com/it/it/emaildell/ | |
| Country Code: 39 | Home and Small Business | |
| City Code: 02 | Technical Support | 02 577 826 90 |
| Customer Care | 02 696 821 14 | |
| Fax | 02 696 821 13 | |
| Switchboard | 02 696 821 12 | |
| Corporate | ||
| Technical Support | 02 577 826 90 | |
| Customer Care | 02 577 825 55 | |
| Fax | 02 575 035 30 | |
| Switchboard | 02 577 821 | |
| Latin America | Customer Technical Support (Austin, Texas, U.S.A.) | 512 728-4093 |
| Customer Service (Austin, Texas, U.S.A.) | 512 728-3619 | |
| Fax (Technical Support and Customer Service) (Austin, Texas, U.S.A.) | 512 728-3883 | |
| Sales (Austin, Texas, U.S.A.) | 512 728-4397 | |
| SalesFax (Austin, Texas, U.S.A.) | 512 728-4600 or 512 728-3772 | |
| Luxembourg | Website: support.euro.dell.com | |
| International Access Code: 00 | E-mail: tech_be@dell.com | |
| Country Code: 352 | Technical Support (Brussels, Belgium) | 3420808075 |
| Home/Small Business Sales (Brussels, Belgium) | toll-free: 080016884 | |
| Corporate Sales (Brussels, Belgium) | 02 481 91 00 | |
| Customer Care (Brussels, Belgium) | 02 481 91 19 | |
| Fax (Brussels, Belgium) | 02 481 92 99 | |
| Switchboard (Brussels, Belgium) | 02 481 91 00 | |
| Mexico | Customer Technical Support | 001-877-384-8979 |
| International Access Code: 00 | or 001-877-269-3383 | |
| Country Code: 52 | Sales | 50-81-8800 |
| or 01-800-888-3355 | ||
| Customer Service | 001-877-384-8979 | |
| or 001-877-269-3383 | ||
| Main | 50-81-8800 | |
| or 01-800-888-3355 | ||
| Netherlands (Amsterdam) | Website: support.euro.dell.com | |
| International Access Code: 00 | E-mail (Technical Support): | |
| Country Code: 31 | (Enterprise): nl_server_support@dell.com | |
| City Code: 20 | (Latitude): nl Latitude_support@dell.com | |
| (Inspiron): nlInspiron_support@dell.com | ||
| (Dimension): nl_length和支持@dell.com | ||
| (OptiPlex): nl_optiplex_support@dell.com | ||
| (Dell Precision): nl_workstation_support@dell.com | ||
| Technical Support | 020 674 45 00 | |
| Technical Support Fax | 020 674 47 66 | |
| Home/Small Business Customer Care | 020 674 42 00 | |
| Relational Customer Care | 020 674 4325 | |
| Home/Small Business Sales | 020 674 55 00 | |
| Relational Sales | 020 674 50 00 | |
| Home/Small Business Sales Fax | 020 674 47 75 | |
| Relational Sales Fax | 020 674 47 50 | |
| Switchboard | 020 674 50 00 | |
| Switchboard Fax | 020 674 47 50 | |
| Norway (Lysaker) | Website: support.euro.dell.com | |
| International Access Code: 00 | E-mail Support (portable computers): | |
| Country Code: 47 | nor_nbk_support@dell.com | |
| E-mail Support (desktop computers): | ||
| nor_support@dell.com | ||
| E-mail Support (servers): | ||
| nordic_server_support@dell.com | ||
| Technical Support | 671 16882 | |
| Relational Customer Care | 671 17514 | |
| Home/Small Business Customer Care | 23162298 | |
| Switchboard | 671 16800 | |
| Fax Switchboard | 671 16865 | |
| Poland (Warsaw) | Website: support.euro.dell.com | |
| International Access Code: 011 | E-mail: pl_support@dell.com | |
| Country Code: 48 | Customer Service Phone | 57 95 700 |
| City Code: 22 | Customer Care | 57 95 999 |
| Sales | 57 95 999 | |
| Customer Service Fax | 57 95 806 | |
| Reception Desk Fax | 57 95 998 | |
| Switchboard | 57 95 999 | |
| Portugal | Website: support.euro.dell.com | |
| International Access Code: 00 | E-mail: support.euro.dell.com/pt/en/emaildell/ | |
| Country Code: 351 | Technical Support | 707200149 |
| Customer Care | 800 300 413 | |
| Sales | 800 300 410 or 800 300 411 or 800 300 412 or 21 422 07 10 | |
| Fax | 21 424 01 12 | |
| Puerto Rico | General Support | 1-800-805-7545 |
| Singapore (Singapore) | Technical Support | toll-free: 800 6011 051 |
| International Access Code: 005 | Customer Service (Penang, Malaysia) | 604 633 4949 |
| Country Code: 65 | Transaction Sales | toll-free: 800 6011 054 |
| Corporate Sales | toll-free: 800 6011 053 | |
| Spain (Madrid) | Website: support.euro.dell.com | |
| International Access Code: 00 | E-mail: support.euro.dell.com/es/es/emaildell/ | |
| Country Code: 34 | Home and Small Business | |
| City Code: 91 | Technical Support | 902 100 130 |
| Customer Care | 902 118 540 | |
| Sales | 902 118 541 | |
| Switchboard | 902 118 541 | |
| Fax | 902 118 539 | |
| Corporate | ||
| Technical Support | 902 100 130 | |
| Customer Care | 902 118 546 | |
| Switchboard | 91 722 92 00 | |
| Fax | 91 722 95 83 | |
| Sweden (Upplands Vasby) | Website: support.euro.dell.com | |
| International Access Code: 00 | E-mail: swe_support@dell.com | |
| Country Code: 46 | E-mail Support for Latitude and Inspiron: | |
| City Code: 8 | Swe-nbk_kats@dell.com | |
| E-mail Support for OptiPlex: Swe_kats@dell.com | ||
| E-mail Support for Servers: Nordic_server_support@dell.com | ||
| Technical Support | 08 590 05 199 | |
| Relational Customer Care | 08 590 05 642 | |
| Home/Small Business Customer Care | 08 587 70 527 | |
| Employee Purchase Program (EPP) Support | 20 140 14 44 | |
| Fax Technical Support | 08 590 05 594 | |
| Sales | 08 590 05 185 | |
| Switzerland (Geneva) | Website: support.euro.dell.com | |
| International Access Code: 00 | E-mail: swisstech@dell.com | |
| Country Code: 41 | E-mail for French-speaking HSB and Corporate Customers: support.euro.dell.com/ch/fr/emaildell/ | |
| City Code: 22 | Technical Support (Home and Small Business) | 0844 811 411 |
| Technical Support (Corporate) | 0844 822 844 | |
| Customer Care (Home and Small Business) | 0848 802 202 | |
| Customer Care (Corporate) | 0848 821 721 | |
| Fax | 022 799 01 90 | |
| Switchboard | 022 799 01 01 | |
| U.K. (Bracknell) | Website: support.euro.dell.com | |
| International Access Code: 00 | Customer Care website: support.euro.dell.com/uk/en/ECare/Form/Home.asp | |
| Country Code: 44 | ||
| City Code: 1344 | E-mail: dell_direct_support@dell.com | |
| Technical Support (Corporate/Preferred Accounts/PAD [1000+ employees]) | 0870 908 0500 | |
| Technical Support (direct/PAD and general) | 0870 908 0800 | |
| Global Accounts Customer Care | 01344 373 186 | |
| Home and Small Business Customer Care | 0870 906 0010 | |
| Corporate Customer Care | 01344 373 185 | |
| Preferred Accounts (500–5000 employees) | 0870 906 0010 | |
| Customer Care | ||
| Central Government Customer Care | 01344 373 193 | |
| Local Government & Education Customer Care | 01344 373 199 | |
| Health Customer Care | 01344 373 194 | |
| Home and Small Business Sales | 0870 907 4000 | |
| Corporate/Public Sector Sales | 01344 860 456 | |
| U.S.A. (Austin, Texas)International Access Code: 011Country Code: 1 | Automated Order-Status Service | toll-free: 1-800-433-9014 |
| AutoTech (portable and desktop computers) | toll-free: 1-800-247-9362 | |
| Consumer (Home and Home Office) | ||
| Technical Support | toll-free: 1-800-624-9896 | |
| Customer Service | toll-free: 1-800-624-9897 | |
| DellNet™ Service and Support | toll-free: 1-877-Dellnet(1-877-335-5638) | |
| Employee Purchase Program (EPP) Customers | toll-free: 1-800-695-8133 | |
| Financial Services website: www.dellfinancialservices.com | ||
| Financial Services (lease/loans) | toll-free: 1-877-577-3355 | |
| Financial Services (Dell Preferred Accounts [DPA]) | toll-free: 1-800-283-2210 | |
| Business | ||
| Customer Service and Technical Support | toll-free: 1-800-822-8965 | |
| Employee Purchase Program (EPP) Customers | toll-free: 1-800-695-8133 | |
| Projectors Technical Support | toll-free: 1-877-459-7298 | |
| Public (government, education, and healthcare) | ||
| Customer Service and Technical Support | toll-free: 1-800-456-3355 | |
| Employee Purchase Program (EPP) Customers | toll-free: 1-800-234-1490 | |
| Dell Sales | toll-free: 1-800-289-3355 | |
| or toll-free: 1-800-879-3355 | ||
| Dell Outlet Store (Dell refurbished computers) | toll-free: 1-888-798-7561 | |
| Software and Peripherals Sales | toll-free: 1-800-671-3355 | |
| Spare Parts Sales | toll-free: 1-800-357-3355 | |
| Extended Service and Warranty Sales | toll-free: 1-800-247-4618 | |
| Fax | toll-free: 1-800-727-8320 | |
| Dell Services for the Deaf, Hard-of-Hearing, or Speech-Impaired | toll-free: 1-877-DELLTTY(1-877-335-5889) |
Limited Warranties and Return Policy
Dell-branded hardware products purchased in the U.S. or Canada come with either a 90-day, one-year, two-year, three-year, or four-year limited warranty. To determine which warranty came with your hardware product(s), see your packing slip or invoice. The following sections describe the limited warranties and return policy for the U.S., the limited warranties and return policy for Canada, and the manufacturer guarantee for Latin America and the Caribbean.
Limited Warranty for Dell-Branded Hardware Products (U.S. Only)
What is covered by this limited warranty?
This limited warranty covers defects in materials and workmanship in your—our end-user customer's—Dell-branded hardware products, including Dell-branded peripheral products.
What is not covered by this limited warranty?
This limited warranty does not cover:
- Software, including the operating system and software added to the Dell-branded hardware products through our factory-integration system, third-party software, or the reloading of software
Non-Dell-branded and Solution Provider Direct products and accessories - Problems that result from:
External causes such as accident, abuse, misuse, or problems with electrical power
Servicing not authorized by Dell
Usage that is not in accordance with product instructions
- Failure to follow the product instructions or failure to perform preventive maintenance
- Problems caused by using accessories, parts, or components not supplied by Dell
- Products with missing or altered service tags or serial numbers
- Products for which we have not received payment
THIS WARRANTY GIVES YOU SPECIFIC LEGAL RIGHTS, AND YOU MAY ALSO HAVE OTHER RIGHTS WHICH VARY FROM STATE TO STATE (OR JURISDICTION TO JURISDICTION). DELL'S RESPONSIBILITY FOR MALFUNCITONS AND DEFECTS IN HARDWARE IS LIMITED TO REPAIR AND REPLACEMENT AS SET FORTH IN THIS WARRANTY STATEMENT. ALL EXPRESS AND IMPLIED WARRANTYES FOR THE PRODUCT, INCLUDING BUT NOT LIMITED TO ANY IMPLIED WARRANTYES AND CONDITIONS OF MERCHANTABILITY AND FITNESS FOR A PARTICULAR PURPOSE, ARE LIMITED IN TIME TO THE TERM OF THE LIMITED WARRANTY PERIOD REFLECTED ON YOUR PACKING SLIP OR INVOICE. NO WARRANTYES, WHETHER EXPRESS OR IMPLIED, WILL APPLY AFTER THE LIMITED WARRANTY PERIOD HAS EXPIRED. SOME STATES DO NOT ALLOW LIMITATIONS ON HOW LONG AN IMPLIED WARRANTY LASTS, SO THIS LIMITATION MAY NOT APPLY TO YOU.
WE DO NOT ACCEPT LIABILITY BEYOND THE REMEDIES PROVIDED FOR IN THIS LIMITED WARRANTY OR FOR CONSEQUENTIAL OR INCIDENTAL DAMAGES, INCLUDING, WITHOUT LIMITATION, ANY LIABILITY FOR THIRD-PARTY CLAIMS AGAINST YOU FOR DAMAGES, FOR PRODUCTS NOT BEING AVAILABLE FOR USE, OR FOR LOST DATA OR LOST SOFTWARE. OUR LIABILITY WILL BE NO MORE THAN THE AMOUNT YOU PAID FOR THE PRODUCT THAT IS THE SUBJECT OF A CLAIM. THIS IS THE MAXIMUM AMOUNT FOR WHICH WE ARE RESPONSIBLE.
SOME STATES DO NOT ALLOW THE EXCLUSION OR LIMITATION OF INCIDENTAL OR CONSEQUENTIAL DAMAGES, SO THE ABOVE LIMITATION OR EXCLUSION MAY NOT APPLY TO YOU.
How long does this limited warranty last?
This limited warranty lasts for the time period indicated on your packing slip or invoice, except that the limited warranty on Dell-branded batteries lasts only one year and the limited warranty on the lamps for Dell-branded projectors lasts only ninety days. The limited warranty begins on the date of the packing slip or invoice. The warranty period is not extended if we repair or replace a warranted product or any parts. Dell may change the availability of limited warranties, at its discretion, but any changes will not be retroactive.
What do I do if I need warranty service?
Before the warranty expires, please call us at the relevant number listed in the following table. Please also have your Dell service tag number or order number available.
| Individual Home Consumers: | U.S. Only |
| Technical Support | 1-800-624-9896 |
| Customer Service | 1-800-624-9897 |
| Individual Home Consumers who purchased through an Employee Purchase Program: | |
| Technical Support and Customer Service | 1-800-822-8965 |
| Home and Small Business Commercial Customers: | |
| Technical Support and Customer Service | 1-800-456-3355 |
| Medium, Large, or Global Commercial Customers, Healthcare Customers, and Value Added Resellers (VARs): | |
| Technical Support and Customer Service | 1-877-459-7298 |
| Government and Education Customers: | |
| Technical Support and Customer Service | 1-877-459-7298 |
| Dell-Branded Memory | 1-888-363-5150 |
What will Dell do?
During the 90 days of the 90-day limited warranty and the first year of all other limited warranties: During the 90 days of the 90-day limited warranty and the first year of all other limited warranties, we will repair any Dell-branded hardware products returned to us that prove to be defective in materials or workmanship. If we are not able to repair the product, we will replace it with a comparable product that is new or refurbished.
When you contact us, we will issue a Return Material Authorization Number for you to include with your return. You must return the products to us in their original or equivalent packaging, prepay shipping charges, and insure the shipment or accept the risk if the product is lost or damaged in shipment. We will return the repaired or replacement products to you. We will pay to ship the repaired or replaced products to you if you use an address in the United States (excluding Puerto Rico and U.S. possessions and territories). Otherwise, we will ship the product to you freight collect.
If we determine that the product is not covered under this warranty, we will notify you and inform you of service alternatives that are available to you on a fee basis.
NOTE: Before you ship the product(s) to us, make sure to back up the data on the hard drive(s) and any other storage device(s) in the product(s). Remove any confidential, proprietary, or personal information and removable media such as floppy disks, CDs, or PC Cards. We are not responsible for any of your confidential, proprietary, or personal information; lost or corrupted data; or damaged or lost removable media.
During the remaining years: For the remaining period of the limited warranty, we will replace any defective part with new or refurbished parts, if we agree that it needs to be replaced. When you contact us, we will require a valid credit card number at the time you request a replacement part, but we will not charge you for the replacement part as long as you return the original part to us within thirty days after we ship the replacement part to you. If we do not receive the original part within thirty days, we will charge to your credit card the then-current standard price for that part.
We will pay to ship the part to you if you use an address in the United States (excluding Puerto Rico and U.S. possessions and territories). Otherwise, we will ship the part freight collect. We will also include a prepaid shipping container with each replacement part for your use in returning the replaced part to us.
NOTE: Before you replace parts, make sure to back up the data on the hard drive(s) and any other storage device(s) in the product(s). We are not responsible for lost or corrupted data.
What if I purchased a service contract?
If your service contract is with Dell, service will be provided to you under the terms of the service agreement. Please refer to that contract for details on how to obtain service.
If you purchased through us a service contract with one of our third-party service providers, please refer to that contract for details on how to obtain service.
How will you fix my product?
We use new and refurbished parts made by various manufacturers in performing warranty repairs and in building replacement parts and systems. Refurbished parts and systems are parts or systems that have been returned to Dell, some of which were never used by a customer. All parts and systems are inspected and tested for quality. Replacement parts and systems are covered for the remaining period of the limited warranty for the product you bought. Dell owns all parts removed from repaired products.
What do I do if I am not satisfied?
We pride ourselves on our great customer service. If you are not satisfied with the service you receive under this limited warranty, please let us know. We have found that the best way to resolve issues regarding our limited warranty is to work together. If, after those discussions, you are still not satisfied, we believe arbitration is the most expeditious way to resolve your concerns. Therefore, ANY CLAIM, DISPUTE, OR CONTROVERSY (WHETHER IN CONTRACT, TORT, OR OTHERWISE, WHETHER PREEXISTING, PRESENT, OR FUTURE, AND INCLUDING STATUTORY, COMMON LAW, INTENTIONAL TORT, AND EQUITABLE CLAIMS) AGAINST DELL arising from or relating to this limited warranty, its interpretation, or the breach, termination, or validity thereof, the relationships which result from this limited warranty (including, to the full extent permitted by applicable law, relationships with third parties), Dell's advertising, or any related purchase SHALL BE RESOLVED EXCLUSIVELY AND FINALLY BY BINDING ARBITRATION ADMINISTERED BY THE NATIONAL ARBITRATION FORUM (NAF) under its Code of Procedure then in effect (available via the Internet at www.arb-forum.com/ or via telephone at 1-800-474-2371). The arbitration will be limited solely to the dispute or controversy between you and Dell. Any award of the arbitrator(s) shall be final and binding on each of the parties, and may be entered as a judgment in any court of competent jurisdiction. Information may be obtained and claims may be filed with the NAF at P.O. Box 50191, Minneapolis, MN 55405. This provision applies only to individual home consumers and consumers who purchased through an employee purchase program. It does not apply to small, medium, large, and global commercial customers or government, education, and healthcare customers.
May I transfer the limited warranty?
Limited warranties on systems may be transferred if the current owner transfers ownership of the system and records the transfer with us. The limited warranty on Dell-branded memory may not be transferred. You may record your transfer by going to Dell's website:
- If you are an Individual Home Consumer, go to www.dell.com/us/en/dhs/topics/sbtopic_015_care.htm
- If you are a Home Office, Small, Medium, Large, or Global Commercial Customer, go to www.dell.com/us/en/biz/topics/sbtopic_care_nav_015_care.htm
- If you are a Government, Education, or Healthcare Customer, or an Individual Home Consumer who purchased through an employee purchase program, go to www.dell.com/us/en/pub/topics/sbtopic_015_care.htm
If you do not have Internet access, call your customer care representative or call 1-800-624-9897.
"Total Satisfaction" Return Policy (U.S. Only)
We value our relationship with you and want to make sure that you're satisfied with your purchases. That's why we offer a "Total Satisfaction" return policy for most products that you—the end-user customer—purchase directly from Dell. Under this policy, you may return to Dell products that you purchased directly from Dell for a credit or a refund of the purchase price paid, less shipping and handling and applicable restocking fees as follows:
-
New Hardware Products and Accessories — All new hardware, accessories, parts, and unopened software still in its sealed package, excluding the products listed below, may be returned within thirty days from the date on the packing slip or invoice. To return applications software or an operating system that has been installed by Dell, you must return the entire computer. A different return policy applies to nondefective products purchased through Dell's Software and Peripherals division by customers of our Small and Medium Business divisions. Those products may be returned within thirty days from the date on the packing slip or invoice, but a fifteen percent (15%) restocking fee will be deducted from any refund or credit. The "Total Satisfaction" Return Policy and Software and Peripherals division return policy are not available for Dell | EMC storage products, EMC-branded products, or enterprise software.
-
Reconditioned or Refurbished Dell-Branded Hardware Products and Parts — All reconditioned or refurbished Dell-branded server and storage products may be returned within thirty days from the date on the packing slip or invoice. All other reconditioned or refurbished Dell-branded hardware products and parts may be returned within fourteen days of the date on the packing slip or invoice.
To return products, e-mail or call Dell customer service to receive a Credit Return Authorization Number within the return policy period applicable to the product you want to return. You must obtain a Credit Return Authorization Number in order to return the product. See "Contacting Dell" or "Getting Help" in your customer documentation (or www.dell.com/us/en/gen/contact.htm) to find the appropriate contact information for obtaining customer assistance.
You must ship the products to Dell within five days of the date that Dell issues the Credit Return Authorization Number. You must also return the products to Dell in their original packaging, in as-new condition along with any media, documentation, and all other items that were included in the original shipment, prepay shipping charges, and insure the shipment or accept the risk of loss or damage during shipment.
Limited Warranty Terms for Dell-Branded Hardware Products (Canada Only)
What is covered by this limited warranty?
This limited warranty covers defects in materials and workmanship in your—our end-user customer's—Dell-branded hardware products, including Dell-branded peripheral products.
What is not covered by this limited warranty?
This limited warranty does not cover:
- Software, including the operating system and software added to the Dell-branded hardware products through our factory-integration system, or the reloading of the software
Non-Dell branded and Solution Provider Direct products and accessories - Problems that result from:
External causes such as accident, abuse, misuse, or problems with electrical power
Servicing not authorized by Dell
Usage that is not in accordance with product instructions
- Failure to follow the product instructions or failure to perform preventive maintenance
- Problems caused by using accessories, parts, or components not supplied by Dell
- Products with missing or altered service tags or serial numbers
- Products for which we have not received payment
THIS WARRANTY GIVES YOU SPECIFIC LEGAL RIGHTS, AND YOU MAY ALSO HAVE OTHER RIGHTS WHICH VARY FROM PROVINCE TO PROVINCE. DELL'S RESPONSIBILITY FOR MALFUNCTIONS AND DEFECTS IN PRODUCT IS LIMITED TO REPAIR AND REPLACEMENT AS SET FORTH IN THIS WARRANTY STATEMENT, FOR THE TERM OF THE WARRANTY PERIOD REFLECTED ON YOUR PACKING SLIP OR INVOICE. EXCEPT FOR THE EXPRESS WARRANTYES CONTAINED IN THIS WARRANTY STATEMENT, DELL DISCLAIMS ALL OTHER WARRANTYES AND CONDITIONS, EXPRESS OR IMPLIED, INCLUDING WITHOUT LIMITATION IMPLIED WARRANTYES AND CONDITIONS OF MERCHANTABILITY AND FITNESS FOR A PARTICULAR PURPOSE, STATUTORY OR OTHERWISE. SOME PROVINCES DO NOT ALLOW THE EXCLUSION OF CERTAIN IMPLIED WARRANTYES OR CONDITIONS, OR LIMITATIONS ON HOW LONG AN IMPLIED WARRANTY OR CONDITION LASTS. THEREFORE, THE FOREGOING EXCLUSIONS AND LIMITATIONS MAY NOT APPLY TO YOU.
WE DO NOT ACCEPT LIABILITY BEYOND THE REMEDIES PROVIDED FOR IN THIS WARRANTY STATEMENT OR FOR SPECIAL, INDIRECT, CONSEQUENTIAL, OR INCIDENTAL DAMAGES, INCLUDING, WITHOUT LIMITATION, ANY LIABILITY FOR THIRD-PARTY CLAIMS AGAINST YOU FOR DAMAGES, FOR PRODUCTS NOT BEING AVAILABLE FOR USE, OR FOR LOST DATA OR LOST SOFTWARE. OUR LIABILITY WILL BE NO MORE THAN THE AMOUNT YOU PAID FOR THE PRODUCT THAT IS THE SUBJECT OF A CLAIM. THIS IS THE MAXIMUM AMOUNT FOR WHICH WE ARE RESPONSIBLE.
SOME PROVINCES DO NOT ALLOW THE EXCLUSION OR LIMITATION OF SPECIAL, INDIRECT, INCIDENTAL, OR CONSEQUENTIAL DAMAGES, SO THE ABOVE LIMITATION OR EXCLUSION MAY NOT APPLY TO YOU.
How long does this limited warranty last?
This limited warranty lasts for the time period indicated on your packing slip or invoice, except that the limited warranty on Dell-branded batteries lasts only one year and the limited warranty on the lamps for Dell-branded projectors lasts only ninety days. The limited warranty begins on the date of the packing slip or invoice. The warranty period is not extended if we repair or replace a warranted product or any parts. Dell may change the terms and availability of limited warranties, at its discretion, but any changes will not be retroactive (that is, the warranty terms in place at the time of purchase will apply to your purchase).
What do I do if I need warranty service?
Before the warranty expires, please call us at the relevant number listed in the following table. Please also have your Dell service tag number or order number available.
| Individual Home Consumers; Home Office and Small Business Customers: | Canada Only |
| Technical Support and Customer Service | 1-800-847-4096 |
| Medium, Large, and Global Commercial Customers; Government, Education, and Healthcare Customers; and Value Added Resellers (VARs): | |
| Technical Support | 1-800-387-5757 |
| Customer Service | 1-800-326-9463 |
| Government or Education Consumers, or Individual Home Consumers who purchased through an Employee Purchase Program: | |
| Technical Support | 1-800-387-5757 |
| Customer Service | 1-800-326-9463 (Extension 8221 for Individual Consumers) |
| Dell-Branded Memory | 1-888-363-5150 |
What will Dell do?
During the 90 days of the 90-day limited warranty and the first year of all other limited warranties: During the 90 days of the 90-day limited warranty and the first year of all other limited warranties, we will repair any Dell-branded hardware products returned to us that prove to be defective in materials or workmanship. If we are not able to repair the product, we will replace it with a comparable product that is new or refurbished.
When you contact us, we will issue a Return Material Authorization Number for you to include with your return. You must return the products to us in their original or equivalent packaging, prepay shipping charges, and insure the shipment or accept the risk if the product is lost or damaged in shipment. We will return the repaired or replacement products to you. We will pay to ship the repaired or replaced products to you if you use an address in Canada. Otherwise, we will ship the product to you freight collect.
If we determine that the problem is not covered under this warranty, we will notify you and inform you of service alternatives that are available to you on a fee basis.
NOTE: Before you ship the product(s) to us, make sure to back up the data on the hard drive(s) and any other storage device(s) in the product(s). Remove any confidential, proprietary or personal information, removable media, such as floppy disks, CDs, or PC Cards. We are not responsible for any of your confidential, proprietary or personal information; lost or corrupted data; or damaged or lost removable media.
During the remaining years following the first year of all limited warranties: We will replace any defective part with new or refurbished parts, if we agree that it needs to be replaced. When you contact us, we will require a valid credit card number at the time you request a replacement part, but we will not charge you for the replacement part as long as you return the original part to us within thirty days after we ship the replacement part to you. If we do not receive the original part within thirty days, we will charge to your credit card the then-current standard price for that part.
We will pay to ship the part to you if you use an address in Canada. Otherwise, we will ship the part freight collect. We will also include a prepaid shipping container with each replacement part for your use in returning the replaced part to us.
NOTE: Before you replace parts, make sure to back up the data on the hard drive(s) and any other storage device(s) in the product(s). We are not responsible for lost or corrupted data.
What if I purchased a service contract?
If your service contract is with Dell, service will be provided to you under the terms of the service contract. Please refer to that contract for details on how to obtain service. Dell's service contracts can be found online at www.dell.ca or by calling Customer Care at 1-800-847-4096. If you purchased through us a service contract with one of our third-party service providers, please refer to that contract (mailed to you with your packing slip or invoice) for details on how to obtain service.
How will you fix my product?
We use new and refurbished parts made by various manufacturers in performing warranty repairs and in building replacement parts and systems. Refurbished parts and systems are parts or systems that have been returned to Dell, some of which were never used by a customer. All parts and systems are inspected and tested for quality. Replacement parts and systems are covered for the remaining period of the limited warranty for the product you bought. Dell owns all parts removed from repaired products.
What do I do if I am not satisfied?
We pride ourselves on our great customer service. If you are not satisfied with the service you receive under this limited warranty, please let us know. We have found that the best way to resolve issues regarding our limited warranty is to work together. If, after those discussions, you are still not satisfied, we believe arbitration is the most expeditious way to resolve your concerns. Therefore, ANY CLAIM, DISPUTE, OR CONTROVERSY (WHETHER IN CONTRACT, TORT, OR OTHERWISE, WHETHER PREEXISTING, PRESENT OR FUTURE, AND INCLUDING STATUTORY, COMMON LAW, INTENTIONAL TORT, AND EQUITABLE CLAIMS) AGAINST DELL arising from or relating to this limited warranty, its interpretation, or the breach, termination or validity thereof, the relationships which result from this limited warranty (including, to the full extent permitted by applicable law, relationships with third parties), Dell's advertising, or any related purchase SHALL BE RESOLVED EXCLUSIVELY AND FINALLY BY BINDING ARBITRATION ADMINISTERED BY THE NATIONAL ARBITRATION FORUM (NAF) under its Code of Procedure then in effect (available via the Internet at www.arb-forum.com/, or via telephone at 1-800-474-2371). The arbitration will be limited solely to the dispute or controversy between you and Dell. Any award of the arbitrator(s) shall be final and binding on each of the parties, and may be entered as a judgment in any court of competent jurisdiction. Information may be obtained and claims may be filed with the NAF at P.O. Box 50191, Minneapolis, MN 55405.
May I transfer the limited warranty?
Limited warranties on systems may be transferred if the current owner transfers ownership of the system and records the transfer with us. The limited warranty on Dell-branded memory may not be transferred. You may record your transfer by going to Dell's website:
For Canada-purchased computers (in-country transfers) and to transfer from one customer to another, go to www.dell.ca/ca/en/gen/topics/segtopic_ccare.nav_013_ccare.htm
- For out-of-country transfers (outside of the original country of purchase), go to www.dell.com/us/en/biz/topics/sbtopic_ccare_nav_016_care.htm
If you do not have Internet access, call Dell at 1-800-847-4096 (Home Consumer customers) or 1-800-326-9463 (Corporate Commercial or Government customers).
"Total Satisfaction" Return Policy (Canada Only)
If you are an end-user customer who bought new products directly from Dell, you may return them to Dell up to 30 days after you receive them for a refund or credit of the product purchase price. If you are an end-user customer who bought reconditioned or refurbished products from Dell, you may return them to Dell within 14 days after the date on the packing slip or invoice for a refund or credit of the product purchase price. In either case, the refund or credit will not include any shipping and handling charges shown on your packing slip or invoice and will be subject to a fifteen percent (15%) restocking fee, unless otherwise prohibited by law. If you are an organization that bought the products under a written agreement with Dell, the agreement may contain different terms for the return of products than specified by this policy.
To return products, you must call Dell Customer Service at 1-800-847-4096 to receive a Credit Return Authorization Number. To expedite the process of your refund or credit, Dell expects you to return the products to Dell in their original packaging within five days of the date that Dell issues the Credit Return Authorization Number. You must also prepay shipping charges and insure the shipment or accept the risk of loss or damage during shipment. You may return software for a refund or credit only if the sealed package containing the floppy disk(s) or CD(s) is unopened. Returned products must be in as-new condition, and all of the manuals, floppy disk(s), CD(s), power cables, and other items included with a product must be returned with it. For customers who want to return, for refund or credit only, either application or operating system software that has been installed by Dell, the whole system must be returned, along with any media and documentation that may have been included in the original shipment.
The "Total Satisfaction" Return Policy does not apply to Dell | EMC storage products. It also does not apply to products purchased through Dell's Software and Peripherals division. For those products, please instead refer to Dell's Software and Peripheral's then-current return policy (see the following section, "Dell Software and Peripherals (Canada Only)").
Dell Software and Peripherals (Canada Only)
Third-Party Software and Peripherals Products
Similar to other resellers of software and peripherals, Dell does not warrant third-party products. Third-party software and peripheral products are covered by the warranties provided by the original manufacturer or publisher only. Third-party manufacturer warranties vary from product to product. Consult your product documentation for specific warranty information. More information may also be available from the manufacturer or publisher.
While Dell offers a wide selection of software and peripheral products, we do not specifically test or guarantee that all of the products we offer work with any or all of the various models of Dell computers, nor do we test or guarantee all of the products we sell on the hundreds of different brands of computers available today. If you have questions about compatibility, we recommend and encourage you to contact the third-party software and peripheral product manufacturer or publisher directly.
Dell-Branded Peripheral Products
Dell does provide a limited warranty for new Dell-branded peripheral products (products for which Dell is listed as the manufacturer) such as monitors, batteries, memory, docking stations, and projectors). To determine which limited warranty applies to the product you purchased, see the Dell packing slip or invoice and/or the product documentation that accompanied your product. Descriptions of Dell's limited warranties are described in preceding sections.
Return Policy
If you are an end-user customer who bought Dell Software and Peripherals products directly from a Dell company, you may return Dell Software and Peripherals products that are in as-new condition to Dell up to 30 days from the date on the packing slip or invoice for a refund of the product purchase price if already paid. This refund will not include any shipping and handling charges shown on your packing slip or invoice; you are responsible for those.
To return products, you must call Dell Customer Service at 1-800-387-5759 to receive a Credit Return Authorization Number. You must ship the Dell Software and Peripherals products back to Dell in their original manufacturer's packaging (which must be in as-new condition), prepay shipping charges, and insure the shipment or accept the risk of loss or damage during shipment.
To qualify for refund or replacement, returned products must be in as-new condition, software products must be unopened, and all of the manuals, floppy disk(s), CD(s), power cables, and other items included with a product must be returned with it.
One-Year End-User Manufacturer Guarantee (Latin America and the Caribbean Only)
Guarantee
Dell Computer Corporation ("Dell") warrants to the end user in accordance with the following provisions that its branded hardware products, purchased by the end user from a Dell company or an authorized Dell distributor in Latin America or the Caribbean, will be free from defects in materials, workmanship, and design affecting normal use, for a period of one year from the original purchase date. Products for which proper claims are made will, at Dell's option, be repaired or replaced at Dell's expense. Dell owns all parts removed from repaired products. Dell uses new and reconditioned parts made by various manufacturers in performing repairs and building replacement products.
Exclusions
This Guarantee does not apply to defects resulting from: improper or inadequate installation, use, or maintenance; actions or modifications by unauthorized third parties or the end user; accidental or willful damage; or normal wear and tear.
Making a Claim
Claims must be made in Latin America or the Caribbean by contacting the Dell point of sale within the guarantee period. The end user must always supply proof of purchase, indicating name and address of the seller, date of purchase, model and serial number, name and address of the customer, and details of symptoms and configuration at the time of malfunction, including peripherals and software used. Otherwise, Dell may refuse the guarantee claim. Upon diagnosis of a warranted defect, Dell will make arrangements and pay for ground freight and insurance to and from Dell's repair/replacement center. The end user must ensure that the defective product is available for collection properly packed in original or equally protective packaging together with the details listed above and the return number provided to the end user by Dell.
Limitation and Statutory Rights
Dell makes no other warranty, guarantee or like statement other than as explicitly stated above, and this Guarantee is given in place of all other guarantees whatsoever, to the fullest extent permitted by law. In the absence of applicable legislation, this Guarantee will be the end user's sole and exclusive remedy against Dell or any of its affiliates, and neither Dell nor any of its affiliates shall be liable for loss of profit or contracts, or any other indirect or consequential loss arising from negligence, breach of contract, or howsoever.
This Guarantee does not impair or affect mandatory statutory rights of the end user against and/or any rights resulting from other contracts concluded by the end user with Dell and/or any other seller.
Dell World Trade LP
One Dell Way, Round Rock, TX 78682, USA
Dell Computadores do Brasil Ltda (CNPJ No. 72.381.189/0001-10)/
Dell Commercial do Brasil Ltda (CNPJ No. 03 405 822/0001-40)
Avenida Industrial Belgraf, 400
92990-000 - Eldorado do Sul - RS - Brasil
Dell Computer de Chile Ltda
Coyancura 2283, Piso 3-Of.302
Providencia, Santiago - Chile
Dell Computer de Colombia Corporation
Carrera 7 #115-33 Oficina 603
Bogota, Colombia
Dell Computer de Mexico SA de CV
Paseo de la Reforma 2620 - 11^ Piso
Col. Lomas Altas
11950 Mexico, D.F.
Dell Computer Corporation Ink and Toner Cartridges Limited Warranties
The following sections describe the limited warranty for ink and toner cartridges for the U.S., Canada, and Latin America. Refer to the appropriate limited warranty accordingly.
Ink and Toner Cartridges Limited Warranty (U.S. and Canada Only)
Dell Computer Corporation warrants to the original purchaser of genuine Dell-branded toner cartridges that they will be free from defects in material and workmanship for the life of the cartridge and that for genuine Dell-branded ink cartridges they will be free from defects in material and workmanship for two years beginning on the date of invoice. If this product proves defective in either material or workmanship, it will be replaced without charge during the limited warranty period if returned to Dell. You must first call our toll-free number to get your return authorization. In the U.S., call 1-800-822-8965; in Canada, call 1-800-387-5757. If we are not able to replace the product because it has been discontinued or is not available, we will either replace it with a comparable product or reimburse you for the cartridge purchase cost, at Dell's sole option. This limited warranty does not apply to ink or toner cartridges that have been refilled or improperly stored or due to problems resulting from misuse, abuse, accident, neglect, mishandling, incorrect environments, or wear from ordinary use.
THIS WARRANTY GIVES YOU SPECIFIC LEGAL RIGHTS, AND YOU MAY ALSO HAVE OTHER RIGHTS WHICH VARY FROM STATE TO STATE (OR JURISDICTION TO JURISDICTION). DELES RESPONSIBILITY FOR MALFUNCTIONS AND DEFECTS IN HARDWARE IS LIMITED TO REPLACEMENT AS SET FORTH IN THIS WARRANTY STATEMENT. FOR CANADIAN CUSTOMERS, EXCEPT FOR THE EXPRESS WARRANTYES CONTAINED IN THIS WARRANTY STATEMENT, DELL DISCLAIMS ALL OTHER WARRANTYES AND CONDITIONS, EXPRESS OR IMPLIED, STATUTORY OR OTHERWISE, FOR THE PRODUCT. FOR U.S. CUSTOMERS, ALL EXPRESS AND IMPLIED WARRANTYES FOR THE PRODUCT, INCLUDING BUT NOT LIMITED TO ANY IMPLIED WARRANTYES AND CONDITIONS OF MERCHANTABILITY AND FITNESS FOR A PARTICULAR PURPOSE ARE LIMITED IN TIME TO THE TERM OF THIS LIMITED WARRANTY. NO WARRANTYES, WHETHER EXPRESS OR IMPLIED, WILL APPLY AFTER THE LIMITED WARRANTY PERIOD HAS EXPIRED. SOME STATES OR JURISDICTIONS DO NOT ALLOW THE EXCLUSION OF CERTAIN IMPLIED WARRANTYES OR CONDITIONS, OR LIMITATIONS ON HOW LONG AN IMPLIED WARRANTY OR CONDITION LASTS, SO THIS LIMITATION MAY NOT APPLY TO YOU. THIS WARRANTY COVERAGE TERMINATES IF YOU SELL OR OTHERWISE TRANSFER THIS PRODUCT TO ANOTHER PARTY.
DELL DOES NOT ACCEPT LIABILITY BEYOND THE REMEDIES PROVIDED FOR IN THIS LIMITED WARRANTY OR FOR SPECIAL, INDIRECT, CONSEQUENTIAL OR INCIDENTAL DAMAGES, INCLUDING, WITHOUT LIMITATION, ANY LIABILITY FOR THIRD-PARTY CLAIMS AGAINST YOU FOR DAMAGES, FOR PRODUCTS NOT BEING AVAILABLE FOR USE, OR FOR LOST DATA OR LOST SOFTWARE. DELL'S LIABILITY WILL BE NO MORE THAN THE AMOUNT YOU PAID FOR THE PRODUCT THAT IS THE SUBJECT OF A CLAIM. THIS IS THE MAXIMUM AMOUNT FOR WHICH DELL IS RESPONSIBLE.
SOME STATES OR JURISDICTIONS DO NOT ALLOW THE EXCLUSION OR LIMITATION OF SPECIAL, INDIRECT, INCIDENTAL OR CONSEQUENTIAL DAMAGES, SO THE ABOVE LIMITATION OR EXCLUSION MAY NOT APPLY TO YOU.
Ink and Toner Cartridges Limited Warranty (Latin America Only)
Dell Computer Corporation warrants to the original purchaser of genuine Dell-branded toner cartridges that the cartridges will be free from defects resulting from material or manufacturing process for the life of the cartridge. For the original purchaser of genuine Dell-branded ink cartridges, Dell warrants that the cartridges will be free from defects resulting from material or manufacturing process for one year beginning from the date of delivery.
If this product presents defects resulting from either material or manufacturing process, it will be replaced without charge during the limited warranty period if returned to Dell.
In order to obtain the necessary information to enable the replacement, call the appropriate toll-free number. In Mexico, call 001-877-533-6230; in Puerto Rico, call 1-877-839-5123. In cases in which either the production of the cartridge has been discontinued or the cartridge is not available, Dell reserves the right, at its sole discretion, to choose between replacing it by a similar product or reimbursing you for the purchase cost.
This limited warranty does not apply to ink or toner cartridges that have been refilled or to defects resulting from misuse, abuse, accident, negligence, mishandling, improper storage or exposure to inappropriate environments.
Dell's liability for the malfunction or defect of hardware after the period of the legal warranty (and specifically the period of the legal warranty of defective products stated in the consumer protections rules), is limited to either the substitution of the product or the reimbursement as stated above. This warranty coverage terminates if you sell or otherwise transfer this product to a third party.
Dell does not accept any additional liability for patrimonial, emotional or any other kind of damage caused to the consumer and/or to a third party, which exceeds the established liability either in this limited warranty or in legal rules that may apply.
Dell Software License Agreement
This is a legal agreement between you, the user, and Dell Products, L.P ("Dell"). This agreement covers all software that is distributed with the Dell product, for which there is no separate license agreement between you and the manufacturer or owner of the software (collectively the "Software"). By opening or breaking the seal on the Software packet(s), installing or downloading the Software, or using the Software that has been preloaded or is embedded in your computer, you agree to be bound by the terms of this agreement. If you do not agree to these terms, promptly return all Software items (disks, written materials, and packaging) and delete any preloaded or embedded Software.
You may use one copy of the Software on only one computer at a time. If you have multiple licenses for the Software, you may use as many copies at any time as you have licenses. "Use" means loading the Software in temporary memory or permanent storage on the computer. Installation on a network server solely for distribution to other computers is not "use" if (but only if) you have a separate license for each computer to which the Software is distributed. You must ensure that the number of persons using the Software installed on a network server does not exceed the number of licenses that you have. If the number of users of Software installed on a network server will exceed the number of licenses, you must purchase additional licenses until the number of licenses equals the number of users before allowing additional users to use the Software. If you are a commercial customer of Dell or a Dell affiliate, you hereby grant Dell, or an agent selected by Dell, the right to perform an audit of your use of the Software during normal business hours, you agree to cooperate with Dell in such audit, and you agree to provide Dell with all records reasonably related to your use of the Software. The audit will be limited to verification of your compliance with the terms of this agreement.
The Software is protected by United States copyright laws and international treaties. You may make one copy of the Software solely for backup or archival purposes or transfer it to a single hard disk provided you keep the original solely for backup or archival purposes. You may not rent or lease the Software or copy the written materials accompanying the Software, but you may transfer the Software and all accompanying materials on a permanent basis if you retain no copies and the recipient agrees to the terms hereof. Any transfer must include the most recent update and all prior versions. You may not reverse engineer, decompile or disassemble the Software. If the package accompanying your computer contains compact discs, 3.5" and/or 5.25" disks, you may use only the disks appropriate for your computer. You may not use the disks on another computer or network, or loan, rent, lease, or transfer them to another user except as permitted by this agreement.
Limited Warranty
Dell warrants that the Software disks will be free from defects in materials and workmanship under normal use for ninety (90) days from the date you receive them. This warranty is limited to you and is not transferable. Any implied warranties are limited to ninety (90) days from the date you receive the Software. Some jurisdictions do not allow limits on the duration of an implied warranty, so this limitation may not apply to you. The entire liability of Dell and its suppliers, and your exclusive remedy, shall be (a) return of the price paid for the Software or (b) replacement of any disk not meeting this warranty that is sent with a return authorization number to Dell, at your cost and risk. This limited warranty is void if any disk damage has resulted from accident, abuse, misapplication, or service or modification by someone other than Dell. Any replacement disk is warranted for the remaining original warranty period or thirty (30) days, whichever is longer.
Dell does NOT warrant that the functions of the Software will meet your requirements or that operation of the Software will be uninterrupted or error free. You assume responsibility for selecting the Software to achieve your intended results and for the use and results obtained from the Software.
DELL, ON BEHALF OF ITSELF AND ITS SUPPLIERS, DISCLAIMS ALL OTHER WARRANTYES, EXPRESS OR IMPLIED, INCLUDING, BUT NOT LIMITED TO, IMPLIED WARRANTYES OF MERCHANTABILITY AND FITNESS FOR A PARTICULAR PURPOSE, FOR THE SOFTWARE AND ALL ACCOMPANYING WRITTEN MATERIALS. This limited warranty gives you specific legal rights; you may have others, which vary from jurisdiction to jurisdiction.
IN NO EVENT SHALL DELL OR ITS SUPPLIERS BE LIABLE FOR ANY DAMAGES WHATSOEVER (INCLUDING, WITHOUT LIMITATION, DAMAGES FOR LOSS OF BUSINESS PROFITS, BUSINESS INTERRUPTION, LOSS OF BUSINESS INFORMATION, OR OTHER PECUNIARY LOSS) ARISING OUT OF USE OR INABILITY TO USE THE SOFTWARE, EVEN IF ADVISED OF THE POSSIBILITY OF SUCH DAMAGES. Because some jurisdictions do not allow an exclusion or limitation of liability for consequential or incidental damages, the above limitation may not apply to you.
U.S. Government Restricted Rights
The software and documentation are "commercial items" as that term is defined at 48 C.F.R. 2.101, consisting of "commercial computer software" and "commercial computer software documentation" as such terms are used in 48 C.F.R. 12.212. Consistent with 48 C.F.R. 12.212 and 48 C.F.R. 227.7202-1 through 227.7202-4, all U.S. Government end users acquire the software and documentation with only those rights set forth herein. Contractor/manufacturer is Dell Products, L.P., One Dell Way, Round Rock, Texas 78682.
General
This license is effective until terminated. It will terminate upon the conditions set forth above or if you fail to comply with any of its terms. Upon termination, you agree that the Software and accompanying materials, and all copies thereof, will be destroyed. This agreement is governed by the laws of the State of Texas. Each provision of this agreement is severable. If a provision is found to be unenforceable, this finding does not affect the enforceability of the remaining provisions, terms, or conditions of this agreement. This agreement is binding on successors and assigns. Dell agrees and you agree to waive, to the maximum extent permitted by law, any right to a jury trial with respect to the Software or this agreement. Because this waiver may not be effective in some jurisdictions, this waiver may not apply to you. You acknowledge that you have read this agreement, that you understand it, that you agree to be bound by its terms, and that this is the complete and exclusive statement of the agreement between you and Dell regarding the Software.
Index
A
A4, loading, 37, 41, 45
A5, loading, 37, 42, 45
attaching an overlay, 15
B
B5, loading, 37, 42, 45
C
cables, power, 49
card stock, loading, 37
D
driver profiler, using, 53
drivers, installing, 53
E
envelopes, loading, 38, 45
executive, loading, 37, 42, 45
F
flash memory, installing, 29
I
installing
flash memory, 29
memory cards, 29
primer drivers, 53
usingWindows2000,55
usingWindows98,57
usingWindowsMe,56
usingWindowsNT,57
using Windows XP, 54
primer memory, 29
L
legal, loading, 39, 41, 45
letter, loading, 37, 45
letterhead, loading, 37, 42, 45
loading
card stock, 37, 45
envelopes, 37, 45
paper
A4, 37, 45
A5,37,45
B5,37,45
executive, 37, 45
legal, 39, 41, 45
letter, 37, 45
letterhead, 37, 45
transparencies, 37, 45
trays 1, 2, and 3, 36
local printer setup utility, using, 52
M
maximum stack height, trays 1,2,3,43
memory cards
flash, 29
installing, 29
menu settings page, printing, 66
metal shield, reinstalling, 31
0
option cards, memory, 29
ordering supplies, 2
overlay, attaching, 15
P
primer
memory, 29
sharing, 59
turning the power on, 49
unpack, 14
prinser software uninstall, using, 52
printing status window, using, 51
printing, menu settings page, 66
R
reinstalling, metal shield, 31
s
safety information, 7
sharing the printer, 59
software applications driver profiler, 53
local printer setup utility, 52
printing status, 51
status monitor, 51
toner re-order, 51
uninstall, 52
stack height, maximum trays 1, 2, 3, 43
status monitor, using, 51
supplies, ordering, 2
T
toner re-order window, using, 51
toner, ordering, 2
transparencies, loading, 37, 45
turning on the printer, 49
U
uninstall software, 52
unpacking, printer, 14
W
warranty, 81
Windows 2000, drivers, 55
Windows 98, drivers, 57
Windows Me, drivers, 56
Windows NT, drivers, 57
Windows XP, drivers, 54
- Owner's Manual
- Look Inside For:
- Order toner cartridges
- Accessing your User's Guide
- Notes, Notices, and Cautions
- UNITED STATES GOVERNMENT RESTRICTED RIGHTS
- FCC emissions information
- CAUTION: Safety instructions
- CAUTION: Use of controls or adjustments or performance of procedures other than those specified herein may result in hazardous radiation exposure.
- CAUTION: If your product is not marked with this symbol , it must be connected to an electrical outlet that is properly grounded.
- Contents
- Load paper
- Connect your printer
- Configure paper trays
- Unpack the printer
- Attaching an operator panel overlay
- Install printer supplies
- Installing the print cartridge
- Removing toner cartridge packaging
- Install the optional
- 250-sheet drawer
- Insert the tray.
- Install optional memory cards
- Removing the printer side cover
- Removing the system board shield
- Installing a memory card
- Reinstalling the system board shield
- Reattaching the printer side cover
- Load paper
- Loading tray 1
- Loading the optional 250-sheet tray
- Loading the manual feed
- Connect your printer
- Attaching a cable
- Turning on the printer
- Turn on the printer.
- Software overview
- Status Monitor
- Printing Status window
- Toner Re-order window
- Dell Local Printer Setup Utility
- Dell Printer Software Uninstall
- Driver Profiler
- Installing printer drivers
- If you purchased your Dell printer and computer together
- If you purchased your Dell printer separately
- Using Windows XP with a USB or parallel cable
- Using Windows 2000 with a USB or parallel cable
- Using Windows Me with a USB or parallel cable
- Using Windows NT with a parallel cable
- Using Windows 98 with a USB or parallel cable
- Sharing your printer
- Configure paper trays
- Type and size settings
- Verify printer setup
- Printing a menu settings page
- Appendix
- Contacting Dell
- Limited Warranties and Return Policy
- Limited Warranty for Dell-Branded Hardware Products (U.S. Only)
- What is covered by this limited warranty?
- What is not covered by this limited warranty?
- How long does this limited warranty last?
- What do I do if I need warranty service?
- What will Dell do?
- What if I purchased a service contract?
- How will you fix my product?
- What do I do if I am not satisfied?
- May I transfer the limited warranty?
- "Total Satisfaction" Return Policy (U.S. Only)
- Limited Warranty Terms for Dell-Branded Hardware Products (Canada Only)
- "Total Satisfaction" Return Policy (Canada Only)
- Dell Software and Peripherals (Canada Only)
- Third-Party Software and Peripherals Products
- Dell-Branded Peripheral Products
- Return Policy
- One-Year End-User Manufacturer Guarantee (Latin America and the Caribbean Only)
- Guarantee
- Exclusions
- Making a Claim
- Limitation and Statutory Rights
- Dell Computer Corporation Ink and Toner Cartridges Limited Warranties
- Ink and Toner Cartridges Limited Warranty (U.S. and Canada Only)
- Ink and Toner Cartridges Limited Warranty (Latin America Only)
- Dell Software License Agreement
- Limited Warranty
- U.S. Government Restricted Rights
- General
- Index
- A
- B
- C
- D
- E
- F
- I
- L
- M
- 0
- P
- R
- s
- T
- U
- W
Marque : DELL
Modèle : P1500
Catégorie : Projecteur