
DR-3 - Pédale d'effets BOSS - Notice d'utilisation et mode d'emploi gratuit
Retrouvez gratuitement la notice de l'appareil DR-3 BOSS au format PDF.

| Type de produit | Pédale d'effets (rythmique) |
| Marque | BOSS |
| Modèle | DR-3 |
| Dimensions (approx.) | 152 x 120 x 57 mm |
| Poids (sans piles) | 0,6 kg |
| Alimentation | Adaptateur secteur PSA (non inclus) ou 6 piles AA (alcalines recommandées) |
| Fonctions principales | 100 styles préréglés, 100 styles utilisateur, 8 motifs par style, enregistrement temps réel et pas à pas, pads dynamiques, Tap Tempo, Key Shift, TSC (Sound Shape et Ambience), MIDI, prise foot switch |
| Types de sons | Batterie, percussion, basse (26 sons de batterie + 1 son de basse par kit) |
| Polyphonie | Jusqu'à 26 voix simultanées (drum + perc + basse) |
| Entrées/Sorties | Sorties audio : Jack 1/4" (R mono/L phones), RCA phono (R/L), MIDI IN, Prise Foot SW (1 ou 2 pédales) |
| Contrôles | Boutons MODE, pads de motifs, pads d'instruments, VARIATION, TSC, EDIT, TEMPO, START/STOP |
| Affichage | Écran LCD |
| Fonctions avancées | Variation (PTN, KIT, MUTE), Mode Auto, création de chansons (Song), chaîne de chansons, synchronisation MIDI |
| Entretien et nettoyage | Utiliser un chiffon doux et sec. Ne pas utiliser de benzène, diluants, alcool ou solvants. |
| Sécurité | Ne pas ouvrir le boîtier, utiliser uniquement l'adaptateur spécifié, éviter l'humidité et les températures extrêmes, ne pas exposer à la pluie. |
| Pièces détachées et réparabilité | Contacter un centre de service Roland agréé. Aucune pièce remplaçable par l'utilisateur. |
| Informations générales | Livré avec 6 piles AA pour test. Manuel d'utilisation inclus. |
FOIRE AUX QUESTIONS - DR-3 BOSS
Questions des utilisateurs sur DR-3 BOSS
0 question sur cet appareil. Repondez a celles que vous connaissez ou posez la votre.
Poser une nouvelle question sur cet appareil
Téléchargez la notice de votre Pédale d'effets au format PDF gratuitement ! Retrouvez votre notice DR-3 - BOSS et reprennez votre appareil électronique en main. Sur cette page sont publiés tous les documents nécessaires à l'utilisation de votre appareil DR-3 de la marque BOSS.
MODE D'EMPLOI DR-3 BOSS
DR-3
Dr. Rhythm
Owner's Manual
Thank you, and congratulations on your choice of the BOSS DR-3 Dr. Rhythm.
Before using this unit, carefully read the sections entitled:
- USING THE UNIT SAFELY (page 2-4)
- IMPORTANT NOTES (page 5)
These sections provide important information concerning the proper operation of the unit.
Additionally, in order to feel assured that you have gained a good grasp of every feature provided by your new unit, Owner's manual should be read in its entirety. The manual should be saved and kept on hand as a convenient reference.
■ Printing Conventions in This Manual
- Text or numerals enclosed in square brackets [ ] indicate buttons.
[SONG] SONG button
START[ /11] START button
- Reference such as (p. **) indicate pages in this manual to which you can refer.
Copyright © 2003 BOSS CORPORATION
All rights reserved. No part of this publication may be reproduced in any form without the written permission of BOSS CORPORATION.
USING THE UNIT SAFELY
INSTRUCTIONS FOR THE PREVENTION OF FIRE, ELECTRIC SHOCK, OR INJURY TO PERSONS
About WARNING and CAUTION Notices
| ▲WARNING | Used for instructions intended to alert the user to the risk of death or severe injury should the unit be used improperly. |
| ▲CAUTION | Used for instructions intended to alert the user to the risk of injury or material damage should the unit be used improperly. * Material damage refers to damage or other adverse effects caused with respect to the home and all its furnishings, as well to domestic animals or pets. |
About the Symbols
| A | The △symbol alerts the user to important instructions or warnings. The specific meaning of the symbol is determined by the design contained within the triangle. In the case of the symbol at left, it is used for general cautions, warnings, or alerts to danger. |
| B | The ⊙symbol alerts the user to items that must never be carried out (are forbidden). The specific thing that must not be done is indicated by the design contained within the circle. In the case of the symbol at left, it means that the unit must never be disassembled. |
| C | The ●symbol alerts the user to things that must be carried out. The specific thing that must be done is indicated by the design contained within the circle. In the case of the symbol at left, it means that the power-cord plug must be unplugged from the outlet. |
ALWAYS OBSERVE THE FOLLOWING
WARNING
- Before using this unit, make sure to read the instructions below, and the Owner's Manual.

- Do not open (or modify in any way) the unit or its AC adaptor.

- Do not attempt to repair the unit, or replace parts within it (except when this manual provides specific instructions directing you to do so). Refer all servicing to your retailer, the nearest Roland Service Center, or an authorized Roland distributor, as listed on the "Information" page.

- Never use or store the unit in places that are:

- Subject to temperature extremes (e.g., direct sunlight in an enclosed vehicle, near a heating duct, on top of heat-generating equipment); or are

- Damp (e.g., baths, washrooms, on wet floors); or are
- Humid; or are
- Exposed to rain; or are
- Dusty; or are
- Subject to high levels of vibration.
WARNING
- Make sure you always have the unit placed so it is level and sure to remain stable. Never place it on stands that could wobble, or on inclined surfaces.

- Use only the specified AC adaptor (PSA-series), and make sure the line voltage at the installation matches the input voltage specified on the AC adaptor's body. Other AC adaptors may use a different polarity, or be designed for a different voltage, so their use could result in damage, malfunction, or electric shock.

- Do not excessively twist or bend the power cord, nor place heavy objects on it. Doing so can damage the cord, producing severed elements and short circuits. Damaged cords are fire and shock hazards!

WARNING
- This unit, either alone or in combination with an amplifier and headphones or speakers, may be capable of producing sound levels that could cause permanent hearing loss. Do not operate for a long period of time at a high volume level, or at a level that is uncomfortable. If you experience any hearing loss or ringing in the ears, you should immediately stop using the unit, and consult an audiologist.
- Do not allow any objects (e.g., flammable material, coins, pins); or liquids of any kind (water, soft drinks, etc.) to penetrate the unit.
-
Immediately turn the power off, remove the AC adaptor from the outlet, and request servicing by your retailer, the nearest Roland Service Center, or an authorized Roland distributor, as listed on the "Information" page when:
-
The AC adaptor or the power-supply cord has been damaged; or
- If smoke or unusual odor occurs
- Objects have fallen into, or liquid has been spilled onto the unit; or
- The unit has been exposed to rain (or otherwise has become wet); or
-
The unit does not appear to operate normally or exhibits a marked change in performance.
-
In households with small children, an adult should provide supervision until the child is capable of following all the rules essential for the safe operation of the unit.
- Protect the unit from strong impact. (Do not drop it!)


WARNING
- Do not force the unit's power-supply cord to share an outlet with an unreasonable number of other devices. Be especially careful when using extension cords—the total power used by all devices you have connected to the extension cord's outlet must never exceed the power rating (watts/ amperes) for the extension cord. Excessive loads can cause the insulation on the cord to heat up and eventually melt through.

- Before using the unit in a foreign country, consult with your retailer, the nearest Roland Service Center, or an authorized Roland distributor, as listed on the "Information" sheet.

- Batteries must never be recharged, heated, taken apart, or thrown into fire or water.


CAUTION
- The unit and the AC adaptor should be located so their location or position does not interfere with their proper ventilation.

- Always grasp only the output plug or the body of the AC adaptor when plugging into, or unplugging from, this unit or an outlet.

- Any accumulation of dust between the AC adaptor and the power outlet can result in poor insulation and lead to fire. Periodically wipe away such dust with a dry cloth. Also, disconnect the power plug from the power outlet whenever the unit is to remain unused for an extended period of time.

- Try to prevent cords and cables from becoming entangled. Also, all cords and cables should be placed so they are out of the reach of children.

- Never climb on top of, nor place heavy objects on the unit.

- Never handle the AC adaptor body, or its output plugs, with wet hands when plugging into, or unplugging from, an outlet or this unit.

- Before moving the unit, disconnect the AC adaptor and all cords coming from external devices.

- Before cleaning the unit, turn off the power and unplug the AC adaptor from the outlet (P. 16).

CAUTION
- Whenever you suspect the possibility of lightning in your area, disconnect the AC adaptor from the outlet.

- If used improperly, batteries may explode or leak and cause damage or injury. In the interest of safety, please read and observe the following precautions (P. 15).

- Carefully follow the installation instructions for batteries, and make sure you observe the correct polarity.


-
Avoid using new batteries together with used ones. In addition, avoid mixing different types of batteries.
-
Remove the batteries whenever the unit is to remain unused for an extended period of time.
-
If a battery has leaked, use a soft piece of cloth or paper towel to wipe all remnants of the discharge from the battery compartment. Then install new batteries. To avoid inflammation of the skin, make sure that none of the battery discharge gets onto your hands or skin. Exercise the utmost caution so that none of the discharge gets near your eyes. Immediately rinse the affected area with running water if any of the discharge has entered the eyes.
-
Never keep batteries together with metallic objects such as ballpoint pens, necklaces, hairpins, etc.
-
Used batteries must be disposed of in compliance with whatever regulations for their safe disposal that may be observed in the region in which you live.

IMPORTANT NOTES
In addition to the items listed under "USING THE UNIT SAFELY" on page 2-4, please read and observe the following:
Power Supply: Use of Batteries
- Do not use this unit on the same power circuit with any device that will generate line noise (such as an electric motor or variable lighting system).
- The AC adaptor will begin to generate heat after long hours of consecutive use. This is normal, and is not a cause for concern.
- The use of an AC adaptor is recommended as the unit's power consumption is relatively high. Should you prefer to use batteries, please use the alkaline type.
- When installing or replacing batteries, always turn off the power on this unit and disconnect any other devices you may have connected. This way, you can prevent malfunction and/or damage to speakers or other devices.
- Batteries are supplied with the unit. The life of these batteries may be limited, however, since their primary purpose was to enable testing.
- Before connecting this unit to other devices, turn off the power to all units. This will help prevent malfunctions and/or damage to speakers or other devices.
Placement
- Using the unit near power amplifiers (or other equipment containing large power transformers) may induce hum. To alleviate the problem, change the orientation of this unit; or move it farther away from the source of interference.
- This device may interfere with radio and television reception. Do not use this device in the vicinity of such receivers.
- Noise may be produced if wireless communications devices, such as cell phones, are operated in the vicinity of this unit. Such noise could occur when receiving or initiating a call, or while conversing. Should you experience such problems, you should relocate such wireless devices so they are at a greater distance from this unit, or switch them off.
- Do not expose the unit to direct sunlight, place it near devices that radiate heat, leave it inside an enclosed vehicle, or otherwise subject it to temperature extremes. Excessive heat can deform or discolor the unit.
- When moved from one location to another where the temperature and/or humidity is very different, water droplets (condensation) may form inside the unit. Damage or malfunction may result if you attempt to use the unit in this condition. Therefore, before using the unit, you must allow it to stand for several hours, until the condensation has completely evaporated.
Maintenance
- For everyday cleaning wipe the unit with a soft, dry cloth or one that has been slightly dampened with water. To remove stubborn dirt, use a cloth impregnated with a mild, non-abrasive detergent. Afterwards, be sure to wipe the unit thoroughly with a soft, dry cloth.
- Never use benzine, thinners, alcohol or solvents of any kind, to avoid the possibility of discoloration and/or deformation.
Additional Precautions
- Please be aware that the contents of memory can be irretrievably lost as a result of a malfunction, or the improper operation of the unit. To protect yourself against the risk of loosing important data, we recommend that you periodically save a backup copy of important data you have stored in the unit's memory on a paper.
Unfortunately, it may be impossible to restore the contents of data that was stored in another MIDI device (e.g., a sequencer) once it has been lost. Roland Corporation assumes no liability concerning such loss of data. - Use a reasonable amount of care when using the unit's buttons, sliders, or other controls; and when using its jacks and connectors. Rough handling can lead to malfunctions.
- Never strike or apply strong pressure to the display.
- When connecting / disconnecting all cables, grasp the connector itself—never pull on the cable. This way you will avoid causing shorts, or damage to the cable's internal elements.
- To avoid disturbing your neighbors, try to keep the unit's volume at reasonable levels. You may prefer to use headphones, so you do not need to be concerned about those around you (especially when it is late at night).
- When you need to transport the unit, package it in the box (including padding) that it came in, if possible. Otherwise, you will need to use equivalent packaging materials.
Making Your Own Rhythm Pattern Arrangements with Style Play
With the DR-3, you can enjoy performing rhythm patterns made up of drum and bass sounds. You can add fill-ins and switch patterns while you play, making it easy to develop choruses, bridges, and solos for your songs.
100 Different Preset Styles
The DR-3 comes with 100 different prepared Styles in a variety of genres, including Rock, Funk, Hip Hop, Jazz, Latin, and more. You can also create up to 100 of your own original Styles.
TSC (Total Sound Control) Function
This includes two types of effects, "Sound Shape," which adjusts the overall tone of the sound, and "Ambience," which alters the overall acoustic characteristics.
This feature makes it easy to attain the sound you want, whether it be a harder sound for Rock, an acoustic sound for Jazz, or the sound you get when performing live on stage.
Sound Shape and Ambience each includes eight presets and eight memories you can use to store your own favorite settings.
Control the DR-3 with a Foot Switch
The DR-3 allows you to connect up to two (optional) foot switches. You can use your foot to control the DR-3 as you perform, making this perfect for jam sessions and live performances. You can a variety of functions to the foot switches, including switching patterns and turning the Variation function on and off.
■ Variation Function Lets You Enjoy a Wide Variety of Arrangements
The DR-3 includes a Variation function that lets you play different arrangements within songs, for example arrangements to build up the excitement, quieter ones for vocal solos, along with a wide variety of other arrangements.
■ Produce Rhythm Patterns Automatically in Auto Mode
In Auto mode, you can produce songs by having the rhythm patterns be changed automatically every eight or sixteen measures, allowing you to enjoy jam sessions once you start a song, without having to operate the DR-3.
■ High-Quality Instrument Sounds-Ghost Notes, Too
The DR-3 features special "soft shot," "double shot," and "buzz shot" sounds for use as snare ghost notes. Using these makes it possible to get even more realistic rhythm patterns.
Dynamics-Capable Pad Keys
The pad keys on the DR-3 are capable of producing dynamics. The volume changes in response to the force you use to play the pads.
This lets you alter the sound you play depending on how hard you hit the pads, such as for hard shots and soft shots on the snare.
Setting the Tempo with Tap Tempo Function
You can set tempos just by tapping the button at the desired timing.
Key Shift Function
You can easily change the key in which you are playing.
You can also easily get flat-tuning of a guitar, or match the key used by a different instrument, such as a sax.
Convenient Song Composing and Performing Functions
While basically following procedures similar to those used in performing Styles, you can create songs intuitively with the panel pads.
After you create a song, you can add cymbal crashes, change bass phrases, and edit specific portions of songs.
■ Synchronize Performances with Digital Recorders and Sequencers
Using MIDI, you can synchronize performances with digital recorders (such as those in the BR Series) and sequencers, or start and stop the DR-3 using a GT-6.
■ Equipped with Both Phono Jacks and Phone Jacks
In addition to 1/4 phone jacks, the DR-3 also features RCA phono jacks, which let you connect a variety of other devices, such as mixers, amps, and audio systems.
Compact Body
The DR-3 is lightweight, compact, and very portable. And since the unit can be powered with batteries, you can use it just about anywhere.
Contents
USING THE UNIT SAFELY 2
IMPORTANT NOTES. 5
Main Features 6
Panel Descriptions 12
Before You Play 15
Install Batteries. 15
Making Connections. 16
Turning On/Off the Power 17
Reset to Default Factory Settings (Factory Reset) 18
Quick Start 201
Let's Listen to the Demo 21
Let's Play a Style 22
Performing Styles with Selecting Patterns ([MANU]) 22
Performing Variations on Styles (VARIATION) 24
Selecting Styles 26
Changing the Tempo ([TEMPO]) 27
Setting the Tempo by Tapping It Out (Tap Tempo) 27
Changing the Key ([KEY SHIFT]) 28
Let's Use a Foot Switch 29
Connecting the Foot Switch 29
Using the Foot Switch 30
Let's Perform with the Patterns Switched Automatically ([AUTO]).....31
Let's Change the Overall Tone of the Sound and Acoustics (TSC) .... 32
Chapter 1 Overview of the DR-3. 34
The DR-3's Performance Modes 34
Style Play Mode 34
Makeup of a Style 35
Song Mode 37
Switching the Pad Functions 37
Main Screens and Functions 38
Starting and Stopping Performances and Recording 40
Adjusting the Tempo ([TEMPO]) 41
Changing the Key of the Performance ([KEY SHIFT]) 42
Chapter 2 Playing Styles (Manual Mode [MANU]) 43
How the Pads Work When Performing Styles 43
Selecting Styles 43
Selecting the Patterns to be Played. 44
Starting/Stopping 44
How to Change Patterns 44
Selecting Variations (VARIATION) 45
Chapter 3 Playing Styles (Auto Mode [AUTO]) 46
Selecting a Style 46
Performing in Auto Mode 46
Changing the Pattern Progression in Auto Mode 47
Chapter 4 Controlling the Styles with a Foot Switch 48
Starting and Stopping Performances 48
Switching Verses 48
Assigning Functions to the Foot Switch 49
Chapter 5 Changing the Overall Tone of the Sound and Acoustics (TSC) 51
Changing the Overall Tone of the Sound ([SOUND SHAPE]) 51
Altering the Acoustic Characteristics of the Overall Sound ([AMBIENCE])... 52
Changing the Sound Shape Parameters 53
How to Make the Settings 53
Changing the Equalizer Parameters 53
Changing the Compressor Parameters. 54
Naming the Settings 55
Copying the Settings 55
Changing the Ambience Parameters 56
How to Make the Settings 56
Changing the Ambience Parameters 56
Naming the Settings 57
Copying the Settings 57
Chapter 6 Performing with the Pads. 58
Playing Drum Sounds 59
Playing Percussion Sounds 59
Playing Bass Sounds. 59
Selecting a Different Sound (VARIATION [KIT]) 60
Chapter 7 Creating Styles 61
Procedure for Creating Styles 61
< 1> Selecting a Number for the Style. 62
< 2> Making the Settings for the New Style 62
Setting the Tempo for the Style 62
Setting the Beat. 62
Setting Up the Kit 63
Changing the Sound to Be Muted 63
Making the TSC Settings for the Style 64
Determining the Number of Measures for Each Pattern 64
< 3> Recording the Patterns. 65
Using Realtime Recording 65
- Recording the Drum Part 65
- Recording the Bass Part 66
Using Step Recording 67
- Recording the Drum Part 67
- Recording the Bass Part 68
Adding Dynamics to the Sounds (Velocity Edit) 69
Transposing the Pattern's Bass Part. 70
Playing Back Recorded Patterns 70
< 4> Confirming the Created Style. 70
Performing the Created Style. 70
Editing the Settings. 70
Naming, Copying, and Deleting Styles 71
Naming the Style 71
Copying the Style 71
Clearing the Style 72
Copying and Deleting Patterns 72
Copying Patterns 72
Clearing Patterns 73
Chapter 8 Creating and Performing Songs ([SONG]) 74
What is a Song? 74
Procedure for Creating Songs 74
< 1> Selecting a Number for the Song. 75
< 2> Make the Settings for the New Song. 75
Setting the Basic Tempo. 75
Making the TSC Settings for the Song 76
< 3> Recording the Song. 76
When Using Step Recording 76
When Using Realtime Recording 77
Editing Notes to Drum Parts and Bass Parts in the Song 78
< 4> Editing Songs. 80
Adding Patterns In the Song (INSERT) 80
Deleting Specified Segments (DELETE) 81
Copying Specified Segments (COPY) 82
Changing the Tempo Part Way Through a Song (TEMPO) 83
< 5> Checking the Created Song. 83
Performing the Created Song. 83
Editing the Settings. 83
Naming, Copying, and Deleting Songs 84
Naming the Song 84
Copying the Song 84
Clearing the Song 85
Performing Songs 85
Performing Songs 85
Switching Patterns With a Foot Switch 86
Playing Multiple Songs Continuously (Song Chain) 87
Chapter 9 Changing the Operating Environment (System) 88
How to Make the Settings 88
Setting the Parts To Be Output from the OUTPUT Jacks. 89
Adjusting the Pad Sensitivity 89
Setting the Reference Pitch for the Bass Part 89
Changing the Volume of the Metronome Sound 89
Chapter 10 Creating Your Own Kits. 90
How to Make the Settings 90
Selecting the Sounds Assigned to the Pads. 91
Setting the Volume 91
Setting the Position of the Sound 91
Naming the Kit. 91
Copying the Kit 92
Chapter 11 Connecting and Using External MIDI Devices 93
What is MIDI? 93
Starting/Stopping and Synchronizing Performances on the DR-3
from an External MIDI Device 93
Setting the MIDI Channels 94
Setting Sync Mode 95
Using An External MIDI Device to Play the DR-3 95
Using the DR-3 to Record Performances Played by External MIDI Devices... 96
Appendices. 98
Troubleshooting 99
Message List 100
Parameter List. 101
Instrument/Bass Tone List 104
Preset Kit List 106
Preset Style List. 116
MIDI Implementation 117
MIDI Implementation Chart 120
Specifications 122
Index 123
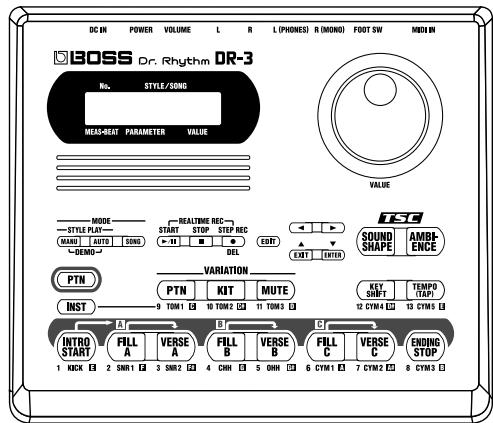
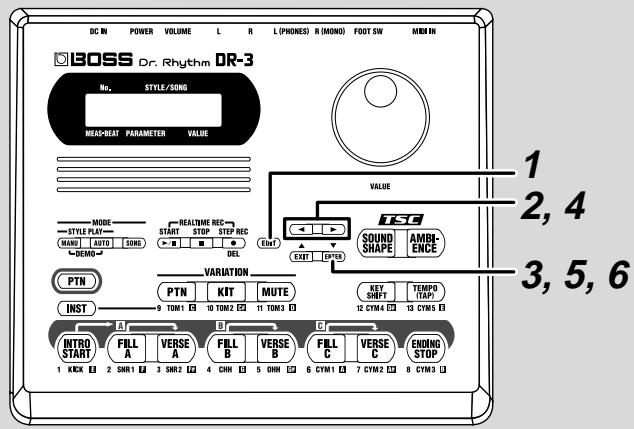
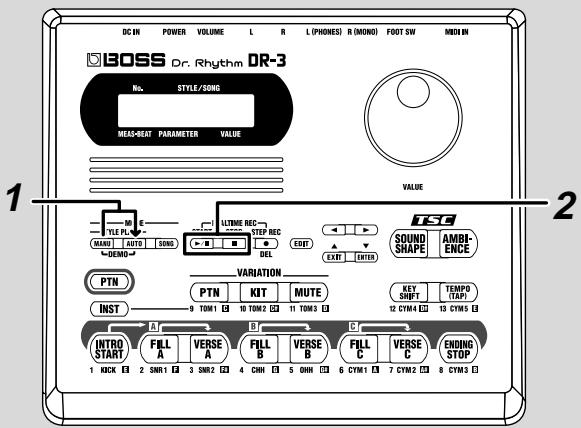
1. Display
- The explanations in this manual include illustrations that depict what should typically be shown by the display. Note, however, that your unit may incorporate a newer, enhanced version of the system (e.g., includes newer sounds), so what you actually see in the display may not always match what appears in the manual.
2. VALUE dial
Selects Styles and songs.
You can set tempos by rotating the dial after pressing the TEMPO button (11).
This is also used during editing to input settings values.
3. MODE button
MANU (Manual) button
Press this button to switch to Manual mode, in which you perform by switching the patterns yourself.
AUTO button
Press this button to switch to Auto mode, in which the patterns are switched automatically during play of Styles.
SONG button
Press this button to switch to Song mode, in which you play songs.
4.
START button
Starts and pauses Styles/songs playback or recording.
STOP button
This stops the performance of the Styles or songs.
STEPREC ● button
This starts Step Recording of Styles and songs.
Pressing START button during Step Recording then starts Realtime Recording.
5. EDIT button
Uses this when making settings related to the performance and the usage environment for the DR-3.
6. / /
/EXIT/
/ENTER buttons
The four buttons, , , and are called the cursor buttons.
Cursor buttons are used to select parameters and changes screens (pages).
EXIT button is pressed to stop an operation. ENTER button is used to "lock in" a value you've set or to execute an operation.
7. TSC (Total Sound Control) buttons
SOUND SHAPE button
Adjusts the overall tone of the sound.
AMBIENCE button
Alters the acoustic characteristics of the overall sound.
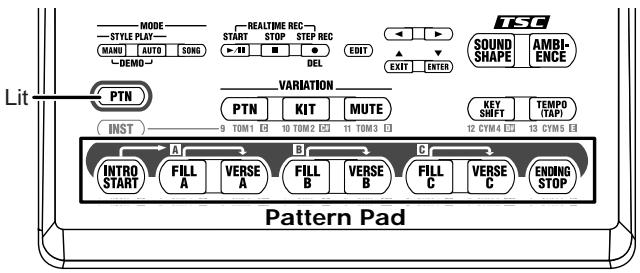
8. PTN button
- These are indicated in this manual as [PTN].
Press this button to switch patterns with the pads (12).
When this button is ON (lit), the 9-12 buttons switch to the following functions.
9. VARIATION buttons
PTN button
The Pattern's variation is played.
KIT button
Plays with the Kit's variation sound.
MUTE button
Some instrument sounds of the pattern are muted.
10. KEY SHIFT button
Changes the key of the Patterns and songs (transposing).
11. TEMPO (TAP) button
Adjusts the tempo.
You can tap this button at least four times to set the tempo to the interval between the taps.
12. Pattern Pads
When the PTN button (8) is on, you can switch the patterns with these eight pads.
13. INST (Instrument) button
Press this button to use the pads to play drum and bass sounds.
When this button is on (lit), the 9-12 buttons play the drum and bass sounds.
Also, you can press this button to switch the sound groups for the pads (14).
14. Pads
When INST button (13) is ON (lit), drum and bass sounds are played with these pads.
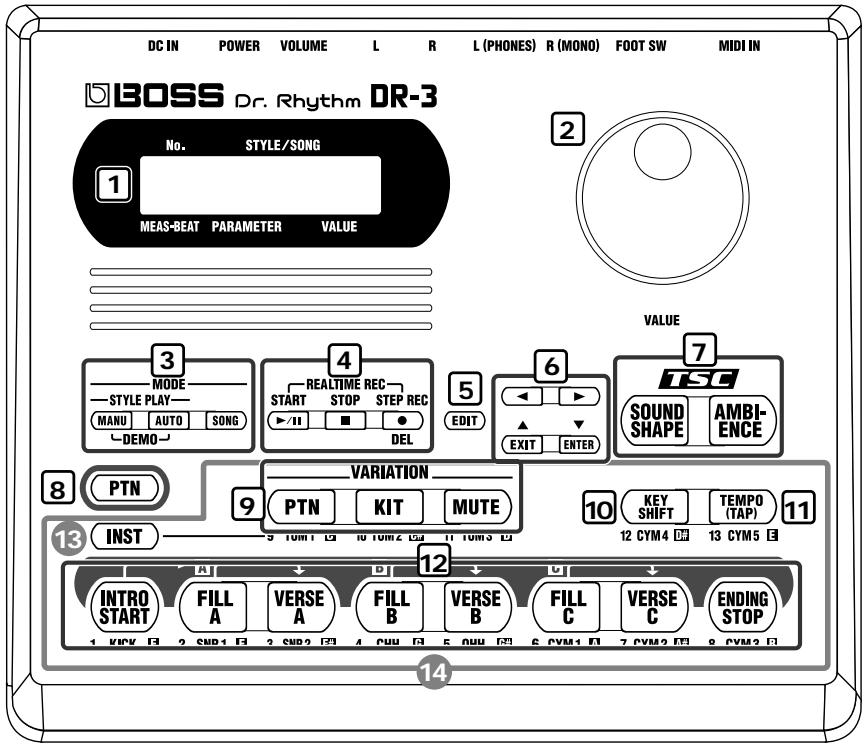
Rear Panel
1. MIDI IN connector
External MIDI device can be connected to this connector.
2. FOOT SW (Switch) jack
By connecting a foot switch, you can obtain pedal control over the start and stop of performances, switching the patterns, or other actions.
3. OUTPUT jack R (MONO) / L (PHONES)
Provides output of the audio signals. Connect to your amp, stereo system, or similar equipment. For monaural output use the R (MONO) jack.
For a set of headphones use the L (PHONES) jack.
- You cannot get monaural output while simultaneously using the headphones.
4. OUTPUT jack R / L
Provides output of the audio signals. Connect to your amp, stereo system, or similar equipment. Connect cables having RCA phono plugs here.
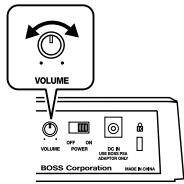
5. VOLUME knob
Adjusts the volume from the OUTPUT jacks.
6. POWER switch
Switches the power on and off.
7. AC Adaptor jack
You can use a separately sold AC adapter (BOSS PSA series).
8. Security Slot (K)
http://www.kensington.com/
Before You Play
Install Batteries
1 Make sure that the power is turned off.

2 Remove the battery cover on the unit's underside.
3 Insert six AA batteries in the battery case, taking care to ensure that the positive (+) and negative (-) terminals are not reversed.
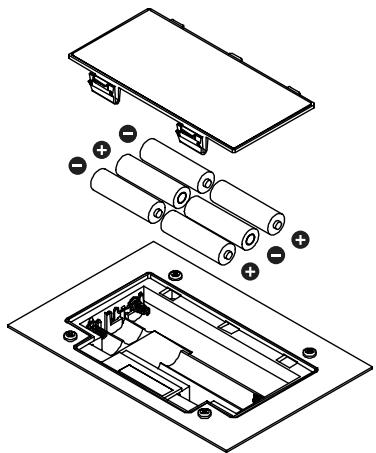
4 Close the battery cover.
NOTE
When turning the unit upside-down, get a bunch of newspapers or magazines, and place them under the four corners or at both ends to prevent damage to the buttons and controls. Also, you should try to orient the unit so no buttons or controls get damaged.
NOTE
When turning the unit upside-down, handle with care to avoid dropping it, or allowing it to fall or tip over.
MEMO
We recommend the use of alkaline batteries for extended battery life.
NOTE
Do not mix new batteries with partially used batteries, and do not mix batteries of differing types.
MEMO
When the battery power begins to run low, "Battery Low!" appears in the display when the power is turned on. When this occurs, replace with new (six AA) batteries.
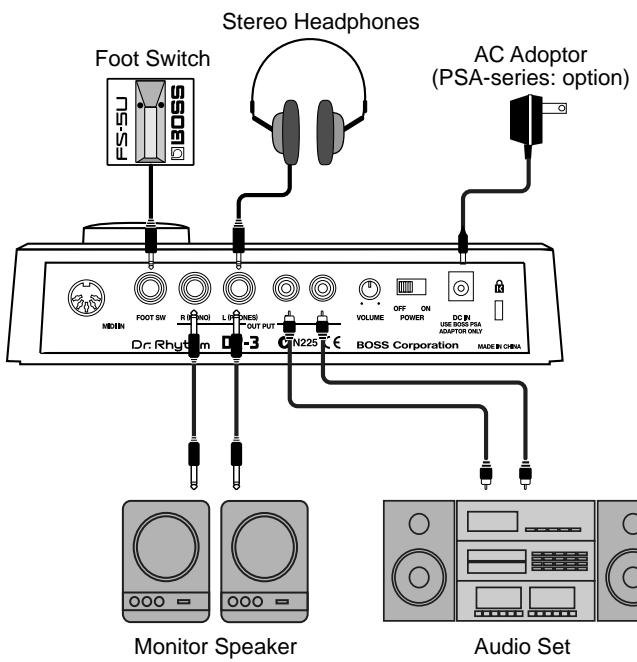
Making Connections
The DR-3 is not equipped with an internal amp or speakers. To hear sound, either connect an amplifier and speakers or use stereo headphones.
Audio cables, MIDI cables, Stereo headphones, and foot switches are not included. Please purchase these items from your dealer.
1
Before you begin making connections, confirm the following.
- Is the volume level of the DR-3 or connected amp turned all the way down?
- Is the power to the DR-3 or connected amp turned off?
2
Connect the amp and audio gear, or the headphones as shown in the diagram.
In order to take full advantage of the DR-3's sound we recommend that you play it in stereo.
When using the system in mono, connect to the OUTPUT R (MONO) jack.
NOTE
To prevent malfunction and/ or damage to speakers or other devices, always turn down the volume, and turn off the power on all devices before making any connections with the DR-3.
#
For instructions on connecting to the MIDI connectors, refer to p. 93.
For instructions on connecting to the FOOT SW jack, refer to p. 29.
NOTE
You cannot get monaural output while simultaneously using the headphones.
Turning On/Off the Power
Turning on the power
Once the connections have been completed (p. 16), turn on power to your various devices in the order specified. By turning on devices in the wrong order, you risk causing malfunction and/or damage to speakers and other devices.
Before you turn the power on, make sure of the following points.
- Are external devices connected correctly?
- Is the volume level of the DR-3 or connected amp turned all the way down?
2 Turn on the POWER switch located on the rear panel of the DR-3.
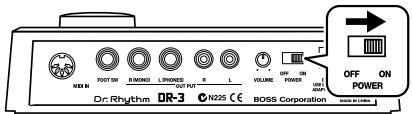
3 Turn on the power of the amp.
Press the flashing [INTRO/START] button to start the performance. Rotate the VOLUME knob on the rear panel to adjust the DR-3's volume level.
Also adjust the volume levels for amps and other connected gear.
Turning Off the Power
Before turning off the DR-3's power, make sure that:
- Is the volume level of the DR-3 or connected amp turned all the way down?
2 Switch off any amps and other external equipment.
3
Turn off the power of the DR-3.
NOTE
This unit is equipped with a protection circuit. A brief interval (a few seconds) after power up is required before the unit will operate normally.
MEMO
Press STOP [ ] to stop the performance.
Reset to Default Factory Settings (Factory Reset)
This returns all settings on the DR-3 to the values they had when the unit shipped from the factory. This is called Factory Reset.
1 With the performance stopped, press [EDIT].
2 Press [▶] to select a
3 Press [ENTER].

Press [▶] to select a

Press [ENTER].
A message confirming that you want to proceed with Factory Reset is displayed.
![BOSS DR-3 - Press [ENTER]. - 1](/content/2025/01/151999/images/9b1b3b9e9e695ceeb23cbef58e82ea786bc3846a1a4e54a399d4163f250e41bf.jpg)
To cancel, press [EXIT].
![BOSS DR-3 - Press [ENTER]. - 2](/content/2025/01/151999/images/97d5c57140ab087def0835ddb324448b2603be53de7e8a4ad8fb25e29daf2419.jpg)
To execute Factory Reset, press [ENTER].
Factory Reset is executed.
When Factory Reset is done, the previous screen is displayed. All of the settings are restored to their original factory status.
Quick Start
This Quick Start manual describes how to enjoy performing the rhythm used in the DR-3's Styles.
Pre-programmed Styles are provided in Rock, Jazz, and a variety of other musical genres.
Once you select a Style in the desired genre, you can put together backing that matches your own performances by switching Patterns. The Patterns prepared for each Style include not only an "intro" and "ending," but up to three types of "fill-ins" and "verses" (main rhythm patterns). You can perform the rhythm in a variety of ways.
Let's Listen to the Demo
Now listen to the demo performance, which brings the DR-3's "Styles" to life.
The "Patterns" in the demo performance are switched automatically. The pattern pads light when the corresponding Patterns are playing.

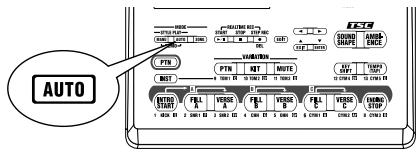
Hold down [MANU] and press [AUTO].
The DR-3 switches to Demo mode, and the performance begins. If a Pattern or song is playing, press STOP [ ] to stop the performance, then perform Step 1.
![BOSS DR-3 - Hold down [MANU] and press [AUTO]. - 1](/content/2025/01/151999/images/f88e3c6b26a53210d41e535d0b6fcf5489d70c48a43c546551d1b4f4f9470ca9.jpg)
The Style name which is playing, is displayed.
![BOSS DR-3 - Hold down [MANU] and press [AUTO]. - 2](/content/2025/01/151999/images/860f5e5a66e2033f26d6be6a8ae4505ccc3c3cd87f70851cb024ac9731d194ad.jpg)
Press STOP [ ] to stop the demo performance.
If you want to listen to the demo performance again, press START [▶/■].
MEMO
Styles and Patterns —
Song performances require rhythm patterns that vary a little for each section of the performance (intro, fill-ins, ending, and so on). The DR-3 features eight prepared rhythm patterns expressing these variations within the songs. Eight patterns are grouped together in what is called a "Style." The DR-3 features 100 pre-programmed internal Styles (Preset Styles) to suit a variety of musical genres. You can also put together your own combinations of Patterns to create whole new Styles (User Styles).
NOTE
All rights reserved. Unauthorized use of this material for purposes other than private, personal enjoyment is a violation of applicable laws.
NOTE
You cannot switch Patterns by pressing the pattern pads while the demo performance is playing. For information about performances which do allow you to switch the Patterns, refer to "Let's Play a Style" (p. 22).
MEMO
When using [MANU], [AUTO], or [SONG] to switch modes, stop the performance first before you press the button.
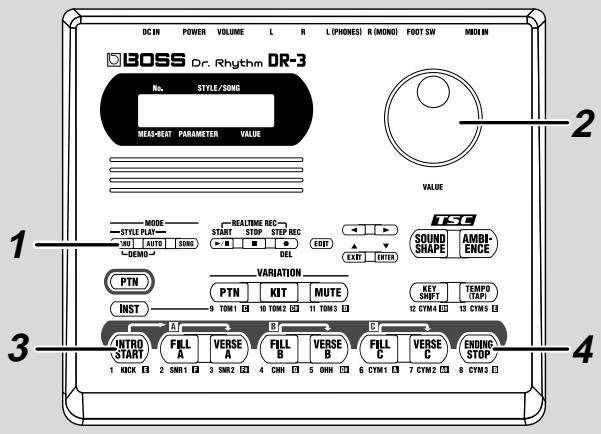
Let's Play a Style
There are two ways to perform Styles, using "Manual mode," in which you switch the Pattern yourself, or "Auto mode," where the DR-3 switches Patterns automatically.
Now, try performing in Manual mode.

For more information on "Auto mode," please refer to p. 31.
Performing Styles with Selecting Patterns ([MANU])
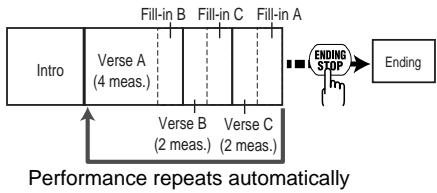
Each Style includes eight prepared rhythm patterns; intro, fill-in A, verse A, fill-in B, verse B, fill-in C, verse C and ending. In Manual mode, you play switching Patterns yourself.
![BOSS DR-3 - Performing Styles with Selecting Patterns ([MANU]) - 1](/content/2025/01/151999/images/e5f4b29e83a0efe6541bbb22ed744a8e58ba60872a4e5e117da2173d30ff406b.jpg)
1
With the performance stopped, press [MANU] so the button lights up.
This puts the DR-3 in Manual mode.
The Style screen appears in the display.
![BOSS DR-3 - Performing Styles with Selecting Patterns ([MANU]) - 2](/content/2025/01/151999/images/011e79a286e3dd127ee1419c45b059bc78041b78689e6753f0200b1330f3a369.jpg)
MEMO
If [INST] is lit, then drum or bass sounds are played when you press the pads (p. 58).
To switch Patterns with the
pads, press [PTN] so that this button lights up.
2
Press [INTRO/START] to start the performance from the intro.
3
Press one of the pattern pads to switch Patterns.
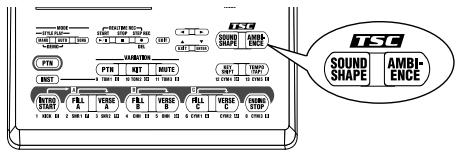
The Patterns assigned to the pattern pads are shown below.
MEMO
When you press a pattern pad other than [INTRO/START], the performance begins from that pattern.
| Pad Name | INTRO/ START | FILL A | VERSE A | FILL B | VERSE B | FILL C | VERSE C | ENDING/ STOP |
| Descrip- tion | After the intro is played, the Style pro- ceeds to Verse A. | After Fill-In A is played, the Style proceeds to Verse A. | This is the main per-formance Pattern. | After Fill-In B is played, the Style proceeds to Verse B. | This is a comple- mentary Pattern to Verse A. | After Fill-In C is played, the Style proceeds to Verse C. | This is the most elab- orate of the Pat- terns A-C. | The ending is played, and then the perfor- mance stops. |
When you press a pattern pad, the pattern for the pad you've pressed will start playing as soon as the one that's currently playing has finished.
When you press [FILL], the fill-in is played, and then the verse corresponding to that fill-in is automatically played. For example, if you press [FILL A], the DR-3 automatically switches to [VERSE A] after the fill-in.
4
When you press [ENDING/STOP], the ending is played and then the performance stops.
MEMO
What is a Fill-In? These are lively performance Patterns inserted in spaces between phrases and other points in songs and Styles. Fill-ins of up to one whole measure in length are played according to when you press the [FILL].
MEMO
To stop the Style without having the ending played, press STOP [ ]
Performing Variations on Styles (VARIATION)
You can use the three VARIATION buttons to add variety to the performance, even with the same Style.
| Button Name | PTN | KIT | MUTE |
| Description | The Pattern's variation is played. | This substitutes the kits, thereby changing the tone. | This mutes a part of the drum set. |
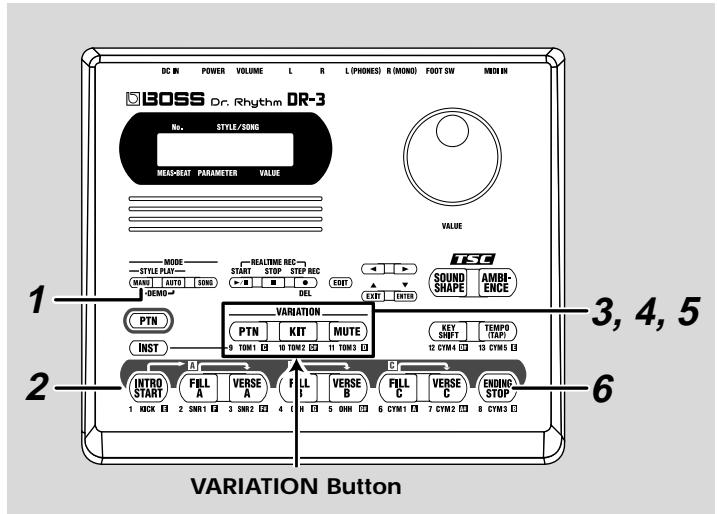
1 With the performance stopped, press [MANU] so the button lights up.
This puts the DR-3 in Manual mode.
2 When you press [INTRO/START], the performance starts from the intro.
3 Press VARIATION [PTN].
VARIATION [PTN] lights up, and the variation for the Pattern currently being performed is played.
When you press VARIATION [PTN] once again, the button's light goes out, and the original Pattern is played.
MEMO
What is a Kit? — These are sounds, selected from those built into the DR-3, consisting of 26 drum sounds and one bass sound that are grouped together as a single set.
MEMO
The settings used when you press a VARIATION button differ according to the Style.
MEMO
You can use the VARIATION buttons not only in Manual mode, but in Auto mode and Song mode (p. 37) as well.
NOTE
The VARIATION [PTN] button does not have any effect on patterns other than verses.
4
Press VARIATION [KIT].
VARIATION [KIT] lights up, and the drum set and bass sounds changes.
When you press VARIATION [KIT] once again, the button's light goes out, and the original Pattern is played.
5
Press VARIATION [MUTE].
VARIATION [MUTE] lights up, and a part of sounds are muted. When you press VARIATION [MUTE] once again, the button's light goes out, and the muted sounds play again.
6
When you press [ENDING/STOP], the ending is played and then the performance stops.
MEMO
With some Styles, the sound may not change.
Selecting Styles
The DR-3 comes with 100 pre-programmed Styles already built in.
Now try listening to some of the different Styles.
1
With the performance stopped, press [MANU] so the button lights up.
The Style screen appears in the display.

2
Turn the VALUE dial to select a Style.
3
Press [INTRO/START] to start the performance from the intro.
You can change Styles by turning the VALUE dial, even during the performance.
4
When you press [ENDING/STOP], the ending is played and then the performance stops.

You can also create your own Styles. For more information, refer to "Chapter 7 Creating Styles" (p. 61).

If you switch the style during its performance, a " 山 " mark appears in front of the style name which will be played next.
The style switches after the currently playing pattern ends, and the " " mark disappears.

When you press a pattern pad other than [INTRO/START], the performance begins from that pattern.

"Preset Style List" (p. 116)
Changing the Tempo ([TEMPO])
Now let's try changing the performance tempo.
![BOSS DR-3 - Changing the Tempo ([TEMPO]) - 1](/content/2025/01/151999/images/abdb63747b76ad2b3b4e4409f4150d250f19cb365847b47bb37fe24a570fe5a4.jpg)
1 Press [TEMPO (TAP)].
The Tempo screen appears.
![BOSS DR-3 - Press [TEMPO (TAP)]. - 1](/content/2025/01/151999/images/76b3e769a28e03c83368f632cb9a0a873b1a67d510325801143e3b26b5f5d390.jpg)
2 Adjust the tempo with the VALUE dial.
The tempo can be set to any value from 20 to 260.
Press [EXIT] to return you to the previous screen.
Setting the Tempo by Tapping It Out (Tap Tempo)
You can have the tempo be set to match an interval that you've demonstrated by tapping the button. This function is called "Tap Tempo."
1 Press [TEMPO (TAP)] at least four times.
The interval between presses of the button is set as the tempo.
Changing the Key ([KEY SHIFT])
You can perform Styles in different keys (transposed). This function is called "Key Shift."
![BOSS DR-3 - Changing the Key ([KEY SHIFT]) - 1](/content/2025/01/151999/images/45e116c4b21ca23608678624b67c2a5d23719fac141dccfc96880ff55f3eb132.jpg)
1 Press [KEY SHIFT].
The Key Shift screen appears.
![BOSS DR-3 - Press [KEY SHIFT]. - 1](/content/2025/01/151999/images/8589a5fe7c949cc4f5455395c44a5176b7fdff630862552a4850da15d587d2d2.jpg)
2 Set the key with the VALUE dial.
You can set the value in semitone units within the range from -12 to +12, or one octave lower to one octave higher.
This changes the key of the performance.
Press [EXIT] to return you to the previous screen.
To return to the original key, press [KEYSHIFT], then set the key to "0" using the VALUE dial.
Let's Use a Foot Switch
You can use a foot switch (such as the optional FS-5U) to start and stop performances and switch verses (p. 23). This is convenient, as it allows you to switch the Patterns with your foot.
You can connect up to two foot switches.
Connecting the Foot Switch
1 Connect the foot switch to the FOOT SW jack on the rear panel.
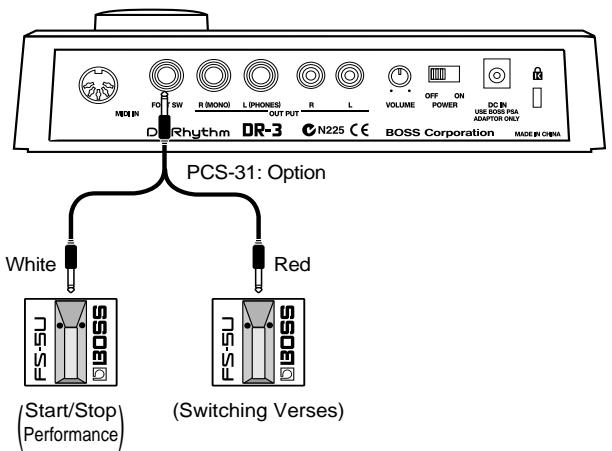
When Connecting Two Foot Switches
With the factory settings, foot switches connected using the plug with a white ring are used for starting and stopping performances, and foot switches connected using the plug with a red ring are used for switching verses.
NOTE
To prevent malfunction and/or damage to speakers or other devices, always turn down the volume, and turn off the power on all devices before connecting a foot switch.
NOTE
A special PCS-31 cable (optional) is required when connecting two foot switches.
MEMO
When connecting the foot switch (the optional FS-5U) to the FOOT SW jack, set the polarity switch as shown in the following figure.
Polarity Switch
MEMO
You can change the foot switch functions. For more details, refer to "Assigning Functions to the Foot Switch" (p. 49).
Using the Foot Switch
The example here describes use of the DR-3 with two foot switches connected.
When you have only one foot switch connected, you can only use it to start and stop the performance.
1 With the performance stopped, press [MANU] so the button lights up.
This puts the DR-3 in Manual mode.
2 When you press the foot switch connected with the plug with a white ring, the performance begins.
The performance starts from the intro.
3 Pressing the foot switch connected with the plug that has a red ring switches to the next verse after the verse currently being played.
When you press the foot switch connected with the plug with the white ring, the ending is played, and then the performance stops.
MEMO
You can change the foot switch functions. For more details, refer to "Assigning Functions to the Foot Switch" (p. 49).
MEMO
When you press the foot switch with the red ring, a fill-in is played after the verse currently being played, and the performance switches to the next verse. Pressing the foot switch while Verse A is playing switches the performance to Verse B, pressing the foot switch during Verse B switches the performance to Verse C, and pressing the foot switch during Verse C switches the performance to Verse A. By continuing to press the foot switch, you can select subsequent verses according to the number of times you press the foot switch.
Let's Perform with the Patterns Switched
Automatically ([AUTO])
When you perform Styles in Auto mode, the DR-3 switches the Patterns automatically, even without the pattern pads being pressed.
This lets you enjoy session-like performances without having to take your hands off the guitar or other instrument you are playing.
![BOSS DR-3 - Automatically ([AUTO]) - 1](/content/2025/01/151999/images/095423ba84ca39473113b3df4d5d4ad00664c2a15da97456904f9d0f03a20406.jpg)
1
With the performance stopped, press [AUTO] so the button lights up.
This puts the DR-3 in Auto mode.
![BOSS DR-3 - Automatically ([AUTO]) - 2](/content/2025/01/151999/images/c79ac7d3ebff723b5b514021f96aa0d3e9910fe80fb360e85d8c6d206a7d35b4.jpg)
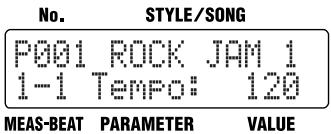
No.
STYLE/SONG
MEAS-BEAT PARAMETER VALUE
2
Press [INTRO/START] to start the performance from the intro.
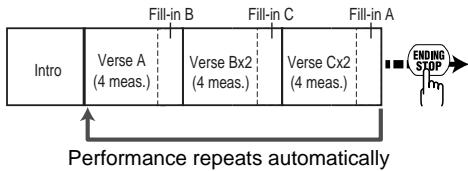
In Auto mode, the Patterns are played automatically, repeating the sequence of INTRO VERSE A FILL B VERSE B FILL C VERSE C FILL A VERSE A... and so on (according to the factory settings).
3
When you press [ENDING/STOP], the ending is played and then the performance stops.
MEMO
You can change the Pattern progression in Auto mode. For more details, refer to
"Changing the Pattern Progression in Auto Mode" (p. 47).
MEMO
To stop the Style without having the ending played,
press STOP [ ]
Let's Change the Overall Tone of the
Sound and Acoustics (TSC)
"TSC," short for "Total Sound Control," is a function that lets you change the acoustic effects for the overall performance just by pressing a few buttons.
TSC includes two types of effect, "Sound Shape," which changes the overall tone of the sound, and "Ambience," which alters the overall acoustic characteristics.
1
With the performance stopped, press [MANU] or [AUTO] so the button lights up.
2
Press [INTRO/START] to start the performance.
3
Press TSC [SOUND SHAPE].
The TSC screen is displayed.
No.
STYLE/SONG
TSC AUDITION
Shape: P1 ROCK
MEAS-BEAT PARAMETER
VALUE
4
Turn the VALUE dial to select a Sound Shape effect.
MEMO
You can save your preferred
"Sound Shape" and
"Ambience" settings.
For more details, refer to
Changing the Sound Shape
Parameters" (p. 53) and
Changing the Ambience
Parameters" (p. 56).
5
Press [SOUND SHAPE] so the button lights up.
Sound Shape is applied to the performance.
Each time you press [SOUND SHAPE], it alternately turns the button on (lit) and off (unlit).
6
Press [EXIT] to return you to the previous screen.
7
Press TSC [AMBIENCE].
The TSC screen is displayed.
No.
STYLE/SONG
TSC AUDITION
Ambi: P4 POWER
MEAS-BEAT PARAMETER
VALUE
8
Turn the VALUE dial to select a Ambience effect.
9
Press [AMBIENCE] so the button light up.
Ambience is applied to the performance.
Each time you press [AMBIENCE], it alternately turns the button on (lit) and off (unlit).
10
Press [EXIT] to return you to the previous screen.
When you press [ENDING/STOP], the ending is played and then the performance stops.
MEMO
For more details about Sound Shape and Ambience, refer to "Chapter 5 Changing the Overall Tone of the Sound and Acoustics (TSC)" (p. 51).
Chapter 1 Overview of the DR-3
The DR-3's Performance Modes
The DR-3 features two performance modes, Style Play mode, in which the rhythm patterns are switched as you play, and Song mode, in which you create data by arranging the patterns beforehand, and then perform.
Furthermore, "Style Play mode" features a Manual mode, in which you switch the rhythm patterns yourself, and an Auto mode, where the rhythm patterns are switched automatically.
A Style contains a set of rhythm patterns that are needed for performance of a song.
In order to perform a song, you need to have different rhythm patterns set in different parts of the song. For example, a rhythm pattern may change like this: Intro/melody A/melody B/ chorus/ending. To express the variation in such a song, each Style includes eight prepared rhythm patterns.
The DR-3 includes 100 different Preset Styles (internal Styles) in rock, jazz, and various other genres, so you can play all the rhythm patterns for a single song by selecting the genre you want to play in and then switching the patterns.
A Song is created by arranging the sequence of rhythm patterns that make up the song.
You can also create a song by setting up a sequence of patterns from different Styles. What's more, you can prepare further song data after you have created a song by editing parts of a song, for example by changing bass phrases.
Switch between these three modes with the MODE button shown below.
Style Play Mode
Manual Mode
Switch to Manual mode by pressing the MODE [MANU] button.
In Manual mode, you can switch patterns by pressing the pattern pads. You can perform freely as you switch the patterns.
Auto Mode
Switch to Auto mode by pressing the MODE [AUTO] button.
In AUTO mode, you can have patterns switch automatically after the performance starts, which then lets you enjoy jamming.
- When using a MODE button to switch modes, stop the performance first before you press the button.
Makeup of a Style
Patterns
The following eight patterns are set up for the different parts of the song.
| Pattern Name | Description |
| INTRO | This is played at the beginning of the song. |
| VERSE A, B, C | These are the main performance Patterns. A is the basic performance Pattern, and B and C are Patterns complemen- tary to Verse A. |
| FILL A, B, C | These are lively performance Patterns inserted in spaces between phrases and other points in songs. Select Fill-In A, B, or C according to the verse you want to have played after the fill-in. |
| ENDING | This is the performance Pattern used to finish the song. |
Each of the eight patterns is assigned to a pattern pad. Press the pattern pads as the Style is played to switch the patterns.

Pattern Pad
Kits
The drum, percussion, and bass sounds used in performing patterns are referred to as "kits." The Styles have predetermined kits assigned to them, so you can change kits by changing Styles, and thus change the sounds played with the pads.
Variation
Variation is a function that alters performances, for example building up the performance or toning it down.
There are three kinds of variations, [PTN] (Pattern), [KIT], and [MUTE].
| [PTN] | [KIT] | [MUTE] |
| This alternates the Pattern. | This substitutes the kits, thereby changing the sound. | This mutes a part of the drum set. This is used to tone down the performance and bring solos out to the forefront. |
The three kinds of variations are switched on and off with the VARIATION [PTN], [KIT] and [MUTE].
VARIATION
PTN
KIT
MUTE
Pattern
Kit
Mute
TSC
"TSC," short for "Total Sound Control," is a function that lets you change the overall tone of the sound and acoustics.
TSC includes two kinds of effects, "SOUND SHAPE" and "AMBIENCE."
"SOUND SHAPE" adjusts the overall tone of the sound with a three-band equalizer and three-band compressor that are used to boost or cut specific pitches (frequency bands).
"AMBIENCE" adjusts the breadth of the sound by altering the acoustic characteristics of the sound.
You can select the TSC settings that sound best with each Style, and you can switch [SOUND SHAPE] and [AMBIENCE] on and off independently.
TSC
SOUND SHAPE
AMBI-ENCE
Tempo
Each Style includes a tempo setting suited to that Style.
After you select a Style, you can perform with a different tempo, and even change the tempo while the performance is in progress.
Song Mode
Switch to Song mode by pressing the MODE [SONG] button.
In Song mode, you create songs by recording the sequence in which the patterns are to be played, or play the song that you have created.
- When using a MODE button to switch modes, stop the performance first before you press the button.
Switching the Pad Functions
The DR-3's [PTN] and [INST] are used to switch between two different functions.
Specifying Patterns with the Pads ([PM] is Lit)
![BOSS DR-3 - Specifying Patterns with the Pads ([PM] is Lit) - 1](/content/2025/01/151999/images/8728f59d3085905d6628af8c32a47bfe8fb261c4535a13af09ce34ee2e9c00f1.jpg)
When you press [PTN], you can then switch the patterns with the pattern pads.
Furthermore, you can press the VARIATION [PTN], [KIT], [MUTE], [KEY SHIFT], and [TEMPO (TAP)] to use the functions marked for each of these buttons.
Playing Instruments (Instrument Sounds) with the Pads ([INST] is Lit)
![BOSS DR-3 - Playing Instruments (Instrument Sounds) with the Pads ([INST] is Lit) - 1](/content/2025/01/151999/images/e6235e5c287c7f00c022528832d56bcf8a03972a2180f5fa9771bfe62b4910c5.jpg)
When you press [INST], different sounds are assigned to the pads, and you can then press the pads to play these drum and bass sounds. The instrument names and the bass pitch names assigned to the pads are printed under each pads.
You cannot use the VARIATION [PTN], [KIT], [MUTE], [KEY SHIFT], and [TEMPO (TAP)] functions when [INST] is lit.
Also, when [INST] is lit, you can use the VALUE dial or [INST] to switch the sound groups (drums, percussion, bass) for the pads.
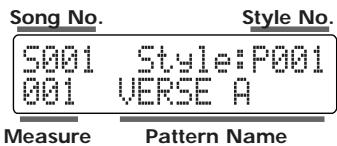
Main Screens and Functions
Style screen

With the performance stopped, pressing [MANU] or [AUTO] causes the button to light up, switches the DR-3 to Style Play mode, and calls up the Style screen.
When the DR-3 is in Style Play mode, pressing the [EXIT] button returns the Style screen to the display.
Song screen
With the performance stopped, pressing [SONG] causes the button to light up, switches the DR-3 to Song mode, and calls up the Song screen.
When the DR-3 is in Song mode, pressing the [EXIT] button returns the Song screen to the display.
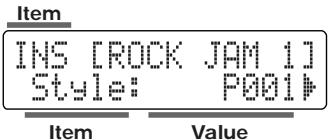
Edit screen
With the performance stopped, pressing [EDIT], switches the DR-3 to Edit mode, and calls up the Edit screen.
In Edit mode, you can press [ ] [ ] to switch "pages," turn the VALUE dial to change the values, press [ENTER] to set the values, and press [EXIT] to cancel operations.
Step Recording screen
In Style Play mode ([MANU] or [AUTO] lit), you can press STEP REC [ ] to start Step Recording and call up the Step Recording screen.
When you press STOP [■], recording stops and you're returned to the Style screen.
Realtime Recording screen
When you press START [▶/■] after pressing STEP REC [●] in Style Play mode ([MANU] or [AUTO] lit), Realtime Recording starts and the Realtime Recording screen is displayed.
When you press STOP [■], recording stops and you're returned to the Style screen.
Velocity Edit screen
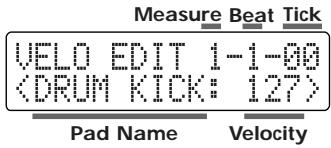
When you press [EDIT] during Style Step Recording (STEP REC [ ] lit), the Velocity Edit screen is displayed.
Pressing [EXIT] returns you to the Step Recording screen.
Song Recording screen
In Song mode ([SONG] lit), you can press STEP REC [ ] to start Step Recording and call up the Song Recording screen.
In Song mode, the Song Recording screen is also displayed during Realtime Recording.
When you press STOP [■], recording stops and you're returned to the Song screen.
Song Edit screen
When you press [EDIT] during Step Recording (STEP REC [ ] lit) in Song mode ([SONG] lit), the Song Edit screen is displayed.
Pressing [EXIT] returns you to the Song Recording screen.
Starting and Stopping Performances and Recording
Use these buttons to start, pause, stop, and record performances of Styles and songs.
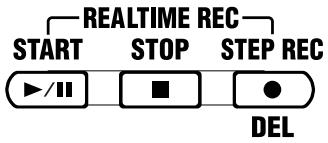
START[>II]
Press START [▶/■] when the performance is stopped to start the performance of the Style or song.
When you press START [▶■] while the performance is playing, the performance of the Style or song is paused. Press the button once again to resume the performance from the point where it was paused.
If you press START [▶/■] while Step Recording (STEP REC [▶/■] lit) is in progress,
Realtime Recording will start.
STOP[ ]
This stops the performance and recording of the Style or song.
STEPREC[>1]
This starts Step Recording of Styles and songs.
If you press START [▶/■] while Step Recording (STEP REC [▶/■] lit) is in progress,
Realtime Recording will start.
![BOSS DR-3 - STEPREC[>1] - 1](/content/2025/01/151999/images/ee974dde555b92aa57b601b51a593303b910a4c7bd0d79401c7d3b718810d64b.jpg)
Realtime recording...p. 65, p. 77
Step recording...p. 67, p. 76
![BOSS DR-3 - STEPREC[>1] - 2](/content/2025/01/151999/images/cdc7d3ac402b0db7cb80e65998163c05ce10f63a7a9f733d5e2557d9f1e0f37f.jpg)
Notes Concerning Editing and Recording
Edited or recorded data is not saved if the power is turned off while editing or recording is still in progress. Be sure to carry out the following.
- To quit editing, press [EXIT].
- To finish recording press STOP [ ]
The message "Keep Power ON! Now Working..." appears when these operations are in progress.
Never turn off the power while this message is displayed.
Adjusting the Tempo ([TEMPO])
Use the following procedure to adjust Style and song tempos.
![BOSS DR-3 - Adjusting the Tempo ([TEMPO]) - 1](/content/2025/01/151999/images/1646491f43d5e7cff631dd278258717290f66bfdd08bcdf7feaab5986789303d.jpg)
1. Press [TEMPO (TAP)].
The Tempo screen appears in the display.
| No. | STYLE/SONG |
| PLAY | TEMP0 |
| Tempo: 120 | |
| MEAS-BEAT | PARAMETER VALUE |
2. Adjust the tempo with the VALUE dial.
The tempo can be set to any value from 20 to 260.
3. Press [EXIT] to return to the previous screen.
MEMO
You can tap [TEMPO (TAP)] at least four times to set the tempo to the interval between the taps. For more details, refer to "Setting the Tempo by Tapping It Out (Tap Tempo)" (p. 27).
Changing the Key of the Performance ([KEY SHIFT])
Use the following procedure to change the key of the Styles and songs (transposing).
![BOSS DR-3 - Changing the Key of the Performance ([KEY SHIFT]) - 1](/content/2025/01/151999/images/11f3e20cf5e1819b5aebf5996e71eb03cfd064ff8ca5d254db01d40eed0c7a72.jpg)
1. Press [KEY SHIFT].
The Key Shift screen appears in the display.
![BOSS DR-3 - Press [KEY SHIFT]. - 1](/content/2025/01/151999/images/d5551122b14bfb9e8520a74a9a6f4db4a281de3e6eec0b7d9e3d6f8d78b53c8f.jpg)
2. Set the key with the VALUE dial.
You can set the value in semitone units within the range from -12 to +12, or one octave lower to one octave higher. This changes the key of the performance.
3. Press [EXIT] to return to the previous screen.
To return to the original key, press [KEYSHIFT], then set the key to "0" using the VALUE dial.
![BOSS DR-3 - Press [EXIT] to return to the previous screen. - 1](/content/2025/01/151999/images/514a9d1a0512fbbe7a7ae8ff356cb6fe1897fb3270be1d6d0c01edcf8ef40558.jpg)
If notes whose pitches are changed using the Key Shift function are in registers that are unplayable for the DR-3, the notes in the expressible range above or below that octave are sounded.
Chapter 2 Playing Styles (Manual Mode [MANU])
The DR-3 features 100 pre-programmed internal Styles in a variety of musical genres. You can perform by selecting the Styles and switching the Patterns in "Manual mode."
How the Pads Work When Performing Styles
The DR-3's pads can be switched between two modes of operation, [PIN] and [INST] (p. 37).
Patterns are switched with the pads when [] is lit.
When switching Patterns and performing Styles in Manual mode,
be sure to confirm that [] is lit.
Selecting Styles
Use this procedure to select the Styles to be performed.
- With the performance stopped, press [MANU] so the button lights up.
- Turn the VALUE dial to select a Style.
Style numbers for the Preset Styles (internal Styles) are preceded by a "P"; Style numbers for the User Styles (p. 61) are preceded by a "U."

For more on "Auto mode," in which the Patterns are selected automatically, refer to
"Chapter 3 Playing Styles (Auto Mode [AUTO])" (p. 46).

For more on creating Styles, refer to "Chapter 7 Creating Styles" (p. 61).

When [INST] is lit, drum and bass sounds are played with the pads while the patterns are in progress.
For more information on [INST], refer to "Chapter 6 Performing with the Pads" (p. 58).

If you switch the style during its performance, a " " mark appears in front of the style name which will be played next.
The style switches after the currently playing pattern ends, and the " " mark disappears.

Depending on its settings, there may be some delay for the TSC (p. 51) to change, if the style is switched while it is being performed.

"Preset Style List" (p. 116)
Selecting the Patterns to be Played
Pattern Pads

A single Style is divided into eight performance units called "Patterns," which are assigned to the pattern pads.
| Pattern Pad | INTRO/ START | FILL A | VERSE A | FILL B | VERSE B | FILL C | VERSE C | ENDING/ STOP |
| Descrip- tion | After the intro is played, the Style pro- ceeds to Verse A. | After Fill-In A is played, the Style proceeds to Verse A. | This is the main per-formance Pattern. | After Fill-In B is played, the Style proceeds to Verse B. | This is a comple- mentary Pattern to Verse A. | After Fill-In C is played, the Style proceeds to Verse C. | This is the most elabo- rate of the Patterns A- C. | The ending is played, and then the perfor- mance stops. |
Starting/Stopping
1. Press any pattern pad.
With the performance stopped, press any of the pattern pads to start the performance.
When you press [INTRO/START], the performance starts from the intro. After the intro is played, the Style proceeds to Verse A.
2. Press [ENDING/STOP].
The ending is played, and then the performance stops.
If you press STOP [ ], the performance stops without the ending being played.
How to Change Patterns
1. Press any of the pattern pads while the performance is in progress.
If while a Pattern is being played you press a pad for a different Pattern, the pad you have pressed begins to flash, indicating that this is to be the next Pattern played. When the currently playing pattern ends, the pattern is switched, and the pad that was flashing will instead light steadily.
When you press any of the [FILL A-C] buttons, a fill-in of up to one measure in length is played, and that is followed by the corresponding [VERSE A-C].
When you press [ENDING/STOP], the ending is played, and then the performance stops.
Selecting Variations (VARIATION)
Each Style includes three different variations, which you can use to add variety to the performance, even with the same Style.
The functions of the three VARIATION buttons are described below.
| Button Name | PTN | KIT | MUTE |
| Descrip- tion | This alternates the Patterns. | This substitutes the kits, thereby changing the sound. | This mutes a part of the drum set. |
1. While the performance is in progress, press VARIATION [PTN], [KIT], or [MUTE] so the button lights up.
The pressed button lights up (indicating it is on).
When you press the button once more, the button's light goes out (indicating it is off), and the original Pattern is played.
You can also perform with more than one of these buttons on.
MEMO
You can use the VARIATION buttons not only in Manual mode, but in Auto mode (p. 46) and Song mode (p. 85) as well.
NOTE
The VARIATION [PTN] button does not have any effect on patterns other than verses.
MEMO
The settings used when you press a VARIATION button differ according to the Style.
Chapter 3 Playing Styles (Auto Mode [AUTO])
When you perform Styles in Auto mode, the DR-3 switches the Patterns automatically, even without the pattern pads being pressed.
This lets you enjoy session-like performances without having to take your hands off the guitar or other instrument you are playing. When performing in Auto mode, the Patterns are basically played in the following sequence. You can also press a button other than [INTRO/START] to begin the performance from that Pattern.
![BOSS DR-3 - Chapter 3 Playing Styles (Auto Mode [AUTO]) - 1](/content/2025/01/151999/images/5a64d969602bbf74d04c7aaeec0deadc7da7127776a22cb6a9fe53d01745b2fb.jpg)
"Patterns" (p. 35)
![BOSS DR-3 - Chapter 3 Playing Styles (Auto Mode [AUTO]) - 2](/content/2025/01/151999/images/07cb05c810b30859ce1de89743164e4c7e5455c5f31e941d9ea5d07b4e50ffcd.jpg)
Pattern Progression in Auto Mode
Selecting a Style
- With the performance stopped, press [AUTO] so the button lights up.
- Turn the VALUE dial to select a Style.
Style numbers for the Preset Styles (internal Styles) are preceded by a "P"; Style numbers for the User Styles (p. 61) are preceded by a "U."
Performing in Auto Mode
- Press any of the pattern pads.
When the performance of the Pattern initially specified is finished, the next Pattern is played automatically.
To see the sequence in which the Patterns are played, please refer to the figure "Pattern Progression in Auto Mode."
If you press a pattern pad while the performance is in progress, the Style switches to the Pattern corresponding to the pressed pad, and the performance then continues by repeating the Pattern progression sequence.
- When you press [ENDING/STOP], the ending is played and then the performance stops.
To stop the Style without having the ending played, press STOP [ ]

You can change the Pattern progressions and the number of measures repeated.
Refer to "Changing the Pattern Progression in Auto Mode" (p. 47).

When [INST] is lit, drum and bass sounds are played with the pads while the patterns are in progress.
For more information on [INST], refer to "Chapter 6 Performing with the Pads" (p. 58).

When the performance is stopped, pressing any pattern pad will start the performance.
Changing the Pattern Progression in Auto Mode
You can change the pattern progression when performing in Auto mode.
1. With the performance stopped, press [EDIT].
The Edit Menu screen appears.
![BOSS DR-3 - With the performance stopped, press [EDIT]. - 1](/content/2025/01/151999/images/77aac42d592ff830e19ad49bf33e51b6bab8eb02eeec4a2ef8246f7177545dd8.jpg)
2. Press [▶], select a , then press [ENTER].
![BOSS DR-3 - Press [▶], select a , then press [ENTER]. - 1](/content/2025/01/151999/images/9ee5c15b9a5418bba1a43aa62405472ac3413999d422dbe93e380270d6470d56.jpg)
3. Press [▶], select a to be set.
![BOSS DR-3 - Press [▶], select a to be set. - 1](/content/2025/01/151999/images/86ef2cea3207fd21ece8b56b9e3bbb9dbffe1aa981c4d034ee4d6e19875d97bc.jpg)
4. Turn the VALUE dial to set the value.
| Parameter | Value |
| AutoType | ABC, ABC 4, ABC 8, ABC 16, AB, AB 4, AB 8, AB 16 |
The letters indicate the sequence of the verses.
The numeral represents the number of measures performed in each verse.
When the number of measures has been specified by means of a value that has been set, then regardless of the original number of measures in each verse, the verse is repeated only for the number of measures specified.
Example: When performing a Style with a Verse A of four measures, a Verse B of two measures, and Verse C of two measures.
- With "ABC" for "AutoType"
The sequence with Verses A, B, and C played once each is repeated.
- With "ABC4" for "AutoType"
The sequence in which four measures of Verses A, B, and C are played is repeated.
5. Press [EXIT] a number of times until you exit Edit mode.
Chapter 4 Controlling the Styles with a Foot Switch
You can use a foot switch (such as the optional FS-5U) to start and stop performances and switch verses (p. 44). This is convenient, as it allows you to switch the Patterns with your foot.
You can connect up to two foot switches.
When using the special cable (PCS-31), the foot switch connected with the white-striped plug is used to start and stop performances, and the foot switch connected with the red-striped plug is used to switch verses (as set at the factory).
Starting and Stopping Performances
You can use a foot switch to start and stop the performance of Styles and songs (p. 85).
- With the performance stopped, press the foot switch.
When [MANU] or [AUTO] is lit: performance of the Style begins from the intro.
When [SONG] is lit: performance of the song begins.
- Press the foot switch while the performance is in progress.
When [MANU] or [AUTO] is lit: the ending is played, and then the performance stops.
When [SONG] is lit: the song stops.
Switching Verses
You can press the foot switch during performance of the Style to have a fill-in inserted in the current verse and then switch to the next verse. For example, if you press the foot switch while Verse A is playing, the DR-3 inserts a fill-in B and switches to Verse B.
- Press the foot switch while the performance is in progress.
A fill-in is inserted, and the DR-3 switches to the verse following the verse currently being played.
Pressing the foot switch while Verse A is playing switches the performance to Verse B, pressing the foot switch during Verse B switches the performance to Verse C, and pressing the foot switch during Verse C switches the performance to Verse A.
By continuing to press the foot switch, you can select subsequent verses according to the number of times you press the foot switch. Pressing the switch while the performance is in progress switches the DR-3 to the next verse specified for the song.
MEMO
For instructions on connecting the foot switch, refer to
"Connecting the Foot Switch" (p. 29).
NOTE
During recording or editing in Edit mode (p. 38), depressing the foot switch will have no effect.
MEMO
Wiring diagrams for the foot switch jack is shown at below.

MEMO
If two foot switches are connected, press the foot switch connected using the plug with the white ring.
MEMO
When connecting two foot switches, press the foot switch connected using the plug with the red ring. If you have only one foot switch connected, use the procedure described in the following section "Assigning Functions to the Foot Switch" to assign "VERSE, LOOP" to the foot switch.
Assigning Functions to the Foot Switch
You can assign functions other than starting and stopping performances and switching verses to the foot switch.
- Press the [EDIT] button.
- Press [▶] to select a
.
- Press [ENTER].
- Press [ ][ ] to select a <FS1> or a <FS2> .
If you have two foot switches connected using the special cable (PCS-31), select <FS1> when making settings for the foot switch with the white ring, and <FS2> when making settings for the foot switch connected using the plug with the red ring.
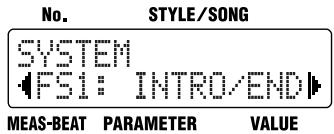
- Turn the VALUE dial to select the function to be assigned.
Refer to the following chart to see which functions can be assigned.
Press [EXIT] a number of times to return to the previous screen.
MEMO
With the factory settings,
Functions That Can Be Assigned to Foot Switches
| Settings | Function |
| INTRO/END | When [MANU] or [AUTO] is lit: When the foot switch is pressed while the performance is stopped, the performance starts from the intro. If the foot switch is pressed while the performance is in progress, the ending is played, and then the performance stops. When [SONG] is lit: When the foot switch is pressed while the performance is stopped, the performance of the song begins, and if pressed while the performance is in progress, the performance stops. |
| VERSE,LOOP | When [MANU] or [AUTO] is lit: A fill-in is played after the verse currently being played, and the performance switches to the next verse in the Pattern. Pressing the foot switch while Verse A is playing switches the performance to Verse B, pressing it during Verse B switches the performance to Verse C, and pressing it during Verse C switches the performance to Verse A. No action results when the foot switch is pressed during the intro or ending. By continuing to press the foot switch, you can select subsequent verses according to the number of times you press the foot switch. When [SONG] is lit: The function that is used when you press the pedal varies according to the [EDIT] <SONG> “LoopType” setting. * Refer to “Switching Patterns With a Foot Switch” (p. 86) |
| VAR PTN | This has the same function as VARIA-TION [PTN] (p. 45). |
| VAR KIT | This has the same function as VARIA-TION [KIT] (p. 45). |
| VAR MUTE | This has the same function as VARIA-TION [MUTE] (p. 45). |
| Settings | Function |
| TAP TEMPO | When the foot switch is pressed four or more times, the tempo is specified according to the interval between each press (Tap Tempo, p. 27). |
| STRT/ PAUSE | This has the same function as START [▶/■]. |
| START/ STOP | When the foot switch is pressed while the performance is stopped, the performance begins, and if pressed while the performance is in progress, the performance stops. |
| STYLE FWD | This switches from the Style currently being played to the next higher-numbered Style. * If the current Style number is “P100,” the DR-3 switches to “U001”; if the current Style number is “U100,” the DR-3 switches to “P001.” |
| STYLE BWD | This switches from the Style currently being played to the Style one number lower. * If the current Style number is “P001,” the DR-3 switches to “U100”; if the current Style number is “U001,” the DR-3 switches to “P100.” |
| INTRO | This has the same function as [IN-TRO/START]. |
| FILL A | This has the same function as [FILL A]. |
| VERSE A | This has the same function as [VERSE A]. |
| FILL B | This has the same function as [FILL B]. |
| VERSE B | This has the same function as [VERSE B]. |
| FILL C | This has the same function as [FILL C]. |
| VERSE C | This has the same function as [VERSE C]. |
| ENDING | This has the same function as [END-ING/STOP]. |
| DRUM KICK- DRUM CYM5 | This plays the sounds assigned to DRUM KICK - DRUM CYM5 in the kit (p. 58) currently being played. |
| PERC 1- PERC 13 | This plays the sounds assigned to PERC 1 - PERC 13 in the kit (p. 58) currently being played. |
Chapter 5 Changing the Overall Tone of the Sound and Acoustics (TSC)
"TSC," short for "Total Sound Control," is a function that lets you change the overall tone of the sound and acoustics.
TSC includes two types of effect, "Sound Shape," which changes the overall tone of the sound, and "Ambience," which alters the acoustic characteristics of the overall sound.
"Sound Shape" and "Ambience" each feature eight preprogrammed groups of settings (Preset), but you can also add up to eight more of your own settings (User settings) to these.
Changing the Overall Tone of the Sound ([SOUND SHAPE])
"Sound Shape" allows you to adjust the overall tone of the sound with a three-band equalizer and three-band compressor that are used to boost or cut specific pitches (frequency bands).
1. Press [SOUND SHAPE].
The TSC screen appears.
![BOSS DR-3 - Press [SOUND SHAPE]. - 1](/content/2025/01/151999/images/25ffdc71069f86e0e59f70c49ace6366fd5628d32f84b46fa0093fac16e97901.jpg)
Each time you press [SOUND SHAPE], it alternately turns the button on (lit) and off (unlit).
2. Turn the VALUE dial to select the effect.
| Value | Name | Value | Name |
| P1 | ROCK | P2 | LOUD |
| P3 | TIGHT | P4 | ENHANC |
| P5 | ACSTIC | P6 | LIVE |
| P7 | LO-FI | P8 | HRDCMP |
| U1-8 | When the unit left the factory, the User settings (U1-U8) contained the same settings as the Preset (P1-P8). | ||
3. Press [EXIT] to return you to the previous screen.
MEMO
With the Preset Styles, settings for the two types of TSC effects are predetermined for each Style individually, allowing you to attain the acoustic effect most suitable for each Style.
MEMO
You can change the parameters of the Sound Shape settings and name the settings. You can store up to eight settings. For more details, refer to "Changing the Sound Shape Parameters" (p. 53).
Altering the Acoustic Characteristics of the Overall Sound ([AMBIENCE])
"Ambience" adjusts the breadth of the sound by altering the acoustic characteristics of the sound.
1. Press [AMBIENCE].
The TSC screen appears.
![BOSS DR-3 - Press [AMBIENCE]. - 1](/content/2025/01/151999/images/bf31e5d36625c515b4e2b25ba1b2cecf1650373bc603e2507bac19292011b5d6.jpg)
Each time you press [AMBIENCE], it alternately turns the button on (lit) and off (unlit).
2. Turn the VALUE dial to select the effect.
| Value | Name | Value | Name |
| P1 | NATURL | P2 | LARGE |
| P3 | BRIGHT | P4 | POWER |
| P5 | ROOM 1 | P6 | ROOM 2 |
| P7 | ROOM 3 | P8 | HALL |
| U1-8 | When the unit left the factory, the User settings (U1-U8) contained the same settings as the Preset (P1-P8). | ||
3. Press [EXIT] to return you to the previous screen.
![BOSS DR-3 - Press [EXIT] to return you to the previous screen. - 1](/content/2025/01/151999/images/83c8879778d252d2beb8626110aacc148efc4d57073983ccd353c4ec78591070.jpg)
You can change the parameters of the Ambience settings and name the settings. You can store up to eight settings. For more details, refer to "Changing the Ambience Parameters" (p. 56).
Changing the Sound Shape Parameters
You can store up to eight edited Sound Shape parameters.
- Unable to change the settings for the Preset Sound Shape, with a “P” appended to their number.
- When the unit left the factory, the User settings (U1-U8) contained the same settings as the Preset (P1-P8).
-
If the parameters below are changed during the performance of a style or song, the changes are nullified when you press [EDIT], restoring the settings for the currently selected style or song.
-
Key Shift value (p. 42)
-
Tempo value (p. 41)
Sound Shape and Ambience values (p. 51, p. 52) -
Certain data cannot be changed while it is being performed. First stop the performance, then make the changes.
How to Make the Settings
- With the performance stopped, press [EDIT]. The Edit Menu screen appears.
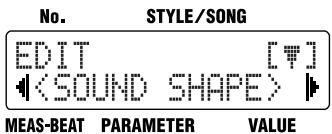
- Press [▶], select a
, then press [ENTER].
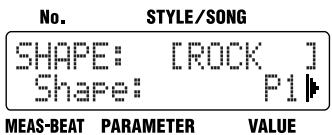
- Turn the VALUE dial to select the Sound Shape number to be set.
- Press [][] , select the parameter to be set.
- Turn the VALUE dial to set the value.
- When you have finished making the setting, press [EXIT] a number of times until you exit Edit mode.
Changing the Equalizer Parameters
This changes the parameters of the Sound Shape 3-Band equalizer.
The values that can be set for each of the parameters are shown below.
| Parameter | Value | Description |
| EQ / Switch | OFF, ON | This parameter turns the equalizer effect on/off. |
| EQ / Input | -24 dB+12 dB | Sets the overall volume before passing through the equalizer. |
| EQ (Low) / Type | Shelving, Peaking | Sets the equalizer type (shelving, peaking) for the lower range. |
| EQ (Low) / Gain | -12 dB+12 dB | Sets the amount of boost or cut in the lower range. |
| EQ (Low) / Freq | 20 Hz-2.0 kHz | Sets the center frequency for the lower range. |
| EQ (Low) / Q (*1) | 0.3–16.0 | Sets the steepness of the frequency response curve for the lower range's center frequency. |
| EQ (Mid) / Gain | -12 dB+12 dB | Sets the amount of boost or cut in the middle range. |
| EQ (Mid) / Freq | 20 Hz-8.0 kHz | Sets the center frequency for the middle range. |
| EQ (Mid) / Q | 0.3–16.0 | Sets the steepness of the frequency response curve for the middle range's center frequency. |
| EQ (High) / Type | Shelving, Peaking | Sets the equalizer type (shelving, peaking) for the upper range. |
| EQ (High) / Gain | -12 dB+12 dB | Sets the amount of boost or cut in the upper range. |
| EQ (High) / Freq | 500 Hz-14.0 kHz | Sets the center frequency for the upper range. |
| EQ (High) / Q (*1) | 0.3–16.0 | Sets the steepness of the frequency response curve for the upper range's center frequency. |
| EQ / Out Level | -24 dB+12 dB | Sets the overall volume level after equalization. |
(^*1) The "EQ (Low) / Q" and "EQ (High) / Q" is disabled when "Shelving" (shelving type equalization) is selected for the "EQ (Low) / Type" or "EQ (High) / Type."
Changing the Compressor Parameters
This changes the parameters of the Sound Shape compressor.
The Compressor compresses the overall output signal when the input volume level exceeds a set value.
The values that can be set for each of the parameters are shown below.
| Parameter | Value | Description |
| COMP / Switch | OFF, ON | This parameter turns the compressor effect on/off. |
| COMP / SplitL | 20 Hz-800 Hz | This sets the frequency (in the lower range) at which the source sound is split into three separate ranges. |
| COMP / SplitH | 1.6 kHz-14.0 kHz | This sets the frequency (in the upper range) at which the source sound is split into three separate ranges. |
| COMP (Low) / Thres | -30 dB+6 dB | This sets the volume level at which the lower-range compressor goes into effect. |
| COMP (Low) / Ratio | 1:1.00-1:16.0,1:INF | This sets the ratio of suppres-sion of the lower-range out-put when the input level exceeds the Lo threshold lev-el (COMP (Low) / Thres). |
| COMP (Low) / Attack | 0 ms-100 ms | This sets the time it takes for the lower-range compressor to go into effect once the in-put level exceeds the Lo threshold level. |
| COMP (Low) / Release | 50 ms-5000 ms | This sets the time it takes for the lower-range compressor effect to stop once the input level falls below the Lo threshold level. |
| COMP(Mid) / Thres | -30 dB+6 dB | This sets the volume level at which the midrange com-pressor goes into effect. |
| COMP(Mid) / Ratio | 1:1.00-1:16.0,1:INF | This sets the ratio of suppres-sion of the midrange output when the input level exceeds the Middle threshold level (COMP(Mid) / Thres). |
| Parameter | Value | Description |
| COMP(Mid)/ Attack | 0 ms-100 ms | This sets the time it takes for the midrange compressor to go into effect once the input level exceeds the Middle threshold level. |
| COMP(Mid)/ Release | 50 ms-5000 ms | This sets the time it takes for the lower-range compressor effect to stop once the input level falls below the Middle threshold level. |
| COMP(Hi)/ Thres | -30 dB-+6 dB | This sets the volume level at which the upper-range compressor goes into effect. |
| COMP(Hi)/ Ratio | 1:1.00-1:16.0,1:INF | This sets the ratio of suppression of the upper-range output when the input level exceeds the Hi threshold level (COMP(Hi) / Thres). |
| COMP(Hi)/ Attack | 0 ms-100 ms | This sets the time it takes for the upper-range compressor to go into effect once the input level exceeds the Hi threshold level. |
| COMP(Hi)/ Release | 50 ms-5000 ms | This sets the time it takes for the upper-range compressor effect to stop once the input level falls below the Hi threshold level. |
| * With the compressor, the level is automatically adjusted to the optimum setting according to the threshold (Thres) and ratio (Ratio) settings. In addition, since lengthening the attack (Attack) setting may result in distortion, a buffer (margin) of -6 dB is provided. Adjust the following parameter levels as needed. | ||
| COMP/ Low Lev | -60 dB-+6 dB | Sets the volume level of the lower range after the signal passes through the expander and compressor. |
| COMP/ Mid Lev | -60 dB-+6 dB | Sets the volume level of the midrange after the signal passes through the expander and compressor. |
| COMP/ High Lev | -60 dB-+6 dB | Sets the volume level of the upper range after the signal passes through the expander and compressor. |
| COMP/ OutLevel | -60 dB-+6 dB | Sets the overall volume level after compressor. |
Naming the Settings
Select a
You can edit the name of the currently selected Sound Shape setting, using up to six characters for the name.
Press [][] to move to the point where you want to enter the character(s).
Each time you press [ENTER], it switches between upper and lower case for the text being input.
Turn the VALUE dial to select the character.
When you have finished making the setting, press [EXIT] a number of times until you exit Edit mode.
■ Copying the Settings
Select a <COPY> on step 4 in p. 53, then press [ENTER].
Copy the currently selected Sound Shape setting to the User settings (U1-U8).
Turn the VALUE dial to select the number for the Sound Shape to be copied, then press [▶].
Turn the VALUE dial to select the copy-destination Sound Shape number, then press [▶].
Press [ENTER] to execute the copy.
If you press [ ], the copy is cancelled, and you're taken back to the screen you were in immediately before that.
When you have finished making the setting, press [EXIT] a number of times until you exit Edit mode.
Changing the Ambience Parameters
You can store up to eight edited Ambience parameters.
- Unable to change the settings for the Preset Ambience, with a “P” appended to their number.
- When the unit left the factory, the User settings (U1-U8) contained the same settings as the Preset (P1-P8).
-
If the parameters below are changed during the performance of a style or song, the changes are nullified when you press [EDIT], restoring the settings for the currently selected style or song.
-
Key Shift value (p. 42)
-
Tempo value (p. 41)
Sound Shape and Ambience values (p. 51, p. 52) -
Certain data cannot be changed while it is being performed. First stop the performance, then make the changes.
How to Make the Settings
- With the performance stopped, press [EDIT]. The Edit Menu screen appears.
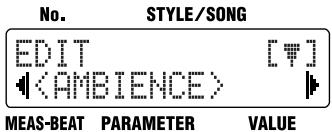
- Press [▶], select a
, then press [ENTER].
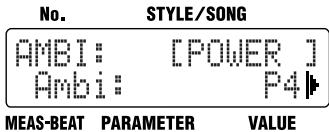
- Turn the VALUE dial to select the Ambience number to be set.
- Press [][] , select the parameter to be set.
- Turn the VALUE dial to set the value.
- When you have finished making the setting, press [EXIT] a number of times until you exit Edit mode.
Changing the Ambience Parameters
The values that can be set for each of the parameters are shown below.
| Parameter | Value | Description |
| Size | 5.6 m-20.5 m | This parameter adjusts the size of the room which is sim-ulated. |
| Time | 0.1–32.0 | This parameter adjusts the duration (time) of the reverb. |
| Level | 0–100 | This parameter adjusts the ef-fect level. |
| PreDelay | 0 ms-20 ms | This parameter adjusts the time interval between the di-rect sound and the beginning of the reverb sound. |
| Density | 0–100 | Adjust the density of the whole reverb sound. |
| ErLevel | 0–100 | This parameter adjusts the volume level of the sound (Early Reflections) that ar-rives at the listener after bouncing off the walls once or a few times. |
| RelDensity | 0–100 | This parameter adjusts the density of the sound that reaches the listener after many repeated reflections. |
| Low Damp / Gain | -36.0 dB-0.0 dB | This parameter adjusts the amount of damping for Low Damp. No low-frequency damping occurs when set to “0.” |
| Low Damp / Freq | 55 Hz-4.00 kHz | This parameter adjusts the standard frequency at which the low-frequencies are damped. The reverb sound in the band below this frequen-cy is damped. |
| Hi Damp / Gain | -36.0 dB-0.0 dB | This parameter adjusts the amount of damping for High Damp. No high-frequency damping occurs when set to “0.” |
| Hi Damp / Freq | 400 Hz–16 kHz | This parameter adjusts the standard frequency at which the high-frequencies are damped. The reverb sound in the band above the standard frequency is damped. |
| Low Cut / Freq | 20 Hz–2.0 kHz | This parameter adjusts the frequency at which the low-frequencies are cut. |
| High Cut / Freq | 250 Hz–14.0 kHz, FLAT | This parameter adjusts the frequency at which the low-frequencies are cut. No effect occurs when set to “FLAT.” |
Naming the Settings
Select a
You can edit the name of the currently selected Ambience setting, using up to six characters for the name.
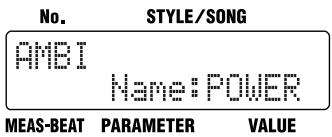
Press [][] to move to the point where you want to enter the character(s).
Each time you press [ENTER], it switches between upper and lower case for the text being input.
Turn the VALUE dial to select the character.
When you have finished making the setting, press [EXIT] a number of times until you exit Edit mode.
■ Copying the Settings
Select a <COPY> on step 4 in p. 56, then press [ENTER].
Copy the currently selected Ambience setting to the User settings (U1-U8).

Turn the VALUE dial to select the number for the Ambience to be copied, then press [▶].

Turn the VALUE dial to select the copy-destination Ambience number, then press [▶].
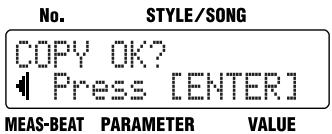
Press [ENTER] to execute the copy.
If you press [ ], the copy is cancelled, and you're taken back to the screen you were in immediately before that.
When you have finished making the setting, press [EXIT] a number of times until you exit Edit mode.
Chapter 6 Performing with the Pads
When you press [INST], the button lights up, and you can then play drum set and bass sounds by pressing the pads. You can also turn [INST] on while Styles and songs are in progress to play sounds with the pads.
You can perform using the following pads when [INST] is lit.
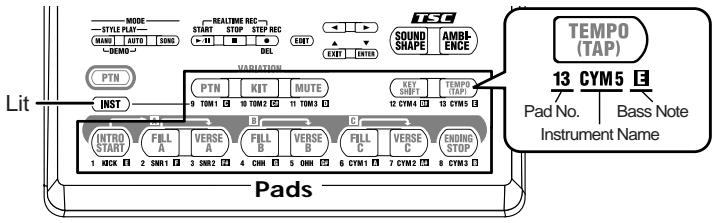
You can perform with the pads using three groups of sounds (DRUM, PERC, BASS).
Select the desired group by pressing [INST], and cycling through the available choices:
“DRUM” “PERC” “BASS” “oct BASS” “oct
BASS" "DRUM" and so on.
The name of the sound group appears in the display.
| Dis-played | Group Name | Sound |
| DRUM | Drum Set | The sounds in the drum set are assigned to the pads. The sound names are printed under the pads. |
| PERC | Percussion | Various percussion instrument sounds are as-signed to the pads. |
| BASS | Bass | The various pitches of the scale for the speci-fied bass sound are assigned to the pads. The note names are printed under the pads. |
| oct BASS | The bass sound one octave lower is assigned to the pads. | |
| oct BASS | The bass sound one octave higher is assigned to the pads. | |
When you tap a pad, the sound of the instrument assigned to that pad or the specified pitch is played.
The volume and tone change according to how hard you tap the pads.
MEMO
The tones that are assigned to the pads in the Preset Styles are predetermined for each Style.
MEMO
Press [PTN] when using the pads to switch Patterns. For more details, refer to "Switching the Pad Functions" (p. 37).
MEMO
You can adjust the pad sensitivity. For more details, refer to "Adjusting the Pad Sensitivity" (p. 89).
Playing Drum Sounds
- Press [INST] a number of times until "DRUM" appears in the display.
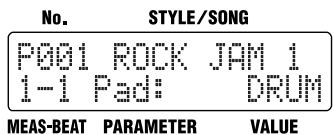
- Tap the pads to perform.
The instrument sounds assigned to the pads are played.
The names of the assigned instruments are printed under the pads.
Playing Percussion Sounds
- Press [INST] a number of times until "PERC" appears in the display.
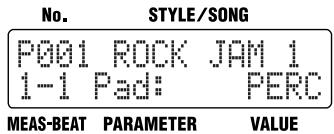
- Tap the pads to perform.
The instrument sounds assigned to the pads are played.
Playing Bass Sounds
- Press [INST] a number of times until "BASS," "oct BASS" or "oct BASS" appears in the display.
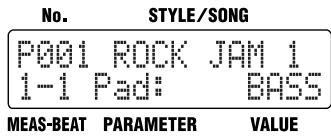
- Tap the pads to perform.
The bass sound is played at the pitch assigned to a particular pad.
The bass sound stops playing when you release the pad.
The names of the notes assigned to the pads are printed under the pads.

For details on the sounds assigned to the pads, refer to the "Preset Kit List" (p. 106).
NOTE
You cannot play more than one bass sound at the same time.
Selecting a Different Sound (VARIATION [KIT])
When [INST] is on, the set of three groups of sounds played with the pads (DRUM, PERC, BASS) is called the "drum kit."
A single Style has two drum kits included with it, and you can switch between these two drum kits by turning VARIATION [KIT] on and off.
![BOSS DR-3 - Selecting a Different Sound (VARIATION [KIT]) - 1](/content/2025/01/151999/images/22ab8e7840eed172bcb012a082804fc0d7b8daa3c4357d169ec63da651e9d0cc.jpg)
- Press [PTN] so the button lights up.
- Press VARIATION [KIT] so the button lights up.
- Press [INST] so the button lights up.
When you press the pads, the variation drum kit plays. To return to the original drum kit, press [PTN] and then VARIATION [KIT], causing the button lights to go out.
MEMO
You can change the instrument sounds contained in a drum kit, and create original drum kits. You can also change the volume and pan (sound localization) settings.
For further details, refer to "Chapter 10 Creating Your Own Kits" (p. 90).
MEMO
Turning VARIATION [KIT] on switches not only the pad drum kit, but also the drum kit for the Style or song currently being played.
Chapter 7 Creating Styles
Even though the DR-3 comes with a great variety of styles, representing many genres, you can also create your own original styles. Such original styles are called "User styles."
User styles have a "U" at the beginning of the style number, for example "U001." You can create and store up to 100 User styles in the DR-3.
Procedure for Creating Styles
Here are the steps you need to take to create a new style:
<1> Select a Number for the Style You Are Creating
<2> Make the Settings for the New Style
- Set the Tempo
- Set the Beat
- Set Up the Drum Kit
- Set VARIATION [MUTE]
- Make the TSC Settings
- Determine the Number of Measures for Each Pattern (These settings can be changed after the patterns are recorded.)
<3> Record the Patterns (Realtime Recording/Step Recording)
- Record the Drum Part
- Record the Bass Part
- Change Dynamics to the Sounds (Velocity Edit)
- Transpose the Bass Part
<4> Check the Created Style
- Edit the Settings
- Name the Style
There are two ways to record the patterns in Step < 3> .
Realtime Recording
With this method, the key pads are played in time with a metronome count, with the pattern being recorded just as it is performed. Even if there is a little unevenness in the timing used in tapping the key pads, the Quantize function allows you to record with the timing corrected. (Refer to step 3 on p. 65)
Step Recording
With this method, you "record" by specifying the timing (step), volume, etc., of each instrument sound, one at a time. This allows patterns to be recorded accurately, even those that are hard to record using Realtime Recording.
You can also record patterns using both Realtime and Step Recording.
After recording the basic pattern using Step Recording, finish creating the Pattern by using Realtime Recording to add sounds in a freer ad-lib style.
Convenient Functions for Creating Styles
You can speed up the process of creating a new style by first copying a Preset style, or the patterns in a Preset style to a User style, and then modifying that to create the new style.
- Copying and Deleting Styles (p. 71)
- Copying and Deleting Patterns (p. 72)
HINT
Creating Two-Measure Patterns from Four-Measure Patterns
When you copy a four-measure pattern, and then, using the procedure described in "Determining the Number of Measures for Each Pattern" (p. 64), set the number of measures to "2," it results in a pattern in which only the first two measures of the original pattern are played. In this manner, you can use the setting described on p. 64 to create a pattern after copying a pattern that is shorter than the one you start with.
HINT
Changing the Key of the Bass Part (Key Transpose)
After copying or recording a pattern, you can change the key of its bass part.
< 1> Selecting a Number for the Style
1. With the performance stopped, press [MANU].
The Style screen appears.
![BOSS DR-3 - With the performance stopped, press [MANU]. - 1](/content/2025/01/151999/images/6fc9592eb977a82d02a8b569864a6e4d2df58de87bb104c7257a51c02c39a5f1.jpg)
2. Turn the VALUE dial to select the number (U001-U100) for the style you are creating.
You cannot record to the Preset styles (P001-P100).
2 Making the Settings for the New Style
-
If the parameters below are changed during the performance of a style, the changes are nullified when you press [EDIT], restoring the settings for the currently selected style or song.
-
Key Shift value (p. 42)
-
Tempo value (p. 41)
Sound Shape and Ambience values (p. 51, p. 52) -
Certain data cannot be changed while it is being performed. First stop the performance, then make the changes.
- VARIATION [PTN] [KIT] and [MUTE] will have no effect in Edit mode.
Setting the Tempo for the Style
1. Select the style to be set, then press [EDIT].
The Edit Menu screen appears.
2. Select a
- DR-3
- Dr. Rhythm
- Owner's Manual
- ■ Printing Conventions in This Manual
- Copyright © 2003 BOSS CORPORATION
- USING THE UNIT SAFELY
- INSTRUCTIONS FOR THE PREVENTION OF FIRE, ELECTRIC SHOCK, OR INJURY TO PERSONS
- ALWAYS OBSERVE THE FOLLOWING
- WARNING
- CAUTION
- IMPORTANT NOTES
- Power Supply: Use of Batteries
- Placement
- Maintenance
- Additional Precautions
- Making Your Own Rhythm Pattern Arrangements with Style Play
- Different Preset Styles
- TSC (Total Sound Control) Function
- Control the DR-3 with a Foot Switch
- ■ Variation Function Lets You Enjoy a Wide Variety of Arrangements
- ■ Produce Rhythm Patterns Automatically in Auto Mode
- ■ High-Quality Instrument Sounds-Ghost Notes, Too
- Dynamics-Capable Pad Keys
- Setting the Tempo with Tap Tempo Function
- Key Shift Function
- Convenient Song Composing and Performing Functions
- ■ Synchronize Performances with Digital Recorders and Sequencers
- ■ Equipped with Both Phono Jacks and Phone Jacks
- Compact Body
- Contents
- Quick Start 201
- Chapter 3 Playing Styles (Auto Mode [AUTO]) 46
- Chapter 4 Controlling the Styles with a Foot Switch 48
- Chapter 5 Changing the Overall Tone of the Sound and Acoustics (TSC) 51
- Chapter 6 Performing with the Pads. 58
- Chapter 7 Creating Styles 61
- Chapter 8 Creating and Performing Songs ([SONG]) 74
- Chapter 9 Changing the Operating Environment (System) 88
- Chapter 10 Creating Your Own Kits. 90
- Chapter 11 Connecting and Using External MIDI Devices 93
- Appendices. 98
- Troubleshooting 99
- Message List 100
- Parameter List. 101
- Instrument/Bass Tone List 104
- Preset Kit List 106
- Preset Style List. 116
- MIDI Implementation 117
- MIDI Implementation Chart 120
- Specifications 122
- Index 123
- Display
- VALUE dial
- MODE button
- MANU (Manual) button
- AUTO button
- SONG button
- 4.
- START button
- STOP button
- STEPREC ● button
- EDIT button
- / /
- /EXIT/
- /ENTER buttons
- TSC (Total Sound Control) buttons
- SOUND SHAPE button
- AMBIENCE button
- PTN button
- VARIATION buttons
- PTN button
- KIT button
- MUTE button
- KEY SHIFT button
- TEMPO (TAP) button
- Pattern Pads
- INST (Instrument) button
- Pads
- Rear Panel
- MIDI IN connector
- FOOT SW (Switch) jack
- OUTPUT jack R (MONO) / L (PHONES)
- OUTPUT jack R / L
- VOLUME knob
- POWER switch
- AC Adaptor jack
- Security Slot (K)
- Before You Play
- Install Batteries
- NOTE
- MEMO
- Making Connections
- 1
- Before you begin making connections, confirm the following.
- 2
- Connect the amp and audio gear, or the headphones as shown in the diagram.
- #
- Turning On/Off the Power
- Turning on the power
- Before you turn the power on, make sure of the following points.
- Turn on the POWER switch located on the rear panel of the DR-3.
- Turn on the power of the amp.
- Turning Off the Power
- Before turning off the DR-3's power, make sure that:
- Switch off any amps and other external equipment.
- 3
- Reset to Default Factory Settings (Factory Reset)
- Press [ENTER].
- To execute Factory Reset, press [ENTER].
- Quick Start
- Let's Listen to the Demo
- Hold down [MANU] and press [AUTO].
- Press STOP [ ] to stop the demo performance.
- Let's Play a Style
- Performing Styles with Selecting Patterns ([MANU])
- 4
- Performing Variations on Styles (VARIATION)
- Press VARIATION [KIT].
- 5
- Press VARIATION [MUTE].
- 6
- Selecting Styles
- Changing the Tempo ([TEMPO])
- Press [TEMPO (TAP)].
- Adjust the tempo with the VALUE dial.
- Press [EXIT] to return you to the previous screen.
- Setting the Tempo by Tapping It Out (Tap Tempo)
- Press [TEMPO (TAP)] at least four times.
- Changing the Key ([KEY SHIFT])
- Press [KEY SHIFT].
- Set the key with the VALUE dial.
- Let's Use a Foot Switch
- Connecting the Foot Switch
- Connect the foot switch to the FOOT SW jack on the rear panel.
- When Connecting Two Foot Switches
- Using the Foot Switch
- Let's Perform with the Patterns Switched
- Automatically ([AUTO])
- Let's Change the Overall Tone of the
- Sound and Acoustics (TSC)
- Press [SOUND SHAPE] so the button lights up.
- 7
- Press TSC [AMBIENCE].
- 8
- Turn the VALUE dial to select a Ambience effect.
- 9
- Press [AMBIENCE] so the button light up.
- 10
- Chapter 1 Overview of the DR-3
- The DR-3's Performance Modes
- Style Play Mode
- Manual Mode
- Auto Mode
- Makeup of a Style
- Patterns
- Kits
- Variation
- TSC
- Tempo
- Song Mode
- Switching the Pad Functions
- Specifying Patterns with the Pads ([PM] is Lit)
- Playing Instruments (Instrument Sounds) with the Pads ([INST] is Lit)
- Main Screens and Functions
- Style screen
- Song screen
- Edit screen
- Step Recording screen
- Realtime Recording screen
- Velocity Edit screen
- Song Recording screen
- Song Edit screen
- Starting and Stopping Performances and Recording
- START[>II]
- STOP[ ]
- STEPREC[>1]
- Notes Concerning Editing and Recording
- Adjusting the Tempo ([TEMPO])
- Press [TEMPO (TAP)].
- Adjust the tempo with the VALUE dial.
- Press [EXIT] to return to the previous screen.
- Changing the Key of the Performance ([KEY SHIFT])
- Press [KEY SHIFT].
- Set the key with the VALUE dial.
- Chapter 2 Playing Styles (Manual Mode [MANU])
- How the Pads Work When Performing Styles
- Selecting the Patterns to be Played
- Pattern Pads
- Starting/Stopping
- Press any pattern pad.
- Press [ENDING/STOP].
- How to Change Patterns
- Press any of the pattern pads while the performance is in progress.
- Selecting Variations (VARIATION)
- While the performance is in progress, press VARIATION [PTN], [KIT], or [MUTE] so the button lights up.
- Chapter 3 Playing Styles (Auto Mode [AUTO])
- Selecting a Style
- Performing in Auto Mode
- Changing the Pattern Progression in Auto Mode
- With the performance stopped, press [EDIT].
- Press [▶], select a , then press [ENTER].
- Press [▶], select a to be set.
- Turn the VALUE dial to set the value.
- Example: When performing a Style with a Verse A of four measures, a Verse B of two measures, and Verse C of two measures.
- Press [EXIT] a number of times until you exit Edit mode.
- Chapter 4 Controlling the Styles with a Foot Switch
- Starting and Stopping Performances
- Switching Verses
- Assigning Functions to the Foot Switch
- Chapter 5 Changing the Overall Tone of the Sound and Acoustics (TSC)
- Changing the Overall Tone of the Sound ([SOUND SHAPE])
- Press [SOUND SHAPE].
- Turn the VALUE dial to select the effect.
- Press [EXIT] to return you to the previous screen.
- Altering the Acoustic Characteristics of the Overall Sound ([AMBIENCE])
- Press [AMBIENCE].
- Changing the Sound Shape Parameters
- How to Make the Settings
- Changing the Equalizer Parameters
- Changing the Compressor Parameters
- Naming the Settings
- ■ Copying the Settings
- Changing the Ambience Parameters
- Chapter 6 Performing with the Pads
- Playing Drum Sounds
- Playing Percussion Sounds
- Playing Bass Sounds
- Selecting a Different Sound (VARIATION [KIT])
- Chapter 7 Creating Styles
- Procedure for Creating Styles
- Realtime Recording
- Step Recording
- Convenient Functions for Creating Styles
- HINT
- Creating Two-Measure Patterns from Four-Measure Patterns
- Changing the Key of the Bass Part (Key Transpose)
- < 1> Selecting a Number for the Style
- With the performance stopped, press [MANU].
- Turn the VALUE dial to select the number (U001-U100) for the style you are creating.
- Making the Settings for the New Style
- Setting the Tempo for the Style
- Select the style to be set, then press [EDIT].
- Select a , then press [ENTER].
- Select a .
- Turn the VALUE dial to set the tempo.
- When you press [EXIT], the setting is changed, and you're returned to the previous screen.
- Setting the Beat
- Press [▶], select a .
- Turn the VALUE dial to set the beat.
- Setting Up the Kit
- Changing the Sound to Be Muted
- Making the TSC Settings for the Style
- Determining the Number of Measures for Each Pattern
- Recording the Patterns
- Using Realtime Recording
- - Recording the Drum Part
- Erasing Previously Recorded Sounds As You Continue Recording
- - Recording the Bass Part
- What is Quantize?
- Using Step Recording
- What is Step Recording?
- Tap the pad for the instrument to be recorded.
- Erasing Sounds That've Been Input
- Changing the Instrument Displayed Without Inputting
- Repeat Steps 3-7 as needed.
- Confirming the Input Sound
- To stop recording, press STOP [ ]
- Press [INST] to select "BASS," "BASS oct" or "BASS oct."
- Press [][] to specify the step to be recorded.
- Inputting Long Notes
- Repeat Steps 5-7 as needed.
- Adding Dynamics to the Sounds (Velocity Edit)
- Transposing the Pattern's Bass Part
- Playing Back Recorded Patterns
- Confirming the Created Style
- Performing the Created Style
- ■ Editing the Settings
- Naming, Copying, and Deleting Styles
- Naming the Style
- ■ Copying the Style
- Clearing the Style
- Copying and Deleting Patterns
- - Copying Patterns
- Clearing Patterns
- Chapter 8 Creating and Performing Songs ([SONG])
- What is a Song?
- Procedure for Creating Songs
- Convenient Functions for Creating Songs
- Using a Foot Switch to Specify Switching of Song Patterns
- < 1> Selecting a Number for the Song
- < 2> Make the Settings for the New Song
- Setting the Basic Tempo
- Press [EDIT].
- Turn the VALUE dial to set the initial tempo.
- Making the TSC Settings for the Song
- Recording the Song
- When Using Step Recording
- When Using Realtime Recording
- Substituting Recorded Patterns
- ■ Editing Notes to Drum Parts and Bass Parts in the Song
- Turn the VALUE dial to set the quantization.
- Press START [▶/■].
- Record the performance, pressing the pads while following the rhythm provided by the metronome.
- Editing Songs
- Adding Patterns In the Song (INSERT)
- Press [SONG] so that the button lights up, then press STEP REC [ ].
- Press [ENTER] and the pattern will be inserted.
- Press [EXIT] a number of times to return to the Song Recording screen.
- - Deleting Specified Segments (DELETE)
- ■ Copying Specified Segments (COPY)
- Changing the Tempo Part Way Through a Song (TEMPO)
- Undoing Tempo Changes
- Checking the Created Song
- Performing the Created Song
- Naming, Copying, and Deleting Songs
- Naming the Song
- ■ Copying the Song
- Clearing the Song
- Performing Songs
- Switching Patterns With a Foot Switch
- Setting a Specified Segment for Playing Repeatedly
- ■ Playing Multiple Songs Continuously (Song Chain)
- Chapter 9 Changing the Operating Environment (System)
- Press [][] , select the parameter to be set.
- Setting the Parts To Be Output from the OUTPUT Jacks
- Adjusting the Pad Sensitivity
- Setting the Reference Pitch for the Bass Part
- Changing the Volume of the Metronome Sound
- Chapter 10 Creating Your Own Kits
- Turn the VALUE dial to select the number for the kit to be set, then press [▶].
- Turn the VALUE dial to select the sound group.
- Press the pad to be edited.
- Press [][] , select the parameter to be set.
- Turn the VALUE dial to set the value.
- Repeat Steps 4-7 as needed.
- When you have finished making the setting, press [EXIT] a number of times until you exit Edit mode.
- Selecting the Sounds Assigned to the Pads
- Setting the Volume
- Setting the Position of the Sound
- Naming the Kit
- Copying the Kit
- Chapter 11 Connecting and Using External MIDI Devices
- What is MIDI?
- MIDI Connector
- MIDI IN
- MIDI Implementation Chart
- Starting/Stopping and Synchronizing Performances on the DR-3 from an External MIDI Device
- Master and Slave
- Data Synchronized with the DR-3
- Setting the MIDI Channels
- Setting Sync Mode
- Using An External MIDI Device to Play the DR-3
- MIDI Channels
- Performance Data Handled by the DR-3
- Note Messages
- Using the DR-3 to Record Performances Played by External MIDI Devices
- Recording Performances on MIDI Keyboards and MIDI Pads
- Recording Sequencer and Rhythm Machine Performances
- Appendices
- Troubleshooting
- Message List
- Message Keep Power On! Now Working...
- Message Battery Low!
- Message Can Not Edit!
- Message Can Not Record
- Message Data Empty!
- Massage Memory Full!
- Message Song Data Full!
- Message Excl. Ptn Full!
- Message Stop SEQ!
- Message MIDl Off Line!
- Message MIDI Full!
- Message Too Busy!
- Message System Error!
- Parameter List
- Instrument/Bass Tone List
- Preset Kit List
- Preset Style List
- RECOGNIZED RECEIVE DATA
- ■Channel Voice Message
- Note Off
- Note On
- Program Change
- System Common Message
- Song Position Pointer
- Song Select
- System Real-time Message
- Timing Clock
- Start
- Continue
- -Stop
- Active Sensing
- Messages stored in patterns
- Specifications
- Styles
- Songs
- TSC (Total Sound Control)
- Max Polyphony
- Instrument
- Resolution
- Recording Method
- Pads
- Display
- Connectors
- Power Supply
- Power Consumption
- Dimensions
- Weight
- Accessories
- Options
- Buttons
- A
- B
- C
- D
- E
- F
- H
- K
- L
- M
- N
- 0
- P
- Q
- R
- s
- T
- U
- V
- Memo ...
- FEDERAL COMMUNICATIONS COMMISSION RADIO FREQUENCY INTERFERENCE STATEMENT
- NOTICE
- AVIS
Marque : BOSS
Modèle : DR-3
Catégorie : Pédale d'effets