
GAMEBOYADVANCE - Console de jeux vidéo portable NINTENDO - Notice d'utilisation et mode d'emploi gratuit
Retrouvez gratuitement la notice de l'appareil GAMEBOYADVANCE NINTENDO au format PDF.

| Type de produit | Console de jeu portable |
| Écran | Écran LCD de 2,9 pouces, rétroéclairé |
| Résolution | 240 x 160 pixels |
| Processeur | 32 bits ARM7TDMI |
| Capacité de mémoire | 32 Ko de RAM |
| Alimentation électrique | Batterie rechargeable NiMH |
| Type de batterie | Batterie lithium-ion |
| Autonomie de la batterie | Environ 15 heures |
| Dimensions approximatives | 82 mm x 144 mm x 24 mm |
| Poids | Approx. 140 g |
| Compatibilités | Jeux Game Boy Advance, Game Boy Color et Game Boy |
| Fonctions principales | Jeux vidéo portables, compatibilité avec accessoires |
| Entretien et nettoyage | Utiliser un chiffon doux, éviter les produits chimiques |
| Pièces détachées et réparabilité | Réparabilité limitée, pièces disponibles sur le marché secondaire |
| Sécurité | Ne pas exposer à l'humidité, éviter les chocs violents |
| Informations générales | Sortie en 2001, populaire pour sa bibliothèque de jeux variée |
FOIRE AUX QUESTIONS - GAMEBOYADVANCE NINTENDO
Questions des utilisateurs sur GAMEBOYADVANCE NINTENDO
0 question sur cet appareil. Repondez a celles que vous connaissez ou posez la votre.
Poser une nouvelle question sur cet appareil
Téléchargez la notice de votre Console de jeux vidéo portable au format PDF gratuitement ! Retrouvez votre notice GAMEBOYADVANCE - NINTENDO et reprennez votre appareil électronique en main. Sur cette page sont publiés tous les documents nécessaires à l'utilisation de votre appareil GAMEBOYADVANCE de la marque NINTENDO.
MODE D'EMPLOI GAMEBOYADVANCE NINTENDO
The official seal is your assurance that this product is licensed or manufactured by Nintendo. Always look for this seal when buying video game systems, accessories, games and related products.
Nintendo does not license the sale or use of products without the Official Nintendo Seal.
- Pour une version française de ce manuel, veuilles aller sur le site www.nintendo.com/consumer/manuals/index.jsp ou appeler le 1-800-255-3700.
- Para Obtener la version de este manual en español, visite myestro web site a www.nintendo.com/consumer/manuals/index.jsp. o llame a 1-800-255-3700.
© 2001-2003 Nintendo. All Rights Reserved.
TM and ^們 are Trademarks of Nintendo
IMPORTANT SAFETY INFORMATION - READ THE FOLLOWING WARNINGS BEFORE YOU OR YOUR CHILD PLAY VIDEO GAMES
WARNING - Seizures
- Some people (about 1 in 4000) may have seizures or blackouts triggered by light flashes or patterns, such as while watching TV or playing video games, even if they have never had a seizure before.
- Anyone who has had a seizure, loss of awareness, or other symptom linked
to an epileptic condition should consult a doctor before playing a video game. - Parents should watch when their children play video games. Stop playing and consult a doctor if you or your child have any of the following symptoms:
Convulsions
Altered vision
Eye or muscle twitching
Involuntary movements
Loss of awareness
Disorientation
-
To reduce the likelihood of a seizure when playing video games:
-
Sit or stand as far from the screen as possible.
- Play video games on the smallest available television screen.
- Do not play if you are tired or need sleep.
- Play in a well-lit room.
- Take a 10 to 15 minute break every hour.
Playing video games can make your muscles, joints, skin or eyes hurt after a few hours. Follow these instructions to avoid problems such as tendinitis, carpal tunnel syndrome, skin irritation or eyestrain:
- Avoid excessive play. It is recommended that parents monitor their children for appropriate play.
- Take a 10 to 15 minute break every hour, even if you don't think you need it.
- If your hands, wrists, arms or eyes become tired or sore while playing, stop and rest them for several hours before playing again.
- If you continue to have sore hands, wrists, arms or eyes during or after play, stop playing and see a doctor.
Leakage of battery acid can cause personal injury as well as damage to your Game Boy. If battery leakage occurs, thoroughly wash the affected skin and clothes. Keep battery acid away from your eyes and mouth. Leaking batteries may make popping sounds.
To avoid battery leakage:
- Do not mix used and new batteries (replace all batteries at the same time).
- Do not mix alkaline with any other type of battery (carbon zinc, nickel cadmium, etc).
- Do not mix different brands of batteries.
- Do not use nickel cadmium (nicad) batteries in your Game Boy, Game Boy pocket or Game Boy Color.
- For Game Boy Advance use only alkaline batteries. Do not use nickel cadmium (nicad), nickel metal hydride (nimh), carbon zinc or any other non-alkaline batteries.
- Do not leave used batteries in the Game Boy. When the batteries are losing their charge, the power light may become dim, the game sounds may become weak, or the display screen may be blank. When this happens, promptly replace all used batteries with new batteries.
- Do not leave batteries in the Game Boy or accessory for long periods of non-use.
- Do not leave the power switch on after the batteries have lost their charge. When you finish using the Game Boy, always slide the power switch OFF.
- Do not recharge the batteries.
- Do not put the batteries in backwards. Make sure that the positive (+) and negative (-) ends are facing in the correct directions. Insert the negative end first. When removing batteries, remove the positive end first.
- Do not dispose of batteries in a fire.
GAME BOY ADVANCE
4
Installing Batteries
Remove the cover on the back of the Game Boy Advance and insert two AA batteries as shown below. Use only two fresh, high quality alkaline batteries. Do not use rechargeable nickel cadmium(nicad), nickel metal hydride (nimh), carbon zinc or any other type of non-alkaline batteries.
Caution: When inserting the batteries, make sure that the positive (+) and negative (-) ends are facing in the correct directions. (See Illustration 1.) Insert the negative end first. When removing batteries, remove the
positive end first.
Note: When the battery life is down to 20% to 30% , the Power Indicator LED will change color from green to red. When the LED begins to grow dim, the battery life is almost gone. If you are playing a game with a battery back-up, you should save your progress and replace the batteries as soon as possible.
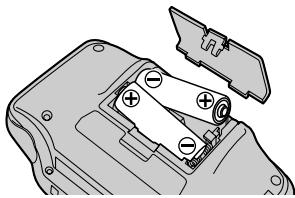
Illustration 1.
5
About Game Boy Advance Game Paks
There are four types of Game Boy Game Paks that will work with the Game Boy Advance:
Type 1. Original Game Boy Game Paks which will work with both the Game Boy Advance and Game Boy® Color (using 4 - 10 colors, see Section 7 below) and with the original Game Boy and Game Boy® pocket systems (using 4 shades of gray).
Type 2. Dual mode Game Boy Game Paks which will work with both the Game Boy Advance and Game Boy Color (using up to 56 colors out of a palette of 32,000) and with the original Game Boy and Game Boy pocket systems (using 4 shades of gray).
Type 3. Full color games (using up to 56 colors out of a pallet of 32,000) that will work only on Game Boy Color and Game Boy Advance.
Type 4. Special full color (32,000 colors maximum) wide screen games that will work only on the Game Boy Advance.
NOTE: You can switch the screen size for Type 1, 2 and 3 games to wide screen mode by pressing the L and R buttons. (This may make some of the images distorted or hard to see.)
A few older Game Boy games may not function properly on the Game Boy Advance causing display or sound problems.
1
Introduction to the Game Boy® Advance Video Game System
6
Using the Game Boy Advance Video Game System
Thank you for purchasing the Nintendo® Game Boy® Advance video game system. The Game Boy Advance is a pocket size color video game system that features:
2.9" Thin-Film Transistor (TFT) color liquid crystal reflective display.
Up to 32,000 simultaneous colors.
32-Bit ARM with embedded memory.
Compatibility with Game Boy and Game Boy Color Game Paks.
Please read both the following instructions and the separate Precautions Booklet before setup or use of the Game Boy Advance. If, after reading all the instructions, you still have questions, please visit our customer service area at www.nintendo.com (in Canada, www.nintendo.ca) or call 1-800-255-3700.
2
List of
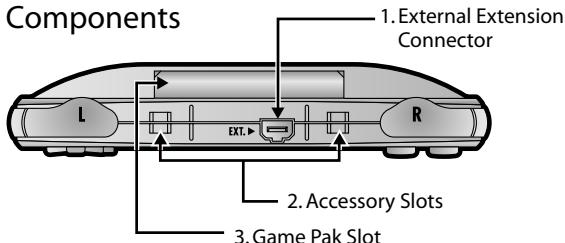
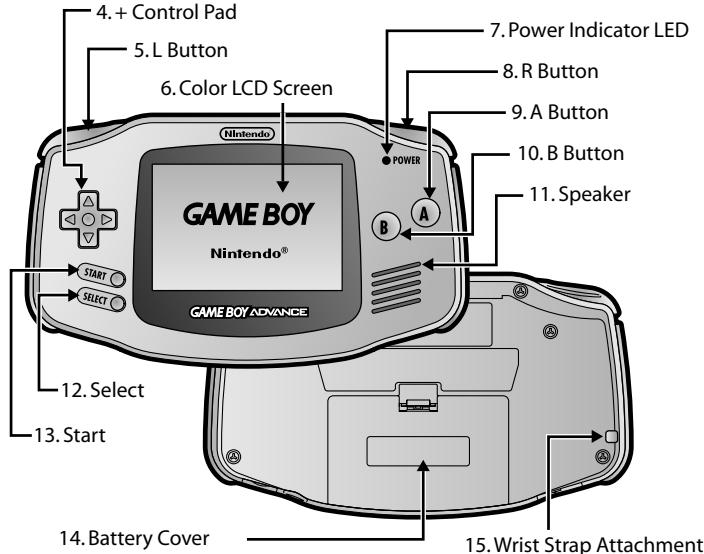
- External Extension Connector (EXT.) - Allows connection to another Game Boy for multi-player games or to the Game Boy® Printer (no longer available). Requires a Game Boy Game Link® cable. See Sections 8 and 9 of this manual for more information.
- Accessory Slots - Allows for attachment of Game Boy Advance accessories.
- Game Pak Slot - For loading a Game Pak.
-
- Control Pad - Game play control.
- L Button - Game play control.
- Color LCD Screen - 2.9" Highly reflective Thin Film Transistor (TFT) LCD screen.
- Power Indicator LED (POWER) - Indicates battery life. For alkaline batteries, the green color will change to red when battery life is down to 20% to 30% and the LED will begin to fade when it is time to replace batteries.
- R Button - Game play control.
- A Button - Game play control.
- B Button - Game play control.
- Speaker - For output of mono sound.
- Select - Game play control.
- Start - Game Play control.
- Battery Cover - Remove cover to add or replace batteries.
- Wrist Strap Attachment - For attachment of a wrist strap. (Sold separately.)
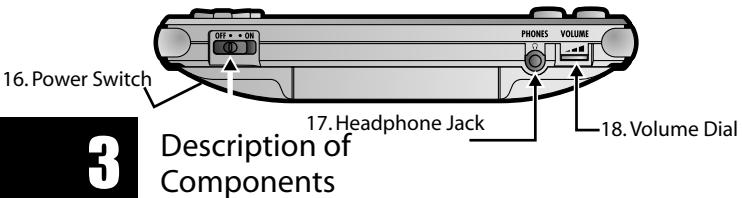
- Power Switch (OFF**ON) - Slide switch to the right to turn power ON. (Note: Always insert a Game Pak before turning power on.)
- Headphone Jack (PHONES) - For connecting a pair of stereo headphones. (Sold separately. See your local Nintendo retailer, visit our online store (USA only) at www.nintendo.com or call at 1-800-255-3700.
-
Volume Dial (VOLUME) - Adjusts volume. Rotate right to increase volume.
-
Insert a Game Pak into the Game Pak Slot with the label facing away from the Game Boy Advance. (See Illustration 2.)
Caution: Always check the Game Pak edge connector for foreign material before inserting the Game Pak into the Game Boy Advance.
Illustration 2.

- Turn on the power by pushing the Power Switch to the right. The Power Indicator LED will be green if you are using fresh batteries (See Illustrations 3 and 4). The screen will display the Game Boy logo, and then change to the display for the game that you are playing. Be sure to read the Game Pak instruction booklet for the game you are playing.
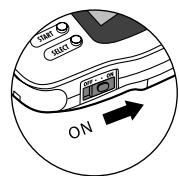
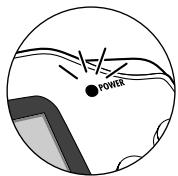
Illustration 3.
Illustration 4.
Note: For best color, use under bright light conditions.
- To remove the Game Pak after playing, first turn the power OFF by sliding the Power Switch to the left, then slide the Game Pak out of the Game Pak Slot (See Illustrations 5 and 6).
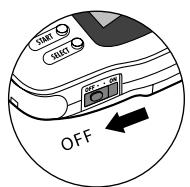
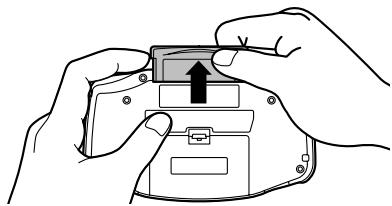
Illustration 5.
Illustration 6.
7
Changing the Screen Color on Original Game Boy Game Paks
There are 12 different color palettes that can be selected when using the original Game Boy Game Paks (Type 1, Section 5 above.)
- To change the color palette, first insert a Game Pak and turn on the power as described in Section 6 above.
- When the Game Boy logo appears, press the + Control Pad and button combination shown below for the desired color pallet.
| PRESS | COLOR | PRESS | COLOR |
| UP | BROWN | LEFT | BLUE |
| UP + A | RED | LEFT + A | DARK BLUE |
| UP + B | DARK BROWN | LEFT + B | GRAY |
| DOWN | PASTEL MIX | RIGHT | GREEN |
| DOWN + A | ORANGE | RIGHT + A | DARK GREEN |
| DOWN + B | YELLOW | RIGHT + B | REVERSE |
Note: This will only work with the original Game Boy (monochrome) Games. The color cannot be changed after the game title screen appears, or on Game Boy Type 2, 3 or 4 Games as described in Section 5 above.