
THE BALL - Aspirateur DYSON - Notice d'utilisation et mode d'emploi gratuit
Retrouvez gratuitement la notice de l'appareil THE BALL DYSON au format PDF.
| Type de produit | Aspirateur traîneau avec technologie Ball |
| Caractéristiques techniques principales | Système de filtration cyclonique, aspiration puissante, tête d'aspiration motorisée |
| Alimentation électrique | Filaire, avec cordon de 6,5 mètres |
| Dimensions approximatives | Longueur : 34 cm, Largeur : 30 cm, Hauteur : 25 cm |
| Poids | 6,5 kg |
| Compatibilités | Accessoires compatibles avec les aspirateurs Dyson |
| Type de batterie | Non applicable (aspirateur filaire) |
| Tension | 220-240 V |
| Puissance | 750 W |
| Fonctions principales | Aspiration des sols durs et moquettes, filtration allergènes |
| Entretien et nettoyage | Filtres lavables, réservoir à poussière facile à vider |
| Pièces détachées et réparabilité | Disponibilité de pièces détachées sur le site Dyson |
| Sécurité | Protection contre la surchauffe, conforme aux normes de sécurité européennes |
| Informations générales utiles | Garantie de 5 ans, service client disponible |
FOIRE AUX QUESTIONS - THE BALL DYSON
Questions des utilisateurs sur THE BALL DYSON
0 question sur cet appareil. Repondez a celles que vous connaissez ou posez la votre.
Poser une nouvelle question sur cet appareil
Téléchargez la notice de votre Aspirateur au format PDF gratuitement ! Retrouvez votre notice THE BALL - DYSON et reprennez votre appareil électronique en main. Sur cette page sont publiés tous les documents nécessaires à l'utilisation de votre appareil THE BALL de la marque DYSON.
MODE D'EMPLOI THE BALL DYSON

Owners manual
Please read this manual carefully before using your DC15.
Important safety instructions
1 Assembling
2 Using your DC15
3 Using your DC15 (continued)
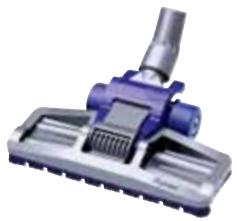
4 Using your DC15 tools
5 Washing your filter
6 Emptying the clear binTM
7 Cleaning the clear bin
8 Clearing blockages
9 Using and maintaining optional accessories
10 Using and maintaining optional accessories (continued)
11 Troubleshooting tips
Warranty and customer care
1 Assembling
IMPORTANT
- Ensure hose is straight when inserting wand.
- Please see section 9 for usage and maintenance instructions for accessories included with some vacuums.
If you have any questions, please call the Dyson Helpline toll free at 1-877-397-6622 or log onto www.dyson.com
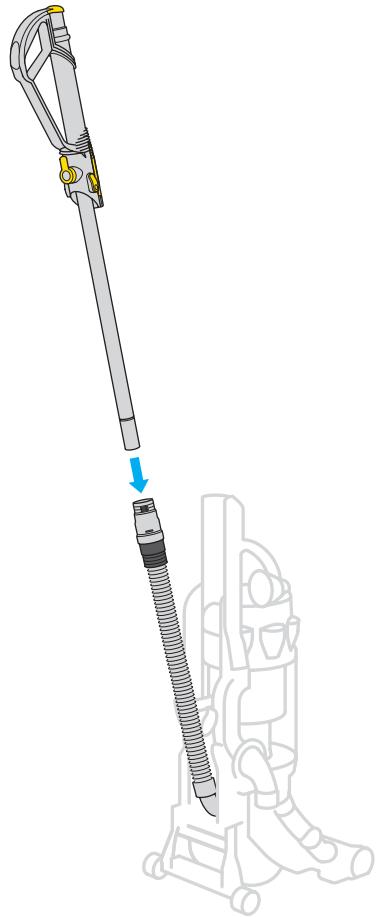
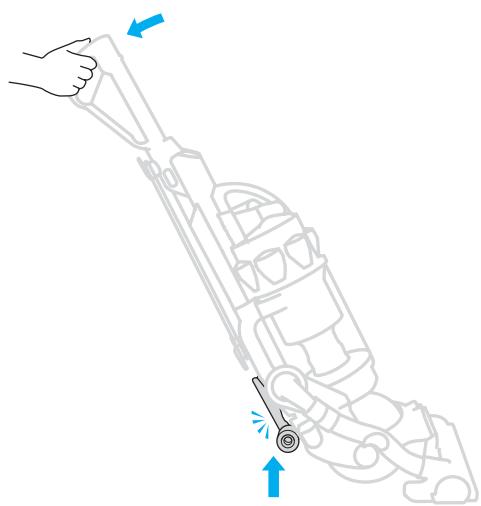
Slide wand down inside hose until it clicks.
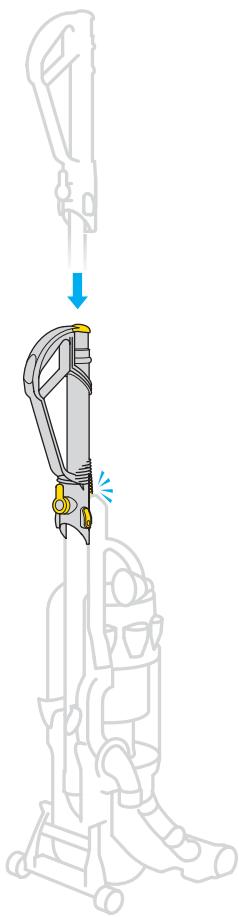
Slot wand into top of machine and click into place.
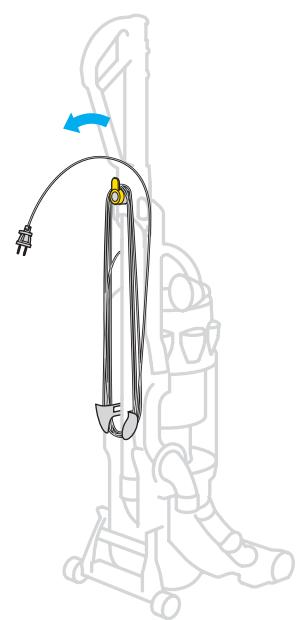
Wind cord counter-clockwise and secure with clip.
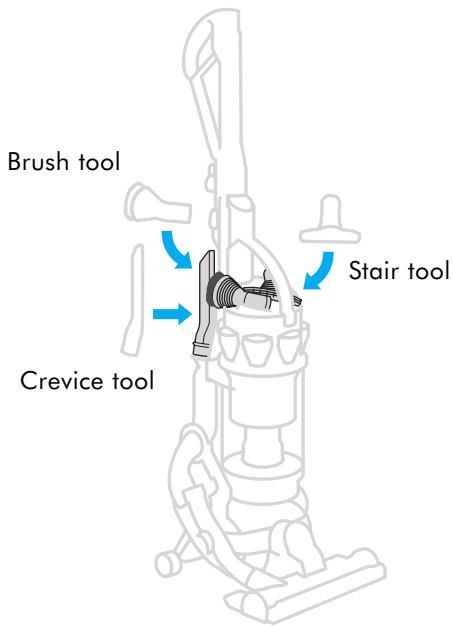
Click tools into place.
tip To quickly release cord, twist upper cord winder downwards. Twist back up before re-winding cord.
2 Using your DC15
CAUTION
- Please note: this machine is intended for domestic use only. Fine dust such as plaster dust or flour should only be vacuumed in very small amounts.
- The brushbar will automatically stop if it becomes obstructed.
- Do not press the cyclone release button while carrying the machine or it could fall and cause injury.
- Ensure the cyclone is secured to the machine.
- Do not shake the machine while carrying or it could fall and cause injury.


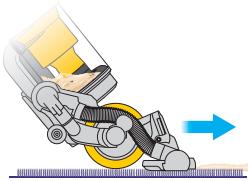
Carrying your DC15
Ensure machine is upright before carrying.
Use the carry handle at the top of the cyclone to lift.
Using your DC15
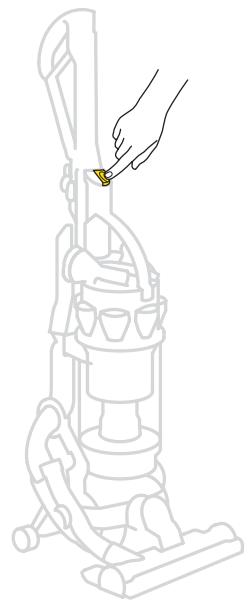
Plug in and press transparent yellow ON/OFF switch.
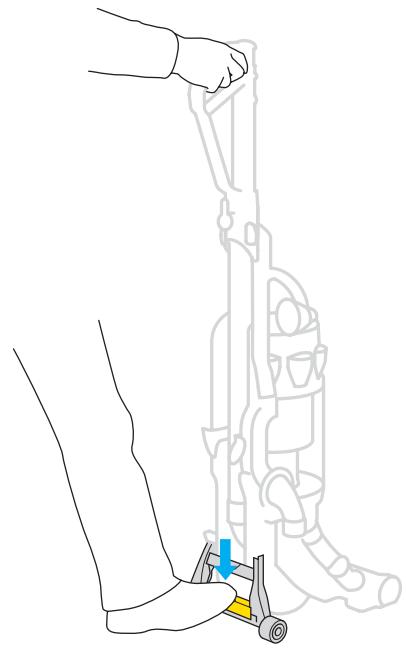
Press stabilizer firmly to release cleaner head and pull handle towards you.
Use stabilizer only - do not stand directly on cleaner head to release vacuum.
Ensure stabilizer wheels are fully retracted and click in place or brushbar will not operate.
tip Do not apply weight to handle while pressing stabilizer.

IMPORTANT
- The brushbar will reset to "ON" each time you start the machine and put it in the cleaning position.
- If the brushbar stops during use, please refer to the clearing blockages section.
- Ensure stabilizer wheels are fully locked in place before releasing the machine.
- Consult your flooring manufacturer's recommended instructions before vacuuming your flooring, rugs, and carpets. Some carpets will fuzz if a rotating brushbar is used when vacuuming. If this happens we recommend vacuuming in bare floors mode and consulting with your flooring manufacturer.
Brush control
To turn the brushbar OFF for bare or delicate flooring, rugs, and carpets, put the machine in the cleaning position, and press the red button. Press it again to restart brushbar.
tip Ensure the stabilizer clicks into place before vacuuming.
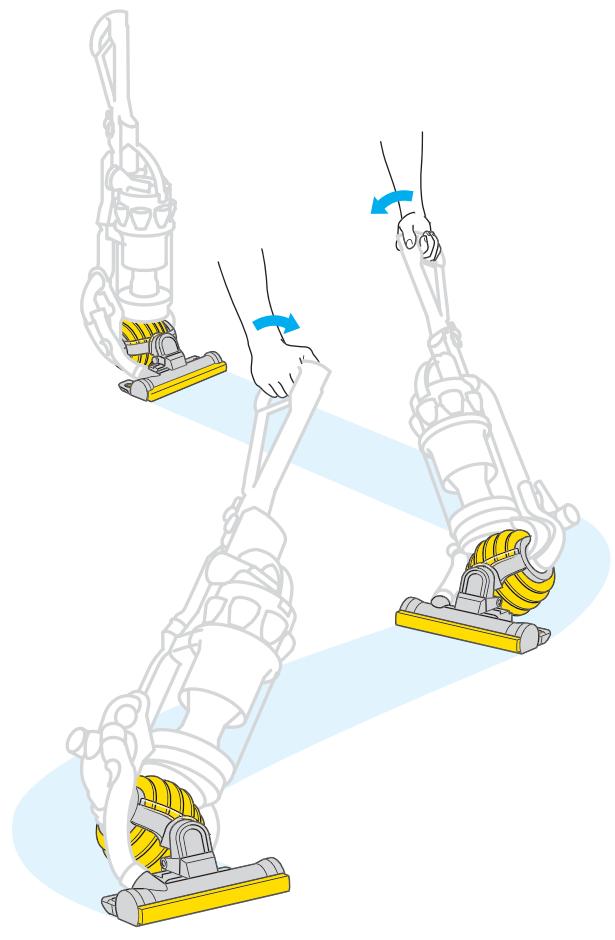
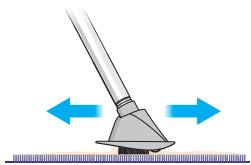
Small movements of the wrist will create a zigzag motion in the cleaner head for easier cleaning around furniture.
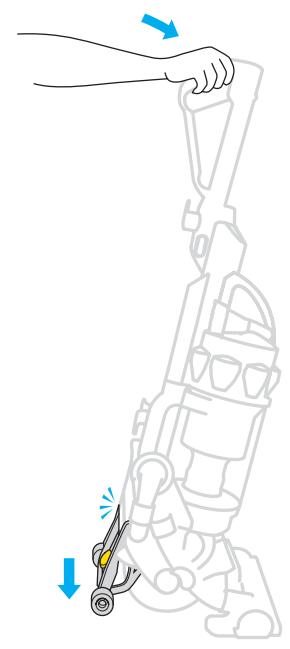
When finished, push the handle firmly beyond the upright position to drop the stabilizing wheels.
Ensure stabilizer wheels are fully locked in place before releasing the machine.
Tip Twist and turn your wrist like you are turning a doorknob to make the most of DC15's maneuverability.
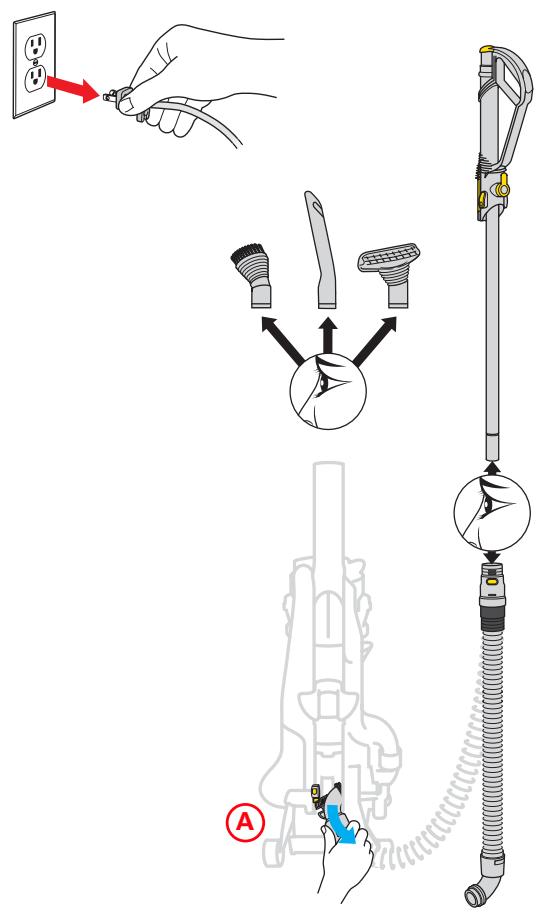
4 Using your DC15 tools
IMPORTANT
- Ensure machine is in upright position before using tools.
- To protect your floors, the brushbar will not rotate when the machine is in an upright position.
- Ensure hair and loose clothing are kept clear of wand cap when machine is switched on.
- Ensure wand cap is closed, unless using with tools.
- Powerful suction can cause the hose to 'pull back' - please take care when using the wand.
- To avoid personal injury and to prevent the machine from falling when cleaning stairs, always place it at the bottom of the stairs.
Do not use your vacuum cleaner outdoors or on wet surfaces. Vacuum may be used inside a garage only when used with the Model 08909 Dyson Car Cleaning Kit accessories. If used in a garage, care should be taken to wipe the soleplate and wheels with a dry cloth after vacuuming to clean off any sand, dirt, or pebbles that could damage delicate floors.
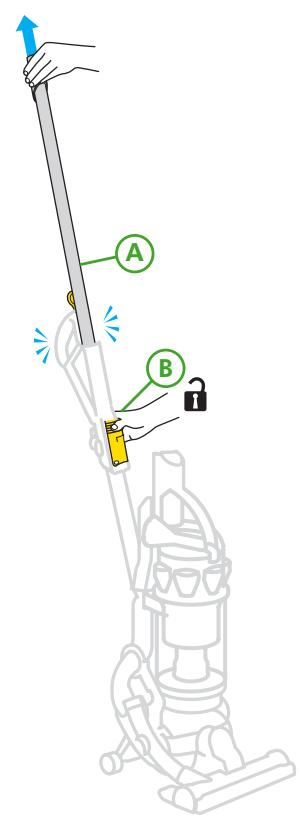
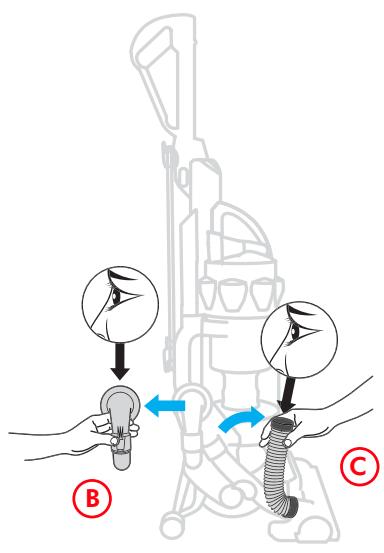
Wand mode
A Push back wand cap. Pull wand from inside handle until it clicks.
B Press wand release button to release hose and wand handle from machine. To push wand back inside hose, ensure hose is straight. Press the same wand release button and push wand down into hose. The vacuum has been designed to follow you when used in wand or hose mode.
tip When putting the wand back on the machine, make sure wand release button is facing forward.
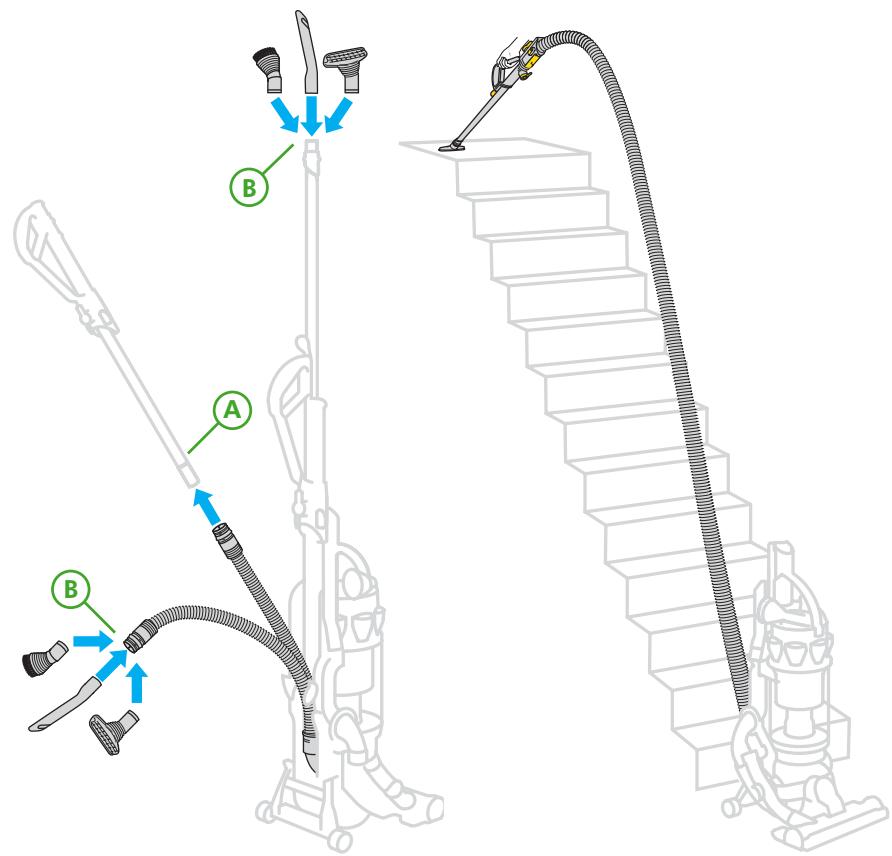
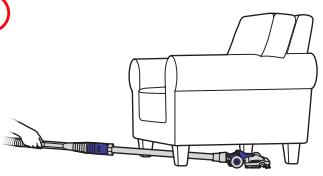
Hose mode
A First extend the wand, then press side hose release buttons to remove wand handle from hose, and pull hose to separate hose from wand.
B Tools can be fitted directly to the end of hose or wand.
Stair cleaning
Always work with the machine at the bottom of the stairs.
5 Washing your filter
CAUTION
- Check your washable filter regularly and wash at least every 6 months according to instructions to maintain performance.
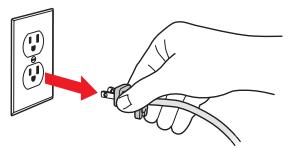
- Turn power off and unplug before washing the filter. Failure to do so could result in electric shock or personal injury.
- Do not use detergent to clean filter.
- Do not put the filter in the dishwasher, washing machine, tumble dryer, microwave, or near an open flame.
tip The filter may require more frequent washing based on individual vacuuming habits. Check regularly.

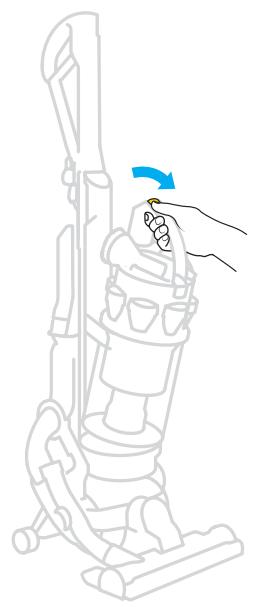
Press button to release cyclone and clear binTM from machine.
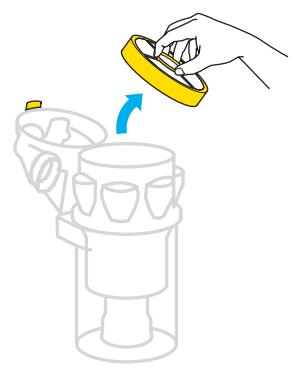
Lift filter release button and remove filter.
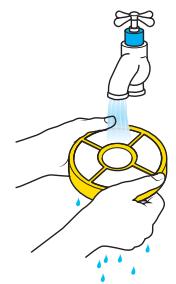
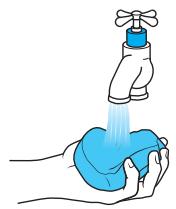
Separate blue filter and yellow case. Wash filter and case in cold water only. Repeat until water runs clear.
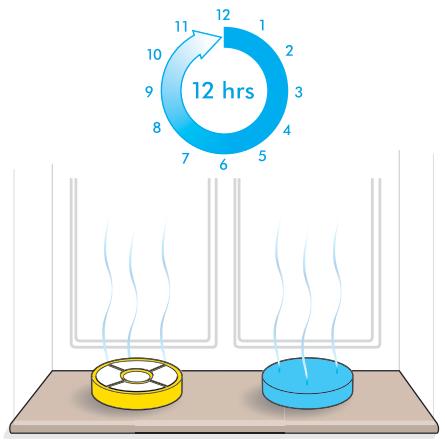
Air dry for at least 12 hours or overnight. Ensure filter is completely dry before refitting onto the machine.

CAUTION
- Turn power off and unplug before emptying the bin. Failure to do so could result in electric shock or personal injury.
- Do not use the machine without the clear bin™ in place.

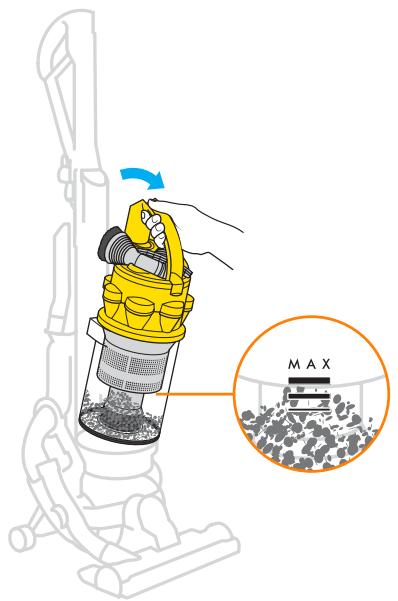

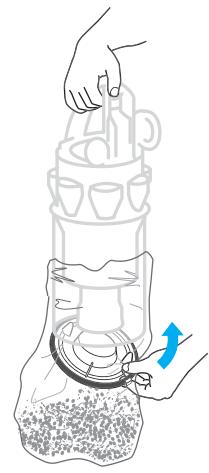
Empty bin as soon as the level of the MAX mark is reached at any point in the bin.
Press button to release cyclone and bin from the machine.
Option 1
Push the button as shown to empty directly into trash.
Shake or tap firmly to remove all dust from inside the cyclone.
Option 2
Emptying into a bag is recommended for allergy sufferers. Place bin in bag and push red bin emptying button.
Let the dust settle and close bin base securely before removing from bag and refitting cyclone and bin on machine.
7 Cleaning the clear bin™
CAUTION
- Do not use detergents, polishes, or air fresheners to clean the clear bin™.
- Do not immerse the cyclone in water.
- Ensure bin is completely dry before replacing.
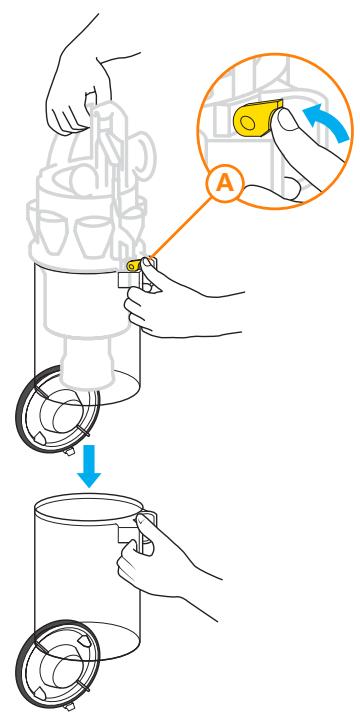

Cleaning the shroud (optional)
Ensure bin is empty (as detailed in section 6) and bin base is open.
Press catch A to release the clear bin from the cyclone.
Clean shroud with a cloth or dry brush to remove lint.
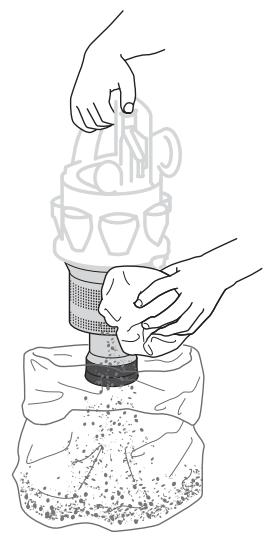
Cleaning the clear binTM (optional)
Ensure bin is empty and bin base is open.
Rinse with cold water only.
Ensure bin is dry before replacing.
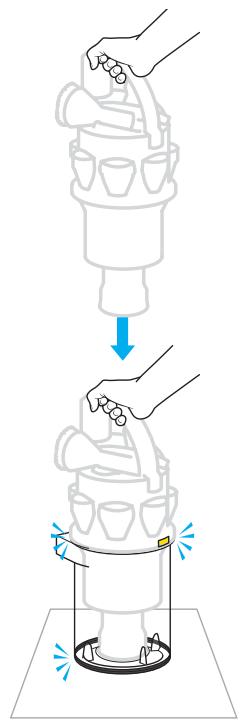
Re-assembling the clear binTM
Holding carry handle, fit cyclone assembly inside the clear bin.
Line up the front and rear guides and push down to click in place.
Ensure the clear bin is secure before replacing on the machine.
Clearing blockages

CAUTION
- Turn power off and unplug before checking for blockages. Failure to do so could result in electric shock or personal injury.
- If any part of your machine becomes blocked, it may overheat and then automatically shut off. Unplug machine and leave to cool down for at least 60 minutes before clearing the blockage.
- For safety, please lay the machine on its side before checking for blockages.
- Please note: clearing blockages is not covered by your machine's limited warranty.
- Beware of sharp objects when clearing blockages.
- Refit all parts of the machine securely before using it.
Check to see if tools, wand, and hose are clear of blockages.
A To remove the hose, rotate base of hose downwards until it clicks, then pull away from the machine.
B Squeeze release buttons to remove the airway inspection and check inside.
C Pull the top end of the tube away from machine and check inside.
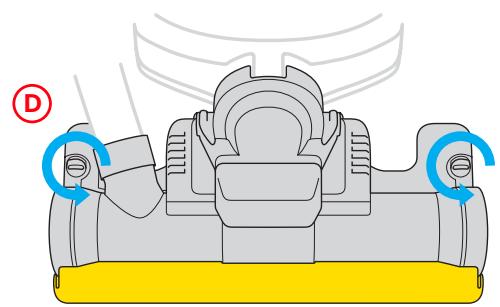

D Undo soleplate fasteners with a coin.
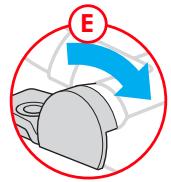
E Rotate endcaps and remove.
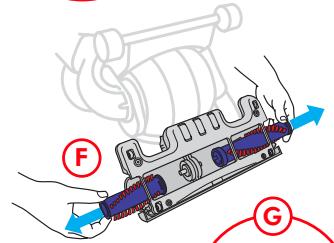
F Pull out brushbar sections.
Cut out debris, avoiding bristles.
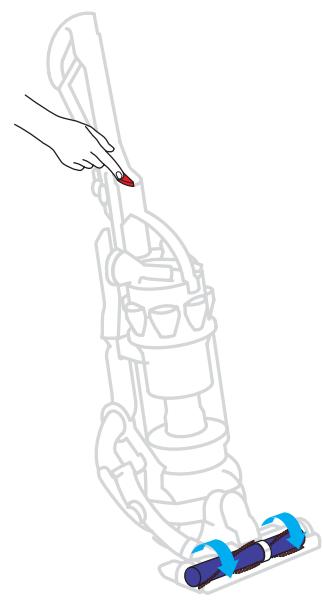
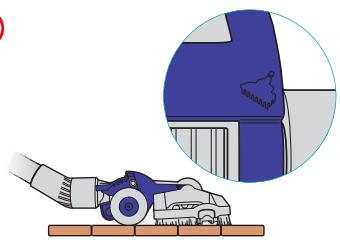
tip When replacing the brushbars, insert them so the ends with the silver pin are facing outside of the vacuum.
9
Using and maintaining optional accessories
Instructions for use
For your safety

CAUTION
Do not use your vacuum cleaner outdoors or on wet surfaces. If used in a garage care should be taken to wipe the soleplate and wheels with a dry cloth after vacuuming to clean off any sand, dirt, or pebbles that could damage delicate floors.
Colors may vary.
Low reach floor tool
For easier cleaning under low furniture
A

B
C
A Attach low reach floor tool to wand and recline handle
B Carpet - Press rear pedal
C Bare floors - Press front pedal
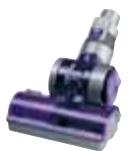
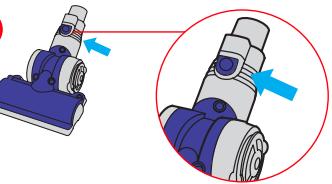
Mini turbine head
Advanced turbine head removes dirt from upholstery, stairs, and the car
A
B
A Push in to stop brushbar from spinning
B Adapter release button not used on all models
A

B
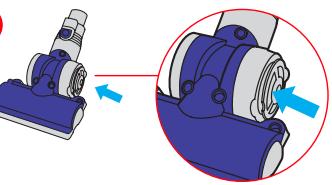
Mini turbine head
maintenance
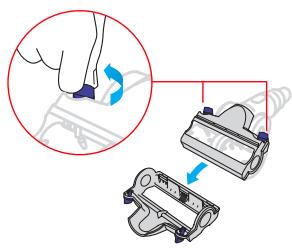
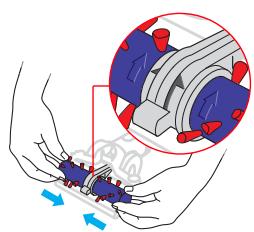
A Remove soleplate
B Remove and clean brushbars
C
D
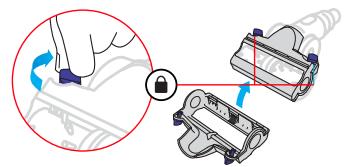
C Replace brushbar
D Replace soleplate
Using and maintaining optional accessories (continued)
Instructions for use For your safety

CAUTION
Do not use your vacuum cleaner outdoors or on wet surfaces. If used in a garage, care should be taken to wipe the soleplate and wheels with a dry cloth after vacuuming to clean off any sand, dirt, or pebbles that could damage delicate floors.
Colors may vary.
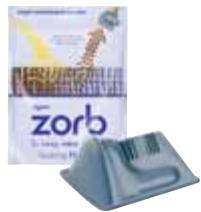
Zorb carpet powder
- Use Zorb for carpet cleaning
A
B
C
D

E
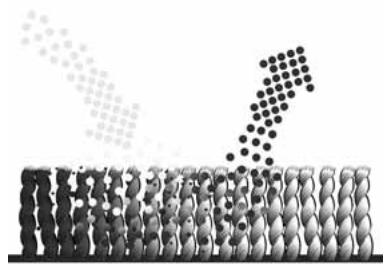
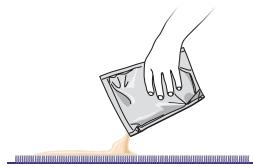
A Sprinkle Zorb onto carpet
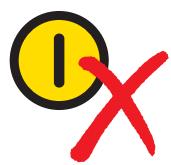
B Ensure machine is switched off
C Work into carpet pile
D Wait 30 minutes
E Vacuum the carpet
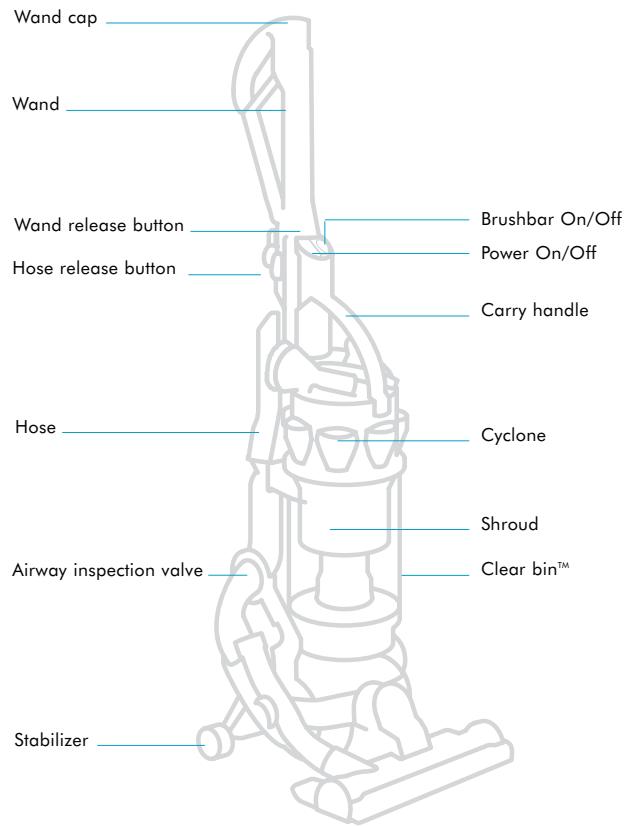
Refer to page 3 for an illustration of your DC15.
If you have any other questions, please call the Dyson Helpline at 1-877-397-6622.
The Helpline is open 7 days a week to answer your questions.
Problem
Less than normal or no pickup while vacuuming upright, or machine turns off in use
Less than normal or no suction from wand or hose
Brushbar will not engage
Brushbar will not turn off
Brushbar keeps turning on
Machine will not recline
Potential solution
- Remove and check washable filter to see if it is clean (filter should be blue in color). Wash filter if necessary as shown in section 5.
-
Be sure the filter housing and airway inspection valve are snapped in securely and confirm there are no blockages.
-
Confirm the airway inspection valve is in place and that there are no blockages.
- Remove the wand and check for blockages.
- Confirm the hose has no blockages or holes by stretching it out.
- Remove and check washable filter to see if it is clean (filter should be blue in color). Wash filter if necessary as shown in section 5.
- When vacuuming upright, ensure that the stabilizer clicks into place before vacuuming.
- Ensure the machine is fully returned to the upright position and the stabilizer bar is locked into place.
- The brushbar defaults to the on position each time you turn your vacuum on. Press the brushbar button to turn the brushbar off for bare or delicate flooring, rugs, and carpets.
- Press stabilizer firmly to release cleaner head and then pull handle towards you.
- To make activating the stabilizer easier, press the foot pedal firmly while holding the handle, but do not apply weight or force to the handle.
Dyson customer care
Limited 2 year household warranty
Terms and Conditions of the Dyson 2 year limited warranty
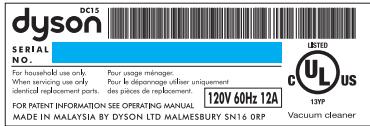
Your serial number can be found on the rating plate, which is on the machine behind the clear bin.
Note your serial number for future reference:
This product is protected by the following intellectual property rights:
Patents/Application numbers:
| GB 2407784 A | CA 2,438,069 | JP 2004-526999 |
| CPT/GBO/004030 | EP136181 | US 10/522,478 |
| GB0416903.3 | JP 2004-520137 | AU 2003382161 |
| AU200226556 | US 2004/01112022 A1 | CA 2,495,073 |
| CA 2,439,250 | AU2001240894 | EP1526798 |
| EP1370172 | EP1268076 | JP 2004-527000 |
| JP 2004-528876 | JP2003-528704 A | US 10/523246 |
| US 2004/0074213 A1 | US 6,835,222 | GB0416355.6 |
| AU2002225029 | AU367277 | GB0416476.0 |
| CA 2,438,073 | CA 2,056,161 | GB0416359.8 |
| EP1371797 | EP 0636338 | GB0410700.9 |
| JP2004-520138 | JP1948863 | AU2002332553 |
| US 2004-0111824 A1 | US5078761 | CA 2,439,247 |
| AU2002225322 | AU2002383157 | EP 1365676 |
| CA 2,438,079 | CA 2,495,053 | JP 2004-524097. |
| EP1361815 | EP1526796 | US 2004-07892 |
| JP 2004-520139 | JP 2004/526998 | AU2003252873 |
| US 2004-0068827 | US 10/522,339 | CA 2449304 |
| GB 2404887 A | AU 2002381359 | EP1380247 |
| WO 2005/016108 | CA 2,495,066 | JP 2003-344965 |
| AU2002225027 | EP1526797 | US 2004/011182 |
Registered Design/Application numbers:
GB3020039 GB3020041 ED 000340500
GB3020040
GB3020041
ED 000281191-0001
ED000340500
Thank you for choosing to buy a Dyson vacuum cleaner.
If you have a question about your Dyson vacuum cleaner, call the Dyson Helpline at 1-877-397-6622 with your serial number and details of where and when you bought the cleaner. Your serial number can be found on the rating plate, which is located on the machine behind the clear bin™. Most questions can be solved over the phone by one of our Helpline staff. If your machine needs service, call the Dyson Helpline. We will discuss with you the options available for service. If your machine is under warranty and it is a covered repair, your machine will be repaired at no cost. To reach the Dyson Helpline call at 1-877-397-6622, or visit Dyson online at www.dyson.com
To help us ensure you receive prompt and efficient service, please register your purchase with us. There are two ways to do this:
- You can register by completing and returning the enclosed form to us by mail.
- Alternatively, you can register on line at www.dyson.com
This will confirm your ownership of your Dyson in the event of an insurance loss and enable us to contact you if necessary. If you have any questions about your Dyson, please call our customer helpline at 1-877-397-6622, 7 days a week, or log on to our website at www.dyson.com
What is covered
Your Dyson vacuum cleaner is warranted against original defects in material and workmanship for a period of two years from the date of purchase when used for private household purposes in accordance with the Dyson Owner's Manual. This warranty provides, at no extra cost to you, all labor and parts necessary to ensure your vacuum cleaner is in proper operating condition during the warranty period. This warranty is subject to the following terms:
What is not covered
Dyson Canada Ltd. shall not be liable for costs, damages, or repairs incurred as a result of:
- Machines purchased from an unauthorized dealer.
- Clearing blockages from your machine.
- Use of parts not in accordance with the Owner's Manual.
Careless operation or handling, misuse, and/or lack of maintenance or use not in accordance with the Owner's Manual. - External sources such as weather.
- Repairs or alterations carried out by unauthorized parties or agents.
- Use of the vacuum cleaner other than for normal domestic household purposes within Canada, e.g., for commercial or rental purposes.
- Normal wear and tear, including normal wearing parts such as belt, filter, brush bar, hose assembly, and power cord (or where external damage or abuse is diagnosed).
- Use of parts and accessories other than those produced or recommended by Dyson Canada Ltd.
Warranty Service
- Please fill out and return the Product Registration Form, or register on line at www.dyson.com
- Before service can take place, the terms of the warranty require that you contact the Dyson Helpline with your model name/number, serial number, date and place of purchase. Please keep your purchase receipt in a safe place to ensure you have this information. The serial number is found on the vacuum cleaner's rating plate, which is located on the machine behind the clear bin.
- All work will be carried out by Dyson Canada Ltd. or its authorized agents.
- Any replaced defective parts will become the property of Dyson, Canada Ltd.
- Service under this limited warranty will not extend the period of this limited warranty.
If your machine is not functioning properly, please call the Dyson Helpline at 1-877-397-6622. Most issues can be rectified over the telephone by our trained customer care staff. If this is not possible Dyson Canada Ltd. will arrange for your vacuum cleaner to be repaired and returned in full working order at no extra cost to yourself.
Warranty Limitations and Exclusions
Any implied warranties relating to your vacuum cleaner, including but not limited to warranty of merchantability or warranty of fitness for a particular purpose, are limited to the duration of this warranty. This limitation is not allowed by some states and so this limitation may not apply to you.
- Your remedy for breach of this warranty is limited to the warranty service described above. Dyson Canada Ltd. will not be liable for any consequential damages or incidental damages you may incur in connection with your purchase and use of your vacuum cleaner. This limitation is not allowed by some states and so this limitation may not apply to you.
- This warranty gives you specific legal rights. You may also have other rights which vary by state.
- This warranty is not transferable.
www.dyson.com

